iPhoto: The Missing Manual, 1st Edition (2014)
Part 1. iPhoto Basics
Chapter 2. The Digital Shoebox
When you get right down to it, working in iPhoto takes place at three different zoom levels. You begin fully zoomed out, looking at piles of photos—your Events (called Spring Break, Robin’s Graduation, and so on). Then you drill down into one of the piles; in the main Photos view, every picture appears as an individual thumbnail. Finally, you can zoom in even more, filling the iPhoto window (or your entire monitor) with just one photo.
If you’ve imported photos into iPhoto as described in the previous chapter, your journey out of chaos has begun. You’re not really organized yet, but at least all your photos are in one place. From here, you can sort your photos, give them titles, group them into smaller subcollections (calledalbums), and tag them with keywords so you can find them quickly. This chapter helps you tackle each of these organizing tasks as painlessly as possible.
The Source List
Even before you start naming your photos, assigning them keywords, or organizing them into albums, iPhoto imposes an order of its own upon your digital shoebox.
The key to understanding it is the Source list at the left side of the iPhoto window. This list grows as you import more pictures and organize them—but right off the bat, you’ll find categories such as Library, Recent, and Albums, each containing icons you can click for fast access to particular photos (Last Import, Last 12 Months, and so on). This section explains each category in detail.
NOTE
If you’re enjoying Full Screen view (The Post-Import Inspection) while perusing your albums, you can use the Events, Faces, Places, Albums, and Projects buttons at the bottom of your monitor to see what’s in your Source list. That said, it might be easier to remain in standard view while you’re poring over this chapter.
Library
The first four icons in the Source list are under a heading called Library. This is a reassuring heading, because no matter how confused you may get in working with subsets of photos later in your iPhoto life, clicking one of the first two icons in this category (Events or Photos) returns you to your entire picture collection and makes all of your photos appear in the viewing area, grouped by date. Clicking the Faces or Places icons (Chapter 4) shows all of your photos grouped by who’s in them or where they were taken.
§ Events. When you click Events in the Source list, each thumbnail represents one pile (or shoebox, or envelope) of pictures. (Figure 2-1, top, shows the effect.) Each pile is one Event, a batch of pictures that were all taken at about the same time—all on someone’s birthday or wedding weekend, for example.
You can open one of these “shoeboxes” by double-clicking it, or you can flick through the thumbnails within an Event by passing your cursor slowly across its thumbnail, left to right. Details on Events begin on Projects.
§ Photos. Click Photos, on the other hand, to see all the photos’ thumbnails displayed—not just summary Event thumbnails, but one thumbnail per photo on a massive, scrolling display (Figure 2-1, bottom). Happily, you can still see which photos were taken at which Event thanks to the headings that separate the batches.
§ Faces. If you’ve taken the time to introduce iPhoto to your friends and family as described on Faces, you can click Faces to see everyone grouped into neat little batches on a virtual corkboard.
§ Places. iPhoto can also group your photos into specific spots on a map. Click Places in the Source list to see your pictures organized on a map of the world. Unless your camera or smartphone is GPS-enabled (iPhones are), this doesn’t happen automatically, but you can tag your photos manually to get them on the map. Editing Names has the scoop.
Recent
Since an iPhoto library can grow to roughly a million, it’s a smart assumption that you’ll often want to see photos you’ve worked with recently. That’s why the items under this heading change over time to reflect what you’ve been doing lately (they’re built-in albums, really). For example:
§ [Most recently viewed Event]. The first album listed here identifies the Event you most recently opened. You can think of this item as a handy shortcut for when the Event you want to work with this morning is the same one you were editing last night. If the Event has a name, you see it here; if not, you see a date instead.
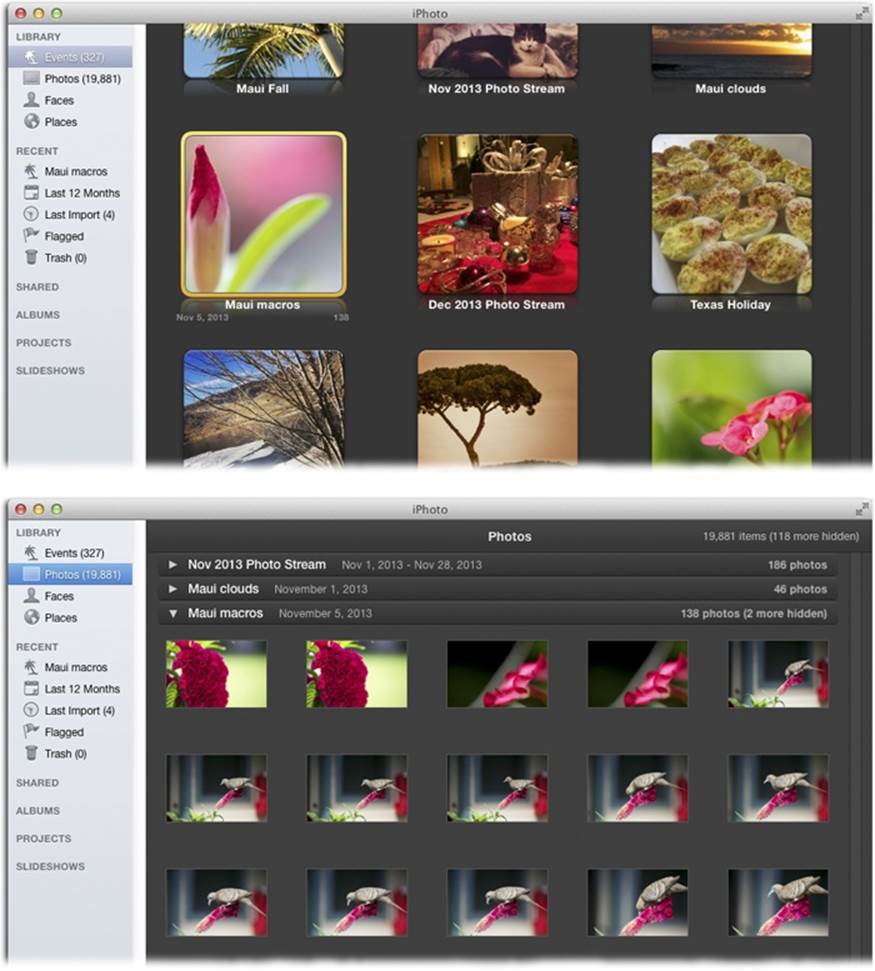
Figure 2-1. Top: You can think of Events as a bird’s-eye view of your photo collection, with each Event a stack of photos that were taken around the same time. Events are iPhoto’s primary organizing structure, though you can combine or split them as you see fit (described later in this chapter). Bottom: Clicking Photos lets you view your entire collection; every single photo has its own thumbnail in a huge scrolling list. They’re still grouped by Event, though, as indicated by the collapsible headings. These headings “float” to the top of the window as you scroll through your photos, so you always know which Event the photos belong to.
§ Last 12 Months. This album puts the most recent photos at your fingertips. The idea, of course, is that the freshest photos are often the most interesting to you. Actually, it doesn’t even have to say “Last 12 Months.” You can specify how many months’ worth of photos appear in this heap—anywhere from one month to a year and a half—by choosing iPhoto→Preferences→General (see Figure 2-2).
§ Last Import. Another group of photos you’ll probably want to access quickly are the photos you just liberated from your camera. That’s the purpose of this album. With one click, iPhoto displays only your most recently downloaded photos, hiding all the others. This album can save you a lot of time, especially as your library grows.
TIP
You can hide a long list of items in the Recent, Shared, Albums, Projects, and Slideshows sections by collapsing them in the Source list (the Shared, Albums, Projects, and Slideshows sections are all collapsed in Figure 2-1). When you point your cursor at a section name, the word “Hide” appears to its right; click it to collapse the section. To expand the section, point your cursor at its name and click the word “Show.”
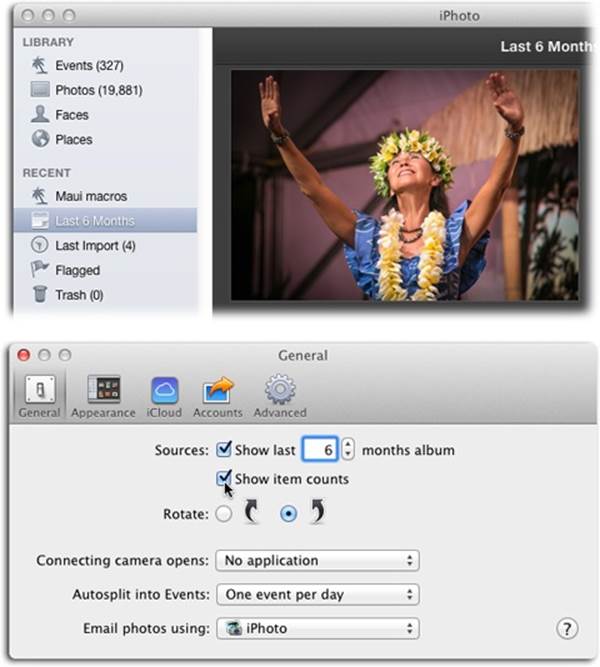
Figure 2-2. You can specify how far back the “Last_Months” album goes in the General panel of iPhoto Preferences window (bottom). And don’t forget that iPhoto isn’t limited to grouping pictures by year. It can also show you the photos you took on a certain day, in a certain week, or during a certain month. See page 78 for details. While you’re in General Preferences, don’t miss the “Show item counts” setting. It places a number in parentheses after each album name in the Source panel (except for smart albums and the “Last _ Months” album) to let you know how many pictures are inside. By turning on this checkbox, you can find out whether you’re certifiably snap happy.
NOTE
When you’re designing a layout of photos to print at home, a temporary Printing album shows up under the Recent heading, too; it disappears once you cancel or print the project. Chapter 7 has more on printing photos on your own printer.
§ Flagged. As noted on Flagging Photos, flagging a photo marks it for your attention later. You can flag all the good ones, or all the ones that need editing, or all the ones you want to round up to use in a calendar project. Click this icon to see all the photos you’ve flagged, no matter which albums or Events they’re in.
§ Trash. Click this icon to see all the photos, albums, folders, books, and other projects you’ve targeted for deletion. They’re not really gone until you empty iPhoto’s Trash, though. See Deleting Photos for details.
TIP
Remember this key fact: Photos listed under the Library and Recent headings are the real photos. Delete a picture from one of these collections, and it’s gone forever (once you empty iPhoto’s Trash, that is). However, that’s not true of albums, which store only aliases—pointers—to the real photos.
Shared
Under this heading, you’ll see the names of all the places you’ve shared or published your photos to, such as Flickr and Facebook. This is also where you’ll find your iCloud photo stream (Using iCloud’s Photo Stream), which lets you see pictures you’ve taken on your iPhone, iPad, or iPod Touch.
This section is also home to one of iPhoto’s coolest features: shared photo streams. If you’ve got an iCloud account (Using iCloud’s Photo Stream), you can share a photo, video, or album with other iCloud members. When you do, the recipient gets an email invitation. Once she accepts it, a new stream appears in the Shared section of her iPhoto Source list, and she can view, “like,” or comment on the item (she can even add photos to the stream, if you set it up that way). Think grandparents and grandkids, and you’ll see the possibilities. See Chapter 8 for the full scoop on photo sharing.
NOTE
Alas, gone are the days when you could share iPhoto libraries across your home or office network. These days, Apple wants you to use iCloud for all your photo-sharing needs, whether you want to or not.
Later in this book, you’ll find out how to archive photos onto CDs or DVDs—and then load them back into iPhoto whenever you darned well feel like it. CD icons and DVD icons show up under the Shared heading, too.
Devices
As soon as you plug a camera or a memory card reader into a USB port or your Mac’s built-in memory card slot, its name appears here. If you plug your iPhone, iPad, or iPod Touch into your Mac, it shows up here, too.
Albums
Later in this chapter, you’ll find out how to create your own sets of pictures, called albums, including how to stick a bunch of related albums into an enclosing entity called a folder. You can even have iPhoto create albums for you, based on criteria like “highest rated” or “is a movie” (these self-populating albums are called smart albums).
Your folders, albums, and smart albums appear in this section.
TIP
Saved slideshows and custom-publishing projects can be filed in folders, too, right alongside albums. You might not expect that, since slideshows and projects begin life under separate headings in the Source list, as explained next.
Projects
Under this heading, you’ll find the icons for any of Apple’s custom-publishing goodies that you’ve assembled, such as photo books, calendars, or greeting cards (of the folded or flat variety). Chapter 9 has details on creating these drool-worthy print pieces.
Slideshows
Saved slideshows (Chapter 6) get their own icons in the Source list, too.
All About Events
The primary photo-organizing concept in iPhoto is the Event: a group of photos that were all taken at about the same time. It certainly makes a lot more sense than the film roll, the organizing construct of early versions of the program. (A film roll consisted of all the photos you imported in one go, no matter how many months apart you took them.) Because of Events’ chronological nature, photos can live in only one Event at a time.
iPhoto performs this chronological autosplitting whenever you bring new pictures in from your camera or memory card, if the Split Events setting was left on (see Figure 1-3). If not, then all the pictures you import in a single batch get clumped into a single Event, regardless of when they were taken. If you’re importing photos from your hard drive, they get funneled into a single Event, too. That said, you can always have iPhoto automatically split your Events after you import them. It’s an easy process and is covered later in this chapter on Splitting and Renaming Events.
Events are the perfect place to assess your photos, culling your collection down to just the keepers. Once you do that, you can organize the keepers into individual albums (Albums), which you can use as the basis of projects—slideshows, calendars, books, and so on. (The box on Assessing Photos has one possible photo-assessment strategy.)
FREQUENTLY ASKED QUESTION: YOUR OWN PERSONAL SORTING ORDER
I want to put my photos in my own order. I tried using View→Sort Photos→Manually, but the command is dimmed out! Did Apple accidentally forget to turn this on?
No, the command works—but only when you’re viewing the contents of an album. You can’t manually sort the thumbnails in All Events or Photos view because, from the factory, they’re arranged by date (though you can choose to view them by keyword, title, or rating, in ascending or descending order, using the aforementioned View→Sort menu).
If you create an album (as explained later in this chapter) and fill it with photos, then you can drag them into any order you want.
The Events List
When you click Events at the top of the Source list, you see an array of big, rounded thumbnails, as shown in Figure 2-1, top. Each thumbnail represents an Event. (This view is called, aptly, All Events view.) To save space, iPhoto shows only one picture from each Event; you can think of it as the top photo on the stack. Using that sample photo, along with the Event’s name and date, you should be able to figure out which stack of photos the Event contains.
TIP
You can make the Event thumbnails bigger or smaller; just drag the Zoom slider in the toolbar.
All Events view is a zoomed-out, bird’s-eye view of your entire photo collection. Thanks to the stacking concept, a single screen full of thumbnails can represent thousands of individual photos.
Here’s a list of things you can do when you’re peering at the Events thumbnails:
§ Scan through a pile. Here’s a tricky move that’s relatively new to the Mac skillset: Move your cursor sideways across an Event thumbnail without clicking. As you go, the photo on the top of the stack changes, as all the pictures within flicker by. This is a quick way to get a look at the other pictures in the virtual heap.
(If there are lots of photos in the Event, then every fraction of a millimeter of mouse movement triggers the appearance of the next photo, which makes it hard to have much control. Making the thumbnails bigger may help. And remember that this technique is just supposed to give you anidea of what’s in the Event—it isn’t supposed to be a real slideshow.)
§ Sort the Events. Ordinarily, iPhoto presents the Event thumbnails in chronological order; in effect, it chooses View→Sort Events→By Date for you. But you can sort them alphabetically by choosing View→Sort Events→By Title. In either case, you can also reverse the sorting by choosing View→Sort Events→Descending (or Ascending).
TIP
Once you open an Event by double-clicking its thumbnail, you can sort its photos by keywords, too. To do so, choose View→Sort Photos→By Keyword.
§ Rearrange the Event thumbnails. You can drag one Event’s thumbnail between two others to rearrange them. When you do that, iPhoto chooses View→Sort Events→Manually for you, because your thumbnails are no longer sorted alphabetically or chronologically. (As the box on Your Own Personal Sorting Order explains, you can’t manually arrange the photo thumbnails inside an Event.)
§ Change the key photo. The key photo is the one on top of the stack; the one that represents the Event itself. iPhoto seemingly picks one at random. Typically, and for pure organizational joy alone, you’ll want to rummage through the Event and pick a better one to represent the whole batch. For a birthday party, for example, you might choose the candle-blowing-out shot.
To change the key photo, scan through the stack using the cursor trick described above. When you see the picture you want to use as the key photo, tap the space bar. You can also Control-click the thumbnail and then, from the shortcut menu, choose Make Key Photo.
NOTE
You can designate a key photo while you’re surveying the photos inside an Event, too. See the Tip on Tip.
§ Rename an Event. To rename an Event, just click its existing name and then type away. Press Return, or click somewhere else, when you’re finished.
§ Merge Events. You can combine two (or more) Events into one simply by dragging one Event thumbnail onto another. iPhoto instantly combines the two sets of photos. (The one you dragged vanishes; the combined pile assumes the name and key photo of the one you dragged onto.) You can also select multiple Events in All Events view and then choose Events→Merge Events.
§ Delete an Event. To remove an entire stack of pictures from your hard drive, click the Event’s thumbnail and then press ⌘-Delete. (Or drag the Event’s thumbnail onto the Trash icon in the Source list.) Later, you can empty iPhoto’s Trash as described on The iPhoto Trash.
NOTE
There are other ways to merge, split, create, delete, rename, and move photos between Events—but you do all that in Photos view, described later in this chapter.
UP TO SPEED: DEFINING AN EVENT
When you import photos from a camera or your hard drive, iPhoto autosplits them into Events. When the importing is over, you might wind up with two, five, or 10 stacks of photos in the All Events view shown in Figure 2-1, depending on how long it’s been since the last time you downloaded pictures.
Initially, iPhoto defines an Event as one day. So if you import pictures you took on June 1, 2, and 3, then you wind up with three Events.
You might consider that breakdown too rigid, though. It’s not an especially logical grouping if, for example, you were away for a wedding weekend, a three-day trip to a theme park, or a weeklong cruise. In those cases, you’d probably consider all the photos from that trip one Event.
In other, less common situations, you might consider one day to be too long a window. If you’re a school photographer who conducts two shooting sessions a day—morning and afternoon, say—you might want iPhoto to split up the incoming photos into smaller time chunks, like a new Event every 4 hours. (Also, some photo-sharing websites limit the number of pictures that can go in a single album.)
In any case, iPhoto can accommodate you. Choose iPhoto→Preferences→General. From the “Autosplit into Events” menu shown at the bottom of Figure 2-2, choose “One event per day,” “One event per week,” “Two-hour gaps,” or “Eight-hour gaps.” (Those “gap” options are iPhoto’s way of saying, “If more than that many hours have elapsed since the last batch of photos you took, then I’ll call it a new Event.”)
As you’ll learn later in this chapter, it’s extremely easy to split, merge, slice, and dice Events, move photos around between Events, and so on. But you may as well let iPhoto do the bulk of the grunt work when you import the pictures.
Opening an Event
Double-clicking an Event expands its stack so you see thumbnails of all the pictures within it, as shown in Figure 2-3. From here, you can search, sort, edit, and pick photos for inclusion in slideshows, prints, books, and so on. To change the thumbnails’ size, use the Zoom slider at the bottom of the iPhoto window.
TIP
Once you’ve opened an Event, you have another, even better chance to choose a key photo for it (the one that appears at the top of the stack in All Events view). Just Control-click the thumbnail of the photo you want to exalt to that special position, and then choose Make Key Photo from the shortcut menu that appears. (Clicking a thumbnail and choosing Events→Make Key Photo does the same thing.)
If the Info panel is open, you can also move your cursor sideways across the Event thumbnail that appears at the top right of your screen; when you see the pic you want to use as the new key photo, click once to make it so.

Figure 2-3. When you double-click an Event to see inside it, iPhoto displays the Event’s name, date, and total number of photos at the top of the window. It also tallies how many photos you’ve temporarily hidden from view (page 47). To see the previous or next Event without returning to All Events view, click the arrows circled here.
You can return to All Events view by clicking Events in the Source list (even though it’s already highlighted), clicking the All Events arrow at the top left of the photo-viewing area (labeled in Figure 2-3), or pressing ⌘-left arrow.
Creating Events Manually
Events are such a convenient way of organizing your photos that Apple lets you create them manually, out of any pictures you choose.
This feature violates the sanctity of the original Event concept: that all the photos taken in a certain time period are one Event. Still, in this case, usefulness trumps concept—and that’s a good thing.
To create an Event, select any bunch of pictures in your library (using any of the techniques described on Selecting Photos) and then choose Events→Create Event. iPhoto removes the photos from their original Events, creates and selects the new one, and gives it a generic name (“untitled event”); just click this placeholder name and then enter a new, more meaningful one.
TIP
If you’ve flagged photos in your collection (Flagging Photos), you can also choose Events→Create Event From Flagged Photos. That’s a great way to round up pictures that currently sit in different Events—but nonetheless belong together. (iPhoto removes them from the old Event.)
Alternatively, you can gather up all your flagged photos and add them to an existing Event. To do that, click Events in the Source list, click the destination Event’s thumbnail to select it, and then choose Events→Add Flagged Photos To Selected Event.
Splitting and Renaming Events
Here’s yet another way to create a new Event: Split off a bunch of photos from another Event. You can either ask iPhoto to do it automatically, based on when the pictures were taken, or you can do it manually:
§ The automatic way. Suppose you turned off the Split Events setting (Connecting with a USB Cable) when you imported your pictures, and now you’re having second thoughts. You wound up importing hundreds of photos taken over the course of several weeks, and now you realize that it would be sort of handy if they were broken up by day or by week.
First, make sure you’ve told iPhoto what time period you want to serve as the cutoff point for Event groups (a day, a week, 2 hours, or 8 hours, as the box on Defining an Event explains). Next, click Events in the Source list, and then select the Event(s) that you want to split (skip ahead toSelecting Photos for selection techniques). Finally, choose Events→Autosplit Selected Events to have iPhoto automatically divide the selected Events into more Events based on the date or time period you requested.
§ The manual way. You can also chop an Event in two, subdividing it at any point that feels right. For example, iPhoto may have grouped 24 hours’ worth of photos into a single Event, even though you road-tripped through three states and you’d prefer those photos to appear in separateEvents, thank you very much. Figure 2-4 has the details.
As you know from Chapter 1, iPhoto gives you the opportunity to name each Event as it’s created—that is, at the joyous moment when a new set of photos becomes one with your iPhoto library. If you don’t type anything into the Event Name box when you import photos, iPhoto just labels each Event with a date. Fortunately, you can change any Event’s name anytime, anywhere it appears. To rename an Event, click its existing name and then start typing.
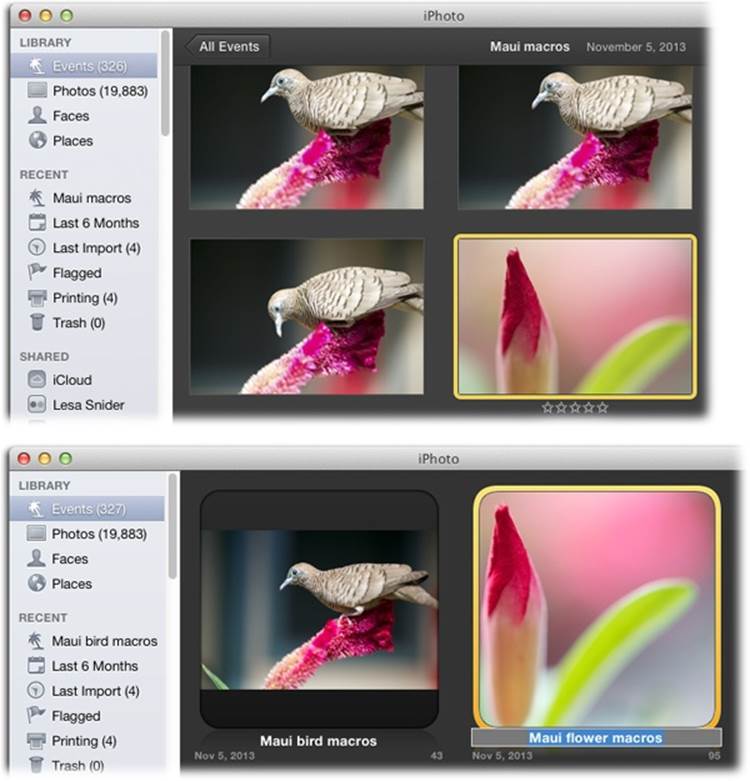
Figure 2-4. Top: To split this Event in two so bird shots are in one and flower shots in another, open the Event, scan through the thumbnails, and then click the photo that marks the beginning of what you’d like to become the new, separate Event. Next, choose Events→Split Event, or press the S key on your keyboard. iPhoto moves the selected photo and all the ones after it into the new Event. Bottom: Return to All Events view to see the new Event (it’s next to the original and named by date); in Photos view, you see all your Events in a list. To rename the Event, click its name and type something else. To rename the next Event, press Tab to highlight its name so you can type away (pressing Shift-Tab highlights the previous Event’s name).
Merging Events
You can merge Events with one quick swipe, too—a great technique when your photo collection starts to get enormous. Also, if you shoot a lot of multiday events (such as weddings or soccer tournaments) and you always keep “Split Events” turned on when you import pictures, you’ll end up with a slew of Events. In that case, it may make sense to combine the individual days of that particular shoot into a single Event.
Start in All Events view (click Events in the Source list), and then proceed as shown in Figure 2-5.
TIP
In All Events view, you can also merge Events by ⌘-clicking to select more than one, and then choosing Events→Merge Events.
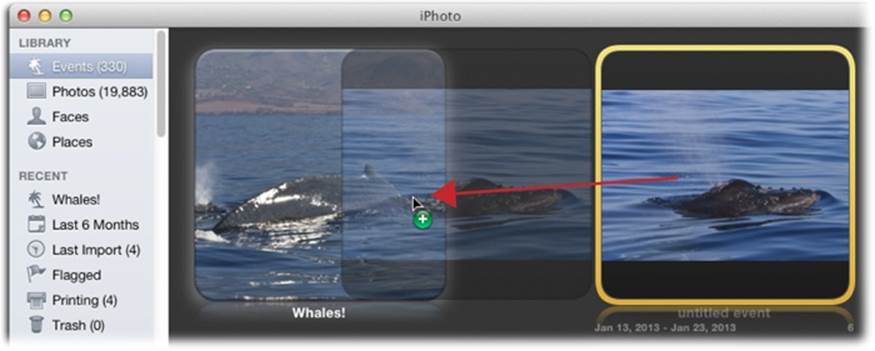
Figure 2-5. You can combine Events by dragging one Event’s thumbnail onto another, as shown here. The Event you moved disappears into the other one. If you change your mind about the merger, undo it by pressing ⌘-Z. (If only that keyboard shortcut worked in real life!)
Photos View
When you click Photos in the Source list, you see all your photos, instead of the representative stacks you get in All Events view. Here, every photo has its own thumbnail and each Event is shown as a collapsible header in the list (see Figure 2-1, bottom). By scrolling through the list, you can survey your entire collection, one glorious thumbnail after the next.
You can do everything in Photos view that you can do when you’re viewing a single Event: You can mark thumbnails with keywords, ratings, and descriptions; pick a photo to edit; or choose several to include in an album, slideshow, book project, and so on. iPhoto also lets you rename Events in this view, as well as move photos between Events (though you can’t split or merge Events in this view).
In short, this is the view where you’ll spend the majority of your organizational time.
Collapsing Events
As your collection grows, Events become excellent visual aids, even in Photos view, to help you locate a certain photo—even months or years after the fact.
Furthermore, as your library becomes increasingly massive, you can use these Event stacks to preserve your sanity. By collapsing the stacks you’re not looking at right now (Figure 2-6), you speed up iPhoto considerably. Otherwise, you may spend hours scrolling through ever more photos. (These days iPhoto can manage up to a million pictures in a single library! Of course, you can always start new libraries, as described in Chapter 12.)
Which leads us to one of the best tips in the whole chapter: Option-click an Event’s flippy triangle to hide or show the contents of all your Events in one fell swoop. When all your Events are collapsed, you see nothing but their names, and scrolling is almost instantaneous no matter how many photos you have.
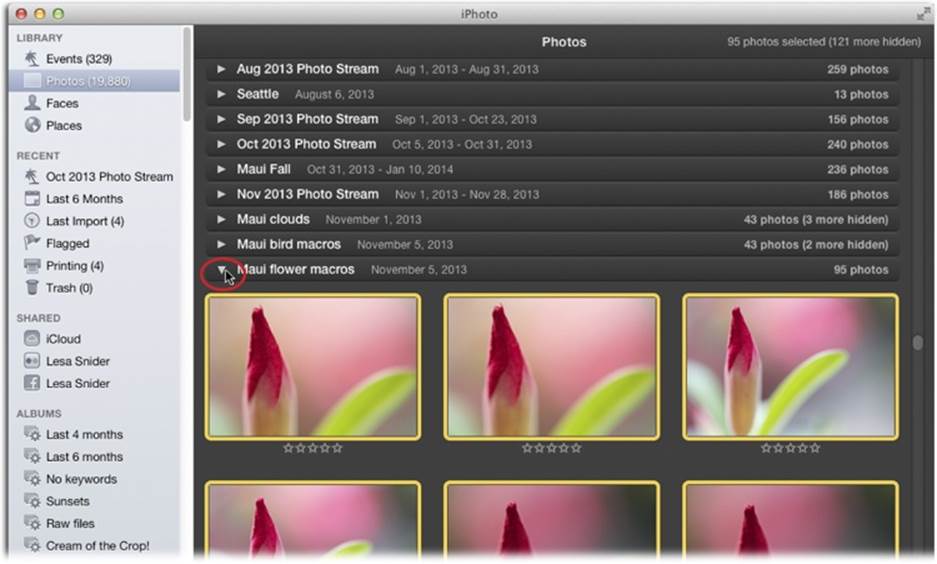
Figure 2-6. This tidy arrangement is a fast way to use iPhoto, as it displays all photos grouped by Event. Click the flippy triangle next to an Event’s header (circled) to expand or collapse that Event. Click anywhere on an Event’s header to select all photos inside it. This is handy when you want to do things like apply a keyword to the whole Event (“flowers,” say).
Moving Photos Between Events
The fact that iPhoto groups photos into Events by time period is a handy starting point. But it’s only a starting point. You can, and should, freely drag photos among your Events according to any logic that suits you.
In Photos view, select any photos you want to move and then drag them onto another Event’s name in a header bar (Figure 2-7) or, if the Event’s flippy triangle points down, directly into the Event alongside its other thumbnails. Poof! The deed is done.
Size Control
You can make the thumbnails in iPhoto grow or shrink using the Zoom slider in the toolbar below the photo-viewing area. Drag the slider all the way to the left, and you get micro-thumbnails so small that you can fit hundreds of them in the iPhoto window. Drag it all the way to the right, and you end up with—you guessed it—large thumbnails.
TIP
You don’t have to drag the Zoom slider; just click anywhere along the slider to make it jump to a new setting. You can also scale all the thumbnails to their minimum or maximum size by clicking the tiny icons at either end of the slider.
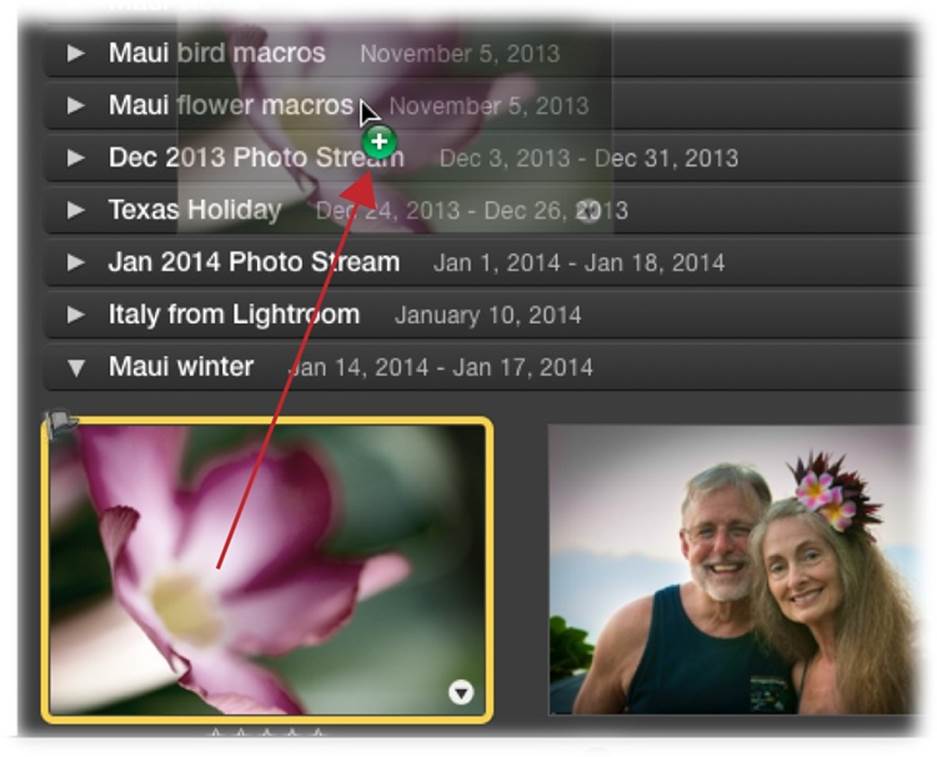
Figure 2-7. When you’re dragging photos between Events in Photos view, it’s easy to accidentally plop them into the wrong one. Because iPhoto doesn’t indicate which Event they’re headed for (hello, Apple?!), be mindful of where your cursor is positioned before releasing your mouse button. If you make a mistake, don’t panic—just press ⌘-Z to undo the move. In Photos view, you can rename an Event by clicking its name in the header bar.
To make your photo large enough to fill the iPhoto window, give the image a double-click or tap the space bar. To get out of this zoomed-in view and back to your thumbnails, double-click the photo or tap the space bar again. You can also click the left-pointing Photos button at the top left of the main viewing area to return to Photos view, or press ⌘-left arrow.
By the way, you might notice that this Zoom slider performs different functions depending on which mode iPhoto is in. For example, when you’re editing a photo, it zooms in and out of an individual image. But when you’re designing a photo-book layout or any other project (Chapter 9), it magnifies or shrinks the book, calendar, or card’s page.
Sorting Photos
Your main iPhoto window may look like a broad, featureless expanse of pictures, but they’re actually in a logical order. iPhoto starts out sorting your photos chronologically, with the oldest ones at the top of the window.
TIP
If you prefer the newest items to appear at the top of the iPhoto window instead of the bottom, choose View→Sort Photos→Descending.
Using the View→Sort Photos submenu, you can make iPhoto sort all the thumbnails in the main window in a number of useful ways:
§ By date. This sort order reflects the dates the photos were taken. iPhoto gets this info from the photos’ metadata (info embedded into the pictures by your camera; though it’s changeable, as the next section explains).
§ By keyword. This option sorts your photos alphabetically by the keywords you’ve assigned to them (Keywords).
§ By title. This arrangement is alphabetical by the photos’ names. (To rename your photos, see The Info Panel.)
§ By rating. If you’d like your masterpieces to appear at the top of the window, and the less-desirables farther down below, choose this option. (Ratings explains how to rate your photos.)
§ Manually. This option is available only when you’re viewing the contents of an album, as it lets you drag the thumbnails around freely, placing them in any order you want. To conserve your Advil supply, however, pay close attention to exactly where you are in your Source list; if you’re in Events or Photos view, you can’t drag photos into a specific order, no matter how much you curse. See the box on Your Own Personal Sorting Order for details.
Renaming and Redating Photos
To make every photo’s name appear beneath its thumbnail, choose View→Titles. (When you do, the photo’s name also appears in the Info panel’s Title field.) Turning on titles works great if you don’t mind referring to your pictures as IMG_09231.JPG, DSC_0082.JPG, and so on. If you don’t rename your photos, viewing their titles is pretty pointless.
That doesn’t mean you should rename all your photos, but if you’re inclined to rename the keepers individually, you’ll find that task really easy in iPhoto. You can rename just about anything by double-clicking its existing name and typing over it: Events, albums, slideshows, projects—and photos (see Figure 2-8).
TIP
If you create an album that you intend to use as the basis for a slideshow, then renaming the photos in the album can come in handy. As Show Caption explains, you can have iPhoto display each photo’s name during the slideshow by turning on the Show Captions option and choosing Titles.
You can make a photo’s name as long as you want, but it’s smart to keep it short (about 10 characters or so). That way, you can see all or most of the name in the Title field (or under the thumbnails).
TIP
You can find a faster method for renaming photos at the bottom of Changing Titles and Dates En Masse. It’s handy if you’re plowing through an album, renaming (or redating) a ton of photos at once.
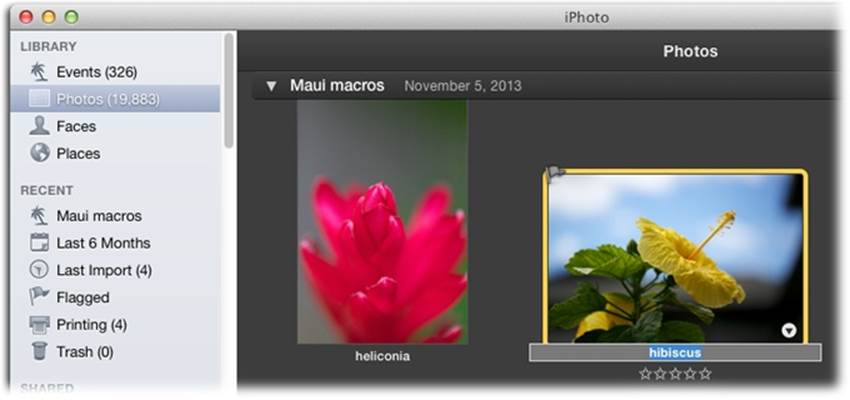
Figure 2-8. Turn on titles by choosing View→Titles, and then you can rename a photo by clicking its existing name and typing away. To rename the next one, press Tab to highlight its name. (To highlight the previous thumbnail’s name, press Shift-Tab instead.) Proceed this way (Tab, type; Tab, type) until you’re finished.
To change a photo’s date, on the other hand, you’ll need to enlist the help of a dialog box. Doing so can help your thumbnails appear in the correct chronological order.
In either All Events or Photos view, select the thumbnail of the photo that you want to change, and then choose Photos→“Adjust Date and Time.” In the resulting dialog box, the existing date and time appear, along with a text box where you can enter a new one, as shown in Figure 2-9.
NOTE
You can change the date of all the photos in an Event en masse. Just choose Events in the Source list and then select the Event thumbnail that you want to alter, instead of a photo thumbnail.
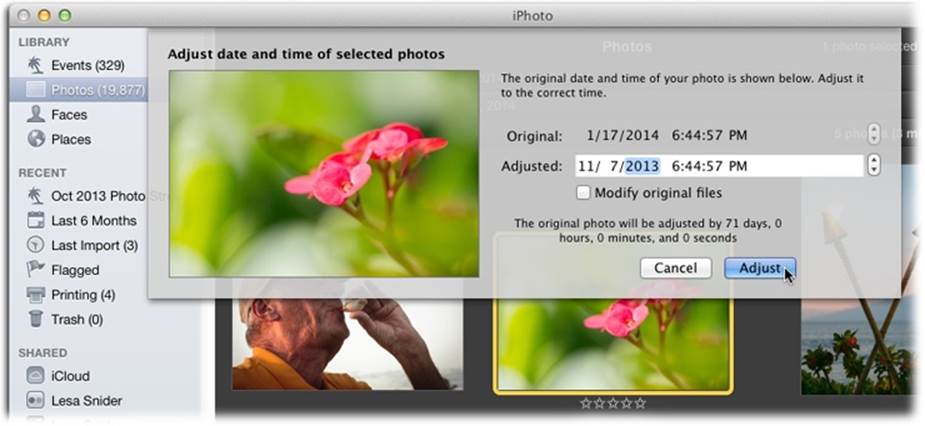
Figure 2-9. As long as you don’t turn on “Modify original files,” the real shot date of your photo remains intact as part of its metadata (page 43). To change the date of an Event, select its thumbnail in All Events view and then open this dialog box. This kind of thing is handy if you got the photos from someone else and they were modified in another program, or if your camera’s date/time stamp is off kilter.
To learn how to rename multiple photos at once, skip ahead to Changing Titles and Dates En Masse.
Scrolling Through Your Photos
Enough learning about iPhoto already—now it’s time to start using it!
Happily, browsing, selecting, and opening photos is straightforward. In fact, here’s everything you need to know:
§ You can use the vertical scroll bar on the right side of the iPhoto window to navigate through your photo thumbnails.
NOTE
If your scroll bar disappears when you stop scrolling, you can make it hang around permanently by going to ![]() →System Preferences→General and setting “Show scroll bars” to Always.
→System Preferences→General and setting “Show scroll bars” to Always.
If you have a laptop, Apple Magic Mouse, or Magic Trackpad, you can also scroll by swiping up or down with one or two fingers, depending on how your “Mouse and Trackpad” system preferences are set up. Using the Page Up and Page Down keys works, too (they scroll one screen at a time). If your mouse has a scroll wheel on top (or a scroll pea, like Apple’s old Mighty Mouse), you can use that to scroll, too.
TIP
iPhoto can display a translucent “heads-up display” that shows, chronologically or alphabetically, where you are as you scroll. See Showing/Hiding Titles, Ratings, and Keywords to turn it on.
§ Even though iPhoto is faster than ever, scrolling can still take awhile if you have a huge library. But you can use this standard OS X trick for faster navigation: Instead of dragging the scroll bar, Option-click the spot on the scroll bar that corresponds to the location you want in your library. If you want to jump to the bottom of the library, for example, Option-click near the bottom of the scroll bar.
NOTE
You can make this the standard behavior for all OS X scroll bars by going to ![]() →System Preferences→General and turning on “Jump to the spot that’s clicked.” With that setting turned on, you won’t need the Option key—simply clicking the scroll bar will do the trick. If you do use the Option key, you’ll jump to the next page instead.
→System Preferences→General and turning on “Jump to the spot that’s clicked.” With that setting turned on, you won’t need the Option key—simply clicking the scroll bar will do the trick. If you do use the Option key, you’ll jump to the next page instead.
§ If your keyboard includes a Home or End key, press the Home key to jump to the very top of your photo collection, or the End key to leap to the bottom. (You have to hold down the fn key plus Home or End on some keyboards.)
Selecting Photos
To select a single picture in preparation for dragging, opening, duplicating, deleting, and so on, click its thumbnail once.
That much may seem obvious. But many Mac novices have no idea how to manipulate more than one icon at a time—an essential survival skill. To select multiple photo (or Event) thumbnails in preparation for doing anything with them en masse, use one of these techniques:
§ Select all the photos in the window. To select all the pictures in the Event or album you’re viewing, press ⌘-A. (That’s the equivalent of the Edit→Select All command.)
TIP
In Photos view, you can select all the photos in one Event by clicking the Event’s name in the header bar, as shown in Figure 2-6.
§ Select several photos by dragging. You can drag diagonally to select a group of nearby photos. You don’t even have to enclose the thumbnails completely; your cursor can touch any part of a thumbnail to select it. If you keep dragging past the edge of the iPhoto window, the program scrolls automatically.
TIP
If you include a particular thumbnail in your dragged group by mistake, ⌘-click it to remove it from the selected cluster.
§ Select consecutive photos. Click the first thumbnail you want to highlight, and then Shift-click the last one. iPhoto selects all the files in between, along with the two photos you clicked (Figure 2-10, top). This trick mirrors the way Shift-clicking works in word processors, the Finder, and many other programs.
§ Pick and choose photos. If you want to highlight, for example, only the first, third, and seventh photos in a window, start by clicking the first photo’s thumbnail. Then ⌘-click each of the others. Each thumbnail sprouts a yellow border to indicate that you’ve selected it (Figure 2-10, bottom).
§ Deselect a photo. If you’re selecting a long string of photos and then click one by mistake, you don’t have to start over. Instead, just ⌘-click it, and the yellow border disappears. (If you do want to start over from the beginning, then just deselect all the photos by clicking in any empty part of the window.)
The ⌘-click trick is especially handy if you want to select almost all the photos in a window. Simply press ⌘-A to select everything in the folder, and then ⌘-click any unwanted photos to deselect them. You’ll save a lot of time and clicking.
TIP
You can also combine ⌘-clicking with Shift-clicking. For instance, you could click the first photo, and then Shift-click the tenth to select all 10. Next, you could ⌘-click photos 2, 5, and 9 to remove them from the selection.

Figure 2-10. Top: To select a block of photos (as indicated by the yellow border on each one), click the first one and then Shift-click the last one. iPhoto selects all the files in between the ones you clicked. Bottom: To select nonadjacent photos, ⌘-click them. To remove one of the photos from your selection, ⌘-click it again.
Once you’ve selected multiple photos, you can manipulate them all at once. For example, you can drag them en masse out of the window and onto your desktop—a quick way to export them. (Actually, you may want to drag them into a folder in the Finder to avoid spraying their icons all over your desktop.) You might also give them keywords or a star rating. Or you can drag them into an album in the Source list. Just drag one of the selected photos, and all the others go along for the ride.
In addition, when multiple photos are selected, the commands in the File, Edit, Photos, and Share menus—including Duplicate, Print, Revert to Original, Move to Trash, Email, and so on—apply to all of them simultaneously.
Hiding Photos
For years, you had only two choices when confronting a so-so photo in iPhoto: Keep it or delete it.
Keeping it isn’t a satisfying solution, because it’s not one of your best, but you’re still stuck with it. You have to look at it every time you open iPhoto, skip over it every time you’re making a photo book or a slideshow, and so on. But deleting it isn’t such a great solution, either. You just never know when you might need exactly that photo again, years later.
Fortunately, there’s a happy solution to this quandary: You can hide a photo. It’s still there behind the scenes, and you can always bring it back into view should the need arise. In the meantime, you can pare your visible collection down to the really good shots, without being burdened every day by the ghosts of your less impressive work.
To hide some photos, select them as explained in the previous section, and then take one of these steps:
§ Press ⌘-L, or choose Photos→Hide Photos.
§ Click the down-pointing triangle at the bottom right of any selected photo’s thumbnail to reveal its shortcut menu, and then click Hide (see Figure 2-11).
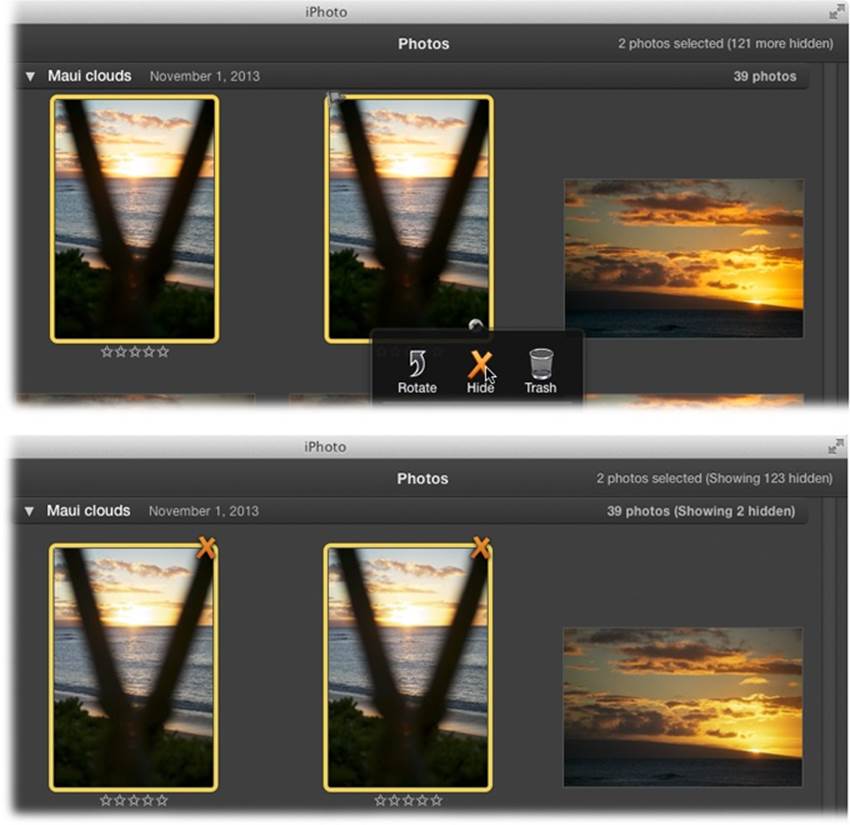
Figure 2-11. Top: When you point your cursor to a photo’s thumbnail, you see a black, down-pointing triangle appear inside a white circle at its bottom right. Click it to reveal the shortcut menu shown here, which includes a Hide option. Bottom: When you choose View→Hidden Photos, the hidden pictures reappear. iPhoto lets you know that you’re viewing hidden photos by displaying an X on each one, and by saying so in the Events header bar and at the top of the iPhoto window; notice how iPhoto added the word “showing” to its count at upper right.
The selected photos vanish from sight. They’re still taking up disk space, of course, but they no longer bog down iPhoto when you’re scrolling or depress you when they stare out at you every day.
But don’t worry: iPhoto doesn’t let you forget that they’re there. Whenever you open an Event, the words “(121 more hidden)”—or whatever the number is—appear in the title bar; you can see this at the top of Figure 2-11 (this notation also appears in Photos view).
Seeing Hidden Photos
To bring all your hidden photos back into view for a moment, choose View→Hidden Photos or press Shift-⌘-H.
Either way, all the hidden photos reappear, bearing little X’s on their corners (see Figure 2-11, bottom). This is your chance to reconsider—either to delete them for good, or to welcome them back into society.
Of course, you can rehide the hidden photos whenever it’s convenient by choosing View→Hidden Photos again.
Unhiding Photos
Just marking a photo as hidden doesn’t mean you can’t change your mind. At any time, you can unhide a hidden photo, turning it back into a full-fledged photographic citizen.
To do that, first make your hidden photos visible, as described above. Then select the photos you want to unhide, and then repeat whatever step you took to hide them in the first place. For example:
§ Press ⌘-L, or choose Photos→Unhide Photos.
§ Click the down-pointing triangle at the bottom right of any selected photo’s thumbnail and then click Show.
Three Ways to Open a Photo
iPhoto wouldn’t be terribly useful if it let you view only postage-stamp versions of your photos (unless, of course, you like to take pictures of postage stamps). Fortunately, the program offers three ways to view your pictures at something much closer to actual size.
You’ll use these methods frequently when you start editing photos as described in Chapter 5. For the moment, it’s useful to know about these techniques simply for the more common act of viewing the pictures at larger sizes.
Method 1: Right in the Window
The easiest way to open a photo is simply to double-click its thumbnail, or select a photo and then tap the space bar. In both instances, the photo opens in the main iPhoto window, scaled to fit the viewable area (Figure 2-12).
NOTE
It used to be that you could tweak iPhoto settings so a double-click switched you to Edit mode, but you can’t do that anymore. Apple (correctly) assumes you’ll do most of your editing in Full Screen view.
Whenever you’ve opened a photo this way, the bottom of the window displays a parade of all the other photos’ thumbnails. This is the filmstrip or thumbnail browser. You can use it to jump to a different photo, as described in Figure 2-12.
TIP
iPhoto lets you see only one photo at a time in this view. To see multiple photos simultaneously (and at a smaller size), you have to be in Edit mode, as explained on Using the Thumbnail Browser.
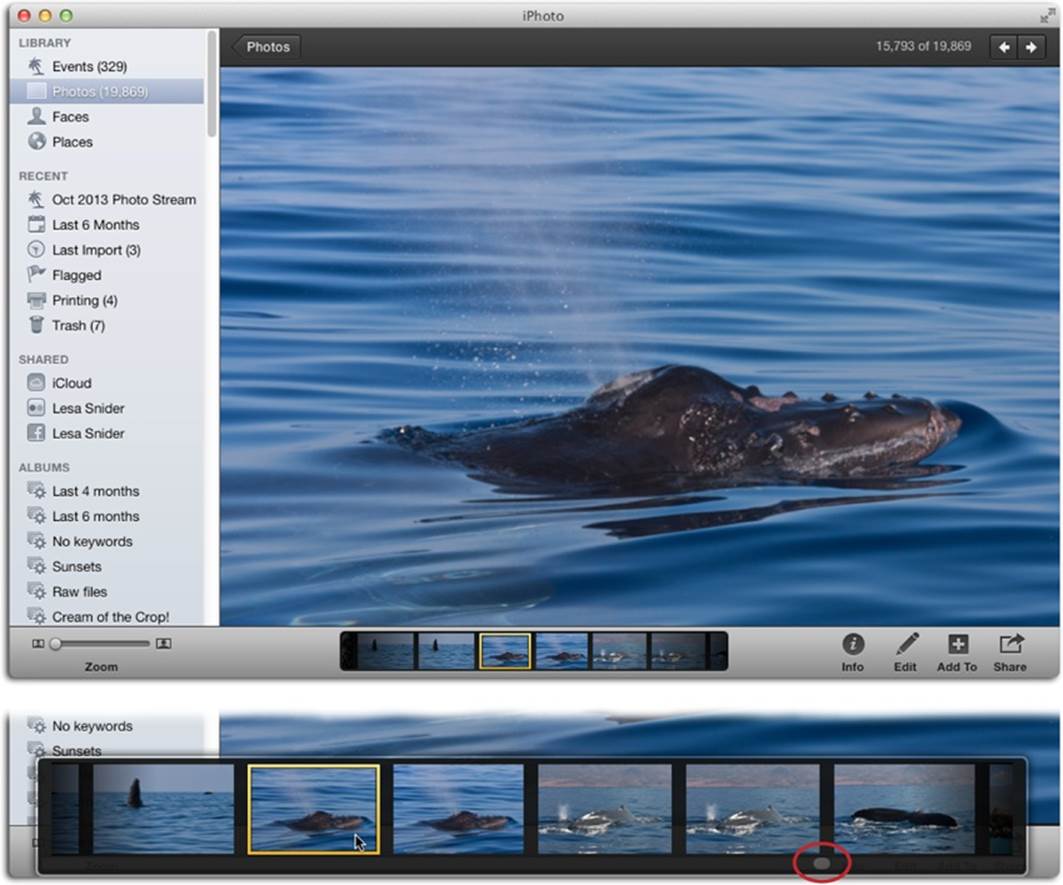
Figure 2-12. Top: Here’s how most people open pictures, at least at first. It’s comforting to see landmarks like the Source list and the toolbar. The downside is that those other screen elements limit the size of the enlarged photo; that’s why you might want to consider Full Screen view. Bottom: When you point your cursor at the filmstrip at the bottom of the window, it enlarges it so you can see the other photos in that Event or album; to view another photo at the same size, give it a click. Use the scroll bar handle beneath the filmstrip (circled) to cruise around inside the Event or album to pick another photo to scrutinize.
Method 2: Full Screen View
Here’s another way to take a good long gander at a photo: Full Screen view. A selected photo in this view fills your entire monitor, edge to edge.
There’s no Source list stacked with icons down the left side—everything you need shrinks down to the smallest possible size at the top and bottom of your monitor, letting you focus on your glorious photo, blown up as big as it can be (Edit mode lets you zoom in further, which is handy when you’re doing detailed work such as removing blemishes). Heck, even the menu bar disappears, though pointing your cursor at the top of your monitor temporarily brings it back.
To enter Full Screen view, click the ![]() at the top right of the iPhoto window (in earlier versions, this button lived at the bottom left). The filmstrip at the bottom expands when you point your cursor at it, making it easy for you to pick a different photo to view, though you can also use the left and right arrow keys on your keyboard to see a different one.
at the top right of the iPhoto window (in earlier versions, this button lived at the bottom left). The filmstrip at the bottom expands when you point your cursor at it, making it easy for you to pick a different photo to view, though you can also use the left and right arrow keys on your keyboard to see a different one.
This mode is fantastic when you’re editing photos or creating projects—honestly, it’s great anytime you’re in iPhoto. To exit Full Screen view, tap the Esc key on your keyboard or point your cursor at the top-right edge of your monitor to reveal the menu bar, and then click the Full Screen icon again.
Method 3: In Another Program
Apple knows there’s other software out there—big, burly photo-editing programs like Adobe Photoshop or its friendlier sibling, Photoshop Elements. That’s why you can tell iPhoto that you’d rather use a different program for manipulating the finer points of your photos. To do so, choose iPhoto→Preferences→Advanced. From the Edit Photos menu, choose “In application,” and then pick another program installed on your Mac. Chapter 5 has more info on editing your photos elsewhere.
FREQUENTLY ASKED QUESTION: THE BLURRY-PHOTO EFFECT
Hey, what’s the deal? When I open a photo for editing, it appears momentarily in a coarse, low-resolution version. It takes a second to fill the window so I can get to work. Do I need to send my copy of iPhoto in for servicing?
Nope, your copy of iPhoto is fine.
Today’s digital photos are pretty big, especially if you’ve got a camera that takes giant-sized photos (20 megapixels, for example).
Now, as it turns out, that’s a lot more pixels than even the biggest computer screen has. So your Mac not only has to “read” all the photo information off your hard drive, but it also must then compute a scaled-down version that’s exactly the size of your iPhoto window. Naturally, all this computation takes time, though now that iPhoto is 64-bit (see the box on Demystifying 64-bit), the lag is far less noticeable, and typically only in Full Screen view.
Apple has tried to disguise this moment of computation by first displaying a full-sized but blurry, low-resolution photo, filling in the sharpened details a moment later. You can’t begin editing until the full-window computation is complete. On the other hand, you do get to see, clearly enough, which photo you’ve opened. And if you’ve opened the wrong one, you don’t have to wait any longer; you can click over to a different photo, having wasted no more time than necessary.
Albums
In the olden days of film cameras and drugstore prints, most people kept their pictures in the paper envelopes they were in when they came home from the drugstore. You might have put a photo in an album or physically mailed it to somebody—but then the photo was no longer in the envelope and couldn’t be used for anything else.
But you’re digital now, baby. You can use a single photo in a million different ways, without ever removing it from its original “envelope” (that is, its Event) or duplicating it.
In iPhoto terminology, an album is a collection of pictures—drawn from a single Event or many different ones—that you group together for easy access and viewing. Represented by a little album-book icon in the Source list at the left side of the screen, an album can consist of any photos you select. It can even be a smart album that iPhoto assembles automatically by matching certain criteria you specify—all pictures with the keyword “sunset,” for example, or all photos that you’ve rated four stars or higher.
While your iPhoto library as a whole might contain thousands of photos from a hodgepodge of unrelated family events, trips, and time periods, an album has a single focus: Cutest Cat Pics, City Skylines, and so on.
As you probably know, mounting snapshots in a real photo album is a pain—that’s why so many people still have stacks of Kodak prints stuffed in envelopes and shoeboxes. But with iPhoto, you don’t need mounting corners, double-sided tape, or scissors to create an album. In the digital world, there’s no excuse for leaving your photos in hopeless disarray.
Of course, you’re not required to group your digital photos in albums with iPhoto, but consider the advantages of doing so:
§ You can find specific photos faster. By opening only the relevant album, you can avoid scrolling through thousands of thumbnails in the library to find the picture you want—a factor that takes on added importance as your collection expands.
§ You can drag photos into a different order. To manually change the order of your photo thumbnails, you first have to create an album. This is especially handy when you’re preparing a slideshow or a print project like a book or a calendar, and you want the pictures to be displayed in a certain order (see Chapters Chapter 6 and Chapter 9 for details).
The single most important point about adding photos to an album is this: Putting photos in an album doesn’t really move or copy them. It makes no difference where the thumbnails start out—whether it’s the library or another album. You’re just creating references, or pointers, back to the photos in your master photo library.
This feature works a lot like aliases in OS X; in fact, behind the scenes, iPhoto actually creates aliases of the photos you’re dragging. (It stashes them in the appropriate album folders within the iPhoto library.)
What this means is that you don’t have to commit a picture to just one album when organizing; one photo can appear in as many different albums as you want. So, if you’ve got a killer shot of Grandma surfing in Hawaii and you can’t decide whether to drop it into the Hawaiian Vacation album or the Grandma & Grandpa album, the answer is easy: Put it in both. iPhoto just creates two references to the same original photo in your library.
Creating an Empty Album
To create a new, completely empty photo album, open the File menu, and then press and hold the Shift key. When you do, the New Album command changes to New Empty Album instead; click it. (You can also create an empty album by pressing Shift-⌘-N.)
When you create an album this way, it appears at the bottom of the Albums section of the Source list with its name highlighted—“untitled album”—so you can type a new one (Best of Bermuda, Marching Band Mayhem, or whatever). You can see several albums on display in Figure 2-13.
You can populate your newly spawned album by dragging thumbnails into it from the photo-viewing area (also shown in Figure 2-13). It doesn’t matter what’s selected in your Source list—Events, Photos, Last Import, another album, or whatever; as long as you can see thumbnails, you can drag them into an album. There’s no limit to the number of albums you can add, either, so feel free to make as many as you need in order to achieve your own brand of organizational nirvana.
Creating an Album by Dragging
Creating a new, empty album isn’t always the best way to start. Usually it’s easier to create an album and fill it with pictures in one fell swoop. Here are a couple of ways you can create a new album by clicking and dragging:
§ Drag a thumbnail (or a batch of them) from the photo-viewing area onto an empty spot in the Source list. When you let go of your mouse, iPhoto creates a new album named “untitled album” that contains all the photos you dragged.
§ Similarly, you can drag a folder of image files from the Finder (the desktop behind iPhoto) directly into the Source list (handy if you’ve created an organizational structure on your hard drive in lieu of in iPhoto). In one step, iPhoto imports the photos, creates a new album, names it after the folder you dragged in, and plops the newly imported photos into that album.
TIP
You can also drag photos directly from the Finder onto an existing album icon in the Source list; iPhoto imports the photos and includes them in that album.

Figure 2-13. When you drag multiple photos into an album, a little red numeric badge appears at the bottom of the ghosted thumbnail as you drag, telling you exactly how many items you’ve got selected. In this example, six pictures are being dragged into an album. New albums always appear at the bottom of the Source list’s Albums section, but you can drag them up or down within that section. You can also make iPhoto put them in alphabetical order by Control-clicking any album and choosing Sort Albums from the shortcut menu.
Creating an Album by Selecting
For the fastest album creation-and-filling in the West, select some photos first using the methods described on Selecting Photos. (If you’re cruising through Photos view, the images don’t have to be from the same Event, or even the same year.) Then:
§ Choose File→New→Album or press ⌘-N. iPhoto adds the photos to the album and selects the album’s name so you can change it.
§ Click Add To in the toolbar, and then choose Album, as shown in Figure 2-14.
§ Click the Share button in iPhoto’s toolbar, and then choose Album.
You can also create an album from flagged photos (Flagging Photos). Flag the images you want to include in your new album, and then click Flagged in your Source list (it’s in the Recent category). Press ⌘-A to select all the flagged photos, and then choose File→New Album. Of course, if you’ve previously flagged photos for another project, they’ll end up in your new album, too.
TIP
To rename an existing album, click it in the Source list to select it and then single-click its name. When you do that, iPhoto highlights the text so you can edit it.
Adding More Photos
To add photos to an existing album, just drag them onto its icon in the Source list. Figure 2-13 illustrates how you can select multiple photos and drag them into an album in one batch. (If you’re paid by the hour, you can also select some photos, click Add To at the bottom of the iPhoto window, click Album, and then click the name of the album you want to add them to. Those extra seconds add up!)
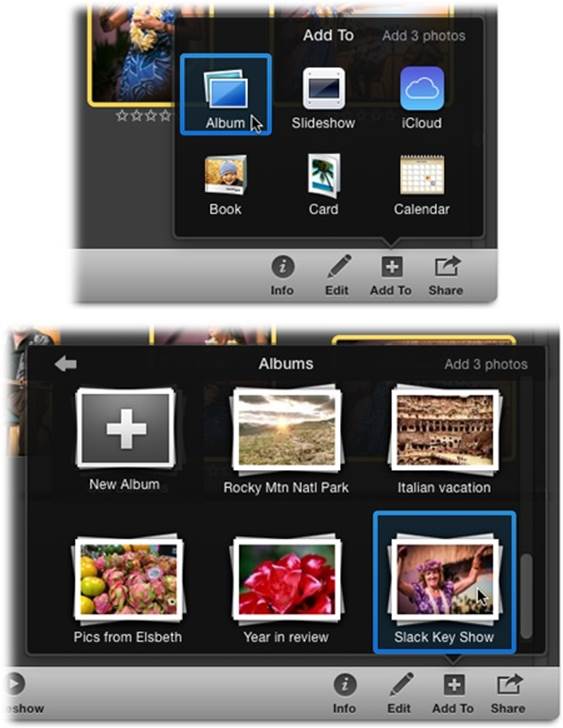
Figure 2-14. Top: When you click the Add To icon at the bottom of your iPhoto window, a menu opens that lets you add the selected photos (or Event) to an album, slideshow, project, and so on. Bottom: When you click Album, another menu appears that lets you create a new album or pick an existing one to receive the selected photos.
Viewing an Album
To view the contents of an album, click its name or icon in the Source list. All the photos included in the selected album appear in the photo-viewing area, while the ones in your library are hidden.
You can even browse more than one album at a time by selecting them in the Source list:
§ To view the contents of several adjacent albums in the list, click the first one, and then Shift-click the last one.
§ To view the contents of albums that aren’t consecutive in the list, ⌘-click each of them.
TIP
Viewing multiple albums at once can be extremely useful when it’s time to share your photos. For example, you can make slideshows or calendar projects containing the contents of multiple albums.
Remember, adding photos to albums doesn’t move them from the original Events or Photos view where they started out. So if you lose track of which album contains a particular photo, just click Events or Photos in the Source list to return to the overview of your entire photo collection.
Changing an Album’s Key Photo
You can change an album’s representative key photo the same way you change an Event’s key photo; flip back to The Events List for details. (That said, you can’t change the key photos of smart albums, which you’ll learn about on Deleting an Album.)
Moving Photos Between Albums
There are two ways to transfer photos from one album to another:
§ To move a photo between albums, select it and then choose Edit→Cut (or press ⌘-X) to remove the photo from the first album. Next, click the destination album’s name or icon, and then choose Edit→Paste (or press ⌘-V). The photo is now a part of the second album.
§ To copy a photo into another album, drag it onto the destination album’s icon in the Source list. Now the photo belongs to both albums.
Removing Photos from an Album
If you change your mind about the way you’ve organized your photos and want to remove a photo from an album, first open the album and select the photo. (Caution: Check your Source list to be sure you’re viewing the contents of an album and not your main library, the Last 12 Months collection, or the Last Import collection. Deleting a photo from those sources really does move it to iPhoto’s Trash.) Then do one of the following:
§ Choose Edit→Cut (or press ⌘-X). With this method, the photo remains in your Mac’s temporary memory (the Clipboard), giving you the opportunity to paste the photo into another album by choosing Edit→Paste or pressing ⌘-V.
§ Drag the photo’s thumbnail onto the little Trash icon in the Recent section of your Source list.
§ Press the Delete key.
§ Point your cursor at the selected photo(s) and click the down-pointing triangle that appears in the lower-right corner. In the resulting shortcut menu, click Trash.
In all but the last option, iPhoto asks if you’re sure you want to remove the photo (notice it doesn’t say “delete”). (If you don’t see this confirmation message, you or someone else probably turned on the Don’t Ask Again checkbox.) Click Remove Photo. The thumbnail disappears from the album, but of course it’s not really gone from iPhoto; it’s still in your library.
Duplicating a Photo
iPhoto doesn’t let you drag the same photo into an album twice. When you try, the thumbnail simply leaps stubbornly back into its original location, as though to say, “Nyah, nyah, you can’t drag the same photo into an album twice!”
It’s often useful to have two copies of a picture, though. As you’ll discover in Chapter 7, a photo whose dimensions are appropriate for a slideshow or photo book (that is, a 4:3 proportion) is inappropriate for ordering prints (4″ x 6″, 8″ x 10″, or whatever). To use the same photo for both purposes, you really need to crop two copies independently.
In this case, the old adding-to-album trick isn’t going to help you. Instead, you truly have to duplicate the file and consume a little more hard drive space behind the scenes. To do this, select the photo, and then choose Photos→Duplicate (or press ⌘-D). iPhoto switches briefly into Import mode, copies the file, and then returns to your previous mode. The copy appears next to the original, bearing the same name plus the words “Version 2.” (If you don’t see the name, choose View→Titles.)
NOTE
If you duplicate a photo in an album, you’ll see the duplicate in the album and in the library. If you duplicate a photo in the library, that’s the only place you’ll see its twin.
Putting Photos in Order
If you plan to turn your album into a slideshow, a calendar, or a printed book, then you’ll have to tinker with the order of the pictures, arranging them in the most logical and compelling sequence. Sure, photos in an Event or a smart album (Deleting an Album) are locked into a strict sort order—either by creation date, rating, or name (title)—but once they’re in a photo album, you can shuffle them manually by dragging. Figure 2-15 shows how.
TIP
Straight from the factory, iPhoto lets you arrange photos inside an album manually. However, if iPhoto seems to be misbehaving, select the album and then choose View→Sort Photos→Manually.
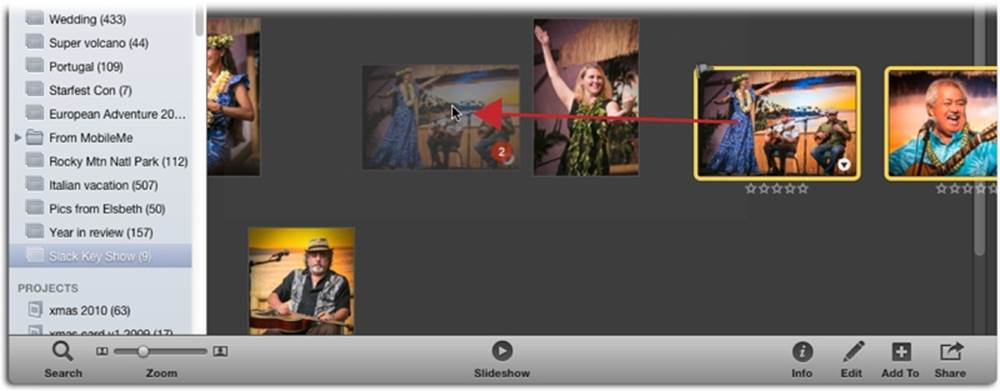
Figure 2-15. Drag to reorder photos within an album. When you do, surrounding photos scoot apart to make room. Here, two photos are being dragged leftward (the red circle indicates the number being moved). Release your mouse button when you’ve got them in the right spot.
Duplicating an Album
It stands to reason that if you have several favorite photos, you might want to use them in more than one iPhoto slideshow, book, or what have you. That’s why it’s often convenient to duplicate an entire album so you can create two different sequences for the photos inside.
Just select an album, and then choose Photos→Duplicate or press ⌘-D. iPhoto does the duplicating in a flash—after all, it’s just copying a bunch of tiny aliases and not chewing up precious hard drive space. Now you’re free to rearrange the order of the photos inside the duplicate album, to add or delete photos, and so on, independently of the original album.
TIP
For quick duplication, you can Control-click an album in the Source list and then choose Duplicate from the shortcut menu.
Merging Albums
Suppose you have three albums containing photos from different trips to the beach, named Spring Break at the Beach, Summer Beach Party, and October Coast Trip. Wouldn’t it make sense to merge them into a single album called Beach Trips?
Unfortunately, there’s no “merge albums” command in iPhoto, though it’s easy to do manually. Start by selecting all three albums in your Source list (⌘-clicking or Shift-clicking each, for example); the photos from each appear in the photo-viewing area. Select all visible thumbnails by pressing ⌘-A, and then press ⌘-N to create a new album.
You now have one big album containing the photos from all three original albums. You can delete the three source albums, if you like, or keep all four hanging around. Remember, albums contain only references to your photos—not the photos themselves—so you’re not wasting space by keeping the extra albums. The only penalty you pay is that you have a longer list of albums to scroll through.
Deleting an Album
To delete an album, just click its icon in your Source list and then press the Delete key. You can also Control-click an album and then choose Delete Album from the shortcut menu. Either way, iPhoto asks you to confirm your intention. If you really want it gone, then click Delete.
Remember, deleting an album doesn’t delete any photos—just the references to those photos. So even if you delete all your albums, your library remains perfectly intact.
Smart Albums
Albums, as you now realize, are a primary organizational tool in iPhoto. But it can take a fair amount of work to get the right images into the right albums yourself, one at a time, using the methods described in the previous section.
But thanks to smart albums, iPhoto can populate albums for you. Smart albums are self-updating folders containing pictures that meet criteria you set up—all pictures with “sunset” as a keyword, for example, or all the photos you’ve rated four stars and higher. (If you’ve ever used smart playlists in iTunes, you’ll recognize the idea immediately.)
TIP
Smart albums can take advantage of Faces and Places tags, too. For example, by using Faces tags, you could quickly create a smart album containing photos of all your kids. Deleting Faces tells you how.
To create a smart album, choose File→New Smart Album or press Option-⌘-N. Whichever method you use, the Smart Album options slide down from the top of the iPhoto window (Figure 2-16).
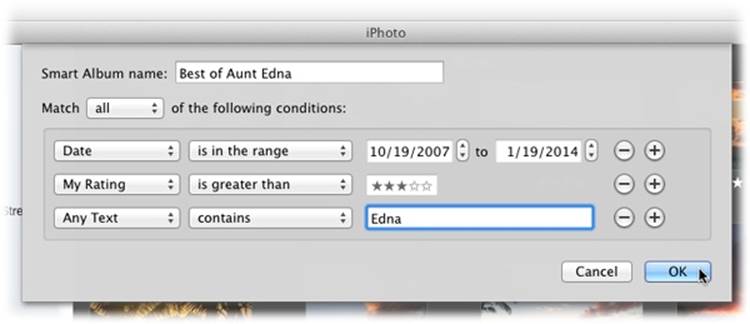
Figure 2-16. This panel is really just a powerful search command that lets you specify your search criteria. For example, with the settings shown here, iPhoto will hunt for highly rated photos taken during a certain time period that also include certain text.
The controls here are designed to set up a search of your entire photo library. Figure 2-16 illustrates how to find pictures that you took from 2007 to 2014, have four- or five-star ratings, and mention Edna in their titles, keywords, or comments.
Click the ![]() button to add a new criterion row and be even more specific about which photos you want iPhoto to include in the smart album. Use the first pop-up menu to choose a type of photo feature (see the following list for details) and the second pop-up menu to tell iPhoto whether you want to match it (“is”), eliminate it (“is not”), and so on. The third part of the criterion row is another pop-up menu or a search field where you finally tell iPhoto what to look for.
button to add a new criterion row and be even more specific about which photos you want iPhoto to include in the smart album. Use the first pop-up menu to choose a type of photo feature (see the following list for details) and the second pop-up menu to tell iPhoto whether you want to match it (“is”), eliminate it (“is not”), and so on. The third part of the criterion row is another pop-up menu or a search field where you finally tell iPhoto what to look for.
Here are your options in the pane’s first menu:
§ You can limit the smart album’s reach by limiting its search to a certain Album. Or, by choosing “is not” from the second pop-up menu, you can eliminate an album from consideration. When you choose this option, all your albums are listed in the third pop-up menu.
TIP
You can also use a smart album to find all the photos that you haven’t put into an album (a great way to rediscover forgotten photos or to find candidates for deletion). To do so, create a new smart album and name it something like “Not in any album.” Then set the pane’s menus to “Album,” “is not,” and “Any.”
§ Any Text searches your library for words or letters that appear in the title, comments, or keywords that you’ve assigned to your photos. If you can’t remember how you spelled a word or whether you put it in the Description or Title field, choose “Any Text,” pick “contains” from the second pop-up menu, and type just the first few letters of the word (“am” for Amsterdam, for example) in the search field. You’re bound to find some windmills now!
§ Description, Filename, Keyword, and Title work the same way, except that they search only that part of the photo’s information. Search for “Keyword” “is” “sunset” (type “sunset” into the text field where the third pop-up menu used to be), for example, to find only those pictures to which you specifically assigned the keyword “sunset,” and not just any old photos where you’ve typed that word somewhere in the comments.
§ Date was once one of iPhoto’s most powerful search criteria. By choosing “is in the range” from the second pop-up menu, you can use it to create an album containing, for example, only the pictures you took on December 24 and 25 of last year, or during that five-day stretch two summers ago when your best friends were in town. These days, however, the Calendar’s date search serves this function much more conveniently (see The Calendar).
§ Event lets you make iPhoto look only in, for example, the last five Events (choose “is in the last” from the second pop-up menu and type 5 in the box). Or, if you’re creating an album of old shots, you can eliminate the latest few Events from consideration by choosing “is not in the last.”
§ If you’ve tagged photos with iPhoto’s Faces or Places info (Chapter 4), then the Face and Place options let you make smart albums based on who’s in the photos or where they were taken.
TIP
Once you dig into Chapter 4 and start tagging people, you can create a smart album on the fly by dragging a Faces snapshot from your corkboard onto an empty spot in your Source list. iPhoto adds a new smart album bearing that person’s name. If you want to add another buddy to the same smart album, just drag his Faces snapshot onto it.
§ The My Rating option really puts the fun into smart albums. Let’s suppose you’ve been dutifully giving your pictures star ratings from one to five, as described on Ratings. It’s payoff time! You can use this option to collect, say, only those with five stars to create a quick slideshow of just the highlights. Another option is to choose “is greater than” two stars for a more inclusive slideshow that leaves out only the real duds.
§ Photo lets you include (or exclude) photos according to whether they’re hidden, flagged, geotagged, or edited. When you choose this option, the third pop-up menu lets you pinpoint raw photos or digital movies. These are fantastically useful options; everyone should have a smart album just for movies, at the very least.
§ Aperture, Camera Model, Flash, Focal Length, ISO, and Shutter Speed are behind-the-scenes data bits that your camera automatically records with each shot, and embeds in the resulting photo file. Thanks to these options, you can use a smart album to round up all your flash photos, all photos taken with an ISO (light sensitivity) setting of 800 or higher, all pictures with a certain shutter speed, and so on. (If you choose Camera Model, the third pop-up menu conveniently lists every camera you’ve ever used to take photos.)
Click the ![]() next to a criterion to take it out of the running. For example, if you decide that date shouldn’t be a factor, delete any criterion row that tells iPhoto to look for certain dates.
next to a criterion to take it out of the running. For example, if you decide that date shouldn’t be a factor, delete any criterion row that tells iPhoto to look for certain dates.
Once you have all the settings just right, click OK, and your smart album is ready for viewing. When you click its name in the Source list (you can tell it’s a smart album because its icon has a little ![]() on it), the main window displays thumbnails of the photos that match your criteria. The best part is that iPhoto keeps this album updated whenever your collection changes—as you change your ratings, take new photos, tag more people, and so on.
on it), the main window displays thumbnails of the photos that match your criteria. The best part is that iPhoto keeps this album updated whenever your collection changes—as you change your ratings, take new photos, tag more people, and so on.
TIP
To change or review a smart album’s parameters, click it in the Source list and then choose File→Edit Smart Album or press ⌘-I to make the Smart Album options reappear. You can also Control-click it in the Source list and choose Edit Smart Album from the shortcut menu. (Because smart albums are self-populating, you can’t change their key photos.)
Folders
Obviously, Apple hit a home run when it invented the album concept. Let’s face it: If there were a Billboard Top Software-Features Hits chart, iPhoto’s albums feature would have been number one for months on end.
Albums may have become too popular, however. It wasn’t long before iPhoto fans discovered that their long list of albums had outgrown the height of their Source lists. As a result, people grew desperate for some way to organize albums within albums.
Apple’s response consisted of one word: folders.
If you choose File→New Folder, iPhoto promptly creates a new, folder-shaped icon in the Source list called “untitled folder” (type a name for it, and then press Return). Its sole purpose in life is to contain other Source list icons—albums, smart albums, saved slideshows, book layouts, and so on.
What’s really nice about folders is that they can contain other folders. That is, iPhoto is capable of more than a two-level hierarchy; you can actually create folders within folders within folders within folders, as shown in Figure 2-17.
Otherwise, folders work exactly like albums. You rename them the same way, drag them up and down the Source list the same way, delete them the same way, and duplicate them the same way.
TIP
If you’ve put something into a folder by accident, no problem; you can easily drag it back out again. Just drag it upward directly onto the Albums heading in the Source list, and then release your mouse button.

Figure 2-17. A folder is a convenient container for other kinds of Source list icons. Once you’ve created a folder, you can drag related albums, saved slideshows, projects, and so on, into it. After that, you can make your Source list tidier by collapsing the folder, thereby hiding its contents. To collapse or expand a folder, click the flippy triangle to its left.
The Info Panel
At the bottom right of your iPhoto window, you’ll find a set of four buttons. The first one, Info, hides or shows the Info panel, which displays general data about a photo, album, Event, or whatever else you’ve selected.
When the Info panel is visible, you may see any number of different displays (Figure 2-18):
§ When a single photo is selected, iPhoto displays that picture’s name, rating, creation time and date, dimensions (in pixels), file size, and camera settings; any description you’ve typed; as well as the photo’s Faces, keywords, or Places tags (if you’ve added any).
If you’ve published the photo to your Facebook, Flickr, or iCloud account, or sent an email from within iPhoto (Emailing Photos), you see that info here, too, in the Sharing section. If someone leaves a comment on a photo, it shows up in the Comments section the next time the photo is synced (which happens automatically when you click an icon in the Shared section of your Source list and then double-click the album containing the photo).
§ When multiple photos are selected, you see the range of their creation dates, plus how many photos are selected, how much disk space they occupy, as well as any Faces, keywords, and Places tags.
§ When no photos are selected, the Info panel displays information about whatever container is selected in the Source list—the current album or Event, for example. You see the name of the container, the range of dates of its photos, the number of photos, and their total file size on your hard drive. You can change an Event or regular album’s key photo here, too: mouse over the container’s thumbnail and click when you see the picture you want to use.
§ When your iCloud, Flickr, or Facebook icon is selected in the Source list (see Chapter 8), you see the number of albums or sets you’ve published, the date range, number of photos, and their total file size.
To close the Info panel, click the Info button again. The panel slides out of sight.
Renaming Photos
Just about everything in iPhoto has its own title: every photo, album, folder, Event, photo book, slideshow, and so on. You can rename most of them by double-clicking the existing name in the Source list.
That said, you can also rename items in the Info panel; simply single-click the first field beneath the camera info (where it says “2013-10 maui-0809” in Figure 2-18), and then type a new name. Done deal.
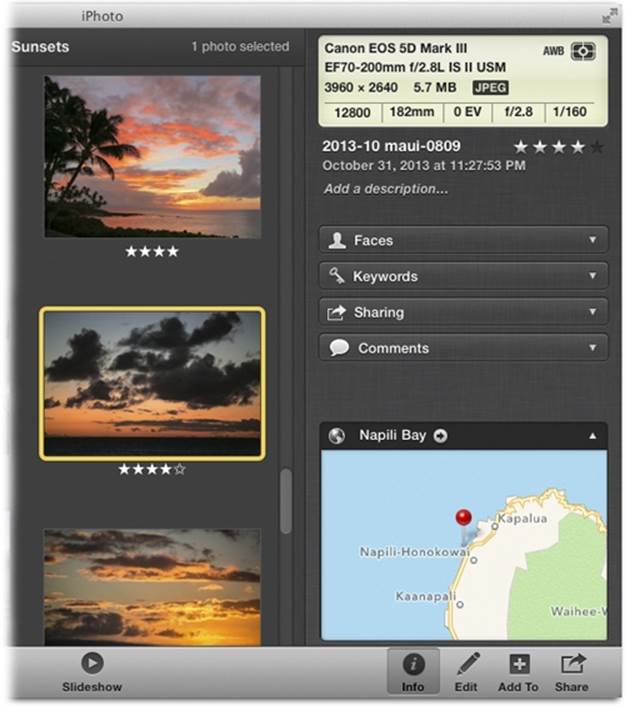
Figure 2-18. When you open the Info panel with a photo selected, you see all manner of details, including the camera info, the photo’s name and date, and its description (if you’ve added one). If you select a photo with Faces, keywords, or Places tags, you see those here, too. If the photo has been published to Facebook, Flickr, iCloud, or emailed using iPhoto, the panel includes a Sharing section (as shown here). Click any section’s name—Faces, Keywords, Sharing, Comments, or Places—to expand or collapse it, though only one section can be expanded at a time. Alas, you’ll find no Info panel when viewing projects or slideshows.
Changing Titles and Dates En Masse
The trouble with naming photos is that hardly anybody takes the time. Yes, the Tab trick described back on Renaming and Redating Photos certainly makes it easier to add a custom name with reasonable speed—but are you really going to sit there and make up individual names for 50,000photos?
Mercifully, iPhoto lets you change the names of several photos at once, thanks to a “batch processing” command. No, each photo won’t have a unique, descriptive name, but at least they can have titles like Spring Break 2 and Spring Break 3 instead of IMG_1345 and IMG_1346.
To use it, select an Event or album—or multiples thereof—and then choose Photos→Batch Change (Shift-⌘-B). The Batch Change pane drops down from the top of the iPhoto window, as shown in Figure 2-19. To create the kind of naming scheme mentioned above, set the first pop-up menu to Title and the second one to Text, enter the name you want to use for the whole batch (“Spring Break,” for example), and then turn on “Append a number to each photo.”
TIP
Don’t be fooled by the command name Batch Change. iPhoto still can’t edit a batch of photos. You can’t, for example, apply the Enhance filter to all of them at once. (Though you can copy and paste edits from one photo to another, as explained in Chapter 5.)
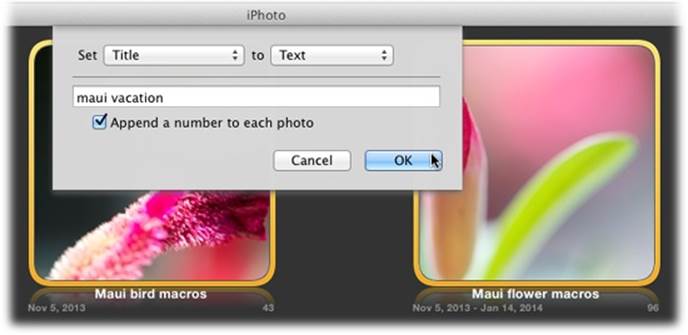
Figure 2-19. iPhoto’s batch-processing feature lets you specify titles, dates, and descriptions for any number of photos you select. When you title a batch of pictures, be sure to turn on “Append a number to each photo” to number them in sequence, too.
When Title is selected in the first Batch Change pop-up menu, peek inside the second pop-up menu for these options:
§ Empty. Set the titles to Empty if you want to un-name the selected photos so they’re all blank. You might appreciate this option when, for example, you’re working on a photo book (Chapter 9) and you’ve opted for titles to appear with each photo, but you really want only a few pictures to appear with names under them.
§ Text. This option produces an empty text box into which you can type, for example, Ski Trip. When you click OK, iPhoto names all of the selected pictures to match. If you turn on the “Append a number to each photo” setting, then iPhoto adds digits after whatever base name you choose—for example, Ski Trip 1, Ski Trip 2, and so on.
§ Event Name. Choose this command to name all the selected photos after the Event they’re part of—“Grand Canyon,” for example. iPhoto automatically adds a hyphen and a number after this base name.
§ Filename. If you’ve been fooling around with naming your photos and now decide that you want their original, camera-given names to return (IMG_1345 and so on), then choose this option.
§ Date/Time. Here’s another approach: Name each photo for the exact time it was taken. The dialog box gives you a wide variety of formatting options: long date, short date, time of day, and so on.
Changing Photo Dates En Masse
You can also use the Batch Change command to rewrite history, resetting the dates of a group of photos all at once.
Choose Date from the first Batch Change pop-up menu and turn on “Add 1 Minute between each photo” to give each one a unique time stamp, which could come in handy later when you’re sorting them. iPhoto changes only its internal time stamps; it doesn’t actually modify the photo files on your hard drive unless you also turn on “Modify original files.”
We trust you won’t use this feature for nefarious ends, such as “proving” to the jury that you were actually in Disney World on the day of the office robbery.
NOTE
Actually, if you just want to fix the date and time stamps on a few photos, or a whole Event, the Photos→“Adjust Date and Time” command is more direct. It opens the “Adjust date and time of selected photos” dialog box, where you can choose a new date and time of the first selected photo. Any other selected photos are adjusted, too, by proportional amounts. For example, if you change the first photo’s time stamp to make it 10 minutes later, then all other selected photos are shifted by 10 minutes. You can see it in action back in Figure 2-9 (Renaming and Redating Photos).
Adding Descriptions
Sometimes you need more than a one- or two-word title to describe the contents of a photo, album, folder, book, slideshow, or Event. If you want to add a lengthier description, you can type it in the Description field in the Info panel, as shown in Figure 2-20.
Even if you don’t write full-blown captions for your pictures, you can use the Description field to store other details associated with your photos.
The best thing about adding a description is that it’s searchable. After you’ve entered all this free-form data, you can use it to quickly locate a photo using iPhoto’s Search command.
TIP
If you speak a non-English language, iPhoto makes your life easier. As you’re typing comments, you can choose Edit→Special Characters. OS X’s Characters panel opens, where you can add international letters like É, ø, and ß. Of course, it’s also ideal for classic phrases like “I ![]() my cat.”
my cat.”
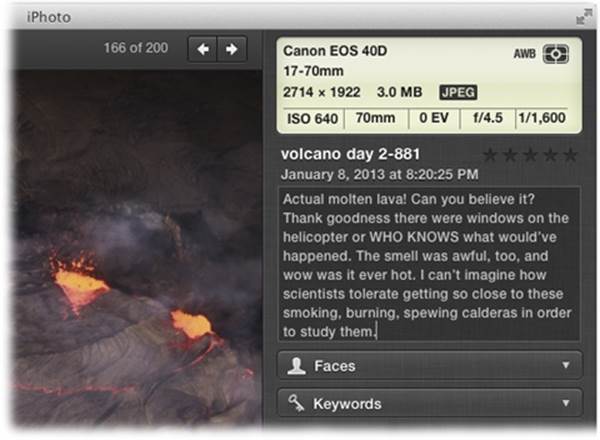
Figure 2-20. Got a picture that’s worth a thousand words? The Description field can handle it, but you’ll need to collapse the other sections in order to see all of it. To add a description, click below the photo’s date, where it says “Add a description,” and then start typing away.
Keep the following in mind as you squirrel away all those bits and scraps of photo information:
§ You don’t have to manually type to enter data into the Description field. You can paste information in using the standard Paste command, or even drag selected text from another program (like Pages) right into the Description box.
§ If no photos, or several photos, are selected, then the notes you type into the Description box get attached to the current album, rather than to pictures.
§ You can add the same comment to a group of photos using iPhoto’s Batch Change command. For example, ⌘-click all the pictures of your soccer team. Next, choose Photos→Batch Change, choose Description from the first pop-up menu, and then type a list of your teammates’ names in the text box. Years later, you’ll have a quick reminder of everyone’s names.
You can just as easily add comments for an album, folder, slideshow icon, book, or Event whose name you’ve highlighted.
TIP
For a real thrill, try using OS X Mavericks’ built-in dictation feature. Visit https://support.apple.com/kb/HT5449 to learn how.
Descriptions as Captions
While the Description field is useful for storing little scraps of background info about your photos, you can also use it to store the captions that you want to appear with your photos. In fact, some of the book layouts included with iPhoto’s book-creation tools (Chapter 9), as well as slideshows (Chapter 6), can use the text in the Description field to generate a caption for each photo.
(On the other hand, you don’t have to use the Description field’s text as captions. You can always add unique captions when you’re editing your photo book.)
Deleting Photos
As every photographer knows—well, every good photographer—not every photo is a keeper. So at some point, you’ll want to take a deep breath and prune your photo collection. Same goes for albums, projects, and so on.
The iPhoto Trash
iPhoto has a private Trash can that works just like the Finder’s Trash. It’s sitting there in the Source list (under the Recent heading, for some reason). When you delete a picture, iPhoto puts it into the Trash “folder,” awaiting permanent disposal via the Empty Trash command. This feature gives you a layer of protection against accidentally deleting a precious picture.
In iPhoto, you can relegate items to the Trash by selecting one or more thumbnails within your library (not in an album, but in All Events or Photos view), and then doing one of the following:
§ Dragging the thumbnails onto the Trash icon in the Source list.
§ Pointing your cursor at a thumbnail and clicking the down-pointing triangle at its bottom right, and then clicking Trash in the shortcut menu.
§ Pressing the Delete key on your keyboard, or choosing Photos→Move to Trash. This maneuver also works when you’re in Edit mode.
TIP
To delete a photo from a smart album, you have to press Option-⌘-Delete instead.
To view the photos that you’ve sentenced to the great shredder in the sky, click the Trash icon in the Source list, as shown in Figure 2-21. If you change your mind, you can always resurrect the photo(s) using these techniques:
§ Select them and then press ⌘-Delete (or choose Photos→“Put Back”). Think of this as the un-Trash command.
§ Drag the thumbnails out of the Trash and onto the Photos icon in the Source list.
§ Control-click the photo or photos and, from the shortcut menu, choose “Restore to Photo Library.”
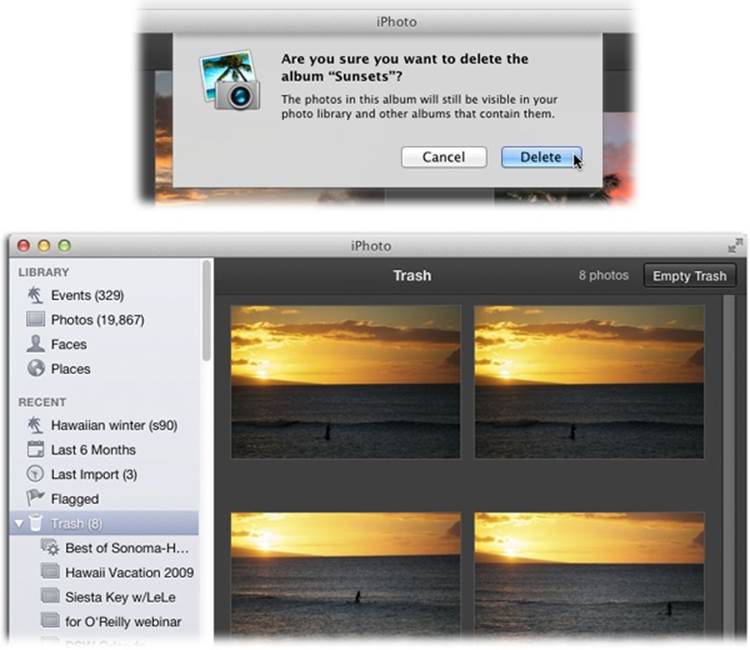
Figure 2-21. Top: When you try to delete a picture, iPhoto asks if you’re sure (though you can bypass the confirmation message by turning on Don’t Ask Again); if you click Delete Photo to confirm that you are, then iPhoto merely plops the file into its Trash folder. However, when you try to delete an album or a project, iPhoto always asks for confirmation, as shown here. Bottom: Clicking the Trash icon in the Source list shows you all the photos awaiting obliteration and displays the total number of files at the top right of the iPhoto window. If you really want to delete them from your hard drive, click Empty Trash.
NOTE
To delete an album, smart album, project, or slideshow, simply select it and then press the Delete key. You won’t see these items in the photo-viewing area when you click the Trash icon in the Source list, but you can see them by clicking the Trash icon’s flippy triangle (see Figure 2-21). To undelete one of these goodies, select it in the list and choose Photos→Put Back (or press ⌘-Delete), or just drag it to another spot in the Source list.
You’ve just rescued them from photo-reject limbo and put them back into your main photo collection.
To permanently delete what’s in the Trash, choose iPhoto→Empty iPhoto Trash, or Control-click the Trash icon to access the Empty Trash command via a shortcut menu. iPhoto then displays a message warning you that emptying the Trash removes these photos permanently and irreversibly.Only when you click OK does your iPhoto library actually shrink in size.
(Of course, if you imported the photos from files on disk or haven’t deleted them from your camera, you can still recover the original files and reimport them.)
Whatever pictures you throw out by emptying the Trash also disappear from any albums you’ve created.
NOTE
If you use iPhoto to track photos that aren’t actually in iPhoto (they remain “out there” in folders on your hard drive), deleting them in iPhoto doesn’t do much. They no longer show up in iPhoto, but they’re still on your hard drive, right where they always were. See Importing Photos from Really Old Cameras for more on this external photo-tracking feature.
Customizing the Shoebox
iPhoto’s Photos view starts out looking just the way you probably see it now, with each picture displayed as a small thumbnail against a dark-gray background. This view makes it easy to browse through photos and work with iPhoto’s various tools.
But, hey, this is your digital shoebox. With a little tweaking and fine-tuning, you can completely customize the way iPhoto displays your photos.
Start with a visit to iPhoto→Preferences→Appearance.
TIP
You can open the iPhoto Preferences window anytime by pressing ⌘-comma. This keystroke is blissfully consistent across most Mac programs.
Changing the View
The controls in the Preferences window’s Appearance panel (Figure 2-22) let you make some pretty significant changes to the overall look of your library.
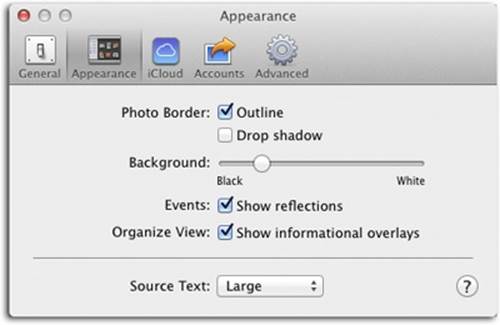
Figure 2-22. You can revert to the look of iPhotos of yore by changing the background color to light gray (it remains dark gray in All Events view), but would you really want to? If you’re tempted, consider that Apple gave iPhoto a dark-gray background for a reason—it’s easier on your eyes and gives you a more accurate sense of color (by eliminating other distracting colors).
Here are your options:
§ Add or remove an outline or a shadow. From the factory, both Photo Border settings are turned on. Outline puts a thin black or white frame around your photos (whichever contrasts best with the screen background).
The “Drop shadow” setting puts a soft black shadow behind each thumbnail in the photo-viewing area, a subtle touch that gives your library an elegant 3D look. As pretty as this effect is, however, there are those who say that on slow Macs, it can bog iPhoto down slightly, as the program has to continually redraw or resize the fancy shadows behind each thumbnail whenever you scroll or zoom. In that case, turning off the drop shadow might grant you slightly faster scrolling.
§ Change the background color. The Background slider lets you adjust the background color of the photo-viewing area. Actually, the term “color” is a bit of an overstatement, since your choices include only white, black, or any shade of gray in between.
§ Show reflections when viewing Events. Turn on the “Show reflections” setting to make the key photos of your Events look like they’re reflecting off a glassy surface. (If your computer starts to lag when you’re scrolling through Events, turn this setting back off.)
§ Show informational overlays. This option is well worth keeping turned on. It makes a big, see-through “heads-up display” appear whenever you use the iPhoto scroll bar to scroll through, well, anything (it does not appear if you’re using gestures or a scroll wheel on your mouse). It shows where you are, chronologically or alphabetically, as you scroll. See Figure 2-23 for an example.
NOTE
The heads-up display doesn’t appear when you’ve chosen Manual sort mode for an album (though honestly, how could it?).
§ Source Text. Use this pop-up menu to control the size of the text in your Source list. Your choices are Large and Small.
Showing/Hiding Titles, Ratings, and Keywords
If you want your thumbnails to appear with their titles, ratings, and keywords, or all three, then choose View→Titles (Shift-⌘-T), View→Ratings (Shift-⌘-R), or View→Keywords (Shift-⌘-K). Titles, ratings, and keywords appear under each thumbnail. (See Chapter 3 for more on keywords.) To show or hide Event titles, choose View→Event Titles or press Shift-⌘-F.
As with most of iPhoto, your formatting options are limited. You can’t control the font, style, color, or size of this text. Your only choice is to display the titles, ratings, and keywords or keep them hidden.
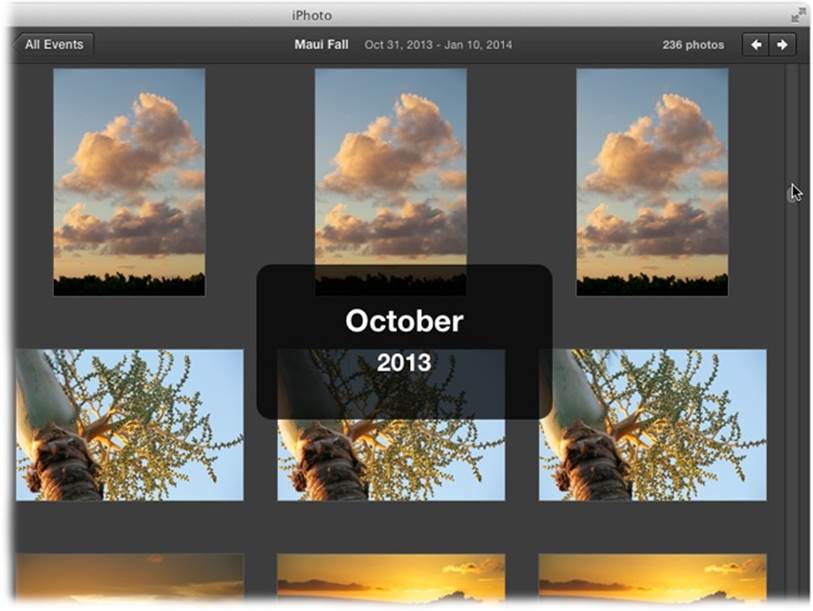
Figure 2-23. As you drag the vertical scroll bar, this heads-up display shows where you are in the collection. What you see here depends on the current sorting method. For example, if you’ve sorted by name, you see letters of the alphabet as you scroll. If you’ve sorted by rating, you see stars that indicate where you are in your scroll through the ratings.