iPhoto: The Missing Manual, 1st Edition (2014)
Part 2. Editing and Sharing
Chapter 7. Making Prints
There’s a lot to love about digital photos that remain digital. You can store thousands of them on a single DVD; you can send them anywhere on earth by email; and they won’t wrinkle, curl, or yellow until your monitor does.
Sooner or later, though, most people want to get at least some of their photos on paper. You may want printouts to paste into your scrapbooks, to put in picture frames on the mantel, to use in homemade greeting cards, or to share with your Luddite friends who don’t use computers.
With iPhoto, you can create such prints using your own printer. Or, for prints that look, feel, and smell like the kind you get from a photo-finishing store, you can transmit your digital files to Kodak Print Services, an online photo-processing lab. In return, you receive an envelope of professionally printed photos on Kodak paper that are indistinguishable from their traditional counterparts.
This chapter explains how to use each of iPhoto’s printing options, including the features that let you print greeting cards, contact sheets, and other special items from your digital photo collection. (Ordering greeting cards, postcards, calendars, and books is covered in Chapter 9.)
Making Your Own Prints
Using iPhoto to print your pictures is pretty easy. But making great prints—the kind that rival traditional film-based photos in their color and image quality—involves more than simply choosing the Print command.
One key factor, of course, is the printer itself. You need a good printer that can produce photo-quality color printouts. Fortunately, getting such a printer these days is pretty easy and inexpensive. Even some of the cheapo inkjet printers from Epson, HP, and Canon can produce amazingly good color images—and they cost less than $100. (Of course, what you spend on those expensive ink cartridges can easily double or triple the cost of the printer in a year.)
TIP
If you’re really serious about producing photographically realistic printouts, consider buying a model that’s specifically designed for photo printing, such as one of the printers in the Epson Stylus Photo series or the slightly more expensive Canon printers. What you’re looking for is a printer that uses six, seven, or eight different colors of ink instead of the usual “inkjet four.” The extra colors do wonders for the printer’s ability to reproduce a wide range of colors on paper.
Even with the best printer, however, you can end up with disappointing results if you fail to consider at least three other important factors when trying to coax the best possible printouts from your digital photos: the resolution of your pictures, your printer settings, and your choice of paper.
Resolution and Shape
Resolution is the number of individual pixels squeezed into each inch of your digital photo, and therefore how large the individual pixels are in size. The basic rule is simple: The higher your photo’s resolution, or ppi (pixels per inch), the smaller the pixels become, and the sharper, clearer, and more detailed the printout will be. If the resolution is too low, the pixels will be large enough to see individually, so you’ll end up with a printout that looks like it was made from Legos.
Low-resolution photos are responsible for more wasted printer ink and crumpled photo paper than any other printing snafu, so it pays to understand how to calculate a photo’s ppi when you want to print it.
Calculating Resolution
To calculate a photo’s resolution, divide the horizontal or vertical size of the photo (measured in pixels) by the horizontal or vertical size of the print you want to make (usually measured in inches).
Suppose a photo measures 1524 x 1016 pixels. (How do you know? See Figure 7-1.) If you want a 4 x 6-inch print, take the longest edge in pixels and divide it by the longest edge of the desired print size in inches: 1524 pixels divided by 6 inches = 254 ppi. That means you’ll be printing at a resolution of 254 ppi, which will look fantastic on paper. (Photos printed on inkjet printers look their best when printed at a resolution of 200 ppi or higher.)
But if you try to print that same photo at 8 x 10 inches, you’ll get into trouble. By stretching those pixels across a larger print area, you’re now printing at just 152 ppi—and you’ll see a noticeable drop in image quality.
While it’s important to print photos at a resolution of 200 to 300 ppi on an inkjet printer, there’s really no benefit to printing at higher resolutions—600 dpi, 800 ppi, or more. It doesn’t hurt to print at a higher resolution, but you probably won’t notice any difference in the printed photos, at least not on inkjet printers (though it’ll take longer for your printer to get the job done). That said, some inkjets can spray ink at finer resolutions—720 ppi, 1440 ppi, and so on—and using these settings produces very smooth, fine printouts.
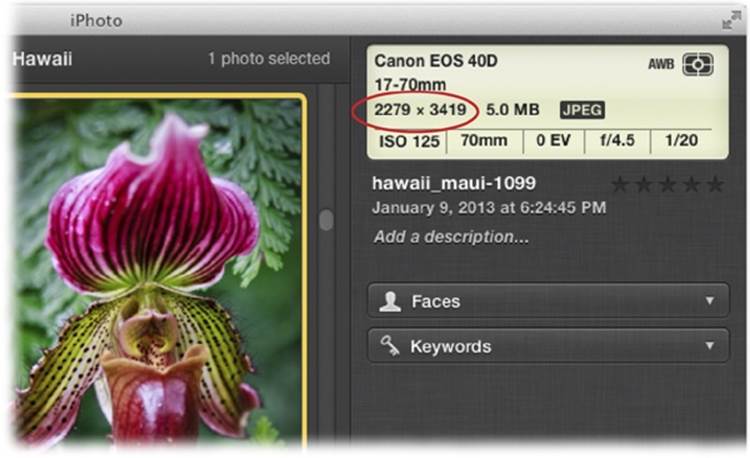
Figure 7-1. To select the best size for a printout, you need to know the photo’s pixel dimensions. iPhoto reveals this information in a convenient spot: at the top of the Info panel (circled) whenever you select a single thumbnail in the photo-viewing area (obviously, you have to open the Info panel to see it!).
Aspect Ratio
You also have to think about your pictures’ aspect ratios—their proportions. Most digital cameras produce photos with 4:3 proportions, which don’t fit neatly onto standard photo paper (4 x 6 and so on). You can read more about this problem on Cropping. (Just to make sure you’re completely confused, some sizes of photo paper are measured height by width, whereas digital photos are measured width by height.)
If you’re printing photos on letter-size paper, the printed images won’t have standard Kodak dimensions. (They’ll be, for example, 4 x 5.3 inches.) You may not particularly care. But if you’re printing onto, say, precut 4 x 6-inch photo paper (which you choose in the Print pane, explained next), you can avoid ugly white bands at the sides by first cropping your photos to standard print sizes.
Tweaking the Printer Settings
Just about every inkjet printer on earth comes with software that adjusts various print quality settings. You can find the controls for these settings right in the Print pane that appears when you choose File→Print. Printing in iPhoto has been greatly simplified, and you don’t have to fiddle and fuss with additional menus or panels. This version of the program knows that if you’re printing in iPhoto, you’re going to be making a photographic print, and it gives you precious few yet extremely practical options (see Figure 7-2).
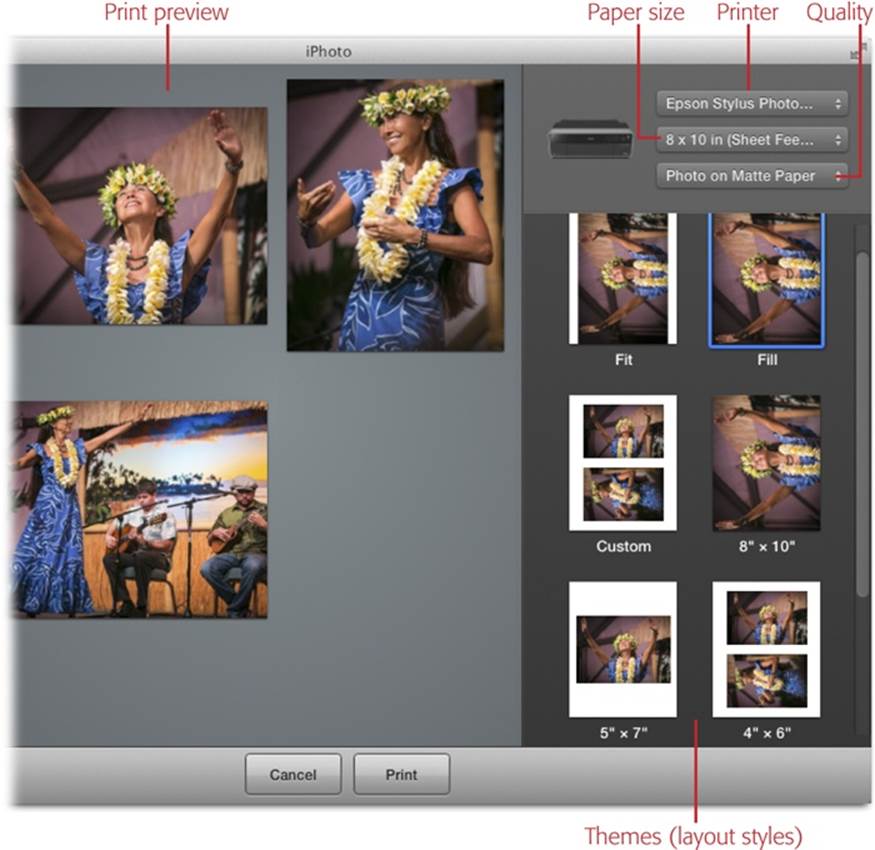
Figure 7-2. Apple recently (and mercifully) simplified iPhoto’s Print pane. Mission-critical printer settings are perched at the top right in three handy pop-up menus. Previous versions offered a multitude of layout styles (called themes), including “mat” frames that you could print right onto the paper. Due to the simpler process, most of those fancy options are now extinct. Instead, you get the option to fit or fill the photo to the page, some common size options, and the ability to print photo thumbnails as a contact sheet (page 178). The preview area shows you exactly what—and how many pages—iPhoto will print.
Before you print, get these settings right. Using the pop-up menus at the top right of the Print pane, check that you’ve got the correct printer selected from the first one and that you’ve picked the appropriate paper size from the second one. Use the third pop-up menu to choose between matte and glossy papers at normal or high quality (fine), and then make sure you load the printer with the paper you’ve specified here.
Choose the wrong settings, and you’ll waste a lot of ink and paper. Even a top-of-the-line Epson photo printer churns out awful photo prints if you feed it plain paper when it’s expecting high-quality glossy stock; you’ll end up with a smudgy, soggy mess. So each time you print, make sure you’ve selected the right printer, paper, and quality settings.
Paper Matters
When it comes to inkjet printing, paper is critical. Regular typing paper—the stuff you’d feed through a laser printer or copier—is too thin and absorbent to handle the amount of ink that gets sprayed on when you print a photo. You may end up with flat colors, slightly fuzzy images, and paper that’s rippled and buckling from all the ink. For really good prints, you need paper designed expressly for inkjets.
Most printers accommodate at least five grades of paper:
§ Plain paper. The kind used in most photocopiers.
§ High-resolution paper. A slightly heavier inkjet paper—not glossy, but with a silky-smooth white finish on one side.
§ Glossy photo paper. A stiff, glossy paper resembling the paper that developed photos are printed on.
§ Matte photo paper. A stiff, non-glossy stock.
§ Most companies also offer an even more expensive glossy film, made of polyethylene rather than paper (which feels even more like traditional photographic paper).
These better photo papers cost much more than plain paper, of course. Glossy photo paper, for example, might run $25 for a box of 50 sheets, which means you’ll be spending about 50 cents per 8 x 10-inch print—not including ink. Still, by using good photo paper, you’ll get much sharper printouts, more vivid colors, and results that look and feel like professional prints.
TIP
To save money, use your printer’s Printing Utility to print its test page (usually a series of colored lines) on plain paper before printing any photos (this utility is typically found in your Applications folder). If the test print indicates a problem with ink or the print heads, you’ll know it before you feed the expensive photo paper through your printer.
Printing from iPhoto, Step by Step
Here’s the sequence for printing in iPhoto:
Phase 1: Choose Photos to Print
Select the thumbnails of the ones you want, using the techniques described on Selecting Photos.
You can also print a photo right from Edit view; the Print command is accessible in all of iPhoto’s views.
When you’re ready, choose File→Print, or press ⌘-P. The wonderfully simplistic, everything-you-need Print pane shown in Figure 7-2 appears.
Phase 2: Choose Your Printer, Paper Size, and Quality
At the top right of the Print pane, specify which printer you’ll use, what paper size you’re putting into the printer, and what kind and quality of paper it is. (See Figure 7-2 for a refresher on how to do this.)
Most of the time, if you have a standard photo inkjet printer, the paper size you pick and the theme size (discussed next) will be one and the same. You’ll want 4 x 6-inch prints on 4 x 6-inch paper, for example. But as noted in Figure 7-3, if the paper size is larger than the print size, you might be able to get more than one print per sheet.
TIP
If you want to create a print that extends to the paper’s edges, be sure to pick a paper size that includes the word “Borderless.” That lets your printer know it’s OK to print to the edges of the paper, if it’s capable of edge-to-edge printing (if it isn’t, you won’t see any Borderless options in the paper-size menu). For example, instead of choosing Letter Size, pick 8 x 10 Borderless.
Phase 3: Choose a Printing Style (Theme)
iPhoto has become a lean, mean printing machine, so these days there are precious few themes to choose from (gone are the themes of earlier versions that included colored borders or captions). Here are your options:
§ Fit. Choose this theme to fit your photo to the paper size you picked. iPhoto doesn’t enlarge your print when you use this option, so you’ll get a white margin that you might need to trim away with an X-Acto knife.
§ Fill. This option makes your photo fill the entire page. If you’ve picked a paper size that includes the word “Borderless,” this theme will print your photo all the way to the paper’s edge (provided your printer has the ability to print to the edges, and these days most of them do). Depending on the paper size you picked from the pop-up menu labeled in Figure 7-2—say, “8 x 10 borderless (auto expand)” vs. “8 x 10 borderless (retain size)”—this option may enlarge the photo so it actually reaches the paper’s edges, causing it to be cropped in unexpected ways.
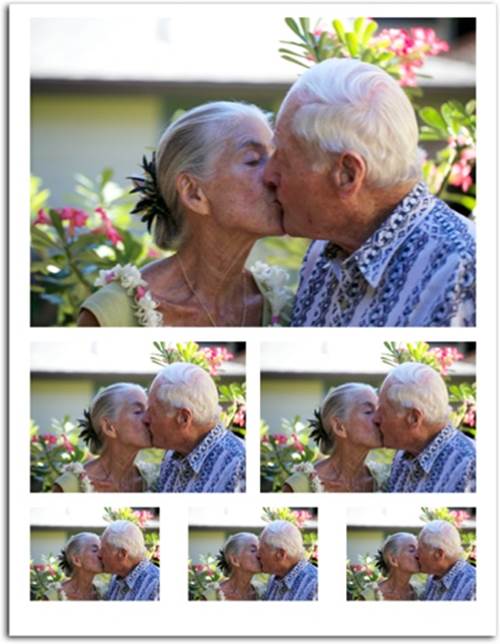
§ Custom. Want to print at a size that’s not listed in iPhoto’s theme presets or squeeze more photos onto the page? No problem. Pick this theme and you can enter any size you want, as Figure 7-3 shows.
§ 8 x 10, 5 x 7, 4 x 6. These themes print single or multiple photos at these common print sizes—as many as iPhoto can squeeze onto the paper size you picked (assuming you selected more than one photo before opening the Print pane).
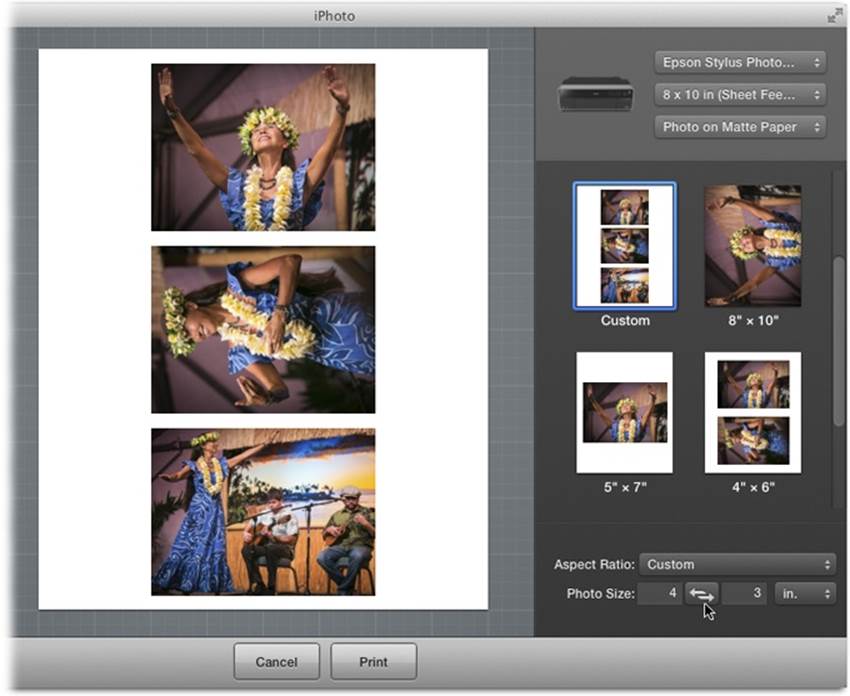
Figure 7-3. By choosing the Custom theme, you can change the aspect ratio and print size to anything you want. Here, the print size is 4 x 3-inches, which means iPhoto can fit three photos onto a single 8 x 10-inch piece of paper (three thumbnails were selected prior to summoning the Print pane). To flip-flop the measurements you entered—say, to print a 3 x 4 instead of 4 x 3—click the button between the numeric fields.
§ Contact Sheet. This means thumbnails—many of them—on each printed sheet (Figure 7-4). You control how many rows and columns appear and what information appears beneath each thumbnail (date, name, camera model, shutter speed, and so on). This theme prints out a grid of photos, tiling as many as 180 pictures onto a single letter-size page (eight columns of 14 rows, for example).
By printing several pictures side by side on the same page, you can easily make quality comparisons among them without using several sheets of paper (handy for showing friends or family so they can decide which shots they want you to print).
You can also use contact sheets to make test prints, saving ink and paper. Sometimes a 2 x 3 print is all you need to determine if a picture is too dark or if its colors are wildly off when rendered by an inkjet printer. Don’t make expensive full-page prints until you’re sure you’ve adjusted your photo and print settings so they’ll print correctly.
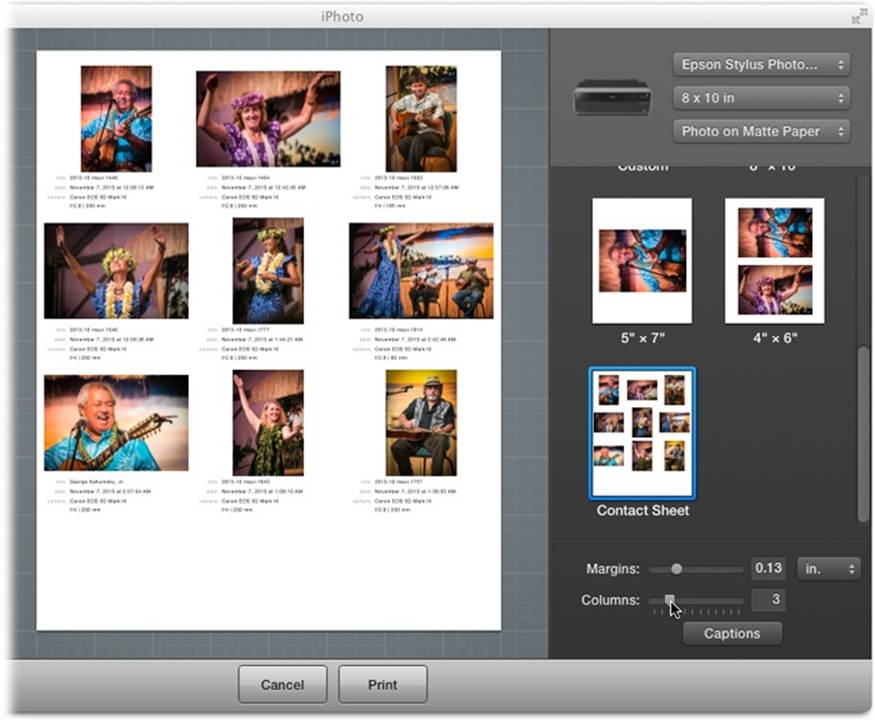
Figure 7-4. When you choose Contact Sheet, iPhoto lets you specify the margins (space) between the photos (which can affect photo size), as well as the number of columns. Using the slider at the bottom of the Print pane, you can choose from 1 to 12 columns, which also affects the size at which the thumbnails will print. Click Captions to instruct iPhoto what info to print beneath each thumbnail. You can choose from things like the photo’s title, the date it was taken, the camera type, as well as the aperture setting. (The Captions dialog box is shown in Figure 7-5.)
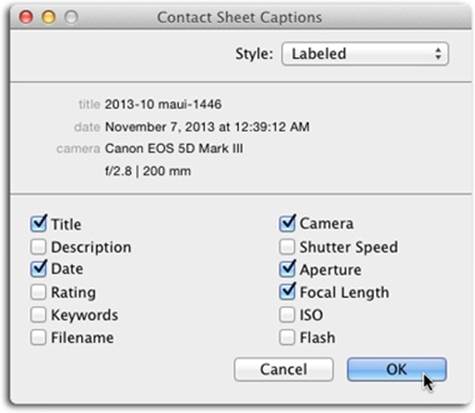
Figure 7-5. When you click the Captions button shown in Figure 7-4, iPhoto opens this dialog box. Use the pop-up menu to pick a formatting style for the captions beneath each thumbnail. Your choices are Basic (standard, left-aligned info), Labeled (shown here, where each piece of info gets a light-gray title), and Condensed (info is centered). For the most professional look, go with Labeled. You see a preview of what the info will look like in the middle of the dialog box. Use the checkboxes to tell iPhoto which pieces of info to display.
Click the theme you want on the right side of the Print pane to see what the print will look like in the print preview area labeled back in Figure 7-2. iPhoto will print as many pages as necessary to accommodate the number of pictures you selected, at the paper size and theme size you’ve picked. How many pages is that? Just count the number of pages you see in the print preview area.
TIP
Until you either print or click Cancel, a new Printing item appears in your Source list (it’s visible in Figure 7-6). While you’re preparing your printout, you can click other Source list items and do other iPhoto work. You can return to your printout-in-waiting anytime by clicking that Printing item.
You can also add new photos to the printout by dragging their thumbnails from Events or albums onto the Printing item in your Source list.
Phase 5: Print
When the print preview looks good, click Print in iPhoto’s toolbar. Only now do you see the more standard Print dialog box shown in Figure 7-6.
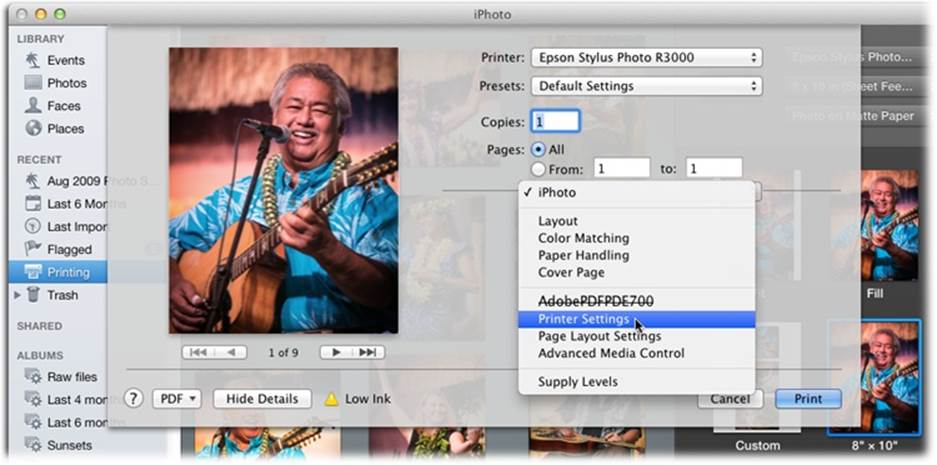
Figure 7-6. Click Show Details to expand this dialog box and, from the pop-up menu shown here, choose Printer Settings (or the similarly worded option) to view settings for to your printer. Doing so lets you pick fancy paper (if your printer can use it) and control resolution, print speed, and more.
NOTE
On the left side of Figure 7-6, you can see the temporary Printing item in the Source list. It stays perched there until you click either the Cancel or the Print button in the Print dialog box (or iPhoto’s toolbar).
This is where you can specify how many copies and exactly which pages you want to print. Typically you’ll print all of them, though if you change your mind about printing a certain one, you can always skip it (for example, to print the first three pages, enter 1 and 3 in the From and To fields, respectively). This kind of thing is handy for testing how well an 8 x 10 is going to turn out before committing to printing all of them.
Finally, click Print (or press Return); your printer scurries into action, printing the photos as you’ve requested.
TIP
The PDF button, a standard part of all OS X Print dialog boxes, lets you save a printout-in-waiting as a PDF file instead of printing it on paper. You can convert any kind of iPhoto printout to PDF (technically they become JPEGs in a PDF wrapper). Click the button, choose “Save as PDF” from the pop-up menu, name the PDF in the Save dialog box, and then click Save. (Saving the file can take a while if you’re converting several pages of photos into a single PDF.)
Ordering Prints Online
If you don’t have a high-quality color printer, or if the thought of wrestling with it makes you cringe, traditional prints of your digital photos are only a few clicks away—if you have an Internet connection and you’re willing to spend a little money, that is.
GEM IN THE ROUGH: PORTRAITS & PRINTS
While iPhoto’s themes offer some practical print layouts, they don’t offer much flexibility. You can’t specify that you want multiple sizes of the same photo per sheet, for example, like the print packages you used to get in grade school.
Fortunately, a free companion program called Portraits & Prints nicely compensates for iPhoto’s printing weaknesses (it’s not an iPhoto plug-in; it’s a completely separate program that can tap into your iPhoto library). As of this writing, you can download it from www.tinyurl.com/portraits-prints.
The idea is that you drag selected photos directly out of the iPhoto window and into the Portraits & Prints window (or click the Add iPhotos button to tunnel into your iPhoto albums). There, you can boost or reduce color intensity, sharpen, crop, rotate, add brightness, and remove red-eye. (If you designate Portraits & Prints as your preferred external editing program [Beyond iPhoto], then changes you make in Portraits & Prints will be reflected in iPhoto’s thumbnails.)
But all that is just an appetizer for the main dish: a delicious variety of printing templates, like the one shown here. The program comes with several “portrait sets” that let you arrange different pictures at different sizes on the same sheet. You can even save your layouts as catalogs, so you can reuse them or reprint them at a later date.
Thanks to a deal between Apple and Kodak, you can order prints from within iPhoto. After you select the size and quantity of the pictures you want printed, one click is all it takes to have iPhoto transmit your photos to Kodak Print Services and bill your credit card for the order. The rates range from 12 cents for a single 4 x 6-inch print to about $18 for a 20 x 30-inch poster. Within a couple of days, Kodak sends you finished photos printed on high-quality glossy photo paper.
Here’s how the print-buying process works:
1. Select the photos you want to print.
Click an album to order prints of everything in it, or select specific photos.
TIP
If you plan to order prints, first crop your photos to the proper proportions (4 x 6, for example) using the Crop tool, as described in Chapter 5. Most digital cameras produce photos whose shape doesn’t quite match standard photo-paper dimensions. So, if you send photos to Kodak uncropped, you’re leaving it up to Kodak to decide which parts of your pictures to lop off to make them fit. (More than one photographer has opened an envelope from Kodak to find loved ones missing the tops of their skulls.) By cropping the pictures to photo-paper shape before you place the order, you decide which parts get eliminated. (You can always restore the photos to their original, uncropped versions using iPhoto’s “Revert to Original” command.)
2. Choose File→Order Prints or click Share in the toolbar and choose Order Prints (see Figure 7-7).
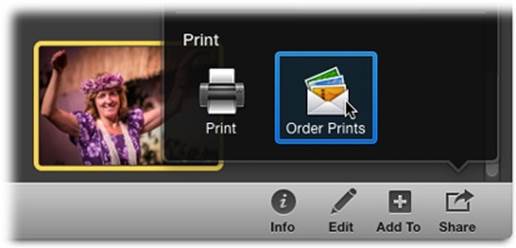
Figure 7-7. Ordering prints through iPhoto is incredibly easy and, in some cases, is far less of a hassle than printing them yourself. It all starts by selecting photos, and then clicking Share→Order Prints.
Your Mac goes online to check in with the Kodak processing center, and the Order Prints window shown in Figure 7-8 opens. (If your computer isn’t online, then the Order Prints window doesn’t open.)
3. Select the sizes and quantities you want.
If you want a certain size print of every photo (say, 4 x 6-inch), just use the Quick Order pop-up menu at the top right of the window. Pick a size and then use the up and down arrows to the right of the menu to choose your quantity.
For more control over sizes and quantities, scroll down the list and fill in the numbers individually for each photo (press the Tab key on your keyboard to move from one field to the next). The total cost of your order is updated as you alter quantities.
As you order, heed the alert icons (little yellow triangles) that may appear on certain lines of the order form (visible in Figure 7-8). These are iPhoto’s standard warning symbols, declaring that certain photos don’t have a high enough resolution to be printed at the specified sizes. A photo that looks great at 5 x 7 inches may look terrible as a 16 x 20-inch enlargement. Unless you’re the kind of person who thrives on disappointment, never order prints in a size that’s been flagged with a low-resolution alert. (See the box on How Low Is Too Low? for more about these warnings.)
TIP
You’ll see the same warning icon when you print your own photos and order photo books, cards, or calendars (Chapter 9). As always, you have few attractive choices: You can order a smaller print, not order a print at all, or accept the lower quality and order the print anyway.
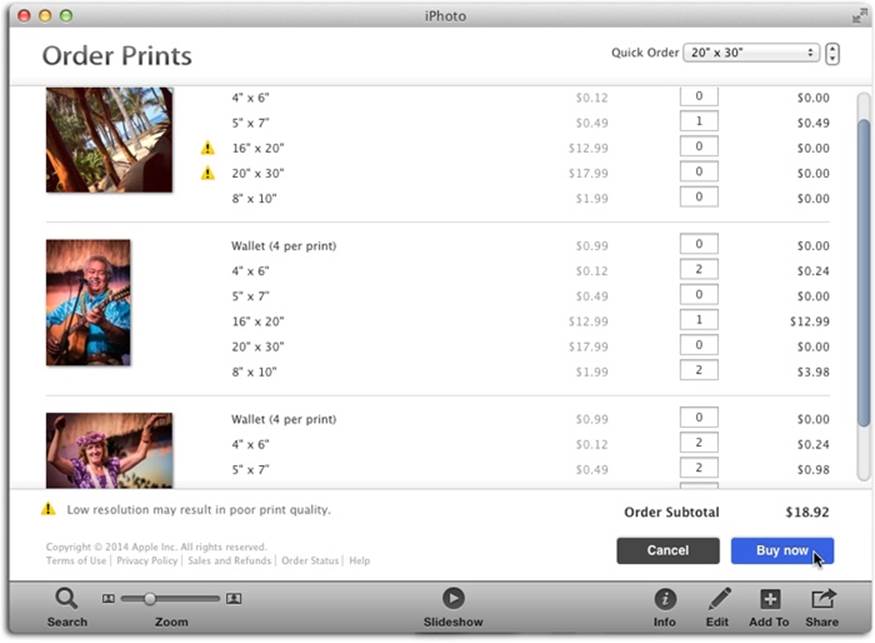
Figure 7-8. The Order Prints window lets you order six different types of prints of your photos—from a set of four wallet-sized prints to mammoth 20 x 30-inch posters. Use the scroll bar on the right to skim through all the photos you’ve selected and specify how many copies of each one you want to order. Note the yellow alert triangles next to certain print sizes. iPhoto is telling you that the photo you’re ordering is too low resolution for the size in question.
4. Click the “Buy now” button.
Another screen appears, listing the total for your order and various shipping methods.
5. Click Check Out and, if necessary, sign in with your Apple ID, or create a new one.
If you already have an account to buy music and movies at the iTunes Store, then you don’t need to set up a new Apple ID to buy photo prints. If you’re not already signed in, you may need to enter your user name and password here; Apple will happily bill the same credit card.
If you’ve never ordered anything from Apple, click “Create Apple ID now” to visit a series of screens where you surrender your identity and credit card info. You’ll also see the option to turn on the “1-Click Ordering system,” which is mandatory if you want to order prints. (All of this is a one-time task designed to save you time when you place subsequent orders.) For details on the process, see Your Apple ID. When the Summary screen finally appears, click Done to return to the Order Prints window.
Either way, your photos are transferred, your credit card is billed, and you go sit by the mailbox.
A batch of 24 standard 4 x 6-inch snapshots costs about $3, plus shipping, which is probably less than what you’d pay to print them at home or at the local drugstore. (You also don’t have to pay for the gas to fetch more photo paper, ink, or visit the drugstore, nor do you have to deal with the hassles of traffic and parking.)
Better yet, you get to print only the prints you actually want, which is far more convenient than the drugstore method, and it’s a handy way to send top-notch photo prints directly to friends and relatives who don’t have computers. Furthermore, it’s ideal for creating high-quality enlargements that would be impossible to print on the typical inkjet printer.
NOTE
If you want to use someone other than Apple for printing your photos—say, your local camera store or the online lab www.mpix.com—you’ll need to export your photos as JPEGs first. See Exporting and Converting Pictures for details.
UP TO SPEED: HOW LOW IS TOO LOW?
When you order photos online, the Order Prints form automatically warns you when a selected photo has a resolution that’s too low to result in a good-quality print. But just what does Kodak consider too low?
Here are Kodak’s official resolution recommendations:
|
TO ORDER THIS SIZE PICTURE: |
YOUR PHOTO SHOULD BE AT LEAST: |
|
Wallet-sized |
640 x 480 pixels |
|
4 x 5 inches |
768 x 512 pixels |
|
5 x 7 inches |
1152 x 768 pixels |
|
8 x 10 inches |
1536 x 1024 pixels |
These are minimum requirements, not suggested settings. Your photos will look better in print if you exceed these resolution settings.
For example, a 1536 x 1024 pixel photo printed at 8 x 10 inches meets Kodak’s minimum recommendation but has an effective resolution of 153 ppi (or 128 ppi once it’s cropped)—a relatively low resolution for high-quality printing. A photo measuring 2200 x 1760 pixels, printed at the same size, would have a resolution of 220 ppi—and look much better on paper, with sharper detail and subtler variations in color.
All materials on the site are licensed Creative Commons Attribution-Sharealike 3.0 Unported CC BY-SA 3.0 & GNU Free Documentation License (GFDL)
If you are the copyright holder of any material contained on our site and intend to remove it, please contact our site administrator for approval.
© 2016-2026 All site design rights belong to S.Y.A.