iPhoto: The Missing Manual, 1st Edition (2014)
Part 2. Editing and Sharing
Chapter 6. iPhoto Slideshows
iPhoto’s slideshow feature offers one of the world’s best ways to show off your digital photos (and videos, for that matter). Slideshows are incredibly easy to set up, they’re free, and they make your photos look fantastic.
In the current version of iPhoto, you’ll find six slideshow themes that include flying, animated visual effects, and one that uses Places tags (Chapter 4) to make your photos emerge from different spots on a spinning globe. Several themes come with their own soundtracks, so the animations and music match, while others merely feature semi-recognizable tunes. And all the themes also take advantage of iPhoto’s face-recognition smarts—they try to center your subjects’ faces onscreen during the slideshow.
NOTE
You can also send your slideshows over to iTunes in order to sync them with your iPhone or iPad. Skip ahead to Using iTunes File Sharing to learn how.
This chapter details not only how to put together an iPhoto slideshow, but also how to create presentations that make you and your photos look their absolute best.
NOTE
In the past, instead of running a slideshow directly from iPhoto, you could send it—music and all—from iPhoto to iDVD, Apple’s DVD-authoring program. But Apple has discontinued iDVD; you can’t get it anymore. If you happen to still have a copy, you can download the PDF “iDVD Slideshows” from this book’s Missing CD page at www.missingmanuals.com/cds.
About Slideshows
When you run an iPhoto slideshow, your Mac presents the pictures in Full Screen view—no windows, no menus, no borders—with your images filling every inch of your monitor. Professional transitions take you from one picture to the next, producing a smooth, cinematic effect. If you want, you can change or turn off the music that accompanies the presentation (each theme comes with its own soundtrack). The overall effect is incredibly polished, yet creating a slideshow requires very little setup.
NOTE
If you’re lucky enough to have more than one monitor—or if you’ve got a laptop plugged into an external monitor or a TV—the slideshow plays on the monitor containing the iPhoto window. The other monitor displays solid black. To create a slideshow that uses both screens, you’ll need to use a screensaver instead (Building a Custom Screensaver tells you how).
Start by picking the pictures you want to include—by selecting an album or an Event, for example. You can also make slideshows based on a particular person on your Faces corkboard or a location in Places (both features are covered in Chapter 4). Once you’ve done that, you can kick off a slideshow in two different ways:
§ Instant. Click the Slideshow button in the middle of the iPhoto toolbar. Your screen goes black and the Themes panel appears, asking you to pick a visual animation style for your slideshow, as described in the next section. Click a theme’s thumbnail to choose it. If you’re feeling feisty, you can also change the music and other settings using the tabs at the top of the panel. But if you just want to see the show, click Play.
In Faces view, you can kick off an instant slideshow by Control-clicking a Faces album and choosing Play Slideshow from the shortcut menu.
§ Saved. In the early days of iPhoto, each album had its own slideshow settings. The album was, in essence, the container for the slideshow.
That was a convenient approach, but not the most flexible. For example, it meant that if you wanted a slideshow that displayed only half the pictures in an album, then you had to make a new album just for that purpose. It also meant that you couldn’t create different slideshow versions of the same album’s worth of photos—a 2-seconds-per-shot version for neighbors, for example, and a 10-seconds-per-shot version for adoring grandparents.
These days, iPhoto offers saved slideshows, which appear in the Source list and are independent of any album. They work a lot like an album in many ways. For example, the photos inside are only “pointers” to the real photos in your library, and you can drag them into any order you like. On the other hand, unlike an album, a saved slideshow contains special advanced controls for building a shockingly sophisticated slideshow.
This chapter covers both techniques.
Slideshow Themes
One of iPhoto’s most fun features is themed slideshows, and Apple frequently adds new ones. Peppered with fancy graphics and animation, these visual presentation styles spice up your slideshows with a minimum of effort on your part.
As shown in Figure 6-1, the first thing iPhoto wants you to do when you play an instant slideshow is to pick a theme from the Themes panel. Your choices include these:
§ Ken Burns. If you like that slow pan-and-zoom approach that made the documentary filmmaker famous, you can use it yourself. There’s more on the man and his technique in the box on The Ken Burns Effect.
§ Origami. This theme displays your photos by folding them open into a variety of different sized squares and rectangles. This effect made its debut on the iPad, but is even better here in iPhoto because any faces the program detects are centered within each shape instead of being clumsily cropped.
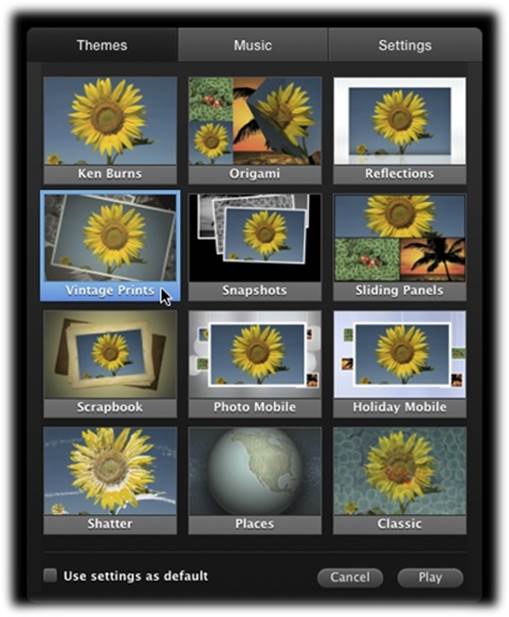
Figure 6-1. Click the Slideshow button on the iPhoto toolbar, and you see this panel, where you can pick a theme for your show. To preview a theme, simply point your cursor at its thumbnail. Click a theme’s thumbnail to select it, and then click Play to see your photos, accompanied by iPhoto’s default music. You can also click the Music and Settings tabs in the panel to tinker with the options before the first slide even plays.
§ Reflections. This one pairs the Ken Burns zoom effect with photos (or groups of photos) on a white background. Look closely and you’ll see a pretty little reflection near the bottom of your screen.
§ Vintage Prints. One of the most beautiful and artistic themes in the bunch, this one displays your photos as if they were the white-bordered prints of yesteryear, and puts them in a big messy stack that fills your screen. The photo on top appears in color, and the rest are black and white. The stacks then zoom in and rotate, à la Ken Burns.
§ Snapshots. This theme also puts white borders around your photos, and slides the old-style photos into the center of the screen, as if they were stacked semi-neatly on your coffee table. As the next photo arrives, it appears to land on top of the previous few shots, which fade to black-and-white in the background.
§ Sliding Panels. Another motion-filled theme, Sliding Panels lives up to its name by slipping your photos onto the screen from several directions. It also displays multiple pictures at once, sort of like the typical layout in a celebrity magazine. It’s trendy.
§ Scrapbook. In this theme, your photos are cleverly displayed in the textured pages and frames of an old-fashioned scrapbook, just like Grandma used to make out of paper and glue. The camera pans across these scrapbook pages, pausing to admire each photo.
§ Photo Mobile, Holiday Mobile. These motion-packed themes make your photos swing in and out of view, bobbing and dangling as if they were attached to a real mobile. The Holiday version even has snowflakes falling in the background.
§ Shatter. This theme colorfully smashes apart your photos across the white expanse of screen—only to reassemble them into the next photo. This hyperkinetic theme works great for slideshows filled with action shots. For weddings or memorials? Not so much.
§ Places. Perhaps the most animated of the slideshow themes, this one begins with a huge, spinning, 3D globe. Next, it zooms into a slightly tilted map displaying red marker pins and small thumbnails of the photos you took in those spots, and then zooms in on each photo. It’s impressive, but if you haven’t geotagged any of your photos (as described in Chapter 4), you’ll see the slightly depressing message shown in Figure 6-2.
§ Classic. It worked for Coca-Cola, so Apple has rebranded the old iPhoto slideshow style as “Classic.” It’s classic indeed: Each slide appears for a couple of seconds, filling the screen, and then fades into the next. You have lots of control over this theme’s transitions and other effects.
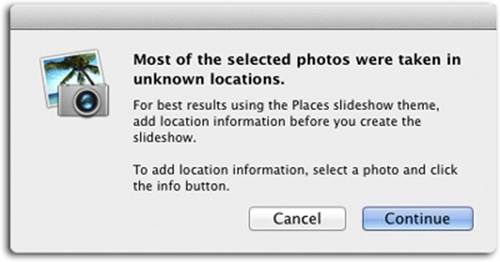
Figure 6-2. iPhoto hates for you to be disappointed, so you see this message if you choose the Places theme and haven’t yet geotagged the photos you selected. Bummer!
Instant Slideshows
An instant slideshow is one that you begin by clicking Slideshow in the iPhoto toolbar, as shown in Figure 6-3. Instant slideshows aren’t quite as instant as they used to be in early versions of iPhoto, but with the built-in themes, you get a slick, fancy slideshow in just a couple of clicks.
TIP
You can also create an instant slideshow by Control-clicking a Faces album and choosing Play Slideshow from the shortcut menu.
FREQUENTLY ASKED QUESTION: THE KEN BURNS EFFECT
Who’s this Ken Burns guy, and what’s his effect?
Apple first introduced what it calls the “Ken Burns effect” in iMovie, not iPhoto. It’s a special effect designed to address the core problem associated with using still photos in a movie—namely, that they’re still! They just sit there without motion or sound, wasting much of the dynamic potential of video.
For years, professional videographers have addressed the problem by using special sliding camera rigs that produce gradual zooming, panning, or both, to bring photographs to life. Among the most famous practitioners of this technique is Ken Burns, the creator of PBS documentaries such as The Civil War, Baseball, and The National Parks—which is why Apple, with Burns’ permission, named the feature after him.
And now your own humble slideshows can have that graceful, animated, fluid Ken Burns touch or even a whole Ken Burns theme. No photo ever just sits there motionless on the screen. Instead, each one flies gracefully onscreen or off, sliding and zooming.
It’s a great effect, but it can occasionally backfire. Every now and then, for example, the photo’s subject won’t be centered, or the photo won’t make it completely onto the screen before the next one appears. (One of the virtues of the saved slideshow, described on Show Title Slide, is that you control where the Ken Burns panning and zooming begins and ends.)

Figure 6-3. The quickest way to kick off a slideshow in iPhoto is to click the Slideshow button at the bottom of your iPhoto window (or monitor, if you’re in full-screen view).
TIP
While there’s no keyboard shortcut for starting a slideshow, you can press the space bar to pause it, or use the arrow keys to move through the show manually, photo by photo. To stop a show once it’s running, either press the Esc key or wiggle your mouse so the slideshow controls appear, and then click the X.
Picking Photos for Instant Slideshows
Among the virtues of instant slideshows is the freedom you have to choose which pictures you want to see. For example:
§ If no photos are selected when you start the show, iPhoto exhibits all the pictures currently in the photo-viewing area, starting with the first photo in the album, Faces stack, or Event.
§ Most of the time, people want to turn an album into a slideshow. That’s easy: Just click the album before starting the slideshow. It can be any album you’ve created, a smart album, the Last Import album, or one of iPhoto’s Recent collections. As long as no individual thumbnails are selected, iPhoto displays all the pictures in the album.
TIP
You can also create an instant slideshow from multiple albums by selecting more than one album simultaneously (by ⌘-clicking them). When you click Play, iPhoto creates a slideshow from all of their merged contents, in order.
§ If one photo is selected, iPhoto uses that picture as its starting point for the show, ignoring any that come before it. If you’ve got the slideshow set to loop continuously (Show Title Slide), then iPhoto will eventually circle back to display the first photo in the window.
§ If you’ve selected more than one picture, iPhoto includes only the selected pictures.
Photo Order
iPhoto displays your pictures in the same order you see them in the photo-viewing area. In other words, to rearrange your slides, drag the thumbnails around within their album. Just remember that you can’t drag pictures around in an Event, Faces, Places, smart album, the Last 12 Months collection, or the Last Import folder—only within a regular album.
NOTE
If iPhoto appears to be shamelessly disregarding the order of your photos when running a slideshow, it’s probably because you’ve got the “Shuffle slide order” option turned on in the Settings panel, as described on Show Title Slide.
Adjusting the Slideshow’s Settings
After you click the toolbar’s Slideshow button, the iPhoto window expands to fill your monitor, turns black, and displays the Themes panel. Here’s what to do next:
1. Click to select one of the 12 themes shown back in Figure 6-1.
Point to a theme’s thumbnail without clicking to see a tiny preview of what it does. If you turn on “Use settings as default,” then iPhoto saves these settings, but only for this slideshow—not for all your slideshows from here on out.
2. Adjust the music and transitions by clicking the Music and Settings tabs.
Each theme comes with its own soundtrack. In fact, Apple paid a lot of money for them, and they include such famous copyrighted tunes as “You’ve Got a Friend in Me” by Randy Newman and the theme from “Peanuts” by Vince Guaraldi. In fact, iPhoto includes a number of songs that were scientifically engineered to work well with its animated themes. But if you don’t care for the canned music or preselected transitions, click the appropriate tabs and make your own adjustments. The following sections explain how.
3. Click Play.
The slideshow starts, beginning with the title of the album. Sit back and enjoy the fruits of your clicking.
What to Do During a Slideshow
Aside from appreciating the sheer beauty of the thing, if you wiggle your mouse while the slideshow is playing, you get the control bar shown in Figure 6-4. Here’s what you can do while this bar is onscreen:
§ Click ![]() to pause the show, or click the arrow buttons to skip forward or back.
to pause the show, or click the arrow buttons to skip forward or back.
§ Click the two-slide icon to reopen the Themes panel shown in Figure 6-1, and then click to pick another theme if the current one isn’t rocking your world.
§ Click the musical notes to open the Music chooser, shown on Music: Soundtrack Central.
§ Click the ![]() icon to open the Settings panel, where you can change the slideshow’s timing and transitions (Slideshow Settings).
icon to open the Settings panel, where you can change the slideshow’s timing and transitions (Slideshow Settings).
§ Finally, click the X to close Full Screen view, end the slideshow, and go back to the regular iPhoto window.
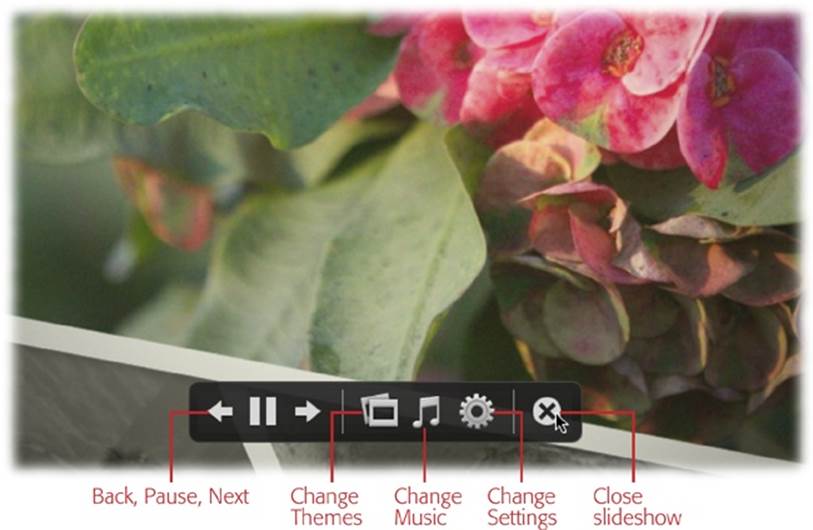
Figure 6-4. As the slideshow progresses, you can pause the show, go backward, or get to the panel for Themes, Music, and Settings, all courtesy of this onscreen control bar. The Vintage Prints theme was used here (it’s visible near the bottom). Nifty, isn’t it?
If you wait long enough without clicking anything, the control bar eventually disappears, returning the slideshow to its full-screen glory.
Music: Soundtrack Central
Perhaps more than any other single element, music transforms a slideshow, turning ordinary photos into a cinematic event. When you pair the right music with the right pictures, you do more than just show off your photos; you create a mood that can stir the emotions of your audience. So if you really want your friends and family to be transfixed by your photos, then add a soundtrack. That’s especially easy if, like many Mac fans, you’ve assembled a collection of your favorite music in iTunes, the music-playing program that comes with every Mac.
For the background music of an iPhoto slideshow, you have the choice of an individual song from your iTunes library or an entire playlist. Gone are the days of listening to the same tune repeating over and over again during a lengthy slideshow—a sure way to go slowly insane.
The possibilities of this feature are endless, especially combined with iPhoto’s smart albums (Deleting an Album). You can create a smart album that contains, say, only photos of your kids taken in December, choose the Holiday Mobile theme, give it a soundtrack composed of holiday tunes (created effortlessly using a smart playlist in iTunes), and you’ve got an instant holiday slideshow!
Your first iPhoto slideshow is born with several ready-to-use soundtracks—as noted earlier, they include expensively licensed songs by Randy Newman, Miles Davis, and Vince Guaraldi. And if you choose one of the animated themes, the song syncs perfectly with the animation (or, at least, it’s supposed to).
iPhoto includes a multitude of songs. To see them all, open the Themes panel and then click the Music tab (Figure 6-5). In that tab’s Source menu, selecting Theme Music shows you all the built-in theme soundtracks included in iPhoto. You can also choose Sample Music to find 11 more slideshow-worthy tracks, including two hits from J.S. Bach and some other instrumentals from various musical genres.
TIP
Inspired to make a playlist right here in iPhoto’s Music panel? Turn on the “Custom Playlist for Slideshow” setting and drag song titles from the list above into the field that appears.
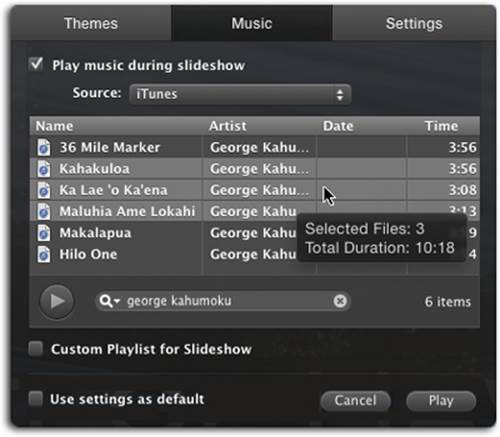
Figure 6-5. The Music panel lets you choose a playlist or individual songs from your iTunes library (depending on what you pick from the Source menu shown here). By clicking the column headings, you can sort the song list by name, artist, date, or length. You can also use the Search box to pinpoint an individual song or artist, as shown here. To select several songs, ⌘-click each one. Point your cursor at a song to have iPhoto tell you the duration of the songs you’ve chosen. If you have a long slideshow, you can use the Source menu to choose an iTunes playlist rather than a single song. iPhoto repeats the song (or playlist) for as long as your slideshow lasts.
Of course, you can also choose music from your own collection. If you choose GarageBand from that Source menu, you can select any musical masterpieces you’ve created yourself, using GarageBand, Apple’s music-recording program.
Most people, however, choose iTunes from this menu. When you do that, every track and playlist in your iTunes library automatically appears in the Music panel’s list. You can search and sort through your songs and playlists, just as if you were in iTunes itself. In other words, you can use this list either to select an entire playlist to use as your soundtrack, or to call up a playlist and then select individual songs within it.
Here are a few other tricks you can use in the Music panel:
§ To listen to a song before committing to it as a soundtrack, double-click it, or click its name in the list, and then click ![]() . Click the same button when you’ve heard enough.
. Click the same button when you’ve heard enough.
§ To use an entire playlist as a soundtrack for your slideshow, select it in the list. At slideshow time, iPhoto begins the slideshow with the first tune in the playlist and continues through all the songs before starting over.
§ To use an individual song as a soundtrack, click its name in the list. That song will loop continuously for the duration of the slideshow.
§ To use more than one song as a soundtrack, ⌘-click each one in the list.
§ Rather than scroll through a huge list, you can locate the tracks you want by using the capsule-shaped Search box below the song list. Click the Search box, and then type a word (or part of a word) to filter your list. iPhoto searches the Artist, Name, and Album fields of the iTunes library and displays only the matching entries. To clear the search and view your whole list again, click the X in the Search box.
§ Click one of the three headers—Name, Artist, or Time—to sort the iTunes music list by that header.
§ You can change the arrangement of the three columns by grabbing the headers and dragging them into a different order.
§ The “Custom Playlist for Slideshow” setting lets you whip up a mini-playlist right here, right now. When you turn on this option, an empty field appears below the list of songs. Scroll through the songs in the top part of the panel; when you find one you want to include in the soundtrack, drag it down into the lower field. Drag the tracks up and down within the playlist to rearrange them.
Once you’ve settled on (and clicked) an appropriate musical soundtrack for the current slideshow, you can turn on “Use settings as default” (to memorize that choice without starting the slideshow) or Play (to begin the slideshow). From now on, that song or playlist plays whenever you run an instant slideshow from that album.
Alternatively, if you decide you don’t want any music to play, then turn off “Play music during slideshow.”
Different Shows, Different Albums
You can save different slideshow settings for each item in your Source list.
To save settings for a specific album, for example, first choose the album in the Source list, and then click the Slideshow button in the iPhoto toolbar to open the slideshow panel (Figure 6-1). On the Music and Settings tabs, you can pick the speed, order, repeat, and music settings you want; finally, turn on “Use settings as default.” The settings you saved automatically kick in each time you launch a slideshow from that particular album.
Slideshow Settings
With the theme and music taken care of, the Settings tab of the slideshow panel handles just about everything else that makes a great presentation. On this tab, you can fiddle with the timing between slides, the Hollywood-style transitions between each shot, titles and captions, and other elements that influence the slideshow’s look and feel. The options available depend on which theme you’re using.
Slide Timing
If left to its own devices, iPhoto advances through your pictures at the rate of one photo every 3–7 seconds, depending on the theme. These durations are fine for most purposes, but you can change the rate.
On the Settings tab of the slideshow panel, use the “Play each slide for a minimum of __ seconds” option to specify a different interval, as shown in Figure 6-6. Or, if you want your slideshow to last exactly as long as the song or playlist you chose for the soundtrack, select “Fit slideshow to music.”
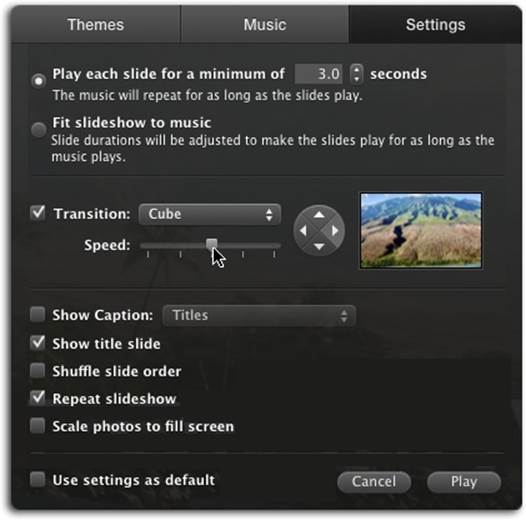
Figure 6-6. The controls in the Settings panel let you fine-tune the timing and transitions between slides. (Depending on your theme, you may not see all these options.) Turn on the Transition setting and then use the pop-up menu to test different effects for getting from one slide to the next. In the lower part of the panel, you can tell iPhoto whether to display the titles, locations, and descriptions you may have spent hours adding to your photos. Turn on “Use settings as default” if you want to save your tinkerings. “Default” here doesn’t mean that iPhoto will use these settings for all your slideshows—just this one.
Transitions
Themes like Shatter and Sliding Panels use special transition effects between images. But if you’re using the Classic or Ken Burns theme for your show, you can choose from 14 different types of transitions—for example, the classic crossfade or dissolve, in which one slide gradually fades away as the next “fades in” to take its place. Here’s a summary:
§ Random. iPhoto uses a combination of its various transitions throughout the slideshow.
§ None. An abrupt switch, or simple cut, to the next image.
§ Cube. Imagine that your photos are pasted onto the sides of a box that rotates to reveal the next one. If you’ve ever used OS X’s Fast User Switching feature, you’ve got the idea.
§ Dissolve. This is the classic crossfade.
§ Droplet. This wild effect resembles animated, concentric ripples expanding from the center of a pond; the new image forms as the ripples spread.
§ Fade Through Black. After each slide has strutted and fretted its time upon the stage, the screen momentarily fades to black before the next one fades into view. The effect is simple and clean, like an old-fashioned living-room slideshow. Along with Dissolve, this effect is one of the mostnatural and least distracting choices.
§ Flip. The first photo seems to flip over, revealing the next photo pasted onto its back.
§ Mosaic Flip Large, Mosaic Flip Small. iPhoto divides the screen into squares, each of which rotates in turn to reveal part of the new image, like puzzle pieces turning over. (The two options refer to the size of the puzzle pieces.)
§ Move In. Photos slide in un-dramatically from the edges of the screen.
§ Page Flip. Apple is just showing off here. The first photo’s lower-right corner peels up like a sheet of paper, revealing the next photo “page” beneath it.
§ Push, Reveal, Wipe. Three variations of “new image sweeping onto the screen.” In Push, Photo A gets shoved off the screen as Photo B slides on. In Reveal, Photo A slides off, revealing a stationary Photo B. And in Wipe, Photo A gets covered up as Photo B slides on.
§ Twirl. Photo A appears to spin furiously, shrinking to a tiny dot in the middle of the screen—and then Photo B spins onscreen from that spot. The whole thing feels a little like the spinning-newspaper effect used to signify breaking news in old black-and-white movies.
In most cases, choosing a transition effect makes two additional controls “light up” just below the pop-up menu:
§ Speed. Move the slider to the right for a speedy transition, or to the left for a leisurely one. Take into account your timing settings: The less time your photo is onscreen, the better off you are with a fast transition, so that your audience has time to see the picture before the next transition starts. However, moving the Speed slider all the way to the right produces a joltingly fast change.
§ Direction. This arrow-covered wheel determines the direction the new image enters from. Click the corresponding arrow to choose right to left, top to bottom, left to right, or bottom to top. As soon as you click, iPhoto shows you what the transition will look like in the preview area to the right of the wheel. (Most people find left to right the most comfortable, but a slow top-to-bottom wipe is pleasant, too.)
Show Caption
Need some words to go with the music? Use this pop-up menu to show text like descriptions, places, dates, or titles.
As you know from Chapter 2, every photo in your collection can have a name—a title, in other words. And if you want to show off your geotagged pictures (Editing Names) from your cross-country trip, it’s easy to put all those place names and descriptions up on the big screen. If you turn on this option, iPhoto superimposes the selected text in big white letters on the lower corner of the image, as shown in Figure 6-7.
NOTE
The Show Caption option works only with themes that aren’t animated, meaning you can use it only on the Ken Burns and Classic themes. After all, rotated or bouncing text is pretty tough to read.

Figure 6-7. If you don’t feel like narrating your slideshow, then fill in the title and description fields in the Info panel (page 63). When it comes time to set up the slideshow, turn on Show Caption in the Settings panel, and then choose the text you want to display (titles and descriptions are turned on here). When you play the slideshow, iPhoto lets your viewers know what they’re looking at, and if you’re clever with what you enter, you can do a wee bit o’ branding!
Needless to say, the cryptic filenames created by your digital camera (like IMG_0034.jpg) usually don’t add much to your slideshow. But if you’ve taken the time to give your photos helpful, explanatory titles (“My dog, age 3 months”), then by all means turn on the Show Captions checkbox and choose the text you want to display.
Show Title Slide
Show titles? Sure—Fiddler on the Roof! West Side Story! Cats!
Just kidding.
Turn on “Show title slide” if you want the first slide in the show to display the name of the album, face, or place you’re basing the slideshow on. (Try it before you chuck it; it’s actually a great way to start a slideshow.)
Shuffle Slide Order
An iPhoto slideshow normally displays your pictures in the order they appear in the photo-viewing area. But if you’d like to add a dash of surprise and spontaneity to the proceedings, then turn on “Shuffle slide order.” Now iPhoto displays the pictures in whatever random order it pleases.
Repeat Slideshow
When iPhoto is done running through all your photos in a slideshow, it ordinarily starts playing the whole sequence from the beginning again. If you want your photos to play just once through, then turn off “Repeat slideshow.”
Scale Photos to Fill Screen
If any photos in your slideshow don’t match your screen’s proportions, then you may want to turn on “Scale photos to fill screen.” For example, if your slideshow contains photos in portrait orientation—that is, pictures taken with the camera rotated—iPhoto normally fills up the unused screen space on each side with vertical black bars.
Turning on this setting makes iPhoto enlarge the picture so much that it completely fills the screen. This option, however, comes at a cost: Now the top and bottom of the picture are lost beyond the edges of the monitor.
When the middle of the picture is the most important part, this option works fine. But if it’s not and the black bars bother you, then the only other alternative is to crop the odd-sized pictures in the saved slideshow (or album) to match your monitor’s shape. (See Cropping.)
NOTE
This option doesn’t mean “Enlarge smaller photos to fill the screen”—iPhoto always does that. This option affects only photos whose proportions don’t match the screen’s.
Saved Slideshows
iPhoto also offers saved slideshows, each of which appears as an icon in your Source list. The beauty of this system is that you can tweak a slideshow to death—you can even set different transition and speed settings for each individual slide—and then save all your work as a clickable icon, ready for playback whenever you’ve got company. Saved slideshows are also a snap to shuttle over to your iPad, iPhone, or iPod for musical memories on the go (Syncing with iTunes).
TIP
Saved slideshows are a great way to create a pro-level portfolio of your artwork or photography, especially since they’re so easily shared with your iPad (Syncing with iTunes).
Here’s how you create and fine-tune a saved slideshow:
1. Select the photos you want to include.
You can select either a random batch of thumbnails (using any of the techniques described on Selecting Photos) or an icon in the Source list (like an album, Place, or Face).
TIP
By Shift-clicking or ⌘-clicking, you can actually select several icons in the Source list simultaneously. When you proceed to step 2, iPhoto merges their contents into one glorious slideshow.
2. Choose File→New Slideshow.
Thunder rumbles, the lights flicker—and you wind up in the slideshow-editing mode shown in Figure 6-8, which has some features of Edit view and some features of regular old thumbnail-organizing mode. The first thing you see is a title slide with the name of the album superimposed atop your first photo.
NOTE
While the title of your slideshow appears on a solid black slide in the thumbnail browser at the top of your screen, that’s not how it’ll play: It’ll be superimposed atop your first photo instead. Feel free to change the font, size, or text itself; just highlight it and then press ⌘-T to summon OS X’s Fonts dialog box.
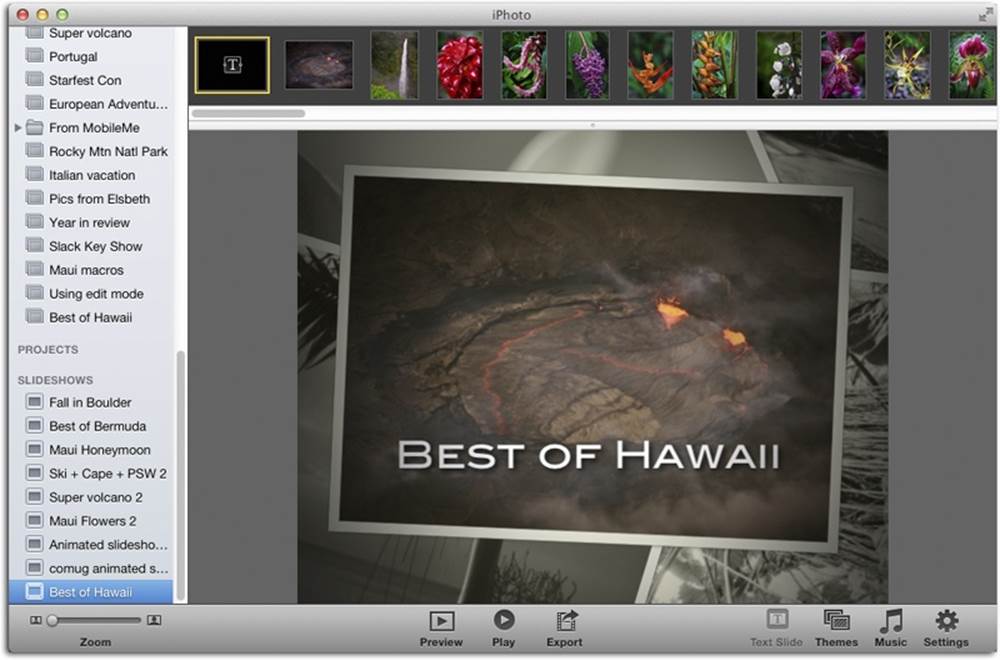
Figure 6-8. In the slideshow editor, the window shape is designed to mimic the shape of your Mac’s monitor (or whatever screen proportions you’ve specified in the Settings panel); that’s why gray bars may appear on the left and right sides of your slides. The Themes, Music, and Settings options in the toolbar let you finesse the slideshow as you go. Click Preview to play the show in the iPhoto window.
In addition, a new icon with the name of the album appears in the Slideshow section at the bottom of the Source list, selected so you can rename it.
3. Choose a playback order for your pictures.
The trick here is to drag the thumbnails at the top of the window horizontally into the order you want them to play (it’s much easier to reorder them in the album before you create the slideshow). You can move them en masse, too. For example, click slide number 1, Shift-click slide number 3, and then drag the three selected thumbnails to a different spot in the lineup.
4. Click Themes in the toolbar to choose one of the 12 themes (Slideshow Themes).
Each theme’s thumbnail image gives the vaguest hint of what to expect; point at it without clicking to see an animated preview. If you don’t like the theme, you can always change it later.
5. Click Music and Settings in the toolbar to set up the global playback options.
These options let you choose settings that affect all slides in the show (like timing and transitions). You can read about what these controls do in the next section.
6. If you like, walk through the slides one at a time, and set up their individual characteristics.
For example, you can choose to have one slide linger longer on the screen, have another dissolve (rather than wipe) into the next picture, and so on. This kind of thing is great for creating a pro-level portfolio of your photography or other artwork.
7. Preview the show.
Click Preview in the toolbar, and iPhoto plays a miniature version of the slideshow. If you have a photo selected, iPhoto starts the preview there.
8. Roll it!
When everything looks ready, click Play in the toolbar to watch the slideshow in full-screen view. Here again, if a photo is selected, that’s where iPhoto starts the show.
When it’s over, you can do all the usual things with the saved slideshow that now resides in your Source list:
§ Delete it. Drag it onto the iPhoto Trash icon, as you would an album. When you’re asked if you’re sure, click Delete or press the Return key.
§ File it away. Drag it into an iPhoto folder (Folders) to keep it organized with the related albums and books.
§ Rename it. Click its name and then type away.
§ Edit it. Click its icon and then use the toolbar settings to tweak it.
Global Settings
As indicated by the preceding steps, you can make two kinds of changes to a saved slideshow: global ones (which affect all slides) and individual ones.
You access most of the global options by clicking Settings in the toolbar, which summons the panel shown in Figure 6-9. Clicking the Themes and Music buttons call up panels, too, as you’d expect.
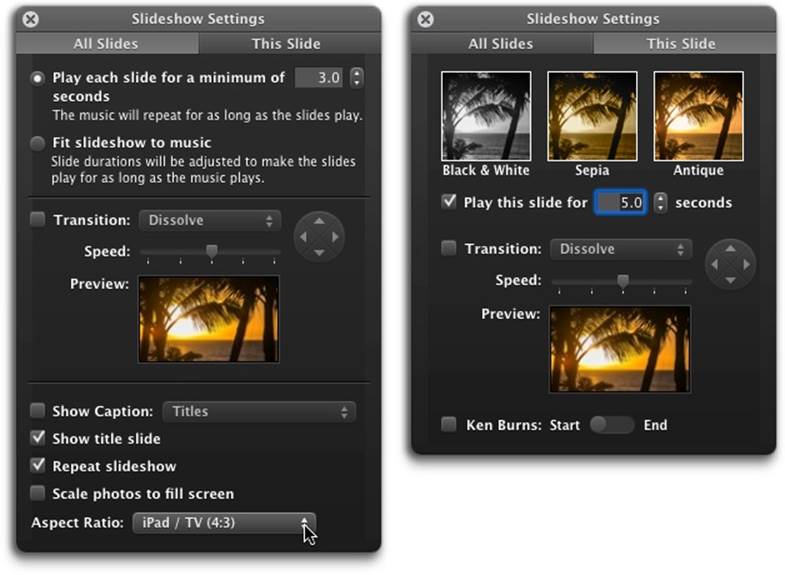
Figure 6-9. Left: The Slideshow Settings panel’s All Slides pane offers a few options that you don’t see when creating an instant slideshow. Everything here is wired for a single purpose: to establish the standard settings for every slide in the show. Right: Of course, you can override these settings on a slide-by-slide basis. The This Slide panel lets you change the color-treatment of individual slides to black & white, sepia, or antique; adjust the speed of a transition; and control the amount of time a slide stays onscreen.
The Themes Panel
This is the same panel with the same 12 themes you saw before (Figure 6-1). If you decide the Snapshots theme just doesn’t work for a slideshow of the high-school football game, then pick another one here.
The Music Settings Panel
The Music Settings panel should look familiar; it’s identical to the panel shown in Figure 6-5. This is where you choose the music to accompany your superbly customized slideshow, as described on Music: Soundtrack Central.
The Slideshow Settings Panel
The All Slides tab of this panel (Figure 6-9, left) should look familiar. If you’re using the Classic or Ken Burns theme, the All Slides tab contains many of the same options described earlier (transition style and duration, whether to fit the slideshow to the soundtrack, the ability to show your photos’ titles and ratings, and so on). See Slideshow Settings for details.
NOTE
The animated themes—Shatter, Sliding Panels, Scrapbook, and so on—handle their own transitions and so offer fewer options in the Slideshow Settings panel.
Down at the bottom of the panel, you also get an Aspect Ratio setting that lets you tell iPhoto what shape the screen will be. Now, this may strike you at first as a singularly stupid setting. After all, doesn’t the Mac know what shape its own screen is? But there’s more to this story: Remember that you can build slideshows that aren’t intended to be played on your Mac’s monitor.
For example, you might want to export a slideshow to play on other people’s screens, or even on their TV sets, by burning the slideshow to a DVD. That’s why this pop-up menu offers four choices: This Screen; HDTV (16:9) for high-definition TV sets and other rectangular ones, iPad/TV (4:3) for iPads and standard squarish TV sets, and iPhone (3:2) for slideshows you plan to export to your iOS devices (Syncing with iTunes).
In any case, the changes you make here affect all photos in the slideshow. Click the X at the top left of the panel when you’re done, confident in the knowledge that you can always override these settings for individual slides.
Individual-Slide Options
The Slideshow Settings panel’s All Slides tab offers plenty of control, but the changes you make there affect every slide in the show. But by selecting a thumbnail at the top of your window and then clicking the panel’s This Slide tab (Figure 6-9, right), you gain control over that particularslide.
Color Options
Certain photos may have more of an impact with a creative color treatment. Using the options at the top of the This Slide tab, you can change the color of the selected photo to Black & White, Sepia (brownish, old-fashioned monochrome), or Antique, which lends a sort of faded, flattened look to the photo’s colors. (These options are a great way to save a photo whose colors seem a bit off.)
Slide Timing
As you know, the All Slides tab is where you specify how long you want each slide to remain onscreen. But if you want to override that setting for a few particularly noteworthy shots, the This Slide tab has the solution. (Photographers love this kind of thing.)
With the specially blessed photo on the screen before you, summon the Settings panel and click This Slide. Then use the “Play this slide for __ seconds” control to specify this slide’s few seconds of fame.
Transition
The options in this pop-up menu are the various effects (Cube, Dissolve, and so on) that you can use for the transition from one slide to another. (Whatever you choose here governs the transition out of the currently selected slide; every slideshow starts with a fade-in from black.)
You can also control the speed of the transitions on a slide-by-slide basis, and even which direction the transition effect proceeds across the screen (for transition styles that offer a choice, that is).
The Ken Burns Checkbox
If you flip back a few pages, you’ll be reminded that the Ken Burns effect is a graceful, panning, zooming effect that animates the photos in your slideshow so they float and move instead of just sit there.
You’ll also be reminded that when you apply the effect to an entire slideshow, you have no control over the pans and zooms. iPhoto might begin or end the pan too soon, causing the primary subject to get chopped in half. Or maybe it zooms too fast, so your viewers never get the chance to soak in the scene—or maybe it pans or zooms in the wrong direction for your creative intentions.
Fortunately, the Ken Burns controls located here let you adjust every aspect of the panning and zooming for one photo at a time (see Figure 6-10). Here’s how it works:
NOTE
The settings you’re about to make in the This Slide tab override whatever global Ken Burns setting you’ve made.
1. Select the photo, click Settings in the toolbar, click the This Slide tab, and then turn on the Ken Burns setting circled in Figure 6-10.
If more than one photo is selected, iPhoto applies the effect to the first one only.
2. Click Start in the This Slide tab, and then adjust the photo’s position and zoom level so it’s the way you want it at the beginning of its time onscreen.
In other words, you’re setting up the photo the way it will first appear. Often, you won’t want to do anything to it at all—you want it to start at its original size and then zoom in from there. But if you want to create a zooming out effect, then use the toolbar’s Zoom slider to magnify the photo, and then drag the picture itself to center it properly (your cursor turns into a hand).
3. Click End in the This Slide tab, and then set up the picture’s zoom level and position.
You’ve just set the photo’s starting and ending conditions. iPhoto interpolates, calculating each intermediate frame between the positions you specified.
Take a moment now to click Preview in the toolbar. The animated photo goes through its scheduled motion, letting you check the overall effect. Repeat steps 2 and 3 as necessary.
TIP
If you accidentally set the End position when you meant to set the Start position, then Option-click the word “Start.” iPhoto graciously copies your End settings over to the Start settings. Now both Start and End are the same, but at least you can edit just one setting instead of two. (The same trick works in the other direction, as well.)
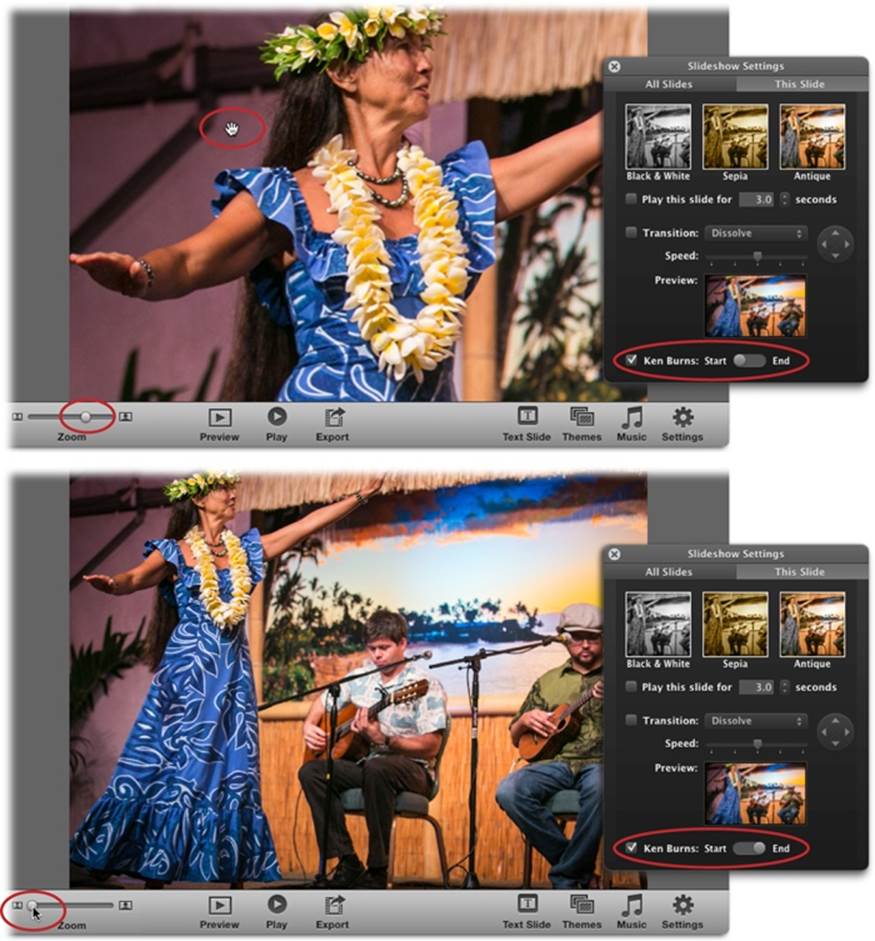
Figure 6-10. You set the start and end points for the Ken Burns effect’s gradual zooming/panning, and iPhoto automatically supplies the in-between frames, producing a gradual shift from the first position to the second. Top: In the Slideshow Settings panel’s This Slide tab, turn on the Ken Burns checkbox and then click Start. Use the Zoom slider in iPhoto’s toolbar to magnify the photo, and then drag the photo to reposition it in the viewing area (you see the grabbing-hand cursor circled here). Bottom: In the This Slide tab, click End. Once again, use the Zoom slider and drag the photo to specify the final zoom level and position. In this example, the Ken Burns effect lets you save the “punch line” (the guitarists) of this story-telling photo for the end of its time onscreen.
Slideshow Tips
The following guidelines will help you build impressive slideshows that truly showcase your talents as a digital photographer.
Picture Size
Choosing photos for your slideshow involves more than just picking the photos you like best. You also have to make sure you’ve selected pictures that are the right size.
iPhoto always displays slideshow photos at full-screen dimensions—and on Apple’s monitors, that means 1366 x 768 pixels at the very least. If your photos are smaller than that—because you cropped them or had your camera set to low quality, say—then iPhoto stretches them to fill thescreen, often with disastrously pixelated results.
Although iPhoto blows up images to fill the screen, it always does so proportionately, maintaining each photo’s vertical-to-horizontal aspect ratio. As a result, photos often appear with vertical bars at the left and right edges when viewed on long rectangular screens like the Apple Cinema Display or iMac. To eliminate this effect, see Scale Photos to Fill Screen.
Determining the Size of Your Photos
If you’re not sure whether your photos are big enough to be slideshow material, open the Info panel by clicking Info in iPhoto’s toolbar, and then look at the panel’s top left. You’ll see something like “1600 x 1200.” That’s the width and height of the photo, measured in pixels. As you might imagine, tiny photos are horribly blocky and blurry when blown up to full-screen size. Big ones look just fine, though if they’re humongous, iPhoto might take longer to display them and, as a result, the transitions may not be as smooth.
Here are a few other ways to make sure your slideshows look their best:
§ Try to stick with photos whose proportions roughly match your screen. If you have a traditionally shaped screen, use photos with a 4:3 width-to-height ratio, just as they came from the camera. However, if you have a widescreen monitor (a recent Cinema Display, iMac, MacBook, and so on), then photos cropped to 6:4 proportions are a closer fit.
If you don’t have time to crop all your odd-sized or vertically oriented photos, then consider using the “Scale photos” feature described on Show Title Slide. It makes your pictures fill the screen nicely, although you risk cutting off important elements (like heads and feet).
POWER USERS’ CLINIC: CROPPING AND ZOOMING
Here’s a totally undocumented iPhoto feature: While creating a saved slideshow, you can choose to present only part of a photo, in effect cropping out portions of it, without actually touching the original.
To enlarge the photo (thus cropping out its outer margins), just drag the Zoom slider at the lower-left corner of the iPhoto window (you don’t have to have any panels open to do it). Whatever photo size you determine this way controls what will appear during the slideshow.
What you may not realize, though, is that you can also drag the picture itself to shift its position onscreen. Simply click within the photo-viewing area and drag the image where you want it. Sounds crazy, but it works.
Between these two techniques—sizing and sliding—you can display just a portion of the photo. (Heck, you could even present the photo twice in the same slideshow, revealing half of it the first time and half of it the next.)
§ Preview images at full size before using them. You can’t judge how sharp and bright an image is going to look based solely on its thumbnail.
§ Keep the timing brief when setting the playing speed—maybe just a few seconds per photo. Better to have your friends wanting to see more of each photo than to have them bored, mentally rearranging their sock drawers as they wait for the next photo. Remember, you can always pause a slideshow if someone wants a longer look at one picture.
§ Consider the order of your photos. An effective slideshow should tell a story. You might want to start with a photo that establishes a location—an overall shot of a park, for example—and then follow it with closeups that reveal the details. (Remember, it’s easier to reorder photos in analbum before creating the slideshow.)
§ If your viewers fall in love with what you’ve shown them, you have several options: Save the slideshow as a QuickTime movie that you can send to them via Dropbox (Exporting a Saved Slideshow) or burn onto a CD or DVD for their at-home enjoyment (Editing Movies in iMovie); create a web journal on your iOS device (Web Journals); or make your admirers buy their own Macs.
NOTE
iPhoto for iOS lets you create slideshows, too; however, it also lets you transfer them onto another iOS device by beaming it or using AirDrop. And if you’ve got an iCloud account, you can post the slideshow on the Web and share it with others. You can also export the slideshow as HTML files by using iTunes’ file-sharing feature. Chapter 15 has the scoop.
You can also export a slideshow to iTunes so you can sync and then play it on an iPod, iPhone, iPad, or Apple TV (Chapter 10). In fact, the newest Apple TV (the tiny black one) can see your iPhoto library and play saved slideshows (though it uses its own transitions).
FREQUENTLY ASKED QUESTION: SLIDESHOW SMACKDOWN: IPHOTO VS. IMOVIE
I’ve read that iMovie is a great slideshow program, too. Supposedly, I can import my photos, add music, and play it all back, fullscreen, with cool cross-dissolves, just like you’re describing here. Which program should I use?
The short answer: iPhoto for convenience, iMovie for control.
In iMovie, you can indeed import photos. Just as in iPhoto, you have control over their individual timings, application of the Ken Burns effect, and transitions between them.
But the soundtrack options are much more expansive in iMovie. Not only can you import music straight from a CD (without having to use iTunes as an intermediary), but you can actually record narration into a microphone as the slideshow plays. And you have a full range of title options, as well as credit-making and special-effects features at your disposal, too.
Still, iPhoto has charms of its own. Creating a slideshow is far less work in iPhoto, for one thing. Remember, too, that iPhoto is beautifully integrated with your various albums. Whereas building an iMovie project is a serious, sit-down-and-work proposition that results in one polished slideshow, your Photo library has as many different slideshows as you have albums—all ready to go at any time.
That said, you can learn a little more about using iMovie in Chapter 10.
All materials on the site are licensed Creative Commons Attribution-Sharealike 3.0 Unported CC BY-SA 3.0 & GNU Free Documentation License (GFDL)
If you are the copyright holder of any material contained on our site and intend to remove it, please contact our site administrator for approval.
© 2016-2026 All site design rights belong to S.Y.A.