Switching to the Mac: The Missing Manual, Mavericks Edition (2014)
Part II. Making the Move
Chapter 8. Windows on Macintosh
The very moment Apple announced in 2006 that all new Mac models would come with Intel chips inside, the geeks and the bloggers started going nuts. “Let’s see,” they thought. “Macs and PCs now use exactly the same memory, hard drives, monitors, mice, keyboards, networking protocols,and processors. By our calculations, it ought to be possible to make a Mac runWindows!”
Now, some in the Cult of Macintosh were baffled by the very idea. Who on earth, they asked, wants to pollute the magnificence of the Mac with a headache like Windows?
Lots of people, as it turns out. Think of all the potential switchers who are tempted by the Mac’s sleek looks, yet worry about leaving Windows behind entirely. Or the people who love Apple’s iLife programs, but have jobs that rely on Microsoft Access, Outlook, or some other piece of Windows corporateware. Even true-blue Mac fans occasionally look longingly at some of the Windows-only games, Web sites, or movie download services they thought they’d never be able to use.
Today, there are two ways to run Windows 7 (or later) on a Mac:
§ Restart it in Boot Camp. Boot Camp is a little Apple program that lets you restart your Mac into Windows.
At that point, it’s a full-blown Windows PC, with no trace of the Mac on the screen. It runs at 100 percent of the speed of a real PC, because it is one. Compatibility with Windows software is excellent. The only downsides: Your laptop battery life isn’t as good, and you have to restart the Mac again to return to the world of OS X.
TIP
What’s cool, though, is that even when you’re running Windows, you can still access your Mac files and folders, as described below.
§ Run Windows in a window. For $80 or so, you can eliminate the Boot Camp Bummer—the business of having to restart the Mac every time you want to switch its operating-system personality. You can buy a program like Parallels or VMware Fusion, which let you run Windows in a window.
You’re still running OS X, and all your Mac files and programs are still available. But you’ve got a parallel universe—Microsoft Windows—running in a window simultaneously.
Compared with Boot Camp, this virtualization software offers only 90 percent of the speed and 90 percent of the software compatibility. But for thousands of people, the convenience of eliminating all those restarts—and gaining the freedom to copy and paste documents between OS X and Windows programs—makes the Windows-in-a-window solution nearly irresistible.
TIP
There’s nothing wrong with using both on the same Mac, by the way. In fact, both Parallels and Fusion can use the same copy of Windows as Boot Camp, so you save disk space and don’t have to manage two different Windows worlds.
Both techniques require you to provide your own copy of Windows. And both are described on the following pages.
Boot Camp
To set up Boot Camp, you need the proper ingredients:
§ A copy of Windows 7 or later. OS X requires the Home Premium, Business, or Ultimate editions of Windows 7—or any version of Windows 8 or 8.1. In all cases, it has to be the 64-bit version of Windows, and it has to be a full installation copy—not an upgrade version.
FREQUENTLY ASKED QUESTION: THE VIRUS QUESTION
Doesn’t running Windows on my Mac mean that I’ll be exposed to the nightmare of viruses and spyware, just like the rest of the Windows world?
Yep!
If you install Windows on your Mac, you should also install Windows antivirus and antispyware software to protect that half of the computer. The world is crawling with commercial programs that do the job. There are also lots of free programs, like Microsoft Security Essentials, which protects you against both viruses and spyware.
The good news is that even if your Windows installation gets infected, the Mac side of your computer is unaffected. Just as OS X can’t run Windows-only software like, say, Microsoft Access, it also can’t run Windows virus software.
Some people, therefore, run Windows naked—without virus protection (especially when using Windows-in-a-window programs like Parallels and VMware Fusion). If a virus does strike, no big deal; they just drag the infected copy of Windows to the Trash and install a fresh one!
NOTE
Mavericks and Windows 8.1 entered the world roughly simultaneously, so Apple didn’t exactly have time to test and polish that combination. Online, the Mac population is divided into thirds: people who had no problem installing Windows 8.1, people who get strange errors that foil the Boot Camp process, and people who could not install Windows 8.1 at all.
If you’re technically savvy, you’d be well advised to Google “Windows 8.1 Boot Camp Mavericks” and try some of the workarounds that your fellow Mac fans have discovered. If you’re not, you may as well spring the $80 for a program like Parallels and get the whole thing working in an hour.
§ At least 10 gigs of free hard drive space on your built-in hard drive, or a second internal drive. (You can’t install Windows on an external drive using Boot Camp.)
§ A wired keyboard and mouse—or Apple Bluetooth wireless versions—is required for the installation process. You can use a Bluetooth keyboard and mouse once the installation is complete.
§ A USB flash drive. You have to use Disk Utility (Disk Utility) to format it using the MS-DOS (FAT32) formatting scheme.
§ A DVD drive, or another USB flash drive. If you have Windows on a disc, then of course you also need a DVD drive for your Mac. If your Mac doesn’t have a DVD drive, then you can use an ISO (disk image) version of Windows that you’ve downloaded—but in that case, you’ll need a second USB flash drive (8 gigabytes or bigger) to hold the Windows image.
NOTE
Not all Macs can handle the ISO version of Windows. To find out if yours can, open Boot Camp Assistant. Click Continue. If you see an option called “Create a Windows 7 or later install disk,” that’s good news; you can install Windows from a flash drive. If not, not.
Before you begin, Apple strongly recommends that you back up your Mac and make sure it’s running the latest version of Mavericks (choose ![]() →Software Update) and that you have the latest version of Boot Camp (visit www.apple.com/support/bootcamp).
→Software Update) and that you have the latest version of Boot Camp (visit www.apple.com/support/bootcamp).
Installing Boot Camp
Open your Applications→Utilities folder. Inside, open the program called Boot Camp Assistant.
Click Continue. You arrive at the Select Tasks screen, where you have three options:
§ Create a Windows 7 or later install disk. If you see this checkbox at all, it means that you have a recent MacBook Air or another Mac without a DVD drive. And you’re in luck: You can install a disk-image (downloadable) copy of Windows, which Microsoft sells. When you click Continue, Boot Camp Assistant will copy the Windows disk image to a USB flash drive that you insert (you’ll need one with 8 gigs of memory or more).
From now on, you’ll be able to install Windows and Boot Camp from that one flash drive.
§ Download the latest Windows support software from Apple. One of Boot Camp’s primary jobs is to teach Windows to recognize and operate all your Mac’s hardware components: keyboard, trackpad, camera, WiFi, and so on. And as you may know, Windows does that by requiring an installed driver (software nugget) for each one of these components. Well, guess what? Out of the box, Windows does not know about any Apple hardware elements. Surprise, surprise.
So your first job is to create an installation disk that contains these drivers. That’s the purpose of the USB flash drive that you formatted as FAT32.
§ Install Windows 7 or later version. This option will guide you through partitioning (subdividing) your hard drive, and installing Windows onto one of the partitions.
Once those setup tasks are complete—you’ve prepared the flash drive and downloaded the drivers—you’re asked to partition, or subdivide, your hard drive. You’re setting aside a certain amount of space that will hold your copy of Windows and all the PC software you decide to install. This partitioning process doesn’t involve erasing your whole hard drive; all your stuff is perfectly safe. (You can’t install Boot Camp if your hard drive is already partitioned—except for OS X’s own Recovery partition, of course.)
The dialog box offers a Divide Equally button, but it also lets you drag a space-divider handle to divide up your drive space between the Mac and Windows sides (Figure 8-1). Use your experience running Windows on a real PC, if you have one, to decide how big your Windows “hard drive” should be; Apple recommends that for Windows 8 or 8.1, the Windows partition should be at least 30 gigabytes.
Most people choose to dedicate a swath of the main internal hard drive to the Windows partition. But if you have a second internal hard drive, you can also choose one of these options:
§ Create a Second Partition. The Boot Camp Assistant carves out a Windows partition from that drive.
§ Erase Disk and Create a Single Partition for Windows. Just what it says.
On the Start Windows Installation screen, you’re supposed to—hey!—start the Windows installation. Grab your Windows DVD and slip it into the Mac. Its installer goes to work immediately.
Following the “I agree to whatever Microsoft’s lawyers say” screen, Microsoft’s installer asks which partition you want to put Windows on. It’s really important to pick the right one. Play your cards wrong, and you could erase your whole Mac partition.
Choose the one called “Disk 0 Partition 3 BOOTCAMP.” (The number may be different, but it will say “BOOTCAMP.”)
Then click “Drive options (advanced),” click Format, click OK, and finally click Next. Your Windows partition is now formatted (it uses the NTFS formatting scheme, if anybody asks).
Now your Mac looks just like a PC that’s having Windows installed. Be patient; sit around for half an hour as the Windows installer flits about, restarts, does what it has to do.
When it’s all over, a crazy, disorienting sight presents itself: your Mac, running Windows. There’s no trace of the familiar desktop, Dock, or ![]() menu; it’s Windows now, baby.
menu; it’s Windows now, baby.

Figure 8-1. How much hard drive space do you want to dedicate to your “PC”? It’s not an idle question; whatever you give Windows is no longer available for your Mac. Drag the vertical handle between the Mac and Windows sides of this diagram.
Walk through the Windows setup screens, creating an account, setting the time, and so on.
At this point, your Mac is actually a true Windows PC. You can install and run Windows programs, utilities, and even games; you’ll discover that they run really fast and well.
But as Windows veterans know, every hardware feature of Windows requires a driver—a piece of software that tells the machine how to communicate with its own monitor, networking card, speakers, and so on. And it probably goes without saying that Windows doesn’t include any drivers for Apple’s hardware components.
That’s why, at this point, you need the FAT32 flash drive you created earlier. It contains all the drivers for the Mac’s graphics card, Ethernet and WiFi networking, audio input and output, built-in camera, brightness and volume keys, ![]() key, multitouch trackpad gestures, and Bluetooth transmitter. (It also installs a new Control Panel icon and system-tray pop-up menu, as described later in this chapter.)
key, multitouch trackpad gestures, and Bluetooth transmitter. (It also installs a new Control Panel icon and system-tray pop-up menu, as described later in this chapter.)
When you insert this disc or flash drive, the drivers installer opens and begins work automatically. (If it doesn’t, double-click the setup.exe file in the WindowsSupport or Boot Camp folder.)
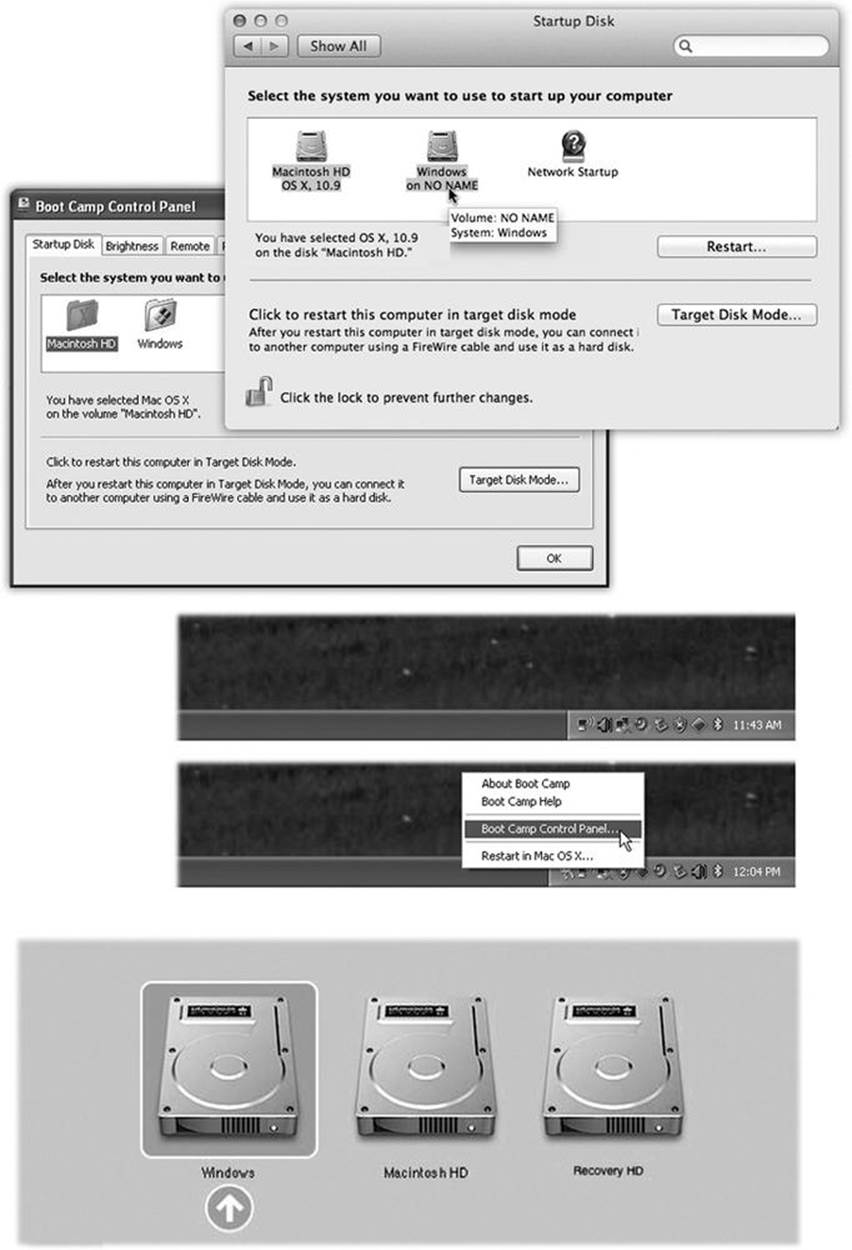
Figure 8-2. Top: To choose your preferred operating system—the one that starts up automatically unless you intervene—choose ![]() →System Preferences. Click Startup Disk, and then click the icon for either OS X or Windows. Next, either click Restart (if you want to switch right now) or close the panel. The identical controls are available when you’re running Windows, thanks to the new Boot Camp Control Panel. Middle: To open the Boot Camp control panel, choose its name from its icon in the Windows system tray. Bottom: This display, known as the Startup Manager, appears when you press Option during startup. It displays all the disk icons, or disk partitions, that contain bootable operating systems. Just click the name of the partition you want, and then click the Continue arrow.
→System Preferences. Click Startup Disk, and then click the icon for either OS X or Windows. Next, either click Restart (if you want to switch right now) or close the panel. The identical controls are available when you’re running Windows, thanks to the new Boot Camp Control Panel. Middle: To open the Boot Camp control panel, choose its name from its icon in the Windows system tray. Bottom: This display, known as the Startup Manager, appears when you press Option during startup. It displays all the disk icons, or disk partitions, that contain bootable operating systems. Just click the name of the partition you want, and then click the Continue arrow.
Click past the Welcome and License Agreement screens, and then click Install. You’ll see a lot of dialog boxes come and go; just leave it alone. Don’t click any Cancel buttons. If you get a complaint that the software hasn’t passed Windows Logo testing, click Continue Anyway.
TIP
If the installation seems to stall, Windows may be waiting for you to click OK or Next in a window that’s hidden behind other windows. Inspect the taskbar and look behind open windows.
When it’s all over, a dialog box asks you to restart the computer; click Restart. When the machine comes to, it’s a much more functional Windows Mac. (And it has an online Boot Camp Help window waiting for you on the screen.)
NOTE
Once you’re running Windows, you might wonder: How am I supposed to right-click? I don’t have a two-button mouse or two-button trackpad!
Yes, you do. See Logging Out, Shutting Down for a panoply of options.
Forth and Back, Windows/Mac
From now on, your main interaction with Boot Camp will be telling it what kind of computer you want your Mac to be today: a Windows machine or a Mac.
Presumably, though, you’ll prefer one operating system most of the time. Figure 8-2 (top and middle) shows how you specify your favorite.
TIP
If you’re running Windows and you just want to get back to OS X right now, you don’t have to bother with all the steps shown in Figure 8-2. Instead, click the Boot Camp system-tray icon and, from the shortcut menu, choose Restart in OS X.
From now on, each time you turn on the Mac, it starts up in the operating system you’ve selected.
If you ever need to switch—when you need Windows just for one quick job, for example—press the Option key as the Mac is starting up. You’ll see something like the icons shown in Figure 8-2 (bottom).
Keyboard Translation Guide
Now, if you really want to learn about Windows, you need Windows 7: The Missing Manual or Windows 8.1: The Missing Manual.
But suggesting that you go buy another book would be tacky. So here’s just enough to get by.
First of all, a Mac keyboard and a Windows keyboard aren’t the same. Each has keys that would strike the other as extremely goofy. Still, you can trigger almost any keystroke Windows is expecting by substituting special Apple keystrokes, like this:
|
Windows keystroke |
Apple keystroke |
|
Ctrl-Alt-Delete |
Control-Option-Delete |
|
Alt |
Option |
|
|
⌘ |
|
Backspace |
Delete |
|
Delete (forward delete) |
|
|
Enter |
Return or Enter |
|
Num lock |
Clear (laptops; Fn-F6) |
|
Print Screen |
F14 (laptops: Fn-F11) |
|
Print active window |
Option-F14 (laptops: Option-Fn-F11) |
The keyboard shortcuts in your programs are mostly the same as on the Mac, but you have to substitute the Ctrl key for the ⌘ key. So in Windows programs, Copy, Save, and Print are Ctrl-C, Ctrl-S, and Ctrl-P.
Similarly, the Alt key is the Windows equivalent of the Option key.
TIP
You know that awesome two-finger scrolling trick on Mac laptops? It works when you’re running Windows, too.
If you really want to understand how your Mac keyboard corresponds to your old PC keyboard, don’t miss Apple’s thrilling document on the subject at http://support.apple.com/kb/HT1167.
UP TO SPEED: REMOVING WINDOWS
Maybe you’re a switcher who held onto Windows because you were worried that you’d need it. Maybe you’re finished with the project, the job, or the phase of life that required you to use Windows on your Mac. But one way or another, there may come a time when you want to get rid of your Windows installation and reclaim all the hard drive space it was using.
You can, and better yet, the process doesn’t touch anything that’s already on the Mac side. You don’t have to erase your entire hard drive or anything—OS X simply erases what’s on the Windows partition of your hard drive, and then adds that disk space back to your main, Mac partition.
To do this, start by making sure you’ve rescued anything worth saving from the Windows side of your computer—it’s about to be erased.
Start up in OS X, quit all open programs, and make sure nobody is logged in but you. Now open up the Boot Camp Assistant program in your Applications→Utilities folder.
On the Select Tasks screen, click “Install or remove Windows 7 or a later version.” On the next screen, you’re warned: “The Windows volume and all of its contents will be permanently lost.” But you knew that. Click Restore.
That’s all there is to it.
Special notes for special setups: If you installed Windows on a separate hard drive, then rather than a partition of your main hard drive, don’t bother with all this. Just erase the Windows hard drive using Disk Utility, as described in Chapter 18, and format it as a Mac drive.
On the other hand, if your Mac has more than one internal hard drive and you created a Windows partition on one of them (rather than taking it over completely), then open Boot Camp Assistant as described above. Click the partition with Windows on it, and then click “Restore to a single Mac OS partition.” Then click Continue.
Accessing Mac Files from the Dark Side—and Vice Versa
When you’ve started up in one operating system, it’s easy to access documents that “belong” to the other one. For example:
§ When you’re running OS X, you can get to the documents you created while you were running Windows, which is a huge convenience. Just double-click the Windows disk icon (called NO NAME or Untitled), and then navigate to the Documents and Settings→[your account name]→My Documents (or Desktop).
You can only copy files to the Mac side, or open them without the ability to edit them.
TIP
You can rename the Windows disk, if you want, so it doesn’t say NO NAME for the rest of its life—as long as you do it while you’re running Windows.
§ When you’re running Windows, you can get to your Mac documents, too. Click Start→Computer. In the resulting window, you’ll see an icon representing your Mac’s hard drive partition. Open it up.
You can see and open these files. But if you want to edit them, you have to copy them to your Windows world first—onto the desktop, for example, or into a folder. (The Mac partition is “read-only” in this way, Apple says, to avoid the possibility that your Mac stuff could get contaminated by Windows viruses.)
TIP
If you did want to edit Mac files from within Windows, one solution is to buy a $50 program called MacDrive (www.mediafour.com). Another solution: Use a disk that both OS X and Windows “see,” and keep your shared files on that. A flash drive works beautifully for this. So does a shared drive on the network.
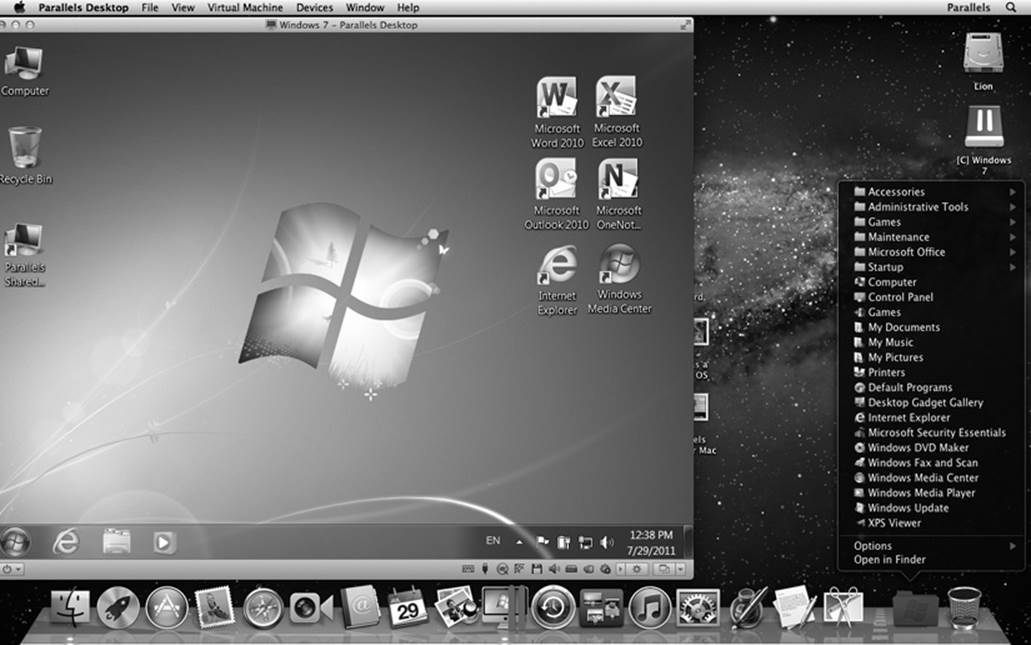
Figure 8-3. The strangest sight you ever did see: OS X and Windows. On the same screen. At the same time. Courtesy of VMware Fusion. Parallels is very similar.
Windows in a Window
The problem with Boot Camp is that every time you switch to or from Windows, you have to close down everything you were working on and restart the computer—and reverse the process when you’re done. You lose 2 or 3 minutes each way. And you can’t copy and paste between Mac and Windows programs.
There is another way: an $80 utility called Parallels Desktop for Mac (www.parallels.com), or its rival, VMware Fusion (www.vmware.com). These programs let you run Windows and OS X simultaneously; Windows hangs out in a window of its own, while the Mac is running OS X (Figure 8-3). You’re getting about 90 percent of Boot Camp’s Windows speed—plenty fast for everything but 3-D games.
Once again, you have to supply your own copy of Windows for the installation process. This time, though, it can be any version of Windows, all the way back to Windows 3.1—or even Linux, FreeBSD, Solaris, OS/2, or MS-DOS. And Windows 8.1 works great.
Having virtualization software on your Mac is a beautiful thing. You can be working on a design in iWork, duck into a Microsoft Access database (Windows only), look up an address, copy it, and paste it back into the Mac program.
And what if you can’t decide whether to use Boot Camp (fast and feature-complete, but requires restarting) or Parallels/Fusion (fast and no restarting, but no 3-D games)? No problem—install both. They coexist beautifully on a single Mac and can even use the same copy of Windows.
Together, they turn the Macintosh into the Uni-Computer: the single machine that can run nearly 100 percent of the world’s software catalog.
POWER USERS’ CLINIC: BEYOND THE BIG NAMES
Parallels and VMware Fusion are bloodthirsty rivals. New versions tumble out with alarming frequency, each designed to one-up the competitor’s.
Both also let you specify which program—Mac or Windows—opens when you double-click documents of specific types (like .jpeg or .doc). That’s yet another way Windows becomes a full player on the Mac team.
Still, these aren’t the only options. Several efforts are afoot to create software that lets you run Windows software without Windows. The most promising one is a $60 program called CrossOver (www.codeweavers.com). It’s a commercialized version of Wine, a Unix-based Windows simulator.
Sure enough, CrossOver-compatible Windows programs open up and run in OS X just as though they were real Mac programs—without your having to own, install, or fire up a copy of Windows itself.
Unfortunately, the list of compatible programs is tiny. The CrossOver Web site lists 9,000 Windows apps that work, but only about 1,000 of them work perfectly. Still, you owe it to yourself to check the list to see if what you need is CrossOver-friendly.
Virtualization Tip-O-Rama
Mastering Parallels or Fusion means mastering Windows, of course, but it also means mastering these tips:
§ You don’t have to run Windows in a window. With one keystroke, you can make your Windows simulator cover the entire screen. You’re still actually running two operating systems at once, but the whole Mac world is hidden for the moment so you can exploit your full screen. Just choose View→Full Screen.
TIP
Or use the keystroke Control-⌘-F (Parallels) or Control-⌘-Return (Fusion) to enter and exit Full Screen mode. (These keystrokes tend to change from version to version. You’ve been warned.)
§ Conversely, both Parallels and Fusion offer something called Coherence or Unity mode, in which there’s no trace of the Windows desktop. Instead, each Windows program floats in its own disembodied window, just like a Mac program; the OS X desktop lies reassuringly in the background.
TIP
In Fusion’s Unity mode and Parallels’ Coherence mode, you can access your Computer, Documents, Network, Control Panel, Search, and Run commands right from Fusion’s or Parallels’ Dock icon or launch palette, so you won’t even care that there’s no Start menu.
In Parallels, press Control-⌘-Enter to enter or exit Coherence mode. In Fusion, hit Control-⌘-U for Unity mode.
TIP
In Fusion, in Unity mode, you can use the usual Mac keystrokes for Cut, Copy, and Paste within Windows applications (⌘-X, ⌘-C, and ⌘-V). In Parallels, on the other hand, you can remap all Windows Ctrl-key shortcuts to the ⌘ key in Preferences.
§ To send the “three-fingered salute” to shut down, restart, or lock Windows (usually Ctrl-Alt-Delete), press Control-Option-Delete (Fusion) or Control-Fn-Alt-Delete (Parallels). Or use the Send Control-Alt-Delete command in the menus.
§ You can drag files back and forth between the Mac and Windows universes. Just drag icons into, or out of, the Windows window.
§ If you have a one-button mouse, you can “right-click” in Parallels by Control-Shift-clicking. In Fusion, Control-click instead. On Mac laptops, you can right-click by putting two fingers on the trackpad as you click.
§ When you quit the virtualization program, you’re not really shutting down the PC; you’re just suspending it, or putting it to sleep. When you double-click the Parallels/VMware icon again, everything in your Windows world is exactly as you left it.
§ Your entire Windows universe of files, folders, and programs is represented by a single file on your hard drive. In Parallels, it’s in your Home→Documents→Parallels folder. In Fusion, it’s in your Home→Documents→Virtual Machines folder.
That’s super convenient, because it means you can back up your entire Windows “computer” by dragging a single icon to another drive. And if your Windows world ever gets a virus or a spyware infestation, you can drag the entire thing to the Trash—and restore Windows from that clean backup.
Life with Microsoft Exchange
In the corporate world, Microsoft Exchange is the 800-pound gorilla. It’s the networking software that runs the email, address books, and calendars for hundreds or thousands of employees. All of this communicates with a central master database whose heart beats away in some closet or back room at your company’s headquarters.
For years, Macs have been second-class citizens in Corporate America. As long as they couldn’t talk to the Exchange brain, they weren’t much use outside the graphic-design department. (You could buy add-on software or muck with workarounds, but you always felt like a weirdo.)
Now, however, Exchange compatibility is built in. In the Mac’s Calendar, your company’s Exchange calendar shows up. In Contacts, your company’s names and addresses show up. In Mail, you can get all your corporate email. Best of all, this information shows up side by side with your own personal data, so you can have it all in one place. All the conveniences of OS X now apply to your corporate email: Spotlight, Quick Look, data detectors, and so on.
GEM IN THE ROUGH: DELEGATING YOUR CALENDARS
Once you’re all Exchanged up, you can even delegate your calendar—that is, permit someone else on your corporate network to see (and, if you wish, edit) your calendar from across the network. That’s handy when you’re a busy executive and you want your personal assistant to help you manage your busy life, or when you’re going to be out of town and you’ve authorized a trusted minion to carry on with your calendar in your absence.
(This is not the same as publishing your calendar as described on “Publishing” Calendars to the Web. Your Exchange calendar isn’t actually going to move. It’ll sit right there on the server—you’re just giving someone else access to it.)
To set this up, choose Calendar→Preferences→Accounts. (If you have more than one account, choose the one you want to share from the Accounts list.)
Click Delegation. Click Edit. On the Manage Account Access screen, click ![]() , and type the name of the person you want to share your calendar with. You can also specify how much access you want that person to have; Read Only means they can just see your life, and Read & Write means they can actually edit it. You can grant different levels of access to your calendar and your Tasks list.
, and type the name of the person you want to share your calendar with. You can also specify how much access you want that person to have; Read Only means they can just see your life, and Read & Write means they can actually edit it. You can grant different levels of access to your calendar and your Tasks list.
Finally, click Done.
Now change hats. Suppose you’re the trusted assistant.
On your Mac, choose Calendar→Preferences→Accounts. You’ll find the account that’s been shared with you on “Delegation – Accounts I can access.”
Finally, turn on the Show checkbox. Close the Preferences dialog box to return to the main Calendar display. Here your boss’s calendars (appointment categories) show up in the left-side list; turn on the checkboxes of the ones you want to appear on the calendar grid.
If your company is using Exchange 2007 or later (Service Pack 1, Update Rollup 4 and later), setting this up could not be easier.
Connecting to Exchange
To connect to your company’s Exchange system, open System Preferences→Internet Accounts. Click the big Microsoft Exchange button, and then proceed as shown in Figure 8-4.
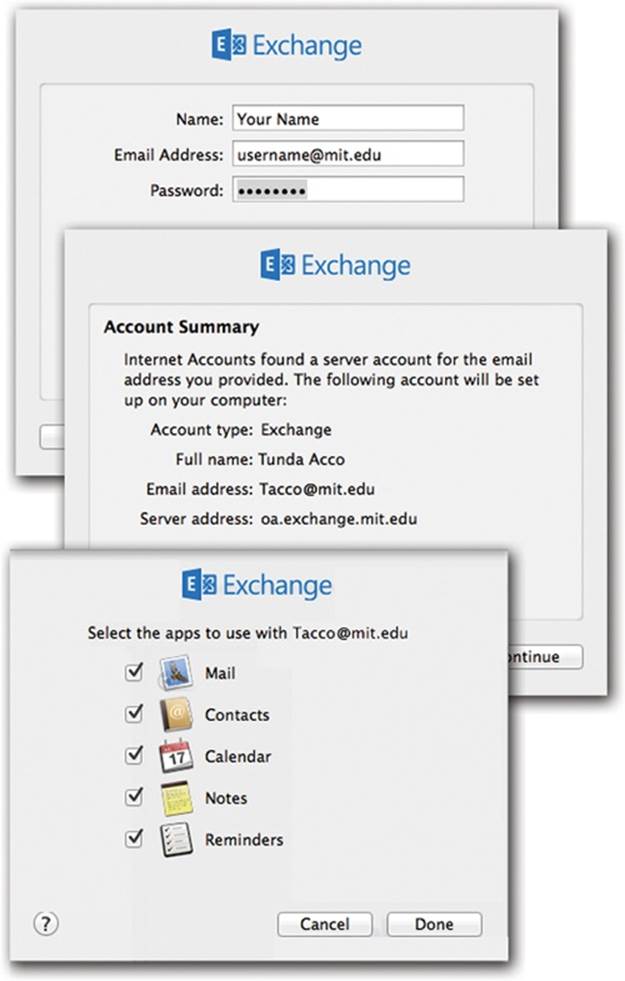
Figure 8-4. Top: In System Preferences, fill in your Exchange information—your email address and password—as provided by your cheerful network administrator. Middle: If you entered your information correctly and your Exchange server recognized you, then this box appears, summarizing the Mac’s understanding of your Exchange account. You’re all set. If your Mac doesn’t find the server, then either (a) your company doesn’t use Exchange 2007 or later, or (b) your network geek hasn’t turned on Exchange Autodiscover. In that case, you have no choice but to call that person over to your desk and either (a) harangue him for not turning on Autodiscover, or (b) have him fill in the server address and other boxes by hand. Bottom: Which elements of your Exchange account do you want your Mac to display? If you choose Mail, for example, then your Mail app will display your Exchange email account. Contacts, Calendars, Notes, and Reminders will all show Exchange’s information as specially identified accounts, which you can hide or show with one click.
Now one of two things happens:
Exchange in Mail
Once everything is set up, open Mail. If you have a lot of mail, it may take time for Mail to synchronize with the Exchange server and display your messages. But it gets there eventually. Your Exchange account appears with its own heading, beneath your personal accounts (Figure 8-5, right).
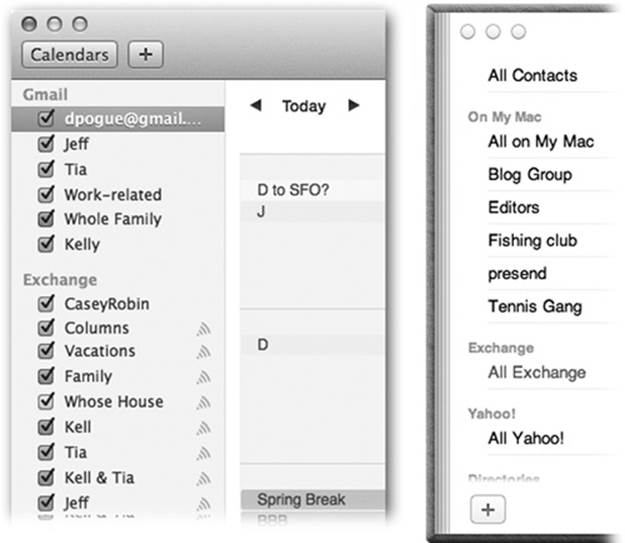
Figure 8-5. Once everything is hooked up, a new heading appears in Mail, Calendar (left), and Contacts (right), named after your Exchange account. That’s your corporate life, which you can hide and show at will.
Now you can send and receive email, create notes and to-do items, respond to emailed invitations, and so on. All the Mail features described in Chapter 11 are ready to go: Spotlight can search all your accounts simultaneously, Smart Folders can round up messages from one account or all of them, Quick Look can show you attachments without your having to open them in a separate program, and so on.
Your corporate appointments now show up in the Mac’s calendar (Calendar), neatly filed under their own heading in the Calendars list (Figure 8-5).
And in Contacts, your company’s Global Address Lists show up as a group in the Groups list, as shown at right in Figure 8-5.