MacBook in easy steps: Covers OS X Yosemite (10.10) (2015)
11
MacBook Networking
This chapter looks at how to use your MacBook to create and work with networks between other computers for sharing information.
Networking Overview
Network Settings
Network Diagnostics
Connecting to a Network
File Sharing
Sharing with AirDrop
Networking Overview
Before you start sharing files directly between computers, you have to connect them together. This is known as networking and can be done with two computers in the same room, or with thousands of computers in a major corporation. If you are setting up your own small network it will be known in the computing world as a Local Area Network (LAN). When setting up a network there are various pieces of hardware that are initially needed to join all of the required items together. Once this has been done, software settings can be applied for the networked items. Some of the items of hardware that may be required include:
•A network card. This is known as a Network Interface Card (NIC); all recent MacBooks have them built-in.
•An Ethernet port and Ethernet cable. This enables you to make the physical connection between devices. Ethernet cables come in a variety of forms, but the one you should be looking for is the Cat5E type as this allows for the fastest transfer of data. If you are creating a wireless network, you will not require these.
•A hub. This is a piece of hardware, with multiple Ethernet ports, that enables you to connect all of your devices together and let them communicate with each other. However, conflicts can occur with hubs if two devices try to send data through it at the same time.
•A switch. This is similar in operation to a hub but is more sophisticated in its method of data transfer, thus allowing all of the machines on the network to communicate simultaneously, unlike a hub.
Once you have worked out all of the devices you want to include on your network you can arrange them accordingly. Try to keep the switches and hub within relative proximity of a power supply and, if you are using cables, make sure they are laid out safely.
It is perfectly possible to create a simple network of two computers just by joining them with an Ethernet cable.
Ethernet network
The cheapest and easiest way to network computers is to create an Ethernet network. This involves buying an Ethernet hub or switch, which enables you to connect several devices to a central point, i.e. the hub or switch. All MacBooks, and most modern printers, have an Ethernet connection, so it is possible to connect various devices, not just computers. Once all of the devices have been connected by Ethernet cables, you can then start applying network settings.
AirPort network
Another option for creating a network is using Apple’s own wireless system, AirPort. This creates a wireless network and there are two main options used by Apple computers: AirPort Express, using the IEEE 802.11n standard, which is more commonly known as Wi-Fi, which stands for Wireless Fidelity, and the newer AirPort Extreme, using the next generation IEEE 802.11ac standard which is up to five times faster than the 802.11n standard. Thankfully, AirPort Express and Extreme are also compatible with devices based on the older IEEE standards, 802.11b/g/n, so one machine loaded with AirPort Extreme can still communicate wirelessly with an older AirPort one.
One of the issues with a wireless network is security, since it is possible for someone with a wireless-enabled machine to access your wireless network if they are within range. However, in the majority of cases the chances of this happening are fairly slim, although it is an issue about which you should be aware.
The basics of a wireless network with Macs is an AirPort card (either AirPort Express or AirPort Extreme) installed in all of the required machines and an AirPort base station that can be located anywhere within 150 meters of the AirPort enabled computers. Once the hardware is in place, wireless-enabled devices can be configured by using the AirPort Setup Assistant utility found in the Utilities folder. After AirPort has been set up, the wireless network can be connected. All of the wireless-enabled devices should then be able to communicate with each other, without the use of a multitude of cables.
Wireless network
A wireless network can also be created with a standard wireless router, rather than using the AirPort option.

Another method for connecting items wirelessly is called Bluetooth. This covers much shorter distances than AirPort and is generally used for items like printers and cellphones. Bluetooth devices can be connected by using the Bluetooth Setup Assistant in the Utilities folder.
Network Settings
Once you have connected the hardware required for a network, you can start applying the network settings that are required for different computers to communicate with one another. To network two Mac computers:
![]() In System Preferences, click on the Network button
In System Preferences, click on the Network button

![]() For a wireless connection, click on the Turn Wi-Fi On button
For a wireless connection, click on the Turn Wi-Fi On button
![]() Details of wireless settings are displayed
Details of wireless settings are displayed
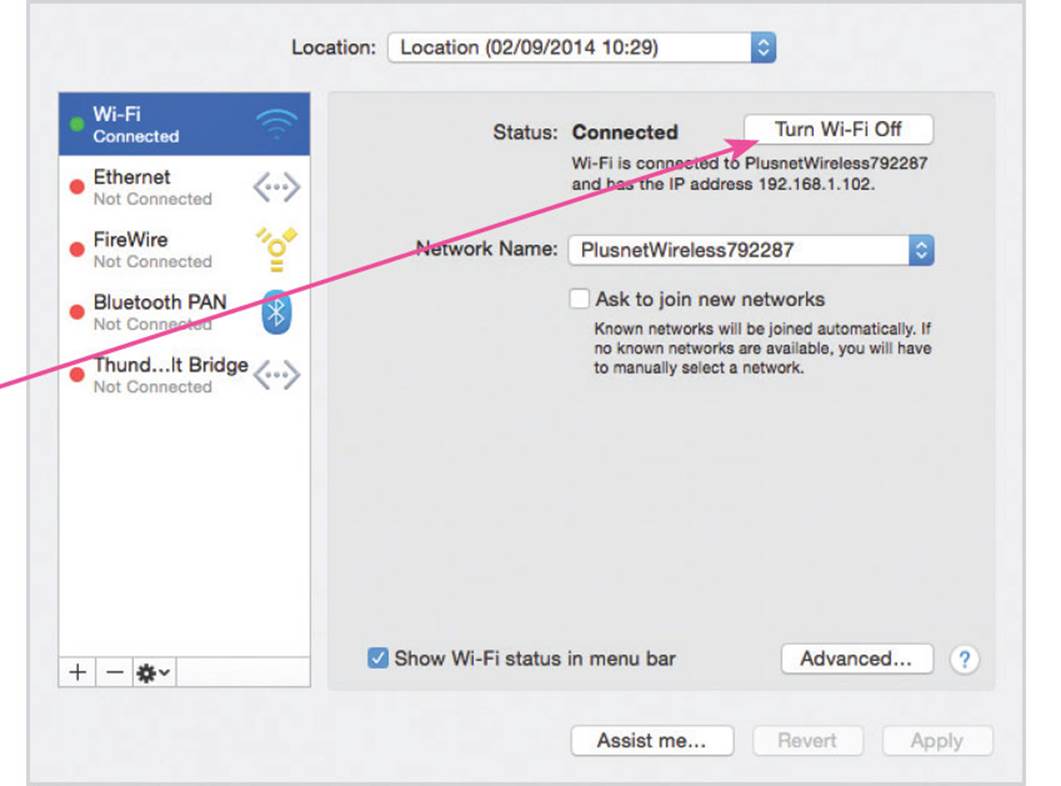
![]() If you are already connected to a network, this will be shown in the Status section. If you are connected to a wireless network the connection will be via AirPort
If you are already connected to a network, this will be shown in the Status section. If you are connected to a wireless network the connection will be via AirPort

![]() The network name is shown here
The network name is shown here

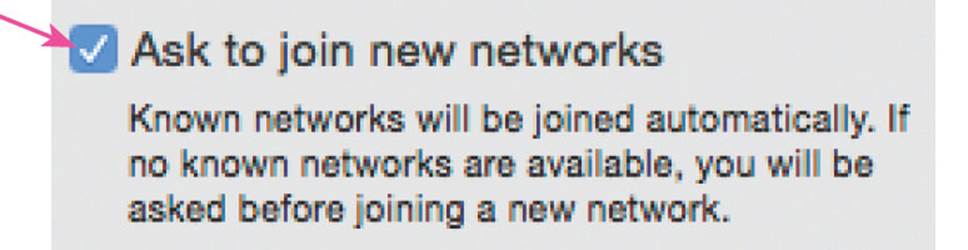
![]() Check On this box if you want to be notified before joining a new network
Check On this box if you want to be notified before joining a new network

If you turn off the Wi-Fi function, this will disconnect you from your network and also the Internet.
If you are asked to join new networks, all of the available networks in range will be displayed, not just the one you may want to join.
![]() For a cable connection, connect an Ethernet cable
For a cable connection, connect an Ethernet cable

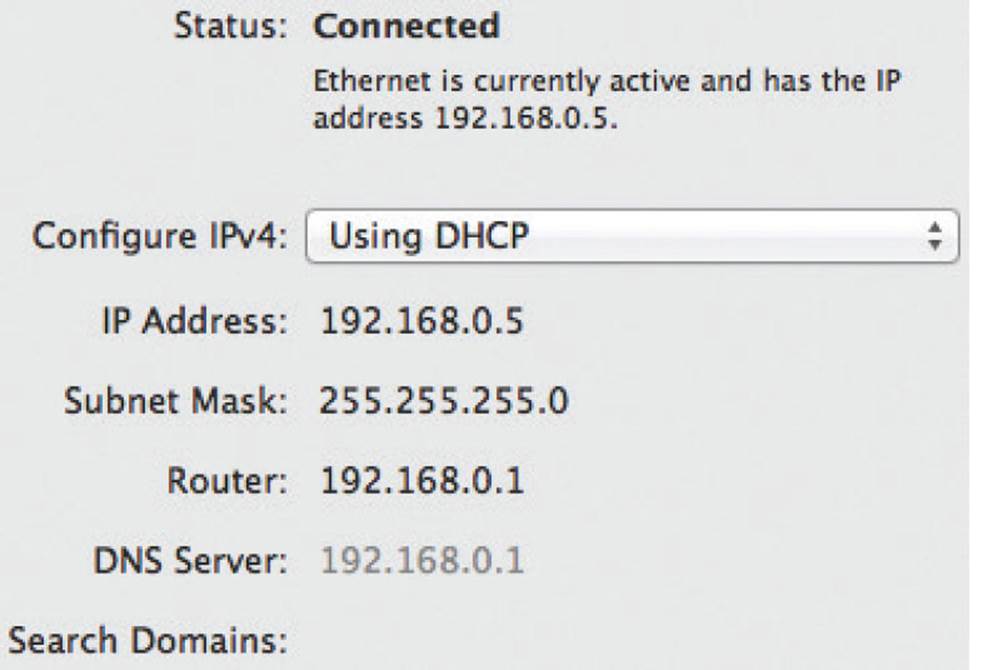
![]() Details of the cable settings are displayed
Details of the cable settings are displayed
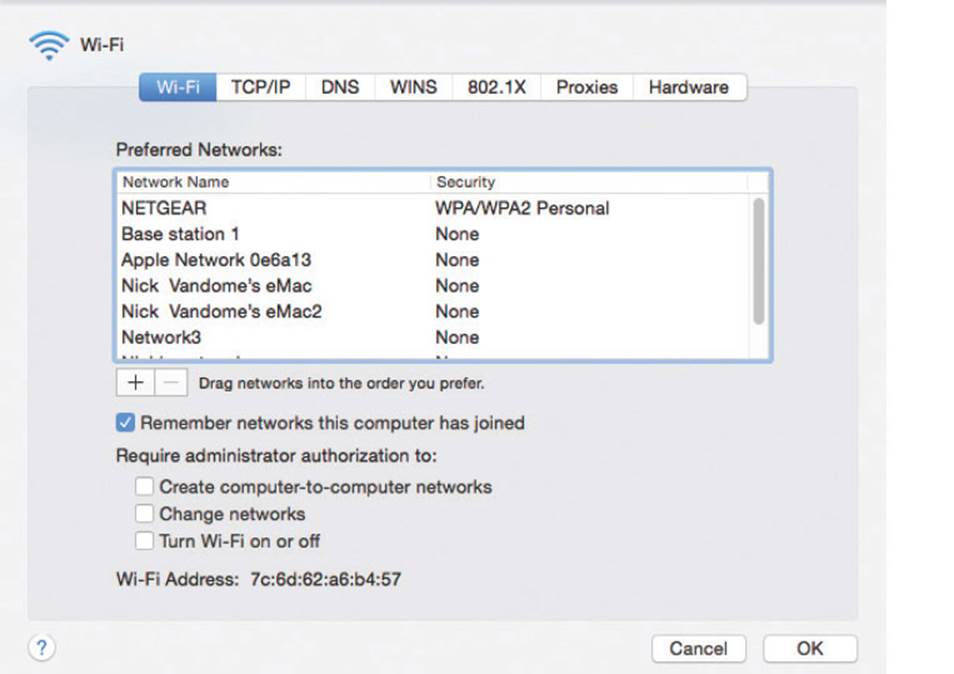
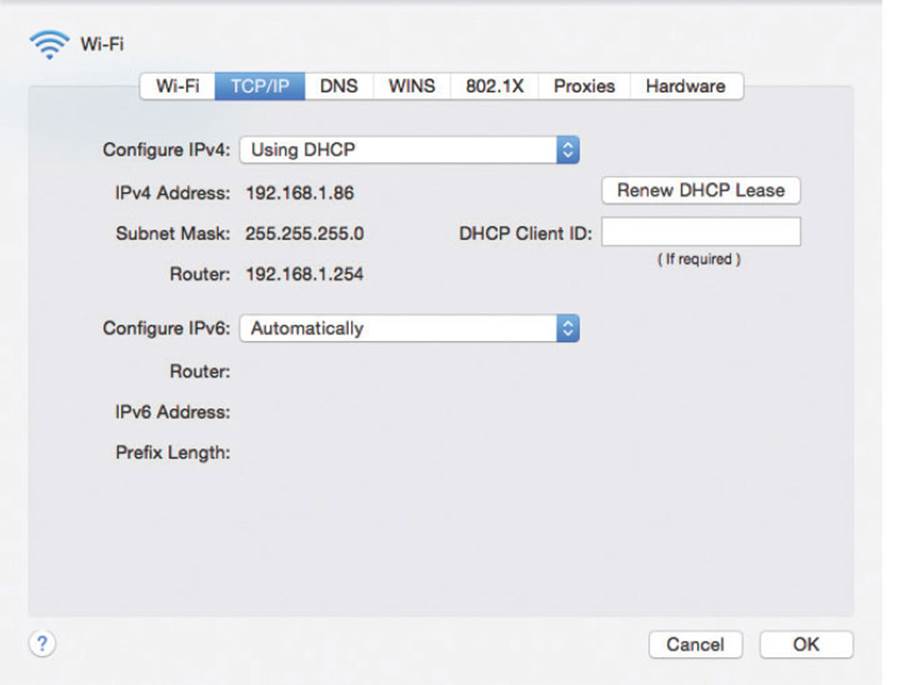
![]() Click on the Advanced... button to access a range of options for both Wi-Fi and cable network connections
Click on the Advanced... button to access a range of options for both Wi-Fi and cable network connections
![]()
![]() Click on the tabs at the top of the window to view the advanced options for each type of connection
Click on the tabs at the top of the window to view the advanced options for each type of connection
For an Ethernet connection you need to have an Ethernet cable connected to your MacBook and the router.
Network Diagnostics
If your network is unavailable you can check to see what the problem is. To do this:
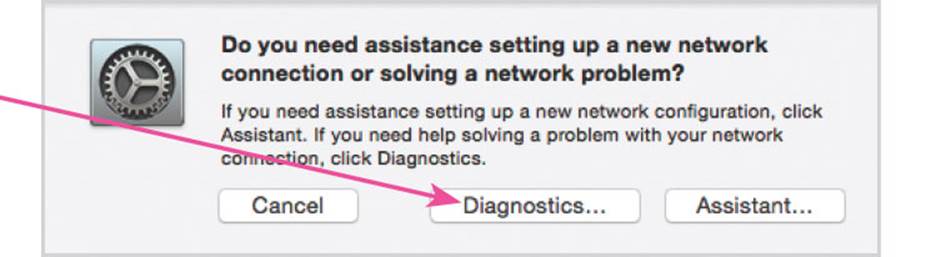
![]() If there is a problem connecting to the Internet, click on the Assist me… button in the Network window
If there is a problem connecting to the Internet, click on the Assist me… button in the Network window

![]() Click on the Diagnostics… button to troubleshoot a connection problem
Click on the Diagnostics… button to troubleshoot a connection problem
![]() The status of the network is shown in the left-hand panel. Select the method you want to connect to a network with, e.g. Wi-Fi (wireless)
The status of the network is shown in the left-hand panel. Select the method you want to connect to a network with, e.g. Wi-Fi (wireless)
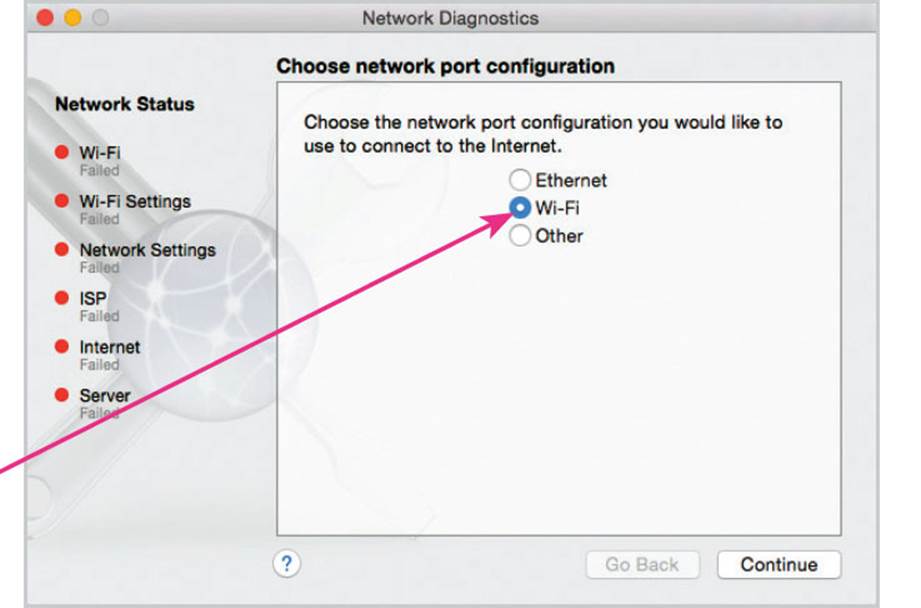
![]() Click on the Continue button
Click on the Continue button

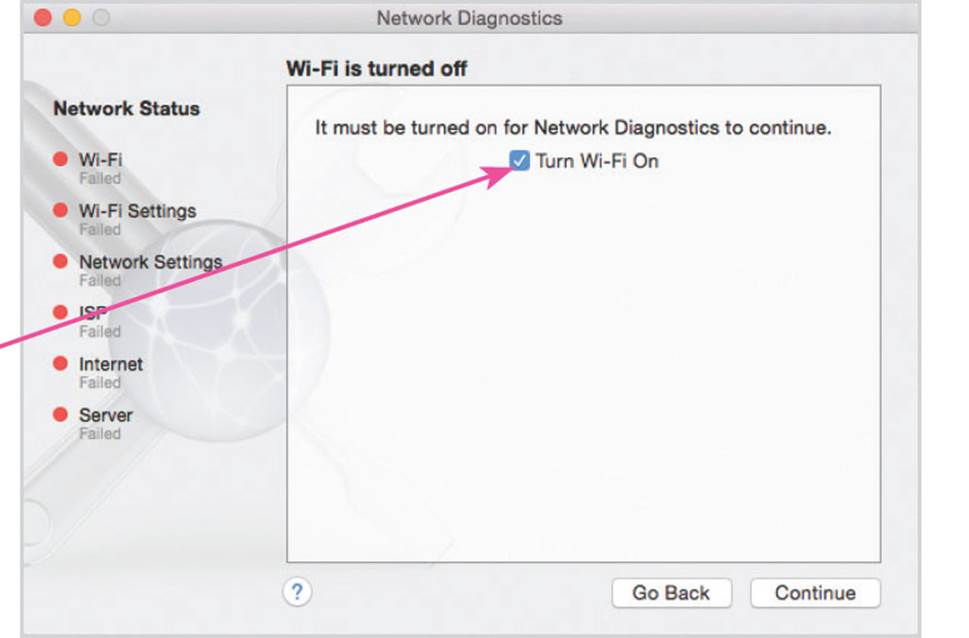
![]() Wi-Fi needs to be turned on for the network diagnostics to continue. Check On the Turn Wi-Fi On box and click the Continue button
Wi-Fi needs to be turned on for the network diagnostics to continue. Check On the Turn Wi-Fi On box and click the Continue button
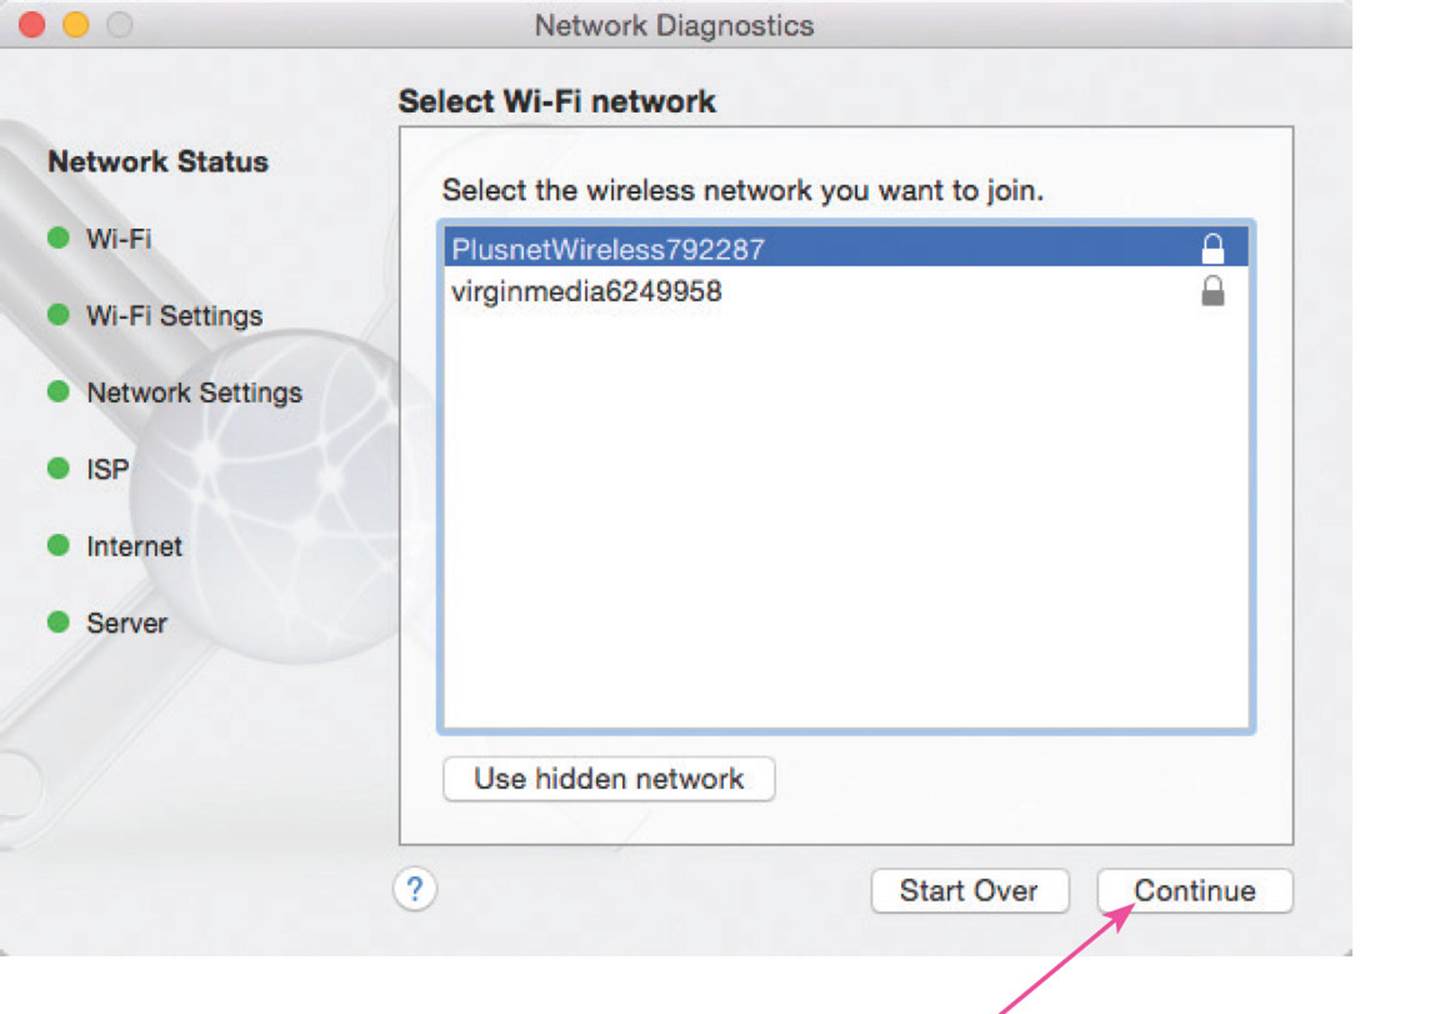
![]() Select an available network. The left-hand panel will display the status for each required element
Select an available network. The left-hand panel will display the status for each required element

Over time, you may end up with a number of network names, not all of which are still used. Delete any names that are redundant so that the list does not become too long.
![]() Click on the Continue button
Click on the Continue button
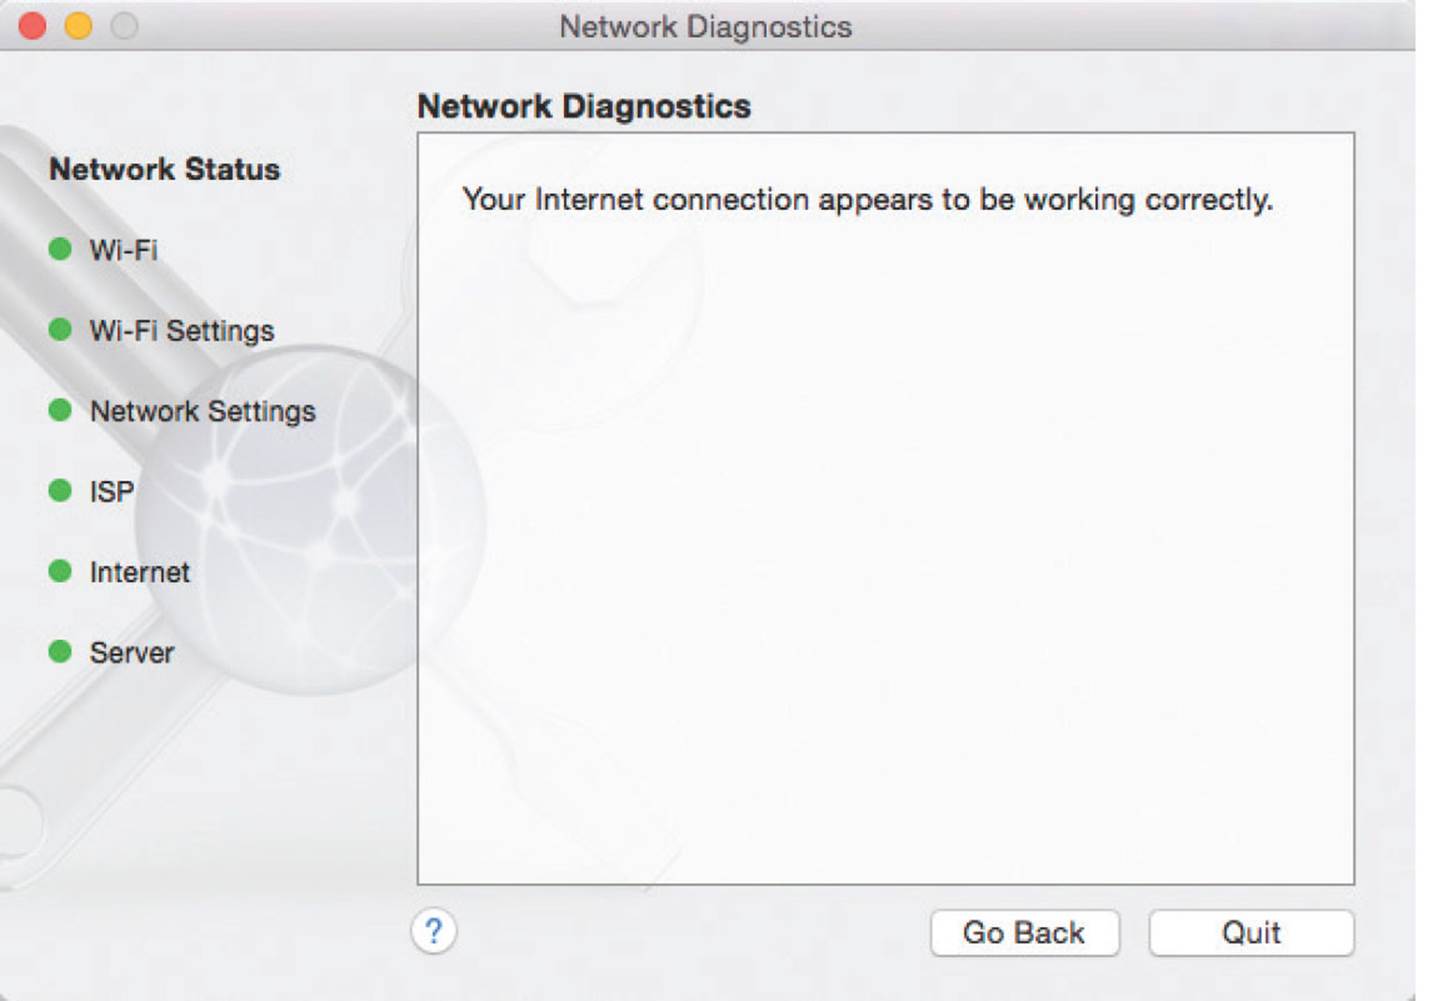
![]() The status of your network is displayed. Click on the Quit button to finish the network diagnostics
The status of your network is displayed. Click on the Quit button to finish the network diagnostics
Connecting to a Network
Connecting as a registered user
To connect as a registered user (usually as yourself when you want to access items on another one of your own computers):
![]() Other connected computers on the network will show up in the Shared section in the Finder. Click on a networked computer
Other connected computers on the network will show up in the Shared section in the Finder. Click on a networked computer

![]() Click on the Connect As... button
Click on the Connect As... button

![]() Check On the Registered User button and enter your username and password
Check On the Registered User button and enter your username and password
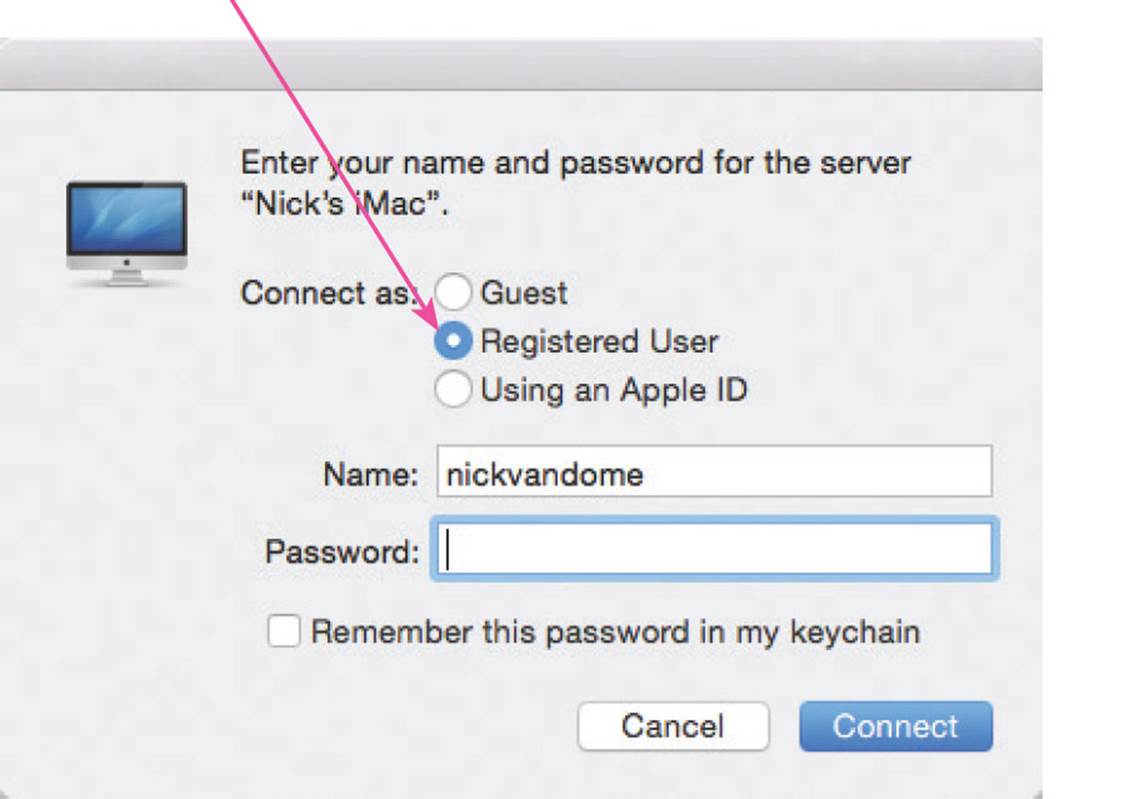
Your username and password is specified in the Accounts section of System Preferences.
![]() Click on the Connect button
Click on the Connect button
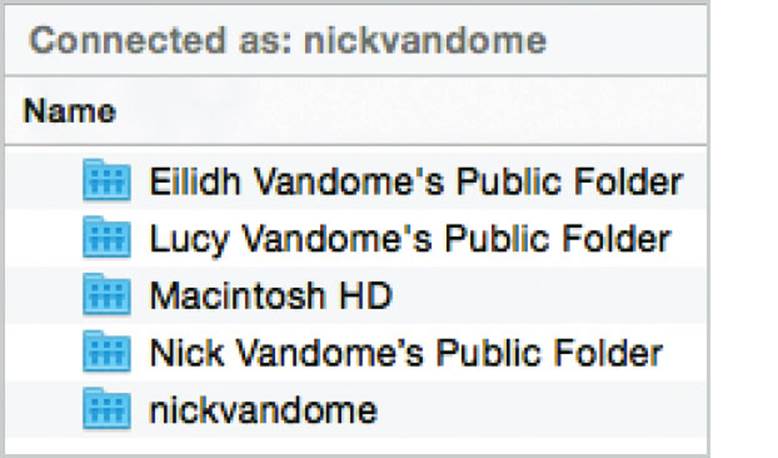
![]() The hard drive and home folder of the networked computer is available to the registered user. Double-click on an item to view its contents
The hard drive and home folder of the networked computer is available to the registered user. Double-click on an item to view its contents
You can disconnect from a networked computer by ejecting it in the Finder, in the same way as you would a removable drive, such as a DVD.
Guest users
Guest users on a network are users other than yourself, or other registered users, to whom you want to limit access to your files and folders. Guests only have access to a folder called the Drop Box in your own Public folder. To share files with Guest users, you have to first copy them into the Drop Box. To do this:
![]() Create a file and select File > Save from the Menu bar
Create a file and select File > Save from the Menu bar
![]() Navigate to your own home folder (this is created automatically by OS X and is displayed in the Finder Sidebar)
Navigate to your own home folder (this is created automatically by OS X and is displayed in the Finder Sidebar)

![]() Double-click on the Public folder
Double-click on the Public folder

![]() Double-click on the Drop Box folder
Double-click on the Drop Box folder

![]() Save the file into the Drop Box
Save the file into the Drop Box
Drop Box is not the same as Dropbox. Dropbox is a cloud storage facility for documents, photos, etc.
If another user is having problems accessing the files in your Drop Box, check the permissions settings assigned to the files (see here for further details).
The contents of the Drop Box can be accessed by other users on the same computer, as well as by users on a network.
Accessing a Drop Box
To access files in a Drop Box:
![]() Double-click on a networked computer in the Finder
Double-click on a networked computer in the Finder

![]() Click on the Connect As... button in the Finder window
Click on the Connect As... button in the Finder window

![]() Select the Guest button
Select the Guest button

![]() Click on the Connect button
Click on the Connect button

![]() Double-click on the administrator’s home folder
Double-click on the administrator’s home folder

![]() Double-click on the Drop Box folder to access the files within it
Double-click on the Drop Box folder to access the files within it

It is better to copy files into the Drop Box rather than moving them from their current location completely.
Set permissions for how the Drop Box operates by selecting it in the Finder and Ctrl+clicking on it. Select Get Info from the menu and apply the required settings under the Ownership & Permissions heading.
File Sharing
One of the main reasons for creating a network of two or more computers is to share files between them. On networked MacBooks, this involves setting them up so that they can share files and then access them.
Setting up file sharing
To set up file sharing on a networked MacBook:
![]() Click on the System Preferences icon on the Dock
Click on the System Preferences icon on the Dock

![]() Click on the Sharing icon
Click on the Sharing icon

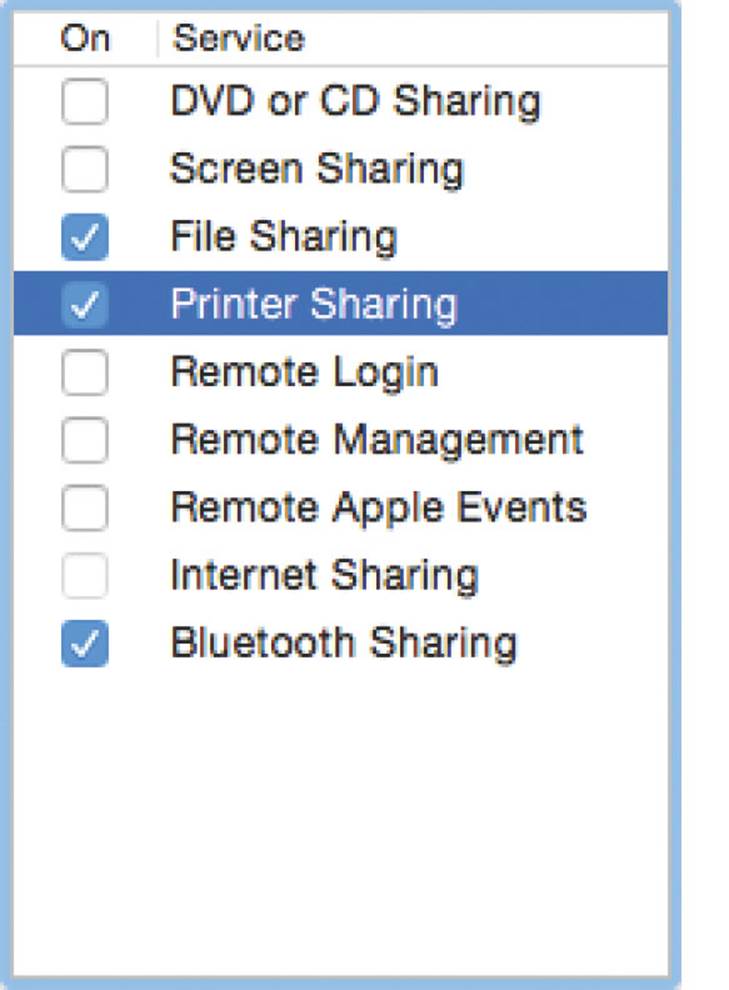
![]() Check the boxes next to the items you want to share (the most common items to share are files and printers)
Check the boxes next to the items you want to share (the most common items to share are files and printers)
![]() Click on the padlock to close it and prevent more changes
Click on the padlock to close it and prevent more changes

If no file sharing options are enabled in the Sharing preference window, no other users will be able to access your computer or your files, even on a network.
Networks can also be created, and items shared, between Macs and Windows-based PCs.
Sharing with AirDrop
Files can also be shared between MacBooks and other compatible Apple devices, such as iPads and iPhones, using the AirDrop feature. This enables the devices to connect wirelessly and you can then share content between them. To do this:
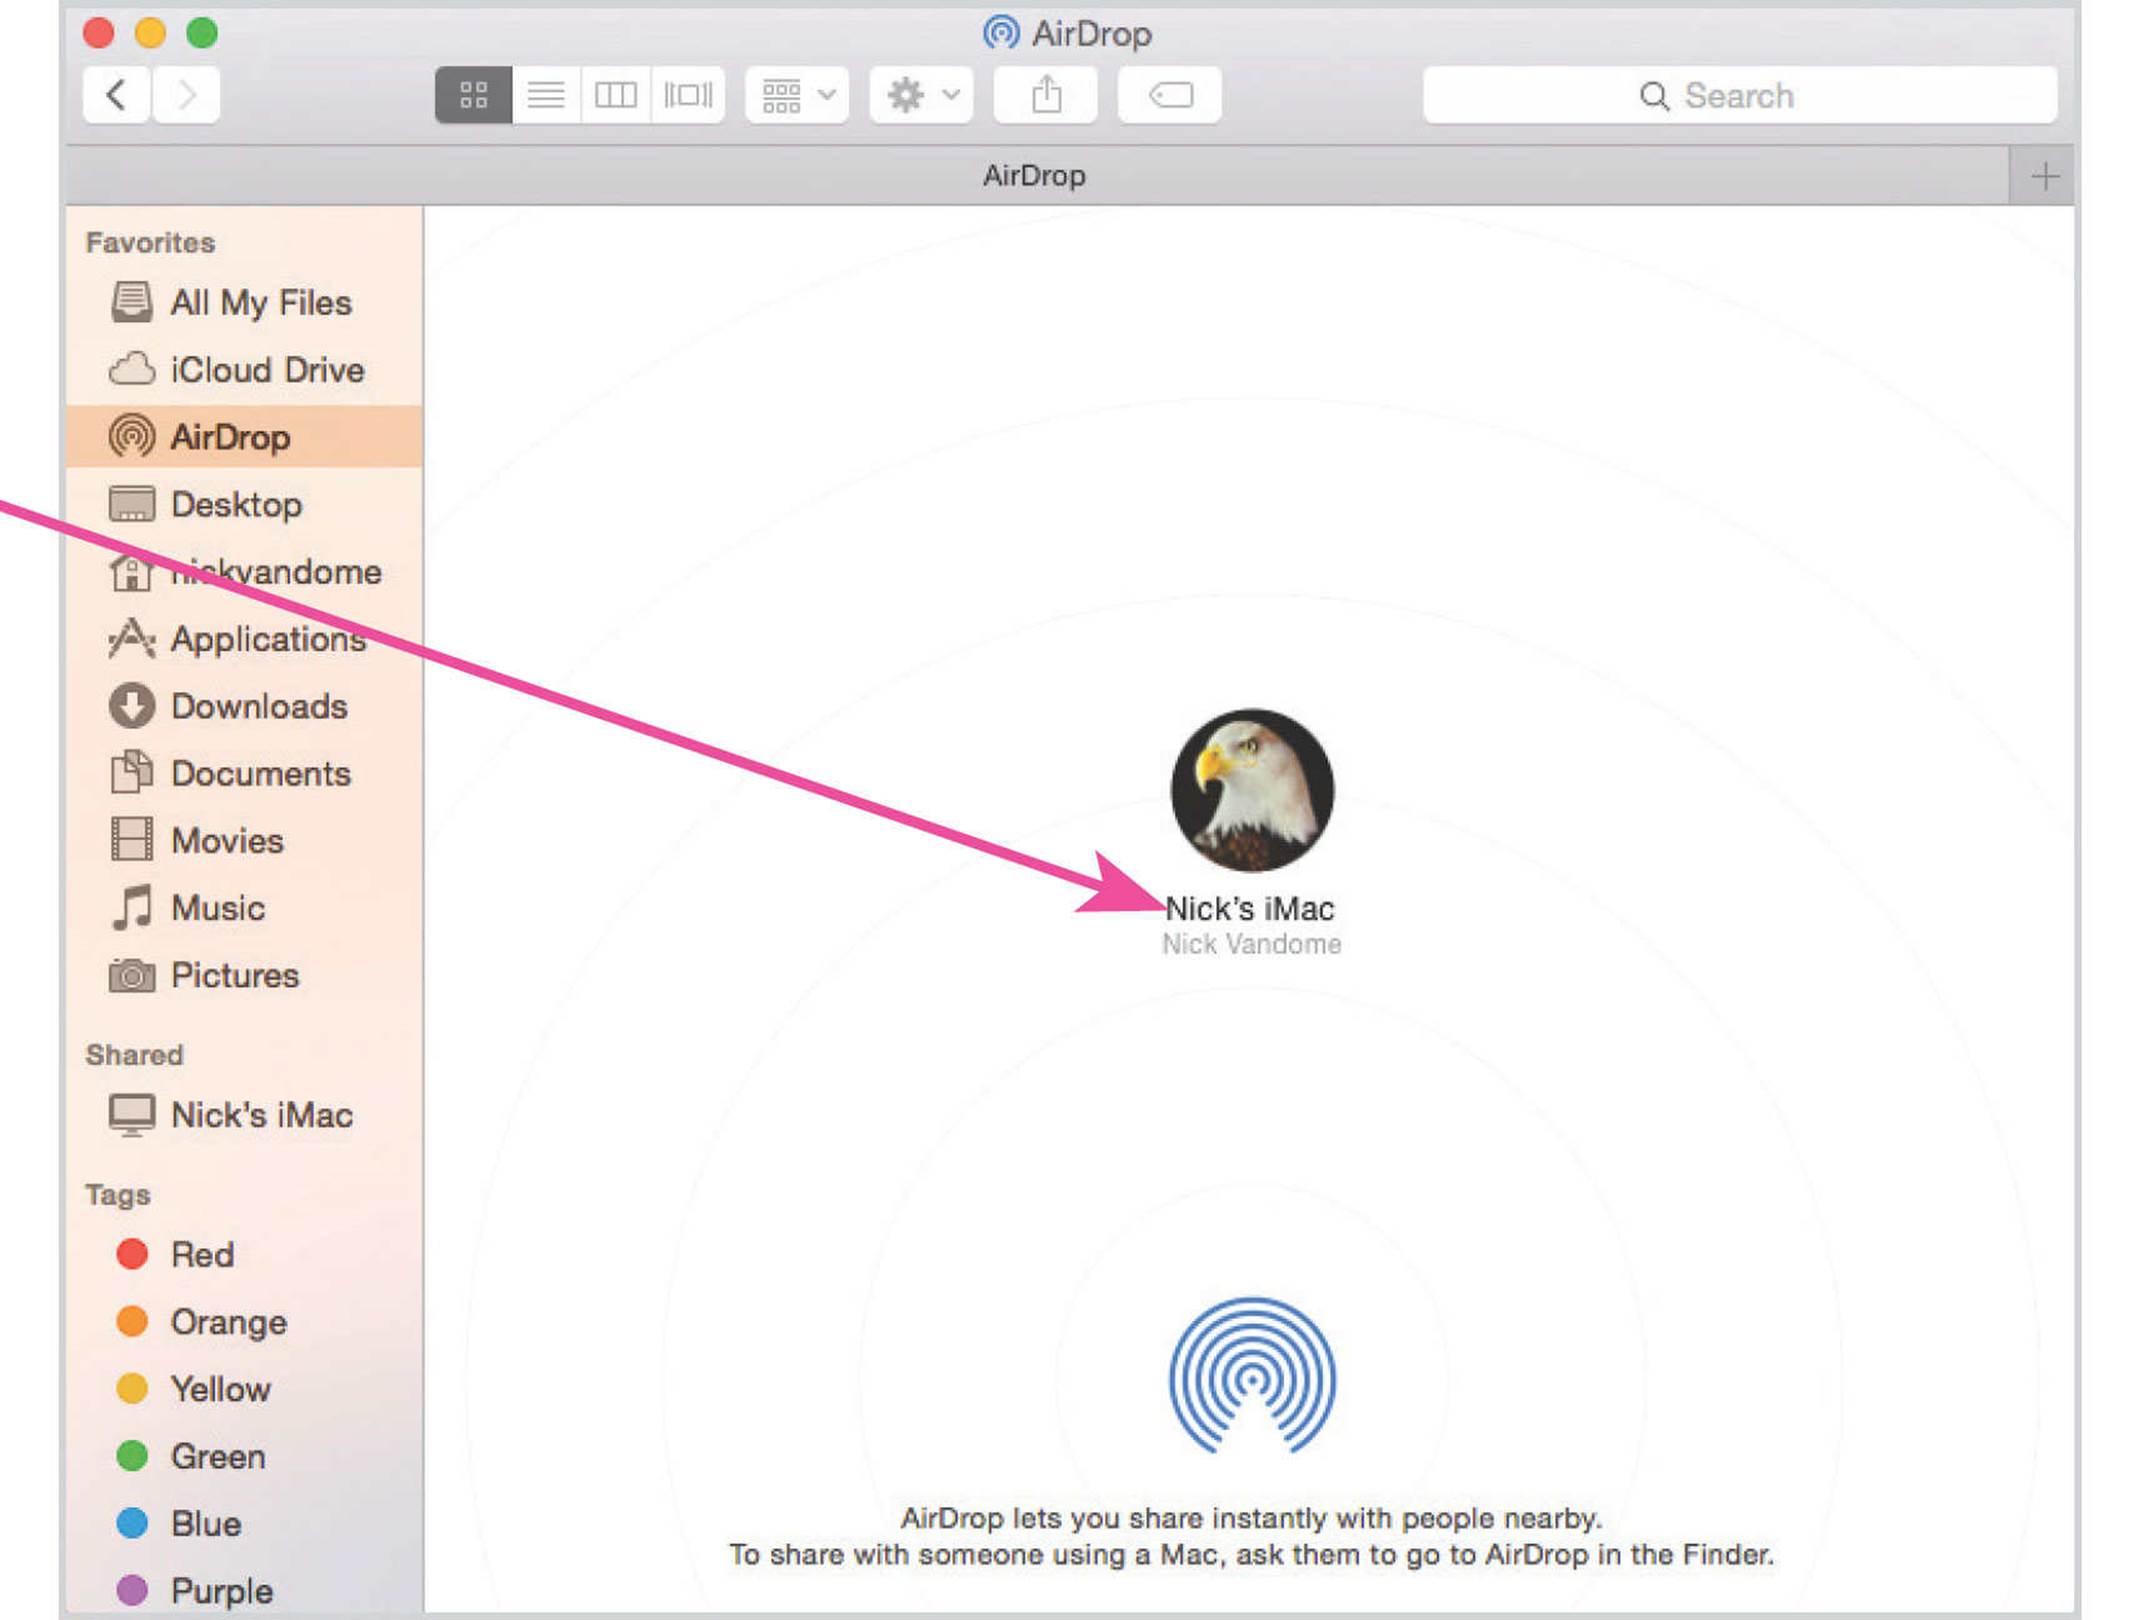
![]() In the Finder Sidebar, click on the AirDrop button
In the Finder Sidebar, click on the AirDrop button

![]() Other users in range with AirDrop are shown in the main Finder window
Other users in range with AirDrop are shown in the main Finder window
![]() Drag content from another Finder window (or the Desktop) over the other user’s icon to share it with them
Drag content from another Finder window (or the Desktop) over the other user’s icon to share it with them

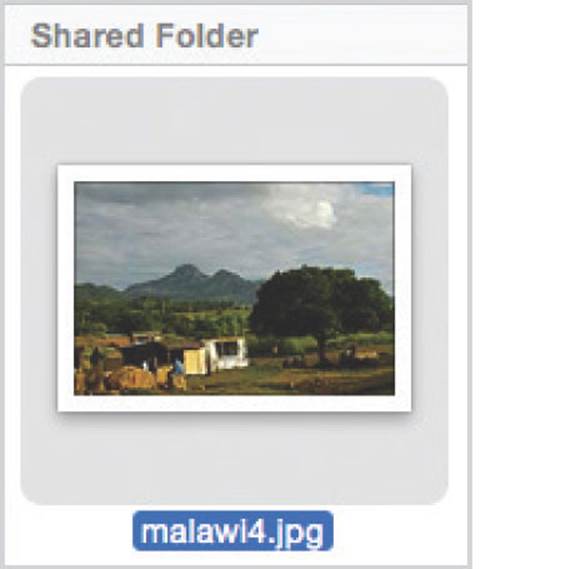
![]() Content that has been shared from another device is initially placed in the Downloads folder in the Finder. It can then be copied from here and placed in another location, if required
Content that has been shared from another device is initially placed in the Downloads folder in the Finder. It can then be copied from here and placed in another location, if required

Devices do not have to be on the same network to share content with AirDrop, as a wireless connection is created between the devices.
Content can also be shared via AirDrop by selecting it in the Finder and clicking on the Share button. Then select AirDrop from the options.