MacBook in easy steps: Covers OS X Yosemite (10.10) (2015)
2
Around a MacBook
This chapter looks at getting started with your MacBook: from opening it up and turning it on through to keyboard functions and the System Preferences that are available. It also looks at setting up notifications for a variety of items such as emails and alerts.
Opening Up
Turning On
MacBook Desktop
Apple Menu
Keyboard Buttons
System Preferences
Notifications
CDs and DVDs
Connecting a Printer
External Drives
Opening Up
The first step towards getting started with a new MacBook is to open it ready for use.
There is no physical latch on the front of a MacBook, just a small groove at the front where the top and bottom parts meet.
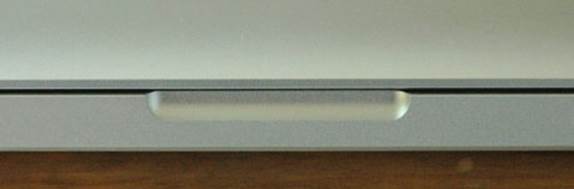
Instead of a latch, a MacBook has a magnetic closing mechanism, which engages when the monitor screen is closed onto the main body of the MacBook. To open it, raise it firmly upwards from the center, where there is a smooth groove.


Open the screen of a MacBook carefully, so as not to put any unnecessary pressure on the connection between the screen and the main body of the MacBook.
Once the MacBook has been opened the screen should stay in whatever position it is placed.
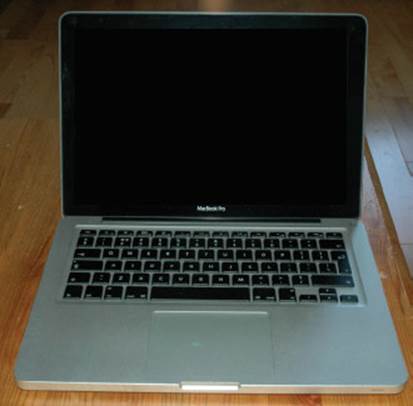
Turning On
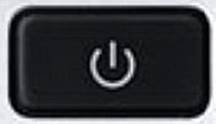
In the latest range of MacBooks, the button for turning on, ready for use, is located at the top-right corner of the keyboard:
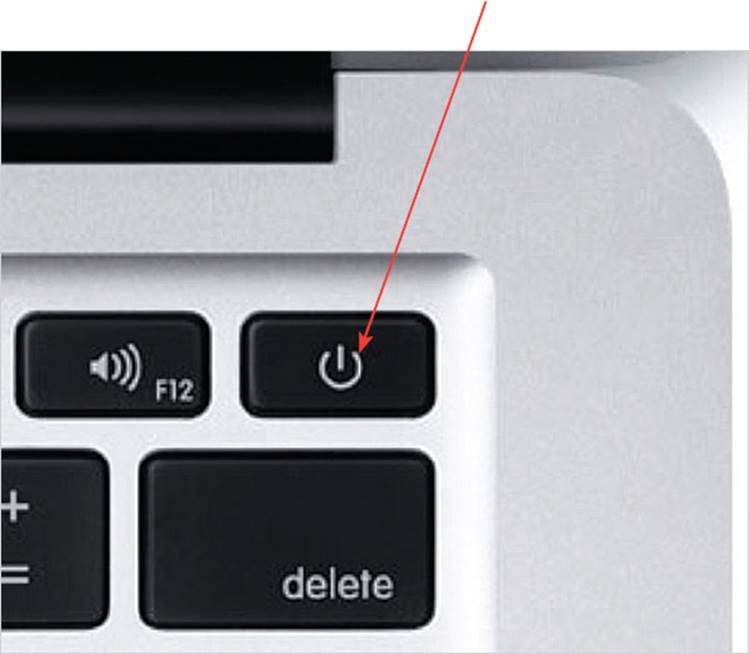
The MacBook can be turned on by pushing this button firmly. The MacBook will then make the Apple “chime” to indicate that it has been turned on and has begun the startup process. Once the MacBook has completed this process the opening screen should be displayed. This will include the Desktop and the Dock, which is located at the bottom of the screen. At this point the MacBook is ready for use.
Press the button for turning on with one firm, definite motion. If you accidentally press it twice in quick succession, the MacBook may turn on and then shut down immediately.
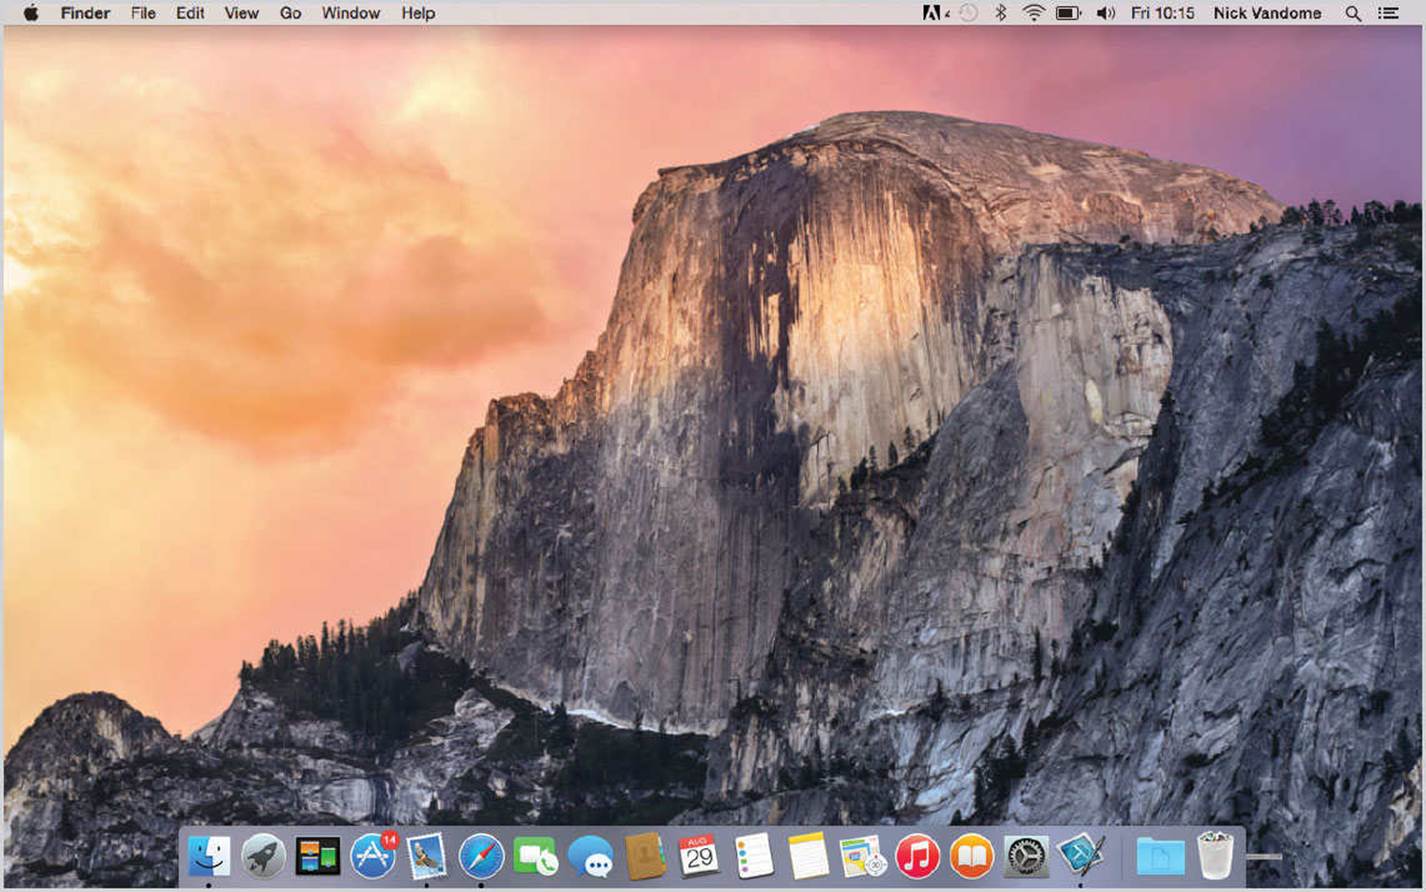
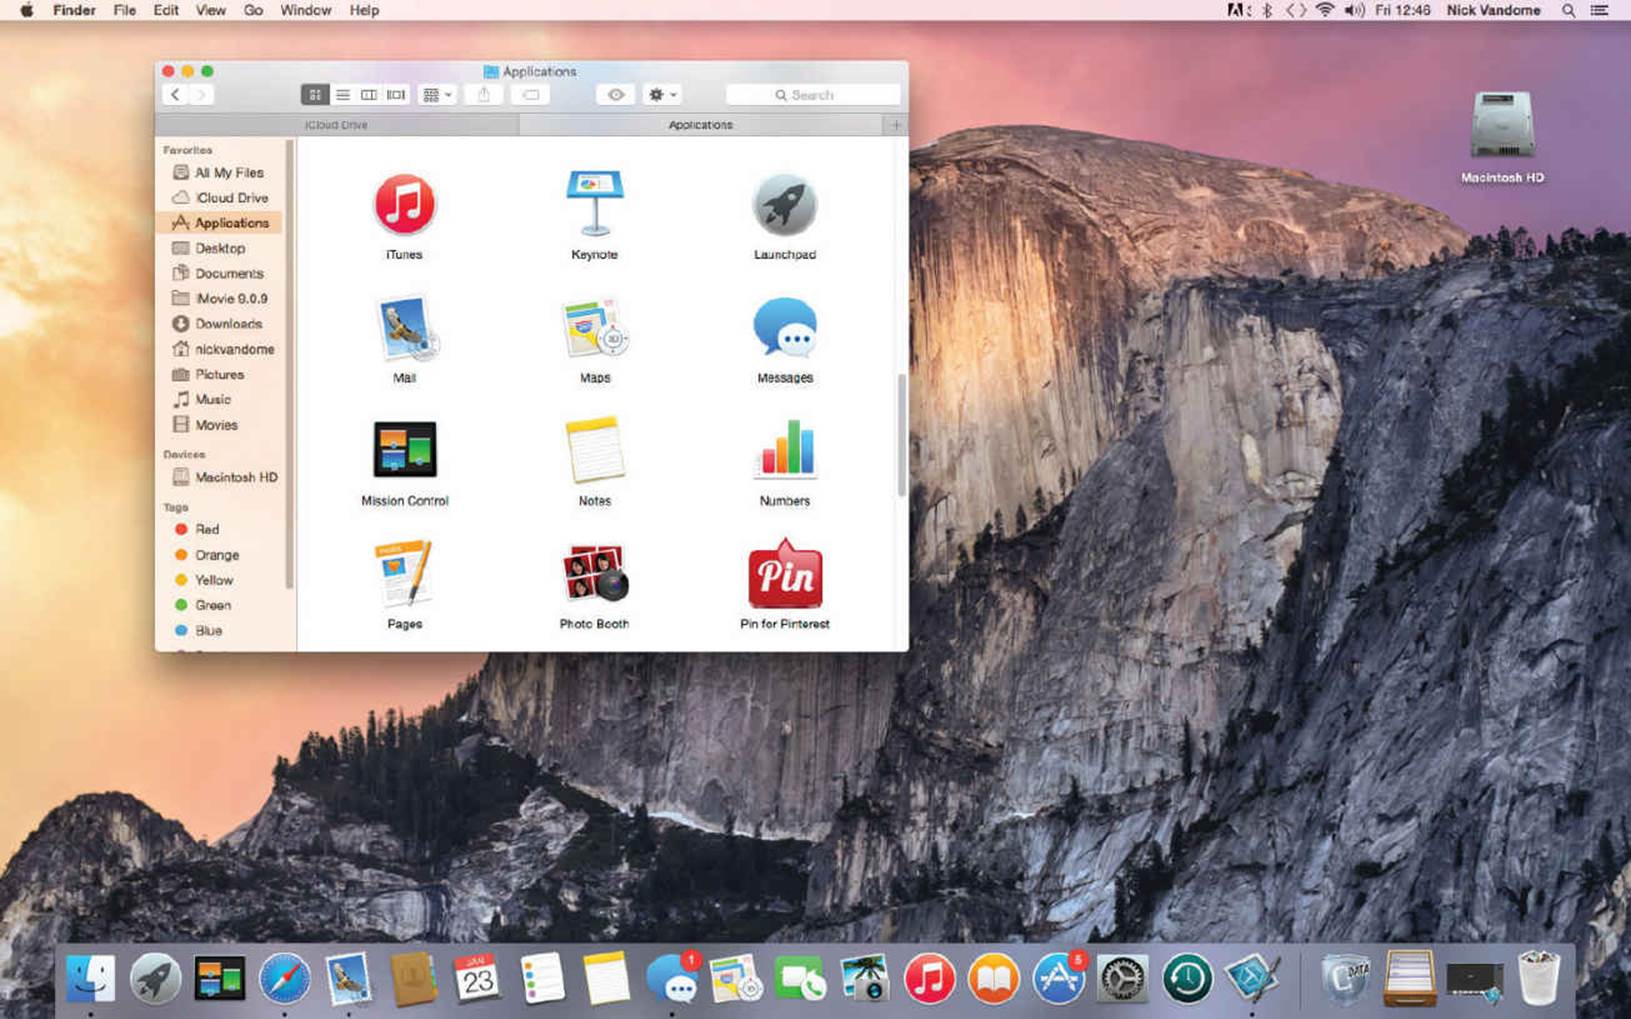
MacBook Desktop
The opening view of a MacBook is known as the Desktop. Items, such as apps and files, can be stored on the Desktop but, in general, it is best to try to keep it as clear as possible.
At the top of the Desktop is the Apple Menu and the Menu bar. This contains links to a collection of commonly-used menus and functions, such as Copy and Paste.
![]()
At the bottom of the Desktop is the Dock. This is a collection of icons that are shortcuts to frequently-used apps or folders.


The menus on the Menu bar are looked at in detail here.
One of the items on the Dock is the Finder. This can be used to access the main area for apps, folders and files and also organize the way you work on your MacBook.


To specify which items appear on the Desktop, click on Finder > Preferences on the Menu bar. Click on the General tab and select to show or hide Hard disks, External disks, CDs, DVDs and iPods or Connected servers. The selected items will then be displayed as icons on the Desktop.
Apple Menu
The Apple Menu is accessed from the Apple symbol at the left-hand side of the Menu bar:
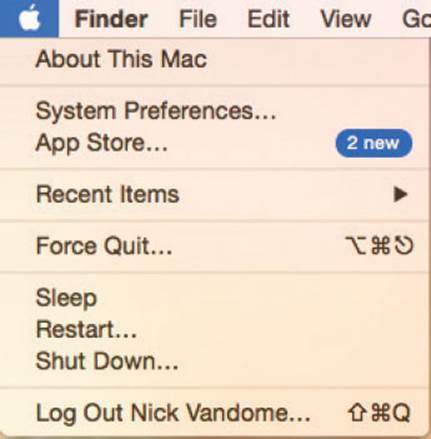
The options on the Apple Menu are:
•About This Mac. This provides general information about the processor, the amount of memory and the OS X version.
•System Preferences. This is a shortcut to System Preferences. This can be used to access a wide range of options, including those for items such as the Dock.
•App Store. This can be used to access the online Mac App Store for downloading apps and also software updates for existing apps and OS X.
•Recent Items. This displays the items you have most recently used and viewed.
•Force Quit. This can be used to manually quit an app that has frozen or will not close.
•Sleep. This puts the MacBook into a state of hibernation.
•Restart. This closes down the MacBook and restarts it.
•Shut Down. This shuts down the MacBook.
•Log Out. This shuts down the currently open apps and logs out the current user.

Force Quit can be used to close down an app that is frozen or is not responding.
Keyboard Buttons
As shown on the previous page, the Apple Menu has options for Sleep, Restart and Shut Down. Sleep saves your current session and puts the MacBook into a state of hibernation. This is useful if your MacBook is going to be inactive for a period but you do not want to close it down.
Shortcut keys can also be used to put the MacBook to sleep.
To do this, press the Alt (Option) and Command keys and the Power button simultaneously. (The Alt and Command keys are located on the left-hand side of the space bar.)


Restart is most frequently used if there is a problem on your MacBook, such as a frozen app, and you want to turn it off and then back on again to try to resolve the issue.
Shortcut Keys
A MacBook keyboard has a number of keys that can be used for shortcuts or specific functions. Four of them are located at the left of the space bar. They are (from left to right):
•The Function key. This can be used to activate the function (Fn) keys at the top of the keyboard. This is used in conjunction with the F keys on the keyboard: to activate the operation of a function key, hold it down while pressing one of the F keys.
•The Control key. This can be used to access contextual menus.
•The Alt (Option) key. This is frequently used in conjunction with the Command key to perform specific tasks, such as above with Sleep.
•The Command key. As above.
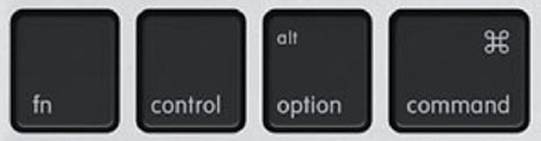
Contextual menus are ones that have actions that are specific to the item being viewed.
At the top of the keyboard there are keys for changing some of the settings on your MacBook. These are (from left to right):
•F1: Decrease brightness.
•F2: Increase brightness.
•F3: Show all open windows (Mission Control).
•F4: Show/Hide Dashboard widgets.

On some MacBook keyboards, the F5 and F6 keys can be used to adjust the backlighting of the keyboard in low-level light.
•F7: Rewind a video.
•F8: Play/Pause a video.
•F9: Fast forward a video (with Fn key, show all open windows, Mission Control).

•F10: Mute volume (with Fn key, displays all open windows for the active app).
•F11: Decrease volume (with Fn key, displays the Desktop and minimizes all windows around the sides of the screen).
•F12: Increase volume (with Fn key, displays the Dashboard).
•Power button. Turns the MacBook on or can be used in conjunction with the Shortcut keys to put it to Sleep.

The Fn options can also be used without pressing the Fn key. To do this, open System Preferences and click on the Keyboard button. Under the Keyboard tab, check on the box that says Use all F1, F2, etc. keys as standard function keys.
System Preferences
In OS X there are preferences that can be set for just about every aspect of the operating system. This gives you great control over how the interface looks and how the operating system functions. To access System Preferences:
Click on this icon on the Dock or from the Applications folder in the Finder
For more information about the Dock, see Chapter Four, and for the Finder, Chapter Five.
Personal preferences
General. Options for the overall look of buttons, menus, windows and scroll bars.
Desktop & Screen Saver. This can be used to change the Desktop background and the screen saver.
Dock. Options for the way the Dock looks and functions.
Mission Control. This gives you a variety of options for managing all of your open windows and apps.
Language & Region. Options for the language used.
Security & Privacy. This enables you to secure your Home folder with a master password, for added security.
Spotlight. This can be used to specify settings for the OS X search facility, Spotlight.
Notifications. This can be used to set up how you are notified about items such as email, messages and software updates.
When viewing a specific System Preference, click on this button at the top of the window to go back to all of the available options.
![]()
Hardware preferences
CDs & DVDs. Options for what action is taken when you insert CDs and DVDs.
Displays. Options for the screen display, such as resolution.
Energy Saver. Options for when the computer is inactive.
Keyboard. Options for how the keyboard functions and also keyboard shortcuts.
Mouse. Options for how an external mouse functions.
Trackpad. Options for when you are using a trackpad.
Printers & Scanners. Options for selecting and installing printers and scanners.
Sound. Options for adding sound effects and playing and recording sound.
Internet & Wireless preferences
iCloud. Options for the online iCloud service.
Internet Accounts. This can be used to set up contacts on your MacBook, using a variety of online services.
Extensions. This determines how plug-ins and extensions are installed on your MacBook.
Network. This can be used to specify network settings for linking two or more computers together.
Bluetooth. Options for attaching Bluetooth wireless devices.
Sharing. Options for selecting how files are shared on a network.
The headings for System Preferences shown here are how they are grouped by default, although the headings themselves do not appear. To change the way System Preferences are organized, click on Viewon the System Preferences Menu bar and select either Organize by Categories or Organize Alphabetically.
System preferences
Users & Groups. This can be used to allow different users to create their own accounts for use on the same computer.
Parental Controls. This can be used to limit access to the MacBook and various online functions.
App Store. This can be used to connect to the App Store to access and install available software updates.
Dictation & Speech. Options for using speakable commands to control the computer.
Date & Time. Options for changing the computer’s date and time to time zones around the world.
Startup Disk. This can be used to specify the disk from which your computer starts up. This is usually the OS X volume.
Time Machine. This can be used to configure and set up the OS X backup facility.
Accessibility. This can be used to set options for users who have difficulty with viewing text on screen, hearing commands, using the keyboard or using the mouse.
Notifications
The Notification Center option provides a single location to view all of your emails, messages, updates and alerts. It appears at the top right-hand corner of the screen. The items that appear in Notifications are set up within System Preferences. To do this:
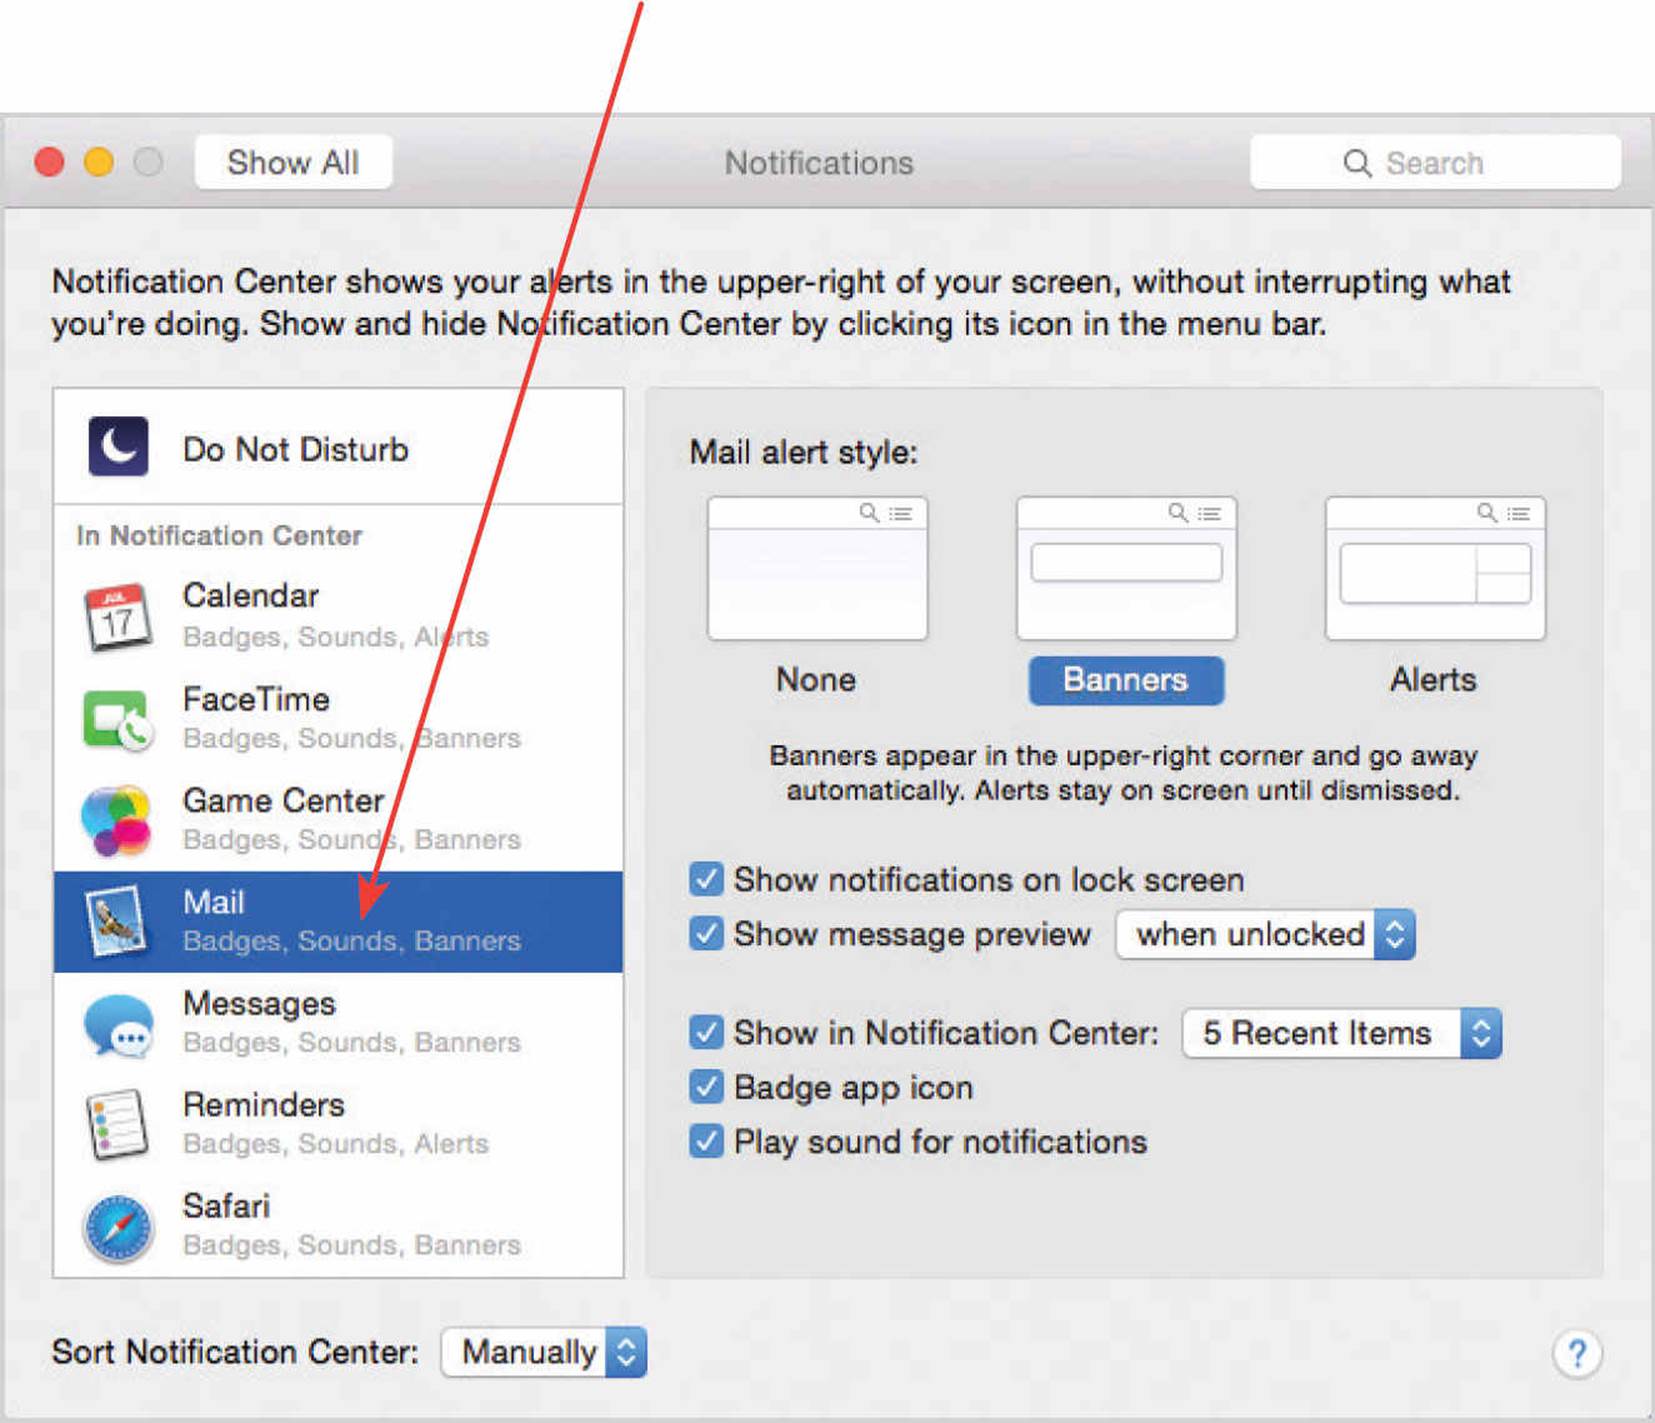
![]() Open System Preferences and click on the Notifications button
Open System Preferences and click on the Notifications button
![]() The items that will appear in the Notification Center are listed here. Click on an item to select it and set its notification options
The items that will appear in the Notification Center are listed here. Click on an item to select it and set its notification options
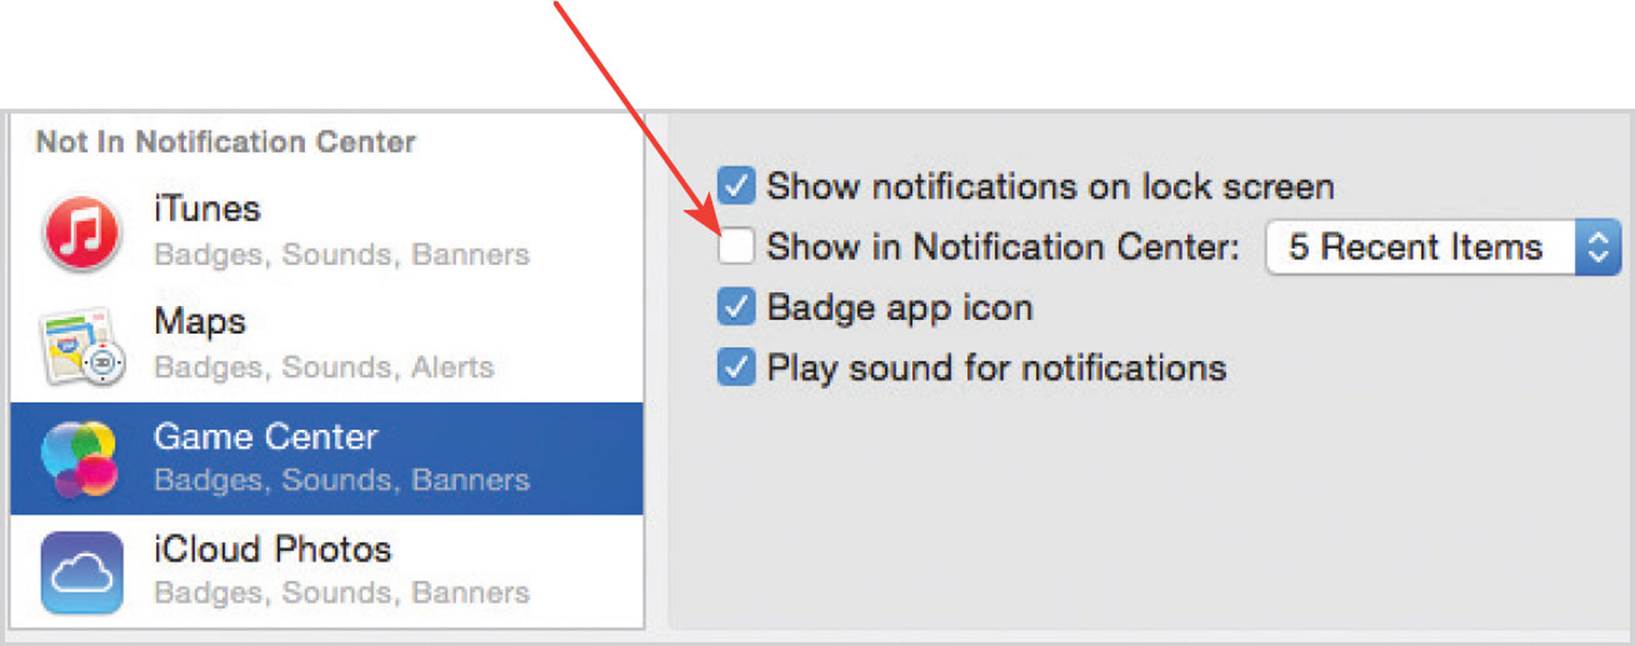
![]() To disable an item so that it does not appear in the Notification Center, select it as above and check off the Show in Notification Center box
To disable an item so that it does not appear in the Notification Center, select it as above and check off the Show in Notification Center box
Notifications can be accessed regardless of the app in which you are working, and they can be actioned directly without having to leave the current app.
Twitter and Facebook feeds can also be set up to appear in the Notification Center, if you have accounts with these sites.
Viewing Notifications
Notifications appear in the Notification Center. The way they appear can be determined in the System Preferences:
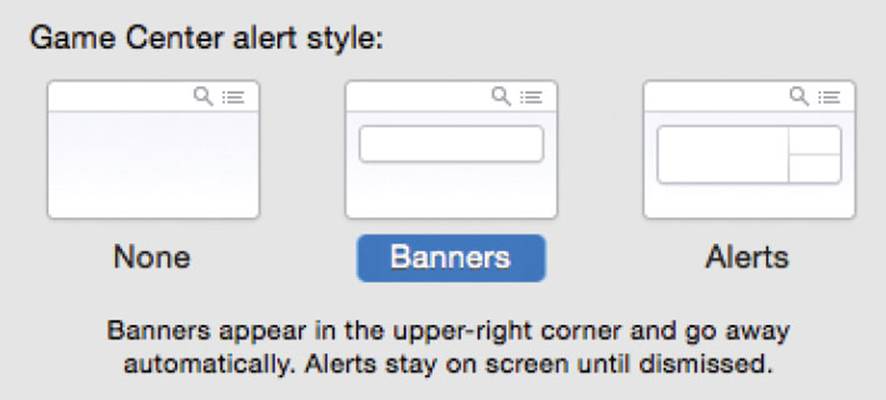
![]() Select an alert style. A banner alert comes up on the screen and then disappears after a few seconds
Select an alert style. A banner alert comes up on the screen and then disappears after a few seconds
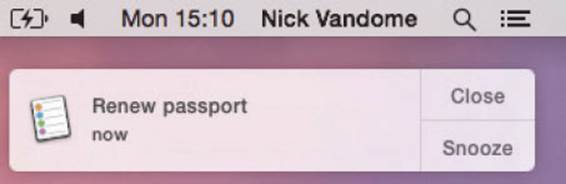
![]() The Alerts option shows the notification and it stays on screen until dismissed (such as this one for reminders)
The Alerts option shows the notification and it stays on screen until dismissed (such as this one for reminders)
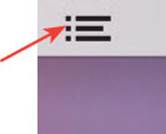
![]() Click on this button in the top right-hand corner of the screen to view all of the items in the Notification Center. Click on it again to hide the Notification Center
Click on this button in the top right-hand corner of the screen to view all of the items in the Notification Center. Click on it again to hide the Notification Center
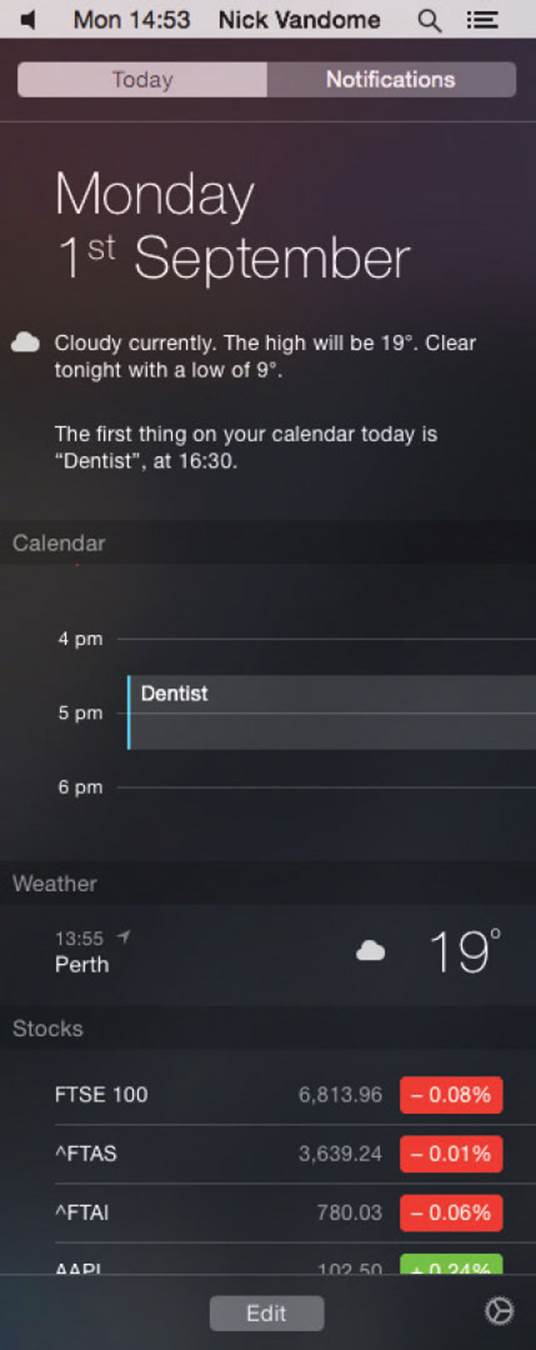
![]() In the Notification Center, click on the Today button to view the weather forecast, calendar events and stock market reports for the current day. Click on the Edit button to change the items that appear
In the Notification Center, click on the Today button to view the weather forecast, calendar events and stock market reports for the current day. Click on the Edit button to change the items that appear

![]() Click on the Notifications button to view the items that have been selected for here. Items such as emails and iMessages can be replied to directly by clicking on them from within the Notifications section
Click on the Notifications button to view the items that have been selected for here. Items such as emails and iMessages can be replied to directly by clicking on them from within the Notifications section
The Notification Center can also be displayed with a Trackpad or Magic Trackpad by dragging with two fingers from right to left, starting from the far right edge.
Software updates also appear in the Notification Center, when they are available.
CDs and DVDs
Although there is no built-in SuperDrive with the latest range of MacBook Air and MacBook Pro versions, CDs and DVDs can still be used with an external USB SuperDrive. As with many of the functions of a MacBook there are settings that can be applied within the System Preferences. To do this:
![]() Open System Preferences and click on the CDs & DVDs button
Open System Preferences and click on the CDs & DVDs button

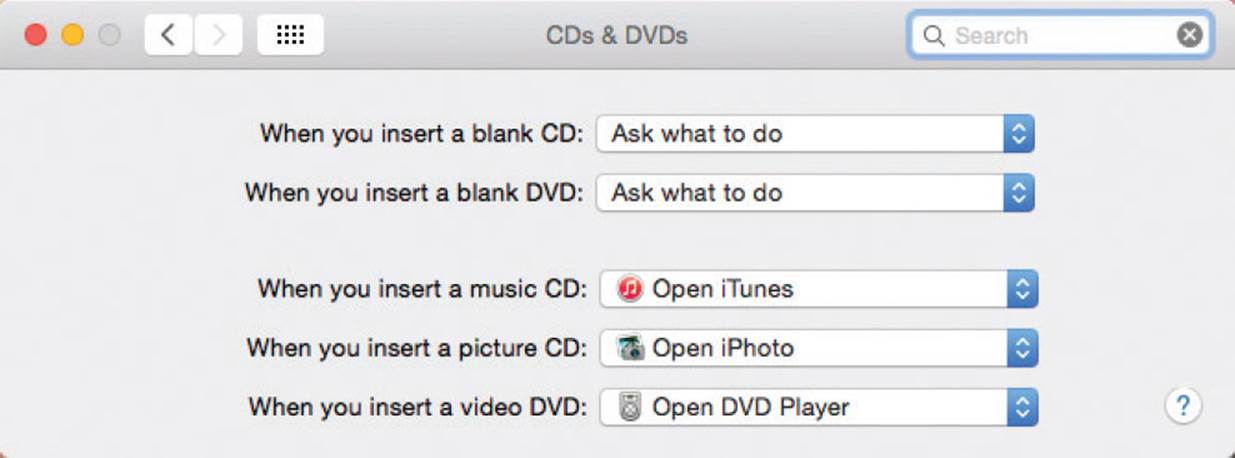
![]() There are various options for what happens when you insert blank CDs/DVDs and also for music, picture and video CDs/DVDs
There are various options for what happens when you insert blank CDs/DVDs and also for music, picture and video CDs/DVDs
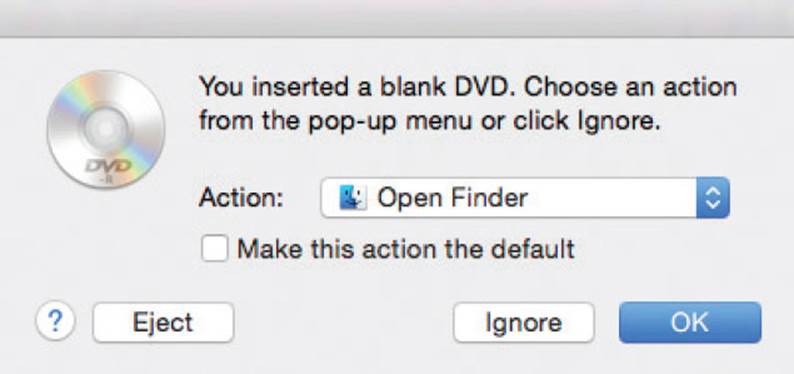
![]() If you insert a blank CD or DVD the following window appears automatically. The Action box offers options for what you want to do with the CD or DVD. Click on the OK button to select an action or click on the Ignorebutton if you do not want to use any of these actions
If you insert a blank CD or DVD the following window appears automatically. The Action box offers options for what you want to do with the CD or DVD. Click on the OK button to select an action or click on the Ignorebutton if you do not want to use any of these actions
USB pen drives can also be used if you want to copy content from a MacBook.
Connecting a Printer
Using a printer on any computer is essential and MacBooks allow you to quickly add a printer to aid your productivity. To do this:
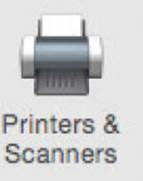
![]() Open the System Preferences folder and click on the Printers & Scanners button
Open the System Preferences folder and click on the Printers & Scanners button
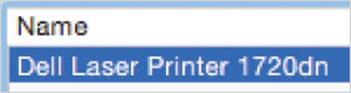
![]() Currently-installed printers are displayed in the Printers List. Click here to add a new printer or any currently available printers
Currently-installed printers are displayed in the Printers List. Click here to add a new printer or any currently available printers

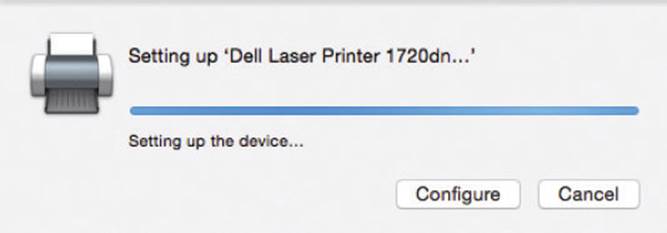
![]() OS X Yosemite loads the required printer driver (if it does not have a specific one it will try to use a generic one)
OS X Yosemite loads the required printer driver (if it does not have a specific one it will try to use a generic one)
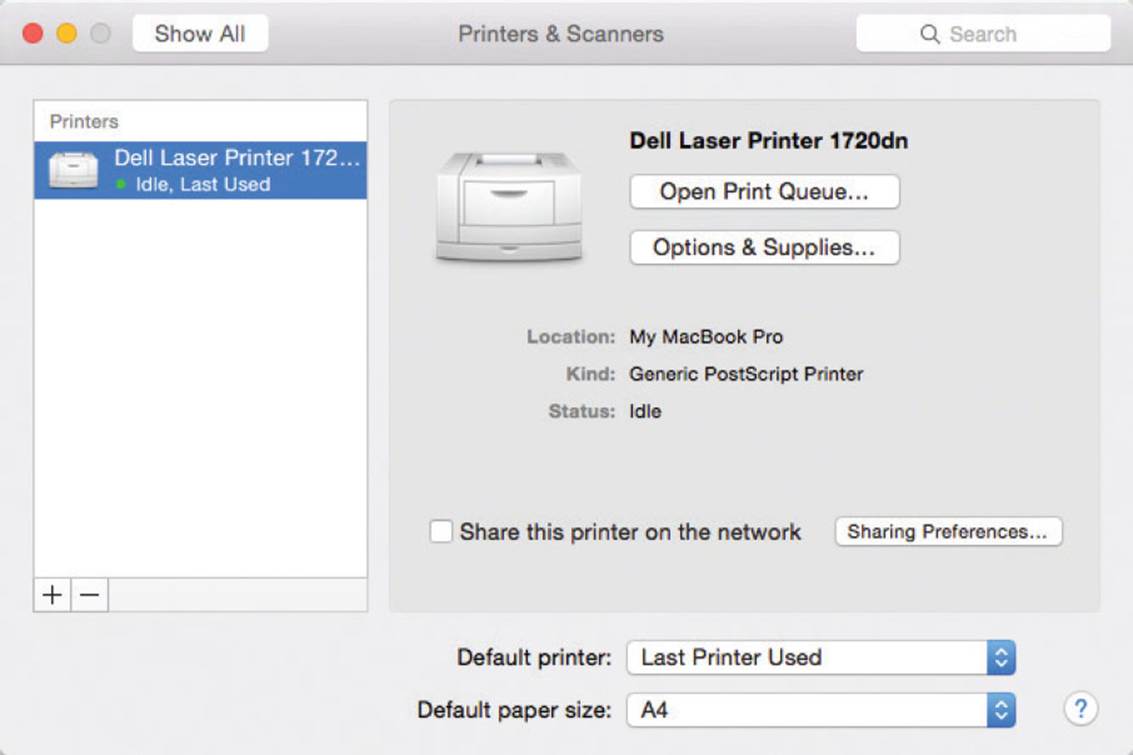
![]() The details about the printer are available in the Printers & Scanners window
The details about the printer are available in the Printers & Scanners window
![]() Once a printer has been installed, documents can be printed by selecting File > Print from the Menu bar. Print settings can be set at this point and they can also be set by selecting File > Page/Print Setup from the Menu bar in most apps
Once a printer has been installed, documents can be printed by selecting File > Print from the Menu bar. Print settings can be set at this point and they can also be set by selecting File > Page/Print Setup from the Menu bar in most apps
Printer drivers are programs that enable the printer to communicate with your computer. Printer drivers are usually provided on a disc when the printer is purchased. In addition, MacBooks will have a number of printer drivers pre-installed. If your MacBook does not recognize your printer, you can load the driver from the disc.
External Drives
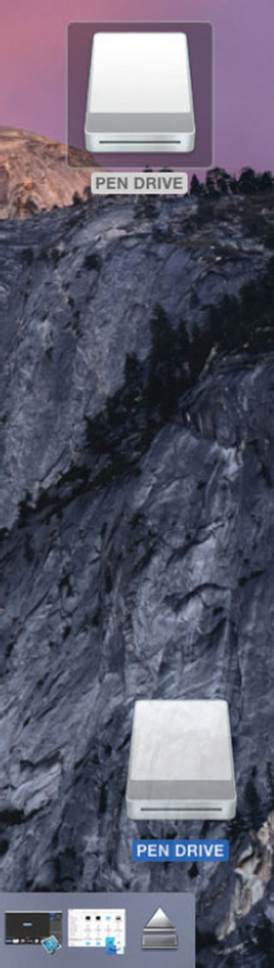
Attaching external drives is an essential part of mobile computing; whether it is to back up data as you are traveling or for downloading photos and other items. On MacBooks, external drives are displayed on the Desktop once they have been attached and they can then be used for the required task. To do this:
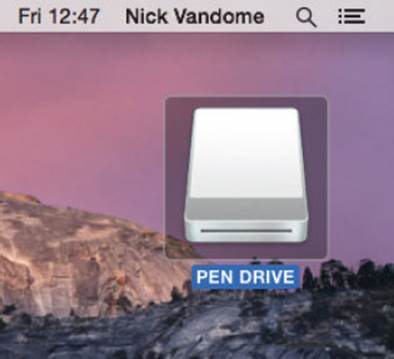
![]() Attach the external drive. This is usually done with a USB cable. Once it has been attached it is shown on the Desktop
Attach the external drive. This is usually done with a USB cable. Once it has been attached it is shown on the Desktop
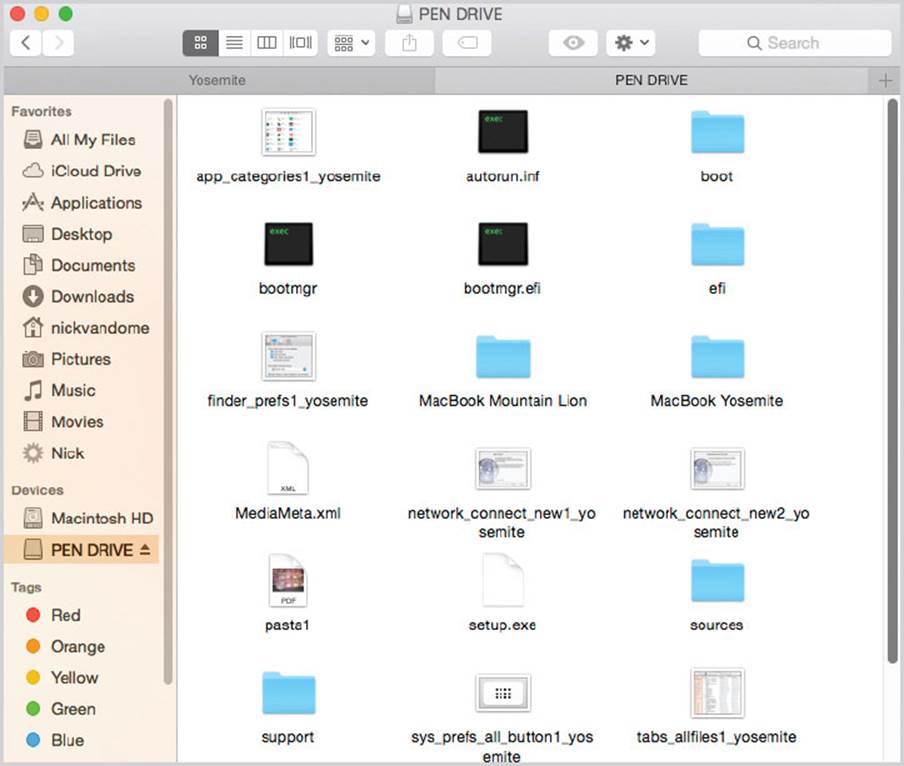
![]() The drive is shown in the Finder
The drive is shown in the Finder
![]()
![]() Perform the required task for the external drive (such as copying files or folders onto it from the hard drive of your MacBook)
Perform the required task for the external drive (such as copying files or folders onto it from the hard drive of your MacBook)
![]() External drives have to be ejected properly, not just pulled out or removed. To do this, click on this button next to the drive in the Finder window, or drag its icon on the Desktop over the Trash icon on the Dock. This will then change into an Eject icon
External drives have to be ejected properly, not just pulled out or removed. To do this, click on this button next to the drive in the Finder window, or drag its icon on the Desktop over the Trash icon on the Dock. This will then change into an Eject icon

External drives can be items such as pen drives, digital cameras or external hard disks.
An external drive can be renamed by Ctrl + clicking on its name in the Finder and overtyping it with a new name.
All materials on the site are licensed Creative Commons Attribution-Sharealike 3.0 Unported CC BY-SA 3.0 & GNU Free Documentation License (GFDL)
If you are the copyright holder of any material contained on our site and intend to remove it, please contact our site administrator for approval.
© 2016-2026 All site design rights belong to S.Y.A.