Teach Yourself VISUALLY MacBook Pro, 2nd Edition (2014)
Part IV. Taking MacBook Pro Further
Chapter 17. Maintaining a MacBook Pro and Solving Problems
Keep App Store Software Current
Software developers regularly update their applications to improve them and to solve bugs. Apple not only issues updates to its applications, but more important, to OS X and the other system software that makes a MacBook Pro work.
To keep your MacBook Pro running well and to reduce security risks, keep your applications and system software current. You can use the Updates feature in the App Store application to keep your software up-to-date, and you can set the App Store preferences in the System Preferences application to check for updates automatically.
Keep App Store Software Current
Update App Store Software Manually
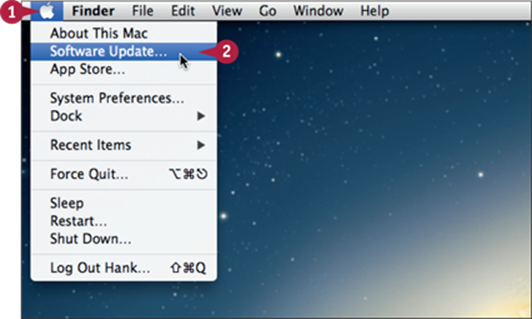
![]() Click Apple (
Click Apple (![]() ).
).
![]() Click Software Update.
Click Software Update.
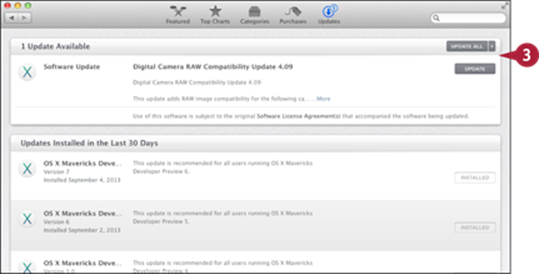
The App Store application opens and automatically checks for updates to OS X and all software you have downloaded from the store. Any available updates appear in the Updates pane.
Note: If there are no updates, your software is current and you can click App Store and then click Quit to quit the App Store application.
![]() Click Update for the application you want to update, or click Update All to apply all updates.
Click Update for the application you want to update, or click Update All to apply all updates.
Your MacBook Pro downloads and installs the update.
Note: Some updates require you to restart your MacBook Pro. In this case, click Restart at the prompt.
Set Your MacBook Pro to Update Apple Software Automatically
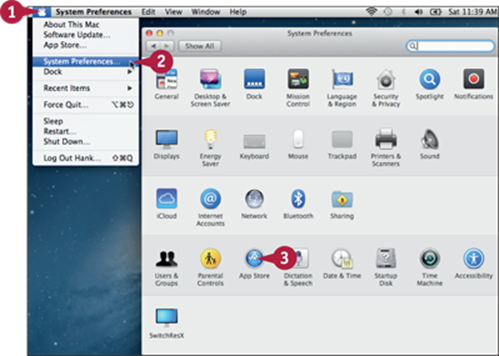
![]() Click Apple (
Click Apple (![]() ).
).
![]() Click System Preferences.
Click System Preferences.
![]() Click App Store.
Click App Store.
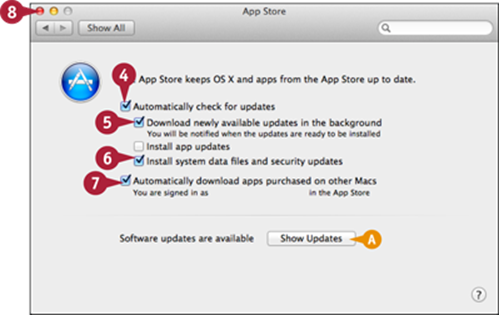
![]() Select the Automatically check for updates check box (
Select the Automatically check for updates check box (![]() changes to
changes to ![]() ).
).
![]() Select the Download newly available updates in the background check box (
Select the Download newly available updates in the background check box (![]() changes to
changes to ![]() ).
).
![]() Select the Install system data files and security updates check box (
Select the Install system data files and security updates check box (![]() changes to
changes to ![]() ).
).
![]() If you have more than one Mac and want all the apps you download on your other Macs to be downloaded to your MacBook Pro, select the Automatically download apps purchased on other Macs check box (
If you have more than one Mac and want all the apps you download on your other Macs to be downloaded to your MacBook Pro, select the Automatically download apps purchased on other Macs check box (![]() changes to
changes to ![]() ).
).
A If updates are currently available, you can click Show Updates to display them in the App Store application.
![]() Click Close (
Click Close (![]() ).
).
The System Preferences window closes.
OS X automatically checks for updates and notifies you when they are available. It also downloads and installs important system and security files automatically.
TIP
What if I do not want to install the updates right now?
If you want to postpone the updates, click the Update All pop-up menu button (![]() ), and select Try in an Hour, Try Tonight, or Remind Me Tomorrow. This pop-up menu also contains the Install Now command. You can also simply quit the App Store application without installing the updates and without setting a reminder.
), and select Try in an Hour, Try Tonight, or Remind Me Tomorrow. This pop-up menu also contains the Install Now command. You can also simply quit the App Store application without installing the updates and without setting a reminder.
Maintain and Update Applications Not from the App Store
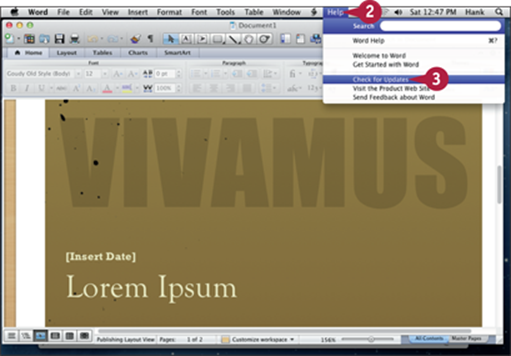
You should also keep current any applications you have installed from sources other than the App Store. Most applications support manual and automatic updates. Typically, you will find a Check for Updates command on the Help menu or on the Application menu, where Application is the application's name. Most applications also support automatic checks for updates.
Maintain and Update Applications Not from the App Store
Manually Update Apps
![]() Open the application.
Open the application.
![]() Click Help.
Click Help.
![]() Click Check for Updates.
Click Check for Updates.
If updates are available, the application prompts you to download and install them; follow the onscreen instructions. If updates are not available, you see a message saying so.
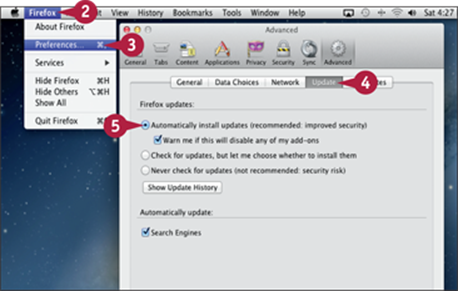
Automatically Update Apps
![]() Open the application.
Open the application.
![]() Click Application. This example uses Firefox.
Click Application. This example uses Firefox.
![]() Click Preferences.
Click Preferences.
![]() Locate the Update preferences.
Locate the Update preferences.
![]() Click the update option you want to use (
Click the update option you want to use (![]() changes to
changes to ![]() ).
).
Each time you launch the application, it checks for newer versions. When it finds one, it prompts you to download and install the newer version. Follow the onscreen instructions to complete the update.
Profile Your MacBook Pro
Each hardware and software component in your MacBook Pro has a specific version and set of capabilities. Most of the time, you do not need to worry about these details. However, sometimes they can be very important, especially when you are trying to troubleshoot and solve problems.
Keeping a current profile of your MacBook Pro is a good idea so that you have detailed information about it should you need to solve a problem or evaluate your MacBook Pro's capabilities. You can use the System Information application.
Profile Your MacBook Pro
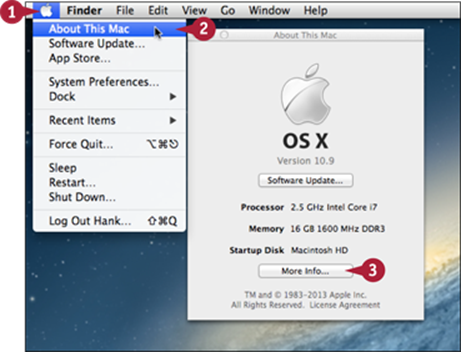
![]() Click Apple (
Click Apple (![]() ).
).
The Apple menu opens.
![]() Click About This Mac.
Click About This Mac.
The About This Mac window opens, showing information about the software version, processor, memory, and startup disk.
![]() Click More Info.
Click More Info.
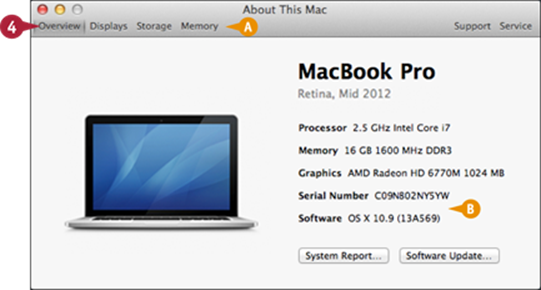
The System Information application appears.
A At the top of the window, you see various categories of information about your MacBook Pro, such as hardware components.
![]() Click the tab of an area for which you want detailed information.
Click the tab of an area for which you want detailed information.
B The details appear in the bottom pane of the window.
![]() Continue to select other areas to get details about them.
Continue to select other areas to get details about them.
Monitor Your MacBook Pro Activity
With the Activity Monitor application, you can examine the status of your MacBook Pro, which is useful when problems occur. For example, you can see how much processing time and memory each application is using, which can often tell you when an application is having a problem.
Monitor Your MacBook Pro Activity
![]() Click Launchpad (
Click Launchpad (![]() ) on the Dock.
) on the Dock.
![]() Type act.
Type act.
![]() Click Activity Monitor (
Click Activity Monitor (![]() ).
).
The Activity Monitor application opens.
Note: If the Activity Monitor title bar shows My Processes, click View, and then click All Processes to display all processes.
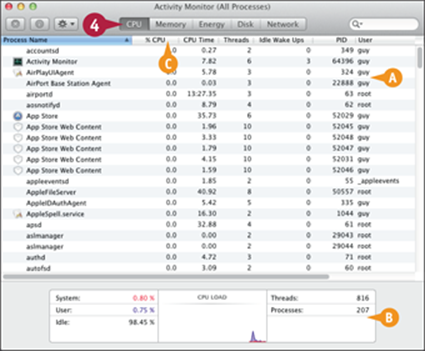
![]() Click CPU.
Click CPU.
The CPU pane appears.
A In the upper part of the window, you see a list of all the processes running on the MacBook Pro.
B At the bottom of the window, you see a graphical representation of the activity of various MacBook Pro processes.
C Click the % CPU column heading to sort the list of processes by the amount of processor time each process is using.
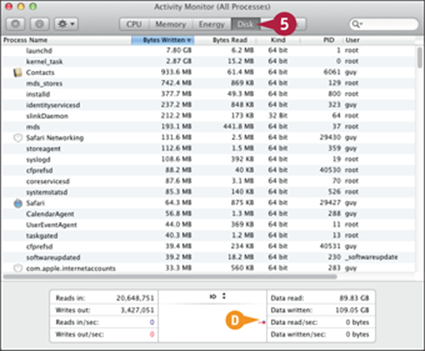
![]() Click Disk.
Click Disk.
The Disk pane appears.
D At the bottom of the window, you see how data is being read from and written to the disk.
Note: You can limit the processes shown in the window to be just for applications, which can make the window's information easier to interpret.
![]() Click View on the menu bar.
Click View on the menu bar.
The View menu opens.
![]() Click Windowed Processes.
Click Windowed Processes.
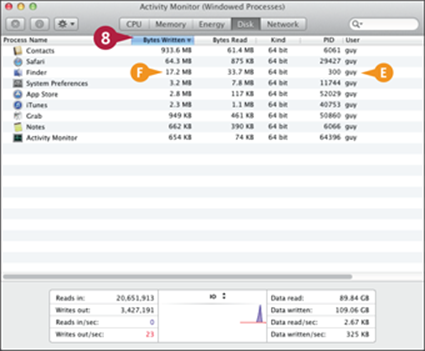
E The list now includes only processes associated with applications that have windows open on the desktop.
![]() Click Bytes Written.
Click Bytes Written.
Note: You can click the current column heading to reverse the sort order.
F Activity Monitor shows the processes listed by the amount of bytes they have written to disk.
![]() Click View on the menu bar.
Click View on the menu bar.
![]() Click All Processes.
Click All Processes.
The full list of processes appears again.
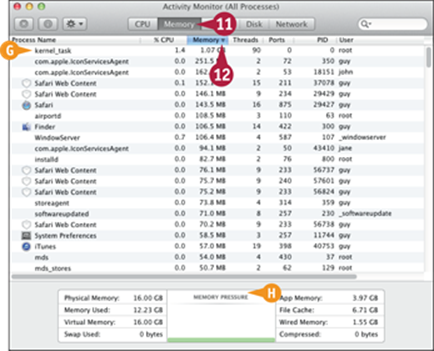
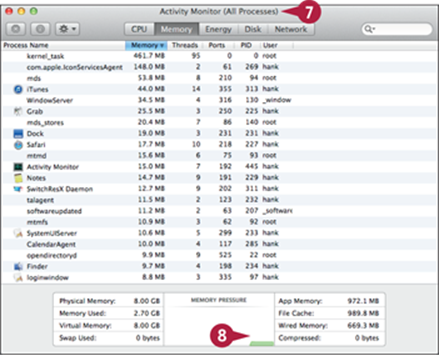
![]() Click Memory.
Click Memory.
The Memory pane appears.
![]() Click the Memory column heading.
Click the Memory column heading.
G Activity Monitor shows the processes listed by the amount of memory they are taking.
H The Memory Pressure readout at the bottom of the window shows how light or heavy the memory pressure is.
TIP
How do I deal with a process that is using a lot of CPU resources for a long period of time?
Switch to the application and try to quit it. If it does not quit, you may need to force quit it, losing any unsaved data. Wait several minutes, then go back to Activity Monitor, select the process, and click Force Quit (![]() ). OS X forces the process to stop. Save your work in other open applications, and then restart your MacBook Pro.
). OS X forces the process to stop. Save your work in other open applications, and then restart your MacBook Pro.
Maintain or Repair the Drive on Your MacBook Pro
If the drive on your MacBook Pro is not performing optimally, neither will your MacBook Pro. To keep the drive in good condition, you should make sure it has as much free space as possible by removing unneeded files, as discussed in the tip at the end of this section.
When problems arise with the drive, you can repair them. To do so, you must start up your MacBook Pro from the Recovery HD volume and then use the OS X Disk Utility application.
Maintain or Repair the Drive on Your MacBook Pro
![]() Shut down your MacBook Pro.
Shut down your MacBook Pro.
![]() Restart your MacBook Pro while pressing and holding
Restart your MacBook Pro while pressing and holding ![]() .
.
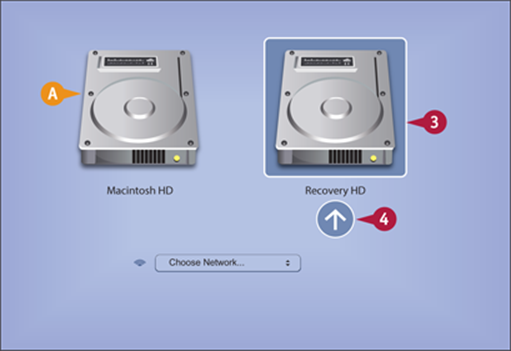
A You see the startup drives available to you.
![]() Click Recovery HD.
Click Recovery HD.
![]() Click the arrow underneath the Recovery HD icon.
Click the arrow underneath the Recovery HD icon.
The MacBook Pro starts up from the Recovery HD volume and the OS X Utilities window appears.
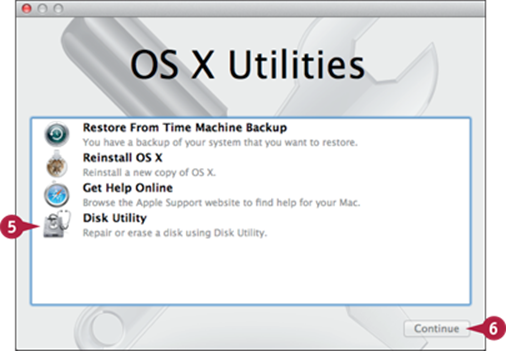
![]() Click Disk Utility.
Click Disk Utility.
![]() Click Continue.
Click Continue.
Disk Utility opens.
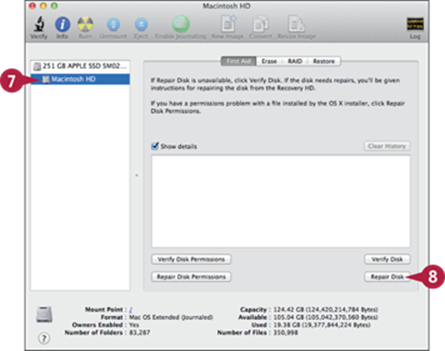
![]() Select the disk you want to maintain or repair, such as the internal disk on the MacBook Pro.
Select the disk you want to maintain or repair, such as the internal disk on the MacBook Pro.
![]() Click Repair Disk.
Click Repair Disk.
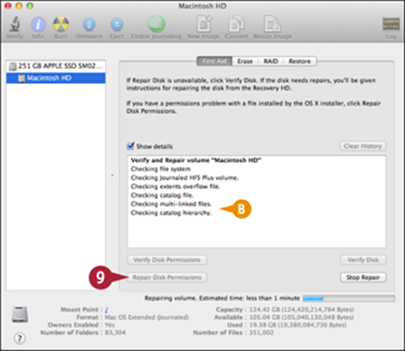
B Disk Utility checks the drive for problems and repairs any that it finds. The progress appears at the bottom of the window.
Note: If Disk Utility finds and repairs any problems, your disk returns to good operating condition.
![]() Click Repair Disk Permissions.
Click Repair Disk Permissions.
Disk Utility corrects problems associated with file and folder permissions on the disk. You can monitor the progress of the process in the bottom part of the window.
![]() When repairs are complete, restart the MacBook Pro.
When repairs are complete, restart the MacBook Pro.
The MacBook Pro restarts from the internal drive automatically.
TIP
What other housekeeping practices can I use to optimize my MacBook Pro?
When you are done with folders or files, move them off the internal drive. You can do this by deleting them if you are sure you will not need them again, or by archiving them by burning them onto a CD or DVD using an external SuperDrive and then deleting them from the hard drive. Try to keep your folders and files well organized so that you have a better idea of what you have stored on the hard drive. You should also make sure that you keep a good backup for all the important files on your internal drive.
Back Up with Time Machine and an External Hard Drive
If something really bad happens to your MacBook Pro, you can lose all the files it contains. This includes data you create, such as your photos, movies, and documents. Much of this data simply cannot be replaced at any cost. To minimize this risk, back up your MacBook Pro consistently using the Time Machine application built into OS X. You can back your file up easily to either an external hard drive, as explained in this section, or to an AirPort Time Capsule, as explained in the next section. Either way, you can easily recover files when you need them.
Back Up with Time Machine and an External Hard Drive
![]() Connect an external hard drive to your MacBook Pro.
Connect an external hard drive to your MacBook Pro.

Note: See Chapter 8 for information on connecting an external hard drive to your MacBook Pro. You should use a hard drive with a large storage capacity for this purpose to provide the longest period of protection possible.
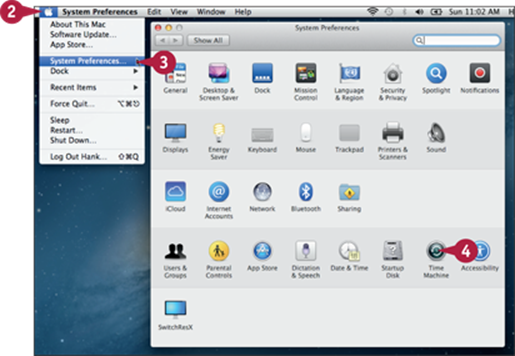
![]() Click Apple (
Click Apple (![]() ).
).
The Apple menu opens.
![]() Click System Preferences.
Click System Preferences.
The System Preferences window opens.
![]() Click Time Machine.
Click Time Machine.

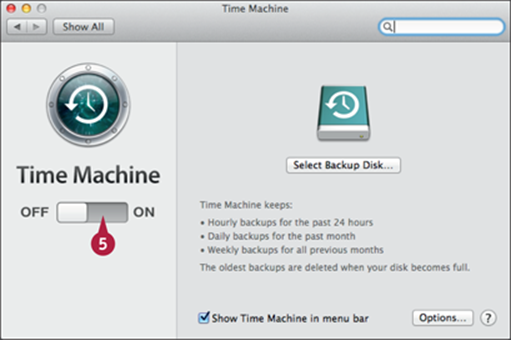
The Time Machine pane opens.
![]() Click the right side of the Time Machine switch to move it to the On position.
Click the right side of the Time Machine switch to move it to the On position.
Time Machine activates.
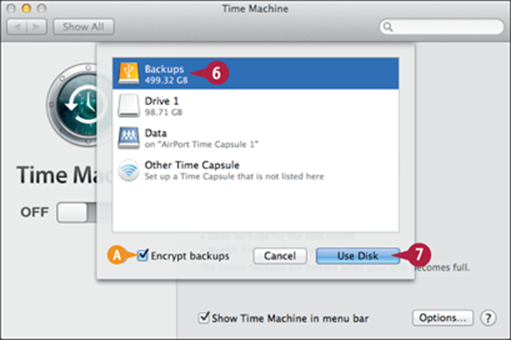
The Select Backup Disk sheet appears.
![]() Click the drive on which you want to store the backups.
Click the drive on which you want to store the backups.
Note: If you encrypt your backups, make sure you never lose the password.
A If you want the backed-up data encrypted, select the Encrypt backups check box (![]() changes to
changes to ![]() ). This prevents the data from being used without the encryption passcode.
). This prevents the data from being used without the encryption passcode.
![]() Click Use Disk.
Click Use Disk.
The sheet closes.
Note: If you chose to encrypt your backups, a sheet opens, prompting you to set your backup password. Type the password and a hint to help you remember it, and then click Encrypt Disk.
The Time Machine pane appears again.
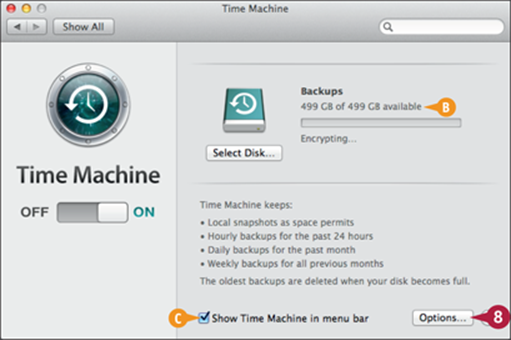
B The drive you selected appears at the top of the pane along with status information about the backup process.
C You can select the Show Time Machine in menu bar check box (![]() changes to
changes to ![]() ) to display the Time Machine pop-up menu (
) to display the Time Machine pop-up menu (![]() ) in the menu bar for quick access to Time Machine.
) in the menu bar for quick access to Time Machine.
![]() Click Options.
Click Options.
TIP
Why would I exclude files from my backups?
The more and larger files you back up, the more room each backup consumes on your backup disk, resulting in fewer backups being stored. This reduces how far you can move “back in time” to restore files from the backup. By excluding files, you make your backups smaller, which means you can go farther back in time to restore files.
Back Up with Time Machine and an External Hard Drive (continued)
Time Machine makes it very easy to create a backup system, and after a few minutes of setup time, backing up is automatic. Unfortunately, many Mac users do not create a backup system. If you do not back up your files, you will eventually lose data. It is not a question of “if,” but “when.”
At some point, you will lose files that you either have to pay to get again or cannot re-create at all, such as your iPhoto collection. With a backup system in place, recovering these files is a simple exercise. Without one, it might be impossible.
Back Up with Time Machine and an External Hard Drive (continued)
The Exclude sheet appears, where you can exclude files from the backup process. This is useful because you can exclude files that do not need to be backed up to make your backups smaller.
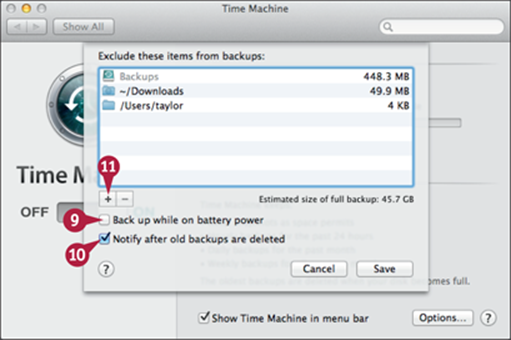
![]() To prevent backups when your MacBook Pro is running on battery power, deselect the Back up while on battery power check box (
To prevent backups when your MacBook Pro is running on battery power, deselect the Back up while on battery power check box (![]() changes to
changes to ![]() ).
).
![]() If you want OS X to notify you when it deletes old backups, select the Notify after old backups are deleted check box (
If you want OS X to notify you when it deletes old backups, select the Notify after old backups are deleted check box (![]() changes to
changes to ![]() ).
).
![]() Click Add (
Click Add (![]() ).
).
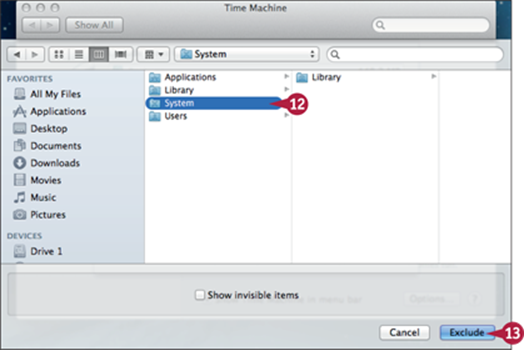
The Select sheet appears.
![]() Navigate to and select the folders or files you want to exclude from the backup.
Navigate to and select the folders or files you want to exclude from the backup.
![]() Click Exclude.
Click Exclude.
If you chose to exclude system files, the You've chosen to exclude the System folder dialog opens. Otherwise, go to step 15.
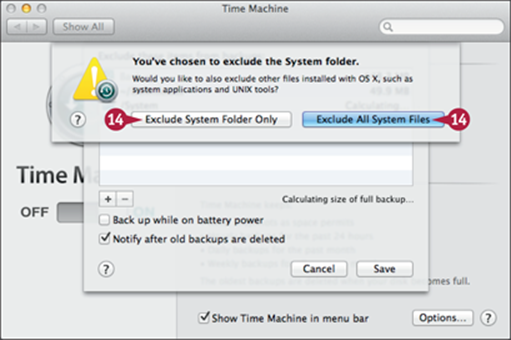
![]() Click Exclude System Folder Only to exclude only files in the System folder, or click Exclude All System Files to exclude system files no matter where they are stored.
Click Exclude System Folder Only to exclude only files in the System folder, or click Exclude All System Files to exclude system files no matter where they are stored.
Note: Exclude All System Files is usually the better option.
The Exclude sheet reappears, showing the list of folders you have excluded from the backup.
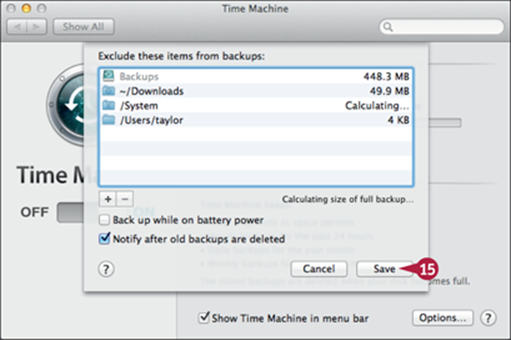
![]() Click Save.
Click Save.
Time Machine starts to back up your files.
Time Machine automatically backs up your data every hour.
Note: After you disconnect the external hard drive so you can move the MacBook Pro around, Time Machine makes the next backup the next time you reconnect the external hard drive. Connect the backup drive frequently to ensure your backups are current.
TIPS
How long is my data protected?
Time Machine backs up your data for as long as it can until the backup hard drive is full. It stores hourly backups for the past 24 hours. It stores daily backups for the past month. It stores monthly backups until the backup disk is full. To protect yourself as long as possible, use the largest hard drive you can afford, and exclude files that you do not need to back up.
How can I tell when the last backup was made?
At the top of the Time Machine pane, you see status information about your backups, such as the time and date of the most current backup.
Back Up Wirelessly with a Time Capsule
The AirPort Time Capsule device combines an AirPort Extreme with a hard drive. This makes wireless backups simple because the Time Capsule provides the wireless network you use, so that any computer on the network can also access the AirPort Time Capsule's hard drive to back up data.
To start backing up wirelessly, install an AirPort Time Capsule on your network. Then, configure Time Machine on your MacBook Pro to back up to it.
Back Up Wirelessly with a Time Capsule
![]() Install an AirPort Time Capsule on your network.
Install an AirPort Time Capsule on your network.
Note: See Chapter 7 for details on AirPort Time Capsule.
![]() Click Apple (
Click Apple (![]() ).
).
The Apple menu opens.
![]() Click System Preferences.
Click System Preferences.
The System Preferences window opens.
![]() Click Time Machine.
Click Time Machine.
The Time Machine pane opens.
![]() Click the right side of the Time Machine switch to move it to the On position.
Click the right side of the Time Machine switch to move it to the On position.
The Select Backup Disk sheet appears.
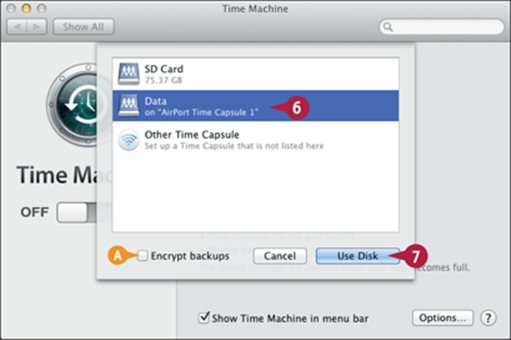
![]() Select the Time Capsule.
Select the Time Capsule.
A If you want the backed-up data encrypted, select the Encrypt backups check box (![]() changes to
changes to ![]() ). This prevents the data from being used without the encryption passcode.
). This prevents the data from being used without the encryption passcode.
![]() Click Use Disk.
Click Use Disk.
Note: If you chose to encrypt your backups, a sheet opens, prompting you to set your backup password. Type the password and a hint to help you remember it, and then click Encrypt Disk.
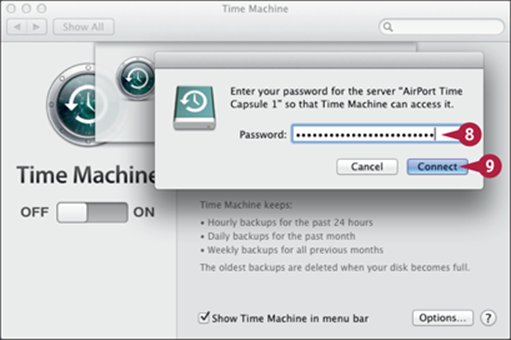
![]() Type the password for the AirPort Time Capsule.
Type the password for the AirPort Time Capsule.
![]() Click Connect.
Click Connect.
The Time Machine pane appears again.
Time Machine starts to back up your files.
Time Machine automatically backs up your data every hour.
TIPS
How can I maximize the length of time my files are protected?
You should eliminate files that you do not really need to back up because they are protected in some other way, such as system files that you can always re-install. To do this, click the Time Capsule and then click Options. Use the resulting sheet to exclude files.
How can I further protect my files?
Online backup services, such as www.carbonite.com, are ideal for this because you can back up any time you are connected to the Internet. Your files are even safer because they are stored in a completely different location than your computer, providing extra protection.
Restore Files with Time Machine
You can use Time Machine to restore files that are included in your backups. You can restore files and folders from the Finder, and you can recover individual items from within some applications. For example, you can recover photos from within iPhoto.
Even if you have not actually lost files, you should try restoring files regularly to make sure your backup system is working correctly and to familiarize yourself with the process.
Restore Files with Time Machine
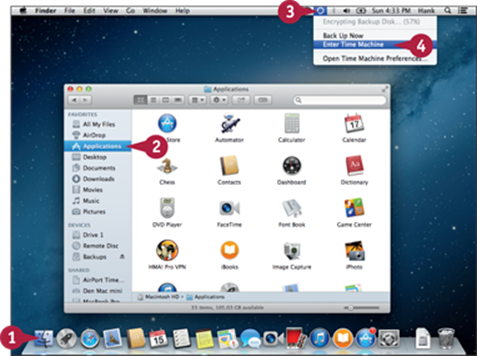
![]() Click Finder (
Click Finder (![]() ) on the Dock.
) on the Dock.
A Finder window opens to your default folder.
![]() Navigate to the location or folder in which the files you want to recover were stored.
Navigate to the location or folder in which the files you want to recover were stored.
![]() Click Time Machine (
Click Time Machine (![]() ).
).
![]() Click Enter Time Machine.
Click Enter Time Machine.
The desktop disappears and the Time Machine window fills the entire space.
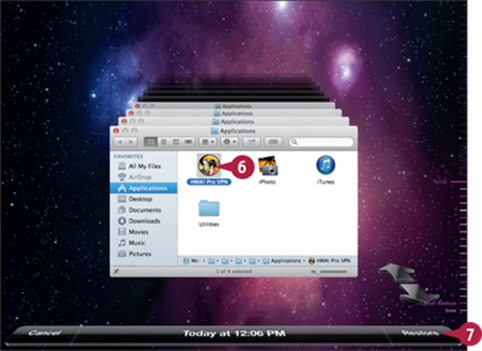
A The Finder window appears in the center of the screen. Behind it, you see all the versions of the window stored in your backup from the current version as far back in time as the backups go.
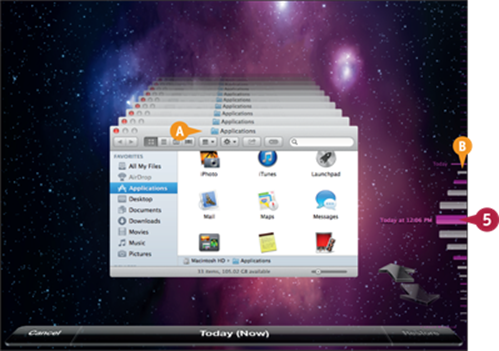
B Along the right side of the window, you see the timeline for your backups. Backups in magenta are stored on your backup drive, while those shown in gray are stored on your internal drive. You can restore files from either location.
![]() Click the date and time on the timeline when the version of the files you need were available.
Click the date and time on the timeline when the version of the files you need were available.
Note: If you chose not to display the Time Machine menu on the menu bar, launch Time Machine by clicking Launchpad (![]() ) on the Dock, typing t, and then clicking Time Machine (
) on the Dock, typing t, and then clicking Time Machine (![]() ).
).
![]() When you reach the files or folders you want to restore, select them.
When you reach the files or folders you want to restore, select them.
![]() Click Restore.
Click Restore.
If any of the files and folders currently exists in the folder, the Copy dialog opens.
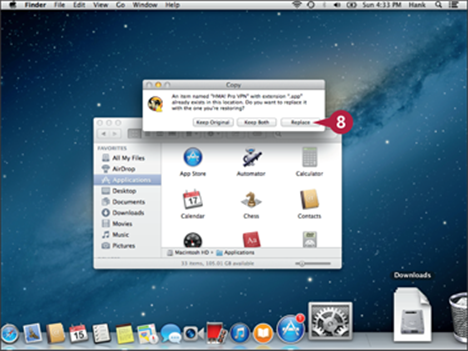
![]() Click Replace if you want to replace the current version of the file with the older version you are restoring. Click Keep Original if you want to keep the current version. Click Keep Both if you want to keep both versions; OS X appends (original) to the name of the current version.
Click Replace if you want to replace the current version of the file with the older version you are restoring. Click Keep Original if you want to keep the current version. Click Keep Both if you want to keep both versions; OS X appends (original) to the name of the current version.
OS X restores the files and folders you selected to their prior locations.
TIPS
How else can I move back in time using Time Machine?
In addition to using the timeline to move back in time, you can click the windows behind the front-most window; each time you click a window, it moves to the front and becomes the active window. You can also click the large backward and forward arrows in the lower-right corner of the Time Machine window to move back or forward in time, respectively.
How can I restore individual files for an application that supports Time Machine?
Some applications, such as iPhoto, support Time Machine directly. To restore files to such applications, open the application and move to the location where the file was previously stored. Launch Time Machine. Move back in time, select the files you want to restore, and click Restore.
Troubleshoot and Solve MacBook Pro Problems
Sometimes an application may hang, displaying the spinning color wheel icon but not responding to the trackpad or keyboard, or it may quit unexpectedly; or you may not be able to get your MacBook Pro to start up at all. The first step in solving any problem is understanding when and how it happens. Part of this is determining if the problem is general or related to a specific user account. Once you have some idea of how and when the problem occurs, you can try to solve it.
Troubleshoot and Solve MacBook Pro Problems
Restart and Find the Cause
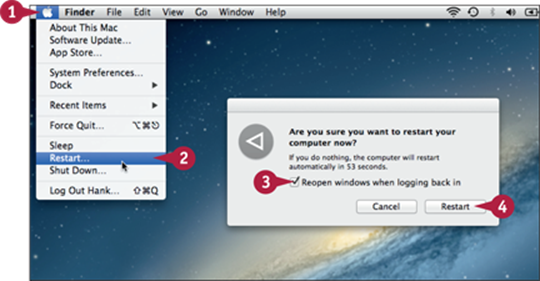
![]() Click Apple (
Click Apple (![]() ).
).
![]() Click Restart.
Click Restart.
![]() Select the Reopen windows when logging back in check box (
Select the Reopen windows when logging back in check box (![]() changes to
changes to ![]() ) if you want to restore your current windows after restarting.
) if you want to restore your current windows after restarting.
![]() Click Restart.
Click Restart.
The MacBook Pro restarts.
![]() Try to replicate the problem by doing the same things you did when it first occurred.
Try to replicate the problem by doing the same things you did when it first occurred.
![]() If you cannot cause the problem to happen again, assume it was solved by the restart and continue working.
If you cannot cause the problem to happen again, assume it was solved by the restart and continue working.
![]() If you can cause the problem to happen again, use Activity Monitor to see if any applications or processes appear to be consuming large amounts of resources. If they are, you have found a likely source of the problem.
If you can cause the problem to happen again, use Activity Monitor to see if any applications or processes appear to be consuming large amounts of resources. If they are, you have found a likely source of the problem.
![]() In the Activity Monitor window, check if the MacBook Pro is running out of memory.
In the Activity Monitor window, check if the MacBook Pro is running out of memory.
![]() To see if your problem might have to do with newly installed software, click the System Report button in the System Information application to get detailed information about your MacBook Pro profile.
To see if your problem might have to do with newly installed software, click the System Report button in the System Information application to get detailed information about your MacBook Pro profile.
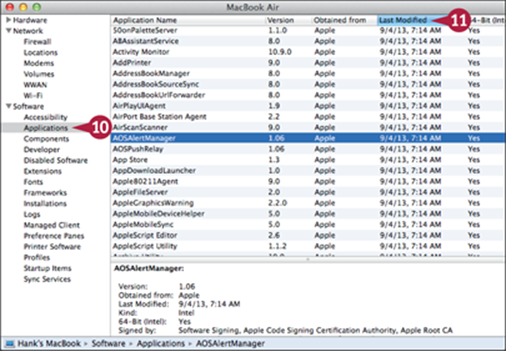
![]() Click the Applications category.
Click the Applications category.
![]() Click the Last Modified down arrow (
Click the Last Modified down arrow (![]() ) to sort the window by the last modified date.
) to sort the window by the last modified date.
![]() Look for any applications you installed just before you started having problems.
Look for any applications you installed just before you started having problems.
Determine if a Problem Is System-Wide or User-Specific
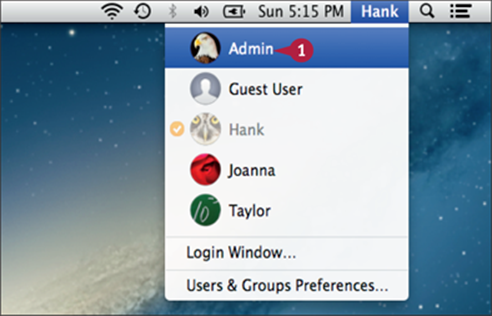
![]() Log in to your troubleshooting user account.
Log in to your troubleshooting user account.
![]() Try to replicate the problem under the new account.
Try to replicate the problem under the new account.
If you can repeat the problem, it is systemic instead of being specific to a user account.
If you cannot repeat the problem, it is likely related to an issue with your user account. In most cases, the issue is related to a preference file that has been corrupted. The next steps explain how to remove preference files.
TIP
How can I check whether the drive on my MacBook Pro is too full?
Click Finder (![]() ) to open a Finder window. Click Go and click Computer, and then Control+click Macintosh HD and click Get Info. In the Info window, look at the Capacity readout and the Available readout. If less than 15 percent of the capacity is available, remove files to free up space on the drive.
) to open a Finder window. Click Go and click Computer, and then Control+click Macintosh HD and click Get Info. In the Info window, look at the Capacity readout and the Available readout. If less than 15 percent of the capacity is available, remove files to free up space on the drive.
Troubleshoot and Solve MacBook Pro Problems (continued)
OS X enables you to force an application to quit when it has stopped responding to the keyboard and trackpad. When you force an application to quit, you lose any unsaved changes in its open documents. So before you force an application to quit, give it two or three minutes to deal with whatever problem it has encountered. Similarly, if your MacBook Pro stops responding to commands, you can force it to shut down by pressing and holding the Power button; press the Power button again to restart the computer. Shutting your MacBook Pro down this way loses all unsaved data, so use this move only when you must.
Troubleshoot and Solve MacBook Pro Problems (continued)
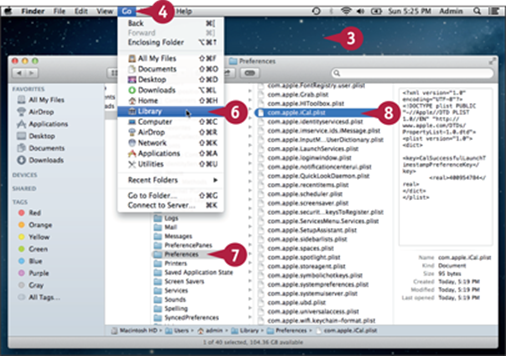
![]() Click the desktop.
Click the desktop.
![]() Click Go.
Click Go.
![]() Press
Press ![]() .
.
The Library item appears on the menu.
![]() Click Library.
Click Library.
Your Library folder opens.
![]() Click Preferences.
Click Preferences.
![]() Delete the preference files for the application you are having trouble with. The application's name is part of the preference's filename.
Delete the preference files for the application you are having trouble with. The application's name is part of the preference's filename.
![]() Try to replicate the problem.
Try to replicate the problem.
If you cannot repeat the problem, you have likely solved it.
Deal with a Hung Application
![]() Identify the hung application by the spinning color wheel remaining on the screen for several minutes.
Identify the hung application by the spinning color wheel remaining on the screen for several minutes.
![]() Press
Press ![]() +
+![]() +
+![]() .
.
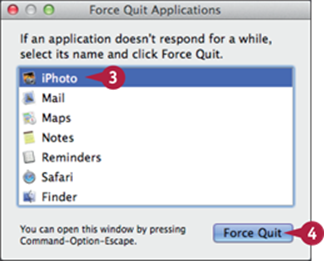
![]() In the Force Quit Applications window, click the hung application.
In the Force Quit Applications window, click the hung application.
![]() Click Force Quit.
Click Force Quit.
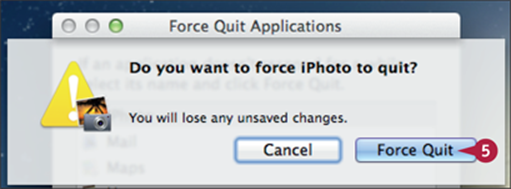
![]() At the prompt, click Force Quit.
At the prompt, click Force Quit.
![]() Restart your MacBook Pro.
Restart your MacBook Pro.
If the application works normally, the problem is solved. If the application continues to hang, you should update it.
Deal with a Startup Problem
![]() Make sure your MacBook Pro is connected to power.
Make sure your MacBook Pro is connected to power.
![]() Restart from the Recovery HD volume.
Restart from the Recovery HD volume.
If MacBook starts up, you know the problem is with the system software installed on the primary startup disk.
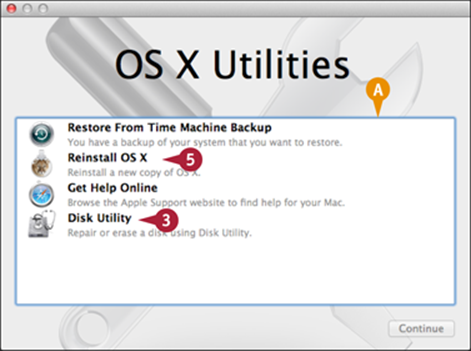
A Your MacBook Pro starts up from the Recovery HD and you see the OS X Utilities window.
![]() Try repairing the startup drive.
Try repairing the startup drive.
If the problem does not recur, you are done. If the problem does recur, you need to reinstall OS X.
![]() Restart from the Recovery HD volume.
Restart from the Recovery HD volume.
![]() Launch the Reinstall OS X application.
Launch the Reinstall OS X application.
![]() Follow the on-screen steps to reinstall or repair the system software on the primary startup disk.
Follow the on-screen steps to reinstall or repair the system software on the primary startup disk.
TIP
How can I limit damage resulting from MacBook Pro problems?
First, back up your data consistently. You should always have current backups of your data because losing data is the most severe consequence of any MacBook Pro problem you might encounter. Second, know how to start up from the recovery drive. If something happens to the system software on your MacBook Pro, you can restart from this drive and hopefully solve the problem you are having. Third, keep a record of important usernames and passwords, such as your Apple ID, so that you will be able to recover content, such as applications, should you need to.