Teach Yourself VISUALLY MacBook Pro, 2nd Edition (2014)
Part I. Discovering MacBook Pro
Chapter 3. Managing the MacBook Pro Desktop Workspace
Understanding Desktop Management Tools
Your MacBook Pro has a lot going on. You will use multiple applications to work on documents, send e-mails, surf the web, and more. Each task has one or more windows associated with it. This can really clutter up the desktop, making you less efficient and your work less enjoyable. Fortunately, OS X provides powerful tools that enable you to manage your desktop efficiently.
Dock
The Dock provides you with one-click access to applications, folders, and documents. It also holds the Trash icon, which both holds files you no longer want and provides a handy way to eject optical discs and other removable items. OS X installs a number of applications and folders on the Dock by default, but you can easily configure the Dock to contain only the items you find the most useful. You can also configure the Dock's location on the desktop, along with its size and behavior.
Mission Control
Mission Control helps you make even better use of your desktop: with a swipe on the trackpad or the press of a button and a swipe, you can quickly cycle through your Dashboard, desktops and spaces, and applications in Full Screen mode. When you see what you want to work with, you can jump right to it.
Window Control
Mission Control also enables you to quickly arrange open windows on the desktop so that you can more easily move between them. For this purpose, Mission Control has three modes. When you open Mission Control, OS X reduces all the open windows in size and groups them by application. You can click a window to jump to it. It can also shrink all the open windows for an application so you can see them all at the same time; click a window to move to it. In addition, you can use Mission Control to quickly move all open windows off the sides of the screen so you can access the desktop.
Desktops
Desktops, also called spaces, are collections of applications that you can switch between quickly and easily to work with a different space. For example, you might have one desktop with your communication applications, such as e-mail, chat, and so on. Another desktop might have your work applications, such as Pages and Numbers. Yet another might have entertainment apps in it. With a gesture and a click, you can move from one set to another.
Dashboard

The Dashboard contains “mini applications” called widgets. You can quickly pop open the Dashboard, use your widgets, and close the Dashboard again to move it out of the way. The Dashboard contains several widgets by default, but like other desktop management tools, you can customize its contents to suit your needs.
Launchpad
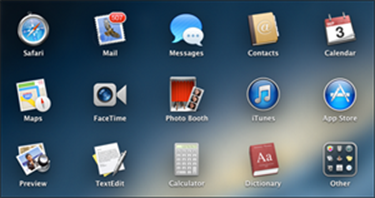
The Launchpad presents icons for all the applications stored in the Applications folder or other system folders on your MacBook Pro on multiple screens. The first screen contains OS X's default applications along with other Apple applications, such as the iLife applications. You can drag your fingers across the trackpad to flip through the screens to see the other applications you have. When you see an application, you want to use, click its icon. Because the Launchpad is focused on helping you use applications, its section is in Chapter 5.
Using and Configuring the Dock
The Dock provides single-click access to various items, including applications, documents, and folders. The Dock includes a number of default icons, and you can add as many icons to your Dock as you want. You can also customize the way the Dock looks and works to suit your preferences. Clicking an application's icon in the Dock opens the application — if it is not open already — and makes it active. Clicking the icon for a minimized window restores that window to its previous size.
Using and Configuring the Dock
Use the Dock
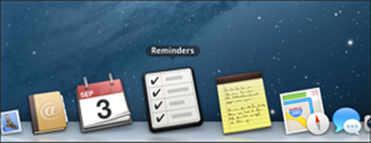
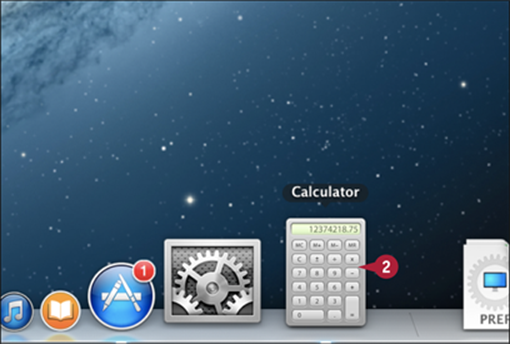
![]() Point to an icon on the Dock.
Point to an icon on the Dock.
The name of the related item appears above the icon.
![]() Click an item to take action on it; for example, clicking an application opens it.
Click an item to take action on it; for example, clicking an application opens it.
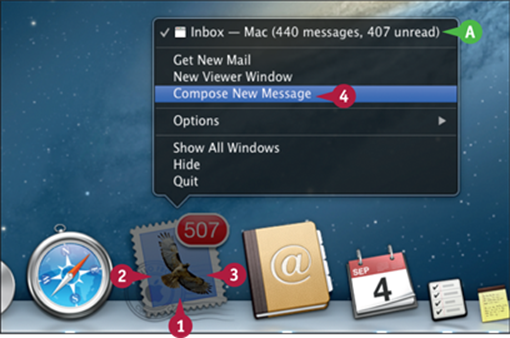
![]() To open a Dock icon's contextual menu, either Control+click or click and hold on the icon.
To open a Dock icon's contextual menu, either Control+click or click and hold on the icon.
![]() Choose the command you want to use from the menu.
Choose the command you want to use from the menu.
A You can also display one of the application's open windows by clicking it on the menu.
Note: As more icons appear on the Dock, the Dock expands until it takes up the full width of the screen. After that, OS X makes the icons smaller so that they fit on it.
Configure the Dock
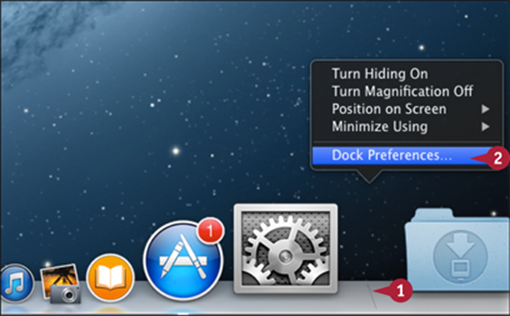
![]() Control+click the dashed dividing line just to the right of the last application icon.
Control+click the dashed dividing line just to the right of the last application icon.
The Dock menu appears.
![]() Click Dock Preferences.
Click Dock Preferences.
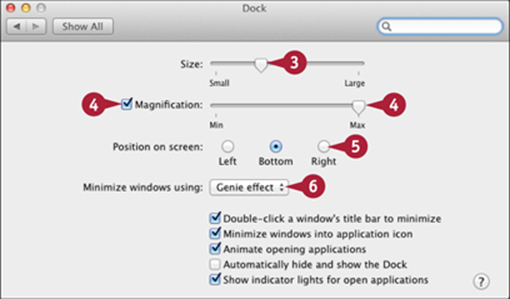
![]() Drag the Size slider left or right to resize the Dock.
Drag the Size slider left or right to resize the Dock.
![]() To magnify icons when you point to them, select the Magnification check box (
To magnify icons when you point to them, select the Magnification check box (![]() changes to
changes to ![]() ) and then drag the slider.
) and then drag the slider.
![]() Position the Dock by clicking Left, Bottom, or Right (
Position the Dock by clicking Left, Bottom, or Right (![]() changes to
changes to ![]() ).
).
![]() Click the Minimize windows using pop-up menu (
Click the Minimize windows using pop-up menu (![]() ) and select the effect you want to use.
) and select the effect you want to use.
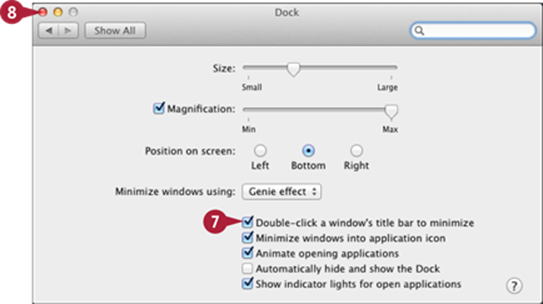
![]() Select the Double-click a window's title bar to minimize check box (
Select the Double-click a window's title bar to minimize check box (![]() changes to
changes to ![]() ) to minimize a window by double-clicking its title bar.
) to minimize a window by double-clicking its title bar.
![]() Click Close (
Click Close (![]() ) or press
) or press ![]() +
+![]() to close the System Preferences application.
to close the System Preferences application.
TIP
What are the other options in the Dock pane in System Preferences?
Select the Minimize windows into application icon check box (![]() changes to
changes to ![]() ) to minimize a window into its application's icon instead of to an icon on the right side of the Dock. Select the Animate opening applications check box (
) to minimize a window into its application's icon instead of to an icon on the right side of the Dock. Select the Animate opening applications check box (![]() changes to
changes to ![]() ) to have icons bounce while their applications are opening. Select the Automatically hide and show the Dock check box (
) to have icons bounce while their applications are opening. Select the Automatically hide and show the Dock check box (![]() changes to
changes to ![]() ) to automatically hide the Dock when you are not pointing to it. Select the Show indicator lights for open applications check box (
) to automatically hide the Dock when you are not pointing to it. Select the Show indicator lights for open applications check box (![]() changes to
changes to ![]() ) to display a blue dot under each open application's icon.
) to display a blue dot under each open application's icon.
Manage the Desktop with Mission Control
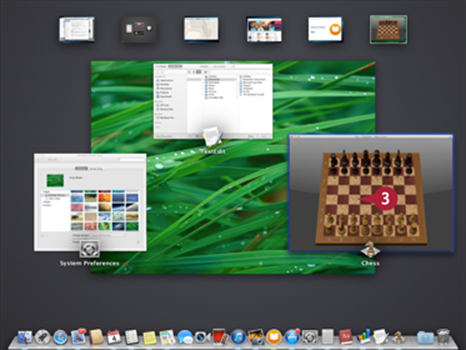
Mission Control is a quick way to get to any open window on your MacBook Pro. You can also use it to get to the Dashboard, applications running in Full Screen mode, and your desktops. When you open Mission Control by using gestures on the trackpad, at the top of the screen you see thumbnails of your desktops, applications in Full Screen mode, and the Dashboard. You see thumbnails of the open applications in the current desktop in the center part of the screen, and you see the Dock. You can quickly get to any window you see.
Manage the Desktop with Mission Control
Configure the Mission Control Gesture
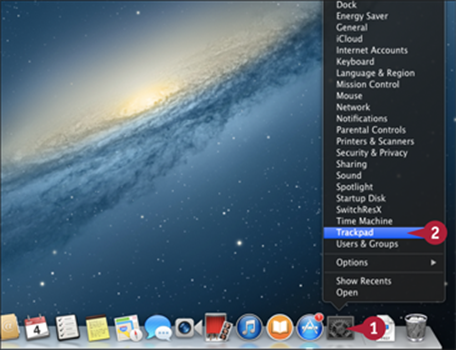
![]() Control+click System Preferences (
Control+click System Preferences (![]() ) in the Dock.
) in the Dock.
The contextual menu opens.
![]() Click Trackpad.
Click Trackpad.
Note: If System Preferences (![]() ) does not appear on the Dock, click Apple (
) does not appear on the Dock, click Apple (![]() ) and then click System Preferences. In the System Preferences window, click Trackpad.
) and then click System Preferences. In the System Preferences window, click Trackpad.
The System Preferences application opens, displaying the Trackpad pane.
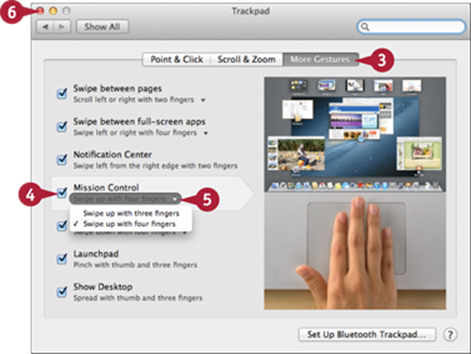
![]() Click More Gestures.
Click More Gestures.
The More Gestures pane appears.
![]() Select the Mission Control check box (
Select the Mission Control check box (![]() changes to
changes to ![]() ).
).
![]() Click the menu under Mission Control and select Swipe up with three fingers or Swipe up with four fingers to suit your preference.
Click the menu under Mission Control and select Swipe up with three fingers or Swipe up with four fingers to suit your preference.
![]() Click Close (
Click Close (![]() ).
).
The System Preferences application closes.
Use Mission Control
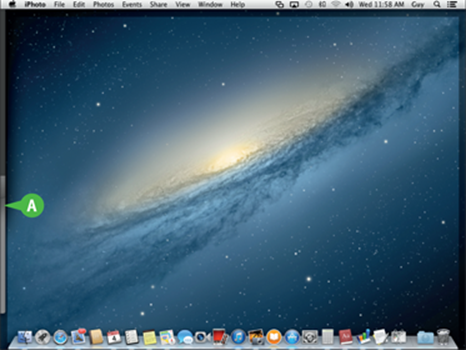
![]() Using three or four fingers, swipe up the trackpad toward the screen.
Using three or four fingers, swipe up the trackpad toward the screen.
Note: You can also press ![]() or Control +
or Control + ![]() on the keyboard to open Mission Control.
on the keyboard to open Mission Control.
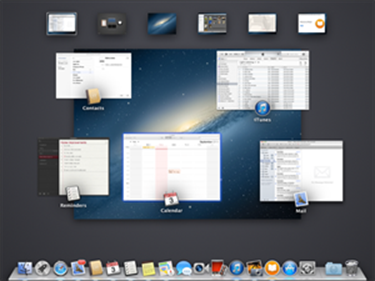
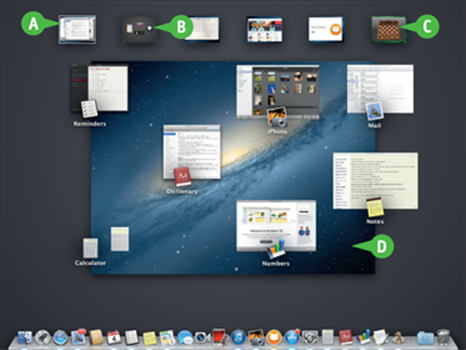
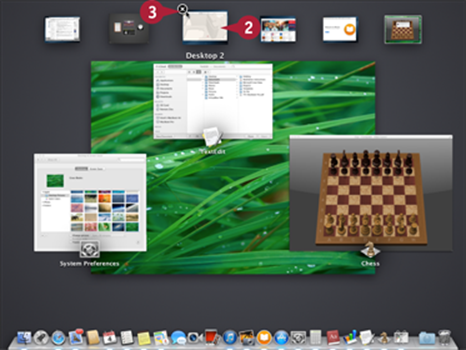
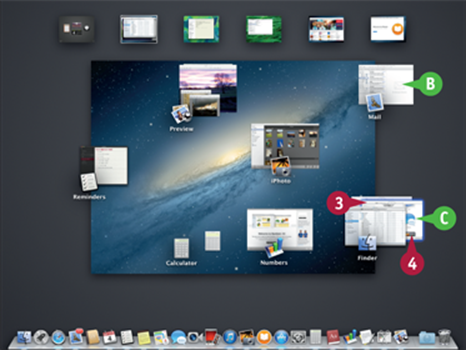
Mission Control opens.
A At the top of the screen, you see a thumbnail for your current desktop on the far left.
B Next at the top of the screen is the thumbnail for the Dashboard.
C To the right of the Dashboard, you see a thumbnail for each desktop or full-screen application.
D In the center of the screen, you see thumbnails for all the open windows in the current desktop. The windows are grouped by the application with which they are associated.
![]() Swipe to the left or right to change the focus to the previous or next desktop.
Swipe to the left or right to change the focus to the previous or next desktop.
![]() To display an application in Full Screen mode, or the Dashboard, click its thumbnail. To display a specific window within the space in focus, click in it.
To display an application in Full Screen mode, or the Dashboard, click its thumbnail. To display a specific window within the space in focus, click in it.
Note: When you point to a window, a blue box outlines it, indicating it will be your destination when you click.
TIP
Can I have a different desktop picture in each desktop?
Yes. Configure System Preferences to be in either no desktop or all of them — you learn how to do this later in this chapter. Move into each desktop and set the background picture for that desktop. When you move into a desktop, its background picture appears.
Configure and Use Mission Control and Desktops
Desktops are collections of applications and documents that you can use to move easily and quickly between sets of windows. When you use desktops, you do not have to bother locating individual windows. Instead, you can see the windows in each desktop and quickly move to the window with which you want to work. For example, if you typically use several Internet applications at the same time, you can create an Internet desktop and add your applications to it. To use the Internet, you just display this desktop, and its open applications are ready to use immediately.
Configure and Use Mission Control and Desktops
Configure Mission Control
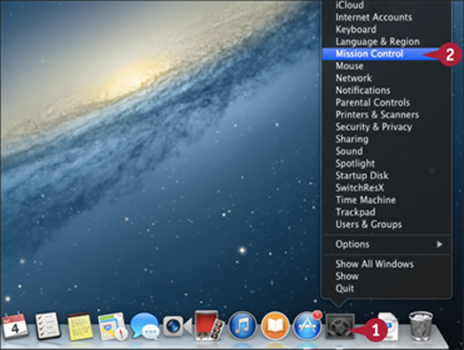
![]() Control+click System Preferences (
Control+click System Preferences (![]() ).
).
![]() Click Mission Control.
Click Mission Control.
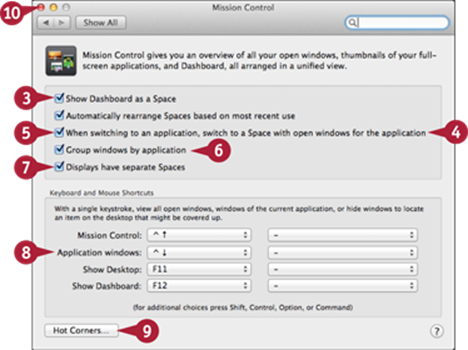
![]() Select the Show Dashboard as a Space check box (
Select the Show Dashboard as a Space check box (![]() changes to
changes to ![]() ) to include the Dashboard.
) to include the Dashboard.
![]() Select the Automatically rearrange Spaces based on most recent use check box (
Select the Automatically rearrange Spaces based on most recent use check box (![]() changes to
changes to ![]() ).
).
![]() Select the When switching to an application, switch to a Space with open windows for the application check box (
Select the When switching to an application, switch to a Space with open windows for the application check box (![]() changes to
changes to ![]() ).
).
![]() Select the Group windows by application check box (
Select the Group windows by application check box (![]() changes to
changes to ![]() ) to group windows.
) to group windows.
![]() Select the Displays have separate Spaces check box (
Select the Displays have separate Spaces check box (![]() changes to
changes to ![]() ).
).
![]() Click these menus and select the keyboard shortcuts.
Click these menus and select the keyboard shortcuts.
![]() Click Hot Corners and choose an action for each screen corner.
Click Hot Corners and choose an action for each screen corner.
![]() Click Close (
Click Close (![]() ).
).
Create Desktops
![]() Activate Mission Control. For example, drag four fingers up the trackpad.
Activate Mission Control. For example, drag four fingers up the trackpad.
The Dashboard, current desktops, and applications in Full Screen mode appear at the top of the screen. The applications and windows open in the current desktop appear in the center of the screen.
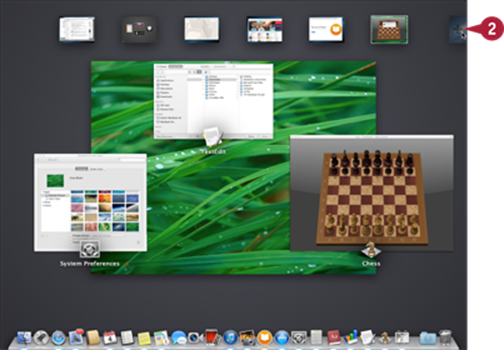
![]() Point to the upper-right corner of the screen, and click the Add button (
Point to the upper-right corner of the screen, and click the Add button (![]() ) that appears.
) that appears.
Note: If you have positioned the Dock on the right side of the screen, point to the upper-left corner of the screen to display the Add button (![]() ).
).
A new space called desktop X, where X is the next unused number, appears and is ready for you to configure.
![]() Repeat step 2 until you have created all the desktops you want.
Repeat step 2 until you have created all the desktops you want.
Delete Desktops
![]() Activate Mission Control.
Activate Mission Control.
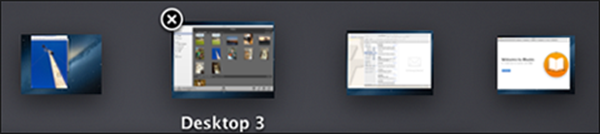
![]() Point to the desktop you want to delete.
Point to the desktop you want to delete.
![]() Click Delete (
Click Delete (![]() ).
).
OS X removes the desktop.
TIP
How many desktops should I use?
This depends on how many applications you use, how you use them, and whether you use an external display to extend your MacBook Pro's screen. Experiment with three or four desktops to start with. If you need more desktops, you can create them in moments; and if you find you have too many desktops, you can delete surplus ones equally easily.
Configure and Use Mission Control and Desktops (continued)
Desktops are a powerful feature, but they can take a bit of getting used to. It might take some trial and error to configure your desktops in a way that you get the most benefit from them. The most common problem is having too many desktops or too many applications in one desktop. Use these steps to configure your desktops initially. Over time, you will discover which desktops work for you and which do not. Keep tweaking your desktops until they suit the way you work.
Configure and Use Mission Control and Desktops (continued)
Change Desktops with a Gesture
![]() Swipe on the trackpad to the left or right with three fingers. On the keyboard, you can press Control+
Swipe on the trackpad to the left or right with three fingers. On the keyboard, you can press Control+![]() or Control+
or Control+![]() .
.
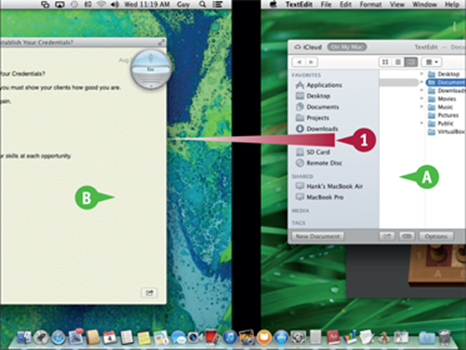
A As you swipe, the current space moves off the screen in the direction you swipe.
B The next space moves onto the screen in the direction you swipe.
Change Desktops with Mission Control
![]() Swipe up with four fingers on the trackpad or press
Swipe up with four fingers on the trackpad or press ![]() or Control+
or Control+![]() on the keyboard.
on the keyboard.

![]() Click the space you want to make active.
Click the space you want to make active.
The desktop, application in Full Screen mode, or Dashboard on which you clicked becomes active.
Configure Desktops
![]() Make the desktop you want to configure active.
Make the desktop you want to configure active.
![]() If the icons for applications you want to add to the desktop do not appear on the Dock, launch the applications.
If the icons for applications you want to add to the desktop do not appear on the Dock, launch the applications.
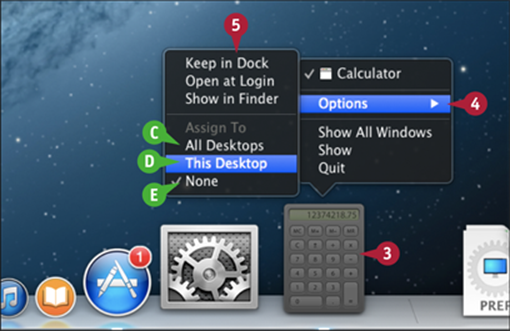
![]() Control+click an application's Dock icon.
Control+click an application's Dock icon.
![]() Click Options.
Click Options.
![]() Select one of the options that follows.
Select one of the options that follows.
C You can choose All Desktops to add the application to all desktops so it is available no matter which one is active.
D You can choose This Desktop to add the application to the active desktop.
E You can choose None to remove the application from all desktops so it behaves independent of the desktop you are using.
![]() Repeat steps 2 to 5 until you configure all the applications you want to associate with the active desktop.
Repeat steps 2 to 5 until you configure all the applications you want to associate with the active desktop.
TIP
What happens when I open an application that is not part of the desktop that I am using?
If an application is available in only one desktop, when you open it from any source, such as the Dock or the Finder, you switch into the desktop with which that application is associated, if you have enabled that option in Mission Control preferences. If the application is not part of a desktop, it opens in the space you are currently using.
Manage Open Windows with Mission Control
Mission Control greatly helps with the inevitable screen clutter as you use your MacBook Pro and open window after window for documents and applications. For this purpose, Mission Control has three modes. You can hide all open windows to show the OS X desktop. You can reduce all open windows to thumbnails so that you can quickly jump into a window you want to use. You can also see thumbnails for just the open windows within a specific application.
Manage Open Windows with Mission Control
Hide All Open Windows
![]() Open several windows.
Open several windows.
![]() Press
Press ![]() +
+![]() .
.
A All the windows move off the MacBook Pro screen.
Note: To return the windows to the desktop, press ![]() +
+![]() again or click one of the sides of the windows that you see at the edges of the desktop.
again or click one of the sides of the windows that you see at the edges of the desktop.
Show Thumbnails of All Open Windows
![]() Make a desktop with open windows active.
Make a desktop with open windows active.
![]() Open Mission Control by swiping three or four fingers up the trackpad. On the keyboard, you can press
Open Mission Control by swiping three or four fingers up the trackpad. On the keyboard, you can press ![]() or Control+
or Control+![]() .
.
B All windows shrink down so that they fit on the desktop.
![]() Point to a window.
Point to a window.
C The window is highlighted with a blue line.
![]() Click a window to move into it.
Click a window to move into it.
Show All Open Windows for an Application
![]() Open multiple windows within the same application.
Open multiple windows within the same application.
![]() Perform the gesture associated with App Exposé. For example, swipe down with four fingers.
Perform the gesture associated with App Exposé. For example, swipe down with four fingers.
Note: You can also press Control+![]() or Control+
or Control+![]() to give the App Exposé command.
to give the App Exposé command.
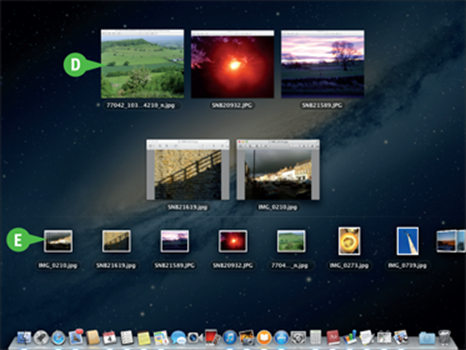
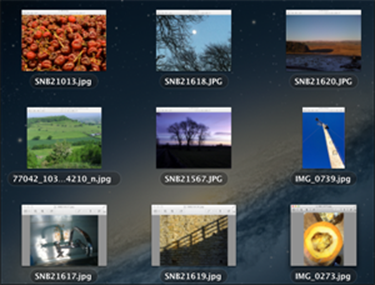
D All windows currently open in the application appear as thumbnails at the top of the screen. You see the title of each window underneath its thumbnail.
E At the bottom of the screen, you see thumbnails for other files you have recently closed in the same application.
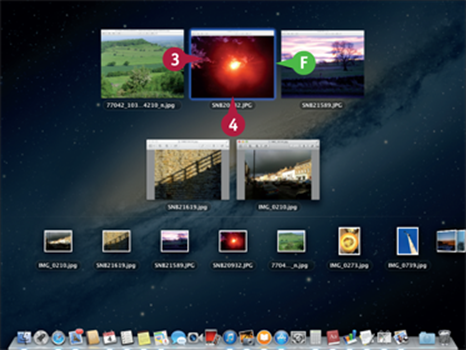
![]() Point to a window or to a recent file.
Point to a window or to a recent file.
F A blue highlight appears around the window or file.
![]() Click the item you want to display.
Click the item you want to display.
Note: You can also press the arrow keys to move to a window and press ![]() to move into it.
to move into it.
TIPS
How can I get back to a recent file?
To browse recent files, swipe to the left or right across the thumbnails along the bottom of the screen. When you see the file you want to open, click it. The file opens and you can use it.
How can I change the set of windows that I am viewing?
With the windows for an application showing, hold down ![]() and press
and press ![]() . The Application Switcher appears. Continue holding down
. The Application Switcher appears. Continue holding down ![]() and press
and press ![]() until the application whose windows you want to see is highlighted with a white box. When it is, release the keys. All the windows open in that application appear.
until the application whose windows you want to see is highlighted with a white box. When it is, release the keys. All the windows open in that application appear.
Using and Configuring the Dashboard
The Dashboard offers an easy way to access widgets, small applications that provide very specific functionality. To use a widget, you activate the Dashboard, which fills the desktop and presents the widgets installed on it. Use the widgets you want; when you are done, close the Dashboard again. OS X includes a number of useful widgets by default, such as Weather, Calculator, Address Book, and Flight Tracker. There is even a widget to help you manage your widgets.
Using and Configuring the Dashboard
Open the Dashboard
![]() Click Launchpad (
Click Launchpad (![]() ) on the Dock.
) on the Dock.
![]() Click Dashboard (
Click Dashboard (![]() ).
).
Note: You can also open Dashboard by opening Mission Control and then clicking the Dashboard space.
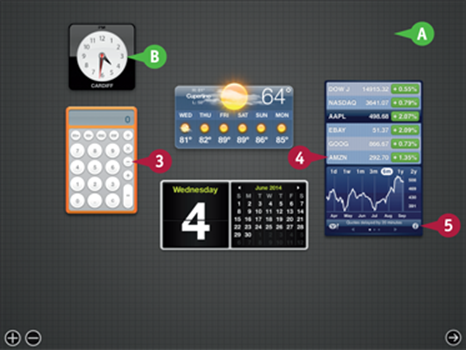
A The desktop and open windows move into the background and the Dashboard appears, displaying the widgets already on the Dashboard.
B If a widget is informational, such as a clock widget, you can view the information it provides.
![]() If the widget needs input, click the widget to make it active.
If the widget needs input, click the widget to make it active.
![]() Point to the widget you want to configure.
Point to the widget you want to configure.
The Info button (a lowercase i) appears.
![]() Click Info (
Click Info (![]() ).
).
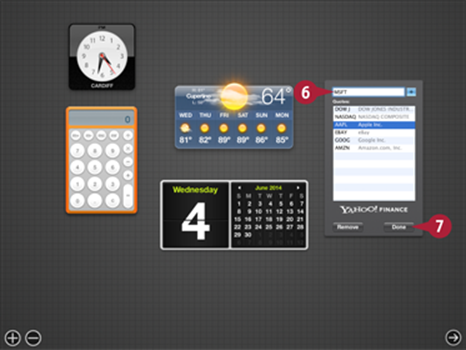
![]() Use the widget's configuration tools to change its settings.
Use the widget's configuration tools to change its settings.
![]() Click Done.
Click Done.
Configure the Dashboard
![]() Open the Dashboard.
Open the Dashboard.
![]() To change the location of widgets, drag them around the screen.
To change the location of widgets, drag them around the screen.
When you release the trackpad, the widget is saved in its new location and appears in that spot each time you open the Dashboard.
![]() Click Add (
Click Add (![]() ).
).
The Dashboard moves into configuration mode. You see all the widgets currently available for the Dashboard.
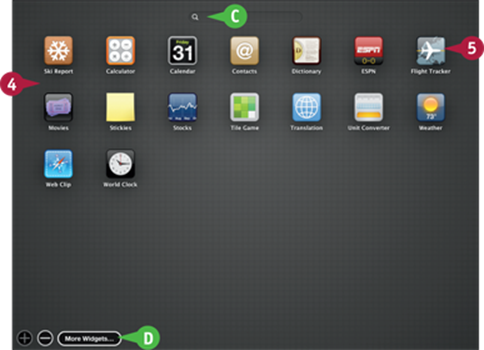
![]() Browse the available widgets.
Browse the available widgets.
C If you have many widgets, you can search by clicking in the Search box and typing a search term.
D To find other widgets, click More Widgets and browse the selection on the Apple Dashboard Widgets page.
![]() Click a widget to add it to your Dashboard.
Click a widget to add it to your Dashboard.
The widget is added to your Dashboard and it returns to its usable mode.
TIP
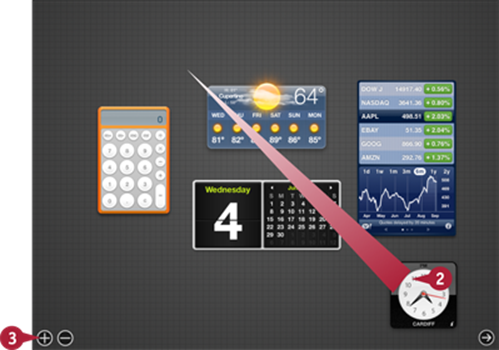
How can I remove widgets from the Dashboard?
To remove a widget from the Dashboard, open the Dashboard and click Remove (![]() ). Click the Delete button (
). Click the Delete button (![]() ) on the widget you want to remove. The widget is removed from the Dashboard, but remains on your MacBook Pro so you can add it again later if desired. Click Remove (
) on the widget you want to remove. The widget is removed from the Dashboard, but remains on your MacBook Pro so you can add it again later if desired. Click Remove (![]() ) again when you finish removing widgets.
) again when you finish removing widgets.
Work with Notifications
As you use your MacBook Pro, you receive e-mail, reminders about appointments and tasks, information updates, and so on. Each application you use can send notifications to keep you informed about what is happening. There are two types of individual notifications. When Alert notifications appear on the screen, you have to take some action to clear them, such as clicking the Dismiss button. Banner notifications are more informational; they appear briefly on the screen and then go away automatically. You can view and work with groups of notifications in the Notification Center.
Work with Notifications
View Alert Notifications
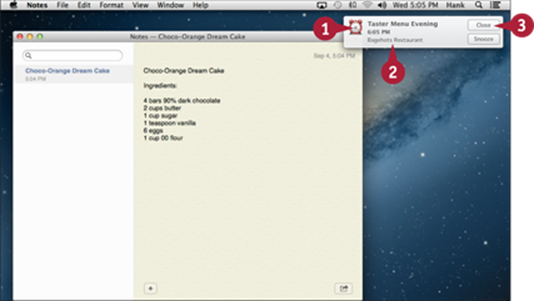
![]() View the information presented in the alert.
View the information presented in the alert.
![]() If you want to see the details of what you are being notified about, click the alert.
If you want to see the details of what you are being notified about, click the alert.
The application that sent the alert appears, and you can work with the item in detail.
![]() If you want to dismiss the alert, click one of its buttons.
If you want to dismiss the alert, click one of its buttons.
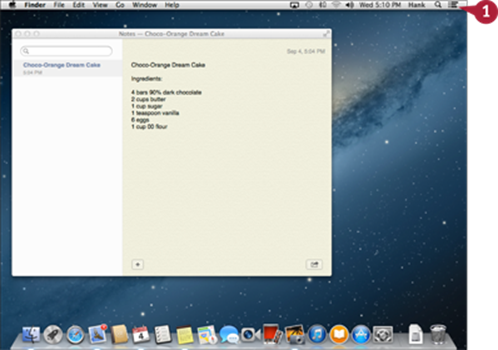
View Banner Notifications

![]() View the information presented in the banner.
View the information presented in the banner.
![]() If you want to see the details of what you are being notified about, click the information.
If you want to see the details of what you are being notified about, click the information.
The application that sent the alert appears, and you can work with the item in detail.
If you do not click the banner, after a few seconds, it disappears.
View Notifications in the Notification Center
![]() Click the Notification Center button (
Click the Notification Center button (![]() ).
).
Note: The color of the dot at the center of the Notification Center button is blue if you have notifications that you have not seen before. Otherwise, it is gray.
The Notification Center opens. You see the notifications you have from various applications, organized into groups with the application's name at the top the group.
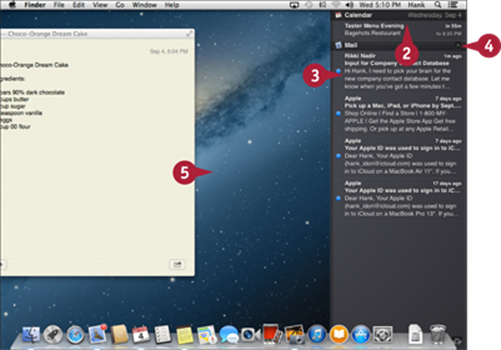
![]() Scroll up and down the list to review all the notifications.
Scroll up and down the list to review all the notifications.
![]() Click a notification to display the related application and see all the item's details. For example, if you click a reminder notification, the Reminders application appears, and you can see all the information in that reminder.
Click a notification to display the related application and see all the item's details. For example, if you click a reminder notification, the Reminders application appears, and you can see all the information in that reminder.
![]() To close a section, click the Close button (
To close a section, click the Close button (![]() ).
).
![]() To close the Notification Center, click the desktop.
To close the Notification Center, click the desktop.
TIP
How can I change the order in which notifications are listed?
By default, groups of notifications are sorted so that the newest notifications appear at the top of the Notification Center. If you prefer to set the order manually, you can use the Notifications pane of the System Preferences Center, explained in the next section, to allow manual configuration. When that is set, drag sections up or down the list to change their order.
Work with Notifications (continued)
You can choose which applications can send notifications to you and which types of notifications each can send. To configure notifications, you use the Notifications pane in the System Preferences application. Here, you can set your Do Not Disturb period and choose who — if anyone — can interrupt it.
As well as banners and alerts, OS X provides badge notifications and sound notifications. Badges are numbers that appear on an application's icon to show how many new items the application has. Sound notifications are sounds an application plays when events occur.
Work with Notifications (continued)
Configure Notifications
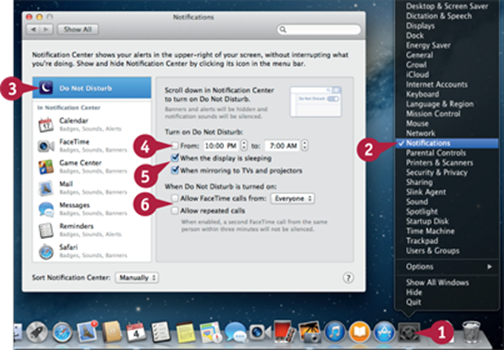
![]() Control+click System Preferences (
Control+click System Preferences (![]() ).
).
![]() Click Notifications.
Click Notifications.
![]() Click Do Not Disturb.
Click Do Not Disturb.
![]() Select the From check box (
Select the From check box (![]() changes to
changes to ![]() ) and choose the start time and end time for your Do Not Disturb period.
) and choose the start time and end time for your Do Not Disturb period.
![]() Choose other times to turn on Do Not Disturb.
Choose other times to turn on Do Not Disturb.
![]() Choose whether and which people can interrupt Do Not Disturb.
Choose whether and which people can interrupt Do Not Disturb.
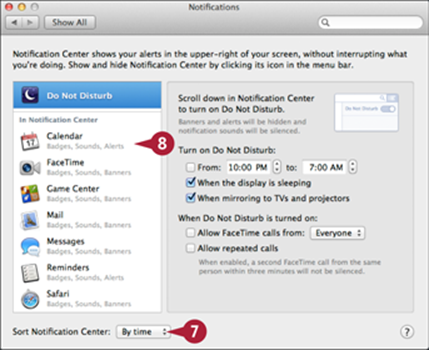
![]() Click the Sort Notification Center pop-up menu (
Click the Sort Notification Center pop-up menu (![]() ) and select Manually if you want to be able to drag notifications up and down the list. Select By time if you want notifications always to be sorted based on when you received them.
) and select Manually if you want to be able to drag notifications up and down the list. Select By time if you want notifications always to be sorted based on when you received them.
![]() Click the application for which you want to configure notifications.
Click the application for which you want to configure notifications.
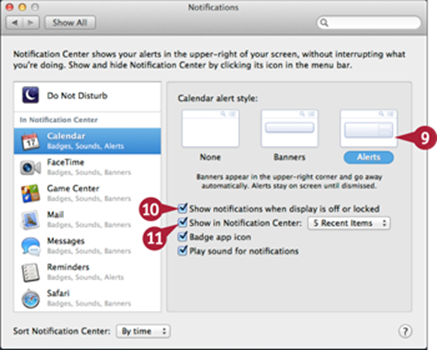
![]() Click None, Banners, or Alerts.
Click None, Banners, or Alerts.
![]() Select the Show notifications when display is off or locked check box (
Select the Show notifications when display is off or locked check box (![]() changes to
changes to ![]() ) to display notifications even when the display is off or locked.
) to display notifications even when the display is off or locked.
![]() Deselect the Show in Notification Center check box (
Deselect the Show in Notification Center check box (![]() changes to
changes to ![]() ) if you do not want the application's notifications to appear in the Notification Center.
) if you do not want the application's notifications to appear in the Notification Center.
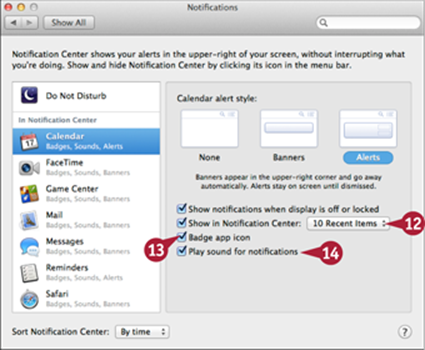
![]() Click the pop-up menu (
Click the pop-up menu (![]() ) and select the number of recent notifications to display.
) and select the number of recent notifications to display.
![]() Deselect the Badge app icon check box (
Deselect the Badge app icon check box (![]() changes to
changes to ![]() ) if you do not want badge notifications to appear on the application's icon.
) if you do not want badge notifications to appear on the application's icon.
![]() Deselect the Play sound for notifications check box (
Deselect the Play sound for notifications check box (![]() changes to
changes to ![]() ) to disable audible alerts.
) to disable audible alerts.
![]() Repeat steps 8 to 14 until you have configured notifications for all the applications shown.
Repeat steps 8 to 14 until you have configured notifications for all the applications shown.
TIP
How do I disable all notifications?
If you want to hide all alerts and banners, open the Notification Center and scroll to the top. Set the Do Not Disturb switch to the On position. All banners and alerts will be hidden. To resume receiving these notifications, set the switch position to the Off position again.
All materials on the site are licensed Creative Commons Attribution-Sharealike 3.0 Unported CC BY-SA 3.0 & GNU Free Documentation License (GFDL)
If you are the copyright holder of any material contained on our site and intend to remove it, please contact our site administrator for approval.
© 2016-2026 All site design rights belong to S.Y.A.