The Unauthorized Guide to iPhone, iPad, and iPod Repair (2013)
Chapter 11. iPod touch 4th Generation Disassembly and Reassembly
Let me be perfectly blunt: I would advise you against attempting any Do-It-Yourself (DIY) disassemblies and/or repairs on any of the iPod touch models. “But this is an iPod repair guide, Tim! What are you trying to say?” I’m simply saying that Apple believes that all of its iPods (including the touches) constitute “disposable hardware.” Consequently, they are manufactured with disposability and not repair in mind.
My evidence for this strong statement can be summarized by the following cogent facts that apply to all generations of the iPod touch, including the most recent model as of this writing, the iPod touch 5th generation:
![]() The amount of adhesive Apple uses to glue the front panel assembly to the rear case is so thick that you will have a near-impossible time getting the front panel to lie flush during reassembly.
The amount of adhesive Apple uses to glue the front panel assembly to the rear case is so thick that you will have a near-impossible time getting the front panel to lie flush during reassembly.
![]() The front panel assembly is tethered to the bottom (!) of the logic board, and if you aren’t careful you can very easily tear the cable.
The front panel assembly is tethered to the bottom (!) of the logic board, and if you aren’t careful you can very easily tear the cable.
![]() The battery and other internal components are permanently soldered (!!) to the logic board.
The battery and other internal components are permanently soldered (!!) to the logic board.
![]() The tolerance used to mount the midplane (separator panel between the front panel assembly and the battery/logic board) is so small that you will have a near-impossible time getting the piece to lie flush during reassembly.
The tolerance used to mount the midplane (separator panel between the front panel assembly and the battery/logic board) is so small that you will have a near-impossible time getting the piece to lie flush during reassembly.
Don’t get me wrong; the iPod touch is a fine device. From a customer’s point of view, I’m very happy with the 4th and 5th generation models that I own. I just want to inform you in the name of full disclosure that you are opening yourself up (pun intended) to a world of hurt if you attempt any repair on these particular iDevices.
Nevertheless, I’m including the procedure in this book for its great educational benefit. On with the show!
External Anatomy
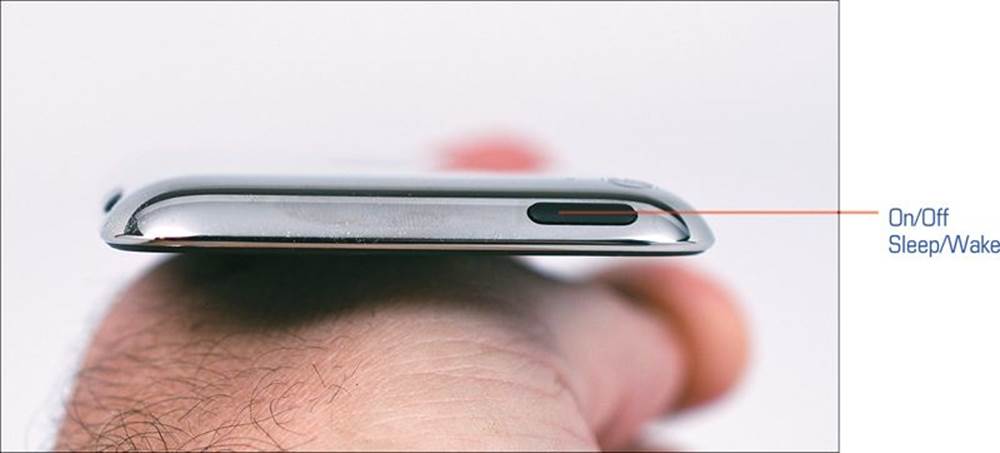
FIGURE 11.1 iPod touch 4th generation top view.
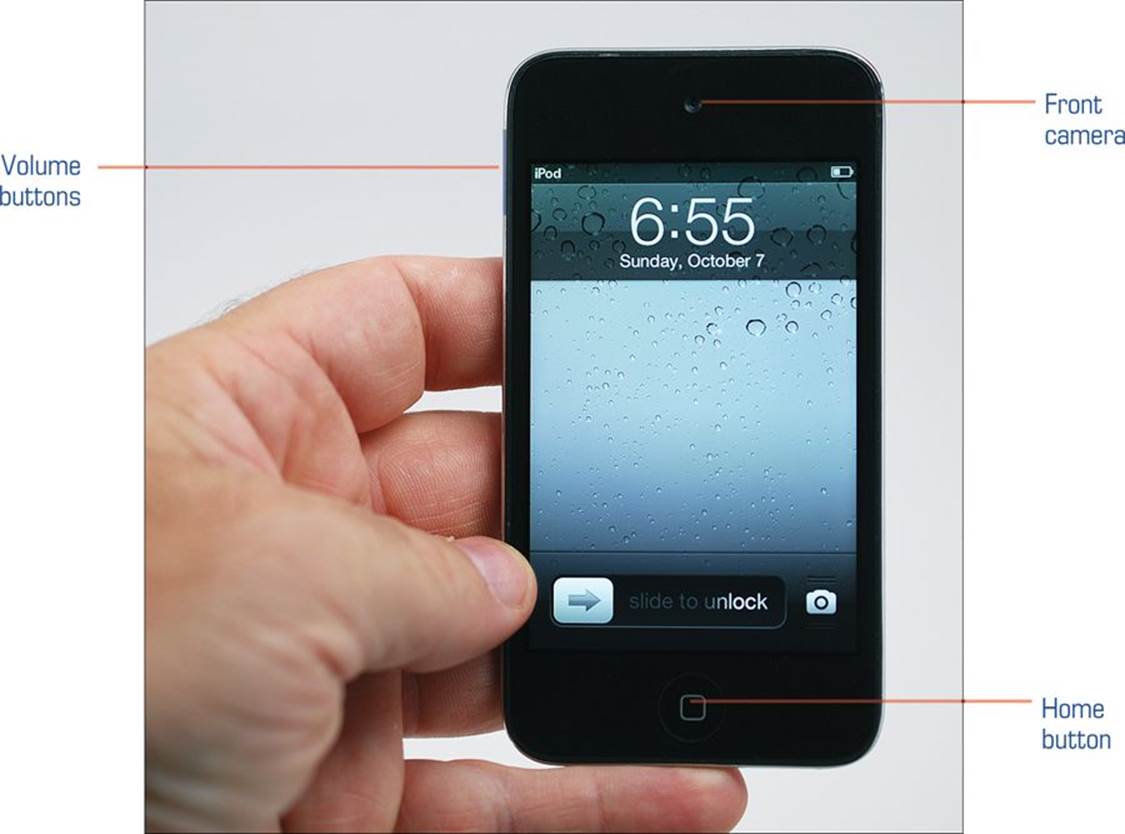
FIGURE 11.2 iPod touch 4th generation front view.
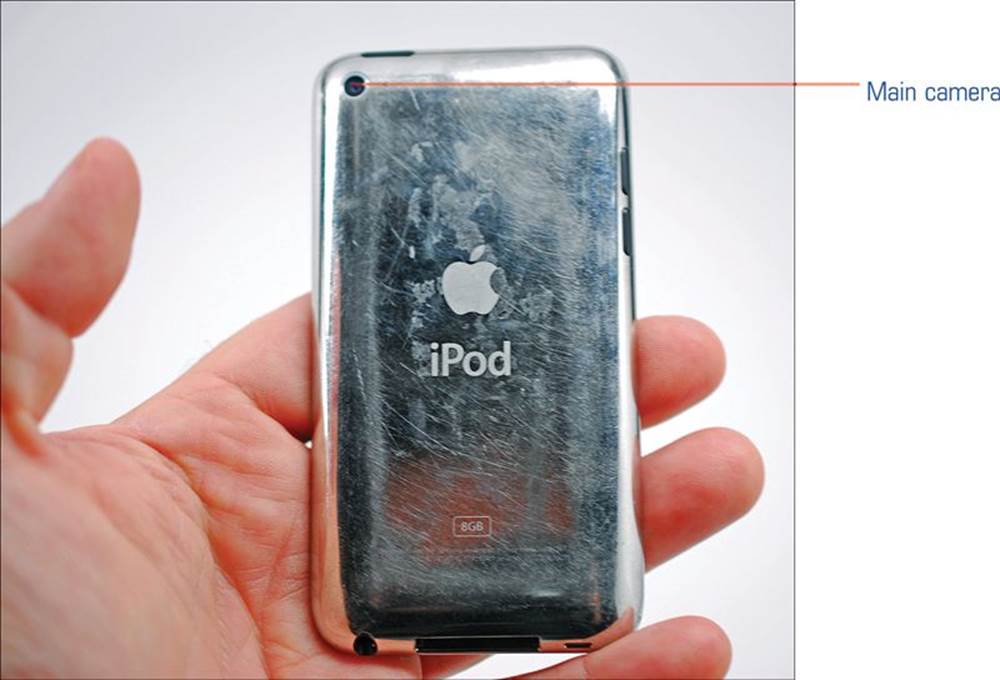
FIGURE 11.3 iPod touch 4th generation rear view.
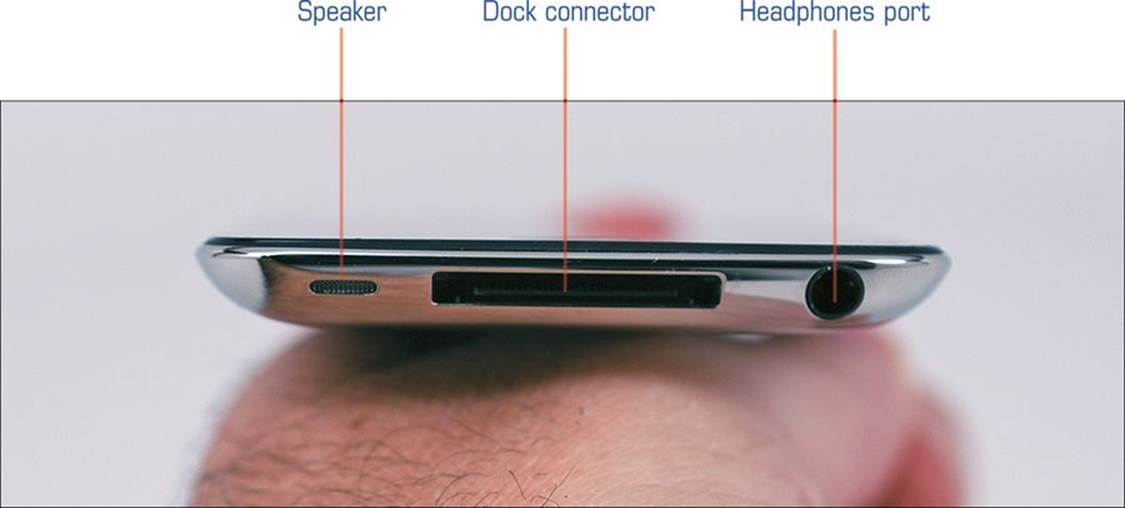
FIGURE 11.4 iPod touch 4th generation bottom view.
You can classify the iPod touch as a thinner version of the iPhone 4. However, as you’ll soon see, the internal architecture of the iPod touch couldn’t be more distinct from that of the iPhone.
Required Tools
![]() Heat gun
Heat gun
![]() Phillips #00 screwdriver
Phillips #00 screwdriver
![]() Plastic opening tools
Plastic opening tools
![]() Soldering iron
Soldering iron
Disassembly Procedure
1. Using your heat gun on its lowest setting, work your way around the perimeter of the iPod touch (see Figure 11.5). Focus most of your efforts in the vicinity of the Home button.
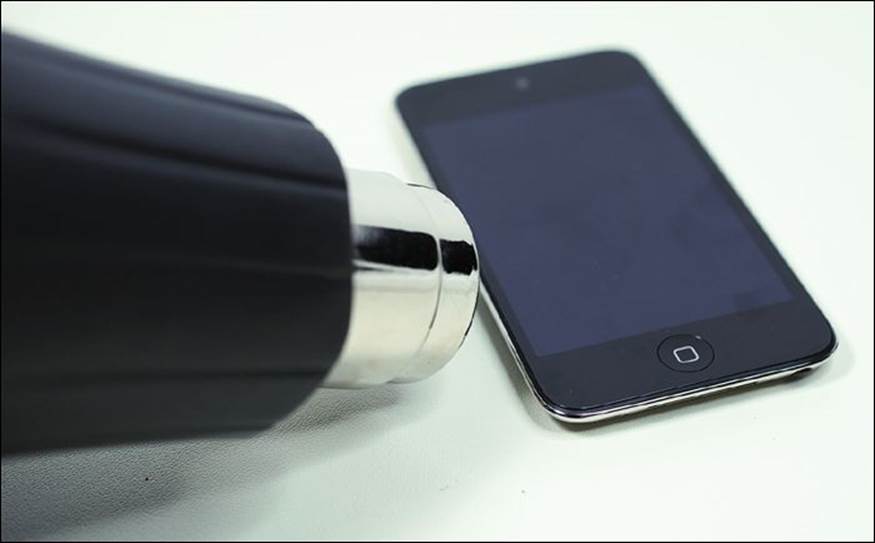
FIGURE 11.5 Heating the front panel assembly.
2. Use a plastic opening tool to gently pry up the front panel assembly from the rear case (see Figure 11.6).
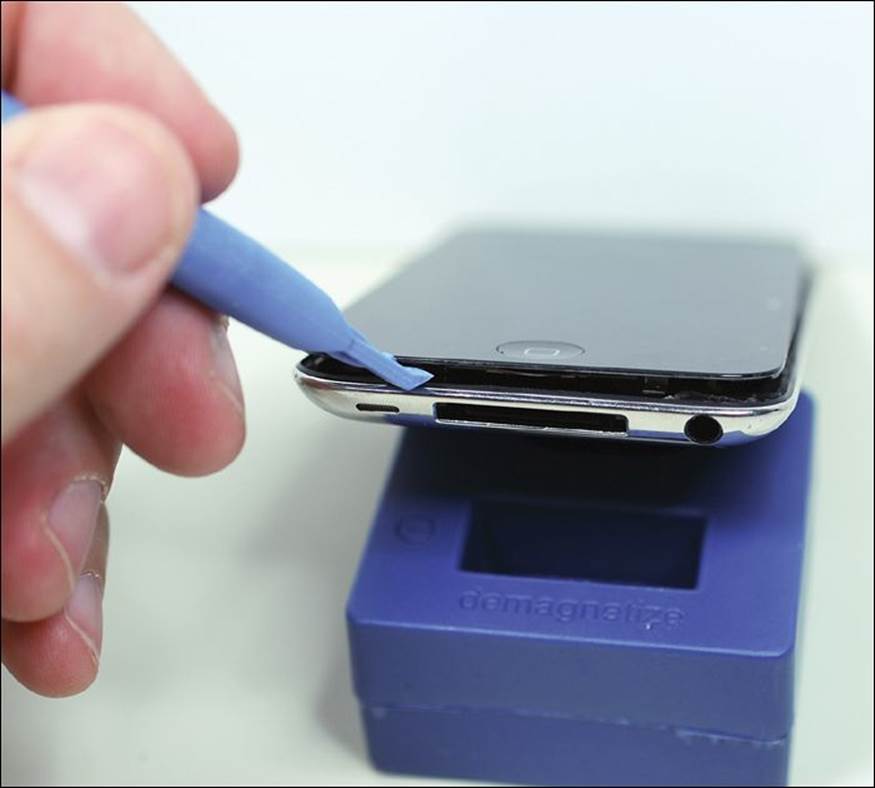
FIGURE 11.6 Prying up the iPod touch front panel assembly.
Caution: Look Before You Pry!
Be sure to insert the opening tool between the top two layers (front glass panel and black plastic bezel near the Home button) and not the bottom two. I’ve cracked a couple iPod touch screens by exerting force in the wrong area. Work slowly, carefully, and mindfully!
3. When the bottom of the front panel assembly comes loose, you can gently (stress: gently) lift the assembly up, as shown in Figure 11.7. Do not lift it more than 45 degrees or so up from the rear case—you will instantly observe delicate ribbon cables connecting the front panel to the logic board. Specifically, the digitizer cable cannot be removed until you take out the logic board. Yes, I know—the construction of this device is nuts.
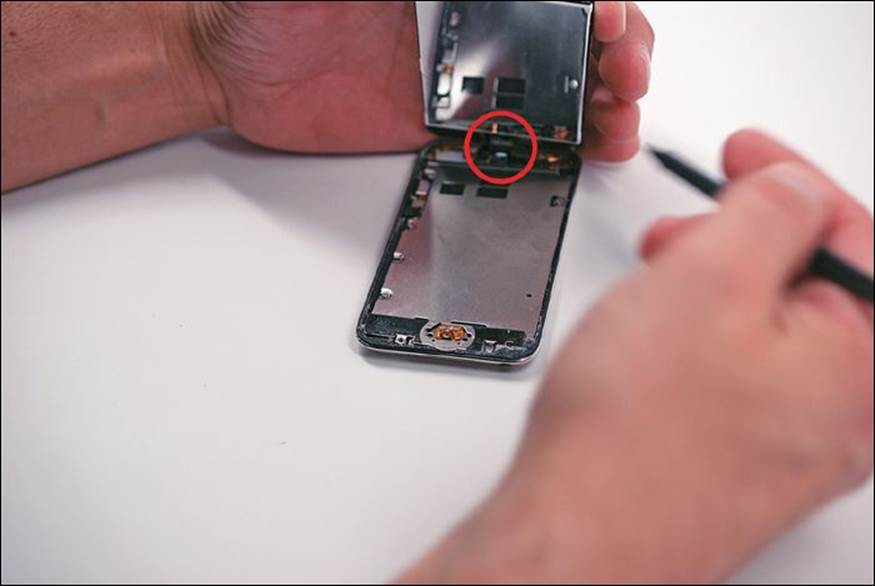
FIGURE 11.7 Lifting the front panel.
Tip: Disconnect the Data Cable
To allow the display to lay flat, disconnect the display data cable. Nonetheless, be ever mindful of that display data cable!
4. You’ve now arrived at the annoying midplane. Remove the eight #00 Phillips screws that are marked in Figure 11.8.
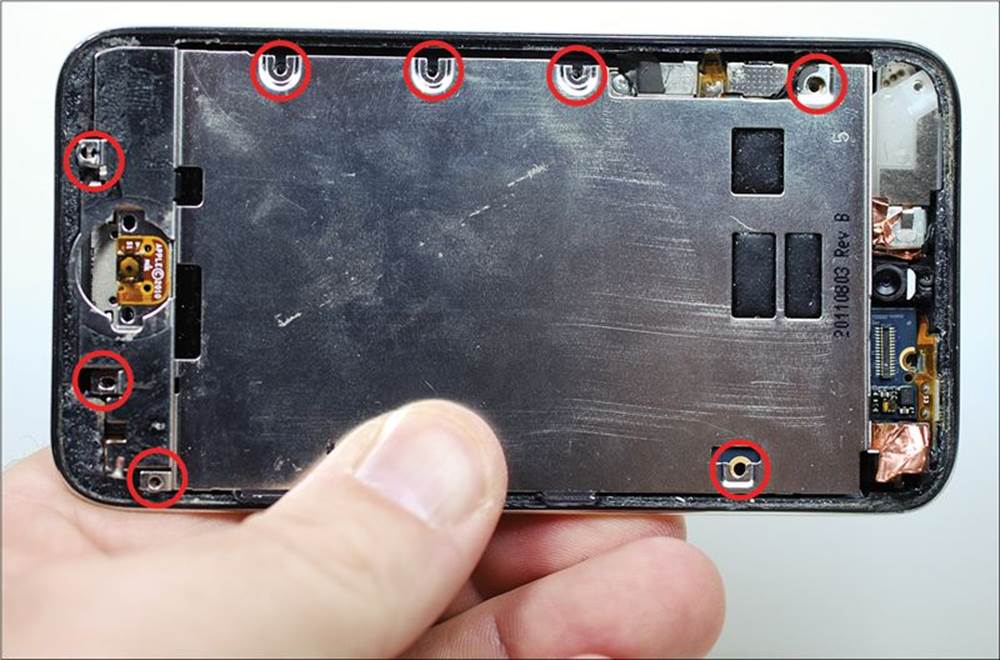
FIGURE 11.8 Removing the screws that hold the midplane to the rear case.
5. Use the plastic opening tool to remove the delicate steel cover from the rear-facing camera (see Figure 11.9).
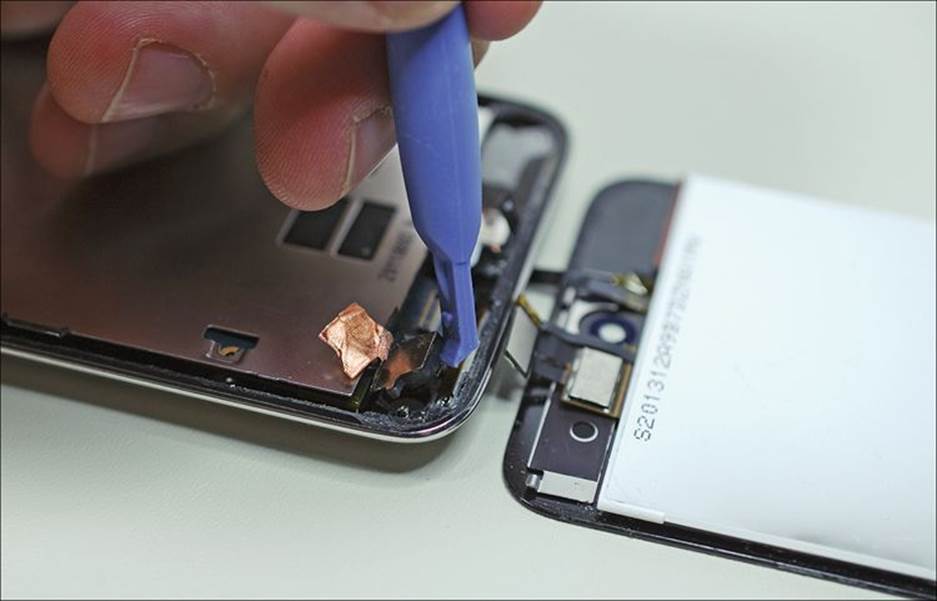
FIGURE 11.9 Removing one of many small cover pieces—this one is for the rear-facing camera.
6. Move to the lower-left corner of the midplane (near the Home button) and pry up the midplane at that corner (see Figure 11.10).
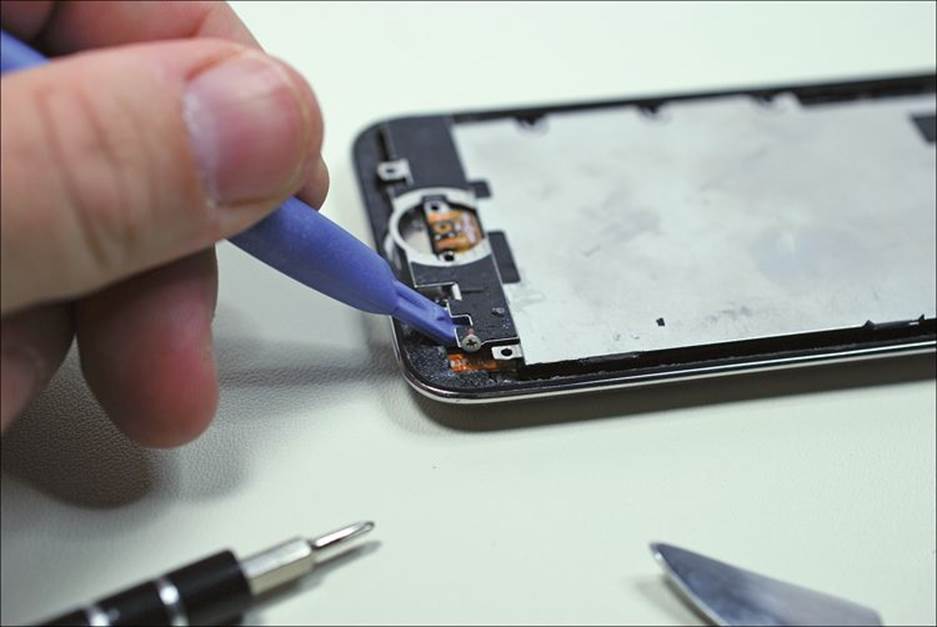
FIGURE 11.10 Beginning to pry up the midplane.
Caution: Watch Those Speaker Wires!
Lifting the midplane at the lower-left corner is important. However, it is even more important that you watch out for the iPod touch speaker that resides just underneath the midplane. Many a tech has severed the tiny wires by not paying enough attention during this step.
7. You should now have enough of the midplane loosened such that you can detach it from the rear case (see Figure 11.11). Again, exercise caution because the rear camera is attached to the midplane by means of a delicate piece of copper tape.
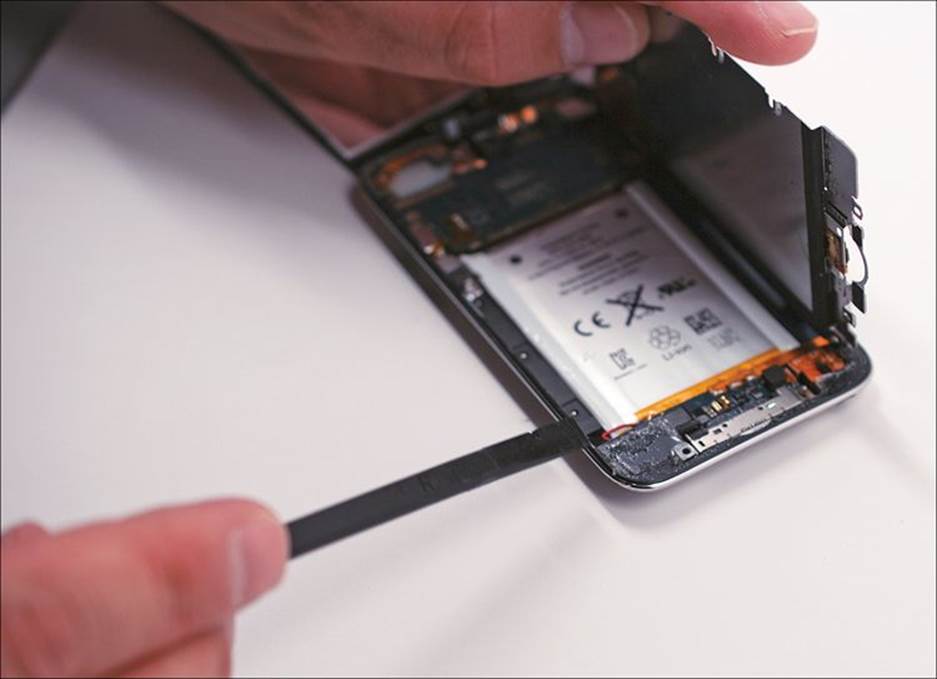
FIGURE 11.11 Removing the midplane from the rear case.
8. Use the plastic opening tool to carefully pry the headphone jack connector up from the bottom right of the rear case (see Figure 11.12).
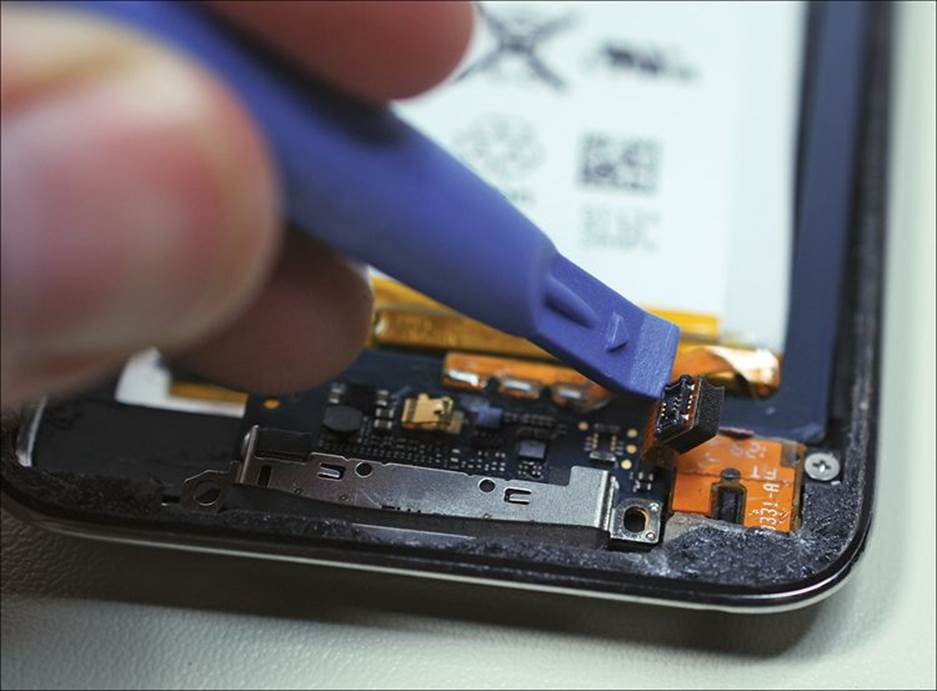
FIGURE 11.12 Removing the headphone jack connector.
9. Remove the single Phillips #00 screw that fastens the headphone jack assembly to the iPod touch rear case (see Figure 11.13).
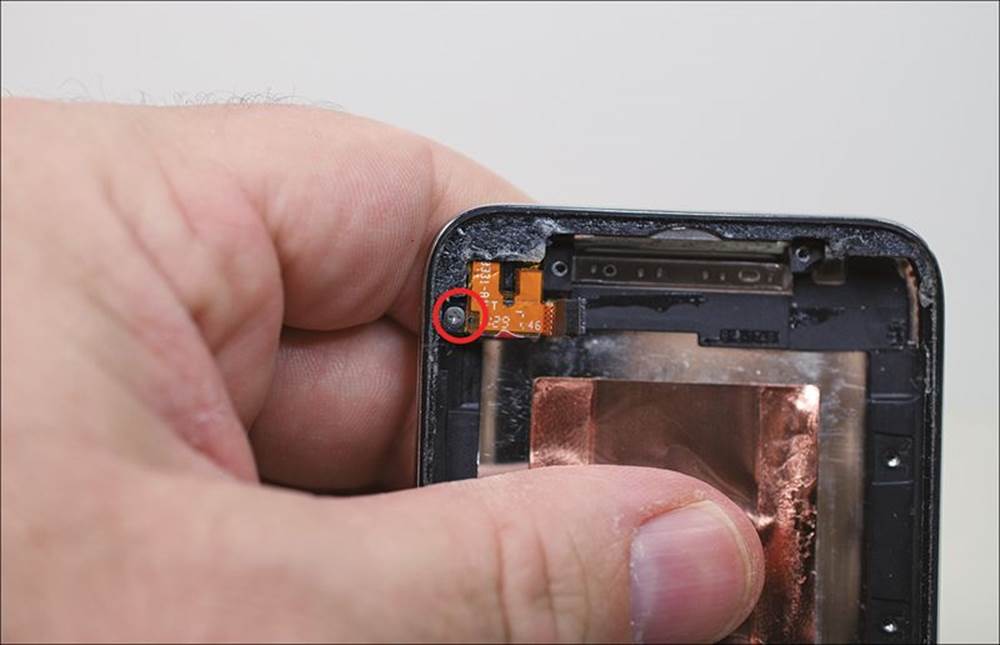
FIGURE 11.13 Removing the headphone jack assembly from the iPod touch.
10. After you remove the screw, you can use tweezers or the plastic opening tool to lift the headphone jack assembly out of the iPod touch.
11. Use the plastic opening tool to carefully pry the speaker from the rear case (see Figure 11.14).
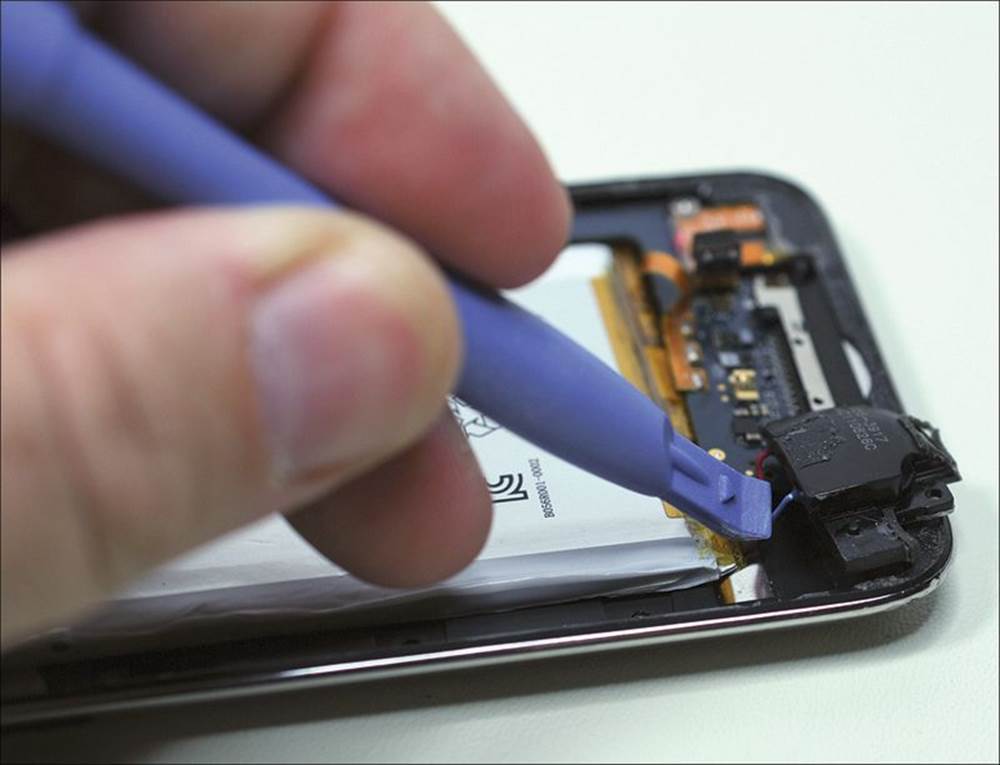
FIGURE 11.14 Removing the speaker assembly (at least mostly removing it, anyway).
Caution: Don’t Break the Cable!
The speaker is tethered to the logic board by an extremely thin cable. Don’t break it, or you are looking at another replacement.
12. Remove the three Phillips #00 screws at the top edge of the logic board, as shown in Figure 11.15.
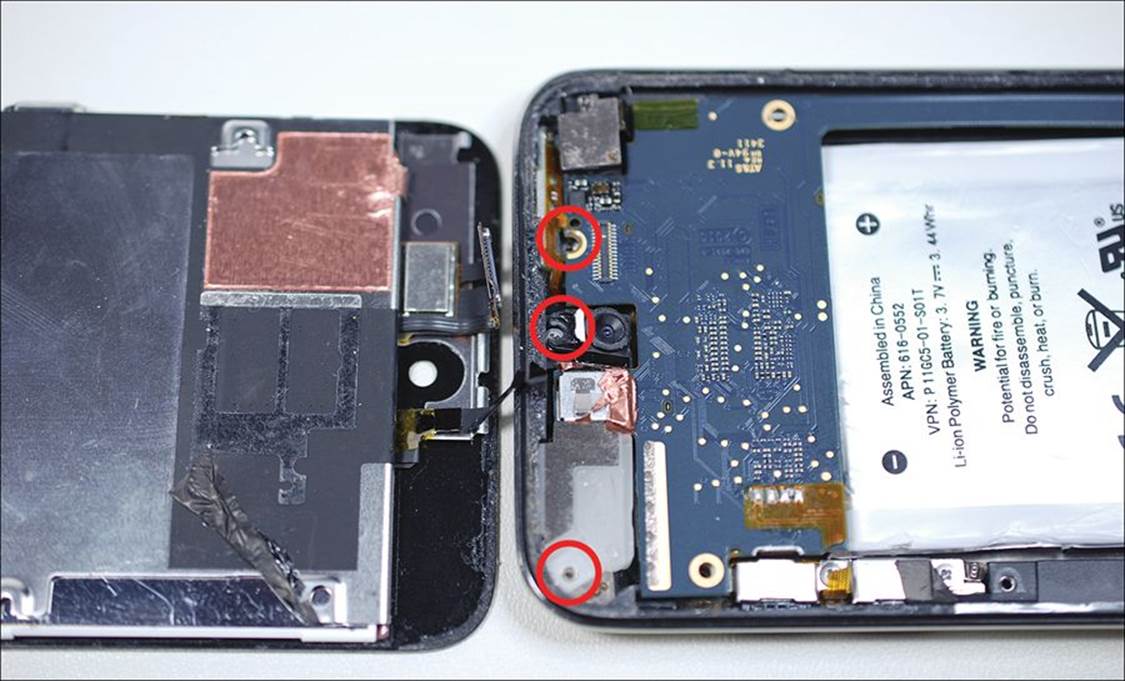
FIGURE 11.15 Removing logic board screws.
13. Use the plastic opening tool to pry the rear-facing camera out from the rear case (see Figure 11.16).
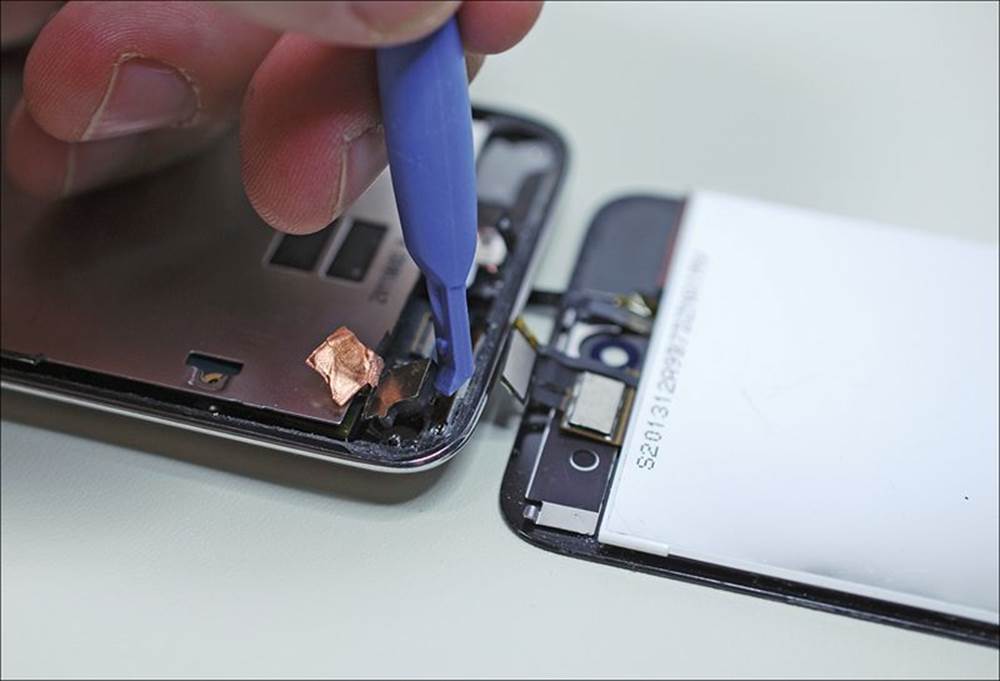
FIGURE 11.16 Removing the rear-facing camera.
14. You can now begin (stress: begin) the process of removing the battery from the iPod touch. Using your plastic opening tool, work your way around the frame and attempt to loosen the adhesive underneath the battery (see Figure 11.17). Please be careful not to puncture the battery cell. At this point you seek to loosen the battery, not to extract it.
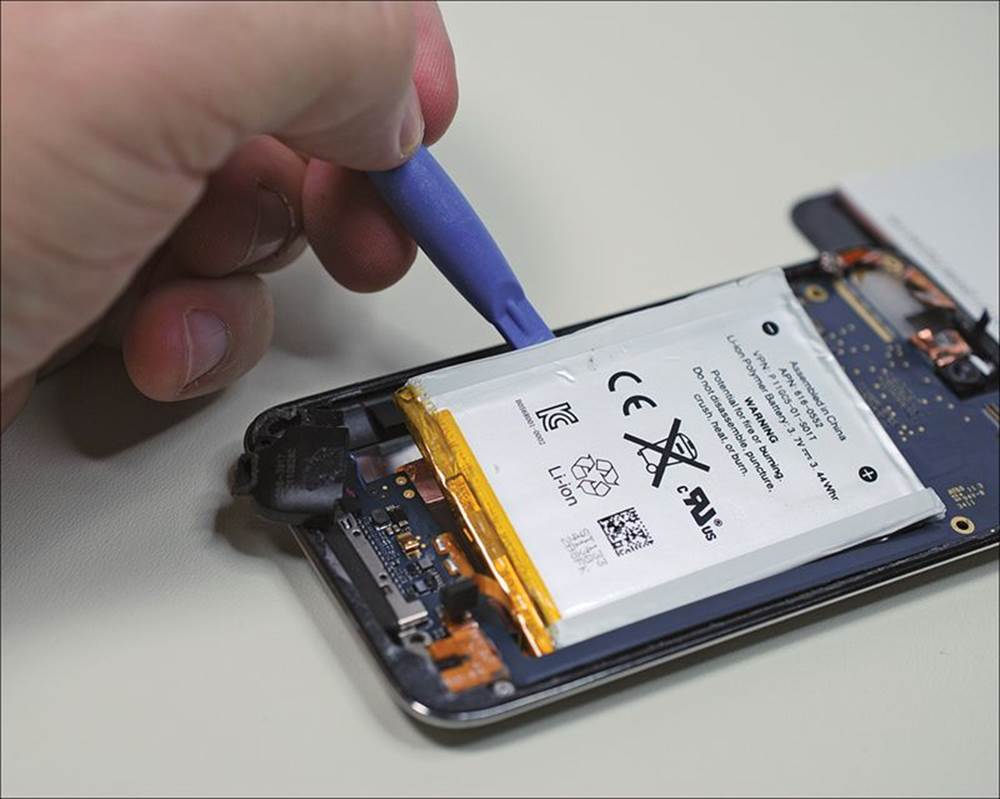
FIGURE 11.17 Loosening the adhesive underneath the battery.
15. Use the plastic opening tool to gently pry up the top of the logic board (work at the upper-right corner). After you’ve loosened the logic board, you can then use the plastic opening tool to push the Dock connector out of its recess. The “uprooted” Dock connector is shown in Figure 11.18.
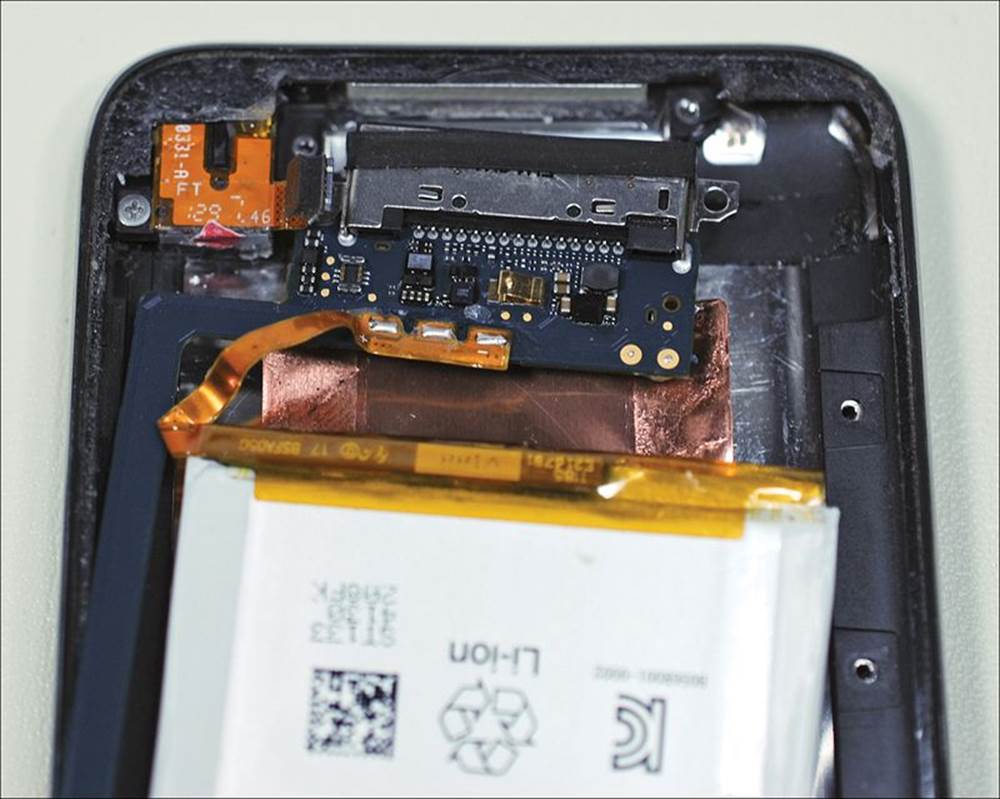
FIGURE 11.18 Freeing the Dock connector.
16. At this point you should be able to flip over the battery/logic board assembly. Don’t handle the component roughly because the digitizer cable located on the underside of the logic board is still connected.
17. Use the plastic opening tool to peel off the yellow Kapton tape located near the bottom of the battery. Rotate the battery up and away from the logic board. Flip the logic board assembly over. After doing so you see the three solder joints that link the battery to the logic board (seeFigure 11.19).
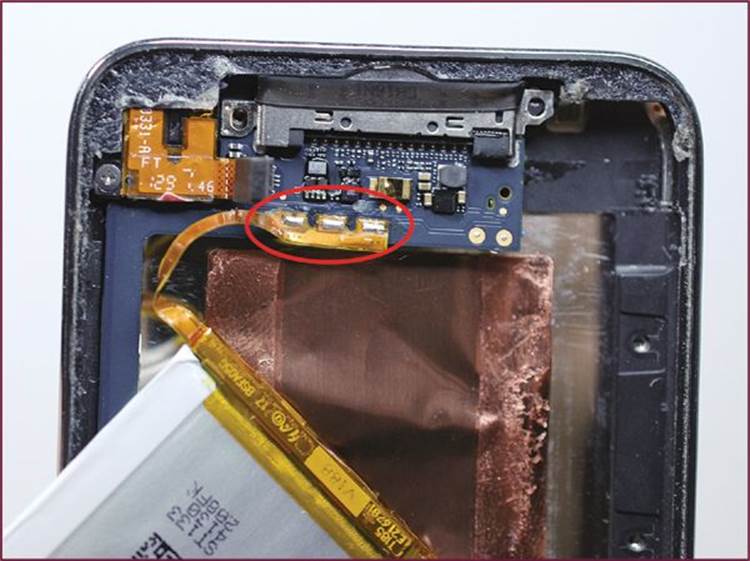
FIGURE 11.19 Battery/logic board solder joints.
Tip: Get Some Kapton, Captain
Kapton tape (kaptontape.com) is a polyamide film-based tape made by DuPont that is used extensively by Apple to cover and bind parts together. The cool thing about Kapton tape is that the tape remains stable (and retains its adhesion) in a range of temperatures. You might want to consider purchasing some for your personal supply.
18. It’s time to call it a day at this point of this particular disassembly. Thanks to our friends at iFixit, I am happy to present you with Figure 11.20, which shows a completely disassembled iPod touch, 4th generation.
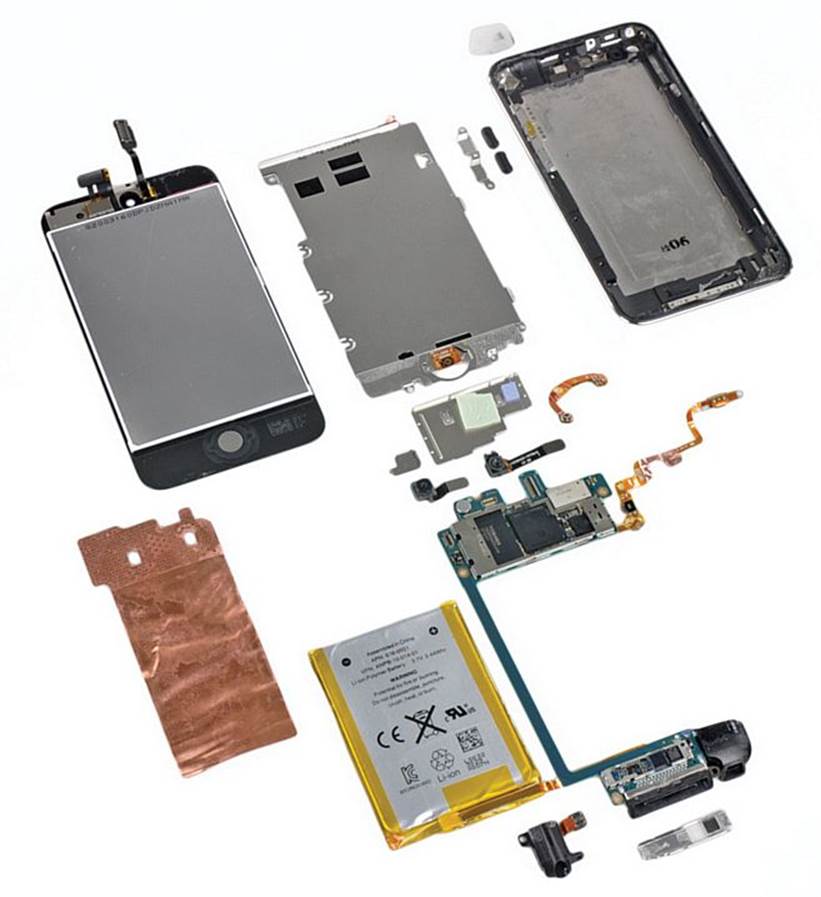
FIGURE 11.20 iPod touch 4th generation, completely disassembled. (Photo courtesy of ifixit.com.)
Reassembly Notes
There are no two ways about it: You need to find an adhesive solution for holding the iPod touch components together during reassembly. In my experience, your best bet is to invest in plenty of the following products:
![]() 3M 3703 Tape: You can use this electrically conductive tape to secure the Wi-Fi ribbon cables to the logic board. Find it online at the 3M site at http://is.gd/GF71mF.
3M 3703 Tape: You can use this electrically conductive tape to secure the Wi-Fi ribbon cables to the logic board. Find it online at the 3M site at http://is.gd/GF71mF.
![]() 3M Adhesive Sticker Tape: You can find sellers who vend this tape pre-cut to match the dimensions of your iPod touch model. For instance, try finding it at TVC-Mall at http://is.gd/ZC0Ocf.
3M Adhesive Sticker Tape: You can find sellers who vend this tape pre-cut to match the dimensions of your iPod touch model. For instance, try finding it at TVC-Mall at http://is.gd/ZC0Ocf.
![]() 3M 300LSE Low Surface Energy Acrylic Adhesive Transfer Tape: (Try to say that five times quickly!) 3M 300LSE Low Surface Energy Acrylic Adhesive Transfer Tape is the specific type of tape used in the precut stickers. You can read about it at the 3M site:http://is.gd/YCw6LB.
3M 300LSE Low Surface Energy Acrylic Adhesive Transfer Tape: (Try to say that five times quickly!) 3M 300LSE Low Surface Energy Acrylic Adhesive Transfer Tape is the specific type of tape used in the precut stickers. You can read about it at the 3M site:http://is.gd/YCw6LB.
Is the iPod touch a “Watered Down” iPhone?
Steve Jobs once famously described the iPod touch as “training wheels” for the iPhone. Some customers believe that they can derive every benefit of the iPhone (with the exception of cellular service) by purchasing an iPod touch. Frankly, the price point between the touches and the iPhones has always been surprisingly close.
However, much has been written on comparing the hardware specifications between the iPod touch and the iPhone, and the results point definitively that the iPod touch is in many ways a solidly inferior device, performance-wise, to its corresponding iPhone model.
Take the so-called Retina display, for example. Apple’s marketing literature brags that the iPod touch 4th generation and the iPhone 4 both share the following display features:
![]() 3.5-inch (diagonal) widescreen multi-touch display.
3.5-inch (diagonal) widescreen multi-touch display.
![]() 960×640 pixel resolution at 326 pixels/inch. (Four times the number of pixels as pre-Retina displays at the same resolution; the idea is that the eye cannot discern individual pixels when viewing a Retina display.)
960×640 pixel resolution at 326 pixels/inch. (Four times the number of pixels as pre-Retina displays at the same resolution; the idea is that the eye cannot discern individual pixels when viewing a Retina display.)
However, it is now common knowledge that the iPod touch does not use the in-plane switching (IPS) LCD display technology that is implemented on the iPhone 4S. Rather, the iPod touch uses the more common twisted nematic (TN) LCD display technology. I’ll tell you, friends: I have worked with the iPhone 4S and the 4th generation iPod touch side-by-side, and there is a noticeable difference in clarity between the two displays. So much so, in point of fact, that I wondered if the touch’s display actually could be called “Retina” outside of its presence in Apple’s marketing materials.
Note: The Skinny on IPS
IPS technology is also used by Apple with its LED Cinema displays and in the iPads. The main selling points about IPS are that that they offer superior color reproduction and they convey a wider viewing angle than that of a typical, non-IPS LCD (like the iPod touch 4th generation).
The rear camera is another sore spot of contention between the two analogous devices. For one thing, the iPod touch rear-facing camera lacks the flash that is present on the iPhone 4S. Also, the iPod touch rear-facing camera shoots at 0.7 megapixels (MP), whereas the iPhone 4S shoots at 8 MP. Those are some significant differences, in my opinion.
When you compare the list prices of the two devices, it seems to me that you take a substantial feature hit by selecting the iPod touch.