Sparrow iOS Game Framework Beginner's Guide (2014)
Chapter 10. Polishing Our Game
In the previous chapter, we added sound and music to our game. We also learned about audio file formats and even how to generate our own sound effects.
In this chapter, we are going to polish our game. We will be covering the following topics in this chapter:
· Improving the game over mechanism
· Adding a minimalistic tutorial
· Loading and saving the current state of the game
Polishing is the process of giving the last finishing touches to the game. There is a saying in software development that the last 20 percent of the development feels as hard as the first 80 percent. With such motivation, let's polish our game, shall we?
Adding additional scenes
Our game still feels rough around the edges. Our first order of business is to add more scenes, which should make the game feel more rounded, especially when starting the game and when the game is over.
The game over scene
Currently, the game over mechanism is a bit too minimalistic. While the player can lose and win the game, they can't restart the game once it is over. The player needs to shut down the application and open it again.
This is counterintuitive as the default behavior of iOS apps is to freeze the app instead of shutting it down. So in the worst case, our game with the Game Over message stays in the memory until the device is rebooted or the user kills the application from the app switcher.
Creating the game over scene
As our first task, we are going to decouple the game over logic and move it into a separate scene. Our game over scene should show whether the game was won or lost.
Time for action – showing the game over scene
Use the following steps to create the game over scene:
1. Open our Xcode project if it's not already open.
2. Create a new Objective-C class inside the GameScenes group.
3. Call this class GameOver it should be a subclass of Scene.
4. Switch to the GameOver.h file.
5. Using the following line of code, add a property called message:
@property SPTextField *message;
6. Using the following line of code, add another property to indicate whether the game was won:
@property (nonatomic) BOOL gameWon;
7. Switch to GameOver.m.
8. Import the SceneDirector.h, Assets.h, and the World.h files, as shown in the following code:
9. #import "SceneDirector.h"
10.#import "Assets.h"
#import "World.h"
11. Add an initializer for this new scene, as shown in the following code:
12.-(id) init
13.{
14. if ((self = [super init])) {
15.
16. SPImage *background = [SPImage imageWithTexture:[Assets texture:@"water.png"]];
17.
18. _message = [SPTextField textFieldWithWidth:Sparrow.stage.width height:Sparrow.stage.height text:@"Game Over"
19. fontName:@"PirateFont" fontSize:24.0f color:SP_WHITE];
20.
21. SPTexture *yesButton = [[Assets textureAtlas:@"ui.xml"] textureByName:@"dialog_yes"];
22.SPButton *resetButton = [SPButton buttonWithUpState:yesButton text:@"Start over"];
23.
24. resetButton.x = (Sparrow.stage.width - resetButton.width) / 2;
25. resetButton.y = Sparrow.stage.height - resetButton.height - 8.0f;
26.
27. [resetButton addEventListenerForType:SP_EVENT_TYPE_TRIGGERED block:^(id event) {
28. [World reset];
29. [(SceneDirector *) self.director showScene:@"piratecove"];
30. }];
31.
32. [self addChild:background];
33. [self addChild:_message];
34. [self addChild:resetButton];
35. }
36.
37. return self;
}
38. Add a getter for the gameWon property, as shown in the following code:
39.-(BOOL) getGameWon
40.{
41. return _gameWon;
}
42. Now, add the setter for the gameWon property, as shown in the following code:
43.-(void) setGameWon:(BOOL)gameWon
44.{
45. _gameWon = gameWon;
46.
47. if (_gameWon) {
48. _message.text = @"You won the game. Congratulations.";
49. } else {
50. _message.text = @"Your ship sank. Try again.";
51. }
}
52. Switch to Game.m.
53. Import the GameOver.h file using the following line of code:
#import "GameOver.h"
54. Then, create an instance of the GameOver scene using the following code:
GameOver *gameOver = [[GameOver alloc] initWithName:@"gameover"];
55. Add the game over instance to the scene director using the following code:
[director addScene:gameOver];
56. Show the game over scene by default using the following line of code:
[director showScene:@"gameover"];
57. Run the example and we will see the game over scene, as shown in the following screenshot:
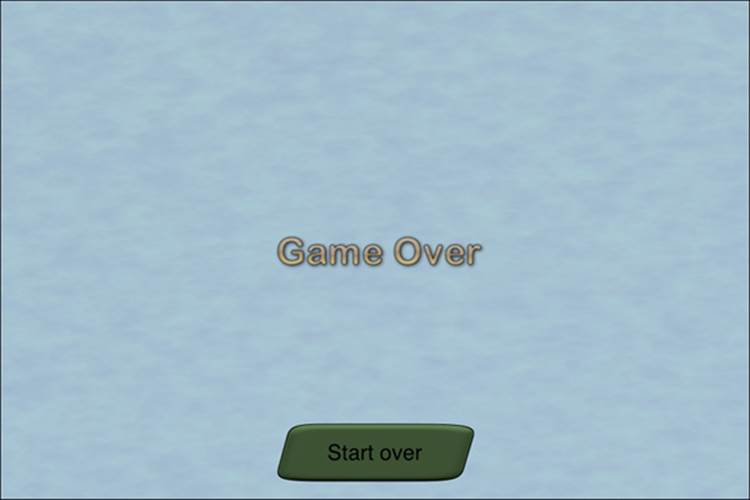
What just happened?
As we have done before, we opened our Xcode project. Then, we created a class, which is going to be our game over scene. It's called GameOver and is a subclass of Scene.
In the GameOver header file, we added two properties in step 5 and 6, respectively. The first property is the message that will be displayed on the screen. The second is to indicate whether the game was won. We added a custom getter and setter for this property later on. We marked this property as non-atomic, as we don't really need thread safety and we used only one thread anyway.
In the GameOver.m file, we imported all the necessary headers, which are as follows:
· The asset manager from Assets.h, as it is most likely that we load an asset
· The scene director from SceneDirector.h, because we need to switch to another scene
· The World class from World.h, as we need to reset our in-game values
Then, we added the initializer. Our game over scene consists of the following:
· Water as the background
· The text field which is the message property
· The reset button
In this example, we used the SPTextField factory method (also known as a convenience constructor) that lets us define the width, height, text, font name, font size, and color in a single step. One thing we need to consider is to keep the font size similar to the original bitmap font size. If it's much bigger than the original size, the font gets all pixelated and washed out.
There is a way to get around this though: if we set SP_NATIVE_FONT_SIZE as the font size for the font instance, it will automatically calculate its actual size so that it is displayed as sharp as possible.
We defined the touch event for the reset button as a block and reset all of our in-game values and switched to the pirate cove scene. After this, we added all of our display objects to the display tree.
Then, we defined our custom getter and setter for our gameWon property:
· Getter: This simply returns the internal _gameWon value
· Setter: After we set the property value, we updated the message depending on its value
In the Game class, we need to create an instance of the GameOver scene, which we then added to the scene director. In step 16, we updated the default scene to be the game over scene.
When we ran the example in the last step, we saw the game over scene.
Connecting the game over scene
Now that we have our game over scene, let's integrate it into the game.
Time for action – having the game over scene show up
To incorporate the game over scene into the game, use the following steps:
1. Switch to the Battlefield.h file.
2. Remove both the textGameWon and textGameLost properties.
3. Switch to the Battlefield.m file.
4. Remove all references to the textGameWon and textGameLost properties.
5. In the GameOver.m file, add a reset method using the following code:
6. -(void) reset
7. {
8. self.gameWon = NO;
}
9. In the SceneDirector.h file, add a property called currentScene using the following code:
@property (readonly) Scene *currentScene;
10. In the SceneDirector.m file, update the showScene method to set the currentScene property, as shown in the following code:
11.-(void) showScene:(NSString *)name
12.{
13. for (NSString* sceneName in _dict) {
14. ((Scene *) _dict[sceneName]).visible = false;
15. [((Scene *) _dict[sceneName]) stop];
16. }
17.
18. if (_dict[name] != nil) {
19. ((Scene *) _dict[name]).visible = YES;
20. [((Scene *) _dict[name]) reset];
21. _currentScene = (Scene *) _dict[name];
22. }
}
23. Switch to the Battlefield.m file.
24. Update the reset method to set the visibility of the ships, as shown in the following code:
25.-(void) reset
26.{
27. self.paused = NO;
28.
29. _pirateShip.x = [(NSNumber *) [Assets dictionaryFromJSON:@"gameplay.json"][@"battlefield"][@"pirate"][@"x"] floatValue];
30. _pirateShip.y = [(NSNumber *) [Assets dictionaryFromJSON:@"gameplay.json"][@"battlefield"][@"pirate"][@"y"] floatValue];
31.
32. [_pirateShip reset];
33. _pirateShip.visible = YES;
34.
35. for (int i = 0; i < [_enemyShip count]; i++) {
36. ((Ship *) _enemyShip[i]).x = [(NSNumber *) [Assets dictionaryFromJSON:@"gameplay.json"][@"battlefield"][@"enemy"][i][@"x"] floatValue];
37. ((Ship *) _enemyShip[i]).y = [(NSNumber *) [Assets dictionaryFromJSON:@"gameplay.json"][@"battlefield"][@"enemy"][i][@"y"] floatValue];
38. [((Ship *) _enemyShip[i]) reset];
39. ((Ship *) _enemyShip[i]).visible = NO;
40. }
41.
42. for (int i = 0; i < World.level; i++) {
43. ((Ship *) _enemyShip[i]).visible = YES;
44. [self updateAI:_enemyShip[i] withState:_aiState];
45. }
}
46. Update the condition to win the game, as shown in the following code:
47.if (deadCount == World.level) {
48. if (World.level == World.levelMax) {
49. [(SceneDirector *) self.director showScene:@"gameover"];
50. ((GameOver *) ((SceneDirector *) self.director).currentScene).gameWon = YES;
51. } else {
52. World.gold = World.gold + (250 * World.level);
53. World.level++;
54. self.paused = YES;
55. [((SceneDirector *) self.director) showScene:@"piratecove"];
56. }
}
57. Next, update the condition to lose the game, as shown in the following code:
58.__weak typeof(self) weakSelf = self;
59._pirateShip.onDead = ^{
60. [(SceneDirector *) weakSelf.director showScene:@"gameover"];
61. ((GameOver *) ((SceneDirector *) weakSelf.director).currentScene).gameWon = NO;
};
62. In Game.m, change the default scene back to the pirate cove.
63. Run the example. When we run the example and once we actually lose the game, we see the following screen:
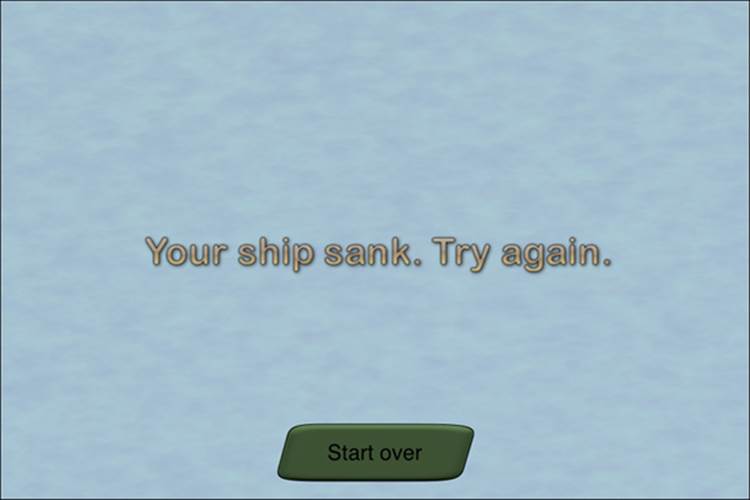
What just happened?
In the Battlefield header file, we removed the text field properties that show up when the game was won or lost. Then, we removed all code portions that reference these properties in Battlefield.m.
In step 5, we added a reset method for our GameOver scene, where we set the gameWon property to NO. The difference between this scene switch is that we need to set the gameWon property after the scene has been switched. In order to facilitate this, we updated the scene director.
In the next step, we added a read-only property called currentScene that gives us a reference to the current scene. After this, we updated the showScene method to set the current scene. This happened right after we set the current scene to be visible and called thereset method.
In the battlefield scene, we first updated the visibilities of our ships. If we hadn't done this, the enemy ships would stay visible even after we reset the game.
In steps 10 and 11, we updated the win and lose conditions. We imported the GameOver.h file here as well, in order to cast the currentScene property to a pointer to the GameOver class.
The last thing we did was change back to the pirate cove scene. When we ran the example and when we lost or won the game, the game over scene was shown and we were able to restart the game.
Adding a main menu
Next, we are going to add a simple main menu.
Time for action – integrating the main menu into our game
Use the following steps to add a main menu:
1. Add a new class called MainMenu which should be a subclass of Scene.
2. Switch to MainMenu.m.
3. Import Assets.h and SceneDirector.h.
4. Add the initializer for the main menu, as shown in the following code:
5. -(id) init
6. {
7. if ((self = [super init])) {
8.
9. SPImage *background = [SPImage imageWithTexture:[Assets texture:@"water.png"]];
10.
11. SPTexture *shipTexture = [[Assets textureAtlas:@"ship_pirate_small_cannon.xml"] textureByName:@"ne_0001"];
12. SPImage *ship = [SPImage imageWithTexture:shipTexture];
13. ship.x = 16.0f;
14. ship.y = (Sparrow.stage.height - ship.height) / 2;
15.
16. SPTexture *dialogTexture = [[Assets textureAtlas:@"ui.xml"] textureByName:@"dialog_yes"];
17. SPButton *buttonNewGame = [SPButton buttonWithUpState:dialogTexture text:@"New game"];
18.
19. buttonNewGame.x = (Sparrow.stage.width - buttonNewGame.width) / 2;
20. buttonNewGame.y = 50.0f;
21.
22. [buttonNewGame addEventListenerForType:SP_EVENT_TYPE_TRIGGERED block:^(id event) {
23. [(SceneDirector *) self.director showScene:@"piratecove"];
24. }];
25.
26. SPButton *buttonContinue = [SPButton buttonWithUpState:dialogTexture text:@"Continue"];
27.
28. buttonContinue.x = (Sparrow.stage.width - buttonContinue.width) / 2;
29. buttonContinue.y = 150.0f;
30. buttonContinue.enabled = NO;
31.
32. [self addChild:background];
33. [self addChild:ship];
34. [self addChild:buttonNewGame];
35. [self addChild:buttonContinue];
36. }
37.
38. return self;
}
39. Switch to Game.m.
40. Import MainMenu.h using the following line of code:
#import "MainMenu.h"
41. Using the following code, create a local variable for the main menu that will hold an instance of the MainMenu class.
MainMenu *mainMenu = [[MainMenu alloc] initWithName:@"mainmenu"];
42. Add the mainMenu instance to the director, as shown in the following code:
[director addScene:mainMenu];
43. Update the showScene call to the main menu scene, as shown in the following code:
[director showScene:@"mainmenu"];
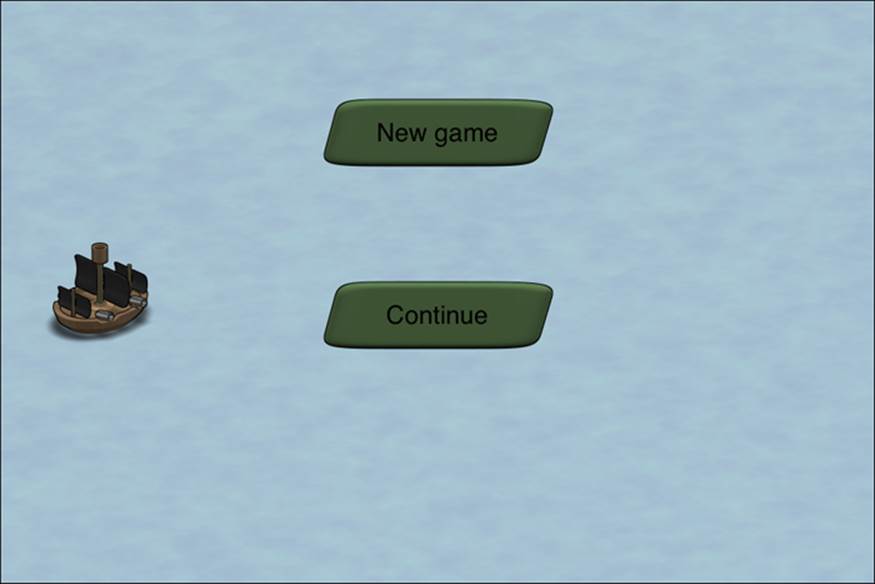
44. Run the example and we will see the main menu, as shown in the following screenshot:

What just happened?
To add a main menu, we needed a class subclassed from Scene. Once the class was created, we imported the asset management system and the scene director.
In step 3, we added the initializer. Our main menu consists of the following:
· The same background that we used in the battlefield and other scenes
· A pirate ship
· A button to start a new game
· A button to continue the game
For the new game, we used a block for its touch event, which switches to the pirate cove scene. The Continue button does not have an event yet and is disabled. After this, we need to take all our elements to the display tree.
In steps 5 to 9, we added the main menu to our game class in a manner similar to how we added the game over scene.
When we ran the example, we saw the main menu.
Have a go hero
The main menu now only has two buttons. Typically, a main menu offers a bit more than this such as buttons to switch to the options menu or the credits screen. In some instances, the main menu even has buttons to navigate to social sites. Go ahead and add the options and credits screens, which can be opened from the main menu.
Adding an intro scene
An intro scene is a perfect way to introduce the player to the characters, the story or the art style of a game. An intro is not necessary for all games; in fact, it's best used if it fits into the overall game and style of the game.
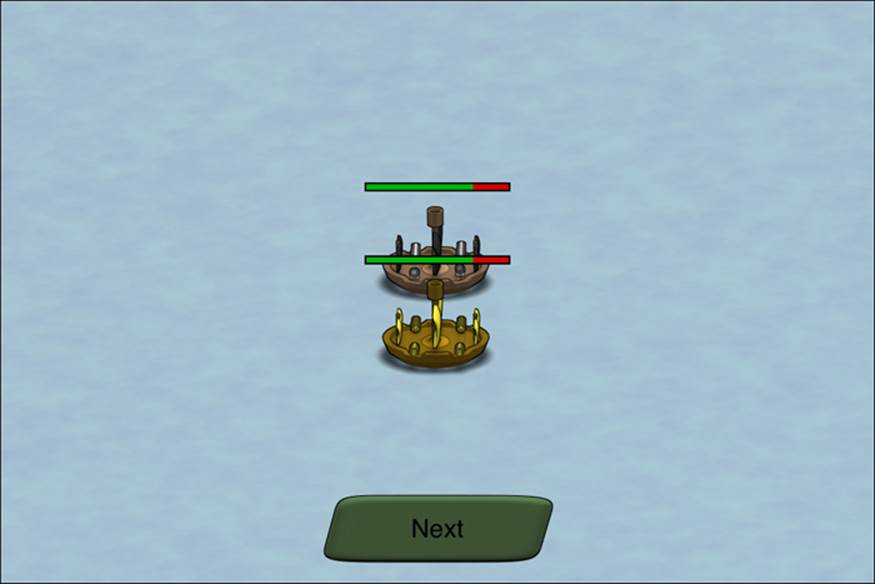
As we don't have a story or characters, we are going to show two ships moving near each other, shooting each other, and eventually one of the ships sinks.
Time for action – creating an intro for our game
Use the following steps to add the intro scene:
1. This is as good a time as any to move the collision detection code into a separate file. Create a new group called Logic and add a class inside this group called Collision which is a subclass of NSObject.
2. Declare this static method in the Collision class, as shown in the following code:
+(void) checkShipCollision: (Ship *) ship1 againstShip: (Ship *) ship2 withReferenceToSprite: (SPSprite *) sprite;
3. Inside Collision.m, implement the checkShipCollision method with the following lines of code:
4. SPRectangle *enemyShipBounds = [ship1 boundsInSpace:sprite];
5. SPRectangle *ball1 = [ship2.cannonBallLeft boundsInSpace:sprite];
6. SPRectangle *ball2 = [ship2.cannonBallRight boundsInSpace:sprite];
7.
8. if ([enemyShipBounds intersectsRectangle:ball1] || [enemyShipBounds intersectsRectangle:ball2]) {
9. if (ship2.cannonBallLeft.visible || ship2.cannonBallRight.visible) {
10. [ship2 abortShooting];
11. if (ship1.type == ShipPirate) {
12. [ship1 hit: World.damage];
13. } else {
14. [ship1 hit:[(NSNumber *) [Assets dictionaryFromJSON:@"gameplay.json"][@"damage"] intValue]];
15. }
16. }
}
17. In order for this code to work, we need to import Assets.h and World.h in the Collision.m file.
18. In Battlefield.m, delete the collision code, import Collision.h, and use the new method from the Collision class now:
19.for (int i = 0; i < World.level; i++) {
20. [Collision checkShipCollision:_pirateShip againstShip:_enemyShip[i] withReferenceToSprite:self];
21. [Collision checkShipCollision:_enemyShip[i] againstShip:_pirateShip withReferenceToSprite:self];
22.
23. [_enemyShip[i] advanceTime:passedTime];
24. if (((Ship *) _enemyShip[i]).isDead) {
25. deadCount++;
26. }
}
27. Add the intro scene by subclassing Scene and call it Intro. This should be done inside the GameScenes group.
28. In Intro.h, import Ship.h and add two instance variables, one for the pirate ship and one for the enemy ship, as shown in the following code:
29.@interface Intro : Scene {
30. Ship *_pirateShip;
31. Ship *_enemyShip;
}
32. Switch to Intro.m.
33. Add an initializer for the Intro class with the help of the following code:
34.-(id) init
35.{
36. if ((self = [super init])) {
37.
38. SPImage *background = [SPImage imageWithTexture:[Assets texture:@"water.png"]];
39.
40. _pirateShip = [[Ship alloc] initWithType:ShipPirate];
41. _pirateShip.x = 16.0f;
42. _pirateShip.y = ((Sparrow.stage.height - _pirateShip.height) / 2) - 20.0f;
43.
44. _enemyShip = [[Ship alloc] initWithType:ShipNormal];
45. _enemyShip.x = Sparrow.stage.width - _enemyShip.width - 16.0f;
46. _enemyShip.y = ((Sparrow.stage.height - _enemyShip.height) / 2) + 20.0f;
47.
48. [self addEventListener:@selector(onEnterFrame:) atObject:self forType:SP_EVENT_TYPE_ENTER_FRAME];
49.
50. SPButton *buttonNext = [SPButton buttonWithUpState:[[Assets textureAtlas:@"ui.xml"] textureByName:@"dialog_yes"] text:@"Next"];
51.
52. buttonNext.x = (Sparrow.stage.width - buttonNext.width) / 2;
53. buttonNext.y = Sparrow.stage.height - buttonNext.height - 8.0f;
54.
55. [buttonNext addEventListenerForType:SP_EVENT_TYPE_TRIGGERED block:^(id event) {
56. [(SceneDirector *) self.director showScene:@"piratecove"];
57. }];
58. [self addChild:background];
59. [self addChild:_pirateShip];
60. [self addChild:_enemyShip];
61. [self addChild:buttonNext];
62. }
63.
64. return self;
}
65. Add the event listener for onEnterFrame, as shown in the following code:
66.-(void) onEnterFrame: (SPEnterFrameEvent *) event
67.{
68. double passedTime = event.passedTime;
69.
70. [Collision checkShipCollision:_pirateShip againstShip:_enemyShip withReferenceToSprite:self];
71. [Collision checkShipCollision:_enemyShip againstShip:_pirateShip withReferenceToSprite:self];
72.
73. [_pirateShip advanceTime:passedTime];
74. [_enemyShip advanceTime:passedTime];
}
75. Add a reset method, as shown in the following code:
76.-(void) reset
77.{
78. [_pirateShip reset];
79. [_enemyShip reset];
80.
81. [_pirateShip moveToX:Sparrow.stage.width / 2 andY:(Sparrow.stage.height / 2) - 20.0f withBlock:^{
82. [_pirateShip.juggler delayInvocationByTime:1.5f block:^{
83. [_pirateShip shootWithBlock:^{
84. [_pirateShip shootWithBlock:^{
85. [_pirateShip shootWithBlock:^{
86. [_pirateShip.juggler delayInvocationByTime:1.0f block:^{
87. [_pirateShip shoot];
88. }];
89. }];
90. }];
91. }];
92. }];
93. }];
94.
95. [_enemyShip moveToX:Sparrow.stage.width / 2 andY:(Sparrow.stage.height / 2) + 20.0f withBlock:^{
96. [_enemyShip shoot];
97. }];
}
98. In MainMenu.m, show the intro scene if the new game button has been touched.
99. In Game.m, import Intro.h, create an instance of the Intro class, and add it the director.
100. Run the example.
When we start a new game, we see the intro in action, as shown in the following code:
What just happened?
As we needed the collision detection in both the intro and the game itself, we moved it into its own class. When we moved the checkShipCollision method, we added an additional parameter. This parameter was then passed as a reference to the boundsInSpacemethod. We imported the asset management and the World class for this code snippet to work.
In the next step, we updated the collision in the battlefield scene.
We then added a new scene called Intro, where we first added two instance variables, one for our own ship and one for the pirate ship. In step 9, we added the initializer, which perform the following:
· Add the water background
· Initialize both ship instances
· Add a button to skip the intro
We then added an event listener to skip the event listener and switch to the pirate cove scene. We also added an event listener for the enter frame event. We then added all elements to the display tree
In step 10, we implemented the onEnterFrame event listener, which calls the collision method and advances the time of both ships.
The reset method calls the reset method of these ships and moves the ships to the center of the screen. The enemy ship can shoot only once, while the pirate ships can shoot multiple times to kill the enemy ship.
We showed the intro scene in the main menu. After this, we added the Intro class to the game class, and when we ran the example, we saw the intro scene when we started a new game.
Implementing tutorial mechanics
There are many different ways for tutorials to be implemented. It may range from just showing an image with controls, to having an interactive experience, to displaying a control scheme each time the player is about to perform an action. In general, the last two options could be achieved with a finite state machine, similar to the one we used for our artificial intelligence.
For our purposes, we will update the intro scene to display hints while the animation is playing.
Time for action – adding a tutorial to our intro scene
Follow these steps to display hints during the intro:
1. In Intro.h, add an instance variable called message:
SPTextField *_message;
2. Switch to Intro.m.
3. Update the initializer with the help of the following code:
4. [buttonNext addEventListenerForType:SP_EVENT_TYPE_TRIGGERED block:^(id event) {
5. [(SceneDirector *) self.director showScene:@"piratecove"];
6. }];
7.
8. SPQuad *quad = [SPQuad quadWithWidth:400.0f height:60.0f color:SP_BLACK];
9. quad.alpha = 0.8f;
10.quad.x = 16.0f;
11.quad.y = 16.0f;
12.
13._message = [SPTextField textFieldWithWidth:400.0f height:60.0f text:@"Welcome to the battlefield."];
14._message.color = SP_WHITE;
15._message.x = 16.0f;
16._message.y = 16.0f;
17.
18.[self addChild:background];
19.[self addChild:_pirateShip];
20.[self addChild:_enemyShip];
21.[self addChild:buttonNext];
22.[self addChild:quad];
23.[self addChild:_message];
24. Update the reset method, as shown in the following code:
25.[_pirateShip moveToX:Sparrow.stage.width / 2 andY:(Sparrow.stage.height / 2) - 20.0f withBlock:^{
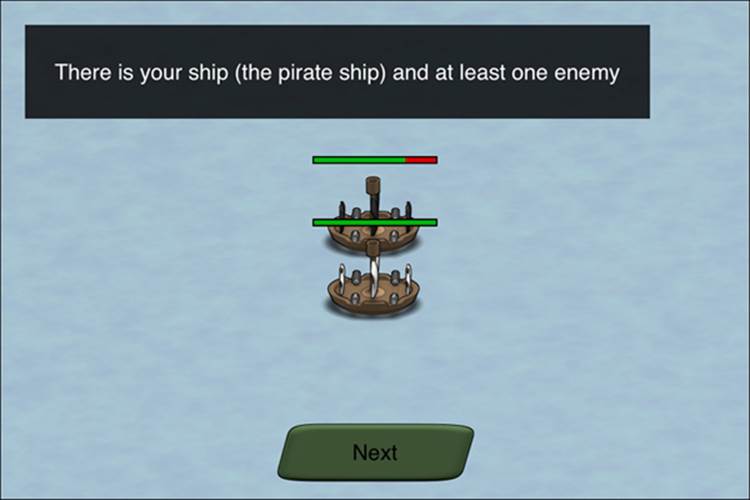
26. _message.text = @"There is your ship (the pirate ship) and at least one enemy";
27. [_pirateShip.juggler delayInvocationByTime:2.5f block:^{
28. [_pirateShip shootWithBlock:^{
29. _message.text = @"Tap anywhere to move your ship.";
30. [_pirateShip shootWithBlock:^{
31. [_pirateShip shootWithBlock:^{
32. _message.text = @"Double-tap on your ship to shoot.";
33. [_pirateShip.juggler delayInvocationByTime:2.5f block:^{
34. _message.text = @"In-between missions you can upgrade your ship.";
35. [_pirateShip shoot];
36. }];
37. }];
38. }];
39. }];
40. }];
}];
41. Run the example and when we see the intro, we now have hints displayed on the screen:
What just happened?
We first added an instance variable to display our hints. We then updated the initializer to initialize this instance variable and have a black but slightly opaque background. We added these two elements to the display tree.
In step 4, we updated the reset method to change the text of the message to show how the core gameplay elements work.
When we ran the example, the hints were displayed during the intro.
Loading and saving the current state
So far we can play the game, but as soon as we end the game, we have to start the game from the beginning.
Time for action – loading and saving the last played game
Follow these steps to load and save the current state:
1. In World.h, declare methods to serialize and deserialize data:
2. +(NSDictionary *) serialize;
+(void) deserialize: (NSDictionary *) dict;
3. Implement these serializers with the following lines of code:
4. +(NSDictionary *) serialize
5. {
6. return @{
7. @"level": [NSNumber numberWithInt:level],
8. @"gold": [NSNumber numberWithInt:gold],
9. @"damage": [NSNumber numberWithInt:damage],
10. @"hitpoints": [NSNumber numberWithInt:hitpoints]
11. };
12.}
13.
14.+(void) deserialize: (NSDictionary *) dict
15.{
16. level = [(NSNumber *) dict[@"level"] intValue];
17. gold = [(NSNumber *) dict[@"gold"] intValue];
18. damage = [(NSNumber *) dict[@"damage"] intValue];
19. hitpoints = [(NSNumber *) dict[@"hitpoints"] intValue];
}
20. In MainMenu.m, add World.h to the import section and update the initializer:
21.buttonContinue.x = (Sparrow.stage.width - buttonContinue.width) / 2;
22.buttonContinue.y = 150.0f;
23.buttonContinue.enabled = NO;
24.
25.NSUserDefaults *userDefaults = [NSUserDefaults standardUserDefaults];
26.id savedGame = [userDefaults objectForKey:@"game"];
27.if (savedGame != nil) {
28. [World deserialize:(NSDictionary *) [userDefaults objectForKey:@"game"]];
29. buttonContinue.enabled = YES;
30.}
31.
32.[buttonContinue addEventListenerForType:SP_EVENT_TYPE_TRIGGERED block:^(id event) {
33. [(SceneDirector *) self.director showScene:@"piratecove"];
34.}];
35.
[self addChild:background];
36. In AppDelegate.m, we import World.h and add a new method, as shown in the following code:
37.- (void)applicationWillResignActiveNotification:(NSNotification*)notification
38.{
39. NSUserDefaults *userDefaults = [NSUserDefaults standardUserDefaults];
40. [userDefaults setObject:[World serialize] forKey:@"game"];
41. [userDefaults synchronize];
}
42. Run the example to see the result. When we start the game, we can now continue the game:
What just happened?
First, we added the serializer and deserializer methods to our World class. The serializer takes values from the World class and places them in NSDictionary. The deserializer works the other way around. It takes values from NSDictionary and updates the values in theWorld class.
In the main menu scene, we checked whether there is already something saved and we deserialize the data in case there is any data. We added an event listener for our Continue button, which directly switches to the pirate cove scene.
In step 4, we saved the game data once the application was not active any more.
When we ran the example, we were able to resume the game.
Pop quiz
Q1. When we override the font size for a bitmap font in SPTextField, it scales to that size.
1. True
2. False
Q2. When is it a good idea to encapsulate code snippets into their own class or methods?
1. Always, even if it's just used a single time
2. If the code snippet is being used multiple times
3. Never
Q3. NSUserDefaults provides a way to store data.
1. True
2. False
Summary
In this chapter, we learned about polishing our game. Specifically, we covered adding more scenes such as a main menu and an intro, and we touched upon tutorial mechanics.
Now that our game almost feels like an actual game, let's see how we can integrate third-party services—which is the topic of the next chapter.
All materials on the site are licensed Creative Commons Attribution-Sharealike 3.0 Unported CC BY-SA 3.0 & GNU Free Documentation License (GFDL)
If you are the copyright holder of any material contained on our site and intend to remove it, please contact our site administrator for approval.
© 2016-2026 All site design rights belong to S.Y.A.