Sparrow iOS Game Framework Beginner's Guide (2014)
Chapter 8. Artificial Intelligence and Game Progression
In the previous chapter, we learned about adding user interface elements to our game. We added a hit points representation above our ships, added buttons, and even created our own dialog.
In this chapter, we will add artificial intelligence to our game. The following are the topics we will cover:
· The concepts of fuzzy logic and state machines
· Enemy ships should move and attack
· Adding some kind of progression to the game
· Winning and losing the game
However, before we get to the actual coding, let's see the concepts of artificial intelligence that we will implement.
Artificial intelligence in theory
The goal for the enemy ships is to move around and attack our ships if they get close enough. There are two concepts we need to look into in detail to help us implement this logic; we will discuss these in the following sections.
Explaining fuzzy logic
Let's take a moving train as an example. We could use a Boolean value to describe its state. If it is set to true, it's moving fast; if it's set to false, it's not moving fast.
However, that will not be enough. Let's say the train is moving at 80 miles per hour and then at 100 miles per hour. At both speeds, our Boolean value will be true, but we have no way of differentiating it further. Also, we don't have a state if the train is not moving.
Fuzzy logic describes an interval of values put into a colloquial term. Let's take a step back and compare it to mathematical logic. Binary (two-valued) logic has two values: true and false. An expression such as 1 + 1 = 2 evaluates to "true". The expression "Adding one to one is most likely going to be two" will not make much sense in binary logic, but it will be possible in fuzzy logic.
Fuzzy logic doesn't have the two values true and false, but it has in-between values such as a bit, quite, or about. This is similar to human thinking.
To illustrate this point further, let's take a look at what our moving train example looks like if put in table form:
|
Term |
Speed |
|
Not moving |
0 miles per hour |
|
Really slow |
1 to 9 miles per hour |
|
Almost fast |
10 to 49 miles per hour |
|
Quite fast |
50 to 89 miles per hour |
|
Really fast |
90 to 119 miles per hour |
For our game, we can apply this to a similar value: the distance between the enemy ship and our own ship.
Explaining state machines
State machines are a number of states put into a sequential logic circuit. This sounds abstract, so let's explain it in detail: a state, first of all, is a value that changes if a different state becomes active. A door has two states: locked and unlocked. If the door is locked, it stays locked until it's unlocked.
Here is an example that is closer to our game: we need a number of states, for example, Move to player, Wait 3 seconds, and Attack player.
Now, we need to put these states in some kind of order. Let's say the enemy first moves to the player, and then it attacks and waits for 3 seconds. Then, the process starts again, as demonstrated in the following diagram:
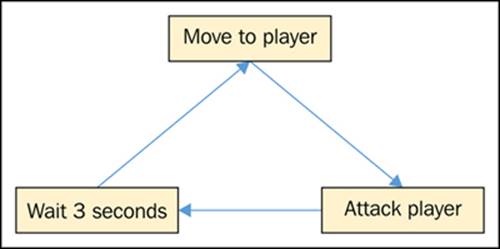
So far, we know about states and state machines. Finite state machines are state machines with a finite number of states. The preceding figure is of course a simplified example of how finite state machines can work. Some of the models also have transitions to describe the action taken to move from one state to another. In illustrations, transitions are often accompanied by conditions such as "Is the player in sight?"
Most simple AIs employ this strategy. One of the most prominent examples is Quake. To be fair, different AI mechanics are used in more complex and modern games. One example is the AI adapting to the player's actions: if in a strategy game, the player chooses to attack a specific point, the AI would adapt to defend this position more and more depending on how often the player attacked.
For our purposes, a finite state machine is more than enough. So, let's see what states we need for the enemy ship:
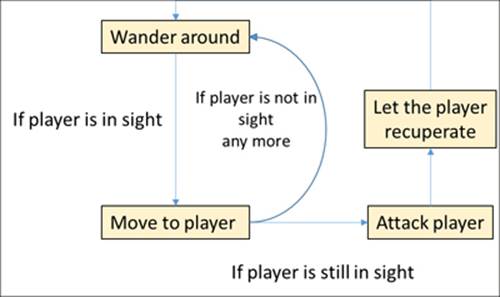
· We want the enemy ship to wander around
· We want the enemy ship to move to the vicinity of the player
· We want the enemy ship to attack
· We want the enemy ship to wait a bit after an attack (for the player to recuperate)
Let's put these states into a diagram as follows:
Letting the enemy ship move and attack
Now that we know about fuzzy logic and state machines, we can implement these as mechanics for our artificial intelligence.
Moving the ship
First of all, we want the ship to move around—both wander around and move to the player ship.
Time for action – getting the enemy ship to move around
In order for the enemy ship to move around, we need to use the following steps:
1. Open our Xcode project if it's not already open.
2. Open the Battlefield.h file.
3. Define all AI states as enum, as shown in the following code:
4. typedef NS_ENUM(NSInteger, AIState) {
5. StateWanderAround,
6. StateMoveToPlayer,
7. StateAttack,
8. StateRecuperate
};
9. Inside the Battlefield scene, add a new instance variable called _aiState, which is of the AIState type.
10. Open the Ship.h file.
11. Add a callback block type, as shown in the following line of code:
typedef void(^ShipCallback)(void);
12. Declare three new methods for the Ship class, as shown in the following code:
13.-(void) moveToX:(float)x andY:(float)y withBlock:(ShipCallback) block;
14.-(float) checkDistanceToShip:(Ship *)ship;
-(void) moveToShip:(Ship *)ship withBlock:(ShipCallback) block;
15. Open the Ship.m file.
16. Move the contents of the -(void) moveToX:(float) x andY:(float) y method into the -(void) moveToX:(float)x andY:(float)y withBlock:(ShipCallback) block method.
17. Inside the new moveTo method, add the following code just after the [tweenY animateProperty:@"y" targetValue:targetY]; line:
18.__block BOOL isTweenXCompleted = NO;
19.__block BOOL isTweenYCompleted = NO;
20.
21.tweenX.onComplete = ^{
22. isTweenXCompleted = YES;
23.
24. if (isTweenXCompleted && isTweenYCompleted) {
25. if (block != nil) {
26. [block invoke];
27. }
28. }
29.};
30.
31.tweenY.onComplete = ^{
32. isTweenYCompleted = YES;
33.
34. if (isTweenXCompleted && isTweenYCompleted) {
35. if (block != nil) {
36. [block invoke];
37. }
38. }
};
39. Implement the checkDistanceToShip method with the following code:
40.-(float) checkDistanceToShip:(Ship *)ship
41.{
42.SPPoint* p1 = [SPPoint pointWithX:self.x + (self.width / 2) y:self.y + (self.height / 2)];
43.SPPoint* p2 = [SPPoint pointWithX:ship.x + (ship.width / 2) y:ship.y + (ship.height / 2)];
44.
45.float distance = [SPPoint distanceFromPoint:p1 toPoint:p2];
46.
47.return distance;
}
48. The moveToShip method should have the following body:
49.-(void) moveToShip:(Ship *)ship withBlock:(ShipCallback)block
50.{
51. floatrandomX = arc4random_uniform(80) - 40.0f;
52. floatrandomY = arc4random_uniform(80) - 40.0f;
53.
54. [self moveToX:ship.x + randomX andY:ship.y + randomY withBlock:block];
}
55. Reimplement the moveToX:(float)x andY:(float)y method, as shown in the following code:
56.-(void) moveToX:(float)x andY:(float)y
57.{
58. [self moveToX:x andY:y withBlock: nil];
}
59. Move on to the Battlefield.m file.
60. Inside the initializer, set the _aiState instance variable to StateWanderAround, as shown in the following line of code:
_aiState = StateWanderAround;
61. Remove the tween and the juggler.
62. Let's declare a helper method for getting a random position on the screen, as shown in the following code:
63.-(SPPoint *) randomPos
64.{
65. return [SPPoint pointWithX:((arc4random() % (int) (Sparrow.stage.width - 80.0f)) + 40.0f) y:((arc4random() % (int) (Sparrow.stage.height - 80.0f)) + 40.0f)];
}
66. Define a method called updateAI, as shown in the following code:
67.-(void) updateAI: (Ship *)ship withState: (AIState) aiState
68.{
69.switch (aiState) {
70.caseStateWanderAround: {
71.SPPoint *point = [self randomPos];
72. [ship moveToX:point.x andY:point.y withBlock:^{
73.if ([ship checkDistanceToShip:_pirateShip] < 200.0f) {
74. //In sight
75. [self updateAI:ship withState:StateMoveToPlayer];
76. } else {
77. //Not in sight
78. [self updateAI:ship withState:aiState]
79. }
80. }];
81. }
82.break;
83.caseStateMoveToPlayer: {
84. [ship moveToShip:_pirateShip WithBlock:^{
85.if ([ship checkDistanceToShip:_pirateShip] < 100.0f) {
86. // Attack
87. [self updateAI:ship withState:StateAttack];
88. } else {
89. //Not in sight
90. [self updateAI:ship withState:StateWanderAround];
91. }
92. }];
93. }
94.break;
95.default:
96.break;
97. }
}
98. Call the updateAI method at the point where we initialized the juggler previously, as shown in the following code:
[self updateAI:_enemyShip withState:_aiState];
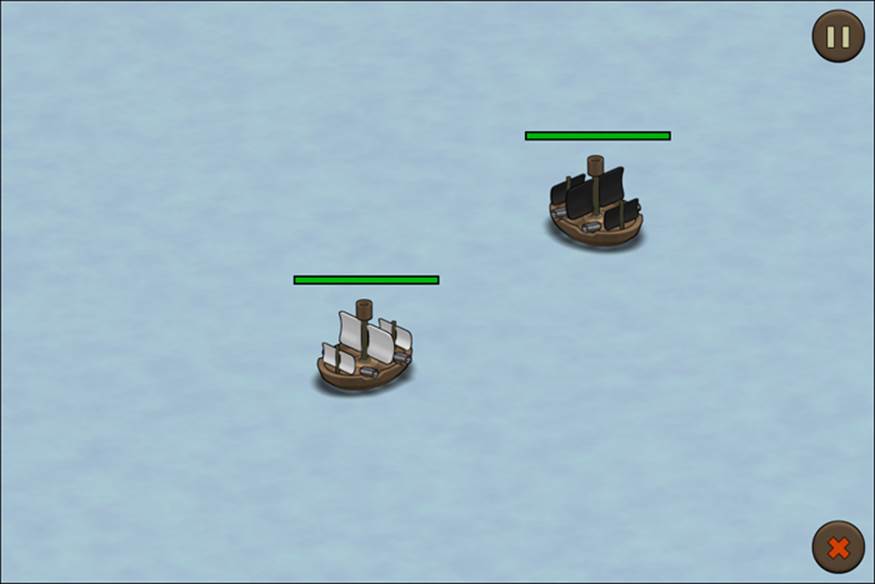
99. Run the example.
We now see that our own ship and the enemy ship are moving around on their own.
What just happened?
In step 1, we opened our game project; in the next step, we looked into the Battlefield.h file. All of the AI states we previously mentioned were put into enum. In step 4, we defined an instance variable that holds the default AI state.
We already had a moveTo method in our Ship class which lets us move any ship around on the screen. Unfortunately, we currently don't have a way of knowing when the movement is over. We can employ an Objective-C language feature which we used in the previous chapters, that is, blocks. We defined a block as a parameter; when the movement was over, the block was called. In step 6, we defined our block type.
In the next step, we declared the general methods for our Ship class:
· Moving to a position and using a callback once the movement is done
· Checking the distance between the current ship and any other ship
· Moving to another ship and using a callback once the operation is over
We then got ready to implement these methods in step 8. We first moved the contents of the old moveTo method to the new one with the callback.
Then, we just needed to call the callback block once the animation was over. Since the tweens could potentially have two different speeds depending on the distance between the touch point and the ship, we needed to record whether each tween was completed for both of the tweens. To check if the tween was actually complete, we added a block to the onComplete property of the tween. Once the tween was done, the block got called. Inside this block, we set a Boolean value to flag that the current tween was complete, and if both tweens are complete, we invoked the callback. To be able to use our local variables in the onComplete blocks, we needed to prefix them with __blocks.
In step 11, we implemented a method that calculates the distance between two ships: we took the center of both ships, converted them into SPPoint, and utilized the static distanceFromPoint method that SPPoint provides. We only needed to return the result.
The moveToShip method called the moveTo method with the coordinates of the ship passed in and some randomness attached to it. We used the arc4random function to get a random value. The arc4random function returned a floating point number between zero and one. The arc4random_uniform function took a parameter and created a random number between zero and the passed-in parameter minus one. In step 13, the moveTo method without the callback just called the moveTo version, with the callback passing through nil as the callback parameter.
When we moved to the Battlefield.m file, we set the _aiState instance variable to the WanderState AI state. We then safely removed the tween and the juggler, which were previously responsible for the enemy ships' move animation.
In step 17, we implemented a method that gets us a random position on the screen. We also set a margin so that the position was definitely within the borders of the screen. We used the SPPoint class factory method to store both the x and y positions.
In the next step, we implemented the method that updates the AI:
· If the ship is wandering around, we get a random position and move there.
· If the ship has moved, it checks if the distance between the player and the ship parameter is less than 200 points. The ship then moves to the player. If that's not the case, we call the updateAI method again with the WanderState AI state.
· If the ship moved to the player, it checks again for the distance. If it's lower than 100 points, it begins attacking, else it's back to wandering around.
Inside the initializer, we called the updateAI method with the enemy ship and our default AI state. This should be right where we previously initialized our instance variable _juggler.
When we ran the example, the enemy ship moved around if it was in the correct state. It moved to the player ship if it was in sight. If the enemy ship was getting too close to the player, it just stopped.
Attacking other ships
Now that the enemy ship is moving around, let's get it to attack our own ship.
Time for action – the enemy should attack the player
For the enemy to attack the players' ship, use the following steps:
1. Open the Ship.h file.
2. Refactor our _juggler instance variable to be a property, as shown in the following line of code:
@property SPJuggler *juggler;
3. Using the following line of code, add a method called shootWithBlock that should shoot and have a callback as its parameter:
-(void) shootWithBlock:(ShipCallback) block;
4. Open the Ship.m file and move the contents of the shoot method into the shootWithBlock method.
5. In the shootWithBlock method, invoke the callback as its last statement inside the complete listener of the currentClip variable.
6. Update the shoot method to call the shootWithBlock method with nil.
7. Open the Battlefield.m file and add a method for collision detection, as shown in the following code:
8. -(void) checkShipCollision: (Ship *) ship1 againstShip: (Ship *) ship2
9. {
10. SPRectangle *enemyShipBounds = [ship1 boundsInSpace:self];
11. SPRectangle *ball1 = [ship2.cannonBallLeft boundsInSpace:self];
12. SPRectangle *ball2 = [ship2.cannonBallRight boundsInSpace:self];
13.
14. if ([enemyShipBounds intersectsRectangle:ball1] || [enemyShipBounds intersectsRectangle:ball2]) {
15. if (ship2.cannonBallLeft.visible || ship2.cannonBallRight.visible) {
16. [ship2 abortShooting];
17. [ship1 hit];
18. }
19. }
}
20. Inside the onEnterFrame method, replace the current collision detection with the checkShipCollision method, as shown in the following code:
21.[self checkShipCollision:_pirateShipagainstShip:_enemyShip];
[self checkShipCollision:_enemyShipagainstShip:_pirateShip];
22. Update the WanderAround AI state with an additional attack opportunity, as shown in the following code:
23.if ([ship checkDistanceToShip:_pirateShip] < 200.0f) {
24. if ([ship checkDistanceToShip:_pirateShip] < 100.0f) {
25. // Attack directly
26. [self updateAI:ship withState:StateAttack];
27. } else {
28. //In sight
29. [self updateAI:ship withState:StateMoveToPlayer];
30. }
31.} else {
32. //Not in sight
33. [self updateAI:ship withState:aiState];
}
34. As shown in the following code, add these states to our switch-case statements in our updateAI method:
35.case StateAttack: {
36. [ship shootWithBlock:^{
37. [self updateAI:ship withState:StateRecuperate];
38. }];
39.}
40.case StateRecuperate: {
41. [ship.juggler delayInvocationByTime:0.3f block:^{
42. [self updateAI:ship withState:StateWanderAround];
43. }];
}
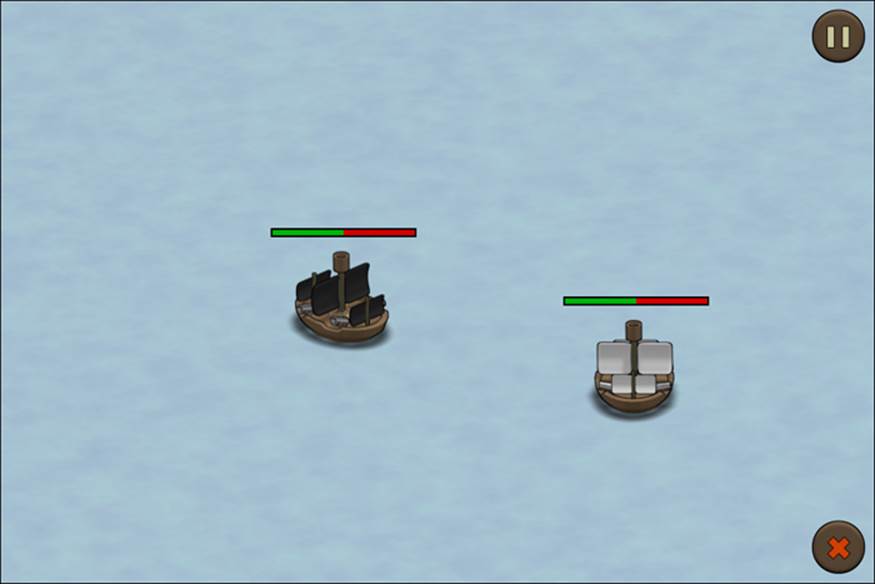
44. Run the example to see the result.
If the enemy ship gets close enough to our ship and is in the attacking state, it begins to attack our ship. Refer to the following screenshot:
What just happened?
In the Ship.h file, we refactored the _juggler instance variable into a property since we needed to access it from the battlefield scene and its access should not be limited to a Ship instance. We added the shootWithBlock method, which we implemented in step 4, where we moved the contents of the shoot method to the new shootWithBlock method.
We then invoked the callback that should now be the last statement in the event listener where the currentClip tween is completed. In step 6, we updated the shoot method to call the shootWithBlock method with an empty block, just like we did in the previous example.
Since we used collision detection more than once, we put it into a separate method in the next step. Now, we can replace our old collision detection logic by calling the new collision detection. We need to call it twice, once with _pirateShip as the first parameters and_enemyShip as the second parameter. The order of the parameter needs to be the other way around when we call checkShipCollision for the second time.
In step 9, we added an additional state transition. If the distance between the pirate ship and the enemy ship was less than 100 points, it attacked directly instead of moving to the player first. In the following steps, we added the following two missing states:
· In the attack state, we called the shootWithBlock method, and when the shooting was complete, we moved to the recuperating state
· In the StateRecuperate AI state, we waited for 0.3 seconds and then moved on to wandering around
When we ran the example, our state machine was completely finished and all states were being used.
Adding fuzzy values to the AI
Our AI works so far, but we don't have any fuzzy logic yet.
Time for action – spicing up the AI with fuzzy values
To replace our hardcoded values, we need to use the following steps:
1. Open the Battlefield.m file.
2. Add a new method called fuzzyValue, as shown in the following code:
3. -(float) fuzzyValue: (NSString *) value
4. {
5. if ([value isEqualToString:@"Very near"]) {
6. return (float) (arg4random() % 40) + 40.0f;
7. } else if ([value isEqualToString:@"Quite near"]) {
8. result = (float) (arc4random() % 30) + 70.0f;
9. } else {
10. result = (float) (arc4random() % 50) + 150.0f;
11. }
}
12. Using the following code, update the hardcoded values with the values from the fuzzyValue method:
13.if ([ship checkDistanceToShip:_pirateShip] < [self fuzzyValue:@"Near"]) {
14.if ([ship checkDistanceToShip:_pirateShip] < [self fuzzyValue:@"Very near"]) {
if ([ship checkDistanceToShip:_pirateShip] < [self fuzzyValue:@"Quite near"]) {
15. Run the example. If we were to insert logging to see what the values actually are, we would see the following output:
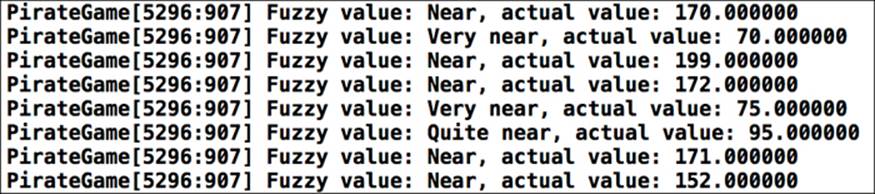
What just happened?
The goal for this example is to replace our hardcoded values with something that resembles fuzzy logic. In step 2, we added a method that checks against the value and returns a new random value each time. The randomness is not a necessary factor of fuzzy logic, but it is used in this case so that the values are inside a specific range.
If we were to have more fuzzy values, it would be a good idea to hold those values inside NSDictionary. This dictionary would have a colloquial term as its key and a block for its value. Inside the block would be logic to return a random number. If the fuzzy value gets passed in, we call the block and get a random number.
Next up, we updated the hardcoded values with the fuzzyValue method and put it in a colloquial term each time.
When we ran the example, the AI worked like it did before, but it had additional randomness now.
Have a go hero
We can improve the AI quite a bit by moving the AI logic away from the battlefield scene into a separate class. Since we used the strings for our fuzzy values quite a lot, it may be a good idea to move them into constants or even create our own macros.
Adding progression to our game
Now that our AI is implemented, let's add some progression to our game. We will need to add levels. Each level should have one more enemy ship, and we can upgrade the damage and hit points of our ship in between the levels.
Adding a World class
We need to keep some values, such as the current level, in a separate entity, which we will describe as a World class.
Time for action – adding a World class
To implement our World class, we need to use the following steps:
1. Add a new Objective-C class called World, which is derived from NSObject.
2. To add a level property from the int type, do the following:
· Add a static variable called level in World.h, as shown in the following line of code:
static int level;
· Add a static getter with the same name that returns the static variable, as shown in the following line of code:
+(int) level;
· Add a static setter (setLevel) that sets the static variable, as shown in the following line of code:
+(void) setLevel:(int)value;
3. Repeat step 2 for the properties gold, hitpoints, and damage.
4. We also need a levelMax property, but this one does not have a setter.
5. We need to import the Assets.h file inside the World.m file.
6. Add a static reset method that needs to be declared in World.h. It should look like the following piece of code:
7. +(void) reset
8. {
9. level = 1;
10. levelMax = 3;
11. gold = 200;
12. damage = [(NSNumber *) [Assets dictionaryFromJSON:@"gameplay.json"][@"damage"] intValue];
13. hitpoints = [(NSNumber *) [Assets dictionaryFromJSON:@"gameplay.json"][@"hitpoints"] intValue];
}
14. We also need a log method. It needs to be declared in World.h and needs to look like the following code:
15.+(void) log
16.{
17. NSLog(@"Level %d of %d", level, levelMax);
18. NSLog(@"Gold: %d", gold);
19. NSLog(@"Players' hit points: %d", hitpoints);
20. NSLog(@"Players' damage: %d", damage);
}
21. In Game.m, we need to call the World methods inside its initializer, as shown in the following code:
22.[director addScene:battlefield];
23.
24.[World reset];
25.[World log];
26.
[director showScene:@"battlefield"];
27. Run the example to see the result. We should now see the following output in the console:

What just happened?
First of all, we created the World class. Objective-C does not support static properties. We can imitate that behavior of having a static property if we add static methods that have methodName as their name where we return a value. We also need to define a method called setMethodName that has a parameter. Now we can access methodName just like a property. However, inside the pseudo-getter, we can only access static variables.
After we were done with the setup, we needed to import the Assets class in step 5. After that, we added a reset method, which loaded the damage and hit points from our gameplay.json file. We set the gold, level, and levelMax variables to default values. In our case, the current level was the first one; we had a maximum of three levels, and 200 was the amount we had at our disposal at the start for the gold variable.
The log method that we implemented later logged all values except for the levelMax value. In step 8, we called the reset method, and we called log directly after that. When we ran the example, we saw the log output in the console.
Have a go hero
Right now, the gold, level, and levelMax variables are being set directly in the code. It's a better idea to load them from the gameplay.json file.
Updating the scene and dialog classes
Before we move on to implementing the progression system, there are a few small things we need to refactor. Let's tackle these issues:
· We have no way of resetting a scene if it's being shown again
· Multiline strings in dialogs are not displayed correctly
· We cannot access the dialog's buttons outside the Dialog class
· The dialog doesn't close after clicking on the buttons
Time for action – updating the scene and dialog classes
To add our first buttons, use the following steps:
1. Open the Dialog.h file.
2. Add properties for both Yes and No buttons using the following code:
3. @propertySPButton *buttonYes;
@propertySPButton *buttonNo;
4. Switch to Dialog.m.
5. Refactor all references from the local variables to use the properties.
6. Update the positions of _title and _content using the following code:
7. content = [SPTextField textFieldWithWidth:background.width - 96.0f height:background.height - 150.0f text:@"Dialog default text"];
8. _content.x = 52.0f;
9. _content.y = 66.0f;
10.
11.[SPTextField registerBitmapFontFromFile:@"PirateFont.fnt"];
12.
13._title = [SPTextField textFieldWithWidth:background.width * 0.6 height:30.0f text:@"Dialog"];
14._title.fontName = @"PirateFont";
15._title.color = SP_WHITE;
16.
17._title.x = 36.0f;
_title.y = 26.0f;
18. In both onButtonYes and onButtonNo, add self.visible = NO; as the first statement.
19. In Scene.h, declare a method called reset using the following line of code:
-(void) reset;
20. In Scene.m, implement the reset method with an empty body.
21. In SceneDirector.m, update this portion of code in the showScene method:
22.if (_dict[name] != nil) {
23. ((Scene *) _dict[name]).visible = YES;
24. [((Scene *) _dict[name]) reset];
25.
}
26. Run the example.
If we were to implement the reset method to the battlefield scene and add a logger message to the reset method of the battlefield scene, our output would change to this:

What just happened?
We tackled the dialog issues first. In steps 2 to 4, we moved the buttons to be properties and updated all references inside the Dialog implementation. We then updated the position of the title and the message content. Long strings were not wider than the bounds of the dialog. In step 6, we hid the dialog once we tapped on any button.
For a scene to be able to reset itself, we first needed to add the reset method and just implement it as an empty method in Scene.m. We then needed to update the scene director to call the reset method from the current scene just after the scene turned visible.
If we ran the example now, and if we implemented the reset method in the battlefield scene and added a logger message, we would see that the reset method from the battlefield scene would actually be called.
Adding game mechanics to the pirate cove
Now that we have a World class and we have updated the Dialog and Scene classes to fit our needs, we can add some game mechanics to the pirate cove. The pirate cove is the place where we can upgrade our ship.
Time for action – making the pirate cove playable
To add game mechanics to the pirate cove, use the following steps:
1. Move the line of code [SPTextField registerBitmapFontFromFile:@"PirateFont.fnt"]; from Dialog.m to the beginning of the Game.m file.
2. Add a button in PirateCove.m, as shown in the following code:
3. SPButton *buttonBattle = [SPButton buttonWithUpState:[[Assets textureAtlas:@"ui.xml"] textureByName:@"dialog_yes"];
4. text:@"Begin battle"];
5.
6. buttonBattle.y = Sparrow.stage.height - buttonBattle.height - 8.0f;
7. buttonBattle.x = (Sparrow.stage.width - buttonBattle.width) / 2;
8.
9. [buttonBattle addEventListenerForType:SP_EVENT_TYPE_TRIGGERED block:^(SPEvent *event){
10. [((SceneDirector *) self.director) showScene:@"battlefield"];
}];
11. Add the button to the display tree using the following line of code:
[self addChild:buttonBattle];
12. In the following code, we add a text field to display the current amount of gold, which needs to be declared as an instance variable first:
13._goldTextField = [SPTextField textFieldWithWidth:Sparrow.stage.width - 16.0f height:30.0f text:@"Gold"];
14._goldTextField.fontName = @"PirateFont";
15._goldTextField.color = SP_WHITE;
16.
17._goldTextField.x = 8.0f;
_goldTextField.y = 8.0f;
18. Add the text field to the display tree using the following line of code:
[self addChild:_goldTextField];
19. Add a method that updates the amount of gold on the screen using the following code:
20.-(void) updateGoldTextField
21.{
22. _goldTextField.text = [NSString stringWithFormat:@"Gold: %d", World.gold];
}
23. Inside the PirateCove.h file, add an instance variable called_dialogUpdateDamage using the following line of code:
Dialog *_dialogUpdateDamage;
24. Add an instance variable called _goldDamage as shown in the following line of code:
int _goldDamage;
25. Inside the initializer, add the following piece of code for the first dialog:
26._dialogUpdateDamage = [[Dialog alloc] init];
27.
28._dialogUpdateDamage.title.text = @"Update damage?";
29.
30._dialogUpdateDamage.x = (Sparrow.stage.width - _dialogUpdateDamage.width) / 2;
31._dialogUpdateDamage.y = (Sparrow.stage.height - _dialogUpdateDamage.height) / 2;
32.
33._dialogUpdateDamage.visible = NO;
34.
35.[weaponsmith addEventListenerForType:SP_EVENT_TYPE_TOUCH block:^(SPEvent *event){
36. if (World.gold < _goldDamage) {
37. _dialogUpdateDamage.buttonYes.enabled = NO;
38. }
39.
40. _dialogUpdateDamage.visible = YES;
41.}];
42.
[_dialogUpdateDamage addEventListener:@selector(onUpdateDamage:) atObject:self forType:EVENT_TYPE_YES_TRIGGERED];
43. Add the dialog to the display tree using the following line of code:
[self addChild:_dialogUpdateDamage];
44. Add the method onUpdateDamage as follows:
45.-(void) onUpdateDamage: (SPEvent *) event
46.{
47.World.damage = World.damage + (int) (World.damage / 10);
48.World.gold = World.gold - _goldDamage;
49. [self updateGoldTextField];
}
50. Repeat steps 7 to 11 for the dialog that upgrades the hit points.
51. Add a reset method to the pirate cove scene as follows:
52.-(void) reset
53.{
54. _goldDamage = (150 + (50 * (World.level - 1)));
55. _dialogUpdateDamage.content.text = [NSString stringWithFormat:@"Increasing damage costs %d gold. Do you wish to proceed?", _goldDamage];
56.
57. _goldHitpoints = (200 + (75 * (World.level - 1)));
58. _dialogUpdateHitpoints.content.text = [NSString stringWithFormat:@"Increasing hitpoints costs %d gold. Do you wish to proceed?", _goldHitpoints];
59.
60. [self updateGoldTextField];
}
61. Update the statement in the Game.m file to show the pirate cove when starting the game.
62. Run the example to see the result. We can now upgrade our ship in the pirate cove, as shown in the following screenshot:
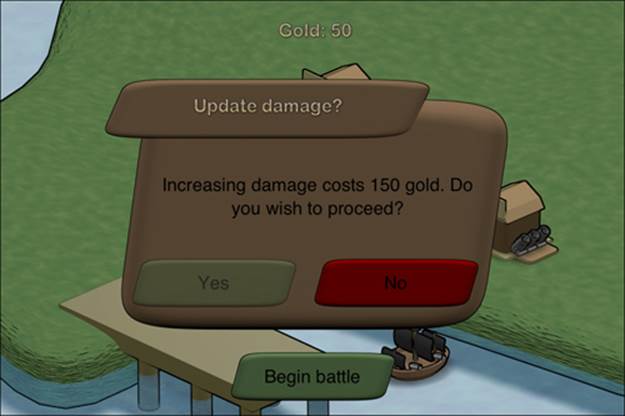
What just happened?
In step 1, we moved the registration of the bitmap font to the Game class. We only needed it once. Since we only had one dialog previously, it didn't really matter where we registered the font. However, as we now have multiple dialogs, the initializer of the dialog would register the font multiple times.
In step 2, we added a button that will be able to switch to the battlefield scene when we tap it. After we added the button to the display tree, we also added a text field to display the current amount of gold. We subsequently added the text field to the display tree. We also added a method that updates the text field.
In steps 6 to 11, we added a dialog to the screen that pops up when we tap the weaponsmith. It checks if we have enough gold at our disposal and lets us upgrade our damage if we do.
In step 13, we implemented the reset method. The intention is to make upgrading the ship more and more expensive depending on the current level.
Adding progression to the game
Everything is set in place for adding progression to the game.
Have a go hero –turning our game into a real game
Let's go ahead and implement game progression. The following are a few things you should keep in mind:
· The World values need to be reset before the battlefield instance is created
· Update the amount of gold once the player gets to a higher level
· Use the reset method of the battlefield scene to reset position and hit points
· There needs to be a way to keep track of all the sunken ships
· The enemies should probably be array-like objects
· The game itself should not start when the battlefield is initialized
After considering the preceding points, the game should look like what is shown in the following screenshot:
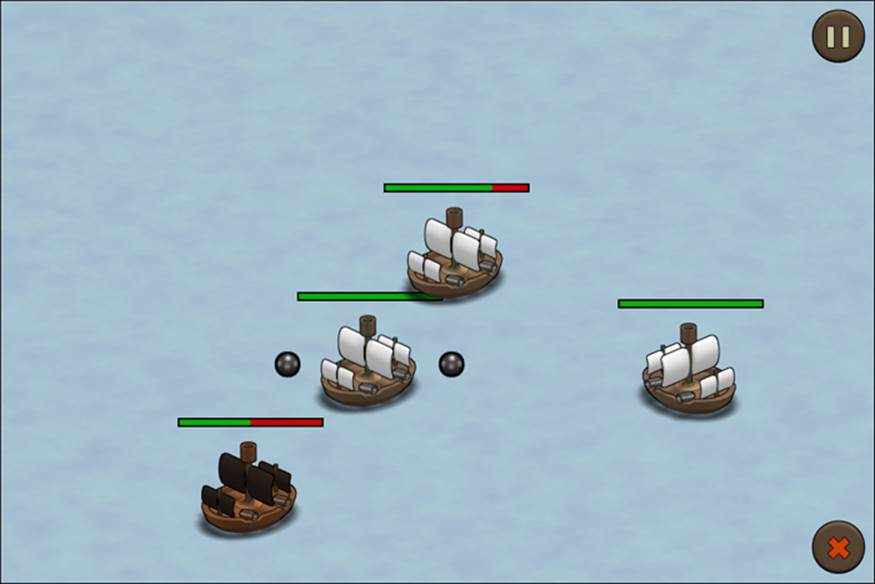
Note
Take a look at how the preceding points can be implemented, and take these source files as the base for the following exercises:
· Battlefield.h: https://raw.github.com/freezedev/pirategame/9d5f53b5cb5e2e9bad822f0abd944e539e9bbf58/Classes/Battlefield.h
· Battlefield.m: https://raw.github.com/freezedev/pirategame/9d5f53b5cb5e2e9bad822f0abd944e539e9bbf58/Classes/Battlefield.m
· Game.m: https://raw.github.com/freezedev/pirategame/9d5f53b5cb5e2e9bad822f0abd944e539e9bbf58/Classes/Game.m
· Ship.h: https://raw.github.com/freezedev/pirategame/9d5f53b5cb5e2e9bad822f0abd944e539e9bbf58/Classes/Ship.h
· Ship.m: https://raw.github.com/freezedev/pirategame/9d5f53b5cb5e2e9bad822f0abd944e539e9bbf58/Classes/Ship.m
· gameplay.json: https://raw.github.com/freezedev/pirategame/9d5f53b5cb5e2e9bad822f0abd944e539e9bbf58/gameplay.json
Adding win and lose conditions
The last thing we will do in this chapter is add win and lose conditions for our game. Right now, we will just show a text field that displays whether we have won or lost.
Time for action – being able to win or lose
To be able to win or lose the game, use the following steps:
1. In Ship.h, add a callback property using the following line of code:
@property (nonatomic, copy) ShipCallbackonDead;
2. This callback property gets invoked if the ship is equal to or less than zero hit points, as shown in the following code:
3. if (_hitpoints<= 0) {
4. self.visible = FALSE;
5.
6. if (self.onDead) {
7. [_onDead invoke];
8. }
}
9. In the Battlefield.h file, add two properties for our new text fields as shown:
10.@property SPTextField *textGameWon;
@property SPTextField *textGameLost;
11. In the initializer, add the following piece of code:
12._textGameLost = [SPTextField textFieldWithWidth:Sparrow.stage.width height:Sparrow.stage.height text:@"Game Over"];
13._textGameLost.fontName = @"PirateFont";
14._textGameLost.color = SP_WHITE;
15._textGameLost.visible = NO;
16.
17._textGameWon = [SPTextField textFieldWithWidth:Sparrow.stage.width height:Sparrow.stage.height text:@"You won the game. Well done"];
18._textGameWon.fontName = @"PirateFont";
19._textGameWon.color = SP_WHITE;
20._textGameWon.visible = NO;
21.
22.__weak typeof(self) weakSelf = self;
23._pirateShip.onDead = ^{
24. weakSelf.textGameLost.visible = YES;
25.};
26.//...
27.[self addChild:_textGameLost];
[self addChild:_textGameWon];
28. Inside the onEnterFrame method, update the progression system by adding the winning condition as shown:
29.if (deadCount == World.level) {
30. if (World.level == World.levelMax) {
31. self.textGameWon.visible = YES;
32. } else {
33. World.gold = World.gold + (250 * World.level);
34. World.level++;
35. self.paused = YES;
36. [((SceneDirector *) self.director) showScene:@"piratecove"];
37. }
}
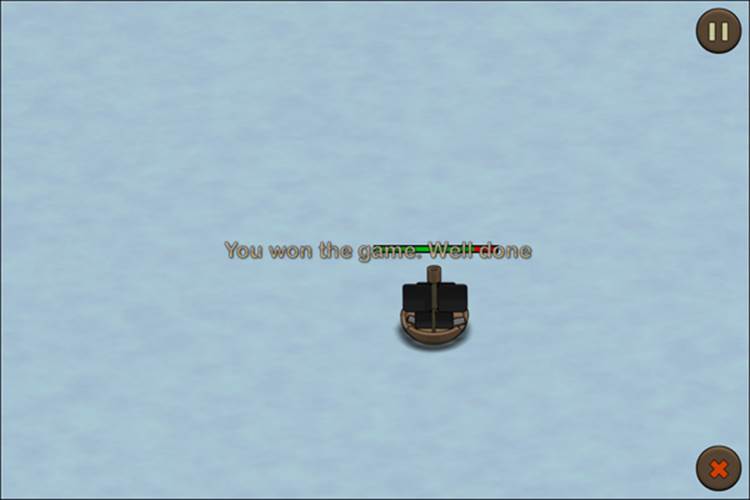
38. Run the example to see the result.
If we now win or lose the game, a text field will be displayed on the screen, as shown in the following screenshot:
What just happened?
We needed to know the exact point when a ship gets destroyed, so we added a callback in steps 1 and 2. Precisely at the moment when the player ship gets destroyed, we wanted to display something to inform that the player has lost the game.
We then added the text fields in steps 3 and 4. The only thing we needed to consider here is that we need to access self (the instance itself) inside the block. Typically, we can't access any property from self in the block, but we do need this because the text field is a property on the instance itself. So, we needed to use an unsafe reference by using the __weak keyword. This is something that should be used with caution and, in general, only as a last resort. We also needed to make sure that the text fields were added as the last elements to the display tree so that they were always on top of all other elements. After we added the lose condition, we added the win condition in step 5. When we ran the example, we saw a text popping up if we either lost or won the game.
Technically, we could also have created the text field dynamically once we won. It is best practice, however, to create everything at the beginning, especially with complex projects.
Pop quiz
Q1. SPPoint provides a method to get the distance between two points.
1. True
2. False
Q2. A finite state machine always needs transitions.
1. True
2. False
Q3. If we want to modify a local variable inside a block, what do we need to do?
1. Make it a weak reference
2. Prefix the variable with __block
3. Refactor it to a property
Summary
In this chapter, we learned about artificial intelligence. Specifically, we covered fuzzy logic and finite state machines, and we also added more gameplay elements.
Now that our game is feature-complete but rough around the edges, let's add some audio to our game—which is the topic of the next chapter.
All materials on the site are licensed Creative Commons Attribution-Sharealike 3.0 Unported CC BY-SA 3.0 & GNU Free Documentation License (GFDL)
If you are the copyright holder of any material contained on our site and intend to remove it, please contact our site administrator for approval.
© 2016-2026 All site design rights belong to S.Y.A.