Swift For Dummies (2015)
Part III. Putting Expressions Together
In this part . . .
· Use basic expressions, blocks, and closures.
· Explore symbols, patterns, and ranges.
· Initialize and deinitialize objects and structures.
Chapter 10. Expressing Yourself
In This Chapter
![]() Understanding optional types
Understanding optional types
![]() Choosing types of expressions
Choosing types of expressions
![]() Using lazy loading for properties with closures
Using lazy loading for properties with closures
Expressions in Swift are very similar to expressions in other programming languages, but there are some differences (of course). Some of these differences arise from Swift-specific features, whereas some simply reflect the requirements of a 21st-century language designed to be developed on extraordinarily powerful computers.
Swift is designed to be easily modified by Apple as circumstances change. In addition, you can define new operators for your own apps. A great deal of flexibility is built in, but in the future there may be added expression syntax both from Apple and from other Swift developers.
Expressions involve not just operators and variables but also the Cocoa and Cocoa Touch frameworks. The best reference for all of these is developer.apple.com. Even without registering, you can search the site for information about the developer tools and languages, making this the first place to turn if you have questions.
Surveying the Types of Swift Expressions
Expressions involve targets (which themselves can be expressions, variables or values) as well as operators. Typically, a single expression contains one operator as well as one, two, or more targets. To get started, remember that there are four kinds of expressions in Swift. They aredistinguished by the placement of an operator in relation to its target, as follows:
· Prefix expressions include an operator that affects the target that follows it.
· Postfix expressions include an operator that affects the target preceding it.
· Binary expressions include an operator that applies to the targets that surround it on both sides.
· Primary expressions don’t contain an operator at all (except when the expression includes a parenthetical expression that happens to contain an operator).
With the exception of primary expressions, then, Swift expressions include an operator. Because of this, it’s worth taking a moment to explore some issues with optional type operators in Swift. These show up frequently in expressions.
Exploring optional type operators
First of all, don’t misread the heading. Optional type operators is a term used frequently in Swift documentation, but it may require a bit of parsing. In Swift, there is a concept of optional types, and the term optional type operators refers to operators that operate on optional types (and not to type operators that are optional — no such thing exists in Swift).
Optional types can either be a known type (either built-in or user-defined) or they can contain nil. If you are used to languages such as Objective-C, you may wonder what the fuss is about — in such languages, which rely on pointers to objects, instances of any type can be nil. As an example, in Objective-C, the following declaration and initialization code is no problem:
UIWindow *window = nil;
In this line, window is the variable, the asterisk is a pointer to an object, and UIWindow is the type; here window is set to nil, and this is perfectly legal.
You can’t use this line in Swift. For one thing, in Swift the order of the variable name and type would be reversed:
var window: UIWindow
However, even if you correct the order of terms, the Objective-C line would be illegal. The following line, a direct paraphrase of the Objective-C code, would still be illegal in Swift:
var window: UIWindow = nil
? is a postfix operator for a type or an expression. As a postfix operator for a type, it is used in syntax such as this property declaration from the beginning of AppDelegate.swift in Locatapp:
var window: UIWindow?
This common style declares a variable called window; it is of optional type UIWindow. That means that it can either be a UIWindow value or it can be nil. UIWindow? and UIWindow are not the same type, so comparing them in type comparisons will generate an error.
The other postfix operator for optionals is !. It provides forced unwrapping of the optional to its underlying type. (There is an example of this in Chapter 6.)
Here are some examples, which you can try for yourself in a playground.
import UIKit
var window: UIWindow
window
This creates a variable called window that is of type UIWindow. The last line references that variable, but it will fail because it is used before the variable has been initialized.
Let’s borrow the Objective-C style to see if that lets you initialize it:
import UIKit
var window: UIWindow = nil
window
Here the second line fails because you cannot set an instance of UIWindow to nil.
Here’s another way of writing the code:
import UIKit
var window: UIWindow? = nil
window
This approach succeeds because Swift allows you to set the optional UIWindow? to nil. When you reference the variable in the third line, the playground reveals its value at the right of the window: nil.
You can unwrap the variable window in the last line by adding ! to the end. Thus, given the code immediately above, window! will generate an error because unwrapping a nil value is an error.
Changing the last line of the code above to window?, however, successfully yields nil because this is a legal value for an optional.
As shown in Chapter 6 (and in the final version of Locatapp, as well as a number of Xcode templates), optional binding is another way to deal with optionals. Here’s the code from Chapter 6:
if let activityURL =
NSURL (string:"http://champlainarts.com") {...
The heart of the if statement is the assignment of a possibly nil value to activityURL. If activityURL is not nil, the body of the If statement proceeds. If it is nil, the body is not executed. (A common reason for this syntax is when an operation, such as the NSURL initializer in this case can fail, leaving the result as nil rather than as a value.)
 Sometimes people refer to optionals as nullable or, less frequently, as nillable.
 For more details of operators, see Chapter 5.
Prefix expressions
Prefix expressions consist of an operator that acts on an expression that follows the prefix. Swift supports these standard C (and other languages) prefix operators as prefix expressions:
· ++ (adds 1 to the expression that follows)
· –– (subtracts 1 from the expression that follows)
· ! (negates the expression that follows — logical NOT)
· ~ (negates the bits of the expression that follows — bitwise NOT)
· + (unary plus normally provides no action but may clarify an expression as being positive)
· – (unary minus negates the value of the expression that follows)
Postfix expressions
Postfix expressions are also found in many other C-derived languages. These include:
· ++ (adds 1 to the expression that precedes it)
· –– (subtracts 1 from the expression that precedes it)
Wait, you may think, are ++ and –– prefix or postfix operators? The answer is simple: The operators are defined, but their placement determines whether they are prefixes or postfixes. This means that the operation (adding or subtracting one from the target expression) is done before or after the expression is evaluated.
Binary expressions
A binary expression consists of two expressions (hence “binary”) joined by one of the binary operators. Binary operators can be simple arithmetic operators performing addition, subtraction, division, or multiplication; bitwise logical operators such as AND and OR; as well as comparative operators such as less than or equal to.
Perhaps the most commonly used binary operators are the various assignment binary operators that range from simple assignment with = to the compound assignment operators such as ≤, +=, *=, and the like.
Although most Swift operators are similar to those in other languages, several are uncommon and I describe these here in this chapter. Remember that these are lists of some of the operators that may be new to you: They are not intended to be exhaustive lists of the operators in each category.
See the discussions of range operators and patterns in Chapter 11.
Cast operators
Cast operators take an expression of one type and use it as another type. You can’t just jump around from one type to another: The casting has to follow the rules of the object hierarchy. A common type of casting is to cast a general type (for example, UIView) to a subclass (such asUILabel). Cast operators are designed to fail gracefully so that you can attempt to cast an expression in order to find out whether it’s possible. Cast operators use is or as, depending on the situation, as follows:
· is: You can check an expression using the is operator. For example, in the following snippet, the value is true if myExpression can be down-cast from myType — in this case, down-casting means testing for a subclass of myExpression.
myExpression is aSubClassOfMyType
· as: The as operator is used to cast an expression to a specific type, as in
myExpression as myType
or
myExpression as? myType
If the cast cannot be performed, as returns a runtime error. In the same circumstance, as? would return nil in the optional myType?.
Ternary conditional and nil coalescing operators
The ternary conditional operator is comparable to the traditional C ? syntax, which is referred to variously as a conditional operator, an inline if (iif), or a ternary if. This syntax is “ternary” in the sense that it uses three target values. With this operator, an expression that evaluates to a Bool (that is, as true or false) is used to choose which of the two expressions is used — often in an assignment statement. Here is a typical use in Swift:
a > b ? <some expression for true> :
<some expression for false>
The nil coalescing operator (??) provides a somewhat similar functionality, but it tests whether or not the first expression is nil. You can use this code to choose between two values, the first of which can be nil.
a ?? b
If a is nil, this expression returns b; if a can be unwrapped to a non-nil value (as would be the case if you wrote a!), the expression returns a rather than b.
You can always rewrite a nil coalescing expression as a ternary conditional expression, but using the nil coalescing operator (??) saves a few keystrokes and can make your code clearer.
Primary expressions
Primary expressions are among the most commonly used Swift syntax elements (some people would say they’re the most commonly used element). You can divide them into two major groups: Swift expressions and common expressions.
The Swift expressions include expressions that are both unique to Swift and common to other modern languages. These are the major Swift expressions:
· Literal expressions: These let you write an array or dictionary with its data using a single line of code.
· Type and class expressions (explicit and implicit): These let you refer to an object (a property or function in most cases) that is part of a class, structure, or extension. They use dot syntax (as in myClass.myProperty).
· Self and super expressions: These let you reference an object itself or its superclass.
· Closures: These are blocks of code that can be passed around in your code; they are often executed at another time and place (as in a completion handler that is executed asynchronously when an operation such as a read or write completes).
The next few sections of this chapter describe these Swift expressions in greater detail.
The common expressions include those that you may have learned in an introductory programming class at any time from the mid-1950s to the present day. These are among the common expressions that are supported in Swift and that are part of the basic programming language repertoire in almost every language today:
· Parenthesized expressions: Parenthesized expressions establish an order of operations. As in other languages, the innermost parenthesized expressions are evaluated before the next-innermost expressions.
· Function call expressions: These behave as they do in other languages. Some Swift extensions are discussed in Chapter 9.
Literal expressions
Array and dictionary literal expressions (often just called literals) let you write an array or dictionary in a single line of code, so you don’t have to construct the object.
For arrays, for instance, you use [ and ] to enclose the elements of the array as in
[element1, element2]
You can also write an empty array by typing
[]
This is commonly used to initialize a var array which will be filled later on as the data becomes available.
Dictionaries use keys to identify their elements, so they consist of pairs of keys and values. To write a dictionary literal, use brackets, just as you would with an array literal. Within the brackets, you type each element as a key-value pair — the colon is part of the data. Thus, a simple dictionary literal might look like
[key: value, anotherKey: anotherValue]
An empty dictionary is written as
[:]
Some literals are used frequently in debugging statements, such as these:
· __FILE__: A literal representing the name of the file.
· __LINE__: A literal representing the line number.
· __COLUMN__: This is a remnant of the long-gone days when punched cards were used to write programs: It is a literal representing the position in the line of source code where the code in __LINE__ and __FILE__ begins.
· __FUNCTION__: A literal representing the name of the function being executed at the time of evaluation.
Note that each of these literals is preceded and followed by two underscores (not one).
Type and class expressions (explicit and implicit)
Swift uses what is commonly referred to as dot syntax — syntax that allows you to specify an identifier, the name of a method or function, or some other object in the context of its owning object. (Remember that the owning object in Swift can be a class, a structure, or an enumeration.) Expressions using dot syntax are called explicit member expressions.
This isn’t as complicated as it may sound. Here’s an example:
someType.someMemberOfThatType
You can use dot syntax by specifying the class or object that contains the property or method you’re looking for, but you can also use either of these reserved words:
· self as in self.someProperty or self.someFunction() means that the property or function is a member of the class in which you are writing the code.
· super as in super.someProperty or super.someFunction() means that the property or function is a member of the superclass of the class in which you are writing. The reserved word super is frequently used in initializers and deinitializers. (For more, see Chapter 12.)
You can also use implicit member expressions. These are expressions that frequently follow explicit member expressions. You can omit the name of the owner if it is clear from the context what it would be.
Many people prefer not to use implicit member expressions because if you move them or place additional lines of code before them, the context for them may change or be unclear.
Message formats versus dot syntax
This is one of the most significant differences between Swift and Objective-C. In Objective-C you might write
[someClass someObjectIn ThatClass]
Because Objective-C is a message-based language, what that syntax means is that you send the someObjectInThatClass message to someClass; by convention, the someObjectInThatClass would be an accessor method that returns someObjectInThatClass.
Just to make things more interesting, it has been possible for some time to use dot syntax in Objective-C, so although you may not be used to the message syntax, it is used in many of the Cocoa and Cocoa Touch frameworks.
Dot-syntax is consistent with many other modern languages, so it shouldn’t be too much of a challenge to get used to it.
Self and super expressions
These use the keywords self and super to let you refer to an object itself or its superclass. The most common usage is to refer to an identifier or expression as in the following examples
self.myName // property
self.myMethod () // expression
You also can refer to an object itself using self.
Closures
In Swift, closures allow you to declare blocks of functionality that you can refer to elsewhere in your code. You can assign names to them and pass them around as parameters. If this sounds somewhat like functions, you’re on the right track. In fact, in Swift, functions are a special case of closures.
As in almost any language, Swift’s functions let you declare blocks of functionality. Inside a function, you can use variables, properties, and methods that are local to the function (that is, they are declared within the function). You can also refer to variables, properties, and methods that are declared in the same context as the function but not within it.
Closures go one step further: They can reference variables, properties, and methods that are declared in the same context as the closure, but because the closure can be passed around just as any other variable or function and can be assigned to a variable or property, they carry all these references with them. The closures are said to be bound to the variables and properties of the context in they are declared. Thus, the closure consists of the block of code together with the bindings to variables and properties.
Closures can be assigned to multiple variables or properties. Closures are treated as first-class reference types, which means that if you assign the same closure to two variables or properties, both variables or properties refer to the same closure.
In Java, closures are known as lambdas, and, closer to home, they’re called blocks in Objective-C.
In Objective-C and similar languages, they are often used as completion routines — code called upon the completion of an operation (often an asynchronous operation). This structure allows you to fire off an asynchronous task to load data or otherwise. When the process is complete, the completion handler fires and that code executes. When the completion handler is implemented as a block (Objective-C) or a closure (Swift), all the variables and properties bound to it when it was referenced in the code you used to start the operation are available to the closure whenever it executes.
Blocks in Objective-C and closures in Swift are basically the same thing. Although some subtle differences exist, the biggest difference is just the name.
The use of blocks as completion handlers has increased since they were first introduced in OS X Snow Leopard (OS X 10.6) in 2009 and iOS 4.0. By now, they are used for many of the completion handlers in the Cocoa and Cocoa Touch frameworks. (Before 2009, functions were passed as completion handlers.)
With Swift, closures easily take on another role — they allow lazy loading (or lazy initialization) of properties and variables. (This is discussed in the next section.) An example from the Master-Detail Application template shows how they can be used in this way. This is a good programming style to adopt.
Understanding Lazy Loading
Lazy loading is a design pattern (a solution paradigm that addresses similar problems in various contexts). Like many modern software environments, Cocoa and Cocoa Touch use lazy loading extensively. In this context, lazy loading most frequently means that when a large amount of data is called for by the user, it is displayed one screen or page at a time. The lazy loading part of the pattern is that the initial data retrieval operation does only enough work to be able to present the bare minimum of data: The data for each screen or page is retrieved only when that page is retrieved.
On OS X, you can spot lazy loading when you power on your Mac. The first screen you see after you’ve logged in may be the image of the last screen you saw before your Mac shut down. As the seconds pass, if you look closely, you’ll see that some of the app icons and other images change as the stored shut-down image is replaced by the new live data.
On iOS, you can spot this on individual apps. As part of the app, you can create a launch image, which is the basic app screen without any data. The launch image may consist only of a background, or it might be a background and a toolbar. This image is shown immediately when you launch the app. As the app continues its startup, the actual data is displayed. To the user, it can appear that the data is being overlaid on a background, but in fact the launch image is being replaced by a live user interface.
With less powerful computers than those in use today (including smartphones), lazy loading was sometimes discouraged because the total amount of processing power needed to retrieve the summary data and then each page of data in turn is greater than doing all the work at once. From a user’s point of view, however, the process is faster. Mainframe systems tended not to use lazy loading, because the computing resources of the mainframe are relatively scarce and need to be shared. On personal computers, there is spare computing power while a user does other things (such as taking a sip of coffee).
The following sections compare lazy loading with Objective-C and lazy loading with Swift so that you can see the differences and get used to using Swift closures in cases such as these.
Lazy loading with Objective-C
Lazy loading is frequently used for asynchronous processes. Setting up the Core Data stack in Cocoa or Cocoa Touch is a great example of this design pattern. Setting up the Core Data environment (called the Core Data stack) can require that the app goes out to a data store such as an SQLite database, which may be located on a network device. Initializing the Core Data stack is something that must be done before any access to the persistent store data is carried out.
If you’re not precise, you might think that this initialization is something that has to be done when the app starts up. This is generally true, but more specifically it must be done before the first data access occurs — and usually this happens as part of the start-up process. But with lazy loading, things can be structured for efficiency.
Objective-C has an accessor method for the managedObjectModel property (managedObjectModel is basically the database schema). Following the Objective-C style of being a function (that is, a method in Objective-C talk) with the same name as the property (_managedObjectModel), this method returns an instance of NSManagedObjectModel, which is the managed object model in question. It is shown in Listing 10-1.
In Objective-C, properties are usually backed by variables that share the property name and are prefixed with an underscore. Thus, managedObjectModel (the property) is backed by _managedObjectModel. (Don’t worry about these details: I steer us back back to Swift shortly.)
What is important is that the first thing in this accessor method is a test to see if _managedObjectModel exists. If it does, then it is returned as the result of the method. This is the code that does that:
if (_managedObjectModel != nil) {
return _managedObjectModel;
}
Thus, after the managed object model has been created, all that the accessor does is test for it; if the test passes, it is returned. This is a very efficient process.
For the first-time access (the lazy part of the process), the managed object model is created and initialized with this code:
NSURL *modelURL =
[[NSBundle mainBundle] URLForResource:@"Locatapp"
withExtension:@"momd"];
_managedObjectModel = [[NSManagedObjectModel alloc]
initWithContentsOfURL:modelURL];
This can be a lengthy process, but it is done only on an as-needed basis when the managed object model doesn’t exist.
Listing 10-1: Lazy Loading with Objective-C: applicationDocumentsDirectory
- (NSManagedObjectModel *)managedObjectModel {
// The managed object model for the application. It is
// a fatal error for the application not to be able to
// find and load its model.
if (_managedObjectModel != nil) {
return _managedObjectModel;
}
NSURL *modelURL =
[[NSBundle mainBundle] URLForResource:@”LocatappObjC”
withExtension:@”momd”];
_managedObjectModel = [[NSManagedObjectModel alloc]
initWithContentsOfURL:modelURL];
return _managedObjectModel;
}
This is an efficient way of doing the initialization only when it is necessary and not doing it at the launch of the app (when it may not be needed).
Technically, this is “lazy initializing” rather than “lazy loading.” Still, lazy loading is the more common term.
Lazy loading the easy way with Swift
Swift includes some features that replace commonly used code in Objective-C. Over the years, it’s become obvious that certain code segments are written over and over, which is tedious and an invitation to typographical errors.
Listing 10-2 in Locatapp (actually in the Swift version of Master-Detail Application) shows Swift’s version of lazy loading of the managed object model. As with Listing 10-1, this can be used as a model for other lazy loading properties.
The most important difference to notice here is that in the Swift code, the if statement at the beginning of Listing 10-1 is missing.
Listing 10-2: Lazy Loading with Swift
lazy var managedObjectModel: NSManagedObjectModel = {
// The managed object model for the application. This
// property is not optional. It is a fatal error for the
// application not to be able to find and load its
// model.
let modelURL =
NSBundle.mainBundle().URLForResource(“Locatapp”,
withExtension: “momd”)!
return NSManagedObjectModel(contentsOfURL: modelURL)!
}()
Listing 10-2 shows the declaration of the managedObjectModel property in AppDelegate.swift. Listing 10-1 relies on a separate declaration in the header file for AppDelegate.h. Swift gets rid of header files and separate declarations.
The declaration in Listing 10-2 declares managedObjectModel as a lazy var property. As I discuss in Chapter 6, a var property is a variable — as opposed to a constant, which is introduced by let.
In Swift, lazy pushes the if statement from Listing 10-1 into the language itself. If the managedObjectModel property exists, it is returned when you access it, but if it has not been created, the code in the function shown in Listing 10-2 is executed to create it.
The code in Listing 10-2 is a closure, and this is a common use of closures in Swift. Closures are also commonly used as completion handlers, but, as noted previously, that usage is comparable to their usage in Objective-C. The lazy keyword and its use, as illustrated in Listing 10-2, is a Swift-only feature.
Summarizing lazy loading
Because lazy loading is so efficient and is used so frequently (and should be used in your Swift apps), I’ve recapitulated the process in Figure 10-1 and in this section.
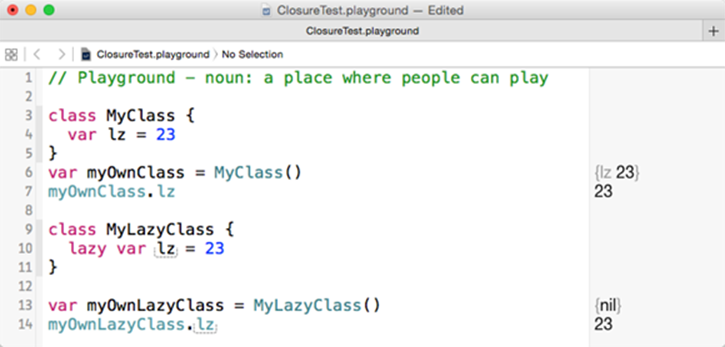
Figure 10-1: Experiment-ing with closures in a playground.
To the experiment with closures and lazy loading in a playground, follow these steps:
1. Declare a class called MyClass.
class MyClass {
}
2. Add a variable called lz.
If you don’t initialize it, you will get an error, so you must set it with a line like this.
var lz = 23
3. Create an instance of the class. In the right-hand sidebar of the playground, you’ll see that the property lz has been initialized to 23 (this is shown in Figure 10-1).
var myOwnClass = MyClass()
4. Access the lz property with this code.
myOwnClass.lz
You’ll see that it is 23.
5. Create a new class called MyLazyClass with this code.
class MyLazyClass {
}
6. Add a lazy variable called lz with this code.
lazy var lz = 23
7. Create an instance of the class.
In the right-hand sidebar of the playground in Figure 10-1, you’ll see that the property lz has been initialized to nil (not to the value of 23).
var myOwnLazyClass = MyLazyClass()
8. Access the lz property with this code:
myOwnLazyClass.lz
The playground shows that it now has the value you set in Step 6.
The point to remember is that until you try to access the lazy property, its value isn’t set, and that is done for you automatically as part of the Swift language as long as you provide the closure code.