Learning Swift Programming (2015)
10. Games with SpriteKit
In Chapter 5, “Making a Game,” you created a tic-tac-toe game with basic graphics. As you did so, you also learned how to organize code for a game by using things like classes, functions, and structs. While this chapter continues to build on those concepts, it focuses more on animation. For tic-tac-toe, you wrote code to change the X and O graphics each time a player touched the game board. This worked well for that small project, but would it work for games that involve frame-based animation? For such games, you should consider using Apple’s SpriteKit library. SpriteKit gives you an infrastructure for handling many aspects of game creation. This chapter focuses on how it helps with 2D animation, basic physics, and sound playback.
In this chapter, you will make a platform game as an example. The hero, a spinning ball, will roll along an animated platform. Barriers will spawn on the path, requiring the hero to leap over them. A text area will display the score, and a basic start screen with a play button will draw users into the action. When you’re finished building the game, it should look as shown in Figure 10.1.
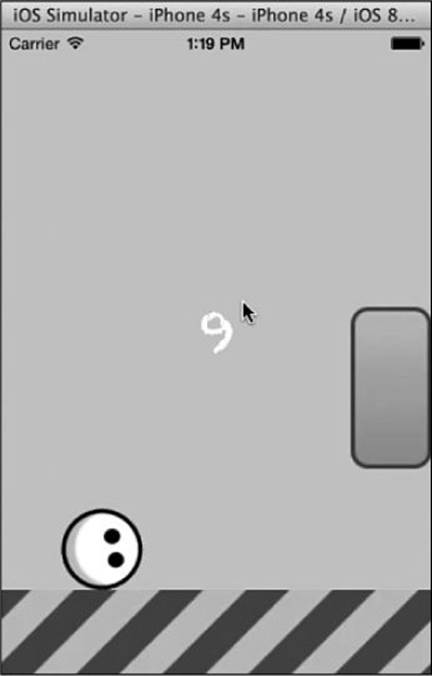
Figure 10.1 The game in action.
Setting Up the Project
To create a new project in Xcode 6, navigate to File > Project in the top menu. For this game, you need to configure only a few settings. Start by selecting Game for the application type. You can make up your own title but make sure that the target device is set to Universal. Once you click Create, Xcode leads you into the new project and presents some options for further configuration. Under the Deployment Info tab, only Portrait should be checked. Click the play symbol in the upper-left corner of Xcode to preview the app. If you set up the project correctly, you should see the screen shown in Figure 10.2.
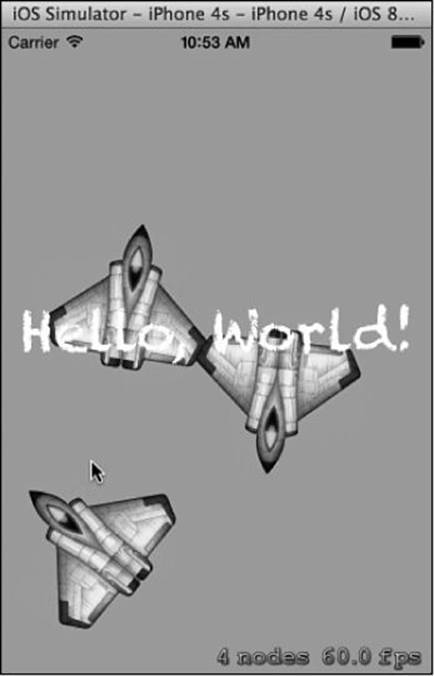
Figure 10.2 The default SpriteKit game.
Xcode presents a simple default game. It illustrates the use of frames and nodes, two topics that we’ll soon discuss in greater detail. Now that you’ve created a project, take a moment to familiarize yourself with the Xcode layout. The left-hand panel lists game resources such as classes and image assets. Click Main.storyboard to reveal the game’s main user interface, where most of the action takes place. You may notice that Main.storyboard has an irregular shape. It doesn’t look like an iPhone or an iPad. That’s because the game’s layout can adapt automatically to both devices.
With Main.storyboard open, take a look at the panel wedged between our main user interface and the list of resources. You should see a group of items under the heading Game View Scene Controller. Click an item, such as View, and select the Inspect Properties icon in the right-hand panel. Notice that you can assign a custom class to the view. By default, all view classes in the game inherit from SKView. This is a base class from which all views extend. In the future, you might want views to inherit properties from other classes. For now, you should keep it simple and stick to one controller that inherits from SKView.
Loading a Scene View
Navigate to the GameViewController class. If you created the program in Chapter 5, viewDidLoad may appear familiar. This method is called right after the application’s interface loads:
class GameViewController: UIViewController {
override func viewDidLoad() {
super.viewDidLoad()
if let scene = GameScene.unarchiveFromFile("GameScene")
as? GameScene {
// Configure the view.
let skView = self.view as SKView
skView.showsFPS = false
scene.size = skView.bounds.size
skView.showsNodeCount = false
/* SpriteKit applies additional optimizations
to improve rendering performance */
skView.ignoresSiblingOrder = true
/* Set the scale mode to scale to fit the window */
scene.scaleMode = .AspectFill
skView.presentScene(scene)
}
}
/* Several other methods */
}
A few built-in functions follow viewDidLoad. They control behavior like rotation and memory management. You should leave them in place and ignore them for now so that you can focus on the first method. The keyword override indicates that you’re overriding a method of the same name in the parent class. In this case, the parent class of GameViewController is UIViewController. Calling super.viewDidLoad lets you keep the behavior of the parent controller’s method and then extend it with your own logic. Don’t forget to always call super.viewDidLoad().
The method’s initial if statement loads a resource for the game scene. This relates to the file GameScene.swift, which you’ll edit soon. The code within the if block changes two properties of the current view: showsFPS and showsNodeCount. You can set both properties to false because they’re used primarily for debugging. Next, you adjust the scene’s size to make it span the dimensions of skView.
Importing Image Assets
Your platform game uses images (pngs) to represent the ground, the player, and the player’s obstacles. This chapter doesn’t spend a lot of time on aesthetics because it isn’t a design tutorial. Of course, you can feel free to polish up the graphics or create your own. Just make sure that the dimensions of your images are similar to those of the original pictures. Table 10.1 shows a detailed overview of the assets.
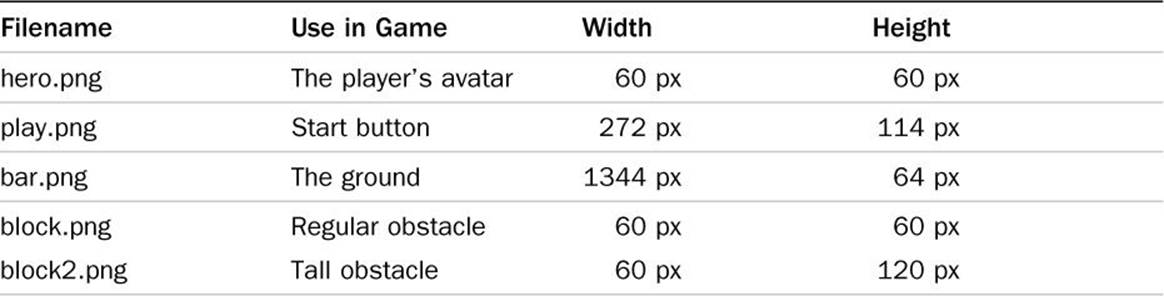
Table 10.1 Image Assets
You need to import each of these assets into Xcode. To do this, you reveal the assets panel by selecting the Image Assets folder in the project tree. You can delete the spaceship image, which belongs to the default game. Then you start by adding the play button. Select the plus icon and then click New Image Set. Name the asset play and drag play.png onto the 1x tile in the main window. Repeat this process for each of the other images, naming each asset after the name of its corresponding file.
Here are the files:
■ https://github.com/skipallmighty/Skiptaculous/blob/master/Skiptaculous/Images.xcassets/bar.imageset/bar.png
■ https://github.com/skipallmighty/Skiptaculous/blob/master/Skiptaculous/Images.xcassets/block1.imageset/block.png
■ https://github.com/skipallmighty/Skiptaculous/blob/master/Skiptaculous/Images.xcassets/block2.imageset/block2.png
■ https://github.com/skipallmighty/Skiptaculous/blob/master/Skiptaculous/Images.xcassets/hero.imageset/hero.png
■ https://github.com/skipallmighty/Skiptaculous/blob/master/Skiptaculous/Images.xcassets/play.imageset/play.png
The Start Screen
To build the tic-tac-toe game in Chapter 5, you imported image assets and referenced them in code. You’ll create similar references for each of the assets that you imported in the previous section. You can begin with the play button. Define the resource as a constant in GameScene.swift, like this:
import SpriteKit
class GameScene: SKScene {
let playButton = SKSpriteNode(imageNamed:"play")
override func didMoveToView(view: SKView) {
self.playButton.position = CGPointMake(CGRectGetMidX(self.frame),
CGRectGetMidY(self.frame))
self.addChild(self.playButton)
self.backgroundColor = UIColor(hex: 0x80D9FF)
}
override func touchesBegan(touches: NSSet, withEvent event: UIEvent) {
/* Coming soon */
}
override func update(currentTime: CFTimeInterval) {
/* Coming soon */
}
}
The methods touchesBegan and update are listed to show how this class will eventually look, but you can focus only on didMoveToView for now. The code in this block executes whenever a player navigates to a view—in this case, the starting screen. Our first goal is to position the play button in the screen’s center. You accomplish this by calling CGPointMake, which takes two CGFloats as arguments.
Compared to regular floats, CGFloats offer greater compatibility across operating systems. Keep in mind that CGFloat is a special type, and it isn’t interchangeable with all floats in Swift. To make the button appear at center-screen, you need two CGFloats that represent the horizontal and vertical centers of the game window. CGRectGetMidX and CGRectGetMidY are helpful built-in functions for finding the values.
Custom Colors
Now you have a play button, but the background is a boring white color. You can improve this by assigning a UIColor object to self.backgroundColor. Notice that you construct UIColor by using a hexadecimal value, also called a hexcode. By default, UIColor accepts color values in red-green-blue (RGB) form. To make the hexcode feature work, you add custom functionality to UIColor. Extending a class is fairly simple. Refer to your list of project files and right-click the Create New File button. Choose Swift as the file type and name the file UIColorExtensions.swift. Then add to it the following code:
import UIKit
extension UIColor {
convenience init(hex: Int, alpha: CGFloat = 1.0) {
let red = CGFloat((hex & 0xFF0000) >> 16) / 255.0
let green = CGFloat((hex & 0xFF00) >> 8) / 255.0
let blue = CGFloat((hex & 0xFF)) / 255.0
self.init(red:red, green:green, blue:blue, alpha:alpha)
}
}
During initialization, the class converts a hexcode to a set of RGB values. This code may be especially convenient to you if you’re used to working with hexadecimals. In any case, it’s useful to learn about extending classes. Extensions allow you to write your own methods and initializers (and other stuff) in an already-existing class, even classes like String, or UIColor as you saw here.
Handling Taps
Now that you’ve created and positioned the play button, you can detect when users tap it. Take another look at the empty touchesBegan method that you defined in GameScene. Fill it with the following code:
override func touchesBegan(touches: NSSet, withEvent event: UIEvent) {
for touch: AnyObject in touches {
let location = touch.locationInNode(self)
if self.nodeAtPoint(location) == self.playButton {
println("Play button pushed")
}
}
}
The opening for statement loops through all touch conditions to account for multitouch devices (as all touches will be sent in an array-like structure to this loop). When the player touches any part of the frame, the code finds the tap coordinates and stores them in location. Then you determine what object, if any, exists beneath the tap location. In this game, only the play button should start the game. The if statement enforces this rule by making sure an object coincides with the tap location and the object is the play button. You can preview the app to see your changes. If your code is working correctly, you should see the results of the println each time you tap the play button.
Dangerous Ground
If printing text brought you to the edge of your seat, hang on tightly. Things will get more exciting when you let players actually start the game. At this point, you should add a file named PlayScene.swift to your project. Just as GameScene contains logic for the start screen, PlayScene is in charge of the game’s main play area. The barebones class should look like this:
import SpriteKit
class PlayScene: SKScene {
override func didMoveToView(view: SKView!) {
self.backgroundColor = UIColor(hex: 0x80D9FF)
}
}
After you import SpriteKit, you define PlayScene as a child class of SKScene. The didMoveToView method is just like the one in GameScene. It fires when the player navigates to the view. You set the arena’s background color and add a print statement only to establish that the class works. Preview the app, and you should notice that the play button still doesn’t do anything. That’s because you need to create a link between GameScene and PlayScene. Return to GameScene and update the touchesBegan method, like this:
override func touchesBegan(touches: NSSet, withEvent event: UIEvent) {
for touch: AnyObject in touches {
let location = touch.locationInNode(self)
if self.nodeAtPoint(location) == self.playButton {
var scene = PlayScene(size: self.size)
let skView = self.view as SKView
skView.ignoresSiblingOrder = true
scene.scaleMode = .ResizeFill
scene.size = skView.bounds.size
skView.presentScene(scene)
}
}
}
The code now includes a reference to PlayScene. Passing self.size as an argument indicates that PlayScene should be the same size as GameScene. You use as to reference the current view because you know that self.view will always be an instance of SKView. Switching ignoresSiblingOrder to true lets SpriteKit perform extra optimizations. While this setting works for most projects, it may not be ideal for games that involve a lot of complex overlapping nodes. After scaling and sizing the main scene, you show it to the player by using presentScene.
Positioning Obstacles
The game’s foundation is complete. You have created views for the start screen and the main play area, and you have imported all the image assets. Now you can weave the graphics into your views. First, you should add the ground. The player’s avatar would drop into a blue abyss without it, and no one wants that. You can associate this node with the bar.png graphic. If you haven’t imported this picture, please refer to the “Importing Image Assets” section, earlier in this chapter. After the asset is ready, position it in PlayScene, like this:
override func didMoveToView(view: SKView!) {
self.backgroundColor = UIColor(hex: 0x80D9FF)
self.runningBar.anchorPoint = CGPointMake(0, 0.5)
self.runningBar.position = CGPointMake(
CGRectGetMinX(self.frame),
CGRectGetMinY(self.frame) + (self.runningBar.size.height / 2))
}
The runningBar constant is an SKSpriteNode that references bar.png. Knowing that the bar will serve as a ground surface, you should position it so it stretches along the bottom of the screen. By default, the position of every sprite is relative to the anchor point you set for the scene, but you can change any element’s anchor point (including the main scene). You set the ground’s anchorPoint to (0, 0.5). This point represents the left edge on the x coordinate and the middle for the y coordinate. In SpriteKit’s coordinate system, (0,0) represents the bottom-left corner, and (1,1) represents the top-right corner. Given this, you can probably figure out that (0, 0.5)refers to a spot on the far left, halfway between the top and bottom of the frame (see Figure 10.3).
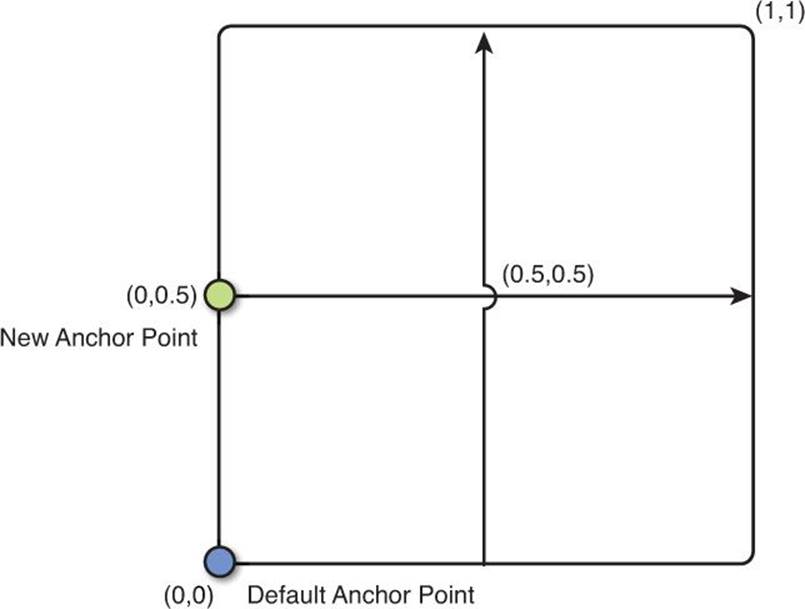
Figure 10.3 The coordinate system in SpriteKit and the changes we made.
To position the bar relative to the anchor point, you create another point by using CGMake. The first argument represents the bar’s spot on the X axis. It should always appear on the far left of the frame. You can find this position by passing self.frame to CGRectGetMinX. Note that in this case, the function always returns a zero. While you could replace it with a hard-coded zero, the change might make the intent of your code less obvious. The performance gains would be minimal, too, because didMoveToView isn’t called frequently.
You call CGRectGetMinY in a similar fashion to get the frame’s bottom. There’s just one problem: No one will see the ground if the top of bar.png begins at the bottom of the frame. The code makes the bar visible by adding half of its height to its position. Every SKSpriteNode contains a struct called size, which includes its width and height.
Moving Obstacles
Preview the app, and you should see a striped ground. That’s nice, but the stripes are stationary. Your hero deserves a more action-packed environment. To make the stripes whoosh to the left by changing the bar’s position each frame, add the following code to the update method in PlayScene:
override func update(currentTime: NSTimeInterval) {
if self.runningBar.position.x <= maxBarX {
self.runningBar.position.x = self.origRunningBarPositionX
}
//move the ground
runningBar.position.x -= CGFloat(self.groundSpeed)
}
The bar.png graphic is wider than the frame so you we can move it to the left without exposing any white space. Just as the bar is sliding out of frame, the game resets its position. There isn’t a noticeable jump-cut when the position shifts because the picture is made up of a repeating texture. You have to store the bar’s original position in origRunningBarPositionX to reset it later. The if statement dictates that if the bar passes a horizontal threshold, you should push it back to its original place and continue the animation seamlessly.
The threshold represented by maxBarX is equal to the bar’s width minus the frame’s width. As long as the bar hasn’t surpassed the limit, you can move it according to the distance defined in groundSpeed. If five pixels seems like a small distance, remember that the code in update executes on every frame (60 times a second). When you preview the app, prepare to be amazed by an infinitely scrolling bar, as shown in Figure 10.4.
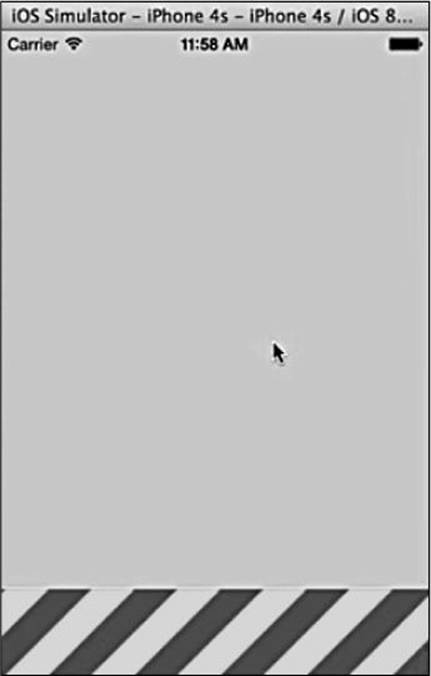
Figure 10.4 The ground in motion.
A Hero to the Rescue
The hero finally has a chance to stand his or her ground. It’s time to create the player. Start by creating a variable “hero.” This SKSpriteNode will reference the hero.png graphic that you imported earlier in this chapter. To position the circle above the platform, add a few lines to the didMoveToView method:
override func didMoveToView(view: SKView!) {
self.backgroundColor = UIColor(hex: 0x80D9FF)
self.runningBar.anchorPoint = CGPointMake(0, 0.5)
self.runningBar.position = CGPointMake(
CGRectGetMinX(self.frame),
CGRectGetMinY(self.frame) + (self.runningBar.size.height / 2))
self.origRunningBarPositionX = self.runningBar.position.x
self.maxBarX = self.runningBar.size.width - self.frame.size.width
self.maxBarX *= -1
self.heroBaseline = self.runningBar.position.y +
(self.runningBar.size.height / 2) + (self.hero.size.height / 2)
self.hero.position = CGPointMake(CGRectGetMinX(self.frame) +
self.hero.size.width + (self.hero.size.width / 4),
self.heroBaseline)
self.addChild(self.runningBar)
self.addChild(self.hero)
}
Take a look at self.hero.position to see where the hero will end up. The first argument that you pass to CGPointMake is an X coordinate based on several factors. First, you find the position of the frame’s left edge and add to it the hero’s width. This positions the hero flush against the left-hand side of the screen. Adding another number—the hero’s width divided by 4—provides some padding. Now refer to the second argument of CGPointMake. This Y coordinate is based on heroBaseline. Your calculation takes into account the bar’s initial height and then adjusts for anchor points. To better understand how anchor points work, experiment with deleting the second and third numbers added to heroBaseline. Notice that the hero falls short of the bar’s top edge. When you’re done experimenting, make sure to restore the variable’s original value.
Rotating Nodes
Now the hero stands in the right spot, but he or she looks boring in contrast to the exciting animated ground. Instead of making the sphere stationary, how about if you roll it over the striped bar? You can create this effect by rotating the player’s avatar on each frame. Add the following code to the update method of PlayScene:
//rotate the hero
var degreeRotation = CDouble(self.groundSpeed) * M_PI / 180
self.hero.zRotation -= CGFloat(degreeRotation)
You have to define the groundSpeed constant, too. Write it as an integer-type property of PlayScene. The ground speed indicates how many degrees the sphere should rotate per frame. Converting the degrees to radians requires a bit of math. We play around with numbers until the hero rotates at the same speed as the ground. After you cast the integer as a CDouble, multiply it by pi and divide the product by 180. Rotate the hero by passing the radian value to the hero’s zRotation property. Notice that you perform a type conversion on the radian because zRotation expects a CGFloat. Click Preview, and you should see the avatar spinning at a moderate pace (see Figure 10.5). As an experiment, you can tweak the ground speed to turn your character into a sloth or a speed demon.
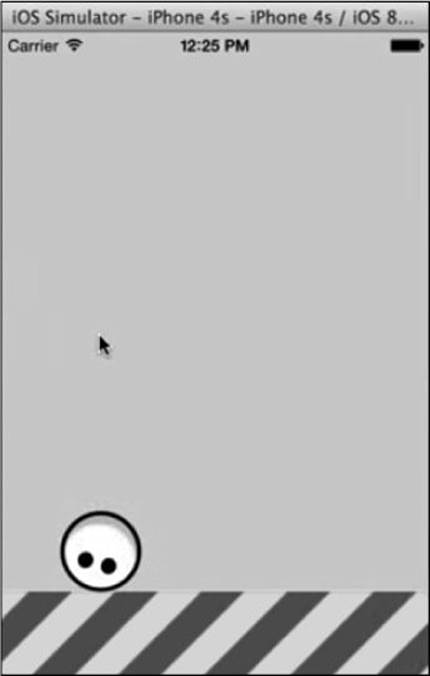
Figure 10.5 Hero is rolling.
Bar Hopping
Now that the hero is animated, you can make him or her jump on command. You start by defining a few physics properties, such as a velocity and gravity. If you’re not into math, don’t worry. The calculations involve basic addition and subtraction. Simply change the hero’s velocity on every frame and during touch events, like this:
override func touchesBegan(touches: NSSet!, withEvent event: UIEvent!) {
if self.onGround {
self.velocityY = -18.0
self.onGround = false
}
}
override func touchesEnded(touches: NSSet!, withEvent event: UIEvent!) {
if self.velocityY < -9.0 {
self.velocityY = -9.0
}
}
override func update(currentTime: NSTimeInterval) {
//jump
self.velocityY += self.gravity
self.hero.position.y -= velocityY
if self.hero.position.y < self.heroBaseline {
self.hero.position.y = self.heroBaseline
velocityY = 0.0
self.onGround = true
}
/* Other code related to hero rotation */
}
The code overrides the touchesBegan method to detect when and where a player taps. You ensure that self.onGround equals true to prevent the player from jumping while he or she is already airborne. If consecutive jumps were allowed, players could fly into the clouds similar to Mario when he has his cape or raccoon tail (depending on your age and your desired level of nostalgia).
The variable velocityY determines how quickly (and ultimately how high) the player ascends. If the character is on the ground when a tap begins, you want to set the velocity to -18. If the touch event ends quickly, you want to set the velocity to -9. Changing the velocity at these points in the code affects the jumping behavior. The longer a player taps, the farther he or she leaps. Eventually, the avatar must return to Earth. That’s where the gravityconstant comes into play.
The update method subtracts 0.2 from velocityY on each frame. Just as the player shouldn’t soar unrealistically, you don’t want him or her to crash through the ground. Each time update is called, an if statement ensures that the player’s vertical position never drops below heroBaseline. When the velocity gets too low, you will revert it to 0.0 and make onGround equal true.
Preview the app, and you should see your avatar leap every time you tap. You can experiment with tapping softly and holding down your finger to see how the actions produce different jumping effects. Changing gravity and velocity can affect the game’s difficulty, too. You’ll see why in the next section, when you work with barriers.
Enemies in Motion
In this game, barriers create a sense of danger. If the player collides with one of the block graphics, he or she bites the dust. The score display introduced later in this chapter rewards players each time they vault over an obstacle. Let’s take an inventory of the graphic assets that you imported earlier. The block1 picture is easy to vault because its height matches that of the avatar. The block2 image offers a tougher challenge because it’s twice as tall as the hero. You define both of them as properties of PlayScene:
let block1 = SKSpriteNode(imageNamed:"block1")
let block2 = SKSpriteNode(imageNamed:"block2")
After defining the blocks as SKSpriteNodes, you need to set their positions. You want the barriers to spawn on the ground and slightly beyond the screen’s right edge. They’ll eventually scroll from right to left. Keep in mind that the objects are positioned relative to their middle, or center, points. Because block1 is equal in height to the avatar, you can position it vertically, using the same heroBaseline property. Positioning block2 involves one extra step. You add block2’s height to heroBaseline to account for block2 being taller than the player. This is all you need to do for the vertical (Y) positioning. To place the obstacles along the X axis, you call CGRectGetMinX, which returns the position of the screen’s right edge, and add the block’s width to it. When you’re done positioning the blocks, remember to call addChild to attach them to the view:
self.block1.position = CGPointMake(CGRectGetMaxX(self.frame) +
self.block1.size.width, self.heroBaseline)
self.block2.position = CGPointMake(CGRectGetMaxX(self.frame) +
self.block2.size.width, self.heroBaseline +
(self.block1.size.height / 2))
Elements of Chance
After you position the obstacles, you can make them spawn during gameplay. To do this, you need to write a few blocks of code. You’ll create a class for keeping tabs on the status of a block, a dictionary in which to store all the blocks, and a method to make things happen randomly. Let’s take it one step at a time and focus on the method for randomness. To keep the player on his or her toes, you want an obstacle to spawn at a random interval of 50 to 200 frames. You need to create a random method to generate numbers within this range:
func random() -> UInt32 {
var range = UInt32(50)..<UInt32(200)
return range.startIndex + arc4random_uniform(range.endIndex - range.startIndex + 1)
}
This code represents the frame range as an array of UInt32 numbers. The built-in arc4random_uniform method spits out an integer between 50 and 200. Of course, this simple random number method does little on its own. The method’s role will become clearer as you move on to tracking obstacles.
Tracking a Brick
To keep tabs on all the blocks, you need to create a dictionary named blockStatuses:
var blockStatuses:Dictionary<String,BlockStatus> = [:]
The blockStatuses dictionary consists of strings and a class called BlockStatus, which you define by adding a new file named BlockStatus.swift to your project and filling it with the following code:
import Foundation
class BlockStatus {
var isRunning = false
var timeGapForNextRun = UInt32(0)
var currentInterval = UInt32(0)
init(isRunning:Bool, timeGapForNextRun:UInt32, currentInterval:UInt32) {
self.isRunning = isRunning
self.timeGapForNextRun = timeGapForNextRun
self.currentInterval = currentInterval
}
func shouldRunBlock() -> Bool {
return self.currentInterval > self.timeGapForNextRun
}
}
This class is short and sweet. It includes a few simple Bools to describe the status of an obstacle. The isRunning property is true while the block is an active barrier that’s visible to the player. timeGapForNextRundescribes how long the block should wait before spawning. You need a measure of time to go along with the variable. currentInterval serves this purpose, telling how many frames have elapsed. By using these Bools in combination with shouldRunBlock, it’s easy to determine when a block should pop into the player’s path.
Tracking All Blocks
Your next task is to fill the blockStatuses dictionary with instances of BlockStatus. First, you assign a name property to the SKSpriteNode references. This allows you to reference the nodes in a more succinct and convenient way:
self.block1.name = "block1"
self.block2.name = "block2"
Now you can instantiate BlockStatus for block1 and block2, using the name of each block as a key:
blockStatuses["block1"] = BlockStatus(isRunning: false,
timeGapForNextRun: random(), currentInterval: UInt32(0))
blockStatuses["block2"] = BlockStatus(isRunning: false,
timeGapForNextRun: random(), currentInterval: UInt32(0))
The instances are nearly identical. You set isRunning to false and currentInterval to 0 to specify that the blocks aren’t running, and they haven’t spent time on the screen. The only difference is in timeGapForNextRun. The random method will almost always pass different integers to BlockStatus. Of course, the function could return the same number twice, but that’s unlikely.
Spawned Obstacles
If you’re ready to put your spawning logic to the test, you can move on to the update function. Your next challenge will to be hurl spawned obstacles toward the player. At the bottom of update, you call a method named blockRunner. The blockRunner function includes a few variables that are defined outside its immediate scope, as properties of PlayScene:
var blockMaxX = CGFloat(0)
var origBlockPositionX = CGFloat(0)
var score = 0
let scoreText = SKLabelNode(fontNamed: "Chalkduster")
Don’t worry if you’re not sure about the purpose of these variables. We’ll soon discuss how they fit into the game. For now, let’s talk about their structure and what they represent at a high level. The blockMaxX float is a horizontal cut-off point. When obstacles scroll from right to left, blockMaxX determines the point at which they vanish. After blocks disappear, the game must restore their original position. It uses origBlockPositionX to remember where the blocks were first situated. The scoreText property, which is of type SKLabelNode, displays the player’s score. You can construct it using any font that’s available to SpriteKit. In this case, go with Chalkduster because it has a game-like aesthetic. Use CGGetMidX and CGGetMidY to put the node center-screen.
Generating Barriers
You’ve already created the only external variables on which blockRunner depends. Now you can jump into the function itself:
func blockRunner() {
for(block, blockStatus) in self.blockStatuses {
var thisBlock = self.childNodeWithName(block)
if blockStatus.shouldRunBlock() {
blockStatus.timeGapForNextRun = random()
blockStatus.currentInterval = 0
blockStatus.isRunning = true
}
if blockStatus.isRunning {
if thisBlock.position.x > blockMaxX {
thisBlock.position.x -= CGFloat(self.groundSpeed)
}else {
thisBlock.position.x = self.origBlockPositionX
blockStatus.isRunning = false
self.score++
if ((self.score % 5) == 0) {
self.groundSpeed++
}
self.scoreText.text = String(self.score)
}
}else {
blockStatus.currentInterval++
}
}
}
First, blockRunner loops through the dictionary of block statuses. It uses the native childNodeWithName function to find the SKSpriteNode associated with each block. If it’s time for a block to run, specify a new random spawn time and make the running status equal to true. If a block is already running, adjust its position. Pull the node farther left on each frame until it disappears from view. You can tweak groundSpeed to change how fast the obstacle travels.
After a node disappears from view on the left side, transport it back to its original position. This movement is invisible to the player, but it’s how you prepare the block for its next run. Set isRunning to false to acknowledge that although the obstacle had a good run, its time in the spotlight is finished. If the block passed without incident, you should reward the player for a successful leap. Increment the score variable by 1.
Hardcore Mode
Players will eventually become familiar with the speed of the obstacles. With a bit of practice, they’ll figure out the timing and rack up dozens of points. You want to provide more a challenge. For every 5 points a player scores, you should add 1 to the groundSpeed. The modulus operator provides a convenient way to keep count:
if ((self.score % 5) == 0) {
self.groundSpeed++
}
Reading aloud, you can pronounce the percentage sign as “modulo” or use the colloquial term “mod.” In this case, score mod 5 returns a 0 only when score is a multiple of 5. After you update the integer, display it by updating the text property of self.scoreText.
There’s one final task to accomplish in the blockRunner method. You’ve handled the case of a block that’s running, but there’s no logic for blocks in which isRunning is false. Remember that the BlockStatus class waits for permission to spawn an obstacle. The class expects its currentInterval property to match timeGapForNextRun, its randomly generated waiting time. If a block isn’t running, you need to increment currentInterval so that the block eventually spawns. The last else statement in blockRunner accomplishes this.
Smashing Physics
Your game has come a long way! Preview the app, and you should see barriers whizzing toward the player. The hero can jump in different ways to avoid collisions, and the ground moves faster as time progresses. The last order of business is to detect collisions between the player and the barriers. SpriteKit can handle much of the collision detection for us. You just have to tell it which objects should collide and when a collision should occur.
You need to create an enum for PlayScene, just above the didMoveToView method. You’ll use this identify the hero and barrier objects for the purposes of collision detection:
enum ColliderType:UInt32 {
case Hero = 1
case Block = 2
}
Invisible Cages
Now you can tell SpriteKit to watch for collisions related to the hero. The key is to apply a physics body to the node. If you’ve created games before, you may be familiar with physics bodies. They’re like invisible cages that wrap around game objects. The “cages” are typically made up of a simpler shape than the objects that they enclose. It’s much easier for computers to process a shape that has fewer points. Think of scuba diving as an analogy: You step into a metal cage that detects collisions between you and a shark. It would be time-consuming and unnecessary (not to mention terrifying) to build a cage that conformed exactly to the shape of your body. There’s one important caveat about this analogy: Although real-life cages are often box shaped, a physics body may conform to any simpler shape. In this case, it will take the form of a circle.
Here’s how you place the circular physics body around the hero:
self.hero.physicsBody = SKPhysicsBody(circleOfRadius:
CGFloat(self.hero.size.width / 2))
self.hero.physicsBody.affectedByGravity = false
self.hero.physicsBody.categoryBitMask = ColliderType.Hero.toRaw()
self.hero.physicsBody.contactTestBitMask = ColliderType.Block.toRaw()
self.hero.physicsBody.collisionBitMask = ColliderType.Block.toRaw()
This code first creates an instance of SKPhysicsBody. Using circleOfRadius, you specify that the “cage” around the hero should be circle shaped. The next setting, affectedByGravity, controls whether SpriteKit applies gravity to the object. You can make the attribute false because you’ve already handled gravity, and extra gravity could make the player break through the ground. The next few properties affect when and how collisions take place. SpriteKit uses categoryBitMask to identify the hero’s physics body. You can pass it a value of 1, representing the player, as defined in the enum for ColliderType. Similarly, you set collisionBitMask and contactTestBitMask to the numeric values for blocks that you defined in ColliderType. This means that the block should stop the hero from moving and trigger a collision event.
Now you can define physics bodies for the two block objects. The process is nearly the same, except the roles are reversed: Blocks should detect collisions with the hero. Another difference is that a property called dynamic must be set to false. A dynamic physics body is one that doesn’t move during collisions. On the other hand, static bodies can displace each other. The game Angry Birds, for example, features both static and dynamic bodies. Birds cause other birds to bounce, but no creatures can move the ground by bumping into it. Taking these minor changes into account, you use this code for the blocks:
self.block1.physicsBody = SKPhysicsBody(rectangleOfSize:
self.block1.size)
self.block1.physicsBody.dynamic = false
self.block1.physicsBody.categoryBitMask = ColliderType.Block.toRaw()
self.block1.physicsBody.contactTestBitMask = ColliderType.Hero.toRaw()
self.block1.physicsBody.collisionBitMask = ColliderType.Hero.toRaw()
self.block2.physicsBody = SKPhysicsBody(rectangleOfSize:
self.block1.size)
self.block2.physicsBody.dynamic = false
self.block2.physicsBody.categoryBitMask = ColliderType.Block.toRaw()
self.block2.physicsBody.contactTestBitMask = ColliderType.Hero.toRaw()
self.block2.physicsBody.collisionBitMask = ColliderType.Hero.toRaw()
A Hero’s Death
Before you test the collisions, you need to make two minor tweaks to the PlayScene class. First, make PlayScene inherit from the SKPhysicsBodyDelegate class. The inheritance gives your code access to SpriteKit’s built-in methods for handling collisions:
class PlayScene: SKScene, SKPhysicsContactDelegate { ...
Second, inside didMoveToView, set a physics-related property called contactDelgate to equal PlayScene:
self.physicsWorld.contactDelegate = self
Now, when you preview the app, you’ll have to be quick on your feet. If you don’t vault the obstacles in time, they’ll push you off the screen. That’s mostly the behavior you want, except it’s a little too forgiving. A collision should force the player to restart the game. Therefore, you need to add a method called didBeginContact to your PlayScene class:
func didBeginContact(contact:SKPhysicsContact) {
died()
}
The built-in method fires whenever a collision occurs. Its main contact parameter includes useful information about which objects touched. For now, you can ignore this feature because the game doesn’t need to know who crashed into whom. It just has to realize that a collision happened. In the event of a collision, it jumps to the died function, which you define like this:
func died() {
if let scene = GameScene.unarchiveFromFile("GameScene") as? GameScene {
let skView = self.view as SKView
skView.ignoresSiblingOrder = true
scene.size = skView.bounds.size
scene.scaleMode = .AspectFill
skView.presentScene(scene)
}
}
The died function is responsible for cutting short the action. It prepares and presents the skView for our initial start screen. The settings here closely resemble those in the touchesBegan method.
Summary
In this chapter, you worked with SpriteKit, a powerful framework for building games in Swift. When it comes to customization, SpriteKit places you, the programmer, in the driver’s seat. After you import graphics, you can make them available as SKNode objects in a game. SpriteKit lets you fine-tune almost any node property. In this chapter, you created a game in which you adjusted the positions, colors, and rotation settings of some nodes. You positioned the hero and barrier blocks flat against the ground to create an illusion of gravity. You used an instance of the UIColor class to make the background look like a blue sky.
Unlike the tic-tac-toe example from Chapter 5, this game involves multiple views: a start screen and a main play area. You’ve learned that SpriteKit’s SKView class helps you to organize your code and transition between game areas. By extending the library’s built-in event handlers, you now know how to make an avatar leap after a tap event. Some basic physics and collision detection give the game a more dynamic feel. Players can jump in different ways to avoid the obstacles whooshing toward them. A physics body can handle the grunt work of detecting collisions. You simply tell it what should happen after a crash.
In this chapter, you started with a blank canvas and produced an action-packed platform game in Swift. Your avatar can vault any obstacles that spawn in his or her path. This is a good metaphor for you as a Swift programmer!