Learning Swift Programming (2015)
11. Games with SceneKit
SceneKit is to 3D what SpriteKit is to 2D. If you get nothing else out of this chapter, get that!
When you first create a SceneKit app from scratch, if you press play, you have a working game. You get a little spaceship that you can tap, and it will light up. This is a big step forward from trying to create such things yourself in any sort of framework. When you first create a SceneKit project, you see code for animation and touch events. SceneKit also has fully featured ways of storing and playing with your assets. You can import special DAE files provided by your artist. Your artist can put cameras and lights and all the objects with their materials in a DAE file. Once you have that DAE file, you can fully control all those objects individually. You can rename them and move them around. 3D can be tricky, so it’s awesome that you can enlist the help of a professional 3D artist to help you out. Your 3D artist won’t necessarily know about game making, but he or she will know about design and what looks good. SceneKit allows you to work together with an artist (or by yourself, or start from scratch).
There are a couple of terms you need to know before you start using SceneKit so that you don’t get confused. You’ll learn those next, and you’ll also learn how to export your files yourself from free 3D tools like Blender.
Creating DAE Files
SceneKit can help you work with an artist’s assets, as long as that person works with a specific format: a DAE file, otherwise known as COLLADA. COLLADA is a ubiquitous and open format, and every 3D authoring tool has the ability to export it.
COLLADA files are written in XML. You could write one yourself, although it would take a very long time, and you don’t really have to do that. 3D programs often have proprietary or incompatible formats, and 3D itself is very complex. COLLADA is really great because it provides an open format that guarantees the 3D to be the same, no matter what software is used.
Xcode can edit DAE files that are imported, and you can resave them. To get started, you export your 3D model from whatever tool you are using; a popular one is Blender. Blender is a free and open source 3D authoring tool. It has a solid learning curve, but after you learn it, you can create absolutely amazing things. When you open Blender, you see something like what Figure 11.1 shows.
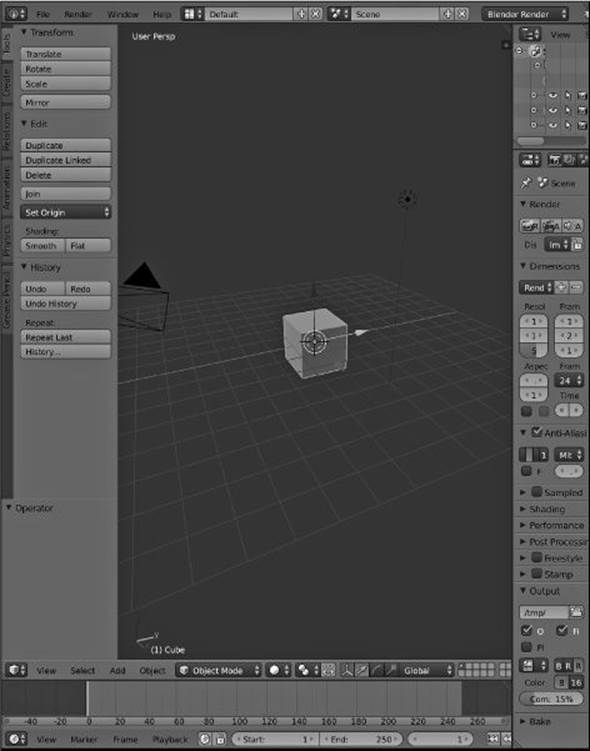
Figure 11.1 Blender’s default view.
Blender has its own menu system, so you will use it to navigate instead of Mac’s menu system. To export a COLLADA file, you select File > Export > Collada (default) .dae. Then you choose a location for your file. You might want to save your file to the desktop so click the Desktop directory. Figure 11.2 shows the save dialog.

Figure 11.2 The save screen in Blender.
You can change the name of your file from “untitled.dae” to whatever you want. Note that COLLADA files cannot store image textures themselves. You’ll have to grab them separately and often add the textures yourself in Xcode.
To see an example of a COLLADA file that my buddy Josh made for me, go to http://goo.gl/nvZ69u. Go ahead and download it on your Mac. Then, when you click the file once to select it and press the spacebar to preview you it, you see the scene shown in Figure 11.3.

Figure 11.3 An awesome DAE file from Josh.
If your artist wants to use image-based textures, make sure you grab those image files from him or her separately. Notice that Josh did not use image-based textures, so the colors in his DAE file show up just fine.
Note
With image-based textures, you must make sure that your artist properly unwraps the textures for you before he or she exports them and hands them off to you. The artist needs to know how to do proper unwrapping. If he or she does not properly apply a texture to an object, you may wind up with some funky-looking textures.
Creating a New SceneKit Project
Now you are ready to import your DAE file into Xcode. In order to do this properly, you must create a new Xcode SceneKit project so you can import those files. Follow these steps:
1. Open Xcode and start a new project by selecting File > New > Project.
2. Choose the game template with the picture of the robot on the icon and click Next.
3. Name your project a name, such as SwiftStacker.
4. Make sure Language is set to Swift.
5. Make sure Game Technology is set to SceneKit.
6. Select iPad as the Device.
7. On the screen that allows you to save your new project, click Create.
8. When you get the list of initial project settings, select Landscape Right, as shown in Figure 11.4. (Because this is a game, you want to make sure that it is available in only one orientation.)

Figure 11.4 Orientation selection.
You are now ready to import your DAE file. Before you do, though, we need to take a look at the project structure and how Apple expects you to do things.
Your SceneKit Files
As you can see in Figure 11.5, these are the main components of your new SceneKit project:
■ AppDelegate.swift: This is where you will get system-level updates, such as applicationWillTerminate, which is called when an application is about to terminate. At that time, you need to save all your data so you don’t lose anything.
■ art.scnassets: This is where Apple expects you to put all your DAE files. It’s where you will put your assets in this chapter.
■ GameViewController.swift: This is where Apple has written all of its game logic for the demo app. It connects to the Main.storyboard SCNView so that you can display your code on the screen. You can separate the game logic into more than one file. In fact, unless this game is a tiny itsy little one, then in order to create reusable assets, it is crucial that you organize your code well.
■ Main.storyboard: This is where your one storyboard asset (SCNView) will sit. This asset will connect to GameViewController.
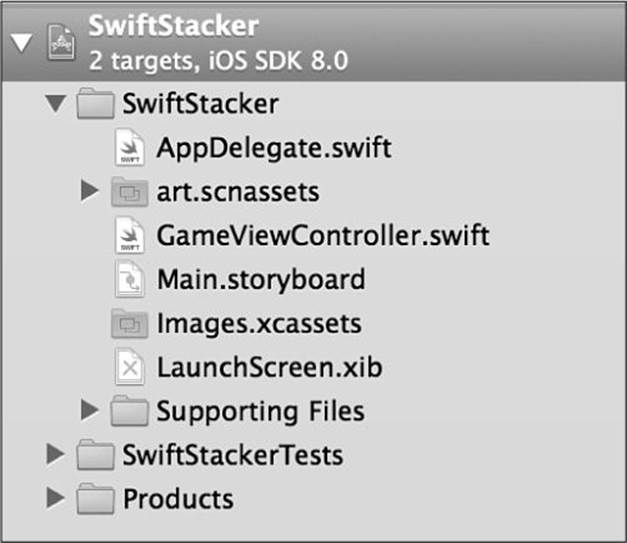
Figure 11.5 The new SceneKit project.
We don’t need to talk about the rest of the files right now. You have your launch screen, which you can play around with, and you have Image.xcassets, which you can use if you decide to combine SpriteKit with SceneKit. You can create really nice GUIs for your SceneKit game by using SpriteKit on top of SceneKit.
Take a look at Main.storyboard, and you will notice that it is one screen with a giant black rectangle in the middle. Click that big black rectangle and select the Identity inspector. You should see that the class is set to SCNView.
Setting the Stage
SceneKit is set up much like a play in real life. When you go to see a play, from your seat you see a giant stage. This is represented in SceneKit by the SCNView. Currently there is nothing/no one on the stage, and there won’t be until the play starts. When you run the application, the actors will enter the stage. In SceneKit, the actors are called nodes, and they are represented with the type SCNNode. All the SceneKit stuff starts with the prefix SCN. Everything that is added is of type SCNNode. For the most part, each camera, light, and other object on the stage is represented by a SCNNode. (Well, this isn’t completely true, but it’s a good way to think about it. In reality, you have the SCNCamera to represent a camera, which is not an SCNNode, but it gets attached to an SCNNode.)
Importing the Assets
Now you are ready to bring your COLLADA into Xcode. It’s easiest if you open this directory in your Finder to do this:
1. Open Finder and navigate to your project. (For example, my project is located in ~/projects/SwiftStacker/.)
2. Open the SwiftStacker/art.scnassets/ directory.
3. Delete your current assets as you will not be using them for this tutorial.
4. Grab the DAE file from http://goo.gl/Bosq5l.
5. Move the DAE file and move into the art.scnassets directory.
Now you should be able to go into Xcode and view your asset. In Xcode, you can expand the art.scnassets directory and click on stuff.dae. You will get a nice menu that looks like the one shown in Figure 11.6.
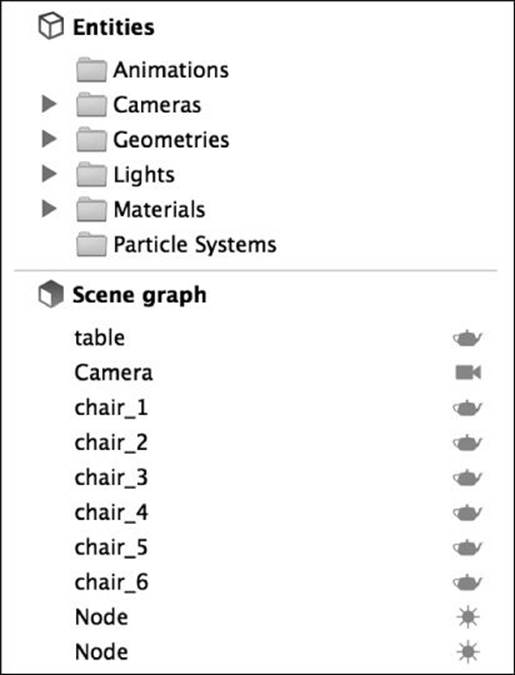
Figure 11.6 The Xcode 3D editor.
Notice that you have a list of all the objects in the scene. You have the table, camera, all the chairs, and two light nodes. The way you can tell that’s a light is the symbol to the right is a little sparkly icon. You can rename a node by double-clicking its name. You will reference the names shown here in your code, so make sure these names are clear so you can easily associate them with their behavior.
This is a good time to talk about some 3D lingo. When you select one of the chairs, you will see its different properties pop up on the right side. If you click the Material inspector (the last icon on the right), you get info about the material.
Material Properties
When you open the Materials tab, you will see that it has lots of information on the different material properties. Let’s talk about each one:
■ Diffuse: This is the closest you can get to saying “the color of the object.” More specifically it is the color the object reveals equally from all directions, from each point on the material’s surface. A diffuse map, meaning an image, can be applied. This image will show directly on the surface of the object. Often, if it is a complex image, it must be mapped properly before being brought into Xcode.
■ Ambient: This property makes it look as if light is hitting your object from all directions equally. For the ambient color of a material to be visible, you must have at least one light with a non-black ambient color. In the case of your app, that light type is SNCLightTypeAmbient.
■ Specular: This is the shininess of your object. This property forms a glossy or bright highlight on the surface of an object. You must set a value of one of the lights to something other than black in order to see any shine. By default, the specular property is set to black, which means no shine, or dull. White appears as shiny. You can apply a specular map, meaning an image that tells the object where to appear shiny.
When the specular map in Figure 11.7 is applied, the parts that get covered in black will become dull and non-shiny, and the parts covered in the white will become shiny.

Figure 11.7 A ridiculously simple specular map.
■ Normal: This is a make-believe line that is perpendicular to the surface of a polygon. You can imagine that you have tons of normals on your object, all pointing in the direction of the average of the vertices of each triangle (see Figure 11.8).
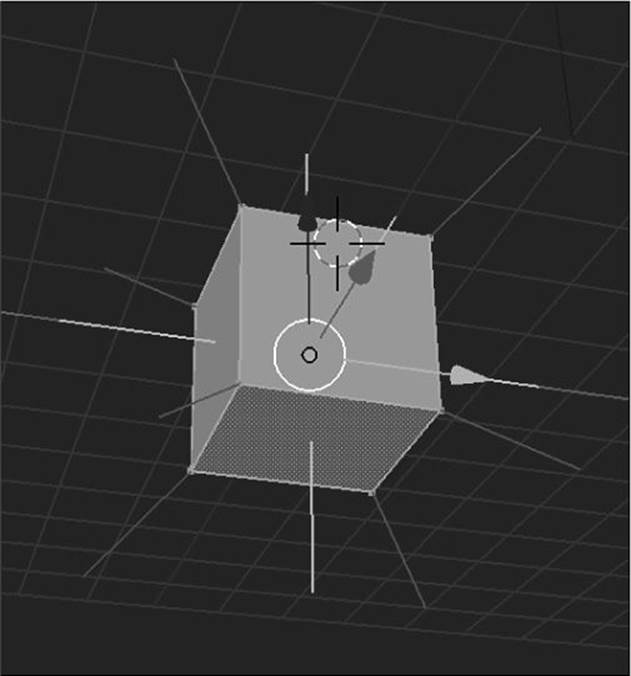
Figure 11.8 The little lines are the normals as seen from Blender.
In Figure 11.8, you can see the direction that the normals are pointing at the vertices of each triangle. You cannot directly see each triangle but they are there. You can change the direction of these normals all at once by using a normal map (otherwise known as a bump map). When the normal map is applied, you can fake the lighting of bumps and dents. You can use this to add a lot of detail without adding extra polygons. This is great for making a simple polygon appear as if it has much more detail.
For example, when the normal map shown in Figure 11.9 is applied to a sphere, it looks as shown in Figure 11.10.
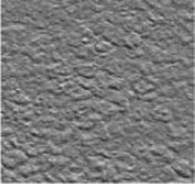
Figure 11.9 A normal map to give your object the appearance of wrinkled paper or stucco.
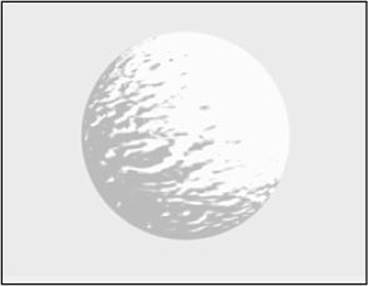
Figure 11.10 This is the normal map from Figure 11.9 applied to a sphere.
■ Reflective: Reflective causes an object to reflect the environment around it. You have to provide it with an image to reflect. SceneKit does not render real-time reflections of objects in the scene.
■ Transparent: You use this property to provide a map that shows what part of the material will be transparent.
■ Emission: You can provide SceneKit with an emission map (that is, an image that describes the emission). Emission maps tell SceneKit which parts of the object should glow with their own light source.
■ Multiply: After you add all the needed properties of the materials listed previously, you can multiply the color of each represented pixel by the color of this property.
Making the Game
With your newfound knowledge you can create your initial scene. You can start by opening up GameViewController.swift and removing some of the default code. Rewrite viewDidLoad to look like this:
var scene:SCNScene!
override func viewDidLoad() {
super.viewDidLoad()
screenWidth = self.view.frame.size.width
screenHeight = self.view.frame.size.height
// create a new scene
scene = SCNScene()
// retrieve the SCNView
scnView = self.view as SCNView
// set the scene to the view
scnView.scene = scene
// allows the user to manipulate the camera
scnView.allowsCameraControl = true
// show statistics such as fps and timing information
scnView.showsStatistics = true
// configure the view
scnView.backgroundColor = UIColor.whiteColor()
//setup delegate
scnView.delegate = self
scnView.pointOfView = blockCam
addFloor()
addLevel()
addBlock()
}
In your SceneKit app, the viewDidLoad function will get called when the view is ready. It’s like saying creation is complete, and you can start programming. You’ll always call the super viewDidLoad function so that the UIViewController that you inherit can do all the initial loading it needs to do. (Make sure you call that; if you don’t, you might get some unexpected results.)
While you’re here, you can add some global variables to the top of the code. (You won’t use them all right away, but you might as well put them in so you won’t get errors later.) Add these global variables right underneath the class declaration:
var floor:SCNNode!
var block:SCNNode!
var scene:SCNScene!
var scnView:SCNView!
var blockCam:SCNNode!
var screenWidth = CGFloat()
var screenHeight = CGFloat()
var blockCamRot:SCNVector4!
Then you load the DAE file by calling the SCNScene initializer, which takes the name of the COLLADA file as a named parameter.
You need to grab a reference to the view that you added in the storyboard. Every UIViewController has its own view that it can reference at any time. That’s why it’s called a view controller: It has a view that it is controlling. You can grab the view of your view controller by using self.view.
Now you can set the scene that your view will be displaying, by saying scnView.scene is equal to the scene you created above by file reference.
Then you set some basic properties of the scene, like allowsCameraControl, which gives you control over the camera. The really cool thing is that you do not have to create and position a camera yourself. You don’t have to do this because my awesome artist Josh added his own camera in the DAE file. You can now take control of the camera that was added for you. You will be able to control its position, rotation, and so on.
You use showsStatistics to add some tiny little statistics to the bottom of the app specifically for debugging purposes. You need to remove those before you release your app to the general public. You also set the background color of the app to be white with scnView.backgroundColor.
At this point, you can run your app, and you should see it running on your iPad or the simulator.
Note
Often a SceneKit game may render pretty slowly on the simulator (even on a super-fast computer), but when you run it on an actual device, it runs very smoothly. You should test your SceneKit games on an actual device if you want realistic results. Of course, using the simulator will work, but you shouldn’t be too shocked if it doesn’t perform as fast as you expect it to.
At first your LaunchScreen.xib will run, showing the user a default launch screen that came with the app. Feel free to play around with the launch screen to make it perfect for this app. Then the app will load and show the scene. If yours doesn’t load for some reason, check that the name you provided in the art.scnassets directory matches the name written in your code.
Adding a Floor
Now you can add a floor to your game. SceneKit has a special geometry class made just for this purpose. SCNFloor is an infinite floor to add to your scene. You can get the texture for this floor from http://goo.gl/8YTY5z.
Here’s the code you add for the floor:
func addFloor() {
var floorGeo = SCNFloor()
floorGeo.reflectionFalloffEnd = 0
floorGeo.reflectivity = 0
floor = SCNNode()
floor.geometry = floorGeo
floor.geometry?.firstMaterial?.diffuse.contents = "art.scnassets/wood.png"
floor.geometry?.firstMaterial?.locksAmbientWithDiffuse = true
floor.geometry?.firstMaterial?.diffuse.wrapS = SCNWrapMode.Repeat
floor.geometry?.firstMaterial?.diffuse.wrapT = SCNWrapMode.Repeat
floor.geometry?.firstMaterial?.diffuse.mipFilter = SCNFilterMode.Linear
floor.physicsBody = SCNPhysicsBody(type: SCNPhysicsBodyType.Static, shape: nil)
floor.physicsBody!.restitution = 1.0
scene.rootNode.addChildNode(floor)
}
This function is called from the viewDidLoad method. Here you create a new SCNFloor. This is the basic geometry model that the floor node will contain. Every SCNNode has its own geometry. You can create it on the fly, using a DAE file. You can also use one of the included classes. In this case, you are going to use the class that’s available to you. When you do this, you can set the reflection level so that it’s not reflective. Then you create the new floor node using a regular SCNNode. Take the geometry that you made and attach it to this node.
You set the floor to have a texture like the wood image. You do this by using diffuse, which is essentially what you would call the visible color or texture of your object. You set that wooden pattern to repeat on both the X and Y, otherwise known as wrapS and wrapT. You set a physics body for the floor. By creating a physics body and attaching it to the node itself, you automatically put physics into motion. There are three types of physics bodies that you should be concerned with. You use a static physics body here, which means that this is like an immovable object, just like a real floor is considered immovable. A ball that would balance against the floor would be considered movable, and that physics body would be set as dynamic. You set the restitution for the physics body to make the ground a little bit bouncy. Finally, you add the floor to the scene.
Adding the Level
Next, you will add a level that your ball or block or hero can run and play on. You are going to use a random function to place the blocks differently every time—similar to the way that Minecraft does it. This function is not nearly as complex as the Minecraft function. Here it is:
func addLevel() {
var last:SCNNode!
var blockWidth = CGFloat(2)
var numberOfBlocks = 100
for n in 1...numberOfBlocks {
var chosenDirection = BlockDirection.getRandomDirection()
var blockGeo = SCNBox(width: blockWidth, height: blockWidth, length:
blockWidth, chamferRadius: 0)
var block = SCNNode(geometry: blockGeo)
var lastPos:SCNVector3 = SCNVector3(x: 0, y: 0, z: 0)
if last != nil {
lastPos = last.position
}
switch(chosenDirection){
case .Top:
block.position = SCNVector3(x: lastPos.x, y: lastPos.y + 1, z: lastPos.z)
case .Right:
block.position = SCNVector3(x: lastPos.x + 1, y: lastPos.y, z: lastPos.z)
case .Left:
block.position = SCNVector3(x: lastPos.x - 1, y: lastPos.y, z: lastPos.z)
case .Front:
block.position = SCNVector3(x: lastPos.x, y: lastPos.y, z: lastPos.z + 1)
case .Back:
block.position = SCNVector3(x: lastPos.x, y: lastPos.y, z: lastPos.z - 1)
}
last = block
block.physicsBody = SCNPhysicsBody(type: SCNPhysicsBodyType.Static,
shape: nil)
if n == numberOfBlocks {
// last block
block.name = "GOAL"
}
self.scene.rootNode.addChildNode(block)
}
}
You start the add-level function by creating a variable that will hold the last block placed. Obviously, this will be nil to start with. You set a variable for the block width, which you can play around with at your own convenience. You also set a variable that contains the number of blocks, which you can also play around with (and I encourage you to do so). You start a loop that goes from 1 to the number of blocks, which in this case is 100.
Placing Each Block
You want to place one block at a time in a loop. You get a random direction by creating an enumeration of different directions. To make this happen, place this code above your viewDidLoad function, inside the game class:
enum BlockDirection {
case Left, Right, Front, Back, Top
static func getRandomDirection() -> BlockDirection {
var directions = [Left,Right,Front,Back,Top]
var range = UInt32(0)..<UInt32(directions.count - 1)
return directions[Int(range.startIndex + arc4random_uniform(range.endIndex -
range.startIndex + 1))]
}
}
This enumeration contains all the different directions in which you could place a block. You are placing a block in reference to the previous block. (You are not going to place any blocks on the bottom, so you leave out the bottom.) The static function grabs one random direction and returns it. It uses a special function arc4random_uniform that is especially fast. You can reuse this function for getting random numbers anytime you need it. Just replace the zero with your starting index.
You start by creating a box that the user can move around with his or her fingers. You create the geometry for that box as you did before, and then you add that geometry to a node. Because this is the first block in the loop, you set the last position so that you have one that is not nil.
You then create a switch statement based on the chosen direction that was given to you randomly. The five choices are all very similar except that each adds a block in the direction chosen, so that the block will be in a different position than the previous block. If, for example, top is chosen, a block will be placed above the previous block. If right is chosen, a block will be placed to the right of the previous block. If left is chosen, a block will be placed to the left of the previous block. You get the idea. SCNVector3 is a special type for SceneKit—basically just an object with an X, Y, and Z points, with some special functionality for 3D. Finally, you save this last block that you just created so that the next time you know where the previous block is.
You add a physics body to this block to make it stationary, by setting the body type as static. You grab the last block and name it GOAL. You then add the block to the scene and then go through the loop again.
Creating a Hero
You can now add the custom functionality to create the hero that will move around the screen. You need some Objective-C code to make this work, so you will create a bridging header. Right-click your main project and add a new .h and .m file named SIMDHelper. Swift will ask whether you want to have it automatically create a bridging header file for you, and you should definitely say yes. When this file is created, some settings will be applied to your project so that the file is referenced properly.
Bridging the Gap to Objective-C
Swift allows you to bring in Objective-C code and use it directly in your Swift code. You can create classes, enums, and structs—and anything else you want. If something is not available in Swift that is available in Objective-C, you can easily make it available yourself by bridging. In this case, you want to add a low-level library called SIMD.h to your game. But before you can add it, you need to bridge it to Swift. In SIMDHelper.h, add the following content:
#import <Foundation/Foundation.h>
#import <SceneKit/SceneKit.h>
#import <simd/simd.h>
@interface SIMDHelper : NSObject
{
}
+ (SCNVector3) vector_maker:(float)followMeX :(float)followMeY
:(float)followMeT :(SCNVector3)cameraSCNVector3 :(float)cameraDamping;
@end
Here you create a header file, which will allow you to use a type called vector_float3, which has not been implemented in Swift. You now need to write the function you created previously in your implementation file. Open SIMDHelper.m and add the following content:
#import "SIMDHelper.h"
#import <Foundation/Foundation.h>
#import <simd/simd.h>
@implementation SIMDHelper
+ (SCNVector3)vector_maker:(float)followMeX :(float)followMeY
:(float)followMeT :(SCNVector3)cameraSCNVector3 :(float)cameraDamping {
vector_float3 targetPos = {followMeX, followMeY, followMeT};
vector_float3 cameraPos = SCNVector3ToFloat3(cameraSCNVector3);
cameraPos = vector_mix(cameraPos, targetPos, (vector_float3)(cameraDamping));
return SCNVector3FromFloat3(cameraPos);
}
@end
Here you create a target X, Y, and Z (labeled T for vector_float3) and convert it to SCNVector3 by using a special function. In this case, you could write this entire thing in Swift if you were a little bit creative. But the point is that this code library was not available in Swift, and you are making it available through the bridging header. This code allows the camera to follow the hero.
Open up your bridging header file and add the following content if it doesn’t already exist:
#import "SIMDHelper.h"
Swift looks at this file and imports all the headers in it. In your Swift code, you don’t need to make any changes.
To recap, you imported some Objective-C files into Swift by using a bridging header. You needed three files in all. One is the regular header for your class, one is an implementation file that contains the actual function you want to run, and the third is the bridging header, which Swift will look at when it needs to pull in code from Objective-C. Now Swift will know that it should pull classes from that header file. You could fill this header file with as many classes as you need. The bridging between Objective-C and Swift that Apple does in order to make other classes available to you is probably done in a similar fashion. You really have a lot of control over what is available to you with this method. Even if everything is not yet implemented into Swift, you can implement it yourself.
Back to the Hero
You can now add code to add the hero to your game. The following code uses a block or a sphere, but you can use whatever you would like:
func addBlock() {
var blockGeo = SCNBox(width: 1, height: 1, length: 1, chamferRadius: 0)
block = SCNNode()
block.geometry = blockGeo
block.geometry?.firstMaterial?.diffuse.contents = UIColor.redColor()
block.physicsBody = SCNPhysicsBody(type: SCNPhysicsBodyType.Dynamic,
shape: SCNPhysicsShape(geometry: blockGeo, options: nil))
blockCam = SCNNode()
blockCam.position = SCNVector3Make(0,14,10);
blockCam.rotation = SCNVector4Make(Float(1.0), Float(0.0), Float(0.0),
Float(-M_PI_4*0.75));
blockCamRot = blockCam.rotation
blockCam.camera = SCNCamera()
blockCam.camera!.xFov = 75
blockCam.camera!.zFar = 500
scene.rootNode.addChildNode(block)
scene.rootNode.addChildNode(blockCam)
}
Again, you start by creating the geometry, and you are free to use whatever geometry you like. You then create the node and add the geometry to the node. You add some color to the block or ball by setting the diffuse property. You tell Swift that you want this block to interact with the physics world. You also tell Swift that it should be a dynamic body.
You then set up a camera to follow the hero. You set an initial position for the camera, and you set a couple properties. xFov tells how far the camera can see on the X axis. (Fov stands for field of vision.) zFar tells how far out you are able to see.
You finish up by adding the hero and the camera to the scene. Make sure you don’t add your camera to your hero. If you do, you are going to get a very shaky ride.
Adding the Controls
You can now add some rudimentary controls so that the hero is able to move around when a player touches the screen. You could do this by using the accelerometer, and you could also do it by using screen tapping or swiping. In this case, you will use screen tapping for now. Add the following code to the bottom of your viewDidLoad method, and note that it includes some commented code for handling swipes in two different directions:
let gestureRecognizers = NSMutableArray()
let tapGesture = UITapGestureRecognizer(target: self, action: "handleTap:")
tapGesture.numberOfTouchesRequired = 1
let twoTapGesture = UITapGestureRecognizer(target: self, action: "handleTwoTap:")
twoTapGesture.numberOfTouchesRequired = 2
// let swipeLeftGesture = UISwipeGestureRecognizer(target: self,
action: "handleSwipeLeft:")
// swipeLeftGesture.direction = .Left
//
// let swipeRightGesture = UISwipeGestureRecognizer(target: self,
action: "handleSwipeRight:")
// swipeRightGesture.direction = .Right
//
// gestureRecognizers.addObject(swipeLeftGesture)
// gestureRecognizers.addObject(swipeRightGesture)
gestureRecognizers.addObject(tapGesture)
gestureRecognizers.addObject(twoTapGesture)
scnView.gestureRecognizers = gestureRecognizers
Here you see how to add gesture recognizers to the app. You can see that I left in two gesture recognizers and commented out two of them. The way it works is you create the individual gesture recognizers themselves and add them to an array. You then take that entire array and set it as the set of gesture recognizers for the entire view. You have a single one-finger tap and a single two-finger tap set here. The way that you are able to set how many fingers are required for the tap is by setting the property of the gesture recognizer numberOfTouchesRequired. These will trigger only if the number of fingers set touch at the same time. One finger will move the hero, and two fingers will make the hero jump. Here’s how you add those two functions to the code, along with the listeners for the swipe-left and swipe-right functions that you might choose to use later:
func handleSwipeLeft(gestureRecognizer:UIGestureRecognizer) {
}
func handleSwipeRight(gestureRecognizer:UIGestureRecognizer) {
}
func handleTap(gestureRecognize: UIGestureRecognizer) {
moveBlock(gestureRecognizer: gestureRecognize)
}
func handleTwoTap(gestureRecognize: UIGestureRecognizer) {
block.physicsBody?.applyForce(SCNVector3(x: 0, y: 4, z: 0), impulse: true)
}
The best way I’ve found to move a body is to apply a force to it. You don’t want to change the velocity directly because you’ll get a very jerky motion. If you just apply some sort of force to the object, though, it will figure out all the physics on its own. The tapping functionality is complicated, so you put it in its own function:
func moveBlock(#gestureRecognizer:UIGestureRecognizer) {
let p = gestureRecognizer.locationInView(scnView)
let halfScreenWidth = screenWidth / 2
let halfScreenHeight = screenHeight / 2
var directionX = (screenWidth/2) - p.x
var directionY = (screenHeight/2) - p.y
var perc = CGFloat()
if directionX < 0 {
directionX = fabs(directionX)
perc = directionX / halfScreenWidth
if directionY < 0 {
directionY = fabs(directionY)
perc = directionY / halfScreenHeight
block.physicsBody?.applyForce(SCNVector3(x: 1, y: 0, z: 1),
impulse: true)
} else {
block.physicsBody?.applyForce(SCNVector3(x: 1, y: 0, z: -1),
impulse: true)
}
} else {
if directionY < 0 {
directionY = fabs(directionY)
perc = directionY / halfScreenHeight
block.physicsBody?.applyForce(SCNVector3(x: -1, y: 0, z: 1),
impulse: true)
} else {
block.physicsBody?.applyForce(SCNVector3(x: -1, y: 0, z: -1),
impulse: true)
}
}
}
This is just an implementation of moving the hero around. What you do first is get the point that the user tapped on the screen. You divide the screen into four sections, similar to folding a paper in half and then in half again. You will watch where the user clicks on the screen and move the hero in that direction. You get a percentage of how far the user clicked on that side so that you can move the hero further in that direction. If the direction X is less than zero, then you know that the user clicked on the left side. (Everything having to do with X is on the left and right sides.) So you can declare that the user clicked on the left side.
Within that left- and right-side functionality, you can make a decision about whether the user clicked on the top or the bottom of the left side or right side. So if the direction is less than zero, you know that the user clicked on the top half of the screen. You use the special little function fabs, which gets the absolute value of a float. The absolute value means that if the float is negative, it will be positive, and if it’s positive, it will still be positive.
Now that you know the finer details of where the user clicked on the screen, you can get the percentage of how far the user is in that section of the screen and apply force to the object according to that direction. In the else section of the code, you check whether the user clicked on the other side of the screen, but everything else is the same. Figure 11.11 shows what your scene will look like.
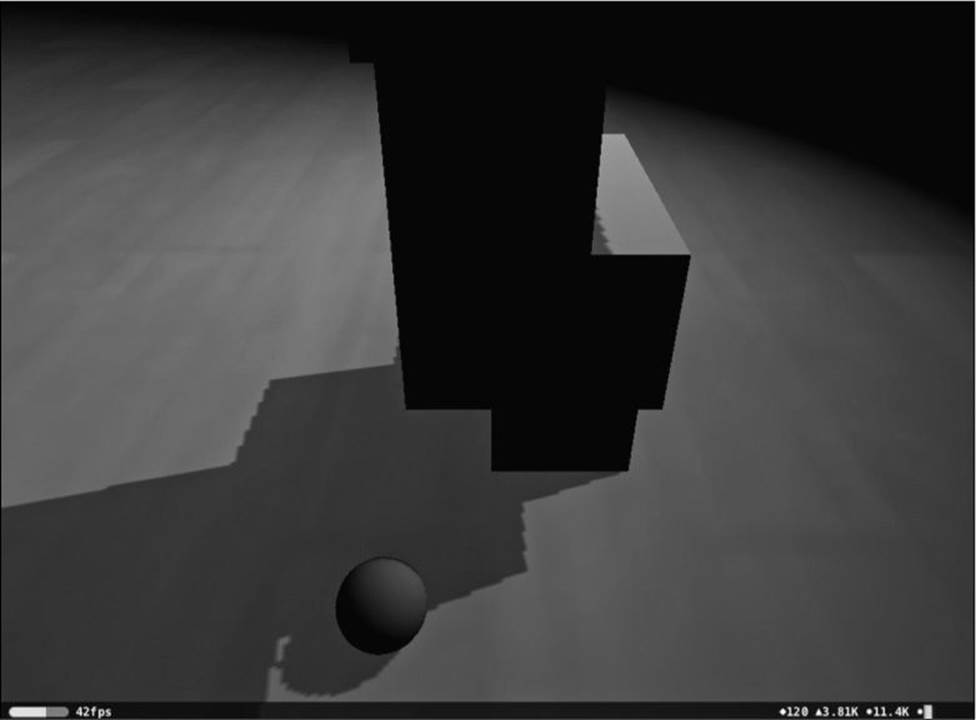
Figure 11.11 Your SceneKit game.
Summary
In this chapter, you created a basic scene, and you can now move the hero around in it. You created a floor and a bunch of blocks that randomly generate, and you made it possible for the ball to jump off those blocks. You created an initial camera view, and you cast shadows and allowed physics to do its thing. If you had used a DAE file in this example, you could have utilized and controlled the artist’s cameras and lighting.
SceneKit is a super-high-level framework that gives you control over a bunch of low-level features. The editor that comes with Xcode 6 can actually edit your files, which you can then resave and redistribute. It’s not meant for heavy editing, but it is a very realistic option to use. You’ve seen that without writing much code at all, you can create a full-fledged game.
A physics library is completely built in to SceneKit and doesn’t need any configuration at all. If you’ve ever worked with 3D in the past, you know how complicated it can be even to just set it up. 3D has a completely unique lingo, which brings a slight learning curve. Although the terminology can be very confusing, SceneKit is almost as easy to use as SpriteKit. It’s almost exactly the same—but with one extra dimension. Thankfully, Apple takes care of all the memory management and garbage collection in Swift. You can write an entire game with fewer than 50 lines of code.
Blender is an easy-to-use 3D editing tool that you can get going on your own in a small amount of time. (Another tool you could use is SketchUp, which is even easier to use and can export DAE files.) Blender also has the levels of complexity you need built in, so there’s no stopping you from making anything you want. The scene you created in this chapter is able to run at more than 40 frames a second. You could organize the game into multiple classes to make it more reusable.