Learning Swift Programming (2015)
4. Structuring Code: Enums, Structs, and Classes
This chapter covers the basic structural methods of Swift: enums, structs, and classes. With these tools, you are able to more easily organize your code for reuse. You will find yourself typing less code when using these tools properly. Structs, enums, and classes are similar to functions in that they allow you to group some code together for reuse. They are different from functions because they can contain functions.
If you are familiar with Objective-C, C, C++, or Java and other languages, you should know about enums as they are a part of many languages. You write typedef because in Objective-C and C (but not C++), you have to always precede an enum with the word enum. You create a typedef to make a shortcut to the enum to reduce the typing. In Swift, you use enum types any time you need to represent a fixed set of constants, including things like the planets in our solar system. You use it in situations where you know all the possible values—for example, menu options or command-line options.
Structures and classes have a lot of similarities in their intended functionalities. Structs, enums, and classes can have methods, which are functions within the enum, struct, or class. These methods provide that specific object with something it can do. Methods are doers. Methods (which you can think of as functions within classes, structs, or enums) give you some information about the object.
Structs and classes are very similar in that they contain a design for representing objects. The big difference is that structs are always created new or copied when passed around, and classes are passed around by reference. If your friend wanted to borrow something from you, you would definitely lend it to him because you two are best buds. If that to-be-borrowed something were a struct, you would have to pull out the 3D printer and print your friend a brand-new one and hand it over. If that something were a class, you would give your friend a card that told exactly where to find that something anytime he looked for it.
Enums
Enums, structs, classes, and protocols are all written in a very similar way. Here is how you create an enum for the suits in a deck of cards:
enum Suit {
//... enum implementation goes here
}
You should choose a singular name (not plural) for the enum—like Suit in this case. You write the word enum and then give the enum a name and write a pair of curly brackets. The enum implementation goes inside the curly brackets. Here is a simple enum that declares all possible suits in a deck of cards:
enum Suit {
case Hearts
case Clubs
case Diamonds
case Spades
}
Now you can declare Suit.Clubs:
var thisCardSuit = Suit.Clubs
Now thisCardSuit is of type Suit. Each one of the choices is called a “member” of the enum. Each member is a constant and cannot be changed. You want to name your enums so they are easily read. When you read the preceding declaration, you can think of it as saying. “This card suit is a suit which is clubs” (or simplified to “This card suit is clubs”), which reads like a sentence.
If the variable you declare is already declared as a type Suit, you do not have to write the full name of the enum. You can use this instead:
var thisCardSuit:Suit // declaring the type suit.
thisCardSuit = .Clubs // Because suit is declared, we don't need to write
Suit.Clubs // Just .Clubs
Notice how you can just write .Clubs. A good example of this is UIImagePickerControllerSourceType, which you use when allowing the user to choose an image from either the camera (to take a picture right now), saved photo albums, or the photo library. If you were to create a function that took a UIImagePickerControllerSourceType as a parameter, then you could pass it just .Camera, like this:
func showImagePickerForSourceType(imageView:UIImageView,
sourceType:UIImagePickerControllerSourceType) {...
...
}
showImagePickerForSourceType(imageView, .Camera)
In this example, you can pass the function .Camera because it knows that sourceType must be of type UIImagePickerControllerSourceType.
Which Member Was Set?
After the sourceType for UIImagePickerControllerSourceType is set, how do you figure out which enum value was set? You use a switch statement. Let’s go back to the suits in the deck of cards example. You will reuse the thisCardSuit variable like so:
switch thisCardSuit {
case .Hearts:
println("was hearts")
case .Clubs:
println("was clubs")
case .Diamonds:
println("was diamonds")
case .Spades:
println("was spades")
}
// was clubs
Of course, this switch statement must be exhaustive (see Chapter 1, “Getting Your Feet Wet”). This example prints out was clubs.
Associated Values
You will often want to associate a value with a member of an enum. Having the member itself is helpful, but sometimes you need more information. Here’s how you could create a Computer enum to get an idea of what I mean:
enum Computer {
//ram and processor
case Desktop(Int,String)
//screen size, model
case Laptop(Int, String)
//screen size, model, weight
case Phone(Int, String, Double)
//screen size, model, weight
case Tablet(Int, String, Double)
}
var tech:Computer = .Desktop(8, "i5")
Here you have made a computer that is of type Computer, with a value of Desktop, with 8 GB of RAM and an i5 processor. Notice how you can give each member value different required associated values. Desktop has Int, String, while Phone has Int, String, and Double. To use this Computer enum in a theoretical app, you would make the user choose a technology. You could have her choose between a desktop, laptop, phone, or tablet. After she chooses, you could specify the RAM and processor. If she chose a desktop, she would provide the screen size and model. If she chose a laptop, phone, or tablet, then she would provide the size, model, and weight.
Now you can check the selected tech value by using a switch statement and simultaneously grab the associated values:
switch tech {
case .Desktop(let ram, let processor):
println("We chose a desktop with \(ram) and a \(processor) processor")
case .Laptop(let screensize):
println("We chose a laptop which has a \(screensize) in screen")
default:
println("We chose some other non important computer.")
}
You see here that you can grab the associated values out of the chosen Computer member by assigning a constant using let. Notice that you have to write let twice if the enum member has multiple associated values. Of course, there is a shorthand way to write this without writing let twice. Here’s a more concise way:
switch tech {
case let .Desktop(ram, processor):
println("We chose a desktop with \(ram) and a \(processor) processor")
case let .Laptop(screensize):
println("We chose a laptop which has a \(screensize) in screen")
default:
println("We chose some other non important computer.")
}
By placing the keyword let after the keyword case and before the member, you can declare two constants at once. This makes for cleaner code.
Raw Values
Raw values are different from associated values. You cannot have two of the same raw values in an enum. Raw values also all use the same type. You can use strings, ints, or any floating-point types. When you use ints, the value automatically increments for you. For example, say that you use ints as the raw value type. Since the raw value will automatically increment, you can use a shorthand way of declaring enum members on one line:
enum Suit:Int {
case Clubs = 1, Hearts, Diamonds, Spades
}
var chosenSuit = Suit.Diamonds
Here you declare the raw value type by adding a colon (:) next to the enum name and writing the type. This is similar to declaring a type for a variable or constant. This example uses Int so the value will auto-increment. When you declare a raw value for the enum, you can grab that raw value out of the variable by using .toRaw():
chosenSuit.toRaw() // 3
The raw value of Diamonds is 3 because of the auto-increment. Clubs is 1, Hearts is 2, Diamonds is 3, and Spades is 4.
Play around with this and change Clubs to any integer you want. Try changing it to 100, or -10, or 0. It still auto-increments perfectly.
You can use fromRaw() to do the opposite of toRaw() by getting the raw value from an integer (or whatever type your enum is). fromRaw() returns an optional of type Suit. Why is it an optional? You might try to grab the member with a raw value of 4000, and that would not exist. However, because fromRaw() gives a suit (in an optional), it’s helpful to compare it to something rather than just print it out. Here’s what it looks like:
Suit.fromRaw(3) == chosenSuit // true
You can then use value binding to find the member for the raw value:
enum Suit:Int {
case Clubs = 1, Hearts, Diamonds, Spades
}
var result = "Don't know yet."
if let theSuit = Suit.fromRaw(3) {
switch theSuit {
case .Clubs:
result = "You chose Clubs"
case .Hearts:
result = "You chose hearts"
case .Diamonds:
result = "You chose diamonds"
case .Spades:
result = "You chose spades"
}
} else {
result = "Nothing"
}
result // You chose diamonds
Here you have to do value binding for fromRaw() because it is an optional and could have been nil. Once you get theSuit out of the value binding, assuming it’s not nil, you can use your normal switch statement to find the chosen suit. Notice that the result variable was successfully changed even though you scoped it through the if and switch statements.
Structs
Structs (which is short for structures) are copied when they’re passed around. Classes are passed around by reference. This means that you will never have the same instance of a struct. Conversely, you can have multiple instances of the same class.
Here is what classes and structs have in common:
■ Both define properties to store values.
■ Both define methods to provide functionality.
■ Both provide subscripts to give access to their values.
■ Both provide initializers to allow you to set up their initial state.
■ Both can be extended to provide additional functionality beyond a default implementation. (This is different from inheritance.)
■ Both have the ability to conform to protocols (which you will learn about in Chapter 8).
Note
Do not worry too much if you don’t understand everything in these lists. You will understand it all by the end of this chapter or in later chapters.
The following are the differences between classes and structs:
■ Classes have inheritance.
■ Classes have type checking.
■ Structs have deinitializers so you can free up unused instances.
■ Structs have reference counting. You can have more than one reference to a class instance.
Here’s an example of a simple struct:
struct GeoPoint {
var lat = 0.0
var long = 0.0
}
This defines a new struct of type GeoPoint. You give the struct two properties and declare them as doubles. (Even though you don’t see any explicit type declaration, it is happening because 0.0 is inferred as a double.)
Now you can use the new struct. If you want to interact with the GeoPoint struct, you must create a GeoPoint instance:
var somePlaceOnEarth = GeoPoint()
Now you can interact with the new GeoPoint struct, using the dot syntax:
somePlaceOnEarth.lat = 21.11111
somePlaceOnEarth.long = 24.232323
Notice that when you created a new GeoPoint struct, the code completion gives you the option to initialize it with properties (see Figure 4.1).
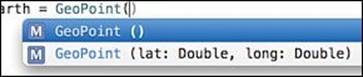
Figure 4.1 Code complete for GeoPoint shows multiple initializers.
You can also write the last three lines as one line:
var somePlaceOnEarth = GeoPoint(lat: 21.1111, long: 24.23232)
Defining Methods in Structs
When we say methods, we are talking about the functions within structs. Methods are just functions that are going to be associated with the structs. By defining a method within the curly brackets of a struct, you are saying that this function belongs to this struct.
Here’s an example of a struct with Point, Size, and Rect, which will based on CGRect:
struct Point {
var x:Int, y:Int
}
struct Size {
var width:Int, height:Int
}
struct Rect {
var origin:Point, size:Size
func center() -> Point {
var x = origin.x + size.width/2
var y = origin.y + size.height/2
return Point(x: x, y: y)
}
}
The first thing to note is that you declared all the variables on one line. You can use this simplified version of declaring variables where it makes your code more readable. For example, this:
var one = 1,two = 2, three = 3
is the same as this:
var one = 1
var two = 2
var three = 3
You might also notice that you set types for the properties explicitly (for example, origin:Point, size:Size). You did not give your properties any default values so Swift would be unable to determine the types of these properties.
However, because you did not give Rect any default value, Swift will complain. If you try to make a new Rect without any default values in the initializer, you will get an error:
var rect:Rect = Rect() // error: missing argument for parameter 'origin' in call
Swift does not like that you did not initialize the properties in the struct itself and did not initialize the properties upon making a new Rect.
The initializer included with every struct is called a memberwise initializer. Memberwise initializers are part of a much larger concept that we won’t cover here. When creating a Rect, you can use the memberwise initializer to get rid of the error:
var point = Point(x: 0, y: 0)
var size = Size(width: 100, height: 100)
var rect:Rect = Rect(origin: point, size: size)
rect.size.height
rect.center()
That’s better! Since you used the memberwise initializers when constructing Point, Size, and Rect, you no longer get errors. Here you also used the center() method of the Rect, and it told you that the center of the Rectis {x 50 y 50}.
Structs Are Always Copied
Earlier we talked about how structs are always copied when they are passed around. Let’s take a look at an example that proves this, using the Point struct because it’s super simple:
var point1 = Point(x:10, y:10)
Now you can create point2 and assign it to point1:
var point2 = point1
You modify point2:
point2.x = 20
Now point1 and point2 are different:
point1.x // 10
point2.x // 20
If point1 and point2 were classes, you would not get different values because classes are passed by reference.
Mutating Methods
If a method inside a struct will alter a property of the struct itself, it must be declared as mutating. This means that if the struct has some property that belongs to the struct itself (not a local variable inside a method) and you try to set that property, you will get an error unless you mark that method as mutating. Here’s a struct that will throw an error:
struct someStruct {
var property1 = "Hi there"
func method1() {
property1 = "Hello there" // property1 belongs to the class itself
so we can't change this with making some changes
}
// ERROR: cannot assign to 'property1' in 'self'
}
The fix for this error is simple. Just add the word mutating in front of the func keyword:
struct someStruct {
var property1 = "Hi there"
mutating func method1() {
property1 = "Hello there"
}
// does not throw an error! YAY
}
Now that this is fixed, let’s take a look at what this error means:
cannot assign 'property1' in 'self'
Well, it is property1 that you are trying to modify. This error says that you cannot assign property1 to self. What is self? self in this case is the struct’s own instance. In this struct, property1 belongs to an instance of the struct. You could rewrite the line with property1 to be self.property1. However, self is always implied, so you don’t need to write it. Also notice that the following code works without the mutating keyword:
struct someStruct {
func method1() {
var property2 = "Can be changed"
property2 = "Go ahead and change me"
}
}
The reason you can set property2 is because it does not belong to self directly. You are not modifying a property of self. You are modifying a local variable within method1.
Classes
In the following example of creating a class, notice that it looks just like a struct but with the word class:
class FirstClass {
// class implementation goes here
}
You create a class exactly the same way you create a struct, but instead of using the word struct, you use the word class. Adding properties to a class is very similar. For example, the following Car class has properties for the make, model, and year (and you will define a default value for each property):
class Car {
let make = "Ford"
let model = "Taurus"
let year = 2014
}
In this example, there are three immutable properties of the Car class. Remember that when you make a struct, you are able to leave these properties blank. If you do the same for a class, you get an error:
class Car {
let make:String
let model:String
let year:Int
}
// error: class 'Car' has no initializers
If you want to fix this error, you must create an initializer for the Car class and initialize all the uninitialized properties. Classes in Swift don’t have automatic initialization (that is, memberwise initializers). If you leave the properties without default values, you must provide an initializer for the class. Each of the uninitialized properties must be initialized.
Swift provides a global function init() for this very purpose. Some languages call this a constructor.
Initialization
Initialization is the process of getting the instance of a class or structure ready for use. In initialization, you take all things that do not have values and give them values. You can also do things like call methods, and do other initializations. The big difference between Objective-C initializers and Swift initializers is that Swift initializers do not have to return self. The goal of Swift initializers is to give a value to everything that does not have a value. Structs can define initializers even though they have their own memberwise initializers. You can also define multiple initializers for a class or struct. The simplest type of initializer is one without any parameters. They are used to create a new instance of its type. Here’s an initializer for the GeoPoint class you created earlier:
struct GeoPoint {
var lat:Double
var long:Double
init() {
lat = 32.23232
long = 23.3434343
}
}
Here you are initializing lat and long with default values. You could put anything you want in that init method.
You can also make multiple initializers so that the user can create a GeoPoint however he wants:
struct GeoPoint {
var x = 0.0
var y = 0.0
var length = 0.0
init() {
}
init(x:Double,y:Double) {
self.x = x
self.y = y
}
init(length:Double) {
self.length = length
}
}
var regularPoint = GeoPoint()
var pointWithSize = GeoPoint(x: 2.0, y: 2.0)
var otherPoint = GeoPoint(length: 5.4)
Now you can initialize Point in three different ways. If you want to create a Point by using x and y, you can use the initializer Point(x:Double,y:Double). If you want to create a Point by length, we could initialize it with Point(length:Double). If you just want to make a standard point, you could initialize it with no parameters to the init method. You would probably add more calculations than shown here, but this is the gist of making multiple initializers. As long as the parameters are different, you can make as many different initializers as you need. SpriteKit’s SKScene has multiple initializers for multiple situations (see Figure 4.2).
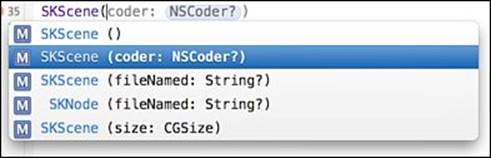
Figure 4.2 SKScene has multiple initializers available.
Here you can see that you can initialize SKScene by filename, by size, and by coder. All this information about multiple initializers applies to both classes and structs. It just so happens that all the examples here use structs.
What Is a Reference Type?
Earlier we said that structs are copied when they are passed around. The other way to say this is that structs are value types, and classes are reference types. This means that when you assign a variable to a new instance of a class and then reassign that variable to another variable, you have the same reference in each copy of the class. Here’s an example:
class Car {
var name = "Honda"
}
var car1 = Car()
var car2 = car1
car1.name = "Dodge" // Dodge
car2.name // Dodge
Cool! Notice that when you change car1.name to "Dodge", car2.name is also changed. That is because both car1 and car2 have a reference to the new instance of the Car. If you had done this with a struct, then car1and car2 would have different values for name.
Do I Use a Struct or a Class?
Whether you need to use a struct or class depends on a few factors, summarized here:
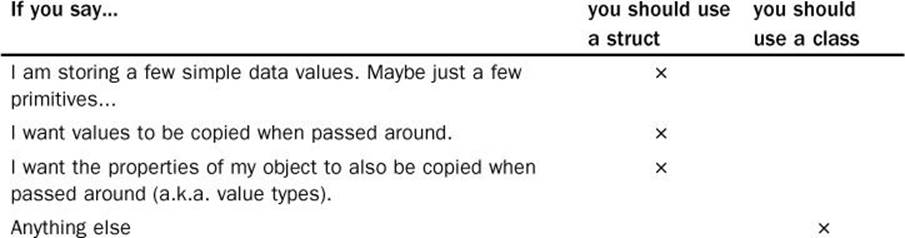
You can see that you will mostly be using classes for your data structures. Here are a couple examples of good uses of structs:
■ A geometric point that contains an x and y and maybe a length
■ A geolocation that defines latitude and longitude
■ A geometric shape (like CGRect) that will contain width and height.
All these structs are simple and contain only a few simple data values (you are not limited to geometric data). They often represent single values like a point or a rectangle.
Forgot Your Pointer Syntax?
When working with C, C++, or Objective-C, you know that you use pointers to reference the address (that is, the location in memory) of some value. You do this in Objective-C by using an asterisk (*). When you create a variable or constant in Swift that references some instance you created, you are not directly accessing that memory address. It is similar to a pointer but not exactly the same. Either way, you never have to reference anything using a pointer syntax when writing Swift.
The reason value types are called value types is that they are passed around as actual values. Reference types are called so because they are passed around as references that point to the actual objects. It’s the difference between using cash and using checks. When you use cash, you are handing the person actual money (analogous to using value types). When you give someone a check, you are giving him or her not the cash itself but a piece of paper telling where to get the cash (analogous to using reference types). If you think about it, most people pass around money by reference rather than by value. They don’t usually deal with the cash itself; they deal with some reference to money.
Property Observers
Property observers are a super-awesome feature built directly into Swift. They allow you to track and reply to changes of a property. You can add property observers to any property except lazy properties, which you won’t learn about here. Here’s how you create a basic property observer:
class Car {
var name:String = "Honda" {
willSet(newName) {
println("About to set the new name to \(newName)")
}
didSet(oldName) {
println("We just set 'name' to the new name \(name) from the old name
\(oldName)")
}
}
}
var car1:Car = Car()
car1.name = "Ford"
// About to set the new name to Ford
// just set name to the new name Ford from the old name Honda
Notice that you add a pair of curly brackets at the end of the variable. Inside those curly brackets you add willSet and didSet. willSet will get called before the property is set. The parameter passed into the function is the new value that the property will be set to. didSet will get called after the property is set. The parameter passed into the function is the old value that the property had before it got changed. Obviously, you can access the new value now because it has already been changed.
Methods in Classes
A method and a function are very similar except for a couple differences (aside from scope issues):
■ A method has a reference to the object that it belongs to.
■ A method is able to use data contained within the class it belongs to.
A method is identical to a function in syntax. Type methods in Swift are similar to Objective-C class methods. A big difference between from C and Objective-C to Swift is that in Swift you can define methods on classes, structs, and enums. This gives you great flexibility and strength. In Swift you have a couple different types of methods available to you. Let’s start with instance methods.
Instance Methods
Instance methods are likely the type of methods you will be creating most of the time. An instance method belongs to an instance of a struct, a class, or an enum. It has access to information about that specific instance. It provides functionality to that instance. Earlier you made a Car class that had a property name. You could provide it with an instance method to make it go. Then each car you create (or instantiate) will have its own distance that it has traveled. Here’s what it would look like:
class Car {
var name = "Ford"
var distance = 0
func gas() {
_spinWheels()
}
func _spinWheels() {
//some complicated car stuff goes here.
distance += 10
}
}
var car1 = Car()
println(car1.distance) // 0
car1.gas()
car1.distance // 10
Just as in a real car, the details of how a car works are hidden away in this example in a private function. For example, you don’t know how the gas pedal on the car works but you know that if you press it the car will go. Obviously, this is not truly necessary in this case, but you can imagine how the details of making a car move forward could get much more complicated. gas and _spinWheels are both instance methods that belong to this specific instance of Car. You know this is true because if you create another car and check the distance, it will not be at the same distance as car1. These methods are acting on this instance. For example here is a new car:
var car2 = Car()
println(car2.distance) // 0
Property Access Modifiers
In the last example you marked a method with an initial underscore to say “Don’t use this method outside this class.” Swift has three property access modifiers—that is, three ways of forcing the use of a method into a context:
■ private entities can be accessed only from within the source file in which they are defined.
■ internal entities can be accessed anywhere within the target where they are defined.
■ public entities can be accessed from anywhere within the target and from any other context that imports the current target’s module.
Without a property access modifier applied, functions are internal. Meaning that if you don’t write public or private or internal on the function, it will operate as if you wrote internal.
In the last example it would be more appropriate to change the method _spinWheels to be private and change the name to just spinWheels. You should do this even though you are working in the playground, so privatewon’t restrict access because it’s all in the same file.
Type (Static) Methods
In Swift you have instance methods, and you have type methods. Whereas instance methods work on the instance of class, type methods work on the class itself. If you made an instance of the Car class and you had created a type method, you would not be able to use it on the instance of the Car class. These methods are only for the class itself. To add a type method to a class, you use the keyword class. To add a type method to a struct, you use the keyword static, as shown here:
class Car {
var name = "Ford"
var distance = 0
class func getCarVersion() -> String {
return "5.0.1"
}
}
var car1 = Car()
println(car1.distance)
Car.getCarVersion()
Notice that if you want to access the car version, you call the method on the Car class itself. You may see these types of methods used on utilities and in various other situations.
Get to Know Thy Self
You use the keyword self quite often in Swift. self is available on each instance of an object. self refers to the current instance. You don’t always have to write self because Swift implies it. For the Car class, you could instead write this:
func spinWheels() {
self.distance += 10
}
By using self.distance to refer to the distance, you are saying, “distance that belongs to this instance of the class.” However, Swift already knows that is what you want, so you can just leave it as distance. It is often helpful to use self to distinguish between a method parameter and a property of the class, as shown here:
class Car {
var name = "Ford"
var distance = 0
func go(distance:Int) {
self.distance += distance
}
}
In this case, the function has a parameter that is the same as the property of the class. To distinguish between them, you use self.distance to mean the property that belongs to the class, and you use just plain distance to mean the parameter of the function.
Inheritance: Creating a Bichon from a Dog from an Animal
In my younger and more vulnerable years, my father gave us a dog that we named Penny. She was a Bichon Frise, and we often called her Le Fluf (in fake French). Penny provides an excellent example of inheritance. Penny was a Bichon Frise, which is a dog, which is an animal. You could get even more generic, but it’s not necessary at this point.
In Swift, a class (the subclass) can inherit methods and properties of another class (the superclass). In our Bichon example, animal is the superclass, and dog is a subclass of animal. Then dog is a superclass of Bichon Frise, which is a subclass of Dog which is a subclass of Animal. In Objective-C, everything eventually inherits from NSObject. It’s like NSObject is 42 (the answer to life, the universe, and everything). It’s the base of all superclasses. Swift does not have one grand base class. Defining a class that doesn’t inherit from anything makes that class the base class for all other classes that inherit from it. In the following example you create a Bichon class, which inherits from the Dog class, which inherits from the Animal class. In this example, the Animal class has its own properties and methods that all its subclasses inherit:
class Animal {
var name:String
var numberOfLegs:Int
func move() -> String{
return "\(name) is moving."
}
init(name:String,numberOfLegs:Int) {
self.name = name
self.numberOfLegs = numberOfLegs
}
}
class Dog:Animal {
var breed:String
override func move() -> String {
return "\(name) the \(breed) is moving."
}
init(name: String, numberOfLegs: Int,breed:String) {
self.breed = breed
super.init(name: name, numberOfLegs: numberOfLegs)
}
}
class Bichon:Dog {
var fluffynessLevel:Double
init(name: String, numberOfLegs: Int, breed: String, fluffynessLevel:Double) {
self.fluffynessLevel = fluffynessLevel
super.init(name: name, numberOfLegs: numberOfLegs, breed: breed)
}
}
var penny = Bichon(name: "Penny", numberOfLegs: 4, breed: "Bichon",
fluffynessLevel: 100.1)
penny.move() // "Penny the Bichon Frise is moving."
This example introduces a couple new concepts. First is super. Calling super is like calling self, except instead of it referring to the instance of the current class, it refers to the instance of the parent class. So if Bichoninherits from Dog, then self would be Bichon, and super would be an instance of Dog.
If you are going to have a class inherit from another class, you should call the initializer of that class along with your class’s initializer. Bichon is the not the one doing the initialization of name; Animal is. So you call super.init, which calls the initialization of the parent, which needs to be called again from Dog to initialize Animal. It is as if you are instantiating the Dog class from the Bichon class and the Animal class from the Dogclass. You are in fact doing just that, except you won’t wind up with three classes in the end. You’ll wind up with three parts that make up the Bichon class. Kind of like in real life. There are parts of you that are unique to you. Some parts you got from your father. Some parts you may have even gotten from your grandfather, and you made them unique. This is the purpose of overriding. You take something that existed in the parent class and override it with your own implementation. In this case, you just overrode the move class to give it a more appropriate implementation from the Dog class. It makes sense to add more details to move since you are no longer just talking about any kind of Animal. You are talking about a Dog. As it turns out, for this small program, the dog implementation of move is good enough that you don’t have to override it in the Bichon class.
Summary
In this chapter you’ve learned how to write enums, structs, and classes. You’ve learned how to instantiate those classes and how they each react differently to being passed around. We learned about passing by reference as opposed to by value. We also took a look the difference between methods and functions.