Learning Swift Programming (2015)
5. Making a Game
Now that we’ve covered user input, events, and data structures in Swift, you’re ready to put the concepts into action. In this chapter you’ll make a tic-tac-toe game featuring tappable buttons and artificial intelligence (AI). To develop and run it as an iOS app, you’ll set up a full-fledged project in Xcode. The IDE makes it easy to add pictures to the game, build a user interface, and respond to player events. If you’ve built iOS apps in the past, some of the Xcode information in this chapter may be a recap for you. When we move on to the actual game logic, you’ll notice a departure from Objective-C. Swift features like type inference really start to shine as you get into bigger and more complex apps.
Building a User Interface (UI)
To start building a game, you need to begin by creating a new Xcode project for the game, which you do by following these steps:
1. Open Xcode 6 and click Create New Xcode Project.
2. Under the iOS > Application tab, select Single View Application (see Figure 5.1).
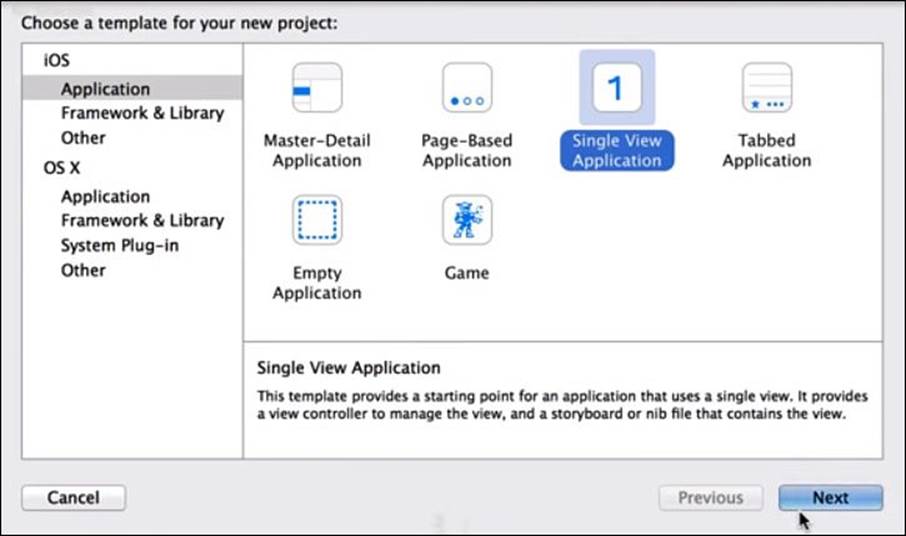
Figure 5.1 The app choosing screen for XCode.
Selecting this option starts you off with a class called a view controller. The class links UI events such as button taps to the application logic. For apps that store data, the controller often serves as a link between the user and the model where info is stored.
This paradigm is known as Model–View–Controller, or MVC. It’s a broad topic, but knowing the basics will help you understand how iOS apps are organized. You can think of the controller as a waiter or waitress in a restaurant. He or she interprets orders from a patron (the user) and passes them along to the kitchen (a model). When data or logic pops out of the oven, the controller presents it back to the table (a UI) for the user to consume.
To continue setting up a single view application, you click Next and then follow these steps:
1. Set Product Name to Swift-Tac-Toe and Organization Identifier to com.swiftallmightly.Tic-Tac-Toe. Be sure to select Swift as your language and iPhone as your device. Deselect Use Core Data.
2. Click Create to open a dialog for naming and saving your project. Then uncheck Create Git Repository.
3. Under the Deployment Info section of the project, check only Portrait for Device Orientation. To keep this exercise simple, disallow Landscape view.
4. In the Interface Builder section of the right panel, uncheck Use Auto Layout. Ensure that Keep Class Size Data For is set to iPhone and then click Disable Class Sizes.
5. In the upper-left corner, next to where Xcode lists the project’s name, is a drop-down menu of devices. Choose iPhone 5s.
Congratulations! You’ve created your first Swift project for iOS.
Importing Assets
Assets O: http://goo.gl/4T1NxG
Assets X: http://goo.gl/f7r45A
Assets bg: http://goo.gl/c6FZPu
Now that you’ve created a project, the left-hand panel of Xcode should show a list of project files. The center pane shows a white screen representing an iPhone. You can spice things up by preparing images for the blank canvas. Here are the specific UI assets you’ll incorporate into the game:

To import the assets into your project, select the Image Assets folder from the list of project files in the left-hand panel. Select the New Image button near the bottom of the editor and then click New Image Set. The first picture to place is for the grid. Xcode accepts two versions of this: a normal-sized version (320 × 568 pixels) and one that’s twice as large (640 × 1136 pixels) for higher-resolution iPhones. After you drag and drop the images onto the 1x and 2x spots, the background asset is ready. The process for importing the X and the O is the same except that the 2x versions aren’t necessary.
Adding Buttons and Labels
Now that you’ve prepared pictures, it’s time to display them as UI elements that players can see and select. You can add a Game Status label and Reset button, too, though these elements aren’t linked to images. Start by navigating to Main.storyboard in the Xcode project inspector. You should see the blank canvas where you’ll place your grid. Locate the search bar in the bottom-right corner of the editor and type in UI Image View. Xcode returns a result, which you can drag and drop onto the main workspace.
Stretch the UIImageView until it fills the screen. After you’ve resized the element, click it and look for the Attributes inspector in the upper-right corner. Be sure to uncheck the User Interaction Enabled option under the View panel. You want players to tap buttons on the grid, but they shouldn’t be allowed to select the grid itself. Next to the Image field under the Image View panel, type bg and press Enter. This links the UI element to the grid image.
It’s important to preview your app. Try clicking the play symbol in the upper-left corner of Xcode. If your project is set up correctly, a picture of a black grid will appear in the iOS Simulator (see Figure 5.2). It’s a good idea to preview your app often as you work through this chapter. Running the project after each small round of changes will help you pinpoint errors.
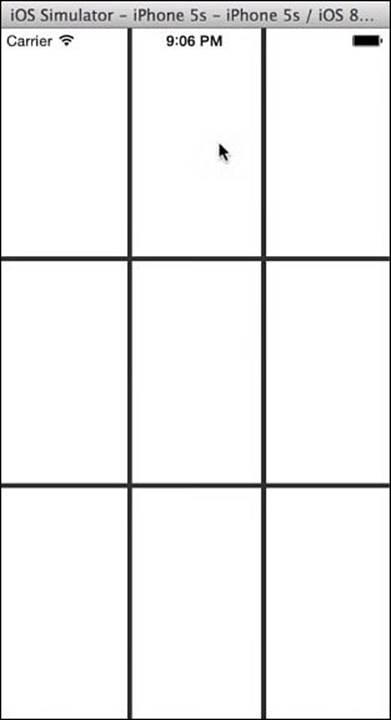
Figure 5.2 Our initial tic-tac-toe board.
You need to create nine other UIImageViews: one to cover each tile in the grid. The background is 320 pixels wide and 568 pixels tall. To find the dimensions of each tile, simply divide by 3. This gives you a width of 106 and a height of 189. You can adjust the tile’s size in the measurements section of the Attributes inspector. To find this section, select the tile and click the ruler icon near the upper-right corner of Xcode. You don’t have to manually adjust each of the tiles. Just copy and paste the original until you have nine of them, one covering each white space in the grid. Finally, you will need to set the “tag” property for each of the nine additional UIImageViews you just added. The first one will have a tag value of “0,” the next “1,” and so on. The final UIImageView will have a tag value of “8.” To set the tag, click on the UIImageView in your storyboard. Then, in the Attributes Inspector, change the value that appears in the “Tag” field.
Next, you have to tell iOS to listen for tap events. It’s possible to make the UIImageViews directly tappable, but for learning purposes, you’ll instead use the Button UI element. Using buttons is a flexible solution for capturing touch events, and you’re likely to use them in future Swift projects. Find the element and drag it to the workspace in the same way you fetched UIImageView. Adjust the button’s width and height so that it covers one of the tiles. By default, it displays the word Button in bright blue. The text is unnecessary because the game needs to display an X and an O instead. Click the button to reveal its properties in the Attributes inspector and erase the placeholder text.
To cover the rest of the game board with buttons, you can copy and paste them just as you copied the UIImageViews. At this point, you might find it hard to select buttons because the UI includes quite a few overlapping elements. Instead of clicking the buttons directly, you click their names from a list of UI resources in the View Controller Scene panel. If you preview the app again, you’ll notice that the buttons and UIImageViews aren’t visible. Rest assured; your hard work hasn’t been lost! The buttons will appear later on, when you link them to X and O images.
The last step in creating the user interface is to make a label and a Reset button. To fetch a label element, you repeat the process of finding a UIImageView, but you search instead for Label. After you drag the label onto the main storyboard, stretch it into a bar that spans the whole width of the screen. Add one more button and change its text to Reset. Bear in mind that the Reset button and label will overlap the thick black lines of the background grid. You can tweak their background colors in the Attributes inspector to make them stand out. Just below the text options in that panel, there’s a check box to make each element hidden by default. Make sure this is checked. The elements will only appear at certain points in the game. When you’re finished arranging all the UI elements, your main storyboard should look as shown in Figure 5.3.
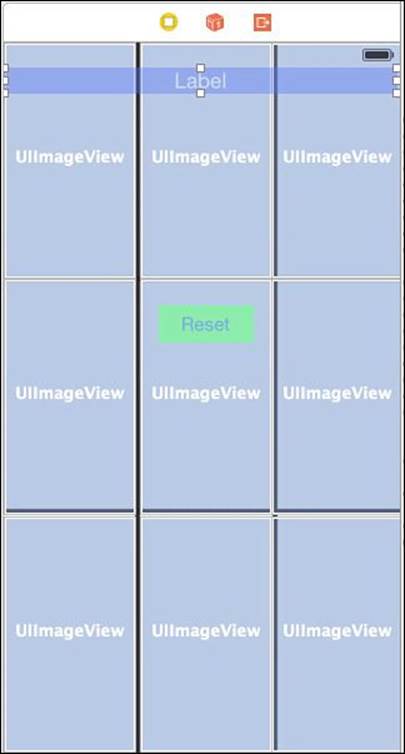
Figure 5.3 Our tic-tac-toe board is ready for Xs and Os.
The Action-Packed View Controller
Now that you’ve developed a working user interface, you can jump into the action: weaving UI elements like buttons and image views into the game logic. In this section, you’ll learn how to represent UI elements as resources in the view controller class. As you write class methods to change the resources, making pictures and text appear, the game will spring to life.
Click the tuxedo icon near the upper-right corner of Xcode to enter a side-by-side view. The main storyboard featuring the UI appears on the right. An editor panel appears on the left, showing the default code for the controller class:
import UIKit
class ViewController: UIViewController {
override func viewDidLoad() {
super.viewDidLoad()
}
override func didReceiveMemoryWarning() {
super.didReceiveMemoryWarning()
// Dispose of any resources that can be recreated.
}
}
In Chapter 4, “Structuring Code: Enums, Structs, and Classes,” you learned that functions and variables can be placed inside—or encapsulated within—a class. Classes help you group related functionality and control access to data.
Note
The benefits of using classes may not be obvious at first in small apps, but imagine yourself expanding on this game. If you wrote classes to represent, say, additional players, each player class might try to change buttons and send messages to the UI. Encapsulating this stuff in one class makes it easier to control when and how the changes occur.
Notice that the ViewController includes two default methods. iOS will call the viewDidLoad method when the UI is ready. Logic for initializing the game should go here. The system will call didReceiveMemoryWarning if your app overuses or misuses resources. At this point, you can leave this default function alone.
You need to represent your UIImageViews as member variables of the ViewController. Take a look at your list of UI resources in the panel to the left of the main storyboard. Rename each UIImageView that represents a tile (all except the background grid). Call the elements ticTacImage, followed by a number related to the element’s place on the game board. Moving from top to bottom and left to right, name the tiles ticTacImage1, ticTacImage2, and so on. For the Reset button and label, use the names resetBtn and userMessage. After you name the resources, you’re free to reference them in your code. Add the following lines to ViewController:
@IBOutlet var ticTacImage1: UIImageView!
@IBOutlet var ticTacImage2: UIImageView!
@IBOutlet var ticTacImage3: UIImageView!
@IBOutlet var ticTacImage4: UIImageView!
@IBOutlet var ticTacImage5: UIImageView!
@IBOutlet var ticTacImage6: UIImageView!
@IBOutlet var ticTacImage7: UIImageView!
@IBOutlet var ticTacImage8: UIImageView!
@IBOutlet var ticTacImage9: UIImageView!
@IBOutlet var resetBtn : UIButton!
@IBOutlet var userMessage : UILabel!
var plays = [Int:Int]()
var done = false
var aiDeciding = false
var ticTacImages:[UIImageView] = []
The @IBOutlet keyword tells Xcode that you want to link the variables to UI elements. Just below the @IBOutlet references is an array called plays. While this isn’t directly related to the UI, it helps manage the overall game logic. The array is set up to hold pairs of integers. The first number in each pair represents the position of a tile. The second integer tells which player “owns” the tile: one for a human and zero for the AI. Finally, you define simple Boolean variables called done and aiDeciding. The variable done will equal true only when a player wins or the game is tied. You can probably guess what aiDeciding means. Later in this chapter, when you start building an AI, the variable will stop humans from picking tiles if the AI is still deciding.
Displaying the Player’s Moves
Having defined the UIImageViews in code, you can dynamically display some images. The goal is to show an X image on tiles that the user taps and an O on tiles tapped by the AI. “Tapped” is a figure of speech here, of course, because an algorithm will decide which tiles the computer player picks. Don’t worry too much about AI for now. You’ll learn about that algorithm in the next section, after we finish laying the groundwork for UI events.
For now, you need to detect when a human player taps a tile, so use this code:
enum Player: Int {
case ComputerPlayer = 0, UserPlayer = 1
}
override func viewDidLoad() {
super.viewDidLoad()
ticTacImages = [ticTacImage1, ticTacImage2, ticTacImage3,
ticTacImage4, ticTacImage5, ticTacImage6, ticTacImage7,
ticTacImage8 ,ticTacImage9]
for imageView in ticTacImages {
imageView.userInteractionEnabled = true
imageView.addGestureRecognizer(UITapGestureRecognizer(
target: self, action: "imageClicked:"))
}
}
func imageClicked(reco: UITapGestureRecognizer) {
var imageViewTapped = reco.view as UIImageView
if plays[imageViewTapped.tag] == nil && !aiDeciding && !done {
setImageForSpot(imageViewTapped.tag, player:.UserPlayer)
checkForWin()
aiTurn()
}
}
func setImageForSpot(spot:Int,player:Player){
var playerMark = player == .UserPlayer ? "x" : "o"
println("setting spot \(player.toRaw()) spot \(spot)")
plays[spot] = player.toRaw()
ticTacImages[spot].image = UIImage(named: playerMark)
}
You begin by organizing UIImageView references for the tiles into the ticTacImages array. In this case, the array makes it easier for you to change certain tiles. Looping through ticTacImages, the code tells iOS to make each tile element tappable, but what should happen after a tap? To answer this question, take a look at the “action” parameter of UITapGestureRecognizer, a native object. It accepts the function imageClicked as an argument and uses it to handle gesture events. The if statement inside imageClicked puts to use variables defined at the end of the last section. It poses three questions whenever a user taps a tile:
■ Has the tile been tapped before? To perform this check, you have to find the number of the selected tile. The tag property that we added to the UIImageViews provides this info. The UIImageView is passed in as imageViewTapped. Next our code passes the tile number to the plays array to see what, if anything, matches it. If the query returns an integer, as opposed to nil, a player “owns” the tile.
■ Is the AI still deciding which tile it should choose? This check has more to do with dramatic effect than with performance. The algorithm will be simple enough that Swift should process it in the blink of an eye. Yet anticipating your opponent’s next move is part of what makes tic-tac-toe fun and suspenseful. By adding an artificial timeout, you make the AI appear more human.
■ Is the game over? This third check is self-explanatory. After a player wins or the game is tied, tapping a tile should have no effect. The tiles will remain disabled until the player taps the Reset button.
If the answer to all three questions is yes, the code proceeds to fill the selected tile with an image. The setImageForSpot function takes as parameters the number of a tile and the number of a player. At the top of the last code snippet is an enum called Player that will store the two player IDs. When a user chooses X or O, based on a given ID, setImageForSpot puts the appropriate image into a tile. After you’ve made all these changes to the view controller, save and run your code. An X should appear when you tap a tile.
Developing the Concept for an AI
The AI in this game involves more lines of code than any of the previous examples in this book. That’s because you’ve learned a lot about Swift, and you’re ready to put your knowledge to the test! Still, you might find it helpful to step back from the code and look at the big picture.
Even though tic-tac-toe is simple and well known, we’ll briefly summarize the game’s rules. A player makes a move by marking a tile with an X or an O. A player wins by covering three tiles in a row, in any direction, with his or her mark. In other words, a smart AI is one that covers three tiles before its human opponent. Specifically, there are five steps the algorithm must take, based on five things the computer player needs to “think about” before each turn:
1. “Do I have one more tile left to win in any direction? If yes, I should fill it.”
2. “Does my human opponent have one more tile left to win? If so, I should block it.”
3. “I should take the center tile.”
4. “I’ll take one of the corner tiles.”
5. “I’m all out of options, so I’ll take a middle tile.”
To make the AI more sophisticated, you could insert an extra process between steps 3 and 4. The process, known as “blocking an opponent’s fork,” has to do with forcing your rival to make a defensive move. You can also make the AI guard against the human player’s attempt to “fork.” For simplicity’s sake, we’ll skip this step and focus only on the five processes listed previously. Besides, keep in mind that an AI algorithm should not be perfect. Players will become frustrated and lose interest in the game if they’re never able to defeat the computer.
Managing the Game State
There’s one more bit of housekeeping to attend to before you can implement the AI algorithm: You need to keep track of the overall game state. This entails tracking when the game ends and issuing an alert to say who won. Call a method named checkForWin after the imageClicked function that you created in the previous section:
func imageClicked(reco: UITapGestureRecognizer) {
// Other code in this method is left out for brevity
checkForWin()
}
Running your code at this point will cause an error because checkForWin doesn’t exist yet, but you’ll create it shortly.
The checkForWin method scans the game board for winning tile combinations:
func checkForWin(){
var whoWon = ["I":0,"you":1]
for (key,value) in whoWon {
var triggerWin:Bool = false
if((plays[6] == value && plays[7] == value &&
plays[8] == value)) {
triggerWin = true
}
if((plays[3] == value && plays[4] == value &&
plays[5] == value)) {
triggerWin = true
}
if((plays[0] == value && plays[1] == value &&
plays[2] == value)) {
triggerWin = true
}
if((plays[6] == value && plays[3] == value &&
plays[0] == value)) {
triggerWin = true
}
if((plays[7] == value && plays[4] == value &&
plays[1] == value)) {
triggerWin = true
}
if((plays[8] == value && plays[5] == value &&
plays[2] == value)) {
triggerWin = true
}
if((plays[6] == value && plays[4] == value &&
plays[2] == value)) {
triggerWin = true
}
if((plays[8] == value && plays[4] == value &&
plays[0] == value)) {
triggerWin = true
}
if (triggerWin){
userMessage.hidden = false
userMessage.text = "Looks like \(key) won!"
resetBtn.hidden = false;
done = true;
}
}
}
Here’s what happens: The method begins with the definition of a variable called whoWon. The dictionary relates a player’s number, a unique ID, to a noun describing the player. Using this dictionary, you iterate exactly twice through the plays array. You may recall that plays is a two-dimensional array of integers. It contains the positions of tiles as numbers. Each number points to the ID of the player who owns the tile. In this case, you can list all winning combos because there are only a few of them: variations of a horizontal row, a vertical row, or a diagonal row. If the player’s ID correlates to the tile positions of a winning combo, you have a winner! You show the userMessage label by switching its hidden attribute to false. You fill the label with victory text and display the Reset button. Finally, you set done to true to let the player know the game is finished and stop him or her from tapping other buttons.
Implementing the AI Logic
Now that you’ve added logic for detecting when a player wins or loses, you can make the computer player strive to achieve a victory. This concerns steps 1 and 2 of the algorithm outlined earlier: The AI should move in for the kill, so to speak, if it has two tiles in a row, and it should block the human player if the human has two tiles in a row. To start processing the AI’s turn in the game, you call a new method named aiTurn. You place the new method calls at the bottom of the imageClicked function:
func imageClicked(reco: UITapGestureRecognizer) {
var imageViewTapped = reco.view as UIImageView
if plays[imageViewTapped.tag] == nil && !aiDeciding && !done {
setImageForSpot(imageViewTapped.tag, player:.UserPlayer)
checkForWin()
aiTurn()
}
}
A lot of logic occurs inside aiTurn. To make things easier to digest, we’ll divide the method into two parts and focus only on the first part in this section. The following code marks the official start of the AI implementation. If you try to compile it right away, you’ll notice several errors. That’s because the code includes functions you haven’t written yet. Don’t worry! The compiler will pass your game with flying colors after you create the missing pieces.
Here is how the AI decides where it should play:
func aiTurn() {
if done {
return
}
aiDeciding = true
//We (the computer) have two in a row
if let result = rowCheck(value: 0){
println("comp has two in a row")
var whereToPlayResult = whereToPlay(result[0], pattern: result[1])
if !isOccupied(whereToPlayResult) {
setImageForSpot(whereToPlayResult, player: .ComputerPlayer)
aiDeciding = false
checkForWin()
return
}
}
//They (the player) have two in a row
if let result = rowCheck(value: 1) {
var whereToPlayResult = whereToPlay(result[0], pattern: result[1])
if !isOccupied(whereToPlayResult) {
setImageForSpot(whereToPlayResult, player: .ComputerPlayer)
aiDeciding = false
checkForWin()
return
}
//Is center available?
}
if !isOccupied(4) {
setImageForSpot(4, player: .ComputerPlayer)
aiDeciding = false
checkForWin()
return
}
if let cornerAvailable = firstAvailable(isCorner: true){
setImageForSpot(cornerAvailable, player: .ComputerPlayer)
aiDeciding = false
checkForWin()
return
}
if let sideAvailable = firstAvailable(isCorner: false){
setImageForSpot(sideAvailable, player: .ComputerPlayer)
aiDeciding = false
checkForWin()
return
}
userMessage.hidden = false
userMessage.text = "Looks like it was a tie!"
reset()
println(rowCheck(value: 0))
println(rowCheck(value: 1))
aiDeciding = false
}
The method first checks the game state. If done is true, the game is finished, and the AI has nothing left to do. In this case, a return statement skips the rest of AI logic. If the game isn’t finished, the function proceeds to set aiDeciding to true. It doesn’t set the variable back to false until the computer player has finished picking a tile. You may recall from earlier in this chapter that imageClicked uses aiDeciding to make the human player wait his or her turn while the computer is making a move.
Finding Victory Conditions
The if statements in aiTurn are where the bulk of the logic takes place. They determine whether either player has two tiles in a row. While the steps for each check are basically the same, we’ll focus on the first one: the check to see whether a computer player is one tile away from a win. To answer this question, you can build a method called rowCheck and a series of short, related functions:
func rowCheck(#value:Int) -> [String]?{
var acceptableFinds = ["011","110","101"]
var findFuncs = [checkTop,checkBottom,checkLeft,checkRight,
checkMiddleAcross,checkMiddleDown,
checkDiagLeftRight,checkDiagRightLeft]
var algorithmResults = findFuncs[0](value: value)
for algorithm in findFuncs {
var algorithmResults = algorithm(value: value)
println(algorithmResults)
var findPattern = find(acceptableFinds,algorithmResults[1])
println(acceptableFinds)
if findPattern != nil {
return algorithmResults
}
}
return nil
}
First, take note of the data types that rowCheck receives and gives back. It accepts an integer representing a player’s ID, which can be 1 or 0. You use this information to search for tiles that belong to a player—in this case, the computer player. If a match is found, you return a pattern indicating which type of match exists. A 011 match, for example, means the leftmost tile is blank, and the two tiles to the right are marked. A 110 match means exactly the opposite. If no match exists, the method returns nil. Because the return type can vary, you have a great excuse to use an optional.
The acceptableFinds array describes which patterns indicate a match. The findFuncs array is closely related. It contains functions that check for certain types of matches. The concept of storing methods in an array may sound confusing if you’re not used to functional programming. Remember that functions are first-class members in Swift, which means they can be passed as arguments to other functions. To see exactly how rowCheck uses findFuncs, look at how you define all the methods included in the array:
func checkBottom(#value:Int) -> [String]{
return ["bottom",checkFor(value, inList: [6,7,8])]
}
func checkMiddleAcross(#value:Int) -> [String]{
return ["middleHorz",checkFor(value, inList: [3,4,5])]
}
func checkTop(#value:Int) -> [String]{
return ["top",checkFor(value, inList: [0,1,2])]
}
func checkLeft(#value:Int) -> [String]{
return ["left",checkFor(value, inList: [0,3,6])]
}
func checkMiddleDown(#value:Int) -> [String]{
return ["middleVert",checkFor(value, inList: [1,4,7])]
}
func checkRight(#value:Int) -> [String]{
return ["right",checkFor(value, inList: [2,5,8])]
}
func checkDiagLeftRight(#value:Int) -> [String]{
return ["diagRightLeft",checkFor(value, inList: [2,4,6])]
}
func checkDiagRightLeft(#value:Int) -> [String]{
return ["diagLeftRight",checkFor(value, inList: [0,4,8])]
}
Notice the logic that these checks have in common. Given a player’s ID as an integer, they check certain types of winning conditions. Each one returns an array of two elements, both of which are strings. The first string describes a type of match in easy-to-read human terms. The second string consists of three numbers. It represents the type of tile pattern, if any, that the algorithm found. This three-number string results from the checkFor method, which you define like this:
func checkFor(value:Int, inList:[Int]) -> String {
var conclusion = ""
for cell in inList {
if plays[cell] == value {
conclusion += "1"
}else{
conclusion += "0"
}
}
return conclusion
}
To understand how checkFor comes into play, take a look at the checkTop method. The tile numbers 0, 1, and 2 represent the top row of the game board. The checkTop method passes to checkFor an array made up of these numbers. Looping through the given integers, checkFor finds out whether the corresponding tiles belong to the computer player. The conclusion variable will be a three-number string if a match is found and an empty string if no match exists.
Now that you’ve explored findFuncs, refer to the place in rowCheck where you loop through the array:
var findFuncs = [checkTop,checkBottom,checkLeft,checkRight,
checkMiddleAcross,checkMiddleDown,
checkDiagLeftRight,checkDiagRightLeft]
for algorithm in findFuncs {
var algorithmResults = algorithm(value: value)
var findPattern = find(acceptableFinds,algorithmResults[1])
if findPattern != nil {
return algorithmResults
}
}
The algorithm in the for statement references each of the elements in findFuncs. In the loop’s first iteration, calling algorithm() is the same as calling checkTop(). In the second pass-through, algorithm() is the same as checkBottom(). This pattern continues until the loop reaches the end of the array. You know, then, that algorithmResults will always contain a string made up of nothing or three numbers. Remember from our definition of rowCheck that acceptableFinds features a list of winning conditions. If algorithmResults isn’t empty, and it matches an element in acceptableFinds, you’ve identified a winning tile. The machine has outsmarted the human. It’s a sad day for humankind, but a good achievement for you as a Swift programmer.
Moving In for the Win
By using rowCheck and a few related functions, you’ve taught the AI how to scan the game board for a winning tile. The next step is teaching it how to take action, marking a tile to secure victory. The rowCheck method includes many moving parts, so to speak. If you’re not entirely sure how it works, consider reviewing the previous sections before moving forward. When you’re ready to continue, step back and look at rowCheck in the context of aiTurn:
if let result = rowCheck(value: 0){
println("computer has two in a row")
var whereToPlayResult = whereToPlay(result[0], pattern: result[1])
if !isOccupied(whereToPlayResult) {
setImageForSpot(whereToPlayResult, player: .ComputerPlayer)
aiDeciding = false
checkForWin()
return
}
}
You’ve defined all but two methods in the block of code: whereToPlay and isOccupied. You pass to whereToPlay a pattern that’s only one tile away from triggering a victory. The function uses this pattern to figure out the position of the remaining tile:
func whereToPlay(location:String,pattern:String) -> Int {
var leftPattern = "011"
var rightPattern = "110"
var middlePattern = "101"
switch location {
case "top":
if pattern == leftPattern {
return 0
}else if pattern == rightPattern{
return 2
}else{
return 1
}
case "bottom":
if pattern == leftPattern {
return 6
}else if pattern == rightPattern{
return 8
}else{
return 7
}
case "left":
if pattern == leftPattern {
return 0
}else if pattern == rightPattern{
return 6
}else{
return 3
}
case "right":
if pattern == leftPattern {
return 2
}else if pattern == rightPattern{
return 8
}else{
return 5
}
case "middleVert":
if pattern == leftPattern {
return 1
}else if pattern == rightPattern{
return 7
}else{
return 4
}
case "middleHorz":
if pattern == leftPattern {
return 3
}else if pattern == rightPattern{
return 5
}else{
return 4
}
case "diagLeftRight":
if pattern == leftPattern {
return 0
}else if pattern == rightPattern{
return 8
}else{
return 4
}
case "diagRightLeft":
if pattern == leftPattern {
return 2
}else if pattern == rightPattern{
return 6
}else{
return 4
}
default:
return 4
}
}
Now that you’ve defined whereToPlay, take another look at the first if statement in aiTurn. You know that whereToPlayResult will store an integer representing a tile position. There’s only one issue: You need to make sure that the human player doesn’t already “own” it. If the tile is taken, the computer can’t move forward and seize it. That’s where isOccupied comes into play:
func isOccupied(spot:Int) -> Bool {
println("occupied \(spot)")
if plays[spot] != nil {
return true
}
return false
}
The method performs a check of plays to see whether a player has claimed a spot on the game board. Remember that plays is a two-dimensional array full of integer pairs. When a player claims a tile, plays keeps track of the tile’s position, along with the player’s ID.
As an aside, notice that isOccupied is simple and brief—only seven lines long. Couldn’t you delete it and check plays directly within aiTurn? This is partially a matter of style, but storing the logic in a function has advantages. Imagine that in the future, you change the criteria for tiles being occupied. The new logic involves checking two arrays instead of one. If the logic is abstracted into the isOccupied function, you can make a single edit, and your app should work correctly. On the other hand, if you copy and paste if statements, you’ll probably spend extra time editing and debugging. Think carefully about abstraction as you venture into building bigger apps with Swift.
Now let’s refer to aiTurn to see how isOccupied fits into the big picture. If the method returns false, the AI player is free at last to mark a tile. The app will update the UI and then indicate that the computer has made up its mind. Finally, you call checkForWin to update the game state. In this case, the function always reveals a message stating that the computer has won. Here’s the isOccupied method in context:
if !isOccupied(whereToPlayResult) {
setImageForSpot(whereToPlayResult, player: .ComputerPlayer)
aiDeciding = false
checkForWin()
return
}
Defending the AI’s Turf and Stealing Center Stage
The computer now knows how to take action when it’s one tile away from a win. In the five-step outline for the AI, the second priority was finding and blocking a human player’s winning tile; basically, the AI wants to defend its turf. The methods from step 1 are generic enough that you can reuse them to defend the AI’s turf in step 2. The only difference is that you have to pass the human player ID instead of the computer ID to rowCheck and setImageForSpot:
// The player has two in a row
if let result = rowCheck(value: 1) {
var whereToPlayResult = whereToPlay(result[0], pattern: result[1])
if !isOccupied(whereToPlayResult) {
setImageForSpot(whereToPlayResult, player: .UserPlayer)
aiDeciding = false
checkForWin()
return
}
}
With the first two if statements in aiTurn, the AI can move in for a victory and defend itself against a human’s near-victory. If no such scenarios exist on the game board, the computer has to pick a different course of action. That’s when the algorithm arrives at step 3: choosing the center tile. If the size of the board varied, you might have to compute the position of the center tile. Fortunately, you know the board consists of nine tiles. Counting from zero, left to right and top to bottom, the fourth tile is in the center. To select the tile, you pass its position to isOccupied and setImageForSpot:
//Is center available?
if !isOccupied(4) {
setImageForSpot(4, player: .ComputerPlayer)
aiDeciding = false
checkForWin()
return
}
Taking Sides
You’re almost done creating an AI in Swift. If the computer player can’t seize a victory, block the opponent’s win, or take a center tile, it has only two options. It tries step 4, claiming a corner tile. If all corners are taken, it falls back to its last resort, marking a middle tile. Steps 4 and 5 are similar in terms of logic:
func firstAvailable(#isCorner:Bool) -> Int? {
var spots = isCorner ? [0,2,6,8] : [1,3,5,7]
for spot in spots {
println("checking \(spot)")
if !isOccupied(spot) {
println("not occupied \(spot)")
return spot
}
}
return nil
}
The firstAvailable method loops through an array of tile positions and returns the first open tile. The array contents differ, depending on which tiles you care about. Corners occupy tiles 0, 2, 6, and 8. Side tiles take up positions 1, 3, 5, and 7. The firstAvailable method returns an integer if a match exists or nil if all tiles are taken.
When It’s a Draw
The if statements in aiTurn account for every possible move available to the AI. The statements also include a return so that if a block executes, the following if blocks won’t be reached. These facts tell you that the compiler won’t reach the bottom of aiTurn unless all tiles are taken and neither player has won. In other words, you know that the game has ended in a tie. Here’s how you add logic to the end of aiTurn to handle this scenario:
userMessage.hidden = false
userMessage.text = "Looks like it was a tie!"
reset()
After the AI outsmarts the user, the human player will be itching to jump back into the game. You can oblige him or her by defining a reset function that will clear the board:
func reset() {
plays = [:]
ticTacImage1.image = nil
ticTacImage2.image = nil
ticTacImage3.image = nil
ticTacImage4.image = nil
ticTacImage5.image = nil
ticTacImage6.image = nil
ticTacImage7.image = nil
ticTacImage8.image = nil
ticTacImage9.image = nil
}
@IBAction func resetBtnClicked(sender : UIButton) {
done = false
resetBtn.hidden = true
userMessage.hidden = true
reset()
}
You’re done! This marks the end of implementing the AI. Take a moment to read over your code and make sure it includes all the methods discussed in this chapter. When you’re ready, click the Play button in Xcode to preview the finished product. Figure 5.4 shows a glimpse.
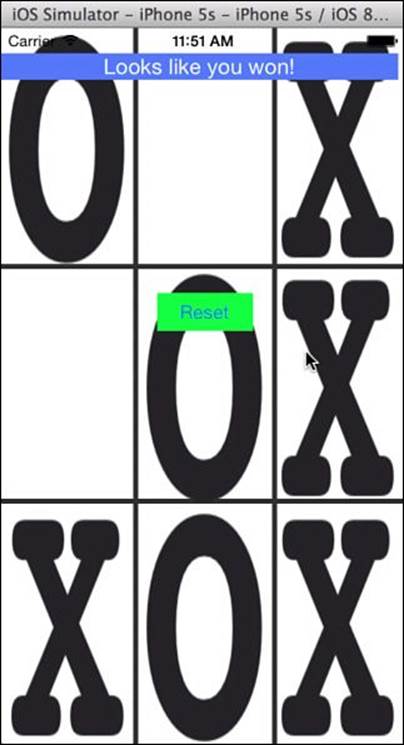
Figure 5.4 The game in action.
For an extra challenge, try enhancing tic-tac-toe:
■ Add steps to the algorithm so that the computer player “forks” and anticipates the human player’s “fork.”
■ Enhance the UI by designing graphics of your own.
■ Create a separate class outside the viewController for methods related to the AI.
Summary
In this chapter you have learned how to dissect and model a problem by using Swift. First, you learned how to set up a full-fledged Xcode project. We walked through the steps for building UI elements and linking them to your code. Working with predefined classes like viewController gave you a glimpse into how bigger apps are organized. Besides learning about projects in Xcode, you applied key features of the Swift language. In the tic-tac-toe exercise you used classes, enumerators, and functions. The features let you reuse code instead of rewriting it, which saved time and reduced the potential for bugs. You applied for, if, and switch statements to control the game’s logic flow.
All materials on the site are licensed Creative Commons Attribution-Sharealike 3.0 Unported CC BY-SA 3.0 & GNU Free Documentation License (GFDL)
If you are the copyright holder of any material contained on our site and intend to remove it, please contact our site administrator for approval.
© 2016-2026 All site design rights belong to S.Y.A.