Learning Swift Programming (2015)
7. Subscripts and Advanced Operators
Swift is such a powerful language that it allows you to create your own new full-fledged language. You will hear people talk about writing functional Swift and writing JQuery-like Swift. It is great to have such flexibility. With Swift you can take an existing syntax and apply it to other things. For example, subscripts allow you to provide functionality to the square brackets notation. What you do with that square brackets notation is up to you. You can provide subscripts for enumerations, structures, and classes. You can use subscripts to query a class to get some sort of information back.
You probably know subscripts from arrays and dictionaries. You use subscripts to access members of an array by using the square brackets notation (for example, myArray[5] to get the sixth element of an array). You use the square brackets notation in dictionaries as well to access values by their key. In both arrays and dictionaries, this implementation is written using subscripts. You can prove this by looking at the Swift source code. I’ll show you how to do that in a second.
With advanced operators, you have the ability to program on the bit and byte levels. Swift gives you basic operators as well as advanced operators—operators like the bitwise AND operator, which combines the bits of two numbers.
I combined subscripts and advanced operators in one chapter because Swift allows you to write your own custom operators. This is obviously all a part of the master plan to describe your own custom language syntax. Often it’s important to define your own custom operators in your custom classes, structs, and enums. Think of the custom Car class you have been using in other chapters. How would you add two cars together with the standard + operator? One thing is for sure: Swift doesn’t know how to add two cars together for you. You have to tell Swift how to do this. And to do that, you need to define your own custom syntax for writing Swift.
Writing Your First Subscript
To create a subscript, you use the keyword subscript in your class, struct, or enum. A basic subscript looks like this:
class Hand {
let fingers = ["thumb","index","middle","ring","pinky"]
subscript(i:Int) -> String{
return fingers[i]
}
}
let hand = Hand()
println("I had to use my \(hand[2]) finger to on the way into work today.")
Here you are creating a class called Hand, which has five fingers. You can access each finger by index. After you create a new instance hand, you can access the thumb by using hand[0]. This directly accesses the fingersarray. You can read and write to subscripts. You can mark them as read-only or read-write. Currently the hand/fingers access is a read-only property. To make it writable, you have to tell Swift, like this:
class Hand {
var fingers = ["thumb","index","middle","ring","pinky"]
subscript(i:Int) -> String{
get{
return fingers[i]
}
set{
fingers[i] = newValue
}
}
}
let hand = Hand()
//Not everyone calls it a pinky. Let's rename it to pinkie.
hand[4] = "pinkie"
println("I use my \(hand[4]) when I drink tea.")
You tell the subscript that you want it to be readable and writeable by adding the get and set properties to it. You access the finger of the hand by using the getter. You have to explicitly write a getter for this subscript because you are adding a setter as well. If you are making a property read-only, you can leave out the getter because it is implied. Now with the setter, you are able to rename one of the fingers of the hand. You rename the pinky to pinkie. Now when you print the sentence, it says “I use my pinkie when I drink tea” instead of “I use my pinky when I drink tea.” But you don’t have to just use integers, and you don’t have to return integers, either. You can use this subscript notation however you would like.
Let’s take a look at the implementation of a Swift array and how it uses subscripts to access elements of the array. In order to do this, you can type the following into the playground:
let a:Array<String> = []
This declares an array using the more verbose syntax. You can now hold down the Command key on your keyboard and click the word Array. The actual implementation of the array is not included in the source code, but you can see a skeleton of how it was declared. You should see something like this:
subscript (subRange: Range<Int>) -> Slice<T>
This allows you to access elements of an array by using a range. You can see that the range must be made up of integers. This looks like it’s probably only a getter and does not include a setter as well.
You can use subscripts for many things. But you should think about their proper use. For example, you could use a subscript to mess around with a String:
class Candianizer{
subscript(sentence:String) -> String {
return sentence + " ay!"
}
}
var candianizer = Candianizer()
candianizer["Today is a good day"] //Today is a good day ay!
In my opinion, this is not a good use of a subscript. Even though you can use a subscript this way, you generally use them to find elements of a collection, list, or sequence. But you can implement a subscript however you find most appropriate. In the last example you might be better off using a function for candianizer.
Dictionaries use subscripts to set and get values for particular instances. You can use subscripts to set a value, like so:
var beethovenByOpus = [67:"Symphony No. 5",
53:"Waldstein",
21:"Symphony No. 1 in C major"]
beethovenByOpus[67]
In this example, you create a dictionary to get some of Beethoven’s works, by opus. Now you can access the works by using the subscript syntax. In this example, beethovenByOpus[67] prints "Symphony No. 5".
Dictionaries are made up of key/value pairs. In this example, the key is 67, and the value is "Symphony No. 5". Now the dictionary has the type Int:String. You could create a dictionary because you know exactly what you need, but you first need to learn about generics. After you get generics down, you can give it a whirl. For now, you should know that for dictionaries, a subscript is both a getter and a setter. You can make subscripts deal with any input types, and they can use any type for return values as well. However, you cannot use inout parameters but you can use multiple parameters to grab any values you want.
Here is an example of creating a multidimensional array for a level of a game. In this example, you use the subscript syntax to grab a specific block from the game:
class Level {
//[Array<Int>]
var map = [[0,0,0,1,1],
[1,1,1,0,0],
[1,1,1,0,1]]
subscript(row:Int,col:Int) -> Int {
return map[row][col]
}
}
var level1 = Level()
level1[0,4]
It is common to use multidimensional arrays to store game-level data. If you are making a tile-based game, maybe the 0s are walkable ground, and the 1s are non-walkable walls. Say that you want an easy way to grab a specific tile. Normally, if you wanted to grab the first tile in the first row, you would use something like this:
level1.map[0][0]
This works well. But you can make the syntax even nicer by creating a subscript to grab the row and column right from the level:
level1[0,0]
Now you get back the tile straight from the level instead of having to access the map. The really great thing about this is that you could add in error checking to make sure the block exists before you try to access it. Also, this map should be read-only. You could add that at the subscript level, like this:
struct Level {
//[Array<Int>]
var map = [[0,0,0,1,1],
[1,1,1,0,0],
[1,1,1,0,1]]
func rowIsValid(row:Int) -> Bool
return row < map.count
}
func colIsValid(row:Int,col:Int) -> Bool {
return col < map[row].count
}
subscript(row:Int,col:Int) -> Int {
get{
assert(rowIsValid(row), "Row does not exist")
assert(colIsValid(row,col: col), "Column does not exist")
return map[row][col]
}
}
}
var level1 = Level()
Check out what happens here: It’s super cool. You use Swift’s assert method to check the validity of the game-level data you are trying to get. You have to send assert a Bool to say true (meaning yes, it is legit) or false(meaning no, it is not legit). You make rowIsValid and colIsValid functions to do that checking for you. The good thing about this is if the user enters a row that is too high or a column that is too high, he or she will get an error message that is geared toward game-level data. Also, the user cannot set the game-level data directly but would have to go through the map, which you could set to be private.
That’s all you need to know about subscripts for right now. It’s all about the way that you want to implement them.
Next we will talk about advanced operators and why it is still important to know how to code on the bit level.
Bits and Bytes with Advanced Operators
Everything you do on computers boils down to bits and bytes, and it’s important to be able to understand things on that level. Even though this seems like an old-school idea, it has many real-world and even future implications. For example, if you want to write code to connect to a Bluetooth low-energy device, such as a heart rate monitor, then you need to look at the Bluetooth specifications for such devices (see https://developer.bluetooth.org/gatt/characteristics/Pages/CharacteristicViewer.aspx?u=org.bluetooth.characteristic.heart_rate_measurement.xml). Notice that in order to be able to get the heart rate out of the data from the Bluetooth device, you need to grab specific bytes and bits. This is a current technology and is growing with the presence of iBeacons.
This doesn’t apply to just Bluetooth, either; another good example is file specifications. If you ever want to create a binary file specification or read a binary file, then you need to know where different information is going to be in bytes of the file. Take the Photoshop file specification (see http://www.adobe.com/devnet-apps/photoshop/fileformatashtml/). Notice that it tells you exactly where to look in the file and how much data to grab. For example, the header info tells you that the length is 4 and the content should always equal 8BPS. This is an identifier for the file. If you read those first few bits of a Photoshop file, it should say 8BPS. This is similar to when you get a box of animal crackers and it says, “Do not eat if seal is broken.” (For me it’s always the giraffe that’s broken, maybe because of its tall stature and long neck.) Don’t assume that it’s a Photoshop file unless it has that signature at the beginning.
It’s important to note that in Swift, you can represent binary with a 0b prefix, in the same way that you write hex with a 0x prefix. Also, a great little trick for binary on a Mac is to open up the built-in calculator. When in the calculator you can then choose View > Programmer to see binary representations of numbers. For example, in decimal, 0b00001111 is 15 (because 1 + 2 + 4 + 8 = 15; see Figure 7.1).
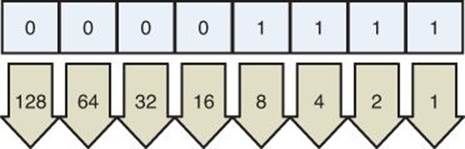
Figure 7.1 Each bit is represented by a square and can have a value of either 0 or 1.
Notice that there are 8 bits here, and all 8 bits together represents 1 byte. For our purposes we are going to read the bits from right to left. Each bit (from right to left) is worth double what the last was worth. To find out what the whole thing is worth, you add the value listed below (values are listed in the arrow below each bit in Figure 7.1) only if the bit (the value in the square) is 1. If the value is 0 you do not add the value of the bit. After you have the value by calculating the 8 bits you can perform different operations on them. Each of these operators is going to do something to the 8 bits of the byte. Some will shift the bytes and others will eliminate bytes. In the end you are left with 8 bits, which represent a byte, which can be translated into letters, numbers, or other stuff (it could be an individual pixel for .png file). Like we said before in the case of the Photoshop file we could be looking for 8BPS to appear in the beginning of the file. Other files types have different signatures. The first advanced operator is bitwise NOT.
Bitwise NOT
You use the bitwise NOT operator when you want to invert all the bits. You write the bitwise NOT as a tilde (~). If you invert 0b00001111, you get 0b11110000, which is 240. You can try this out in playground. You represent the 8 bits as 1 byte by using UInt8. The 8 in UInt8 stands for the number of bits. UInt8 represents 1 byte because it has 8 bits available to store things. This means you have values from 1 to 255 available to you with UInt8. This is the case because if you make all 8 bits set to 1, then 0b11111111 is equal to 255. If you use UInt16, then you have 16 bits available to you, and your max value is much larger, at 65,535. You can try this out in the calculator as we mentioned in the previous section.
Let’s get back to inverting bits, which you could do by first assigning your binary value to a variable and then inverting it. Using bitwise NOT takes everything that was a 1 and makes it a 0 and everything that was a 0 and makes it a 1 (see Figure 7.2).
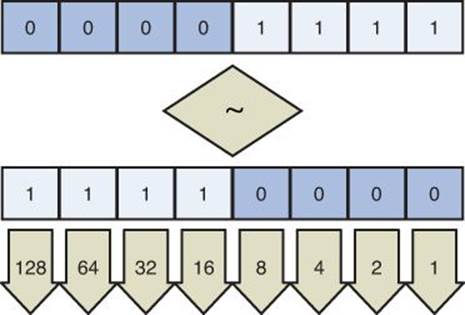
Figure 7.2 Inverting bits with bitwise not.
Let’s write some code that actually inverts some bits.
var b:UInt8 = 0b00001111 // 15
~b // 240
In this example we created the number 15 represented in bits. We assigned it to a variable that is of type UInt8 so we could store those 8 bits in the perfect container for it. You inverted it with the tilde (~) and you got back 240 because 0b00001111 iverted is 0b11110000. 128 + 64 + 32 + 16 = 240
Bitwise AND
Bitwise AND is represented by a single ampersand: &. Whereas bitwise NOT inverts all the bits, bitwise AND changes the bits only if both bits are 1s. For example, say that you have something like what’s shown in Figure 7.3.
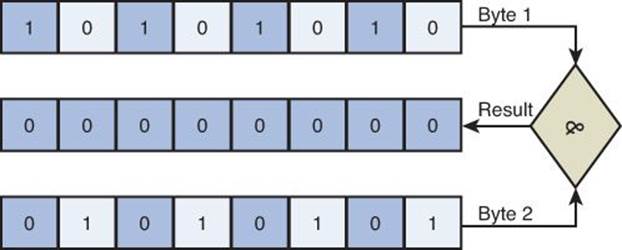
Figure 7.3 Performing a bitwise AND on two bytes.
In this example, the result of the bitwise AND combination is 0 because there is no place where both bit 1 and bit 2 contain 1s in the same slot. You could code this example like so:
var a:UInt8 = 0b10101010 //170
var b:UInt8 = 0b01010101 //85
a&b //0
Figure 7.4 shows another example of a bitwise AND combination that has some positive results.
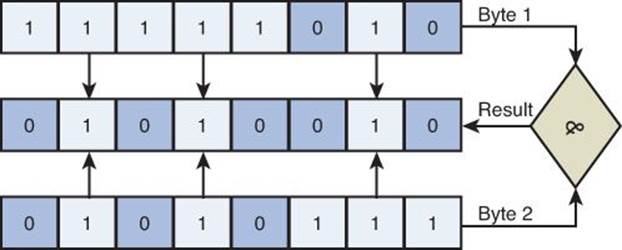
Figure 7.4 Another bitwise AND with more positive results.
In this example, bits of the top byte (all the bits of the first byte) contain 1s where the bits of the bottom byte (bit 2) also does, so the result has some positive results—in spots 2, 4, and 7 from the left. In the playground, you could write this example like so:
var a:UInt8 = 0b11111010 //250
var b:UInt8 = 0b01010111 //87
a&b //82
Bitwise OR
Bitwise OR is written using a single pipe: |. Whereas bitwise AND returns the new number if both bits are set to 1, bitwise OR returns the new number if either bit is equal to 1 (see Figure 7.5).
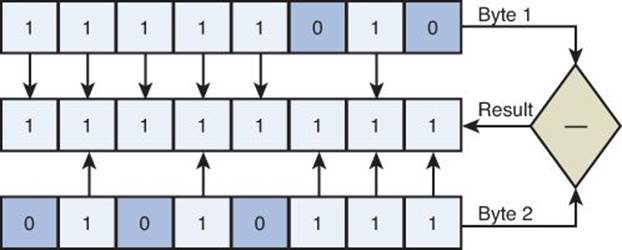
Figure 7.5 Performing a bitwise OR on two bytes with the result in the middle.
When you use the bitwise OR operator, the result is all 1s (255). You can try this out with code like so:
var a:UInt8 = 0b11111010 //250
var b:UInt8 = 0b01010111 //87
a|b //255
Figure 7.6 shows another example where both inputs are 0, so the resulting bit is 0 also.
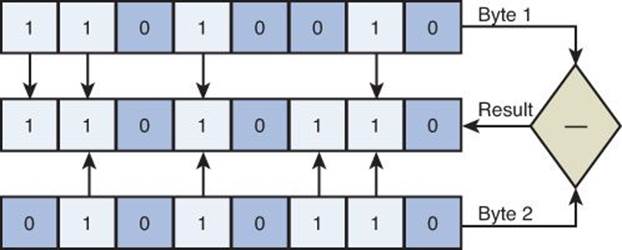
Figure 7.6 Another bitwise OR comparing two bytes.
You could write this comparison as follows:
var a:UInt8 = 0b11010010 //210
var b:UInt8 = 0b01010110 //86
a|b //214
Bitwise XOR
Otherwise known as the exclusive OR operator, written as ^, bitwise XOR compares two inputs and returns 1 when the two inputs are different (see Figure 7.7).
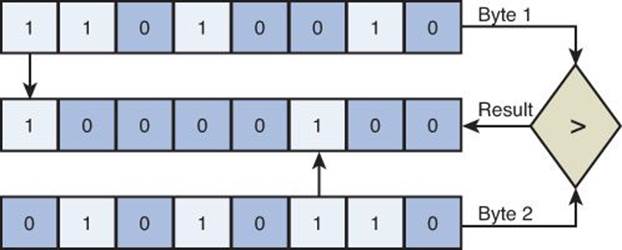
Figure 7.7 Performing a bitwise XOR on two bytes (one on top and one on bottom).
Notice in this example that only the comparisons where input 1 and input 2 are different result in a 1. Matching 1s (1 and 1) returns 0 and matching 0s (0 and 0) returns 0.
Shifting Bits
You can take the 8 bits of a byte and shift them all to the left or to the right. You can do this using the bitwise left shift operator (<<) or the bitwise right shift operator (>>). Notice in Figure 7.8 how each shift is in its own box. You are essentially moving a bit to the next box over.
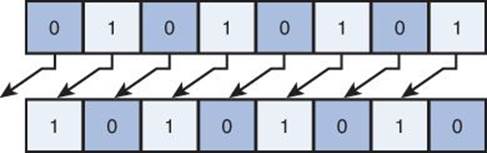
Figure 7.8 Shifting bits to the left.
You could write this in code like so:
var a:UInt8 = 0b01010101 //85
a << 1 //170
Notice that this bitwise left shift had the effect of doubling the integer. Doing a bitwise right shift, on the other hand, halves the number:
var a:UInt8 = 0b01010101 //85
a >> 1 //42
Notice that because you are working with integers and not floating-point numbers, you end up with 42 and not 42.5. Also notice that if 1 was the leftmost bit, then this does not necessarily multiply it by 2. This is because the first 1 winds up getting discarded when it moves off the left (see Figure 7.9). Here is an example of the 1 getting discarded:
var a:UInt8 = 0b11010101 //213
a << 1 //170
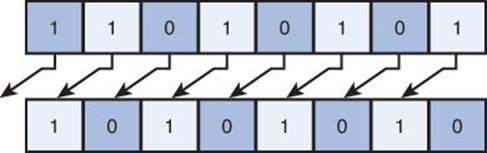
Figure 7.9 Shifting bits.
Any bits that are moved outside the bits of the integer are thrown away. Also note that when a new space is created, as in Figure 7.9, a 0 is inserted. This method is known as logical shifting.
UInt8, UInt16, UInt32, Int8, Int16, Int32, and So On
There is a difference between signed and unsigned types. It has nothing to do with autographs. When you have a signed type, it can be positive or negative. The types that start with Int are signed and can be either negative or positive. How does Swift represent a negative value in 8 bits internally? The leftmost bit says whether the number is positive or negative. This is how it is represented internally. A 1 as the first bit means the Int is negative, and a 0 means positive. Any of the types that are Ints (Int8, Int16, Int32, and so on) use the first bit to say whether the number is negative or positive. If Int8 has 8 bits available, it now has 7 to represent the number and 1 to represent the sign (see Figure 7.10). UInts (unsigned integers) don’t do this. For example, the max value of UInt8 is 255, and the max value of Int8 is 127. The leftmost bit was worth 128 so 255–128 and you are left with 127.
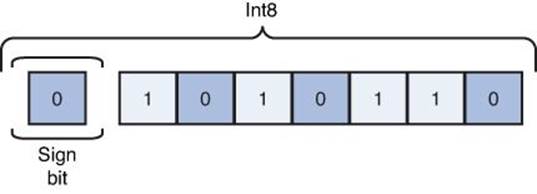
Figure 7.10 A signed byte: the Int8.
In code, however, you can represent –4 in binary like so:
var a:Int8 = -0b100
Value Overflow and Underflow
If you try to fit too much into an Int that cannot handle it, you get an error. For example, the max for an Int32 is 2,147,483,647. You don’t have to do math to figure this out. You can figure it out like this:
Int32.max // 2,147,483,647
Int32.min // -2,147,483,647
Int16.max // 32,767
// etc...
var a:Int32 = 2_147_483_649 // ERROR: integer literal overflows when stored into
'Int32'
In this case, Int32 is not big enough to hold the number you tried to assign it. It is a little too large (the max is 2147483647 and you tried to use 2147483649), and you get an error. It isn’t always desirable or necessary to get an error. You can use value overflow and value underflow to fix this. When you reach the max value of an Int, and you add one more, value overflow causes the Int to circle back around to the minimum value. Let’s watch that Intcircle back around:
var a:Int32 = 2_147_483_647
a &+ 1 // -2,147,483,648
This would normally cause an error, but instead it loops around to the minimum value of the Int. The opposite happens when you use value underflow. If you are at the minimum of an Int and you subtract 1, in order to not get an error, you must use value underflow, like this:
var a:UInt8 = 0
a &- 1 // 255
This would normally throw an error, but instead it loops back around to the max value of a UInt8. We use that ampersand to say we want value underflow and value overflow.
Customizing Operators
Think about the custom Car class you’ve been working with in this book. It has a name, and you could easily add a price to it. What happens if you want to add two cars together? Swift does not know how to do this, so you need to tell it how. You might want to combine cars by name or by price, or you might want to do something else.
You can overload (that is, tell the operators to do something else) all the operators in Swift to do what you would expect for your custom types.
In the case of the custom Car class, you have to tell Swift how to add these two things together. Here is a full example of how you can define your own equality operator to see if two “ingredients” are equal:
enum DrinkType:UInt8 {
case Cognac = 1, Bitters, Gin, Dry_Vermouth, Absolut
}
struct Ingredient:Equatable {
var quantity = 0.0
var type:DrinkType = .Cognac
}
func == (a:Ingredient,b:Ingredient) -> Bool {
if a.quantity == b.quantity {
if a.type == b.type {
return true
}
}
return false
}
var someGin = Ingredient(quantity: 2.5, type: .Gin)
var someDryVermouth = Ingredient(quantity: 0.5,type: .Dry_Vermouth)
var someAbsolut = Ingredient(quantity: 2.5, type: .Absolut)
var dryMartini = [someGin,someDryVermouth]
var absolutGibson = [someAbsolut,someDryVermouth]
var availableDrinks = ["Dry Martini":dryMartini,"Absolute Gibson":absolutGibson]
class Drink {
var contents = [Ingredient]()
func serveIt() -> String {
for (key,value) in availableDrinks {
if contents == value {
return "Serving \(key)"
}
}
return "Drink not available."
}
}
var drink = Drink()
drink.contents.append(someGin)
drink.contents.append(someDryVermouth)
drink.serveIt()
This is quite a significant example, but I want to make sure you get the gist of why you have to define your own operators. In this example, you define a bunch of ingredients for drinks in an enum. You create an Ingredientstructure so that you can give a quantity and drink type. Now when you have those quantities and drink types together, you cannot compare them using ==. Try it out. It will not work because you need to first say that the struct itself is Equatable. What this really means is that it can be used for comparison with a == operator. Without marking the struct as equatable (you should try this), you get an error when you try to compare two ingredients.
When the Ingredient is Equatable, you have to define how you are going to compare two ingredients. What you really want here is to make sure the quantity and type are the same. You make a global == function to define what happens when you compare two ingredients. You make it global because that’s the way that Swift works. Don’t worry: You can define as many of those == functions as you need, as long as you are comparing something other than ingredients. That will make the method signature different—and it will make it legit.
Now you can create a new drink by using the Drink class, and you can try to serve the drink. Swift is able to loop through the dictionary of available drinks and compare its current drink contents to see whether it matches a recipe for another type of drink. This example can compare only two ingredients because that is the functionality you wrote. You could also create other operators for this struct as well. Such operators are called binary operators because they take two parameters, one on each side of the operator (for example, a == b). You can also create unary operators, which operate on only one side (for example, -a or a++). When the operator is on the left, it is called a prefix unary operator, and on the right it is a postfix unary operator. You could define these for your Ingredient class to increase the quantity of the ingredient by 1. Here’s how you write that function, which you can add right below your == function:
postfix func ++ (inout a:Ingredient) -> Ingredient {
a.quantity += 1
return a
}
var someGin = Ingredient(quantity: 2.5, type: .Gin)
someGin++
Now you have the ability to create an ingredient and increment its quantity by 1. In this case you are using a postfix operator because you put the operator after the instance of the struct. You use inout because you want to modify the object itself. Usually with these unary operators, you use an inout parameter. Also note that if you define multiple binary and unary operators, you can use them within each other’s definitions. For example, if you defined a binary addition operator, then you could use it to increase the quantity for the definition of the ++ operator.
The only operators you can’t redefine are the assignment and ternary operators (that is, a = b and c ? d : e). That one with the question mark is the ternary operator.
Making Your Own Operators
In addition to redefining operators, you can make your own. Custom operators can start with these characters:
/ = - + * % < > ! & | ^ . ~
They can also start with Unicode math, symbol, arrow, dingbat, and line/box drawing characters. All characters after the first one can be any of the preceding characters and/or Unicode characters. In this section, you’ll define the binary ~<*^*>~ operator, just to be extreme. (This arm-flailing-starry-eyed-looking-up operator won’t do anything impressive or useful.)
To define an operator, you must use the keyword operator and define it as prefix, infix, or postfix, like this:
infix operator ~<*^*>~ {}
Here you are putting the operator into existence. You haven’t actually defined what it does yet.
Next, you define what the operator does. Note that because you use sqrt here, you need to import UIKit:
func ~<*^*>~ (a:Ingredient,b:Ingredient) -> Ingredient {
let c = sqrt(a.quantity)
let d = sqrt(b.quantity)
let e = pow(c, d)
return Ingredient(quantity: e, type: a.type)
}
var someDryVermouth = Ingredient(quantity: 0.5,type: .Dry_Vermouth)
var someAbsolut = Ingredient(quantity: 2.5, type: .Absolut)
var newIng = someDryVermouth ~<*^*>~ someAbsolut
newIng.quantity //0.578115871271409
What the operator actually does is up to you. At this point, the new operator is completely useless, but you can see that you can really name your operators however you like.
You have three options when creating operators: infix, prefix, and postfix operators. An infix operator has arguments on both sides of the operator, and the operator you just made is an example of this type. A prefix operator is placed before the argument. Here’s an example of this:
prefix operator --- {}
prefix func --- (inout a:Ingredient) -> Ingredient {
a.quantity -= 2
return a
}
---someGin
Here you are creating a triple minus decrement, which will subtract not 1 but 2. It is a prefix operator because you write the triple minus before the variable.
A postfix operator is used after the variable. Here’s an example of a custom postfix operator:
postfix operator +++ {}
postfix func +++ (inout a:Ingredient) -> Ingredient {
a.quantity += 2
return a
}
someGin+++
Here you are creating a triple plus increment, which will add not 1 but 2. It is a postfix operator because you write the triple plus before the variable.
Bits and Bytes in Real Life
In this section, you are going to pull in a file and read its bits and bytes. You should be able to decode the file according to the specifications. Let’s see what you can do with it. If you are using a Mac, then you already have Python installed, which means you can simply start a local webserver without installing anything. You are going to host a GIF file and read it in. You can use any GIF you want, but I have prepared one for you at http://i.imgur.com/j74SykU.gif.
To start up a new single-view application, follow these steps:
1. Select File > New > Project.
2. Make sure IOS > Application is selected and click on Single View Application.
3. Set Product Name to GIFReader and make sure language is set to Swift.
4. Click Next.
5. On the Save screen, click Create. You now have AppDelegate.swift, Main.storyboard, and ViewController.swift.
6. Open ViewController.swift and edit the viewDidLoad function, like this:
override func viewDidLoad() {
super.viewDidLoad()
loadGIF()
}
7. Write the skeleton for the loadGIF function, like this:
func loadGIF() {
}
8. Create a new file that does the URL requesting. Call it Service.swift and add the following:
import UIKit
class Service {
var url = "http://i.imgur.com/j74SykU.gif"
func getGIF(callback:(NSData)->()) {
request(url,callback)
}
func request(url:String,callback:(NSData)->()) {
var nsURL = NSURL(string: url)
let task = NSURLSession.sharedSession().dataTaskWithURL(nsURL) {
(data,response,error) in
callback(data)
}
task.resume()
}
}
Here you create a generic request method that requests any data from any URL and returns that data. It is a good amount of code, so you should abstract it away. You use NSURLSession.sharedSession().dataTaskWithURL(url) to grab some data from a URL. You could easily modify this to return JSON data as well. If you were writing a larger app, you could write a function like getPosts, getComments, or getWhatever, and all you would have to do is call request(url,callback).
9. Save your file and go back to ViewController.swift. Right above the viewDidLoad method, as the first line in the class, instantiate your service so you can use it:
var service:Service = Service()
10. In your new loadGIF function, load the GIF:
func loadGIF() {
service.getGIF() {
(data) in
println("Got GIF: \(data.length)")
}
}
11. Notice the brevity of the function to load the GIF. You have abstracted away all the messy loading and created a simple closure to load the GIF. You should now have the entire GIF in the data parameter, which is of type NSData. Now the bits and bytes can begin. Test your app by running it with Command+R. You should see a trace statement saying that it got the data and will print out the length. (You can be sure it’s the right length if you inspect the real file with Command+I. When I did this, I saw that it was 1.97 MB. The println command returned "Got PSD: 1978548" for me, which says that the length of the data is in bytes.)
12. Remove println. Now you need to take each byte from the data and place each byte into an array. You can use an array of UInt8s to divide everything up 1 byte at a time. After these few lines, you will have a new array containing 1 byte per array element. It’s not always useful to load everything into memory, but the point of this example is to show you how to work with bits and bytes. You will use the getBytes from NSData, and you will provide the length of the whole thing. In real life, you might want to load a little bit at a time. Hopefully you aren’t using a 300 MB GIF. Change your code like so:
func loadGIF() {
service.getGIF() {
(data) in
var bytes = [UInt8](count:data.length, repeatedValue:0)
data.getBytes(&bytes, length: data.length)
println(bytes.count)
}
}
Here you create an array of 0 the length of the data. Then you take that array and make a buffer to fill with the data. You basically pass in the bytes array like an inout parameter, and it fills it up with the right bytes. You can now check the bits and bytes to see whether it conforms to the GIF file specifications. That isn’t a whole lot of code, and most of it loads the file.
However, you don’t need to store the bytes in an array. Sometimes you will need to do this but not this time. There are even easier ways to read the data. You need to get the first 6 bytes and see if it is equal to "GIF89a" or something else. You can do that with one line of code by rewriting loadGIF():
func loadGIF() {
service.getGIF() {
(data) in
println(NSString(data: data.subdataWithRange(NSMakeRange(0, 6)),
encoding: NSUTF8StringEncoding))
}
}
Here you use NSString, which has an initializer to create a string from data. You don’t want all the data; you just want to check the first 6 bytes, so you use NSMakeRange to create a range from 0 to 6. You set the encoding to NSUTF8StringEncoding. When you run this, the console should say "GIF89a" (or something similar). This means the GIF file is legit because version numbers as of July 10, 1990 are "87a" for May 1987 and "89a" for July 1989.
13. Get the width and height of the file at bytes 7 and 8 and at bytes 9 and 10:
func loadGIF() {
service.getGIF() {
(data) in
var current = 0
var newCurrent = 0
println(NSString(data: data.subdataWithRange(NSMakeRange(0, 6)),
encoding: NSUTF8StringEncoding))
current = 6
var width = [UInt16](count:1, repeatedValue:0)
newCurrent = current + 2
data.getBytes(&width, range: NSMakeRange(current, newCurrent))
current = newCurrent
println(width)
var height = [UInt16](count:1, repeatedValue:0)
newCurrent = current + 2
data.getBytes(&height, range: NSMakeRange(current, newCurrent))
current = newCurrent
println(height)
}
}
Keep track of where the current byte pointer is. Otherwise, you are going to have to keep a count in your head. You know the width and height come right after the GIF signature. You get the width and height at the next 4 bytes, with 2 bytes each. You use a UInt16 to represent 2 bytes. Because UInt8 represents 1 byte, this means a UInt32 will represent 4 bytes.
14. Now you need to find out whether the gif contains a global color table. And for that you can inspect the first bit of the next byte:
var packed = [UInt8](count:1, repeatedValue:0)
data.getBytes(&packed, range: NSMakeRange(current, 1))
var hasGlobalColorTable = false
if packed[0] & 1 == 1 {
//odd first bit is 1
hasGlobalColorTable = true
}
var restOfLogicalScreenDescriptor = 3
current = current + restOfLogicalScreenDescriptor
println(hasGlobalColorTable)
15. You grab the next byte by using UInt8. You can do a trick to find whether the first bit is a 0 or a 1. By using & 1, you can see if that equals 1 and therefore the first bit is 1. You also need to take into account the rest of this block. You add 3 more bytes to account for the rest of logical screen descriptor since you are not using it right now anyway.
As you can see, there are a lot of steps involved in getting all the data out of a GIF file. Here you’ve seen the gist of reading binary data based on a specification. UInt8 represents 1 byte, UInt16 represents 2 bytes, and so on and so forth. Depending on your next size step in the specification, you can grab however large a piece you need (in bytes).
Summary
In this chapter you have learned how to create your own custom syntax. These features are super-duper powerful and can be combined in many different ways. When you combine them with trailing closures and @autoclosures(which you will learn about in Chapter 9, “Becoming Flexible with Generics”), the possibilities are endless. You can define your own way of processing data with your own custom operators using your own custom classes made of ASCII pandas and Hebrew letters. You can, technically, use the subscript syntax however you want, but remember that with great power comes great responsibility. You have to be careful not use them as functions but to use them as element assessors.
You’ve also learned in this chapter that generics give you real power. You can now apply everything from this chapter and the previous ones to create your own dictionaries and custom arrays.
In this chapter, you’ve also learned how to program at the bit level. In this chapter you’ve learned how to pull data from a URL and then parse it. You can now take any specification and parse away, and you can also create your own specifications.