Troubleshooting Your Mac: A Joe On Tech Guide (2015)
Chapter 4. Solve Common Problems
Now that you have a collection of basic problem-solving techniques under your belt, it’s time to move on to specific problems. I realize that many problems you may encounter aren’t mentioned here (in which case, move on to Troubleshoot Novel Problems), but these are 21 of the most common Mac problems for which there’s a straightforward path to a solution.
Note: One category of Mac trouble I don’t cover here is font misbehavior. If you need help troubleshooting a font-related problem, read Sharon Zardetto’s Take Control of Fonts in Snow Leopard. It hasn’t been revised in several years, but it remains the only book about Mac font problems and much of its advice is still worthwhile.
Your Mac Won’t Turn On
One day you sit down at your Mac and press the power button, but instead of the reassuring startup chime you hear nothing. No power light, a blank screen—no sign of life. This is an especially good time to remember not to panic. Take a deep breath and try these steps in order until the problem goes away:
1. Check the entire electrical path. Start with the power cord where it connects to your Mac and make sure it’s firmly seated. Then make sure the other end is plugged in tightly. If you have anything else between the plug and the wall outlet—such as an outlet strip, surge protector, or UPS—check each of the plugs along the chain. Also, check for crimps or sharp angles in the cords, which could mean broken wires inside. If you find or suspect a broken wire, replace the cord. (If you were using a surge protector and there was a lightning strike or power surge, it may have sacrificed itself to protect your Mac. Be sure to check its failure indicator.)
If all the connections look good, try plugging a lamp or other device into the same outlet as your Mac to verify that the juice is flowing. If not, check your building’s circuit breakers.
2. If your Mac uses an external display (I’m thinking of the Mac mini and the Mac Pro), confirm that it’s not just the display that isn’t working. As in step 1, check the connections (both to AC power and to your Mac), and make sure the display is turned on. (Apple’s Cinema displays have no power switch.) If possible, connect the display to another computer to confirm that it works.
3. Unplug everything from the Mac except the keyboard, mouse, and display (on a Mac laptop, disconnect everything but the power adapter), and press the power key again. If it turns on, suspect a faulty peripheral; you can figure out which one by reconnecting your peripherals one at a time, restarting after each.
4. Reset the SMC. (See Reset NVRAM or SMC.) This reset can be done without power.
If none of these procedures brings your Mac back to life, it’s time to call a repairperson. See Go to the Source.
Your Mac Stalls During Startup
You press your Mac’s power button (or restart it), you hear the startup chime, and then you see a gray screen. But then…nothing. Maybe the Apple logo appears, maybe not, but no matter how long you wait, the startup process remains stuck.
This problem may have any number of causes, so the best thing to do is address the possible difficulties systematically.
Plain Gray Screen
If the gray screen is completely blank, try each of these steps in order until your Mac starts normally:
1. Detach all wired peripherals from your Mac except for your keyboard and mouse (or other pointing device); on a Mac laptop, disconnect everything but the power adapter. Although I’m thinking primarily of USB devices here, you should also detach any Thunderbolt or FireWire devices.
Now press and hold the power button for about 10 seconds to shut down your Mac, wait a few seconds, and press the power button again to turn it back on. If your Mac returns to life, one of the things you unplugged was hindering startup. You’ll have to try them one at a time to see what the culprit was. Note that some USB devices work perfectly well except that they keep your Mac from booting. If the device you find to be problematic is also essential, you can unplug it every time you’re about to restart and plug it back in once your Mac is up and running.
2. Try a safe boot (see Start Up in Safe Mode). If your Mac completes the startup process, try restarting normally. If the stall returns, move on to step 3.
3. Clear the NVRAM and SMC (see Reset NVRAM or SMC).
4. Make sure your RAM is behaving (see Check Your RAM). If you’re unable to use tools such as Apple Hardware Test or Apple Diagnostics, you can try turning off your Mac and removing any user-accessible RAM modules, one at a time (trying to turn on your Mac again after each one). If your Mac has no user-accessible RAM, or if the behavior is the same no matter which module(s) you remove, move on to step 5.
5. Check your disk (see Run Disk Repair Utilities).
If, even after all those steps, your Mac still hangs during the startup process, it’s time to talk to a professional (see Go to the Source).
Gray Screen with “No Startup Disk Found” Icon
If the gray screen has a folder with a flashing question mark, or a prohibitory (slashed circle ⃠) icon, it means your Mac can’t find a valid startup volume. That in turn could mean any of the following:
· Your Mac has “forgotten” which volume you want to start up from.
· Your startup volume is damaged.
· The physical drive on which your startup volume resides is malfunctioning.
If this happens, try the following steps:
1. Press and hold the power button for about 10 seconds, until your Mac shuts off completely.
2. Press the power button again, but then immediately hold down ⌘‑R to start in OS X Recovery (see Start in OS X Recovery).
3. When you see the OS X Utilities screen, choose Apple → Startup Disk. If your startup volume appears, select it, click Restart, and skip the remaining steps.
4. If your startup volume didn’t appear at all in the Choose Startup Disk window, do the following:
a. Click Restart anyway, but again hold down ⌘-R to return to OS X Recovery. (Merely quitting Startup Disk often leads to a blank screen rather than to the list of recovery utilities.)
b. Select Disk Utility and click Continue.
c. Select the your startup disk and click First Aid (if you’re running El Capitan) or go to the First Aid tab and click Repair Disk (in Yosemite or earlier).
d. After the repair process is complete, choose Apple → Startup Disk, select your startup disk, and click Restart.
5. If even that doesn’t work, try reinstalling OS X on your startup disk. (Doing so won’t erase any of your data or apps.) You can do this either by restarting in OS X Recovery, selecting Reinstall OS X, and following the prompts or, if you have a bootable duplicate, by starting from the duplicate and running the OS X installer from there.
If none of these steps work, if Disk Utility says it can’t repair your disk, or if you don’t see the startup disk at all in Disk Utility or the OS X Installer, it’s time to take your Mac in for repair (see Go to the Source).
Note: If your Mac’s screen shows the flashing question mark, but only for a moment (and then it continues with the startup process), go to System Preferences → Startup Disk, reselect your startup volume, and then close System Preferences.
Gray Screen with Apple Logo and Spinning Gear
If the Apple logo appears on the gray screen, but then the spinning gear icon also appears below it and keeps spinning for several minutes or more with no further change, this generally means your Mac has found a valid startup volume but the copy of OS X installed on it is damaged or incomplete in some way. If this happens, try the following steps in order until your Mac is able to start up normally:
1. Press and hold the power button for about 10 seconds, until your Mac shuts off completely.
2. Press the power button again, but then hold down Shift to try a safe boot (see Start Up in Safe Mode). If your Mac completes the startup process, try restarting normally. If the stall returns, move on to the next step.
3. Force another shutdown (as in step 1) and then press the power button again. But this time, hold down ⌘-R to use OS X Recovery. Select Disk Utility, and click Continue. Select your startup disk and click First Aid (if you’re running El Capitan) or go to the First Aid tab and click Repair Disk (in Yosemite or earlier). After the repair process is complete, choose Disk Utility → Quit Disk Utility, choose OS X Utilities → Quit OS X Utilities, and click Restart.
4. If you have a third-party disk repair utility (see Get a Disk Repair Utility), try running it now.
5. If disk repair fails to enable your Mac to start, try reinstalling OS X on your startup disk. (Doing so won’t erase any of your data or apps.) You can do this either by restarting in OS X Recovery, selecting Reinstall OS X, and following the prompts or, if you have a bootable duplicate, by starting from the duplicate and running the OS X installer from there.
If none of these steps work, or if Disk Utility says it can’t repair your disk, it’s time to seek professional help (see Go to the Source).
Your Mac Keeps Turning Itself Off
Perhaps the problem isn’t that your Mac won’t turn on, but that it keeps turning itself off when you don’t want it to. This could signal a problem with your Mac’s power supply, logic board, or RAM, or even a malfunctioning fan.
Before taking your Mac in to the shop for a potentially expensive repair, try the following:
· Check to see that the power cord is firmly seated (on both ends). If your Mac is plugged into an outlet strip, make sure it’s also plugged in securely. While you’re at it, check the cable to see that there’s no visible damage. Even if it looks fine, try a spare cable if you have one.
· If your Mac is plugged into a UPS, make sure the UPS itself is working and that it can run the Mac from battery. If not, a small power fluctuation could result in the Mac losing power when you thought it was being protected by the UPS.
· Carefully check the settings in System Preferences → Energy Saver. In particular, click the Schedule button and verify that your Mac is not set to shut down automatically.
· Start Up in Safe Mode and run your Mac for a while to see if the problem recurs.
· Reset the NVRAM and SMC (read Reset NVRAM or SMC).
· Check Your RAM. But note that sometimes even RAM that passes all tests with flying colors can lead to random shutdowns because of subtle variations from Apple’s specifications. For example, the late-2010 iMacs often exhibit this problem when outfitted with 16 GB of third-party RAM (lower amounts of RAM, and Apple’s factory-installed RAM, appear to be fine). I encountered this problem myself, and in my case the solution was to replace the RAM with the same brand (Samsung) that Apple uses.
· Check your fan(s). Most Mac models have at least one cooling fan; some have several. (The MacBook introduced in 2015 is the first Mac to have no fan at all; I wouldn’t be surprised if others follow.) If a fan is broken, components inside your Mac can overheat, and in such cases your Mac may shut down to prevent permanent damage. One easy way to check on the health of your Mac’s fan(s) is to use a free utility such as one of these:
§ Macs Fan Control (alt.cc/5q)
§ smcFanControl (alt.cc/5r)
Both of these utilities display the current speed of each of your fans (as well as other statistics) and let you manually adjust the speeds if need be. If your Mac is shutting down unexpectedly, what you’re looking for is any fan with a speed of 0 (or far below the minimum speed shown), even when the Mac is busy and its internal temperature is high. That could indicate a malfunctioning fan. If you’re handy with tools and don’t mind fiddling with your Mac’s innards, you might be able to replace it yourself. Otherwise, you’ll have to pay a professional to do it for you.
If your Mac continues to shut itself off or restart randomly after you’ve tried all these suggestions, it’s time to take it in for repair (see Go to the Source).
Your Fan Runs Excessively
In the previous topic, I suggested that a broken fan could lead to overheating, which, in turn, may cause your Mac to turn off spontaneously. The flip side of that problem is a fan that runs too much—as in, it’s so noisy that it’s distracting, and the noise is evident most or all of the time.
Fans help to cool off your Mac’s internal components, which is important because overheating can lead to physical damage. If it’s evident from the sound that a fan is working too hard, that suggests one of the following:
· The inside of your Mac is unusually hot. This may be caused by software that simply requires a great deal of processing power over a sustained period of time; it could also be that a component (such as a hard drive) is faulty and thus overheating. Or—perhaps the most common cause—dust is blocking the flow of air, forcing the fan to compensate.
· Your Mac is incorrectly telling the fan to run. A faulty temperature sensor, or an erroneous System Management Controller (SMC) setting, could cause this.
Try the following steps until your fan noise returns to tolerable levels:
· See if it’s a software problem. Use Activity Monitor to see if an app is keeping the CPU unusually busy. If so, the app might have a bug or need updating, or you might need to reduce the number or complexity of tasks you’ve asked the app to do.
· Eliminate dust. See the sidebar Deal with Dust, ahead.
· Reset the SMC. See Reset NVRAM or SMC.
· Check for other hardware faults. Use Apple Hardware Test or Apple Diagnostics (both covered in Check Your RAM) to see if another component is reporting a failure.
If all those steps fail, consult an expert (see Go to the Source).
Deal with Dust
If you know or suspect that dust is gunking up your Mac, you can remove it with a soft brush, a battery-powered or antistatic vacuum cleaner with a hose attachment, or a can of compressed air.
Start by de-dusting the ventilation openings on the outside of your Mac. Then move on to the inside:
1. Shut down your Mac.
2. Touch a metal portion of the case to discharge any static electricity.
3. Unplug your Mac; also unplug any peripherals or other cables.
4. Carefully open the case. If it’s not a model that’s easily accessible (like a Mac Pro), consult your Mac’s manual (you can download manuals from Apple at alt.cc/an) or the Apple support website (alt.cc/as) for instructions.
5. Remove any visible dust using your tool of choice.
6. Close the computer’s case, reattach peripherals and other cables, and turn it back on.
For more details on dust removal, see Maintaining Your Mac: A Joe On Tech Guide (alt.cc/mym).
Your Mac Is Abnormally Slow
A single app running slowly is annoying, but when your entire Mac slows down, getting even simple tasks done can be an exercise in frustration. You can use any of numerous tactics to return your Mac to its usual peppy state.
Discovering the causes of Mac slowdowns is a surprisingly complex undertaking. I can’t do justice to it in a couple of pages here. In fact, it’s worth its own entire book—which is in preparation as I write this. Check joeontech.net/books for my book Speeding Up Your Mac: A Joe On Tech Guide, scheduled for publication in December 2015. That book will go into vastly more detail—and will show you how to perform rigorous tests to figure out the exact causes of slowdowns and the extent to which various procedures improve your Mac’s speed.
For now, in the interest of offering something to get you started, here are a few “quick fix” steps to take that can solve common performance problems:
1. Restart your Mac. After restarting, you may find that your Mac runs more slowly the longer you use it. If so, continue with one or more of the following steps.
2. Quit inactive apps. You may want to keep some apps, like your email client, open all day. But anything that’s running in the background can drag your CPU down. (Some apps are kinder than others about CPU usage when they’re in the background; consult Activity Monitor to find out which ones are using the most juice.)
3. Prune login items. Once you’ve quit some background apps, you need to make sure they don’t run automatically the next time you log in: Go to System Preferences → Users & Groups → Login Items and locate any items in the list you don’t need to open when you log in. Select each one and click the minus ![]() button.
button.
Note: Several other mechanisms exist to launch background processes, but for the sake of simplicity I’m omitting them here. Suffice it to say that if an app includes a problematic background process, uninstalling that entire app is usually the best and most reliable solution.
4. Log out of other accounts. If you use Fast User Switching, other logged-in accounts may be draining system resources. Switch to another account using the Fast User Switching menu in the menu bar, log out, and repeat this with any additional accounts except your own.
5. Upgrade your firmware. I cover this in You Experience Repeated Kernel Panics. It’s a quick, easy procedure that may or may not speed up your Mac, but it can prevent problems that could lead to slow performance.
6. Reset the SMC. In certain cases resetting the SMC can perk up an otherwise slow Mac. See Reset NVRAM or SMC.
7. Update OS X. At minimum, make sure that you’ve applied any free updates (using the Updates view in the App Store), because minor updates always fix bugs and often improve performance. In most cases, it pays to install major upgrades too.
8. Upgrade your RAM. If your Mac doesn’t already hold its maximum amount of RAM, consider adding more. RAM is fairly inexpensive, and it makes a huge difference in performance. If your Mac can hold 16 GB of RAM or less, I suggest maxing it out. (Especially if your Mac currently has 4 GB of RAM or less, I recommend upgrading—to at least 8 GB.) You might need even more if you work with high-end video, audio, graphics, or scientific software, but very few people would benefit from as much as 64 GB (the current maximum in a Mac Pro).
If you’ve done all this and still find your Mac is slow, don’t worry; a great deal more advice is coming in Speeding Up Your Mac: A Joe On Tech Guide.
You Can’t Empty the Trash
Once in a while, you may choose Finder → Empty Trash and get an error message saying a file can’t be deleted. The error message may give several reasons for this, such as the file being in use, being locked, or having permissions that prevent you from deleting it.
If you’re running Yosemite or Mavericks, the easiest solution is to choose Finder → Secure Empty Trash, which works nearly all the time (regardless of the cause).
El Capitan has no Secure Empty Trash command, but it seems to be much better than earlier versions of OS X at deleting files that would have caused problems with emptying the Trash. If you do have problems emptying the Trash in El Capitan, try this:
1. Open Terminal (in /Applications/Utilities).
2. As a safety measure to avoid accidentally deleting all your files, type the following command, and then press Return:
cd ~/.Trash
3. Type the following:
sudo rm -R
followed by a space (the space is very important).
Note: The command above works only if you’re logged in to an administrator account. If you aren’t, leave off the sudo part of the command.
4. Open the Trash window, select everything inside it, and drag the selected items into the Terminal window.
5. Press Return.
6. Enter your administrator password when prompted.
You can download numerous utilities that can force the Trash to empty, but in my opinion this procedure is sufficiently simple that nearly anyone can do it—and it requires no extra software.
An App Grinds to a Halt
At some point you’ve undoubtedly seen your pointer turn into a spinning rainbow pinwheel ![]() as an app stops responding. Apple calls this the “spinning wait cursor,” but most Mac power users I know refer to it as the SPOD—the initials stand for “spinning pizza of death,” “spinning pinwheel of doom,” or any of several other clever variants—or the spinning beach ball. It indicates that an app has been unresponsive for more than a few seconds. Most of the time, other software continues to function, and your pointer appears as a SPOD only when it’s over one of the windows of the problematic app (or another of its elements, such as its menu bar or Dock icon).
as an app stops responding. Apple calls this the “spinning wait cursor,” but most Mac power users I know refer to it as the SPOD—the initials stand for “spinning pizza of death,” “spinning pinwheel of doom,” or any of several other clever variants—or the spinning beach ball. It indicates that an app has been unresponsive for more than a few seconds. Most of the time, other software continues to function, and your pointer appears as a SPOD only when it’s over one of the windows of the problematic app (or another of its elements, such as its menu bar or Dock icon).
Apps can stop responding temporarily for many different reasons. Sometimes they’re working hard at a task and don’t even take a breath, as it were, for a considerable period of time. Or you could be running low on free RAM, causing apps to slow down as they lean more heavily on virtual memory. An app could also have a bug that causes it to hang. Whatever the reason, the SPOD is annoying because it means you can’t do anything with that app until it goes away.
When you encounter the SPOD, follow these steps until the problem goes away:
1. Wait. More often than not, the SPOD goes away on its own—after a few seconds or, occasionally, as long as a few minutes. If the problem resolves itself and doesn’t return, you don’t need to do anything else.
2. Quit other apps. If you have many apps open at once, they can use up such a large proportion of your Mac’s memory and CPU cycles that the app you’re actively using doesn’t have enough breathing room. So quit apps you aren’t actively using, or at least close extra windows (including open windows in the Finder and tabs in your web browser), to free up extra resources. To see a list of apps and background processes that don’t show in the Dock, Use Activity Monitor.
3. Force-quit. After two minutes or so of waiting—especially if you’ve quit as many other apps and closed as many windows as you can—you can be fairly confident that the app with the SPOD isn’t going to come back to life. (If you want additional confirmation that it’s truly stuck, look for the app’s name in Activity Monitor; if it’s shown in red with “(Not Responding)” after it and stays that way for more than 30 seconds or so, it’s unlikely to start working again.) Your best bet is to force-quit it; see Force-Quit an App for details. (Note that in so doing, you’ll lose any unsaved work, but you may not have any choice.)
4. Restart. As I’ve said elsewhere in this book, restarting clears up a lot of common complaints. If a relaunched app hangs again, try restarting (see Restart Your Mac).
5. Check your disk space. If an app continues to run slowly even after your restart, make sure you’re not running low on free disk space. Learn more in Check Free Disk Space.
6. See if you have a damaged preference file. For instructions, read Check Preference Files.
7. Check for software updates. If the app was running slowly due to a bug, it may have been fixed in a more recent version. Download and apply any available updates.
8. Try more RAM. If you run lots of apps at once, or if you run just one or two apps with voracious RAM appetites (I’m thinking of software such as Photoshop and Final Cut Pro), you’ll likely find that your Mac runs rather slowly if it has, say, 4 GB of RAM or less. If your Mac can accommodate 16 GB or less, I suggest installing as much RAM as it will hold. Beyond that, only power users are likely to see much of a speed boost with more RAM.
9. Contact the developer. When none of these steps solve the problem, contact the developer’s tech support department. They may know what the problem is or be able to suggest more concrete next steps.
I’ll say more about dealing with the nefarious SPOD in Speeding Up Your Mac: A Joe On Tech Guide, planned for publication in December 2015.
Looking for Signs of Life
When an app stops responding, OS X itself may have seized up. If so, you’ll be unable to switch to other apps, force-quitting may not work, and you may even lose keyboard and mouse control. Holding down the power button to force a shutdown is usually the only cure. However, those symptoms could also mean than that an app is monopolizing your processor temporarily. How can you tell the difference?
The key is to take steps before your Mac hangs to provide clues as to its activity level. You can do this in either or both of two ways:
· Go to System Preferences → Date & Time → Clock, make sure Digital is selected, and check “Display the time with seconds,” “Flash the time separators,” or both. Later, if a freeze occurs, look at the clock in your menu bar. If the seconds display doesn’t change or the colons don’t flash for more than a minute or two, your Mac is unlikely to return to life on its own; restart it manually.
· Download a utility that displays a CPU usage meter in your menu bar, Notification Center, or some other handy place. My personal favorite is MenuMeters (alt.cc/2d); for other options, search for “CPU monitor” in the App Store.
When your Mac appears to hang, check the CPU meter. If the value changes over a period of a minute or two, your Mac is simply busy, so I suggest continuing to wait for a while. If it’s stuck for more than a few minutes, restart your Mac manually.
An App Crashes
When an app crashes in OS X, it usually disappears without warning. A few seconds later, a dialog like the one shown in Figure 8 appears. The translation is: something went wrong. We don’t know what (although clicking Show Details may provide some clues—at least to the app’s developer). You can relaunch the app and keep your fingers crossed that it won’t crash again.
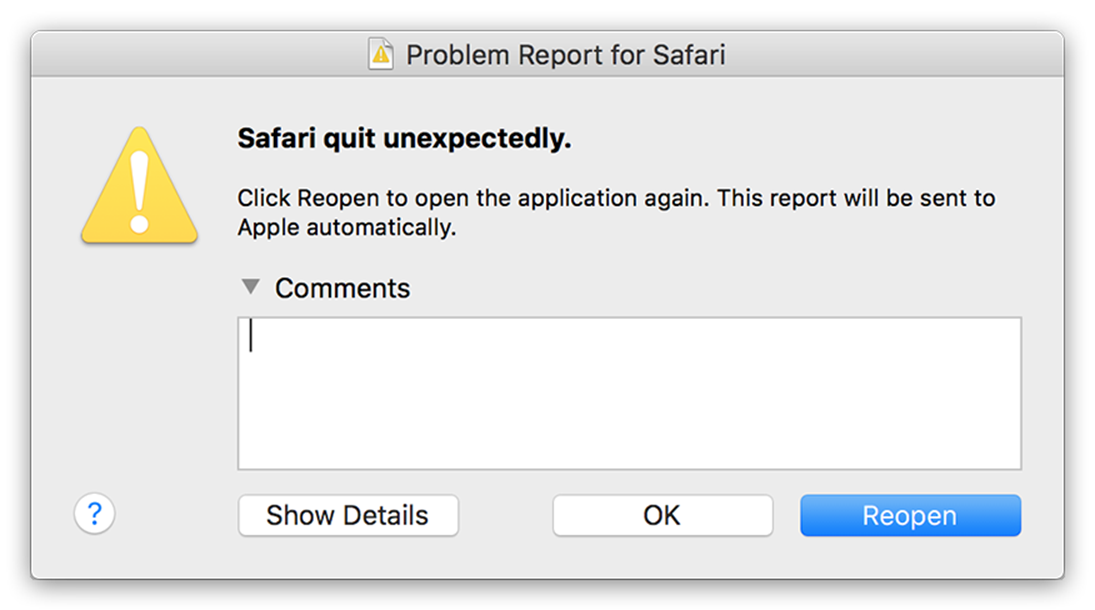 Figure 8: An app crash usually produces a dialog like this one.
Note: A few apps, notably Microsoft Office, have their own mechanisms for reopening after crashes and may not display this dialog. If you experience a crash without this type of dialog, move on directly to step 2 in the directions below.
When an app crashes, try each of these steps in sequence until the app runs without crashing:
1. Click Reopen. Often, clicking this button is all you need to do, and your app works properly from then on. Clicking Reopen (or OK) automatically sends details about the problem and your system configuration to Apple (as well as to the app’s developer, if you gave OS X permission to share that data). If you prefer not to send this data, go to System Preferences → Security & Privacy → Privacy, click the lock ![]() icon in the lower-left corner, and enter your credentials; then, select Diagnostics & Usage in the list on the left and uncheck either or both of “Send diagnostic & usage data to Apple” and “Share crash data with app developers.” If you choose not to send data to Apple, the options in future crash dialogs change to Ignore, Report, and Reopen.
icon in the lower-left corner, and enter your credentials; then, select Diagnostics & Usage in the list on the left and uncheck either or both of “Send diagnostic & usage data to Apple” and “Share crash data with app developers.” If you choose not to send data to Apple, the options in future crash dialogs change to Ignore, Report, and Reopen.
Be aware that even in the very best case, a bug fix, if needed, may not appear for weeks or months. So by all means send the reports if you like, but don’t assume that doing so will lead to a quick (or indeed any) solution.
Note: If the app crashes again after you click Reopen, you can keep trying, but success is unlikely.
2. Restart. As usual, restarting often cures what ails your Mac. Be sure to launch the app in question right after you restart, and check to see if it runs correctly.
3. Try another document. Sometimes a damaged document (or, for a browser, a badly behaving website) can cause an app to crash. To check this, close the document (or webpage) you were working in and open a different one or create a new one.
4. Check your preferences. A damaged preference file can also result in an app crash. Follow the steps in Check Preference Files, earlier, to check or reset the app’s preferences. If you rule out a bad preference file as the cause of the problem, continue with the next step.
5. Update your software. Make sure you’re running the latest version of the software that’s crashing. The developer may have fixed the bug that caused your problem.
6. Repair disk permissions. No luck yet? If you’re still running Yosemite or Mavericks, repairing disk permissions is worth a try, particularly if the app in question is from Apple. (As a reminder, repairing permissions is neither possible nor necessary in El Capitan.) SeeRepair Permissions.
7. Log in as a different user. Log out (choose Apple → Log Out username) and log back in again using your test user account (see Log In to Another User Account). If the app no longer crashes, something in your home folder was probably causing the problem.
Back in your main account, look through the folders in ~/Library (especially in ~/Library/Application Support) and in System Preferences → Users & Groups → Login Items, and remove any items you may have added or updated recently. One of those is very likely the culprit.
8. Try a safe boot. Read Start Up in Safe Mode for details. If rebooting in safe mode solves the problem, you know that some system-level process is at fault or that one of the caches disabled by safe mode was corrupted. First try restarting normally and see if the problem is gone. If not, look inside the folders in /Library, particularly the Extensions, LaunchAgents, and LaunchDaemons folders, for anything that’s been added recently. Move any suspicious files to your desktop, restart normally again, and relaunch the app.
9. Run a disk repair utility. See Run Disk Repair Utilities. All sorts of random disk errors can lead to app crashes.
10. Reinstall the software. If the app still crashes, there’s a chance—albeit a remote one—that the app itself, or one of its support files, is damaged in such a way that only reinstalling it can help. So you can try deleting it completely, including its preference file and any other supporting files. Then download and install a fresh copy.
Tip: It can be difficult to find all the components that an app has spread all over your disk, but numerous uninstaller utilities exist that can simplify the task. I mention several of these near the end of Check Free Disk Space.
11. Check your logs. If you’ve gotten this far and the app is still crashing, be sure to look at your logs for clues (see Check Log Files). If they don’t point to any causes you can discern, contact the developer’s tech support department.
12. Check your backup. Try restarting from your bootable duplicate and running the app. If it works correctly, consider cloning your backup disk back onto your startup disk. If your latest backup wasn’t extremely recent, you may need to exercise caution to avoid overwriting newer files that you still want to keep. But this is still faster and easier than the final option…
13. Reinstall OS X. When all else has failed, that’s what you need to do—but it’s not as bad as it sounds. Check the sidebar A Clean Start for more details.
You Experience Repeated Kernel Panics
When a single app crashes, it’s annoying, but at least the rest of OS X usually continues to function. Occasionally, though, you may find that your Mac restarts spontaneously (always, of course, at a most inconvenient time); when the screen comes back on, a message like the one in Figure 9 appears. What has happened is known as a kernel panic—a type of low-level, system-wide crash that OS X can’t recover from.
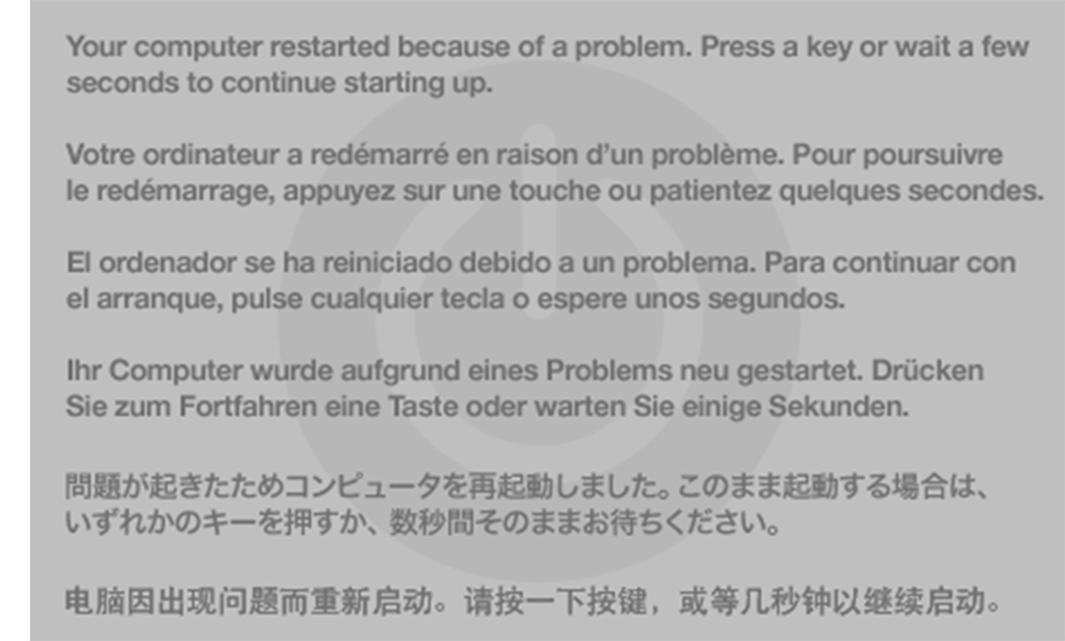 Figure 9: This mysterious-looking message means you’ve just had a kernel panic. Follow the instructions, and then if it recurs, take steps to solve the underlying cause.
A single isolated kernel panic is usually nothing to worry about. Follow the instructions: press a key or wait a few seconds, and let your Mac start up normally. During startup, you’ll see two extra dialogs:
· The first asks whether you want to reopen the apps that were open before the crash. The thinking here is that if one of the open apps was the cause of the crash, you wouldn’t want it to open again. In my experience, however, apps are rarely the cause of kernel panics, so I’d suggest clicking Open. (If the crash recurs immediately, click Cancel next time; if the problem is gone then, you also have pretty good evidence that one of your open apps caused the problem.)
· The second dialog offers to let you report the problem to Apple (click Report) or pretend nothing happened (click Cancel). If you click Report (which I recommend, because it will help Apple solve problems like this one in future versions of OS X), a window appears that contains more information about the crash. (You can toggle the display of the extra information by clicking Hide Details or Show Details.) This information is largely inscrutable to anyone who isn’t a programmer, but it’s there so that you know what information Apple is collecting. Click OK to send the report.
If you see a kernel panic only once, or only rarely, that’s all you need to do. However, if kernel panics happen often (say, more than once per week), something more serious may be afoot.
Unlike app crashes, kernel panics tend to occur seemingly randomly, making them difficult to reproduce. It doesn’t usually make sense to try something, test whether the panic recurs, and then move on to the next step. Instead, if you realize a kernel panic is happening repeatedly, start by doing all these things:
· Check for software updates. Any of the apps that were running when the kernel panic occurred may have bugs that resulted in the crash. Download and apply any available updates (see Keep Your Software Up to Date).
· Make sure your firmware is up to date. Firmware updates, like software updates, are available through Software Update (choose Apple → Software Update). In addition, Apple provides complete details on how to find out whether firmware updates are available for your Mac, and how to download and install them if so. See Apple’s support article at alt.cc/4f.
· Check your disk space. A kernel panic could be a sign that you’re running critically low on free disk space. If necessary, delete unneeded files to free up extra space; see Check Free Disk Space.
· Make sure your RAM is healthy. See Check Your RAM. In the process of running Apple Hardware Test or Apple Diagnostics, you may also discover other hardware errors that could be the cause of a kernel panic.
· Check your logs for clues. When a kernel panic occurs, OS X stores information about it in a log file. Even if you can’t make sense of all the details in this log file, glancing at it (especially the most recent portion before the panic) may give you a sense of which component(s) of your system may have either triggered, or been the victim of, the panic. Open the Console utility (consult Check Log Files) and look for entries in /Library/Logs/DiagnosticReports.
If you continue having kernel panics and your logs weren’t helpful in pointing out a possible cause, try each of these steps in order:
1. Unplug peripherals. If you have anything plugged into your Mac other than a keyboard, mouse or trackball, display, and Ethernet cable, unplug it. (On a Mac laptop, unplug everything but the power adapter.) Restart, and see if the kernel panic recurs. If not, add the devices back one at a time, restarting after each one:
§ If you find the one that causes the crash, check that you’re using the latest driver software (if the peripheral requires software); if so, contact the developer for help. (If you have a spare device of the sort that’s causing problems—an extra mouse, say—you can try that in the meantime.)
§ If the panics continue with all devices unplugged, move on to step 2.
2. Try a safe boot. Read Start Up in Safe Mode for instructions. If the problem goes away, look in the folders inside /Library and ~/Library for files you’ve added recently. (To make this easier, choose View → As List and then click the Date Modified column to sort the folder’s contents by how recently they were changed.) In particular, look in /Library/Extensions and /System/Library/Extensions for any third-party items you remember adding. This may include things like drivers for audio interfaces and input devices, security software, and certain system enhancements. If you find any, look for an uninstaller provided by the developer, and if there is one, use it. If not, consult the documentation that came with the software, or the developer’s website, for removal instructions. (I recommend against manually dragging these items to the Trash unless you can find no other way to remove them.)
Restart and see if the problem goes away. If it does, reinstall the apps that use the kernel extensions (or other uninstalled files) one at a time, restarting after each one, until you find the culprit.
If, after you’ve done all these things, the kernel panics continue, your only recourse may be to reinstall OS X. See the sidebar “A Clean Start,” next, for specific advice.
A Clean Start
When you can’t get rid of a kernel panic, consider reinstalling OS X. This isn’t the quickest or easiest troubleshooting step, but it needn’t be painful either—as long as you do it the right way. When the time comes to reinstall, follow this procedure:
1. Be sure you have at least one up-to-date bootable duplicate.
2. Restart using OS X Recovery (see Start in OS X Recovery).
3. Select Reinstall OS X and click Continue.
When the process is complete, your Mac reboots—hopefully without the kernel panic!
The Keyboard or Mouse Doesn’t Work
Few computer problems are more frustrating than an unresponsive input device, because it can prevent you from performing the usual troubleshooting tricks you’d normally use! If your keyboard or mouse stops working—or if your mouse pointer moves but its clicks don’t register—you can typically resolve the problem in one of several ways.
Wired Devices
If your input device is connected via a USB cable (look for a USB ![]() logo on the cable or next to the port on the Mac), follow these steps in order until the device starts working again:
logo on the cable or next to the port on the Mac), follow these steps in order until the device starts working again:
1. Unplug the device, wait 10 seconds, and plug it in.
2. Plug it into a different USB port (preferably one built into your Mac itself rather than on a keyboard or hub).
Note: If your input device is normally plugged into a hub and step 2 resolves the problem, the hub could be at fault. If it has a power adapter, make sure that it’s plugged in securely (on both ends). Try unplugging the hub from both the Mac and AC power and reattaching it, then reattaching your input device to the hub. If it still doesn’t work, suspect the hub; they go bad sometimes and must be replaced.
3. Restart. Notice a trend here? Restarting cures many ills. (And remember, as discussed in Restart Your Mac, you can do so using the keyboard alone if your mouse isn’t working, and using the power switch alone if neither keyboard nor mouse is working.)
Tip: If you’re using a third-party input device that comes with its own software (I’m thinking of brands like Kensington, Logitech, and Microsoft) or you’re using a utility to modify your input device’s behavior (such as USB Overdrive), and nothing else has worked, this is a good time to check for an update to your mouse or keyboard software.
4. Unplug any other USB peripherals that may be connected, and restart again.
5. If possible, verify that the input device works on another computer. If it doesn’t, the device may be broken; contact the input device manufacturer for assistance.
6. If you have a spare input device, plug it in and try using it.
If your input device doesn’t respond after any of these steps, and other input devices don’t work either, your Mac may require service (see Go to the Source).
Bluetooth Devices
If your Bluetooth mouse or keyboard isn’t responding, try these steps:
1. Check your device’s batteries. If the battery level is low, or if you’re not sure, recharge or replace the batteries.
2. Make sure the device is turned on. For good measure, turn it off and back on again; if it’s somehow stuck, this may unstick it.
3. Temporarily turn off any other Bluetooth devices in the vicinity; they could be causing interference.
4. Re-pair the device. First, go to System Preferences → Bluetooth, hover over the device, and click the X ![]() icon that appears next to it to unpair it. Next, make sure the device is discoverable (the procedure to do so varies from one device to the next; check its instruction manual or the manufacturer’s website). Then, still in System Preferences → Bluetooth, wait a moment or two for the device to show up in the list, click the Pair button next to the device, and follow the prompts.
icon that appears next to it to unpair it. Next, make sure the device is discoverable (the procedure to do so varies from one device to the next; check its instruction manual or the manufacturer’s website). Then, still in System Preferences → Bluetooth, wait a moment or two for the device to show up in the list, click the Pair button next to the device, and follow the prompts.
5. If possible, verify that the input device works on another computer. To do this, first unpair it from your Mac and pair it to the other Mac (just as in step 4). If it doesn’t work on another computer, the device may be broken; contact the input device manufacturer for assistance. If the device appears to be functional, move on to the last step.
6. If you have a spare USB input device, plug it in and use it. It’s likely that your Mac’s Bluetooth circuitry isn’t working, so visit or call a repair facility for assistance (see Go to the Source).
You Lose Your Internet Connection
Not all that many years ago, connecting to the internet was a special activity that most of us did on occasion by using a modem and a dial-up account. Nowadays, although dial-up access has its place, most Mac users have a high-speed, always-on connection of one sort or another—typically via DSL, cable, or a satellite link. And an increasing number of apps, from search tools to backup software, assume that your internet connection is always available. So if your connection suddenly goes down, getting even basic work done may be difficult—and some apps may refuse to run at all.
If you’re setting up a new DSL, cable, or satellite connection, your internet service provider is the best source of help. And if you’ve just installed a new router or AirPort base station, look at the included instructions for troubleshooting tips. But if your connection was working fine, and it disappears without your having done anything different, follow these steps in order until you’re able to connect:
1. Check your web browser. If you notice an internet outage while in a web browser, try a different one. (Safari, for example, may lose its connection even though other browsers work well.) And if you notice it in an email client or other app, open a browser. Try visiting a few websites that are normally reliable (like apple.com, google.com, and amazon.com).
Tip: If your browser displays a button labeled Network Diagnostics, click it and follow the prompts to run that utility. Or, alternatively, run the Network Diagnostics utility manually by going to System Preferences → Network, clicking Assist Me, and then clicking Diagnostics. This tool effectively automates steps 2 and 3, which you can then skip.
If some sites respond but not others, it could indicate a web server failure or a routing problem somewhere on the internet—either one is likely intermittent. (You can use the Down for Everyone or Just Me site at isup.me to check whether the problem is related to your location on the internet.) If no sites respond in any browser, continue to the next step.
2. Check your Ethernet or AirPort connection:
§ If your Mac connects to a router, switch, or modem using Ethernet, check the cable connections at both ends; you could even try a different cable if you have one. If the cable appears to be working, move on to step 3.
§ If you connect to the internet wirelessly, make sure the connection is active by checking the Wi-Fi ![]() menu in your menu bar. If that menu is absent, go to System Preferences → Network and select the “Show Wi-Fi status in menu bar” checkbox. Even if it is active, you might try choosing Turn Wi-Fi Off from the menu, waiting a few seconds, and then choosing Turn Wi-Fi On; occasionally this can jog an unresponsive connection back to life.
menu in your menu bar. If that menu is absent, go to System Preferences → Network and select the “Show Wi-Fi status in menu bar” checkbox. Even if it is active, you might try choosing Turn Wi-Fi Off from the menu, waiting a few seconds, and then choosing Turn Wi-Fi On; occasionally this can jog an unresponsive connection back to life.
If the connection is not active, verify that you’re using a network for which you have access privileges, and that the signal level is consistently above one bar.
3. Try another computer. If you have more than one computer using the same internet connection, see if another computer can connect. If not, skip to step 6. But if the other computer can connect, your internet connection itself is working, so you’ll need to look for a more specific problem.
4. Check for a self-assigned IP address. If your Mac is configured to use dynamic IP addressing (as is usually the case for home broadband connections) and it’s unable to get an IP address from your router or your ISP, it will assign itself an address beginning with 169.254. When that happens, you won’t be able to connect to any computers outside your local network.
To check, go to System Preferences → Network. Your current connection should be preselected at the left. If the IP address (shown to the right) begins with 169.254, it’s self-assigned. To request a new IP address, click Advanced, click TCP/IP, and then click Renew DHCP Lease button. Wait a few seconds. If you get a new, router-assigned IP address, check your browser to see if your connection is live.
5. Restart your Mac. If your IP address isn’t self-assigned, or if trying to get a new address doesn’t help, your next step is to restart your Mac. After restarting, check a website or two to confirm that your connection is restored.
6. Reset your router or base station. If your connection still isn’t working, look beyond your Mac. Whatever equipment is between your Mac and your outside internet connection—which may include your DSL or cable modem, AirPort base station or third-party wireless access point, other routers, or switches—should be reset. Power it off (or, if it has no power switch, unplug it). Wait 10 seconds, and power it back on. If you have more than one such device, do this for all of them, powering them back on in order of closeness to the internet (the DSL, cable, or satellite modem; then your AirPort Extreme Base Station or other router; then your Ethernet switch; etc.). Make sure each device has booted completely before powering up the next one.
Once everything has reconnected, try accessing a webpage again.
7. Check your DNS settings. Still no luck? There’s another thing to check. Sometimes your internet service provider doesn’t specify the addresses for DNS (Domain Name System) servers, instead supplying them to your computer dynamically. If their default DNS servers aren’t responding for any reason—or if the addresses for those servers don’t get through to your Mac—you might not be able to reach any other computers on the internet.
You can test whether your DNS settings are causing problems by entering the IP address for a website in your browser. For example, enter http://70.186.26.26 to go to www.google.com, which is highly reliable, and then:
§ If you get an error message, proceed to step 8.
§ If Google’s webpage does appear, you know that DNS settings are at fault. So go to System Preferences → Network and select your current network connection in the list on the left. Click Advanced and then click DNS.
In the DNS Server(s) field, you should have one or more IP addresses entered. If not, and if your ISP supplied you with addresses for its DNS servers, enter them now. Otherwise, enter these two addresses (one on each line), which point your Mac to OpenDNS, a free DNS service: 208.67.222.220 and 208.67.222.222. Click OK (if applicable) and then Apply, and try connecting again.
8. Try a ping test. If DNS appears to be working but you still can’t connect, there’s one more thing you can check. When you ping another computer, you send it a “packet”—a tiny message to say, essentially, “Is anyone there?” If you get no response, it usually means either that computer isn’t functioning or your internet connection is dead; if you get a slow response, it can mean hardware problems at your ISP (among other things).
To do a ping test, open Network Utility (in /Applications/Utilities) and click Ping at the top. Enter 70.186.26.26 in the address field (again, to go to www.google.com), make sure “Send only 10 pings” is selected, and click Ping. You should see a series of messages as shown in Figure 10.
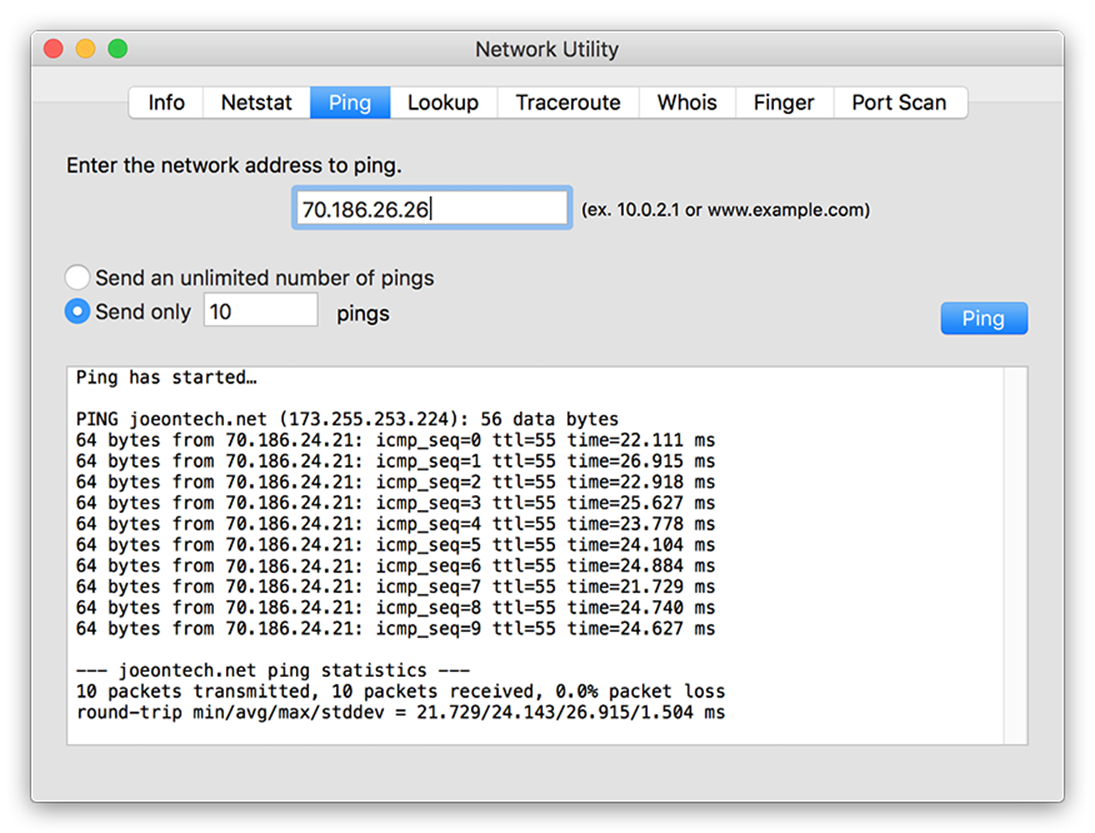 Figure 10: Using Network Utility’s ping feature can help you tell whether your internet connection is healthy, flaky, or nonexistent.
If all the packets sent were received (0% packet loss) and the whole process took less than 30 seconds or so, your internet connection is working. If the summary line near the end says that none of the packets were received (100% packet loss), your internet connection is down. If only some of the packets weren’t received, or if completion of the test required several minutes or more, the slowdown is most likely with your ISP or other internet routing equipment.
If all these steps fail, contact your ISP for assistance.
Printing Doesn’t Work
Printing is a hugely complex topic. Because printers fall into so many categories and can be connected in so many ways, lots of things can cause printing problems. So I want to concentrate on a few of the most likely causes and solutions to printing problems. In this section, I assume that your printer was previously working fine with your Mac but then suddenly stopped printing entirely.
(If it prints, but the printout is distorted or otherwise incorrect—or if it never printed in the first place—consult the documentation that came with your printer and consider contacting the printer manufacturer’s tech support. If you’re seeing incorrect fonts on printed pages, you may find a solution in Sharon Zardetto’s somewhat outdated but still useful Take Control of Fonts in Snow Leopard.)
If you get nothing out of your printer—for more than one document and from at least two different apps—follow these steps, trying to print after each one and stopping when you’ve succeeded:
1. Make sure the printer is plugged in. While you’re at it, check the cable connecting it to your Mac (or your router or AirPort base station), if there is one.
2. If your printer’s icon is already showing in the Dock, click it. If not, then go to System Preferences → Printers & Scanners (or, in some versions of OS X, Print & Scan), select your printer on the left, and click Open Print Queue. If there’s a button in that window’s toolbar labeled Resume, click it. (Ordinarily, when the queue is running, it’s labeled Pause.) Also, if there’s a job in the list with a status of Hold, select it and click Resume.
3. Select any print jobs in the list and click Delete.
4. Turn your printer off, wait a few seconds, and turn it back on.
5. If your printer is connected to a router, AirPort base station, or any other intermediate device, turn off that device, wait a few seconds, and turn it back on.
6. Go back to System Preferences → Printers & Scanners. Select your printer and click the minus ![]() button. Then click plus
button. Then click plus ![]() or Add, and follow the prompts to set it up again.
or Add, and follow the prompts to set it up again.
7. If you have another Mac, see if you can print to this printer from it. If you can, you know the problem is with your Mac and not your printer. So double-check your cabling or other networking connection to the problematic printer.
If none of these procedures get your printer working again, contact the printer’s manufacturer, a consultant, or a repair shop for assistance (see Find a Consultant and Go to the Source).
Spotlight Searches Fail
If Spotlight searches fail blatantly (such as no results appearing for a common term), you can try any of several repair techniques, depending on the scope of the problem.
Searching Is Broken in Apple Mail
In Apple Mail, when you search only message headers (To, From, or Subject), Mail gets its results from its own index, whereas when you search message content, Mail relies on the system-wide Spotlight index. For whatever reason, Spotlight seems to fail within Mail more frequently than it does elsewhere. That’s why you may sometimes encounter a situation in which the Entire Message button is disabled when you search in Mail, but searching in headers still works.
If that happens—or if searches yield no results when you can clearly see there are messages with matching content—try each of these steps, in order, until the problem goes away:
1. Make sure that neither the folder ~/Library/Mail nor any of its parent folders is in Spotlight’s Privacy list (in System Preferences → Spotlight → Privacy).
2. You may have mailboxes whose contents have not yet been downloaded to your Mac. To ensure that they have been, choose Mailbox → Synchronize → account name. (This may take some time.)
3. Force Mail to rebuild its envelope index—that is, its internal metadata index. To do this, first quit Mail. In the Finder, go to ~/Library/Mail/V3/MailData (in El Capitan) or ~/Library/Mail/V2/MailData (in Yosemite or Mavericks) and drag the files Envelope Index, Envelope Index-shm, and Envelope Index-wal to the Trash. Open Mail again. It will say you need to “import” all your messages again, which is Mail’s way of saying it needs to rebuild its index. This process should take only a few minutes.
4. Open Terminal (in /Applications/Utilities) and enter the following command, followed by Return, to re-import your Mail messages into the Spotlight index:
mdimport -r /System/Library/Spotlight/Mail.mdimporter
If none of those steps solve the problem, skip ahead to Spotlight Indexes Are Damaged to learn how to rebuild your entire Spotlight index.
Tip: For additional Mail troubleshooting tips, see Apple Mail Fails to Connect, ahead.
Spotlight Fails on Certain Document Types
Spotlight relies on a series of special importer files that tell it how to index the contents of various kinds of documents. For example, Mail has its own importer (mentioned just previously), and there’s one each for PDF, Rich Text, Microsoft Office, and numerous other document types. Third-party apps sometimes include their own importers to supplement those supplied as part of OS X. If searches for a certain document type fail, the first thing to try is to ask Spotlight to re-import all (and only) the documents of that type.
The way to do this is to open Terminal (in /Applications/Utilities) and enter mdimport -r followed by a space and then the full path to the importer in question. Those importers can be found in /System/Library/Spotlight, /Library/Spotlight, or~/Library/Spotlight. (Feel free to peruse those folders to see what’s there; it varies from one Mac to another, depending on the version of OS X you’re using and which third-party software you’ve installed.)
Here are some examples of what you might enter in Terminal:
· iWork: mdimport -r /Library/Spotlight/iWork.mdimporter
· Microsoft Office: mdimport -r /Library/Spotlight/Microsoft\ Office.mdimporter
· PDF: mdimport -r /System/Library/Spotlight/PDF.mdimporter
If the problem still exists, move on to the next possibility: rebuilding Spotlight indexes from scratch.
Spotlight Indexes Are Damaged
When Spotlight gets fundamentally confused and its system-wide index is out of whack, you can tell it to start over—that is, to trash your entire Spotlight index and allow Spotlight to rebuild it from scratch. The rebuilding process goes on in the background, but it may take several hours. It will also likely slow down your Mac while it’s working, so it’s best to do this just before bedtime or when you otherwise won’t be using the Mac. Follow these steps:
1. Make sure you’re logged in to an administrator account on your Mac.
2. Open Terminal (in /Applications/Utilities) and enter the following:
sudo mdutil -E /
3. Press Return and enter your password when prompted.
When your Mac finishes rebuilding the Spotlight indexes, searching should work once again.
Keychain (Seemingly) Forgets Passwords
OS X’s keychain stores usernames and passwords for a long list of network and local services, including those from your email accounts in Apple Mail and web-based forms that you can optionally store while browsing the web with Safari. If your keychain file becomes damaged, a variety of symptoms can result, such as failure to connect to a wireless network, a file or mail server, or iCloud, even though the passwords are stored in your keychain and you’ve connected successfully in the past.
If you suspect a keychain problem, using Keychain First Aid—a feature built into the Keychain Access utility—is a good first troubleshooting step:
1. Open Keychain Access (in /Applications/Utilities).
2. Choose Keychain Access → Keychain First Aid.
3. Enter your keychain password in the Password field.
Note: In the earliest versions of 10.11 El Capitan, the Password field is missing, which sort of complicates this procedure! I’ve reported this to Apple as a bug. In the meantime, this procedure may or may not work, but you should at least be able to verify your keychain.
4. Select the Repair button.
5. Click Start.
Keychain First Aid scans, and attempts to repair, all your keychains. The bottom part of the window displays the log of messages about the repair process, noting any errors that were resolved; most errors cause no problems for users, so don’t worry about them.
If your keychain still doesn’t work, I suggest restoring it from your backup. (The keychain file you want to restore is located in ~/Library/Keychains and is called login.keychain unless you manually changed it.)
Apple Mail Fails to Connect
Apple Mail is a powerful and capable email client—still, after all these years, my favorite of the many I’ve used. But it does have a reputation for failing to connect properly to receive or send email, seemingly at random times and for no apparent reason. If this happens to you, several remedies are possible. Try them in order until you get things working again. (This information was adapted from my book Take Control of Apple Mail, which has a lot more information about using Apple Mail and fixing its problems.)
Check Connection Doctor
Choose Window → Connection Doctor. In the Connection Doctor window, Mail lists every incoming and outgoing email account you’ve configured. It attempts to log in to each account, and if it fails with any of them, it shows an explanation of why it failed. These explanations aren’t always helpful, but they often give you a good starting point in debugging your problem, and they’re written in refreshingly plain English. If the Connection Doctor window suggests a specific fix, try that first. Otherwise, proceed with the following steps.
Fix Incoming Mail Problems
If Mail cannot download incoming messages, the cause may be anything from an incorrect setting in Mail to a server problem or loss of internet connectivity. Work through each of the following sections until you resolve the problem.
Username and Password Errors
Sometimes, even after successfully checking your email many times with the password you entered when setting up an account, Mail displays a dialog claiming that the mail server has “rejected” your password. Worse, you may re-enter your password—and even select “Remember this password in my keychain”—but find that another error message pops up as soon as you click OK. This annoyance may be due to any number of causes, but most have simple solutions.
If Mail suddenly begins prompting you for your password repeatedly when checking incoming mail (after retrieving it correctly earlier), try these steps in order until the problem goes away:
1. Click Cancel, and then check your email again in a minute or two. Sometimes the problem goes away on its own. (If your account is offline—not connected to the mail server—choose Mailbox → Take All Accounts Online.)
2. Check and repair your keychain, following the instructions earlier in Keychain (Seemingly) Forgets Passwords.
3. If the problem persists, return to Keychain Access. Make sure that Passwords or All Items is selected under Category, locate your mail server in the list (for iCloud accounts, the entry’s name should show the Apple ID you use for iCloud, and its type should be “application password”), select it, and click Delete. The next time you check your email, you’ll be prompted for your password; enter it, select “Remember this password in my keychain,” and click OK. In most cases, the re-entered password should “stick” from then on.
4. If even that doesn’t work, your mail server may be at fault. Try checking your messages with another email client (a dedicated email app, not webmail in your browser). If the other client also gives you error messages, ask your ISP for help.
Connection Errors
Sometimes, when talking to a mail server, Mail encounters an error before it even gets to the point of sending your password. These errors tend to fall into two categories, which I call “squiggles” and “bangs.”
If you see a lightning bolt ![]() symbol, which I call a “squiggle,” next to an account name in your sidebar, that account is offline. The problem could also affect your Mac as a whole.
symbol, which I call a “squiggle,” next to an account name in your sidebar, that account is offline. The problem could also affect your Mac as a whole.
Tip: If you don’t see the individual account names in your sidebar, click the disclosure triangle next to the Inbox icon.
If you encounter a squiggle, follow these steps until the problem goes away:
1. Check your internet connection. Visit your favorite website to make sure your Mac can access the internet. If it can’t, the problem relates to a failed Internet connection (see You Lose Your Internet Connection).
2. Try bringing your accounts online manually. To reestablish a connection, click the squiggle ![]() symbol next to an account name. Sometimes this jogs the connection back to life.
symbol next to an account name. Sometimes this jogs the connection back to life.
3. Check mail server availability. Mail servers occasionally crash, and sometimes become unreachable due to network problems. If you get as far as this step, contact your ISP to see if there’s a problem with the server or the network.
If an account remains offline even after you complete the preceding steps, contact your email provider to see if there’s a problem.
If you see an alert ![]() symbol, which I call a “bang,” next to an account name in your sidebar, that account had a failed connection. This generally means Mail could contact the server but received an error message before it could log in.
symbol, which I call a “bang,” next to an account name in your sidebar, that account had a failed connection. This generally means Mail could contact the server but received an error message before it could log in.
If you encounter a bang, follow these steps:
1. Try again. Click the bang ![]() symbol to see the error message Mail encountered. In the dialog that appears, click Take All Accounts Online. Sometimes errors are fleeting and go away if you do this.
symbol to see the error message Mail encountered. In the dialog that appears, click Take All Accounts Online. Sometimes errors are fleeting and go away if you do this.
2. Check your port number. Trying to connect to the wrong port will always cause a bang. Go to Mail → Preferences → Accounts → account name → Advanced and see what number is in the Port field. For IMAP, it’s normally 143 if SSL is off, or 993 if SSL is on; for POP, it’s 110 if SSL is off, or 995 if SSL is on. Some email providers may use different ports, though; consult the information your provider gave you when you signed up, or your provider’s support website, if you’re in doubt.
If the number is wrong, first uncheck “Automatically detect and maintain account settings” (if present), then enter the correct number. Close the Preferences window, save changes when prompted, and try connecting again.
3. Verify your SSL setting. Another problem that can cause a bang is an incorrect SSL setting. Some POP and IMAP servers support SSL, some don’t. To check your SSL setting, go to Mail → Preferences → Accounts → account name → Advanced. Uncheck “Automatically detect and maintain account settings” (if present), then toggle the state of the Use SSL checkbox, close the Preferences window (saving changes when prompted), and try to connect again.
In most cases, one of these changes will solve your problem.
Fix Outgoing Mail (SMTP) Problems
One of the most frequently reported problems with Mail is an inability to send messages: after you click the Send button, an error message appears. Rather than go into every detail about the many possible causes, symptoms, and solutions, I want to focus on two central points. If you get an error when sending mail, most likely the reason is one of the following:
· You have incorrect SMTP settings (which could include a missing password—Mail sometimes “forgets” these for no obvious reason).
· The ISP running the network you’re currently connected to is blocking the port Mail wants to use.
In both cases, the solution is usually to make sure you know the correct settings and then enter them in the proper places.
Find the Correct Settings
When you initially set up your email account, your email provider should have supplied you with a short list of information you’d need to access your account:
· Your username, password, and email address
· Addresses for the incoming (POP, IMAP, iCloud, or Exchange) mail server and the outgoing (SMTP) server
· Whether the incoming and/or outgoing servers use SSL (secure sockets layer), which encrypts email in transit
You may also have received the following information:
· What authentication method the servers use to verify your identity (for example, Password, MD5 Challenge-Response, or Kerberos)
· What port(s) the incoming and outgoing servers can use
You’ll need all this information now. If you can’t find it in your records or on your email provider’s website, contact their customer service department for assistance.
Fix the “Incorrect Settings” Problem
An SMTP server typically requires several settings to be correct: email address, username, and password; the server’s address; the port; the authentication method; and the SSL setting (on or off). If any one of these is wrong, you won’t be able to send mail. Unfortunately, Mail’s error messages don’t always clarify which setting might be incorrect.
If an error message doesn’t provide an obvious solution, do this:
1. Go to Mail → Preferences → Accounts → _account name → _Account Information.
2. From the Outgoing Mail Server (SMTP) pop-up menu, choose Edit SMTP Server List.
3. Confirm that the correct SMTP server is already selected in the list at the top; if not, select the one you want.
4. In the Account Information view, confirm that the address in the Outgoing Mail Server (SMTP) field in the bottom portion of the dialog is exactly what your email provider specified (typically something like smtp.example.com).
Note: This setting can’t be changed for iCloud accounts.
5. In the Advanced view, confirm that the server port, Use SSL checkbox, authentication method, username, and password exactly match what your email provider specified. If any of these items are incorrect, or if you’re not sure, change the information and click OK. (You may need to uncheck the box next to “Automatically detect and maintain account settings.“) Note that some email providers expect you to use your entire email address as the username.
Now, choose Window → Connection Doctor and wait for it to complete its checks. Next to the SMTP server you just modified, if you see a green dot (on the left) and the text “Connection and login to server succeeded” (on the right), the change worked.
6. Still having problems? Return to the Advanced view from step 5. Choose a different authentication method, click OK, and repeat the check in Connection Doctor. Repeat this step up to five times, trying each method (including None) in turn.
7. If you’re still unable to send mail, return yet again to the Advanced view from step 5, select “Allow insecure authentication,” click OK, and check Connection Doctor again. (Normally this is applicable only with the Password authentication method, so you don’t have to repeat this with each method.)
8. If even that didn’t work, try one more thing. Back in the Advanced view, toggle the Use SSL checkbox, click OK, and repeat the check in Connection Doctor. If that doesn’t work, move on to the suggestions for fixing a blocked port, next.
Fix the “Blocked Port” Problem
TCP port 25 is the “channel” most email apps use to send mail. But many ISPs routinely block the use of port 25, except when used for email originating within that ISP’s network and sent via its own SMTP servers. For example, if you’re a Kabletown customer and connect via cable modem from your home, you could send email via Kabletown’s SMTP server through port 25. But you couldn’t send mail using, for example, smtp.gmail.com on port 25 (because that server is outside the network from which you’re connecting); similarly, if you take your laptop to a coffee shop whose network service is provided by another ISP, that network would likely block port 25, preventing you from reaching your regular Kabletown SMTP server while you’re away from home.
Either way, the result is an error message when you try sending email from a particular account—even though you might be able to send from that account at another location, or from another account at your current location.
One way to solve this problem is to switch to a different port—one that isn’t blocked. For this to work, your email provider must support the use of the alternative port. To learn whether they do, check their website or contact their tech support department—or try one of the commonly used alternatives. The most commonly used alternative ports are 465 and 587, and Mail is smart enough to try these two ports automatically if port 25 doesn’t work. (In El Capitan and Yosemite, Mail tries these other ports only if the “Automatically detect and maintain account settings” checkbox is selected; see step 4 just ahead.)
However, if your provider uses a less common port (such as 2525) you can enter that manually:
1. Choose Mail → Preferences → Accounts → account name → Account Information.
2. From the Outgoing Mail Server (SMTP) pop-up menu, choose Edit SMTP Server List.
3. Confirm that the correct SMTP server is already selected in the list at the top; if not, select the one you want.
4. In the Advanced view below, uncheck “Automatically detect and maintain account settings” (if present), enter the port number (whatever your email provider told you) in the Port field, and click OK.
Now, choose Window → Connection Doctor and wait for it to complete its checks. Next to the SMTP server you just modified, if you see a green dot (on the left) and the text (on the right) “Connection and login to server succeeded,” all is well. If not, contact your email provider for assistance.
If no alternative port solves the problem, you have three options:
· Use your email provider’s webmail interface to send mail until you return to your regular network.
· Send your email message from a different account in Mail, if one is available that doesn’t suffer from the port-blocking problem.
· Use a virtual private network (VPN), such as those provided at modest cost by Cloak (getcloak.com), PublicVPN (publicvpn.com) or by WiTopia (witopia.net), or the free Hotspot Shield service (hotspotshield.com).
A VPN makes it appear to remote servers as though your Mac is on a different network, not the one you’re actually connected to, and in most cases the VPN won’t block port 25. Once you connect your Mac to the internet using one of these services, you should be able to send email on whichever port you normally use.
Time Machine Misbehaves
Of the nearly 100 Mac-compatible backup apps out there, Time Machine has the distinct advantage of being built into OS X (and thus both free and officially supported by Apple). For reasons I detail in Backing Up Your Mac: A Joe On Tech Guide (alt.cc/buym), I think Time Machine alone is an insufficient backup solution, but it’s reasonably good as far as it goes. However, because you’re entrusting your valuable data to your backup software, it can be especially scary and frustrating when that software flakes out—as Time Machine has been known to do. Worse, Time Machine tends to be pretty opaque; finding out exactly what’s gone wrong or how to fix it can be tricky.
The ways in which Time Machine sometimes misbehaves are numerous, and I can’t cover them all here. But I do want to mention a few of the most common concerns and how to deal with them—as well as point you to some places where you can learn more about other sorts of errors.
Discover a Time Machine Problem
One of the strangest things about Time Machine misbehavior is that it’s often silent—that is, some kinds of failure happen almost invisibly, and unless you know where to look and what to look for, you might not know that backups have been failing for days on end. Backups are so important that I’d prefer to see a prominent alert whenever anything goes wrong, but Time Machine presents such alerts only in what it deems to be exceptional circumstances.
Usually, what you see is more subtle. The Time Machine menu bar icon ![]() (assuming you have it showing) changes in one of two ways, both displaying an exclamation point in the center:
(assuming you have it showing) changes in one of two ways, both displaying an exclamation point in the center:
· If the backup destination disk was unavailable the last time Time Machine tried to run, the icon has a simple exclamation point ![]() in it. (Unfortunately, the exclamation point appears only until the next successful backup. If you have multiple Time Machine backup disks, only one of which is misbehaving, and you don’t look at the icon at just the right time, you might miss it.)
in it. (Unfortunately, the exclamation point appears only until the next successful backup. If you have multiple Time Machine backup disks, only one of which is misbehaving, and you don’t look at the icon at just the right time, you might miss it.)
· If the last backup was not merely delayed due to unavailable media but failed for some other reason, the icon changes to show a triangle with an exclamation point inside it ![]() (the standard “alert” symbol).
(the standard “alert” symbol).
Tip: Because the Time Machine icon in the menu bar is sometimes the only clue that Time Machine is having problems, I recommend making sure it’s visible. If it’s not, go to System Preferences → Time Machine and select “Show Time Machine in menu bar.”
In either of these cases, you can click the Time Machine menu and then choose the first command (either “Latest Backup: Delayed” or “Latest Backup: Failed”) to open System Preferences → Time Machine and display a dialog with explanatory text. (Alternatively, you can go to System Preferences → Time Machine in the usual way; next to the text “Latest backup” will be the word “Delayed” or “Failed” in red, along with a red “i” ![]() icon that you can click to display the same explanatory text.) Regardless of the error type, refer to later portions of this section to find out what to do in response to the provided explanation.
icon that you can click to display the same explanatory text.) Regardless of the error type, refer to later portions of this section to find out what to do in response to the provided explanation.
You may also notice that the regular Time Machine menu bar icon ![]() (with the tiny triangle at the 7:00 position to indicate a backup in progress) simply takes an unusually long time. In this case, once again, click the menu and look at the first item in it to see what Time Machine is currently up to. If it says something like “Calculating Changes” or “Preparing” for more than a few minutes, let it run its course, even if that takes hours. Time Machine has determined that it must double-check every single file on your disk for some reason, and if you interrupt the process, it will simply start all over again later.
(with the tiny triangle at the 7:00 position to indicate a backup in progress) simply takes an unusually long time. In this case, once again, click the menu and look at the first item in it to see what Time Machine is currently up to. If it says something like “Calculating Changes” or “Preparing” for more than a few minutes, let it run its course, even if that takes hours. Time Machine has determined that it must double-check every single file on your disk for some reason, and if you interrupt the process, it will simply start all over again later.
If the menu says something that you can’t understand, launch Console (see Check Log Files), choose File → Open System Log, and type backupd into the Filter field to view only the entries involving Time Machine. What you find could give you some idea of the problem.
Help Time Machine Find an Unavailable Disk
If the Time Machine’s error message tells you that the backup disk is not available (wording may vary slightly), this isn’t necessarily a problem; for example, if you’ve intentionally disconnected the backup disk for some reason, it’s entirely expected. However, if you didn’t deliberately disconnect the backup disk, try one of the following:
· If your backup disk is connected locally (via Thunderbolt or USB, for example), check to see that the disk appears in the Finder (either on the desktop or in the sidebar of a Finder window). If it does, eject it by dragging it to the Trash or by selecting it and pressing ⌘-E. Then physically unplug the drive. If the drive uses an external AC adapter, make sure that the adapter is plugged in on both ends and that the drive’s light is on (indicating it’s receiving power). Then reattach the drive to your Mac.
· If your backup disk is a Time Capsule (or an external disk connected to the Time Capsule), restart the Time Capsule using AirPort Utility (in /Applications/Utilities).
· If your backup disk is another network volume, check to see that the volume appears in the Finder. If it does, eject it. Then reconnect to the network volume in the Finder.
After doing any of these things, return to System Preferences → Time Machine, click Select Disk (or Choose Disk), and verify that the correct volume is selected; if it isn’t, select it and click Use Disk. Then choose Back Up Now from the Time Machine menu.
Fix a Damaged Backup Disk
If the backup volume becomes damaged or corrupted, it can lead to a variety of error messages, such as an inability to copy a certain file or create a folder, a claim that the disk is read-only, or a failure to restore a file. Sometimes you can repair such errors with Disk Utility and then continue your Time Machine backups normally, although in my experience Disk Utility is often unsuccessful. But it never hurts to try.
Do this:
1. Go to System Preferences → Time Machine and turn Time Machine off.
2. If you use a Time Capsule or other network volume, connect using an Ethernet cable if you can, because it will make the repair go much faster.
3. Make sure your Time Machine backup disk is connected and mounted in the Finder. (For Time Capsules or other network volumes, select the device in a Finder window’s sidebar; if it doesn’t mount automatically, click Connect As and supply your credentials if prompted.)
4. Open Disk Utility (in /Applications/Utilities).
5. Select your Time Machine volume:
§ For directly attached hard drives, select the Time Machine volume (indented underneath the disk name) in the sidebar.
§ For internal Time Capsule disks or other network volumes, view the backup volume in the Finder, then navigate within the volume to the folder containing your backups (usually there’s only one, at the top level of the volume, but the name varies); drag the disk image file corresponding to the name of your Mac into Disk Utility. Then select that disk image in Disk Utility’s sidebar.
§ For external disks connected to a Time Capsule, navigate in the Finder to the folder containing your backups and double-click the disk image file corresponding to the name of your Mac. Then select that disk image in Disk Utility’s sidebar.
6. In El Capitan, click First Aid followed by Run; in Yosemite or earlier, click Repair Disk.
Wait for the repair process to complete—and note that it could take a long time (many hours, or even overnight). If it succeeds, you should be back in business; turn Time Machine back on and it should run normally. If it fails, you’re most likely out of luck; you’ll have to erase your backup disk and start over from scratch.
Restore Files After a Hardware or Name Change
Because of the way Time Machine stores its data, certain changes to your system could cause Time Machine to “lose” its backups—to seemingly forget which backups go with your disk, such that no existing backups appear when you visit the Time Machine screen, and your next backup starts over from scratch. Among the changes that could trigger this condition are:
· Restoring your entire disk (not just a few files or folders) from a Time Machine backup
· Having your logic board replaced
· Changing your Mac’s name in System Preferences → Sharing
In these cases, you can retrieve files from your old backup and even reconnect Time Machine to your current disk. To retrieve files from your old backup, right-click (or Control-click) the Time Machine icon in the Dock and choose Browse Other Time Machine Disks from the contextual menu. (Alternatively, Option-click the Time Machine ![]() menu and choose Browser Other Backup Disks.) In the window that appears, select the backup you want to use and click Use Selected Disk. To reconnect Time Machine to your current disk, follow the steps outlined at alt.cc/p3.
menu and choose Browser Other Backup Disks.) In the window that appears, select the backup you want to use and click Use Selected Disk. To reconnect Time Machine to your current disk, follow the steps outlined at alt.cc/p3.
Find Missing Volumes
If you’re using a properly formatted external drive that’s connected directly to your Mac, it will almost certainly appear in Time Machine’s list of potential destinations. (If it doesn’t, try turning the drive off and back on, disconnecting and reconnecting it, or both.) If you’re looking for a network volume—an external drive connected to another Mac—and it’s not in the list, check the following:
· Is the hard drive plugged in (both to AC power and to the other Mac) and turned on?
· Can your Mac see the other Mac on the network? To find out, look in the sidebar of any Finder window. You should see the other Mac’s name listed there. If you don’t see it in the sidebar, check the following:
§ Is the Mac to which the drive is connected on and awake?
§ If you’re using wireless networking, do both Macs have Wi-Fi turned on and connected?
(If you mount the network volume, it still won’t appear in the sidebar if the sidebar isn’t configured to show it. Choose Finder → Preferences to check which items will display in your sidebar.)
· Is the volume mounted on your Mac? To check this, select the computer name in the sidebar. If you’re already connected to that Mac, a list of shared folders and volumes appears. If you see “Connected as: Guest,” click Connect As and enter your credentials—the username and password set up for you on the other computer. Finally, click (in Column view) or double-click (in other views) a folder to mount the corresponding volume. When a server has one or more mounted volumes, an eject ![]() icon appears by its name in the sidebar; in Column view, the same icon appears next to the name of each mounted volume.
icon appears by its name in the sidebar; in Column view, the same icon appears next to the name of each mounted volume.
· Is the volume shared correctly on the other Mac?
Solve Other Time Machine Problems
If your difficulties with Time Machine go beyond what I’ve mentioned here, consult these resources:
· Apple’s official support page on troubleshooting Time Machine is at alt.cc/a4.
· I say a bit more about troubleshooting Time Machine in Backing Up Your Mac: A Joe On Tech Guide (alt.cc/buym).
· The late James Pond created an excellent and extensive website about Time Machine at pondini.org, including a thorough troubleshooting section at alt.cc/p2. Although James is no longer with us, the information is still remarkably helpful (and largely accurate despite having been written a few versions of OS X ago).
A Volume Won’t Unmount
Have you ever tried to eject a CD, disk image, or network volume, only to see an message saying the volume couldn’t be ejected because it’s in use? In some cases, the dialog asks whether you want to eject the disk immediately; if so, click Force Eject. If that doesn’t work—or if the dialog never appears at all—you’ll have to figure out which process is using the volume so you can quit it.
To find the offending process, open Terminal (in Applications/Utilities) and enter the following, substituting for VolumeName the name of the volume you can’t unmount:
lsof | grep /Volumes/ volume name
This command shows any processes that are currently using this volume. For example:
MyApp 8907 jk txt REG 14,6 348480 369666 /Volumes/MyApp/Install MyApp.app/Contents/MacOS/myapp
You’re interested in the first two items in the line: the name of the process (MyApp in this example) and the process ID, or PID (8907 here), which identifies the process that’s using something on the volume you want to eject. Armed with this information, you can quit the process—either by switching to it in the Finder and using the Quit command or by using the kill command in Terminal. First try this command (substituting the process’s PID for PID):
kill PID
If that doesn’t work, try this more powerful variation:
kill -9 PID
Note: This tip is adapted from my book Take Control of the Mac Command Line with Terminal, which also has many more such “recipes.”
The “Open With” Menu Contains Errors
If you right-click (or Control-click) a file in the Finder, the contextual menu that appears has an Open With submenu that lists all the apps known to be able to open that file. Sometimes, however, that menu contains errors, such as duplicate entries for a given app, or a missing app that should be there.
When the Open With menu contains errors, the solution is to rebuild OS X’s Launch Services database, which keeps track of which apps are used to open which files (among other things). Besides errors on the Open With menu, other symptoms of a faulty Launch Services database include the wrong app opening when you double-click a file and incorrect file icons.
To rebuild your Mac’s Launch Services database, open Terminal (in /Applications/Utilities) and enter the following command as a single, long line—with no spaces in the initial path that begins with /System and ends with lsregister):
/System/Library/Frameworks/CoreServices.framework/Frameworks/LaunchServices.framework/Support/lsregister -kill -r -domain local -domain system -domain user
After doing this you may see alerts the first time you open certain apps, because OS X will think they’re being launched for the first time. If you see any such alerts, click OK.
iCloud Data Doesn’t Sync Properly
Most of the time, iCloud “just works”: the data that’s supposed to sync from one of your devices to the others via the cloud does so almost immediately and without incident. But syncing is complex, and sometimes things go wrong. If you notice that data on one of your devices that should be syncing with iCloud is different on your other devices, you can often take steps to correct the problem.
What types of data am I talking about? I’m thinking primarily of the main iCloud categories, like documents (iCloud Drive), calendars, contacts, reminders, notes, Safari bookmarks and tabs, photos in your iCloud Photo Library, and the contents of your iCloud keychain. Keep in mind, however, that many third-party apps and services piggyback on iCloud (particularly on iCloud Drive) for syncing, so the data could be almost anything.
When syncing isn’t working as you expect, try the following steps in order until the problem goes away:
1. Check each device’s internet connection (see You Lose Your Internet Connection).
2. See if any of Apple’s online services are experiencing outages. To do this, visit the Apple Services, Stores, and iCloud status page (alt.cc/ast). If the service you need is down, there’s nothing to be done but wait until Apple fixes the problem.
3. Try turning just the affected data type off and then back on in System Preferences → iCloud.
4. If all else fails, the all-purpose iCloud troubleshooting procedure often works; sign out of iCloud completely and then sign back in:
a. Go to System Preferences → iCloud.
b. Click Sign Out. You’ll see a series of prompts asking whether you want to delete various kinds of data from your Mac. Given the choice, I suggest opting to keep the data, but the decision is of little importance because even if you delete the data from your Mac, iCloud will restore it as soon as you turn it back on.
c. Restart your Mac.
d. Go back to System Preferences → iCloud and sign back in.
e. Turn on all the iCloud features you want to use, and wait while iCloud resyncs your data.
5. If even step 4 fails, you may need to sign out on all the devices you use with iCloud and then sign back in on all of them.
To learn more about iCloud, read Take Control of iCloud (alt.cc/tcic).
Continuity Features Fail
In Yosemite and iOS 8, Apple introduced a suite of features that’s collectively called Continuity (alt.cc/5t). The intent of Continuity is to make it easier to shift between your Macs and iOS devices—and, indeed, to make them interchangeable to a large extent.
Continuity features include:
· Handoff: Start working on a document or email message, or performing some task, on one device and then continue on another, right where you left off.
· Instant Hotspot: Use your iPhone’s cellular data connection to provide internet access to your Mac or another iOS device.
· Phone forwarding: Make and receive phone calls on your Mac or iOS device using your iPhone’s cellular connection.
· Text message forwarding: Send and receive SMS messages on your Mac or iOS device using your iPhone’s cellular connection.
· AirDrop between Mac and iOS: Transfer files quickly between a Mac and an iOS device. (Mac-to-Mac and iOS-to-iOS AirDrop transfers were supported previously, but Continuity extends AirDrop to work between platforms.)
When Continuity first appeared, many users found it to be extremely finicky. Some features would work but others wouldn’t, a feature would work between two devices but only in one direction (for example, you could use Handoff to start a document on your Mac and finish it on your iOS device, but not the other way around), or a feature would work only intermittently. With El Capitan and iOS 9, most of these problems seem to have disappeared, so if you’re experiencing any of them, my first piece of advice is to update your devices to the latest versions of their respective operating systems.
Also, keep in mind that on a Mac, Continuity requires factory-installed Bluetooth 4.0 (also known as Bluetooth LE, for Low Energy), which means that only relatively recent models are supported. The full list is:
· iMac: 21-inch or 27-inch, Late 2012 or later
· MacBook: Retina, 12-inch, Early 2105 or later
· MacBook Air: 11-inch or 13-inch, Mid 2012 or later
· MacBook Pro: 13-inch or 15-inch, Retina or not, Mid 2012 or later
· Mac mini: Mid 2012 or later
· Mac Pro: Late 2013 or later
If you’re using a supported Mac and are totally up to date on OS X and iOS versions, yet Continuity problems remain, try each of these steps in order until the problem goes away:
1. Make sure all devices are signed in to the same iCloud account.
2. Confirm that Bluetooth is turned on for each device. On a Mac, go to System Preferences → Bluetooth. If the text there says “Bluetooth: Off,” click the Turn Bluetooth On button.
3. Verify that all your devices are on the same Wi-Fi network.
4. Restart any devices you’re having trouble with. (For an iOS device, this means turning it off and then back on.)
5. On each device that’s having problems, sign out of iCloud completely and then sign back in (see step 4 in iCloud Data Doesn’t Sync Properly).
If you’re still having trouble, it’s time to consult Apple or an authorized support provider (see Go to the Source).
Your Laptop’s Battery Misbehaves
If your Mac laptop’s battery starts acting up—for example, it runs down too quickly, won’t hold a charge, or won’t charge completely, or you see a message saying “Service Battery”—the first easy thing to try is resetting your Mac’s SMC (see Reset NVRAM or SMC).
If that doesn’t work, consult Apple’s support page “About Mac notebook batteries” (alt.cc/5u), which includes extensive troubleshooting advice. I won’t reiterate everything from that page here, but I would like to point out that batteries have a finite lifespan, and can be recharged only a certain number of times. Apple generally replaces batteries that will no longer hold at least 80% of their original charge if they’re less than a year old (or three years, if you have AppleCare—see Consider Purchasing AppleCare).
Note: If you have an older Mac laptop with a removable battery, Apple also recommends that you calibrate it at least every two months. See alt.cc/5v for instructions.
All materials on the site are licensed Creative Commons Attribution-Sharealike 3.0 Unported CC BY-SA 3.0 & GNU Free Documentation License (GFDL)
If you are the copyright holder of any material contained on our site and intend to remove it, please contact our site administrator for approval.
© 2016-2026 All site design rights belong to S.Y.A.