Adaptive Code via C#. Agile coding with design patterns and SOLID principles (2014)
Part I: An Agile foundation
Chapter 2. Dependencies and layering
After completing this chapter, you will be able to
![]() Manage complex dependencies from method level to assembly level.
Manage complex dependencies from method level to assembly level.
![]() Identify areas where dependency complexity is greatest and use tools to reduce complexity.
Identify areas where dependency complexity is greatest and use tools to reduce complexity.
![]() Decompose your code into smaller, more adaptive pieces of functionality that promote reuse.
Decompose your code into smaller, more adaptive pieces of functionality that promote reuse.
![]() Apply layering patterns where they are most useful.
Apply layering patterns where they are most useful.
![]() Understand how dependencies are resolved and debug dependency problems.
Understand how dependencies are resolved and debug dependency problems.
![]() Hide implementations behind simple interfaces.
Hide implementations behind simple interfaces.
All software has dependencies. Each dependency is either a first-party dependency within the same code base, a third-party dependency on an external assembly, or the ubiquitous dependency on the Microsoft .NET Framework. Most nontrivial projects make use of all three types of dependency.
A dependency abstracts functionality away from calling code. You don’t need to worry too much about what a dependency is doing, much less how it is doing it, but you should ensure that all dependencies are correctly managed. When a dependency chain is poorly managed, developers force dependencies that need not exist and tangle the code into knots with spurious assembly references. You might have heard the adage that “the most correct code is that which is not written.” Similarly, the best-managed dependency is that which does not exist.
To keep your code adaptive to change, you must manage dependencies effectively. This applies at all levels of the software—from architectural dependencies between subsystems to implementation dependencies between individual methods. A poorly architected application can slow down the delivery of working software, even halt it entirely in the worst case.
I cannot emphasize enough how important it is to take a purist approach to dependency management. If you compromise on such an important issue, you might notice a temporary increase in velocity, but the long-term effects are potentially fatal to the project. It is an all-too-familiar story: the short-lived productivity boost quickly dissipates as the amount of code and number of modules increases. The code becomes rigid and fragile, and progress slows to a crawl. In terms of Scrum artifacts and metrics, the sprint burndown chart flatlines because no story points are claimed and, as long as the problem is unaddressed, the feature burnup chart follows suit because no features are completed. Even the bug count increases. When the dependency structure is incomprehensible, a change in one module can cause a direct side effect in another, seemingly unrelated module.
With discipline and awareness, you can easily manage dependencies. There are established patterns that help you arrange your application in the short term so that it can adapt to changes in the long term. Layering is one of the most common architectural patterns, and this chapter elaborates on the different layering options available, in addition to other methods of dependency management.
The definition of dependency
What is a dependency? Generically, a dependency is a relationship between two distinct entities whereby one cannot perform some function—or exist—without the other. A good analogy of this is that one person can be said to be financially dependent on another. Often, in legal documents, you are required to state whether you have any dependents—that is, whether anyone depends on you for their living expenses and other basic necessities. This typically refers to a spouse or children. When I lived in Bermuda, for example, I had a work permit that stated that my wife and my daughter could stay there only as long as my work permit was valid. In this way, they were dependent on me and they were my dependents.
Transferring this definition to code, the entities are often assemblies: assembly A uses another assembly, B, and thus you can say that A depends on B. A common way of stating this relationship is that A is the client of B, and B is the service of A. Without B, A cannot function. However, it is very important to note that B is not dependent on A and, as you will learn, must not and cannot depend on A. This client/service relationship is shown in Figure 2-1.
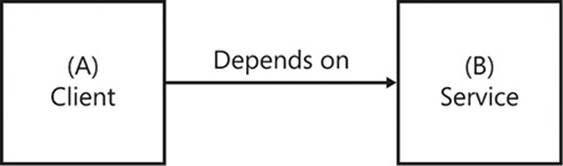
FIGURE 2-1 In any dependency relationship, the dependent is referred to as the client, and the entity that is being depended on is the service.
Throughout this book, code is discussed from the point of view of the client and the service. Although some services are hosted remotely, such as services that were created by using Windows Communication Foundation (WCF), this is not a prerequisite to code being termed a service. All code is service code and all code is client code depending on the perspective from which you are approaching the code. Any class, method, or assembly can call other methods, classes, and assemblies; thus the code is a client. The same class, method, or assembly can also be called by other methods, classes, and assemblies; thus the code is also a service.
A simple example
Let’s look at how a dependency behaves in a practical situation. This example is a very simple console application that prints a message to the screen. It’s the universal “Hello World!” example. This example is necessarily trivial, because I want to distill the problems with dependencies down to their essence.
You can follow the steps here manually or retrieve the solution from GitHub. See Appendix A, “Adaptive tools,” for basic instructions on using Git, and Appendix B, “Git branches,” (online only) for a reference of each code listing to a Git branch name.
1. Open Microsoft Visual Studio and create a new console application, as shown in Figure 2-2. I have called mine SimpleDependency, but the name is not important.
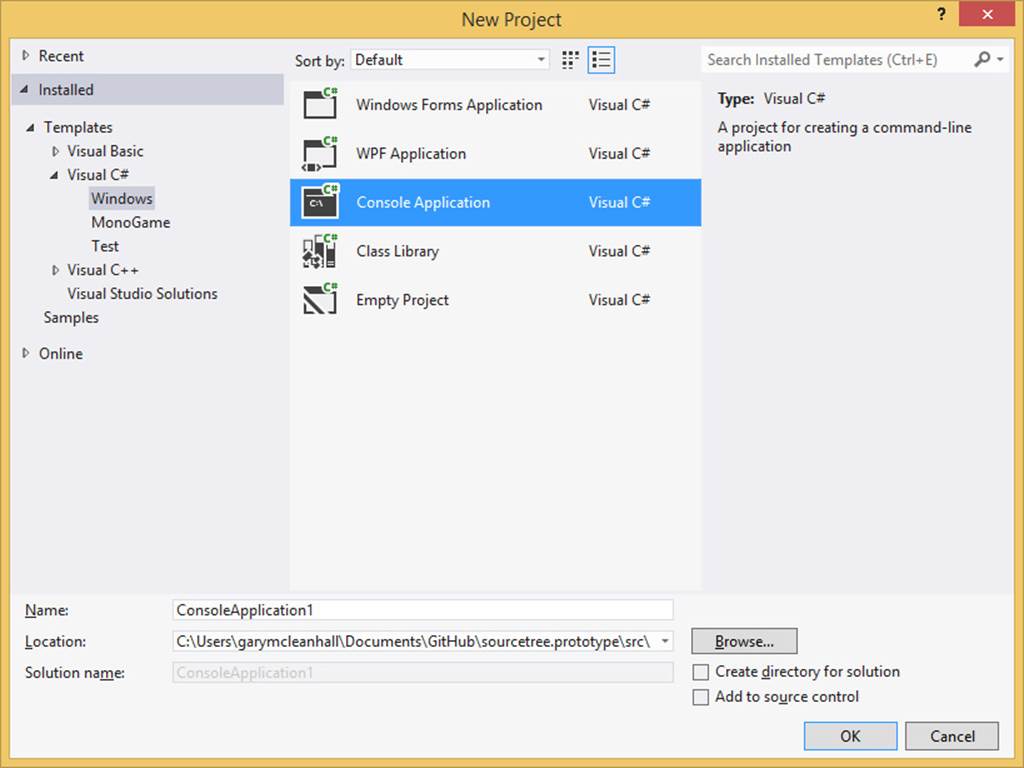
FIGURE 2-2 The New Project dialog box in Visual Studio allows you to select from many different project templates.
2. Add a second project to the solution, this time a class library. I have called mine MessagePrinter.
3. Right-click the console application’s References node and select Add Reference.
4. In the Add Reference dialog box, navigate to Projects and select the class library project.
You have now created a dependency from one assembly to another, as shown in Figure 2-3. Your console application depends on your class library, but the class library does not depend on your console application The console application is the client, and the class library is the service. Although this application does not do much at the moment, build the solution and navigate to the project’s bin directory—this is where the executable file is.
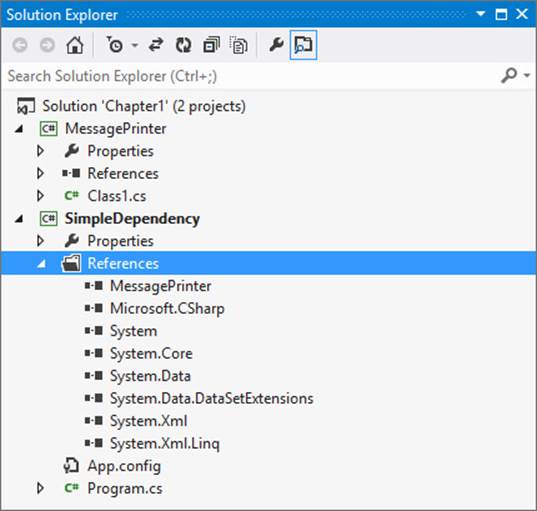
FIGURE 2-3 The referenced assemblies for any project are listed under its References node.
The bin directory contains the SimpleDependency.exe file, but it also contains the MessagePrinter.dll file. This was copied into the bin directory by the Visual Studio build process because it was referenced as a dependency by the executable. I want to show you an experiment, but first a slight modification to the code is needed. Because this is a console application that does nothing, it will initialize and shut down before you have any time to react. Open the console application’s Program.cs file.
Listing 2-1 shows the addition (in bold) inside the Main method. This is the entry point to the application that currently does nothing and exits quickly. By inserting a call to Console.ReadKey(), you ensure that the application waits for the user to press a key before it terminates.
LISTING 2-1 The call to ReadKey prevents the console application from exiting immediately.
namespace SimpleDependency
{
class Program
{
static void Main()
{
Console.ReadKey();
}
}
}
Rebuild the solution and run the application. As expected, it shows the console window, waits for you to press a key on the keyboard, and then terminates after you do so. Place a breakpoint on the Console.ReadKey() line, and debug the solution from Visual Studio.
When the application pauses at the breakpoint, you can view the assemblies that have been loaded into memory for this application. To do this, you can either use the menu bar to select Debug > Windows > Modules, or you can use the keyboard shortcut Ctrl+D, M. Figure 2-4 shows the list of modules that have been loaded for the application.
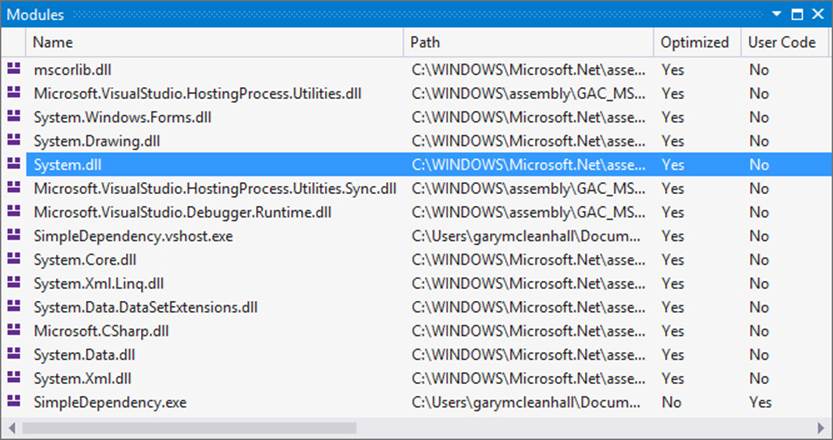
FIGURE 2-4 When you are debugging, the Modules window shows all of the currently loaded assemblies.
Did you notice something strange? There is no mention of the class library that was created. For this example, shouldn’t MessagePrinter.dll be loaded? Actually, no—this is exactly the expected behavior. Here’s why: the application isn’t using anything from inside theMessagePrinter assembly, so the .NET runtime does not load it.
Just to prove conclusively that the dependent assembly is not really a prerequisite, navigate again to the console application’s bin directory and delete MessagePrinter.dll. Run the application again, and it will continue happily without raising an exception.
Let’s repeat this experiment a couple more times to truly find out what is happening. First, add a using MessagePrinter directive to the top of the Program.cs file. This imports the MessagePrinter namespace. Do you think this is enough to cause the Common Language Runtime (CLR) to load the module? It is not. The dependency is once again ignored, and the assembly is not loaded. This is because the using statement for importing a namespace is just syntactic sugar that only serves to reduce the amount of code you need to write. Rather than writing out the entire namespace whenever you want to use a type from inside it, you can import the namespace and reference the types directly. The using statement generates no instructions for the CLR to execute.
This next test builds on the first test, so you can leave the using statement in place. In Program.cs, above the call to Console.ReadLine(), add a call to the constructor for MessagePrinting.Service, as shown in Listing 2-2.
LISTING 2-2 Introducing a dependency by calling an instance method.
using System;
using MessagePrinter;
namespace SimpleDependency
{
class Program
{
static void Main()
{
var service = new MessagePrintingService();
service.PrintMessage();
Console.ReadKey();
}
}
}
The Modules window now shows that the MessagePrinter.dll assembly has been loaded, because there is no way to construct an instance of the MessagePrintingService without pulling the contents of the assembly into memory.
You can prove this if you delete the MessagePrinter.dll from the bin directory and run the application again. An exception is thrown this time.
Unhandled Exception: System.IO.FileNotFoundException: Could not load file or assembly
'MessagePrinter, Version=1.0.0.0, Culture=neutral, PublicKeyToken=null' or one of its
dependencies. The system cannot find the file specified.
Framework dependencies
The dependency shown in the previous section is called a first-party dependency. Both the console application and the class library on which it depends belong to the same Visual Studio solution. This means that the dependency should always be accessible, because the dependency project can always be rebuilt from the source code if necessary. It also means that you can modify the source code of first-party dependencies.
Both projects have other dependencies in the form of .NET Framework assemblies. These are not part of the project but are expected to be available. Each .NET Framework assembly is versioned to the .NET Framework version for which it was built: 1, 1.1, 2, 3.5, 4, 4.5, and so on. Some .NET Framework assemblies are new to a particular version and cannot be referenced by projects that are using an earlier version of the .NET Framework. Other assemblies change from version to version of the .NET Framework, and a specific version must be used.
The SimpleDependency project has several references to the .NET Framework, as shown earlier in Figure 2-3. Many of these dependencies are defaults that are added to all console application projects. The example application doesn’t use them, so they can be safely removed. In fact, for both projects, everything except System and System.Core are superfluous, so they can be removed from the references list. The application will still run correctly.
By removing unnecessary framework dependencies, you make it easier to visualize the dependencies required by each project.
Framework assemblies always load
It is worth noting that, unlike other dependencies, references to .NET Framework assemblies will always cause those assemblies to load. Even if you are not really using an assembly, it will still load at application startup. Fortunately, if multiple projects in the solution all reference the same assembly, only one instance of this assembly is loaded into memory and is shared among all dependents.
The default reference list
The default references for a project vary depending on the project type. Each project type has a project template that lists the references required. This is how a Windows Forms application can reference the System.Windows.Forms assembly, whereas a Windows Presentation Foundation application can reference WindowsBase, PresentationCore, and Presentation-Framework.
Listing 2-3 shows the references for a console application. All Visual Studio project templates are located under the Visual Studio installation directory root /Common7/IDE/ProjectTemplates/ and are grouped by language.
LISTING 2-3 Part of a Visual Studio project template for conditionally referencing different assemblies.
<ItemGroup>
<Reference Include="System"/>
$if$ ($targetframeworkversion$ >= 3.5)
<Reference Include="System.Core"/>
<Reference Include="System.Xml.Linq"/>
<Reference Include="System.Data.DataSetExtensions"/>
$endif$
$if$ ($targetframeworkversion$ >= 4.0)
<Reference Include="Microsoft.CSharp"/>
$endif$
<Reference Include="System.Data"/>
<Reference Include="System.Xml"/>
</ItemGroup>
There is some logic in these files that can alter how the template generates a real project instance. Specifically, the references differ depending on the version of the .NET Framework that is being used for the resulting project. Here, the Microsoft.CSharp assembly is only referenced if the project is targeting .NET Framework 4, 4.5, or 4.5.1. This makes sense, because it is normally only required if you use the dynamic keyword that was introduced in the .NET Framework 4.
Third-party dependencies
The final type of dependency is that of assemblies developed by third-party developers. Typically, if something is not provided by the .NET Framework, you can implement a solution yourself by creating first-party dependencies. This could be a laborious task depending on the size of the solution required. Instead, you can elect to make use of prefabricated solutions. As an example, you are unlikely to want to implement your own Object/Relational Mapper (ORM), because such a large piece of infrastructural code could take months to be functional and years to be complete. Instead, you could look first to Entity Framework, which is part of the .NET Framework. If that did not meet your needs, you could look instead at NHibernate, which is a mature ORM library that has been extensively tested.
The main reason to use a third-party dependency is to exchange the effort required for implementing some features or infrastructure for the effort of integrating something that is already written and suitable for the job. Do not forget that this integration effort could still be significant, depending on the structure of both your first-party code and the interface of the third-party code. When your aim is to deliver increments of business value on an iterative basis—as in Scrum—using third-party libraries allows you to maintain this focus.
Organizing third-party dependencies
The simplest way to organize dependencies that are external to your project and the .NET Framework is to create a solution folder called Dependencies under the Visual Studio solution of a project and to add the .dll files to that folder. When you want to add references to these assemblies to the projects of the solution, you can do so by browsing to the files in the Reference Manager dialog box (shown in Figure 2-5).
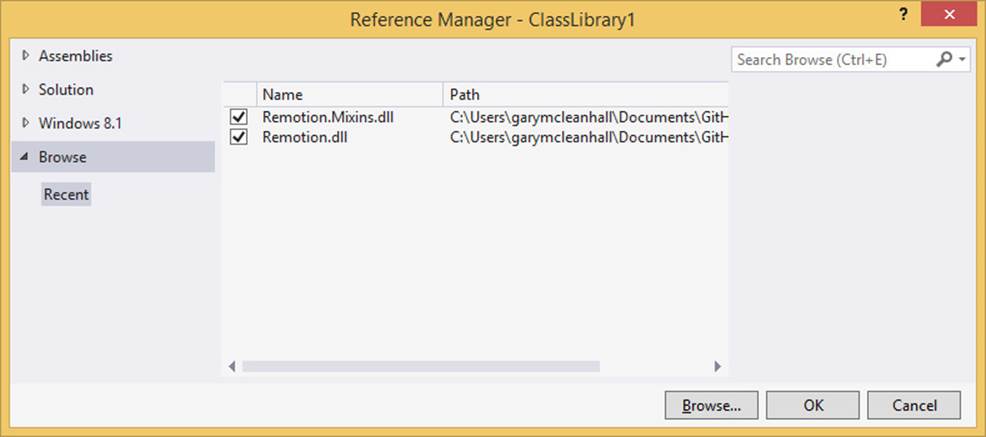
FIGURE 2-5 Third-party references can be stored in a Dependencies folder in the Visual Studio solution.
The other advantage of this approach is that all of the external dependencies are stored in source control. This allows other developers to receive the dependencies just by retrieving the latest version of the source from a central repository. This is a much simpler approach than requiring all of the developers to install or download the files themselves.
A better way to organize third-party dependencies is demonstrated later in this chapter, in the “Dependency management with NuGet” section. In brief, the NuGet dependency management tool manages a project’s third-party dependencies for you, including downloading a package containing all relevant artifacts, referencing assemblies, and upgrading library versions.
Modeling dependencies in a directed graph
A graph is a mathematical construct that consists of two distinct elements: nodes and edges. An edge can only exist between two nodes and serves to connect them in some way. Any node can be connected to any number of the other nodes in a graph. A graph can be one of several types, depending on variations in the graph’s properties. For example, the graph in Figure 2-6 shows edges that are directionless: the edge between nodes A and C is neither from A to C nor from C to A—the presence of the edge is all that matters. This is called an undirected graph.
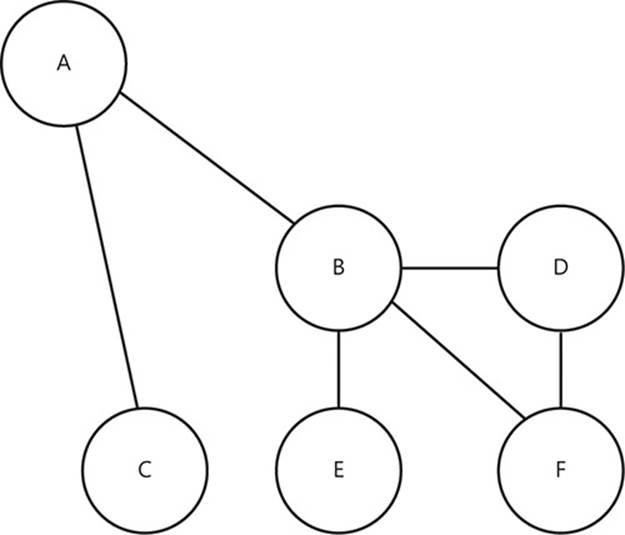
FIGURE 2-6 A graph consists of nodes that are connected by edges.
If, as in Figure 2-7, the edges have arrowheads at one end, you can determine the direction of the edges. There is an edge from A to C, but not an edge from C to A. This is called a directed graph, or a digraph.
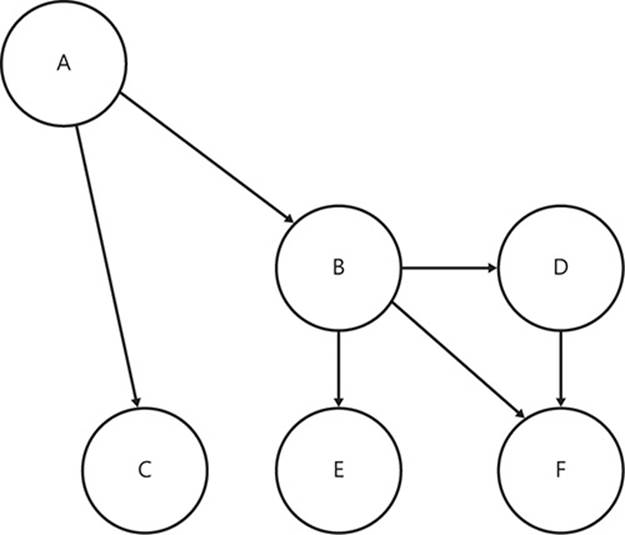
FIGURE 2-7 The edges of this graph are specifically directed, so there is no edge (B,A), yet the edge (A,B) exists.
There are many areas of software engineering in which graphs are excellent models, but graphs are extremely applicable to modeling code dependencies. As you have already learned, dependencies consist of two entities with a direction applied from the dependent code to the dependency. You can think of the entities as nodes and draw a directed edge from dependent to dependency. When you extend this to the rest of the entities, you form a dependency digraph.
This structure can be applied at several different granularities, as Figure 2-8 shows. The nodes in the graph could represent the classes in a project, different assemblies, or groups of assemblies that form a subsystem. In all cases, the arrows between the nodes represent the dependencies between components. The source of the arrow is the dependent component and the target of the arrow is the dependency.
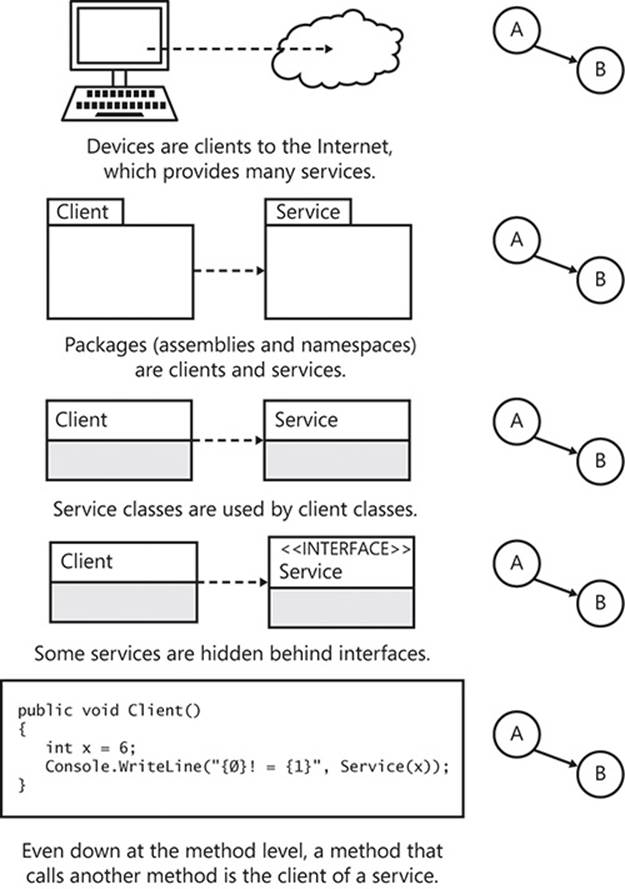
FIGURE 2-8 Dependencies at all levels can be modeled as graphs.
For each node at a coarse-grained granularity, there is a set of nodes at a more fine-grained granularity. Inside subsystems are assemblies; inside assemblies are classes; inside classes are methods. This exemplifies how a dependency on a single method can pull in a whole subsystem of chained dependencies.
However, with all of these examples, you do not know what sort of dependency you are dealing with (inheritance, aggregation, composition, or association), just that there is a dependency. This is still useful, because managing dependencies only requires knowledge of the binary relationship between two entities: is there a dependency or not?
Cyclic dependencies
Another part of graph theory is that directed graphs can form cycles: the ability to traverse from one node back to itself by following the edges. The graphs shown so far are said to be acyclic digraphs—containing no cycles. Figure 2-9 shows an example of a cyclic digraph. If you start at node D, you can follow the edge to E, then B, and finally, end up back at D again.
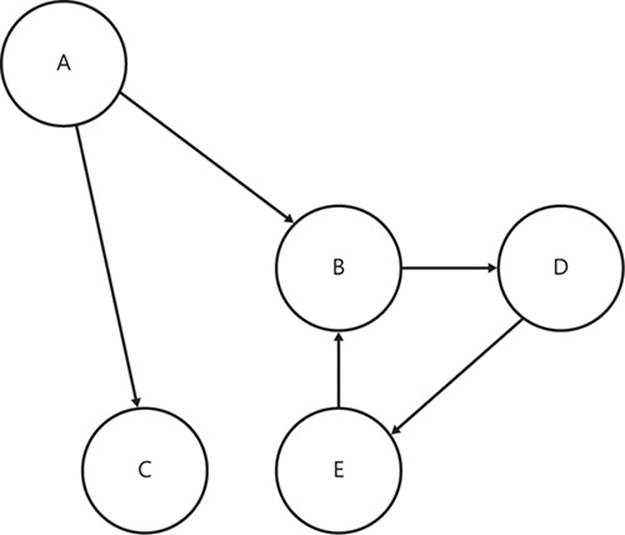
FIGURE 2-9 This digraph contains cycles.
Imagine that these nodes represent assemblies. D has an implicit dependency on anything that its explicit and implicit dependencies also depend on. D depends on E explicitly but B and D implicitly. Therefore, D depends on itself.
For assemblies, this is actually not possible. If you try to set this up in Visual Studio, when you come to assigning the reference from E to B, Visual Studio will not allow this to happen, as Figure 2-10 shows.
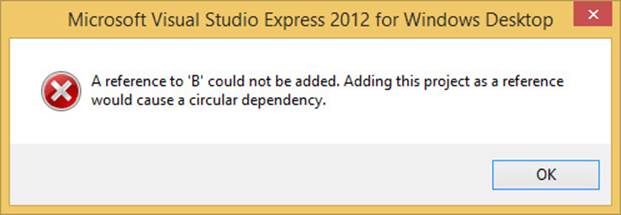
FIGURE 2-10 It is not possible to create a cyclic dependency in Visual Studio.
So, although modeling dependencies as graphs might seem academic, it has clear benefits when you are organizing your dependencies. Cyclic dependencies between assemblies are not a diversion from a purist ideal but are completely disallowed, and their avoidance is mandatory.
Loops are specializations of the cycles in digraphs. If a node is connected with an edge to itself, that edge becomes a loop. Figure 2-11 shows an example of a graph with a loop.
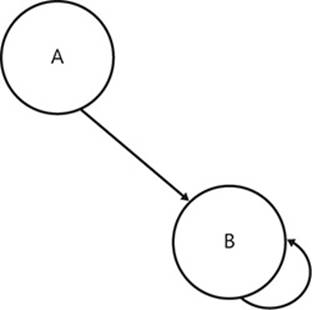
FIGURE 2-11 In this digraph, node B links to itself with a loop.
In practice, assemblies always explicitly self-depend, and such an observation is not particularly noteworthy. However, at the method level, a loop is evidence of recursion, as shown in Listing 2-4.
LISTING 2-4 A self-loop in a digraph that represents methods results in recursion.
namespace Graphs
{
public class RecursionLoop
{
public void A()
{
int x = 6;
Console.WriteLine("{0}! = {1}", x, B(x));
}
public int B(int number)
{
if(number == 0)
{
return 1;
}
else
{
return number * B(number - 1);
}
}
}
}
The class in Listing 2-4 shows the functional equivalent of the dependency graph in Figure 2-11. Method A calls method B; therefore, you say that method A is dependent on method B. However, more interesting is method B’s dependency on itself—B is an example of a recursive function; that is, a function that calls itself.
Managing dependencies
You have learned so far that dependencies are necessary but also must be carefully managed lest they present you with problems later in development. These problems can be quite difficult to back out of after they have manifested themselves. Therefore, it is best to manage your dependencies correctly from the outset and to stay vigilant so that no problems creep in. Poorly managed dependencies can quickly escalate from a small compromise to become an overall architectural problem.
The rest of this chapter is focused on the more practical aspects of continually managing dependencies. This includes avoiding anti-patterns and, more importantly, understanding why these common patterns are anti-patterns. Conversely, some patterns are benevolent and should be embraced; these are offered as direct alternatives to the noted anti-patterns.
Patterns and anti-patterns
As an engineering discipline, object-oriented software development is a relatively new endeavor. Over the last few decades, some repeatable collaborations between classes and interfaces have been identified and codified as patterns.
There are many software development patterns, each providing a generic solution that can be repurposed to a specific problem domain. Some patterns can be used in conjunction with each other to produce elegant solutions to complex problems. Of course, not all patterns are applicable all the time, and it takes experience and practice to recognize when and where certain patterns might apply.
Some patterns are not so benevolent. In fact, they are quite the opposite. They are considered anti-patterns. These patterns harm the adaptability of your code and should be avoided. Some anti-patterns began as patterns before slowly falling out of favor due to perceived negative side effects.
Implementations versus interfaces
Developers who are new to the concept of programming to interfaces often have difficulty letting go of what is behind the interface.
At compile time, any client of an interface should have no idea which implementation of the interface it is using. Such knowledge can lead to incorrect assumptions that couple the client to a specific implementation of the interface.
Imagine the common example in which a class needs to save a record in persistent storage. To do so, it rightly delegates to an interface, which hides the details of the persistent storage mechanism used. However, it would not be right to make any assumptions about which implementation of the interface is being used at run time. For example, casting the interface reference to any implementation is always a bad idea.
The new code smell
Interfaces describe what can be done, whereas classes describe how it is done. Only classes involve the implementation details—interfaces are completely unaware of how something is accomplished. Because only classes have constructors, it follows that constructors are an implementation detail. An interesting corollary to this is that, aside from a few exceptions, you can consider an appearance of the new keyword to be a code smell.
Code smells
Saying that code smells is a way of saying that some code is potentially problematic. The word “potentially” is chosen deliberately because two occurrences of a code smell might not be equally problematic. Unlike anti-patterns, which are more universally considered bad practice, code smells are not necessarily bad practice. Code smells are warnings that something could be wrong and that the root cause might need to be corrected.
Code smells might be indicative of technical debt that will need to be repaid—and the longer the debt remains unpaid, the harder it might be to fix.
There are many different categories of code smell. The use of the new keyword—direct object instantiation—is an example of “inappropriate intimacy.” Because constructors are implementation details, their use can cause unintended (and undesirable) dependencies to be required by client code.
Code smells, like anti-patterns, are fixed by refactoring the code so that it has a better, more adaptive design. Although the code might fulfill its requirements, its current design is suboptimal and might cause issues in the future. This is undoubtedly a development task that yields no immediate tangible benefit to the business. As with all refactor work, there appears to be no business value associated with fixing the problem. However, just as financial debt can lead to crippling interest repayments, technical debt can spiral out of control and ruin good dependency management practices, jeopardizing future enhancements and code fixes.
Listing 2-5 shows a couple of examples where directly instantiating an object instance by using the new keyword is a code smell.
LISTING 2-5 An example of how instantiating objects prevents code from being adaptive.
public class AccountController
{
private readonly SecurityService securityService;
public AccountController()
{
this.securityService = new SecurityService();
}
[HttpPost]
public void ChangePassword(Guid userID, string newPassword)
{
var userRepository = new UserRepository();
var user = userRepository.GetByID(userID);
this.securityService.ChangeUsersPassword(user, newPassword);
}
}
The AccountController class is part of a hypothetical ASP.NET MVC application. Do not worry too much about the specifics; concentrate on the inappropriate object construction, highlighted in bold. The controller’s responsibility is to allow the user to perform account queries and commands. There is only one command shown: ChangePassword.
There are several problems with this code, and they are caused directly by the two occurrences of new:
![]() The AccountController is forever dependent on the SecurityService and User-Repository implementations.
The AccountController is forever dependent on the SecurityService and User-Repository implementations.
![]() Whatever dependencies the SecurityService and UserRepository have are now implicit dependencies of the AccountController.
Whatever dependencies the SecurityService and UserRepository have are now implicit dependencies of the AccountController.
![]() The AccountController is now extremely difficult to unit test—the two classes are impossible to mock with conventional methods.
The AccountController is now extremely difficult to unit test—the two classes are impossible to mock with conventional methods.
![]() The SecurityService.ChangeUsersPassword method requires clients to load User objects.
The SecurityService.ChangeUsersPassword method requires clients to load User objects.
These problems are addressed in greater detail in the following sections.
Inability to enhance the implementations
If you want to change your implementation of the SecurityService, your two options are to change the AccountController directly to refer to this new implementation or add the new functionality to the existing SecurityService. Throughout this book, you will learn why neither option is preferred. For now, consider that the aim is to never edit either the AccountController or the SecurityService class after they have been created.
Chain of dependency
The SecurityService is also likely to have some dependencies of its own. By having a default constructor, it is making the bold claim that it does not have any dependencies. However, what if the code shown in Listing 2-6 is the implementation of the SecurityService constructor?
LISTING 2-6 The SecurityService has the same problem as the AccountController.
public SecurityService()
{
this.Session = SessionFactory.GetSession();
}
This service actually depends on NHibernate, the Object/Relational Mapper, which is being used to retrieve a session. The session is NHibernate’s analogy for a connection to persistent, relational storage, such as Microsoft SQL Server, Oracle, or MySQL. As you saw previously, this means that the AccountController also depends—implicitly—on NHibernate.
Furthermore, what if the signature of the SecurityService constructor changes? That is, what if it suddenly requires clients to provide the connection string to the database that the Session needs? Any client using the SecurityService, including the AccountController, would have to be updated to provide the connection string. Again, this is a change that you should not have to make.
Lack of testability
Testability is a very important concern, and it requires code to be designed in a certain fashion. If it is not, testing is extremely difficult. Unfortunately, neither the AccountController nor the Security-Service is easily tested. This is because you cannot replace their dependencies with fake versions that do not perform any action. For example, when testing the SecurityService, you do not want it to make any connections to the database. That would be needless and slow, and would introduce another large failure point in the test: what if the database is unavailable? There are ways to test these classes by replacing their dependencies at run time with fakes. Tools such as Microsoft Moles and Typemock can hook into constructors and ensure that the objects that they return are fakes. But that is an example of treating the symptoms and not the cause.
More inappropriate intimacy
The AccountController.ChangePassword method creates a UserRepository class to retrieve a User instance. It only needs to do this because that is what the SecurityService.ChangeUsers-Password method demands of it. Without a User instance, the method cannot be called. This is indicative of a badly designed method interface. Instead of requiring all clients to retrieve a User, the SecurityService should, in this case, retrieve the User itself. The two methods would then look like Listing 2-7.
LISTING 2-7 An improvement is made to all clients of SecurityService.
[HttpPost]
public void ChangePassword(Guid userID, string newPassword)
{
this.securityService.ChangeUsersPassword(userID, newPassword);
}
//...
public void ChangeUsersPassword(Guid userID, string newPassword)
{
var userRepository = new UserRepository();
var user = userRepository.GetByID(userID);
user.ChangePassword(newPassword);
}
This is definitely an improvement for the AccountController, but the ChangeUsersPassword method is still directly instantiating the UserRepository.
Alternatives to object construction
What would improve the AccountController and SecurityService—or any other example of inappropriate object construction? How can they be made demonstrably correct so that none of the aforementioned problems apply? There are a few options, all complementary, that you can choose from.
Coding to an interface
The first and most important change that you should make is to hide the implementation of Security-Service behind an interface. This allows the AccountController to depend only on the interface, and not on the implementation, of SecurityService. The first refactor is to extract an interface out of SecurityService, as shown in Listing 2-8.
LISTING 2-8 Extracting an interface from SecurityService.
public interface ISecurityService
{
void ChangeUsersPassword(Guid userID, string newPassword);
}
//...
public class SecurityService : ISecurityService
{
public ChangeUsersPassword(Guid userID, string newPassword)
{
//...
}
}
The next step is to update the client so that it no longer depends on the SecurityService class, but rather on the ISecurityService interface. Listing 2-9 shows this refactor applied to the AccountController.
LISTING 2-9 The AccountController now uses the ISecurityService interface.
public class AccountController
{
private readonly ISecurityService securityService;
public AccountController()
{
this.securityService = new SecurityService();
}
[HttpPost]
public void ChangePassword(Guid userID, string newPassword)
{
securityService.ChangeUsersPassword(user, newPassword);
}
}
This example is not yet complete—you are still dependent on the SecurityService implementation because of its constructor. The concrete class is still being instantiated in the constructor of AccountController. To separate the two classes completely, you need to make a further refactor: introduce dependency injection (DI).
Using dependency injection
This is a large topic that cannot be covered in a small amount of space. In fact, Chapter 9, “Dependency injection,” is devoted to the subject, and there are entire books dedicated to it. Luckily, DI is not particularly complex or difficult, so the basics can be covered here from the point of view of classes that make use of DI. Listing 2-10 shows another refactor that has been applied to the constructor of the AccountController class. The constructor is the only change here, highlighted in bold. It is a very minor change as far as this class is concerned, but it makes a huge difference to your ability to manage dependencies. Rather than constructing the SecurityService class itself, the AccountController now requires some other class to provide it with an ISecurityService implementation. Not only that, a precondition has been introduced to the constructor that prevents its clients from passing in a null value for the securityService parameter. This ensures that, when you use the securityService field in the ChangePassword method, you are guaranteed to have a valid instance and do not have to check for nullanywhere else.
LISTING 2-10 Using dependency injection allows you to remove the dependency on the SecurityService class.
public class AccountController
{
private readonly ISecurityService securityService;
public AccountController(ISecurityService securityService)
{
if(securityService == null) throw new ArgumentNullException("securityService");
this.securityService = securityService;
}
[HttpPost]
public void ChangePassword(Guid userID, string newPassword)
{
this.securityService.ChangeUsersPassword(user, newPassword);
}
}
The SecurityService also needs to follow suit and apply dependency injection. Listing 2-11 shows how it looks after refactoring.
LISTING 2-11 Dependency injection is a ubiquitous pattern that can be applied liberally almost everywhere.
public class SecurityService : ISecurityService
{
private readonly IUserRepository userRepository;
public SecurityService(IUserRepository userRepository)
{
if(userRepository == null) throw new ArgumentNullException("userRepository");
this.userRepository = userRepository;
}
public ChangeUsersPassword()
{
var user = userRepository.GetByID(userID);
user.ChangePassword(newPassword);
}
}
Just as the AccountController enforces its dependency on a valid ISecurityService instance, so too does the SecurityService enforce its dependency on a valid IUserRepository—by throwing an exception if it is given a null reference on construction. Similarly, the UserRepository class dependency has been entirely removed, in favor of an IUserRepository interface.
The Entourage anti-pattern
The Entourage anti-pattern gets its name from the fact that even though you think you are asking for just one simple thing, it brings along all of its friends. This is much like music or film stars who are followed by hangers-on and moochers: their entourage. It is a name that I have created to best describe undesirable dependency management.
The Entourage anti-pattern is a common mistake that is made when developers explain programming to an interface. Rather than providing a full solution, the demonstration commonly stops short of saying, unequivocally, that interfaces and their dependencies should not be in the same assembly.
The Unified Modeling Language (UML) diagram in Figure 2-12 shows how the AccountController example is organized at the package level. The AccountController depends on the ISecurityService interface, which is implemented by the SecurityService class. The diagram also shows the packages—in the .NET Framework these are assemblies or Visual Studio projects—where each entity is. This is an example of the Entourage anti-pattern: the implementation of an interface in the same assembly as the interface itself.
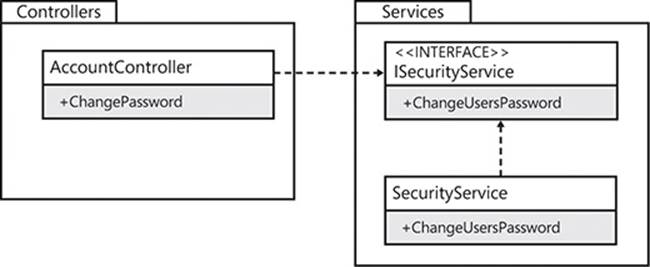
FIGURE 2-12 The AccountController assembly depends on the Services assembly.
You have already learned that the SecurityService class has some dependencies of its own, and how the chain of dependencies results in implicit dependencies from client to client to client. Expanding on the package diagram, Figure 2-13 displays the full extent of the Entourage problem.
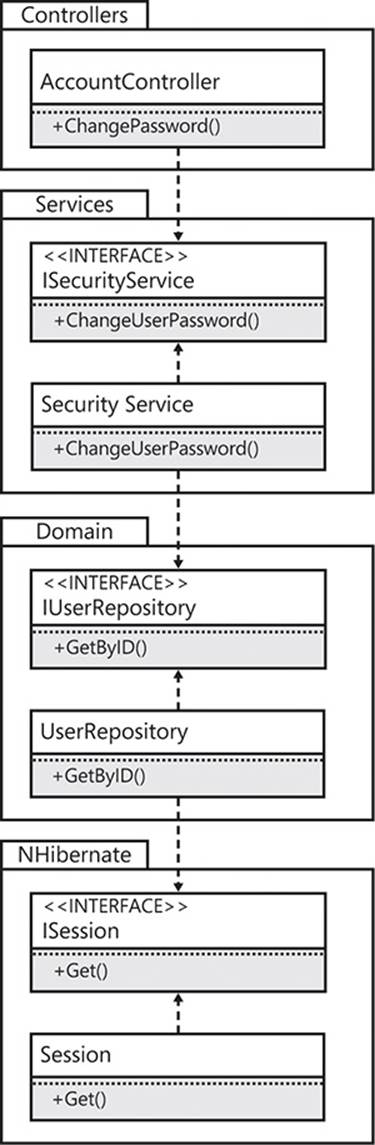
FIGURE 2-13 The AccountController is still at the mercy of too many implementations.
If you build the Controllers project in isolation, you will still find NHibernate in the bin/ directory, indicating that it is still an implicit dependency. Although you have made excellent steps to separate the AccountController class from any unnecessary dependencies, it is still not loosely coupled from the implementations in each dependent assembly.
There are two problems caused by this anti-pattern. The first issue is that of programmer discipline. You need the interfaces in each of the packages—Services, Domain, and NHibernate—to be marked as public. However, you also need the concrete classes—the implementations—to be marked as public to make them available for construction at some point (just not inside the client classes). This means that there is nothing to stop an undisciplined developer from making a direct reference to the implementation. There is a temptation to cut corners and just callnew on the class to get an instance of it.
Second, what happens if you create a new implementation of the SecurityService that, instead of depending on a domain model that is persisted by using NHibernate, instead uses a third-party service bus, such as NServiceBus, to send a command message to a handler? Adding it into the Services assembly creates yet another dependency, leading to a bloated, fragile codebase that will be very difficult to adapt to new requirements.
It is a general rule that implementations should be split from their interfaces by placing them in separate assemblies. For this, you can use the Stairway pattern.
The Stairway pattern
The Stairway pattern is the correct way to organize your classes and interfaces. By putting interfaces and their implementations in different assemblies, you can vary the two independently, and clients only need to make a single reference—to the interface assembly.
You might be thinking, “But how many assemblies am I going to need to keep track of? If I split every interface and class into its own assembly, I would have a solution with 200 projects!” Fear not, because applying the Stairway pattern should only increase the number of projects by a few while giving you the benefit of a well-organized and easy-to-understand solution. It is possible that the number of overall projects will decrease when you apply the Stairway pattern, if the projects were particularly badly arranged before.
The running example of the AccountController, refactored to use the Stairway pattern, is shown in Figure 2-14. Each implementation—that is, each class—only references the assembly that contains the interface on which it is dependent. It does not reference the implementation assembly, not even implicitly. Each implementation class also references its interface’s assembly. This really is the best of all worlds: interfaces without any dependencies, client code without any implicit dependencies, and implementations that continue the pattern by depending only on other interface assemblies.
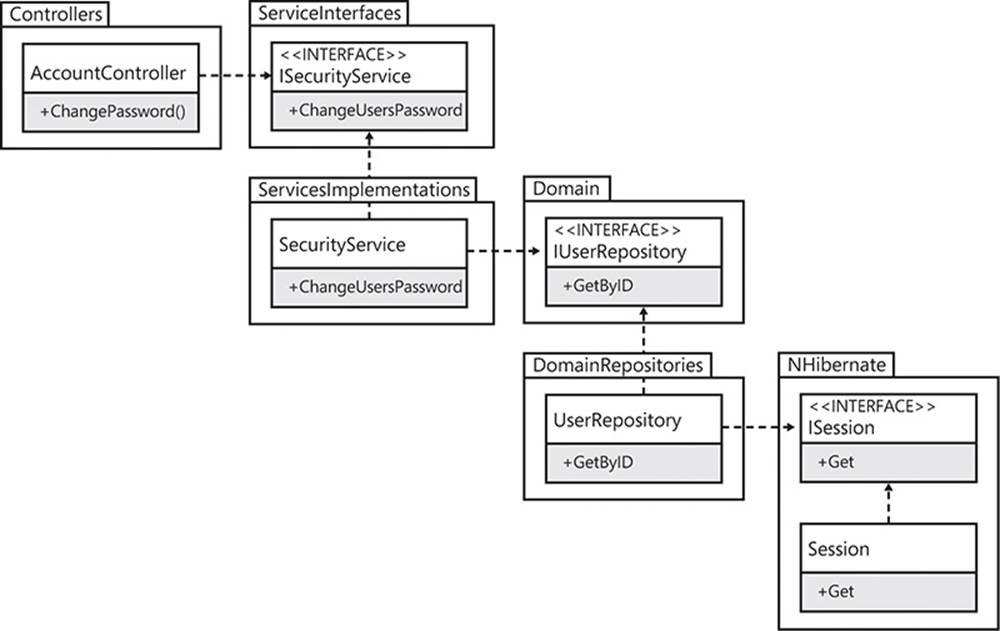
FIGURE 2-14 The Stairway pattern is aptly named.
I now want to focus on one of those benefits in greater detail: interfaces should not have any external dependencies. As far as possible, this should always be adhered to. Interfaces should not have methods or properties that expose any data objects or classes defined in third-party references. Although they can, and certainly will, need to depend on classes and data types from other projects in the solution and common .NET Framework libraries, a reference to infrastructural entities should be avoided. Third-party libraries are commonly used for infrastructure purposes. Even the interfaces from libraries such as Log4Net, NHibernate, and MongoDB are infrastructural dependencies that will tie your interfaces to a specific implementation. This is because those libraries are packaged by using the Entourage anti-pattern, rather than the Stairway pattern. They each provide a single assembly that contains both the interface you want to depend on and the implementation that you do not want to depend on.
To get around this problem, you can refer instead to your own interfaces for logging, domain persistence, and document storage. You can write a simple interface that hides the third-party dependency behind a first-party dependency. Then, if you ever need to replace the third-party dependency, you can do so by writing a new adapter to your interface for the new library.
On a pragmatic level, this might not be entirely feasible. In instances where converting a third-party dependency to a first-party dependency presents an inordinate amount of work, the team must acknowledge that they will have to retain the dependency and it will become omnipresent. If the library is outgrown, it will be incredibly difficult and time-consuming to replace. This sort of concession is commonly made for frameworks, which are much larger than simple libraries.
Resolving dependencies
Knowing how to arrange your projects and the dependencies that they have will not help when it comes to debugging a dependency between assemblies. Sometimes assemblies are not available at run time and it becomes necessary to find out why.
Assemblies
The Common Language Runtime (CLR), which is the virtual machine that the .NET Framework uses to execute code instructions, is a software product like any other and has been programmed to behave in a predictable and logical way when hosting applications. A good grounding in the theory and practice of how assemblies are resolved and how errors in resolution can be fixed is very useful. A little knowledge can go a long way when you need to track down a problem with finding assemblies.
Resolution process
The assembly resolution process is an important facet of the CLR. This covers the gap between adding a reference to an assembly or project and having the application running with this assembly loaded. There are several steps involved, and little more is needed than an overview so that, when something goes wrong during the process, you can reason about the probable causes of the problem.
Figure 2-15 shows the assembly resolution process as a flow chart. This flow chart is at a high level and does not include every detail, but there is enough to show the headline items in the process. The process is as follows:
![]() The CLR uses a just-in-time (JIT) model to resolve assemblies. As was already proven earlier in the chapter, the references contained in an application are not resolved as you start up the application, but rather when you first make use of a feature of that assembly—literally just in time.
The CLR uses a just-in-time (JIT) model to resolve assemblies. As was already proven earlier in the chapter, the references contained in an application are not resolved as you start up the application, but rather when you first make use of a feature of that assembly—literally just in time.
![]() Each assembly has an identity that is a composite of its name, version, culture, and public key token. Features such as binding redirects can change this identity, so determining it is not quite as simple as it might seem.
Each assembly has an identity that is a composite of its name, version, culture, and public key token. Features such as binding redirects can change this identity, so determining it is not quite as simple as it might seem.
![]() When the assembly’s identity has been established, the CLR is able to determine whether it has already attempted to resolve this dependency previously during the current execution of the application, as shown in the following snippet taken from a Visual Studio project file.
When the assembly’s identity has been established, the CLR is able to determine whether it has already attempted to resolve this dependency previously during the current execution of the application, as shown in the following snippet taken from a Visual Studio project file.
<reference include="MyAssembly, Version=2.1.0.0, Culture=neutral,
PublicKeyToken=17fac983cbea459c" />
![]() Asking this question causes the CLR to branch depending on the answer. If you have attempted to resolve this assembly, that process has either already succeeded or failed. If it succeeded, the CLR can use the assembly that has already been loaded, and it exits early. If not, the CLR knows that it need not continue attempting to resolve this assembly because it will fail.
Asking this question causes the CLR to branch depending on the answer. If you have attempted to resolve this assembly, that process has either already succeeded or failed. If it succeeded, the CLR can use the assembly that has already been loaded, and it exits early. If not, the CLR knows that it need not continue attempting to resolve this assembly because it will fail.
![]() Alternatively, if this is the first attempt to resolve the assembly, the CLR first checks the global assembly cache (GAC). The GAC is a machine-wide assembly repository that allows multiple versions of the same assembly to be executed in the same application. If the assembly is found in the GAC, the resolution process is successful and the discovered assembly is loaded. So you now know that, because the GAC is searched first, the presence of an applicable assembly in the GAC will take precedence over an assembly on the file system.
Alternatively, if this is the first attempt to resolve the assembly, the CLR first checks the global assembly cache (GAC). The GAC is a machine-wide assembly repository that allows multiple versions of the same assembly to be executed in the same application. If the assembly is found in the GAC, the resolution process is successful and the discovered assembly is loaded. So you now know that, because the GAC is searched first, the presence of an applicable assembly in the GAC will take precedence over an assembly on the file system.
![]() If the assembly could not be found in the GAC, the CLR starts probing a variety of directories in search of it. The directories searched depend on the app.config settings. If there is a codeBase element in the app.config, that location is checked and—if the assembly is not found—no other locations are subsequently checked. However, the default is for the application’s root directory to be searched, which is typically the /bin folder that relates to the entry point or web application. If the assembly cannot be found there, the resolution process fails and an exception is thrown by the CLR. Typically, this results in the termination of the application.
If the assembly could not be found in the GAC, the CLR starts probing a variety of directories in search of it. The directories searched depend on the app.config settings. If there is a codeBase element in the app.config, that location is checked and—if the assembly is not found—no other locations are subsequently checked. However, the default is for the application’s root directory to be searched, which is typically the /bin folder that relates to the entry point or web application. If the assembly cannot be found there, the resolution process fails and an exception is thrown by the CLR. Typically, this results in the termination of the application.
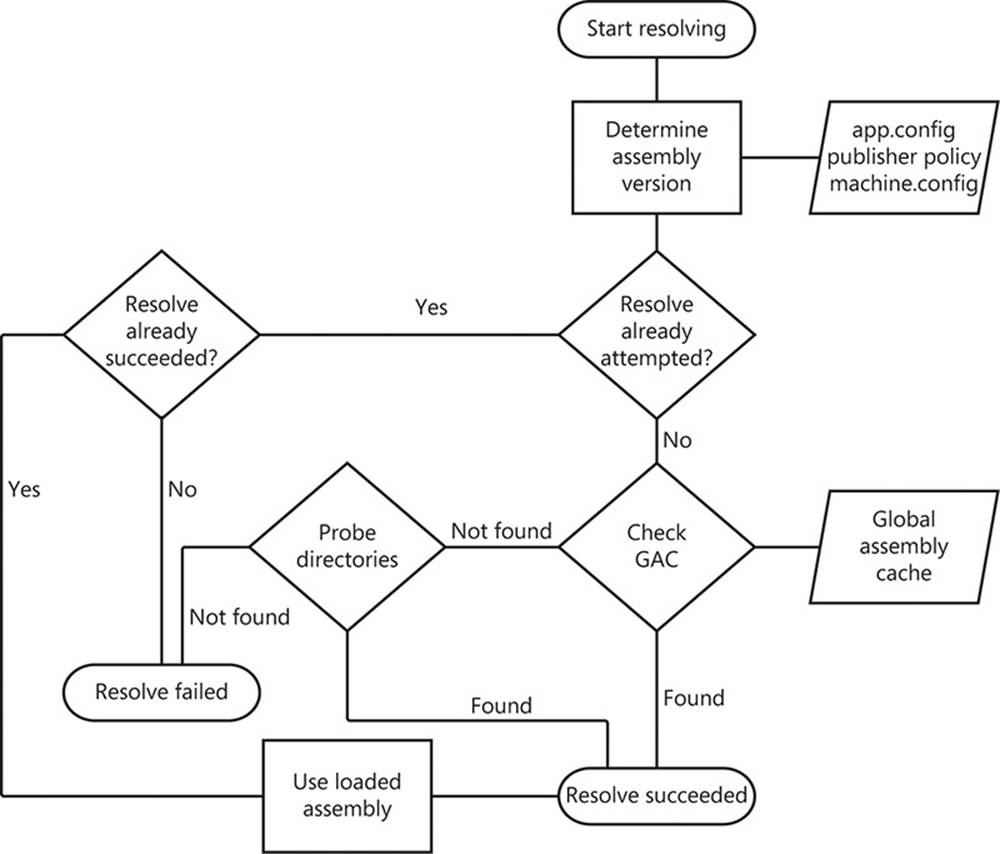
FIGURE 2-15 A brief overview of the assembly resolution process.
The Fusion log
This is a very useful tool for debugging failed attempts by the CLR to bind to an assembly at run time. Rather than trying to step through the application in the Visual Studio debugger, it is better to turn Fusion on and read the log file that results.
To enable Fusion you must edit the Windows registry, as shown in the following code.
HKLM\Software\Microsoft\Fusion\ForceLog 1
HKLM\Software\Microsoft\Fusion\LogPath C:\FusionLogs
The ForceLog value is a DWORD, whereas the LogPath is a string. You can set the LogPath to whatever path you choose. An example of a failed binding is shown in Listing 2-12.
LISTING 2-12 Sample output from Fusion for a failed attempt to bind an assembly.
*** Assembly Binder Log Entry (6/21/2013 @ 1:50:14 PM) ***
The operation failed.
Bind result: hr = 0x80070002. The system cannot find the file specified.
Assembly manager loaded from: C:\Windows\Microsoft.NET\Framework64\v4.0.30319\clr.dll
Running under executable C:\Program Files\1UPIndustries\Bins\v1.1.0.242\Bins.exe
--- A detailed error log follows.
=== Pre-bind state information ===
LOG: User = DEV\gmclean
LOG: DisplayName = TaskbarDockUI.Xtensions.Bins.resources, Version=1.0.0.0, Culture=en-US,
PublicKeyToken=null (Fully-specified)
LOG: Appbase = file:///C:/Program Files/1UPIndustries/Bins/v1.1.0.242/
LOG: Initial PrivatePath = NULL
LOG: Dynamic Base = NULL
LOG: Cache Base = NULL
LOG: AppName = Bins.exe
Calling assembly : TaskbarDockUI.Xtensions.Bins, Version=1.0.0.0, Culture=neutral,
PublicKeyToken=null.
===
LOG: This bind starts in default load context.
LOG: No application configuration file found.
LOG: Using host configuration file:
LOG: Using machine configuration file from C:\Windows\Microsoft.NET\Framework64
\v4.0.30319\config\machine.config.
LOG: Policy not being applied to reference at this time (private, custom, partial, or
location-based assembly bind).
LOG: Attempting download of new URL file:///C:/Program Files/1UPIndustries/
Bins/v1.1.0.242/en-US/TaskbarDockUI.Xtensions.Bins.resources.DLL.
LOG: Attempting download of new URL file:///C:/Program Files/1UPIndustries/
Bins/v1.1.0.242/en-US/TaskbarDockUI.Xtensions.Bins.resources/
TaskbarDockUI.Xtensions.Bins.resources.DLL.
LOG: Attempting download of new URL file:///C:/Program Files/1UPIndustries/Bins/
v1.1.0.242/en-US/TaskbarDockUI.Xtensions.Bins.resources.EXE.
LOG: Attempting download of new URL file:///C:/Program Files/1UPIndustries/
Bins/v1.1.0.242/en-US/TaskbarDockUI.Xtensions.Bins.resources/
TaskbarDockUI.Xtensions.Bins.resources.EXE.
LOG: All probing URLs attempted and failed.
After the registry is edited, all attempts, successful or otherwise, to resolve an assembly by any managed application will be written to the logs. This is obviously a lot of log files, which can be good, but it can start to become a needle-in-a-haystack sort of problem.
Luckily, Fusion has a UI application, shown in Figure 2-16, which makes it slightly easier to find the right file for your application, rather than scouring the file system.
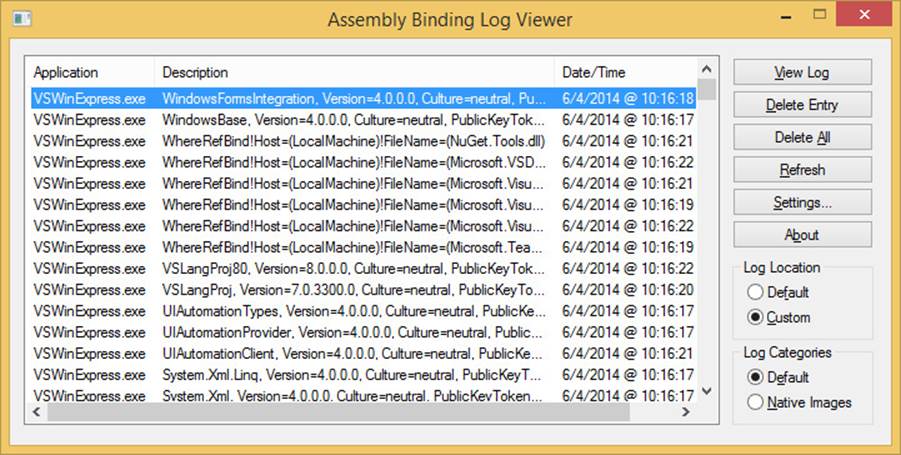
FIGURE 2-16 Fusion has a user interface for finding the log file for your application.
Not all dependencies require assembly references. One alternative is to deploy the service code as a hosted service. This requires inter-process or inter-network communication, but it minimizes the assembly references required between client and server, as the next section examines.
Services
In comparison to assemblies, the coupling of a client to a hosted service can be much looser, which is beneficial but also comes at a cost. Depending on your application’s requirements, you could have the client know a lot or a little about the location of the service. Also, you can vary how the service is implemented so that it has very few requirements. With each of these options, there are different tradeoffs to be considered.
Known endpoint
When the location of the service is known to clients at compile time, you can create a service proxy on the client side. This proxy can be created in at least two ways: by using Visual Studio to add a service reference to a project, and by creating the service proxy yourself via theChannelFactory class in the .NET Framework.
Adding a service reference in Visual Studio is very easy: just select Add Service Reference on the shortcut menu for the project. All the Add Service Reference dialog box needs is the location of the Web Services Definition Language (WSDL) file, which provides a metadata description of the service, its data types, and available behavior. Visual Studio then generates a set of proxy classes for this service, saving a lot of time. It can even generate asynchronous versions of the service methods to mitigate against blocking. However, the tradeoff of using this method is the loss of control over the code that is generated. The code that Visual Studio generates is unlikely to match up to your in-house coding standards, which might be a problem depending on how strict those standards are. Another issue is that the generated service proxy does not lend itself to unit testing: it does not generate any interfaces, just implementing classes.
An alternative to adding a service reference is to create a service proxy yourself in code. This method is best used when the client has access to the interface of the service and can reuse it directly by reference. Listing 2-13 shows an example of creating a service proxy by using theChannel-Factory class.
LISTING 2-13 The ChannelFactory class allows you to create a service proxy.
var binding = new BasicHttpBinding();
var address = new EndpointAddress("http://localhost/MyService");
var channelFactory = new ChannelFactory<IService>(binding, address);
var service = channelFactory.CreateChannel();
service.MyOperation();
service.Close();
channelFactory.Close();
The ChannelFactory class is generic, and its constructor requires the interface for the service proxy that you want it to create. Because this code also requires a Binding and an Endpoint-Address, you must furnish the ChannelFactory with the full address/binding/contract (ABC). In this example, the IService interface is the same interface that the service implements. What you receive from ChannelFactory.CreateChannel is a proxy that, for each call made, will call the equivalent method on the server-side implementation. Because the same interface is used, client-side classes can require this interface as a constructor parameter to be resolved by dependency injection, and the client classes instantly become testable. In addition, they don’t have to know that they are calling a remote service.
Service Discovery
Sometimes you might know the binding type of a service or its contract, but not the address where it is hosted. In this case, you can use Service Discovery, which was introduced to Windows Communication Foundation (WCF) in the .NET Framework 4.
Service Discovery comes in two flavors: managed and ad hoc. In managed mode, a centralized service called a discovery proxy is well known to clients, which directly send it queries for finding other services. This is the less interesting mode, because it introduces a single point of failure (SPOF): if the discovery proxy is not available, clients cannot access any other services because they are not discoverable.
Ad hoc mode obviates the need for a discovery proxy by using multicast network messages. The default implementation of this uses the User Datagram Protocol (UDP), with each discoverable service listening on a specified IP address1 for queries. Clients effectively ask the network whether there is a service that matches its query criteria—a contract or binding type, for example. In this scenario, if one of the services is unavailable, only that service cannot be discovered, whereas the rest will respond to requests. Listing 2-14 shows how to host a discoverable service programmatically, and Listing 2-15 shows how to add discoverability to a service via configuration.
1 The IP address used is 239.255.255.250 (IPv4) or [FF02::C] (IPv6). The port used is 3702. This is set by the WS-Discovery standard, so is not configurable.
LISTING 2-14 Programmatically hosting a discoverable service.
class Program
{
static void Main(string[] args)
{
using (ServiceHost serviceHost = new ServiceHost(typeof(CalculatorService)))
{
serviceHost.Description.Behaviors.Add(new ServiceDiscoveryBehavior());
serviceHost.AddServiceEndpoint(typeof(ICalculator), new BasicHttpBinding(),
new Uri("http://localhost:8090/CalculatorService"));
serviceHost.AddServiceEndpoint(new UdpDiscoveryEndpoint());
serviceHost.Open();
Console.WriteLine("Discoverable Calculator Service is running...");
Console.ReadKey();
}
}
}
LISTING 2-15 Hosting a discoverable service via configuration.
<system.serviceModel>
<behaviors>
<serviceBehaviors>
<behavior>
<serviceMetadata httpGetEnabled="true" httpsGetEnabled="true"/>
<serviceDebug includeExceptionDetailInFaults="false"/>
</behavior>
<behavior name="calculatorServiceDiscovery">
<serviceDiscovery />
</behavior>
</serviceBehaviors>
<endpointBehaviors>
<behavior name="calculatorHttpEndpointDiscovery">
<endpointDiscovery enabled="true" />
</behavior>
</endpointBehaviors>
</behaviors>
<protocolMapping>
<add binding="basicHttpsBinding" scheme="https" />
</protocolMapping>
<serviceHostingEnvironment aspNetCompatibilityEnabled="true"
multipleSiteBindingsEnabled="true" />
<services>
<service name="ConfigDiscoverableService.CalculatorService"
behaviorConfiguration="calculatorServiceDiscovery">
<endpoint address="CalculatorService.svc"
behaviorConfiguration="calculatorHttpEndpointDiscovery"
contract="ServiceContract.ICalculator" binding="basicHttpBinding" />
<endpoint kind="udpDiscoveryEndpoint" />
</service>
</services>
</system.serviceModel>
To become discoverable, all a service needs to do is add the ServiceDiscoveryBehavior and host a DiscoveryEndpoint. In this example, the UdpDiscoveryEndpoint is used for receiving multicast network messages from clients.
![]() Note
Note
Service Discovery in WCF complies with the WS-Discovery standard. This makes it interoperable with different platforms and languages, not just the .NET Framework.
Clients make use of the DiscoveryClient class to find a discoverable service, which also needs a DiscoveryEndpoint. The Find method is then called with a configured FindCriteria instance, which describes the attributes of the service to be found. Find returns aFindResponse instance that contains an Endpoints property—a collection of EndpointDiscoveryMetadata instances, one per matching service. Listing 2-16 shows these steps to find a discoverable service.
LISTING 2-16 Service Discovery is a good way to decouple code.
class Program
{
private const int a = 11894;
private const int b = 27834;
static void Main(string[] args)
{
var foundEndpoints = FindEndpointsByContract<ICalculator>();
if (!foundEndpoints.Any())
{
Console.WriteLine("No endpoints were found.");
}
else
{
var binding = new BasicHttpBinding();
var channelFactory = new ChannelFactory<ICalculator>(binding);
foreach (var endpointAddress in foundEndpoints)
{
var service = channelFactory.CreateChannel(endpointAddress);
var additionResult = service.Add(a, b);
Console.WriteLine("Service Found: {0}", endpointAddress.Uri);
Console.WriteLine("{0} + {1} = {2}", a, b, additionResult);
}
}
Console.ReadKey();
}
private static IEnumerable<EndpointAddress> FindEndpointsByContract
<TServiceContract>()
{
var discoveryClient = new DiscoveryClient(new UdpDiscoveryEndpoint());
var findResponse = discoveryClient.Find(new
FindCriteria(typeof(TServiceContract)));
return findResponse.Endpoints.Select(metadata => metadata.Address);
}
}
Bear in mind that with UDP, as opposed to TCP, there is no guarantee of message delivery. It is possible for datagrams to be lost in transmission, so either the request might not reach a viable service or the response might not make it back to the client. In either scenario, it would appear to the client that there wasn’t a service available to handle the request.
![]() Tip
Tip
When hosting a discoverable service in Internet Information Services (IIS) or Windows Process Activation Service (WAS), ensure that you use the Microsoft AppFabric AutoStart functionality. Discoverability depends on the availability of the service, meaning that it must be running in order to receive queries from clients. AppFabric AutoStart allows the service to run when the application is started in IIS. Without AutoStart, the service is not started until the first request is made.
RESTful services
The most compelling reason to create RESTful services (REST: REpresentational State Transfer) is the very low dependency burden expected of clients. All that is needed is an HTTP client, which is commonly provided by the frameworks and libraries of languages. This makes RESTful services ideal for developing services that need to have wide-ranging, cross-platform support. For example, both Facebook and Twitter have REST APIs for various queries and commands. This ensures that clients can be developed for a large number of platforms: Windows Phone 8, iPhone, Android, iPad, Windows 8, Linux, and much more. Having a single implementation that can service all of these clients would be more difficult without the very low dependency requirements that REST allows.
The ASP.NET Web API is used for creating REST services that use the .NET Framework. Similar to the ASP.NET MVC framework, it allows developers to create methods that map directly to web requests. The Web API provides a base controller class called ApiController. You inherit from this controller and add methods named like the HTTP verbs: GET, POST, PUT, DELETE. HEAD, OPTIONS, and PATCH. Whenever an HTTP request arrives using one of these verbs, the corresponding method is called. Listing 2-17 shows an example of a service that implements all of these verbs.
LISTING 2-17 Almost all of the HTTP verbs are supported by the ASP.NET Web API.
public class ValuesController : ApiController
{
public IEnumerable<string> Get()
{
return new string[] { "value1", "value2" };
}
public string Get(int id)
{
return "value";
}
public void Post([FromBody]string value)
{
}
public void Put(int id, [FromBody]string value)
{
}
public void Head()
{
}
public void Options()
{
}
public void Patch()
{
}
public void Delete(int id)
{
}
}
Listing 2-18 shows the client code for accessing the GET and POST methods of this service, using the HttpClient class. Although this is by no means the only way to access REST services in the .NET Framework, it relies on only the framework itself.
LISTING 2-18 Clients can use the HttpClient class to access RESTful services.
class Program
{
static void Main(string[] args)
{
string uri = "http://localhost:7617/api/values";
MakeGetRequest(uri);
MakePostRequest(uri);
Console.ReadKey();
}
private static async void MakeGetRequest(string uri)
{
var restClient = new HttpClient();
var getRequest = await restClient.GetStringAsync(uri);
Console.WriteLine(getRequest);
}
private static async void MakePostRequest(string uri)
{
var restClient = new HttpClient();
var postRequest = await restClient.PostAsync(uri,
new StringContent("Data to send to the server"));
var responseContent = await postRequest.Content.ReadAsStringAsync();
Console.WriteLine(responseContent);
}
}
Just to emphasize the point that multiple clients can be written with equally low dependency requirements, Listing 2-19 shows a Windows PowerShell 3 script for accessing the GET and POST methods of the service.
LISTING 2-19 Accessing the REST service from Windows PowerShell 3 is extremely trivial.
$request = [System.Net.WebRequest]::Create("http://localhost:7617/api/values")
$request.Method ="GET"
$request.ContentLength = 0
$response = $request.GetResponse()
$reader = new-object System.IO.StreamReader($response.GetResponseStream())
$responseContent = $reader.ReadToEnd()
Write-Host $responseContent
This code uses the WebRequest object from the .NET Framework to call the RESTful service. This class is the superclass of the HttpRequest class. The Create method is a factory method that returns an HttpRequest instance because an http:// URI was provided.
Dependency management with NuGet
Dependency management can be greatly simplified with the use of dependency management tools. Such tools are responsible for following dependency chains to ensure that all dependent artifacts are available. They also manage the versioning of dependencies: you can specify that you want to depend only on specific versions of dependencies, and the dependency management tools do the rest.
NuGet is a package management utility for the .NET Framework. NuGet refers to a dependency as a package, but the tool is not limited to assemblies. NuGet packages can also include configuration, scripts, and images—almost anything you need. One of the most compelling reasons to use a package manager such as NuGet is that it has knowledge of a package’s dependencies and will bring the entire dependency chain with it when a project references a package.
As of Visual Studio 2013, NuGet is fully integrated as the default package management utility.
Consuming packages
NuGet adds some new commands to the shortcut menu in the Solution Explorer window of Visual Studio. From there, you can open the NuGet package management window and add a reference to a dependency.
For this example, I’m going to add a dependency to CorrugatedIron, the .NET Framework client driver for the Riak NoSql key/value store. Figure 2-17 shows the NuGet package management window.
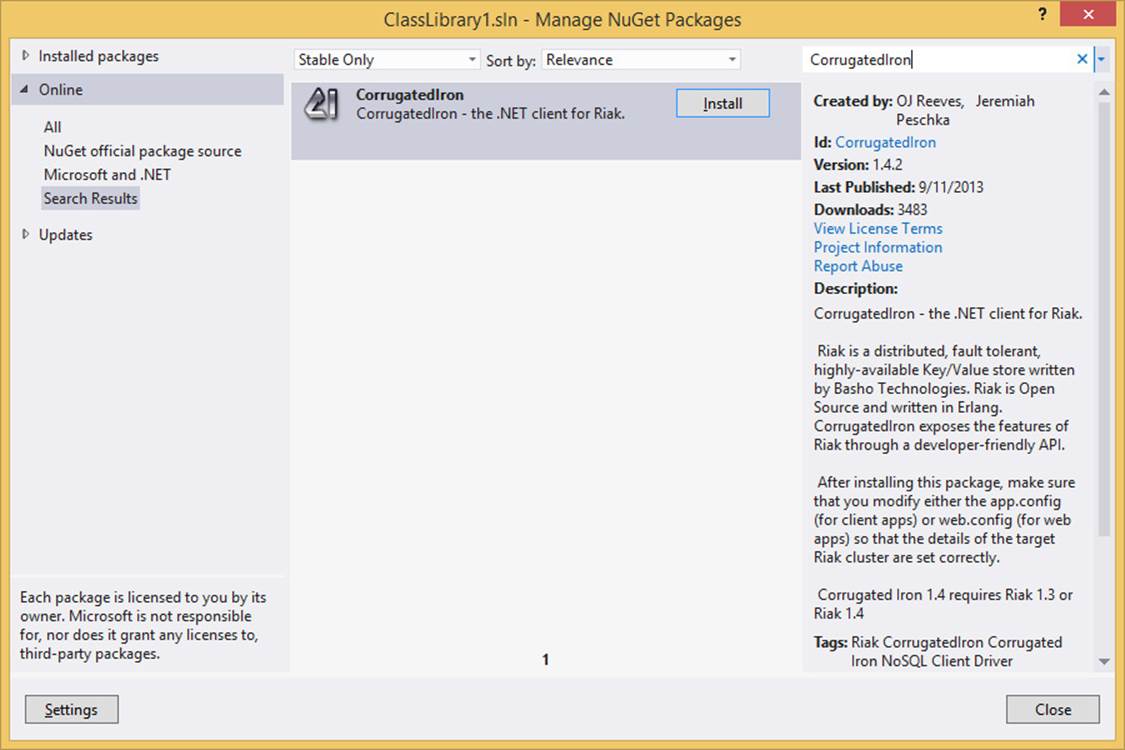
FIGURE 2-17 NuGet packages have a lot of useful metadata associated with them.
Whenever a package is selected in the list, the information pane on the right shows some metadata about the package. This includes its unique name in the gallery, the author or authors of the package, the version of the package, the date it was last published, a description of the package, and any dependencies that it has. The dependencies are very interesting, because they show what else is going to be installed as a result of referencing this package, in addition to the required or supported versions of the dependencies. CorrugatedIron, for example, requires at least version 4.5.10 of Newtonsoft.Json, a .NET Framework JSON/class serializer, and at least version 2.0.0.602 of protobuf-net. Both of these packages could have dependencies of their own.
When you choose to install this package, NuGet will first try to download all the files and place them in a packages/ folder under the solution’s root folder. This allows you to put this entire directory into source control, exactly as you did earlier with a dependencies/ folder. NuGet then references the downloaded assemblies in the project where you want to use this library. Figure 2-18 shows the references for the project after Riak is added.
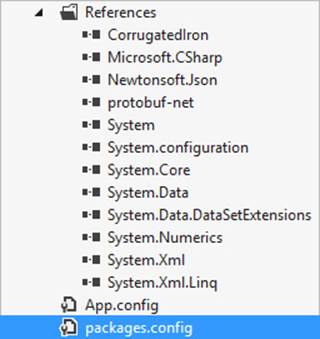
FIGURE 2-18 The target package and all of its dependencies are referenced by the project.
In addition to making the references, NuGet also creates a packages.config file that contains information about which packages—and which versions—are referenced by the project. This is useful when it comes to upgrading or uninstalling packages, which is also something that NuGet is able to do.
Riak also needs some default configuration before it is ready to be used. So not only has NuGet downloaded and referenced a lot of assemblies, it has also edited your app.config to include some sensible default values for required settings that Riak needs. Listing 2-20 shows the current state of the app.config after Riak is installed.
LISTING 2-20 NuGet has added a new configSection to the app.config specifically for Riak.
<configuration>
<configSections>
<section name="riakConfig" type="CorrugatedIron.Config.RiakClusterConfiguration,
CorrugatedIron" />
</configSections>
<riakConfig nodePollTime="5000" defaultRetryWaitTime="200" defaultRetryCount="3">
<nodes>
<node name="dev1" hostAddress="riak-test" pbcPort="10017" restScheme="http"
restPort="10018" poolSize="20" />
<node name="dev2" hostAddress="riak-test" pbcPort="10027" restScheme="http"
restPort="10028" poolSize="20" />
<node name="dev3" hostAddress="riak-test" pbcPort="10037" restScheme="http"
restPort="10038" poolSize="20" />
<node name="dev4" hostAddress="riak-test" pbcPort="10047" restScheme="http"
restPort="10048" poolSize="20" />
</nodes>
</riakConfig>
</configuration>
Clearly, this is a great timesaver because you haven’t had to search the Riak site for a download of CorrugatedIron or any of its dependencies. Everything has been put into a state where you can concentrate on developing. And when it comes time to upgrade CorrugatedIron to the next version, you can also use NuGet to automatically update all of the packages that depend on it in the entire solution.
Producing packages
NuGet also allows you to create packages. You might want to create packages for publication on the official NuGet package gallery so that other developers can use them, or you might want to host your own package feed for first-party dependencies. Figure 2-19 shows the NuGet Package Explorer, which can be used to create your own packages. In this package, I have configured CorrugatedIron to be a dependency, so it will also depend on Newtonsoft.Json and protobuf-net, implicitly. I have added a library artifact that is targeted specifically to the .NET Framework 4.5.1 and a text file that will be created in the referenced assembly under My folder/NewFile.txt. There is even a Windows PowerShell script that is instructed to run during installation. This could feasibly be used to do almost anything—thanks to the flexibility of Windows PowerShell.
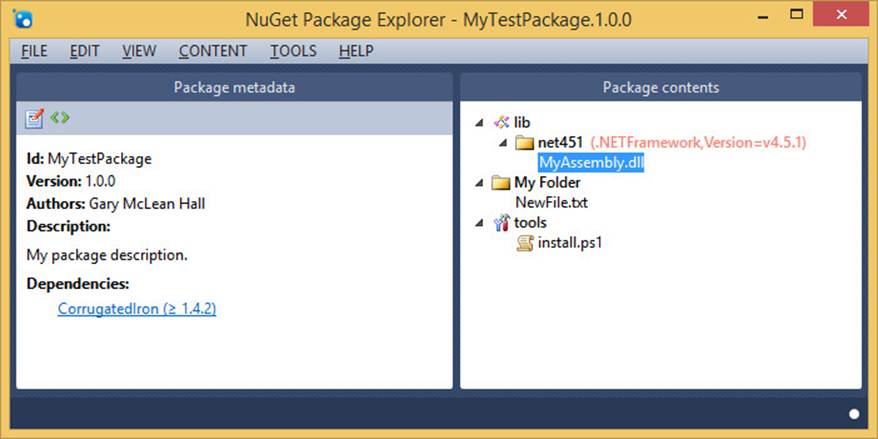
FIGURE 2-19 The NuGet Package Explorer makes it very easy to construct your own packages.
Each package has an XML file that details the metadata that is shown in the installation window. Listing 2-21 shows some of the syntax of this file.
LISTING 2-21 The package XML definition, including metadata.
<package xmlns="http://schemas.microsoft.com/packaging/2010/07/nuspec.xsd">
<metadata>
<id>MyTestPackage</id>
<version>1.0.0</version>
<authors>Gary McLean Hall</authors>
<requireLicenseAcceptance>false</requireLicenseAcceptance>
<description>My package description.</description>
<dependencies>
<dependency id="CorrugatedIron" version="1.0.1" />
</dependencies>
</metadata>
</package>
NuGet is such a productivity and organizational bonus that it is painful to return to manually managing third-party dependencies, if a package does not exist for a particular library. In fact, NuGet is not only for third-party dependencies. When a solution becomes large enough it is advisable to split the solution into multiple parts, sliced by layer. The assemblies for each layer can then be packaged by using NuGet and consumed by layers above. This keeps solutions small and easy to work with.
Chocolatey
The best way to describe Chocolatey is that it is a package management tool, just like NuGet, but its packages are applications and tools, not assemblies. Developers with some Linux knowledge will find that Chocolatey is like apt-get, which is Debian and Ubuntu’s package manager. Again, many of the benefits of package management apply: simplified installation, dependency management, and ease of use.
The following Windows PowerShell script can be used to download and install Chocolatey.
@powershell -NoProfile -ExecutionPolicy unrestricted -Command "iex ((new-object
net.webclient).DownloadString('https://chocolatey.org/install.ps1'))" && SET
PATH=%PATH%;%systemdrive%\chocolatey\bin
After Chocolatey is installed, you can use the command line to search for and install various applications and tools. The installation procedure will have already updated the command-line path to include the chocolatey.exe application. Much like Git, Chocolatey has subcommands such as list and install, but these also have synonyms that can be used as shortcuts: clist and cinst, respectively. Listing 2-22 shows a sample Chocolatey session that finds the package name for Filezilla, the FTP client, and then installs it.
LISTING 2-22 First you search the packages for the application that you want, and then you install it.
C:\dev> clist filezilla
ferventcoder.chocolatey.utilities 1.0.20130622
filezilla 3.7.1
filezilla.commandline 3.7.1
filezilla.server 0.9.41.20120523
jivkok.tools 1.1.0.2
kareemsultan.developer.toolkit 1.4
UAdevelopers.utils 1.9
C:\dev> cinst filezilla
Chocolatey (v0.9.8.20) is installing filezilla and dependencies. By installing you acceptthe license for filezilla and each dependency you are installing.
. . .
This Finished installing 'filezilla' and dependencies - if errors not shown in console,none detected. Check log for errors if unsure.
As long as no errors were reported by Chocolatey, the requested package is now installed. Be aware that Chocolatey should have altered your system PATH so that any new binaries can be executed from the command line, but it does not always do so. There are a lot of packages available via Chocolatey, and the convenience that it provides is a compelling reason to use it.
Layering
To this point, this chapter has looked primarily at managing dependencies at the assembly level. This is a natural first step to organizing your application, because all classes and interfaces are contained in assemblies, and how they reference each other is a common concern. When correctly organized, your assemblies will contain classes and interfaces that only pertain to a single group of related functionality. Taken in aggregate, however, how can you ensure that groups of assemblies are also correctly organized?
Groups of two or more interrelated assemblies form components of the software system that is being developed. It is equally important—if not more so—that these components interact in a similarly well-defined and structured fashion. As Figure 2-20 shows, components are not physical artifacts of deployment, like assembly dynamic-link libraries (DLLs), but are logical groupings of assemblies that share a similar theme.
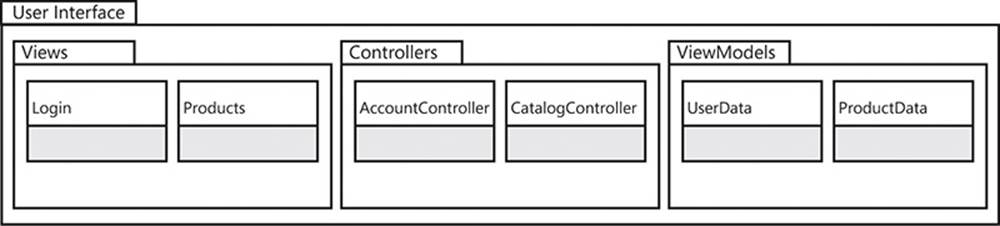
FIGURE 2-20 By grouping related assemblies together, you can define logical components.
There are three assemblies included in the diagram: Views, Controllers, and ViewModels. Each assembly contains two classes that serve different purposes and might require different dependencies. Although the classes and assemblies are constructs provided by the .NET Framework, the User Interface package that groups everything is logical. The three assemblies might be located in the solution in a folder called UserInteraces, but there is nothing preventing you from polluting this layer with another project that does not belong. Nothing, that is, except your own diligence.
In dependency management, components are no different from other programming constructs at lower levels. As with methods, classes, and assemblies, you can consider layers to be another node in the dependency graph shown earlier in this chapter. Thus, the same rules apply: keeping the digraph acyclic and ensuring a single responsibility.
Layering is an architectural pattern that encourages you to think of software components as horizontal layers of functionality that build on each other to form a whole application. Components are layered, one on top of another, and the dependency direction must always point downward. That is, the bottom layer of the application has no dependencies2, and each layer upward depends on the layer immediately below it. At the top of the stack is the user interface. If the application is a service layer, the top layer will be the API that clients will use to interact with the system.
2 This isn’t strictly true: there are likely to be some dependencies, but because it is the bottom layer with no other first-party code to depend on, they are likely to be third-party, infrastructural dependencies.
Common patterns
There are several common layering patterns from which to choose for any project. Each one presented here should be used as a guide to be tailored to the specific requirements and restrictions of your situation. The differentiating factor between the layering patterns is simply the number of layers used. This section starts with a simple architecture made up of only two layers, then inserts a third layer in between, and finally, extrapolates to an arbitrary number of layers.
The number of layers required correlates to the complexity of the solution; the complexity of the solution correlates to the complexity of the problem. Therefore, the more complex the problem, the more inclined you might be to invest in a multilayered architecture. Complexity, in this instance, is measured by many factors: the time constraints placed on the project, its required longevity, how frequent requirements might change, and the importance that the development team places on patterns and practices, to name only a few.
Because this book is about adapting to changes in requirements, I advocate doing the simplest thing possible first, and refactoring toward something more complex only when required. This has positive effects on projects. First, it allows you to deliver something as soon as possible. Feedback should be sought early and frequently in software development. Trying to deliver the perfect solution is pointless if the customer’s idea of perfection differs from the development team’s idea of perfection. Developing a multilayer solution takes longer than a simple two-layer solution, delaying that all-important feedback loop.
Layers vs. tiers
The difference between layers and tiers is the difference between the logical organization and physical deployment of code. Logically, you could separate an application in three or four layers, but physically deploy it into one tier. The number of tiers is somewhat related to the number of machines that the application is deployed to. If you deploy to a single machine, you are deploying an application in one tier. If you deploy the application to two machines, split by at least two layers, you are deploying to two tiers.
With every tier that you deploy to, you accept that you are crossing a network boundary, and with that comes a temporal cost: it is expensive to cross a processing boundary within the same machine, but it is much more expensive to cross a network boundary. However, deploying in tiers has a distinct advantage because it allows you to scale your applications. If you deploy a web application that consists of a user interface layer, a logic layer, and a data access layer onto a single machine—thus a single tier—that machine now has a lot of work to do, and the number of users you can support will necessarily be lower. Were you to split the application’s deployment into two tiers—putting the database on one tier and the user interface and logic layers on another—you could actually scale the user interface layer both horizontally andvertically.
To scale vertically, you just increase the power of the computer by adding memory or processing units. This allows the single machine to achieve more by itself. However, you can also scale horizontally by adding completely new machines that perform exactly the same task. There would be multiple machines to host the web user interface code and a load balancer that would direct clients to the least busy machine at any point in time. Of course, this is not a panacea to supporting more concurrent users on a web application. This requires more care with data caching and user authentication, because each request made by a user could be handled by a different machine.
Two layers
A two-layered solution is the simplest step forward from having no discernable layering. It is only useful in a narrow set of circumstances, but it is extremely quick to implement. The only two layers included are the user interface layer and the data access layer. Remember that this does not limit you to just two assemblies, but two logical groups of assemblies: one focusing directly on the user interface, the other on data access.
Figure 2-21 shows the two layers as packages in a UML diagram, each layer containing assemblies relating to those layers. The only dependency shown is directed from the user interface layer down to the data access layer. This is the only way that the dependencies can ever be directed in any layered architecture.
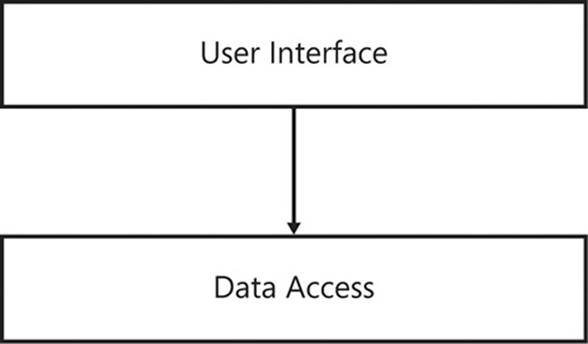
FIGURE 2-21 A two-layered application consists of the UI components and the data access components.
User interface
The user interface layer is responsible for:
![]() Providing a way for the user to interact with the application (for example, desktop windows and controls, a webpage, or a console application’s command line or menu).
Providing a way for the user to interact with the application (for example, desktop windows and controls, a webpage, or a console application’s command line or menu).
![]() Presenting data and information to the user.
Presenting data and information to the user.
![]() Receiving requests from the user in the form of queries or commands.
Receiving requests from the user in the form of queries or commands.
![]() Validating input that the user has entered.
Validating input that the user has entered.
The user interface layer can vary in its implementation. It could be a Windows Presentation Foundation (WPF) client packed with fancy graphics and animation, a set of webpages that the user navigates through, or a simple console application that uses command-line switches or a simple menu for the user to select a command or query to execute.
![]() Note
Note
In some cases, the user interface could be replaced with a set of services that surface functionality to clients elsewhere. There isn’t really a user interface, but the two-layer architecture is still apparent, with the UI layer being replaced by an API layer.
The user interface layer sits on top of the data access layer and can make use of it. However, as discussed previously in relation to assembly references, the user interface layer should not make direct reference to any of the data access layer’s implementation assemblies. There should be a strict separation between the interface and implementation assemblies of the two layers. This makes the layering diagram look a little more like Figure 2-22.
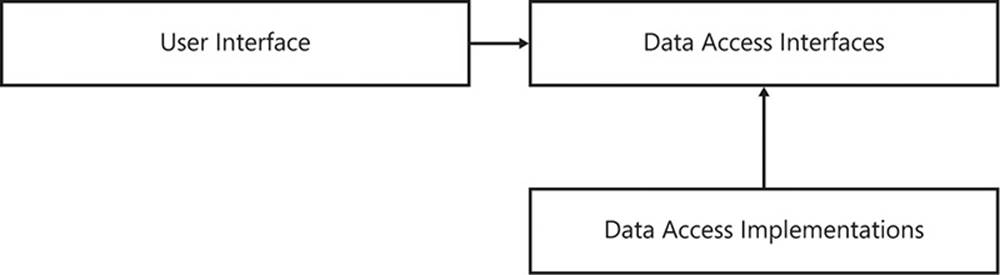
FIGURE 2-22 The two layers are separated into implementation assemblies and interface assemblies.
This is solving the Entourage anti-pattern with the Stairway pattern, but this time it is doing so at the architectural level. Each layer is the combination of an abstraction of the functionality that a higher layer depends on, along with an implementation of this abstraction. If a layer above starts referencing part of the implementation of a layer, that layer is called a leaky abstraction. The dependencies of that layer’s implementation will begin to leak into layers further up the stack, resulting in avoidable dependencies.
Data access
The responsibilities of the data access layer are:
![]() Servicing queries for data.
Servicing queries for data.
![]() Serializing and deserializing object models to and from a relational model.
Serializing and deserializing object models to and from a relational model.
The implementation of the data access layer can be just as varied as that of the user interface layer. This layer typically includes some kind of persistent data store that could include a relational database such as SQL Server, Oracle, MySQL, or PostgreSQL or a document database such as MongoDB, RavenDB, or Riak. In addition to the data storage mechanism, there is likely to be one or more supporting assemblies for executing queries or insert/update/delete commands by calling stored procedures, or for mapping data to a relational database via Entity Framework or NHibernate.
Data access layers should be hidden behind interfaces that do not depend on any of these technology choices. As with all interfaces, there should be no reference to a third-party dependency, thus keeping clients separated from the choice of implementation.
A well-designed data access layer is reusable across multiple applications. If two different user interfaces require the same data but present it in different forms, the same data access layer can be shared between them. Imagine an application that runs across multiple platforms: Windows 8 and Windows Phone 8. Both have different user interface requirements, but each could use the same data access layer.
As with any architecture, using only two layers has some tradeoffs that must be considered carefully before adoption. The two-layer architecture is a good choice when:
![]() There is little or no logic to the application beyond some trivial validation. This can easily be encapsulated in either the data access layer or the user interface layer.
There is little or no logic to the application beyond some trivial validation. This can easily be encapsulated in either the data access layer or the user interface layer.
![]() The application performs mainly CRUD operations on data. Creating, reading, updating, and deleting data becomes more difficult with every additional layer placed between the user interface and the data itself.
The application performs mainly CRUD operations on data. Creating, reading, updating, and deleting data becomes more difficult with every additional layer placed between the user interface and the data itself.
![]() Time is short. If only a prototype or a bootstrap needs to be developed, limiting the number of layers can save a lot of time and the feasibility of a proof of concept can be ascertained. When you stick to good practices such as the Stairway pattern, it is easier to insert additional layers as necessary later.
Time is short. If only a prototype or a bootstrap needs to be developed, limiting the number of layers can save a lot of time and the feasibility of a proof of concept can be ascertained. When you stick to good practices such as the Stairway pattern, it is easier to insert additional layers as necessary later.
However, the two-layer architecture has some obvious drawbacks and is a bad choice when:
![]() There is significant logic in the application, or logic is subject to change. Any logic placed in the user interface layer or data access layer is technically a pollution of that layer and decreases its flexibility and maintainability.
There is significant logic in the application, or logic is subject to change. Any logic placed in the user interface layer or data access layer is technically a pollution of that layer and decreases its flexibility and maintainability.
![]() The application is certain to outgrow two layers within one or two sprints. Any concessions made to obtain quick feedback are not worth the investment if that architecture will only last a matter of weeks.
The application is certain to outgrow two layers within one or two sprints. Any concessions made to obtain quick feedback are not worth the investment if that architecture will only last a matter of weeks.
The two-layer architecture is still very much a viable alternative. Too many developers are enchanted by the latest architectural trend and overlook simpler designs. This causes an otherwise trivial application to receive feedback too late and makes it fragile and hard to maintain. Often, the simplest thing possible is the right thing to do.
Three layers
The three-layer architecture adds an extra layer between the user interface and the data access layer. This is the logic layer. The addition of the logic layer allows the application to encapsulate more complex processing. The logic layer, like the data access layer, can be reused across multiple applications, so it need not be implemented multiple times. Figure 2-23 shows the typical three-layer architecture.
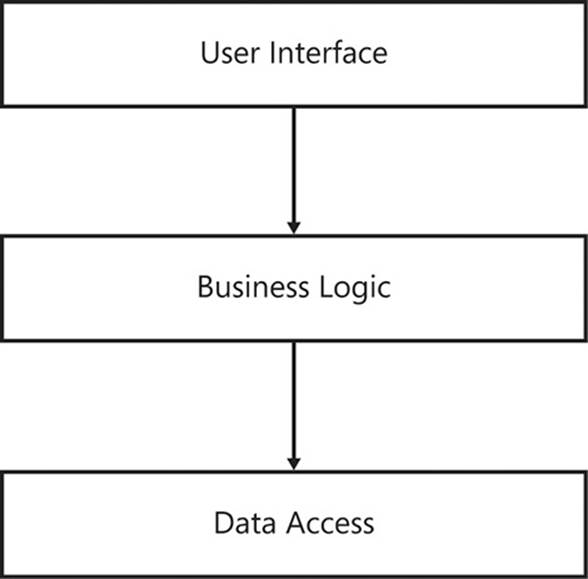
FIGURE 2-23 The third layer contains processing or business logic for the application.
Again, like the data access layer, the logic layer provides interface and implementation assemblies to clients, to avoid a leaky abstraction.
![]() Note
Note
Although the three-layer architecture is very common for web applications, it is typically deployed in only two tiers. One node handles the database, and another node handles almost everything else: the user interface, the logic, and even part of the data access.
Business logic
The business logic layer’s responsibilities are to:
![]() Handle commands from the user interface layer.
Handle commands from the user interface layer.
![]() Model the business domain to capture business processes, rules, and workflow.
Model the business domain to capture business processes, rules, and workflow.
The logic layer might be a command processor that receives commands from the user via the user interface layer and, by collaborating with the data access layer, solves a specific problem or executes a particular task. It could also be a fully developed domain model that aims to map a business’s processes into software. For the latter, it is common for the data access layer to include an Object/Relational Mapping component so that the logic layer can be implemented directly into classes, possibly by using domain-driven design (DDD). In a domain model, there should be no dependencies, either further down the stack or via some implementation-specific technology. For example, the domain model’s assemblies should have no dependencies on an Object/Relational Mapping library. Instead, a separate mapping assembly should be created that is implementation specific and instructs the ORM how to map to the domain model. This allows the domain model’s core classes to be reused without depending on the ORM, and the ORM could be replaced without affecting the domain model or its clients. Figure 2-24 shows a possible implementation of a logic layer that uses a domain model.
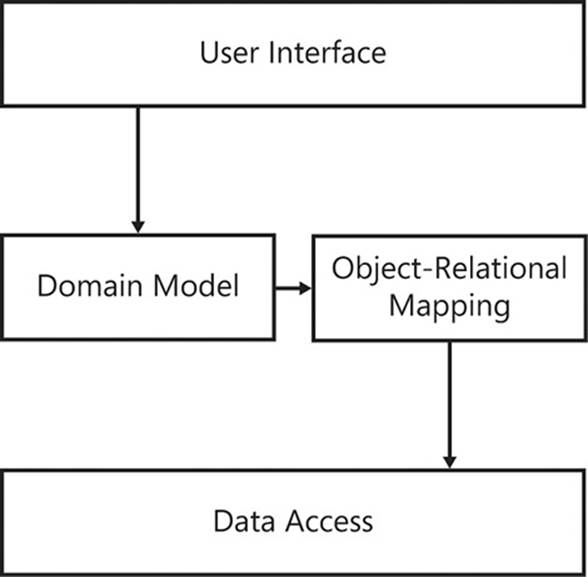
FIGURE 2-24 How the assemblies of a domain model collaborate to form a logic layer.
The addition of a logic layer is necessary when there is complex logic in the application, such as business rules that aim to reflect the real-world workflows of people’s jobs. Even if the logic is not particularly complex but changes often, this is a good argument for introducing a separate layer for encapsulating this behavior. It simplifies the user interface and data access layers, allowing them to concentrate fully on their only purpose.
Cross-cutting concerns
Sometimes a component’s responsibilities are not easily limited to a single layer. Functions such as auditing, security, and caching can permeate through the entire application, because they are applicable at every layer. Tracing the code’s actions at each method call and return, for example, is a useful debugging tool when the application has been deployed and if the Visual Studio debugger cannot be attached to step through the code. You can manually produce an output of the values of parameters as they are passed around, and the return values of various methods, as shown inListing 2-23.
LISTING 2-23 Manually applying cross-cutting concerns quickly swamps the real intent of the code.
public void OpenNewAccount(Guid ownerID, string accountName, decimal openingBalance)
{
log.WriteInfo("Creating new account for owner {0} with name '{1}' and an opening
balance of {2}", ownerID, accountName, openingBalance");
using(var transaction = session.BeginTransaction())
{
var user = userRepository.GetByID(ownerID);
user.CreateAccount(accountName);
var account = user.FindAccount(accountName);
account.SetBalance(openingBalance);
transaction.Commit();
}
}
This is laborious and error-prone, and it instantly pollutes every method with irrelevant boilerplate code, increasing the noise-to-signal ratio. Instead, you can factor out such cross-cutting concerns into encapsulated functionality and apply them to the code in a much less invasive fashion. The most common way of adding functionality non-invasively is through aspect-oriented programming.
Aspects
Aspect-oriented programming (AOP) is the application of cross-cutting concerns—or aspects—to multiple layers in the code. The .NET Framework has several AOP libraries to choose from (search NuGet for AOP), but the examples given here are for PostSharp, which has a free Express version, though with reduced functionality. Listing 2-24 shows tracing code factored out into a PostSharp aspect and applied as an attribute to some methods.
LISTING 2-24 Aspects are a great way to implement cross-cutting concerns.
[Logged]
[Transactional]
public void OpenNewAccount(Guid ownerID, string accountName, decimal openingBalance)
{
var user = userRepository.GetByID(ownerID);
user.CreateAccount(accountName);
var account = user.FindAccount(accountName);
account.SetBalance(openingBalance);
}
The two attributes decorating the OpenNewAccount method provide the same functionality as shown in Listing 2-23, but the intent of the method is clearer. The Logged attribute writes information about the method call to a log, including parameter values. The Transactionalattribute wraps the method in a database transaction and commits the transaction on success or rolls back the transaction on failure. The key here is that both of these attributes are generic enough to be applied to any method, not specifically this one, so they can be reused many times.
Asymmetric layering
All of the users’ requests to an application occur through the provided user interface. However, the path that the requests follow after that is not necessarily always the same. The layering could be asymmetrical, depending on the type of request being made. This is motivated by the need to be pragmatic and to consider whether the layering in place is overkill for some requests or even insufficient for some requests.
A pattern of asymmetric layering that has rapidly gained popularity in the last few years is Command/Query Responsibility Segregation (CQRS). Before discussing CQRS, which is an architectural pattern, a grounding in its method-level influencer, command/query separation, is required.
Command/query separation
Bertrand Meyer, in his book Object-Oriented Software Construction (Prentice Hall, 1997), used the phrase command/query separation (CQS) to explain that all object methods should be one of only two things: a command or a query.
Commands are imperative calls to action, requiring the code to do something. These methods are allowed to change the state of a system but should not also return a value. Listing 2-25 shows an example of a CQS-compliant command method, followed by one that is noncompliant.
LISTING 2-25 CQS-compliant and non-CQS-compliant command methods.
// Compliant command
Public void SaveUser(string name)
{
session.Save(new User(name));
}
// Non-compliant command
public User SaveUser(string name)
{
var user = new User(name);
session.Save(user);
return user;
}
Queries are requests for data, requiring the code to get something. These methods return data to calling clients but should not also change the state of a system. Listing 2-26 shows an example of a CQS-compliant query method, followed by one that is noncompliant.
LISTING 2-26 CQS-compliant and non-CQS-compliant query methods.
// Compliant query
Public IEnumerable<User> FindUserByID(Guid userID)
{
return session.Get<User>(userID);
}
// Non-compliant query
public IEnumerable<User> FindUserByID(Guid userID)
{
var user = session.Get<User>(userID);
user.LastAccessed = DateTime.Now;
return user;
}
Commands and queries are thus differentiated by the presence of a return value. If a method returns a value (and is CQS-compliant) you can safely assume that it does not change any state of the object. The advantage here is that you can reorder query calls knowing that they have no other effect on the object. A method having no return value (and that is CQS-compliant) indicates that you can assume that it does change the state of the object. For these calls, you would have to be more careful in your call order.
Command/Query Responsibility Segregation
The Command/Query Responsibility Segregation pattern is attributed to Greg Young. The pattern is the application of CQS at an architectural level and is an example of asymmetric layering. Commands and queries follow much the same rules as with CQS, but CQRS goes one step further: it acknowledges that commands and queries might need to follow different paths through the layering in order to be best handled.
An example of where minimal CQRS can be applied is when you are developing a three-layer architecture with a domain model. In this instance, the domain model is only ever used by the commanding side of the application, with a much simpler two-layer architecture used for the querying side. Figure 2-25 exemplifies this design.
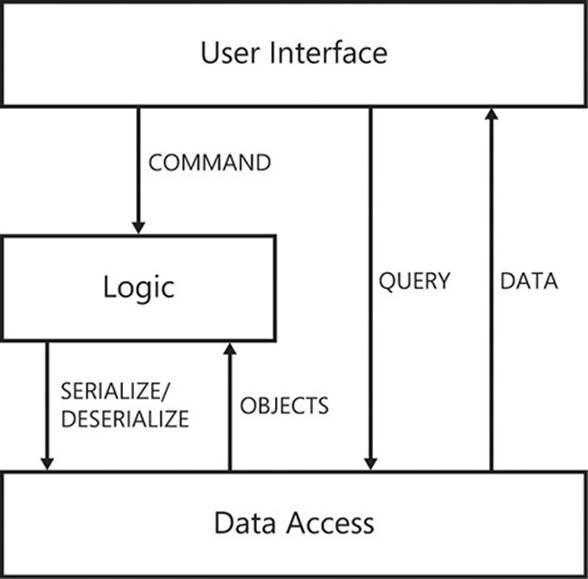
FIGURE 2-25 Domain models should only be used for handling commands.
Querying data often needs to be fast and is allowed to provide few guarantees of transactional consistency: phantom reads or nonrepeatable reads can be an acceptable tradeoff for increased responsiveness. Command processing, though, is often required to have transactional consistency, hence the differing layers in place to handle commands and queries. Sometimes, the data access layers can also differ between commands and queries. A fully ACID-compliant (ACID stands for atomic, consistent, isolated, durable) database might be needed for commands, whereas simple document storage might suffice for queries. The document storage would be updated asynchronously by events published from the command layer, giving eventual consistency to the query reads.
Conclusion
This chapter has shown how the organization of dependencies presents a significant problem when creating software applications. The long-term health, adaptability, and possibly the viability of a project relies on sound management of dependencies. A mess of spaghetti-like interdependencies will occur if developers create classes that reference each other without careful consideration, which can seriously affect a team’s ability to deliver business value in a consistent, predictable fashion.
Dependencies must be managed at all levels, from individual classes and methods interacting with each other, through assembly references, to the high-level architecture of components. Developers must be constantly vigilant that spurious dependencies do not leak outside of their method, class, assembly, or layer.
In some ways, this chapter underpins a lot of the content of the rest of this book. The content provides a solid foundation for maintainable, adaptive code that is reinforced with each chapter. If your assemblies are a spaghetti of references, and your layers do not hide their infrastructural dependencies, your code will become harder to test, amend, and understand, no matter what other patterns or practices you attempt to follow.
All materials on the site are licensed Creative Commons Attribution-Sharealike 3.0 Unported CC BY-SA 3.0 & GNU Free Documentation License (GFDL)
If you are the copyright holder of any material contained on our site and intend to remove it, please contact our site administrator for approval.
© 2016-2026 All site design rights belong to S.Y.A.