Beginning ASP.NET-4.5 in C# and VB (2013)
Chapter 15
Working with Data — Advanced Topics
WHAT YOU WILL LEARN IN THIS CHAPTER:
- How to change the formatting of the various data-bound controls using styles, themes, and skins
- How to handle the various events that are fired by the data controls to change their appearance conditionally
- How to hand-code the UI of data access pages to get complete freedom over the pages’ structure and markup
- How to use the built-in caching mechanisms to improve the performance of your website
WROX.COM CODE DOWNLOADS FOR THIS CHAPTER
You can find the wrox.com code downloads for this chapter on the Download Code tab at www.wrox.com/go/begaspnet451. The code is in the Chapter 15 folder.
The previous three chapters introduced you to a lot of new concepts. Chapter 12 discussed databases in general and SQL Server 2012 Express LocalDB edition in particular. That chapter also covered the basic operations to create, read, update, and delete data. Chapter 13 focused mostly on working with the SqlDataSource control and the different data-bound controls that you have at your disposal. Finally, Chapter 14 explored the world of the ADO.NET Entity Framework, Microsoft’s latest data access technology designed to speed up the way you write data access code.
To help you really understand the core concepts of data access, those three chapters focused mainly on the data source controls and the principles behind them, and much less on the presentation of data with the data-bound controls. Obviously, in a real-world application this is not enough, and you need a way to present data in a clear and attractive way.
The data-bound controls that ship with ASP.NET provide many options to change the way data is presented. They enable you to completely change the design (font, colors, spacing, and so on) of the data they are presenting. Additionally, you can tweak these controls to hide specific columns, modify column headers, and even change the look and feel of the controls programmatically.
In the next sections you see how to style your controls using a variety of techniques. Later sections in this chapter show you how to hand-code your data access pages, giving you great flexibility. Near the end of the chapter, caching — a technique to improve the performance of your website — is discussed.
FORMATTING YOUR CONTROLS USING STYLESChapters 13 and 14 explained how to work with the numerous data-bound ASP.NET controls. You learned how to display and edit lists of data with controls like GridView, Repeater, and ListView, as well as how to work with single record controls such as DetailsView.
So far, you’ve relied on the built-in look and feel of the controls, which often results in dull and plain-looking screens. Figure 15-1 shows the GridView that you created in Chapter 13 to manage the genres in the Planet Wrox database in Firefox.
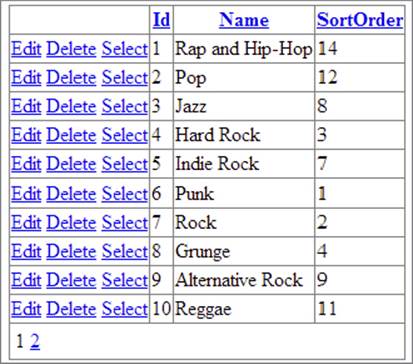
FIGURE 15-1
This control relies on the default settings of the browser to display text and links, which usually results in purple and blue links with the default font, such as Times New Roman. Additionally, the columns in the grid are just as wide as necessary to display the text they contain. It would be a lot easier on the eyes if you could present the GridView as in Figure 15-2 instead.
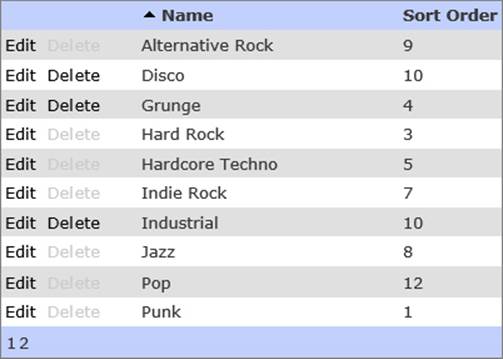
FIGURE 15-2
The column for the Edit and Delete links is now a little wider, separating it clearly from the actual content in the grid. The Id column has been hidden and the Name column has been made wider. The different colors for the header, footer, items, and alternating items make the data in the grid a lot easier to read. Because some genres have reviews attached to them, their Delete links are disabled. And finally, a little glyph has been added to the Name heading to indicate the direction the column is sorted on.
Changing the dull-looking GridView from Figure 15-1 into the snazzier one shown in Figure 15-2 is easily accomplished with the use of ASP.NET styles and the many events that the data-bound controls fire. In the next section you see how to apply these styles to a single control in a page. In the section that follows you see how to move the styles to a theme, so styles can be reused more easily by all controls in a section of your site. You have already seen some styles at work in Chapter 7, where you used them to style the Menu and the TreeView controls. However, because styles are used so much for formatting data-bound controls, they really deserve their own section.
Many of the data-bound and navigation controls have a number of style properties that enable you to modify the look and feel of the control. For example, the GridView control has RowStyle and AlternatingRowStyle properties that enable you to customize the look of an individual row in the grid. Here’s an example of a GridView with two style elements that renders odd and even rows with different background colors:
<asp:GridView ID="GridView1" runat="server"> <AlternatingRowStyle BackColor="White" /> <RowStyle BackColor="#EFF3FB" /></asp:GridView>Likewise, the DetailsView has a CommandRowStyle property that is used to control the appearance of the command row that holds commands such as Insert, Delete, Cancel, and so on.
Ultimately, each style property inherits from the Style class that lives in the System.Web.UI.WebControls namespace. Figure 15-3 shows you a filtered view of the diagram for this class with its most common properties visible.
FIGURE 15-3
As you can see from their names, the properties of the Style class are used to change style-related information on the objects to which this class is applied. Each of these properties is eventually converted to a CSS property or an HTML attribute, such as background-color, border, and so on. Other styles, like the styles for the GridView control, add various layout-related properties, such as different options to control alignment. The following table lists the most important properties of the various Style-derived classes that are available. Note that not every property is available for every style. IntelliSense shows you exactly what properties you can use in a certain style.
|
PROPERTY |
DESCRIPTION |
|
|
These enable you to change the background and text color of the elements. They map to the CSS properties |
|
|
These enable you to change the border of the element to which the style is applied. They map directly to their CSS counterparts |
|
|
This enables you to assign a CSS class instead of inline style information. You should give preference to the |
|
|
This enables you to set the font for the element through the various subproperties like |
|
|
These end up as |
|
|
This ends up as a |
|
|
These enable you to control the height and width of the elements to which they are applied and map directly to their CSS |
Check out the MSDN documentation (at http://bit.ly/Lb3WZd) for a full description of the Style class.
The different data-bound controls each have a different set of styles, although they do share a few. The following table lists the available styles for the GridView and describes their purpose. The other data-bound controls have slightly different styles, but from their names you should be able to see what they do and determine what they are used for. Another good way to learn more about the different styles that are available is by using Visual Studio’s Auto Format, which inserts a number of styles for you. You see later how to use and improve the styles that are generated by the Auto Format feature.
|
STYLE |
DESCRIPTION |
|
|
These control the look of a single row. By default, the |
|
|
This can be applied to selected rows, and gives you the opportunity to visually present selected rows differently from unselected rows. |
|
|
This can be applied to rows that are currently in Edit mode. For example, when you click the Edit link for a row in the |
|
|
This enables you to define the look of the row that is displayed when the grid is bound to an empty data source. This style works together with the |
|
|
These control the appearance of the header and footer rows. |
|
|
This enables you to influence the look of the pager bar displayed in the |
|
|
Collectively, these styles enable you to change the looks of the header and the entire column when the column is sorted in ascending or descending order. |
Some controls, like Repeater and ListView, have no built-in styles. Because these controls do not contribute any HTML to the page all by themselves and leave it up to you to define the look and feel in the numerous templates these controls have, there is no point in having separate styles; you can simply add the necessary style or class information to the elements you define in their templates.
To show you how to use these styles with your controls, the following exercise guides you through the process of enhancing the GridView control in the Genres page of the Management section. In a later exercise, you see how to move the style-related information to a theme and CSS file to improve the reusability of the code and to reduce the amount of HTML sent to the browser on each request.
In this Try It Out, you use the built-in formatting capabilities of VS to change the appearance of the GridView control. You see how VS creates the necessary styles for you, each with its relevant styling properties set.
1. Open Genres.aspx from the Management folder of the main Planet Wrox website that you have been working on so far.
2. Switch to Design View and open the GridView control’s Smart Tasks panel. Make sure you open that of the GridView and not the one for the surrounding Content block.
3. At the top of the panel, click the Auto Format link.
4. From the list of format schemes on the left, choose Classic. The Preview on the right is updated and now looks like Figure 15-4.
FIGURE 15-4
5.
Click OK to have VS generate the necessary templates for you. The GridView is updated in Design View immediately, showing the selected format scheme.
6. Switch back to Markup View and inspect the various styles that have been generated. You should see the following styles, some placed before and others placed below the <Columns> element:
7.<AlternatingRowStyle BackColor="White" />
8....
9.<EditRowStyle BackColor="#2461BF" />
10.<FooterStyle BackColor="#507CD1" Font-Bold="True" ForeColor="White" />
11.... Some styles are not shown here to save some space
<SortedDescendingHeaderStyle BackColor="#4870BE" />12.Save the changes to the page and request it in the browser by pressing Ctrl+F5. You should see the list of genres with the selected formatting scheme applied.
13.Open the HTML source for the page by right-clicking the page in the browser and choosing the View Source or View Page Source command. Scroll down a bit until you see an HTML table with its id set to cpMainContent_GridView1. You’ll see that the table itself has a style attribute that sets text color and border properties:
14.<table cellspacing="0" cellpadding="4" id="cpMainContent_GridView1"
style="color:#333333;border-collapse:collapse;">Additionally, you see that the numerous child elements of the table (table rows and anchor elements) all have different style settings applied. For example, odd and even rows now have the following style applied:
<tr style="background-color:#EFF3FB;"> ... </tr><tr style="background-color:White;"> ... </tr>Close the source document and click the headers of the GridView a few times. The header changes color to indicate the column is now sorted.
The different style elements you created in step 5 are converted into their CSS and HTML equivalents. For example, RowStyle and AlternatingRowStyle have their BackColor set to a different background color:
<RowStyle BackColor="#EFF3FB" /><AlternatingRowStyle BackColor="White" />When the control renders its HTML, it applies these backgrounds to the table row of the items and alternating items:
<tr style="background-color:#EFF3FB;"> ... </tr><tr style="background-color:White;"> ... </tr>The same principle is applied to the other styles in the GridView.
If you look at the source of the page in the browser, you see a lot of page bloat, because each individual row has its properties set. This increases the page size, especially with larger results displayed in the GridView. To decrease the page size and improve the performance of the page, you could move the style definitions to a page theme and then use CSS and jQuery instead. You see how to do this next.
Chapter 6 discussed how to create consistent-looking web pages using master pages, themes, and skins. With the basic theme infrastructure set up, it’s now easy to add a new theme that applies to the entire Management section. Earlier you saw how to create a skin file to change the appearance of a button; in the following exercise you see how to reuse this concept to create a skin file for the GridView, enabling you to style all GridView controls in the Management folder in one fell swoop.
In this Try It Out, you move the various Style properties from the Genres.aspx page into a separate .skin file. You also move the inline style information to a separate CSS file. You then use some jQuery to separate data and appearance of the page even further.
1. On the Solution Explorer, right-click the App_Themes folder, choose Add ⇒ Add ASP.NET Folder ⇒ Theme, and type Management as the new theme name.
2. Right-click this new folder and choose Add ⇒ Add New Item. Add a skin file called GridView.skin. You should end up with a Solution Explorer looking like Figure 15-5.
FIGURE 15-5
3.
Open the Genres.aspx page in Markup View and delete all the style elements you created in the previous exercise except the HeaderStyle, the PagerStyle, the SortedAscendingHeaderStyle, and the SortedDescendingHeaderStyle. From the four remaining styles, remove all attributes and replace them with a single CssClass attribute named after the style and prefixed with GridView. You should end up with the following styles:
4.<HeaderStyle CssClass="GridViewHeaderStyle" />
5.<PagerStyle CssClass="GridViewPagerStyle" />
6.<SortedAscendingHeaderStyle CssClass="GridViewSortedAscendingHeaderStyle" />
<SortedDescendingHeaderStyle CssClass="GridViewSortedDescendingHeaderStyle" />Don’t worry if VS adds red error lines under the CSS class names. Because the CSS classes aren’t defined yet, it can’t find them. Later, you add them to the theme’s CSS file, where VS still can’t find them. They’ll work fine at run time, though, so don’t worry.
7. Select the styles in the code editor and then cut them to the clipboard using Ctrl+X. Switch to the GridView.skin file, delete all existing code (the comment text you saw earlier), and paste the styles into the skin file.
8. Wrap the styles in an <asp:GridView> element with its runat attribute set to server and its CssClass attribute set to GridView. Don’t add an ID attribute, because skin files don’t need this. You should end up with this code:
9.<asp:GridView runat="server" CssClass="GridView">
10.... styles go here
</asp:GridView>11.Open the resources folder for this chapter (located at C:\BegASPNET\Resources\Chapter 15 if you followed the instructions in the Introduction section of this book) in File Explorer (Windows Explorer in Windows 7), select the Images folder and theManagement.css file, and press Ctrl+C to copy them. Switch back to VS, click the Management folder under App_Themes, and press Ctrl+V. Just as the other two themes do, the management theme now has its own style sheet and Images folder, shown inFigure 15-6.
FIGURE 15-6
The two images are used to change the header for sorted columns in the GridView, as you will see later.
12.Open the Web.config file for the Management folder in the root that you added earlier and set the theme to Management:
13.<system.web>
14.<pages theme="Management" />
</system.web>15.Open the Management.master file from the MasterPages folder, switch to Markup View, and below the ContentPlaceHolder in the <head> section of the page, drag the file jquery-2.0.3.min.js from the Scripts folder. VS inserts the following <script> element for you:
16.</asp:ContentPlaceHolder>
17.<script src="../Scripts/jquery-2.0.3.min.js"></script>
</head>18.Go back to Genres.aspx and in Markup View, under the Columns element of the GridView control, delete the bound field for the Id column. Users typically don’t need to see the IDs of items in the user interface because they are often meaningless to them. By removing the Id column, you reduce the noise in the page. Set the ItemStyle-Width for the CommandField to 100px and for the Name column to 200px. Finally, set ShowSelectButton of the CommandField to False, and set the HeaderText of the SortOrder field toSort Order with a space between the words. You should end up with this GridView:
19.<asp:GridView ID="GridView1" runat="server" AllowPaging="True"
20.AllowSorting="True" AutoGenerateColumns="False" DataKeyNames="Id"
21.DataSourceID="SqlDataSource1" GridLines="None" CellPadding="4"
22.ForeColor="#333333" EmptyDataText="There are no data records to display.">
23.<Columns>
24.<asp:CommandField ShowDeleteButton="True" ShowEditButton="True"
25.ShowSelectButton="False" ItemStyle-Width="100px" />
26.<asp:BoundField DataField="Name" HeaderText="Name"
27.SortExpression="Name"ItemStyle-Width="200px" />
28.<asp:BoundField DataField="SortOrder"HeaderText="Sort Order"
29.SortExpression="SortOrder"></asp:BoundField>
30.</Columns>
</asp:GridView>31.Scroll down to the end of the page in Markup View and, right before the closing </asp:Content> tag, add the following jQuery code wrapped in a <script> block:
32.<script>
33.$(function()
34.{
35.$('.GridView tr:odd:not(.GridViewPagerStyle)').
36.addClass('GridViewAlternatingRowStyle');
37.});
</script>38.Save all your changes by pressing Ctrl+Shift+S and then open Genres.aspx in the browser. You should now see the list of genres that was presented in Figure 15-2, except for the disabled Delete links, which you add later. Click the header of the Name or Sort Order columns to order the data in the GridView. Notice how the GridView now shows a little glyph beside the name to indicate the sort direction.
39.Click Manage Reviews in the main Management menu to open the Reviews page. Select a genre from the drop-down list to display a list of reviews. Note that the Reviews list — visible in Figure 15-7 — now also has some of the same styles applied as the Genres list you saw earlier, except for the alternating row styles applied by jQuery and the settings on the GridView such as GridLines and CellPadding.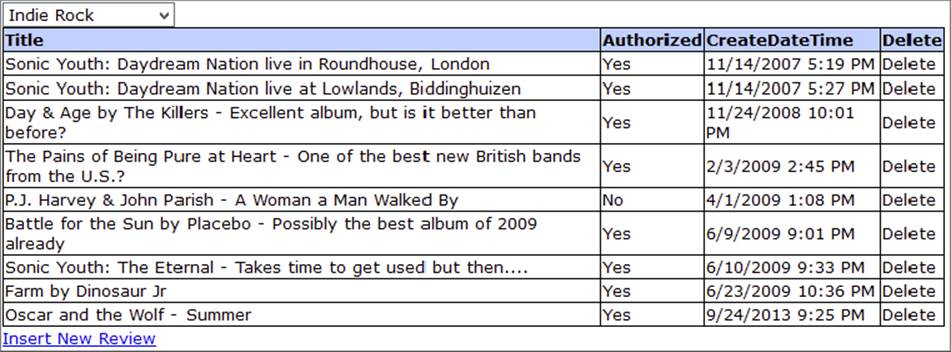
FIGURE 15-7
The concepts from this exercise should be familiar by now. You have seen how to create and apply themes and skins in Chapter 6, and how to use the various control styles in the previous exercise. You also saw the concepts behind jQuery in Chapter 11. What may be new is the way that odd rows in the GridView are selected to dynamically change their background color, skipping the footer row using the not filter:
$('.GridView tr:odd:not(.GridViewPagerStyle)')First, all odd table rows are selected using the selector .GridView tr:odd. However, depending on the number of rows in the GridView, this may also select the footer row (with the paging controls in it) because the footer is rendered as a <tr> as well. To stop the footer from being included you use the not filter and pass it an expression on which you want to filter. In this case, the expression is .GridViewPagerStyle because that’s the class name applied to the footer row. The jQuery code is only applied to theGenres.aspx page, but you could move it to the Management master page or copy it to individual pages. Either way, it helps in removing page bloat because you don’t have to add a style or class attribute to each row in the GridView. Instead, you can let jQuery figure out what rows are odd and even. If you want, you can create a ContentPlaceHolder in the master page for the Management section as you’ve done with the Frontend.master file, in which to put page-specific JavaScript code.
Assigning the image to the sorted column header requires a few rule sets. First, each sorted header (ascending or descending) is given some padding:
.GridViewSortedAscendingHeaderStyle, .GridViewSortedDescendingHeaderStyle{ padding-left: 20px;}This moves the text in the header cell a bit to the right, making room for the image. Then for both the ascending and descending sort order, there is a separate rule that assigns the image. The rule is applied by ASP.NET by adding a class attribute to the relevant HTML elements. The following shows the selector for a column that is sorted in ascending order:
.GridViewSortedAscendingHeaderStyle{ background-image: url(Images/SortAscending.png);}The .GridViewHeaderStyle th selector then stops the background image from repeating, positions the image near the top, and determines the background color and text alignment:
.GridViewHeaderStyle th, .GridViewPagerStyle{ background-color: #BCD1FE; background-repeat: no-repeat; background-position: 0 5px; text-align: left;}By moving your control style declarations to a separate skin file that in turn is part of a theme, you have created a very flexible, maintainable solution. If you want to see how the new styles are applied, open the source of the page in the browser using its View Source command. Instead of inline styles, the relevant class attributes are applied. If you want to change the layout of all the GridView controls in the Management section, all you need to do now is modify the relevant CSS in the Management.css file. If you need to make changes to other styles, don’t forget to add them to the GridView.skin file first.
Obviously, you can still tweak the controls at the page level. Though the skin defines the global look and feel of the GridView, you can still set individual properties on columns as you did with the ItemStyle-Width in the Genres page.
Although styles, skins, and themes are powerful tools to style your web pages, you’ll find that they are often an all-or-nothing solution. For example, if you create ItemStyle and AlternatingItemStyle elements (rather than using jQuery as you just did), they are applied to each and every row in the grid. What if you wanted to change the look and feel of just a few rows? Or what if you wanted to change some rows based on the actual data that the row is holding? You see how to accomplish conditional formatting and more, using event handling, in the following section.
HANDLING EVENTS
Previous chapters have covered how the ASP.NET controls can raise events. You learned how to handle these events with event-handler code that you typically add to the page’s Code Behind file. For example, you wrote code to handle a Button control’s Click event. However, most controls expose a lot more events.
A solid understanding of the various events that fire during a control’s life cycle and the order in which they fire is important knowledge for an ASP.NET developer. Being able to hook into the control’s life cycle, tweaking parts of the output as you go, enables you to create flexible, dynamic web pages that do exactly what you want.
To gain an understanding of the various events and the order in which they fire, the next section explains the basic steps in the ASP.NET control life cycle. You won’t see every event that is fired in the process, but instead you see the ones you are most likely to use. Later sections then show you how to make use of these events to change the behavior of your web pages.
The ASP.NET Page and Control Life Cycles RevisitedIn Chapter 6 you learned about the stages in a page’s life. You learned about different events such as PreInit, Load, PreRender, and Unload. Besides these events that are raised by the ASPX page, all the other controls in your ASPX pages can raise their own events. These events can be as simple as a Button control’s Click event (triggered by a user action) or be more complex events, such as Inserting, which is raised by controls like the SqlDataSource or the DataBound event that is raised by various data-bound controls. You see many of these events in the next exercise.
To give you an idea of the different events that you can hook into during a page or control’s life cycle and the order in which they fire, this Try It Out shows you how to set up a page that displays some data from the Genres table using an SqlDataSource. You also add a button to the page that you can use to trigger a postback to see how that influences things. You then hook up a number of event handlers to a few interesting events of the controls on the page so you can see in what order things are called. You can apply the concepts you learn in this exercise to any other page or control that raises events to get a better understanding of how they operate.
1. Inside the Demos folder, create a new file called Events.aspx. Make sure it’s based on your custom page template so it inherits from BasePage. Set the page’s Title to Events Demo.
2. Switch the page to Design View, drop a GridView into the cpMainContent placeholder, and then hook it up to a new SqlDataSource control using the GridView’s Smart Tasks panel. Use PlanetWroxConnectionString1 as the connection string and configure the control to retrieve all columns from the Genre table. There’s no need to set up insert, update, or delete behavior, nor do you need to select specific columns or add a Where clause.
3. Back on the GridView control’s Smart Tasks panel, enable sorting by selecting the second check box. When you’re done, your code should look like this:
4.<asp:GridView ID="GridView1" runat="server" AllowSorting="True"
5.AutoGenerateColumns="False" DataKeyNames="Id" DataSourceID="SqlDataSource1">
6.<Columns>
7.<asp:BoundField DataField="Id" HeaderText="Id" InsertVisible="False"
8.ReadOnly="True" SortExpression="Id" />
9.<asp:BoundField DataField="Name" HeaderText="Name" SortExpression="Name" />
10.<asp:BoundField DataField="SortOrder" HeaderText="SortOrder"
11.SortExpression="SortOrder" />
12.</Columns>
13.</asp:GridView>
14.<asp:SqlDataSource ID="SqlDataSource1" runat="server"
15.ConnectionString="<%$ ConnectionStrings:PlanetWroxConnectionString1 %>"
SelectCommand="SELECT * FROM [Genre]"></asp:SqlDataSource>16.Make sure you’re in Markup View, and directly under the opening Content tag for the cpMainContent placeholder and before the GridView add the following markup that creates a table with one row and two cells, each with a large heading (h1) and aLabel control called NoPostBack and PostBack, respectively.
17.<table>
18.<tr>
19.<td><h1>No PostBack</h1><asp:Label ID="NoPostBack" runat="server" /></td>
20.<td><h1>PostBack</h1><asp:Label ID="PostBack" runat="server" /></td>
21.</tr>
</table>22.Switch to Design View, and below the GridView drop a Button control and double-click it in Design View to set up an event handler for its Click event in the Code Behind.
23.Switch back to Design View and double-click the gray and read-only area of the page to set up a handler for the Page control’s Load event.
24.Switch to Design View again, click the GridView, and open its Properties Grid by pressing F4. Switch to the Events tab and double-click the following events to set up handlers for them in the Code Behind. After each handler, switch back to Design View by pressing Ctrl+Tab so you can add the next event.
· Sorted
· Sorting
· RowCreated
· DataBinding
· DataBound
· RowDataBound
25.Repeat the preceding step, but now set up a handler for the Selecting event of the SqlDataSource control.
26.Make sure you are in Code Behind and at the top of the file add the following Imports/using statement:
VB.NET
Imports System.Runtime.CompilerServicesC#
using System.Runtime.CompilerServices;Then below the last event handler (but still within the class definition), add the following method that writes some text to one of the two labels, depending on whether the current page request is the result of a postback:
VB.NET
Private Sub WriteMessage(<CallerMemberName> Optional handlerName As String = "") If Page.IsPostBack Then PostBack.Text &= handlerName & "<br />" Else NoPostBack.Text &= handlerName & "<br />" End IfEnd SubC#
private void WriteMessage([CallerMemberName] string handlerName = ""){ if (Page.IsPostBack) { PostBack.Text += handlerName + "<br />"; } else { NoPostBack.Text += handlerName + "<br />"; }}27.To each of the event handlers that you have set up, add the following code that calls your custom method. Because you’re not passing a value for the optional handlerName parameter, .NET automatically inserts the name of the calling method because of the CallerMemberName attribute applied to that parameter in the WriteMessage method. You see how this works later.
VB.NET
Protected Sub Page_Load(sender As Object, e As EventArgs) Handles Me.LoadWriteMessage()
End SubC#
protected void Page_Load(object sender, EventArgs e){WriteMessage();
}28.Finally, add the following event handler to the Code Behind manually:
VB.NET
Protected Sub Page_PreRenderComplete(sender As Object, e As EventArgs) Handles Me.PreRenderComplete WriteMessage("Page_PreRenderComplete<br />------------")End SubC#
protected void Page_PreRenderComplete(object sender, EventArgs e){ WriteMessage("Page_PreRenderComplete<br />------------");}The PreRenderComplete event fires very late in the Page control’s life cycle, making it an ideal place to put a line at the bottom of the event list. That way you can clearly see what set of events belong to each other, which in turn helps you to figure out what events are triggered during page load or a postback.
29.Save all your changes and open the page in the browser. In addition to the GridView with the available genres, you should also see a list with event names under the No PostBack heading:
30.Page_Load
31.SqlDataSource_Selecting
32.GridView1_DataBinding
33.GridView1_RowCreated
34.GridView1_RowDataBound
35.GridView1_RowCreated
36.GridView1_RowDataBound
37....
38.GridView1_DataBound
Page_PreRenderCompleteNote that the RowCreated and RowDataBound events are repeated multiple times — once for each genre from the database plus two more. You see later why that is. Click the button below the GridView to cause a postback. The No PostBack label won’t change, but the PostBack label now shows the following list of event names:
GridView1_RowCreatedGridView1_RowCreated...GridView1_RowCreatedGridView1_RowCreatedPage_LoadButton1_ClickPage_PreRenderCompleteClick one of the column headers of the GridView to order the data it is displaying. Notice that the second label’s text is extended with a second set of event names. Each set is separated by a line of dashes, created by the Page_PreRenderComplete event handler.
Technically, this exercise isn’t complicated. You set up a bunch of event handlers for the various controls in your page. Inside the event handler you call a method that checks whether the page is currently loading for the first time or is loading due to a postback. To make it easy to add the name of the calling method to the Label control, the handlerName parameter of the method has a special CallerMemberName attribute applied, like this:
VB.NET
Private Sub WriteMessage(<CallerMemberName> Optional handlerName As String = "")C#
private void WriteMessage([CallerMemberName] string handlerName = "")This attribute has been introduced in .NET 4.5 and can be applied to optional parameters (identified in VB.NET with the Optional keyword and a default value, and in C# simply by assigning it a default value). When no value is passed to the WriteMessagemethod for this parameter (as is the case for most of the handlers except for the last one you added), .NET fills it for you with the name of the calling method. This is very convenient for debugging purposes because it enables you to easily figure out which method called WriteMessage. In earlier versions of .NET you had to pass the name of the calling method manually in each call to WriteMessage, making this code a bit more tedious to write. Also, because this attribute only has an effect when no value is passed in, you can still supply a value yourself, as is the case with the Page_PreRenderComplete handler. Besides the method name, this code also passes the line break and the dashed line and, as such, you have to supply the value yourself.
The WriteMessage method then updates one of the two Label controls with the name of the event that triggered the event handler.
What’s also interesting about this exercise is the order in which the events occur. Take a look at the first list, displayed when the page first loads:
Page_LoadSqlDataSource1_SelectingGridView1_DataBindingGridView1_RowCreatedGridView1_RowDataBoundGridView1_RowCreatedGridView1_RowDataBound...GridView1_DataBoundPage_PreRenderComplete — — — — — — — — -First Page_Load is triggered. Then the GridView sees that it’s hooked up to a SqlDataSource and asks that control for its data. This causes the Selecting events to be triggered. When the GridView receives the data from the SqlDataSource, it fires its DataBindingevent to signal it’s about to bind the data to the control. The GridView then starts to create rows. For each item in the data source, it creates a row, fires RowCreated, binds the item’s data to the row, and finally calls RowDataBound. If you carefully count the number of times that RowCreated and RowDataBound are called, you’ll notice that the total number of calls is the actual number of items that are in the data source plus two. This is because the same event is also raised when the control creates its header and footer rows. You see how to distinguish between these rows inside an event handler in a later exercise.
Finally, when the GridView is done creating and binding all the rows in the data source, it fires its DataBound event.
On postback, the story looks quite different. When you click the button to cause a postback, the following events are raised:
...GridView1_RowCreatedGridView1_RowCreatedGridView1_RowCreatedGridView1_RowCreatedPage_LoadButton1_ClickPage_PreRenderComplete — — — — — — — — -Note that this list contains no RowDataBound or DataBound events, and the SqlDataSource is also nowhere to be seen. The GridView is able to reconstruct the entire control from View State, eliminating the need to access the database again. While getting the data from View State, the GridView still needs to re-create each row in the grid, so you still see the RowCreated events. Toward the end of the list you see the Page_Load event followed by the Button control’s Click event. It’s important to understand and remember that user-triggered control events like a Button control’s Click or a SelectedIndexChanged of a DropDownList occur after the Load event of the Page. Note that this Load event isn’t the start of the Page’s life cycle. Before the Load event, the Page is already instantiated and has fired its Init event. You could add a handler for this event to the code to confirm this.
At the end of the exercise, you clicked a column header to sort the data in the grid. This time, the GridView knows it must sort the data that is being displayed. It cannot do that itself, so instead it asks the SqlDataSource for a fresh copy of the data in the order the user requested. Just as you did the first time the page loaded, you see the various RowCreated and DataBound events appear. What’s interesting to see is that the Sorting and Sorted events fire after each other, and before the SqlDataSource gets its data. The reason for this is that the GridView doesn’t handle the sorting here; it merely exposes the sorting parameters (the sort expression and the direction) to other controls. With a SqlDataSource, sorting takes place at the database level, but it retrieves the sorting parameters from the GridView.
If you want to see other events at work, simply repeat steps 7 and 10 of the preceding exercise, setting up handlers for the various events. To see the effect of View State, try disabling it either at the control level (for example, for the GridView) or at the page level. In Chapter 18 you learn a technique called tracing that enables you to find out this information for all controls in your page, including the time it takes to execute the various events.
Although the preceding exercise is quite useless in a real-world application, it should help you gain an understanding of the various control events and the order in which they fire. You can use the exact same principles to hook into the page and make modifications to the page itself, or to any of the controls in the page. In the next exercise you see how to change the appearance of rows in the data source, depending on the data that you are displaying.
The ASP.NET Page Life Cycle and Events in Data ControlsAs previously discussed, the GridView raises its RowCreated and RowDataBound events for each row it adds to its output. These events are ideal to peek into the data and then, based on that data, take appropriate action. For example, you can use these events to verify whether a review that is being displayed is authorized. If it’s not (meaning it won’t be visible in the front-end website), you can change the review’s appearance to draw attention to it. Another example of using events would be to hide or disable elements in the interface when it doesn’t make sense for them to be visible or active. You see how to disable the Delete link in the Genres GridView in the next exercise.
In this Try It Out you write an event handler for the RowDataBound event of the GridView control in the Genres page of the Management section. Within this event, you can diagnose the data item that is being bound to the GridView row, enabling you to see if the genre has reviews attached to it or not. If reviews are associated with the genre, you use some code to disable the Delete link so users cannot accidentally try to delete that genre.
1. Open the Genres.aspx page from the Management folder in Markup View and locate the SqlDataSource control. Find the SelectCommand and modify the SQL statement so it reads like this:
2.SelectCommand="SELECT Genre.Id, Genre.Name, Genre.SortOrder,
3.COUNT(Review.Id) AS NumberOfReviews FROM Genre LEFT OUTER JOIN Review
ON Genre.Id = Review.GenreId GROUP BY Genre.Id, Genre.Name, Genre.SortOrder"You can type the entire SQL statement on a single line or break it up over multiple lines as I’ve done here.
4. Switch to Design View and open the GridView control’s Smart Tasks panel. Click the Refresh Schema link on the Smart Tasks panel and answer No to the questions about regenerating fields and keys to maintain the current layout of the controls.
Click Edit Columns on the Smart Tasks panel to bring up the Fields dialog box. Click the CommandField item in the Selected Fields list and then click the blue link at the bottom right of the dialog box to convert the field to a TemplateField. This way the column is expanded into a template, which makes it easier to access the controls, such as the Delete link, it contains. Click OK to close the Fields dialog box.
5. In Markup View, locate the Delete link (the one with its CommandName set to Delete) and change its ID to DeleteLink:
6.<asp:LinkButtonID="DeleteLink"runat="server" CausesValidation="False"
CommandName="Delete" Text="Delete"></asp:LinkButton>7. Switch to Design View, open the Properties Grid for the GridView, and switch to the Events tab. Set up an event handler for the RowDataBound event.
8. At the top of the Code Behind of the Web Form, add the following line of code:
VB.NET
Imports System.DataC#
using System.Data;9. Inside the event handler that VS created for you, add the following code:
VB.NET
Protected Sub GridView1_RowDataBound(sender As Object, e As GridViewRowEventArgs) Handles GridView1.RowDataBoundSelect Case e.Row.RowType
Case DataControlRowType.DataRow Dim myRowView As DataRowView = CType(e.Row.DataItem, DataRowView) If Convert.ToInt32(myRowView("NumberOfReviews")) > 0 Then Dim deleteLink As LinkButton = TryCast(e.Row.FindControl("DeleteLink"), LinkButton) If deleteLink IsNot Nothing Then deleteLink.Enabled = False End If End If End SelectEnd SubC#
protected void GridView1_RowDataBound(object sender, GridViewRowEventArgs e){switch (e.Row.RowType)
{ case DataControlRowType.DataRow: DataRowView myDataRowView = (DataRowView)e.Row.DataItem; if (Convert.ToInt32(myDataRowView["NumberOfReviews"]) > 0) { LinkButton deleteLink = e.Row.FindControl("DeleteLink") as LinkButton; if (deleteLink != null) { deleteLink.Enabled = false; } } break; }}10.Save changes to all open files and then request Genres.aspx in the browser. Notice how for genres that have reviews attached to them, the Delete link is now disabled, as shown in Figure 15-8.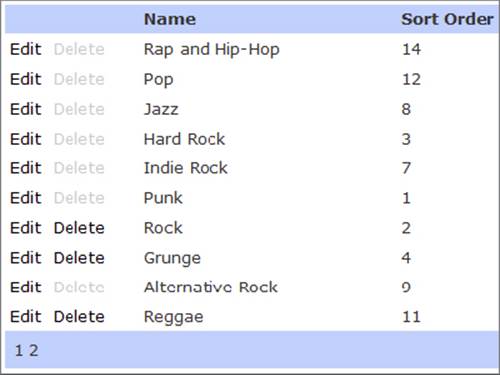
FIGURE 15-8
Although short, this exercise demonstrates a powerful way to hook into the different events of a control and change the presentation of the underlying control. To see how it works, take a look at the modified SQL code first:
SELECT Genre.Id, Genre.Name, Genre.SortOrder, COUNT(Review.Id) AS NumberOfReviewsFROM Genre LEFT OUTER JOIN Review ON Genre.Id = Review.GenreIdGROUP BY Genre.Id, Genre.Name, Genre.SortOrderThis modified SQL statement gets all the columns from the Genre table but introduces a new column, called NumberOfReviews, which contains the number of reviews associated with each genre. It does this by executing the SQL COUNT function against the Idcolumn of the Review table. The statement uses GROUP BY to group the selected rows into a set of summary rows by collapsing non-unique rows. Because the SQL statement is grouped on all unique columns in the Genre table, you get a unique row including the number of reviews for each genre row, whether or not reviews are associated, as shown in Figure 15-9, which displays the result of this query in SSMS.

FIGURE 15-9
GridView in the markup of the page makes use of the first three columns, just as it did in the previous version of this page. But you can access the fourth column as well. You do this in the Code Behind, in the RowDataBoundevent to be exact, which fires for each row after the GridView is done binding the data for a specific row:
VB.NET
Protected Sub GridView1_RowDataBound(sender As Object, e As GridViewRowEventArgs) Handles GridView1.RowDataBoundSelect Case e.Row.RowType
Case DataControlRowType.DataRow ... End SelectEnd SubC#
protected void GridView1_RowDataBound (object sender, GridViewRowEventArgs e){switch (e.Row.RowType)
{ case DataControlRowType.DataRow: ... }}The RowDataBound event gets passed an instance of GridViewRowEventArgs, a class that provides information about the row and data that are being bound at this stage. One of the properties of this class is the Row that represents the actual row that is being added to the GridView. This row in turn contains a RowType enumeration property that you can test to see what kind of row is being added. This enumeration contains six different members that map directly to the different types of rows the GridView can contain: DataRow for normal and alternating rows, EmptyDataRow for empty data rows, Header and Footer for the header and footer rows that are placed at the top and bottom, Pager for the pager bar, and Separator for rows separating the data items in the grid. Because you need to change the appearance of an actual data row, the code in the Case block only fires for normal and alternating rows.
Inside the Case block, the following code is executed:
VB.NET
Dim myRowView As DataRowView = CType(e.Row.DataItem, DataRowView)If Convert.ToInt32(myRowView("NumberOfReviews")) > 0 Then Dim deleteLink As LinkButton = TryCast(e.Row.FindControl("DeleteLink"), LinkButton) If deleteLink IsNot Nothing Then deleteLink.Enabled = False End IfEnd IfC#
DataRowView myDataRowView = (DataRowView)e.Row.DataItem;if (Convert.ToInt32(myDataRowView["NumberOfReviews"]) > 0){ LinkButton deleteLink = e.Row.FindControl("DeleteLink") as LinkButton; if (deleteLink != null) { deleteLink.Enabled = false; }}The DataItem property contains a reference to the data item object that is being bound. When you are using a SqlDataSource control, the DataItem is presented as a DataRowView, a .NET object that encapsulates a row returned from the database. The DataItemis therefore cast to a DataRowView object and then it’s indexed — using myRowView("NumberOfReviews") in VB.NET and myRowView["NumberOfReviews"] in C# — to get the count of reviews from the NumberOfReviews column. If the count is larger than zero, it means reviews are associated with this genre and the Delete link must be disabled. Earlier you converted the CommandField to a template field, which added an explicit declaration for the Delete link in your code:
<asp:LinkButton ID="DeleteLink" runat="server" CausesValidation="False" CommandName="Delete" Text="Delete"></asp:LinkButton>Using FindControl on the row that is being data bound, you can then get a reference to the Delete link, convert it to a proper LinkButton, and set its Enabled property to False. Because this code is also called when a row in the GridView is in Edit mode (by clicking the Edit link), you need to check if deleteLink is null (Nothing in VB.NET) or not. In case you’re editing, the GridView row does not contain the DeleteLink (because the EditItemTemplate is active, and not the ItemTemplate) and therefore FindControlreturns null.
When you disable a LinkButton by setting Enabled to False as in this example, ASP.NET applies a CSS class of aspNetDisabled:
<a id="cpMainContent_GridView1_DeleteLink_0" class="aspNetDisabled">Delete</a>You can then style this disabled link with the CSS class (which you find in Management.css that you added earlier) and give it a gray color:
a.aspNetDisabled{ color : #CCC;}If you’re using Model Binding instead of a SqlDataSource control, you can accomplish the same functionality with this GetData method:
VB.NET
Public Function GridView1_GetData() As IQueryable Dim myEntities As New PlanetWroxEntities() Return From genre in myEntities.Genres.Include("Reviews") Order By genre.Name Select genreEnd SubC#
public IQueryable<Genre> GridView1_GetData(){ PlanetWroxEntities myEntities = new PlanetWroxEntities(); return from genre in myEntities.Genres.Include("Reviews") orderby genre.Name select genre;}This selects each Genre along with its associated Reviews. You can then get the Count of the Reviews and use that in the Markup to disable the Delete button like this:
<asp:LinkButton ID="DeleteLink" runat="server" CausesValidation="False" CommandName="Delete" Text="Delete"Enabled='<%# Item.Reviews.Count > 0 %>'>
</asp:LinkButton>
Note that this code selects all reviews from the database as well, so it’s not very efficient. As an alternative, you could select an anonymous object that contains the Genre’s Id and Name properties, as well as a total count of all the reviews. This in turn also means you need to implement your own paging and sorting mechanism in the code behind using LINQ’s Skip and Take methods as Model Binding cannot do that for you automatically with anonymous objects, or you could disable sorting and paging of the GridView.
By disabling the delete button, you can easily prevent errors that may occur when you try to delete a genre that has associated reviews. However, you may not always be able to prevent an error from occurring during a CRUD operation against a data source control. For example, you may try to delete a genre that initially didn’t have any reviews attached. But imagine that right before you try to delete the genre, somebody else inserts a new review for it. When you then try to delete the genre you’ll get an error because the genre is now linked to a review. In such cases, the data source controls enable you to diagnose the error that occurred and then take the necessary measures, like providing feedback to the users informing them that their CRUD operation didn’t succeed.
Handling Errors That Occur in the Data Source ControlsIn Chapter 18 you see a lot more about recognizing and handling errors that occur in your ASP.NET pages. That chapter demonstrates how to catch errors that may occur in your code, and then handle them by logging them or by informing the user. But because the data source controls expose error information as well, it’s interesting to look at data access errors in this chapter.
The SqlDataSource control (and other data source controls as well) give you information about errors (exceptions in .NET parlance) that may occur during one of the four CRUD operations. With the SqlDataSource control, all four events accept an instance ofSqlDataSourceStatusEventArgs. Figure 15-10 shows these three EventArgs classes and their properties.
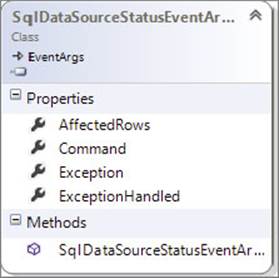
FIGURE 15-10
This class has two important properties: Exception and ExceptionHandled. The first contains the actual exception that occurred or Nothing (in VB.NET) or null (in C#) when everything goes according to plan and no error occurs. You can examine this error and take appropriate action. For example, you can inform the user that something went terribly wrong, or you can send an e-mail to the site’s webmaster informing her about the error so appropriate follow-up action can be taken.
If you decide to handle the error in the event handler of the data source control, you should set the ExceptionHandled property of the object to True. This signals to the ASP.NET run time that you are aware of the exception and have dealt with it adequately. If you omit setting this property, the run time forwards the exception, which is eventually displayed to the user.
In the following exercise, you see how to make use of the SqlDataSourceStatusEventArgs class in the Genres.aspx page. Rest assured, you can apply the exact same principles from this section to events that are raised by the other data source control as well.
In this Try It Out you see how to deal with exceptions that occur in a GridView when deleting rows. You’ll temporarily comment out the code that disables the Delete link so you can try to delete genres with associated reviews. The code then displays an error message when a user tries to delete a genre that still has reviews attached to it. This exercise mainly serves to demonstrate how to handle exceptions that may be thrown by the data source controls. From an end user’s perspective, disabling the Delete link when it’s not appropriate, as you did in an earlier exercise, should take care of the problem in most circumstances, but someone else could still insert a new review before you try to delete a genre. The best way to handle this is to combine both solutions: You disable links that are not available, and handle an error gracefully in case someone else has created a review for a genre you just tried to delete.
1. Open Genres.aspx from the Management folder.
2. Switch to Design View and from the Toolbox drag a Label control onto the GridView. This places the Label that will hold an error message above the GridView. Change the ID of the Label to ErrorMessage and clear its Text property. (Right-click the Textproperty label in the Properties Grid and choose Reset. This removes the entire Text property and its value from the control’s markup.) Set its CssClass to ErrorMessage. Finally, set its EnableViewState property to false to ensure the label doesn’t maintain its text after postbacks. You should end up with this code:
3.<asp:Label ID="ErrorMessage" runat="server" CssClass="ErrorMessage"
4.EnableViewState="false"></asp:Label>
<asp:GridView ID="GridView1" runat="server" AllowPaging="True"5. Open the Management.css file from the Management theme folder and add the following rule set:
6..ErrorMessage
7.{
8.color: Red;
9.font-weight: bold;
}10.Switch back to Genres.aspx, make sure the page is in Design View, and click the SqlDataSource control once to select it. Then open its Properties Grid, switch to the Events tab, and set up an event handler for the Deleted event by double-clicking the event name in the list of events.
11.At the top of the Code Behind, add the following namespace to bring the SqlException class into scope:
VB.NET
Imports System.Data.SqlClientC#
using System.Data.SqlClient;12.Inside the event handler that VS added for you in step 4, write the following code:
VB.NET
Protected Sub SqlDataSource1_Deleted(sender As Object, e As SqlDataSourceStatusEventArgs) Handles SqlDataSource1.DeletedIf e.Exception IsNot Nothing AndAlso TypeOf (e.Exception) Is SqlException Then
Dim myException As SqlException = CType(e.Exception, SqlException) If myException.Number = 547 Then ErrorMessage.Text = "Sorry, you can't delete this genre because " & "it has associated reviews that you need to delete first." e.ExceptionHandled = TrueEnd If
End IfEnd SubC#
protected void SqlDataSource1_Deleted(object sender, SqlDataSourceStatusEventArgs e){if (e.Exception != null && e.Exception is SqlException)
{ SqlException myException = (SqlException)e.Exception; if (myException.Number == 547) { ErrorMessage.Text = @"Sorry, you can't delete this genre because it has associated reviews that you need to delete first."; e.ExceptionHandled = true; } }}13.Comment out the code that you added in the previous Try It Out to stop the Delete link from being disabled. For this exercise it’s enough to just comment out the line that disables the link:
VB.NET
' deleteLink.Enabled = FalseC#
// deleteLink.Enabled = false;If you wanted to remove this functionality completely, you could remove the entire event handler. In that case, don’t forget to remove the handler from the GridView’s markup in C# as well.
14.Save all your changes and then press Ctrl+F5 to open Genres.aspx in your browser. Try deleting a genre that you know has associated reviews, such as Rap and Hip-Hop. Instead of deleting the genre, the ASPX page now presents you with the error that is displayed above the GridView in Figure 15-11.
FIGURE 15-11
If the error message doesn’t appear in red, press Ctrl+F5 to force a fresh copy of the Management theme’s style sheet.
15.Click the Manage Reviews menu item in the Management menu and then select the Rap and Hip-Hop genre from the drop-down list. Delete the reviews in the genre, or edit them and reassign them to a different genre.
16.Click the Genres menu item in the Management menu and try deleting the Rap and Hip-Hop genre again. This time the genre is successfully deleted from the database.
17.To see the error you would get without this error handling, comment out the line in the Code Behind that sets ExceptionHandled to True. Save your changes, open the page again in your browser, and try to delete a genre with reviews. You’ll get a detailed ASP.NET error instead, shown in Figure 15-12.
FIGURE 15-12
Notice how this error is almost identical to the one you got near the end of Chapter 12 when you tried to delete a genre manually. Don’t forget to enable both lines you commented out in this exercise when you’re done, so links are disabled when appropriate and you still get a friendly error message when the genre can’t be deleted.
How It Works
When you click the Delete link in the GridView visible in Figure 15-11, the GridView triggers the Delete command on the associated SqlDataSource control. As you have seen in previous chapters, this control tries to send a DELETE statement to the database. The database then tries to delete the requested genre from the database, but finds out that it can’t because the genre has related reviews. This results in a foreign key constraint error, which means the genre cannot be deleted because its ID is used as a foreign key in another table.
This foreign key constraint error is then returned from the database and eventually ends up in the Exception property of the e argument of the SqlDataSource1_Deleted handler. The code then checks if there was an error (e.Exception is not Nothing/null) and checks the type of the exception to find out whether it’s a SqlException:
VB.NET
If e.Exception IsNot Nothing AndAlso _ TypeOf (e.Exception) Is SqlException Then ...End IfC#
if (e.Exception != null && e.Exception is SqlException){ ...}When you are working with a SQL Server database, as is the case in the Planet Wrox example, the errors thrown by the database are of type SqlException from the System.Data.SqlClient namespace that you imported in this exercise. This enables you to clearly separate database errors from other errors.
When SQL Server throws an error, it also passes an error number, which is stored in the Number property of the exception. To access that number, you need to cast the exception to a true SqlException, which you do with this code:
VB.NET
Dim myException As SqlException = CType(e.Exception, SqlException)C#
SqlException myException = (SqlException)e.Exception;Finally, the code checks the Number property. When it is 547, it means that SQL Server threw a foreign key constraint error to indicate you cannot delete a genre because it still has associated reviews. When this is the case, the Label control’s Text property is set, and finally the code sets e.ExceptionHandled to True. This tells the ASP.NET run time that the error has been dealt with, so the user won’t get a nasty error page, but a nice and friendly error message at the top of the GridView instead. Note that for all other types of exceptions, the user still gets the default ASP.NET error message screen, also called the Yellow Screen of Death. Chapter 18 teaches you some techniques to log the error in a central location and present the user with a friendly, human-readable error page instead.
The number 547 seems to be arbitrarily chosen, but it’s the number that SQL Server returns for a foreign key constraint exception. In Chapter 18, which deals with debugging, you learn a few tricks that enable you to look into the exceptions that are thrown so you can diagnose the Number property for different kinds of exceptions.
In the past few chapters you have seen many examples of accessing a database using one of the built-in data controls such as the SqlDataSource. Useful and quick to use as they are, they are not suitable for every situation. In cases where they don’t fit, you can always hand-code your pages, as you see how to do next.
The biggest issue I often have with the data controls is the amount of markup that they require. Although, for example, the ListView generates most of the code for you when associated with a data source control, you still end up with a lot of code in the page. This makes it cumbersome and time-consuming to make a lot of modifications to this control. Another issue with these controls is that often you find yourself defining almost identical markup twice: once for an Insert template and once for an Edit template. The final issue I often encounter when working with the data controls is that I do not have complete control over the markup they create. This can make it difficult sometimes to create fancy and complex pages with multiple levels of bound drop-down controls, AJAXUpdatePanel controls, image uploads, and more. To overcome these issues, you can hand-code your pages, which gives you full control over the markup in the page and the code in the Code Behind.
Hand-coding isn’t as difficult as it seems and you do get a lot of flexibility in return for the extra effort. Though the actual process differs from page to page, here’s a general description of the steps you need to carry out to hand-code an Add/Edit page that enables you to enter a new or update an existing item in the database with the same markup:
- Create the user interface by adding a number of controls, such as
TextBoxandDropDownList, to a page that enables users to enter new and update existing data. - Add validation controls to the page so users are required to enter valid data.
- In the Code Behind, figure out whether you’re creating a new or editing an existing item. You can make the distinction by looking at the query string, for example. When you’re editing an existing item, you get it from the data source and prepopulate the form controls.
- Handle the Save button to insert or update the item. When you’re updating an existing item, you should get the item from the database first and then overwrite the existing values with the new ones from the form. Finally, save the items back to the data store.
In the next Try It Out you build a page that implements this process.
In all the database examples you have seen so far, the code accesses the database for each and every request. Every time some data needs to be displayed, it’s retrieved fresh from the database. Clearly, this can be a waste of time and resources like network bandwidth and CPU cycles, especially if the data hasn’t changed since the last time you accessed it. In the final section of this chapter, you are introduced to a technique called caching that can greatly improve the responsiveness and performance of your application.
CACHING
Caching is one of the best and often easiest ways to improve the performance of an application. It’s also an option that is too often overlooked by developers. With caching, a copy of your data is stored in a location that can be accessed very quickly. The idea with caching is that fetching data from the cache should be faster than regenerating it or fetching it from the original data source. Therefore, most caching solutions store data in memory, which is usually the fastest way to get the data. The .NET cache is no exception, and enables you to store frequently accessed data in a special location in the computer’s memory.
Typically, the caching principle takes the route displayed in Figure 15-15.
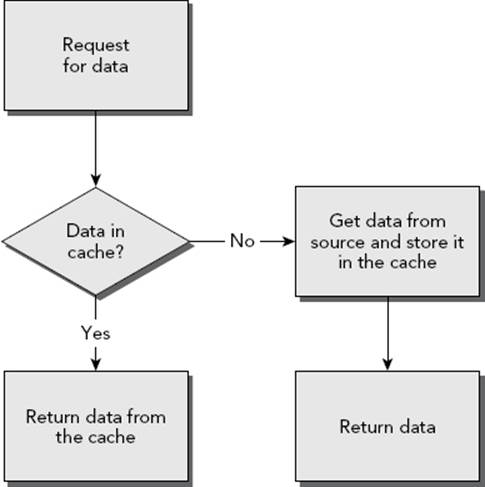
FIGURE 15-15
The application queries for some data — for example, a list of genres from the database. Instead of accessing the database directly, the cache is examined to see if it already contains the requested data. If it does, the data is returned from the cache directly. If it’s not stored in the cache yet, it is retrieved from the data source (such as a SQL Server database), a copy of the data is stored in the cache for later retrieval, and finally, the data is returned to the calling code.
Although caching is generally a great solution to improve your application, it has a few drawbacks that you need to be aware of. The following section explains a few common pitfalls you can run into when using caching. The section after that shows the different caching mechanisms you have available in your ASP.NET web applications.
Common Pitfalls with Caching DataWhen working with cached data you typically encounter two common problem areas:
- You end up with stale — or out-of-date — data.
- You assume an item is present in the cache when it isn’t.
In the next sections you see how to avoid these two problems.
Avoiding Stale DataStale data is cached data that no longer matches its original source. For example, when you cache the results of a query for all the genres in the database and use that data instead of getting it fresh from the database, a new genre inserted by another user may go unnoticed.
To avoid stale data you need a way to invalidate the cache. With cache invalidation, an item is removed from the cache so it can be re-created on the next request. To invalidate cached data, you have a number of options at your disposal. First of all, you can choose to set a short cache duration. For example, you could cache the Genres list for, say, 10 minutes. If another user inserts a new genre during those 10 minutes, it won’t show up in your pages. However, after 10 minutes, the list is removed from the cache and re-created with fresh data the next time it is requested. You see how to use time-based caching later.
Another option to invalidate the cache is by using a cache dependency. With a cache dependency, you create a relationship between the cached item and the original data source. When the underlying data source changes, the cached item is invalidated so it can be re-created the next time it is requested. You see how to use the CacheDependency class later.
You can also use a cache dependency when using a database like Microsoft SQL Server. This means that as soon as the data that is part of the cached query is changed, the cached item is invalidated. Database caching and invalidation is an advanced and broad subject. You find more in the chapter that deals with caching in Professional ASP.NET 4.5 in C# and VB, published by Wrox (ISBN: 978-1-118-31182-0).
Don’t Rely on the Data Being ThereTo minimize memory consumption for an application, the caching mechanism in ASP.NET automatically removes old and infrequently used items from the cache from time to time. Also, when the server is consuming too much memory, items may be ejected from the cache as well. Therefore, you shouldn’t rely on items being in the cache. They may have been removed by the cache itself when the ASP.NET run time determined that the item was not used often enough and was thus taking up precious space unnecessarily. The entire cache is also cleared when the web application or web server restarts (which happens when you make changes to the Web.config file, for example). But items can also be removed because of their dependencies. Therefore, you should never rely on the item being in the cache, even if you set it there yourself earlier in the application’s life cycle. Later in this chapter you see how to use the Cache API (application programming interface; the way you can interact with a program) to use the cache programmatically.
Using the Cache API is not the only way to use the cache. The next section shows you the different ways of caching data in ASP.NET.
Different Ways to Cache Data in ASP.NET Web ApplicationsYou can deploy a few different caching strategies in your ASP.NET applications, including output caching, caching with the built-in data source controls, and programmatic caching. All three options are discussed in the remainder of this chapter.
Output CachingWith output caching, the end result of a rendered page is cached. This means that the very first time a page is requested, its final result is added to the cache. Subsequent requests to the same page result in the same HTML being sent. This last sentence is important enough to be repeated: Subsequent requests to the same page result in the same HTML being sent. This means the page is not processed at the server again, and no custom code in the Code Behind will fire. The exact same HTML from the first request is simply returned on each subsequent request.
Enabling output caching is extremely simple; just add an OutputCache directive below your Page directive, as shown in bold under this C# @ Page directive (you use the same code if you’re using VB.NET, but your @ Page directive may look slightly different):
<%@ Page Title="About this Site" Language="C#" MasterPageFile="~/MasterPages/Frontend.master" AutoEventWireup="true" CodeFile="Default.aspx.cs" Inherits="About_Default" %><%@ OutputCache Duration="60" VaryByParam="None" %>The Duration is the number of seconds you want to cache the page before ASP.NET creates a new copy of it. In the preceding example, the page is cached for a minute.
The None value in the VaryByParam attribute tells .NET to cache a single version of the page, no matter what query string values you pass to it. Although this is fine for relatively static pages like the About page in the Planet Wrox site, this is typically not an ideal solution for dynamic pages. Imagine a dynamic page that shows the details for a review based on the query string that is being passed to the page. The first time you request the page you may browse to something like:
http://localhost:12345/Reviews/ViewDetails.aspx?Id=23
ASP.NET generates a page showing review 23 and then caches the entire output of the page. So what happens when you then request this page?
http://localhost:12345/Reviews/ViewDetails.aspx?Id=33
Instead of seeing the review with an ID of 33, you end up with the review with an ID of 23! To overcome this problem, ASP.NET enables you to cache specific versions of a page. For example, you can instruct the page to cache a copy of the page for each unique query string field that it retrieves. You do this by setting the VaryByParam attribute of the directive to a comma-separated list of possible query string or form values. ASP.NET will cache a copy of the page for each unique combination of the fields it finds. As an example, consider a page that accepts the ID of a review in the query string and then displays its details. To cache a copy for each unique review, you add Id to the VaryByParam attribute like this:
<%@ OutputCache Duration="60"VaryByParam="Id"%>
For a page showing the details of a specific review, this is perfect. For each unique review, ASP.NET keeps a cached copy. This means that the database will only be hit when the review is not present in the cache. All other requests will be served from the cache.
One of the problems with output caching is that it’s often an all-or-nothing scenario. Although it’s easy to cache different pages based on, for example, a query string value, you’ll need to write custom code to handle other situations like dealing with themes. When a page is requested and cached for the first time, the user’s theme is taken into account. If subsequent users have a different theme set they still see the page in the originally requested theme. Another case where output caching can be problematic is when you’re using security-related controls such as the LoginView (discussed in the next chapter). These controls can display content based on the currently logged-in user. If that page is cached, other users will see the content that belongs to the first user that requested the page.
One solution to this problem is to not use output caching at the page level and move content that applies to all users to a separate user control, which you then embed in the page as you saw how to do with the Contact Form. For example, a list with news articles or the full list of reviews could be the same for all users. If you move the code for these lists to a user control with output caching enabled, your containing page is still created separately for each user, but the content from the user control is only generated the first time, and then reused for all subsequent requests.
Another solution is to instruct the data source controls to cache data for you, as you see in the next section.
If you’re not affected by the drawbacks of output caching (such as when you’re not using themes or the security-related controls), output caching is an excellent mechanism to improve the performance of your site.
Caching with Data Source ControlsThe biggest benefit of caching with the data source controls is that they only cache dynamic, database-driven data, and not the entire page. That enables you to keep other parts of the page dynamic, such as a banner module or a personalized greeting welcoming the user. Caching is supported by design on most of the data source controls, except for the SiteMapDataSource, LinqDataSource, and EntityDataSource controls.
Caching with the data source controls is very easy: All you need to do is set the EnableCaching property and then specify a CacheDuration. The following code snippet shows a SqlDataSource control that caches its data for 10 minutes:
<asp:SqlDataSource ID="SqlDataSource1" runat="server" CacheDuration="600" EnableCaching="True"></asp:SqlDataSource>What’s cool about caching with the data source controls is that they are smart enough to see if you are making updates to the underlying data. So, when you have set up a SqlDataSource control to cache data for the SelectCommand for 20 minutes, but then make a change to the data by using the InsertCommand, UpdateCommand, or DeleteCommand, the cache is invalidated automatically. This only works when you execute the insert, update, or delete command against the exact same SqlDataSource. If you have one page that displays and caches a list with reviews (such as All.aspx, for example) and then have another page that is used to insert a new review (such as AddEditReview.aspx in the Management folder), this won’t work. After you have inserted a new review in the Management section of the site, it won’t show up in All.aspx until the cache has expired.
Code-free caching with the data source controls is useful in many situations. However, the data source controls cannot be used in every situation. What if you want to cache the results of data you get from a completely different source? What if you want to cache data you receive in a hand-coded page targeting the Entity Framework, or the contents of a text or an XML file that you frequently need to access? For those cases, ASP.NET gives you programmatic access to the cache.
Programmatic CachingWith programmatic caching, you can store items in the cache through VB.NET or C# code. Obviously, you can also access them again later. To store items, you use the Add or the Insert method or you index the Cache collection directly. The Add method is quite powerful (and complex) and enables you to specify a host of options that determine how long the item is cached, what priority it should have compared to other cached items, and what factors trigger the item’s removal from the cache.
The Insert method, on the other hand, is much easier. It has a few short overloads that enable you to specify the cached item and associate it with a specific key. Another overload also enables you to define dependencies that can be used to invalidate a cached item when the original source is changed. This is great for caching files that don’t change very often. You can read a file from disk, and store it in the cache with a dependency on the original file. You then keep reading the file from the cache instead of from disk. When the file on disk is changed, the cached item is invalidated automatically and you can read the original source file again and store it in the cache. The following example shows how to modify the ContactForm.ascx user control to store and get the item from the cache until it changes:
VB.NET
If Page.IsValid ThenDim mailBody As String = TryCast(Cache("ContactFormMailBody"), String)
If String.IsNullOrEmpty(mailBody) Then Dim fileName As String = Server.MapPath("~/App_Data/ContactForm.txt") mailBody = System.IO.File.ReadAllText(fileName)Cache.Insert("ContactFormMailBody", mailBody, New CacheDependency(fileName))
End If mailBody = mailBody.Replace("##Name##", Name.Text) ...End IfC#
if (Page.IsValid){string mailBody = Cache["ContactFormMailBody"] as string;
if (string.IsNullOrEmpty(mailBody)) { string fileName = Server.MapPath("~/App_Data/ContactForm.txt"); mailBody = System.IO.File.ReadAllText(fileName);Cache.Insert("ContactFormMailBody", mailBody, new CacheDependency(fileName));
} mailBody = mailBody.Replace("##Name##", Name.Text); ...}Notice how a new CacheDependency (for which you need to bring the System.Web.Caching namespace into scope with an Imports/using statement) is created and passed to the Insert method. This CacheDependency expects the name of the file it is dependent on. As soon as you change the file on disk (using VS or Notepad, or by overwriting it through FTP, for example), ASP.NET removes the item from the cache so it will be read from the original source file again the next time this code is executed.
You remove items from the cache using the Remove method that accepts the key of the cached item. You define this key when inserting the item, using either Add or Insert.
To access the items in the cache, you have a few options available. First of all, you can access the Cache collection directly:
VB.NET
myReview = TryCast(Cache(myKey), Review)
C#
Review myReview = Cache[myKey] as Review;
Here, the Cache collection is indexed using the key stored in the myKey variable.
Additionally, you can use the Get method that expects the key:
VB.NET
myReview = TryCast(Cache.Get(myKey), Review)
C#
myReview = Cache.Get(myKey) as Review;
Because Get is a method, the C# example now also uses parentheses around the cache key, making both examples look more like each other.
Finally, you can access items in the cache using the Item property that also accepts the key of the cached item.
All three ways to access items in the cache always return an object or Nothing/null when the item cannot be found. That means that if you know the type you are getting back from the cache, you should cast it to the appropriate type using TryCast in VB.NET or the askeyword in C# before you can use its properties. The previous two examples show you how the item from the cache is cast to a strongly typed Review object first.
To give you an idea of how to use the cache programmatically, the next exercise shows you how to insert a review in the cache, so you don’t have to get it from the database every time you need it.
In this Try It Out exercise you see how to cache a Review instance you get from EF using a LINQ to Entities query so it can be retrieved later by its key (which contains the review’s ID).
1. Start by adding a new page called ViewDetails.aspx in the Reviews folder of your web application. Make sure it’s based on your custom template. There’s no need to set an explicit title, because it will be set programmatically. Instead, remove theTitle="" attribute from the Page directive. There’s a funny and old bug in ASP.NET that causes programmatic modifications to the page’s Title not to stick when this attribute is set to an empty string in Markup View.
2. In Markup View, add three Label controls to the cpMainContent content placeholder and name the controls as follows:
· TitleLabel
· SummaryLabel
· BodyLabel
Delete the Text attribute and its value from all three labels.
3. Wrap the TitleLabel label in an <h1> element, and set the CssClass property of the SummaryLabel control to Summary. You should end up with this code:
4.<h1><asp:Label ID="TitleLabel" runat="server"></asp:Label></h1>
5.<asp:Label CssClass="Summary" ID="SummaryLabel" runat="server"></asp:Label>
<asp:Label ID="BodyLabel" runat="server"></asp:Label>6. Switch to Design View and double-click the read-only area of the page to set up a handler for Page_Load.
7. Add the following code to the Page_Load event handler that has been created for you:
VB.NET
Protected Sub Page_Load(sender As Object, e As EventArgs) Handles Me.LoadDim reviewId As Integer = Convert.ToInt32(Request.QueryString.Get("ReviewId"))
Dim cacheKey As String = "Reviews" + reviewId.ToString() Dim myReview As Review = TryCast(Cache(cacheKey), Review) If myReview Is Nothing Then Using myEntities As New PlanetWroxEntities() myReview = (From r In myEntities.Reviews Where r.Id = reviewId Select r).SingleOrDefault() If myReview IsNot Nothing Then Cache.Insert(cacheKey, myReview, Nothing, DateTime.Now.AddMinutes(20), System.Web.Caching.Cache.NoSlidingExpiration) End If End Using End If If myReview IsNot Nothing Then TitleLabel.Text = myReview.Title SummaryLabel.Text = myReview.Summary BodyLabel.Text = myReview.Body Title = myReview.Title MetaDescription = myReview.Summary End IfEnd SubC#
protected void Page_Load(object sender, EventArgs e){int reviewId = Convert.ToInt32(Request.QueryString.Get("ReviewId"));
string cacheKey = "Reviews" + reviewId.ToString(); Review myReview = Cache[cacheKey] as Review; if (myReview == null) { using (PlanetWroxEntities myEntities = new PlanetWroxEntities()) { myReview = (from r in myEntities.Reviews where r.Id == reviewId select r).SingleOrDefault(); if (myReview != null) {Cache.Insert(cacheKey, myReview, null, DateTime.Now.AddMinutes(20),
System.Web.Caching.Cache.NoSlidingExpiration); } } } if (myReview != null) { TitleLabel.Text = myReview.Title; SummaryLabel.Text = myReview.Summary; BodyLabel.Text = myReview.Body; Title = myReview.Title; MetaDescription = myReview.Summary; }}8. Open the page All.aspx from the Reviews folder and delete the GridView that you created in the previous chapter. Replace it with a simple Repeater control that contains a single HyperLink into your new details page:
9.<asp:Content ID="Content2" ContentPlaceHolderID="cpMainContent" runat="Server">
10.<asp:Repeater ID="Repeater1" runat="server" ItemType="Review">
11.<ItemTemplate>
12.<asp:HyperLink ID="HyperLink1" runat="server"
13.NavigateUrl='<%# "ViewDetails?ReviewId=" + Item.Id.ToString() %>'
14.Text='<%# Item.Title %>'></asp:HyperLink>
15.</ItemTemplate>
16.<SeparatorTemplate><br /></SeparatorTemplate>
17.</asp:Repeater>
</asp:Content>18.Switch to the Code Behind of the page and replace the last two calls that used the GridView so they end up using the Repeater control instead:
VB.NET
Repeater1.DataSource = authorizedReviews.ToList()Repeater1.DataBind()C#
Repeater1.DataSource = authorizedReviews.ToList();Repeater1.DataBind();19.Add the following CSS declaration to the end of the CSS files for the Monochrome and the DarkGrey themes. Since this is a front-end page visited by your users, you don’t need to add it to the Management theme:
20..Summary
21.{
22.font-style: italic;
23.display: block;
}24.Save all changes and then request All.aspx from the Reviews folder in your browser. Click the title of a review and you’re taken to ViewDetails.aspx with the ID of the requested review in the query string.
You should now see the details of the review displayed on the page. Press Ctrl+F5 or Ctrl+R to refresh the contents of the page. Although you don’t see the difference, the review now comes from the cache and thus the page saves a trip to the database. If you want to confirm this is really the case, you can add a Label control to the ViewDetails.aspx page and then update it with text saying whether or not the item was in the cache:
VB.NET
Label1.Text = "In the cache"If myReview Is Nothing ThenLabel1.Text = "NOT in the cache"
Using myEntities As New PlanetWroxEntities()C#
Label1.Text = "In the cache";if (myReview == null){Label1.Text = "NOT in the cache";
using (PlanetWroxEntities myEntities = new PlanetWroxEntities())This code initially sets the Label’s Text to "In the cache". However, if the item isn’t found, the Label is updated to reflect that observation.
How It Works
In the ViewDetails.aspx page you first added a few labels that hold relevant properties of the Review, such as its Title, Summary, and Body. You assigned the Label control for the summary a CssClass so you can influence its styling from your CSS files. The.Summary selector assigns an italic font and sets the display property to block, forcing the body text that follows onto its own line.
The code in the Code Behind then starts by looking at whether or not it can retrieve the item from the cache:
VB.NET
Dim myReview As Review = TryCast(Cache("Reviews" + reviewId.ToString()), Review)C#
Review myReview = Cache["Reviews" + reviewId.ToString()] as Review;As the key for the cached item, the code uses a combination of the word Reviews and the Id of each item. This gives each review a unique key to be used for the cache. If the item cannot be found in the cache (possibly because you’re loading the page for the first time or because ASP.NET removed it), the TryCast method in VB.NET and the as keyword in C# return Nothing/null. So, by checking the myReview variable for that value, you can determine whether the item was in the cache. If it was, you’re pretty much done, but if it wasn’t you need to get it from the database using a LINQ to Entities query similar to those you’ve seen before. Note that the query uses the SingleOrDefault() operator to limit the query to a single Review instance, because there should only be one by the given ID, or to Nothing/null when the item cannot be found. What you do when the item is not found is up to you; you can display an error message in a Label control informing the user that the item is no longer available, or you can redirect to the homepage or another page in your site.
After the item is retrieved from the database, it’s inserted into the cache with the following code:
VB.NET
Cache.Insert("Reviews" + reviewId.ToString(), myReview, Nothing, DateTime.Now.AddMinutes(20), System.Web.Caching.Cache.NoSlidingExpiration)C#
Cache.Insert("Reviews" + reviewId.ToString(), myReview, null, DateTime.Now.AddMinutes(20), System.Web.Caching.Cache.NoSlidingExpiration);The first parameter of the Insert method is the cache key and the second parameter is the object you want to cache: the actual Review instance, in this case. The third parameter enables you to hook up your cached item to some dependency, such as a file or a database, so the item is removed from the cache when the dependent object changes. This is not used in this example, so null (Nothing in VB) is passed. The fourth parameter defines the absolute expiration date: the date and time at which the item is considered outdated and has to be removed from the cache. In this example, this date is constructed by adding 20 minutes to the current date and time, meaning the item will be cached for a maximum duration of 20 minutes. The final parameter can be used to set a new expiration time every time the item is accessed. This is a great way to cache frequently used items and ensures that items that are not used often are removed from the cache sooner. However, the previous example is using an absolute expiration date, which means you have to pass the constant value of System.Web.Caching.Cache.NoSlidingExpiration as the sliding expiration parameter because the two parameters are mutually exclusive.
At this stage, if the item exists in the database, you have a valid Review instance, whether or not it came from the cache. This instance is then used to fill the Label controls in the page and the page’s Title and MetaDescription properties:
VB.NET
TitleLabel.Text = myReview.TitleSummaryLabel.Text = myReview.SummaryBodyLabel.Text = myReview.BodyTitle = myReview.TitleMetaDescription = myReview.SummaryC#
TitleLabel.Text = myReview.Title;SummaryLabel.Text = myReview.Summary;BodyLabel.Text = myReview.Body;Title = myReview.Title;MetaDescription = myReview.Summary;Setting the Title and MetaDescription is good for your users and for the ranking of your page in search engines. The title is used when bookmarking a page, so a clear title helps the user find your page again. Search engines such as Google and Bing use the title in their evaluation of what the page is about. They use the text that you set in the MetaDescription (which ends up as a <meta name="description" /> element in the <head> section of the page’s HTML) to present the results to the user. This means the text you enter there is often your first point of contact with a user that uses a search engine. As such, it’s an important piece of information. Rather than reusing the Summary property for this purpose, you could add an additional column (calledSearchEngineDescription, for example) to the Reviews table in the database. You then need to bring this column into the ADO.NET Entity Data Model by right-clicking the EDMX model diagram in the Entity Designer and choosing Update Model from Database. Once you’ve added this property to the model, don’t forget to change the edit pages in the Management section (AddEditReview.aspx or AddEditReviewHandCoded.aspx) so they support this new property as well. Finally, in the ViewDetails.aspx page you can then assign its value to the MetaDescription property of the Page class.
Besides the MetaDescription property, the Page class was extended with a MetaKeywords property in ASP.NET 4. This property works more or less the same as the MetaDescription and enables you to set the keywords for the page. Although the importance of keywords to influence search engine ranking is heavily debated (many say they are not used by search engines at all), it can’t hurt to set them. You could add the keywords to the database and model by following the same steps as outlined for theSearchEngineDescription property. For a lot more tips on search engine optimization (SEO), consider getting a copy of Wrox’s Professional Search Engine Optimization with ASP.NET: A Developer’s Guide to SEO (ISBN: 978-0-470-13147-3).
The ViewDetails.aspx page now performs pretty well; The first time it loads, the item is retrieved from the database and stored in the cache. On subsequent visits to the page, the database is no longer accessed but the item is retrieved from the much faster cache.
PRACTICAL DATA TIPS
Here are some practical tips on working with data in your ASP.NET websites:
- Whenever you use the numerous style properties of the data-bound controls, consider using the
CssClassproperty instead of setting the individual style properties directly. This avoids page bloat and makes your site easier to maintain. - The section about the control’s life cycle has an exercise that shows you how to display the various events and the order in which they occur. You could extend the example and write code for even more events. Additionally, you could add more controls to the page and handle their events as well to help you establish a solid understanding of those events. Because a good understanding of those events and their order is often critical in writing web applications, the time you put into this little research project is well spent.
- Whenever you are writing pages that access a database or other slow or scarce resources like files or web services, consider whether they can benefit from caching. Although it’s not that hard to add caching at a later stage, it’s best to put it in as early as possible.
- Consider hand-coding complex data access pages. Though they are more difficult to write at first, you’ll end up with pages that are easier to maintain in the long run.
SUMMARY
This chapter covered some of the more advanced topics on presenting data with the data controls that earlier chapters deliberately skipped to enable you to focus on the core data access concepts.
The chapter started off with a good look at the numerous style elements that most data-bound controls have to influence their appearance. You then learned more about the numerous events that controls can fire. These events can be used to change the appearance of the controls programmatically. Therefore, a solid understanding of the page’s life cycle is important knowledge.
The chapter closed with a discussion of the various caching capabilities that ASP.NET supports to help you improve the performance of your websites.
This chapter showed you some advanced ways to handle data in an ASP.NET web application. The following chapter shows you how to protect some of this data — for example, the Management folder — from unauthorized users by implementing ASP.NET security.
1. Imagine you have a simple Web Form with a single Button on it. If you click the Button in the browser, it causes a postback and at the server its Click event is triggered. What happens first — the Page’s Load event or the Button control’s Click event?
2. Right now, when you insert or edit an item on AddEditReviewHandCoded.aspx, you’re taken back to Reviews.aspx when you’re done. It would be nice if the genre for the new or updated review item would already be preselected in the drop-down list. What code do you need to write to implement this feature?
3. What’s the proper way to avoid an exception that you handled in a data-bound control’s event in the Code Behind from being displayed in the page?
You can find answers to these exercises in Appendix A.
WHAT YOU LEARNED IN THIS CHAPTER
|
ASP.NET styles |
Control properties that inherit from the |
|
Caching |
A technique used to store copies of data in a location that is quicker to access than the original source in order to improve performance. |
|
Cache invalidation |
A mechanism where items are removed from the cache when they are no longer valid. |
|
Exception |
The .NET term for an error (exceptions are discussed in great detail in Chapter 18). |
|
Foreign key constraint error |
An error that occurs at the database level when you try to delete a row that other rows depend on |
|
|
These two properties on the |
|
Output caching |
A form of caching where an entire page or a user control is cached to prevent it from being generated from scratch every time it’s accessed. |
|
Stale data |
A cached copy of some data that no longer accurately represents the original data. |
All materials on the site are licensed Creative Commons Attribution-Sharealike 3.0 Unported CC BY-SA 3.0 & GNU Free Documentation License (GFDL)
If you are the copyright holder of any material contained on our site and intend to remove it, please contact our site administrator for approval.
© 2016-2026 All site design rights belong to S.Y.A.