Beginning ASP.NET-4.5 in C# and VB (2013)
Chapter 3
Designing Your Web Pages
WHAT YOU WILL LEARN IN THIS CHAPTER:
- What CSS is and why you need it
- How CSS looks and how to write it
- The different ways to add CSS code to your ASP.NET pages and external files
- The numerous tools that VS offers you to quickly write CSS
WROX.COM CODE DOWNLOADS FOR THIS CHAPTER
You can find the wrox.com code downloads for this chapter on the Download Code tab at www.wrox.com/go/begaspnet451. The code is in the Chapter 3 folder.
The pages you created in the previous two chapters look pretty plain and dull. That’s because they lack styling information and therefore default to the standard layout that the browser applies. To spruce up your pages, you need a way to change their presentation in the browser. The most common way to do this is by using the cascading style sheets (CSS) language. CSS is the de facto language for formatting and designing information on the web, including ASP.NET web pages. With CSS you can quickly change the appearance of your web pages, giving them that great look that your design or corporate identity dictates.
Solid support for working with CSS was initially added in Visual Web Developer (VWD) 2008, one of the predecessors of VS Express 2013 for Web. VS 2012 included a brand new CSS editor with features similar to other languages, such as C# and VB. The CSS editor has been further enhanced in VS 2013.
To understand the relevance of and need for CSS in your ASP.NET websites, you need to understand the shortcomings of HTML first. The next section looks at the problems that HTML presents, and how CSS is able to overcome these issues.
WHY DO YOU NEED CSS?In the early days of the Internet, web pages consisted mostly of text and images. The text was formatted using plain HTML, using tags like <strong> to make the text bold, and the <font> tag to influence the font family, size, and color. Web developers soon realized that they needed more power to format their pages, so CSS was created to address some of HTML’s styling shortcomings.
One of the problems with using HTML for formatting is that it offers only a limited set of options to style your pages. You can only use elements like <em> and <strong> to change the appearance of text. In previous versions of HTML you could also use the <font>element and an attribute like bgcolor to further change the appearance of HTML elements. These elements and attributes are now deprecated in HTML5. You also have a number of other attributes at your disposal for changing the way links appear in your page.
Obviously, this feature set isn’t rich enough to create the attractive web pages that your users expect and demand.
Another problem with HTML with a lot more impact on how you build your web pages is the way the styling information is applied to the page. By design, HTML forces you to embed your formatting in your HTML document, making it harder to reuse or change the design later. Consider the following example that was common in many websites before CSS became widely applicable:
<p><font face="Arial" color="red" size="+1"> This is red text in an Arial type face and slightly larger than the default text.</font></p>The problem with this code snippet is that the actual data (the text in the <p> element) is mixed with the presentation (the formatting of the text with the <font> tag in this example). Ideally, the two should be separated, so each of them is easier to change without affecting the other.
Imagine you used the <p> and <font> elements to mark up the first paragraph of every page in your site. What happens when you decide to change the color of the font from red to dark blue? Or what if your corporate identity dictates a Verdana font instead of Arial? You would need to visit each and every page in your site, making the required changes.
Besides maintainability, another problem with HTML formatting is the fact that you can’t easily change the formatting at run time in the user’s browser. With the HTML from the previous code snippet, there is no way to let your visitor change things like the font size or color, a common request to help people who are visually impaired. If you want to offer your visitors an alternative version of the page with a larger font size or a different color, you would need to create a copy of the original page and make the necessary changes.
The final problem with HTML formatting is that the additional markup in your page adds considerably to the size of the page. This makes it slower to download and display because the information needs to be downloaded with each page in your website. It also makes it harder to maintain your pages because you’d need to scroll through large HTML files to find the content you need.
To summarize, formatting with HTML suffers from the following problems:
- Its feature set severely limits the formatting possibilities that your pages require.
- Data and presentation are mixed within the same file.
- HTML doesn’t enable you to easily change formatting at run time in the browser.
- The required formatting tags and attributes make your pages larger and thus slower to load, display, and maintain.
Fortunately, CSS enables you to overcome all of these problems.
How CSS Fixes Formatting ProblemsCSS is designed to format your web pages in almost every possible way. It offers a rich set of options to change every little aspect of your web page, including fonts (size, color, family, and so on), colors and background colors, borders around HTML elements, positioning of elements in your page, and much more. CSS is understood by all major browsers today, so it’s the language for visual presentation of web pages and very popular among web developers.
CSS overcomes the problem of mixed data and presentation by enabling you to define all formatting information in external files. Your ASPX or HTML pages can then reference these files and the browser will apply the correct styles for you. With this separation, the HTML document contains what you want to display, and the CSS file defines how you want to display it, enabling you to change or replace one of the two documents, leaving the other unmodified. In addition, you can place CSS directly in an HTML or ASPX page, which gives you a chance to add small snippets of CSS exactly where you need them. You should be cautious when placing CSS directly in an HTML or ASPX page, because you can no longer control style information from a single, central location.
Because you can place all CSS code in a separate file, it’s easy to offer the user a choice between different styles — for example, one with a larger font size. You can create a copy of the external style sheet, make the necessary changes, and then offer this alternative style sheet to the user. You see how this works in Chapter 6 when ASP.NET Themes are discussed.
Another benefit of a separate style sheet file is the decreased bandwidth that is required for your site. Style sheets don’t change with each request, so a browser saves a local copy of the style sheet the first time it downloads it. From then on, it uses this cached copy instead of requesting it from the server over and over again. Sometimes this caching can work against you when the browser doesn’t download the latest CSS files with your changes. If you find that the browser is not picking up the changes you made to a CSS file, use Ctrl+F5 or Ctl+R in the browser (not in VS) to get a fresh copy from the server.
Now that you have seen why CSS is so important, it’s time to find out how it looks and how to use it.
AN INTRODUCTION TO CSSIn terms of syntax, CSS is an easy language to learn. Its “grammar” consists of only a few concepts. That makes it relatively easy to get started with. What makes CSS a bit more difficult is the way all major browsers render a page. Although virtually every modern desktop browser understands CSS, they all have their quirks when it comes to displaying a page according to the CSS standard. This standard, maintained by the same organization that maintains the HTML standard, the World Wide Web Consortium, or W3C for short, comes in three different versions: 1.0, 2.1, and 3.0. Of these three versions, 2.1 is the most applicable today. It contains everything that version 1.0 contains but also adds a lot of possibilities on top of that. It’s also the version that VS uses and generates by default. Version 3.0 is currently under development and it’s expected to take some time before the major browsers have solid support for it.
Before you look at the actual syntax of CSS, it’s a good idea to see an example first. In the following exercise, you will write a simple ASPX page that contains some CSS to format the contents of the page. This helps in understanding the CSS language, which is discussed in full detail in the section that follows.
In this Try It Out you will write some CSS that changes the appearance of a header and two paragraphs. You’ll hand code the page for now; the second half of this chapter shows you how to use the CSS tools available in VS.
1. In the Demos folder of the Planet Wrox project, create a new Web Form called CssDemo.aspx. For this exercise, it doesn’t matter if you choose Inline Code or Code Behind.
2. Make sure the page is in Markup View and then locate the closing </title> tag in the source. Position your cursor at the end of the line and press Enter to create an empty line between the <title> and <head> tags. On this new line type the word styleand then press Tab. VS completes the <style> element for you. Press Enter to create some room between the tags and then complete the block as follows:
3.<title></title>
4.<style>
5.
6.</style>
</head>
Instead of using the style code snippet, you can also type the full code yourself. Note that as soon as you type the opening angle bracket (<), a list pops up that enables you to select the <style> tag. All you need to do to complete the word is press the Tab or Enter key. The same help is available for attributes on an element. Simply select the relevant attribute in the list and press Tab or Enter, and the value is inserted for you automatically, nicely surrounded by the double quotes.
7. Next, between the opening and closing <style> tags, type the following bolded CSS code:
8.<style>
9.h1
10.{
11.font-size: 20px;
12.color: Green;
13.}
14.
15.p
16.{
17.color: #0000FF
18.font-style: italic;
19.}
20.
21..RightAligned
22.{
23.text-align: right;
24.}
</style>Take great care when typing this code, because CSS is rather picky about syntax. The first item in the list is an h1 tag to style a heading at the first level, so it gets a size of 20 pixels and is displayed in a green font. Notice the colon between font-sizeand 20px and that the line is closed with a semicolon.
The second item in the list simply contains the letter p and defines the look and feel for all <p> elements in the page. It uses a hexadecimal value (#0000FF) for the color blue.
The last item is prefixed with a period (.) followed by the text RightAligned. This item is used to right-align some text in the page. Because CSS is case sensitive, it’s important to type this exactly as shown here, with a capital R and A, or the CSS code won’t line up with the HTML shown in the next step.
Note that as soon as you type the hash symbol (#) after the color property, a color picker pops up to help you to select a color, as shown in Figure 3-1. For now, just close the color picker by pressing Esc and manually complete the code. You will see more of this color picker later in this chapter.
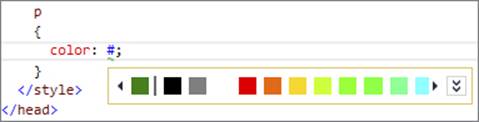
FIGURE 3-1
25.
Scroll down in the page a bit until you see the opening <div> tag. Right after this tag, type the following bolded code:
26.<div>
27.<h1>Welcome to this CSS Demo page</h1>
28.<p>CSS makes it super easy to style your pages.</p>
29.<p class="RightAligned">
30.With very little code, you can quickly change the looks of a page.
31.</p>
</div>Instead of typing in this code directly, you can also use the Formatting toolbar while in Design View to create elements like <h1> and <p>. For now, you need to switch to Markup View to add class="RightAligned", but in later exercises in this chapter you see how you can have the IDE write this code for you.
32.If you switch to Design View (or Split View), you’ll see that the designer shows your text with the formatting defined in the <style> element of the page. Figure 3-2 shows the page in Split View so you can see the code and the design at the same time.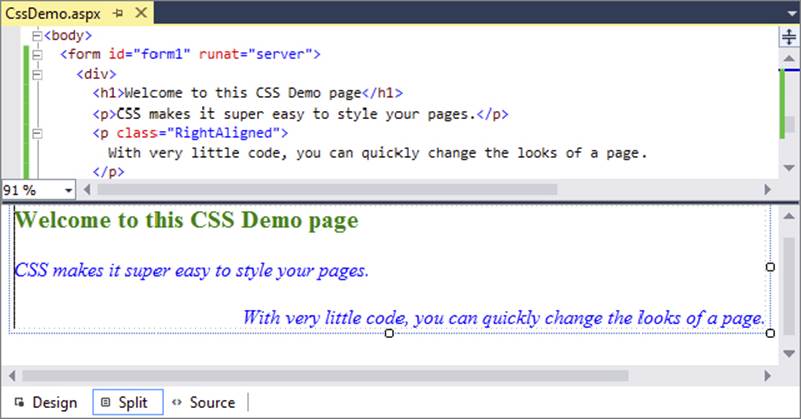
FIGURE 3-2
Although this black-and-white book makes it difficult to see different font colors, in Figure 3-2 you can see clearly that the <h1> has a larger font size. The figure also shows that all paragraphs are now displayed with an italic font. Finally, you can see that the last paragraph is aligned to the right of the window, because the class attribute on the tag is set to RightAligned.
Press Ctrl+F5 to view CssDemo.aspx in your browser. The page you see in the browser is identical to the preview you got in the Design View of VS.
How It Works
Although the code you typed in this exercise is relatively simple, there’s a lot going on under the hood of the browser (and the Design View of VS) to make this possible. You started by adding some styles to the <head> section of the page:
<style> h1 { font-size: 20px; color: Green; } ...</style>The <style> tag is used to wrap a CSS style sheet that is embedded in the page.
The code block from h1 until the closing curly brace (}) between the <style> tags is called a rule set or simply a rule. The rule in this code snippet defines the appearance for all <h1> elements in your page. The h1 at the top of the code block is called aselector and is used to indicate to what element the formatting should be applied. In this case, the selector maps directly to an HTML element, but many other selectors are available, as you will see in the next section. Figure 3-3 shows how the elements are related to each other.

FIGURE 3-3
Between the curly braces you see the style information that should be applied to the heading. Each line between the curly braces is called a declaration. A declaration consists of a property, followed by a colon, and then followed by a value. The semicolon (;) at the end of a declaration separates it from the next declaration, and is required on all declarations except for the last one in the rule set. However, for consistency, it’s a good idea to add it to all declarations, which is what I’ll do in the remainder of this book.
When the browser loads this page, it also reads in the styles you defined between the <style> tags. Then, whenever it comes across an HTML element that matches the selector, it applies the CSS rules to that element. So, for the <h1> and <p> elements, their respective rules are applied. This causes the heading to turn green with a large font, while the paragraphs turn blue with an italic font.
But why does the last paragraph turn blue and get right-aligned? In CSS, you can have rules coming from different sources. The last <p> element gets its style information from the standard p selector in the style definition. So, the p rule gives the paragraph a blue and italic font. However, it also has a class defined. This class, called RightAligned, links to a Class selector .RightAligned (note the leading period) in the style sheet and causes the text to be aligned to the right of the window. You see more of Class and other selectors in the next section. In the end, the last <p> element gets its rules from two selectors at the same time. You can make up and assign your own class names (as shown with the RightAligned class), giving you the flexibility to design your pages and elements exactly how you want them.
The next section digs a lot deeper in the syntax of CSS, giving you a much more detailed view on selectors, properties, and values.
CSS — The LanguageAs you saw in the previous Try It Out exercise, a cascading style sheet is actually a collection of rules. A rule is a combination of a selector and one or more declarations, which in turn can be broken down to a property and a value. You’re probably getting a little dizzy from all the new terms that were introduced in the past few paragraphs, so in the next section, you see most of them again, with a detailed explanation and code examples that show you what they are used for and how they work.
The Style SheetThe style sheet contains all the relevant style information that should be applied to page elements. In its simplest form, a style sheet looks like this:
h1{ color: Green;}A style sheet can also contain more than one rule, as you saw in the previous exercise. At the same time, each rule can contain multiple declarations, enabling you to group them under a single selector:
h1{ font-size: 20px; color: Green;}The code you just saw is functionally identical to this:
h1{ font-size: 20px;}h1{ color: Green;}The condensed form, where the two declarations are grouped under the same selector, is much easier to read, understand, and maintain, so it’s advisable to use this syntax as much as possible.
To be able to style an element on a page, a browser has to know three things:
- What element of the page must be styled?
- What part of that element must be styled?
- How do you want that part of the selected element to look?
The answers to these questions are given by selectors, properties, and values.
SelectorsAs its name implies, a selector is used to select or point to one or more specific elements within your page. A number of different selectors are available, giving you fine control over what elements you want to style. The selector answers the first question: What element of the page must be styled? The next section shows you the four most important types of selectors.
The Universal SelectorThe Universal selector, indicated by an asterisk (*), applies to all elements in your page. You can use the Universal selector to set global settings like a font family. The following rule set changes the font for all elements in your page to Arial:
*{ font-family: Arial;}The Type selector enables you to point to an HTML element of a specific type. With a Type selector, all HTML elements of that type will be styled accordingly.
h1{ color: Green;}This Type selector now applies to all <h1> elements in your code and gives them a green color. Type selectors are not case sensitive, so you can use both h1 and H1 to refer to the same heading. I prefer to use all lowercase for my Type selectors, so that’s what you’ll see in this book.
The ID selector is always prefixed by a hash symbol (#) and enables you to refer to a single element in the page. Within an HTML or ASPX page, you can give an element a unique ID using the id attribute. With the ID selector, you can change the behavior for that single element, like this:
#IntroText{ font-style: italic;}Because you can reuse this ID across multiple pages in your site (it only has to be unique within a single page), you can use this rule to quickly change the appearance of an element that you use once per page, but more than once in your site, for example, with the following HTML code:
<p id="IntroText">I am italic because I have the right ID.</p><p id="BodyText">I am NOT italic because I have a different ID.</p>In this example, the #IntroText selector changes the font of the first paragraph — which has the matching id attribute — but leaves the other paragraph unmodified. ID selectors are case sensitive, so make sure that the id attribute and the selector always use the same casing.
Notice that the selector uses a hash symbol (#) in its name, but you don’t use this symbol in the id attribute.
The Class selector enables you to style multiple HTML elements through the class attribute. This is handy when you want to apply the same type of formatting to a number of unrelated HTML elements. The following rule changes the text to red and bold for all HTML elements that have their class attributes set to Highlight:
.Highlight{ color: Red; font-weight: bold;}The following code snippet uses the Highlight class to make the contents of a <span> element and a link (<a>) appear with a bold typeface:
This is normal text but <span class="Highlight">this is Red and Bold.</span>This is also normal text but <a href="CssDemo.aspx" class="Highlight">this link is Red and Bold as well.</a>Notice that the selector uses a period in its name, but you don’t use this period when referring to the selector in the class attribute. The class attribute is very useful because it enables you to reuse a piece of CSS for many different purposes, regardless of the HTML element that uses the class. Class selectors are case sensitive so make sure you type them correctly (or let IntelliSense help you pick the classes from the list when possible).
CSS supports more types of selectors, giving you even more control over the elements you want to target, but the four different types you just saw are the most widely used.
Grouping and Combining SelectorsCSS also enables you to group multiple selectors by separating them with a comma. This is handy if you want to apply the same styles to different elements. The following rule turns all headings in the page to red:
h1, h2, h3, h4, h5, h6{ color: Red;}Moreover, with CSS you can also combine selectors, enabling you to hierarchically point to a specific element in a page. You can do this by separating the selectors with a space. The following example targets all <p> elements that fall within a <section> element with anid of MainContent, leaving all other paragraphs unmodified. Also note there’s no space between section and #MainContent. This results in that part of the selector targeting a <section> element with an id of MainContent.
section#MainContent p{ font-size: 18px;}Note that combining is very different from grouping. Grouping is just a shortcut to avoid typing the same declarations over and over again, whereas combining enables you to target specific elements in your document.
With combining, you’re not limited to ID and Type selectors; you can also use it with the other selectors, as is demonstrated with the following example:
section#MainContent p.Attention{ font-weight: bold;}This rule changes all paragraphs with the class Attention within the <section> element with its id set to MainContent and leaves all others untouched. The following HTML snippet uses this rule to show the effect:
<section id="MainContent"> <p class="Attention">My class is Attention, so my text is bold.</p> <p>My text is not bold, as it lacks the Attention class.</p></section><p class="Attention">I am NOT bold because I don't fall within MainContent.</p>The second question that needs to be answered to apply a certain style in your page is about what part of the element must be styled. You do this with properties.
PropertiesProperties are the part of the element that you want to change with your style sheet. The CSS specification defines a long list of properties (VS’s IntelliSense list shows more than 100 items), although you won’t use all of them in most websites. The following table lists some of the most common CSS properties and describes where they are used.
|
PROPERTY |
DESCRIPTION |
EXAMPLE |
|
|
Specifies the background color or image of an element. |
|
|
|
Specifies the border of an element. |
|
|
|
Changes the font color. |
|
|
|
Changes the way elements are displayed, enabling you to hide or show them. |
|
|
|
Enables you to “float” an element in the page using a left or right float. Other content is then placed on the opposite side. |
|
|
|
Changes the appearance of fonts used on your page. |
|
|
|
Sets the height or width of elements in your page. |
|
|
|
Sets the amount of free space inside (padding) and outside (margin) of an element. |
|
|
|
Controls whether an element is visible in the page. Invisible elements still take up screen space; you just don’t see them. |
|
Fortunately, VS helps you to find the right property with its many CSS tools, so you don’t have to remember them all.
For a property to be useful, you need to give it a value, which answers the third question: How do you want the part of the selected element to look?
Values
Just as with properties, values come in many flavors. The values you have available depend on the property. For example, the color attribute takes values that represent a color. This can be a named color (such as White), a hexadecimal number representing a red, green, and blue (RGB) component (such as #FF0000), or you can set it using the CSS rgb notation. The following examples are all functionally equivalent and set the color of the h1 element to red:
h1{ color: Red;}h1{ color: #FF0000;}h1{ color: rgb(100%, 0%, 0%);}You can also specify the transparency of a color using the rgba notation where the fourth parameter is a decimal number between 0 (fully transparent) and 1 (no transparency) like this:
color: rgba(255, 0, 0, 0.50);Using named colors can increase the readability of your CSS code, but because you’re limited to a relatively short list of named colors, you often need the hexadecimal notation to get the exact color you want. Later in this chapter you see how to use the built-in color picker to create the exact color you need.
Many other values are possible as well, including size units (px, em, and so on), font families, images (which take the form of url(SomeImage.jpg)), or so-called enumerations like the border-style, which enables you to set a border style such as solid, dashed and double.
Many of the CSS properties enable you to write a shorthand version as well as a more expanded version. Take, for example, the border property. In its shortest form, you can set the border property like this:
border: 1px solid Black;This border property applies a border to all four sides of an HTML element. The border size is 1px, the style is solid (some of the other options include dashed, dotted, and double), and the border color is set to Black.
This is an easy way to quickly set all four borders of the HTML to the same values. However, if you want more control over the individual borders and their properties, you can use the expanded version:
border-top-width: 1px; border-top-style: solid; border-top-color: Black; border-right-width: 1px; border-right-style: solid; border-right-color: Black; border-bottom-width: 1px; border-bottom-style: solid; border-bottom-color: Black; border-left-width: 1px; border-left-style: solid; border-left-color: Black;This long version causes the exact same style to be applied: a solid black border on all four sides with a thickness of 1 pixel. In most cases, you should favor shorthand notation over its expanded counterpart, because it’s much easier to read and maintain. However, if you need absolute control over the border — for example, if you want a 2-pixel dashed border on the left and top sides, and a green, solid border on the right and bottom sides of the HTML element — it’s good to know that you can set each border property of all four directions individually. You can also mix these options. The following example sets the border on all four sides to a 1-pixel solid black line, and then overrides just the color of the left border:
border: 1px solid Black;border-left-color: Blue;Other CSS properties that support shorthand include font, background, list-style, margin, and padding. If you’re unsure whether a property supports shorthand, consult the IntelliSense pop-up list that appears by pressing Ctrl+Space when you’re entering a property in a CSS file or a <style> block.
Although at times it seems you need to write CSS by trial and error, and just hope for the right result, there’s actually a quite accurate model behind CSS that determines how items should be laid out on the page. This model is called the CSS Box Model.
The CSS Box ModelThe CSS Box Model describes the way three important CSS properties are applied to HTML elements: padding, border, and margin. Figure 3-4 shows a graphical representation of the box model.
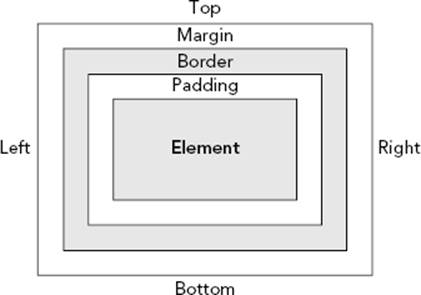
FIGURE 3-4
In the middle there is an HTML element like a <p> or a <div> with a certain height and width. Just around it there is padding; the whitespace that surrounds the element within its border. Immediately after the padding you can see the border and finally on the outside there is the margin, which defines the room between an element (including its padding and border) and its surrounding elements. The three outer properties of an element — padding, border, and margin — add up to the space that an element takes up in the page. To see how this works, consider the following CSS and HTML:
.MyDiv{ width: 200px; padding: 10px; border: 2px solid Black;}...<div class="MyDiv">Element</div>This renders a rectangle in the browser with the <div> element surrounded by a black border of two pixels, as shown in Figure 3-5.
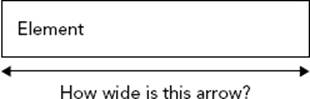
FIGURE 3-5
Before you read on, try answering the question: How wide is the arrow below the <div> element?
If you guessed 224 pixels, you are correct. The width of the arrow is the sum of three values: the width of the actual element (200 pixels), plus the width of the padding surrounding it on both sides (two times 10 pixels), plus the width of the borders on both sides (two times 2 pixels), resulting in a total width of 224 pixels. So, if you wanted the entire box to be 200 pixels wide instead, you’d need to set the width property of the MyDiv selector to 176px. Outside the border of the element, margin could further influence the gap between this element and its surrounding elements.
The example shows the effect on the width only, but the same principles apply to the height of elements. Keep this box model in mind when laying out your pages. When things end up wider or taller than you anticipated, check the width, height, padding, border, andmargin properties in the CSS style sheet.
In the next exercise, you modify the site’s homepage that you created in the previous chapter. You add the basic layout for the site, which is then styled using a style sheet. In Chapter 6 you use this page again when you upgrade it to a master page.
In this exercise you modify two files. First, you add the basic layout elements to the Default.aspx page to create room for a header, a menu, the main content area, a sidebar, and a footer. Then you modify the Styles.css file from the Styles folder to change the size and location of these elements. Finally, you attach the style sheet to the page, so the style information is applied when the page is viewed in the designer or in a browser.
1. Open the Default.aspx file from the root of your website and, if necessary, switch to Markup View.
2. Modify the code within the <form> element so it ends up like this:
3.<form id="form1" runat="server">
4.<div id="PageWrapper">
5.<header>Header Goes Here</header>
6.<nav>Menu Goes Here</nav>
7.<section id="MainContent">
8.<h1>Hi there visitor and welcome to Planet Wrox</h1>
9....
10.</section>
11.<aside id="Sidebar">Sidebar Goes Here</aside>
12.<footer>Footer Goes Here</footer>
13.</div>
</form>Make sure that the welcome message you added in the previous chapter ends up between the opening and closing tag of the MainContent <section> element. If you were already familiar with versions of HTML before HTML5, you may a bit surprised by the new elements such as header, section, and footer. These elements were introduced in HTML5 to give a better semantic structure to your documents. Refer to Chapter 1 for a quick introduction to HTML5.
14.Open the Styles.css file from the Styles folder. If you added some code to this file earlier, remove that code first.
15.At the top of the CSS file, type the following code that uses an ID selector to select the header element:
16.header
17.{
18.
}19.Position your mouse between the curly braces and type the letter b. This brings up the IntelliSense list and shows you all properties that start with the letter b, as shown in Figure 3-6.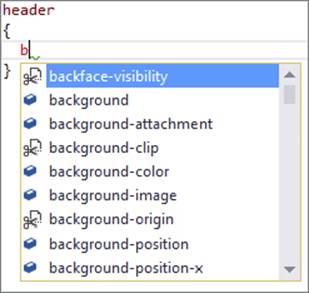
FIGURE 3-6
Next, type the letter c. The list is filtered further as you can see in Figure 3-7.
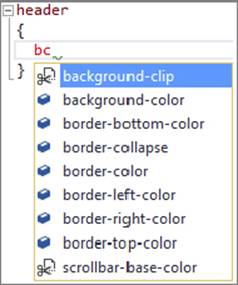
FIGURE 3-7
Notice how this filtering is done in a pretty smart way. The filter does not limit the list to only those properties that start with or contain the letters bc (which in this case don’t exist), but it also supports what is called a title case search, which means it lists items that have each word in the property begin with the letters you’re searching for. In this case, bc matches items such as background-clip, background-color, and more. The same applies to all other CSS properties. For example, td would give you text-decoration, bbw gives you border-bottom-width, and so on. This makes it extremely easy to write CSS code with only a few keystrokes.
Note how some items in the list have an icon with a pair of scissors instead of the standard property icon. The scissors icon indicates a code snippet that you can expand by pressing Tab twice. Doing so inserts browser-specific CSS into the file that is used for CSS properties that are not yet widely implemented by all browsers.
Continue this exercise by selecting background-color from the list. You can double-click the value, press Enter or Tab, and VS completes the property for you. Next, type a colon, then a space and then the hash symbol (#) followed by C0C0C0 (which represents the color silver). Close the line with a semicolon. Your final code should now look like this:
header{ background-color: #C0C0C0;}20.Complete the code block for the header element by adding width and height properties like this:
21.{
22.background-color: #C0C0C0;
23.width: 844px;
24.height: 86px;
25.}
26.Complete the CSS file by creating the following rules. Make good use of Visual Studio’s IntelliSense and title case search feature to minimize the number of keystrokes needed to write this code.
27.*
28.{
29.font-family: Arial;
30.}
31.
32.h1
33.{
34.font-size: 20px;
35.}
36.
37.#PageWrapper
38.{
39.width: 844px;
40.margin: auto;
41.}
42.
43.nav
44.{
45.width: 844px;
46.}
47.
48.section#MainContent
49.{
50.width: 664px;
51.float: left;
52.}
53.
54.aside
55.{
56.background-color: Gray;
57.width: 180px;
58.float: left;
59.}
60.
61.footer
62.{
63.background-color: #C0C0C0;
64.width: 844px;
65.clear: both;
}Since the Universal selector (*) applies to all elements in your site, it’s common to move it to the top of the CSS above, even above the header selector, which you could do now.
66.When you’re done creating the rules, save and close the Styles.css file, because you’re done with it for now.
67.Open the Default.aspx file again and switch to Design View. From the Solution Explorer, drag the Styles.css file from the Styles folder onto the page. You should immediately see the Design View change to reflect the code you wrote in the style sheet. When you drop the style sheet on the page, VS inserts code in the <head> section of the page in Markup View that attaches the style sheet to the document:
68.<head runat="server">
69.<title></title>
70.<style type="text/css">
71..auto-style1
72.{
73.color: #FF0000;
74.}
75.</style>
76.<link href="Styles/Styles.css" rel="stylesheet" type="text/css" />
</head>You can also drag an existing style sheet from the Solution Explorer directly in the <head> section of a page in Markup View. When you do that, VS adds the same <link> element but leaves out the type attribute. Since this attribute is optional in HTML5, this is not a problem.
77.Since the site uses HTML5, you need a browser that supports this latest HTML version for the page to render correctly. For older browsers, such as Internet Explorer 8 and below, you can use a nifty JavaScript library called Modernizr. One of the many features of this library is dynamically adding support for new HTML elements such as nav, section and aside through JavaScript.
Adding Modernizr to your site is very easy using the Package Manager Console that ships with Visual Studio. To add the library, follow these steps:
1. Choose Tools ⇒ Library Package Manager ⇒ Package Manager Console.
2. Type the following command and press Enter:
Install-Package Modernizr3. After a short delay, your site is expanded with a file called packages.config that keeps track of the installed packages and a Scripts folder that now contains the file modernizr-2.7.1.js. Note: your version number could be different if a newer version of Modernizr has been released by the time you read this book. To add this library to your page, open Default.aspx in Markup View and drag the file from the Solution Explorer to the head section of the code, directly after the link to the style sheet. You should end up with this code:
4.<link href="Styles/Styles.css" rel="stylesheet" type="text/css" />
5.<script src="Scripts/modernizr-2.7.1.js"></script>
</head>You should add the Modernizr library to your site even if you have a modern web browser. Since you can’t control the browsers visiting your site, you want to make sure everybody sees your site as intended. Adding Modernizr fixes the HTML5 compatibility issues for older browsers while hardly causing any overhead. You can learn more about Modernizr on its website at http://modernizr.com. You’ll see a lot more about the Package Manager Console in Chapter 11.
11.Finally, save the changes to all open documents (press Ctrl+Shift+S) and then request Default.aspx in your browser. Your screen should look similar to Figure 3-8, which shows the page in Mozilla Firefox.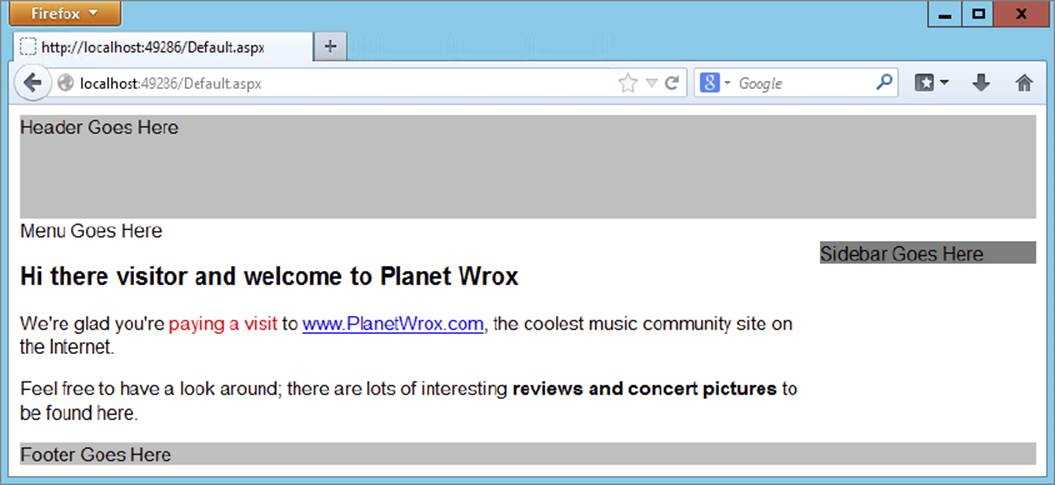
FIGURE 3-8
Features like IntelliSense and title case search make it easy to write CSS with a minimum number of keystrokes. At first you may be typing in most of the CSS yourself, but once you become more familiar with Visual Studio’s CSS editor, you can let VS write most of the code for you.
Note that the header, PageWrapper, nav, and footer elements have an exact width of 844 pixels. This way, the site fits nicely on screens with a size of 1024 x 768 pixels, still a reasonably common screen size for many of today’s computers, without being squeezed between the Windows borders. Systems with bigger screens simply center the site in the available space. This centering is done by the PageWrapper element, which has its margin set to auto. This means that the available space on the left and right sides (but not at the top and bottom) is equally divided, effectively centering the PageWrapper element in the middle of the browser window. As an alternative to fixed width layouts, you can also create a responsive layout that adapts to the visitor’s screen size. The Bootstrap framework mentioned earlier makes this very easy.
Note also that the MainContent section and the aside are positioned next to each other. You do this with the CSS float property:
section#MainContent { width: 664px; float: left;}aside{ background-color: Gray; width: 180px; float: left;}This tells the MainContent to “float” on the left side of content that follows it, effectively placing the aside to the right of it. You need to tell the aside to float as well; if you leave it out, it will be placed at the left of the page, right where it was before you applied the CSS. If you have multiple aside elements in your site (which is a common practice), you can target this aside that acts as a sidebar by adding an id attribute (such as Sidebar) just as I did with the MainContent section element and then update the CSS as follows:
aside#Sidebar{ ...}The combined width of the MainContent and aside elements adds up to 844 pixels, which is exactly the width of their parent element: the PageWrapper.
To end the float and tell the footer element to be placed directly under the MainContent and aside elements, the clear property is used to clear any float (left or right) that may be in effect:
footer{ background-color: #C0C0C0; width: 844px; clear: both;}The gray backgrounds are just temporarily added to the code, so it’s easier to see what <div> ends up where. In future exercises, you modify the CSS file again to fit the scheme of the Planet Wrox website.
To tell the browser what styles to apply, you link the style sheet in the head of the page:
<link href="Styles/Styles.css" rel="stylesheet" type="text/css" />This tells the browser to look in the Styles folder for a file called Styles.css and apply all rules in that file to the current document. Once the browser has downloaded the CSS file, it applies all the styles it finds in there to your HTML elements, resulting in the layout shown in Figure 3-8.
In this exercise, you saw how to link an external style sheet to a page using the <link> tag. However, you have more ways to include style sheets in your web pages.
Adding CSS to Your Pages
The first way to add CSS style sheets to your web pages is through the <link> element that points to an external CSS file, as you saw in the previous exercise. Take a look at the following <link> to see what options you have when embedding a style sheet in your page:
<link href="StyleSheet.css" rel="Stylesheet" type="text/css" media="screen" />The href property points to a file within your site, just as you saw in the previous chapter when you created links between two pages. The rel and type attributes tell the browser that the linked file is in fact a cascading style sheet. The media attribute is quite interesting: it enables you to target different devices, including the screen, printer, handheld devices, and even Braille and aural support tools for visually impaired visitors. The default for the media attribute is screen, so it’s OK to omit the attribute if you’re targeting standard desktop browsers.
You briefly saw the second way to include style sheets at the beginning of this chapter: using embedded <style> elements. The <style> element should be placed at the top of your ASPX or HTML page, between the <head> tags. Within the <style> tags, you can write the exact same CSS you saw earlier. For example, to change the appearance of an <h1> element in the current page only, you can add the following code to the <head> of your page:
<head runat="server"> <title></title><style>
h1 { color: Blue; } </style></head>The type attribute on the <style> element is optional as well, so you’ll come across <style> elements with and without that attribute.
The third way to apply CSS to your HTML elements is to use inline styles with the style attribute that you saw earlier in this chapter. Because the style attribute is already applied to a specific HTML element, you don’t need a selector and you can write the declaration in the attribute directly:
<span style="color: White; background-color: Black;"> This is white text on a black background.</span>You have so many options to add style sheets to your site, what’s the best method to use? In general, you should give preference to external style sheets over embedded styles, which in turn are preferred over inline styles. External style sheets enable you to change the appearance of the entire site through a single file. Make one change to your external style sheet file, and all pages that use this style sheet pick up the change automatically.
However, it’s perfectly acceptable to use embedded and inline styles as well in certain circumstances. If you want to change the look of a single page, without affecting other pages in your site, an embedded style sheet is your best choice. The same applies to inline styles: If you only want to change the behavior of a single element in a single page, and you’re pretty sure you’re not going to need the same declaration for other HTML elements, you could use an inline style.
An important thing to consider is the way that the various types of style sheets override one another. If you have multiple identical selectors with different property values, the one defined last takes precedence. For example, consider a rule defined in an external style sheet called Styles.css that sets the color of all <h1> elements to green:
h1{ color: Green;}Now imagine you’re attaching this style sheet in a page that also has an embedded rule for the same h1 but that sets a different color:
<link href="Styles/Styles.css" rel="stylesheet" type="text/css" /><style> h1 { color: Blue; }</style>With this code, the color of the actual <h1> element in the page will be blue. This is because the embedded style sheet that sets the color to blue is defined later in the page, and thus overrides the setting in the external file. If you turn the styles around like this,
<style> h1 { color: Blue; }</style><link href="Styles/Styles.css" rel="stylesheet" type="text/css" />the heading will be green, because the setting in the external style sheet now overrules that of the embedded style.
The same principle applies to inline styles. Because they’re defined directly on the HTML elements, their settings take precedence over embedded and external style sheets.
It’s also good to know that CSS generally overrules attributes on HTML elements. For example, if you have a CSS rule that sets the width and height of an image, the height and width attributes on the img element are ignored. For example, the image in this code snippet ends up as a 100-pixel square:
img{ height: 100px; width: 100px;}...<img src="SomeImage.jpg" width="200px" height"200px" />
In general, it’s recommended that you attach external files at the top of the <head> section, followed by embedded style sheets. That way, the external file defines the global look of elements, and you can use embedded styles to overrule the external settings on a page-by-page basis.
VS makes it easy to move embedded style sheets to an external CSS file, something you learn how to do in the next section, which discusses the remainder of the CSS tools in VS.
WORKING WITH CSS IN VISUAL STUDIOVisual Studio 2013 has a number of great tools on board to make working with CSS as easy as possible, including:
- The CSS Properties Grid, which enables you to change property values.
- The Manage Styles window, which enables you to organize styles in your site, changing them from embedded to external style sheets and vice versa; reorder them; link existing style sheets to a document; and create new inline, embedded, or external style sheets.
- The Apply Styles window, which you can use to choose from all available styles in your site and quickly apply them to elements in your page.
- Hierarchical indenting, which makes your CSS code easier to understand.
- Smarter IntelliSense and title case search features, which make it easy to enter CSS code manually.
- A number of helpful editor features such as the ability to easily comment and uncomment code and wrap code in collapsible regions, a color picker, and code snippets.
You’ve already seen some of these tools at work, and the next sections give you a detailed look at the remaining tools.
Using the CSS EditorThe CSS text editor in VS hosts a number of powerful features, demonstrated in the next Try It Out exercise.
In this exercise you modify the Styles.css file you created earlier by adding a few new styles. Along the way you’re introduced to a number of the CSS editor features listed earlier.
1. Open the Styles.css file from the Styles folder and locate the section#MainContent selector. Right below its closing curly brace, add the following CSS selector that targets links (a elements) in the MainContent section:
2.section#MainContent a
3.{
4.
}5. Between the opening and closing curly braces, type color, followed by a colon (:) and then by a hash symbol (#). As soon as you type the hash symbol, VS presents you with a color picker. If you click the down arrow at the right of the color picker, it expands and shows more options, visible in Figure 3-9.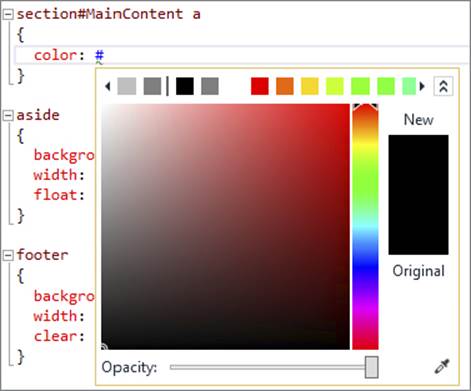
FIGURE 3-9
This color picker has a few interesting features. Firstly, the top row of colored squares contains a list of colors that are defined in your style sheet. This is a great way to quickly pick a color you’ve already been using for another selector. The list of recognized colors is then followed by a vertical bar, which in turn is followed by some default colors that VS adds for you. In Figure 3-9 you can see two recognized colors: a light and a dark shade of gray. The other colors are all defaults. Secondly, you can mix your own color by dragging the mouse over the large square in the middle as well as over the colored vertical bar on the right. Finally, using the tiny color picker icon at the bottom right of the screen, you can quickly select a color from any other Windows application or your desktop. This is a great way to retrieve the color from an image you may have opened in some graphics program, for example.
If you want to type in your own color information, simply ignore the color picker (or close it by pressing the Esc key).
For this exercise, click a green square, which inserts the hexadecimal value (such as #4cff00) of the color for you. Complete the line of code by entering a semicolon.
6. Complete the style rule for section#MainContent a and add two more style rules as follows:
7.section#MainContent a
8.{
9.color: #4cff00;
10.text-decoration: underline;
11.}
12.
13.section#MainContent a:visited
14.{
15.color: #FF0000;
16.text-decoration: underline;
17.}
18.
19.section#MainContent a:hover
20.{
21.color: #FFA500;
22.text-decoration: underline;
}23.Next, choose Edit ⇒ Format Document from the main menu. Alternatively, press Ctrl+K followed by Ctrl+D. This shortcut and menu command are available for other types of files as well, such as HTML, ASPX, Visual Basic, and C# files. When executed, they format the document according to the settings for that particular file type. In the case of CSS, it formats your code by placing the opening curly brace at a consistent location, and indenting and formatting the individual rules. It also performs what’s called a hierarchical indent. To best understand how this works, take a look at Figure 3-10, which depicts the section#MainContent rule set as well as the new selectors for the a elements you added earlier after you formatted the document.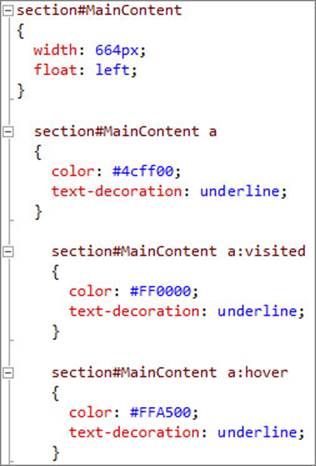
FIGURE 3-10
Notice how the section#MainContent a rule set has been indented below the section#MainContent rule set. This helps to understand the relationship between the two selectors used by the rule set (section#MainContent a only targets a elements within a parent section element with an id of MainContent). Likewise, the section#MainContent a:visited and section#MainContent a:hover rule sets are indented below the a element because they can be considered “children” of the a element. If you don’t like this behavior, you can turn it off by setting Hierarchical Indentation to Off under Tools ⇒ Options ⇒ Text Editor ⇒ CSS ⇒Advanced. Alternatively, press Ctrl+Q to put focus on the Quick Launch box, type CSS Advanced, and press Enter. This opens the same Options dialog box. While you’re there, spend some time browsing around the items under the Text Editor node to get an idea of how you can change the formatting of the many languages that VS supports.
24.The final two editor features worth showing here are Regions and Comments. If your CSS code becomes unwieldy, it may help to wrap some parts of the code that belong together in a region. A region in VS can then be collapsed to hide the code, and expanded again when you need to change it. To create a region, you wrap the code in a region / endregion pair using CSS comment syntax. For example:
25./*#region Name Of Region */
26.... Your CSS code here
/*#endregion*/For this exercise, add the opening region statement with a name of Main Content (/*#region Main Content */) right above the section#MainContent rule set, and the closing statement (/*#endregion*/) below the section#MainContent a:hover rule set. Once the region is created, in Figure 3-11 you see a minus (-) icon in the gutter next to the text editor.
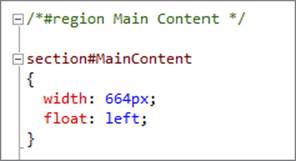
FIGURE 3-11
You can now collapse the region by clicking the minus icon. VS hides the code block and shows the name of the region instead, as shown in Figure 3-12.
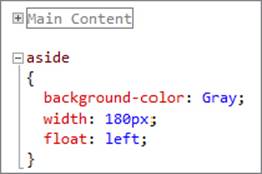
FIGURE 3-12
This makes it really easy to get some code out of the way when working with large code files. Note: Regions are also supported by other file types, such as C# and VB files, although each language uses a slightly different syntax.
The region feature in VS makes use of standard CSS comments syntax. This means that the browser ignores the region code as well as its name.
To comment out other code (so it’s not interpreted by the browser), select some text and then press Ctrl+K followed by Ctrl+C (for Comment). The code is then commented out using /* and */, as shown in Figure 3-13.
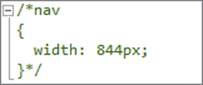
FIGURE 3-13
To uncomment the code again, press Ctrl+K followed by Ctrl+U (for Uncomment). Both commands are also available in the Edit ⇒ Advanced menu. You can also start a comment manually by typing /*. VS then inserts the closing */ for you automatically.
27.Save the changes to the CSS file. You can leave the region code in, but make sure you uncomment any code you may have commented out in the preceding step.
28.Switch to the Default.aspx page and, if necessary, switch to Design View. Select the text “look around” in the paragraph. If you typed something else in an earlier Try It Out, select that text instead. At this stage, all that’s important is that you have some text to turn into a link.
29.On the Formatting toolbar, click the Convert to Hyperlink button (with the link symbol and arrow on it), click the Browse button in the dialog box that appears, and select Default.aspx in the root of the site. This way, the link points to the same page it’s defined in, which is fine for this exercise. Click OK twice to dismiss the dialog boxes.
30.Save the changes to all open documents (choose File ⇒ Save All from the main menu or press Ctrl+Shift+S) and then request Default.aspx in your browser by pressing Ctrl+F5. You should see the page appear with the “look around” link underlined, as shown in Figure 3-14, which shows the page in Google Chrome.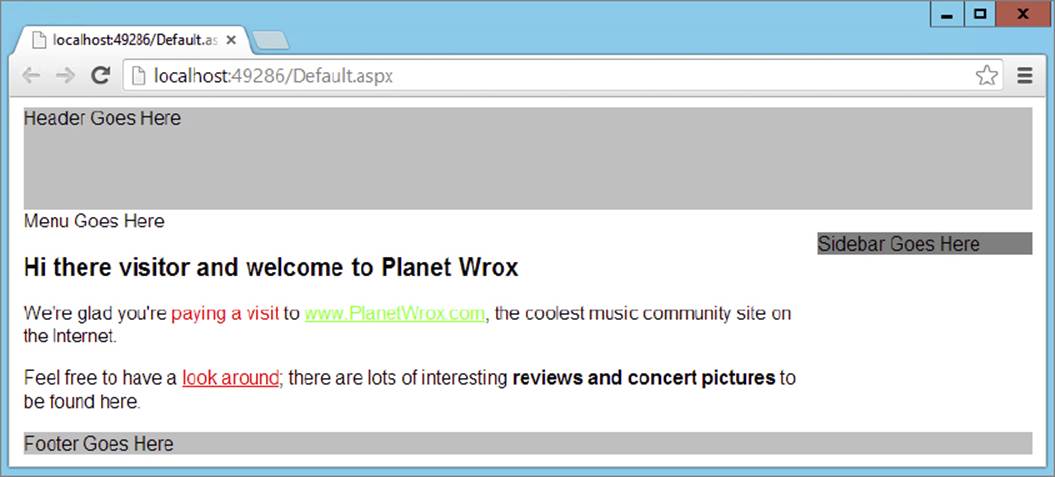
FIGURE 3-14
31.
Hover your mouse over the “look around” link; note that it turns to orange.
32.Notice how the link to www.PlanetWrox.com is green (provided you haven’t visited this site before), whereas the link to Default.aspx is red (because you’re currently viewing Default.aspx, the browser marks this page as “visited”). If you visit the Planet Wrox website and then come back to your Default.aspx page, the link to the Planet Wrox site will have turned red as well. Hovering over it still turns it to orange. If you want to test the page in another browser, right-click Default.aspx in the Solution Explorer and choose Browse With from the context menu. If your alternate browser is listed there already, select it from the list and then click Browse. You can select multiple browsers at the same time by holding down the Ctrl key when you click them. These browsers will all open when you click the Browse button. Optionally, you can make the browser or browsers the default by clicking the Set as Default button. Combined with a new VS feature called Browser Link (which you’ll see in Chapter 18), this is a great way to quickly develop and test your pages in multiple browsers.
If your browser is not listed, click the Add button and then the ellipsis next to the Program Name box to search for your favorite browser. When the browser is displayed in the list, click it to select it.
You can also access these settings from the Standard toolbar, shown in Figure 3-15.
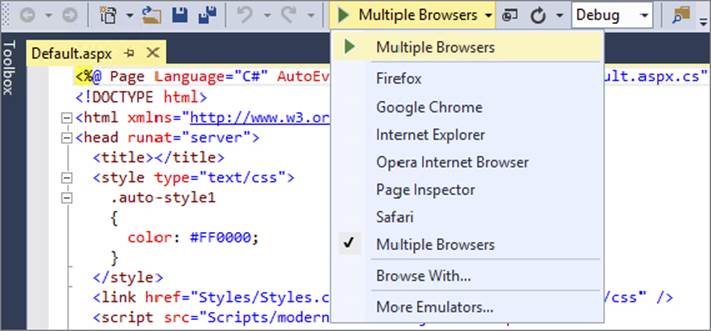
FIGURE 3-15
This exercise started off by showing you some of the features of the CSS editor in VS. The color picker, code commenting, hierarchical indenting, and code formatting are all designed to make it as easy as possible to write CSS code.
The :hover and :visited parts on the a selector you added are probably new to you. These selectors are called pseudo class selectors. The a:visited selector is applied only to links that the user has already visited in the browser. The a:hover selector is applied only to the <a> element when the user hovers the mouse over the link.
When you open the page in the browser, the updated style sheet is downloaded and the browser then applies the a:visited rule set to all links in the MainContent section you visited before. When you hover your mouse over a link, the rule setsection#MainContent a:hover is applied, causing the link to turn orange.
Viewing your pages in different browsers is a good thing to do. Although modern browsers tend to render a page more and more similarly, subtle differences exist that you need to be aware of and handle in your HTML and CSS code. Installing a few different browsers on your system (Internet Explorer, Firefox, Safari, Opera, and Chrome, for example), assigning them to the Browse With dialog box as shown in this Try It Out, and testing your pages in these browsers as often as you can will help to ensure your pages look exactly right in the majority of the browsers.
As useful as external style sheets are, sometimes you really want to use embedded or inline styles instead. Creating and managing those styles, explained in the next section, is just as easy.
Creating Embedded and Inline Style Sheets
When you’re working with a page in Design View, you often need to make minor tweaks to part of the page, like styling a piece of text, aligning an image, or applying a border to an element. At this stage, you need to make a decision about whether to create an inline, embedded, or external style sheet. As you saw earlier, you should opt for external or embedded style sheets if you envision that you’re going to reuse a style later. VS doesn’t care much, though. It enables you to create styles at all three levels. Even better, it enables you to easily upgrade an embedded style to an external one, or copy inline style information to a different location, giving you great flexibility and the option to change your mind later.
In the next exercise, you see how to create inline and embedded style sheets. You see later how to move those styles to an external style sheet, enabling other pages to reuse the same styles.
In this Try It Out, you add a style rule to the <h1> element of the page to remove the default margin that a browser draws around the heading. In addition, you style the first paragraph using a class attribute, giving it a different look to make it stand out from the other paragraphs on the page.
1. Go back to VS and make sure that the Default.aspx page is open in Design View.
2. Click once on the <h1> element in the Document Window to select it and then choose Format ⇒ New Style. The New Style dialog box appears (visible in Figure 3-16) that lets you visually create new CSS code.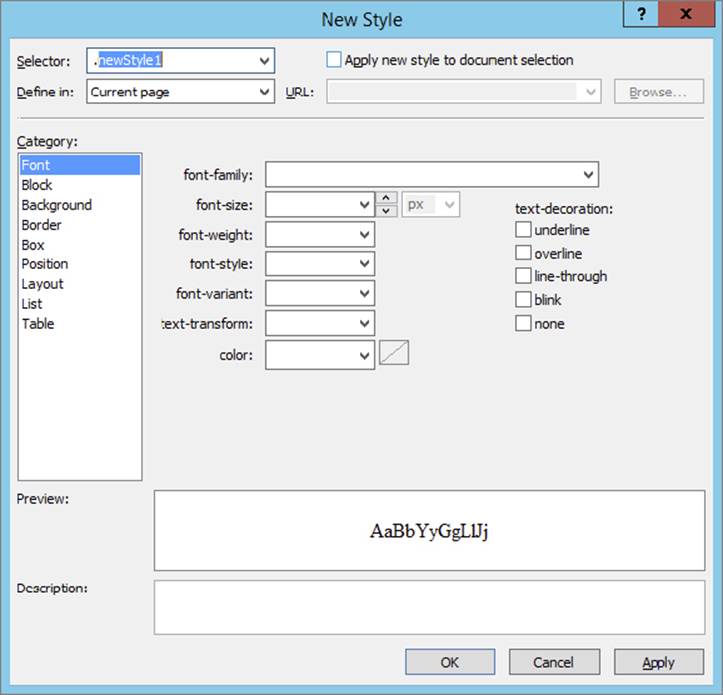
FIGURE 3-16
3.
At the top of the screen, open the Selector drop-down list and choose (inline style). It’s the first item in the list. This ensures that the new style is applied as an inline style to the <h1> element.
4. Switch to the Box category, shown in Figure 3-17. This dialog box has a handy diagram that serves as a refresher on the CSS Box Model, showing you where the properties padding, border, and margin end up.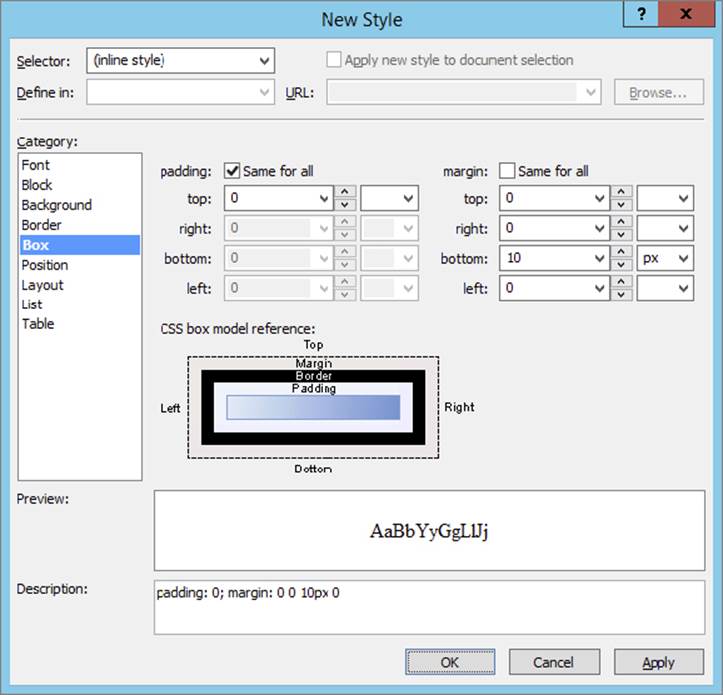
FIGURE 3-17
By default, browsers draw some white space above or below an <h1> element, but the actual amount differs between browsers. To give each browser the same consistent settings, you can reset the padding to 0 and then apply a little bit of margin at the bottom of the heading, which creates some distance to the elements following it. To do this, set padding to 0 in the top box and clear the value from the drop-down list next to the text box. By leaving the Same for All option selected, VS creates a shorthand declaration for you. Then uncheck Same for All for the margin section, enter 0 for the top, right, and left boxes, and clear the value from the drop-down next to each value. Next, enter 10 for the bottom text box and make sure px is selected in the drop-down list. Your screen should now look like Figure 3-17.
Click OK to close the dialog box and apply the changes to the heading. You end up with the following <h1> element with an inline style in Markup View:
<h1 style="padding: 0; margin: 0 0 10px 0"> Hi there visitor and welcome to Planet Wrox</h1>5. Next, in Design View, select the first paragraph by clicking it. A small glyph appears to indicate you selected a <p> element. The Tag Selector at the bottom of the Document Window should highlight the <p> element, as shown in Figure 3-18.![]()
FIGURE 3-18
6.
With the paragraph still selected, choose Format ⇒ New Style from the main menu. This time, instead of creating an inline style, type the text .Introduction in the Selector box. Don’t forget the dot (.) in front of the selector’s name.
7. At the top of the screen, select the check box for Apply New Style to Document Selection. With this setting on, the new class you’re about to create is applied to the <p> element that you have selected.
8. From the font-style drop-down list, choose italic.
9. Click OK to close the dialog. Note that the entire paragraph is now displayed with an italic font.
10.With the <p> element still selected, open the CSS Properties Grid (see Figure 3-19) by choosing View ⇒ CSS Properties. This grid gives you an overview of all the CSS properties and shows which ones are currently active for your page.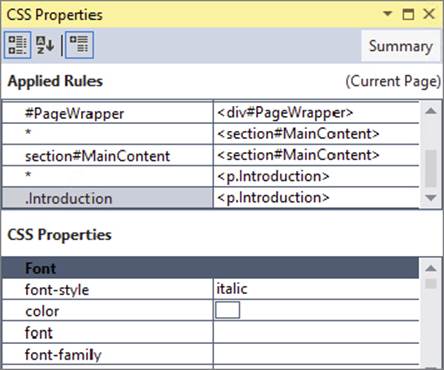
FIGURE 3-19
This grid shows a list of applied rules in the top part of the window in the order in which they are applied. The bottom part of the window is used to show the CSS properties for those rules. In Figure 3-19 you see the rules that are applicable to the.Introduction selector.
11.Locate the color property in the CSS Properties Grid and set it to a dark blue color, like #003399. To achieve this, open the drop-down list for the property value and choose a color from the color picker. If the color you’re looking for is not available, click the More Colors button to bring up the extended color picker, shown in Figure 3-20.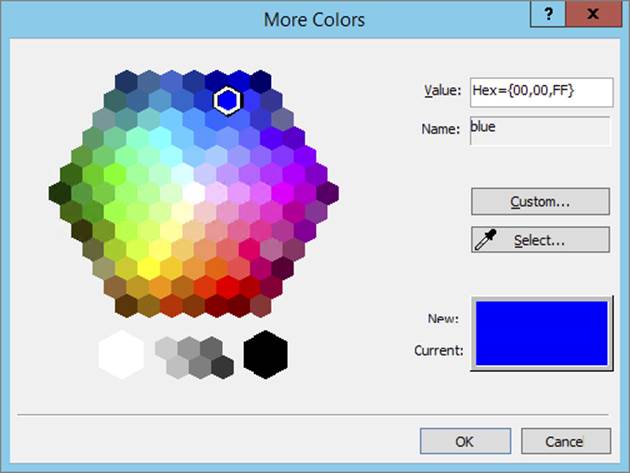
FIGURE 3-20
Instead of using the color picker, you can also type a value in the Properties Grid directly. This is how many of the properties work in the CSS Properties Grid: They let you enter values directly or enable you to change the value visually using a drop-down list or a button with ellipses at the end of the property’s value box. Figure 3-21 shows the different options you have for the font-style property in a convenient drop-down list.
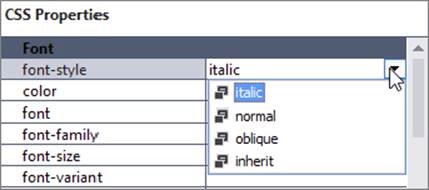
FIGURE 3-21
Take special note of the three buttons at the top of the window, because they house some useful functionalities. The first two buttons enable you to switch between categorized mode and alphabetical mode, making it easier to find the right property. The third button enables you to display the applied properties at the top of the list or at their default locations in the list.
12.Finally, save all changes and open Default.aspx in your browser (see Figure 3-22). You’ll see that the first paragraph is now displayed with a blue and italic font except for the link in the text, which is green or red depending on whether you visited that site before. Additionally, if you followed all the instructions from the previous chapter, the text “paying a visit” is red, set by the embedded CSS class.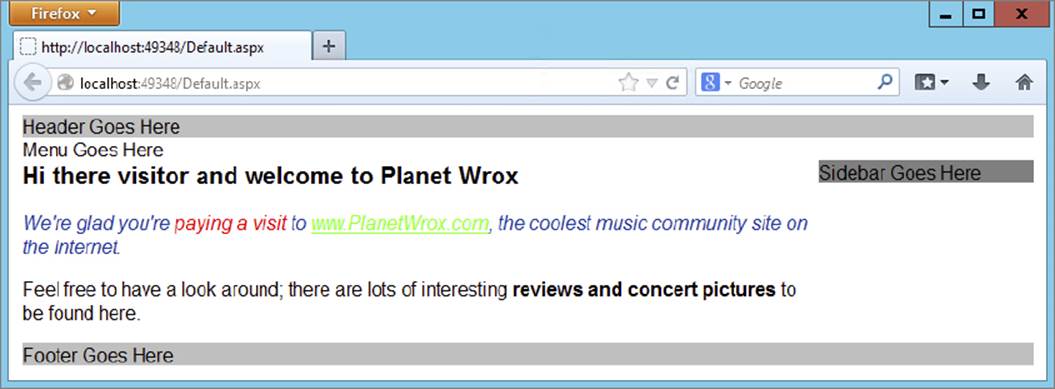
FIGURE 3-22
13.
Switch back to VS and look at your page in Markup View. In the <head> section of the page, you should see the following embedded style sheet:
14..Introduction
15.{
16.font-style: italic;
17.color: #003399;
18.}
19.</style>
<link href="Styles/Styles.css" rel="stylesheet" type="text/css" />The numerous tools that VS offers make it easy to write CSS for your website. You don’t need to hand code anything, or remember all the different properties that the CSS standard supports. Instead, you can simply choose them from different lists on the CSS Properties Grid. This grid enables you to enter values manually but also offers handy tools to select colors, files, items from drop-down lists, and more.
All changes you make in the Properties Grid are applied to the relevant style sheet, whether you’re working with an inline, embedded, or external style sheet. At the same time, the Design View is updated to reflect the new CSS options you have set.
When you look at the <h1> element, you can see that VS created an inline style with padding set to 0 to affect all four sides at once, and margin set to 0 0 10px 0 to control all four sides individually.
Once you have created a bunch of useful and reusable styles, you need a way to apply your existing styles to other pages or HTML elements. You see how this works next.
Applying StylesIf you have some experience with Microsoft Word, you may be familiar with the Styles dialog box, which lists all available styles and enables you to apply them to selected portions of text. This way, you can quickly apply identical formatting to blocks of text. This works similarly in VS. With the Apply Styles window — accessible by choosing View ⇒ Apply Styles from the main menu — you can easily apply style rules to elements in the page.
In this exercise, you reuse the .Introduction class and apply it to the second paragraph of the page as well. That way, both paragraphs end up looking the same.
1. Still in Default.aspx, make sure you’re in Design View and then select the second paragraph of the page by clicking it. Ensure that the Tag Selector at the bottom of the Document Window shows that the <p> element is selected, and not another one like<strong> that may be part of the <p> element. If you have only one paragraph of text, create a new one first (by pressing Enter after the first paragraph in Design View), enter some text, and then select that paragraph.
2. Open the Apply Styles window by choosing View ⇒ Apply Styles. Make sure the window is not accidentally docked in the main Document Window, but either floats or is placed at the side of the Document Window. This window shows all the selectors it finds in the current page and any attached style sheet. If you don’t see all the styles shown in Figure 3-23, click the Options button and choose Show All Styles.
FIGURE 3-23
3.
Click the Introduction class in the CSS Styles list. VS adds a class attribute to the <p> tag:
4.<p class="Introduction">
5.Feel free to have a <a href="Default.aspx">look around</a>; there are lots of
6.interesting <strong>reviews and concert pictures</strong> to be found here.
</p>If you want to apply multiple classes, hold down the Ctrl key while clicking one of the other classes in the list. This applies a list of classes separated by a space to the element’s class attribute. You can follow the same steps to apply the selected style in Markup View as well.
7. Using the Clear Styles button, you can quickly remove existing classes and inline styles from a tag. Consider the HTML fragment you saw in the previous chapter when you used the Formatting toolbar to format text in the page. If you used the Foreground Color button, you ended up with code similar to this:
We're glad you're <span class="auto-style1">paying a visit</span>To remove the class attribute, select the <span> tag in the Tag Selector, or simply click the <span> tag in Markup View and then click Clear Styles in the Apply Styles window, which you can see below the toolbar in Figure 3-23. You’ll end up with this HTML:
We're glad you're paying a visitBecause an empty <span> around the text has no use, VS removes it for you as well. In addition, VS also removes the auto-style1 rule because it’s no longer used by any code on the page. If the Apply Styles window is empty when you click the <span> in Markup View, you may need to switch to Design View first to populate the dialog.
Removing style attributes from HTML elements works the same way.
How It WorksOnce again, VS is able to keep all relevant windows in sync: the Design View, Markup View, and the various CSS design tools. When you apply a class from the Apply Styles window, VS adds the requested class to the selected HTML element in Markup View. It then also updates the Design View window. Similarly, when you remove a selector or a declaration from an embedded style in Design View, both the Design View and the CSS tools windows are updated.
The final CSS functionality you need to look at in this chapter is located on the Manage Styles and Apply Styles windows. Besides helping you attach CSS files to your documents, these windows enable you to manage your styles easily.
Managing StylesBecause it’s so easy to add new inline and embedded styles, your pages may quickly become a mess with styles all over the place. To achieve reusability, you should move as much of your inline and embedded styles as possible to an external style sheet. This is exactly what the Apply Styles and Manage Styles windows enable you to do.
Earlier in this chapter, you modified the <h1> element and applied padding and margin to the heading. However, Default.aspx is not the only page that could benefit from this style for a heading, so it makes sense to move it to the Styles.css file. Similarly, the Introduction class seems reusable enough to include it in the Styles.css file so other pages can access it. This Try It Out shows you how to move styles around in your site.
1. Make sure that Default.aspx is still open and switch to Markup View if necessary.
2. Locate the <h1> element and click it once. VS highlights the tag in the Tag Selector at the bottom of the Document Window to indicate it’s the active tag.
3. Open the Apply Styles window by choosing View ⇒ Apply Styles from the main menu. Alternatively, if you have the window docked with other windows, simply click its tab to make it active. Again, make sure the window is not accidentally docked in the main Document Window, but either floats or is placed at the side of the Document Window. At the bottom of the Apply Styles window, you’ll see an inline style appear (see Figure 3-24).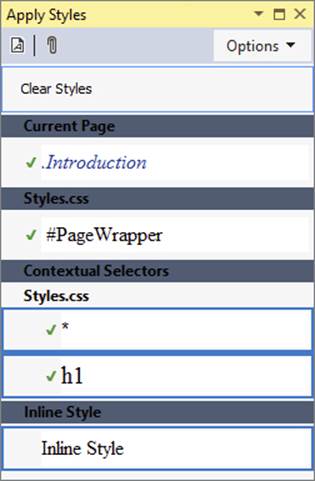
FIGURE 3-24
4.
Right-click Inline Style and choose New Style Copy. The New Style dialog box appears, enabling you to create a new style based on the current selection. At the top of the window, choose h1 from the Selector drop-down list, and from the Define In drop-down list choose Existing style sheet. From the URL drop-down list, choose Styles/Styles.css. If that item isn’t available, click the Browse button to locate and select it. Your dialog box should end up like Figure 3-25.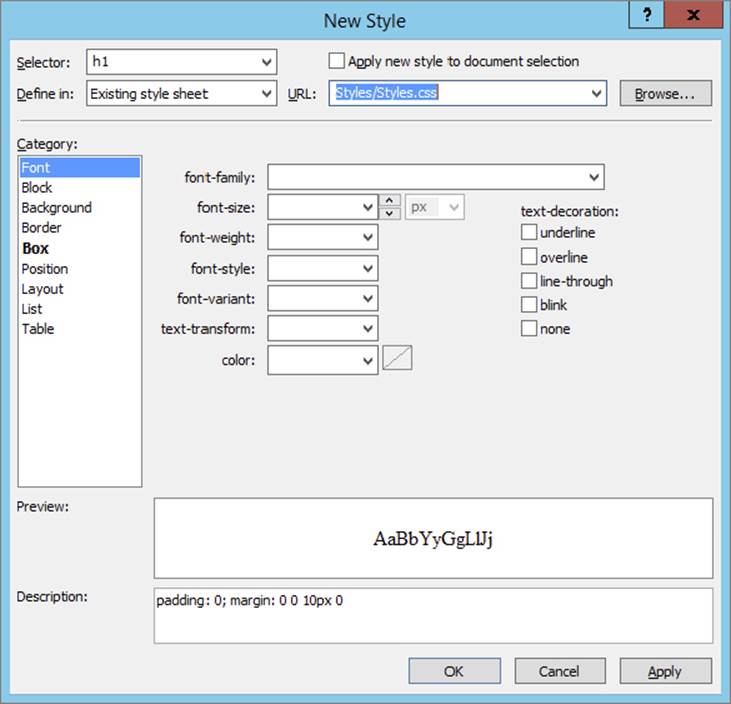
FIGURE 3-25
5.
Click OK to close the dialog box. VS creates a copy of the h1 style and places it in the Styles.css file. VS creates a new selector for h1 in the Styles.css file instead of adding the padding and margin info to the existing rule set. If you want to, you can combine the two selectors into one manually.
6. In the Apply Styles window, right-click Inline Style again, and this time choose Remove Inline Style from the context menu. This removes the style attribute from the h1 element.
7. From the main menu, choose View ⇒ Manage Styles. Again, make sure the window is placed beside the Document Window and not docked in the Document Window. Under the Current Page item, locate the .Introduction selector.
8. Click the .Introduction selector once, and then drag it into the area for Styles.css, for example dropping it after the h1 selector. Note that VS draws lines between the selectors as you hover over them to indicate the point where the selector will end up.Figure 3-26 shows how the .Introduction selector is dragged from the current page into Styles.css, between the h1 and #PageWrapper selectors.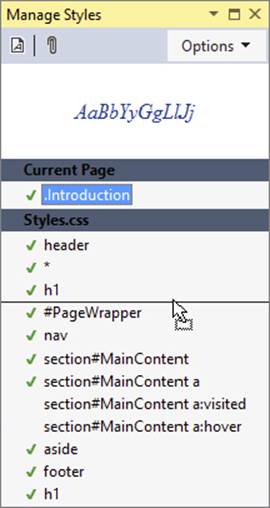
FIGURE 3-26
9.
Once you drop the selector in the Styles.css section of the Manage Styles window, the associated style is removed from your current page, and then inserted in Styles.css. Because that CSS file is included in your current page using the <link />element, you won’t see a difference in Design View. You can now remove the empty <style> element from Default.aspx, because it’s not needed anymore.
10.If you haven’t already merged the two h1 selectors, open Styles.css and scroll down to the end of the file. Copy the two lines for the padding and margin properties to the clipboard and then delete the entire selector. Scroll up in the file and then paste the two CSS rules inside the other h1 selector. You should end up with this code:
11.h1
12.{
13.font-size: 20px;
14.padding: 0;
15.margin: 0 0 10px 0;
}16.Save any pending changes you may have and then open Default.aspx in your browser by pressing Ctrl+F5. Note that the paragraphs haven’t changed and still use the same blue and italic font.
Unfortunately, VS doesn’t allow you to move inline styles to external style sheet files. However, by creating a copy of the existing style, and then deleting the original inline style, you can achieve the same effect. Moving embedded or external style sheets between files is a lot easier. You can simply drag a style from one file to another, and VS will automatically move the code for you. This makes it easy to organize your CSS. Instead of leaving all your embedded CSS in your page because you’re afraid to touch it, you can now simply drag and drop it into an external file. This makes it a lot easier to reuse those styles in other pages, decreasing page size and page bloat and making your site a lot easier to manage. Obviously, it’s important that the file you are moving your CSS to is attached to the pages you’re working with.
PRACTICAL TIPS ON WORKING WITH CSSFollow these tips to make the most of CSS:
- Take some time to familiarize yourself with the many properties that CSS supports. The best way to do this is to create a brand-new page in your
Demosfolder, create a few HTML elements like<div>and<p>tags, and then simply experiment with all the different properties. By trying out many of the properties on the CSS Properties Grid, you get a feel for what options you have available. This makes it easier later if you want to apply a certain effect to some piece of content. - When creating custom CSS classes, try to come up with names that describe the behavior of the rule, rather than the look and feel. For example, a class called
.Introductionto style the first paragraph of a page is a good description. It enables you to change the underlying values without affecting the actual meaning of the name. But classes with names like.BlueAndItalicare guaranteed to give you problems later. What if you decide to change the blue to black? You either end up with a very odd class name that doesn’t describe its own behavior, or you’ll need to rename the class and then update the entire site, changing references to the old class to.BlackAndItalic. - Try to create smaller and reusable rule sets that you can combine if required, rather than creating large, monolithic rules that can only be used on a single UI element. For example, instead of creating a style like this:
·.ImportantHeading
·{
·color: Red;
·font-size: 20px;
·font-weight: bold;
}you’re better off creating a few lightweight rules that are easier to reuse:
h1{ font-size: 20px;}.Attention{ color: Red; font-weight: bold;}When you apply the .Attention class to a heading like this: <h1 class="Attention">, you get the exact same behavior you got when you gave it the ImportantHeading class. However, with the separate Attention class, you have created a reusable rule that you can apply to other elements that need the user’s attention, like <p> or <span> elements.
This chapter gave you a good look at CSS, the most important language for styling your ASPX and HTML web pages.
CSS enables you to overcome the limitations of HTML with respect to styling your web pages because it is designed to minimize page bloat, give you greater control over the look of your page, and generally help you create websites that load more quickly and are easier to maintain.
Once you have a good understanding of the CSS terminology, you’ll find it’s easy to work with the many CSS tools that VS has on board. Tools like the Manage Styles and Apply Styles windows, the Style Builder, and the smart IntelliSense in the code editor make writing and managing CSS very easy.
You can apply CSS not only to HTML, as you’ve seen in this chapter, but also to ASP.NET Server Controls. The CSS you apply to those controls eventually ends up in the browser as inline style attributes, and the same principles apply as those you’ve seen in this chapter. The next chapter gives you a detailed look at the many available ASP.NET Server Controls.
1. What is the main benefit of using an external style rather than embedded style sheets?
2. Write a CSS rule that changes the appearance of all headings at level one (h1) in your page to the following:
· The heading uses an Arial font face.
· The heading should be blue.
· The heading must have a font size of 18 pixels.
· The heading has a blue, thin border at the top and left side.
For the last requirement, check out VS’s IntelliSense list in a CSS file to discover another shorthand version for the border property.
3. Which of the two following rules is easier to reuse across pages in your website? Can you explain why?
4.#MainContent
5.{
6.border: 1px solid Blue;
7.}
8.
9..BoxWithBorders
10.{
11.border: 1px solid Blue;
}12.VS enables you to attach an external style sheet to a page in a number of different ways. Can you name two different ways to do this?
You can find answers to these exercises in Appendix A.
WHAT YOU LEARNED IN THIS CHAPTER
|
CSS |
Cascading style sheets, the language used to lay out web pages in the browser. |
|
CSS Box Model |
The model on which the dimensions of elements are calculated with regard to height, width, padding, border, and margin. |
|
Declaration |
A combination of a property and a value that determines the styling for the element to which the declaration applies. |
|
Embedded style sheets |
CSS code that is defined in a page in a |
|
External style sheets |
CSS code that is defined in a separate file and then included in a page using the |
|
Inline style sheets |
CSS code that is defined directly on an element using the |
|
Rule set |
A combination of a selector and one or more declarations wrapped in a pair of curly braces. |
|
Selector |
A CSS construct to point to one or more elements in the page. Different selectors exist, including the Universal selector, the ID and Class selectors, and the Type selector. |
All materials on the site are licensed Creative Commons Attribution-Sharealike 3.0 Unported CC BY-SA 3.0 & GNU Free Documentation License (GFDL)
If you are the copyright holder of any material contained on our site and intend to remove it, please contact our site administrator for approval.
© 2016-2026 All site design rights belong to S.Y.A.