Beginning ASP.NET-4.5 in C# and VB (2013)
Chapter 9
Validating User Input
WHAT YOU WILL LEARN IN THIS CHAPTER:
- What user input is and why it’s important to validate it
- What ASP.NET 4.5.1 has to offer to aid you in validating user input
- How to work with the built-in validation controls and how to create solutions that are not supported out of the box
- How to send e-mail using ASP.NET
- How to read text files
WROX.COM CODE DOWNLOADS FOR THIS CHAPTER
You can find the wrox.com code downloads for this chapter on the Download Code tab at www.wrox.com/go/begaspnet451. The code is in the Chapter 9 folder.
So far you have been creating a fairly static website where you control the layout and content by adding fixed pages to the site and its navigation menus. But you can make your site a lot more attractive by incorporating dynamic data. This data usually flows in two directions: it either comes from the server and is sent to the end user’s browser, or the data is entered by the user and sent to the server to be processed or stored.
Data coming from the server can be retrieved from many different data sources, including files and databases, and is often presented with the ASP.NET data controls. You see how to access databases in Chapter 12 and onward.
The other flow of data comes from the user and is sent to the server. The scope of this information is quite broad, ranging from simple page requests and “Contact Us” forms to complex shopping cart scenarios and wizard-like user interfaces, but the underlying principle of this data flow is basically the same in all scenarios — users enter data in a Web Form and then submit it to the server.
To prevent your system from receiving invalid data, it’s important to validate this data before you allow your system to work with it. Fortunately, ASP.NET 4.5.1 comes with a bag of tools to make data validation a simple task.
The first part of this chapter gives you a good look at the validation controls that ASP.NET supports. You see what controls are available, how to use and customize them, and in what scenarios they are applicable.
The second half of this chapter shows you how to work with data in other ways. You see how to receive the information a user submits to your site and then send it by e-mail and how to customize the mail body using text-based templates.
By the end of the chapter, you will have a good understanding of the flow of information to an ASP.NET website and the various techniques you have at your disposal to validate this data.
GATHERING DATA FROM THE USERLiterally every website on the Internet has to deal with input from the user. Generally, this input can be sent to the web server with a number of different techniques, of which GET and POST are the most common. In Chapter 4, you briefly saw the difference between these two methods and saw that GET data is appended to the actual address of the page being requested, whereas with the POST method, the data is sent in the body of the request for the page.
With the GET method, you can retrieve the submitted data using the QueryString property of the Request object, as discussed in Chapter 7. Imagine you are requesting the following page:
http://www.PlanetWrox.com/Reviews/ViewDetails.aspx?ReviewId=34&CategoryId=3
With this example, the query string is ReviewId=34&CategoryId=3. The question mark is used to separate the query string from the rest of the address, and the query string itself consists of name/value pairs separated by an ampersand (&). The names and values in turn are separated by the equals symbol (=). To access individual items in the query string, you can use the Get method of the QueryString collection:
VB.NET
' Assigns the value 34 to the reviewId variableDim reviewId As Integer = Convert.ToInt32(Request.QueryString.Get("ReviewId"))' Assigns the value 3 to the categoryId variableDim categoryId As Integer = Convert.ToInt32(Request.QueryString.Get("CategoryId"))C#
// Assigns the value 34 to the reviewId variableint reviewId = Convert.ToInt32(Request.QueryString.Get("ReviewId"));// Assigns the value 3 to the categoryId variableint categoryId = Convert.ToInt32(Request.QueryString.Get("CategoryId"));The POST method, on the other hand, gets its data from a form with controls that have been submitted to the server. Imagine you have a form with two controls: a TextBox called Age to hold the user’s age and a Button to submit that age to the server. In the Buttoncontrol’s Click event, you could write the following code to convert the user’s input to an integer:
VB.NET
Dim age As Integer = Convert.ToInt32(Age.Text) ' age now holds the user's ageC#
int age = Convert.ToInt32(Age.Text); // age now holds the user's ageNote that in this case, there is no need to access a collection like Form as you saw with the QueryString collection earlier. ASP.NET shields you from the complexity of manually retrieving data from the submitted form, and instead populates the various controls in your page with the data from the form. If you have the need, you can still access the form values by accessing the Request.Form collection, similar to how you do it with the Request.QueryString collection.
With the previous code example, all is well as long as users enter values that look like an age in the text box. But what happens when a user submits invalid data, either deliberately or by accident? What if a user sends the text I am 42 instead of just the number 42? When that happens, the code will crash. The ToInt32 method of the Convert class throws an exception (an error) when you pass it something that cannot be represented as a number. As soon as the exception is thrown, page execution stops completely. Chapter 18 digs deeper into exception handling.
To avoid these problems, you need to validate all the data that is being sent to the server. When it doesn’t look valid, you need to reject it and make sure your application deals with it gracefully.
Validating User Input in Web FormsPeople concerned with validating user input often use the mantra: Never trust user input. Although this may seem like paranoia at first, it is really important in any open system. Even if you think you know who your users are, and even if you trust them completely, they are often not the only users that can access your system. As soon as your site is out on the Internet, it’s a potential target for malicious users and hackers who will try to find a way into your system. In addition to these evil visitors, even your trustworthy users may send incorrect data to your server by accident.
To help you overcome this problem as much as possible, ASP.NET ships with a range of validation controls that help you validate data before it is used in your application. In the following sections, you see how to use the standard validation controls to ensure the user submits valid data into the system.
The ASP.NET Validation ControlsASP.NET 4.5.1 comes with six useful controls to perform validation in your website. Five of them are used to perform the actual validation, whereas the final control — ValidationSummary — is used to provide feedback to the user about any errors made in the page.Figure 9-1 shows the available controls in the Validation category of the Toolbox.
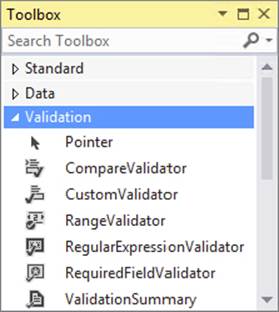
FIGURE 9-1
The validation controls are extremely helpful in validating the data that a user enters in the system. They can easily be hooked to other controls like the TextBox or a DropDownList; however, they also support custom validation scenarios. Figure 9-2 demonstrates two of the validation controls — RequiredFieldValidator and RangeValidator — at work to prevent a user from submitting the form without entering required and valid data.
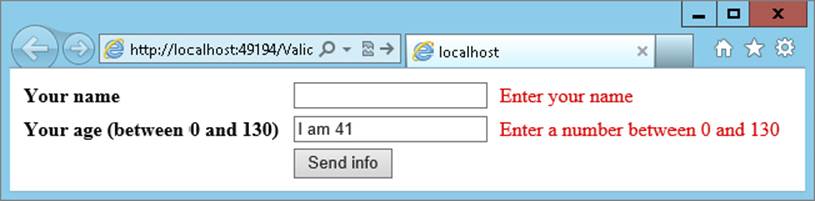
FIGURE 9-2
The great thing about the validation controls is that they can check the input at the client and at the server. When you add a validation control to a web page, the control renders JavaScript that validates the associated control at the client. This client-side validation works on most modern web browsers with JavaScript enabled, including Internet Explorer, Firefox, Chrome, Opera, and Safari and on many different devices such as desktops, tablets, and phones. At the same time, the validation is also carried out at the server automatically. This makes it easy to provide your user with immediate feedback about the data using client-side scripts, while your web pages are safe from bogus data at the server.
A Warning on Client-side Validation
Although client-side validation may seem like it’s enough to prevent users from sending invalid data to your system, you should never rely on it as the only solution to validation. It’s easy to disable JavaScript in the browser, rendering the client-side validation routines useless. In addition, a malicious user can easily bypass the entire page in the browser and send information directly to the server, which will happily accept and process it if you don’t take countermeasures.
In general, you should see client-side validation as a courtesy to your users only. It gives them immediate feedback so they know they forgot to enter a required field, or entered incorrect data without a full postback to the server. Server-side validation, on the other hand, is the only real means of validation. It’s effectively the only way to prevent invalid data from entering your system.
The following section discusses how you can employ the validation controls to protect your data.
Using the Validation ControlsTo declare a validation control in your ASPX page, you use the familiar declarative syntax. For example, to create the RequiredFieldValidator control used in Figure 9-2, you need the following code:
<asp:RequiredFieldValidator ID="ReqVal1" runat="server" ControlToValidate="YourName" ErrorMessage="Enter your name" />The ControlToValidate property links this validation control to another control (YourName in this example) in the page. When asked to perform its validation, the validation control looks at the value of the linked control and when that value doesn’t meet the validation rules you set, it displays the message set in the ErrorMessage property by default although you can override this behavior as you’ll see later.
To give you an idea of how the validation controls work, the following exercise guides you through the process of using the RequiredFieldValidator in a contact form that is placed in a user control. The exercise is followed by an in-depth discussion of the various validation controls.
Using the HTML5 Data Types
HTML5 has introduced a number of new types for the type attribute on the input element. These new types enable you to determine how a browser should interpret the field so it can render a correct user interface for it. ASP.NET 4.5.1 supports these new attributes using the TextMode property of a TextBox control. In addition to the SingleLine, MultiLine, and Password types that have been supported since ASP.NET 1, you can now use the following values as well:
|
VALUE |
DESCRIPTION |
|
Color |
Enables the user to choose a color, usually from a color picker. |
|
Date / DateTime / DateTimeLocal / Month / Week / Time |
Enables various ways for the user to enter a date or time. Depending on the type, the browser renders a calendar or other specialized control to enter a value. |
|
|
Enables the user to enter an e-mail address. |
|
Url |
Enables the user to enter a web address. |
|
Number |
Enables the user to enter a number. |
|
Range |
Enables the user to enter a number with a specified range. The browser typically draws a slider control to enter the value. |
|
Search |
Enables the user to enter a search term. This typically renders a standard text box but with an option in the right corner to clear the text. |
These server-side values for the TextMode property are converted into client-side HTML attributes with the same name, but written in lowercase. To see how that looks, consider this TextBox:
<asp:TextBox runat="server" ID="Email" TextMode="Email" />When rendered in the browser, this control generates the following HTML:
<input name="Email" type="email" id="Email" />Based on various values for the type attribute, browsers can help the user enter the correct data by drawing a different user interface for the control and by validating the data that is entered. Also, devices with a “soft keyboard” — a keyboard that is displayed on-screen — are able to adapt the keyboard to match the data type for the input control. For example, Apple’s iPad shows a numeric keyboard if you put the focus on a text box with its type set to number.
Although these new attribute values are a great addition to HTML, you need to be aware of a few caveats. First of all, with HTML5 being so new, not all browsers support these new features. Figure 9-4 shows each of these attributes in the five most popular browsers today. On the first row, you see Internet Explorer 11, Firefox 24, and Chrome 29; and on the second row, you see Safari 5 and Opera 16.
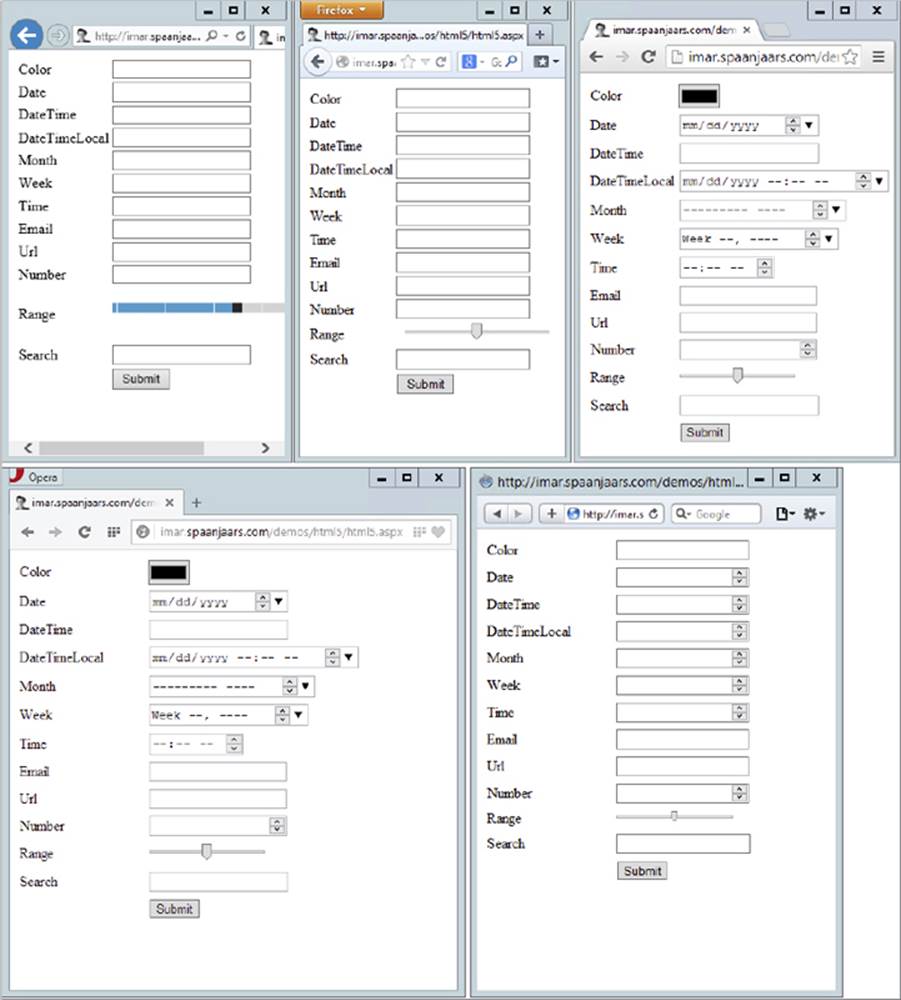
FIGURE 9-4
input box with its type attribute set to email.
You can try out a live example of this page to test your browser by navigating to http://imar.spaanjaars.com/demos/html5/html5.aspx.
Another thing you need to realize is that you should see these new attributes as helpful hints to the user only; you should never solely rely on them for validation purposes. It would be easy for a malicious user to bypass the validation carried out by the browser. In addition, because browser support is still so limited, the validation won’t be carried out for all fields in all browsers.
Given the limited implementation of these new attributes in major browsers, you may wonder if it’s worth using them in the first place. My recommendation would be to use them, even though support is somewhat limited. First of all, new versions of browsers are released on a regular basis, bringing better HTML5 support. In addition, other devices such as phones and tablets come to the market with browsers that do have support for these attributes. Finally, using these attributes is pretty much risk-free. The default type for an input element is text, so when a browser encounters a value it doesn’t understand, it treats the element as a simple text box.
Because you can’t rely on these HTML5 attributes to validate your data, it’s important that you use the ASP.NET validation controls. The next section discusses the remaining validation controls that are available in ASP.NET.
The Standard Validation Controls
The five validation controls (the ones in the Validation category of the Toolbox whose names end in Validator) ultimately all inherit from the same base class, and thus share some common behavior. Four of the five validation controls operate in the same way, and contain built-in behavior that enables you to validate associated controls. The last control, the CustomValidator, enables you to write custom validation rules not supported out of the box.
The following table lists a number of common properties that are shared by the validation controls and that you typically use when working with them.
|
PROPERTY |
DESCRIPTION |
|
|
This property determines whether or not the hidden error message takes up space. With the |
|
|
This property enables you to set the CSS |
|
|
This property holds the error message used in the |
|
|
The |
|
|
This property contains the server ID of the control that needs to be validated. |
|
|
This property determines whether the control provides validation at the client. The default is |
|
|
This property determines whether client-side script gives the focus to the first control that generated an error. This setting is |
|
|
Validation controls can be grouped together, enabling you to perform validation against a selection of controls. All controls with the same |
|
|
You don’t typically set this property at design time, but at run time, it provides information about whether the validation test has passed. The |
At first glance, these two properties seem to serve the same purpose. Both of them can be used to provide feedback to the user in the form of an error message. But when used in combination with a ValidationSummary control, there’s a subtle difference between the two. When you set both the properties at the same time, the validation control displays the Text property, whereas the ValidationSummary uses the ErrorMessage. Figure 9-5 shows a sample login page with two RequiredFieldValidator controls. Both validation controls have their Text property set to an asterisk (*) to give the user a visual cue that there is a problem. The ValidationSummary below the control then displays the full ErrorMessage properties.
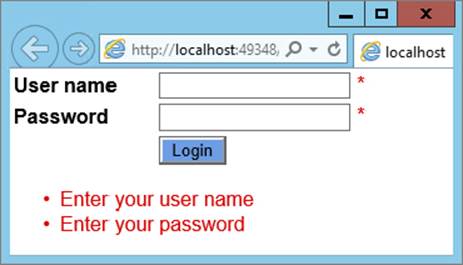
FIGURE 9-5
RequiredFieldValidator at work, so the next sections give you a good look at the three remaining standard validation controls. A later section then shows you how to use the CustomValidator and the ValidationSummary controls.
RangeValidator
The RangeValidator control enables you to check whether a value falls within a certain range. The control is able to check data types like strings, numbers, dates, and currencies. For example, you can use it to make sure a number is between 1 and 10, a character between A and F, or a selected date falls between today and the next two weeks. The following table lists its most important properties.
|
PROPERTY |
DESCRIPTION |
|
|
This property determines the lowest acceptable value. For example, when checking an integer number between 1 and 10, you set this property to 1. |
|
|
This property determines the highest acceptable value. For example, when checking an integer number between 1 and 10, you set this property to 10. |
|
|
This property determines the data type that the validation control checks. This value can be set to |
The following example shows a RangeValidator that ensures that the value entered in the Rate text box is a whole number that lies between 1 and 10:
<asp:RangeValidator ID="RangeValidator1" runat="server" ControlToValidate="Rate" ErrorMessage="Enter a number between 1 and 10" MaximumValue="10" MinimumValue="1" Type="Integer" />RegularExpressionValidator
The RegularExpressionValidator control enables you to check a value against a regular expression that you set in the ValidationExpression property of the control. Regular expressions offer a compact syntax that enables you to search for patterns in text strings. Regular expressions are a complex subject, but fortunately, Visual Studio comes with a few built-in expressions that make it easy to validate values like e-mail addresses and ZIP codes. If you want to learn more about regular expressions, pick up a copy of Wrox’s Beginning Regular Expressions by Andrew Watt (ISBN: 978-0-7645-7489-4).
The following example shows a RegularExpressionValidator control that ensures that a user enters a value that looks like an e-mail address:
<asp:RegularExpressionValidator ID="RegularExpressionValidator1" runat="server" ControlToValidate="Email" ErrorMessage="Enter a valid e-mail address" ValidationExpression="\w+([-+.']\w+)*@\w+([-.]\w+)*.\w+([-.]\w+)*" />CompareValidator
The CompareValidator can be used to compare the value of one control to another value. This is often used in sign-up forms where users have to enter a password twice to make sure they type the same password both times. Instead of comparing to another control, you can also compare against a constant value.
The following table lists the additional properties for the CompareValidator control.
|
PROPERTY |
DESCRIPTION |
|
|
This property contains the ID of the control that the validator compares against. When this property is set, |
|
|
This property determines the type of compare operation. For example, when |
|
|
This property determines the data type that the validation control checks. This value can be set to |
|
|
This property enables you to define a constant value to compare against. This is often used in agreements where you have to enter a word like Yes to indicate that you agree to some condition. Simply set the |
This example shows a CompareValidator that ensures that two TextBox controls contain the same password:
<asp:CompareValidator ID="CompareValidator1" runat="server" ControlToCompare="ConfirmPassword" ControlToValidate="Password" ErrorMessage="Your passwords don't match" />In the following exercise, you see most of these controls at work, except for the RangeValidator. However, its usage is similar to the other validation controls, so it’s just as easy to add it to your web page or user control when you need it.
In the previous Try It Out, you started with the basics for the contact form by creating a user control holding a table and a few controls to let users enter their name. In this exercise, you extend the form and add fields for an e-mail address, a home phone number, a business phone number, and a comment. You use the validation controls to ensure that the e-mail address is in a valid format, and that at least one of the two phone numbers is filled in. To make sure users enter a correct e-mail address, they are asked to enter it twice. If you don’t like this behavior, you can simply delete the row with the text box for the second e-mail address and ignore the CompareValidator.
1. Open ContactForm.ascx from the Controls folder again and switch to Design View.
2. In the second column, drag five additional TextBox controls in the empty table cells between the text box for the name and the Send button. From top to bottom, name the new controls by setting their ID as follows:
· EmailAddress
· ConfirmEmailAddress
· PhoneHome
· PhoneBusiness
· Comments
3. Set the TextMode property of the Comments control to MultiLine, and then make the control a little wider and taller in the designer so it’s easier for a user to add a comment.
4. Set the TextMode property of the two e-mail fields to Email. On browsers that support this, this will validate the value as an e-mail address and may trigger the correct “soft keyboard” to be displayed.
5. In the first cell of the rows to which you added the TextBox controls, add text describing the purpose of the TextBox. Figure 9-6 shows an example.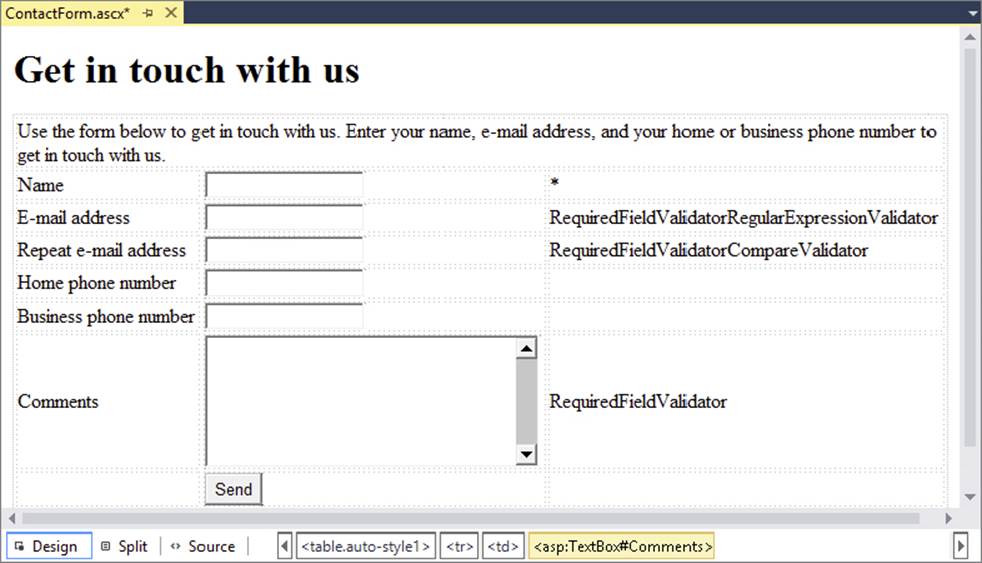
FIGURE 9-6
6.
RequiredFieldValidator and a RegularExpressionValidator. In the last cell of the row for the second e-mail address, drag a RequiredFieldValidator and a CompareValidator. Finally, in the last cell for the comments row, drag a RequiredFieldValidator. When you’re done, your form looks like Figure 9-6.
7. For each of the five validation controls you added, open the Properties Grid and set the Text property to an asterisk (*), the Display property to Dynamic, and the CssClass to ErrorMessage. To do this for all controls at once, select the first validator control, then press the Ctrl key and click the others. When you make changes to the Properties Grid while you’ve selected multiple controls, the changes are applied to all of them.
8. Next, set the remaining properties for the controls as shown in the following table.
|
CONTROL |
PROPERTIES YOU NEED TO SET |
VALUES YOU NEED TO SET |
|
|
|
Enter an e-mail address |
|
|
|
|
|
|
|
Enter a valid e-mail address |
|
|
|
|
|
|
|
Confirm the e-mail address |
|
|
|
|
|
|
|
The e-mail addresses don’t match |
|
|
|
|
|
|
|
|
|
|
|
Enter a comment |
|
|
|
9. Still in Design View, click the RegularExpressionValidator once, open its Properties Grid, and locate the ValidationExpression property. When you click the property in the grid, the grid shows a button with an ellipsis. When you click that button, you get a dialog box that enables you to select a regular expression, shown in Figure 9-7.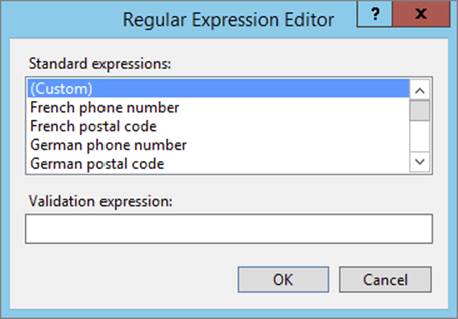
FIGURE 9-7
10.
11.Save all the changes and then request the Contact.aspx page from the About folder in your browser. If you get errors, make sure you set all the ControlToValidate properties on the relevant controls as shown earlier. Play around with the various validation controls by leaving out required data or by entering bogus data. At this stage, you will only see the red asterisks appear to give an indication of the problem. After you have seen how these validators work, you learn how to use theValidationSummary to provide more detailed information to the user.
Depending on your browser, you may see other notifications about invalid fields such as colored borders or tooltips explaining the problem. Only when you have entered all required fields and typed the same e-mail address in both text boxes will the page submit to the server.
How It WorksJust like the RequiredFieldValidator control, the other validation controls emit JavaScript to the client, which is triggered when you click the Send button or when the value of one of the client controls is changed. The CompareValidator works by looking at the value of two different controls. Only when both contain the same data will it return true. It’s important to realize that the CompareValidator control does not trigger its validation code when the text boxes are empty. Therefore, it’s important to hook up a RequiredFieldValidator control as well. This control first makes sure the user entered at least some data and then the CompareValidator control ensures that the text is the same in both text boxes.
The RegularExpressionValidator control works by checking the pattern of the data that it is validating. If you look at the ValidationExpression property of the control, you see a long, cryptic string. This pattern ensures that the e-mail address contains some text, optionally followed by some separation character like a dash (-) or period, followed by more text. It also ensures that there’s an @ symbol in the address, followed by a domain name, a period, and then at least one more character to represent the top-level domain like .com, .nl, or .co.uk. With this expression, you@example.com is considered a valid e-mail address. So is a@a.a, whereas you@you isn’t.
Note that the RegularExpressionValidator control only roughly checks the syntax of the e-mail address. It’s still perfectly possible to enter a nonexistent e-mail address that just looks valid or even an invalid e-mail address such as a@a.a. However, in many cases, this validator is good enough to filter out common typos that users make when entering e-mail addresses.
If you look at the source for the page you see a lot of JavaScript code at the end of the file. With this code, ASP.NET has implemented the client-side validation since the first version of ASP.NET. However, starting with ASP.NET 4.5, you now have another alternative that uses jQuery under the hood. You learn more about jQuery and the alternative validation mechanism in Chapter 11.
The validation controls you have seen so far are very easy to use. You add them to a page, set a few properties, and then they do all the hard work for you. However, they do not support every possible validation scenario you may come up with. For example, what if you wanted to ensure that a user entered at least one of the two phone numbers? And what if you wanted to present your users with a full list of all the errors they made in the form? This is where the CustomValidator and the ValidationSummary controls come in.
The CustomValidator and ValidationSummary Controls
The CustomValidator control enables you to write custom validation functions for both the client (in JavaScript) and the server (using VB.NET or C#). This gives you great flexibility with regard to the data you want to validate and the rules you want to apply.
The ValidationSummary control provides the user with a list of errors that it retrieves from the individual validation control’s ErrorMessage properties. It can display these errors in three different ways: using a list embedded in the page, using a JavaScript alert box, or using both at the same time. You control this setting with the ShowMessageBox and ShowSummary properties. Additionally, the DisplayMode property enables you to change the way the list of errors is presented. The default setting is BulletList where each error is an item in a bulleted list, but other options are List (without bullets) and SingleParagraph.
You learn how to write client- and server-side validation methods and how to use the ValidationSummary control in the following exercise.
In this exercise, you see how to use the CustomValidator in your page to ensure that at least one of the two phone numbers is entered. The validation is carried out at the client and at the server. Additionally, you see how to use the ValidationSummary control to provide feedback to your users about the errors they made in the form.
Go back to the ContactForm.ascx user control in VS and switch it to Design View. Right-click the row with the Button control in it (right-click a cell, not the button) and choose Insert ⇒ Row Below from the context menu to insert a new table row. Alternatively, you can click in a cell of the row to select it and then press Ctrl+Alt+down arrow to have the row inserted for you as well.
2. Select the three cells of the row you just inserted, right-click them, and choose Modify ⇒ Merge Cells to create a single cell that spans all three columns.
3. From the Validation category of the Toolbox, drag a ValidationSummary control into this newly created cell and set its CssClass property to ErrorMessage.
4. In the empty cell after the text box for the Home phone number, drag a CustomValidator control and set the following properties:
|
PROPERTY |
VALUE |
|
|
ErrorMessage |
|
|
Dynamic |
|
|
Enter your home or business phone number |
|
|
* |
|
|
validatePhoneNumbers |
5. Double-click the CustomValidator control in Design View to have VS write an event handler for the ServerValidate event. Add the following code to the handler:
VB.NET
Protected Sub CustomValidator1_ServerValidate(source As Object, args As ServerValidateEventArgs) Handles CustomValidator1.ServerValidateIf Not String.IsNullOrEmpty(PhoneHome.Text) OrElse
Not String.IsNullOrEmpty(PhoneBusiness.Text) Then args.IsValid = True Else args.IsValid = False End IfEnd SubC#
protected void CustomValidator1_ServerValidate(object source, ServerValidateEventArgs args){if (!string.IsNullOrEmpty(PhoneHome.Text) ||
!string.IsNullOrEmpty(PhoneBusiness.Text)) { args.IsValid = true; } else { args.IsValid = false; }}6. Switch to Markup View of the user control and add the following block of JavaScript code right before the table with the controls:
7.<script>
8.function validatePhoneNumbers(source, args)
9.{
10.var phoneHome = document.getElementById('<%= PhoneHome.ClientID %>');
11.var phoneBusiness = document.getElementById('<%= PhoneBusiness.ClientID %>');
12.if (phoneHome.value != '' || phoneBusiness.value != '')
13.{
14.args.IsValid = true;
15.}
16.else
17.{
18.args.IsValid = false;
19.}
20.}
21.</script>
<table class="auto-style1">In JavaScript, it’s common to write method names using camel casing, where the first word of the method name is written in lowercase, followed by words with the first letter in uppercase.
If you find that VS is adding your opening curly braces ({) at the end of a line, rather than on their own line, choose Tools ⇒ Options from the main menu. Then expand the path Text Editor ⇒ JavaScript ⇒ Formatting, and check off both items in the New Lines category. This is purely a formatting preference; the JavaScript runs fine with or without the curly brace on its own line. Note that JavaScript is case sensitive, so make sure you type the code exactly as shown here.
22.Save all the changes by pressing Ctrl+Shift+S, request the Contact.aspx page in your browser, and click the Send button. Note that the ValidationSummary control shows a list of all the problems with the data entered in the form. The client-side JavaScript function validatePhoneNumbers now ensures that you enter at least one phone number before you can submit the page back to the server. Figure 9-8 shows how the page appears in Google Chrome.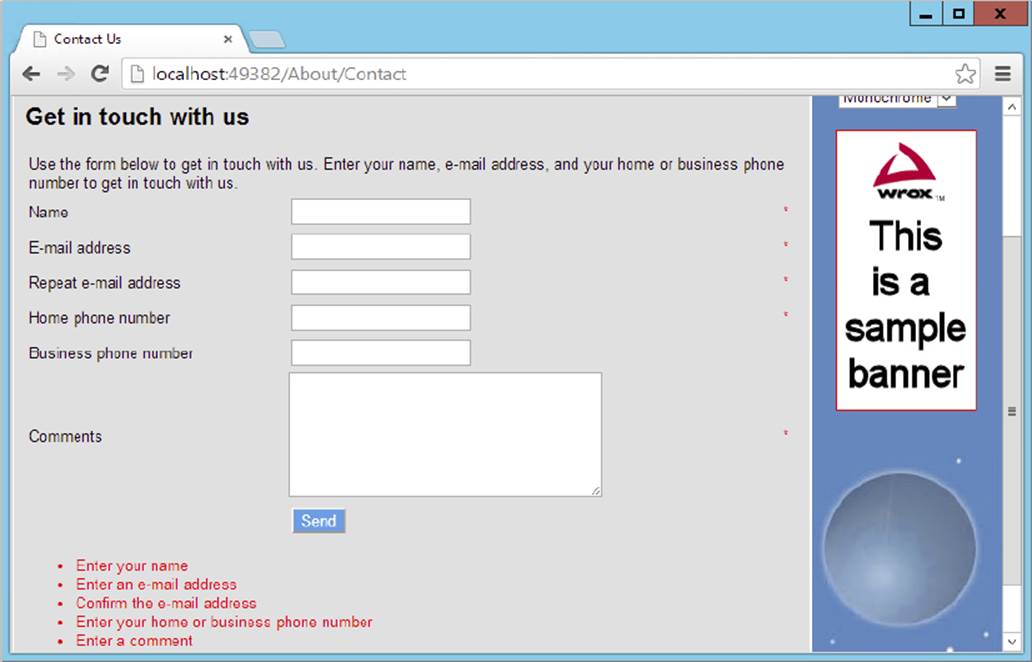
FIGURE 9-8
23.
Go back to VS and click the ValidationSummary control in Design View. On the Properties Grid, change ShowMessageBox to True and ShowSummary to False. (Quick tip: you can easily choose the next item in a drop-down list on the Properties Grid by double-clicking the value. For booleans, this means that if you double-click False, it turns to True and vice versa). Also, set its HeaderText property to Please correct the following errors:.
24.Open the page in the browser again and click the Send button once more. Note that instead of the inline list with errors, you now get a client-side alert, shown in Figure 9-9. The list of errors is preceded with the HeaderText of the ValidationSummary.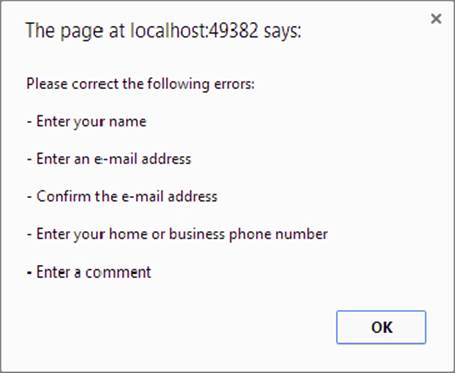
FIGURE 9-9
When you added the CustomValidator control, you set up two event handlers, one for the client-side and one for the server-side validation check, both in bold in the following snippet:
<asp:CustomValidator ID="CustomValidator1" runat="server" ErrorMessage="Enter yourhome or business phone number"ClientValidationFunction="validatePhoneNumbers"
OnServerValidate="CustomValidator1_ServerValidate" Display="Dynamic">*</asp:CustomValidator>If you’re using VB.NET, you won’t see the OnServerValidate attribute because that is set up in the Code Behind using the Handles keyword.
The JavaScript function validatePhoneNumbers that you set in the ClientValidationFunction is triggered at the client when you click the Send button. This function is defined in the markup section of the user control and contains two references to the text boxes for the phone numbers:
var phoneHome = document.getElementById('<%= PhoneHome.ClientID %>');var phoneBusiness = document.getElementById('<%= PhoneBusiness.ClientID %>');The calls to the ClientID are wrapped in a server-side <%= %> block. This code runs at the server, and then returns the ClientID of the control to the client. If you look at the HTML for the Contact page in the browser, you find the following code:
function validatePhoneNumbers(source, args){ var phoneHome = document.getElementById('cpMainContent_ContactForm_PhoneHome'); var phoneBusiness = document.getElementById('cpMainContent_ContactForm_PhoneBusiness'); if (phoneHome.value != '' || phoneBusiness.value != '')Here you can see how the server-side ClientID properties of the controls have been transformed into their client id counterparts. This is a much better solution than hard-coding the id attributes of the text boxes in the final HTML, because they can be changed easily by the ASP.NET run time. You saw how and why this happened in the preceding chapter.
To make the final JavaScript in the browser slightly shorter and easier to read, you can use the ClientIDMode property you saw in the preceding chapter to “fix” the IDs of the phone number controls. Because it’s unlikely you will have two ContactForm user controls in a single page, you can safely assume that you won’t end up with two client controls with the same name if you fix the client control IDs. To do this, you need to set the ClientIDMode for these two controls to Static, like this:
<asp:TextBox ID="PhoneHome" runat="server"ClientIDMode="Static"/>
...<asp:TextBox ID="PhoneBusiness" runat="server"ClientIDMode="Static"/>
Because the control IDs are now fixed, they end up as-is in the final HTML:
var phoneHome = document.getElementById('PhoneHome');var phoneBusiness = document.getElementById('PhoneBusiness');Eventually, the client IDs are passed to the JavaScript function getElementById on the document object to get a reference to their respective text boxes in JavaScript. In Chapter 11, which deals with jQuery, I discuss an easier alternative to usinggetElementById.
The code then examines the value properties of these two TextBox controls. If one of them is not an empty string, the validation succeeds. But how does the validatePhoneNumbers method report back to the validation mechanism whether the validation succeeded or not? When the ASP.NET validation mechanism calls the validatePhoneNumbers method, it passes two arguments: source, which is a reference to the actual CustomValidator in the HTML, and args. The args object exposes an IsValid property that enables you to determine whether or not the validation succeeded:
if (phoneHome.value != '' || phoneBusiness.value != ''){ args.IsValid = true;}else{ args.IsValid = false;}With this code, if both text boxes are empty, IsValid is set to false, so validation won’t succeed, stopping the form from being submitted. If at least one of the text boxes contains a value, IsValid is set to true. In this example, the source argument is not used, but you could use it to highlight or otherwise change the validation control based on whether or not it’s valid.
At the server, the CustomValidator control calls the server-side validation method, which performs the same check:
VB.NET
If Not String.IsNullOrEmpty(PhoneHome.Text) OrElse Not String.IsNullOrEmpty(PhoneBusiness.Text) Then args.IsValid = TrueElse args.IsValid = FalseEnd IfC#
if (!string.IsNullOrEmpty(PhoneHome.Text) || !string.IsNullOrEmpty(PhoneBusiness.Text){ args.IsValid = true;}else{ args.IsValid = false;}By checking the data at the client and at the server, you ensure your system accepts only valid data. Even when the browser doesn’t support JavaScript (possibly because the user turned it off deliberately), your data is still checked at the server. However, it’s important to realize that you still need to check whether the page is valid before you work with the data submitted to it. You do this by checking the IsValid property of the page:
VB.NET
If Page.IsValid Then ' OK to proceedEnd ifC#
if (Page.IsValid){ // OK to proceed}The IsValid property returns True when all the controls in the page or in the active ValidationGroup are valid. By checking the IsValid property on the server before you work with the data, you can be sure that the data is valid according to your validation controls, even if the user turned off JavaScript in the browser, and sent the form to the server without any client-side checks. You see the IsValid property used again later in this chapter, when sending e-mail is discussed.
In addition to the validation controls you have seen so far, ASP.NET comes with another validation mechanism, which is discussed next.
Understanding Request Validation
By design, an ASP.NET page throws an exception whenever one of the controls on a page contains content that looks like HTML tags. For example, you see the error shown in Figure 9-10 when you enter <h1>Hello World</h1> or <script>alert(‘Hello World’);</script>as the contents for the comments text box in the contact form.
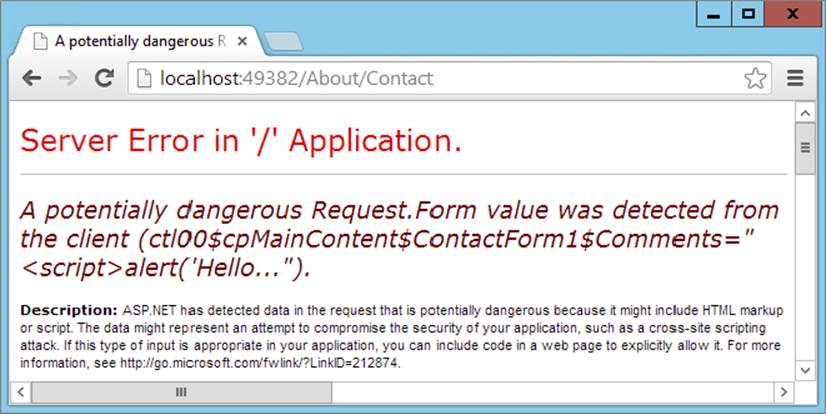
FIGURE 9-10
The ASP.NET run time does this to prevent users from entering HTML or JavaScript that can potentially mess with the design or workings of your website or that could lead to security risks. If you’re sure you want to allow your users to enter HTML, you have a few options available. First, you can disable request validation by setting the ValidateRequest attribute in the @ Page directive to False:
<%@ Page .... Inherits="Contact" Title="Contact Us"ValidateRequest="False"%>
With this setting set to False, users can enter HTML without causing an error. In previous versions of ASP.NET, this was the only way to enable a user to send HTML to your page. The downside of this solution is that it’s all or nothing. By turning off request validation at the page level, all controls in the page will now accept HTML. This unnecessarily opens up your page for potential abuse. As a good security mechanism, you should allow HTML only for specific fields that you determine explicitly.
Fortunately, since ASP.NET 4.5 this is very easy; the Control class (from which controls such as TextBox inherit) has been extended with a ValidateRequestMode property that controls the check for invalid data. When set to Enabled, the control does not accept HTML; when set to Disabled the control does accept HTML, similar to how ValidateRequest enabled this for all controls in the page. The final value for ValidateRequestMode is Inherit, which gives it the value set by the parent of the control such as a PlaceHolder. This is convenient because you can wrap multiple controls that should accept HTML in a PlaceHolder and then configure the ValidateRequestMode on the container instead of on each individual control.
Before you set this property on a control, make sure you really want to allow users to submit HTML in your controls. This opens up your site for Cross Site Scripting attacks when you’re not careful. Depending on the situation, you may need to sanitize the data by removing dangerous pieces of code such as <script> elements. When displaying the data on a page, you could use a Literal control, with its Mode set to Encode in order for the HTML to be encoded and rendered harmless. With this property set, the text is displayed verbatim, without being interpreted as HTML or JavaScript.
The information that a user inputs on your Web Forms is typically not the only data that makes your website an interactive, data-driven system. In most websites, you have information coming from other data sources as well, such as databases, text, XML files, and web services. In addition, there is also data going out of your system. You may want to send an e-mail to the owner of the website whenever someone posts information through the contact page, or you may want to notify people whenever you add a new feature or review to the website. For these scenarios, it’s important to understand how ASP.NET enables you to send e-mail. This is discussed in the next section.
Sending E-mail from Your WebsiteWriting code that sends e-mail from an ASP.NET page is pretty straightforward. Inside the System.Net.Mail namespace you find a number of classes that make it easy to create and send e-mail messages. These classes enable you to create new messages; add addressees in the To, CC, and Bcc fields; add attachments; and, of course, send the messages.
The following table describes four classes that you typically work with when sending e-mail from a .NET application.
|
CLASS |
DESCRIPTION |
|
|
This class represents the message you’re going to send. It has properties such as |
|
|
This class represents a sender or receiver address used in the e-mail. It has a few constructor overloads that enable you to set the e-mail address and display name. |
|
|
This class represents a file you can attach to a |
|
|
This class is used to send the actual message. By default, an instance of this class checks the |
Although the code to send e-mail is pretty easy, configuring your application and network can often be a bit trickier. The machine you are using to send e-mail must be able to access an SMTP server, either available locally on your network or over the Internet. In most cases, you should use the SMTP server that you also use in your e-mail client (for example, Microsoft Outlook). If you’re hosting your site with an external hosting party, you need to use the SMTP server it provides. Contact your network administrator or your ISP if you are unsure about your SMTP server.
When you have the address of the SMTP server, you can configure it globally in the Web.config file in the <system.net> element. When you are using the SMTP server from your ISP, the configuration setting looks like this:
<system.net> <mailSettings> <smtp deliveryMethod="Network" from="Your Name <you@example.com >"> <network host="smtp.example.com" /> </smtp> </mailSettings> </system.net> ...</configuration>You must add the <system.net> element as a direct child of the Web.config file’s root element <configuration>. Within <system.net> you add a <mailSettings> element, which in turn contains an <smtp> element. Finally, the <network> element has a host attribute that points to your SMTP server.
The <smtp> element accepts an optional from attribute that enables you to set the name and e-mail address of the sender in the format Name <E-mail Address>. Because the angle brackets (< >) in XML have special meaning, you need to escape them with < and >. When you send e-mail programmatically, you can override this From address as you see in the next Try It Out exercise.
If your ISP requires you to authenticate before you can send the e-mail or wants you to use a different port number, you can add this information to the <network /> element:
<smtp deliveryMethod="Network" from="Your Name <you@example.com >"><network host="smtp.example.com"userName="UserName" password="Password"
port="587"/>
</smtp>The port number varies from server to server. In some cases, you can leave out the port attribute and the SmtpClient will use the default port number (which is 25). Other port numbers that are frequently used include 465 and 587.
Some mail servers — like the one supplied by Gmail — require you to use Secure Sockets Layer (SSL), a technique that encrypts the data going to the mail server to improve security. In ASP.NET prior to version 4, you had to enable SSL programmatically in your own code. Fortunately, with the inclusion of the enableSsl attribute on the <network /> element, this is no longer the case. To use a Gmail server or any other mail server that requires SSL, you use a <network /> element that looks like this:
<networkenableSsl="true"host="smtp.gmail.com" password="Password"
userName="YourAccountName@gmail.com" port="587" />
Don’t forget to enter your password and username — which in the case of Gmail is your full Gmail e-mail address. Depending on your settings, you may need to generate an application-specific password, which you can do here: http://bit.ly/N9Wv35.
For Outlook.com (the former Hotmail), you can use the following settings:
<network host="smtp.live.com" password="Password"
userName="you@yourdomain.com" enableSsl="true" port="587" />
And for Yahoo, you can use the following settings:
<network host="smtp.mail.yahoo.com" password="Password"
userName="YourAccountName@yahoo.com" />
During development, there’s a much easier way to handle mail sent by your application: drop it in a folder on your local hard drive directly. To do this, create a folder like C:\TempMail. You need to create the folder yourself because it won’t be created automatically. Then configure the <smtp /> element as follows:
<smtp deliveryMethod="SpecifiedPickupDirectory" from="Planet Wrox <planetwrox@example.com>"> <specifiedPickupDirectory pickupDirectoryLocation="C:\TempMail" /></smtp>With these settings in Web.config, your messages are not sent over the network, but are dropped as physical files (with an .eml extension) in the folder you configured in the pickupDirectoryLocation attribute. You can read these files with mail clients like Outlook or Windows Live Mail (which you can download from the Internet). I prefer this setting during development over the networked version because mail arrives instantly, and doesn’t clutter up my mail account or Inbox. Another alternative is to use a fake development SMTP server such as smtp4dev. You can find out more about this program on their website at http://smtp4dev.codeplex.com.
Refer to the online MSDN documentation at http://tinyurl.com/bu79nkm for more information about the different settings that the <mailSettings> element takes.
To create and send an e-mail message, you need to carry out four steps. First, you need to create an instance of the MailMessage class. You then configure the message by adding a body and a subject. The next step is to provide information about the sender and receivers of the message, and finally, you need to create an instance of the SmtpClient class to send the message. The following exercise shows you how to code these four steps.
In this exercise, you create a simple page in the Demos folder. The code in this page creates an e-mail message that is sent when the page loads. In a later exercise, you modify the contact form so it can send the user’s response by e-mail.
1. Under the Demos folder, create a new file called Email.aspx. Make sure it’s based on your own base page template so that it has the right master page and inherits from BasePage automatically. Change the page’s Title to E-mail Demo.
2. Switch to the Code Behind by pressing F7 and at the top of the file, before the class definition, add the following statement to make the classes in the System.Net.Mail namespace available to your code:
VB.NET
Imports System.Net.MailC#
using System.Net.Mail;3. Add the following code to a Page_Load handler. If you’re using VB.NET, you need to set up the handler first using the two drop-down lists at the top of the Document Window (or by double-clicking the page in Design View):
VB.NET
Protected Sub Page_Load(sender As Object, e As EventArgs) Handles Me.LoadDim myMessage As MailMessage = New MailMessage()
myMessage.Subject = "Test Message" myMessage.Body = "Hello world, from Planet Wrox" myMessage.From = New MailAddress("you@example.com", "Sender Name") myMessage.To.Add(New MailAddress("you@example.com", "Receiver Name")) Dim mySmtpClient As SmtpClient = New SmtpClient() mySmtpClient.Send(myMessage)End SubC#
protected void Page_Load(object sender, EventArgs e){MailMessage myMessage = new MailMessage();
myMessage.Subject = "Test Message"; myMessage.Body = "Hello world, from Planet Wrox"; myMessage.From = new MailAddress("you@example.com", "Sender Name"); myMessage.To.Add(new MailAddress("you@example.com", "Receiver Name")); SmtpClient mySmtpClient = new SmtpClient(); mySmtpClient.Send(myMessage);}Change the e-mail addresses and names in the two lines that set the From and To addresses to your own. If you have only one e-mail address, you can use the same address for the sender and the receiver.
4. Open Web.config and right before the closing </configuration> tag, add the following settings:
5.<system.net>
6.<mailSettings>
7.<smtp deliveryMethod="Network" from="Your Name <you@example.com>">
8.<network host="smtp.example.com"/>
9.</smtp>
10.</mailSettings>
11.</system.net>
</configuration>Don’t forget to change smtp.example.com to the name of your SMTP server. Also, be sure to enter your name and e-mail address in the from attribute. If necessary, add the userName, password, enableSsl, and port attributes to the <network> element as shown earlier.
If you’re using Gmail, Outlook.com, or Yahoo, use the settings shown at the start of this section. Otherwise, check with your host for specific requirements concerning the port number when SSL is used; typical port numbers include 465 and 587. The source that comes with this book uses SpecifiedPickupDirectory as the delivery method, which means you need to create a folder called C:\TempMail in order to send e-mail if you want to run that code.
12.Save all changes, switch back to Email.aspx, and request it in your browser. After a while, you should receive an e-mail message at the address you specified in step 3 of this exercise or in your local pickup folder.
If you can’t make sending mails from your local machine work, you can always use the SpecifiedPickupDirectory delivery option to store the files on your local machine. This way, you need to configure the mail server only when you deploy your website, and it gives you a quick, convenient solution during development.
How It Works
You added the following Imports or using statement to the Code Behind file:
VB.NET
Imports System.Net.MailC#
using System.Net.Mail;This statement is used to make the classes in this namespace available in your code without prefixing them with their full namespace. This enables you, for example, to create a MailMessage instance like this:
VB.NET
Dim myMessage As MailMessage = New MailMessage()C#
MailMessage myMessage = new MailMessage();Without the Imports or using statement, you would need this longer code instead:
VB.NET
Dim myMessage As System.Net.Mail.MailMessage = New System.Net.Mail.MailMessage()C#
System.Net.Mail.MailMessage myMessage = new System.Net.Mail.MailMessage();The code in Page_Load creates a new MailMessage object and sets its Subject and Body properties. The code then assigns addresses for the sender and recipient of the e-mail message:
VB.NET
myMessage.From = New MailAddress("you@example.com", "Sender Name")myMessage.To.Add(New MailAddress("you@example.com", "Receiver Name"))C#
myMessage.From = new MailAddress("you@example.com", "Sender Name");myMessage.To.Add(new MailAddress("you@example.com", "Receiver Name"));The From property of the MailMessage is of type MailAddress, so you can assign a new MailAddress directly. The constructor of the MailAddress class accepts the e-mail address and friendly name as strings, so you can create and assign the From address with a single line of code.
The To property of the MailMessage class is a collection, so you cannot assign a MailAddress instance directly. Instead, you need to use the Add method to assign an address. This also enables you to add multiple recipients by calling To.Add multiple times, each time passing in a different MailAddress instance. You use the CC and Bcc properties in a similar way to assign e-mail addresses to the carbon copy and blind carbon copy fields of an e-mail message.
The final two lines of the code send out the actual message:
VB.NET
Dim mySmtpClient As SmtpClient = New SmtpClient()mySmtpClient.Send(myMessage)C#
SmtpClient mySmtpClient = new SmtpClient();mySmtpClient.Send(myMessage);When the Send method is called, the SmtpClient scans the Web.config file for a configured SMTP server or local drop folder. It then contacts that server and delivers the message or saves it locally.
In the preceding Try It Out exercise, the body text for the e-mail message is hard-coded. This isn’t always the best solution because it means you need to scan and change your code whenever you want to change the text. It’s often better to use a text-based template instead. You see how to do this in the next section.
Reading from Text FilesThe .NET Framework comes with a few handy classes and methods that make working with files very easy. For example, the File class located in the System.IO namespace enables you to read from and write to files, create and delete files, and move files around on disk. This class contains only static methods, which means you don’t have to create an instance of the class first. Instead, you call methods directly on the File class. For example, to read the contents of a text file, you can use the following code:
VB.NET
Dim myContents As String = System.IO.File.ReadAllText("C:\MyFile.txt")C#
string myContents = System.IO.File.ReadAllText(@"C:\MyFile.txt");In this example, the filename in C# is prefixed with an @ symbol, to avoid the need to prefix each backslash (\) with an additional backslash. In C#, the backslash has a special meaning (it’s used to “escape” other characters that have a special meaning), so to use it in a string, you normally need to prefix it with another backslash. Using the @ symbol tells the compiler that it should treat each backslash it finds as literal, ignoring the special meaning of the character. It also preserves any line breaks inside the string.
The following table lists the most common methods of the File class that enable you to work with files.
|
METHOD |
VALUE |
|
|
Appends a specified string to a text file. If the file does not exist, it’s created first. |
|
|
Copies a file from one location to another. |
|
|
Deletes the specified file from disk. |
|
|
Checks if the specified file exists on disk. |
|
|
Moves the specified file to a different location. |
|
|
Reads the contents of a text file. |
|
|
Writes the contents of a string to a new file and overwrites the target file if it already exists. |
You can use these methods for all kinds of purposes. For example, when a user has uploaded a file, you can use the Move method to move it to a different folder. Additionally, when you want to get rid of uploaded files that you don’t need anymore, you use the Deletemethod.
The ReadAllText method is useful to read the complete contents of a text file. For example, when sending text by e-mail, you could store the body text of the e-mail in a text file. When you’re about to send the e-mail, you call ReadAllText and assign the contents that this method returns to the body of the e-mail. You see how this works in the following Try It Out.
This exercise shows you how to use e-mail to send the user data from the contact form to your own Inbox. As the body of the e-mail message, the code reads in a text file that contains placeholders. These placeholders are filled with the actual user data from the form.
1. Start by adding a new text file to the App_Data folder in your website. If you don’t have the App_Data folder yet, right-click the website and choose Add ⇒ Add ASP.NET Folder ⇒ App_Data. Create the text file by right-clicking the App_Data folder and choosing Add ⇒ Add New Item. Then select Text File, name the file ContactForm.txt, and click Add.
2. Enter the following text in the text file, including the placeholders wrapped in a pair of double hash symbols:
3.Hi there,
4.
5.A user has left the following feedback at the site:
6.
7.Name: ##Name##
8.E-mail address: ##Email##
9.Home phone: ##HomePhone##
10.Business phone: ##BusinessPhone##
Comments: ##Comments##Save and close the file.
11.Open the Code Behind of the ContactForm.ascx user control and import the following namespaces (no need to type the comments) at the top of the file:
VB.NET
Imports System.IO ' Provides access to the File class for reading the fileImports System.Net.Mail ' Provides access to the various mail related classesPartial Class Controls_ContactForm Inherits System.Web.UI.UserControlC#
using System.IO; // Provides access to the File class for reading the fileusing System.Net.Mail; // Provides access to the various mail related classespublic partial class Controls_ContactForm : System.Web.UI.UserControl12.Switch to Markup View and add the runat="server" and id="FormTable" attributes to the table with the server controls. This way you can hide the entire table programmatically when the form has been submitted. To do this, locate the opening <table>tag and modify it like this:
<table class="auto-style1" runat="server" id="FormTable">13.Scroll down to the end of the file and right after the closing </table> tag, add a label called Message. Set its Text property to Message Sent. Hide the label by setting the Visible property to false:
14.</table>
<asp:Label ID="Message" runat="server" Text="Message Sent" Visible="false" />15.Switch the control into Design View and set ShowSummary of the ValidationSummary back to true and ShowMessageBox to false. Because these are the default values, VS removes the attributes from the markup completely. Next, double-click the Send button. Inside the event handler that VS adds for you, add the following code:
VB.NET
Protected Sub SendButton_Click(sender As Object, e As EventArgs) _ Handles SendButton.ClickIf Page.IsValid Then
Dim fileName As String = Server.MapPath("~/App_Data/ContactForm.txt") Dim mailBody As String = File.ReadAllText(fileName) mailBody = mailBody.Replace("##Name##", Name.Text) mailBody = mailBody.Replace("##Email##", EmailAddress.Text) mailBody = mailBody.Replace("##HomePhone##", PhoneHome.Text) mailBody = mailBody.Replace("##BusinessPhone##", PhoneBusiness.Text) mailBody = mailBody.Replace("##Comments##", Comments.Text) Dim myMessage As MailMessage = New MailMessage() myMessage.Subject = "Response from web site" myMessage.Body = mailBody myMessage.From = New MailAddress("you@example.com", "Sender Name")myMessage.To.Add(New MailAddress("you@example.com", "Receiver Name"))
myMessage.ReplyToList.Add(New MailAddress(EmailAddress.Text)) Dim mySmtpClient As SmtpClient = New SmtpClient() mySmtpClient.Send(myMessage) Message.Visible = True FormTable.Visible = False End IfEnd SubC#
protected void SendButton_Click(object sender, EventArgs e){if (Page.IsValid)
{ string fileName = Server.MapPath("~/App_Data/ContactForm.txt"); string mailBody = File.ReadAllText(fileName); mailBody = mailBody.Replace("##Name##", Name.Text); mailBody = mailBody.Replace("##Email##", EmailAddress.Text); mailBody = mailBody.Replace("##HomePhone##", PhoneHome.Text); mailBody = mailBody.Replace("##BusinessPhone##", PhoneBusiness.Text); mailBody = mailBody.Replace("##Comments##", Comments.Text); MailMessage myMessage = new MailMessage(); myMessage.Subject = "Response from web site"; myMessage.Body = mailBody; myMessage.From = new MailAddress("you@example.com", "Sender Name"); myMessage.To.Add(new MailAddress("you@example.com", "Receiver Name")); myMessage.ReplyToList.Add(new MailAddress(EmailAddress.Text)); SmtpClient mySmtpClient = new SmtpClient(); mySmtpClient.Send(myMessage); Message.Visible = true; FormTable.Visible = false; }}Again, make sure you replace the e-mail addresses for the From and To properties of the MailMessage with your own. Also, the replace method is case sensitive so make sure you type the placeholders exactly as how you wrote them in the text file.
16.Save all your changes and once again request the Contact.aspx page in the browser. Enter your details and click the Send button. You’ll see the text Message Sent appear.
17.Check the e-mail account you sent the e-mail to (or look in the folder C:\TempMail if you’re dropping your mail on disk) and you should see an e-mail message similar to Figure 9-11.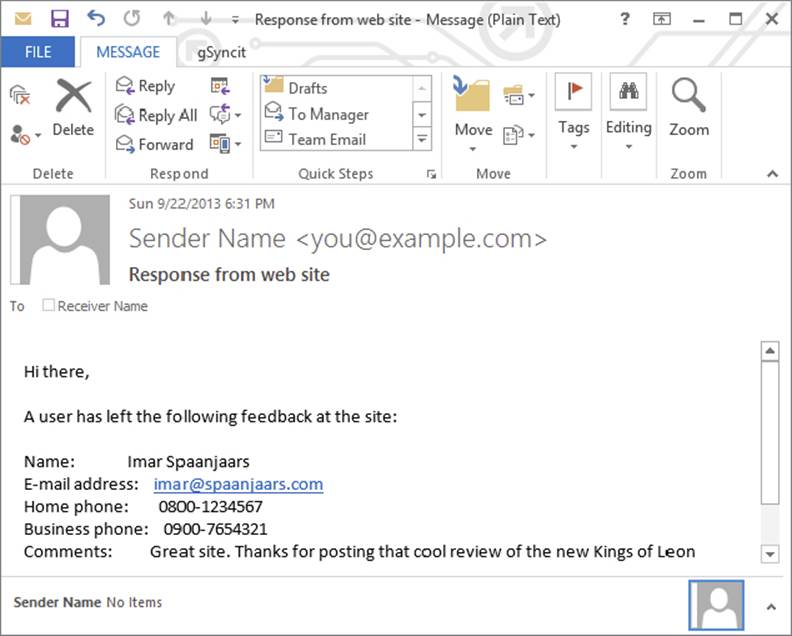
FIGURE 9-11
The mail-sending part of this exercise is pretty similar to the demo page you created earlier. What’s different, however, is where the body text for the mail message comes from. Instead of hard-coding the body in the Code Behind of the ContactFormcontrol, you moved the text to a separate file. This file in turn contains a few placeholders that are replaced at run time with the user’s details. To read the entire file at once, you use the following code:
VB.NET
Dim fileName As String = Server.MapPath("~/App_Data/ContactForm.txt")Dim mailBody As String = File.ReadAllText(fileName)C#
string fileName = Server.MapPath("~/App_Data/ContactForm.txt");string mailBody = File.ReadAllText(fileName);The first line uses Server.MapPath to translate a virtual path into its physical counterpart. By using the virtual path, it’s easier to move your site to a different location because it doesn’t depend on any hard-coded paths.Server.MapPath("~/App_Data/ContactForm.txt") returns a physical path such as C:\BegASPNET\Site\App_Data\ContactForm.txt. This path is then fed to the ReadAllText method of the File class, which opens the file and returns its contents, which are then assigned to the mailBody variable.
The code then uses a number of calls to the
Replace method of the String class to replace the static placeholders in the message body with the details the user entered in the contact form. The return value of the Replace method — the new text with the replaced strings — is reassigned to the mailBody variable. After the final call to Replace, the mailBody no longer contains the placeholders, but the user’s details instead:
VB.NET
mailBody = mailBody.Replace("##Name##", Name.Text)...mailBody = mailBody.Replace("##Comments##", Comments.Text)C#
mailBody = mailBody.Replace("##Name##", Name.Text);...mailBody = mailBody.Replace("##Comments##", Comments.Text);The Replace method is case sensitive, so if you find that some placeholders are not replaced correctly, make sure you used the same capitalization in the code and in the message body.
The placeholders are wrapped in a pair of double hash symbols (##). The hash symbols are arbitrarily chosen, but help to identify the placeholders, minimizing the risk that you accidentally replace some text that is supposed to be in the actual message.
Once the message body is set up, it’s assigned to the Body property of the MailMessage object, which is then sent using the SmtpClient, identical to what you saw in an earlier exercise.
You may have noticed the call to the ReplyToList collection of the MailMessage instance. This code adds the e-mail address that the user entered in the EmailAddress text box to the reply-to list of the mail message. This means that when you receive the message and want to reply to it, the reply gets sent to the user’s address instead of to the From address you assigned to the message. This is especially useful in contact forms where users enter an e-mail address so you can directly reply to them. You may be tempted to assign the address the user entered to the From property directly, but you’re advised not to do this. Some mail servers require this address to be your own and thus sending the mail may fail. Also, your message may be rejected when users enter an invalid address. By setting the From address to one of your own and adding the user’s address to the ReplyToList, you create a reliable, yet convenient solution.
When you filled in your details in the contact form and clicked the Send button, you may have noticed some page flicker as the page submits to the server and is then reloaded with the success message. This page flicker can easily be minimized or completely removed using Ajax technologies, which are discussed in the next chapter.
PRACTICAL TIPS ON VALIDATING DATA
The following list provides practical tips on validating data:
- Always validate all user input. Whenever you have a public website on the Internet, you lose the ability to control its users. To stop malicious users from entering bogus data in your system, always validate your users’ input using the ASP.NET validation controls.
- Always provide useful error messages in your validation controls. Either assign the error message to the
ErrorMessageproperty and leave theTextempty, or use aValidationSummarycontrol to show a list of error messages. - Consider using the
CssClassattribute of the validation controls to move the style definitions for the error messages to a separate CSS file instead of setting them directly on the validation controls. - Whenever you are writing code that sends an e-mail message, consider moving the body of the e-mail to a separate text file stored in the
App_Datafolder because it makes your application much easier to maintain. - When storing data in text or XML files, always store them in the
App_Datafolder that is designed specifically for this purpose. This way, all your data files are nicely packed together. More importantly, by default the web server blocks access to the files in this folder so a visitor to your site cannot request them directly. - When sending e-mails as a test, always send them to an existing and valid address. Even though an address like
asdf@test.commay appear to be invalid, there’s a fair chance the account exists and is monitored, leading to the possible loss of sensitive data, like passwords you may be sending through e-mail. - Consider using
SpecifiedPickupDirectoryas thedeliveryMethodfor SMTP mail during development. It avoids the need to send messages over the network, resulting in a faster response and a cleaner inbox.
User input is an important aspect of most interactive websites. The input comes from different sources in your website: the contact form you created in this chapter, the query string, and other sources. To stop users from entering invalid or even dangerous content into your system, it’s important to validate all input before you work with it.
The biggest benefit of the validation controls that ship with ASP.NET is that they work at the client and at the server, enabling you to create responsive forms where users get immediate feedback about any errors they make, without the need for a full postback. At the same time, the data is validated at the server, ensuring that data coming from clients that don’t use JavaScript is valid as well.
To store the information that users submit to your site, you have a couple of options. The data can be stored in a database or a text file or sent by e-mail. The latter option is particularly useful for contact forms, so you get an immediate alert when someone leaves a comment at your website. Sending e-mail is a breeze with the classes in the System.Net.Mail namespace. These classes enable you to create an e-mail message, add subject, body, sender, and recipient information, and then send the message using the SmtpClient class.
1. To make the ContactForm.ascx user control even more reusable, you can create a string property on it such as PageDescription that enables you to set the name of the page that uses the control. You can then add this string to the declaration of the control in the containing page. Finally, you can add the description to the subject of the message that you send. This way, you can see from which page the contact form was called. What code do you need to write to make this happen?
2. Why is it so important that you check the value of the IsValid property of the Page when processing data? What can happen if you forget to make this check?
3. What’s the difference in behavior between the To and the From property of the MailMessage class?
4. When you use a CustomValidator, you can write validation code at the client and at the server. How do you tell the ASP.NET run time what client-side validation method to call during the validation process?
5. How do you tell the validation mechanism that validation succeeded or failed in your CustomValidator routines?
You can find answers to these exercises in Appendix A.
WHAT YOU LEARNED IN THIS CHAPTER
|
Client-side validation |
Validation that takes place in the client’s browser. Mainly serves as a courtesy to users and offers quick feedback. |
|
|
Contains methods that enable you to work with files, including reading and writing text files. |
|
Regular expressions |
A compact and flexible, albeit quite complex, syntax for finding strings of text in other strings. |
|
|
A method on the |
|
Server-side validation |
Validation that takes place at the server. You always need server-side validation to protect your data because client-side validation can be bypassed. |
|
SMTP Server |
A server responsible for accepting and delivering e-mail. |
|
SSL |
A technique to encrypt (and thus protect) data flowing between two machines. |
|
|
The namespace for e-mail classes such as |
|
Validation controls |
A set of ASP.NET Server Controls that enable you to validate user input at the client and at the server. |
All materials on the site are licensed Creative Commons Attribution-Sharealike 3.0 Unported CC BY-SA 3.0 & GNU Free Documentation License (GFDL)
If you are the copyright holder of any material contained on our site and intend to remove it, please contact our site administrator for approval.
© 2016-2026 All site design rights belong to S.Y.A.