CLR via C#(2012)
Part I. CLR Basics
Chapter 2. Building, Packaging, Deploying, and Administering Applications and Types
In this chapter:
.NET Framework Deployment Goals
Building Types into a Module
A Brief Look at Metadata
Combining Modules to Form an Assembly
Assembly Version Resource Information
Culture
Simple Application Deployment (Privately Deployed Assemblies)
Simple Administrative Control (Configuration)
Before we get into the chapters that explain how to develop programs for the Microsoft .NET Framework, let’s discuss the steps required to build, package, and deploy your applications and their types. In this chapter, I’ll focus on the basics of how to build assemblies that are for your application’s sole use. In Chapter 3, I’ll cover the more advanced concepts you’ll need to understand, including how to build and use assemblies containing types that will be shared by multiple applications. In both chapters, I’ll also talk about the ways an administrator can affect the execution of an application and its types.
Today, applications consist of several types, which are typically created by you and Microsoft. In addition, there are many component vendors creating and selling types that other companies can use to reduce a software project’s development time. If these types are developed using any language that targets the common language runtime (CLR), they can all work together seamlessly; a type written in one language can use another type as its base class without concern for the language the base type was developed in.
In this chapter, I’ll also explain how these types are built and packaged into files for deployment. In the process, I’ll take you on a brief historical tour of some of the problems that the .NET Framework is solving.
.NET Framework Deployment Goals
Over the years, Microsoft Windows has gotten a reputation for being unstable and complicated. This reputation, whether deserved or not, is the result of many different factors. First, all applications use dynamic-link libraries (DLLs) from Microsoft or other vendors. Because an application executes code from various vendors, the developer of any one piece of code can’t be 100 percent sure how someone else is going to use it. Although this kind of interaction can potentially cause all kinds of trouble, in practice, these problems don’t typically arise because applications are tested and debugged before they are deployed.
Users, however, frequently run into problems when one company decides to update its code and ships new files to them. These new files are supposed to be backward-compatible with the previous files, but who knows for sure? In fact, when one vendor updates its code, it usually finds it impossible to retest and debug all of the already-shipped applications to ensure that the changes will have no undesirable effect.
I’m sure that everyone reading this book has experienced some variation of this problem: when installing a new application, you discover that it has somehow corrupted an already-installed application. This predicament is known as “DLL hell.” This type of instability puts fear into the hearts and minds of the typical computer user. The end result is that users have to carefully consider whether to install new software on their machines. Personally, I’ve decided not to try out certain applications out of fear that it might adversely affect some application I really rely on.
The second reason that contributed to the aforementioned reputation of Windows is installation complexities. Today, when most applications are installed, they affect all parts of the system. For example, installing an application causes files to be copied to various directories, updates registry settings, and installs shortcuts on your desktop and Start menu/screen. The problem with this is that the application isn’t isolated as a single entity. You can’t easily back up the application since you must copy the application’s files and also the relevant parts of the registry. In addition, you can’t easily move the application from one machine to another; you must run the installation program again so that all files and registry settings are set properly. Finally, you can’t easily uninstall or remove the application without having this nasty feeling that some part of the application is still lurking on your machine.
The third reason has to do with security. When applications are installed, they come with all kinds of files, many of them written by different companies. In addition, Web applications frequently have code (like ActiveX controls) that is downloaded in such a way that users don’t even realize that code is being installed on their machine. Today, this code can perform any operation, including deleting files or sending e-mail. Users are right to be terrified of installing new applications because of the potential damage they can cause. To make users comfortable, security must be built into the system so that the users can explicitly allow or disallow code developed by various companies to access their system’s resources.
The .NET Framework addresses the DLL hell issue in a big way, as you’ll see while reading this chapter and Chapter 3. It also goes a long way toward fixing the problem of having an application’s state scattered all over a user’s hard disk. For example, unlike COM, types no longer require settings in the registry. Unfortunately, applications still require shortcut links. As for security, the .NET Framework includes a security model called code access security. Whereas Windows security is based on a user’s identity, code access security allows hosts to set permissions thereby controlling what the loaded components can do. A host application like Microsoft SQL Server can grant just a few permissions to code, while a locally installed (self-hosting) application could run with full trust (all permissions). As you’ll see, the .NET Framework enables users to control what gets installed and what runs, and in general, to control their machines, more than Windows ever did.
Building Types into a Module
In this section, I’ll show you how to turn your source file, containing various types, into a file that can be deployed. Let’s start by examining the following simple application:
public sealed class Program {
public static void Main() {
System.Console.WriteLine("Hi");
}
}
This application defines a type, called Program. This type has a single public, static method called Main. Inside Main is a reference to another type called System.Console. System.Console is a type implemented by Microsoft, and the Intermediate Language (IL) code that implements this type’s methods is in the MSCorLib.dll file. So our application defines a type and also uses another company’s type.
To build this sample application, put the preceding code into a source code file, say, Program.cs, and then execute the following command line:
csc.exe /out:Program.exe /t:exe /r:MSCorLib.dll Program.cs
This command line tells the C# compiler to emit an executable file called Program.exe (/out:Program.exe). The type of file produced is a Win32 console application (/t[arget]:exe).
When the C# compiler processes the source file, it sees that the code references the System.Console type’s WriteLine method. At this point, the compiler wants to ensure that this type exists somewhere, that it has a WriteLine method, and that the argument being passed to this method matches the parameter the method expects. Since this type is not defined in the C# source code, to make the C# compiler happy, you must give it a set of assemblies that it can use to resolve references to external types. In the command line above, I’ve included the/r[eference]:MSCorLib.dll switch, which tells the compiler to look for external types in the assembly identified by the MSCorLib.dll file.
MSCorLib.dll is a special file in that it contains all the core types: Byte, Char, String, Int32, and many more. In fact, these types are so frequently used that the C# compiler automatically references the MSCorLib.dll assembly. In other words, the following command line (with the /rswitch omitted) gives the same results as the line shown earlier:
csc.exe /out:Program.exe /t:exe Program.cs
Furthermore, because the /out:Program.exe and the /t:exe command-line switches also match what the C# compiler would choose as defaults, the following command line gives the same results too:
csc.exe Program.cs
If, for some reason, you really don’t want the C# compiler to reference the MSCorLib.dll assembly, you can use the /nostdlib switch. Microsoft uses this switch when building the MSCorLib.dll assembly itself. For example, the following command line will generate an error when CSC.exe attempts to compile the Program.cs file because the System.Console type is defined in MSCorLib.dll:
csc.exe /out:Program.exe /t:exe /nostdlib Program.cs
Now, let’s take a closer look at the Program.exe file produced by the C# compiler. What exactly is this file? Well, for starters, it is a standard portable executable (PE) file. This means that a machine running 32-bit or 64-bit versions of Windows should be able to load this file and do something with it. Windows supports three types of applications. To build a console user interface (CUI) application, specify the /t:exe switch; to build a graphical user interface (GUI) application, specify the /t:winexe switch, and to build a Windows Store app, specify the/t:appcontainerexe switch.
Response Files
Before leaving the discussion about compiler switches, I’d like to spend a moment talking about response files. A response file is a text file that contains a set of compiler command-line switches. When you execute CSC.exe, the compiler opens response files and uses any switches that are specified in them as though the switches were passed to CSC.exe on the command line. You instruct the compiler to use a response file by specifying its name on the command line prepended by an @ sign. For example, you could have a response file called MyProject.rsp that contains the following text:
/out:MyProject.exe
/target:winexe
To cause CSC.exe to use these settings, you’d invoke it as follows:
csc.exe @MyProject.rsp CodeFile1.cs CodeFile2.cs
This tells the C# compiler what to name the output file and what kind of target to create. As you can see, response files are very convenient because you don’t have to manually express the desired command-line arguments each time you want to compile your project.
The C# compiler supports multiple response files. In addition to the files you explicitly specify on the command line, the compiler automatically looks for files called CSC.rsp. When you run CSC.exe, it looks in the directory containing the CSC.exe file for a global CSC.rsp file. Settings that you want applied to all of your projects should go in this file. The compiler aggregates and uses the settings in all of these response files. If you have conflicting settings in the local and global response files, the settings in the local file override the settings in the global file. Likewise, any settings explicitly passed on the command line override the settings taken from a local response file.
When you install the .NET Framework, it installs a default global CSC.rsp file in the %SystemRoot%\Microsoft.NET\Framework(64)\vX.X.Xdirectory (where X.X.X is the version of the .NET Framework you have installed). The latest version of this file contains the following switches:
# This file contains command-line options that the C#
# command line compiler (CSC) will process as part
# of every compilation, unless the "/noconfig" option
# is specified.
# Reference the common Framework libraries
/r:Accessibility.dll
/r:Microsoft.CSharp.dll
/r:System.Configuration.dll
/r:System.Configuration.Install.dll
/r:System.Core.dll
/r:System.Data.dll
/r:System.Data.DataSetExtensions.dll
/r:System.Data.Linq.dll
/r:System.Data.OracleClient.dll
/r:System.Deployment.dll
/r:System.Design.dll
/r:System.DirectoryServices.dll
/r:System.dll
/r:System.Drawing.Design.dll
/r:System.Drawing.dll
/r:System.EnterpriseServices.dll
/r:System.Management.dll
/r:System.Messaging.dll
/r:System.Runtime.Remoting.dll
/r:System.Runtime.Serialization.dll
/r:System.Runtime.Serialization.Formatters.Soap.dll
/r:System.Security.dll
/r:System.ServiceModel.dll
/r:System.ServiceModel.Web.dll
/r:System.ServiceProcess.dll
/r:System.Transactions.dll
/r:System.Web.dll
/r:System.Web.Extensions.Design.dll
/r:System.Web.Extensions.dll
/r:System.Web.Mobile.dll
/r:System.Web.RegularExpressions.dll
/r:System.Web.Services.dll
/r:System.Windows.Forms.Dll
/r:System.Workflow.Activities.dll
/r:System.Workflow.ComponentModel.dll
/r:System.Workflow.Runtime.dll
/r:System.Xml.dll
/r:System.Xml.Linq.dll
Because the global CSC.rsp file references all of the assemblies listed, you do not need to explicitly reference these assemblies by using the C# compiler’s /reference switch. This response file is a big convenience for developers because it allows them to use types and namespaces defined in various Microsoft-published assemblies without having to specify a /reference compiler switch for each when compiling.
Referencing all of these assemblies could slow the compiler down a bit. But if your source code doesn’t refer to a type or member defined by any of these assemblies, there is no impact to the resulting assembly file, nor to run-time execution performance.
NOTE
When you use the /reference compiler switch to reference an assembly, you can specify a complete path to a particular file. However, if you do not specify a path, the compiler will search for the file in the following places (in the order listed):
§ Working directory.
§ The directory that contains the CSC.exe file itself. MSCorLib.dll is always obtained from this directory. The path looks something like this: %SystemRoot%\Microsoft.NET\Framework\v4.0.#####.
§ Any directories specified using the /lib compiler switch.
§ Any directories specified using the LIB environment variable.
Of course, you’re welcome to add your own switches to the global CSC.rsp file if you want to make your life even easier, but this makes it more difficult to replicate the build environment on different machines—you have to remember to update the CSC.rsp the same way on each build machine. Also, you can tell the compiler to ignore both local and global CSC.rsp files by specifying the /noconfig command-line switch.
A Brief Look at Metadata
Now we know what kind of PE file we’ve created. But what exactly is in the Program.exe file? A managed PE file has four main parts: the PE32(+) header, the CLR header, the metadata, and the IL. The PE32(+) header is the standard information that Windows expects. The CLR header is a small block of information that is specific to modules that require the CLR (managed modules). The header includes the major and minor version number of the CLR that the module was built for: some flags, a MethodDef token (described later) indicating the module’s entry point method if this module is a CUI, GUI or Windows Store executable, and an optional strong-name digital signature (discussed in Chapter 3). Finally, the header contains the size and offsets of certain metadata tables contained within the module. You can see the exact format of the CLR header by examining the IMAGE_COR20_HEADER defined in the CorHdr.h header file.
The metadata is a block of binary data that consists of several tables. There are three categories of tables: definition tables, reference tables, and manifest tables. Table 2-1 describes some of the more common definition tables that exist in a module’s metadata block.
Table 2-1. Common Definition Metadata Tables
|
Metadata Definition Table Name |
Description |
|
ModuleDef |
Always contains one entry that identifies the module. The entry includes the module’s file name and extension (without path) and a module version ID (in the form of a GUID created by the compiler). This allows the file to be renamed while keeping a record of its original name. However, renaming a file is strongly discouraged and can prevent the CLR from locating an assembly at runtime, so don’t do this. |
|
TypeDef |
Contains one entry for each type defined in the module. Each entry includes the type’s name, base type, and flags (public, private, etc.) and contains indexes to the methods it owns in the MethodDef table, the fields it owns in the FieldDef table, the properties it owns in the PropertyDef table, and the events it owns in the EventDef table. |
|
MethodDef |
Contains one entry for each method defined in the module. Each entry includes the method’s name, flags (private, public, virtual, abstract, static, final, etc.), signature, and offset within the module where its IL code can be found. Each entry can also refer to a ParamDef table entry in which more information about the method’s parameters can be found. |
|
FieldDef |
Contains one entry for every field defined in the module. Each entry includes flags (private, public, etc.), type, and name. |
|
ParamDef |
Contains one entry for each parameter defined in the module. Each entry includes flags (in, out, retval, etc.), type, and name. |
|
PropertyDef |
Contains one entry for each property defined in the module. Each entry includes flags, type, and name. |
|
EventDef |
Contains one entry for each event defined in the module. Each entry includes flags and name. |
As the compiler compiles your source code, everything your code defines causes an entry to be created in one of the tables described in Table 2-1. Metadata table entries are also created as the compiler detects the types, fields, methods, properties, and events that the source code references. The metadata created includes a set of reference tables that keep a record of the referenced items. Table 2-2 shows some of the more common reference metadata tables.
Table 2-2. Common Reference Metadata Tables
|
Metadata Reference Table Name |
Description |
|
AssemblyRef |
Contains one entry for each assembly referenced by the module. Each entry includes the information necessary to bind to the assembly: the assembly’s name (without path and extension), version number, culture, and public key token (normally a small hash value generated from the publisher’s public key, identifying the referenced assembly’s publisher). Each entry also contains some flags and a hash value. This hash value was intended to be a checksum of the referenced assembly’s bits. The CLR completely ignores this hash value and will probably continue to do so in the future. |
|
ModuleRef |
Contains one entry for each PE module that implements types referenced by this module. Each entry includes the module’s file name and extension (without path). This table is used to bind to types that are implemented in different modules of the calling assembly’s module. |
|
TypeRef |
Contains one entry for each type referenced by the module. Each entry includes the type’s name and a reference to where the type can be found. If the type is implemented within another type, the reference will indicate a TypeRef entry. If the type is implemented in the same module, the reference will indicate a ModuleDef entry. If the type is implemented in another module within the calling assembly, the reference will indicate a ModuleRef entry. If the type is implemented in a different assembly, the reference will indicate an AssemblyRef entry. |
|
MemberRef |
Contains one entry for each member (fields and methods, as well as property and event methods) referenced by the module. Each entry includes the member’s name and signature and points to the TypeRef entry for the type that defines the member. |
There are many more tables than what I listed in Tables Table 2-1 and Table 2-2, but I just wanted to give you a sense of the kind of information that the compiler emits to produce the metadata information. Earlier I mentioned that there is also a set of manifest metadata tables; I’ll discuss these a little later in the chapter.
Various tools allow you to examine the metadata within a managed PE file. One that I still use frequently is ILDasm.exe, the IL Disassembler. To see the metadata tables, execute the following command line:
ILDasm Program.exe
This causes ILDasm.exe to run, loading the Program.exe assembly. To see the metadata in a nice, human-readable form, select the View/MetaInfo/Show! menu item (or press CTRL+M). This causes the following information to appear:
===========================================================
ScopeName : Program.exe
MVID : {CA73FFE8-0D42-4610-A8D3-9276195C35AA}
===========================================================
Global functions
-------------------------------------------------------
Global fields
-------------------------------------------------------
Global MemberRefs
-------------------------------------------------------
TypeDef #1 (02000002)
-------------------------------------------------------
TypDefName: Program (02000002)
Flags : [Public] [AutoLayout] [Class] [Sealed] [AnsiClass]
[BeforeFieldInit] (00100101)
Extends : 01000001 [TypeRef] System.Object
Method #1 (06000001) [ENTRYPOINT]
-------------------------------------------------------
MethodName: Main (06000001)
Flags : [Public] [Static] [HideBySig] [ReuseSlot] (00000096)
RVA : 0x00002050
ImplFlags : [IL] [Managed] (00000000)
CallCnvntn: [DEFAULT]
ReturnType: Void
No arguments.
Method #2 (06000002)
-------------------------------------------------------
MethodName: .ctor (06000002)
Flags : [Public] [HideBySig] [ReuseSlot] [SpecialName]
[RTSpecialName] [.ctor] (00001886)
RVA : 0x0000205c
ImplFlags : [IL] [Managed] (00000000)
CallCnvntn: [DEFAULT]
hasThis
ReturnType: Void
No arguments.
TypeRef #1 (01000001)
-------------------------------------------------------
Token: 0x01000001
ResolutionScope: 0x23000001
TypeRefName: System.Object
MemberRef #1 (0a000004)
-------------------------------------------------------
Member: (0a000004) .ctor:
CallCnvntn: [DEFAULT]
hasThis
ReturnType: Void
No arguments.
TypeRef #2 (01000002)
-------------------------------------------------------
Token: 0x01000002
ResolutionScope: 0x23000001
TypeRefName: System.Runtime.CompilerServices.CompilationRelaxationsAttribute
MemberRef #1 (0a000001)
-------------------------------------------------------
Member: (0a000001) .ctor:
CallCnvntn: [DEFAULT]
hasThis
ReturnType: Void
1 Arguments
Argument #1: I4
TypeRef #3 (01000003)
-------------------------------------------------------
Token: 0x01000003
ResolutionScope: 0x23000001
TypeRefName: System.Runtime.CompilerServices.RuntimeCompatibilityAttribute
MemberRef #1 (0a000002)
-------------------------------------------------------
Member: (0a000002) .ctor:
CallCnvntn: [DEFAULT]
hasThis
ReturnType: Void
No arguments.
TypeRef #4 (01000004)
-------------------------------------------------------
Token: 0x01000004
ResolutionScope: 0x23000001
TypeRefName: System.Console
MemberRef #1 (0a000003)
-------------------------------------------------------
Member: (0a000003) WriteLine:
CallCnvntn: [DEFAULT]
ReturnType: Void
1 Arguments
Argument #1: String
Assembly
-------------------------------------------------------
Token: 0x20000001
Name : Program
Public Key :
Hash Algorithm : 0x00008004
Version: 0.0.0.0
Major Version: 0x00000000
Minor Version: 0x00000000
Build Number: 0x00000000
Revision Number: 0x00000000
Locale: <null>
Flags : [none] (00000000)
CustomAttribute #1 (0c000001)
-------------------------------------------------------
CustomAttribute Type: 0a000001
CustomAttributeName:
System.Runtime.CompilerServices.CompilationRelaxationsAttribute ::
instance void .ctor(int32)
Length: 8
Value : 01 00 08 00 00 00 00 00 > <
ctor args: (8)
CustomAttribute #2 (0c000002)
-------------------------------------------------------
CustomAttribute Type: 0a000002
CustomAttributeName: System.Runtime.CompilerServices.RuntimeCompatibilityAttribute :
:
instance void .ctor()
Length: 30
Value : 01 00 01 00 54 02 16 57 72 61 70 4e 6f 6e 45 78 > T WrapNonEx<
: 63 65 70 74 69 6f 6e 54 68 72 6f 77 73 01 >ceptionThrows <
ctor args: ()
AssemblyRef #1 (23000001)
-------------------------------------------------------
Token: 0x23000001
Public Key or Token: b7 7a 5c 56 19 34 e0 89
Name: mscorlib
Version: 4.0.0.0
Major Version: 0x00000004
Minor Version: 0x00000000
Build Number: 0x00000000
Revision Number: 0x00000000
Locale: <null>
HashValue Blob:
Flags: [none] (00000000)
User Strings
-------------------------------------------------------
70000001 : ( 2) L"Hi"
Coff symbol name overhead: 0
===========================================================
===========================================================
===========================================================
Fortunately, ILDasm processes the metadata tables and combines information where appropriate so that you don’t have to parse the raw table information. For example, in the dump above, you see that when ILDasm shows a TypeDef entry, the corresponding member definition information is shown with it before the first TypeRef entry is displayed.
You don’t need to fully understand everything you see here. The important thing to remember is that Program.exe contains a TypeDef whose name is Program. This type identifies a public sealed class that is derived from System.Object (a type referenced from another assembly). TheProgram type also defines two methods: Main and .ctor (a constructor).
Main is a public, static method whose code is IL (as opposed to native CPU code, such as x86). Main has a void return type and takes no arguments. The constructor method (always shown with a name of .ctor) is public, and its code is also IL. The constructor has a void return type, has no arguments, and has a this pointer, which refers to the object’s memory that is to be constructed when the method is called.
I strongly encourage you to experiment with using ILDasm. It can show you a wealth of information, and the more you understand what you’re seeing, the better you’ll understand the CLR and its capabilities. As you’ll see, I’ll use ILDasm quite a bit more in this book.
Just for fun, let’s look at some statistics about the Program.exe assembly. When you select ILDasm’s View/Statistics menu item, the following information is displayed:
File size : 3584
PE header size : 512 (496 used) (14.29%)
PE additional info : 1411 (39.37%)
Num.of PE sections : 3
CLR header size : 72 ( 2.01%)
CLR meta-data size : 612 (17.08%)
CLR additional info : 0 ( 0.00%)
CLR method headers : 2 ( 0.06%)
Managed code : 20 ( 0.56%)
Data : 2048 (57.14%)
Unaccounted : -1093 (-30.50%)
Num.of PE sections : 3
.text - 1024
.rsrc - 1536
.reloc - 512
CLR meta-data size : 612
Module - 1 (10 bytes)
TypeDef - 2 (28 bytes) 0 interfaces, 0 explicit layout
TypeRef - 4 (24 bytes)
MethodDef - 2 (28 bytes) 0 abstract, 0 native, 2 bodies
MemberRef - 4 (24 bytes)
CustomAttribute- 2 (12 bytes)
Assembly - 1 (22 bytes)
AssemblyRef - 1 (20 bytes)
Strings - 184 bytes
Blobs - 68 bytes
UserStrings - 8 bytes
Guids - 16 bytes
Uncategorized - 168 bytes
CLR method headers : 2
Num.of method bodies - 2
Num.of fat headers - 0
Num.of tiny headers - 2
Managed code : 20
Ave method size - 10
Here you can see the size (in bytes) of the file and the size (in bytes and percentages) of the various parts that make up the file. For this very small Program.cs application, the PE header and the metadata occupy the bulk of the file’s size. In fact, the IL code occupies just 20 bytes. Of course, as an application grows, it will reuse most of its types and references to other types and assemblies, causing the metadata and header information to shrink considerably as compared to the overall size of the file.
NOTE
By the way, ILDasm.exe does have a bug in it that affects the file size information shown. In particular, you cannot trust the Unaccounted information.
Combining Modules to Form an Assembly
The Program.exe file discussed in the previous section is more than just a PE file with metadata; it is also an assembly. An assembly is a collection of one or more files containing type definitions and resource files. One of the assembly’s files is chosen to hold a manifest. The manifest is another set of metadata tables that basically contain the names of the files that are part of the assembly. They also describe the assembly’s version, culture, publisher, publicly exported types, and all of the files that comprise the assembly.
The CLR operates on assemblies; that is, the CLR always loads the file that contains the manifest metadata tables first and then uses the manifest to get the names of the other files that are in the assembly. Here are some characteristics of assemblies that you should remember:
§ An assembly defines the reusable types.
§ An assembly is marked with a version number.
§ An assembly can have security information associated with it.
An assembly’s individual files don’t have these attributes—except for the file that contains the manifest metadata tables.
To package, version, secure, and use types, you must place them in modules that are part of an assembly. In most cases, an assembly consists of a single file, as the preceding Program.exe example does. However, an assembly can also consist of multiple files: some PE files with metadata and some resource files such as .gif or .jpg files. It might help you to think of an assembly as a logical EXE or a DLL.
I’m sure that many of you reading this are wondering why Microsoft has introduced this new assembly concept. The reason is that an assembly allows you to decouple the logical and physical notions of reusable types. For example, an assembly can consist of several types. You could put the frequently used types in one file and the less frequently used types in another file. If your assembly is deployed by downloading it via the Internet, the file with the infrequently used types might not ever have to be downloaded to the client if the client never accesses the types. For example, an independent software vendor (ISV) specializing in UI controls might choose to implement Active Accessibility types in a separate module (to satisfy Microsoft’s Logo requirements). Only users who require the additional accessibility features would require this module to be downloaded.
You configure an application to download assembly files by specifying a codeBase element (discussed in Chapter 3) in the application’s configuration file. The codeBase element identifies a URL pointing to where all of an assembly’s files can be found. When attempting to load an assembly’s file, the CLR obtains the codeBase element’s URL and checks the machine’s download cache to see if the file is present. If it is, the file is loaded. If the file isn’t in the cache, the CLR downloads the file into the cache from the location the URL points to. If the file can’t be found, the CLR throws a FileNotFoundException exception at runtime.
I’ve identified three reasons to use multifile assemblies:
§ You can partition your types among separate files, allowing for files to be incrementally downloaded as described in the Internet download scenario. Partitioning the types into separate files also allows for partial or piecemeal packaging and deployment for applications you purchase and install.
§ You can add resource or data files to your assembly. For example, you could have a type that calculates some insurance information. This type might require access to some actuarial tables to make its computations. Instead of embedding the actuarial tables in your source code, you could use a tool (such as the Assembly Linker, AL.exe, discussed later) so that the data file is considered to be part of the assembly. By the way, this data file can be in any format—a text file, a Microsoft Office Excel spreadsheet, a Microsoft Office Word table, or whatever you like—as long as your application knows how to parse the file’s contents.
§ You can create assemblies consisting of types implemented in different programming languages. For example, you can implement some types in C#, some types in Microsoft Visual Basic, and other types in other languages. When you compile the types written with C# source code, the compiler produces a module. When you compile other types written with Visual Basic source code, the compiler produces a separate module. You can then use a tool to combine all of these modules into a single assembly. To developers using the assembly, the assembly appears to contain just a bunch of types; developers won’t even know that different programming languages were used. By the way, if you prefer, you can run ILDasm.exe on each of the modules to obtain an IL source code file. Then you can run ILAsm.exe and pass it all of the IL source code files. ILAsm.exe will produce a single file containing all of the types. This technique requires your source code compiler to produce IL-only code.
IMPORTANT
To summarize, an assembly is a unit of reuse, versioning, and security. It allows you to partition your types and resources into separate files so that you, and consumers of your assembly, get to determine which files to package together and deploy. Once the CLR loads the file containing the manifest, it can determine which of the assembly’s other files contain the types and resources the application is referencing. Anyone consuming the assembly is required to know only the name of the file containing the manifest; the file partitioning is then abstracted away from the consumer and can change in the future without breaking the application’s behavior.
If you have multiple types that can share a single version number and security settings, it is recommended that you place all of the types in a single file rather than spread the types out over separate files, let alone separate assemblies. The reason is performance. Loading a file/assembly takes the CLR and Windows time to find the assembly, load it, and initialize it. The fewer files/assemblies loaded the better, because loading fewer assemblies helps reduce working set and also reduces fragmentation of a process’s address space. Finally, NGen.exe can perform better optimizations when processing larger files.
To build an assembly, you must select one of your PE files to be the keeper of the manifest. Or you can create a separate PE file that contains nothing but the manifest. Table 2-3 shows the manifest metadata tables that turn a managed module into an assembly.
Table 2-3. Manifest Metadata Tables
|
Manifest Metadata Table Name |
Description |
|
AssemblyDef |
Contains a single entry if this module identifies an assembly. The entry includes the assembly’s name (without path and extension), version (major, minor, build, and revision), culture, flags, hash algorithm, and the publisher’s public key (which can be null). |
|
FileDef |
Contains one entry for each PE and resource file that is part of the assembly (except the file containing the manifest since it appears as the single entry in the AssemblyDef table). The entry includes the file’s name and extension (without path), hash value, and flags. If this assembly consists only of its own file, the FileDef table has no entries. |
|
ManifestResourceDef |
Contains one entry for each resource that is part of the assembly. The entry includes the resource’s name, flags (public if visible outside the assembly and private otherwise), and an index into the FileDef table indicating the file that contains the resource file or stream. If the resource isn’t a stand-alone file (such as .jpg or a .gif), the resource is a stream contained within a PE file. For an embedded resource, the entry also includes an offset indicating the start of the resource stream within the PE file. |
|
ExportedTypesDef |
Contains one entry for each public type exported from all of the assembly’s PE modules. The entry includes the type’s name, an index into the FileDef table (indicating which of this assembly’s files implements the type), and an index into the TypeDef table. Note: To save file space, types exported from the file containing the manifest are not repeated in this table because the type information is available using the metadata’s TypeDef table. |
The existence of a manifest provides a level of indirection between consumers of the assembly and the partitioning details of the assembly and makes assemblies self-describing. Also, note that the file containing the manifest has metadata information that indicates which files are part of the assembly, but the individual files themselves do not have metadata information that specifies that they are part of the assembly.
NOTE
The assembly file that contains the manifest also has an AssemblyRef table in it. This table contains an entry for all of the assemblies referenced by all of the assembly’s files. This allows tools to open an assembly’s manifest and see its set of referenced assemblies without having to open the assembly’s other files. Again, the entries in the AssemblyRef table exist to make an assembly self-describing.
The C# compiler produces an assembly when you specify any of the following command-line switches: /t[arget]:exe, /t[arget]:winexe, /t[arget]: appcontainerexe, /t[arget]:library, or /t[arget]:winmdobj[2]. All of these switches cause the compiler to generate a single PE file that contains the manifest metadata tables. The resulting file is either a CUI executable, a GUI executable, a Windows Store executable, a class library, or a WINMD library respectively.
In addition to these switches, the C# compiler supports the /t[arget]:module switch. This switch tells the compiler to produce a PE file that doesn’t contain the manifest metadata tables. The PE file produced is always a DLL PE file, and this file must be added to an assembly before the CLR can access any types within it. When you use the /t:module switch, the C# compiler, by default, names the output file with an extension of .netmodule.
IMPORTANT
Unfortunately, the Microsoft Visual Studio integrated development environment (IDE) doesn’t natively support the ability for you to create multifile assemblies. If you want to create multifile assemblies, you must resort to using command-line tools.
There are many ways to add a module to an assembly. If you’re using the C# compiler to build a PE file with a manifest, you can use the /addmodule switch. To understand how to build a multifile assembly, let’s assume that we have two source code files:
§ RUT.cs, which contains rarely used types
§ FUT.cs, which contains frequently used types
Let’s compile the rarely used types into their own module so that users of the assembly won’t need to deploy this module if they never access the rarely used types:
csc /t:module RUT.cs
This line causes the C# compiler to create a RUT.netmodule file. This file is a standard DLL PE file, but, by itself, the CLR can’t load it.
Next let’s compile the frequently used types into their own module. We’ll make this module the keeper of the assembly’s manifest because the types are used so often. In fact, because this module will now represent the entire assembly, I’ll change the name of the output file to MultiFileLibrary.dll instead of calling it FUT.dll:
csc /out:MultiFileLibrary.dll /t:library /addmodule:RUT.netmodule FUT.cs
This line tells the C# compiler to compile the FUT.cs file to produce the MultiFileLibrary.dll file. Because /t:library is specified, a DLL PE file containing the manifest metadata tables is emitted into the MultiFileLibrary.dll file. The /addmodule:RUT.netmodule switch tells the compiler that RUT.netmodule is a file that should be considered part of the assembly. Specifically, the /addmodule switch tells the compiler to add the file to the FileDef manifest metadata table and to add RUT.netmodule’s publicly exported types to the ExportedTypesDef manifest metadata table.
Once the compiler has finished all of its processing, the two files shown in Figure 2-1 are created. The module on the right contains the manifest.
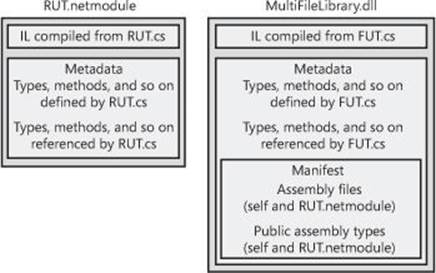
Figure 2-1. A multifile assembly consisting of two managed modules, one with a manifest.
The RUT.netmodule file contains the IL code generated by compiling RUT.cs. This file also contains metadata tables that describe the types, methods, fields, properties, events, and so on that are defined by RUT.cs. The metadata tables also describe the types, methods, and so on that are referenced by RUT.cs. The MultiFileLibrary.dll is a separate file. Like RUT.netmodule, this file includes the IL code generated by compiling FUT.cs and also includes similar definition and reference metadata tables. However, MultiFileLibrary.dll contains the additional manifest metadata tables, making MultiFileLibrary.dll an assembly. The additional manifest metadata tables describe all of the files that make up the assembly (the MultiFileLibrary.dll file itself and the RUT.netmodule file). The manifest metadata tables also include all of the public types exported from MultiFileLibrary.dll and RUT.netmodule.
NOTE
In reality, the manifest metadata tables don’t actually include the types that are exported from the PE file that contains the manifest. The purpose of this optimization is to reduce the number of bytes required by the manifest information in the PE file. So statements like “The manifest metadata tables also include all the public types exported from MultiFileLibrary.dll and RUT.netmodule” aren’t 100 percent accurate. However, this statement does accurately reflect what the manifest is logically exposing.
Once the MultiFileLibrary.dll assembly is built, you can use ILDasm.exe to examine the metadata’s manifest tables to verify that the assembly file does in fact have references to the RUT.netmodule file’s types. Here is what the FileDef and ExportedTypesDef metadata tables look like:
File #1 (26000001)
-------------------------------------------------------
Token: 0x26000001
Name : RUT.netmodule
HashValue Blob : e6 e6 df 62 2c a1 2c 59 97 65 0f 21 44 10 15 96 f2 7e db c2
Flags : [ContainsMetaData] (00000000)
ExportedType #1 (27000001)
-------------------------------------------------------
Token: 0x27000001
Name: ARarelyUsedType
Implementation token: 0x26000001
TypeDef token: 0x02000002
Flags : [Public] [AutoLayout] [Class] [Sealed] [AnsiClass]
[BeforeFieldInit](00100101)
From this, you can see that RUT.netmodule is a file considered to be part of the assembly with the token 0x26000001. From the ExportedTypesDef table, you can see that there is a publicly exported type, ARarelyUsedType. The implementation token for this type is 0x26000001, which indicates that the type’s IL code is contained in the RUT.netmodule file.
NOTE
For the curious, metadata tokens are 4-byte values. The high byte indicates the type of token (0x01=TypeRef, 0x02=TypeDef, 0x23=AssemblyRef, 0x26=File (file definition), 0x27=ExportedType). For the complete list, see the CorTokenType enumerated type in the CorHdr.h file included with the .NET Framework SDK. The three lower bytes of the token simply identify the row in the corresponding metadata table. For example, the implementation token 0x26000001 refers to the first row of the File table. For most tables, rows are numbered starting with 1, not 0. For the TypeDef table, rows actually start with 2.
Any client code that consumes the MultiFileLibrary.dll assembly’s types must be built using the /r[eference]: MultiFileLibrary.dll compiler switch. This switch tells the compiler to load the MultiFileLibrary.dll assembly and all of the files listed in its FileDef table when searching for an external type. The compiler requires all of the assembly’s files to be installed and accessible. If you were to delete the RUT.netmodule file, the C# compiler would produce the following error: “fatal error CS0009: Metadata file ‘C:\ MultiFileLibrary.dll’ could not be opened—‘Error importing module ‘RUT.netmodule’ of assembly ‘C:\ MultiFileLibrary.dll’—The system cannot find the file specified’”. This means that to build a new assembly, all of the files from a referenced assembly must be present.
As the client code executes, it calls methods. When a method is called for the first time, the CLR detects the types that the method references as a parameter, a return type, or as a local variable. The CLR then attempts to load the referenced assembly’s file that contains the manifest. If the type being accessed is in this file, the CLR performs its internal bookkeeping, allowing the type to be used. If the manifest indicates that the referenced type is in a different file, the CLR attempts to load the necessary file, performs its internal bookkeeping, and allows the type to be accessed. The CLR loads assembly files only when a method referencing a type in an unloaded assembly is called. This means that to run an application, all of the files from a referenced assembly do not need to be present.
Adding Assemblies to a Project by Using the Visual Studio IDE
If you’re using the Visual Studio IDE to build your project, you’ll have to add any assemblies that you want to reference to your project. To do so, open Solution Explorer, right-click the project you want to add a reference to, and then select the Add Reference menu item. This causes the Reference Manager dialog box, shown in Figure 2-2, to appear.
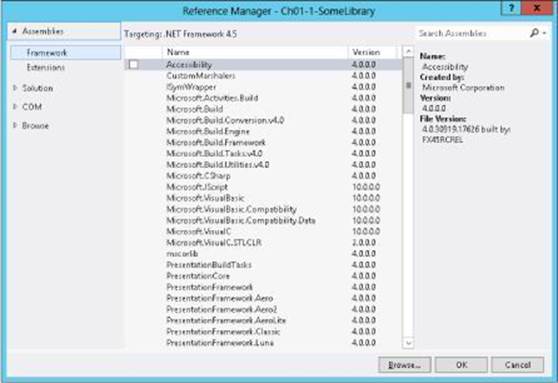
Figure 2-2. The Reference Manager dialog box in Visual Studio.
To have your project reference an assembly, select the desired assembly from the list. If the assembly you want isn’t in the list, click the Browse button to navigate to the desired assembly (file containing a manifest) to add the assembly reference. The Solution option allows the current project to reference an assembly that is created by another project in the same solution. The COM option in the Reference Manager dialog box allows an unmanaged COM server to be accessed from within managed source code via a managed proxy class automatically generated by Visual Studio. The Browse option allows you to select an assembly that you recently added to another project.
To make your own assemblies appear in the Reference Manager’s dialog box, follow the instruction at http://msdn.microsoft.com/en-us/library/wkze6zky(v=vs.110).aspx.
Using the Assembly Linker
Instead of using the C# compiler, you might want to create assemblies by using the Assembly Linker utility, AL.exe. The Assembly Linker is useful if you want to create an assembly consisting of modules built from different compilers (if your compiler doesn’t support the equivalent of C#’s/addmodule switch) or perhaps if you just don’t know your assembly packaging requirements at build time. You can also use AL.exe to build resource-only assemblies, called satellite assemblies, which are typically used for localization purposes. I’ll talk about satellite assemblies later in the chapter.
The AL.exe utility can produce an EXE or a DLL PE file that contains only a manifest describing the types in other modules. To understand how AL.exe works, let’s change the way the MultiFileLibrary.dll assembly is built:
csc /t:module RUT.cs
csc /t:module FUT.cs
al /out: MultiFileLibrary.dll /t:library FUT.netmodule RUT.netmodule
Figure 2-3 shows the files that result from executing these statements.
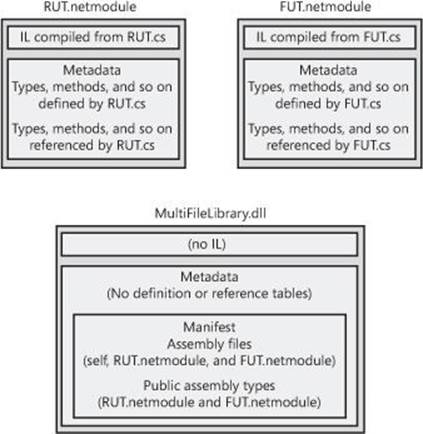
Figure 2-3. A multifile assembly consisting of three managed modules, one with a manifest.
In this example, two separate modules, RUT.netmodule and FUT.netmodule, are created. Neither module is an assembly because they don’t contain manifest metadata tables. Then a third file is produced: MultiFileLibrary.dll, which is a small DLL PE file (because of the/t[arget]:library switch) that contains no IL code but has manifest metadata tables indicating that RUT.netmodule and FUT.netmodule are part of the assembly. The resulting assembly consists of three files: MultiFileLibrary.dll, RUT.netmodule, and FUT.netmodule. The Assembly Linker has no way to combine multiple files into a single file.
The AL.exe utility can also produce CUI, GUI, and Windows Store app PE files by using the /t[arget]:exe, /t[arget]:winexe, or /t[arget]:appcontainerexe command-line switches. But this is very unusual since it would mean that you’d have an EXE PE file with just enough IL code in it to call a method in another module. You can specify which method in a module should be used as an entry point by adding the /main command-line switch when invoking AL.exe. The following is an example of how to call the Assembly Linker, AL.exe, by using the/main command-line switch:
csc /t:module /r:MultiFileLibrary.dll Program.cs
al /out:Program.exe /t:exe /main:Program.Main Program.netmodule
Here the first line builds the Program.cs file into a Program.netmodule file. The second line produces a small Program.exe PE file that contains the manifest metadata tables. In addition, there is a small global function named __EntryPoint that is emitted by AL.exe because of the/main:Program.Main command-line switch. This function, __EntryPoint, contains the following IL code:
.method privatescope static void __EntryPoint$PST06000001() cil managed
{
.entrypoint
// Code size 8 (0x8)
.maxstack 8
IL_0000: tail.
IL_0002: call void [.module 'Program.netmodule']Program::Main()
IL_0007: ret
} // end of method 'Global Functions'::__EntryPoint
As you can see, this code simply calls the Main method contained in the Program type defined in the Program.netmodule file. The /main switch in AL.exe isn’t that useful because it’s unlikely that you’d ever create an assembly for an application that didn’t have its entry point in the PE file that contains the manifest metadata tables. I mention the switch here only to make you aware of its existence.
With the code that accompanies this book, I have created a Ch02-3-BuildMultiFileLibrary.bat file that encapsulates all the steps required to build a multifile assembly. The Ch02-4-AppUsingMultiFileLibrary project in Visual Studio invokes this batch file as a prebuild command-line step. You can examine this project to see how to integrate building and referencing a multifile assembly from within Visual Studio.
Adding Resource Files to an Assembly
When using AL.exe to create an assembly, you can add a file as a resource to the assembly by using the /embed[resource] switch. This switch takes a file (any file) and embeds the file’s contents into the resulting PE file. The manifest’s ManifestResourceDef table is updated to reflect the existence of the resources.
AL.exe also supports a /link[resource] switch, which also takes a file containing resources. However, the /link[resource] switch updates the manifest’s ManifestResourceDef and FileDef tables, indicating that the resource exists and identifying which of the assembly’s files contains it. The resource file is not embedded into the assembly PE file; it remains separate and must be packaged and deployed with the other assembly files.
Like AL.exe, CSC.exe also allows you to combine resources into an assembly produced by the C# compiler. The C# compiler’s /resource switch embeds the specified resource file into the resulting assembly PE file, updating the ManifestResourceDef table. The compiler’s/linkresource switch adds an entry to the ManifestResourceDef and the FileDef manifest tables to refer to a stand-alone resource file.
One last note about resources: it’s possible to embed standard Win32 resources into an assembly. You can do this easily by specifying the pathname of a .res file with the /win32res switch when using either AL.exe or CSC.exe. In addition, you can quickly and easily embed a standard Win32 icon resource into an assembly file by specifying the pathname of the .ico file with the /win32icon switch when using either AL.exe or CSC.exe. Within Visual Studio, you can add resource files to your assembly by displaying your project’s properties and then clicking the Application tab. The typical reason an icon is embedded is so that Windows Explorer can show an icon for a managed executable file.
NOTE
Managed assembly files also contain Win32 manifest resource information in them. By default, the C# compiler automatically produces this manifest information but you can tell it not to by using the /nowin32manifest switch. The default manifest produced by the C# compiler looks like this:
<?xml version="1.0" encoding="UTF-8" standalone="yes"?>
<assembly xmlns="urn:schemas-microsoft-com:asm.v1" manifestVersion="1.0">
<assemblyIdentity version="1.0.0.0" name="MyApplication.app" />
<trustInfo xmlns="urn:schemas-microsoft-com:asm.v2">
<security>
<requestedPrivileges xmlns="urn:schemas-microsoft-com:asm.v3">
<requestedExecutionLevel level="asInvoker" uiAccess="false"/>
</requestedPrivileges>
</security>
</trustInfo>
</assembly>
Assembly Version Resource Information
When AL.exe or CSC.exe produces a PE file assembly, it also embeds into the PE file a standard Win32 version resource. Users can examine this resource by viewing the file’s properties. Application code can also acquire and examine this information at runtime by callingSystem.Diagnostics.FileVersionInfo’s static GetVersionInfo method with the assembly pathname as parameter. Figure 2-4 shows the Details tab of the Ch02-3-MultiFileLibrary.dll Properties dialog box.
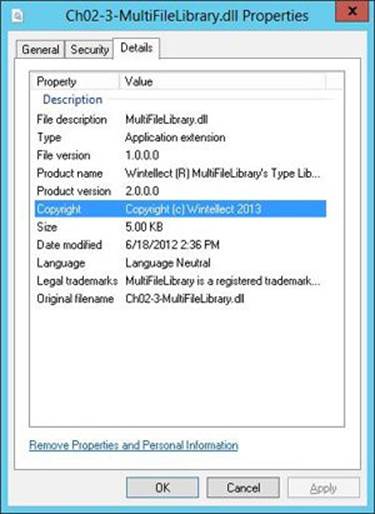
Figure 2-4. The Details tab of the Ch02-3-MultiFileLibrary.dll Properties dialog box.
When building an assembly, you should set the version resource fields by using custom attributes that you apply at the assembly level in your source code. Here’s what the code that produced the version information in Figure 2-4 looks like:
using System.Reflection;
// FileDescription version information:
[assembly: AssemblyTitle("MultiFileLibrary.dll")]
// Comments version information:
[assembly: AssemblyDescription("This assembly contains MultiFileLibrary's types")]
// CompanyName version information:
[assembly: AssemblyCompany("Wintellect")]
// ProductName version information:
[assembly: AssemblyProduct("Wintellect (R) MultiFileLibrary's Type Library")]
// LegalCopyright version information:
[assembly: AssemblyCopyright("Copyright (c) Wintellect 2013")]
// LegalTrademarks version information:
[assembly:AssemblyTrademark("MultiFileLibrary is a registered trademark of Wintellect")]
// AssemblyVersion version information:
[assembly: AssemblyVersion("3.0.0.0")]
// FILEVERSION/FileVersion version information:
[assembly: AssemblyFileVersion("1.0.0.0")]
// PRODUCTVERSION/ProductVersion version information:
[assembly: AssemblyInformationalVersion("2.0.0.0")]
// Set the Language field (discussed later in the "Culture" section)
[assembly:AssemblyCulture("")]
IMPORTANT
Unfortunately, the Windows Explorer Properties dialog box is missing entries for some of the attributes. In particular, it would be great if the value of the AssemblyVersion attribute were shown because the CLR uses this value when loading assemblies, as we’ll discuss in Chapter 3.
Table 2-4 shows the version resource fields and the custom attributes that correspond to them. If you’re using AL.exe to build your assembly, you can use command-line switches to set this information instead of using the custom attributes. The second column in Table 2-4 shows the AL.exe command-line switch that corresponds to each version resource field. Note that the C# compiler doesn’t offer these command-line switches and that, in general, using custom attributes is the preferred way to set this information.
Table 2-4. Version Resource Fields and Their Corresponding AL.exe Switches and Custom Attributes
|
Version Resource |
AL.exe Switch |
Custom Attribute/Comment |
|
FILEVERSION |
/fileversion |
System.Reflection.AssemblyFileVersionAttribute. |
|
PRODUCTVERSION |
/productversion |
System.Reflection. AssemblyInformationalVersionAttribute. |
|
FILEFLAGSMASK |
(none) |
Always set to VS_FFI_FILEFLAGSMASK (defined in WinVer.h as 0x0000003F). |
|
FILEFLAGS |
(none) |
Always 0. |
|
FILEOS |
(none) |
Currently always VOS__WINDOWS32. |
|
FILETYPE |
/target |
Set to VFT_APP if /target:exe or /target:winexe is specified; set to VFT_DLL if /target:library is specified. |
|
FILESUBTYPE |
(none) |
Always set to VFT2_UNKNOWN. (This field has no meaning for VFT_APP and VFT_DLL.) |
|
AssemblyVersion |
/version |
System.Reflection.AssemblyVersionAttribute. |
|
Comments |
/description |
System.Reflection.AssemblyDescriptionAttribute. |
|
CompanyName |
/company |
System.Reflection.AssemblyCompanyAttribute. |
|
FileDescription |
/title |
System.Reflection.AssemblyTitleAttribute. |
|
FileVersion |
/version |
System.Reflection.AssemblyFileVersionAttribute. |
|
InternalName |
/out |
Set to the name of the output file specified (without the extension). |
|
LegalCopyright |
/copyright |
System.Reflection.AssemblyCopyrightAttribute. |
|
LegalTrademarks |
/trademark |
System.Reflection.AssemblyTrademarkAttribute. |
|
OriginalFilename |
/out |
Set to the name of the output file (without a path). |
|
PrivateBuild |
(none) |
Always blank. |
|
ProductName |
/product |
System.Reflection.AssemblyProductAttribute. |
|
ProductVersion |
/productversion |
System.Reflection. AssemblyInformationalVersionAttribute. |
|
SpecialBuild |
(none) |
Always blank. |
IMPORTANT
When you create a new C# project in Visual Studio, an AssemblyInfo.cs file is created automatically for you in a Properties folder. This file contains all of the assembly version attributes described in this section, plus a few additional attributes that I’ll cover in Chapter 3. You can simply open the AssemblyInfo.cs file and modify your assembly-specific information. Visual Studio also provides a dialog box that you can use to edit the assembly version information in this file. To see this dialog box, in Solution Explorer, double-click your project’s Properties entry, and on the Application tab, click Assembly Information; you’ll see a dialog box like the one shown in Figure 2-5.
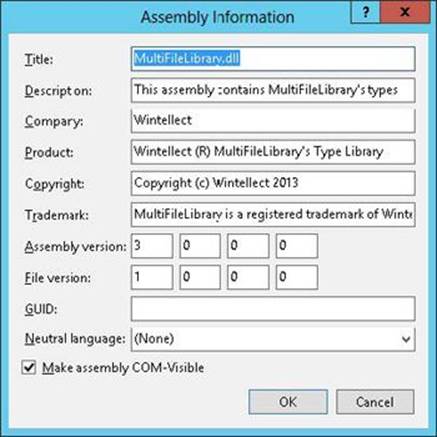
Figure 2-5. Visual Studio’s Assembly Information dialog box.
Version Numbers
In the previous section, you saw that several version numbers can be applied to an assembly. All of these version numbers have the same format: each consists of four period-separated parts, as shown in Table 2-5.
Table 2-5. Format of Version Numbers
|
Major Number |
Minor Number |
Build Number |
Revision Number |
|
|
Example: |
2 |
5 |
719 |
2 |
Table 2-5 shows an example of a version number: 2.5.719.2. The first two numbers make up the public perception of the version. The public will think of this example as version 2.5 of the assembly. The third number, 719, indicates the build of the assembly. If your company builds its assembly every day, you should increment the build number each day as well. The last number, 2, indicates the revision of the build. If for some reason your company has to build an assembly twice in one day, maybe to resolve a hot bug that is halting other work, the revision number should be incremented. Microsoft uses this version-numbering scheme, and it’s highly recommended that you use this scheme as well.
You’ll notice that an assembly has three version numbers associated with it. This is very unfortunate and leads to a lot of confusion. Let me explain each version number’s purpose and how it is expected to be used:
§ AssemblyFileVersion This version number is stored in the Win32 version resource. This number is for information purposes only; the CLR doesn’t examine this version number in any way. Typically, you set the major and minor parts to represent the version you want the public to see. Then you increment the build and revision parts each time a build is performed. Ideally, Microsoft’s tool (such as CSC.exe or AL.exe) would automatically update the build and revision numbers for you (based on the date and time when the build was performed), but unfortunately, they don’t. This version number can be seen when using Windows Explorer and is typically used to identify a specific version of an assembly when troubleshooting a customer’s system.
§ AssemblyInformationalVersion This version number is also stored in the Win32 version resource, and again, this number is for information purposes only; the CLR doesn’t examine or care about it in any way. This version number exists to indicate the version of the product that includes this assembly. For example, version 2.0 of a product might contain several assemblies; one of these assemblies is marked as version 1.0 since it’s a new assembly that didn’t ship in version 1.0 of the same product. Typically, you set the major and minor parts of this version number to represent the public version of your product. Then you increment the build and revision parts each time you package a complete product with all its assemblies.
§ AssemblyVersion This version number is stored in the AssemblyDef manifest metadata table. The CLR uses this version number when binding to strongly named assemblies (discussed in Chapter 3). This number is extremely important and is used to uniquely identify an assembly. When starting to develop an assembly, you should set the major, minor, build, and revision numbers and shouldn’t change them until you’re ready to begin work on the next deployable version of your assembly. When Assembly-A references a strongly named Assembly-B, Assembly-B’s version is embedded inside Assembly-A’s AssemblyRef table’s entry. This way, when the CLR needs to load Assembly-B, it knows exactly which version Assembly-A was built and tested with. It is possible to have the CLR load a different version by using a binding redirect which is discussed in Chapter 3.
Culture
Like version numbers, assemblies also have a culture as part of their identity. For example, I could have an assembly that is strictly for German, another assembly for Swiss German, another assembly for U.S. English, and so on. Cultures are identified via a string that contains a primary and a secondary tag (as described in RFC 1766). Table 2-6 shows some examples.
Table 2-6. Examples of Assembly Culture Tags
|
Primary Tag |
Secondary Tag |
Culture |
|
De |
(none) |
German |
|
De |
AT |
Austrian German |
|
De |
CH |
Swiss German |
|
En |
(none) |
English |
|
En |
GB |
British English |
|
En |
US |
U.S. English |
In general, if you create an assembly that contains code, you don’t assign a culture to it. This is because code doesn’t usually have any culture-specific assumptions built into it. An assembly that isn’t assigned a culture is referred to as being culture neutral.
If you’re designing an application that has some culture-specific resources to it, Microsoft highly recommends that you create one assembly that contains your code and your application’s default (or fallback) resources. When building this assembly, don’t specify a culture. This is the assembly that other assemblies will reference when they create and manipulate types it publicly exposes.
Now you can create one or more separate assemblies that contain only culture-specific resources—no code at all. Assemblies that are marked with a culture are called satellite assemblies. For these satellite assemblies, assign a culture that accurately reflects the culture of the resources placed in the assembly. You should create one satellite assembly for each culture you intend to support.
You’ll usually use the AL.exe tool to build a satellite assembly. You won’t use a compiler because the satellite assembly should have no code contained within it. When using AL.exe, you specify the desired culture by using the /c[ulture]:text switch, where text is a string such as “en-US,” representing U.S. English. When you deploy a satellite assembly, you should place it in a subdirectory whose name matches the culture text. For example, if the application’s base directory is C:\MyApp, the U.S. English satellite assembly should be placed in the C:\MyApp\en-US subdirectory. At runtime, you access a satellite assembly’s resources by using the System.Resources.ResourceManager class.
NOTE
It is possible to create a satellite assembly that contains code, though this practice is discouraged. If you prefer, you can specify the culture by using the System.Reflection.AssemblyCultureAttribute custom attribute instead of using AL.exe’s /culture switch, for example, as shown here:
// Set assembly's culture to Swiss German
[assembly:AssemblyCulture("de-CH")]
Normally, you shouldn’t build an assembly that references a satellite assembly. In other words, an assembly’s AssemblyRef entries should all refer to culture-neutral assemblies. If you want to access types or members contained in a satellite assembly, you should use reflection techniques as discussed in Chapter 23.
Simple Application Deployment (Privately Deployed Assemblies)
Throughout this chapter, I’ve explained how you build modules and how you combine those modules into an assembly. At this point, I’m ready to explain how to package and deploy all of the assemblies so that users can run the application.
Windows Store apps have very strict rules about packaging assemblies, and Visual Studio will package all of an application’s required assemblies together into a single .appx file, which is either uploaded to the Windows Store or can be side-loaded onto a machine. When a user installs an appx file, all the assemblies it contains are placed in a directory where the CLR will load them and Windows adds an application tile to the user’s Start screen. If other users install the same appx file, the previously-installed assemblies are used and the new user simply gets a tile added to their Start screen. When a user uninstalls a Windows Store app, the system removes the tile from the user’s Start screen. If no other users have the app installed, then Windows destroys the directory along with all the assemblies. Note that different users can install different versions of the same Windows Store app. To accommodate this, Windows installs the assemblies into different directories so that multiple versions of a single app can reside on a single machine simultaneously.
For desktop (non-Windows Store) applications, assemblies don’t dictate or require any special means of packaging. The easiest way to package a set of assemblies is simply to copy all of the files directly. For example, you could put all of the assembly files on a CD-ROM and ship it to the user with a batch file setup program that just copies the files from the CD to a directory on the user’s hard drive. Because the assemblies include all of the dependent assembly references and types, the user can just run the application and the runtime will look for referenced assemblies in the application’s directory. No modifications to the registry are necessary for the application to run. To uninstall the application, just delete all the files—that’s it!
Of course, you can package and install the assembly files by using other mechanisms, such as .cab files (typically used for Internet download scenarios to compress files and reduce download times). You can also package the assembly files into an MSI file for use by the Windows Installer service (MSIExec.exe). Using MSI files allows assemblies to be installed on demand the first time the CLR attempts to load the assembly. This feature isn’t new to MSI; it can perform the same demand-load functionality for unmanaged EXE and DLL files as well.
NOTE
Using a batch file or some other simple “installation software” will get an application onto the user’s machine; however, you’ll need more sophisticated installation software to create shortcut links on the user’s desktop and Start menu/screen. Also, you can easily back up and restore the application or move it from one machine to another, but the various shortcut links will require special handling.
Of course, Visual Studio has a built-in mechanism that you can use to publish an application by displaying a project’s Properties pages and clicking the Publish tab. You can use the options available on the Publish tab to cause Visual Studio to produce an MSI file and copy the resulting MSI file to a Web site, FTP server, or file path. The MSI file can also install any prerequisite components such as the .NET Framework or Microsoft SQL Server Express Edition. Finally, the application can automatically check for updates and install them on the user’s machine by taking advantage of ClickOnce technology.
Assemblies deployed to the same directory as the application are called privately deployed assemblies because the assembly files aren’t shared with any other application (unless the other application is also deployed to the same directory). Privately deployed assemblies are a big win for developers, end users, and administrators because they can simply be copied to an application’s base directory, and the CLR will load them and execute the code in them. In addition, an application can be uninstalled by simply deleting the assemblies in its directory. This allows simple backup and restore as well.
This simple install/move/uninstall scenario is possible because each assembly has metadata indicating which referenced assembly should be loaded; no registry settings are required. In addition, the referencing assembly scopes every type. This means that an application always binds to the same type it was built and tested with; the CLR can’t load a different assembly that just happens to provide a type with the same name. This is different from COM, in which types are recorded in the registry, making them available to any application running on the machine.
In Chapter 3, I’ll discuss how to deploy shared assemblies that are accessible by multiple applications.
Simple Administrative Control (Configuration)
The user or the administrator can best determine some aspects of an application’s execution. For example, an administrator might decide to move an assembly’s files on the user’s hard disk or to override information contained in the assembly’s manifest. Other scenarios also exist related to versioning; I’ll talk about some of these in Chapter 3.
To allow administrative control over an application, a configuration file can be placed in the application’s directory. An application’s publisher can create and package this file. The setup program would then install this configuration file in the application’s base directory. In addition, the machine’s administrator or an end user could create or modify this file. The CLR interprets the content of this file to alter its policies for locating and loading assembly files.
These configuration files contain Extensible Markup Language (XML) and can be associated with an application or with the machine. Using a separate file (vs. registry settings) allows the file to be easily backed up and also allows the administrator to copy the application to another machine—just copy the necessary files and the administrative policy is copied too.
In Chapter 3, we’ll explore this configuration file in more detail. But I want to give you a taste of it now. Let’s say that the publisher of an application wants its application deployed with the MultiFileLibrary assembly files in a different directory than the application’s assembly file. The desired directory structure looks like this:
AppDir directory (contains the application's assembly files)
Program.exe
Program.exe.config (discussed below)
AuxFiles subdirectory (contains MultiFileLibrary's assembly files)
MultiFileLibrary.dll
FUT.netmodule
RUT.netmodule
Since the MultiFileLibrary files are no longer in the application’s base directory, the CLR won’t be able to locate and load these files; running the application will cause a System.IO.FileNotFoundException exception to be thrown. To fix this, the publisher creates an XML configuration file and deploys it to the application’s base directory. The name of this file must be the name of the application’s main assembly file with a .config extension: Program.exe.config, for this example. The configuration file should look like this:
<configuration>
<runtime>
<assemblyBinding xmlns="urn:schemas-microsoft-com:asm.v1">
<probing privatePath="AuxFiles" />
</assemblyBinding>
</runtime>
</configuration>
Whenever the CLR attempts to locate an assembly file, it always looks in the application’s directory first, and if it can’t find the file there, it looks in the AuxFiles subdirectory. You can specify multiple semicolon-delimited paths for the probing element’s privatePath attribute. Each path is considered relative to the application’s base directory. You can’t specify an absolute or a relative path identifying a directory that is outside of the application’s base directory. The idea is that an application can control its directory and its subdirectories but has no control over other directories.
PROBING FOR ASSEMBLY FILES
When the CLR needs to locate an assembly, it scans several subdirectories. Here is the order in which directories are probed for a culture-neutral assembly (where firstPrivatePath and secondPrivatePath are specified via the config file’s privatePath attribute):
AppDir\AsmName.dll
AppDir\AsmName\AsmName.dll
AppDir\firstPrivatePath\AsmName.dll
AppDir\firstPrivatePath\AsmName\AsmName.dll
AppDir\secondPrivatePath\AsmName.dll
AppDir\secondPrivatePath\AsmName\AsmName.dll
...
In this example, no configuration file would be needed if the MultiFileLibrary assembly files were deployed to a subdirectory called MultiFileLibrary, since the CLR would automatically scan for a subdirectory whose name matches the name of the assembly being searched for.
If the assembly can’t be found in any of the preceding subdirectories, the CLR starts all over, using an .exe extension instead of a .dll extension. If the assembly still can’t be found, a FileNotFoundException is thrown.
For satellite assemblies, similar rules are followed except that the assembly is expected to be in a subdirectory, whose name matches the culture, of the application’s base directory. For example, if AsmName.dll has a culture of “en-US” applied to it, the following directories are probed:
C:\AppDir\en-US\AsmName.dll
C:\AppDir\en-US\AsmName\AsmName.dll
C:\AppDir\firstPrivatePath\en-US\AsmName.dll
C:\AppDir\firstPrivatePath\en-US\AsmName\AsmName.dll
C:\AppDir\secondPrivatePath\en-US\AsmName.dll
C:\AppDir\secondPrivatePath\en-US\AsmName\AsmName.dll
C:\AppDir\en-US\AsmName.exe
C:\AppDir\en-US\AsmName\AsmName.exe
C:\AppDir\firstPrivatePath\en-US\AsmName.exe
C:\AppDir\firstPrivatePath\en-US\AsmName\AsmName.exe
C:\AppDir\secondPrivatePath\en-US\AsmName.exe
C:\AppDir\secondPrivatePath\en-US\AsmName\AsmName.exe
C:\AppDir\en\AsmName.dll
C:\AppDir\en\AsmName\AsmName.dll
C:\AppDir\firstPrivatePath\en\AsmName.dll
C:\AppDir\firstPrivatePath\en\AsmName\AsmName.dll
C:\AppDir\secondPrivatePath\en\AsmName.dll
C:\AppDir\secondPrivatePath\en\AsmName\AsmName.dll
C:\AppDir\en\AsmName.exe
C:\AppDir\en\AsmName\AsmName.exe
C:\AppDir\firstPrivatePath\en\AsmName.exe
C:\AppDir\firstPrivatePath\en\AsmName\AsmName.exe
C:\AppDir\secondPrivatePath\en\AsmName.exe
C:\AppDir\secondPrivatePath\en\AsmName\AsmName.exe
As you can see, the CLR probes for files with either an .exe or .dll file extension. Since probing can be very time-consuming (especially when the CLR is looking for files over a network), in the XML configuration file, you can specify one or more culture elements to limit the probing that the CLR performs when looking for satellite assemblies. Microsoft provides a FusLogVw.exe tool that you can use to see how the CLR is binding to assemblies at runtime. For more information about it, see http://msdn.microsoft.com/en-us/library/e74a18c4(v=vs.110).aspx.
The name and location of this XML configuration file is different depending on the application type:
§ For executable applications (EXEs), the configuration file must be in the application’s base directory, and it must be the name of the EXE file with “.config” appended to it.
§ For Microsoft ASP.NET Web Form applications, the file must be in the Web application’s virtual root directory and is always named Web.config. In addition, subdirectories can also contain their own Web.config file, and the configuration settings are inherited. For example, a Web application located at http://Wintellect.com/Training would use the settings in the Web.config files contained in the virtual root directory and in its Training subdirectory.
As mentioned at the beginning of this section, configuration settings apply to a particular application and to the machine. When you install the .NET Framework, it creates a Machine.config file. There is one Machine.config file per version of the CLR you have installed on the machine.
The Machine.config file is located in the following directory:
%SystemRoot%\Microsoft.NET\Framework\version\CONFIG
Of course, %SystemRoot% identifies your Windows directory (usually C:\WINDOWS), and version is a version number identifying a specific version of the .NET Framework (something like v4.0.#####).
Settings in the Machine.config file represent default settings that affect all applications running on the machine. An administrator can create a machine-wide policy by modifying the single Machine.config file. However, administrators and users should avoid modifying this file because it contains many settings related to various things, making it much more difficult to navigate. Plus, you want the application’s settings to be backed up and restored, and keeping an application’s settings in the application-specific configuration file enables this.
[2] When using /t[arget]:winmdobj, the resulting .winmdobj file must be passed to the WinMDExp.exe tool which massages the metadata a bit in order to expose the assembly’s public CLR types as Windows Runtime types. The WinMDExp.exe tool does not touch the IL code in any way.