CLR via C#(2012)
Part I. CLR Basics
Chapter 3. Shared Assemblies and Strongly Named Assemblies
In this chapter:
Two Kinds of Assemblies, Two Kinds of Deployment
Giving an Assembly a Strong Name
The Global Assembly Cache
Building an Assembly That References a Strongly Named Assembly
Strongly Named Assemblies Are Tamper-Resistant
Delayed Signing
Privately Deploying Strongly Named Assemblies
How the Runtime Resolves Type References
Advanced Administrative Control (Configuration)
In Chapter 2, I talked about the steps required to build, package, and deploy an assembly. I focused on what’s called private deployment, in which assemblies are placed in the application’s base directory (or a subdirectory thereof) for the application’s sole use. Deploying assemblies privately gives a company a large degree of control over the naming, versioning, and behavior of the assembly.
In this chapter, I’ll concentrate on creating assemblies that can be accessed by multiple applications. The assemblies that ship with the Microsoft .NET Framework are an excellent example of globally deployed assemblies, because all managed applications use types defined by Microsoft in the .NET Framework Class Library (FCL).
As I mentioned in Chapter 2, Microsoft Windows has a reputation for being unstable. The main reason for this reputation is the fact that applications are built and tested using code implemented by someone else. After all, when you write an application for Windows, your application is calling into code written by Microsoft developers. Also, a large number of companies make controls that application developers can incorporate into their own applications. In fact, the .NET Framework encourages this, and many control vendors have appeared over time.
As time marches on, Microsoft developers and control developers modify their code: they fix bugs, patch security flaws, add features, and so on. Eventually, the new code makes its way onto the user’s machine. The user’s applications that were previously installed and working fine are no longer using the same code that the applications were built and tested with. As a result, the applications’ behavior is no longer predictable, which contributes to the instability of Windows.
File versioning is a very difficult problem to solve. In fact, I assert that if you take a file that is used by other code files and change just one bit in the file—change a 0 to a 1 or a 1 to a 0—there’s absolutely no way to guarantee that code that used the file before it was changed will now work just as well if it uses the new version of the file. One of the reasons why this statement is true is that a lot of applications exploit bugs, either knowingly or unknowingly. If a later version of a file fixes a bug, the application no longer runs as expected.
So here’s the problem: How do you fix bugs and add features to a file and also guarantee that you don’t break some application? I’ve given this question a lot of thought and have come to one conclusion: It’s just not possible. But, obviously, this answer isn’t good enough. Files will ship with bugs, and companies will always want to provide new features. There must be a way to distribute new files with the hope that the applications will work just fine. And if the application doesn’t work fine, there has to be an easy way to restore the application to its last-known good state.
In this chapter, I’ll explain the infrastructure that the .NET Framework has in place to deal with versioning problems. Let me warn you: What I’m about to describe is complicated. I’m going to talk about a lot of algorithms, rules, and policies that are built into the common language runtime (CLR). I’m also going to mention a lot of tools and utilities that the application developer must use. This stuff is complicated because, as I’ve mentioned, the versioning problem is difficult to address and to solve.
Two Kinds of Assemblies, Two Kinds of Deployment
The CLR supports two kinds of assemblies: weakly named assemblies and strongly named assemblies.
IMPORTANT
By the way, you won’t find the term weakly named assembly in any of the .NET Framework documentation. Why? Because I made it up. In fact, the documentation has no term to identify a weakly named assembly. I decided to coin the term so that I can talk about assemblies without any ambiguity as to what kind of assembly I’m referring to.
Weakly named assemblies and strongly named assemblies are structurally identical—that is, they use the same portable executable (PE) file format, PE32(+) header, CLR header, metadata, manifest tables, and Intermediate Language (IL) that we examined in Chapter 1 and Chapter 2. And you use the same tools, such as the C# compiler and AL.exe, to build both kinds of assemblies. The real difference between weakly named and strongly named assemblies is that a strongly named assembly is signed with a publisher’s public/private key pair that uniquely identifies the assembly’s publisher. This key pair allows the assembly to be uniquely identified, secured, and versioned, and it allows the assembly to be deployed anywhere on the user’s machine or even on the Internet. This ability to uniquely identify an assembly allows the CLR to enforce certain known-to-be-safe policies when an application tries to bind to a strongly named assembly. This chapter is dedicated to explaining what strongly named assemblies are and what policies the CLR applies to them.
An assembly can be deployed in two ways: privately or globally. A privately deployed assembly is an assembly that is deployed in the application’s base directory or one of its subdirectories. A weakly named assembly can be deployed only privately. I talked about privately deployed assemblies in Chapter 2. A globally deployed assembly is an assembly that is deployed into some well-known location that the CLR looks in when it’s searching for the assembly. A strongly named assembly can be deployed privately or globally. I’ll explain how to create and deploy strongly named assemblies in this chapter. Table 3-1 summarizes the kinds of assemblies and the ways that they can be deployed.
Table 3-1. How Weakly and Strongly Named Assemblies Can Be Deployed
|
Kind of Assembly |
Can Be Privately Deployed |
Can Be Globally Deployed |
|
Weakly named |
Yes |
No |
|
Strongly named |
Yes |
Yes |
Giving an Assembly a Strong Name
If multiple applications are going to access an assembly, the assembly must be placed in a well-known directory, and the CLR must know to look in this directory automatically when a reference to the assembly is detected. However, we have a problem: Two (or more) companies could produce assemblies that have the same file name. Then, if both of these assemblies get copied into the same well-known directory, the last one installed wins, and all of the applications that were using the old assembly no longer function as desired. (This is exactly why DLL hell exists today in Windows, in which shared DLLs are all just copied into the System32 directory.)
Obviously, differentiating assemblies simply by using a file name isn’t good enough. The CLR needs to support some mechanism that allows assemblies to be uniquely identified. This is what the term strongly named assembly refers to. A strongly named assembly consists of four attributes that uniquely identify the assembly: a file name (without an extension), a version number, a culture identity, and a public key. Since public keys are very large numbers, we frequently use a small hash value derived from a public key. This hash value is called a public key token. The following assembly identity strings (sometimes called an assembly display name) identify four completely different assembly files:
"MyTypes, Version=1.0.8123.0, Culture=neutral, PublicKeyToken=b77a5c561934e089"
"MyTypes, Version=1.0.8123.0, Culture="en-US", PublicKeyToken=b77a5c561934e089"
"MyTypes, Version=2.0.1234.0, Culture=neutral, PublicKeyToken=b77a5c561934e089"
"MyTypes, Version=1.0.8123.0, Culture=neutral, PublicKeyToken=b03f5f7f11d50a3a"
The first string identifies an assembly file called MyTypes.exe or MyTypes.dll (you can’t actually determine the file extension from an assembly identity string). The company producing the assembly is creating version 1.0.8123.0 of this assembly, and nothing in the assembly is sensitive to any one culture because Culture is set to neutral. Of course, any company could produce a MyTypes.dll (or MyTypes.exe) assembly file that is marked with a version number of 1.0.8123.0 and a neutral culture.
There must be a way to distinguish this company’s assembly from another company’s assembly that happens to have the same attributes. For several reasons, Microsoft chose to use standard public/private key cryptographic technologies instead of any other unique identification technique such as GUIDs, URLs, or URNs. Specifically, cryptographic techniques provide a way to check the integrity of the assembly’s bits as they are installed on a machine, and they also allow permissions to be granted on a per-publisher basis. I’ll discuss these techniques later in this chapter. So a company that wants to uniquely mark its assemblies must create a public/private key pair. Then the public key can be associated with the assembly. No two companies should have the same public/private key pair, and this distinction is what allows two companies to create assemblies that have the same name, version, and culture without causing any conflict.
NOTE
The System.Reflection.AssemblyName class is a helper class that makes it easy for you to build an assembly name and to obtain the various parts of an assembly’s name. The class offers several public instance properties, such as CultureInfo, FullName, KeyPair, Name, and Version. The class also offers a few public instance methods, such as GetPublicKey, GetPublicKeyToken, SetPublicKey, and SetPublicKeyToken.
In Chapter 2, I showed you how to name an assembly file and how to apply an assembly version number and a culture. A weakly named assembly can have assembly version and culture attributes embedded in the manifest metadata; however, the CLR always ignores the version number and uses only the culture information when it’s probing subdirectories looking for the satellite assembly. Because weakly named assemblies are always privately deployed, the CLR simply uses the name of the assembly (tacking on a .dll or an .exe extension) when searching for the assembly’s file in the application’s base directory or in any of the application’s subdirectories specified in the Extensible Markup Language (XML) configuration file’s probing element’s privatePath XML attribute.
A strongly named assembly has a file name, an assembly version, and a culture. In addition, a strongly named assembly is signed with the publisher’s private key.
The first step in creating a strongly named assembly is to obtain a key by using the Strong Name utility, SN.exe, that ships with the .NET Framework SDK and Microsoft Visual Studio. This utility offers a whole slew of features depending on the command-line switch you specify. Note that all SN.exe’s command-line switches are case-sensitive. To generate a public/private key pair, you run SN.exe as follows:
SN -k MyCompany.snk
This line tells SN.exe to create a file called MyCompany.snk. This file will contain the public and private key numbers persisted in a binary format.
Public key numbers are very big. If you want to, after creating the file that contains the public and private key, you can use the SN.exe utility again to see the actual public key. To do this, you must execute the SN.exe utility twice. First, you invoke SN.exe with the –p switch to create a file that contains only the public key (MyCompany.PublicKey):[3]
SN -p MyCompany.snk MyCompany.PublicKey sha256
Then, you invoke SN.exe, passing it the –tp switch and the file that contains just the public key:
SN -tp MyCompany.PublicKey
When I execute this line, I get the following output:
Microsoft (R) .NET Framework Strong Name Utility Version 4.0.30319.17929
Copyright (c) Microsoft Corporation. All rights reserved.
Public key (hash algorithm: sha256):
00240000048000009400000006020000002400005253413100040000010001003f9d621b702111
850be453b92bd6a58c020eb7b804f75d67ab302047fc786ffa3797b669215afb4d814a6f294010
b233bac0b8c8098ba809855da256d964c0d07f16463d918d651a4846a62317328cac893626a550
69f21a125bc03193261176dd629eace6c90d36858de3fcb781bfc8b817936a567cad608ae672b6
1fb80eb0
Public key token is 3db32f38c8b42c9a
The SN.exe utility doesn’t offer any way for you to display the private key.
The size of public keys makes them difficult to work with. To make things easier for the developer (and for end users too), public key tokens were created. A public key token is a 64-bit hash of the public key. SN.exe’s –tp switch shows the public key token that corresponds to the complete public key at the end of its output.
Now that you know how to create a public/private key pair, creating a strongly named assembly is simple. When you compile your assembly, you use the /keyfile:<file> compiler switch:
csc /keyfile:MyCompany.snk Program.cs
When the C# compiler sees this switch, the compiler opens the specified file (MyCompany.snk), signs the assembly with the private key, and embeds the public key in the manifest. Note that you sign only the assembly file that contains the manifest; the assembly’s other files can’t be signed explicitly.
If you are using Visual Studio, you can create a new public/private key file by displaying the properties for your project, clicking the Signing tab, selecting the Sign The Assembly check box, and then choosing the <New…> option from the Choose A Strong Name Key File combo box.
Here’s what it means to sign a file: When you build a strongly named assembly, the assembly’s FileDef manifest metadata table includes the list of all the files that make up the assembly. As each file’s name is added to the manifest, the file’s contents are hashed, and this hash value is stored along with the file’s name in the FileDef table. You can override the default hash algorithm used with AL.exe’s /algid switch or apply the assembly-level System.Reflection.AssemblyAlgorithmIdAttribute custom attribute in one of the assembly’s source code files. By default, a SHA-1 algorithm is used.
After the PE file containing the manifest is built, the PE file’s entire contents (except for any Authenticode Signature, the assembly’s strong name data, and the PE header checksum) are hashed, as shown in Figure 3-1. This hash value is signed with the publisher’s private key, and the resulting RSA digital signature is stored in a reserved section (not included in the hash) within the PE file. The CLR header of the PE file is updated to reflect where the digital signature is embedded within the file.
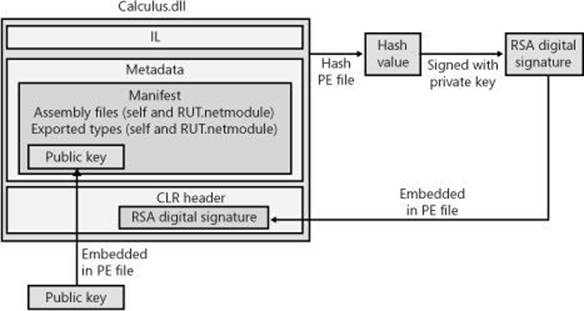
Figure 3-1. Signing an assembly.
The publisher’s public key is also embedded into the AssemblyDef manifest metadata table in this PE file. The combination of the file name, the assembly version, the culture, and the public key gives this assembly a strong name, which is guaranteed to be unique. There is no way that two companies could each produce an assembly named OurLibrary with the same public/private keys unless the companies share this key pair with each other.
At this point, the assembly and all of its files are ready to be packaged and distributed.
As described in Chapter 2, when you compile your source code, the compiler detects the types and members that your code references. You must specify the referenced assemblies to the compiler. For the C# compiler, you use the /reference compiler switch. Part of the compiler’s job is to emit an AssemblyRef metadata table inside the resulting managed module. Each entry in the AssemblyRef metadata table indicates the referenced assembly’s name (without path and extension), version number, culture, and public key information.
IMPORTANT
Because public keys are such large numbers, and a single assembly might reference many assemblies, a large percentage of the resulting file’s total size would be occupied with public key information. To conserve storage space, Microsoft hashes the public key and takes the last 8 bytes of the hashed value. These reduced public key values—known as public key tokens—are what are actually stored in an AssemblyRef table. In general, developers and end users will see public key token values much more frequently than full public key values.
Note, however, that the CLR never uses public key tokens when making security or trust decisions because it is possible that several public keys could hash to a single public key token.
The AssemblyRef metadata information (obtained by using ILDasm.exe) for a simple class library DLL file is shown here:
AssemblyRef #1 (23000001)
-------------------------------------------------------
Token: 0x23000001
Public Key or Token: b7 7a 5c 56 19 34 e0 89
Name: mscorlib
Version: 4.0.0.0
Major Version: 0x00000004
Minor Version: 0x00000000
Build Number: 0x00000000
Revision Number: 0x00000000
Locale: <null>
HashValue Blob:
Flags: [none] (00000000)
From this, you can see that the DLL assembly references a type that is contained in an assembly matching the following attributes:
"MSCorLib, Version=4.0.0.0, Culture=neutral, PublicKeyToken=b77a5c561934e089"
Unfortunately, ILDasm.exe uses the term Locale when it really should be using Culture.
If you look at the DLL assembly’s AssemblyDef metadata table, you see the following:
Assembly
-------------------------------------------------------
Token: 0x20000001
Name : SomeClassLibrary
Public Key :
Hash Algorithm : 0x00008004
Version: 3.0.0.0
Major Version: 0x00000003
Minor Version: 0x00000000
Build Number: 0x00000000
Revision Number: 0x00000000
Locale: <null>
Flags : [none] (00000000)
This is equivalent to the following:
"SomeClassLibrary, Version=3.0.0.0, Culture=neutral, PublicKeyToken=null"
In this line, no public key token is specified because the DLL assembly wasn’t signed with a public/private key pair, making it a weakly named assembly. If I had used SN.exe to create a key file compiled with the /keyfile compiler switch, the resulting assembly would have been signed. If I had then used ILDasm.exe to explore the new assembly’s metadata, the AssemblyDef entry would have bytes appearing after the Public Key field, and the assembly would be strongly named. By the way, the AssemblyDef entry always stores the full public key, not the public key token. The full public key is necessary to ensure that the file hasn’t been tampered with. I’ll explain the tamper resistance of strongly named assemblies later in this chapter.
The Global Assembly Cache
Now that you know how to create a strongly named assembly, it’s time to learn how to deploy this assembly and how the CLR uses the information to locate and load the assembly.
If an assembly is to be accessed by multiple applications, the assembly must be placed into a well-known directory, and the CLR must know to look in this directory automatically when a reference to the assembly is detected. This well-known location is called the global assembly cache (GAC). The exact location of the GAC is an implementation detail that is subject to change with different versions of the .NET Framework. However, you can typically find it in the following directory:
%SystemRoot%\Microsoft.NET\Assembly
The GAC directory is structured: It contains many subdirectories, and an algorithm is used to generate the names of these subdirectories. You should never manually copy assembly files into the GAC; instead, you should use tools to accomplish this task. These tools know the GAC’s internal structure and how to generate the proper subdirectory names.
While developing and testing, the most common tool for installing a strongly named assembly into the GAC is GACUtil.exe. Running this tool without any command-line arguments yields the following usage:
Microsoft (R) .NET Global Assembly Cache Utility. Version 4.0.30319.17929
Copyright (c) Microsoft Corporation. All rights reserved.
Usage: Gacutil <command> [ <options> ]
Commands:
/i <assembly_path> [ /r <...> ] [ /f ]
Installs an assembly to the global assembly cache.
/il <assembly_path_list_file> [ /r <...> ] [ /f ]
Installs one or more assemblies to the global assembly cache.
/u <assembly_display_name> [ /r <...> ]
Uninstalls an assembly from the global assembly cache.
/ul <assembly_display_name_list_file> [ /r <...> ]
Uninstalls one or more assemblies from the global assembly cache.
/l [ <assembly_name> ]
List the global assembly cache filtered by <assembly_name>
/lr [ <assembly_name> ]
List the global assembly cache with all traced references.
/cdl
Deletes the contents of the download cache
/ldl
Lists the contents of the download cache
/?
Displays a detailed help screen
Options:
/r <reference_scheme> <reference_id> <description>
Specifies a traced reference to install (/i, /il) or uninstall (/u, /ul).
/f
Forces reinstall of an assembly.
/nologo
Suppresses display of the logo banner
/silent
Suppresses display of all output
As you can see, you can invoke GACUtil.exe, specifying the /i switch to install an assembly into the GAC, and you can use GACUtil.exe’s /u switch to uninstall an assembly from the GAC. Note that you can’t ever place a weakly named assembly into the GAC. If you pass the file name of a weakly named assembly to GACUtil.exe, it displays the following error message: “Failure adding assembly to the cache: Attempt to install an assembly without a strong name.”
NOTE
By default, the GAC can be manipulated only by a user belonging to the Windows Administrators group. GACUtil.exe will fail to install or uninstall an assembly if the user invoking the execution of the utility isn’t a member of this group.
Using GACUtil.exe’s /i switch is very convenient for developer testing. However, if you use GACUtil.exe to deploy an assembly in a production environment, it’s recommended that you use GACUtil.exe’s /r switch in addition to specifying the /i or /u switch to install or uninstall the assembly. The /r switch integrates the assembly with the Windows install and uninstall engine. Basically, it tells the system which application requires the assembly and then ties the application and the assembly together.
NOTE
If a strongly named assembly is packaged in a cabinet (.cab) file or is compressed in some way, the assembly’s file must first be decompressed to temporary file(s) before you use GACUtil.exe to install the assembly’s files into the GAC. Once the assembly’s files have been installed, the temporary file(s) can be deleted.
The GACUtil.exe tool doesn’t ship with the end-user .NET Framework redistributable package. If your application includes some assemblies that you want deployed into the GAC, you should use the Windows Installer (MSI), because MSI is the only tool that is guaranteed to be on end-user machines and capable of installing assemblies into the GAC.
IMPORTANT
Globally deploying assembly files into the GAC is a form of registering the assembly, although the actual Windows registry isn’t affected in any way. Installing assemblies into the GAC breaks the goal of simple application installation, backup, restore, moving, and uninstall. So it is recommended that you avoid global deployment and use private deployment whenever possible.
What is the purpose of “registering” an assembly in the GAC? Well, say two companies each produce an OurLibrary assembly consisting of one file: OurLibrary.dll. Obviously, both of these files can’t go in the same directory because the last one installed would overwrite the first one, surely breaking some application. When you install an assembly into the GAC, dedicated subdirectories are created under the %SystemRoot%\Microsoft.NET\Assembly directory, and the assembly files are copied into one of these subdirectories.
Normally, no one examines the GAC’s subdirectories, so the structure of the GAC shouldn’t really matter to you. As long as the tools and the CLR know the structure, all is good.
Building an Assembly That References a Strongly Named Assembly
Whenever you build an assembly, the assembly will have references to other strongly named assemblies. This is true because System.Object is defined in MSCorLib.dll, which is strongly named. However, it’s likely that an assembly will reference types in other strongly named assemblies published either by Microsoft, a third party, or your own organization. In Chapter 2, I showed you how to use CSC.exe’s /reference compiler switch to specify the assembly file names you want to reference. If the file name is a full path, CSC.exe loads the specified file and uses its metadata information to build the assembly. As mentioned in Chapter 2, if you specify a file name without a path, CSC.exe attempts to find the assembly by looking in the following directories (in order of their presentation here):
1. Working directory.
2. The directory that contains the CSC.exe file itself. This directory also contains the CLR DLLs.
3. Any directories specified using the /lib compiler switch.
4. Any directories specified using the LIB environment variable.
So if you’re building an assembly that references Microsoft’s System.Drawing.dll, you can specify the /reference:System.Drawing.dll switch when invoking CSC.exe. The compiler will examine the directories shown earlier and will find the System.Drawing.dll file in the directory that contains the CSC.exe file itself, which is the same directory that contains the DLLs for the version of the CLR the compiler is tied to. Even though this is the directory where the assembly is found at compile time, this isn’t the directory where the assembly will be loaded from at runtime.
You see, when you install the .NET Framework, two copies of Microsoft’s assembly files are actually installed. One set is installed into the compiler/CLR directory, and another set is installed into a GAC subdirectory. The files in the compiler/CLR directory exist so that you can easily build your assembly, whereas the copies in the GAC exist so that they can be loaded at runtime.
The reason that CSC.exe doesn’t look in the GAC for referenced assemblies is that you’d have to know the path to the assembly file and the structure of the GAC is undocumented. Alternatively, CSC.exe could allow you to specify a still long but slightly nicer-looking string, such as “System.Drawing, Version=4.0.0.0, Culture=neutral, PublicKeyToken=b03f5f7f11d50a3a.” Both of these solutions were deemed worse than having the assembly files installed twice on the user’s hard drive.
In addition, the assemblies in the compiler/CLR directory are machine agnostic. That is, these assemblies contain only metadata in them. Since the IL code is not required at build time, this directory does not have to contain x86, x64, and ARM versions of an assembly. The assemblies in the GAC contain metadata and IL code because the code is needed only at runtime. And, since the code can be fine-tuned for a specific CPU architecture, the GAC allows multiple copies of an assembly to reside within it; each copy is located under a different subdirectory for each CPU architecture.
Strongly Named Assemblies Are Tamper-Resistant
Signing an assembly with a private key and embedding the signature and public key within an assembly allows the CLR to verify that the assembly has not been modified or corrupted. When an assembly is installed into the GAC, the system hashes the contents of the file containing the manifest and compares the hash value with the RSA digital signature value embedded within the PE file (after unsigning it with the public key). If the values are identical, the file’s contents haven’t been tampered with. In addition, the system hashes the contents of the assembly’s other files and compares the hash values with the hash values stored in the manifest file’s FileDef table. If any of the hash values don’t match, at least one of the assembly’s files has been tampered with, and the assembly will fail to install into the GAC.
When an application needs to bind to an assembly, the CLR uses the referenced assembly’s properties (name, version, culture, and public key) to locate the assembly in the GAC. If the referenced assembly can be found, its containing subdirectory is returned, and the file holding the manifest is loaded. Finding the assembly this way assures the caller that the assembly loaded at runtime came from the same publisher that built the assembly the code was compiled against. This assurance is possible because the public key token in the referencing assembly’s AssemblyRef table corresponds to the public key in the referenced assembly’s AssemblyDef table. If the referenced assembly isn’t in the GAC, the CLR looks in the application’s base directory and then in any of the private paths identified in the application’s configuration file; then, if the application was installed using MSI, the CLR asks MSI to locate the assembly. If the assembly can’t be found in any of these locations, the bind fails, and a System.IO.FileNotFoundException is thrown.
When strongly named assembly files are loaded from a location other than the GAC (via the application’s base directory or via a codeBase element in a configuration file), the CLR compares hash values when the assembly is loaded. In other words, a hash of the file is performed every time an application executes and loads the assembly. This performance hit is a tradeoff for being certain that the assembly file’s content hasn’t been tampered with. When the CLR detects mismatched hash values at runtime, it throws a System.IO.FileLoadException.
NOTE
When a strongly named assembly is installed in the GAC, the system ensures that the file containing the manifest hasn’t been tampered with. This check occurs only once, at installation time. In addition, to improve performance, the CLR does not check if a strongly named assembly has been tampered with if the assembly is fully trusted and is being loaded into a fully trusted AppDomain. On the other hand, when a strongly named assembly is loaded from a directory other than the GAC, the CLR verifies the assembly’s manifest file to ensure that the file’s contents have not been tampered with, causing an additional performance hit every time this file is loaded.
Delayed Signing
Earlier in this chapter, I discussed how the SN.exe tool can produce public/private key pairs. This tool generates the keys by making calls into the Crypto API provided by Windows. These keys can be stored in files or other storage devices. For example, large organizations (such as Microsoft) will maintain the returned private key in a hardware device that stays locked in a vault; only a few people in the company have access to the private key. This precaution prevents the private key from being compromised and ensures the key’s integrity. The public key is, well, public and freely distributed.
When you’re ready to package your strongly named assembly, you’ll have to use the secure private key to sign it. However, while developing and testing your assembly, gaining access to the secure private key can be a hassle. For this reason, the .NET Framework supports delayed signing, sometimes referred to as partial signing. Delayed signing allows you to build an assembly by using only your company’s public key; the private key isn’t necessary. Using the public key allows assemblies that reference your assembly to embed the correct public key value in their AssemblyRef metadata entries. It also allows the assembly to be placed in the GAC appropriately. If you don’t sign the file with your company’s private key, you lose all of the tampering protection afforded to you because the assembly’s files won’t be hashed, and a digital signature won’t be embedded in the file. This loss of protection shouldn’t be a problem, however, because you use delayed signing only while developing your own assembly, not when you’re ready to package and deploy the assembly.
Basically, you get your company’s public key value in a file and pass the file name to whatever utility you use to build the assembly. (As I have shown earlier in this chapter, you can use SN.exe’s –p switch to extract a public key from a file that contains a public/private key pair.) You must also tell the tool that you want the assembly to be delay signed, meaning that you’re not supplying a private key. For the C# compiler, you do this by specifying the /delaysign compiler switch. In Visual Studio, you display the properties for your project, click the Signing tab, and then select the Delay Sign Only check box. If you’re using AL.exe, you can specify the /delay[sign] command-line switch.
When the compiler or AL.exe detects that you’re delay signing an assembly, it will emit the assembly’s AssemblyDef manifest entry, which will contain the assembly’s public key. Again, the presence of the public key allows the assembly to be placed in the GAC. It also allows you to build other assemblies that reference this assembly; the referencing assemblies will have the correct public key in their AssemblyRef metadata table entries. When creating the resulting assembly, space is left in the resulting PE file for the RSA digital signature. (The utility can determine how much space is necessary from the size of the public key.) Note that the file’s contents won’t be hashed at this time either.
At this point, the resulting assembly doesn’t have a valid signature. Attempting to install the assembly into the GAC will fail because a hash of the file’s contents hasn’t been done—the file appears to have been tampered with. On every machine on which the assembly needs to be installed into the GAC, you must prevent the system from verifying the integrity of the assembly’s files. To do this, you use the SN.exe utility, specifying the –Vr command-line switch. Executing SN.exe with this switch also tells the CLR to skip checking hash values for any of the assembly’s files when loaded at runtime. Internally, SN’s –Vr switch adds the assembly’s identity under the following registry subkey: HKEY_LOCAL_MACHINE\SOFTWARE\Microsoft\StrongName\Verification.
IMPORTANT
When using any utility that manipulates the registry, make sure that you run the 64-bit version of the utility on a 64-bit machine. By default, the 32-bit utilities are installed in C:\Program Files (x86)\Microsoft SDKs\Windows\v8.0A\bin\NETFX 4.0 Tools, and the 64-bit utilities are installed in C:\Program Files (x86)\Microsoft SDKs\Windows\v8.0A\bin\NETFX 4.0 Tools\x64.
When you’re finished developing and testing the assembly, you need to officially sign it so that you can package and deploy it. To sign the assembly, use the SN.exe utility again, this time with the –R switch and the name of the file that contains the actual private key. The –R switch causes SN.exe to hash the file’s contents, sign it with the private key, and embed the RSA digital signature in the file where the space for it had previously been reserved. After this step, you can deploy the fully signed assembly. On the developing and testing machines, don’t forget to turn verification of this assembly back on by using SN.exe’s –Vu or –Vx command-line switch. The following list summarizes the steps discussed in this section to develop your assembly by using the delayed signing technique:
1. While developing an assembly, obtain a file that contains only your company’s public key, and compile your assembly by using the /keyfile and /delaysign compiler switches:
csc /keyfile:MyCompany.PublicKey /delaysign MyAssembly.cs
2. After building the assembly, execute the following line so that the CLR will trust the assembly’s bytes without performing the hash and comparison. This allows you to install the assembly in the GAC (if you desire). Now, you can build other assemblies that reference the assembly, and you can test the assembly. Note that you have to execute the following command line only once per machine; it’s not necessary to perform this step each time you build your assembly.
SN.exe -Vr MyAssembly.dll
3. When ready to package and deploy the assembly, obtain your company’s private key, and then execute the line below. You can install this new version in the GAC if you desire, but don’t attempt to install it in the GAC until executing step 4.
SN.exe -Ra MyAssembly.dll MyCompany.PrivateKey
4. To test in real conditions, turn verification back on by executing the following command line:
SN.exe -Vu MyAssembly.dll
At the beginning of this section, I mentioned how organizations keep their key pairs in a hardware device such as a smart card. To keep these keys secure, you must make sure that the key values are never persisted in a disk file. Cryptographic service providers (CSPs) offer containers that abstract the location of these keys. Microsoft, for example, uses a CSP that has a container that, when accessed, obtains the private key from a hardware device.
If your public/private key pair is in a CSP container, you’ll have to specify different switches to the CSC.exe, AL.exe, and SN.exe programs: When compiling (CSC.exe), specify the /keycontainer switch instead of the /keyfile switch; when linking (AL.exe), specify its /keynameswitch instead of its /keyfile switch; and when using the Strong Name program (SN.exe) to add a private key to a delay-signed assembly, specify the –Rc switch instead of the –R switch. SN.exe offers additional switches that allow you to perform operations with a CSP.
IMPORTANT
Delayed signing is also useful whenever you want to perform some other operation to an assembly before you package it. For example, you may want to run an obfuscator over your assembly. You can’t obfuscate an assembly after it’s been fully signed because the hash value will be incorrect. So, if you want to obfuscate an assembly file or perform any other type of post-build operation, you should use delayed signing, perform the post-build operation, and then run SN.exe with the –R or –Rc switch to complete the signing process of the assembly with all of its hashing.
Privately Deploying Strongly Named Assemblies
Installing assemblies into the GAC offers several benefits. The GAC enables many applications to share assemblies, reducing physical memory usage on the whole. In addition, it’s easy to deploy a new version of the assembly into the GAC and have all applications use the new version via a publisher policy (described later in this chapter). The GAC also provides side-by-side management for an assembly’s different versions. However, the GAC is usually secured so that only an administrator can install an assembly into it. Also, installing into the GAC breaks the simple copy deployment story.
Although strongly named assemblies can be installed into the GAC, they certainly don’t have to be. In fact, it’s recommended that you deploy assemblies into the GAC only if the assembly is intended to be shared by many applications. If an assembly isn’t intended to be shared, it should be deployed privately. Deploying privately preserves the simple copy install deployment story and better isolates the application and its assemblies. Also, the GAC isn’t intended to be the new C:\Windows\System32 dumping ground for common files. The reason is because new versions of assemblies don’t overwrite each other; they are installed side by side, eating up disk space.
In addition to deploying a strongly named assembly in the GAC or privately, a strongly named assembly can be deployed to some arbitrary directory that a small set of applications know about. For example, you might be producing three applications, all of which want to share a strongly named assembly. Upon installation, you can create four directories: one for each application and an additional directory for the assembly you want shared. When you install each application into its directory, also install an XML configuration file, and have the shared assembly’s codeBaseelement indicate the path of the shared assembly. Now at runtime, the CLR will know to look in the strongly named assembly’s directory for the shared assembly. For the record, this technique is rarely used and is somewhat discouraged because no single application controls when the assembly’s files should be uninstalled.
NOTE
The configuration file’s codeBase element actually identifies a URL. This URL can refer to any directory on the user’s machine or to a Web address. In the case of a Web address, the CLR will automatically download the file and store it in the user’s download cache (a subdirectory under C:\Users\UserName\Local Settings\Application Data\Assembly, where UserName is the name of the Windows user account currently signed on). When referenced in the future, the CLR will compare the timestamp of the downloaded file with the timestamp of the file at the specified URL. If the timestamp of the file at the URL is newer, the CLR will download the new version of the file and load it. If the previously downloaded file is newer, the CLR will load this file and will not download the file again (improving performance). An example of a configuration file containing a codeBase element is shown later in this chapter.
How the Runtime Resolves Type References
At the beginning of Chapter 2, we saw the following source code:
public sealed class Program {
public static void Main() {
System.Console.WriteLine("Hi");
}
}
This code is compiled and built into an assembly, say Program.exe. When you run this application, the CLR loads and initializes. Then the CLR reads the assembly’s CLR header, looking for the MethodDefToken that identifies the application’s entry point method (Main). From the MethodDef metadata table, the offset within the file for the method’s IL code is located and JIT-compiled into native code, which includes having the code verified for type safety. The native code then starts executing. Following is the IL code for the Main method. To obtain this output, I ran ILDasm.exe, chose the View menu’s Show Bytes menu item, and then double-clicked the Main method in the tree view.
.method public hidebysig static void Main() cil managed
// SIG: 00 00 01
{
.entrypoint
// Method begins at RVA 0x2050
// Code size 11 (0xb)
.maxstack 8
IL_0000: /* 72 | (70)000001 */
ldstr "Hi"
IL_0005: /* 28 | (0A)000003 */
call void [mscorlib]System.Console::WriteLine(string)
IL_000a: /* 2A | */
ret
} // end of method Program::Main
When JIT-compiling this code, the CLR detects all references to types and members and loads their defining assemblies (if not already loaded). As you can see, the IL code above has a reference to System.Console.WriteLine. Specifically, the IL call instruction references metadata token 0A000003. This token identifies entry 3 in the MemberRef metadata table (table 0A). The CLR looks up this MemberRef entry and sees that one of its fields refers to an entry in a TypeRef table (the System.Console type). From the TypeRef entry, the CLR is directed to an AssemblyRef entry: “mscorlib, Version=4.0.0.0, Culture=neutral, PublicKeyToken=b77a5c561934e089”. At this point, the CLR knows which assembly it needs. Now the CLR must locate the assembly in order to load it.
When resolving a referenced type, the CLR can find the type in one of three places:
§ Same file Access to a type that is in the same file is determined at compile time (sometimes referred to as early bound). The type is loaded out of the file directly, and execution continues.
§ Different file, same assembly The runtime ensures that the file being referenced is, in fact, in the assembly’s ModuleRef table of the current assembly’s manifest. The runtime then looks in the directory where the assembly’s manifest file was loaded. The file is loaded, its hash value is checked to ensure the file’s integrity, the type’s member is found, and execution continues.
§ Different file, different assembly When a referenced type is in a different assembly’s file, the runtime loads the file that contains the referenced assembly’s manifest. If this file doesn’t contain the type, the appropriate file is loaded. The type’s member is found, and execution continues.
NOTE
The ModuleDef, ModuleRef, and FileDef metadata tables refer to files using the file’s name and its extension. However, the AssemblyRef metadata table refers to assemblies by file name without an extension. When binding to an assembly, the system automatically appends .dll and .exe file extensions while attempting to locate the file by probing the directories as mentioned in the Simple Administrative Control (Configuration) section in Chapter 2.
If any errors occur while resolving a type reference—file can’t be found, file can’t be loaded, hash mismatch, and so on—an appropriate exception is thrown.
NOTE
If you want, your code can register callback methods with System.AppDomain’s AssemblyResolve, ReflectionOnlyAssemblyResolve, and TypeResolve events. In your callback methods, you can execute code that resolves the binding problem and allows the application to continue running without throwing an exception.
In the previous example, the CLR determines that System.Console is implemented in a different assembly than the caller. The CLR must search for the assembly and load the PE file that contains the assembly’s manifest. The manifest is then scanned to determine the PE file that implements the type. If the manifest file contains the referenced type, all is well. If the type is in another of the assembly’s files, the CLR loads the other file and scans its metadata to locate the type. The CLR then creates its internal data structures to represent the type, and the JIT compiler completes the compilation for the Main method. Finally, the Main method can start executing.
Figure 3-2 illustrates how type binding occurs.
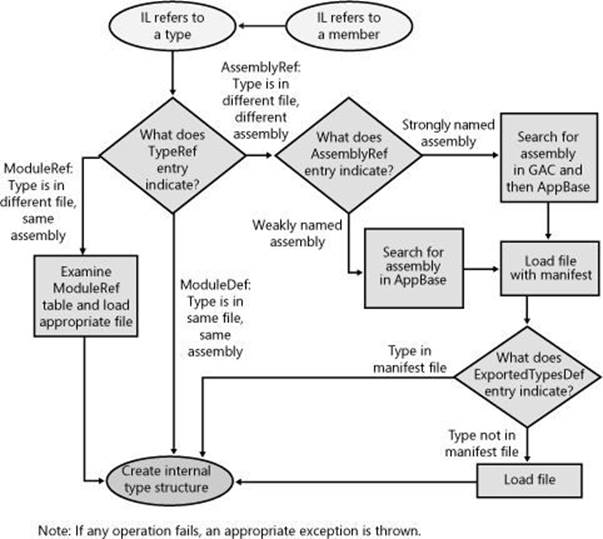
Figure 3-2. Flowchart showing how, given IL code that refers to a method or type, the CLR uses metadata to locate the proper assembly file that defines a type.
IMPORTANT
Strictly speaking, the example just described isn’t 100 percent correct. For references to methods and types defined in an assembly that does not ship with the .NET Framework, the discussion is correct. However, the .NET Framework assemblies (including MSCorLib.dll) are closely tied to the version of the CLR that’s running. Any assembly that references .NET Framework assemblies always binds to the version that matches the CLR’s version. This is called unification, and Microsoft does this because they test all of the .NET Framework assemblies with a particular version of the CLR; therefore, unifying the code stack helps ensure that applications will work correctly.
So in the previous example, the reference to System.Console’s WriteLine method binds to whatever version of MSCorLib.dll matches the version of the CLR, regardless of what version of MSCorLib.dll is referenced in the assembly’s AssemblyRef metadata table.
There is one more twist to this story: To the CLR, all assemblies are identified by name, version, culture, and public key. However, the GAC identifies assemblies using name, version, culture, public key, and CPU architecture. When searching the GAC for an assembly, the CLR figures out what type of process the application is currently running in: 32-bit x86 (possibly using the WoW64 technology), 64-bit x64, or 32-bit ARM. Then, when searching the GAC for an assembly, the CLR first searches for a CPU architecture–specific version of the assembly. If it does not find a matching assembly, it then searches for a CPU-agnostic version of the assembly.
In this section, you saw how the CLR locates an assembly when using a default policy. However, an administrator or the publisher of an assembly can override the default policy. In the next two sections, I’ll describe how to alter the CLR’s default binding policy.
NOTE
The CLR supports the ability to move a type (class, structure, enum, interface, or delegate) from one assembly to another. For example, in .NET 3.5, the System.TimeZoneInfo class is defined in the System.Core.dll assembly. But in .NET 4.0, Microsoft moved this class to the MSCorLib.dll assembly. Normally, moving a type from one assembly to another would break applications. However, the CLR offers a System.Runtime.CompilerServices.TypeForwardedToAttribute attribute, which can be applied to the original assembly (such as System.Core.dll). The parameter that you pass to this attribute’s constructor is of type System.Type and it indicates the new type (that is now defined in MSCorLib.dll) that applications should now use. The CLR’s binder uses this information. Since the TypeForwardedToAttribute’s constructor takes a Type, the assembly containing this attribute will be dependent on the new assembly defining the type.
If you take advantage of this feature, then you should also apply the System.Runtime.CompilerServices.TypeForwardedFromAttribute attribute to the type in the new assembly and pass to this attribute’s constructor a string with the full name of the assembly that used to define the type. This attribute typically is used for tools, utilities, and serialization. Since theTypeForwardedFromAttribute’s constructor takes a String, the assembly containing this attribute is not dependent on the assembly that used to define the type.
Advanced Administrative Control (Configuration)
In the section Simple Administrative Control (Configuration) in Chapter 2, I gave a brief introduction to how an administrator can affect the way the CLR searches and binds to assemblies. In that section, I demonstrated how a referenced assembly’s files can be moved to a subdirectory of the application’s base directory and how the CLR uses the application’s XML configuration file to locate the moved files.
Having discussed only the probing element’s privatePath attribute in Chapter 2, I’m going to discuss the other XML configuration file elements in this section. Following is an XML configuration file:
<?xml version="1.0"?>
<configuration>
<runtime>
<assemblyBinding xmlns="urn:schemas-microsoft-com:asm.v1">
<probing privatePath="AuxFiles;bin\subdir" />
<dependentAssembly>
<assemblyIdentity name="SomeClassLibrary"
publicKeyToken="32ab4ba45e0a69a1" culture="neutral"/>
<bindingRedirect
oldVersion="1.0.0.0" newVersion="2.0.0.0" />
<codeBase version="2.0.0.0"
href="http://www.Wintellect.com/SomeClassLibrary.dll" />
</dependentAssembly>
<dependentAssembly>
<assemblyIdentity name="TypeLib"
publicKeyToken="1f2e74e897abbcfe" culture="neutral"/>
<bindingRedirect
oldVersion="3.0.0.0-3.5.0.0" newVersion="4.0.0.0" />
<publisherPolicy apply="no" />
</dependentAssembly>
</assemblyBinding>
</runtime>
</configuration>
This XML file gives a wealth of information to the CLR. Here’s what it says:
§ probing element Look in the application base directory’s AuxFiles and bin\subdir subdirectories when trying to find a weakly named assembly. For strongly named assemblies, the CLR looks in the GAC or in the URL specified by the codeBase element. The CLR looks in the application’s private paths for a strongly named assembly only if no codeBase element is specified.
§ First dependentAssembly, assemblyIdentity, and bindingRedirect elements When attempting to locate version 1.0.0.0 of the culture-neutral SomeClassLibrary assembly published by the organization that controls the 32ab4ba45e0a69a1 public key token, locate version 2.0.0.0 of the same assembly instead.
§ codeBase element When attempting to locate version 2.0.0.0 of the culture-neutral SomeClassLibrary assembly published by the organization that controls the 32ab4ba45e0a69a1 public key token, try to find it at the following URL:www.Wintellect.com/SomeClassLibrary.dll. Although I didn’t mention it in Chapter 2, a codeBase element can also be used with weakly named assemblies. In this case, the assembly’s version number is ignored and should be omitted from the XML’s codeBase element. Also, the codeBase URL must refer to a directory under the application’s base directory.
§ Second dependentAssembly, assemblyIdentity, and bindingRedirect elements When attempting to locate version 3.0.0.0 through version 3.5.0.0 inclusive of the culture-neutral TypeLib assembly published by the organization that controls the 1f2e74e897abbcfe public key token, locate version 4.0.0.0 of the same assembly instead.
§ publisherPolicy element If the organization that produces the TypeLib assembly has deployed a publisher policy file (described in the next section), the CLR should ignore this file.
When compiling a method, the CLR determines the types and members being referenced. Using this information, the runtime determines, by looking in the referencing assembly’s AssemblyRef table, the assembly that was originally referenced when the calling assembly was built. The CLR then looks up the assembly/version in the application’s configuration file and applies any version number redirections; the CLR is now looking for this assembly/version.
If the publisherPolicy element’s apply attribute is set to yes—or if the element is omitted—the CLR examines the GAC for the new assembly/version and applies any version number redirections that the publisher of the assembly feels is necessary; the CLR is now looking for this assembly/version. I’ll talk more about publisher policy in the next section. Finally, the CLR looks up the new assembly/version in the machine’s Machine.config file and applies any version number redirections there.
At this point, the CLR knows the version of the assembly that it should load, and it attempts to load the assembly from the GAC. If the assembly isn’t in the GAC, and if there is no codeBase element, the CLR probes for the assembly as I described in Chapter 2. If the configuration file that performs the last redirection also contains a codeBase element, the CLR attempts to load the assembly from the codeBase element’s specified URL.
Using these configuration files, an administrator can really control what assembly the CLR decides to load. If an application is experiencing a bug, the administrator can contact the publisher of the errant assembly. The publisher can send the administrator a new assembly that the administrator can install. By default, the CLR won’t load this new assembly because the already-built assemblies don’t reference the new version. However, the administrator can modify the application’s XML configuration file to instruct the CLR to load the new assembly.
If the administrator wants all applications on the machine to pick up the new assembly, the administrator can modify the machine’s Machine.config file instead, and the CLR will load the new assembly whenever an application refers to the old assembly.
If the new assembly doesn’t fix the original bug, the administrator can delete the binding redirection lines from the configuration file, and the application will behave as it did before. It’s important to note that the system allows the use of an assembly that doesn’t exactly match the assembly version recorded in the metadata. This extra flexibility is very handy.
Publisher Policy Control
In the scenario described in the previous section, the publisher of an assembly simply sent a new version of the assembly to the administrator, who installed the assembly and manually edited the application’s or machine’s XML configuration files. In general, when a publisher fixes a bug in an assembly, the publisher would like an easy way to package and distribute the new assembly to all of the users. But the publisher also needs a way to tell each user’s CLR to use the new assembly version instead of the old assembly version. Sure, each user could modify his or her application’s or machine’s XML configuration file, but this is terribly inconvenient and error prone. What the publisher needs is a way to create policy information that is installed on the user’s computer when the new assembly is installed. In this section, I’ll show how an assembly’s publisher can create this policy information.
Let’s say that you’re a publisher of an assembly and that you’ve just created a new version of your assembly that fixes some bugs. When you package your new assembly to send out to all of your users, you should also create an XML configuration file. This configuration file looks just like the configuration files we’ve been talking about. Here’s an example file (called SomeClassLibrary.config) for the SomeClassLibrary.dll assembly:
<configuration>
<runtime>
<assemblyBinding xmlns="urn:schemas-microsoft-com:asm.v1">
<dependentAssembly>
<assemblyIdentity name="SomeClassLibrary"
publicKeyToken="32ab4ba45e0a69a1" culture="neutral"/>
<bindingRedirect
oldVersion="1.0.0.0" newVersion="2.0.0.0" />
<codeBase version="2.0.0.0"
href="http://www.Wintellect.com/SomeClassLibrary.dll"/>
</dependentAssembly>
</assemblyBinding>
</runtime>
</configuration>
Of course, publishers can set policies only for the assemblies that they themselves create. In addition, the elements shown here are the only elements that can be specified in a publisher policy configuration file; you can’t specify the probing or publisherPolicy elements, for example.
This configuration file tells the CLR to load version 2.0.0.0 of the SomeClassLibrary assembly whenever version 1.0.0.0 of the assembly is referenced. Now you, the publisher, can create an assembly that contains this publisher policy configuration file. You create the publisher policy assembly by running AL.exe as follows:
AL.exe /out:Policy.1.0.SomeClassLibrary.dll
/version:1.0.0.0
/keyfile:MyCompany.snk
/linkresource:SomeClassLibrary.config
Let me explain the meaning of AL.exe’s command-line switches:
§ /out This switch tells AL.exe to create a new PE file, called Policy.1.0.SomeClassLibrary.dll, which contains nothing but a manifest. The name of this assembly is very important. The first part of the name,Policy, tells the CLR that this assembly contains publisher policy information. The second and third parts of the name,1.0, tell the CLR that this publisher policy assembly is for any version of the SomeClassLibrary assembly that has a major and minor version of 1.0. Publisher policies apply to the major and minor version numbers of an assembly only; you can’t create a publisher policy that is specific to individual builds or revisions of an assembly. The fourth part of the name,SomeClassLibrary, indicates the name of the assembly that this publisher policy corresponds to. The fifth and last part of the name,dll, is simply the extension given to the resulting assembly file.
§ /version This switch identifies the version of the publisher policy assembly; this version number has nothing to do with the SomeClassLibrary assembly itself. You see, publisher policy assemblies can also be versioned. Today, the publisher might create a publisher policy redirecting version 1.0.0.0 of SomeClassLibrary to version 2.0.0.0. In the future, the publisher might want to direct version 1.0.0.0 of SomeClassLibrary to version 2.5.0.0. The CLR uses this version number so that it knows to pick up the latest version of the publisher policy assembly.
§ /keyfile This switch causes AL.exe to sign the publisher policy assembly by using the publisher’s public/private key pair. This key pair must also match the key pair used for all versions of the SomeClassLibrary assembly. After all, this is how the CLR knows that the same publisher created both the SomeClassLibrary assembly and this publisher policy file.
§ /linkresource This switch tells AL.exe that the XML configuration file is to be considered a separate file of the assembly. The resulting assembly consists of two files, both of which must be packaged and deployed to the users along with the new version of the SomeClassLibrary assembly. By the way, you can’t use AL.exe’s /embedresource switch to embed the XML configuration file into the assembly file, making a single file assembly, because the CLR requires the XML file to be contained in its own separate file.
Once this publisher policy assembly is built, it can be packaged together with the new SomeClassLibrary.dll assembly file and deployed to users. The publisher policy assembly must be installed into the GAC. Although the SomeClassLibrary assembly can also be installed into the GAC, it doesn’t have to be. It could be deployed into an application’s base directory or some other directory identified by a codeBase URL.
IMPORTANT
A publisher should create a publisher policy assembly only when deploying an update or a service pack version of an assembly. When doing a fresh install of an application, no publisher policy assemblies should be installed.
I want to make one last point about publisher policy. Say that a publisher distributes a publisher policy assembly, and for some reason, the new assembly introduces more bugs than it fixes. If this happens, the administrator would like to tell the CLR to ignore the publisher policy assembly. To have the runtime do this, the administrator can edit the application’s configuration file and add the following publisherPolicy element:
<publisherPolicy apply="no"/>
This element can be placed as a child element of the <assemblyBinding> element in the application’s configuration file so that it applies to all assemblies, or as a child element of the <dependentAssembly> element in the application’s configuration file to have it apply to a specific assembly. When the CLR processes the application’s configuration file, it will see that the GAC shouldn’t be examined for the publisher policy assembly. So the CLR will continue to operate using the older version of the assembly. Note, however, that the CLR will still examine and apply any policy specified in the Machine.config file.
IMPORTANT
A publisher policy assembly is a way for a publisher to make a statement about the compatibility of different versions of an assembly. If a new version of an assembly isn’t intended to be compatible with an earlier version, the publisher shouldn’t create a publisher policy assembly. In general, use a publisher policy assembly when you build a new version of your assembly that fixes a bug. You should test the new version of the assembly for backward compatibility. On the other hand, if you’re adding new features to your assembly, you should consider the assembly to have no relationship to a previous version, and you shouldn’t ship a publisher policy assembly. In addition, there’s no need to do any backward compatibility testing with such an assembly.
[3] In this example, I am using Enhanced Strong Naming, which was introduced in .NET Framework version 4.5. If you need to produce an assembly that is compatible with previous versions of the .NET Framework, then you will also have to create a counter-signature using the AssemblySignatureKeyAttribute. For details about this, see http://msdn.microsoft.com/en-us/library/hh415055(v=vs.110).aspx.