Adaptive Code via C#. Agile coding with design patterns and SOLID principles (2014)
Chapter 12. Anti-Tampering
Protecting software from reverse engineering is an often-overlooked programming topic with no easy answers. Despite the lack of absolute solutions, it can still be interesting to explore techniques that may help prevent others from understanding and modifying a compiled binary. The reasons for protecting compiled code are varied: you may need to protect proprietary data or algorithms, or you may want to ensure that the proper execution of a program is not interfered with or bypassed.
In addition, most hostile code that the security professional works with will have some form of anti-tampering mechanism in it. In binaries left on a compromised system one will often see encrypted strings, anti-debugger tricks, self-modifying code, and other techniques intended to prevent one from understanding what the binary actually does. Misleading information such as fake debugging symbols, unused command strings, function names that are never dynamically linked, and irrelevant URLs will be left in plain sight, while the real data is stored encrypted as seemingly arbitrary data. You must have some familiarity with obfuscation and protection techniques to have a chance of dealing with such programs effectively.
Where necessary in this chapter, examples are given in inline Intel x86 assembly language for the GCC compiler. Every compiler uses a different form of inline assembly language, and it would be impractical to present the code for each; we have chosen GCC because it supports so many operating systems. If you are converting from GCC inline assembler to that of another compiler, be advised that the operand order is reversed in GCC (the operands are in "src, dest" order rather than in "dest, src order"),[1] and effective addresses are expressed in AT&T syntax rather than in Intel syntax. A detailed list of the differences between Intel and AT&T syntax can be found in "Using as, The GNU Assembler" (http://www.gnu.org/manual/gas-2.9.1/html_chapter/as_toc.html).
12.1. Understanding the Problem of Software Protection
Problem
You are considering adding protection to your software to help prevent crackers from illegally using your software, discovering how your software works, modifying the way in which your software works, or for a variety of other possible reasons. Before investing the time and effort, you would like to understand more about software protection.
Solution
The problem of protection boils down to determining whether the operating conditions for the software are met. This can mean that the user is allowed to run the software, that the machine is licensed to run the software, that the software has not been modified, or that the software is running in a reasonably secure environment (e.g., no debuggers are present).
There are a number of different approaches to software protection:
Input validation
Critical code or data is provided as input to the program, and the correctness of this input determines whether the program will execute correctly. This input can be a key supplied by the user or a "key file" generated during the install process, often used to decrypt portions of the file at runtime. Input validation can be bypassed by obtaining valid input or by removing the dependency on the input.
Hardware validation
A piece of hardware is used to determine whether the program will execute correctly, effectively tying the program to a single machine. This usually involves storing critical code or data on a piece of dedicated hardware, checking hardware serial numbers such as those stored on hard drives and CPUs, or checking the value of the real-time clock. Hardware validation can be bypassed by removing the hardware dependency or by emulating the hardware itself.
Network validation
A remote server determines whether the program will execute and provides critical code or data upon successful validation. Network validation can be bypassed by removing the network dependency or by running the application on a controlled local network.
Environment validation
A check of the local system is performed by examining the memory and disk drives of the system, querying operating system variables, and performing architecture-specific checks to determine whether the environment is safe for execution. These checks can be benign (such as ensuring that the minimum amount of memory or CPU speed is met) or aggressive (such as searching for the presence of a debugger). Environment validation can be bypassed by running the software in an emulator, removing the dependency on the environment check, or modifying the signatures and behavior of software and hardware components on the local system.
Integrity validation
The software examines itself and its components in memory or on disk to determine whether it has been modified since compilation. This often takes the form of producing a digital signature for the software and comparing it with a valid signature, although the comparison may be eliminated by using the signature, or a transformation thereof, as critical code or data during the execution of the software.
Each of these approaches has its advantages, and each has its flaws. Input validation is trivial to implement and sells well because of the illusion that strong encryption provides strong protection. However, it is trivial to detect, and the input can always be intercepted during a valid execution of the software in order to crack the protection. Hardware validation is difficult to bypass and is effective against debugging and disassembly of the software. On the downside, it is expensive, difficult to implement effectively, and requires that the hardware itself be trusted, which is virtually never the case. Network validation is also proof against debugging and disassembly because all validation is performed remotely and required code or data is supplied by the server upon validation. However, it requires that the network itself be trusted (which is not necessarily the case on a local network with no Internet access) and can be broken once a valid execution of the software has been monitored. Environment validation is effective at demanding more skill from a potential attacker. It is trivial to detect, relatively easy to bypass, and very costly in terms of development and debugging time. Integrity validation is simple to implement and addresses the issue at the core of software protection. It is also easy to spot and can quickly be bypassed when the signatures used to verify integrity are stored locally.
There is no single, correct technique. The best results are obtained by combining a number of different techniques: for example, using the correct signature from an integrity validation as the key to decrypt portions of the software during an input validation. It is difficult to name any specific technique, or even a combination of techniques, that can be considered a reliable protection mechanism.
Discussion
The key to writing a good software protection mechanism is in knowing and not underestimating the typical software protection cracker, and assessing the goals and costs of protecting against attack.
The threat of protection crackers
Software is rarely cracked for profit. It is cracked because the protection is trivial ("Why crack it? Because I can"), because the software itself is in demand ("crack requests" and "zero-day warez"), or because the protection is interesting, often sheerly because it is difficult (this is "reverse engineering" for sport). Protecting against every type of attacker is impossible. Instead, we recommend that you determine which type of attacker poses the greatest threat.
If your software is popular and has a high demand, you will want to defend against the "zero-day" cracker by making the crack itself take a long time to produce. The goal here is to sell more copies of the application in the time between when the software is released and when the crack is produced. The crack can be made to take longer in a variety of ways. Distributing validation checks requires that more locations be patched and thereby increases the complexity of the crack. Delaying the effects of a failed validation increases the probability that incomplete cracks will be produced. Performing supplemental validation checks in areas of the program that are used only by the "power user" of your software can also be effective because most crackers know little or nothing about the software they crack and use only the basic feature set when testing their crack. The rule of thumb for this type of software is to hide the protection itself and provide "red herring" protections, which are slightly difficult to defeat, and which appear to be responsible for the security of the application. Anti-debugger code, hardware validation, and network validation all fail here as they only serve to draw attention to the protection itself.
If your software is released frequently and/or has a low cost or a relatively small user base, you will want to defend against the "because I can" cracker by increasing the skill needed to crack your program. This way, users of your software will find it more reasonable to purchase your software than to crack it. Encrypting or packing the software can do this by including anti-debugger code and by making the code of the protection itself tedious to debug and disassemble (e.g., by incorporating a lot of irrelevant mathematical transformations, breaking the protection up into numerous small subroutines, and repeatedly moving variables around on the stack and in memory). In this situation, there is little need for outwitting the cracker with this type of software, as heavy-duty protection would come at too great a software development cost. Instead, focus your protection efforts on frustrating the casual or inexperienced cracker.
If your software is genuinely valuable and is more likely to be reverse-engineered for its algorithms than cracked for purposes of redistribution, you will want to protect against the "for sport" cracker. In this case, you assume that the value of your software is in its originality, and therefore that it's worth spending large amounts of time and money to protect the software. In such cases, the attacker is usually a professional: the application is run in a sandboxed environment, the system state is backed up to recover from hostile code, and replacement hardware is available in case of failure or to examine a hardware validation protection. Dealing with such attackers requires using every technique at your disposal. Encrypt the application in memory, embed a virtual machine to disassociate machine code instructions from effects in the application, or even embed the core algorithms in custom hardware.
The goal of software protection
You must realize that the goal of any specific software protection is not to protect the software but instead to discourage the potential cracker. For any given application that is being protected, you should assume that the cracker has absolute control over the physical and software components of the system on which the application is running. Hardware may be emulated or custom-designed; the operating system and relevant tools may be patched or written from scratch; the network may be an isolated LAN or even a series of loopback devices on a single machine. What this boils down to is that there are few, if any, components of the system that the application can assume to be trusted. This does not mean that writing software protection is futile; rather, it means that you must set realistic goals for the software protection.
The most basic goal of a protection is to increase the level of skill required to crack the application. Anyone with reasonable programming knowledge and a good debugger can trace through an application, find the conditional jumps that a protection makes in the course of its validation, and disable them. A custom packing utility that unpacks only a few instructions at a time, contains a fair amount of anti-debugging code, and reuses code and data addresses to make reconstructing a process image difficult, will require a good deal of experience in protection cracking to defeat.
The ultimate goal is to disguise the nature of the protection itself. Software protections fail primarily because they are easy to spot. When the correct location of a protection is known, the application is 90% cracked. The strongest encryption and the most innovative anti-debugging techniques only serve to lead the cracker directly to your software protection. At that point, it is simply a matter of time before the protection is circumvented. The protection checks should be as unpredictable as possible, so that the cracker finds it difficult to consistently trigger the protection; likewise, the effects of the protection should be hidden, performing long-term code or data corruption that will eventually render the application useless, rather than displaying a message or refusing to execute portions of the application.
The cost of software protection
There is obviously a cost associated with developing a software protection. Often, this cost is extremely high in comparison to the benefits obtained. A protection that takes a week to develop will take an hour or two to defeat, while a month of development might produce a protection that takes a day to bypass. In short, the cost for the attacker, in terms of time and skill, is almost always much lower than the cost for the developer.
When planning to implement a protection, keep these three costs in mind:
Development time
Designing and writing an effective software protection is quite difficult. The programmer must have knowledge of assembly language and operating system internals and some experience with protection cracking techniques. Writing and testing a protection takes valuable resources away from application development. As a result, it is tempting to use a third-party software protection rather than to develop one from scratch. This is often a mistake, however, because most commercial software protections are well known to protection crackers and can be bypassed quite easily. If you are using a third-party software protection, be sure to supplement it with additional in-house protection mechanisms.
Debugging difficulty
Any software protection worth using is going to make the application difficult to debug; after all, this is what a protection is designed to prevent. Protections that rely on CPU-specific instructions or data structures internal to the operating system may very well introduce bugs into an otherwise working application. Supporting such applications on a wide variety of hardware and operating systems can be a nightmare, especially with a large number of users actively reporting problems. Once again, these factors may seem to favor the use of third-party software protections; however, as mentioned above, the gain from such protections is often minimal.
Maintainability
Incorporating a software protection into an application often comes at the price of code understandability. Months or years after the protection has been developed, the programmers maintaining the application may no longer be able to understand the protection or the code it protects. This can result in modifications to the application that result in the protection's failing.
The techniques of software protection are often at odds with the goals of code reusability and maintainability. Most methods entail the obfuscation of code and data within the binary, while some attempt to foil the use of standard analysis tools such as debuggers and disassemblers. Because the obfuscation must take place at a binary level rather than a source-code level, and because binary analysis tools work with an assembly language representation of the binary rather than with the original source code, many of the anti-tampering techniques presented are implemented at the assembly-language level.
Anti-tampering techniques
This chapter is concerned with preventing software tampering: detecting changes in a compiled application, combating the use of common cracking tools, and preventing the understanding of code and data. There are four main approaches to anti-tampering covered here:
§ Detecting modification to a compiled binary
§ Obfuscating code instructions to impede the understanding of an algorithm
§ Obfuscating data in the program
§ Defeating analysis tools
The techniques provided in this chapter are not exhaustive, but rather are intended to demonstrate the options that are available to the programmer, and to provide easy-to-use code and macros for protecting binaries. Much of the code provided is intended to serve as example code, which, for the sake of clarity, limits the code to the technique being discussed. Secure applications of many of these techniques—such as determining where to store keys and valid checksums, or how to detect the success or failure of a validation check without using a conditional jump—require combining different techniques in a single protection. It is left to the reader to devise these combinations based on the examples provided. Many of the techniques presented here—most notably in the anti-debugger section—do not represent the most innovative of software protection technology because of the complexity of more advanced topics. Those interested in pursuing the topic of software protection are encouraged to read the papers listed in Section 12.1.4, but note that this is by no means an exhaustive list of such literature.
See Also
§ "A Taxonomy of Obfuscating Transformations" by Christian Collberg, Clark Thomborson, and Douglas Low: http://www.cs.arizona.edu/~collberg/Research/Publications/CollbergThomborsonLow97a/index.html
§ "Richey's Anti Cracking FAQ": http://mail.hep.by/mirror/wco/T99/Anticrk.htm
§ "Post-Discovery Strategies" by Seplutra: http://www.cwizardx.com/vdat/tusp0001.htm#antidebug
§ "Protecting Your Programs from Piracy" by Vitas Ramanchauskas: http://mail.hep.by/mirror/wco/T99/Antihack.htm
§ UPX Open Source Executable Packer: http://upx.sourceforge.net
[1] Really, this is an artifact of AT&T assembly syntax.
12.2. Detecting Modification
Problem
Binary patches can be applied to compiled programs to alter the contents of code or data. The program needs a way of verifying its integrity at runtime.
Solution
Detecting whether portions of a binary have been modified is essentially an error-detection problem; therefore, a checksum algorithm such as CRC32, MD5, or SHA1 can be used to generate a signature for an arbitrary block of code or data. This signature can then be checked at runtime to determine whether any modification has taken place.
Discussion
WARNING
We have chosen the CRC32 algorithm both for its ease of implementation and for its speed. It is ideal for detecting changes to short sequences of bytes; however, because there are only 232 possible checksum values, and because it is not cryptographically secure, the likelihood of a collision is high, giving the attacker a realistic chance to replace code without changing the checksum. For this kind of application, cryptographic strength is probably overkill, as there are easier attacks than forcing a collision in the checksums (e.g., simply patch the checksumming code).
The checksum API presented here is an implementation of CRC32, which consists of macros for marking the start and end of the block to be checked, as well as a function to calculate the checksum of the block. The function crc32_calc( ) is used to compute the checksum of a buffer.
#define CRC_START_BLOCK(label) void label(void) { }
#define CRC_END_BLOCK(label) void _##label(void) { }
#define CRC_BLOCK_LEN(label) (int)_##label - (int)label
#define CRC_BLOCK_ADDR(label) (unsigned char *)label
static unsigned long crc32_table[256] = {0};
#define CRC_TABLE_LEN 256
#define CRC_POLY 0xEDB88320L
static int crc32(unsigned long a, unsigned long b) {
int idx, prev;
prev = (a >> 8) & 0x00FFFFFF;
idx = (a ^ b) & 0xFF;
return (prev ^ crc32_table[idx] ^ 0xFFFFFFFF);
}
static unsigned long crc32_table_init(void) {
int i, j;
unsigned long crc;
for (i = 0; i < CRC_TABLE_LEN; i++) {
crc = i;
for (j = 8; j > 0; j--) {
if (crc & 1) crc = (crc >> 1) ^ CRC_POLY;
else crc >>= 1;
}
crc32_table[i] = crc;
}
return 1;
}
unsigned long crc32_calc(unsigned char *buf, int buf_len) {
int x;
unsigned long crc = 0xFFFFFFFF;
if (!crc32_table[0]) crc32_table_init( );
for (x = 0; x < buf_len; x++) crc = crc32(crc, buf[x]);
return crc;
}
The following program demonstrates the use of the checksum implementation. Note that the program is first compiled with a printf( ) in main( ) that will print the checksum to stdout. As long as main( ) is linked into the program after the buffer being checked, this printf( ) can be removed and the program recompiled without the value of the checksum changing. Once the checksum is known, a hex editor can be used to patch the checksum value into the location crc32_stored. In this example, the four bytes of the checksum are stored between two 0xFEEDFACE markers that should be overwritten with random bytes before the binary is distributed. Note that the markers will be stored in little-endian order in the binary, hence the reversed ordering of the bytes in the C source.
#include <stdio.h>
/* warning: replace "crc32_stored" with the real checksum! */
asm(".long 0xCEFAEDFE \n" /* look for 0xFEEDFACE markers */
"crc32_stored: \n"
".long 0xFFFFFFFF \n" /* change this in the binary! */
".long 0xCEFAEDFE \n" /* end marker */
);
CRC_START_BLOCK(test)
int test_routine(int a) {
while (a < 12) a = (a - (a * 3)) + 1;
return a;
}
CRC_END_BLOCK( test )
int main(int argc, char *argv[ ]) {
unsigned long crc;
crc = crc32_calc(CRC_BLOCK_ADDR(test), CRC_BLOCK_LEN(test));
#ifdef TEST_BUILD
/* This printf( ) displays the CRC value that needs to be stored in the program.
* The printf( ) must be removed, and the program recompiled before distribution.
*/
printf("CRC is %08X\n", crc);
#else
if (crc != crc32_stored) {
printf("CRC32 %#08X does not match %#08X\n", crc, crc32_stored);
return 1;
}
printf("CRC32 %#08X is OK\n", crc);
#endif
return 0;
}
As mentioned in the comment just prior to the printf( ) call in main( ), you should compile this program with TEST_BUILD defined, then execute it to obtain the CRC value that needs to be replaced for crc32_stored in the binary. Then rebuild the program with TEST_BUILD undefined, and modify the binary with the proper CRC value from the first run.
It is tempting to generate a checksum of the entire program and use this to determine whether any bytes have been changed; however, this causes a loss of granularity for the checksum and can degrade performance. Instead, you should generate multiple checksums for vital sections of code. These checksums can be encrypted, and they can even be supplemented with checksums of trivial blocks of code to disguise which portions of code are significant.
The check used in main( ) performs a simple comparison, if (crc != crc32_stored). While this demonstrates the basic use of a checksum, use of a straight comparison such as this is strongly discouraged. When disassembled, the call to crc32( ) and the subsequent compare are immediately obvious:
804842b: ff 75 fc pushl -4(%ebp)
804842e: ff 75 f8 pushl -8(%ebp)
8048431: e8 f2 fe ff ff call 8048328 <crc32> ;call crc32( )
8048436: 83 c4 10 add $0x10,%esp
8048439: 89 45 f4 mov %eax,-12(%ebp)
804843c: 8b 45 f4 mov -12(%ebp),%eax
804843f: 3b 05 d0 83 04 08 cmp 0x80483d0,%eax ;compare result
8048445: 74 22 je 8048469 ;jump-if-equal
An attacker simply has to change the je instruction (opcode 0x74) at offset 8048445 to a jmp instruction (opcode 0xEB) to defeat this protection. The generated checksum should never be checked against a valid one; instead, the generated checksum should be used as a source of information that the program requires to execute properly. A byte within the checksum could be used as an index into a jump table, for example, or the checksum itself could be used as a key to decrypt critical code or data.
The next program demonstrates how to use a table of function pointers to test the value of a checksum. Each nibble or half-byte in the checksum is used as an index into a 16-entry table of function pointers; only the correct table entry calls the function to check the next nibble. This method requires 8 tables of 16 function pointers so that one table is used for each nibble in the checksum.
#include <stdio.h>
CRC_START_BLOCK(test)
int test_routine(int a) {
while (a < 12) a = (a - (a * 3)) + 1;
return a;
}
CRC_END_BLOCK(test)
typedef void (*crc_check_fn)(unsigned long *);
static void crc_check(unsigned long *crc);
static void crc_nib2 (unsigned long *crc);
static void crc_nib3 (unsigned long *crc);
static void crc_nib4 (unsigned long *crc);
static void crc_nib5 (unsigned long *crc);
static void crc_nib6 (unsigned long *crc);
static void crc_nib7 (unsigned long *crc);
static void crc_nib8 (unsigned long *crc);
crc_check_fn b1[16] = {0,}, b2[16] = {0,}, b3[16] = {0,}, b4[16] = {0,},
b5[16] = {0,}, b6[16] = {0,}, b7[16] = {0,}, b8[16] = {0,};
#define CRC_TABLE_LOOKUP(table) \
int index = *crc & 0x0F; \
crc_check_fn next = table[index]; \
*crc >>= 4; \
(*next)(crc)
static void crc_check(unsigned long *crc) { CRC_TABLE_LOOKUP(b1); }
static void crc_nib2 (unsigned long *crc) { CRC_TABLE_LOOKUP(b2); }
static void crc_nib3 (unsigned long *crc) { CRC_TABLE_LOOKUP(b3); }
static void crc_nib4 (unsigned long *crc) { CRC_TABLE_LOOKUP(b4); }
static void crc_nib5 (unsigned long *crc) { CRC_TABLE_LOOKUP(b5); }
static void crc_nib6 (unsigned long *crc) { CRC_TABLE_LOOKUP(b6); }
static void crc_nib7 (unsigned long *crc) { CRC_TABLE_LOOKUP(b7); }
static void crc_nib8 (unsigned long *crc) { CRC_TABLE_LOOKUP(b8); }
static void crc_good(unsigned long *crc) {
printf("CRC is valid.\n");
}
int main(int argc, char *argv[ ]) {
unsigned long crc;
crc = crc32_calc(CRC_BLOCK_ADDR(test), CRC_BLOCK_LEN(test));
#ifdef TEST_BUILD
printf("CRC32 %#08X\n", crc);
#else
crc_check(&crc);
#endif
return 0;
}
When this program is compiled with TEST_BUILD defined, the resulting binary will print the CRC32 computed for the function test_routine( ) . If the computed CRC32 is 0xFFF7FB7C, the following table indices will represent valid function pointers: b1[12], b2[7], b3[11], b4[15], b5[7], b6[15],b7[15], b8[15]. Each of these contains a pointer to the function that will process the next nibble in the checksum, except for b8[15], which contains a pointer to the function that is called when the checksum has proven valid. The tables in the source can now be rewritten to reflect these correct values:
crc_check_fn b1[16] = { 0, 0, 0, 0, 0, 0, 0, 0, 0, 0, 0, 0, crc_nib2, 0, 0, 0 },
b2[16] = { 0, 0, 0, 0, 0, 0, 0, crc_nib3, 0, 0, 0, 0, 0, 0, 0, 0 },
b3[16] = { 0, 0, 0, 0, 0, 0, 0, 0, 0, 0, 0, crc_nib4, 0, 0, 0, 0 },
b4[16] = { 0, 0, 0, 0, 0, 0, 0, 0, 0, 0, 0, 0, 0, 0, 0, crc_nib5 },
b5[16] = { 0, 0, 0, 0, 0, 0, 0, crc_nib6, 0, 0, 0, 0, 0, 0, 0, 0 },
b6[16] = { 0, 0, 0, 0, 0, 0, 0, 0, 0, 0, 0, 0, 0, 0, 0, crc_nib7 },
b7[16] = { 0, 0, 0, 0, 0, 0, 0, 0, 0, 0, 0, 0, 0, 0, 0, crc_nib8 },
b8[16] = { 0, 0, 0, 0, 0, 0, 0, 0, 0, 0, 0, 0, 0, 0, 0, crc_good };
Obviously, the NULL bytes will have to be replaced with other values to disguise the fact that they are invalid entries. They can be replaced with pointers to functions that handle incorrect checksums, or they can be filled with garbage values to make the program unstable. For example:
crc_check_fn b8[16] = { crc_good - 64, crc_good - 60, crc_good - 56, crc_good - 52,
crc_good - 48, crc_good - 44, crc_good - 40, crc_good - 36,
crc_good - 32, crc_good - 28, crc_good - 24, crc_good - 20,
crc_good - 16, crc_good - 12, crc_good - 8, crc_good - 4,
crc_good };
In this table, the use of incrementally increasing values causes the table to appear to be valid data, as opposed to addresses in the code segment. Note that you can use the techniques for disguising function pointers described in Recipe 12.9 so that casual scans through the data segment do not reveal this to be a table of function pointers.
See Also
Recipe 12.9
12.3. Obfuscating Code
Problem
Most C programs use common programming idioms based on C statements, default data types, and function invocation/return conventions based on the C standard library. Those familiar with C and how it is compiled to assembly language can easily identify these idioms in compiled binary code.
Solution
Obfuscating compiled code requires understanding how the code will look at an assembly-language level. The purpose of obfuscating C code is to create maintainable source code that will run at close to the speed of the original, but that is difficult to understand when represented in assembly language. This difficulty may arise from an increase in the complexity of the algorithm, from an apparent increase in complexity, or from a misrepresentation of the constants, data types, and conditional expressions used in an algorithm.
The examples presented in the discussion for this recipe represent only a handful of ways in which code can be obfuscated. More involved transformations include blurring the boundaries between functions by interleaving the code of two or more functions into a multipurpose function, using custom virtual machines or emulators to execute a byte-code representation of a function, and spawning new threads or processes to perform trivial or irrelevant tasks.
Discussion
TIP
Increased code obfuscation comes at the price of code maintainability. In general, it is preferable to combine several simple techniques along with data obfuscation than to dedicate development and debugging time to perfecting a single, advanced obfuscation technique.
The most common idiom in C programs is "test-and-branch": a value is tested, and the result of the test determines the next statement to be executed. The test-and-branch idiom is the underlying mechanism for conditional expressions (if, if-else, switch) and loops (for, while, do-while), and it is usually implemented in assembly language as:
cmp value, constant
jcc if_true_handler
where jcc is a conditional branch determined by the type of test being performed. Table 12-1 lists the Intel conditional branch instructions and their corresponding C comparison operators.
Table 12-1. Intel conditional branch instructions and their C comparison operators
|
C operator |
Asm mnemonic |
Flags tested |
|
= = |
jz, je |
ZF = = 1 |
|
!= |
jnz, jne |
ZF = = 0 |
|
>= |
jge, jnl |
SF = = OF |
|
jae, jnb, jnc |
CF = = 0 |
|
|
> |
jg, jnle |
ZF = = 0 && SF = = OF |
|
ja, jnbe |
CF = = 0 && ZF = = 0 |
|
|
<= |
jle, jng |
ZF = = 1 && SF != OF |
|
jbe, jna |
ZF = = 1 && CF = = 1 |
|
|
< |
jl, jnge |
SF != OF |
|
jb, jc, jnae |
CF = = 1 |
Intel provides conditional branch instructions that check the parity (PF) flag as well as the zero (ZF), sign (SF), overflow (OF), and carry (CF) flags. The parity flag is set if the least-significant byte in the result of an operation contains an even number of 1 bytes; the zero flag is set if an operation returns zero; the sign flag is set to the most-significant bit of the result; the overflow flag is set if an operation overflows the bounds of a signed integer; and the carry flag is set on arithmetic carry or borrow, and when an operation overflows the bounds of an unsigned integer.
In compiled C code, equality tests make use of ZF, while greater-than and less-than tests make use of OF, CF, and SF. By rewriting test-and-branch code to use the PF, or to use the sign, overflow, or carry flags in circumstances where a zero flag would be expected, the purpose of the test-and-branch can be made less obvious. A simple example can be found in the test-for-zero operation, often implemented in C as:
if (!value) {
; /* zero-handling code here */
}
This produces the following assembly language:
movl value, %eax
test %eax, %eax ; equivalent to (%eax & %eax)
jnz nonzero_value ; jump over zero-handling code
; zero-handling code is here
nonzero_value:
; execution resumes here
In the following alternate implementation, the negl instruction replaces the contents of the eax register with its two's complement. More importantly, it sets CF to 0 if the eax register is 0, and to 1 otherwise. A test for equality has now been replaced by what appears to be a bounds or range check.
Removing the conditional branch can make things even less obvious. The rcl instruction, for example, can be used to rotate CF into a register, which can then be used as an index into a two-element table of addresses. The following IF_ZERO macro demonstrates this technique.
#define IF_ZERO(val) \
asm(" xorl %%ebx, %%ebx\n\t" \
" negl %%eax\n\t" \
" rcl $3, %%ebx\n\t" \
" movl 0f( , %%ebx ), %%eax \n\t" \
" jmp *%%eax \n" \
"0: \n\t" \
" .long 1f\n\t" \
" .long 2f\n" \
"1: \n" \
: : "a" (val) : "%ebx");
#define ELSE \
asm(" jmp 3f\n\t" \
"2: \n");
#define ENDIF \
asm("3: \n");
The IF_ZERO macro places the value to be tested in the eax register, then uses the negl instruction to set the carry flag if the value in the eax register is nonzero. The carry flag is then rotated into a register and used as an index into a jump table. The macro can be used to test for equality by subtracting one value from another and passing it the result. The following example demonstrates how to use IF_ZERO to test the result of calloc( ). Note that the ELSE macro must be included even if an else condition is not needed.
struct MY_STRUCT my_struct;
my_struct = calloc(sizeof(struct MY_STRUCT), 1);
IF_ZERO(my_struct)
fprintf(stderr, "alloc failed\n");
return 0;
ELSE /* the else is required */
ENDIF
The C if statement itself is simple, and it is easy to recognize in a binary. For example:
int value = check_input(user_input);
if (value) {
; /* success-handling code here */
}
This will usually be compiled as a test of value followed by a jnz instruction. Comparing value with a constant results in a jnz instruction following a compare of value with that constant. Changing the type of the value being tested from an integer to a floating-point number will change not only its representation in memory, but also the actual assembly-language comparison instruction:
float value = check_input(user_input);
if (value = = 1.0) {
; /* success-handling code here */
}
Comparing the assembly code generated for the integer test and the float test clearly illustrates the difference between the two from a code obfuscation standpoint:
; First, the integer test: if (value) ...
8048346: 8b 45 fc mov 0xfffffffc(%ebp),%eax
8048349: 85 c0 test %eax,%eax
804834b: 74 10 je 804835d <main+0x35>
; Compare with the float test: if (value = = 1.0) ...
804835d: d9 45 f8 flds
8048360: d9 e8 fld1
8048362: d9 c9 fxch %st(1)
8048364: da e9 fucompp
8048366: df e0 fnstsw %ax
8048368: 80 e4 45 and $0x45,%ah
804836b: 80 fc 40 cmp $0x40,%ah
804836e: 74 02 je 8048372 <main+0x4a>
When a constant value is used in a comparison, it can be increased or decreased as long as value is adjusted by the same amount:
if ((value + 8) << 2 = = 32) { /* if (! value ) */
; /* success-handling code here */
}
if (!(--value)) { /* if ( value = = 1 ) */
; /* success-handling code here */
}
A conditional expression in an if or while statement can be made more confusing by adding additional expressions that will always evaluate to true or false but that appear to be real conditions from within the context of the expression:
volatile int bogus_value = rand( ) % 7;
if (value = = MAGIC_CONSTANT) {
; /* success-handling code here */
} else if (bogus_value > 8) {
; /* this will never be true */
}
The volatile keyword is used here to prevent the compiler from optimizing the else if block out of existence; many "dead code" obfuscations will be recognized as such and discarded by an optimizing compiler. See Recipe 13.2 for a more in-depth discussion of compiler dead-code elimination optimizations.
The best type of bogus condition involves entirely unrelated data, thereby implying that a connection exists between the data in the real and the bogus conditions. Function pointers are ideal candidates for this type of obfuscation:
volatile int const_value = (int) printf;
if (value = = MAGIC_CONSTANT && (const_value & 0xFFFF0000)) {
; /* success-handling code here */
}
Because library functions are loaded into a predictable range of memory, the upper half of a library function's address can be used as a runtime constant. In the previous code, the second half of the logical AND operation always evaluates to true.
Most programs link to shared libraries using dynamic linking resolved by the program loader, which creates references to the shared library functions at the point where they are called. To make compiled code more difficult to understand, shared library functions should be referenced as far away as possible from the calls to them—if not replaced entirely with custom code. By explicitly loading a library with functions like dlopen( ) on Unix or LoadLibrary( ) on Windows, you can refer only to the function pointers where the function is called. The function pointers can be re-used during the course of execution so that different library functions are stored in the same function pointer. Alternatively, a function can be used to return the function pointer from a list or table of such pointers, thereby frustrating automatic analysis:
#ifdef WIN32
#include <windows.h>
#define SPC_C_RUNTIME "msvcrt.dll"
#define SPC_LIBRARY_TYPE_HMODULE
#define SPC_LOAD_LIBRARY(name) LoadLibrary((name))
#define SPC_RESOLVE_SYM(lib, name) GetProcAddress((lib), (name))
#else
#include <dlfcn.h>
#define SPC_C_RUNTIME "libc.so"
#define SPC_LIBRARY_TYPE void *
#define SPC_LOAD_LIBRARY(name) dlopen((name), RTLD_LAZY);
#define SPC_RESOLVE_SYM(lib, name) dlsym((lib), (name))
#endif
enum file_op_enum {
fileop_open, fileop_close, fileop_read, fileop_write, fileop_seek
};
void *file_op(enum file_op_enum op) {
static SPC_LIBRARY_TYPE lib = 0;
static struct FILEOP {
void *open, *close, *read, *write, *seek;
} s = {0};
if (!lib) lib = SPC_LOAD_LIBRARY(SPC_C_RUNTIME);
switch (op) {
case fileop_open:
if (!s.open) s.open = SPC_RESOLVE_SYM(lib, "open");
return s.open;
case fileop_close:
if (!s.close) s.close = SPC_RESOLVE_SYM(lib, "close");
return s.close;
case fileop_read:
if (!s.read) s.read = SPC_RESOLVE_SYM(lib, "read");
return s.read;
case fileop_write:
if (!s.write) s.write = SPC_RESOLVE_SYM(lib, "write");
return s.write;
case fileop_seek:
if (!s.seek) s.seek = SPC_RESOLVE_SYM(lib, "seek");
return s.seek;
}
return 0;
}
The names of the libraries and functions should of course be stored as encrypted strings (see Recipe 12.11) to provide the best possible obfuscation; additional unused library and function names can be stored in plaintext to mislead the analyst.
See Also
Recipe 12.11, Recipe 13.2
12.4. Performing Bit and Byte Obfuscation
Problem
Small values such as bytes, shorts, and integers are difficult to disguise while undergoing mathematical transformations. This makes the values or ranges of constants, indexes, and counters easy to determine in compiled binary code.
Solution
The Obcode library by Pawel Krawczyk (http://echelon.pl/pubs/ ) provides an API for obfuscating bit and byte values, even during the manipulation of those values. The size of the variables are inflated eightfold, so that a byte variable takes 8 bytes and an integer variable takes 32 bytes. The library provides for byte operations such as XOR, AND, OR, and NOT, and operations for integers including ADD, XOR, copy, and swap.
The Obcode library is still under development and thus is lacking in features; however, even in its current state it provides an excellent means of obfuscating small values in memory. Obfuscated values can be stored within data files or within the program itself, provided that the same seed or key is passed to obcode_init( ) for both the reading and the writing of the value.
Discussion
In the Obcode data types, each bit is represented by a byte. If the value of the byte is even, the value of the encoded bit is 1; otherwise, the value of the bit is 0. An Obcode byte is encoded as a series of 8 Obcode bits; likewise, an Obcode int is encoded as a series of 32 Obcode bits. Operations on Obcode values do not decode the values, but rather work on the encoded versions; therefore, the C statement:
x = y ^ z;
would be implemented as:
int i;
for (i = 0; i < 8; i++) {
if (obit_get(y.s[i]) = = obit_get(z.s[i])) x.s[i] = obit_set(0);
else x.s[i] = obit_set(1);
}
where x, y, and z are Obcode bytes, obit_get( ) returns 0 if the Obcode bit argument is odd and 1 if the argument is even, and obit_set( ) returns an Obcode bit representation of the argument. The values of x, y, and z are randomly determined at runtime.
The Obcode API is defined in the file obcode.h:
/* obcode.h */
struct obyte {
unsigned char s[8];
};
struct obint {
unsigned char s[32];
};
extern void obcode_init(unsigned char key);
extern void obcode_finish(void);
extern unsigned char obit_set(int b);
extern unsigned char obit_get(unsigned char b);
extern void obyte_set(struct obyte *b, unsigned char c);
extern unsigned char obyte_get(struct obyte *b);
extern void obit_xor(unsigned char *b1, unsigned char *b2, unsigned char *b3);
extern void obyte_xor(struct obyte *ob1, struct obyte *ob2, struct obyte *ob3);
extern void obit_or(unsigned char *b1, unsigned char *b2, unsigned char *b3);
extern void obit_and(unsigned char *b1, unsigned char *b2, unsigned char *b3);
extern void obit_not(unsigned char *b1, unsigned char *b2);
extern void obyte_add(struct obyte *ob1, struct obyte *ob2, struct obyte *ob3);
extern void obyte_copy(struct obyte *dst, struct obyte *src);
extern void obyte_swap(struct obyte *ob1, struct obyte *ob2);
The following program demonstrates the basic usage of the Obcode library: the first argument passed to the program is XOR'd with a key, then used as an index into a table of function pointers.
#include <stdio.h>
#include <stdlib.h>
#include <obcode.h>
/* typedefs for clarity */
typedef unsigned char obit_t;
typedef struct obyte obyte_t;
typedef struct obint obint_t;
int obytes_equal(obyte_t *a, obyt_t *b) {
int i;
for (i = 0; i < 8; i++)
if (obit_get(a.s[i]) != obit_get(b.s[i])) return 0;
return 1;
}
/* do-nothing subroutines */
void action_write(char *arg) { printf("write %s\n", arg); }
void action_read(char *arg) { printf("read %s\n", arg); }
void action_error(void) { printf("ERROR: Bad parameter\n"); }{
int main(int argc, char *argv[ ]) {
obyte_t input, read_val, write_val;
unsigned char i;
if (argc < 2) {
fprintf(stderr, "Usage: %s num string\n", argv[0]);
return 1;
}
/* initialize the obcode lib with a random key */
obcode_init(0);
/* obfuscate the first argument */
obyte_set(&input, (unsigned char)atoi(argv[1]));
/* obfuscate the values to compare it to--these should really be stored in
* obfuscated form instead of generated
*/
obyte_set(&read_val, 63);
obyte_set(&write_val, 112);
/* perform comparisons */
if (obytes_equal(&input, &read_val)) action_read(argv[2]);
else if (obytes_equal(&input, &write_val)) action_write(argv[2]);
else action_err( );
/* cleanup */
obcode_finish( );
return 0;
}
See Also
Obcode library by Pawel Krawczyk: http://echelon.pl/pubs/
12.5. Performing Constant Transforms on Variables
Problem
Variables used frequently—such as in loops or counters—are difficult to obfuscate without impacting the performance of the program.
Solution
Change variables by a constant value.
Discussion
Changing variables by a constant value is a trivial form of obfuscation; however, it is fast and easy to implement, and it can be combined with other obfuscation methods. Here is an example of the obfuscation:
#define SET_VAR(var) (((var) * 3) + 0x01040200)
#define GET_VAR(var) (((var) - 0x01040200) / 3)
The macros can be applied to any usage of an integer:
for (i = SET_VAR(0); GET_VAR(i) < 10; i = SET_VAR(j + 1)) {
j = GET_VAR(i);
printf("2 + %d = %d\n", i, 2 + GET_VAR(i));
}
Constant transforms are useful only if the SET_VAR and GET_VAR macros are used far apart; otherwise, the transform is immediately obvious. Transformations that are more robust can be created that use different mathematical operations in each of the SET_VAR and GET_VAR macros so that different constants are used in the expansion of each macro. Note that the SET_VAR macro can be used in the initialization of a variable, which will obfuscate the value of the variable at compile time.
12.6. Merging Scalar Variables
Problem
Scalar variables with constant or initialized values disclose information about ranges of values.
Solution
Merging multiple scalar values into a single, larger scalar value can make simple, unrelated values appear to be a large value or bit field. Two 8-bit values can be merged into a single 16-bit value, and two 16-bit values can be merged into a single 32-bit value.
Discussion
Merging scalar variables is a light obfuscation. When used in a loop, a debugger can set a watch on the counter variable and make obvious the fact that the upper or lower half of the variable is being incremented with each iteration of the loop.
The following macros merge two char values into a single short value, and two short values into a single int value. This is accomplished by shifting the shorter values into the larger value that contains them, and by masking half of the larger value and shifting as appropriate to retrieve the shorter value.
/* x and y are chars, returns a short */
/* x is in position 0, y is in position 1 */
#define MERGE_CHAR(x, y) (((y) << 8 ) | (x))
/* s is a short and c is position -- 0 or 1 */
#define GET_CHAR(s, c) (char)(((s) >> (8 * (c))) & 0x00FF)
/* s is a short, c is a position, and val is a char value */
#define SET_CHAR(s, c, val) (((s) & (0xFF00 >> (8 * (c)))) | ((val) << (8 * (c))))
/* x and y are shorts. returns an int */
/* x is in position 0, y is in position 1 */
#define MERGE_SHORT(x, y) (((y) << 16 ) | (x))
/* i is an int and s is position -- 0 or 1 */
#define GET_SHORT(i, s) (short)(((i) >> (16 * (s))) & 0x0FFFF)
/* i is an int, s is position, and val is a short value */
#define SET_SHORT(i, s, val) (((i) & (0xFFFF0000 >> (16 * (s)))) | \
((val) << (16 * (s))))
These macros can be used to obfuscate the conditions of a loop:
int xy = MERGE_SHORT(0x1010, 0xFEEF);
char i;
short ij = MERGE_CHAR(1, 12);
for (i = GET_CHAR(ij, 0); i < GET_CHAR(ij, 1); i++) {
xy = SET_SHORT(xy, 0, (GET_SHORT(xy, 0) + i));
printf("x %#04hX y %#04hX\n", GET_SHORT(xy, 0), GET_SHORT(xy, 1));
}
12.7. Splitting Variables
Problem
Large scalar variables that cannot be merged, or that have large values that cannot easily be manipulated with a constant transform, need to be obfuscated.
Solution
Splitting variables can be effective when the variables holding the split values are in different scopes. The split can also be performed during variable initialization by rewriting the SPLIT_VAR macro presented in Section 12.7.3 to declare and initialize the variables, rather than simply assigning to them.
Discussion
The value of a scalar variable can be split over a number of equal- or smaller-sized variables. The following code demonstrates how the four bytes of an integer can be stored in four different character variables:
#define SPLIT_VAR(in, a, b, c, d) do { \
(a) = (char)((in) >> 24); \
(b) = (char)((in) >> 16); \
(c) = (char)((in) >> 8); \
(d) = (char)((in) & 0xFF); \
} while (0)
#define REBUILD_VAR(a, b, c, d) \
((((a) << 24) & 0xFF000000) | (((b) << 16) & 0x00FF0000) | \
(((c) << 8) & 0x0000FF00) | ((d) & 0xFF))
Each char variable (a, b, c, and d) is filled with a byte of the original four-byte integer variable. This is done by shifting each byte in turn into one of the char variables. Obviously, the four char variables should not be stored contiguously in memory, or splitting the variable will have no effect.
#include <stdlib.h>
char g1, g2; /* store half of the integer here */
void init_rand(char a, char b) {
srand(REBUILD_VAR(a, g1, b, g2));
}
int main(int argc, char *argv[ ]) {
int seed = 0x81206583;
char a, b;
SPLIT_VAR(seed, a, g1, b, g2);
init_rand(a, b);
return 0;
}
12.8. Disguising Boolean Values
Problem
Variables representing boolean values are difficult to disguise because they usually compile to comparisons with 0 or 1.
Solution
Disguising boolean values can be tackled effectively at the assembly-language level by replacing simple test-and-branch code with more complex branching (see Recipe 12.3). Alternatively, the default boolean test can be replaced with an addition.
Discussion
By replacing the default boolean test—usually a sub or an and instruction—with an addition, the purpose of the variable becomes unclear. Rather than implying a yes or no decision, the variable appears to represent two related values:
typedef struct {
char x;
char y;
} spc_bool_t;
#define SPC_TEST_BOOL(b) ((b).x + (b).y)
#define SPC_SET_BOOL_TRUE(b) do { (b).x = 1; (b).y = 0; } while (0)
#define SPC_SET_BOOL_FALSE(b) do { (b).x = -10; (b).y = 10; } while (0)
The SPC_TEST_BOOL macro can be used in conditional expressions:
spc_bool_t b;
SPC_SET_BOOL_TRUE(b);
if (SPC_TEST_BOOL(b)) printf("true!\n");
else printf("false!\n");
See Also
Recipe 12.3
12.9. Using Function Pointers
Problem
By knowing which functions are called—either directly or indirectly—a programmer can understand the operation of a compiled program without resorting to runtime analysis.
Solution
The address of a function will always be visible in memory before it is called; however, by storing an obfuscated version of the function pointer, disassemblers and cross-reference analysis tools will fail to recognize the stored pointer as a code address. Note that this technique will not work with function pointers that require relocation, such as the addresses of functions in shared libraries.
Discussion
Function pointers can be handled like other variables. Because they are essentially compile-time constants, it is best to use a technique that obfuscates them at compile time. It is important that the functions created using the SET_FN_PTR macro presented below be inlined by the compiler so that they do not appear in the resulting executable's symbol table; otherwise, they will be obvious tip-offs to a cracker that something is not as it should be.
#define SET_FN_PTR(func, num) \
static inline void *get_##func(void) { \
int i, j = num / 4; \
long ptr = (long)func + num; \
for (i = 0; i < 2; i++) ptr -= j; \
return (void *)(ptr - (j * 2)); \
}
#define GET_FN_PTR(func) get_##func( )
With the SET_FN_PTR macro, the pointer to a function is returned by a routine that stores the function pointer modified by a programmer-supplied value. The GET_FN_PTR macro calls this routine, which performs a mathematical transformation on the stored pointer and returns the real function address. The following example demonstrates the usage of the macros:
#include <stdio.h>
void my_func(void) {
printf("my_func( ) called!\n");
}
SET_FN_PTR(my_func, 0x01301100); /* 0x01301100 is some arbitrary value */
int main(int argc, char *argv[ ]) {
void (*ptr)(void);
ptr = GET_FN_PTR(my_func); /* get the real address of the function */
(*ptr)( ); /* make the function call */
return 0;
}
12.10. Restructuring Arrays
Problem
Arrays contain information in their structure. Knowing how many dimensions an array has can help in understanding the underlying data. You need a way to hide dimensional information about arrays.
Solution
Disguising the nature of arrays is different from obfuscating a variable. What is important in this case is the order of elements in the array, not the elements themselves. Array elements can be obfuscated using any standard variable obfuscation, but arrays themselves should be restructured as well.
Arrays can be restructured in four ways:
§ Splitting a one-dimensional array into multiple one-dimension arrays
§ Folding a one-dimensional array into a multidimensional array
§ Flattening a multidimensional array into a one-dimensional array
§ Merging two one-dimensional arrays into a single one-dimensional array
In this recipe, an API will be developed for splitting, folding, flattening, and merging arrays.
Discussion
TIP
Array obfuscation is a powerful way of disguising groupings of information by adding or subtracting dimensions from an array. Note that the array data is not obfuscated, merely the ordering of the data. This is insignificant with one-dimensional arrays but can be very effective with large multidimensional arrays.
The first step in developing the API for restructuring arrays is to define a new data type that will represent an array, rather than using the normal C convention for arrays. This array type will hide the management of the array restructuring from the programmer.
typedef enum {
SPC_ARRAY_SPLIT, SPC_ARRAY_MERGE, SPC_ARRAY_FOLD, SPC_ARRAY_FLAT
} spc_array_type;
typedef struct {
spc_array_type type;
int sz_elem;
int num_elem;
int split;
unsigned char data[1];
} spc_array_t;
Four functions—spc_array_split( ), spc_array_merge( ), spc_array_fold( ), and spc_array_flat( )—are provided for creating arrays. The spc_array_get( ) function retrieves an element from an array, and the spc_array_set( ) function sets an element in the array. Use spc_array_free( ) to destroy an array.
#include <stdlib.h>
#include <limits.h>
/* Create a split array of num_elem elements, each of size sz_elem */
spc_array_t *spc_array_split(int sz_elem, int num_elem) {
double size;
spc_array_t *a;
size = (((double)sz_elem * (double)num_elem) / 2) + (double)sizeof(spc_array_t);
if (size > (double)INT_MAX) return 0;
if (!(a = (spc_array_t *)calloc((size_t)size, 1))) return 0;
a->type = SPC_ARRAY_SPLIT;
a->sz_elem = sz_elem;
a->num_elem = num_elem;
a->split = 2; /* array is split into 2 arrays */
return a;
}
/* Create two merged arrays with num_first elements in array 1 and num_second
* elements in array 2
*/
spc_array_t *spc_array_merge(int sz_elem, int num_first, int num_second) {
double size;
spc_array_t *a;
size = (((double)num_first + (double)num_second) * (double)sz_elem) +
(double)sizeof(spc_array_t);
if (!num_first || size > (double)INT_MAX) return 0;
if (!(a = (spc_array_t *)calloc((size_t)size, 1))) return 0;
a->type = SPC_ARRAY_MERGE;
a->sz_elem = sz_elem;
a->num_elem = num_first + num_second;
a->split = num_first / num_second;
if (!a->split) a->split = (num_second / num_first) * -1;
return a;
}
/* Create an array folded 'layers' times, with num_elem elements */
spc_array_t *spc_array_fold(int sz_elem, int num_elem, int layers) {
double size = (sz_elem * num_elem) + sizeof(spc_array_t);
spc_array_t *a;
size = ((double)sz_elem * (double)num_elem) + (double)sizeof(spc_array_t);
if (size > (double)INT_MAX) return 0;
if (!(a = (spc_array_t *)calloc((size_t)size, 1))) return 0;
a->type = SPC_ARRAY_FOLD;
a->sz_elem = sz_elem;
a->num_elem = num_elem;
a->split = layers;
return a;
}
/* Create a flattened array of num_dimen dimensions with num_elem elements per
* dimension, flattened to a single dimension
*/
spc_array_t *spc_array_flat(int sz_elem, int num_elem, int num_dimen) {
double size;
spc_array_t *a;
size = ((double)sz_elem * (double)num_elem * (double)num_dimen) +
(double)sizeof(spc_array_t);
if (size > (double)INT_MAX) return 0;
if (!(a = (spc_array_t *)calloc((size_t)size, 1))) return 0;
a->type = SPC_ARRAY_FLAT;
a->sz_elem = sz_elem;
a->num_elem = num_elem * num_dimen;
a->split = num_dimen;
return a;
}
/* return the real index of element 'idx' in array 'subarray' */
static int array_index(spc_array_t *a, int subarray, int idx) {
int index = -1, num_row, diff;
num_row = a->num_elem / a->split;
switch (a->type) {
case SPC_ARRAY_SPLIT:
if (idx % a->split) index = idx / a->split;
else index = (a->num_elem / a->split) + (idx / a->split);
break;
case SPC_ARRAY_MERGE:
/* a->split = = size diff between array 1 and 2 */
if (a->split < 0) {
subarray = !subarray;
diff = a->split * -1;
} else diff = a->split;
if (!subarray) index = idx + idx / diff;
else index = diff + (idx * (diff + 1));
break;
case SPC_ARRAY_FOLD:
index = (idx / num_row) + (a->split * (idx % num_row) );
break;
case SPC_ARRAY_FLAT:
index = subarray + (a->split * (idx % num_row));
break;
}
return (index >= a->num_elem ? -1 : index);
}
/* Get a pointer to element 'idx' in array 'subarray' */
void *spc_array_get(spc_array_t *a, int subarray, int idx) {
int index;
if (!a || (index = array_index(a, subarray, idx)) = = -1) return 0;
return (void *)(a->data + (a->sz_elem * index));
}
/* Set element 'idx' in array 'subarray' to the data pointed to by 'src' --
* note that the sz_elem used to initialize the array is used here to copy
* the correct amount of data.
*/
int spc_array_set(spc_array_t *a, int subarray, int idx, void *src) {
int index;
if (!a || !src || (index = array_index(a, subarray, idx)) = = -1)
return 0;
memcpy(a->data + (a->sz_elem * index), src, a->sz_elem);
return 1;
}
/* Free an spc_array_t, including its table of elements */
int spc_array_free(spc_array_t *a) {
if (a) free(a);
return !!a;
}
The function spc_array_split( ) creates a two-dimensional array that is accessed as if it were an array of a single dimension; all odd-numbered elements are stored in the first half of the array, and all even-numbered elements are stored in the second half. For example, an array of five elements with indices numbered zero through four is conceptually broken up into two arrays where the second and fourth elements are stored in the first array, and the first, third, and fifth elements are stored in the second array. The two conceptual arrays are actually stored contiguously in memory. The effect is a simple reordering of the elements as illustrated in Figure 12-1.
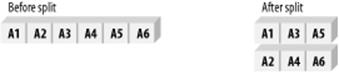
Figure 12-1. Memory representation of split arrays
The function spc_array_merge( ) creates a single-dimensional array whose elements are indexed as if they were two separate arrays; the elements are referenced by an array number (0 or 1) and an index into that array. The ratio of the size between the two arrays is used to determine the placement of each element, so that the arrays are stored in memory as illustrated in Figure 12-2.

Figure 12-2. Memory representation of merged arrays
Folded arrays created using the spc_array_fold( ) function become multidimensional arrays, similar to the two-dimensional arrays created with spc_array_split( ). Each array element is referenced by an index as if it were in a single-dimensional array. The number of dimensions chosen determines the ordering of the elements. The memory representation of folded arrays is illustrated in Figure 12-3.
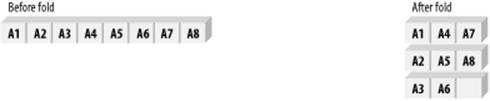
Figure 12-3. Memory representation of folded arrays
The spc_array_flat( ) function stores multiple arrays or a multidimensional array as a single-dimensional array with each element referenced by an array number and an index into that array. The first element of each array is stored, followed by the second element of each array, and so forth until the end of the arrays are reached. Note that not all arrays need be the same size for this to work correctly, as long as the space reserved for the one-dimensional array contains NULL entries for the unused elements. The memory representation of flat arrays is illustrated in Figure 12-4.
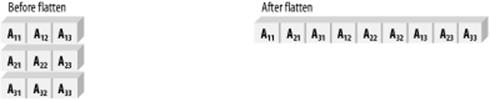
Figure 12-4. Memory representation of flat arrays
The following example demonstrates how to create, initialize, and iterate through each type of array:
#include <stdio.h>
int main(int argc, char *argv[ ]) {
int i, j, *p, val;
spc_array_t *a_split, *a_merge, *a_flat, *a_fold;
/* Split arrays */
a_split = spc_array_split(sizeof(int), 8);
for (i = 0; i < a_split->num_elem; i++) {
val = i * 10;
printf("%#.8X ", val);
spc_array_set(a_split, 0, i, &val);
}
putchar('\n');
for (i = 0; i < a_split->num_elem; i++) {
if (!(p = (int *)spc_array_get(a_split, 0, i))) break;
printf("%#.8X ", *p);
}
putchar('\n');
/* Merged arrays */
a_merge = spc_array_merge(sizeof(int), 4, 8);
for (i = 0; i < 4; i++) {
val = (i * 12) / 3;
printf("%#.8X ", val);
spc_array_set(a_merge, 0, i, &val);
}
putchar('\n');
for (i = 0; i < 8; i++) {
val = (i * 2) + 10;
printf("%#.8X ", val);
spc_array_set(a_merge, 1, i, &val);
}
putchar('\n');
for (i = 0; i < 4; i++) {
if (!(p = (int *)spc_array_get(a_merge, 0, i))) break;
printf("%#.8X ", *p);
}
putchar('\n');
for (i = 0; i < 8; i++) {
if (!(p = (int *)spc_array_get(a_merge, 1, i))) break;
printf("%#.8X ", *p);
}
putchar('\n');
/* Folded arrays */
a_fold = spc_array_fold(sizeof(int), 32, 4);
for (i = 0; i < a_fold->num_elem; i++) {
val = ((i * 3) + 2) % 256;
printf("%#.2X ", val);
spc_array_set(a_fold, 0, i, &val);
}
putchar('\n');
for (i = 0; i < a_fold->num_elem; i++) {
if (!(p = (int *)spc_array_get(a_fold, 0, i))) break;
printf("%#.2X ", *p);
}
putchar('\n');
/* Flat arrays */
a_flat = spc_array_flat(sizeof(int), 6, 4);
for (i = 0; i < 4; i++) {
printf("Dimension %d: ", i);
for (j = 0; j < 6; j++) {
val = (i * j) << 2;
printf("%#.8X ", val);
spc_array_set(a_flat, i, j, &val);
}
putchar('\n');
}
for (i = 0; i < 4; i++) {
printf("Dimension %d: ", i );
for (j = 0; j < 6; j++) {
if (!(p = spc_array_get(a_flat, i, j))) break;
printf("%#.8X ", *p);
}
putchar('\n');
}
return 0;
}
12.11. Hiding Strings
Problem
ASCII strings are a ready source of information about a compiled binary—so much so that the first response of many programmers to a foreign binary is to run the Unix utility strings on it to guess what it does. When viewing a file in a binary editor, ASCII strings are the only data structures that can be immediately recognized without prior knowledge of the file format or any familiarity with machine code.
Solution
Strings can be generated dynamically from a collection of substrings or random characters. Alternatively, strings can be encrypted in the binary and decrypted on the fly by the program as needed.
Discussion
WARNING
The techniques for hiding strings presented in this recipe are intended to prevent their discovery from casual analysis, and should not be considered a secure way of hiding strings. In cases where a string must be hidden securely, you should treat the string as if it were a password, and use a strong encryption method.
The purpose of obfuscating data is to mislead the observer in such a way that he may not even realize that the obfuscation has taken place. Calling an encryption routine is a more secure way to hide data, but it defeats the purpose of obfuscation as it makes obvious the fact that the data is both encrypted and important.
An example of dynamically generating strings from a collection of substrings is presented below. In the example, the string "/etc/passwd" is created on the fly. A quick scan of the compiled version of the code will not reveal the string because the characters that compose it are stored out of order as separate strings. Routines like this one can be generated automatically by Perl or shell scripts as a separate C source code file, then linked in with rest of the program's object files.
#include <stdio.h>
#include <string.h>
char *get_filename(int n, char *buf, int buf_len) {
int x;
char *p;
buf[0] = 0;
p = &((char *)&n)[0];
for (x = 0; x < 4; x++, p++) {
switch (*p) {
case 1:
strncat(buf, "swd", buf_len - strlen(buf));
break;
case 2:
strncat( buf, "no", buf_len - strlen(buf));
break;
case 3:
strncat( buf, "/e", buf_len - strlen(buf));
break;
case 4:
strncat( buf, "as", buf_len - strlen(buf));
break;
case 5:
strncat( buf, "us", buf_len - strlen(buf));
break;
case 6:
strncat( buf, "tc/p", buf_len - strlen(buf));
break;
case 7:
strncat( buf, "mp", buf_len - strlen(buf));
break;
default:
strncat( buf, "/", buf_len);
}
}
buf[buf_len] = 0;
return buf;
}
int main(int argc, char *argv[ ]) {
char filename[32];
/* 0x01040603 is 03 . 06 . 04 . 01 -- note that the number is passed as little
* endian but read as big endian!
*/
printf("get_filename( ) returns \"%s\"\n",
get_filename(0x01040603, filename, sizeof(filename)));
return 0;
}
Strings can also be stored encrypted in the binary and in memory. You can achieve this by generating separate object files with the encrypted strings in them, by encrypting the strings in the binary after compilation, or by initializing the strings with encrypted characters. The following code demonstrates the last technique, using the A macro to subtract a constant value from each character in the string. Note that this is not a strong encryption method, but rather a quick and simple obfuscation of the value of each character.
#define A(c) (c) - 0x19
#define UNHIDE_STR(str) do { char *p = str; while (*p) *p++ += 0x19; } while (0)
#define HIDE_STR(str) do { char *p = str; while (*p) *p++ -= 0x19; } while (0)
Each character of the string must be initialized, which makes this method somewhat cumbersome, but it allows the obfuscation to take place at compile time:
#include <stdio.h>
int main(int argc, char *argv[ ]) {
char str[ ] = {
A('/'), A('e'), A('t'), A('c'), A('/'),
A('p'), A('a'), A('s'), A('s'), A('w'), A('d'), 0
};
UNHIDE_STR(str);
printf("%s\n", str);
HIDE_STR(str);
return 0;
}
12.12. Detecting Debuggers
Problem
Software protection crackers frequently rely on debuggers to observe the runtime behavior of an application and to test binary patches that remove or bypass a protection. You would like to prevent casual analysis of your application by including anti-debugger code.
Solution
The Intel x86 instruction set uses the int3 opcode (0xCC) as a one-byte embedded breakpoint. Key addresses in the program—such as the first address in a function—can be checked to see whether they have been replaced with an int3 opcode.
Discussion
General debugger detection is difficult to perform successfully because of the limited number of techniques available and the ease with which they may be defeated. We advise you to attempt to detect specific debuggers in addition to using these general methods (see Recipe 12.13, Recipe 12.14, and Recipe 12.15).
The two macros defined below can be used to mark locations in the source where you might expect an int3 to be placed by someone trying to debug your program. The names used with these macros can then be passed as an argument to spc_check_int3( ) to test for the existence of the breakpoint instruction.
#define SPC_DEFINE_DBG_SYM(name) asm(#name ": \n")
#define SPC_USE_DBG_SYM(name) extern void name(void)
inline int spc_check_int3(void *address) {
return (*(volatile unsigned char *)address = = 0xCC);
}
The SPC_DEFINE_DBG_SYM macro can be used to label an arbitrary code address, which can then be made available with the SPC_USE_DBG_SYM macro and passed to spc_check_int3( ):
#include <stdio.h>
void my_func(void) {
int x;
SPC_DEFINE_DBG_SYM(myfunc_nodebug);
for (x = 0; x < 10; x++) printf("X!\n");
}
SPC_USE_DBG_SYM(myfunc_nodebug);
int main(int argc, char *argv[ ]) {
if (spc_check_int3(myfunc_nodebug)) printf("being debugged: int3!\n");
return(0);
}
Checking for int3 opcodes is a crude and largely unreliable method. The comparison with the 0xCC byte is immediately obvious when examining the disassembly of the above source code:
8048328 <dbg_check_int3>:
8048328: push %ebp
8048329: mov %esp, %ebp
804832b: sub $4, %esp
804832e: mov 8(%ebp), %eax
8048331: mov (%eax), %al
8048333: cmp $0xCC, %al
8048335: jne 8048340
8048337: movl $1, -4(%ebp)
804833e: jmp 8048347
8048340: movl $0, -4(%ebp)
8048347: mov -4(%ebp), %eax
804834a: leave
804834b: ret
The compare instruction at address 8048333 is obviously checking for an embedded int3 instruction. A software protection cracker can neutralize this check either by changing the 0xCC byte in the compare instruction to another value (such as 0x90, the nop instruction) or by changing the conditional jump instruction at address 8048335 (opcode 0x75) to an unconditional jump instruction (opcode 0xEB). In addition, most modern debuggers support the use of the debug registers present in Intel x86 CPUs because the Pentium breakpoints set using these registers do not require theint3 instruction and will not be detected with this method.
See Also
Recipe 12.13, Recipe 12.14, Recipe 12.15
12.13. Detecting Unix Debuggers
Problem
You need to prevent someone from debugging a Unix binary.
Solution
Single-stepping through code in a Unix environment causes a SIGTRAP to be sent to the process. The debugger captures this signal and allows the user to examine the state of the process before continuing execution. By installing a SIGTRAP handler and sending itself a SIGTRAP, the process can determine whether it is being debugged.
Discussion
The spc_trap_detect( ) function is used to install a signal handler to catch trap signals sent to the target, then issue a trap signal. The SPC_DEBUGGER_PRESENT macro checks the num_traps counter managed by the trap signal handler; if the counter is zero, a debugger is capturing the trap signals and is not sending them to the process.
#include <stdio.h>
#include <signal.h>
#define SPC_DEBUGGER_PRESENT (num_traps = = 0)
static int num_traps = 0;
static void dbg_trap(int signo) {
num_traps++;
}
int spc_trap_detect(void) {
if (signal(SIGTRAP, dbg_trap) = = SIG_ERR) return 0;
raise(SIGTRAP);
return 1;
}
The following example demonstrates the use of spc_trap_detect( ) to initialize the debugger detection, and SPC_DEBUGGER_PRESENT to check for the presence of a debugger:
int main(int argc, char *argv[ ]) {
int x;
spc_trap_detect( );
for (x = 0; x < 10; x++) {
if (SPC_DEBUGGER_PRESENT) printf("being debugged!\n");
else printf("y\n");
}
return(0);
}
This detection method is not particularly effective because most Unix debuggers allow the trap signal to be sent through to the process; however, tools that automatically single step through their targets (to record system calls, data access, etc.) will be detected using this method.
Most Unix debuggers are based on the ptrace system service, which is an interface to process control services in the kernel. ptrace-based debuggers were designed with source code debugging in mind, so they are incapable of dealing with hostile code. Detecting a ptrace debugger is simple, and the technique is well-known: ptrace prevents a process that is currently being traced from tracing itself or another process, so an attempt to ptrace another process will always fail if the current process is being traced. The following code demonstrates how to detect a ptrace-based debugger by creating a child process and attempting to attach to it.
#include <sys/types.h>
#include <errno.h>
#include <signal.h>
#include <stdlib.h>
#include <unistd.h>
#include <sys/ptrace.h>
#include <sys/wait.h>
int spc_detect_ptrace(void) {
int status, waitrc;
pid_t child, parent;
parent = getpid();
if (!(child = fork())) {
/* this is the child process */
if (ptrace(PT_ATTACH, parent, 0, 0)) exit(1);
do {
waitrc = waitpid(parent, &status, 0);
} while (waitrc == -1 && errno == EINTR);
ptrace(PT_DETACH, parent, (caddr_t)1, SIGCONT);
exit(0);
}
if (child == -1) return -1;
do {
waitrc = waitpid(child, &status, 0);
} while (waitrc == -1 && errno == EINTR);
return WEXITSTATUS(status);
}
The state of the art in anti-debugging on Unix is not very advanced, because all widely used Unix debuggers are based on ptrace and do not require any special tricks to detect; generally speaking, any method that detects or counters ptrace should succeed. It is important to realize, however, that calls to ptrace( ) can be replaced with nop instructions in the binary to defeat the debugger detection, so take care to disguise them. For example, by using the system call interface instead of the C interface, the ptrace( ) system call can also be hooked at the kernel level to force a successful return.
See Also
"Linux Anti-Debugging Techniques" by Silvio Cesare (the techniques listed here were published in that 1999 paper, http://vx.netlux.org/lib/vsc04.html.
12.14. Detecting Windows Debuggers
Problem
You need to prevent someone from debugging a Windows binary.
Solution
The Win32 API provides the IsDebuggerPresent( ) function for checking whether the current process is being debugged. It returns nonzero if a debugger is present.
Discussion
The simplest method of detecting the presence of a debugger on Windows is to use the IsDebuggerPresent( ) Win32 API function. It is exported by the system DLL kernel32.dll and is available on Windows 98, Windows ME, and Windows NT 4.0 and later. Note that it is not available on Windows 95 or Windows NT 3.51 or earlier.
This method only detects process debuggers that rely on the Win32 Debug API, and it can easily be circumvented by using a ring0 debugger such as SoftICE. This, and other methods of varying quality, have appeared in many tutorials on software protection, virus writing, and software cracking.
See Also
§ "Anti-Debugging in Win32" by Lord Julus: http://vx.netlux.org/texts/html/lj_vx03.html
§ "Win32 Anti-Debugging Tricks" by Billy Belcebu: http://library.succurit.com/virus/ANTIDEBG.TXT
12.15. Detecting SoftICE
Problem
SoftICE is a ring0 debugger that cannot be detected using standard debugger detection techniques.
Solution
Numega's SoftICE debugger is a kernel-mode debugger intended for debugging device drivers and Windows itself. It is favored by software protection crackers because of its power. Four well-known methods for detecting the presence of SoftICE exist, which are detailed in Section 12.15.3.
Discussion
The "Meltice" technique is one of the oldest methods for detecting SoftICE. It attempts to open virtual devices created by SoftICE; if any of these devices exist, the debugger is present.
#include <windows.h>
BOOL spc_softice_meltice(void) {
HANDLE hFile;
hFile = CreateFile(TEXT("\\.\\SICE"), GENERIC_READ, 0, 0, OPEN_EXISTING, 0, 0);
if (hFile = = INVALID_HANDLE_VALUE)
hFile = CreateFile(TEXT("\\.\\NTICE"), GENERIC_READ, 0, 0, OPEN_EXISTING, 0, 0);
if (hFile = = INVALID_HANDLE_VALUE)
hFile = CreateFile(TEXT("\\.\\SIWDEBUG"), GENERIC_READ, 0, 0,
OPEN_EXISTING, 0, 0);
if (hFile = = INVALID_HANDLE_VALUE)
hFile = CreateFile(TEXT("\\.\\SIWVID"), GENERIC_READ, 0, 0, OPEN_EXISTING, 0, 0);
if (hFile = = INVALID_HANDLE_VALUE) return FALSE;
CloseHandle(hFile);
return TRUE;
}
SoftICE provides an interface via the debug breakpoint (int3) instruction that allows a process to communicate with the debugger. By loading a magic value ("BCHK") into the ebp register and executing an int3, the Boundschecker (originally the Numega Boundschecker utility) interface can be accessed. The function to be called is loaded into the eax register; function 4 will set the al register to 0 if SoftICE is present.
#include <windows.h>
_ _declspec(naked) BOOL spc_softice_boundschecker(void) {
_ _asm {
push ebp
mov ebp, 0x4243484B ; "BCHK"
mov eax, 4 ; function 4: boundschecker interface
int 3
test al, al ; test for zero
jnz debugger_not_present
mov eax, 1 ; set the return value to 1
pop ebp
ret
debugger_not_present:
xor eax, eax ; set the return value to 0
pop ebp
ret
}
}
The int3 interface can also be used to issue commands to SoftICE by setting the esi and edi registers to magic values, then invoking function 0x911:
#include <windows.h>
char *sice_cmd = "hboot";
BOOL spc_softice_command(char *cmd) {
_ _asm {
push esi
mov esi, 0x4647 ; "FG"
push edi
mov edi, 0x4A4D ; "JM"
push edx
mov edx, [cmd] ; command (string) to execute
mov ax, 0x0911 ; function 911: execute SOFTICE command
int 3
pop edx
pop edi
pop esi
}
}
Finally, the presence of SoftICE can be detected by invoking function 0x43 of interrupt 0x68:
#include <windows.h>
_ _declspec(naked) BOOL spc_softice_ispresent(void) {
_ _asm {
mov ah, 0x43
int 0x68
cmp ax, 0xF386
jnz debugger_not_present
mov eax, 1
ret
debugger_not_present:
xor eax, eax
ret
}
}
SoftICE detection and counterdetection is a continuously evolving field. Different versions of SoftICE have different memory footprints and runtime behavior that can be used to detect them; however, because most software protection crackers have modified their versions of SoftICE to foil known detection methods, it is advisable not to rely entirely on SoftICE detections for protection.
See Also
§ "About Anti-SoftICE Tricks" by Frog's Print: http://www.crackstore.com/003.htm
§ "Anti-Debugging Tricks" by Black Fenix: http://in.fortunecity.com/skyscraper/browser/12/sicedete.html
§ "Anti-Debugging Tricks" by CrackZ: http://mail.hep.by/mirror/wco/T99/Antidbug.htm
§ "Win32 Anti-Debugging Tricks" by Billy Belcebu: http://library.succurit.com/virus/ANTIDEBG.TXT
§ "Anti-debugging in Win32" by Lord Julus: http://vx.netlux.org/texts/html/lj_vx03.html
§ "The IceDump project": http://ghiribizzo.virtualave.net/icedump/icedump.html
12.16. Countering Disassembly
Problem
An object file disassembler can produce an assembly language version of a binary, which can then be used to understand and possibly modify the binary.
Solution
Anti-disassembly tricks are useful in frustrating automatic analysis, but they generally will not hold up to a human review of the disassembly. Make sure to combine the methods presented in the discussion with data or code obfuscation techniques.
Discussion
Many disassemblers assume that long runs of NULL bytes are data, although some will continue to disassemble regardless. In the Intel instruction set, 0x00 is the opcode for add al, [eax]—a valid instruction. The following macros use NULL bytes to increment the eax register by pushing eax, loading the address of the pushed value into eax, and executing add al, [eax] instructions as many times as the user specifies.
#define NULLPAD_START asm volatile ( \
"pushl %eax \n" \
"movl %esp, %eax\n")
#define NULLPAD asm volatile ("addb %al, (%eax)\n")
#define NULLPAD_END asm volatile ("popl %eax\n")
#define NULLPAD_10 NULLPAD_START; \
NULLPAD; NULLPAD; NULLPAD; NULLPAD; NULLPAD; \
NULLPAD_END
This is particularly effective if the value referenced by eax—that is, the value at the top of the stack—is used later in the program. Note that many disassemblers that ignore runs of NULL bytes allow the user to override this behavior.
To demonstrate the effect this macro has on disassemblers, the following source code was compiled and disassembled:
void my_func(void) {
int x;
NULLPAD_10;
for (x = 0; x < 10; x++) printf("%x\n", x);
}
DataRescue's IDA Pro disassembler creates a code/data boundary at the start of the NULL bytes, and completely ignores the instructions that follow:
08048374 my_func:
08048374 55 push ebp
08048375 89 E5 mov ebp, esp
08048377 83 EC 08 sub esp, 8
0804837A 50 push eax
0804837B 89 E0 mov eax, esp
0804837B ; ------------------------------------------------------------------
0804837D 00 db 0 ;
0804837E 00 db 0 ;
0804837F 00 db 0 ;
08048380 00 db 0 ;
08048381 00 db 0 ;
08048382 00 db 0 ;
08048383 00 db 0 ;
08048384 00 db 0 ;
08048385 00 db 0 ;
08048386 00 db 0 ;
08048387 58 db 58h ; X
08048388 C7 db 0C7h ; +
08048389 45 db 45h ; E
0804838A FC db 0FCh ; n
0804838B 00 db 0 ;
0804838C 00 db 0 ;
0804838D 00 db 0 ;
The GNU objdump utility ignores the NULL bytes, though the rest of the disassembly was not affected:
08048374 <my_func>:
8048374: 55 push %ebp
8048375: 89 e5 mov %esp,%ebp
8048377: 83 ec 08 sub $0x8,%esp
804837a: 50 push %eax
804837b: 89 e0 mov %esp,%eax
...
8048385: 00 00 add %al,(%eax)
8048387: 58 pop %eax
8048388: c7 45 fc 00 00 00 00 movl $0x0,0xfffffffc(%ebp)
804838f: 83 7d fc 09 cmpl $0x9,0xfffffffc(%ebp)
8048393: 7e 02 jle 8048397 <my_func2+0x23>
8048395: eb 1a jmp 80483b1 <my_func2+0x3d>
Most disassemblers can be fooled by a simple misalignment error—for example, jumping into the middle of an instruction so that the target of the jump is disassembled incorrectly. The typical technique of performing an unconditional jump into another instruction is not very effective with disassemblers that follow the flow of execution—the jump will be followed, and the bytes between the jump and the jump target will be ignored. Instead, you can use a conditional jump, followed by the first byte of a multibyte instruction (0x0F is ideal for this, because it is the first byte of all two-byte opcodes); this way, a flow-of-execution disassembler will disassemble the code after the conditional branch.
#define DISASM_MISALIGN asm volatile ( \
" pushl %eax \n" \
" cmpl %eax, %eax \n" \
" jz 0f \n" \
" .byte 0x0F \n" \
"0: \n" \
" popl %eax \n")
This macro compares the eax register to itself, forcing a true condition; the jz instruction is therefore always followed during execution. A disassembler will either ignore the jz instruction and interpret the 0x0F byte that follows as an instruction, or it will follow the jz instruction. If the jzinstruction is followed, the disassembler can still interpret the code incorrectly if the address after the jz instruction is disassembled before the address to which the jz instruction jumps. For example:
void my_func(void) {
int x;
DISASM_MISALIGN;
for (x = 0; x < 10; x++) printf("%x\n", x);
}
IDA Pro disassembles the code after the jz instruction at address 0804837D before following the jump itself, resulting in an incorrect disassembly:
08048374 my_func:
08048374 55 push ebp
08048375 89 E5 mov ebp, esp
08048377 83 EC 08 sub esp, 8
0804837A 50 push eax
0804837B 39 C0 cmp eax, eax
0804837D 74 01 jz short near ptr loc_804837F+1
0804837F
0804837F loc_804837F: ; CODE XREF: .text:0804837D#j
0804837F 0F 58 C7 addps xmm0, xmm7
08048382 45 inc ebp
08048383 FC cld
08048383 ; --------------------------------------------------------------------
08048384 00 db 0 ;
08048385 00 db 0 ;
08048386 00 db 0 ;
08048387 00 db 0 ;
08048388 83 db 83h ; â
08048389 7D db 7Dh ; }
0804838A FC db 0FCh ; n
The GNU objdump disassembler does not follow the jump at all and encounters the same problem:
08048374 <my_func2>:
8048374: 55 push %ebp
8048375: 89 e5 mov %esp,%ebp
8048377: 83 ec 08 sub $0x8,%esp
804837a: 50 push %eax
804837b: 39 c0 cmp %eax,%eax
804837d: 74 01 je 8048380 <my_func2+0xc>
804837f: 0f 58 c7 addps %xmm7,%xmm0
8048382: 45 inc %ebp
8048383: fc cld
8048384: 00 00 add %al,(%eax)
8048386: 00 00 add %al,(%eax)
8048388: 83 7d fc 09 cmpl $0x9,0xfffffffc(%ebp)
Sophisticated disassemblers attempt to reconstruct as much as possible of the original source code of the binary. One of the tasks they perform towards this goal is the recognition of functions within the binary. Because the end of a function is generally assumed to be the first return instruction encountered, it is possible to truncate a function within the disassembler by providing a false return. The following macro will return to a byte after the ret instruction, causing the definition of the function to end prematurely:
#define DISASM_FALSERET asm volatile ( \
" pushl %ecx /* save registers */\n" \
" pushl %ebx \n" \
" pushl %edx \n" \
" movl %esp, %ebx /* save ebp, esp */\n" \
" movl %ebp, %esp \n" \
" popl %ebp /* save old %ebp */\n" \
" popl %ecx /* save return addr */\n" \
" lea 0f, %edx /* edx = addr of 0: */\n" \
" pushl %edx /* return addr = edx */\n" \
" ret \n" \
" .byte 0x0F /* off-by-one byte */\n" \
"0: \n" \
" pushl %ecx /* restore ret addr */\n" \
" pushl %ebp /* restore old &ebp */\n" \
" movl %esp, %ebp /* restore ebp, esp */\n" \
" movl %ebx, %esp \n" \
" popl %ebx \n" \
" popl %ecx \n")
The first three pushl instructions and the last three popl instructions save and restore the registers that will be used in the course of the false return. The current stack pointer is saved in the ebx register, and the current stack pointer is set to the frame pointer (ebp) of the current function—this places the frame pointer of the calling function at the top of the stack. The saved frame pointer is moved into the ebp register, and the return address is moved into the ecx register so that these values can be preserved across the return. The instruction movl 0f, %edx stores the address of the local code label 0: in the edx register. This address is then pushed onto the stack, where it becomes the new return address. The following ret instruction causes the program to jump to code label 0:, where the execution context of the function (the stack and frame pointers, saved frame pointer, and return address) is restored to its original state.
When a disassembler follows the control flow of the program, rather than blindly disassembling instructions from the start of the code segment, it will encounter the false return statement and will stop disassembly of the current function. As a result, any instructions after the false return will not be disassembled, and they will appear as data located in the code segment.
void my_func(void) {
int x;
for (x = 0; x < 10; x++) printf("%x\n", x);
DISASM_FALSERET;
/* other stuff can be done here that won't be disassembled */
}
This produces the following disassembly in IDA Pro:
08048357 51 push ecx
08048358 53 push ebx
08048359 52 push edx
0804835A 89 E3 mov ebx, esp
0804835C 89 EC mov esp, ebp
0804835E 5D pop ebp
0804835F 59 pop ecx
08048360 8D 15 69 83 04 08 lea edx, ds:dword_8048369
08048366 52 push edx
08048367 C3 retn
08048367 my_func endp ; sp = -0Ch
08048367
08048367 ;----------------------------------------------------------------
08048368 0F db 0Fh ;
08048369 51 55 89 E5 dword_8048369 dd 0E5895551h
08048369 ; DATA XREF: my_func+38#r
0804836D 89 db 89h ; ë
0804836E DC db 0DCh ; ?
0804836F 5A db 5Ah ; Z
08048370 5B db 5Bh ; [
08048371 59 db 59h ; Y
08048372 C9 db 0C9h ; +
08048373 C3 db 0C3h ; +
The false return at address 08048367 ends the function, with the subsequent code not being disassembled. The XREF at address 08048369, however, clearly indicates that something strange is going on, even though the disassembly is incorrect. There is also an indication of a stack error at theendp directive. A cracker can simply examine the instruction making the reference, in this case push edx at address 08048366, to realize that the return address is being overwritten.
A disassembler that does not follow the control flow will be not be affected by the false return trick, as the following output from objdump demonstrates:
8048357: 51 push %ecx
8048359: 52 push %edx
8048358: 53 push %ebx
804835a: 89 e3 mov %esp,%ebx
804835c: 89 ec mov %ebp,%esp
804835e: 5d pop %ebp
804835f: 59 pop %ecx
8048360: 8D 15 69 83 04 08 lea 0x8048369,%edx
8048366: 52 push %edx
8048367: c3 ret
8048368: 0f 51 55 89 sqrtps 0xffffff89(%ebp),%xmm2
804836c: e5 89 in $0x89,%eax
804836e: dc 5a 5b fcompl 0x5b(%edx)
8048371: 59 pop %ecx
8048372: c9 leave
8048373: c3 ret
The false return at address 08048367 does not affect the subsequent disassembly, although the misalignment trick at address 08048368 does cause the next three instructions to be disassembled incorrectly. This provides an example of how two simple techniques can be combined to create an inaccurate disassembly in different types of disassemblers.
12.17. Using Self-Modifying Code
Problem
You want to hide portions of your binary using self-modifying code without rewriting existing code in assembler.
Solution
The most effective use of self-modifying code is to overwrite a section of vital code with another section of vital code, such that both vital sections do not exist at the same time. This can be time-consuming and costly to develop; a more expedient technique can be achieved with C macros that decrypt garbage bytes in the code section to proper executable code at runtime. The process involves encrypting the protected code after the binary has been compiled, then decrypting it only after it has been executed.
The code presented in this recipe applies to FreeBSD, Linux, NetBSD, OpenBSD, and Solaris. The concepts apply to Unix and Windows in general.
Discussion
For the code presented in this recipe, we'll be using RC4 to perform our encryption. We've chosen to use RC4 because it is fast and easy to implement. You will need to use the RC4 implementation from Recipe 5.23 or an alternative implementation from somewhere else to use the code we will be presenting.
The actual code to decrypt and replace the code in memory is minimal. The complexity arises from having to obtain the code to be encrypted, encrypting it, and making it accessible to the code that will be decrypting and executing it. A set of macros provides the means to mark replaceable code, and a single function, spc_smc_decrypt( ) , performs the decryption of the code. Because we're using RC4, encryption and decryption are performed in exactly the same way, so spc_smc_decrypt( ) can also be used for encryption, which we'll do later on.
#include <errno.h>
#include <stdio.h>
#include <string.h>
#include <sys/types.h>
#include <sys/mman.h>
#define SPC_SMC_START_BLOCK(label) void label(void) { }
#define SPC_SMC_END_BLOCK(label) void _##label(void) { }
#define SPC_SMC_BLOCK_LEN(label) (int)_##label - (int)label
#define SPC_SMC_BLOCK_ADDR(label) (unsigned char *)label
#define SPC_SMC_START_KEY(label) void key_##label(void) { }
#define SPC_SMC_END_KEY(label) void _key_##label(void) { }
#define SPC_SMC_KEY_LEN(label) (int)_key_##label - (int)key_##label
#define SPC_SMC_KEY_ADDR(label) (unsigned char *)key_##label
#define SPC_SMC_OFFSET(label) (long)label - (long)_start
extern void _start(void);
/* returns number of bytes encoded */
int spc_smc_decrypt(unsigned char *buf, int buf_len, unsigned char *key, int key_len) {
RC4_CTX ctx;
RC4_set_key(&ctx, key_len, key);
/* NOTE: most code segments have read-only permissions, and so must be modified
* to allow writing to the buffer
*/
if (mprotect(buf, buf_len, PROT_WRITE | PROT_READ | PROT_EXEC)) {
fprintf(stderr, "mprotect: %s\n", strerror(errno));
return(0);
}
/* decrypt the buffer */
RC4(&ctx, buf_len, buf, buf);
/* restore the original memory permissions */
mprotect(buf, buf_len, PROT_READ | PROT_EXEC);
return(buf_len);
}
The use of mprotect( ) , or an equivalent operating system routine for modifying the permissions of a page of memory, is required on most modern operating systems to write to the code segment. This is an inherent weakness of the self-modifying code technique: the call to mprotect( ) is suspicious, and it is trivial to write a utility that searches the disassembly of a program for calls to mprotect( ) that enable write access or take an address in the code segment as the first parameter. The use of mprotect( ) should be obfuscated (see Recipe 12.3 and Recipe 12.9).
Once the binary has been compiled, the protected code will have to be encrypted before it can be executed. The following code demonstrates a utility for encrypting a portion of an ELF executable file based on the contents of another portion of the file. The usage is:
smc_encrypt filename
code_offset
code_len
key_offset
key_len
In the command, code_offset and code_len are the location in the file of the code to be encrypted and the code's length, and key_offset and key_len are the location in the file of the key with which to encode the code and the key's length.
#include <errno.h>
#include <fcntl.h>
#include <limits.h>
#include <stdio.h>
#include <stdlib.h>
#include <string.h>
#include <unistd.h>
#include <sys/types.h>
#include <sys/mman.h>
#include <sys/stat.h>
/* ELF-specific stuff */
#define ELF_ENTRY_OFFSET 24 /* e_hdr e_entry field offset */
#define ELF_PHOFF_OFFSET 28 /* e_hdr e_phoff field offset */
#define ELF_PHESZ_OFFSET 42 /* e_hdr e_phentsize field offset */
#define ELF_PHNUM_OFFSET 44 /* e_hdr e_phnum field offset */
#define ELF_PH_OFFSET_OFF 4 /* p_hdr p_offset field offset */
#define ELF_PH_VADDR_OFF 8 /* p_hdr p_vaddr field offset */
#define ELF_PH_FILESZ_OFF 16 /* p_hdr p_size field offset */
static unsigned long elf_get_entry(unsigned char *buf) {
unsigned long entry, p_vaddr, p_filesz, p_offset;
unsigned int i, phoff;
unsigned short phnum, phsz;
unsigned char *phdr;
entry = *(unsigned long *) &buf[ELF_ENTRY_OFFSET];
phoff = *(unsigned int *) &buf[ELF_PHOFF_OFFSET];
phnum = *(unsigned short *) &buf[ELF_PHNUM_OFFSET];
phsz = *(unsigned short *) &buf[ELF_PHESZ_OFFSET];
phdr = &buf[phoff];
/* iterate through program headers */
for ( i = 0; i < phnum; i++, phdr += phsz ) {
p_vaddr = *(unsigned long *)&phdr[ELF_PH_VADDR_OFF];
p_filesz = *(unsigned long *)&phdr[ELF_PH_FILESZ_OFF];
/* if entry point is in this program segment */
if ( entry >= p_vaddr && entry < (p_vaddr + p_filesz) ) {
/* calculate offset of entry point */
p_offset = *(unsigned long *)&phdr[ELF_PH_OFFSET_OFF];
return( p_offset + (entry - p_vaddr) );
}
}
return 0;
}
int main(int argc, char *argv[ ]) {
unsigned long entry, offset, len, key_offset, key_len;
unsigned char *buf;
struct stat sb;
int fd;
if (argc < 6) {
printf("Usage: %s filename offset len key_offset key_len\n"
" filename: file to encrypt\n"
" offset: offset in file to start encryption\n"
" len: number of bytes to encrypt\n"
" key_offset: offset in file of key\n"
" key_len: number of bytes in key\n"
" Values are converted with strtol with base 0\n",
argv[0]);
return 1;
}
/* prepare the parameters */
offset = strtoul(argv[2], 0, 0);
len = strtoul(argv[3], 0, 0);
key_offset = strtoul(argv[4], 0, 0);
key_len = strtoul(argv[5], NULL, 0);
/* memory map the file so we can access it via pointers */
if (stat(argv[1], &sb)) {
fprintf(stderr, "Stat failed: %s\n", strerror(errno));
return 2;
}
if ((fd = open(argv[1], O_RDWR | O_EXCL)) < 0) {
fprintf(stderr, "Open failed: %s\n", strerror(errno));
return 3;
}
buf = mmap(0, sb.st_size, PROT_READ|PROT_WRITE, MAP_SHARED, fd, 0);
if ((int)buf < 0) {
fprintf(stderr, "Open failed: %s\n", strerror(errno));
close(fd);
return 4;
}
/* get entry point : here we assume ELF example */
entry = elf_get_entry(buf);
if (!entry) {
fprintf(stderr, "Invalid ELF header\n");
munmap(buf, sb.st_size);
close(fd);
return 5;
}
/* these are offsets from the entry point */
offset += entry;
key_offset += entry;
printf("Encrypting %d bytes at 0x%X with %d bytes at 0x%X\n",
len, offset, key_len, key_offset);
/* Because we're using RC4, encryption and decryption are the same operation */
spc_smc_decrypt(buf + offset, len, buf + key_offset, key_len);
/* mem-unmap the file */
msync(buf, sb.st_size, MS_SYNC);
munmap(buf, sb.st_size);
close(fd);
return 0;
}
This program incorporates an ELF file-header parser in the elf_get_entry( ) routine. The program header table entries of the ELF header are searched for the loadable segment containing the entry point. This is done to translate the entry point virtual address into an offset from the start of the file. This is necessary because the offsets generated by the SPC_SMC_OFFSET macro are relative to the program entry point (_start).
The following code provides an example of using the code we've presented in this recipe. The program decrypts itself at runtime, using bogus_routine( ) as a key for decrypting test_routine( ) .
#include <stdio.h>
#include <unistd.h>
SPC_SMC_START_BLOCK(test)
int test_routine(void) {
int x;
for (x = 0; x < 10; x++) printf("decrpyted!\n");
return x;
}
SPC_SMC_END_BLOCK(test)
SPC_SMC_START_KEY(test)
int bogus_routine(void) {
int x, y;
for (x = 0; x < y; x++) {
y = x + 256;
y /= 32;
x = y * 2 / 24;
}
return 1;
}
SPC_SMC_END_KEY(test)
int main(int argc, char *argv[ ]) {
spc_smc_decrypt(SPC_SMC_BLOCK_ADDR(test), SPC_SMC_BLOCK_LEN(test),
SPC_SMC_KEY_ADDR(test), SPC_SMC_KEY_LEN(test));
#ifdef UNENCRYPTED_BUILD
/* This printf( ) displays the parameters to pass to the smc_encrypt utility on
* stdout. The printf( ) must be removed, and the program recompiled before
* running smc_encrypt. Having the printf( ) at the end of the file prevents
* the offsets from changing after recompilation.
*/
printf("(offsets from _start)offset: 0x%X len 0x%X key 0x%X len 0x%X\n",
SPC_SMC_OFFSET(SPC_SMC_BLOCK_ADDR(test)), SPC_SMC_BLOCK_LEN(test),
SPC_SMC_OFFSET(SPC_SMC_KEY_ADDR(test)), SPC_SMC_KEY_LEN(test));
exit(0);
#endif
test_routine( );
return 0;
}
As mentioned in the comment just prior to the printf( ) call in main( ), this program should be compiled with UNENCRYPTED_BUILD defined, then executed to obtain the parameters to the smc_encrypt utility:
/bin/sh>cc -I. smc.c smc_test.c -D UNENCRYPTED_BUILD
/bin/sh>./a.out
(offsets from _start)offset: 0xB0 len 0x36 key 0xEB len 0x66
The program is then recompiled, with UNENCRYPTED_BUILD not defined in order to remove the printf( ) and exit( ) statements. The smc_encrypt utility is then run on the resulting binary to produce a working program:
/bin/sh>cc -I. smc.c smc_test.c
/bin/sh>smc_encrypt a.out 0xB0 0x36 0xEB 0x66
Self-modifying code is one of the most potent techniques available for protecting binary code; however, it makes the build process more complex, as you can see in the above example. In addition, some processor architectures (such as the x86 line before the Pentium II) cache instructions and do not invalidate this cache when the code segment is written to. To be compatible with these older architectures, you will need to use one of the three ring3 serializing instructions (cpuid, iret, and rsm) to invalidate the cache. This can be performed with a macro:
#define INVALIDATE_CACHE asm volatile( \
"pushad \n" \
"cpuid \n" \
"popad \n")
The pushad and popad instructions are needed because the cpuid instruction overwrites the four general-purpose registers. Once again, as with the call to mprotect( ), note that the use of the cpuid instruction is suspicious and will draw attention to the code of the protection. It is better to place the call to the decrypted code far enough away (16 bytes should be sufficient, because only 486 and Pentium CPUs will be affected) from the actual decryption routine so that the decrypted code will not be in the instruction cache.
This implementation of self-decrypting code is a simple one; it could be defeated by pulling the decryption code from the binary, decrypting the protected code, then replacing the call to the decryption routine with nop instructions. This is possible because the size of the encrypted code is the same as the decrypted code; a more robust solution would be to use a stronger encryption method or a compression method, and extract the protected code to a dynamically allocated region of memory. However, such a method requires extensive manipulation of the object files before and after linking. You might consider using a commercially available binary packer to reduce development and testing time.
See Also
Recipe 5.23, Recipe 12.3, Recipe 12.9
All materials on the site are licensed Creative Commons Attribution-Sharealike 3.0 Unported CC BY-SA 3.0 & GNU Free Documentation License (GFDL)
If you are the copyright holder of any material contained on our site and intend to remove it, please contact our site administrator for approval.
© 2016-2026 All site design rights belong to S.Y.A.