C++ All-in-One For Dummies (2009)
Book I
Introducing C++

Contents at a Glance
Chapter 1: Creating a First C++ Program
Creating a Project
Typing the Code
Starting with Main
Showing Information
Let Your Program Run Away
Chapter 2: Storing Data in C++
Putting Your Data Places: Variables
Manipulating Integer Variables
Characters
Strings
Deciding between Conditional Operators
Telling the Truth with Boolean Variables
Reading from the Console
Chapter 3: Directing Your C++ Program Flow
Doing This or Doing That
Evaluating Conditions in C++
Including Evaluations in C++ Conditional Statements
Repeating Actions with Statements That Loop
Chapter 4: Dividing Your Work with Functions
Dividing Your Work
Calling a Function
Writing Your Own Functions
Calling All String Functions
Understanding main
Chapter 5: Dividing Between Source-Code Files
Creating Multiple Source Files
Sharing with Header Files
Sharing Variables Among Source Files
Using the Mysterious Header Wrappers
Chapter 6: Referring to Your Data through Pointers
Heaping and Stacking the Variables
Dynamically Allocating with new
Freeing Pointers
Passing Pointer Variables to Functions
Returning Pointer Variables from Functions
Returning a Pointer as a Nonpointer
Passing by Reference
Remembering the Rules
Chapter 7: Working with Classes
Understanding Objects and Classes
Working with a Class
Starting and Ending with Constructors and Destructors
Building Hierarchies of Classes
Chapter 8: Using Advanced C++ Features
Filling Your Code with Comments
Converting Types
Reading from the Console
Understanding Preprocessor Directives
Using Constants
Using Switch Statements
Supercharging enums with Classes
Working with Random Numbers
Storing Data in Arrays
Chapter 1: Creating a First C++ Program
In This Chapter
Organizing your programs into projects
Typing code into the code editor
Writing a program that writes to the screen
Doing basic math
Running your program
It’s your lucky day. You have decided to learn the most popular programming language on the planet. From the biggest skyscrapers housing huge Fortune-500 companies all the way down to the garages with the self-starting kids grinding out the next generation of software, people are using C++. Yes, there are other languages, but more programmers use C++ than any other language. In this chapter, you start right out writing a C++ program.
For this chapter we use CodeBlocks, a full-featured system for easily creating C++ code — and it’s free! You don’t need to spend hundreds of dollars to get up and running. Instead, you can install it right from the CD-ROM that came with this book. However, you’re not limited to using CodeBlocks. Several other tools are available to you, but in this chapter we suggest working with CodeBlocks because it’s easy to use. In fact, you may find you like it so well that you wind up almost neglecting the other tools.
We assume that you have already installed CodeBlocks. If you have not, you can find instructions in Appendix B.
Creating a Project
Creating a computer program is usually a bigger job than you’d want to organize in your head. Program code is saved in files much like the documents in a word processor. But programs often have more than one source-code file. At big companies in big buildings in big cities, some programs are really big — hundreds of source-code files for just one program.
Understanding projects
Projects can contain a lot of source code. To keep all that source code together, programmers use a file that manages it all called a project. Projects have a few key elements:
♦ A set of source-code files
♦ (Optionally) Resource information such as icons and sound files
♦ A description of how to compile (build) the application
♦ Integrated Development Environment (IDE) settings that tell how to set up the editor you use to write the application
♦ Some general descriptions of the program being built, such as its name and what type of program it is
By type of program, we don’t mean “word processor” or “really cool earth-shattering software,” even if that’s what your program is. We use type to mean your program’s overall relationship with other programs:
♦ Does this program run by itself?
♦ Does this program add to or extend the functionalities of another program (such as Microsoft Excel)?
♦ Does this program serve as a library (a bunch of code that you make available to another program)?
All this information, along with your source-code files, represents a project.
In the CodeBlocks tool, you create a new project each time you start work on a new program. You provide a little information about the program you’re working on, and then you begin writing your code. All the code for your program goes in one place — stored in the project.
 This book presents a lot of sample programs, so you may want to create a directory (or folder) on your hard drive to house all the programs you create as you work through this book. Call it MyProjects, or something specific like CPPAllInOne, or whatever you prefer.
Defining your first project
To create a new project in CodeBlocks, start CodeBlocks and choose File⇒New⇒Project or click Create a New Project on the Start Here page that appears when you start the program. A dialog box appears, as shown in Figure 1-1.
Figure 1-1: The New from Template dialog box lets you select a new project type.
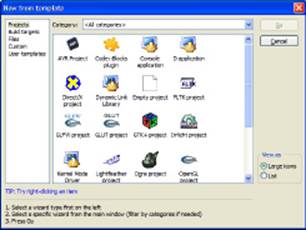
When you create a project in CodeBlocks, you choose from a list of several types of programs. They’re shown as icons in the New from Template dialog box. The following list shows some program types:
♦ Win32 GUI Project: This is a standard Windows program that includes, well, a window. You know the kind; it usually has a menu across the top and something inside it that you can either click or type into.
♦ Console Application: This is a program that gets a paltry Console window instead of a regular Windows window. Console refers to a window with a command prompt (folks who recall the old days before Windows call it a DOS box). You can remember this because you may have to “console it” for being just a boring DOS-type text window with a prompt.
♦ Static library: A static library is a set of C++ code that you use later in another project. It’s like making a really great marinade that you won’t use up today. You’ll use some of it tomorrow and some of it after that. Same with a C++ library.
♦ Dynamic Link Library: A Dynamic Link Library (DLL) is kind of like a static library except it stays separated from the main program and gets its own file with a .DLL extension.
Programmers have a bad habit of dropping DLLs in your c:\windows\system or c:\windows\system32 directory when you probably don’t really want them there. That’s why you’ve likely heard of DLLs before.
♦ Empty project: A blank project that’s as clean as a blank sheet of white typing paper, ready for you to fill ’er up.
What about all of those other projects?
CodeBlocks supports a host of other application types. This book doesn’t discuss them because they won’t add to your initial understanding of C++ programming. However, these other projects are valuable in the right environment. For example, the GIMP Tool Kit Plus (GTK+) Project relies on a graphical user interface designed for the X Windowing system (see more at http://www.gtk.org/).
You’ll find that CodeBlocks uses a considerable number of acronyms and abbreviations for project and resource names without defining any of them. We define all the acronyms that we employ on first use in the book. However, some of these acronyms and abbreviations go on and on. For example, you might wonder about the GIMP part of the GTK+ definition. GIMP stands for GNU Image Manipulation Program. Of course, now you need to know GNU, which stands for Gnu’s Not Unix. Okay, now that we’ve exhausted that bit of fun, if you ever do run across an interesting acronym or abbreviation, you can always get it defined for you on the Acronym Finder Web site (http://www.acronymfinder.com/). The bottom line is that you need to research both projects and resources before you use them.
Frankly, it’s kind of a pain to use an empty project, because you have to tweak and set a bunch of things. So we never use this option.
For the samples in this chapter, create a Console Application. Follow these steps:
1. In the New from Template dialog box, click the Console Application icon found in the Projects tab. Click Go.
You see the Welcome page of the Console Application wizard.
2. Click Next.
The wizard asks which language you want to use.
3. Highlight C++ and click Next.
You see a list of project-related questions, as shown in Figure 1-2. These questions define project basics, such as the project name.
4. Type a name for your project in the Project Title field.
The example uses SayHello as the project title. Notice that the wizard automatically starts creating an entry for you in the Project Filename field.
Figure 1-2:Provide the name of your project for CodeBlocks.
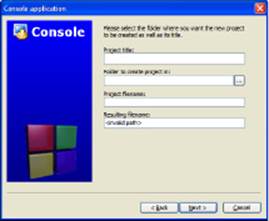
5. Type a location for your project in the Folder to Create Project In field.
The example uses FirstProject as the folder name. You can also click the ellipses button next to the Folder to Create Project In field to use the Browse for Folder dialog box to locate the folder you want to use. Notice that the wizard completes the entry in the Project Filename field.
If you made a folder to house all the programs for this book (as suggested in the “Understanding projects” section of the chapter), put your FirstProject folder in the folder for the book. Make sure you’re inside the folder you just created.
6. (Optional) Type a project filename in the Project Filename field.
7. Click Next.
You see the compiler settings shown in Figure 1-3. Most of the projects in this book use the default compiler settings. However, if you look at the Compiler drop-down list, you see that CodeBlocks supports a number of compilers and you can add more to it. The other settings control the creation and location of a Debug version (the version you use for finding problems in your code) and a Release version (the version that you send to a customer) of the application.
8. Change any required compiler settings and click Finish.
The wizard creates the application for you. It then displays the CodeBlocks IDE shown in Figure 1-4 with the project loaded.
Figure 1-3: Tell CodeBlocks where to place the Debug and Release versions of your application.
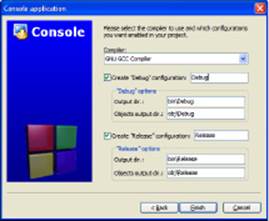
Figure 1-4: Use the CodeBlocks IDE to interact with your project.
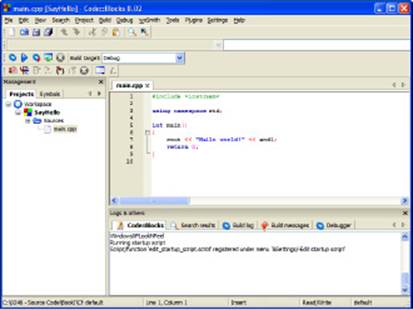
The project window is organized side by side:
♦ The left side is an Explorer view (called a tree view), which represents your project. At the top of the tree view is a workspace — the essential unit of a project. Below the workspace is the name of your project. Underneath that are the components of your project. In this case, only one component exists so far: the source-code file whose filename is main.cpp. Remember that to program in C++, you enter code into a source-code file; this file, called main.cpp, is such a file for your SayHello project.
♦ The right side (which actually takes up about three-quarters of the screen) is the source-code file itself.
This part works much like a word processor or an e-mail editor, and you can type the code into the window. You notice that you already have some code there — a sort of starter code that came into being when you chose Console Application and created the project.
♦ At the bottom of the display are a number of status windows. The Code::Blocks window tells you how the wizard created your application. Don’t worry about these windows for right now. You see them in action as the book progresses.
Building and executing your first application
Okay, it’s time to work with your first application. Use the following steps to save the file, build the program (make it into an executable that Windows can use), and execute the program.
1. Save the code file by choosing File⇒Save Everything.
Saving the files ensures you have a good copy on disk should something go wrong. For example, you could completely crash the IDE if your application does the wrong thing.
2. Choose Build⇒Build or press Ctrl+F9.
This action creates the executable file. Building the code converts words you understand into code that Windows understands. Notice that CodeBlocks automatically selects the Build Log window for you and you see the steps that CodeBlocks takes to create your application. At the end of the process, you should see 0 Errors, 0 Warnings as the output.
3. Choose Build⇒Run or press Ctrl+F10.
An output window like the one shown in Figure 1-5 opens and you see your first program execute.
4. Press Enter to stop program execution.
The program window disappears and you see the CodeBlocks IDE again.
Well that wasn’t interesting, was it? But that’s okay! The program starts out in a basic situation: We have a console window, and then when the program is finished doing whatever it must do, it shows the message Press any key to continue — and when you do so, the program ends.
Figure 1-5:Execute your first program.
Typing the Code
The right-hand 75 percent or so of the CodeBlocks window is called the code editor; it’s where you type and change your code. Of all the tasks we just mentioned, the nearest equivalent to using the CodeBlocks code editor is composing an e-mail message.
 Word movement and selection actions look a bit strange on the screen. They ignore some characters, such as braces — the curly characters { and }. (We recently added this to our “Mysteries of Life” on the refrigerator.)
The code editor works like the editor in an e-mail message. You can
♦ Type code.
♦ Move the cursor with the arrow keys (up, down, left, right) to the position where you want to type. The cursor is the little blinking vertical bar that shows where your text goes when you type. Some folks call it a caret or an insertion point.
♦ Click where you want to type. Use the mouse to point where you want to type, then click the mouse button. The cursor jumps to the spot where you click.
♦ Select text to delete or change. You can select text in either of two ways:
• Point with the mouse at the first or last character you want to select; then hold down the mouse button while you drag the mouse.
• Move the cursor to the first or last character you want to select; then hold down the Shift key while you press the arrow keys.
♦ Scroll the text up and down (vertically) or left and right (horizontally) with the scrollbars. The scrollbars work only when there is more text than you can see in the window, just like most other places in the Windows and Macintosh worlds. You can scroll up and down (if there’s enough text in the editor) by using Ctrl+↑ and Ctrl+↓ key combinations.
 ♦ Scrolling changes only what you see. You must use the mouse or the arrow keys to select what you see.
After you play around a bit with the editor, you can use Table 1-1 to do a few of your favorite tasks. (Of course, if you’re new to programming, you may not know yet whether these are your favorites — but they will be soon. Trust me.)
|
Table 1-1 Navigation and Edit Commands |
|
|
Command |
Keystroke or Action |
|
Cursor movement |
↑, ↓, ←, or →, Home, End |
|
Moving from word to word |
Ctrl+← or Ctrl+→ |
|
Selecting with the mouse |
Click the mouse in the text, and while the mouse button is down, drag the mouse |
|
Selecting with the cursor |
Shift+↑, Shift+↓, Shift+←, or Shift+→ |
|
Selecting the next word |
Shift+Ctrl+→ |
|
Selecting the previous word |
Shift+Ctrl+← |
|
Selecting everything |
Ctrl+A |
|
Going to the top |
Ctrl+Home |
|
Going to the bottom |
Ctrl+End |
Starting with Main
When a computer runs code, it does so in a step-by-step, line-by-line manner. But your code is organized into pieces, and one of these pieces is called the main function, or simply main. main is the part that runs first. main tells the computer which other parts of the program you want to use. main is the head honcho, the big boss.
How does the computer know what is main? You type lines of code between the brace characters, { and }. Here is the default program that CodeBlocks produces when you create a Console Application project.
int main()
{
cout << “Hello world!” << endl;
return 0;
}
The word main is required, and it tells the computer where main is. You might also see main shown as:
int main(int argc, char *argv[])
Don’t worry about the words around main for now. You discover what these words mean later in the chapter. For now, all you need to know is that every C++ program has a main function.
The computer performs the code line by line. If a line is blank, the computer just goes to the next line. When you write lines of code, you are instructing the computer to do something (which is why some people refer to lines of code as instructions).
Showing Information
Ready to type some code and try it out? Let’s do it! This code will open the famous console window and write some words to it.
First, make sure that you still have the CodeBlocks tool open and the SayHello project open, as in this chapter’s preceding examples. If not, follow these steps:
1. Start CodeBlocks if it’s not already running.
You see a Start page for the CodeBlocks IDE.
2. Click the SayHello.cbp project found in the Recent Projects list.
CodeBlocks opens the project for you.
If the main.cpp code isn’t showing in the right 75 percent of the window, click main.cpp in the tree view on the left. It will immediately open. (If you don’t see the tree view, click the little tab at the top that says Projects; it’s next to a tab that says Symbols.)
Follow these steps carefully. Make sure that you type everything exactly as given here:
1. Position the cursor on the line with the opening brace.
In this case, that’s line 6. You can see the line number on the left side of the code editor.
2. Press the Enter key.
The cursor should be in the fifth column. If it isn’t — if it stays in the first column — then press the spacebar four times.
3. Type the following line of code exactly as it appears here.
Put no spaces between the two less-than (<) symbols. Make sure that you remember the final semicolon at the end. Here’s the line:
cout << “Hello, I am your computer talking.” << endl;
4. Delete the line of code that looks like this:
cout << “Hello world!” << endl;
In the end, your code will look like the following example (the new line that you typed is shown here in bold):
#include <iostream>
using namespace std;
int main()
{
cout << “Hello, I am your computer talking.” << endl;
return 0;
}
If you don’t type your code correctly, the computer can tell you. This step compiles the program: the computer makes sure that what you wrote is okay and then translates it into a runnable program. (Don’t worry too much about what that means. For now just think of it as making sure that your program is okay. Appendix A gives you the whole story about compiling.)
To find out whether your program is good to go, choose Build⇒Build.
If all is well, you see a window in the lower-left of the main CodeBlocks window with the really happy message, 0 errors, 0 warnings. A message like You rock! might be nicer, but 0 errors, 0 warnings ain’t all that bad, we guess.
If you didn’t type the line correctly, all is not lost because the computer will tell you what you did wrong. In this case, you will see something like what is shown in Figure 1-6. A list with columns appears at the bottom of your screen.
Figure 1-6:CodeBlocks tells you about errors in your program.
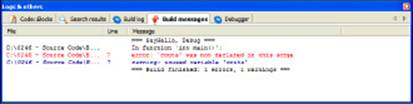
♦ The leftmost column shows the name of the file where the error was. In this case the error was in main.cpp, the only file we were working on.
♦ The second column shows the line number of the problem (in this case, 7).
♦ The third column of the list makes a basic attempt to tell us what we did wrong, like this:
error: ‘couts’ was not declared in this scope
When the compiler doesn’t recognize a word, it says that the word is not declared. In other words, the compiler doesn’t know what couts is. (The word should be cout.)
If we want to see the problem, we can point at the error report line and double-click. The bad line appears in the code editor, with a little red box next to the line. The line is also highlighted. As soon as we press an arrow key, the highlight vanishes.
Thus, if we press the → key a few times and get to the word couts and then delete the letter s, we can try again. If we choose Build⇒Build, this time we see the happy message 0 errors, 0 warnings. Excellent!
No errors means that the program is good enough to run. So run it!
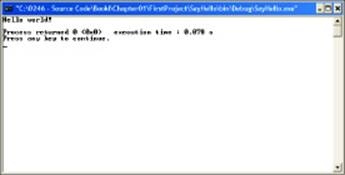
Choose Build⇒Run. A console appears with text that looks like this:
Hello, I am your computer talking.
Process returned 0 (0x0) execution time : 0.015 s
Press any key to continue.
See what happened? There is now a message that says, Hello, I am your computer talking. Apparently the thing you typed caused that message to appear. (Go ahead and press Enter to close the console.)
And in fact, that’s exactly what happened. That’s how you make a message appear on the console screen. The steps look like this:
1. Type cout.
Although cout looks like it’s pronounced “cowt,” most programmers say “see-out.” Think of it as shorthand for console output. (But don’t type console output in its place, because the compiler won’t accept that.)
2. After the word cout, type a space and then type two less-than signs (make sure to leave that one space before them).
These less-than signs just mean, the thing that follows is going to appear on the console. The thing that follows, you will notice, is in double quotes. That’s the way the computer knows where it starts and ends. The words and stuff inside these double quotes is called a string because it’s a bunch of letters strung together. (I’m not making this up.) The computer knows where the string starts because there’s a double quote, and it knows where the string ends because there’s a double quote. The computer doesn’t display these two sets of double quotes when the program runs.
Then some weirdness follows. There’s another set of less-than signs, which means you want to write more to the console. But what follows? It’s endl. Notice this is not in quotes. Therefore we are not saying that we want the strange barely pronounceable word “endl” to appear on the screen. Instead, we’re using a special notation that tells the computer that we want to start fresh on the next line. And if you look at the output, you’ll notice that the words that follow (the message about pressing the any key) are, indeed, on the next line. Note that endl is pronounced “end-el.”
So that’s not so bad after all. Let us recap:
♦ The word cout means you want to write to the console.
♦ The << symbols together (with no space between them!) mean the thing that follows is what you want to write.
♦ After the << symbol, you tell the computer what you want to write. It can either be a string of letters, symbols, and other characters (all inside quotes), or it can be the word endl.
♦ You can put multiple items in a row and have them appear on the console that way, provided you start the line with cout and precede each item with the << symbols.
Oh, and if you have a sharp eye, you may notice one more thing we haven’t mentioned yet: we included a semicolon at the end of the line. In C++, every line must end with a semicolon. That’s just the way it’s done.
Statements in C++ end with a semicolon.
 It’s not quite accurate to say that every line must end with a semicolon. You can break any line into multiple lines. The computer doesn’t mind. We could just as easily have written our line as the following two lines:
cout << “Hello, I am your computer talking.”
<< endl;
This is fine, provided that you don’t split any individual word (such as cout and endl), or the << symbols, or the string. In effect, anyplace you have a space occurring “naturally” in the code (for example, between I and am), you can start a new line if you want. Then, when the wholestatement is finished, you end with a semicolon. Think of the semicolon as a signal to the computer that the old statement is finished.
Doing some math
You can get the computer to do some math for you; you can use the same cout approach we described in the preceding section, and you throw in some numbers and arithmetic symbols.
Although addition uses the familiar plus sign (+) and subtraction uses the familiar minus (-) sign, multiplication and division use symbols you might not be familiar with. To multiply, you use the asterisk (*); to divide, you use the forward-slash (/).
Table 1-2 shows the math symbols.
|
Table 1-2 Math Symbols |
|
|
Symbol |
Function |
|
+ |
Addition (plus) |
|
- |
Subtraction (minus) |
|
* |
Multiplication (times) |
|
/ |
Division (divided by) |
Yep, it’s now math-with-weird-symbols time. Continue with the source code you already have. Click somewhere on the line you typed — you know, the one that looks like this:
cout << “Hello, I am your computer talking.” << endl;
Press End so the cursor moves to the end of the line. Then press Enter so you can start a new line in between the cout line and the line that starts with the word return.
Whenever you want to insert a line between two other lines, the easiest way to get it right is to go to the first of those two lines, press End, and then press Enter. This will insert a new blank line in the right place.
After you press Enter, you will notice that something happened: The cursor is not at the start of the newly inserted line; instead, there are four spaces and it’s indented flush with the other lines. That’s not a mistake. Believe it or not, it’s a serious lifesaver. Well, okay, maybe not a lifesaver, but it’s almost as good as those little candies that everybody loves. The reason is that often you indent your code (this particular code is indented four spaces); if you’re typing lots of code, it’s a bummer to have to type four spaces (or press the Tab key) every time you start a new line. So CodeBlocks considerately (and automatically) does the indentation for you.
If, for some reason, your code didn’t automatically indent and the cursor is loitering at the beginning of the line, the auto-indent feature is not turned on. It should be on by default, but if it isn’t, here’s how to turn it on:
1. Choose Settings⇒Editor Options.
The Configure Editor dialog box appears.
2. Make sure that the Tab Indents check box is selected, then click OK.
3. Once back in the code, press Backspace to delete your new line, then try pressing Enter again.
Behold! The code automatically indents.
4. After your new blank line appears and indents itself, type the following:
cout << 5 + 10 << endl;
The beginning and the end of this line are just like those of the line you typed earlier. The difference is the middle — instead of typing a string, you type a math problem: 5 plus 10. Note that we put spaces around the 5, around the +, and around the 10 — but not between the 1 and 0. If you put a space there, the computer gets confused (it doesn’t know that you meant to write a single two-digit number). When you’re finished, your code should look like the following code snippet (here the new line you typed is shown in bold):
#include <iostream>
using namespace std;
int main()
{
cout << “Hello, I am your computer talking.” << endl;
cout << 5 + 10 << endl;
return 0;
}
5. Save your work by choosing File⇒Save Everything.
Instead of choosing File⇒Save Everything, you can recognize that the only thing that changed is the source-code file you’re currently working on. If you see the blinking cursor in the code editor, you know that the code editor is active. If not, click somewhere in your code to activate the editor. When you see the blinking cursor, press Ctrl+S. This saves your file.
In the computer world, there’s an adage that goes something like this: “Save early, save often.” Get in the habit of pressing Ctrl+S every so often. You won’t wear out your hard drive, and the keyboard is pretty durable. Every time we type a few lines of code, we press Ctrl+S. Before we compile, we press Ctrl+S. When we’re feeling paranoid that the last Ctrl+S didn’t stick, we press Ctrl+S. When we’re stuck at a traffic light, we press Ctrl+S.
Now you can tell the computer to compile your code. If you haven’t saved it, do so now by pressing Ctrl+S. Then choose Build⇒Build. If you typed everything correctly, you should see the magical message 0 errors, 0 warnings appear in the Build Log window. But if not, don’t worry; you can easily fix it. Look at your code and find the difference between the line we wrote earlier and your code. Here it is again, just for safe measure:
cout << 5 + 10 << endl;
There is a space after cout, a space after <<, a space after 5, a space after +, a space after 10, and a space after <<. And there is a semicolon at the end. Make sure that these are all correct.
Then when you successfully compile and see the happy message 0 errors, 0 warnings, you are ready to run your program. Choose Build⇒Run.
A console window opens, and you should see the following:
Hello, I am your computer talking.
15
Process returned 0 (0x0) execution time : 0.000 s
Press any key to continue.
Notice the second line is the answer to the math problem 10 + 5. That means the computer knows how to do math, more or less correctly. (Okay, it had better be correct, or we’re going to demand a refund from our teachers.)
Ordering the operations
If you want, you can play around with some more complicated problems. For example, you can try something like this:
cout << 5 + 10 / 2 * 3 + 25 << endl;
What do you think the answer will be? The answer depends on computer rules for the order in which it performs math problems. These are called orders of operation. Multiplication and division take precedence over addition and subtraction. Therefore, the computer does all the multiplication and division first from left to right; then it does the addition and subtraction from left to right. Figure 1-7 shows the order in which the computer does this particular math problem.
Going overboard
The computer actually has various limits, including when it comes to math. If you try something like this
cout << 8762547892451 * 10 / 2 * 3 + 25 << endl;
Figure 1-7: The computer likes to use orders of operation.
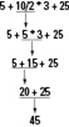
an error message shows up in the error window when you try to compile:
error: integer constant is too large for “long” type
This message is bad. The reason is that you’ve gone beyond the limits of what this style of math enables you to do. So be careful.
You can also go too big when you run your program — and (unfortunately) you won’t know it. For example, the line
cout << 12345 * 12345 * 12345 * 12345 * 12345 << endl;
will compile correctly — but (aieee!) shows the following result:
253233049
Nope, it’s not correct. Not even a good guess. So the moral here is mainly to use the approach to coding shown in this section only when you’re using basic math and don’t have to juggle really big numbers. If you’re getting over five or six digits, you’re getting into too-big territory.
The greatest positive number you can use is 2,147,483,647. The greatest negative number is -2,147,483,647. However, if you’re willing to stick to only positive numbers and 0, the computer can make some adjustments inside and handle a higher positive number. In that case, your numbers can range from 0 to 4,294,967,295.
Pairing the parentheses
If you want to get around the order in which the computer does its math, you can add parentheses. For example, if you use the following line, the computer does the final operation (+) before it does the others:
cout << 5 + 10 / 2 * (3 + 25) << endl;
Whereas previously, without the parentheses, this thing came out to be 45, now it comes out to be 145. First the computer does the 3 + 25 to get 28. Then it begins with the multiplication and division, from left to right. So it takes 10 / 2 to get 5, then multiples that by (3 + 25), or 28, to get 140. Then it starts with the addition and subtraction from left to right. So it adds 5 to this to get the final number, 145.
Tabbing your output
Just as you can write a string of letters and numbers to the console, you can also write a tab. For example, take the following line from your program
cout << “Hello, I am your computer talking.” << endl;
and change it to the line shown in bold in the following code:
#include <iostream>
using namespace std;
int main()
{
cout << “Hello\tI am your computer talking.” << endl;
return 0;
}
In the preceding code, we replaced the comma and space with a backslash and then a lowercase t. (We also removed the extra line about math, just in case you tried the math things from the preceding section.) But when you compile and run this program (remember to compile it first!), it won’t print exactly what’s in the double quotes. Here’s what you see:
Hello I am your computer talking.
The extra space in the displayed line is a tab space, just as if you had pressed the Tab key while typing this. (Is that slick, or what?)
There’s a complication to using the backslash: You can’t just type a backslash or a double quote and expect to see it on the screen. A couple of workarounds will show the actual characters:
♦ Really want to display a backslash, not a special character? Use a backslash followed by another backslash. (Yes, it’s bizarre.) The compiler treats only the first backslash as special. When a string has two backslashes in a row, the compiler treats the second backslash as, well, a backslash.
For example, the following line of code has two backslashes:
cout << “\\tabc” << endl;
The following text shows up at the console:
\tabc
♦ If a string starts with a double quote and ends with a double quote, how in the world would you actually print a double quote? Type a backslash, then a double quote, as in the following code:
cout << “Backslash and double quote equal \” in C++.” << endl;
When that code runs in a program, you see this on the screen:
Backslash and double quote equal “ in C++.
C++ programmers use the term escape-sequence to refer to any special character in a string that starts with a backslash. This is an outdated bit of vocabulary — maybe not as old as “methinks,” but it does date back to the original C language of the 1970s. Back then, you made special characters appear on console screens by first pressing the Esc key.
Let Your Program Run Away
The word execute refers to running your program, but you need to compile (or build using the CodeBlocks terminology) the program before you run it. The compilation process transforms your program into an executable file. An executable file is a special type of file that contains a program that you can run on your computer. When you run your word processor program, you run an executable file containing the word processor program.
After the computer compiles (builds) your program, it performs a step called linking. People often refer to these two steps together as simply compiling. Indeed, in this book, we often use the term to mean both steps together. If you’re curious about what goes on here, take a look at Appendix A. It has a section devoted to the compiling and linking processes.
Whenever you want to run your program, you first compile it, and then you run it. If you make more changes to your program, you must compile it again before running it. Otherwise, the executable file won’t have your changes.
Because you almost always use Build and Run in sequence, the kind people who built CodeBlocks included a special menu item called Build and Run on the Build menu. The computer first compiles your code, then it immediately runs the program if there are no errors. If there are errors, the compiler doesn’t run the program, and the errors are reported as usual.
We almost always use the Build and Run option, rather than clicking Build and then Run separately.
Sometimes the old-fashioned approach is more efficient: When we compile and run our programs, we use shortcut keys. It takes a bit of extra time to grab the mouse, move the pointer to a menu, and so on. Instead, we press F9 to compile.
Table 1-3 lists keyboard shortcuts for compiling.
|
Table 1-3 Keyboard Shortcuts for Compiling and Running |
|
|
Action |
Keyboard Shortcut |
|
Build |
Ctrl+F9 |
|
Run |
Ctrl+F10 |
|
Build and run |
F9 |
All materials on the site are licensed Creative Commons Attribution-Sharealike 3.0 Unported CC BY-SA 3.0 & GNU Free Documentation License (GFDL)
If you are the copyright holder of any material contained on our site and intend to remove it, please contact our site administrator for approval.
© 2016-2026 All site design rights belong to S.Y.A.