Introduction to Game Design, Prototyping, and Development (2015)
Part II: Digital Prototyping
Chapter 16. Introducing Our Development Environment: Unity
This is the start of your programming adventure.
In this chapter, you download Unity, the game development environment that you will use throughout the rest of this book. We talk about why Unity is a fantastic game development tool for any budding game designer or developer and why we’ve chosen C# as the language for you to learn.
You also take a look at the sample project that ships with Unity, learn about the various window panes in the Unity interface, and move these panes into a logical arrangement that will match the examples you see in the rest of the book.
Downloading Unity
First things first, let’s start downloading Unity. The Unity installer is over 1 GB in size, so depending on your Internet speed, this could take anywhere from a few minutes to a couple of hours. After you’ve gotten this process started, we can move on to talking about Unity.
As of this writing, the latest major version of Unity is Unity 4. Because Unity is under constant development, the current minor version should be something like 4.x.y, with the x and y being sub-version numbers. Regardless of version, Unity is always available for free from Unity’s official website:
http://unity3d.com/unity/download
This should take you to a page that provides the latest download link for your system (see Figure 16.1). Unity is available for both PC and OS X, and it is nearly identical on both platforms.
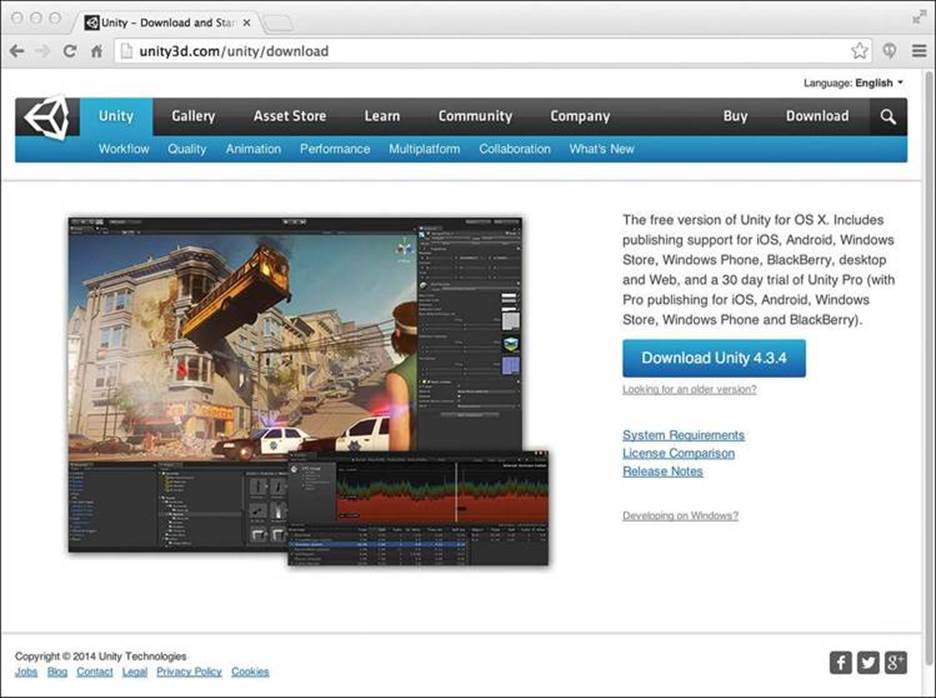
Figure 16.1 The web page to download Unity
Tip
Unity is free, but you will still need to acquire a license, and this requires that you have an available Internet connection the first time that you run the application.
Introducing Our Development Environment
Before you can begin prototyping in earnest, you first need to become familiar with Unity, our chosen development environment. Unity itself can really be thought of as a synthesis program; while you will be bringing all the elements of your game prototypes together in Unity, the actual production of the assets will largely be done in other programs. You will program in MonoDevelop; model and texture in a 3D modeling program like Maya, Autodesk 3ds Max, or Blender; edit images in a photo editor such as Photoshop or GIMP; and edit sound in an audio program such as Pro Tools or Audacity. Because a large section of this book is about programming and learning to program in C# (pronounced “see-sharp”), you’ll be spending most of the time with tutorials using MonoDevelop, but it’s still critically important to understand how to use Unity and how to effectively set up your Unity environment.
Why Choose Unity?
There are many game development engines out there, but we’ve chosen to focus on Unity for several reasons:
![]() Unity is free: With the free version of Unity, you can create and sell games that run on OS X, PC, the Web, Linux, iOS, Android, BlackBerry, Windows Phone, Windows Store, and more. While the Pro version of Unity includes a few additional useful features, for a game designer just learning to prototype, the free version is really all that you need. The Pro version normally costs $1,500 (or $75/month), but if you’re a student, a one-year license for Unity Pro is about ten times less!
Unity is free: With the free version of Unity, you can create and sell games that run on OS X, PC, the Web, Linux, iOS, Android, BlackBerry, Windows Phone, Windows Store, and more. While the Pro version of Unity includes a few additional useful features, for a game designer just learning to prototype, the free version is really all that you need. The Pro version normally costs $1,500 (or $75/month), but if you’re a student, a one-year license for Unity Pro is about ten times less!
Tip
Student Pricing If you are a student, you can purchase a 1-year educational license for Unity Pro at a tremendous discount (about $150 instead of $1,500). This license does prevent you from being able to sell your game directly to players, but it lets you use the full power of Unity Pro to develop your game and make excellent portfolio pieces. After you’re done developing, if you know you’ve got a hit on your hands, you can purchase the commercial version of Pro before attempting to sell your game. Unity has also recently added Pro student licenses that do allow you to sell your games, but those have a higher cost.
To find the latest student pricing for Unity, I recommend searching the Web for “unity educational student pricing.” That will make sure that you’re looking at the latest.
![]() Write once, deploy anywhere: The free version of Unity can build applications for OS X, PC, the Web, Linux, iOS, Android, BlackBerry, Windows Phone, Windows Store, and more, all from the same code and files. This kind of flexibility is at the core of Unity; in fact, it’s what the product and company are named for. There are also paid extensions to Unity Pro that professionals can use to create games for the PlayStation 3, Xbox 360, and several other game consoles.
Write once, deploy anywhere: The free version of Unity can build applications for OS X, PC, the Web, Linux, iOS, Android, BlackBerry, Windows Phone, Windows Store, and more, all from the same code and files. This kind of flexibility is at the core of Unity; in fact, it’s what the product and company are named for. There are also paid extensions to Unity Pro that professionals can use to create games for the PlayStation 3, Xbox 360, and several other game consoles.
![]() Great support: In addition to excellent documentation, Unity has an incredibly active and supportive development community. Hundreds of thousands of developers are using Unity, and many of them contribute to the discussions on Unity forums across the web.
Great support: In addition to excellent documentation, Unity has an incredibly active and supportive development community. Hundreds of thousands of developers are using Unity, and many of them contribute to the discussions on Unity forums across the web.
![]() It’s awesome!: My students and I have joked that Unity has a “make awesome” button. Although this is not strictly true, there are several phenomenal features built in to Unity that will make your games both play and look better by simply checking an option box. Unity engineers have already handled a lot of the difficult game programming tasks for you. Collision detection, physics simulation, pathfinding, particle systems, draw call batching, shaders, the game loop, and many other tough coding issues are all included. All you need to do is make a game that takes advantage of them!
It’s awesome!: My students and I have joked that Unity has a “make awesome” button. Although this is not strictly true, there are several phenomenal features built in to Unity that will make your games both play and look better by simply checking an option box. Unity engineers have already handled a lot of the difficult game programming tasks for you. Collision detection, physics simulation, pathfinding, particle systems, draw call batching, shaders, the game loop, and many other tough coding issues are all included. All you need to do is make a game that takes advantage of them!
Why Choose C#?
Within Unity, you have the choice to use any of three programming languages: UnityScript, C#, or Boo. Very, very few people actually use Boo, so you’re really left with two choices.
UnityScript, A Version of JavaScript
JavaScript is often seen as a language for beginners; it’s easy to learn, the syntax is forgiving and flexible, and it’s also used for scripting web pages. JavaScript was initially developed in the mid-1990s by Netscape as a “lite” version of the Java programming language. It was used as a scripting language for web pages, though early on that often meant that various JavaScript functions worked fine in one web browser but didn’t work at all in another. The syntax of JavaScript was the basis for HTML5 and is very similar to Adobe Flash’s ActionScript 3. Despite all of this, it is actually JavaScript’s flexibility and forgiving nature that make it an inferior language for this book. As one example, JavaScript uses weak typing, which means that if we were to create a variable (or container) named bob, we could put anything we wanted into that variable: a number, a word, an entire novel, or even the main character of our game. Because the variable bob doesn’t have a variable type, Unity never really knows what kind of thing bob is, and that could change at any time. These flexibilities in JavaScript make scripting more tedious and prevent programmers from taking advantage of some of the most powerful and interesting features of modern languages.
C#
C# was developed in 2000 as Microsoft’s response to Java. They took a lot of the modern coding features of Java and put them into a syntax that was much more familiar to and comfortable for traditional C++ developers. This means that C# has all the capabilities of a modern language. For you experienced programmers, these features include function virtualization and delegates, dynamic binding, operator overloading, lambda expressions, and the powerful Language INtegrated Query (LINQ) query library among many others. For those of you new to programming, all you really need to know is that working in C# from the beginning will make you a better programmer and prototyper in the long run. In my prototyping class at the University of Southern California, I taught using both UnityScript and C# in different semesters, and I found that students who were taught C# consistently produced better game prototypes, exhibited stronger coding practices, and felt more confident about their programming abilities than their peers who had been taught UnityScript in prior semesters of the class.
Runtime Speed of Each Language
If you’ve had some experience programming, you might assume that C# code in Unity would execute faster than code written in JavaScript or Boo. This assumption would come from the understanding that C# code is usually compiled while JavaScript and Boo are interpreted (meaning that compiled code is turned into a computer’s machine language by a compiler as part of the coding process, while interpreted code is translated on-the-fly as the player is playing the game, making interpreted code generally slower). However, in Unity, every time you save a file of C#, UnityScript, or Boo code, Unity imports it, converts any of the three languages to the same Common Intermediate Language (CIL), and then compiles that CIL into machine language. So, regardless of the language you use, your Unity game prototypes will execute at the same speed.
On the Daunting Nature of Learning a Language
There’s no way around it, learning a new language is tough. I’m sure that’s one of the reasons that you bought this book rather than just trying to tackle things on your own. Just like Spanish, Korean, Mandarin, French, or any other human language, there are going to be things in C# that don’t make any sense at first, and there are places that I’m going to tell you to write something that you don’t immediately understand. There will also probably be a point where you are just starting to understand some things about the language but feel utterly confused by the language as a whole (which is the exact same feeling you’d have if you took one semester of Spanish class and then tried to watch soap operas on Telemundo). This feeling comes for almost all of my students about halfway through the semester, and by the end of the semester, every one of them feels much more confident and comfortable with both C# and game prototyping.
Rest assured, this book is here for you, and if you read it in its entirety, you will emerge with not only a working understanding of C# but also several simple game prototypes that you can use as foundations on which to build your own projects. The approach that I take in this book comes from many semesters of experience teaching “nonprogrammers” how to find the hidden coder within themselves and, more broadly, how to convert their game ideas into working prototypes. As you’ll see throughout this book, that approach is composed of three steps:
1. Concept introduction: Before asking you to code anything for each project, I’ll tell you what we’re doing and why. This general concept of what you’re working toward in each tutorial will give you a framework on which to hang the various coding elements that are introduced in the chapter.
2. Guided tutorial: You’ll be guided step by step through a tutorial that will demonstrate these concepts in the form of a playable game. Unlike some other approaches, we will be compiling and testing the game throughout the process so that you can identify and repair bugs (problems in the code) as you go, rather than trying to fix all of them at the end. Additionally, I’ll even guide you to create some bugs so that you can see the errors they cause and become familiar with them; this will make it easier when you encounter your own bugs later.
3. Lather, rinse, repeat: In many tutorials, you’ll be asked to repeat something. For instance, in a top-down shooter game like Galaga, the tutorial would guide you through the process of making one single enemy type, and then it would ask you to create three others on your own. Don’t skip this part! This repetition will really drive the concept home, and it will help your understanding solidify later.
Pro Tip
90% of Bugs Are Just Typos I’ve spent so much time helping students fix bugs that now I can very quickly spot a typo in code. The most common include the following:
![]() Misspellings: If you type even one letter wrong, the computer won’t have any idea what you’re talking about.
Misspellings: If you type even one letter wrong, the computer won’t have any idea what you’re talking about.
![]() Capitalization: To your C# compiler, A and a are two completely different letters, so variable, Variable, and variAble are all completely different words.
Capitalization: To your C# compiler, A and a are two completely different letters, so variable, Variable, and variAble are all completely different words.
![]() Missing semicolons: Just like almost every sentence in English should end in a period, nearly every statement in C# should end in a semicolon ( ; ). If you leave the semicolon out, it will often cause an error on the next line. FYI: A semicolon is used because the period was needed for decimal numbers and what’s called dot syntax in variable names and subnames (e.g., varName.subVarName.subSubVarName).
Missing semicolons: Just like almost every sentence in English should end in a period, nearly every statement in C# should end in a semicolon ( ; ). If you leave the semicolon out, it will often cause an error on the next line. FYI: A semicolon is used because the period was needed for decimal numbers and what’s called dot syntax in variable names and subnames (e.g., varName.subVarName.subSubVarName).
Earlier, I mentioned that most of my students feel confused and daunted by C# at about the midway point of the semester, and it’s at exactly that time that I assign them the Classic Games Project. They are asked to faithfully recreate the mechanics and game feel of a classic game over the course of four weeks. Some great examples have included Super Mario Bros., Metroid, Castlevania, Pokemon, and even the original Legend of Zelda. By being forced to work things out on their own, to schedule their own time, and to dig deeply into the inner workings of these seemingly simple games, the students come to realize that they understand much more C# than they thought, and that is the time that everything really falls into place. The key component here is that the thought process changes from “I’m following this tutorial” to “I want to do this...now how do I make it happen?” At the end of this book, you will be prepared to tackle your own game projects (or your own Classic Game Project, if you want). The tutorials in this book can be a fantastic starting point on which to build your own games.
Running Unity for the First Time
Hopefully reading all of that will have given Unity enough time to download in the background. Congratulations! You’re about to embark on a challenging but rewarding journey.
Installing Unity
Depending on your personal system settings, the Unity installer should have placed itself in a Downloads folder somewhere on your hard drive. I’m sure you’ve done this kind of thing several times before, so find the file, run the installer with all default options, and let’s get to work. This is a big install, so it could take a while. In the final bit of the installation, it may look like it has frozen; but don’t worry, just give it some time to complete.
Your First Launch: Licensing
The first time you run Unity, it will open a built-in web page that will ask you to create a license and register (see Figure 16.2), but it’s really quite painless, and it shouldn’t take much time at all. You will need to choose between the free license and a 30-day trial of Unity Pro. At this time, I recommend activating the free version of Unity, especially if you plan to work through this book slowly. The Pro version will be nice to have for the prototype you’ll make in Chapter 34, “QuickSnap,” so I recommend waiting until then to start the 30-day trial of Unity Pro. However, choosing the 30-day Unity Pro trial now would allow you to see the beautiful reflections and depth-of-field shaders in Figure 16.4.
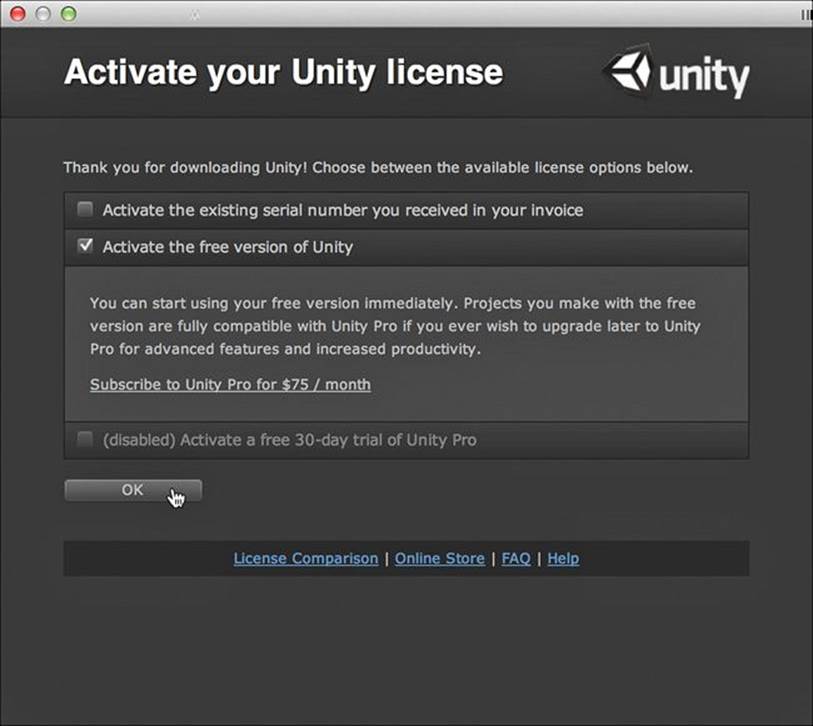
Figure 16.2 Unity licensing window
You can choose to activate the 30-day trial any time, although you can only activate it once, and once the trial is over, you will be reverted to the free version. If you choose the free version now, you can always go back and upgrade to the Pro trial by selecting Unity > Manage License from the menu bar on OS X (on PC, choose Help > Manage License).
Once you click OK, you are prompted to create a Unity account. They’ll send you an email to confirm this (so you need to give them a valid email address). Then, you may be asked to take part in a survey, which you can choose to skip if you want (through a link at the bottom of the survey).
After this, Unity will automatically open the AngryBots demo project. This is a large project, so it may take several seconds to load. It may appear that Unity has frozen or is unresponsive, but if you wait a bit, everything will show up.
Example Project: AngryBots
When you first launch Unity, it will open a demo project and will show you a Welcome to Unity window that pops up over the main Unity window. For now, close the Welcome to Unity window, but feel free to explore the introductory videos and other links there later if you want more of an introduction to Unity than is provided in this chapter.
Unless you tell it not to (by holding the Option key at launch), Unity will open an existing project every time you launch it. The default project for this is AngryBots (see Figure 16.3), a game created internally by the Unity team to show off the capabilities of the engine. If for some reason the default scene doesn’t open automatically, you will need to double-click the AngryBots Scene Asset to open it; it should be the first one listed in the Project window pane in the bottom half of the screen. You’ll see Project and several other window panes on screen that I’ll explain later, but for now, just click the large Play button at the top of the Unity window (the triangle pointing to the right in the top, center of the Unity window) and enjoy playing this game for a while. You can read about the controls for this game in the nearby tip.
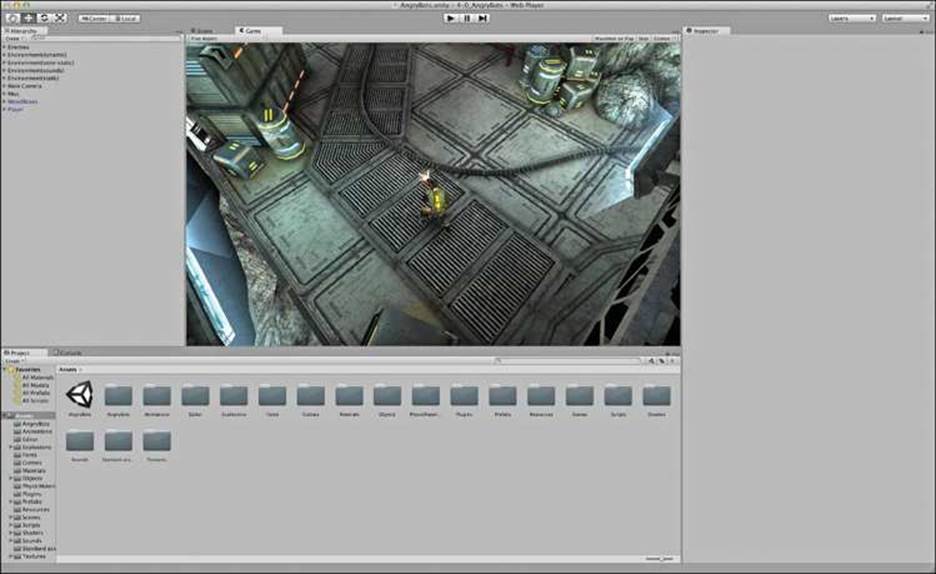
Figure 16.3 The Unity window when it opens for the first time
Tip
AngryBots controls
![]() Movement is controlled by the W, A, S, and D or arrow keys.
Movement is controlled by the W, A, S, and D or arrow keys.
![]() The gun will always aim at your mouse pointer.
The gun will always aim at your mouse pointer.
![]() Hold down the left mouse button to fire.
Hold down the left mouse button to fire.
You must stand very close to any circular door for a couple of seconds for it to open.
There are several computers that you need to stand in front of in order to unlock them (turn the color of electric wires coming out of them from red to green).
Here are some things to notice while you’re playing:
![]() Shaders: AngryBots is rife with shaders (see Figure 16.4), code written specifically for the graphics card with the sole purpose of making the game look amazing. Special ones to check out include the following:
Shaders: AngryBots is rife with shaders (see Figure 16.4), code written specifically for the graphics card with the sole purpose of making the game look amazing. Special ones to check out include the following:
A. The depth-of-field image effect that makes some parts of the scene in-focus while others are out-of-focus (see letter A in Figure 16.4). This will only appear in Unity Pro.
B. The reflections on the floors (especially of the laser sight) (see letter B in Figure 16.4). This will only appear in Unity Pro.
C. The animated water droplets on the floor when outside (see letter C in Figure 16.4). This appears regardless of whether you are using Unity Pro or free.
As explained earlier, if you chose to activate the free license rather than the 30-day Unity Pro trial, you will not see the most advanced shaders. This is one of the few differences between the free and Pro versions of Unity.
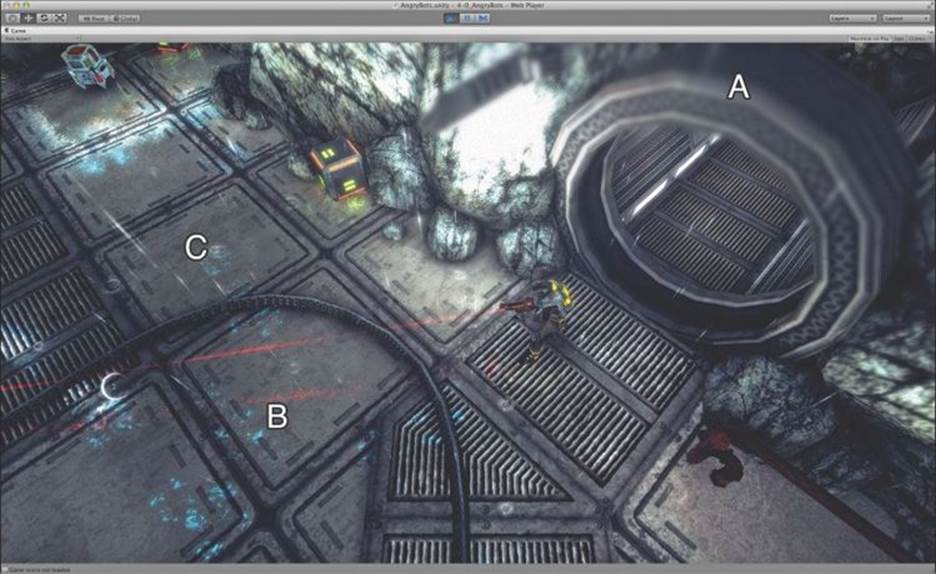
Figure 16.4 Screen showing the effects of various shaders
![]() Character rigging and animation: Unity makes use of animation blending to enable the player character to walk in one direction while looking and shooting in another.
Character rigging and animation: Unity makes use of animation blending to enable the player character to walk in one direction while looking and shooting in another.
![]() AI pathing: Enemies will move around objects in a room to find and attack the player.
AI pathing: Enemies will move around objects in a room to find and attack the player.
Feel free to explore the whole space and see what elements of AngryBots you might want to use in your own project. Go ahead, I’ll wait.
...
...
So, what did you think? Did you blow up the base, or did you escape the exploding station? Did you find the white museum? The controls of this game are a little unusual, but regardless, it’s a good showcase for how beautiful Unity can look.
Now, let’s do something really cool.
Compile and Deploy AngryBots for the Web
Once you’ve clicked the blue Stop button at the top of the Unity window (the square next to the Play button), choose File > Build Settings from the menu bar (meaning that you should choose the item Build Settings from the File menu, as shown in Figure 16.5).
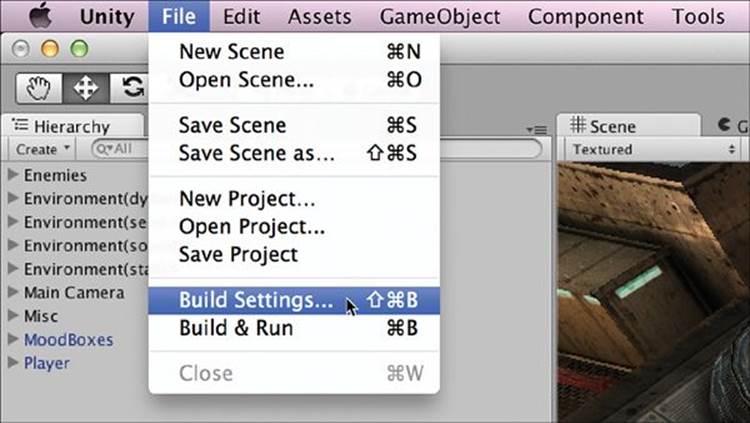
Figure 16.5 Build Settings menu selection
You should see the Build Settings window shown in Figure 16.6.

Figure 16.6 Unity build settings for the web player
From here, be sure to click Web Player on the left and then check Offline Deployment in the Web Player options area. Click Build and Run, and Unity will ask you where to save the files. Type AngryBots Web Build for the filename and click Save.
Unity will process this for a while and build a web version of the game for you. Once it’s built, your web browser will automatically be opened and sent to the page you just made as shown in Figure 16.7. Depending on your browser, you may be prompted to give the Unity plug-in permission to run.
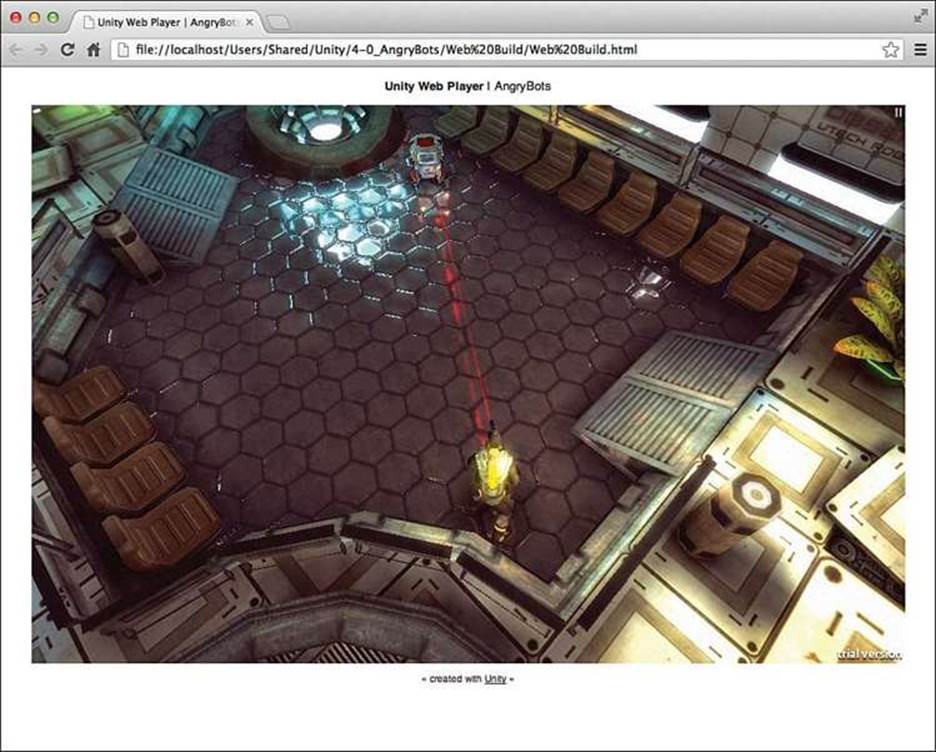
Figure 16.7 AngryBots running in a browser window
And there you go. You’ve compiled AngryBots for the web. Unity makes things like this very easy so that you can focus on the interesting work: game design and development.
Setting Up the Unity Window Layout
The last thing we need to do before we start actually making things in Unity is to get our environment laid out properly. Unity is very flexible, and one of those flexibilities is that it allows you to arrange its window panes however you like. You can see several window layouts by choosing various options from the Layout pop-up menu in the top-right corner of the Unity window (see Figure 16.8).
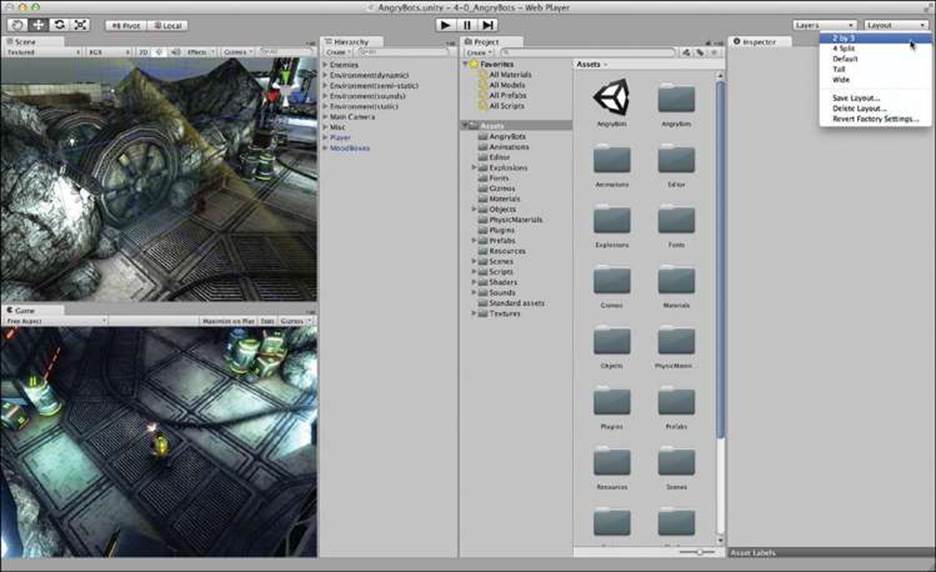
Figure 16.8 Position of the Layout pop-up menu and selection of the 2 by 3 layout
Choose 2 by 3 from this pop-up menu. This will be the starting point for making our layout.
Before doing anything else, let’s make the Project pane look a little cleaner. Click on the options pop-up for the Project pane (shown in the black circle in Figure 16.9) and choose One Column Layout.
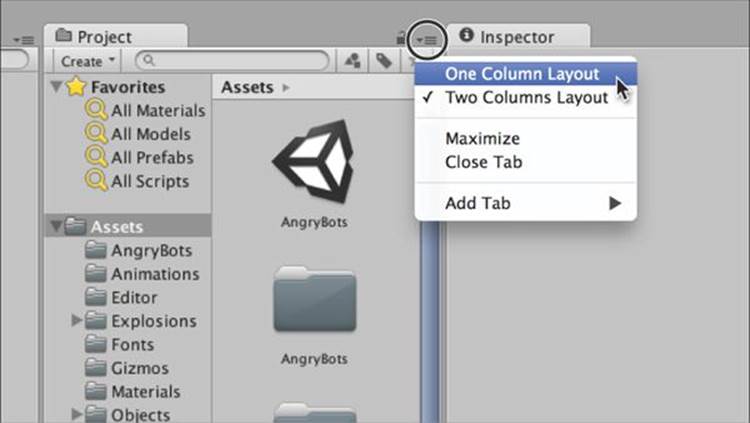
Figure 16.9 Choosing the One Column Layout for the Project pane
Unity enables you to both move window panes around and adjust the borders between them. As shown in Figure 16.10, you can move a pane by dragging its tab (the arrow cursor) or adjust a border between panes by dragging the border between them (the left-right resize cursor).
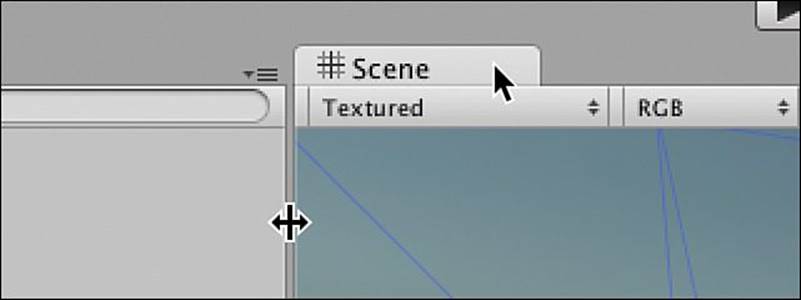
Figure 16.10 Two types of cursors for moving and resizing Unity’s window panes
When you drag a pane by its tab, a small ghosted version will appear (see Figure 16.11). Some locations will cause the pane to snap into place. When this happens, the ghosted version of the tab will appear in the new location.
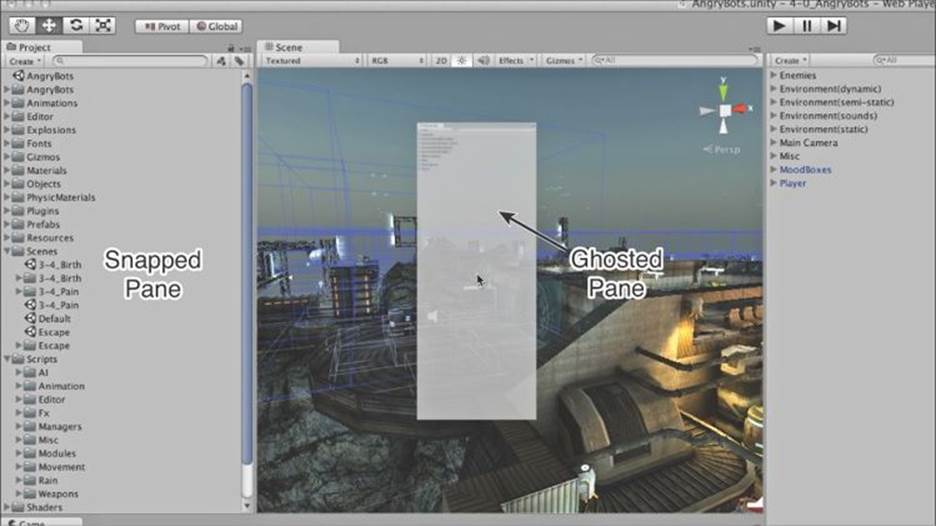
Figure 16.11 Ghosted and snapped panes when moving them around the Unity window
Play around with moving the window panes until your window looks like Figure 16.12.
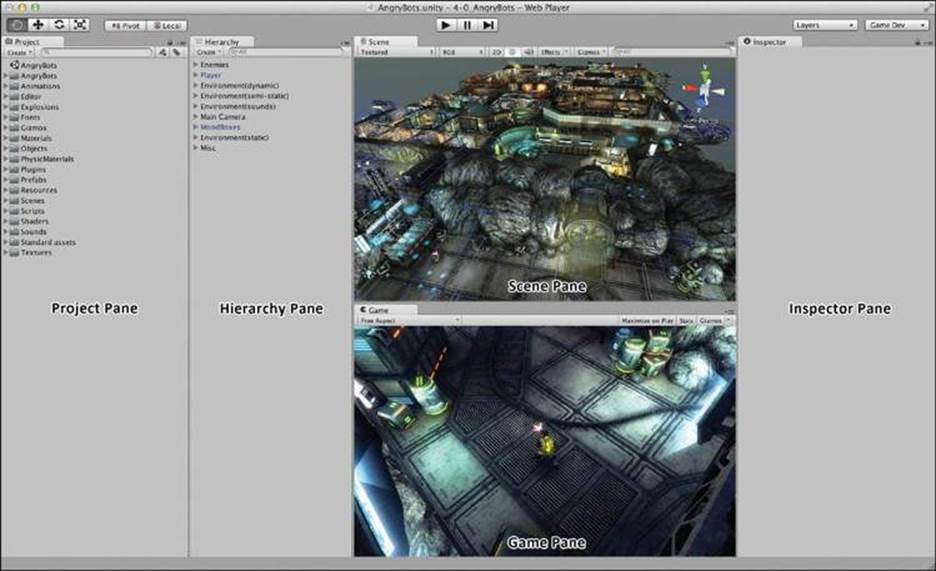
Figure 16.12 Proper layout for the Unity window...but it’s still missing something
Now the last thing we need to add is the Console pane. From the menu bar, choose Window > Console. Then drag the Console pane below the Hierarchy pane. You’ll also need to move the Project pane after you’ve done this to create the final layout shown in Figure 16.13.
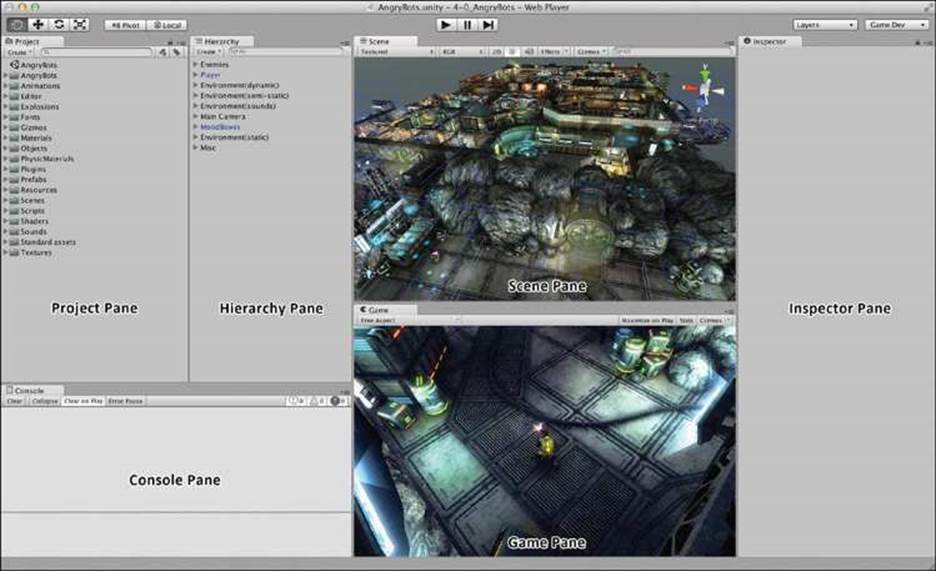
Figure 16.13 Final layout of the Unity window, including the Console pane
Now you just need to save this layout in the Layout pop-up menu so that you don’t have to go through all that again. Click the Layout pop-up menu and choose Save Layout, as shown in Figure 16.14.
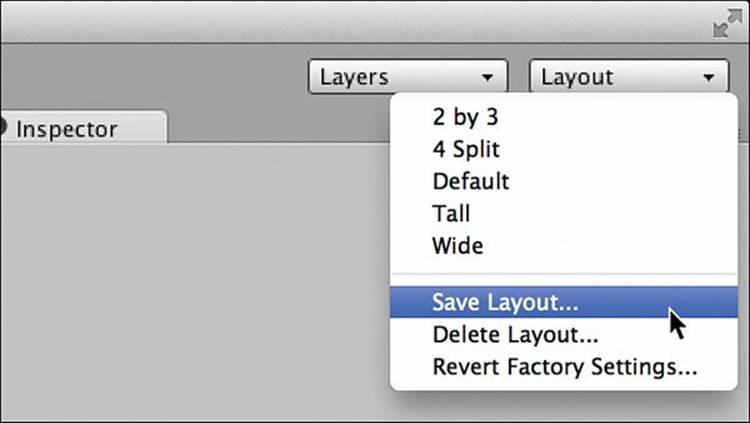
Figure 16.14 Saving the layout
Save this layout with the name Game Dev, with a leading space before the G in Game (i.e., “Game Design”). By putting a space at the beginning of the name, you make sure that this layout is sorted to the top of the menu. Now, any time you need to return to this layout, you can simply choose it from this pop-up menu.
Learning Your Way Around Unity
Before we can really get into coding things, you need to get to know the various window panes that you’ve just arranged. Refer back to Figure 16.13 as we discuss each pane:
![]() Scene pane: The Scene pane allows you to navigate around your scene in 3D and to select, move, rotate, and scale objects.
Scene pane: The Scene pane allows you to navigate around your scene in 3D and to select, move, rotate, and scale objects.
![]() Game pane: The Game pane is where you will preview your actual gameplay; it’s the window in which you played AngryBots before compiling the web build. This pane also shows you the view from the Main Camera in your scene.
Game pane: The Game pane is where you will preview your actual gameplay; it’s the window in which you played AngryBots before compiling the web build. This pane also shows you the view from the Main Camera in your scene.
![]() Hierarchy pane: The Hierarchy pane shows you every GameObject that is included in your current scene. For now, you can think of each scene as a level of your game. Everything that exists in your scene, from the camera to your player-character, is a GameObject.
Hierarchy pane: The Hierarchy pane shows you every GameObject that is included in your current scene. For now, you can think of each scene as a level of your game. Everything that exists in your scene, from the camera to your player-character, is a GameObject.
![]() Project pane: The Project pane contains all of the assets that are included in your project. An asset is any kind of file that is part of your project, including images, 3D models, C# code, text files, sounds, fonts and so on. The Project pane is a reflection of the contents of the Assets folder within your Unity project folder on your computer hard drive. These assets are not necessarily in your current scene.
Project pane: The Project pane contains all of the assets that are included in your project. An asset is any kind of file that is part of your project, including images, 3D models, C# code, text files, sounds, fonts and so on. The Project pane is a reflection of the contents of the Assets folder within your Unity project folder on your computer hard drive. These assets are not necessarily in your current scene.
![]() Inspector pane: Any time you click on an asset in the Project pane or a GameObject in the Scene or Hierarchy panes, you will be able to see and edit information about it in the Inspector pane.
Inspector pane: Any time you click on an asset in the Project pane or a GameObject in the Scene or Hierarchy panes, you will be able to see and edit information about it in the Inspector pane.
![]() Console pane: The Console pane will allow you to see messages from Unity about errors or bugs in your code as well as messages from yourself that will help you understand the inner workings of your own code.1 We will use the Console pane extensively in Chapter 18, “Hello World: Your First Program,” and Chapter 19, “Variables and Components.”
Console pane: The Console pane will allow you to see messages from Unity about errors or bugs in your code as well as messages from yourself that will help you understand the inner workings of your own code.1 We will use the Console pane extensively in Chapter 18, “Hello World: Your First Program,” and Chapter 19, “Variables and Components.”
1 Unity’s print() and Debug.Log() functions allow you to print messages to the Console pane.
Summary
That’s it for setup. Now, let’s move on to actually developing! As you’ve seen in this chapter, Unity can create some pretty stunning visuals and compelling gameplay. Though the process of making beautiful 3D models and shaders is outside the scope of this book, it’s important for you to know the extent of Unity’s graphical capabilities. In the next chapter, you’ll learn more about C#, the language you’ll be using for game development.