Introduction to Game Design, Prototyping, and Development (2015)
Part II: Digital Prototyping
Chapter 18. Hello World: Your First Program
Welcome to coding.
By the end of this chapter, you’ll have created your own new project and written your first bits of code. We start with the classic Hello World project that has been a traditional first program since long before I started coding, and then we move on to something with more of a Unity flair to it.
Creating a New Project
Now that we’ve got the Unity window set up properly (in the previous chapter), let’s leave AngryBots behind and make our own program. Not surprisingly, you start this by creating a new project.
Appendix A, “Standard Project Setup Procedure,” contains detailed instructions that show you how to set up Unity projects for the chapters in this book. At the start of each project, you will see a sidebar like the one here. Please follow the directions in the sidebar to create the project for this chapter.
Set Up the Project for this Chapter
Following the standard project setup procedure, create a new Project in Unity. For information on the standard project setup procedure, see Appendix A.
![]() Project name: Hello World
Project name: Hello World
![]() Scene name: (none yet)
Scene name: (none yet)
![]() C# Script names: (none yet)
C# Script names: (none yet)
You should read the whole procedure in Appendix A, but for now, you only need to create the project. The scene and C# scripts will be created as part of this chapter.
When you create a project in Unity, you’re actually just making a folder that will hold all the files that comprise your project. As you can see, once Unity has finished creating the project, the new project comes with an open scene containing only a Main Camera and absolutely nothing in the Project pane. Before doing anything else, save your scene by choosing File > Save Scene from the menu bar. Unity will automatically choose the correct place to save the scene, so just name it _Scene_0 and click Save.1 Now your scene appears in the Project pane.
1 The underscore (_) at the beginning of the scene name _Scene_0 will cause the scene to always be sorted to the top of the Project pane. I also often change the name of Main Camera to _MainCamera to achieve the same sorting benefit in the Hierarchy pane.
Right-click the Project pane and choose Reveal in Finder (or Show in Explorer for Windows) as shown in Figure 18.1.
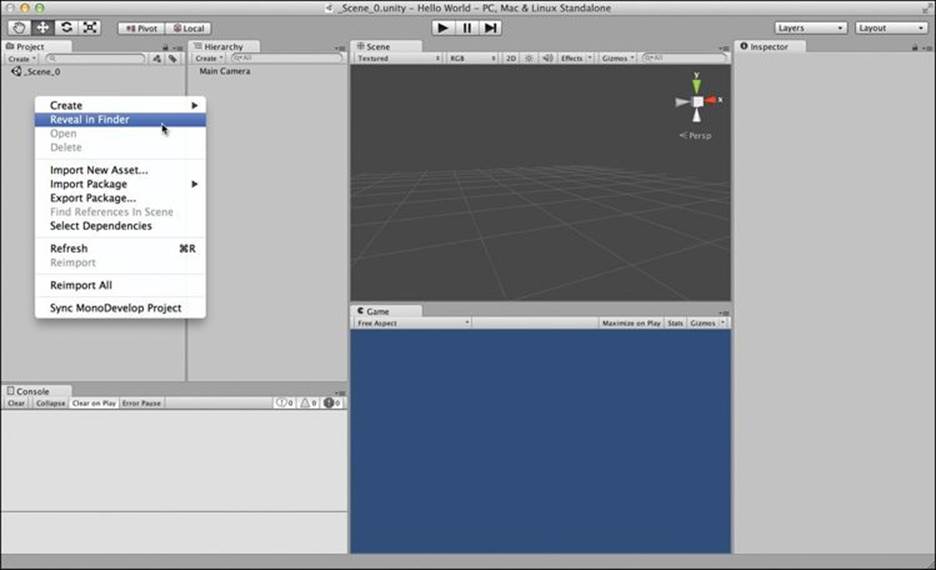
Figure 18.1 The blank canvas of a new Unity project (showing Reveal in Finder in the Project pane pop-up menu)
Tip
Right-Click on OS X Performing a right-click on an OS X mouse or trackpad is not as straightforward as doing so on a Windows PC. For information on how to do so, check out the “Right-Click on OS X” section of Appendix B, “Useful Concepts Reference.”
Selecting Reveal in Finder will open a Finder window (or Explorer window) showing you the contents of your Project folder (see Figure 18.2).
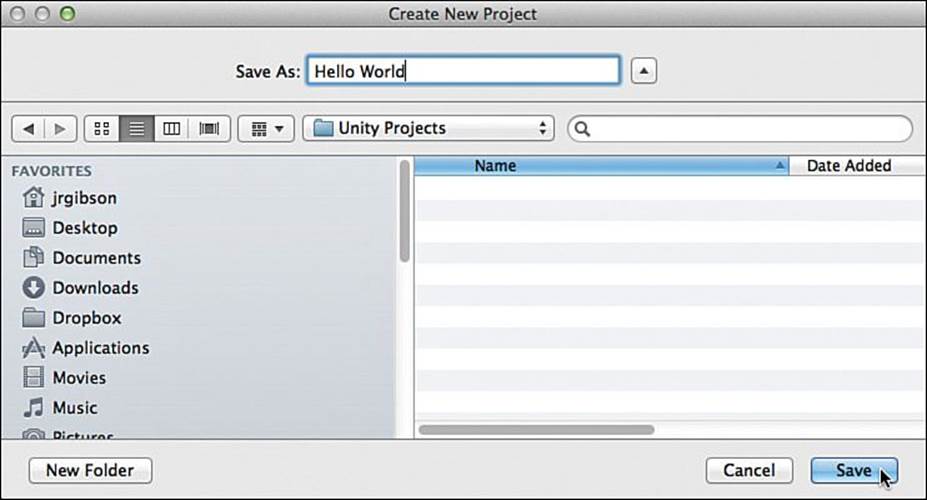
Figure 18.2 The project folder for Hello World as it appears in the OS X Finder
As you can see in the image in Figure 18.2, the Assets folder holds everything that appears in the Project pane inside of Unity. In theory, you can use the Assets folder and the Project pane interchangeably (for example, if you drop an image into the Assets folder, it appears in the Project pane and vice versa), but I highly recommend working exclusively with the Project pane rather than the Assets folder. Making changes in the Assets folder directly can sometimes lead to problems, and the Project pane is generally safer. In addition, it is very important that you never touch the Library, ProjectSettings, or Temp folders. Doing so could cause unexpected behavior from Unity and could possibly even damage your project.
Warning
Never Change the Name of Your Project Folder While Unity Is Running If you change the name of the project folder while Unity is running, it will crash in a very ungraceful way. Unity does a lot of file management in the background while it’s running, and changing a folder name on it will almost always cause a crash. If you want to change your project folder name, quit Unity, change the folder name, and launch Unity again.
Switch back to Unity now.
Making a New C# Script
It is time. Now you’re going to write your first chunk of code. We’ll be talking a lot more about C# in later chapters, but for now, just copy what you see here. Click the Create button in the Project pane and choose Create > C# Script (as shown in Figure 18.3). A new script will be added to the Project pane, and its name will automatically be highlighted for you to change. Name this script HelloWorld (make sure there’s no space between the two words) and press Return (or Enter on PC) to set the name.
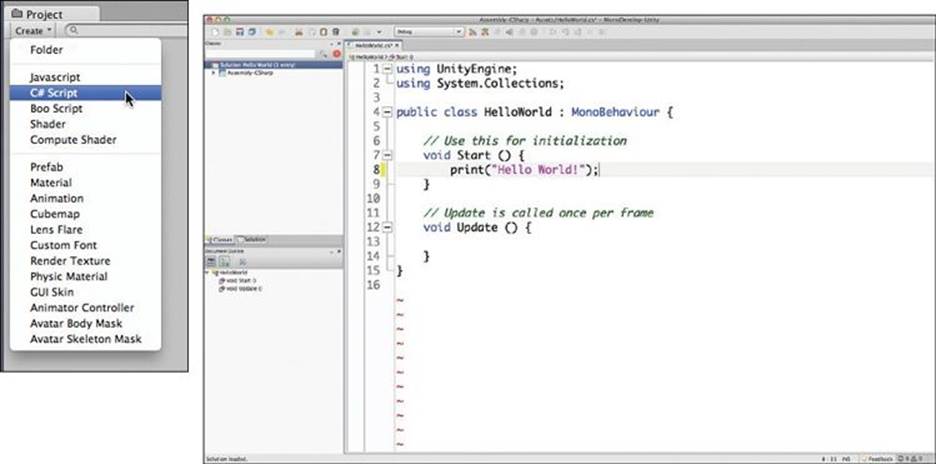
Figure 18.3 Creating a new C# script and viewing that script in MonoDevelop
Double-click the name or the icon of the HelloWorld script to launch MonoDevelop, our C# editor. Your script should look exactly like the one in Figure 8.3 except for line 8. Type two tabs and the code print("Hello World"); into line 8 of your script in MonoDevelop. Make sure to spell and capitalize everything correctly and to put a semicolon (;) at the end of the line. Your HelloWorld script should now look exactly like the following code listing. In code listings throughout the book, anything new that you need to type will be in bold weight, and code that is already there is in normal weight.
Each line in the following code syntax also has a line number preceding it. As you can see in Figure 18.3, MonoDevelop will automatically show you line numbers for your code, so you do not need to type them yourself. They are just here in the book to help make the code listings more clear.
1 using UnityEngine;
2 using System.Collections;
3
4 public class HelloWorld : MonoBehaviour {
5
6 // Use this for initialization
7 void Start () {
8 print("Hello World");
9 }
10
11 // Update is called once per frame
12 void Update () {
13
14 }
15 }
Note
Your version of MonoDevelop may automatically add extra spaces in some parts of the code. For example, it may have added a space between print and ( in line 8 of the Start() function. This is okay, and you shouldn’t be too concerned about it. In general, while capitalization matters tremendously to programming, spaces are more flexible. In addition, a series of several spaces (or several line breaks/returns) will be seen by the computer as just one, so you can add extra spaces and returns if it makes your code more readable (though extra returns may make your line numbers different from those in the code listings).
You should also not be too upset if your line numbers differ from the ones in the examples. As long as the code is the same, the line numbers don’t really matter.
Now, save this script by choosing File > Save from the MonoDevelop menu bar and switch back to Unity.
This next part’s a bit tricky, but you’ll soon be used to it because it is so often done in Unity. Click and hold on the name of the HelloWorld script in the Project pane, drag it over on top of Main Camera in the scene Hierarchy pane, and release the mouse button as is shown in Figure 18.4. When you are dragging the script, you will see the words HelloWorld (Monoscript) following the mouse, and when you release the mouse button over Main Camera, the HelloWorld (Monoscript) words will disappear.
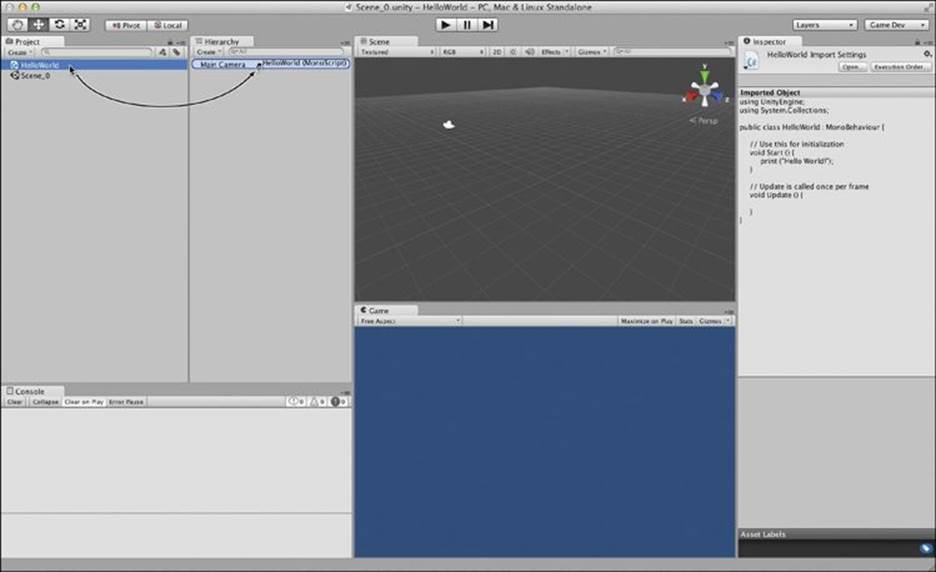
Figure 18.4 Attaching the HelloWorld C# script to the Main Camera in the Hierarchy pane
Dragging the HelloWorld script onto Main Camera attaches the script to Main Camera as a component. All objects that appear in the scene hierarchy pane (for example, Main Camera) are known as GameObjects, and GameObjects are made up of components. If you now click Main Camera in the Hierarchy pane, you should see HelloWorld (Script) listed as one of Main Camera’s components in the Inspector pane. As you can see in Figure 18.5, the Inspector pane shows several components of the Main Camera, including its Transform, Camera, GUILayer, Flare Layer, Audio Listener, and HelloWorld (Script). GameObjects and components are covered in much more detail in later chapters.
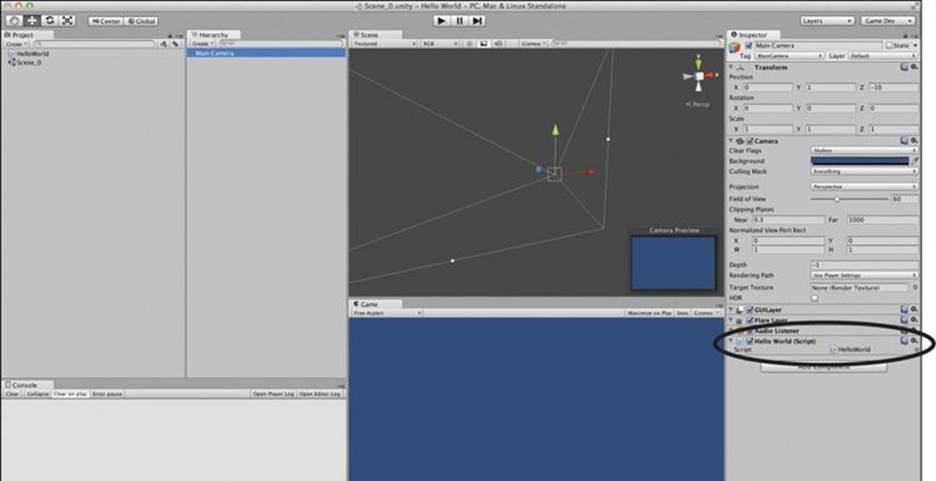
Figure 18.5 The HelloWorld script now appears in the Inspector pane for Main Camera.
Now, just click the Play button (the triangle facing to the right at the top of the Unity window) and watch the magic!
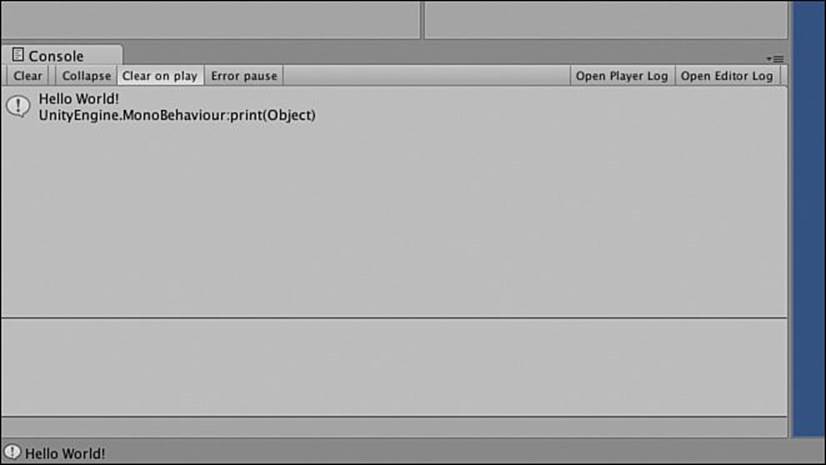
Figure 18.6 Hello World! printed to the Console pane
The script we wrote printed Hello World! to the Console pane, as shown in Figure 18.6. You’ll notice that it also printed Hello World! to the small gray bar at the bottom-left corner of the screen. This probably isn’t the most magical thing that’s ever happened in your life, but you have to start somewhere, and that we have. As a wise old man once said, you’ve taken your first step into a larger world.
Start() Versus Update()
Now let’s try moving the print() function call from Start() to Update(). Go back to MonoDevelop and edit your code as shown in the following code listing.
Adding the two forward slashes (//) to the beginning of line 8 converts everything on line 8 that follows the slashes to a comment. Comments are completely ignored by the computer and are used to either disable code (as you are now doing to line 8) or to leave messages for other humans reading the code (as you can see on lines 6 and 11). Adding two slashes before a line (as we’ve done to line 8) is referred to as commenting out the line. Type the statement print("Hello World!"); into line 13 to make it part of the Update() function.
1 using UnityEngine;
2 using System.Collections;
3
4 public class HelloWorld : MonoBehaviour {
5
6 // Use this for initialization
7 void Start () {
8 // print("Hello World!"); // This line is now ignored.
9 }
10
11 // Update is called once per frame
12 void Update () {
13 print("Hello World!");
14 }
15 }
Save the script (replacing the original version) and try clicking the Play button again. You’ll see that Hello World! is now printed many, many times in rapid succession (see Figure 18.7). You can click the Play button again to stop execution now, and you’ll see that Unity stops spitting outHello World! messages.
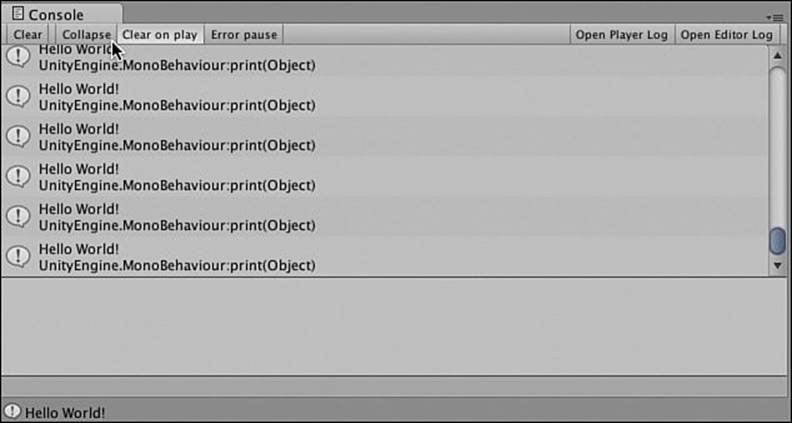
Figure 18.7 Update() has caused Hello World! to be printed once every frame
Start() and Update() are both special functions in Unity’s version of C#. Start() is called once on the first frame that an object exists, whereas Update() is called every frame, hence the single message of Figure 18.6 versus the multiple messages of Figure 18.7. Unity has a whole list of these special functions that are called at various times. Many of them will be covered later in the book.
Tip
If you want to see each repeat of the same message only once, you can click the Collapse button of the Console pane (indicated by the arrow cursor in Figure 18.7), and it will ensure that each different message text appears only once.
Making Things More Interesting
Now, we’re going to add some Unity style to your first program. In this example, we’re going to create many, many copies of a cube. Each of these cube copies will independently bounce around and react to physics. This will demonstrate both the speed at which Unity runs and the ease with which it enables you to create content.
Start by creating a new scene. Choose File > New Scene from the menu bar. You won’t notice much of a difference because we didn’t really have much in _Scene_0 other than the script on the camera, but if you click the Main Camera, you’ll see it no longer has a script attached, and you’ll also notice that the title bar of the Unity window has changed from _Scene_0.unity - Hello World - PC, Mac, & Linux Standalone to Untitled - Hello World - PC, Mac, & Linux Standalone. As always, the first thing you should do is save this new scene. Choose File > Save Scene from the menu bar and name this _Scene_1.
Now, choose GameObject > Create Other > Cube from the menu bar. This will place a Game Object named Cube in the Scene pane (and in the Hierarchy pane). If it’s difficult to see Cube in the Scene pane, try double-clicking its name in the Hierarchy pane, which should focus the scene on Cube. For more information, read the “Changing the Scene View” sidebar later in this chapter that covers how to manipulate the view of the Scene pane.
If you click Cube in the hierarchy, you should see it selected in the Scene pane and see its components appear in the Inspector pane (see Figure 18.8). The primary purpose of the Inspector pane is to enable you to view and edit the components that comprise any GameObject. This Cube GameObject has Transform, Mesh Filter, Box Collider, and Mesh Renderer components:
![]() Transform: The Transform component sets the position, rotation, and scale of the GameObject. This is the only component that is required in every GameObject.
Transform: The Transform component sets the position, rotation, and scale of the GameObject. This is the only component that is required in every GameObject.
![]() Cube (Mesh Filter): The Mesh Filter component gives the GameObject its three-dimensional shape, which is modeled as a mesh composed of triangles. 3D models in games are generally a surface that is hollow inside. Unlike a real egg (which is filled with a yolk and albumen), a 3D model of an egg would just be a mesh simulating the eggshell. The Mesh Filter component attaches a 3D model to the GameObject. In the case of Cube, the Mesh Filter is using a simple 3D cube model that is built into Unity, but you can also import complex 3D models into the Project pane to bring more complex meshes into your game.
Cube (Mesh Filter): The Mesh Filter component gives the GameObject its three-dimensional shape, which is modeled as a mesh composed of triangles. 3D models in games are generally a surface that is hollow inside. Unlike a real egg (which is filled with a yolk and albumen), a 3D model of an egg would just be a mesh simulating the eggshell. The Mesh Filter component attaches a 3D model to the GameObject. In the case of Cube, the Mesh Filter is using a simple 3D cube model that is built into Unity, but you can also import complex 3D models into the Project pane to bring more complex meshes into your game.
![]() Box Collider: Collider components enable a GameObject to interact with other objects in the physics simulation that Unity runs. There are several different kinds of colliders, the most common of which are: Sphere, Capsule, Box, and Mesh (in increasing order of computational complexity). A GameObject with a collider component (and no Rigidbody component) acts as an immovable object in space that other GameObjects can run into.
Box Collider: Collider components enable a GameObject to interact with other objects in the physics simulation that Unity runs. There are several different kinds of colliders, the most common of which are: Sphere, Capsule, Box, and Mesh (in increasing order of computational complexity). A GameObject with a collider component (and no Rigidbody component) acts as an immovable object in space that other GameObjects can run into.
![]() Mesh Renderer: While the Mesh Filter provides the actual geometry of the GameObject, the Mesh Renderer component makes that geometry appear on screen. Without a renderer, nothing in Unity will appear on screen. Renderers work with the Main Camera to convert the 3D geometry of the Mesh Filter into the pixels you actually see on screen.
Mesh Renderer: While the Mesh Filter provides the actual geometry of the GameObject, the Mesh Renderer component makes that geometry appear on screen. Without a renderer, nothing in Unity will appear on screen. Renderers work with the Main Camera to convert the 3D geometry of the Mesh Filter into the pixels you actually see on screen.

Figure 18.8 Creating a new Cube GameObject
Now we’re going to add one more component to this GameObject: a Rigidbody. With the Cube still selected in the hierarchy, choose Component > Physics > Rigidbody from the menu bar, and you’ll see a Rigidbody component added to the Inspector:
![]() Rigidbody: The Rigidbody component tells Unity that we want physics to be simulated for this GameObject. This includes physical forces like gravity, friction, collisions, and drag. A Rigidbody enables a GameObject with a collider to move through space. Without a Rigidbody, even if the GameObject is moved by adjusting its transform, the Collider component of the GameObject will not move. You must attach a Rigidbody component to any GameObject that you want to both move and properly collide with other colliders.
Rigidbody: The Rigidbody component tells Unity that we want physics to be simulated for this GameObject. This includes physical forces like gravity, friction, collisions, and drag. A Rigidbody enables a GameObject with a collider to move through space. Without a Rigidbody, even if the GameObject is moved by adjusting its transform, the Collider component of the GameObject will not move. You must attach a Rigidbody component to any GameObject that you want to both move and properly collide with other colliders.
Now, if you click the Play button, you’ll see the box fall due to gravity.
All the physical simulations in Unity are based on the metric system. This means that
![]() 1 unit of distance = 1 meter (for example, the units for the position of a transform). I will sometimes refer to one unit of distance in Unity as 1m.
1 unit of distance = 1 meter (for example, the units for the position of a transform). I will sometimes refer to one unit of distance in Unity as 1m.
![]() 1 unit of mass = 1 kilogram (for example, the units of mass of a Rigidbody).
1 unit of mass = 1 kilogram (for example, the units of mass of a Rigidbody).
![]() The default gravity of -9.8 = 9.8 m/s2 in the downward (negative y) direction.
The default gravity of -9.8 = 9.8 m/s2 in the downward (negative y) direction.
![]() An average human character would be about 2 units (2 meters) tall.
An average human character would be about 2 units (2 meters) tall.
Click the Play button again to stop the simulation.
Currently, your scene is a little dark, so let’s add some light. Choose GameObject > Create Other > Directional Light from the menu bar. This will add a directional light to the scene, enabling you to see the cube more clearly. We’ll talk more about the various kinds of lights in later chapters.
Making a Prefab
Now, we’re going to make Cube into a prefab. A prefab is a reusable element in a project that can be instantiated (cloned into existence) any number of times. You can think of a prefab as a mold for a GameObject, and each GameObject made from that prefab is called an instance of the prefab (hence the word instantiate). To make a prefab, click Cube in the Hierarchy pane, drag it over to the Project pane, and release the mouse button (see Figure 18.9).
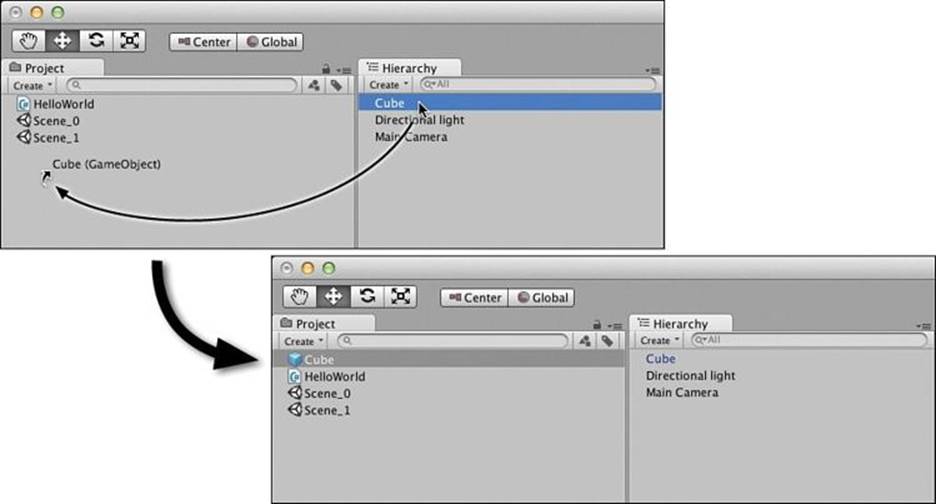
Figure 18.9 Making Cube into a prefab
You’ll see that a couple of things have just happened:
1. A prefab named Cube has been created in the Project pane. You can tell it’s a prefab by the blue cube icon next to it. (The prefab icon is always a cube regardless of the shape of the prefab itself.)
2. The name of the Cube GameObject in the Hierarchy has turned blue. If a GameObject has a blue name in the Hierarchy it means that that GameObject is an instance of a prefab (which is a copy made from the prefab mold).
Just for the sake of clarity, let’s rename the Cube prefab in the Project pane to Cube Prefab. Click once on the Cube prefab to select it. Then click a second time to rename it (you can also try pressing Return [or F2 on PC] once it’s selected to rename it) and then change the name to Cube Prefab. You’ll see that because the instance in the Hierarchy pane is just a copy of this, its name changes as well. If you had renamed the instance in the Hierarchy to be different from the name of the prefab, the instance name would not have been affected.
Now that we’ve got our prefab set up, we don’t actually need the instance in the scene any more. Click Cube Prefab in the Hierarchy pane (not the Project pane!). Then choose Edit > Delete from the menu bar.
It’s time to get our hands dirty with some more code.
Choose Assets > Create > C# Script from the menu bar and rename the newly created script CubeSpawner (making sure that there are two capital letters and no spaces in the name). Double-click the CubeSpawner script to open MonoDevelop, add the bolded code shown here, and save it:
1 using UnityEngine;
2 using System.Collections;
3
4 public class CubeSpawner : MonoBehaviour {
5 public GameObject cubePrefabVar;
6
7 // Use this for initialization
8 void Start () {
9 Instantiate( cubePrefabVar );
10 }
11
12 // Update is called once per frame
13 void Update () {
14
15 }
16 }
As with our previous script, this needs to be attached to something to run, so in Unity, drag the CubeSpawner script over to Main Camera just as you did previously in Figure 18.4.
Now, click the Main Camera in the Hierarchy pane. You’ll see that a Cube Spawner (Script) component has been added to the Main Camera GameObject (see Figure 18.10).
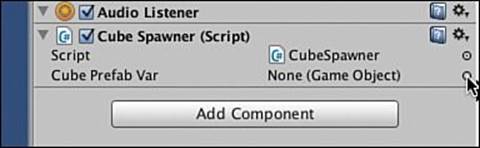
Figure 18.10 The CubeSpawner script component in the Inspector pane for Main Camera
You can also see that there is a variable called Cube Prefab Var in this component (though it really should be cubePrefabVar, as explained in the following warning). That comes from the "public GameObject cubePrefabVar;" statement you typed on line 5. If a variable of a script is labeled "public", it will appear in the Inspector pane.
Warning
Variable Names Look Different in the Inspector Someone at Unity thought it would look nice to change the capitalization and spacing of variable names in the Inspector pane. I have no idea why this has lasted into the current version, but it means that your variable names like cubePrefabVar will incorrectly appear in the Inspector as Cube Prefab Var. Be careful to always refer to your variable names properly in your programming and please ignore the strange capitalization and spacing that you see in the Inspector. Throughout the book, I refer to variables by their proper name in code rather than the names that appear in the Inspector.
As you can see in the Inspector, cubePrefabVar currently has no value assigned. Click the circular target to the right of the cubePrefabVar variable value (as shown by the arrow cursor in Figure 18.10), and this will bring up the Select GameObject dialog box from which you can select a prefab to be assigned to this variable. Make sure that the Assets tab is selected. (The Assets tab shows GameObjects in your Project pane, while the Scene tab shows GameObjects in your Hierarchy.) Double-click CubePrefab to select it (see Figure 18.11).
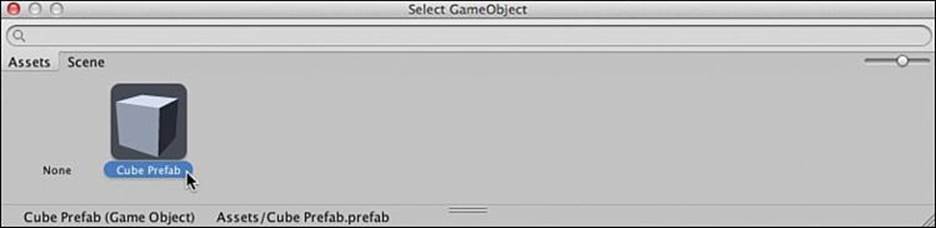
Figure 18.11 Selecting the Cube Prefab for the cubePrefabVar variable of the CubeSpawner script
Now, you can see in the Inspector that the value of cubePrefabVar is Cube Prefab from the Project pane. To double-check this, click the value Cube Prefab in the Inspector, and you’ll see that Cube Prefab is highlighted yellow in the Project pane.
Click the Play button.
You’ll see that a single Cube Prefab (Clone) GameObject is instantiated in the Hierarchy. Just like we saw in the Hello World script, the Start() function is called once, and it creates a single instance (or clone) of the Cube Prefab. Now, switch to MonoDevelop, comment out theInstantiate() call on line 9 in the Start() function and add an Instantiate( cubePrefabVar ); statement to line 14 in the Update() function, as shown in the following code.
1 using UnityEngine;
2 using System.Collections;
3
4 public class CubeSpawner : MonoBehaviour {
5 public GameObject cubePrefabVar;
6
7 // Use this for initialization
8 void Start () {
9 // Instantiate( cubePrefabVar );
10 }
11
12 // Update is called once per frame
13 void Update () {
14 Instantiate( cubePrefabVar );
15 }
16 }
Save the CubeSpawner script, switch back to Unity, and press Play again. As shown in Figure 18.12, this will give you cubes galore.
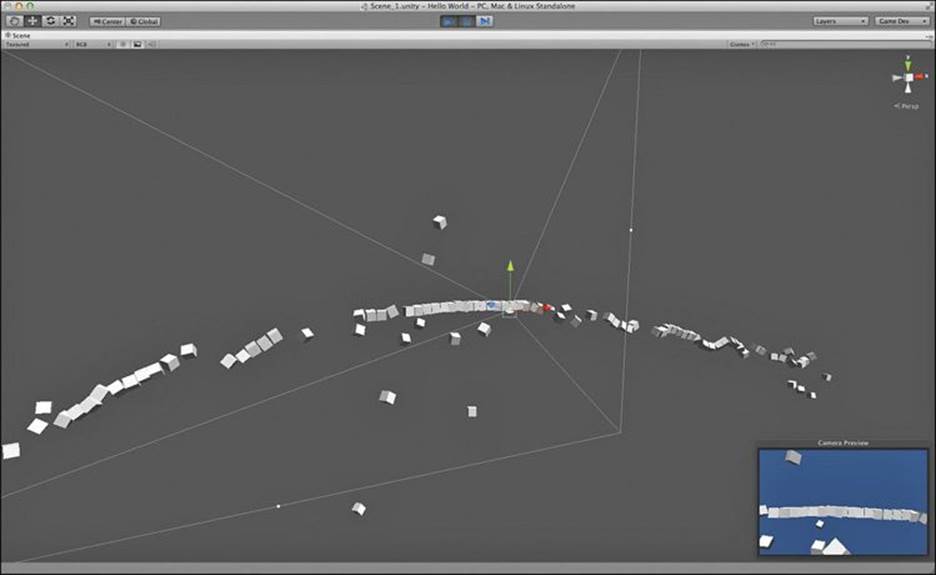
Figure 18.12 Creating a new instance of the CubePrefab every Update() quickly adds up to a lot of cubes!
This is an example of the power of Unity. Very quickly, we were able to get up to speed and make something cool and interesting. Now, let’s add some more objects to the scene for the cubes to interact with.
In the Hierarchy, click the Create pop-up menu and choose Cube. Rename this cube Ground. With a GameObject selected in the Scene pane or Hierarchy pane, pressing the W, E, or R keys will allow you to translate (move), rotate, or scale the GameObject. This will show gizmos (the arrows, circles, and such shown around the cube in Figure 18.13) around Ground. In translation mode, clicking and dragging on one of the arrows will move the cube exclusively along the axis of that arrow (x, y, or z). The colored elements of the rotation and scale gizmos lock the transformation to a specific axis in similar ways. See the “Changing the Scene View” sidebar for information about how to use the hand tool shown in Figure 18.13.
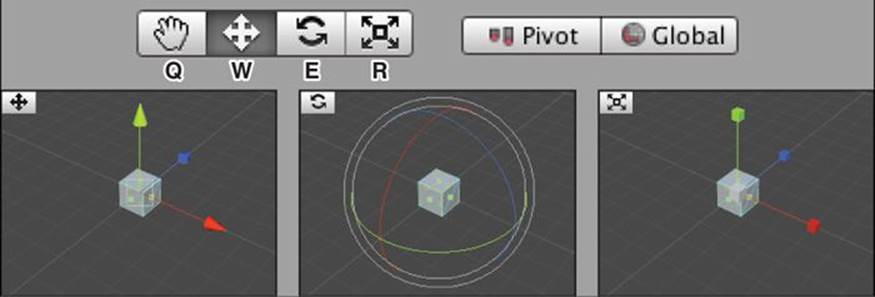
Figure 18.13 The translate (position), rotate, and scale gizmos. Q, W, E, and R are the keys that select each tool. Unity has just added another icon after the scale one (R) in their current beta for version 4.6, but that’s not common knowledge yet.
Changing the Scene View
The first tool on the toolbar shown in Figure 18.13—known as the hand tool—is used to manipulate the view shown in the Scene pane. The Scene pane has its own invisible scene camera that is different from the Main Camera in the Hierarchy. The hand tool has several different abilities. Select the hand tool (by either clicking it or pressing Q on your keyboard) and try the following:
![]() Left-dragging (that is, clicking and dragging using the left mouse button) in the Scene pane will move the position of the scene camera without changing the position of any of the objects in the scene. To be technical, the scene camera is moved in a plane perpendicular to the direction that the camera is facing (that is, perpendicular to the camera’s forward vector).
Left-dragging (that is, clicking and dragging using the left mouse button) in the Scene pane will move the position of the scene camera without changing the position of any of the objects in the scene. To be technical, the scene camera is moved in a plane perpendicular to the direction that the camera is facing (that is, perpendicular to the camera’s forward vector).
![]() Right-dragging in the Scene pane will rotate the scene camera to look in the direction of your drag. The scene camera stays in the same position when right-dragging.
Right-dragging in the Scene pane will rotate the scene camera to look in the direction of your drag. The scene camera stays in the same position when right-dragging.
![]() Holding the Option key (or Alt key on PC) will change the cursor over the Scene pane from a hand to an eye, and left-dragging with the Option key held will cause the Scene view to rotate around objects in the Scene pane (this is known as orbiting the camera around the scene). When Option-left-dragging, the position of the scene camera changes, but the location that the scene camera is looking at does not.
Holding the Option key (or Alt key on PC) will change the cursor over the Scene pane from a hand to an eye, and left-dragging with the Option key held will cause the Scene view to rotate around objects in the Scene pane (this is known as orbiting the camera around the scene). When Option-left-dragging, the position of the scene camera changes, but the location that the scene camera is looking at does not.
![]() Scrolling with the scroll wheel on your mouse will cause the scene camera to zoom in and out of the scene. Zooming can also be done by Option-right-dragging in the Scene pane.
Scrolling with the scroll wheel on your mouse will cause the scene camera to zoom in and out of the scene. Zooming can also be done by Option-right-dragging in the Scene pane.
The best way to get a feel for the hand tool is to try moving around the scene using the different methods described in this sidebar. After you have played with it a little, it should become second nature to you.
Try moving Ground to a Y position of -4 and setting its scale in the X and Z dimensions to 10. Throughout the book, I will suggest positions, rotations, and scales using this format.
![]()
Ground here is the name of the GameObject, and (Cube) is the type of the GameObject. P:[0,-4,0] means to set the X position to 0, the Y position to -4, and the Z position to 0. Similarly, R:[0,0,0] means to keep the X, Y, and Z rotations set to 0. S:[10,1,10] means to set the X scale to 10, the Y scale to 1, and the Z scale to 10. You can either use the tools and gizmos to make these changes or just type them into the Transform component of the Ground’s Inspector.
Feel free to play around with this and add more objects. The instances of Cube Prefab will bounce off of the static objects that you put into the scene (see Figure 18.14). As long as you don’t add a Rigidbody to any of the new shapes, they should be static (i.e., solid and immovable). When you’re done, be sure to save your scene!
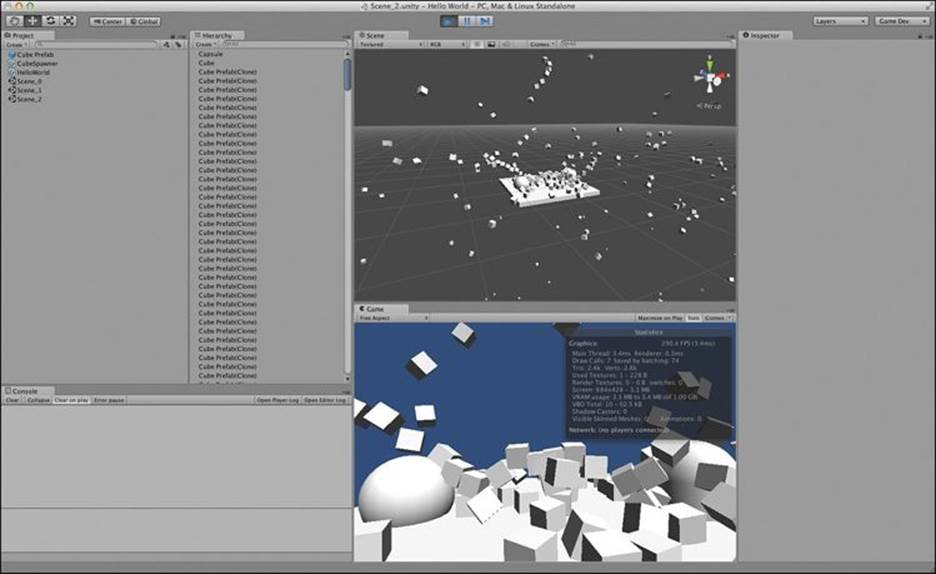
Figure 18.14 The scene with static shapes added
Summary
In about 20 pages, you’ve gone from nothing to having a working Unity project with a little programming in it. Admittedly, this project was pretty small, but I hope that it has served to show you the raw speed at which Unity can operate as well as the speed at which you can get something running in Unity.
The next chapter will continue your introduction to C# and Unity by introducing you to variables and increasing your knowledge of the most common components that can be added to a GameObject.