Introduction to Game Design, Prototyping, and Development (2015)
Part I: Game Design and Paper Prototyping
Chapter 9. Paper Prototyping
In this chapter, you learn about paper prototyping, one of the best tools available to game designers to rapidly test and iterate on game ideas. Although simple to implement, paper prototypes can teach you a tremendous amount about various aspects of your game, even if that game will eventually be digital.
By the end of the chapter, you will know the best practices for implementing paper prototypes and understand the parts of a digital game that can best be understood and tested through paper.
The Benefits of Paper Prototypes
While digital technologies have enabled a whole new world of possibilities for game development, many designers still find themselves exploring their initial ideas using traditional paper methods. With computers able to calculate and display information much faster than a person could draw or calculate by hand, you may be wondering why this is. It largely comes down to two factors: speed and ease of implementation. However, there are many benefits that you should consider, including:
![]() Initial development speed: For quickly throwing together a game, nothing beats paper. You can grab some dice and some 3x5 note cards and make a game in very little time. Even when you have a lot of experience as a game designer, starting on a new digital game project can take quite a bit of time if it’s completely different from anything you’ve done before.
Initial development speed: For quickly throwing together a game, nothing beats paper. You can grab some dice and some 3x5 note cards and make a game in very little time. Even when you have a lot of experience as a game designer, starting on a new digital game project can take quite a bit of time if it’s completely different from anything you’ve done before.
![]() Iteration speed: It’s also very fast to make changes to paper games; in fact, it’s even possible to make changes to the games while you’re playing. Because of the ease of changes, paper prototypes are a great fit for game brainstorming at the beginning of preproduction on a project (when large changes to the project can happen often). If a paper prototype isn’t working, making a change can take as little as a few minutes.
Iteration speed: It’s also very fast to make changes to paper games; in fact, it’s even possible to make changes to the games while you’re playing. Because of the ease of changes, paper prototypes are a great fit for game brainstorming at the beginning of preproduction on a project (when large changes to the project can happen often). If a paper prototype isn’t working, making a change can take as little as a few minutes.
![]() Low technical barrier to entry: Because very little technical knowledge or artistic talent is required to make a paper prototype, anyone on the game development team can take part in the process. This is a way to get great ideas from people on your team who would be less able to effectively contribute to a digital prototype.
Low technical barrier to entry: Because very little technical knowledge or artistic talent is required to make a paper prototype, anyone on the game development team can take part in the process. This is a way to get great ideas from people on your team who would be less able to effectively contribute to a digital prototype.
![]() Collaborative prototyping: Because of the low barrier to entry and the rapid iteration, it’s possible to collaboratively create and modify a paper prototype in a way that is not yet possible for digital prototypes. A group of people from across your team can work together on a paper prototype and share ideas quickly. As an added benefit, bringing people from across your game development team into the design process in this way can help to increase their buy-in for the entirety of the project and can serve as a fantastic team-building activity.
Collaborative prototyping: Because of the low barrier to entry and the rapid iteration, it’s possible to collaboratively create and modify a paper prototype in a way that is not yet possible for digital prototypes. A group of people from across your team can work together on a paper prototype and share ideas quickly. As an added benefit, bringing people from across your game development team into the design process in this way can help to increase their buy-in for the entirety of the project and can serve as a fantastic team-building activity.
![]() Focused prototyping and testing: To even a complete novice, it is obvious that a paper prototype of a digital game is going to be very different from the final digital product. This allows you to test specific elements of your game without your testers getting hung up on details. Many years ago, an internal document to user interface designers at Apple Computer recommended that they make rough sketches of the buttons for their interfaces on paper, scan the paper, and then make their UI prototypes from the scanned images. Because the sketched and scanned images of UI elements like buttons and menus were so obviously not the final look that Apple would choose for the UI, testers didn’t get hung up on the look of the buttons and instead focused on the usability of the interface, which is what Apple was interested in testing. A paper prototype can help direct the attention of your testers in the same way so that they don’t get hung up on the look of the prototype but instead focus on the specific aspect of gameplay that you intend to test.
Focused prototyping and testing: To even a complete novice, it is obvious that a paper prototype of a digital game is going to be very different from the final digital product. This allows you to test specific elements of your game without your testers getting hung up on details. Many years ago, an internal document to user interface designers at Apple Computer recommended that they make rough sketches of the buttons for their interfaces on paper, scan the paper, and then make their UI prototypes from the scanned images. Because the sketched and scanned images of UI elements like buttons and menus were so obviously not the final look that Apple would choose for the UI, testers didn’t get hung up on the look of the buttons and instead focused on the usability of the interface, which is what Apple was interested in testing. A paper prototype can help direct the attention of your testers in the same way so that they don’t get hung up on the look of the prototype but instead focus on the specific aspect of gameplay that you intend to test.
Paper Prototyping Tools
You might want to have several paper prototyping tools on hand. You can make a paper prototype from almost anything, but some tools can help make the process go faster:
![]() Large sheets of paper: At most office supply stores, you can get easel-sized sheets of paper (something like 24 inches wide by 36 inches tall). These often come in a pad of several sheets, and some have a mild adhesive on the back of each sheet to stick them to walls and such. You can also often find large sheets of paper inscribed with a square or hexagonal grid. See the “Movement on Different Grid Types” sidebar for information about why you may want to choose a hexagonal or square grid and how to handle free movement on an open grid game board.
Large sheets of paper: At most office supply stores, you can get easel-sized sheets of paper (something like 24 inches wide by 36 inches tall). These often come in a pad of several sheets, and some have a mild adhesive on the back of each sheet to stick them to walls and such. You can also often find large sheets of paper inscribed with a square or hexagonal grid. See the “Movement on Different Grid Types” sidebar for information about why you may want to choose a hexagonal or square grid and how to handle free movement on an open grid game board.
Movement on Different Grid Types
As shown in Figure 9.1, you need to make choices about how players can move across the grid in your game. As depicted in image A, on a square grid diagonal movement moves the player almost 50% further than orthogonal movement. (According to the Pythagorean theorem, the diagonal distance is ![]() or roughly 1.414.) However, movement to any adjacent hex in a hexagonal grid is the same, regardless of which hex you choose (image B).
or roughly 1.414.) However, movement to any adjacent hex in a hexagonal grid is the same, regardless of which hex you choose (image B).
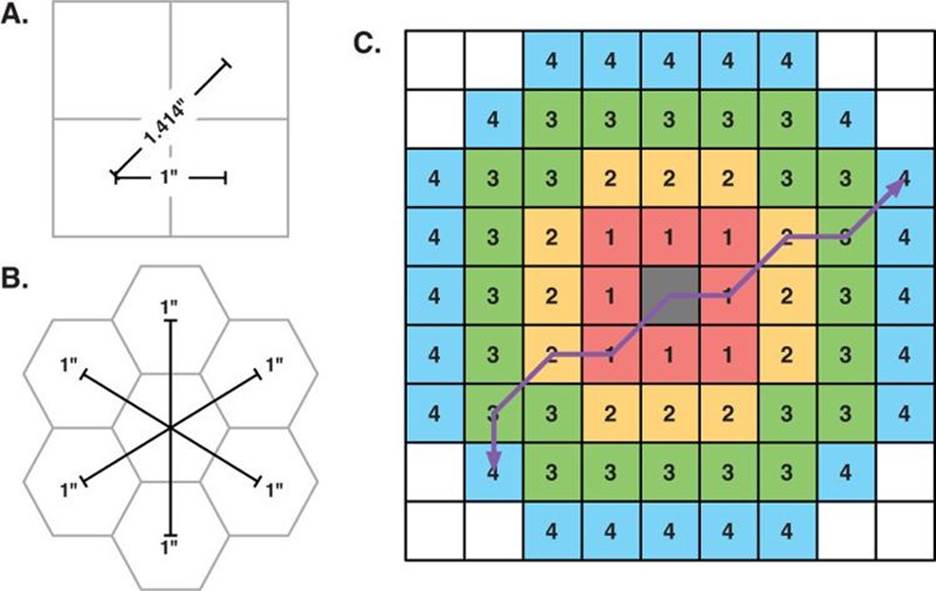
Figure 9.1 Movement systems
Image C shows a simple alternative movement system across a square grid that can be used in board games to still allow diagonal movement yet prevent abuse thereof. Players are allowed to move diagonally with every other movement. This evens out the distances somewhat and makes the possible movement within a specific number of moves roughly circular. The purple lines on diagram C show two different possible paths of four moves each.
Hexagonal grids are often used for military simulation board games where an accurate representation of distances and movement is critical. However, most buildings in the real world are rectangular, so they don’t fit as well on a hexagonal board. The choice of which to use is up to you as a designer.
![]() Dice: Most people have some d6 dice (normal six-sided dice) sitting around. As a game designer, it’s also really good to have some of the other varieties. Your local game store should have sets for sale that include all the dice normally used for d20 roleplaying games including 2d6 (2 six-sided dice), 1d8, 1d12, 1d20, and percentile dice (2d10 with one marked 0-9 and the other marked 00-90; rolled together, they give you a number between 00 and 99). Chapter 11, “Math and Game Balance,” includes a lot of information about different kinds of dice and what the probability space of their randomness looks like. For example, with 1d6, you have an even chance of any number from 1 to 6, but with 2d6 there are 6 different ways to roll a 7 (a 6/36 chance) but only one way to roll a 12 (a 1/36 chance).
Dice: Most people have some d6 dice (normal six-sided dice) sitting around. As a game designer, it’s also really good to have some of the other varieties. Your local game store should have sets for sale that include all the dice normally used for d20 roleplaying games including 2d6 (2 six-sided dice), 1d8, 1d12, 1d20, and percentile dice (2d10 with one marked 0-9 and the other marked 00-90; rolled together, they give you a number between 00 and 99). Chapter 11, “Math and Game Balance,” includes a lot of information about different kinds of dice and what the probability space of their randomness looks like. For example, with 1d6, you have an even chance of any number from 1 to 6, but with 2d6 there are 6 different ways to roll a 7 (a 6/36 chance) but only one way to roll a 12 (a 1/36 chance).
![]() Cards: Cards are a fantastic prototyping tool because they are so malleable. Create cards numbered 1-6, and you have a 1d6 deck. If you shuffle before every draw, it acts just like a 1d6, but if you draw all the cards before reshuffling, then you’re guaranteed to get one each of 1, 2, 3, 4, 5, and 6 before seeing any number for a second time.
Cards: Cards are a fantastic prototyping tool because they are so malleable. Create cards numbered 1-6, and you have a 1d6 deck. If you shuffle before every draw, it acts just like a 1d6, but if you draw all the cards before reshuffling, then you’re guaranteed to get one each of 1, 2, 3, 4, 5, and 6 before seeing any number for a second time.
![]() Card sleeves: Most gaming stores sell several different styles of card sleeves. Card sleeves were initially developed to protect baseball cards, and they were extended to the gaming industry with the rise of collectible card games like Magic: The Gathering in the ’90s. Each card sleeve is a protective plastic cover for an individual card, and there’s enough room inside of them for both a regular card and a slip of paper. This is great for prototyping because it means that you can print the cards for your prototype on regular printer paper and then put them into a sleeve in front of a regular playing card. The regular card will give the card enough stiffness to be shuffled without the time and expense of writing or printing on card stock. The card sleeves can also ensure that all the card backs look uniform, or alternatively, several sets of card sleeves can be used to keep different decks of designed cards separate.
Card sleeves: Most gaming stores sell several different styles of card sleeves. Card sleeves were initially developed to protect baseball cards, and they were extended to the gaming industry with the rise of collectible card games like Magic: The Gathering in the ’90s. Each card sleeve is a protective plastic cover for an individual card, and there’s enough room inside of them for both a regular card and a slip of paper. This is great for prototyping because it means that you can print the cards for your prototype on regular printer paper and then put them into a sleeve in front of a regular playing card. The regular card will give the card enough stiffness to be shuffled without the time and expense of writing or printing on card stock. The card sleeves can also ensure that all the card backs look uniform, or alternatively, several sets of card sleeves can be used to keep different decks of designed cards separate.
![]() 3x5 note cards: Cut in half, 3x5 note cards are a great size for a deck of cards. At their regular size, they’re fantastic for brainstorming. Some stores now sell 3x5 cards that have already been cut in half (to 3x2.5).
3x5 note cards: Cut in half, 3x5 note cards are a great size for a deck of cards. At their regular size, they’re fantastic for brainstorming. Some stores now sell 3x5 cards that have already been cut in half (to 3x2.5).
![]() Post-It notes: These simple little sticky notes are fantastic for quickly arranging and sorting ideas.
Post-It notes: These simple little sticky notes are fantastic for quickly arranging and sorting ideas.
![]() Whiteboard: Nothing says brainstorming like a white board. Be sure to have lots of colors of markers available. White boards tend to get erased often, so be sure to snap a digital photo of anything you write on one that is at all worth keeping. If you have a whiteboard tabletop or a vertical whiteboard that is magnetic, you can also draw a game board on it, but I tend to prefer large sheets of paper for game boards because they don’t get erased as often.
Whiteboard: Nothing says brainstorming like a white board. Be sure to have lots of colors of markers available. White boards tend to get erased often, so be sure to snap a digital photo of anything you write on one that is at all worth keeping. If you have a whiteboard tabletop or a vertical whiteboard that is magnetic, you can also draw a game board on it, but I tend to prefer large sheets of paper for game boards because they don’t get erased as often.
![]() Pipe cleaners / LEGO blocks: Both of these can be used for the same purpose: quickly building little things. These could be playing pieces, set pieces, or really anything you can think of. LEGO blocks are a lot more sturdy, but pipe cleaners are much cheaper and more flexible.
Pipe cleaners / LEGO blocks: Both of these can be used for the same purpose: quickly building little things. These could be playing pieces, set pieces, or really anything you can think of. LEGO blocks are a lot more sturdy, but pipe cleaners are much cheaper and more flexible.
![]() A notebook: As a designer, you should always have a notebook handy. I like the pocket-size Moleskine with unlined paper, but there are several types. The key element of your notebook is that it needs to be small enough to carry with you and have enough pages that you won’t be filling it up and replacing it every few weeks. Any time someone plays your game prototype, you should be taking notes. You always think you’ll remember the important things, but that’s often not the case.
A notebook: As a designer, you should always have a notebook handy. I like the pocket-size Moleskine with unlined paper, but there are several types. The key element of your notebook is that it needs to be small enough to carry with you and have enough pages that you won’t be filling it up and replacing it every few weeks. Any time someone plays your game prototype, you should be taking notes. You always think you’ll remember the important things, but that’s often not the case.
An Example of a Paper Prototype
In this section of the chapter, I’ll explain the paper prototype for an upcoming tactical combat game that I’m developing. For this paper prototype to work, one person—referred to as the game master (GM)—will need to take on the role of the computer artificial intelligence (AI). The other takes the role of the player.
Initial Game Concept
The eventual game will be a touchscreen tablet expansion of the type of turn-based tactical combat exemplified by the Blitz system developed by SEGA for the Valkyria Chronicles series of games. The game will pit a squad of player-controlled characters against a computer-controlled enemy squadron. Because this is a paper prototype for a digital game, I started by making some sketches of how I thought the final digital game might work.
Figure 9.2 shows a very rough mockup of gameplay for the tactics game. In the touchscreen version, the player starts each turn looking at a top-down map of the space and draws a line to show the path that she wants the character to follow. Each character can only move a certain distance on each turn. The character will then run along the line, and as the character approaches various cover points (areas of the map where a character can hide from incoming enemy attacks), the player has the option to tap on the cover point and have her character detour to that cover. The player can then swipe away from the cover to have the character hop out from behind cover and continue on the original path. Pressing Attack! at any time during the move will give the player a short amount of time to line up a shot and fire on an enemy. The player may tap Done to end the turn.
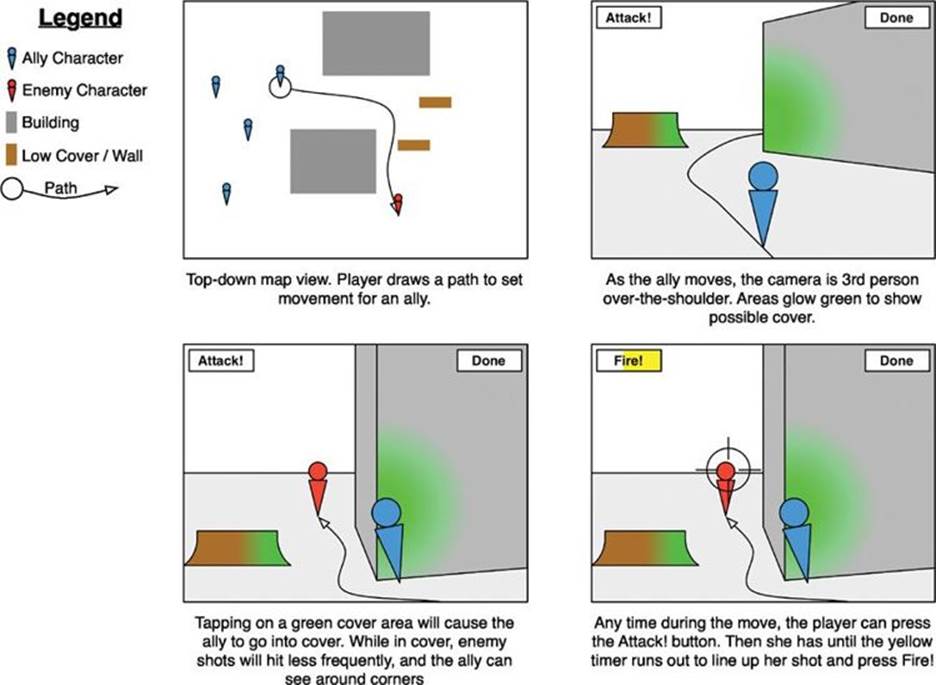
Figure 9.2 Mockup images of the tactics game
Several elements of this game can be prototyped with paper:
![]() Map layout: I hope to procedurally generate the level maps for this game, but I don’t yet know what kind of maps will be best suited to the style of game. This paper prototype will help me understand this better.
Map layout: I hope to procedurally generate the level maps for this game, but I don’t yet know what kind of maps will be best suited to the style of game. This paper prototype will help me understand this better.
![]() Artificial intelligence: The final game will involve artificial intelligence to decide enemy goals, movements, and attacks. By paying attention to the choices made by the person playing the GM for the enemy forces in the game, we can learn how to design this AI.
Artificial intelligence: The final game will involve artificial intelligence to decide enemy goals, movements, and attacks. By paying attention to the choices made by the person playing the GM for the enemy forces in the game, we can learn how to design this AI.
![]() Weapon designs: Various weapons in the game will have different chances of hitting, damage amounts per shot, and so on. The paper prototype can help define what weapons are interesting in this space and how to balance them against each other.
Weapon designs: Various weapons in the game will have different chances of hitting, damage amounts per shot, and so on. The paper prototype can help define what weapons are interesting in this space and how to balance them against each other.
![]() Finding the fun: While some of the fun of the final game will be the graphics, movement, and touch-based interaction (all of which can only really happen in a digital prototype), the core mechanic and the core fun in the game should come from the interesting tactical decisions that the player must make every turn and the necessity of guiding a small team to overcome challenging obstacles and a larger enemy force. All of these can be discovered through the paper prototype.
Finding the fun: While some of the fun of the final game will be the graphics, movement, and touch-based interaction (all of which can only really happen in a digital prototype), the core mechanic and the core fun in the game should come from the interesting tactical decisions that the player must make every turn and the necessity of guiding a small team to overcome challenging obstacles and a larger enemy force. All of these can be discovered through the paper prototype.
Constructing the Prototype
The prototype starts with a large sheet of hex grid paper. You can search online for a pad of ½" hex grid paper, or you can find a PDF of a hex grid and print it yourself. For the size map we’re talking about, if you’re printing, you’ll probably want to tape four pieces of paper together.
Making the Map
The first thing you need to do is to decide what kind of mission you want this to be. There are several possible mission types:
![]() Rout: The player must destroy at least 80% of the enemy forces, causing them to retreat.
Rout: The player must destroy at least 80% of the enemy forces, causing them to retreat.
![]() Assassination: The player must find and eliminate a single enemy target.
Assassination: The player must find and eliminate a single enemy target.
![]() Sabotage: The player must sneak into an enemy base and reach a specific target (that will be sabotaged in some way).
Sabotage: The player must sneak into an enemy base and reach a specific target (that will be sabotaged in some way).
![]() Infiltration/exfiltration: The player must sneak in to the enemy base, reach a specific space, and then retreat without triggering an alarm.
Infiltration/exfiltration: The player must sneak in to the enemy base, reach a specific space, and then retreat without triggering an alarm.
![]() Capture: The player must take and hold certain goal points to control the map area.
Capture: The player must take and hold certain goal points to control the map area.
For this first prototype, we’ll set up a capture mission, since it has a nice mix of strategic goals for both the player and the AI. (Once the player has captured a goal point, the AI may try to recapture it.)
Starting from the center of the map, place some small buildings by drawing shaded boxes on the map (or by placing pieces of colored paper over parts of the map). To make movement, visibility, and cover easier to handle, characters will not be able to enter buildings in this prototype. You should also place some low walls around the map along the borders between spaces. These walls will be about waist high in the prototype and can be used by characters for cover. Finally, place about three control points by shading areas in red. These areas are usually surrounded by walls, and the player’s goal during play is to capture all three control points. When you’re done, your map should look something like the one in Figure 9.3.
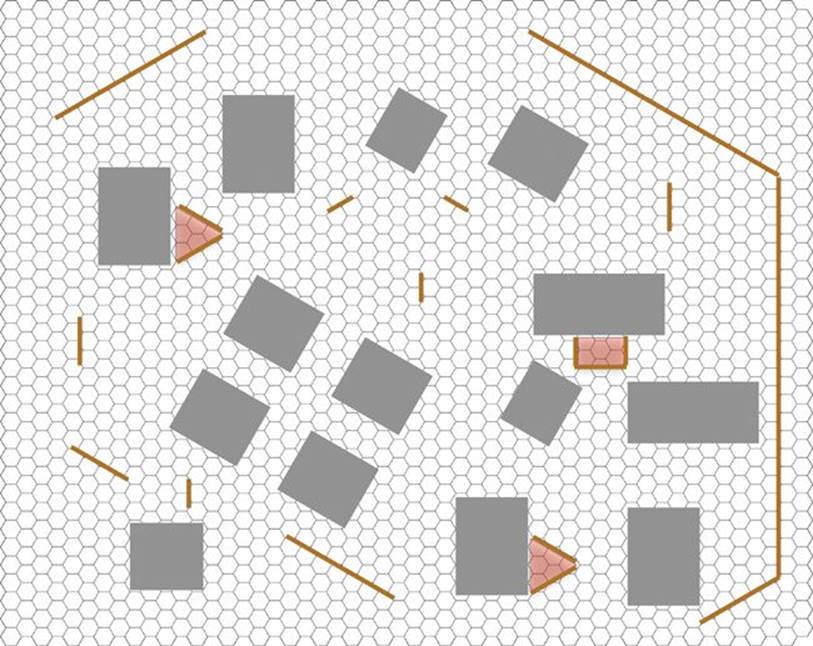
Figure 9.3 The player map showing buildings, walls, and control points
Copy the building locations onto a smaller version of the map that will be held by the GM. (I recommend also printing a sheet of ¼" hex graph paper for this.) Then, the GM should secretly place a number of markers to indicate enemy soldier locations on her map. The indicators should show not only position but also facing as shown in Figure 9.4. These enemy unit locations are not revealed to the player until one of her units is in a position to see the enemy (as covered shortly). When placing enemy units, remember that the goal of the GM is not to beat the player but rather to create an experience that feels fun and challenging. For example, placing a lot of units together in each control point and facing them each in different directions makes a lot of strategic sense, but that kind of arrangement would be less enjoyable for the player. The player will want to be able to do things like sneak up on an enemy, and as a designer, the GM should support this.
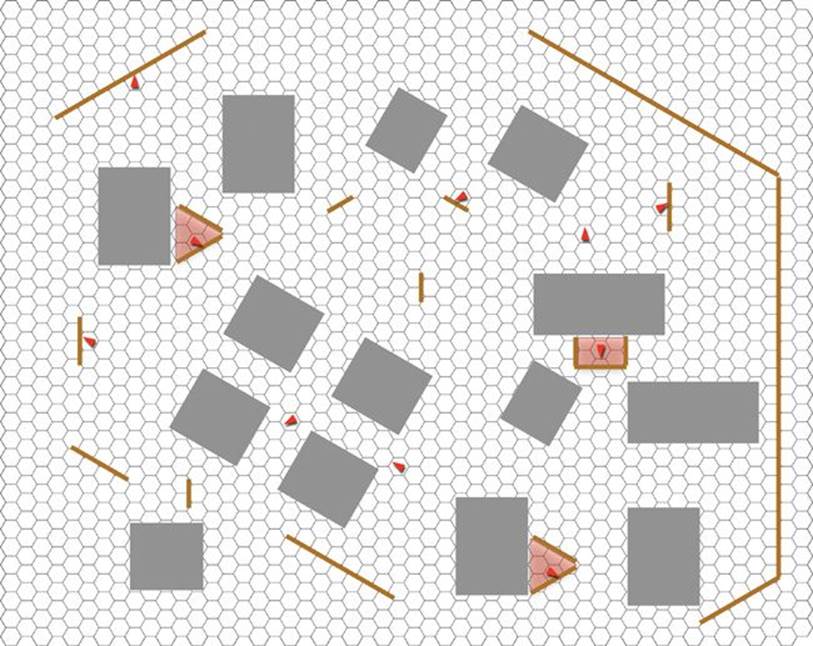
Figure 9.4 The GM map showing enemy unit placement and facing
Gameplay
Establishing the gameplay for the prototype comes next. This section covers the required elements of the gameplay for our example.
Objective
The player’s objective is to capture all three control points.
Required Equipment
The required equipment includes the following:
![]() Hex-grid paper map.
Hex-grid paper map.
![]() Smaller hex-grid GM map.
Smaller hex-grid GM map.
![]() Several six-sided dice.
Several six-sided dice.
![]() Unit markers that can fit within a single hex and face in an obvious direction. Units should also be colored and numbered for easy reference (for example, Red-4, Blue-2, and so on). Player units should be blue, and enemy units red. (Colors don’t really matter; all that matters is that you can tell the units apart, and it’s obvious which belong to the player.)
Unit markers that can fit within a single hex and face in an obvious direction. Units should also be colored and numbered for easy reference (for example, Red-4, Blue-2, and so on). Player units should be blue, and enemy units red. (Colors don’t really matter; all that matters is that you can tell the units apart, and it’s obvious which belong to the player.)
![]() A sheet of paper to track unit health and another to take playtest notes.
A sheet of paper to track unit health and another to take playtest notes.
Setup
In the initial version of the prototype, the player is given four units, all of which have the same capabilities. (In later revisions of the prototype, the capabilities of the units will vary.)
The player may select any hex on the edge of the map as her starting position. She places her first unit on that hex and then must place the other units on adjacent hexes.
Visibility
Visibility is critically important in this game. Any unit can see a distance of ten spaces in an arc in front of it. The arc is shown in Figure 9.5. Units can also share information, so once a unit of the enemy side sees one of the player’s units, all enemy units are aware of its presence. Units must have line of sight to see each other, and buildings block line of sight. If any part of a building is in between two units, they cannot see each other (with the exception of building corners described in the section on “Cover” that follows.
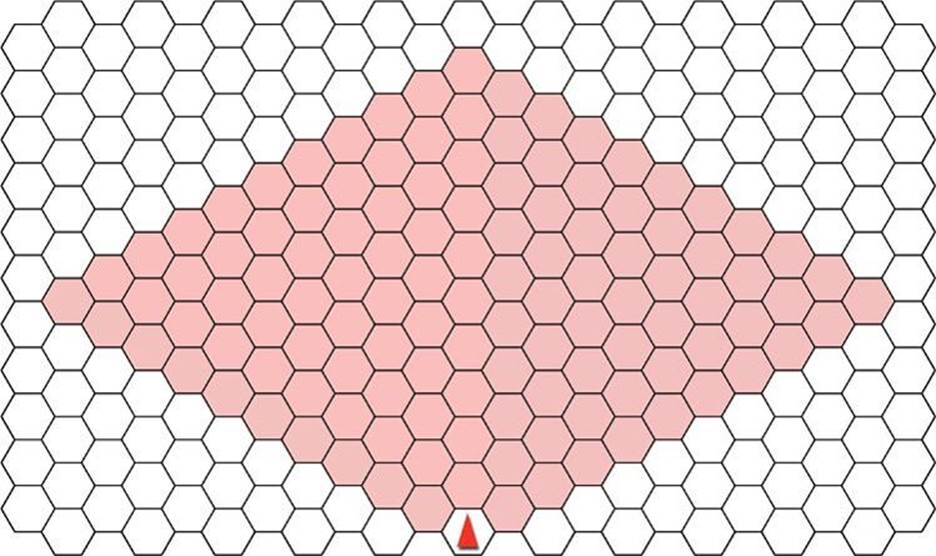
Figure 9.5 The area shaded red shows visibility for the enemy unit.
The GM is responsible for tracking visibility. During movement, if an enemy unit comes into view of one of the player’s units, the GM must place that unit on the player map (regardless of whether it is the player’s unit or the enemy unit that is moving). Whenever an enemy unit is no longer in sight of a player, its token is removed from the board. Alternatively, you can just flip that unit token over to show that it’s no longer being updated (that is, the enemy unit could be moving, but since the player can’t see it, the token stays in the same place), and then, when the enemy unit comes back into view of the player, you can flip the token right side up again and move it to the updated location.
Player Movement
On the player’s turn, she has 4 action points to spend. For each action point, she can activate one unit, so she could move each unit once or one unit four times. However, each time that a unit is moved in a single turn, that unit’s movement amount decreases. A unit can move 8 hexes on its first action each turn; on subsequent actions it can move 6, 4, and finally 2 hexes for a single action point. Players can move any direction, and while moving, players should be considered to be seeing up to 10 hexes in all directions for the purposes of visibility (though units are still unable to see through buildings).
Weapons and Firing
Each unit in the game can be outfitted with one of the weapons that are depicted in Figure 9.6. For the first time you play the prototype, I recommend giving all units pistols and then experimenting with other weapons in later playtests. A unit can shoot at any other unit that is visible to it, and a unit may choose to fire once per action (even during the middle of movement). To calculate the odds of hitting, count the number of spaces from the firing unit to the target and consult Figure 9.6. For example, if a unit with a pistol were shooting at another unit five spaces away, the to-hit value would be 3. The player controlling the firing unit would then roll four six-sided dice (one for each of the pistol’s four shots), and any die with a result of 3 or higher would hit (which is a 66% chance of hitting for each die). The unit attacked would then take 2 points of damage for each shot that hit.
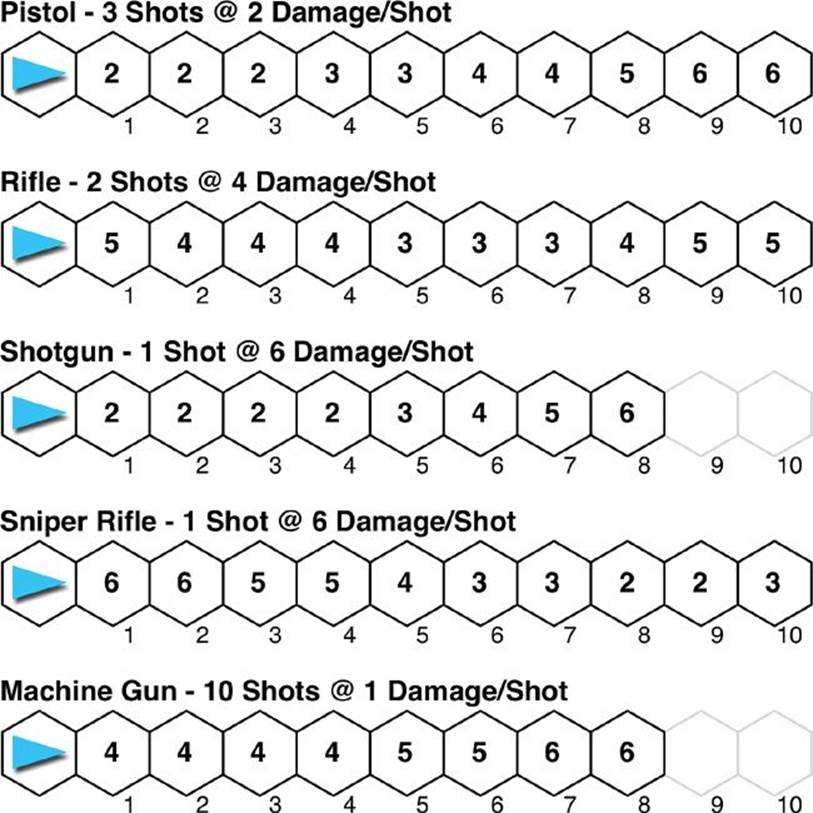
Figure 9.6 Weapon statistics and chance to hit
In Chapter 11, you will build the spreadsheet that I used to explore the initial balance of the weapons in Figure 9.6.
Counterattacks
If a unit has been attacked and survives the attack, it will immediately turn to face its attacker (placing the attacker within the survivor’s visibility arc) and return fire using standard attack rules. This means that attacking is risky if the attacked unit isn’t killed by the attacker.
Cover
Cover protects units. If a unit is in a hex that is adjacent to either a short wall or the corner of a building, that unit is considered to be in cover. While in cover, the damage taken by a unit is halved (round down). So, if a unit was shot, and the total damage from the attack was 7 points, the damage would be rounded down to 3 points if the target were in cover.
If a unit is in cover around the corner of a building, that unit is treated as having visibility around both sides of the corner as shown in Figure 9.7. This is done to simulate the ability of the unit to peek around the corner and is similar to the advantage that a unit would have in the digital game.
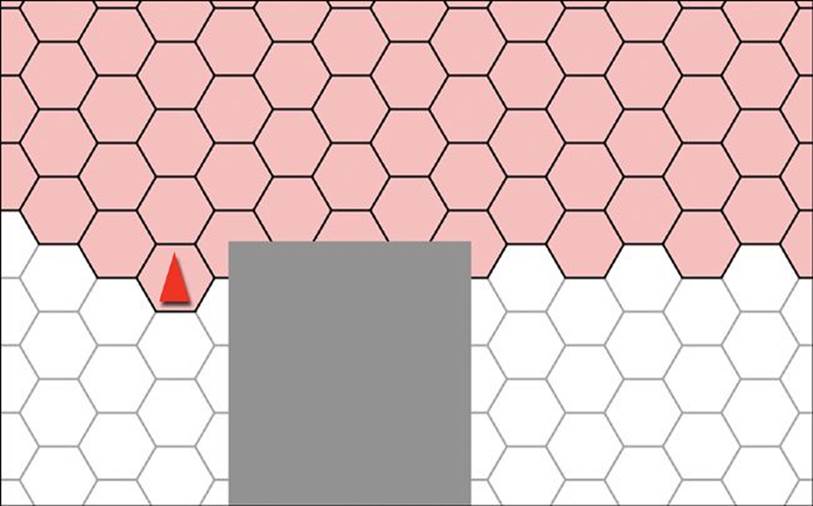
Figure 9.7 Unit visibility when in corner cover
Health
Each unit starts with 6 points of health. If a unit’s health drops to 0, that unit is knocked out and can no longer take actions or react at all. Health is not allowed to go below 0; so once a unit is knocked unconscious, it is immune to further damage. Another unit can revive the knocked-out unit through the use of a health pack.
Health Packs
Each unit carries one health pack that can be used either on itself or a unit in an adjacent hex. Using a health pack consumes a unit’s single attack during its action and will heal 4 points of health. A health pack can only be used once and is then depleted.
Interception Fire
Other units can fire on a unit that is moving in certain special circumstances:
![]() A stationary unit may fire on a moving unit when the moving unit enters its visibility.
A stationary unit may fire on a moving unit when the moving unit enters its visibility.
![]() A stationary unit may fire on a moving unit when the unit exits its visibility.
A stationary unit may fire on a moving unit when the unit exits its visibility.
![]() If the moving unit is visible to the stationary unit but it is outside the range of the stationary unit’s weapon, the stationary unit instead fires when the moving unit enters or exits the range of the stationary unit’s weapon (while still visible).
If the moving unit is visible to the stationary unit but it is outside the range of the stationary unit’s weapon, the stationary unit instead fires when the moving unit enters or exits the range of the stationary unit’s weapon (while still visible).
![]() A stationary unit may fire on a moving unit that ends its move within view of the stationary unit.
A stationary unit may fire on a moving unit that ends its move within view of the stationary unit.
Interception fire is calculated like a regular attack, except that only half the normal number of dice are rolled (rounded up). This means that shotguns, rifles, and sniper rifles each get one interception shot die, while a pistol would get 2 interception shot dice.
When units are stationary, they can only see in the arc in front of them; however, once a moving target has moved into the stationary unit’s visible arc, the stationary unit will rotate facing to follow the moving target until the target leaves its visibility.
If there is a moment when both the moving unit and the stationary unit wish to fire at the same time, the moving unit shoots first.
Capturing Control Points
If a unit ends its turn within the shaded area of a control point and there are no enemy units also conscious within the same control point, the control point is captured. The opposing team can recapture a control point through the same rules.
GM Strategy
As mentioned previously, one of the major goals of this prototype is to determine the best strategy for the digital game’s AI. Here are some things to consider:
![]() GM units should generally not be moved until they are either seen by the player or become aware of the player in some other way. (For example, if a red unit sees the player, you can imagine that it might notify other nearby red units.) Because the player has fewer numbers than the red forces, this gives her a chance for surprise attacks.
GM units should generally not be moved until they are either seen by the player or become aware of the player in some other way. (For example, if a red unit sees the player, you can imagine that it might notify other nearby red units.) Because the player has fewer numbers than the red forces, this gives her a chance for surprise attacks.
![]() Once the player has taken a control point, all GM units are aware of this. So, even if a red unit has not yet been activated by seeing or being seen by a player unit, the GM unit could choose to move toward the control point in the hopes of retaking it.
Once the player has taken a control point, all GM units are aware of this. So, even if a red unit has not yet been activated by seeing or being seen by a player unit, the GM unit could choose to move toward the control point in the hopes of retaking it.
![]() Remember to keep track not only of which GM units the player can see but also which player units the GM units can see. As a GM try not to act on information about player units that individual GM units shouldn’t have.
Remember to keep track not only of which GM units the player can see but also which player units the GM units can see. As a GM try not to act on information about player units that individual GM units shouldn’t have.
![]() The GM should take notes about which strategies work well against the player and which are too difficult or too easy. Remember that the GM’s goal is for the player to have fun and succeed without it being overly easy for the player.
The GM should take notes about which strategies work well against the player and which are too difficult or too easy. Remember that the GM’s goal is for the player to have fun and succeed without it being overly easy for the player.
Playtest
Play the prototype a few times with different friends and see what you think. Be sure to keep these questions in mind:
![]() Does the initial building placement that you chose work? If not, why not? If it does work, why do you think it does?
Does the initial building placement that you chose work? If not, why not? If it does work, why do you think it does?
![]() Are the weapons balanced to each other? If not, rebalance them to find something that feels right. (You can use the spreadsheet covered in Chapter 11 to do so.)
Are the weapons balanced to each other? If not, rebalance them to find something that feels right. (You can use the spreadsheet covered in Chapter 11 to do so.)
![]() Do the units start with the right amount of health? Does the health pack heal the right amount of damage?
Do the units start with the right amount of health? Does the health pack heal the right amount of damage?
![]() Is your strategy as a GM sound? Is the player having fun?
Is your strategy as a GM sound? Is the player having fun?
Be sure to write down both your answers to these questions and your players’ answers every time you play the game. You may find that your opinions change over time, and you may find that your opinions differ from those of the player. Writing all of these down can help you to gain perspective on which playtests went better or worse than others and give you more awareness of trends over time.
Best Uses for Paper Prototyping
As you saw in the example prototype, there are both strengths and weaknesses of paper prototyping for digital games. Here are some things that paper prototypes are particularly good at:
![]() Understanding player movement through space: Through various building and wall layouts, you will find that players tend to choose similar paths through space. Understanding player flow through space will help you in all types of level design.
Understanding player movement through space: Through various building and wall layouts, you will find that players tend to choose similar paths through space. Understanding player flow through space will help you in all types of level design.
![]() Balancing simple systems: The weapons in the prototype are all based on three simple variables: accuracy over distance, number of shots, and damage per shot. Although there are only three of these, balancing each weapon against the others is more complex than it may originally seem. For example, consider the shotgun and the machine gun relative to each other:
Balancing simple systems: The weapons in the prototype are all based on three simple variables: accuracy over distance, number of shots, and damage per shot. Although there are only three of these, balancing each weapon against the others is more complex than it may originally seem. For example, consider the shotgun and the machine gun relative to each other:
![]() Shotgun: At 6 points of damage per shot, the shotgun will kill an enemy with one shot, and at a range of 1 to 4, it will hit on any roll other than a 1 (for a 5/6 chance of hitting). However, because it has only one shot, if that shot misses, the enemy will take no damage at all.
Shotgun: At 6 points of damage per shot, the shotgun will kill an enemy with one shot, and at a range of 1 to 4, it will hit on any roll other than a 1 (for a 5/6 chance of hitting). However, because it has only one shot, if that shot misses, the enemy will take no damage at all.
![]() Machine Gun: The machine gun only does 1 point of damage per shot, so six shots must hit to kill the enemy. At a range of 1 to 4, any roll above 3 will hit (for a 3/6 chance of hitting). With ten shots, it is much more likely that you will get close to the average damage of the gun at that distance (5 points) rather than the all or nothing of the shotgun.
Machine Gun: The machine gun only does 1 point of damage per shot, so six shots must hit to kill the enemy. At a range of 1 to 4, any roll above 3 will hit (for a 3/6 chance of hitting). With ten shots, it is much more likely that you will get close to the average damage of the gun at that distance (5 points) rather than the all or nothing of the shotgun.
With these stats, the shotgun is risky but powerful while the machine gun is reliable but a little less powerful. We’ll look into all the math behind these statements in Chapter 11.
![]() Graphical user interface: It is very easy to print several mock-ups of a GUI (i.e., buttons, menus, input fields) and then ask testers which on-screen button they would press to accomplish a certain task (e.g., pausing the game, picking a character).
Graphical user interface: It is very easy to print several mock-ups of a GUI (i.e., buttons, menus, input fields) and then ask testers which on-screen button they would press to accomplish a certain task (e.g., pausing the game, picking a character).
![]() Trying wild ideas: Because of the rapid iteration and development speed of paper prototypes, it is easy to just try a crazy rule every once in a while to see how it changes gameplay. What if interception fire happened once for every step taken by a moving player? What if attackers got a damage or to-hit bonus for firing on a target that was unaware of them (that is, that couldn’t see them)? These are easy questions to answer using a paper prototype.
Trying wild ideas: Because of the rapid iteration and development speed of paper prototypes, it is easy to just try a crazy rule every once in a while to see how it changes gameplay. What if interception fire happened once for every step taken by a moving player? What if attackers got a damage or to-hit bonus for firing on a target that was unaware of them (that is, that couldn’t see them)? These are easy questions to answer using a paper prototype.
Poor Uses for Paper Prototyping
As you have probably been able to tell playing the example prototype, paper prototyping is not very good at some things:
![]() Tracking lots of information: Several things in the prototype could have been handled better by a computer. These include visibility calculations, tracking health, counting how many spaces an attacker is from a target, and so on. For the paper prototype, you want to focus on the simple systems in your game and get a good idea of things like the layout of the level and the general feel of each weapon (e.g., the “risky” shotgun and the “reliable” machine gun). You’ll then fine-tune this information with the digital prototype.
Tracking lots of information: Several things in the prototype could have been handled better by a computer. These include visibility calculations, tracking health, counting how many spaces an attacker is from a target, and so on. For the paper prototype, you want to focus on the simple systems in your game and get a good idea of things like the layout of the level and the general feel of each weapon (e.g., the “risky” shotgun and the “reliable” machine gun). You’ll then fine-tune this information with the digital prototype.
![]() Game rhythm for fast or slow games: Paper prototypes can also give you a false impression of game rhythm and feel if the game will be played much more quickly or more slowly than the paper prototype. For instance, if this were an action game rather than a turn-based strategy game, the player would have a lot less time for thought and strategizing in the real game than the prototype, so it could give you some false ideas about how strategic the player would be. In another example, I once saw a team put too much stock in a paper prototype for a game that would be played by players around the world over the span of a month. The paper prototype had a number of interesting revenge mechanics where players could directly taunt and compete with each other. These worked really well with all players in the same room and the paper prototype lasting only an hour or so. However, with players distributed around the world and the actual game lasting weeks or months, the revenge mechanics were less immediate and didn’t work very well.
Game rhythm for fast or slow games: Paper prototypes can also give you a false impression of game rhythm and feel if the game will be played much more quickly or more slowly than the paper prototype. For instance, if this were an action game rather than a turn-based strategy game, the player would have a lot less time for thought and strategizing in the real game than the prototype, so it could give you some false ideas about how strategic the player would be. In another example, I once saw a team put too much stock in a paper prototype for a game that would be played by players around the world over the span of a month. The paper prototype had a number of interesting revenge mechanics where players could directly taunt and compete with each other. These worked really well with all players in the same room and the paper prototype lasting only an hour or so. However, with players distributed around the world and the actual game lasting weeks or months, the revenge mechanics were less immediate and didn’t work very well.
![]() Physical interface: While paper prototypes can work well for GUIs, they have very little to tell us about physical interfaces (e.g., gamepad controllers, touchscreens, keyboard, and mouse). Until you have a digital prototype working with the actual physical interface that will be used by the player, you really won’t know anything about how well the physical control scheme maps to your game. This is a tough issue as can be evidenced by the subtle changes to controls for most game series (for example, all the changes over the years to the controls of the variousAssassin’s Creed games).
Physical interface: While paper prototypes can work well for GUIs, they have very little to tell us about physical interfaces (e.g., gamepad controllers, touchscreens, keyboard, and mouse). Until you have a digital prototype working with the actual physical interface that will be used by the player, you really won’t know anything about how well the physical control scheme maps to your game. This is a tough issue as can be evidenced by the subtle changes to controls for most game series (for example, all the changes over the years to the controls of the variousAssassin’s Creed games).
Summary
I hope that this chapter has demonstrated to you the power and ease of paper prototyping. At some of the best university game design programs, game design students spend their first semester working primarily on board games and card games to build their skills in paper prototyping, game balance, and tuning. Not only can paper prototypes help you rapidly explore concepts for your digital games, they can also help you build skills in iterative design and decision making that will be invaluable to you when you start making digital games.
Each time you start designing a new game (or a new system for a game you’re already developing), ask yourself the question of whether that game or system could benefit from a paper prototype. For example, the game that is prototyped in this chapter took me just a couple hours to develop and implement as an initial paper prototype, yet it took me over a week to program all the different logic, camera moves, artificial intelligence, controls, and so on in the digital version.
Another thing that you can learn from paper prototypes is to not be discouraged when a design decision you make backfires. We all make bad design decisions throughout our careers as designers, and it’s okay to do so. The benefit of a bad decision in a paper prototype is that you can quickly discover that it is a bad decision, toss it out, and move on to the next idea.
In the next chapter, you will learn about various forms of playtesting and usability testing. This knowledge can help you get more valid and specific information from your playtests. Then, in Chapter 11, you’ll explore some of the math behind game design and look at how to use a spreadsheet program to help you balance your games.
All materials on the site are licensed Creative Commons Attribution-Sharealike 3.0 Unported CC BY-SA 3.0 & GNU Free Documentation License (GFDL)
If you are the copyright holder of any material contained on our site and intend to remove it, please contact our site administrator for approval.
© 2016-2026 All site design rights belong to S.Y.A.