Unity in Action: Multiplatform game development in C# with Unity 5 (2015)
Part 3. Strong finish
Chapter 12. Deploying your game to players’ devices
This chapter covers
· Building an application package for various platforms
· Assigning build settings, such as the app icon or name
· Interacting with the web page for web games
· Developing plug-ins for apps on mobile platforms
Throughout the book you’ve learned how to program various games within Unity, but the crucial last step has been missing: deploying those games to players. Until a game is playable outside the Unity editor, it’s of little interest to anyone other than the developer. Unity shines at this last step, with the ability to build applications for a huge variety of gaming platforms. This final chapter will go over how to build games for these various platforms.
When I speak of building for a platform, I’m referring to generating an application package that will run on that platform. On every platform (Windows, iOS, and so on) the exact form of a built application differs, but once the executable has been generated, that app package can be played without Unity and can be distributed to players. A single Unity project can be deployed to any platform without needing to be redone for each.
This “build once, deploy anywhere” capability applies to the vast majority of the features in your games, but not to everything. I would estimate that 95% of the code written in Unity (for example, almost everything we’ve done so far in this book) is platform-agnostic and will work just as well across all platforms. But there are a few specific tasks that differ for different platforms, so we’ll go over those platform-specific areas of development.
In total, the basic free version of Unity is capable of building apps for the following platforms:
· Windows PC
· Mac OS X
· Linux
· Web (both the web player and WebGL)
· iOS
· Android
· Blackberry 10
In addition, through specially licensed modules, Unity can build apps for the following:
· XBox 360
· XBox One
· PlayStation 3
· PlayStation 4
· PS Vita
· Wii U
· Windows Phone 8
Whew, that full list is really long! Frankly, that’s almost comically long, way more than the supported platforms of almost any other game development tool out there. This chapter will focus on the first six platforms listed because those platforms are of primary interest to the majority of people exploring Unity, but keep in mind how many options are available to you.
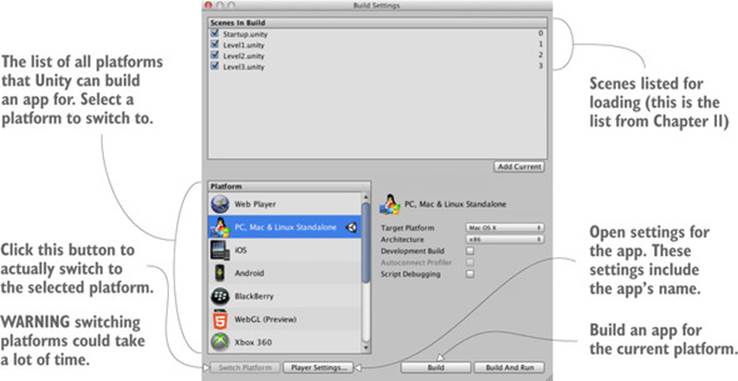
To see all these platforms, open the Build Settings window. That’s the window you used in the previous chapter to add scenes to be loaded; to access it, choose File > Build Settings. In chapter 11 you only cared about the list at the top, but now you want to pay attention to the buttons at the bottom (see figure 12.1). You’ll notice a lot of space taken up by the list of platforms; the currently active platform is indicated with the Unity icon. Select platforms in this list and then click the Switch Platform button.
Figure 12.1. The Build Settings window
Warning
When in a big project, switching platforms often takes quite a bit of time to complete; make sure you’re ready to wait. This is because Unity recompresses all assets (such as textures) in an optimal way for each platform.
Also across the bottom of this window are the Player Settings and Build buttons. Click Player Settings to view settings for the app in the Inspector, such as the name and icon for the app. Clicking Build launches the build process.
Tip
Build And Run does the same thing as Build, plus it automatically runs the built application. I usually want to do that part manually, so I rarely use Build And Run.
When you click Build, the first thing that comes up is a file selector so that you can tell Unity where to generate the app package. Once you select a file location, the build process starts. Unity creates an executable app package for the currently active platform; let’s go over the build process for the most popular platforms: desktop, web, and mobile.
12.1. Start by building for the desktop: Windows, Mac, and Linux
The simplest place to start when first learning to build Unity games is by deploying to desktop computers—Windows PC, Mac OS X, or Linux. Because Unity runs on desktop computers, that means you’ll build an app for the computer you’re already using.
Note
Open up any project to work with in this section. Seriously, any Unity project will work; in fact, I strongly suggest using a different project in every section to drive home the fact that Unity can build any project to any platform!
12.1.1. Building the application
First choose File > Build Settings to open the Build Settings window. By default, the current platform will be set to PC, Mac, and Linux, but if that isn’t current, select the correct platform from the list and click Switch Platform.
On the right side of the window you’ll notice the Target Platform menu. This menu lets you choose between Windows PC, Mac OS X, and Linux. All three are treated as one platform in the list on the left side, but these are very different platforms, so choose the correct one.
Once you’ve chosen your desktop platform, click Build. A file dialog pops up, allowing you to choose where the built application will go. Change to a safe location if necessary (the default location is usually within the Unity project, which isn’t a great place to put builds). Then the build process starts; this could take a while for a big project, but the build process should be fast for the tiny demos we’ve been making.
Custom post-build script
Although the basic build process works fine in most situations, you may want a series of steps to be taken (such as moving help files into the same directory as the application) every time you build your game. You can easily automate such tasks by programming them in a script that will execute after the build process completes.
First, create a new folder in the Project view and name that folder Editor; any scripts that affect Unity’s editor (and that includes the build process) must go in the Editor folder. Create a new script in that folder, rename it TestPostBuild, and write the following code in it:
using UnityEngine;
using UnityEditor;
using UnityEditor.Callbacks;
public static class TestPostBuild {
[PostProcessBuild]
public static void OnPostprocessBuild(BuildTarget target, string
pathToBuiltProject) {
Debug.Log("build location: " + pathToBuiltProject);
}
}
The directive [PostProcessBuild] tells the script to run the function that’s immediately after it. That function will receive the location of the built app; you could then use that location with the various filesystem commands provided by C#. For now the file path is being printed to the console to test that the script works.
The application will appear in the location you chose; double-click it to run it, like any other program. Congrats, that was easy! Building applications is a snap, but the process can be customized in a number of ways; let’s look at how to adjust the build.
12.1.2. Adjusting Player Settings: setting the game’s name and icon
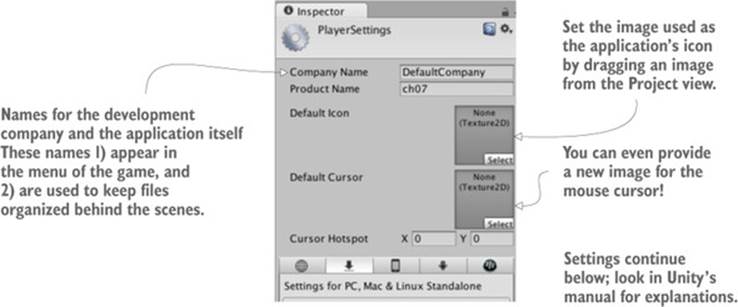
Go back to the Build Settings window, but this time click Player Settings instead of Build. A huge list of settings will appear in the Inspector (see figure 12.2); these settings control a number of aspects of the built application.
Figure 12.2. Player settings displayed in the Inspector
Because of the large number of settings, you’ll probably want to look them up in Unity’s manual; the relevant doc page is http://docs.unity3d.com/Manual/class-PlayerSettings.html.
The first three settings at the top are easiest to understand: Company Name, Product Name, and Default Icon. Type in values for the first two. Company Name is the name for your development studio, and Product Name is the name of this specific game. Then drag an image from the Project view (import an image into the project if needed) to set that image as the icon; when the app is built, this image will appear as the application’s icon.
Quality settings
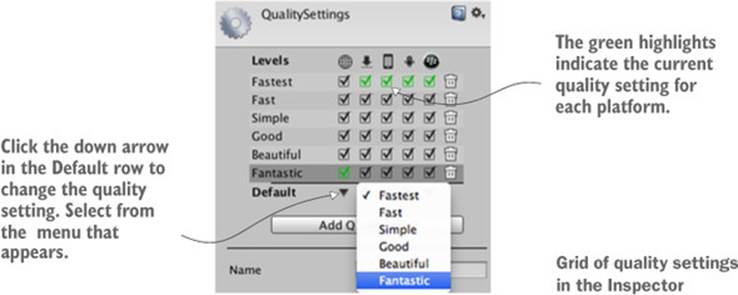
The built application is also affected by project settings located under the Edit menu. In particular, the visual quality of the final app can be tuned here. Go to Project Settings in the Edit menu and then choose Quality from the drop-down menu.
Quality settings appear in the Inspector, and the most important settings are the grid of check marks at the top. The different platforms that Unity can target are listed as icons across the top, and the possible quality settings are listed along the side. The boxes are checked for quality settings available for that platform, and the check box is highlighted green for the setting being used. Most of the time these settings default to Fastest (which is the lowest quality) but you can change to Fantastic quality if things look bad; if you click the down arrow underneath a platform’s column, a pop-up menu will appear.
It seems a bit redundant that this UI has both check boxes and the Default menu, but there you have it. Different platforms often have different graphical capabilities, so Unity allows you to set different quality levels for different build targets (such as highest quality on desktop and lower quality on mobile).
Customizing the icon and name of the application are important for giving it a finished appearance. Another useful way of customizing the behavior of built applications is with platform-dependent code.
12.1.3. Platform-dependent compilation
By default, all the code you write will run the same way on all platforms. But Unity provides a number of compiler directives (known as platform defines) that cause different code to run on different platforms. You’ll find the full list of platform defines on this page of the manual:http://docs.unity3d.com/Manual/PlatformDependent-Compilation.html.
As that page indicates, there are directives for every platform that Unity supports, allowing you to run separate code on every platform. Usually the majority of your code doesn’t have to be inside platform directives, but occasionally small bits of the code need to run differently on different platforms. Some code assemblies only exist on one platform (for example, chapter 11 mentioned that filesystem access isn’t available on the web player), so you need to have platform compiler directives around those commands. The following listing shows how to write such code.
Listing 12.1. PlatformTest script showing how to write platform-dependent code
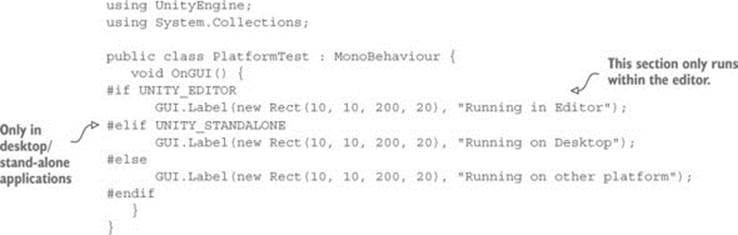
Create a script called PlatformTest and write the code from this listing in it. Attach that script to an object in the scene (any object will do for testing), and a small message will appear in the top-left of the screen. When you play the game within Unity’s editor, the message will say “Running in the Editor,” but if you build the game and run the built application, the message will say “Running on Desktop.” Different code is being run in each case!
For this test we used the platform define that treats all desktop platforms as one, but as indicated on that doc page, separate platform defines are available for Windows, Mac, and Linux. In fact, there are platform defines for all the platforms supported by Unity so that you can run different code on each. Let’s move on to the next important platform: the web.
12.2. Building for the web
Although desktop platforms are the most basic targets to build for, another important platform for Unity games is deployment to the web. This refers to games that run within a web browser and can thus be played over the internet.
12.2.1. Unity Player vs. HTML5/WebGL
Previously, Unity had to deploy web builds in a form that plays within a custom browser plug-in. This has long been necessary because 3D graphics aren’t built-in for web browsers. In the last few years, though, a standard has emerged for 3D graphics on the web called WebGL. Technically, WebGL is separate from HTML5, although the two terms are related and are often used interchangeably.
Unity 5 has added WebGL to the platforms list of the Build window, and future versions may even make it the new main avenue for doing web builds. In part, these changes in Unity’s web build are being driven by strategic decisions made within Unity (the company). These changes are also being driven by pushes from browser makers, who are moving away from custom plug-ins and embracing HTML5/WebGL as the way to do interactive web applications, including games.
Regardless of the form of the final built app, the process for doing a web build is almost exactly the same for both a web player and WebGL. The following sections will describe the process for the web player, so you should also use that platform. The text will mention spots where the code you write differs slightly for WebGL.
12.2.2. Building the Unity file and a test web page
Open a different project (again, this is to emphasize how any project will work) and open the Build Settings window. Switch the platform to Web Player and then click the Build button. A file selector will come up; type in the name WebTest for this application, and change to a safe location if necessary (that is, a location not within the Unity project).
The build process will now create two files: the actual Unity game will have the extension .unity3d, and there will be a bare-bones web page for playing that game. Open this web page and the game should be embedded in the middle of the otherwise blank page.
There’s nothing particularly special about this page; it’s just an example to test your game with. It’s possible to customize the code on that page, or even provide your own web page (with the Unity code copied over). One of the most important customizations to make is enabling communication between Unity and the browser, so let’s go over that next.
12.2.3. Communicating with JavaScript in the browser
A Unity web game can communicate with the browser (or rather with JavaScript running in the browser), and these messages can go in both directions: from Unity to the browser, and from the browser to Unity. Sending messages to the browser is straightforward: Unity has a couple of special commands that directly run code in the browser.
For messages from the browser the methodology is slightly more involved: Java-Script in the browser identifies an object by name, and then Unity passes the message to the named object in the scene. Thus you must have an object in the scene that will receive communications from the browser.
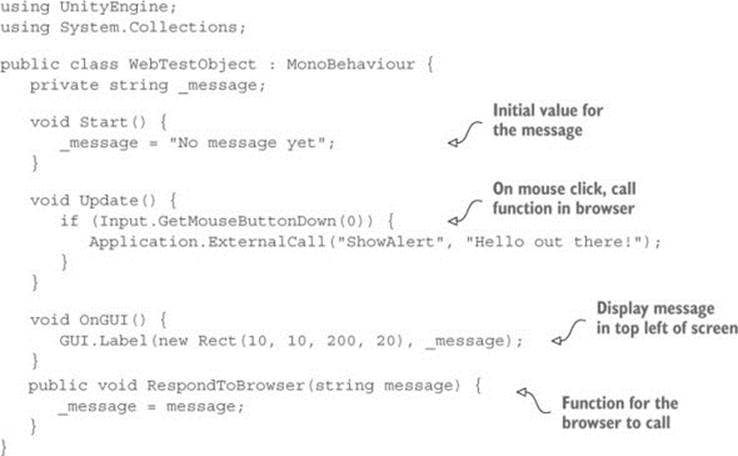
To demonstrate these tasks, create a new script in Unity called WebTestObject. Also create an empty object in the active scene called Listener (the object in the scene must have that exact name, because that’s the name used in the code). Attach the new script to that object, and then write in the code from the next listing.
Listing 12.2. WebTestObject script for testing communication with the browser
Now build for web again to update the game with this new code. Unity’s web build is ready now, but the web page also needs to be adjusted. You need to add a couple of functions to the JavaScript on the page, as well as add a button to the HTML. Add the JavaScript code and the HTML tag in the following listing; the JavaScript functions go at the end of the <script> tag, and the HTML button goes at the end of the page’s <body>.
Listing 12.3. JavaScript and HTML that enable browser–Unity communication
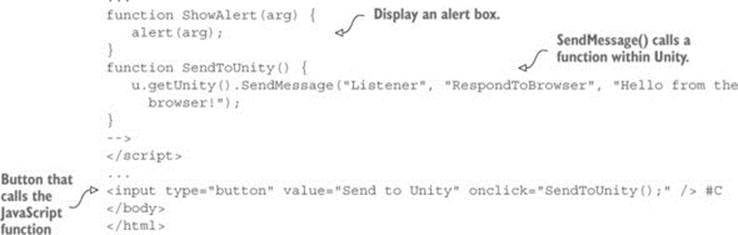
Open the web page to test this code out. To test communication from Unity to the browser, the WebTestObject script in Unity will call a function in the browser when you click within Unity; try clicking a few times and you’ll see an alert box appear in the browser. TheApplication.ExternalCall() method will run the named JavaScript function. Unity also has Application.ExternalEval() for sending messages to the browser; in that case, arbitrary snippets of JavaScript are run in the browser, rather than calling a defined function. Most of the time it’s better to call functions (to keep JavaScript and Unity compartmentalized), but sometimes it’s useful to run arbitrary snippets, such as this code to reload the page:
Application.ExternalEval("location.reload();");
JavaScript in the web page can also send a message to Unity; click the button on the web page and you’ll see the changed message displayed in Unity. The button’s HTML tag links to a JavaScript function, and that function calls SendMessage() on the Unity instance. This method calls a named function on a named object within Unity; the first parameter is the name of the object, the second parameter is the name of the method, and the third parameter is a string to pass in while calling the method. Listing 12.3 calls RespondToBrowser() from the WebTestObject script.
Note
WebGL builds can also communicate with JavaScript in the web page, and the code to do so is almost exactly the same. Indeed, it is exactly the same for communicating from Unity to the page. As for the other direction—from the page to Unity—the SendMessage() method has the same parameters but no longer requires the u.getUnity() prefix.
That wraps up browser communication for web builds; there’s one more platform (or rather, set of platforms) to discuss building apps for: mobile apps.
12.3. Building for mobile apps: iOS and Android
Mobile apps are another important build target for Unity. My gut impression (totally not scientific) is that mobile games are the largest number of commercial games created using Unity.
Definition
Mobile refers to handheld computing devices that people carry around. The designation started with smartphones but now includes tablets. The two most widely used mobile computing platforms are iOS (from Apple) and Android (from Google).
Setting up the build process for mobile apps is more complicated than either desktop or web builds, so this is an optional section—optional as in only read through it and not actually do the steps; I’ll still write as if you’re working along, but you’d have to buy a developer license for iOS and install all the developer tools for Android.
Warning
Mobile devices are undergoing so much innovation that the exact build process is likely to be slightly different by the time you read this. The high-level concepts are probably still true, but you should look at up-to-date documentation online for an exact rundown on the commands to execute and buttons to push. For starters, here are the doc pages from Apple and Google:
https://developer.apple.com/library/ios/documentation/IDEs/Conceptual/AppDistributionGuide/Introduction/Introduction.html
http://developer.android.com/tools/building/index.html
Touch input
Input on mobile devices works differently than on the desktop or the web. Mobile input is done by touching the screen, rather than with the mouse and keyboard. Unity has input functionality for handling touches, including code like Input.touchCount and Input.GetTouch().
You may want to use these commands to write platform-specific code on mobile devices. Handling input that way can be a hassle, though, so a number of code frameworks are available to streamline the use of touch input. For example, I use FingerGestures (http://fingergestures.fatalfrog.com/).
All right, with those caveats out of the way, I’ll explain the overall build process for both iOS and Android. Keep in mind that these platforms occasionally change the details of the build process.
12.3.1. Setting up the build tools
Mobile devices are all separate from the computer you’re developing on, and that separateness makes the process of building and deploying to devices slightly more complex. You’ll need to set up a variety of specialized tools before you can click Build.
Setting up iOS build tools
At a high level, the process of deploying a Unity game on iOS requires first building an Xcode project from Unity and then building the Xcode project into an IPA (iOS App Package) using Xcode. Unity can’t build the final IPA directly because all iOS apps have to go through Apple’s build tools. That means you need to install Xcode (Apple’s programming IDE), including the iOS SDK.
Warning
That means you have to be working on a Mac—Xcode only runs on OS X. Developing a game within Unity can be done on either Windows or Mac, but building the iOS app must be done on a Mac.
Get Xcode from Apple’s website, in the developer section: https://developer.apple.com/xcode/downloads/.
Note
If you aren’t already a licensed developer, you need to be in order to go through all these steps and build an iOS app. The iOS Developer Program costs $99/year; enroll at https://developer.apple.com/programs/ios/.
Once Xcode is installed, go back to Unity and switch to iOS. You need to adjust the Player settings for the iOS app (remember, open Build Settings and click Player Settings). You should already be on the iOS tab of the Player settings, but click the iPhone icon tab if needed. Scroll down to Other Settings and then look for Identification. Bundle Identifier needs to be adjusted so that Apple will correctly identify the app.
Note
Both iOS and Android use Bundle Identifier the same way, so that setting is important on both platforms. The identifier should follow the same convention as that for any code package: all lowercase in the form com.companyname.productname.
Another important setting that applies to both iOS and Android is Bundle Version (this is the version number of the app). Most of the settings beyond that are platform-specific, though; for example, recently iOS added a short version number that will be visible to players, separate from the main bundle version. There’s also a setting for Scripting Backend; Mono was always used before, but the new IL2CPP back end can support platform updates, like 64-bit binaries.
Now click Build in Unity. Select the location for the built files, and that’ll generate an Xcode project in that location. The Xcode project that results can be modified directly if you want (some simple modifications could be part of the postbuild script). Regardless, open the Xcode project; the built folder has many files, but double-click the .xcodeproj file (it has an icon of a blueprint). Xcode will open with this project loaded; Unity already took care of most of the needed settings in the project, but you do need to adjust the provisioning profiles being used.
iOS provisioning profiles
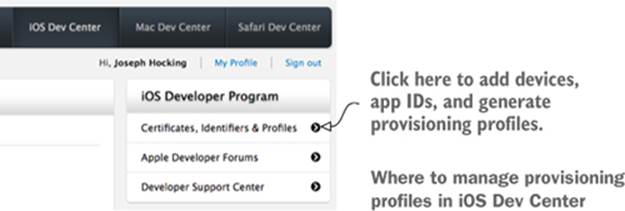
Of all the aspects of iOS development, provisioning profiles change the most frequently and are the most unusual. In short, these are files used for identification and authorization. Apple tightly controls what apps can run on what devices; apps submitted to Apple for approval use special provisioning profiles that allow them to work through the App Store, whereas apps in development use provisioning profiles that are specific to registered devices.
You’ll need to add both your iPhone’s UDID (an ID specific to your device) and the app’s ID (the Bundle Identifier in Unity) to a control panel at iOS Dev Center, Apple’s website for iOS developers. For a complete explanation of this process, visithttps://developer.apple.com/devcenter/ios/index.action.
Select your app in the project list on the left side of Xcode. Several tabs relevant to the selected project will appear; go to Build Settings and scroll down to Code Signing to set the provisioning profiles (see figure 12.3). Also make sure Scheme Destination at the top is set to iOS Device and not the simulator (some build options are grayed out if this is wrong).
Figure 12.3. Provisioning profile settings in Xcode

Once the provisioning profiles are set, you’re ready to build the app. From the Product menu, choose either Run or Archive. There are a lot of options in the Product menu, including the tantalizingly named Build, but for our purposes the two options that are useful are either Run or Archive. Build generates executable files but doesn’t bundle them for iOS, whereas
· Run will test the application on an iPhone connected to the computer with a USB cable.
· Archive will create an application package that can be sent to other registered devices (what Apple refers to as “ad-hoc distribution”).
Archive doesn’t create the app package directly but rather creates a bundle in an intermediate stage between the raw code files and an IPA. The created archive will be listed in Xcode’s Organizer window; in that window, click the Distribute button in order to generate an IPA file from the archive. Figure 12.4 shows this process; after you click Distribute, you’ll be asked if you want to distribute the app on the store or ad hoc.
Figure 12.4. Distribute archived iOS apps from the Organizer window.

If you choose ad hoc distribution, you’ll end up with an IPA file that can be sent to testers. You could send the file directly for them to install through iTunes, but it’s more convenient to use TestFlight (https://developer.apple.com/testflight/) to handle distributing and installing ad hoc builds.
Setting up Android build tools
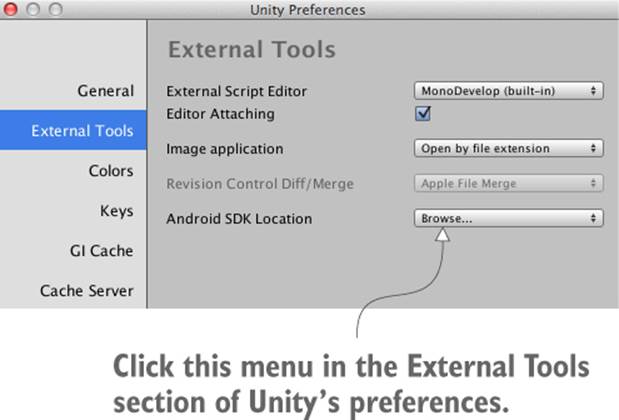
Unlike iOS apps, Unity can generate the APK (Android Application Package) directly. This requires pointing Unity to the Android SDK, which includes the necessary compiler. Download the Android SDK from the Android website; then choose this file location in Unity’s preferences (seefigure 12.5). You can download the SDK here: http://developer.android.com/sdk/index.html.
Figure 12.5. Unity preference setting to point to Android SDK
After setting the Android SDK in Unity’s preferences, you need to specify the Bundle Identifier just as you did for iOS. You’ll find Bundle Identifier in Player Settings; set it to com.companyname.productname (as explained in section 12.3.1). Then click Build to start the process. As with all builds, it’ll first ask where to save the file. Then it’ll create an APK file in that location.
Now that you have the app package, you must install it on a device. You can get the APK file onto an Android phone by downloading the file from the web or by transferring the file via a USB cable connected to your computer (an approach referred to as sideloading). The details of how to transfer files onto your phone vary for every device, but once there it can be installed using a file manager app. I don’t know why file managers aren’t built into Android, but you can install one for free from the Play Store. Navigate to your APK file within the file manager and then install the app.
As you can see, the basic build process for Android is a lot simpler than the build process for iOS. Unfortunately, the process of customizing the build and implementing plug-ins is more complicated than with iOS; you’ll learn how in section 12.3.3. Before that, let’s talk about texture compression.
12.3.2. Texture compression
Assets can add a lot of file size to an app, and this certainly includes textures. To reduce their file size, you can compress assets in some way; mobile apps in particular need to be careful about using too much space, so these apps apply compression to their textures. A variety of methods exist to compress images, with different pros and cons to each method. Because of these pros and cons, you may need to adjust how Unity compresses the textures.
It’s essential to manage texture compression on mobile devices, but technically textures are often compressed on other platforms, too. But you don’t have to pay as much attention to compression on other platforms for various reasons (the chief reason is that the platform is more technologically mature). On mobile devices, you need to pay closer attention to texture compression because the devices are touchier about this detail.
Unity compresses textures for you; in most development tools you need to compress images yourself, but in Unity you generally import uncompressed images, and then Unity applies image compression in the import settings for the image (see figure 12.6).
Figure 12.6. Texture compression settings in the Inspector
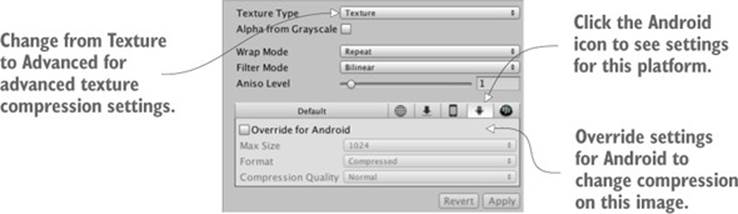
These compression settings are the default, and you may need to adjust them for specific images. In particular, image compression is trickier on Android. This is mostly due to the fragmentation of Android devices: because all iOS devices use pretty much the same video hardware, iOS apps can have texture compression optimized for their graphics chips (the GPU). Android apps don’t enjoy the same uniformity of hardware, so their texture compression has to aim for the lowest common denominator.
To be more specific, all iOS devices use PowerVR GPUs; thus, iOS apps can use the optimized PVR texture compression. Some Android devices also use PowerVR chips, but they just as frequently use Adreno chips from Qualcomm, Mali GPUs from ARM, or other options. As a result, Android apps generally rely on Ericsson Texture Compression (ETC), a compression algorithm supported by all Android devices. Unfortunately, ETC (ETC1, anyway; the successor under development is ETC2) doesn’t support alpha transparency, so images with alpha transparency can’t be compressed using that algorithm.
Unity recompresses images when you switch platforms. On Android, Unity gets around the transparent image limitation by converting images with transparency to 16-bit instead of compressing them. Converting images to 16-bit does lower their file size, but it does so at the cost of reducing image quality. Because of this, on Android you sometimes need to manually reset the compression of individual images, determining image by image which ones need transparency versus which ones can have ETC (better image quality and no transparency), and deciding which transparent images need reduced file size versus which ones can be made uncompressed.
If you need to adjust compression on a texture, adjust the settings shown in figure 12.6. Change Texture Type to Advanced in order to access those settings, and set Android (click the Android icon tab) to override the default compression.
Adjusting texture compression is an important optimization detail on Android. The topic of the next section is important for both iOS and Android: developing native plug-ins.
12.3.3. Developing plug-ins
Unity has a huge amount of functionality built in, but that functionality is mostly limited to features common across all platforms. Taking advantage of platform-specific toolkits (such as Play Game Services on Android) often requires add-on plug-ins for Unity.
Tip
A variety of premade mobile plug-ins are available for iOS- and Android-specific features; appendix D lists a few places to get mobile plug-ins. These plug-ins operate in the manner described in this section, except that the plug-in code is already written for you.
The process for communicating back and forth with native plug-ins is similar to the process for communicating with the browser. On the Unity side of things, there are special commands that call functions within the plug-in. On the plug-in’s side, the plug-in can use SendMessage() to send a message to an object in Unity’s scene. The exact code looks different on different platforms, but the general idea is always the same.
Warning
Just as with the initial build process, the process for developing mobile plug-ins tends to change frequently—not the Unity end of the process, but the native code part. I’ll cover things at a high level, but you should look for up-to-date documentation online.
Also, plug-ins for both platforms are put in the same place within Unity. Create a folder in the Project view called Plugins; much as with folders like Editor, Unity handles the Plugins folder in a special way. In this case, Unity looks for plug-in files within the Plugins folder. Then, inside Plugins create two folders for Android and iOS; Unity copies the contents of those folders when doing a build.
iOS plug-ins
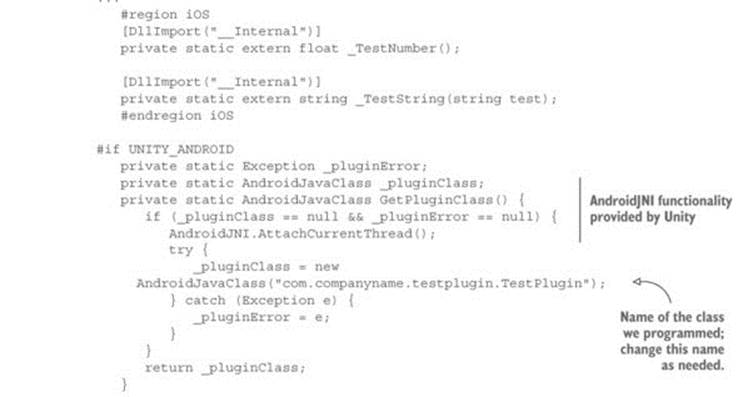
The “plug-in” is really just some native code that gets called by Unity. First create a script in Unity to handle the native code; call this script TestPlugin (see the next listing).
Listing 12.4. TestPlugin script that calls iOS native code from Unity
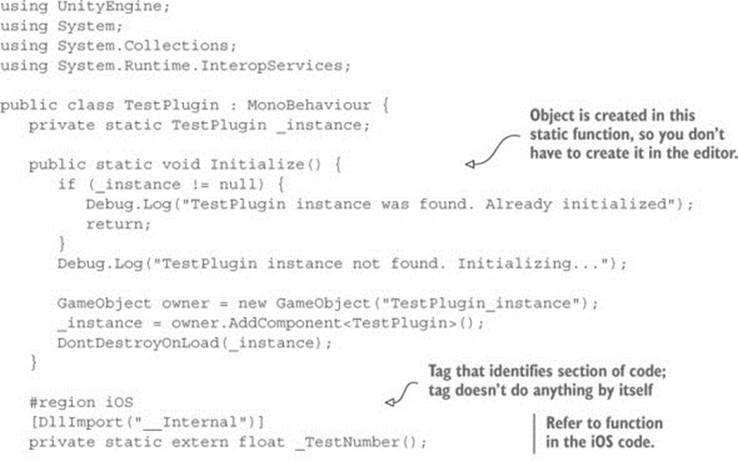
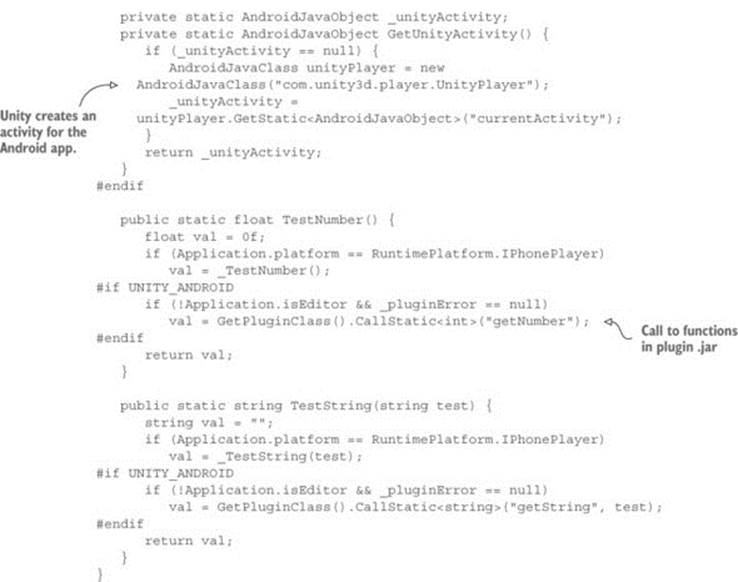
First, note that the static Initialize() function creates a permanent object in the scene so that you don’t have to do it manually in the editor. You haven’t previously seen code to create an object from scratch because it’s a lot simpler to use a prefab in most cases, but in this case it’s cleaner to create the object in code (so that you can use the plug-in script without editing the scene).
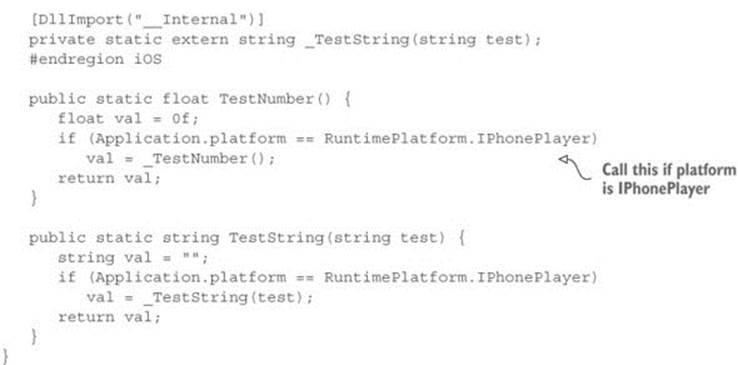
The main wizardry going on here involves the DLLImport and static extern commands. Those commands tell Unity to link up to functions in the native code you provide. Then you can use those referenced functions in this script’s methods (with a check to make sure the code is running on iPhone/iOS).
Next you’ll use these plug-in functions to test them. Create a new script called MobileTestObject, create an empty object in the scene, and then attach the script (see the next listing) to the object.
Listing 12.5. Using the plug-in from MobileTestObject
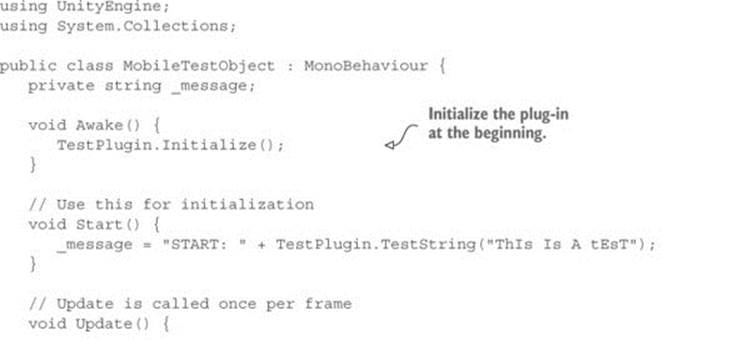
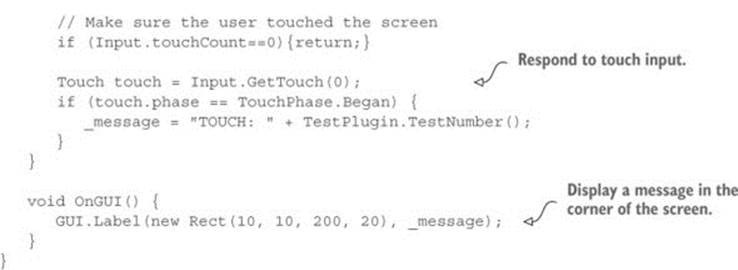
The script in this listing initializes the plug-in object and then calls plug-in methods in response to touch input. Once this is running on the device, you’ll see the test message in the corner change whenever you tap the screen.
The final thing left to do is to write the native code that TestPlugin references. Code on iOS devices is written using Objective C and/or C, so we need both a .h header file and a .mm implementation file. As described earlier, they need to go in the folder Plugins/iOS/ in the Project view. Create TestPlugin.h and TestPlugin.mm there; in the .h file write the code from the following listing.
Listing 12.6. TestPlugin.h header for iOS code
#import <Foundation/Foundation.h>
@interface TestObject : NSObject {
NSString* status;
}
@end
Look for an explanation about iOS programming to understand what this header is doing; explaining iOS programming is beyond this introductory book. Write the code from the next listing in the .mm file.
Listing 12.7. TestPlugin.mm implementation
#import "TestPlugin.h"
@implementation TestObject
@end
NSString* CreateNSString (const char* string)
{
if (string)
return [NSString stringWithUTF8String: string];
else
return [NSString stringWithUTF8String: ""];
}
char* MakeStringCopy (const char* string)
{
if (string == NULL)
return NULL;
char* res = (char*)malloc(strlen(string) + 1);
strcpy(res, string);
return res;
}
extern "C" {
const char* _TestString(const char* string) {
NSString* oldString = CreateNSString(string);
NSString* newString = [oldString uppercaseString];
return MakeStringCopy([newString UTF8String]);
}
float _TestNumber() {
return (arc4random() % 100)/100.0f;
}
}
Again, a detailed explanation of this code is a bit beyond this book. Note that many of the string functions are there to convert between how Unity represents string data and what the native code uses.
Tip
This sample only communicates in one direction, from Unity to the plug-in. But the native code could also communicate to Unity by using the UnitySendMessage() method. You can send a message to a named object in the scene; during initialization the plug-in createdTestPlugin_instance to send messages to.
With the native code in place, you can build the iOS app and test it on a device. Very cool! That’s how to make an iOS plug-in, so let’s look at Android, too.
Android plug-ins
To create an Android plug-in, the Unity side of things is almost exactly the same. We don’t need to change MobileTestObject at all. Make the additions shown in the following listing in TestPlugin.
Listing 12.8. Modifying TestPlugin to use the Android plug-in
You’ll notice most of the additions happen inside UNITY_ANDROID platform defines; as explained earlier in the chapter, these compiler directives cause code to apply only to certain platforms and are omitted on other platforms. Whereas the iOS code wasn’t doing anything that would break on other platforms (it won’t do anything, but it won’t cause errors, either), the code for Android plug-ins will only compile when Unity is set to the Android platform.
In particular, note the calls to AndroidJNI. That’s the system within Unity for connecting to native Android. The other possibly confusing word that appears is Activity; in Android apps, an activity is an app process. Unity is an activity of the Android app, so the plug-in code needs access to that activity to pass it around when needed.
Finally, you need the native Android code. Whereas iOS code is written in languages like Objective C and C, Android is programmed in Java. But we can’t simply provide the raw Java code for the plug-in; the plug-in must be a JAR packaged from the Java code. Here again, the details of Android programming are out of scope for a Unity intro, but for reference the following listing shows an Ant build file (replace paths with locations on your computer; especially notice Unity’s classes.jar to use when building Android plug-ins) and listing 12.10 shows the Java code for the plug-in being used.
Listing 12.9. Script build.xml that generates a JAR from the Java code
<?xml version="1.0" encoding="UTF-8"?>
<project name="TestPluginJava">
<!-- Change this in order to match your configuration -->
<property name="sdk.dir"
value="LOCATION OF ANDROID SDK"/>
<property name="target" value="android-18"/>
<property name="unity.androidplayer.jarfile"
value="/Applications/Unity/Unity.app/Contents/PlaybackEngines/
AndroidPlayer/development/bin/classes.jar"/>
<!-- Source directory -->
<property name="source.dir"
value="LOCATION OF THIS PROJECT/Assets/Plugins/ Android/TestPlugin" />
<!-- Output directory for .class files-->
<property name="output.dir"
value="LOCATION OF THIS PROJECT/Assets/Plugins/ Android/TestPlugin/classes"/>
<!-- Name of the jar to be created. Please note that the name
should match the name of the class and the name
placed in the AndroidManifest.xml-->
<property name="output.jarfile" value="../TestPlugin.jar"/>
<!-- Creates the output directories if they don't exist yet. -->
<target name="-dirs" depends="message">
<echo>Creating output directory: ${output.dir} </echo>
<mkdir dir="${output.dir}" />
</target>
<!-- Compiles this project's .java files into .class files. -->
<target name="compile" depends="-dirs"
description="Compiles project's .java files into .class files">
<javac encoding="ascii" target="1.6" debug="true"
destdir="${output.dir}" verbose="${verbose}"
includeantruntime="false">
<src path="${source.dir}" />
<classpath>
<pathelement
location="${sdk.dir}\platforms\${target}\android.jar"/>
<pathelement location="${unity.androidplayer.jarfile}"/>
</classpath>
</javac>
</target>
<target name="build-jar" depends="compile">
<zip zipfile="${output.jarfile}" basedir="${output.dir}" />
</target>
<target name="clean-post-jar">
<echo>Removing post-build-jar-clean</echo>
<delete dir="${output.dir}"/>
</target>
<target name="clean"
description="Removes output files created by other targets.">
<delete dir="${output.dir}" verbose="${verbose}" />
</target>
<target name="message">
<echo>Android Ant Build for Unity Android Plugin</echo>
<echo> message: Displays this message.</echo>
<echo> clean: Removes output files created by other targets.
</echo>
<echo> compile: Compiles .java files into .class files.</echo>
<echo> build-jar: Compiles .class files into .jar file.</echo>
</target>
</project>
Listing 12.10. TestPlugin.java that compiles into a JAR
package com.companyname.testplugin;
public class TestPlugin {
private static int number = 0;
public static int getNumber() {
number++;
return number;
}
public static String getString(String message) {
return message.toLowerCase();
}
}
Android’s manifest and resources folder
It wasn’t required for this simple test plug-in, but Android plug-ins often must edit the manifest file. All Android apps are controlled by a main configuration file called AndroidManifest.xml; Unity creates a basic manifest file if you don’t provide one, but you could provide one manually by putting it in Plugins/Android/alongside the plug-in JAR.
When an Android app is built, Unity puts the generated manifest file in the Temp folder at StagingArea/AndroidManifest.xml; copy that file to manually edit it (the downloaded code includes a sample manifest file).
Similarly, there’s a folder called res where you can put resources like custom icons; you could create res in the Android plugins folder.
The JAR file generated by that build script goes in Plugins/Android (people often put the entire Java project here for clarity, but technically only the JAR matters). Now build the game, and then the message will change whenever you tap the screen. Also, like the iOS plug-in, an Android plug-in could use UnityPlayer.UnitySendMessage() to communicate with the object in the scene (the Java code would need to import Unity’s Android Player library/JAR).
I know I glossed over a lot in developing Android JARs, but that’s because the process is both too complicated and changes frequently. If you become advanced enough to develop plug-ins for your Android games, you’re going to have to look up documentation on Android’s developer website.
Congratulations, you’ve reached the end!
Congratulations, you now know the steps for deploying a Unity game to mobile devices. The basic build process for all platforms is simple (just a single button), but customizing the app on various platforms can get complicated. Now you’re ready to get out there and build your own games!
12.4. Summary
In this chapter you’ve learned that
· Unity can build executable applications for a huge variety of platforms, including desktop computers, mobile devices, and websites.
· A host of settings can be applied to builds, including details like the icon for the app and the name that appears.
· Web games can interact with the web page they’re embedded in, allowing for all kinds of interesting web apps.
· Unity supports custom plug-ins in order to extend its functionality.
Afterword
At this point, you know everything you need to know in order to build a complete game using Unity—everything from a programming standpoint, that is; a top-notch game needs fantastic art and sounds, too. But success as a game developer involves a lot more than technical skills. Let’s face it—learning Unity isn’t your end goal. Your goal is to create successful games, and Unity is just a tool (granted, a very good tool) to get you to that goal.
Beyond the technical skills to implement everything in the game, you need an additional intangible attribute: grit. I’m talking about the doggedness and confidence to keep working on a challenging project and see it through to the end, what I sometimes refer to as “finishing ability.” There’s only one way to build up your finishing ability, and that’s to complete lots of projects. That seems like a catch-22 (to gain the ability to complete projects, you first need to complete a lot of projects), but the key point to recognize is that small projects are way easier to complete than large projects.
Thus, the path forward is to first build a lot of small projects—because those are easy to complete—and work up to larger projects. Many new game developers make the mistake of tackling a project that’s too large. They make this mistake for two main reasons: they want to copy their favorite (big) game, and everyone underestimates how much work it takes to make a game. The project seemingly starts off fine but quickly gets bogged down in too many challenges, and eventually the developer gets dejected and quits.
Instead, someone new to game development should start small. Start with projects so small that they almost seem trivial; the projects in this book are the sort of “small, almost to the point of trivial” projects that you should start with. If you’ve done all the projects in this book, then you’ve already gotten a lot of these starter projects out of the way. Try something bigger for your next project, but be wary of making too big a jump. You’ll build up your skills and confidence so you can get a little more ambitious each time.
You’ll hear this same advice almost any time you ask how to start developing games. For example, Unity asked the web series Extra Credits (a great series about game development) to do some videos about starting in game dev, and you’ll find those videos here:
· http://unity3d.com/learn/tutorials/modules/beginner/your-first-game/
Game design
The entire Extra Credits series goes way beyond this handful of videos sponsored by Unity. It covers a lot of ground but mostly focuses on the discipline of game design.
Definition
Game design is the process of defining a game by creating its goals, rules, and challenges. Game design is not to be confused with visual design, which is designing appearance, not function; this is a common mistake because the average person is most familiar with “design” in the context of “graphic design.”
Definition
One of the most central parts of game design is crafting game mechanics; these are individual actions (or systems of actions) within a game. The mechanics in a game are often set up by its rules, whereas the challenges in a game generally come from applying the mechanics to specific situations. For example, walking around the game is a mechanic, whereas a maze is a kind of challenge based on that mechanic.
Thinking about game design can be tricky for newcomers to game development. On the one hand, the most successful (and satisfying to create!) games are built with interesting and innovative game mechanics. On the other hand, worrying too much about the design of your first game can distract you from other aspects of game development, like learning how to program a game. You’re better off starting out by aping the design of existing games (remember, I’m only talking about starting out; cloning existing games is great for initial practice, but eventually you’ll have enough skills and experience to branch out further).
That said, any successful game developer should be curious about game design. There are lots of ways to learn more about game design—you already know about the Extra Credits videos, but here are some other websites:
· www.gamasutra.com
· www.lostgarden.com
· www.sloperama.com
There are also a number of great books on the subject, such as the following:
· Game Design Workshop, Third Edition, by Tracy Fullerton (A K Peters/CRC Press, 2014)
· A Theory of Fun for Game Design, Second Edition, by Raph Koster (O’Reilly Media, 2013)
· The Art of Game Design, Second Edition, by Jesse Schell (A K Peters/CRC Press, 2014)
Marketing your game
In the Extra Credits videos the fourth video is about marketing your game. Sometimes game developers put off thinking about marketing. They only want to think about building the game and not marketing it, but that attitude will probably result in a failed game. The best game in the world still won’t be successful if nobody knows about it!
The word marketing often evokes thoughts of ads, and if you have the budget, then running ads for your game is certainly one way to market it. But there are lots of low-cost or even free ways to get the word out about your game. Specifics tend to change over time, but overall strategies mentioned in that video include tweeting about your game (or posting on social media in general, not just Twitter) and creating a trailer video to share on YouTube with reviewers, bloggers, and so on. Be persistent and get creative!
Now go and create some great games. Unity is an excellent tool for doing just that, and you’ve learned how to use it. Good luck on your journey!
All materials on the site are licensed Creative Commons Attribution-Sharealike 3.0 Unported CC BY-SA 3.0 & GNU Free Documentation License (GFDL)
If you are the copyright holder of any material contained on our site and intend to remove it, please contact our site administrator for approval.
© 2016-2026 All site design rights belong to S.Y.A.