Unity in Action: Multiplatform game development in C# with Unity 5 (2015)
Part 3. Strong finish
Chapter 11. Putting the parts together into a complete game
This chapter covers
· Assembling objects and code from other projects
· Programming point-and-click controls
· Upgrading the UI from the old to a new system
· Loading new levels in response to objectives
· Setting up win/loss conditions
· Saving and loading the player’s progress
The project in this chapter will tie together everything from previous chapters. Most chapters have been pretty self-contained, and there was never any end-to-end look at the entire game. I’ll walk you through pulling together pieces that had been introduced separately so that you know how to build a complete game out of all the pieces. I’ll also discuss the encompassing structure of the game, including switching levels and especially ending the game (for example, Game Over when you die, Success when you reach the exit). And I’ll show you how to save the game, because saving the player’s progress becomes increasingly important as the game grows in size.
Warning
Much of this chapter will use tasks that were explained in detail in previous chapters, so I’ll move through steps quickly. If certain steps confuse you, refer to the relevant previous chapter (for example, chapter 6 about the UI) for a more detailed explanation.
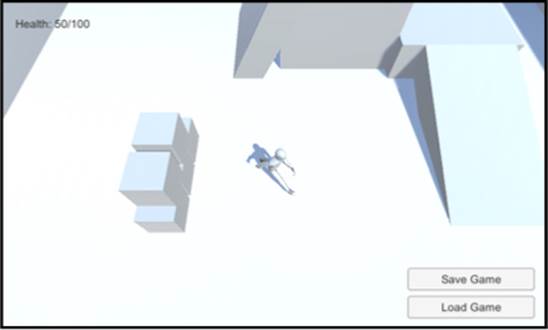
This chapter’s project is a demo of an action RPG. In this sort of game, the camera is placed high and looks down sharply (see figure 11.1), and the character is controlled by clicking the mouse where you want to go; you may be familiar with the game Diablo, which is an action RPG like this. I’m switching to yet another game genre so that we can squeeze in one more genre before the end of the book!
Figure 11.1. Screenshot of the top-down viewpoint
In full, the project in this chapter will be the biggest game yet. It’ll feature the following:
· A top-down view with point-and-click movement
· The ability to click on devices to operate them
· Scattered items you can collect
· Inventory that’s displayed in a UI window
· Enemies wandering around the level
· The ability to save the game and restore your progress
· Three levels that must be completed in sequence
Whew, that’s a lot to pack in; good thing this is almost the last chapter!
11.1. Building an action RPG by repurposing projects
We’ll develop the action RPG demo by building on the project from chapter 8. Copy that project’s folder and open the copy in Unity to start working. Or, if you skipped directly to this chapter, download the sample project for chapter 8 in order to build on that.
The reason we’re building on the chapter 8 project is that it’s the closest to our goal for this chapter and thus will require the least modification (when compared to other projects). Ultimately, we’ll pull together assets from several chapters, so technically it’s not that different than if we started with one of those projects and pulled in assets from chapter 8.
Here’s a recap of what’s in the project from chapter 8:
· A character with an animation controller already set up
· A third-person camera that follows the character around
· A level with floors, walls, and ramps
· Lights and shadows all placed
· Operable devices, including a color-changing monitor
· Collectible inventory items
· Back-end managers code framework
This hefty list of features covers quite a bit of the action in the RPG demo already, but there’s a bit more that we’ll either need to modify or add.
11.1.1. Assembling assets and code from multiple projects
All right, the first modifications will be to update the managers framework and to bring in computer-controlled enemies. For the former task, recall that updates to the framework were made in chapter 9, which means those updates aren’t in the project from chapter 8. For the latter task, recall that you programmed an enemy in chapter 3.
Updating the managers framework
Updating the managers is a fairly simple task, so let’s get that out of the way first. The IGameManager interface was modified in chapter 9 (see the next listing).
Listing 11.1. Adjusted IGameManager
public interface IGameManager {
ManagerStatus status {get;}
void Startup(NetworkService service);
}
The code in this listing adds a reference to NetworkService, so also be sure to copy over that additional script; drag the file from its location in the chapter 9 project (remember, a Unity project is a folder on your disc, so get the file from there) and drop it in the new project. Now modify Managers.cs to work with the changed interface (see the following listing).
Listing 11.2. Changing a bit of code in the Managers script

Finally, adjust both InventoryManager and PlayerManager to reflect the changed interface. The next listing shows the modified code from InventoryManager; PlayerManager needs the same code modifications but with different names.
Listing 11.3. Adjusting InventoryManager to reflect IGameManager

Once all the minor code changes are in, everything should still act as before. This update should work invisibly, and the game still works the same. That adjustment was easy, but the next one will be harder.
Bring over the AI enemy
Besides the NetworkServices adjustments from chapter 9, you also need the AI enemy from chapter 3. Implementing enemy characters involved a bunch of scripts and art assets, so you need to import all those assets.
First copy over these scripts (remember, WanderingAI and ReactiveTarget were behaviors for the AI enemy, Fireball was the projectile fired, the enemy attacks the PlayerCharacter component, and SceneController handles spawning enemies):
· PlayerCharacter.cs
· SceneController.cs
· WanderingAI.cs
· ReactiveTarget.cs
· Fireball.cs
Similarly, get the Flame material, Fireball prefab, and Enemy prefab by dragging those files in. If you got the enemy from chapter 10 instead of 3, you also need the added fire particle material.
After copying over all the required assets, the links between assets will probably be broken, so you’ll need to relink everything in order to get them to work. In particular, scripts are probably not correctly connected to the prefabs. For example, the Enemy prefab has two missing scripts in the Inspector, so click the circle button (indicated in figure 11.2) to choose WanderingAI and ReactiveTarget from the list of scripts. Similarly, check the Fireball prefab and relink that script if needed. Once you’re through with the scripts, check the links to materials and textures.
Figure 11.2. Linking a script to a component

Now add SceneController.cs to the controller object and drag the Enemy prefab onto that component’s Enemy slot in the Inspector. You may need to drag the Fireball prefab onto the Enemy’s script component (select the Enemy prefab and look at WanderingAI in the Inspector). Also attach PlayerCharacter.cs to the player object so that enemies will attack the player.
Play the game and you’ll see the enemy wandering around. The enemy shoots fireballs at the player, although it won’t do much damage; select the Fireball prefab and set its Damage value to 10.
Note
Currently the enemy isn’t particularly good at tracking down and hitting the player. In this case, I’d start by giving the enemy a wider field of vision (using the dot product approach from chapter 8). Ultimately, though, you’ll spend a lot of time polishing a game, and that includes iterating on the behavior of enemies. Polishing a game to make it more fun, though crucial for a game to be released, isn’t something you’ll do in this book.
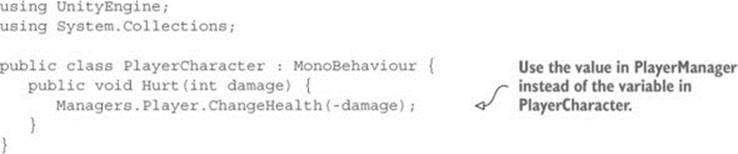
The other issue is that when you wrote this code in chapter 3, the player’s health was an ad hoc thing for testing. Now the game has an actual PlayerManager, so modify PlayerCharacter according to the next listing in order to work with health in that manager.
Listing 11.4. Adjusting PlayerCharacter to use health in PlayerManager
At this point you have a game demo with pieces assembled from multiple previous projects. An enemy character has been added to the scene, making the game more threatening. But the controls and viewpoint are still from the third-person movement demo, so let’s implement point-and-click controls for an action RPG.
11.1.2. Programming point-and-click controls: movement and devices
This demo needs a top-down view and mouse control of the player’s movement (refer back to figure 11.1). Currently the camera responds to the mouse, whereas the player responds to the keyboard (that is, what was programmed in chapter 7), which is the reverse of what you want in this chapter. In addition, you’ll modify the color-changing monitor so that devices are operated by clicking on them. In both cases, the existing code isn’t terribly far from what you need; you’ll make adjustments to both the movement and device scripts.
Top-down view of the scene
First, you’ll raise the camera to 8 Y to position it for an overhead view. You’ll also adjust OrbitCamera to remove mouse controls from the camera and only use arrow keys (see the following listing).
Listing 11.5. Adjusting OrbitCamera to remove mouse controls

The camera’s Near/Far clipping planes
As long as you’re adjusting the camera, I want to point out the Near/Far clipping planes. These settings never came up before because the defaults are fine, but you may need to adjust these in some future project.
Select the camera in the scene and look for the Clipping Planes section in the Inspector; both Near and Far are numbers you’ll type here. These values define near and far boundaries within which meshes are rendered: polygons closer than the Near clipping plane or farther than the Far clipping plane aren’t drawn.
You want the Near/Far clipping planes as close together as possible while still being far enough apart to render everything in your scene. When those planes are too far apart (Near is too close or Far is too far), the rendering algorithm can no longer tell which polygons are closer. This results in a characteristic rendering error called z-fighting (as in the Z-axis for depth) where polygons flicker on top of each other.
With the camera raised even higher, the view when you play the game will be top-down. At the moment, though, the movement controls still use the keyboard, so let’s write a script for point-and-click movement.
Writing the movement code
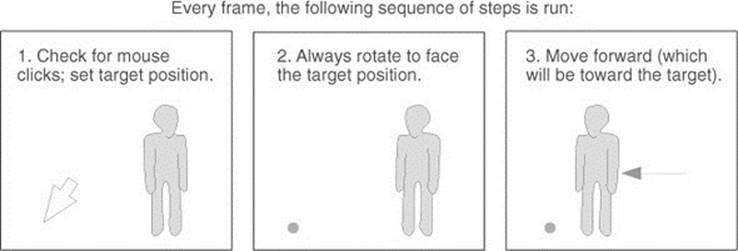
The general idea for this code (illustrated in figure 11.3) will be to automatically move the player toward its target position. This position is set by clicking in the scene. In this way, the code that moves the player isn’t directly reacting to the mouse but the player’s movement is being controlled indirectly by clicking.
Figure 11.3. Diagram of how point-and-click controls work
Note
This movement algorithm is useful for AI characters as well. Rather than using mouse clicks, the target position could be on a path that the character follows.
To implement this, create a new script called PointClickMovement and replace the RelativeMovement component on the player. Start coding PointClickMovement by pasting in the entirety of RelativeMovement (because you still want most of that script for handling falling and animations). Then adjust the code according to the next listing.
Listing 11.6. New movement code in PointClickMovement script
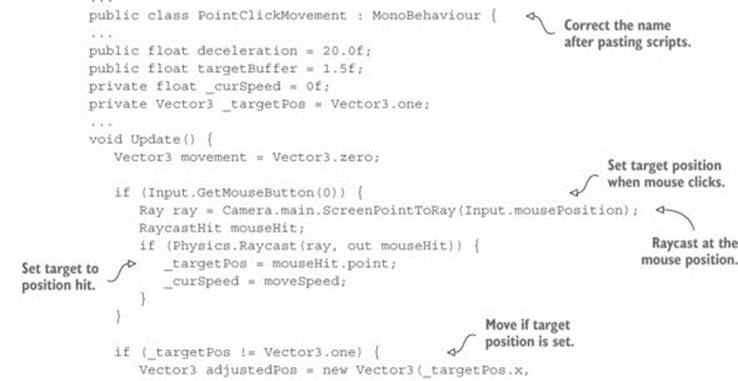
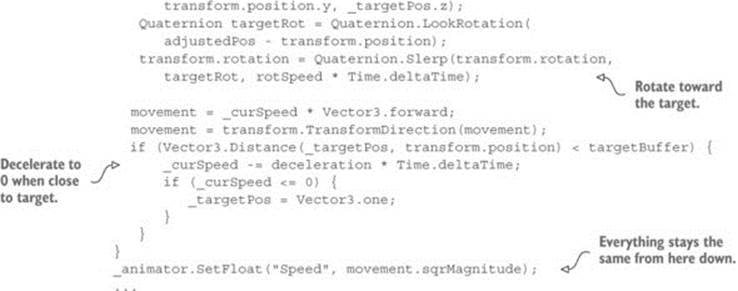
Almost everything at the beginning of the Update() method was gutted, because that code was handling keyboard movement. Notice that this new code has two main if statements: one that runs when the mouse clicks, and one that runs when a target is set.
When the mouse clicks, set the target according to where the mouse clicked. Here’s yet another great use for raycasting: to determine which point in the scene is under the mouse cursor. The target position is set to where the mouse hits.
As for the second conditional, first rotate to face the target. Quaternion.Slerp() rotates smoothly to face the target, rather than immediately snapping to that rotation. Then, transform the forward direction from the player’s local coordinates to global coordinates (in order to move forward). Finally, check the distance between the player and the target: if the player has almost reached the target, decrement the movement speed and eventually end movement by removing the target position.
Exercise: Turn off jump control
Currently this script still has the jump control from RelativeMovement. The player still jumps when the spacebar is pressed, but there shouldn’t be a jump button with point-and-click movement. Here’s a hint: adjust the code inside the 'if (hitGround)' conditional branch.
This takes care of moving the player using mouse controls. Play the game to test it out. Next let’s make devices operate when clicked on.
Operating devices using the mouse
In chapter 8 (and here until we adjust the code), devices were operated by pressing a button. Instead, they should operate when clicked on. To do this, you’ll first create a base script that all devices will inherit from; the base script will have the mouse control, and devices will inherit that. Create a new script called BaseDevice and write the code from the following listing.
Listing 11.7. BaseDevice script that operates when clicked on
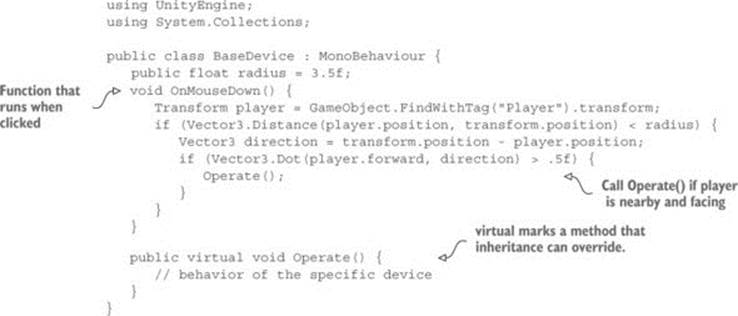
Most of this code happens inside OnMouseDown() because MonoBehaviour calls that method when the object is clicked on. First, it checks the distance to the player, and then it uses dot product to see if the player is facing the device. Operate() is an empty shell to be filled in by devices that inherit this script.
Note
This code looks in the scene for an object with the Player tag, so assign this tag to the player object. Tag is a drop-down menu at the top of the Inspector; you can define custom tags as well, but several tags are defined by default, including Player. Select the player object to edit it, and then select the Player tag.
Now that BaseDevice is programmed, you can modify ColorChangeDevice to inherit from that script. The following listing shows the new code.
Listing 11.8. Adjusting ColorChangeDevice to inherit from BaseDevice
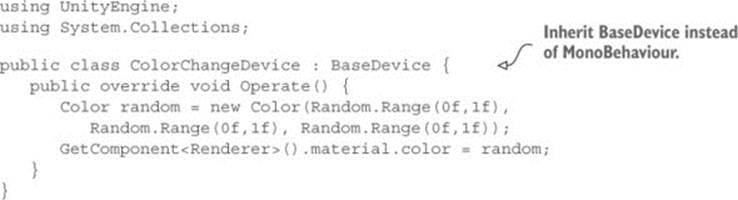
Because this script inherits from BaseDevice instead of MonoBehaviour, it gets the mouse control functionality. Then it overrides the empty Operate() method to program the color changing behavior.
Now the device will operate when you click on it. Also remove the player’s Device-Operator script component, because that script operates devices using the control key.
This new device input brings up an issue with the movement controls: currently the movement target is set any time the mouse clicks, but you don’t want to set the movement target when clicking on devices. You can fix this issue by using layers; similar to how a tag was set on the player, objects can be set to different layers and the code can check for that. Adjust PointClickMovement to check for the object’s layer (see the next listing).
Listing 11.9. Adjusting mouse click code in PointClickMovement
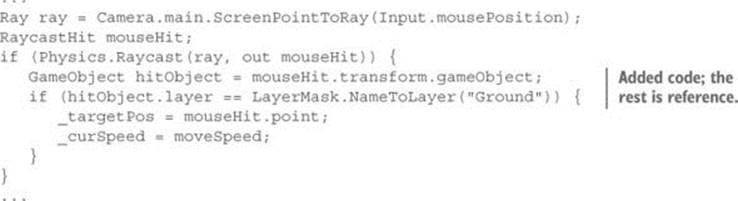
This listing adds a conditional inside the mouse click code to see if the clicked object is on the Ground layer. Layers (like Tags) is a drop-down menu at the top of the Inspector; click it to see the options. Also like tags, several layers are already defined by default. You want to create a new layer, so choose Edit Layers in the menu. Type Ground in an empty layer slot (probably slot 8; NameToLayer() in the code converts names into layer numbers so that you can say the name instead of the number).
Now that the Ground layer has been added to the menu, set ground objects to the Ground layer—that means the floor of the building, along with the ramps and platforms that the player can walk on. Select those objects, and then select Ground in the Layers menu.
Play the game and you won’t move when clicking on the color-changing monitor. Great, the point-and-click controls are complete! One more thing to bring into this project from previous projects is the improved UI.
11.1.3. Replacing the old GUI with a new interface
Chapter 8 used Unity’s old immediate-mode GUI because that approach was simpler to code. But the UI from chapter 8 doesn’t look as nice as the one from chapter 6, so let’s bring over that interface system. The newer UI is more visually polished than the old GUI; figure 11.4 shows the interface you’re going to create.
Figure 11.4. The UI for this chapter’s project
First, you’ll set up the UI graphics. Once the UI images are all in the scene, you can attach scripts to the UI objects. I’ll list the steps involved without going into detail; if you need a refresher, refer back to chapter 6:
1. Import popup.png as a sprite (choose Texture Type).
2. In the Sprite Editor, set a 12-pixel border on all sides (remember to apply changes).
3. Create a canvas in the scene (GameObject > UI > Canvas).
4. Choose the Pixel Perfect setting of the canvas.
5. Optional: Name the object HUD Canvas and switch to 2D view mode.
6. Create a Text object connected to that canvas (GameObject > UI > Text).
7. Set the Text object’s anchor to top-left and position 100, -40.
8. Type Health: as the text on the label.
9. Create an image connected to that canvas (GameObject > UI > Image).
10. Name the new object Inventory Popup.
11. Assign the pop-up sprite to the image’s Source Image.
12. Set Image Type to Sliced and select Fill Center.
13. Position the pop-up image at 0, 0 and scale the pop-up to 250 width 150 height.
Note
Recall how to switch between viewing the 3D scene and the 2D interface: toggle 2D view mode and double-click either the Canvas or the Building to zoom to that object.
Now you have the Health label in the corner and the large blue pop-up window in the center. Let’s program these parts first before getting deeper into the UI functionality. The interface code will use the same Messenger system from chapter 6, so copy over the Messenger script. Then create a GameEvent script (see the following listing).
Listing 11.10. GameEvent script to use with this Messenger system
public static class GameEvent {
public const string HEALTH_UPDATED = "HEALTH_UPDATED";
}
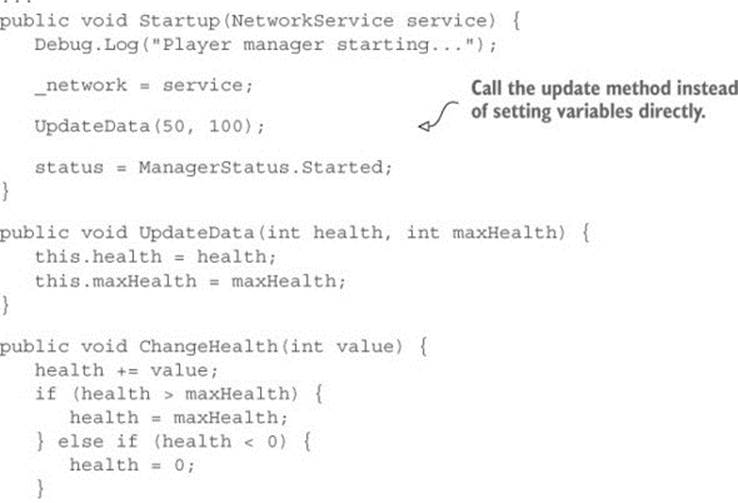
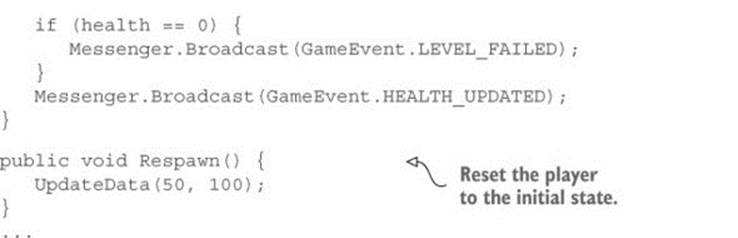
For now only one event is defined; over the course of this chapter you’ll add a few more events. Broadcast this event from PlayerManager.cs (shown in the next listing).
Listing 11.11. Broadcasting the health event from PlayerManager.cs
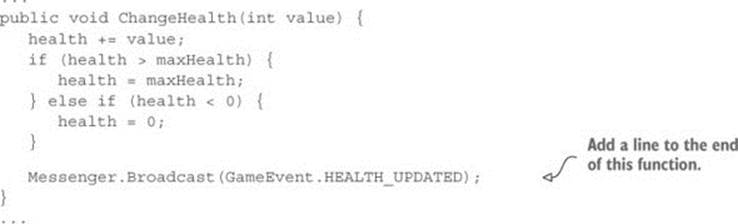
The event is broadcast every time ChangeHealth() finishes to tell the rest of the program that the health has changed. You want to adjust the health label in response to this event, so create a UIController script (see the next listing).
Listing 11.12. The script UIController, which handles the interface
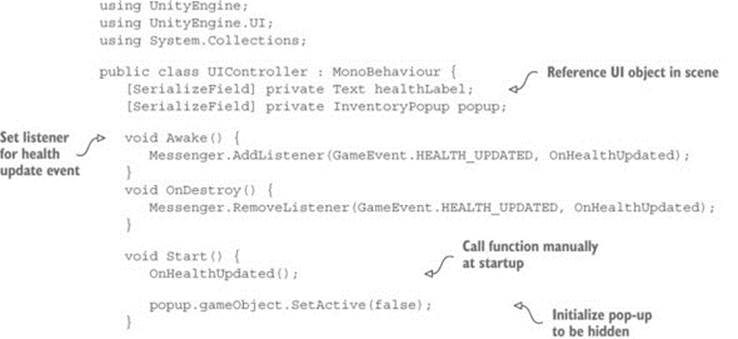
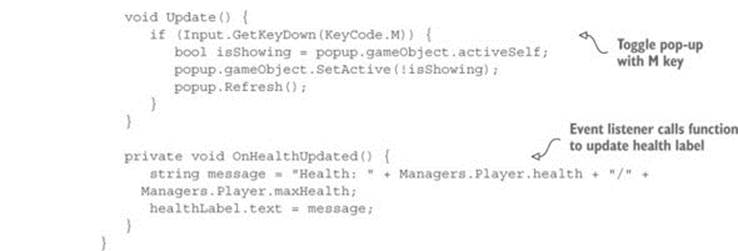
Attach this script to the Controller object and remove BasicUI. Also, create an InventoryPopup script (add an empty public Refresh() method for now; the rest will be filled in later) and attach it to the pop-up window (the Image object). Now you can drag the pop-up to the reference slot in the Controller’s component; also link the health label to the Controller.
The health label changes when you get hurt or use health packs, and pressing M toggles the pop-up window. One last detail to adjust is that currently clicking on the pop-up window causes the player to move; just as with devices, you don’t want to set the target position when the UI has been clicked on. Make the adjustment shown in the next listing to PointClickMovement.
Listing 11.13. Checking the UI in PointClickMovement
using UnityEngine.EventSystems;
...
void Update() {
Vector3 movement = Vector3.zero;
if (Input.GetMouseButton(0) &&
!EventSystem.current.IsPointerOverGameObject()) {
...
Note that the conditional checks whether or not the mouse is on the UI. That completes the overall structure of the interface, so now let’s deal with the inventory pop-up specifically.
Implementing the Inventory pop-up
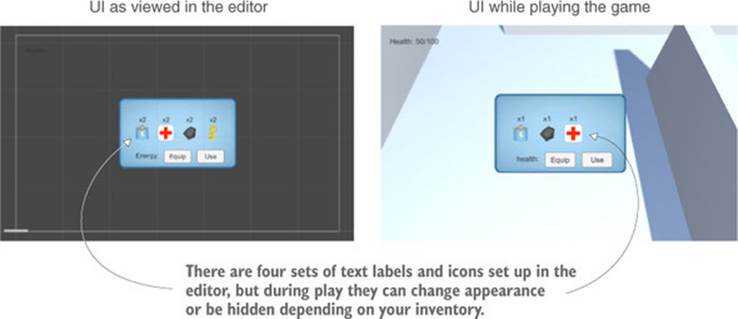
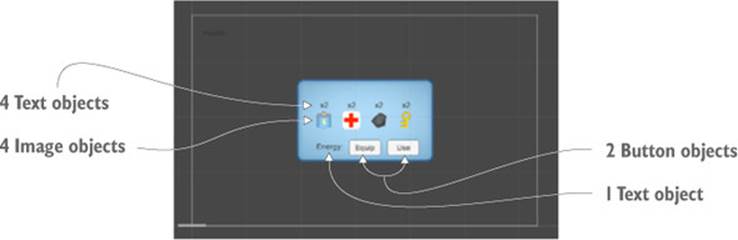
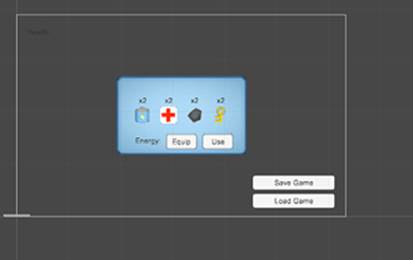
The pop-up window is currently blank but it should display the player’s inventory (depicted in figure 11.5). These steps will create the UI objects:
1. Create four images and parent them to the pop-up (that is, drag objects in the Hierarchy).
2. Create four text labels and parent them to the pop-up.
3. Position all the images at 0 Y and X values -75, -25, 25, and 75.
4. Position the text labels at 50 Y and X values -75, -25, 25, and 75.
5. Set the text (not the anchor!) to Center alignment, Bottom vertical align, and Height 60.
6. In Resources, set all inventory icons as Sprite (instead of Textures).
7. Drag these sprites to the Source Image slot of the Image objects (also set Native Size).
8. Enter x2 for all the text labels.
9. Add another text label and two buttons, all parented to the pop-up.
10. Position this text label at -120, -55 and set Right alignment.
11. Type Energy: for the text on this label
12. Set both buttons to Width 60, then Position at -50 Y and X values 0 or 70.
13. Type Equip on one button and Use on the other.
Figure 11.5. Diagram of the inventory UI
These are the visual elements for the inventory pop-up; next is the code. Write the contents of the following listing into the InventoryPopup script.
Listing 11.14. Full script for InventoryPopup
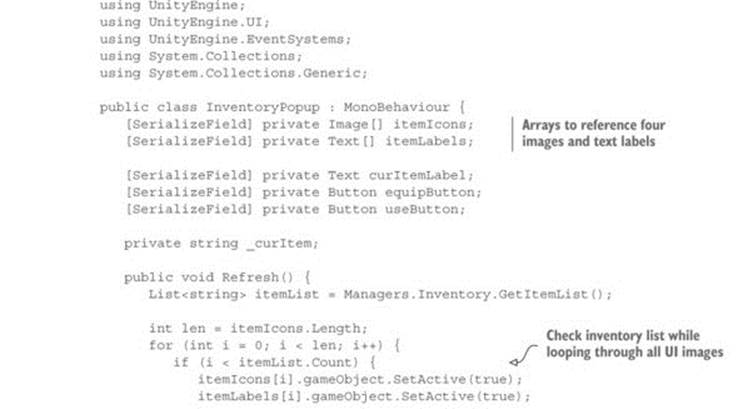
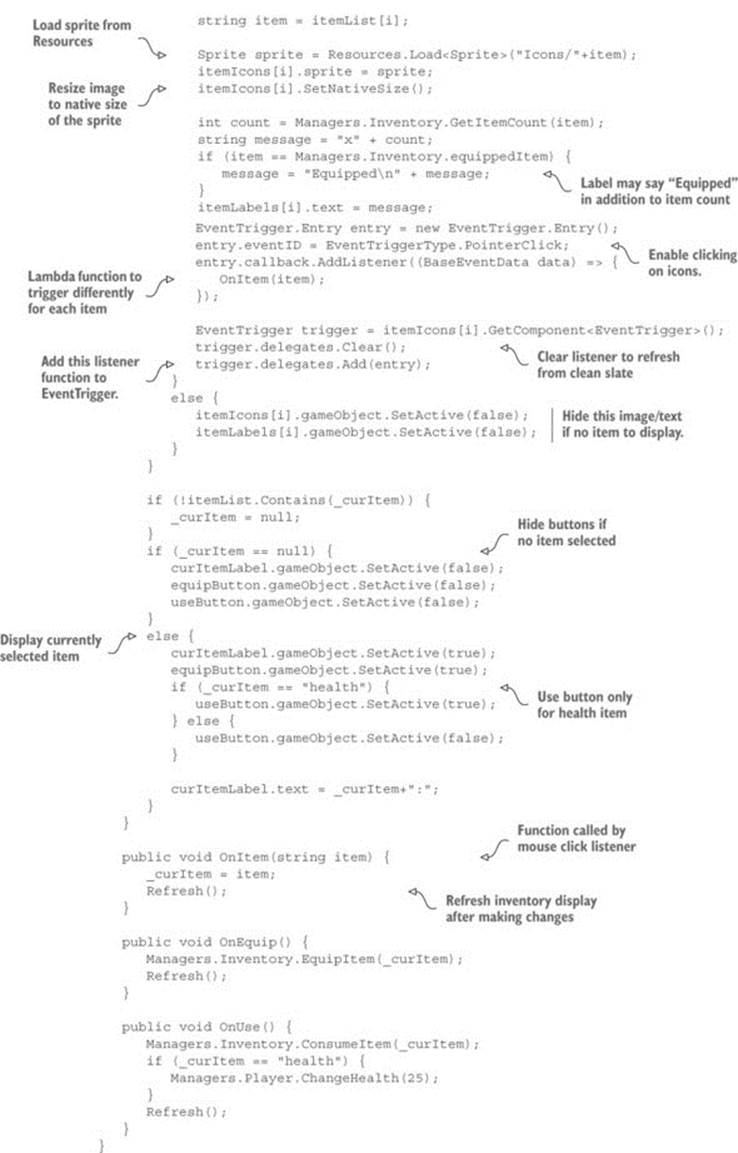
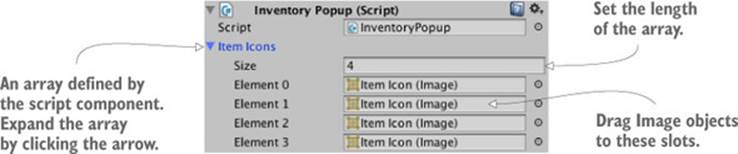
Whew, that was a long script! With this programmed, it’s time to link together everything in the interface. The script component now has the various object references, including the two arrays; expand both arrays and set to a length of 4 (see figure 11.6). Drag the four images to the iconsarray, and drag the four text labels to the labels array.
Figure 11.6. Arrays displayed in the Inspector
Note
If you aren’t sure which object is linked where (they all look the same), click the slot in the Inspector to see that object highlighted in the Hierarchy view.
Similarly, slots in the component reference the text label and buttons at the bottom of the pop-up. After linking those objects, you’ll add OnClick listeners for both buttons. Link these events to the pop-up object, and choose either OnEquip() or OnUse() as appropriate.
Finally, add an EventTrigger component to all four of the item images. The InventoryPopup script modifies this component on each icon, so they better have this component! You’ll find EventTrigger under Add Component > Event (it may be more convenient to copy/paste the component by clicking the little gear button in the top corner of the component: select Copy Component from one object and then Paste As New on the other). Add this component but don’t assign event listeners, because that’s done in the InventoryPopup code.
And that completes the inventory UI! Play the game to watch the inventory pop-up respond when you collect items and click buttons. We’re now finished assembling parts from previous projects; next I’ll explain how to build a more expansive game from this beginning.
11.2. Developing the overarching game structure
Now that you have a functioning action RPG demo, we’re going to build the overarching structure of this game. By that I mean the overall flow of the game through multiple levels and progressing through the game by beating levels. What we got from chapter 8’s project was a single level, but the roadmap for this chapter specified three levels.
Doing this will involve decoupling the scene even further from the Managers back end, so you’ll broadcast messages about the managers (just as PlayerManager broadcasts health updates). Create a new script called StartupEvent (listing 11.15); define these events in a separate script because these events go with the reusable Managers system, whereas GameEvent is specific to the game.
Listing 11.15. The StartupEvent script
public static class StartupEvent {
public const string MANAGERS_STARTED = "MANAGERS_STARTED";
public const string MANAGERS_PROGRESS = "MANAGERS_PROGRESS";
}
Now it’s time to start adjusting Managers, including broadcasting these new events!
11.2.1. Controlling mission flow and multiple levels
Currently the project has only one scene, and the Game Managers object is in that scene. The problem with that is that every scene will have its own set of game managers, whereas you actually want a single set of game managers shared by all scenes. To do that, you’ll create a separate Startup scene that initializes the managers and then shares that object with the other scenes of the game.
We’re also going to need a new manager to handle progress through the game. Create a new script called MissionManager (as shown in the next listing).
Listing 11.16. MissionManager
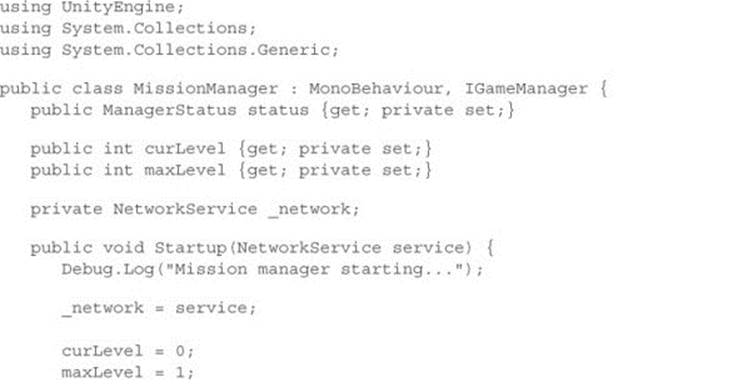

For the most part, there’s nothing unusual going on in this listing, but note the LoadLevel() method near the end; although I mentioned that method before (in chapter 5), it wasn’t important until now. That’s Unity’s method for loading a scene file; in chapter 5 you used it to reload the one scene in the game, but you can load any scene by passing in the name of the scene file.
Attach this script to the Game Managers object in the scene. Also add a new component to the Managers script (see the following listing).
Listing 11.17. Adding a new component to the Managers script
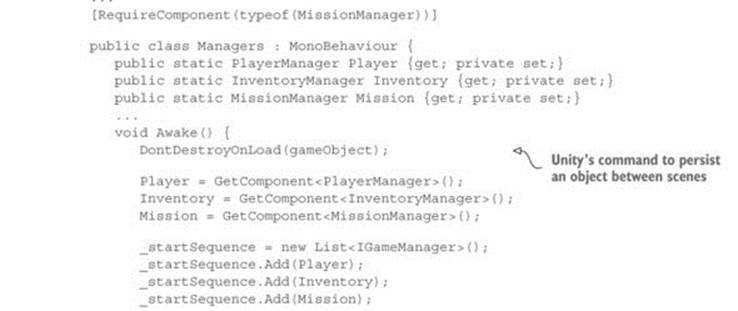
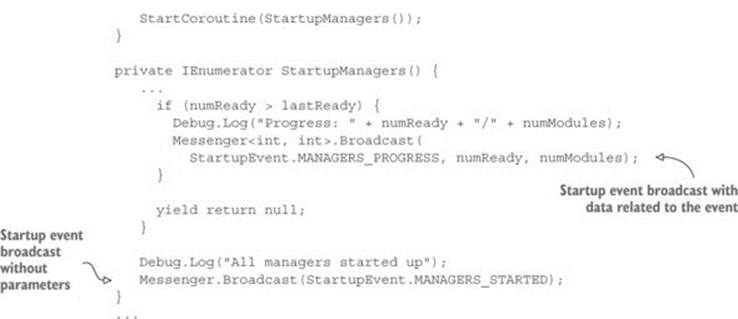
Most of this code should already be familiar to you (adding MissionManager is just like adding other managers), but there are two new parts. One is the event that sends two integer values; you saw both generic valueless events and messages with a single number before, but you can send an arbitrary number of values with the same syntax.
The other new bit of code is the DontDestroyOnLoad() method. It’s a method provided by Unity for persisting an object between scenes. Normally all objects in a scene are purged when a new scene loads, but by using DontDestroyOnLoad() on an object, you ensure that that object will still be there in the new scene.
Separate scenes for startup and level
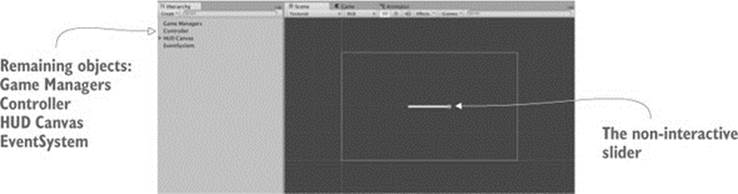
Because the Game Managers object will persist in all scenes, you must separate the managers from individual levels of the game. In Project view, duplicate the scene file (Edit > Duplicate) and then rename the two files appropriately: one Startup and the other Level1. Open Level1 and delete the Game Managers object (it’ll be provided by Startup). Open Startup and delete everything other than Game Managers, Controller, HUD Canvas, and EventSystem. Remove the script components on Controller, and delete the UI objects (health label and InventoryPopup) parented to the Canvas.
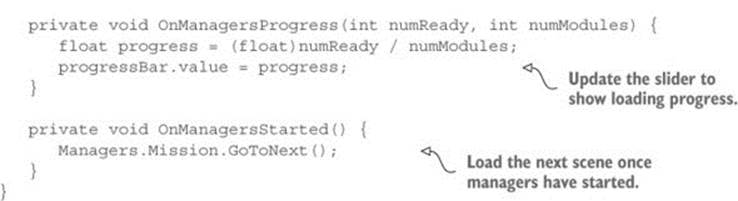
The UI is currently empty, so create a new slider (see figure 11.7) and then turn off its Interactable setting. The Controller object also has no script components anymore, so create a new StartupController script and attach that to the Controller object (see the following listing).
Figure 11.7. The Startup scene with everything unnecessary removed
Listing 11.18. The new StartupController script
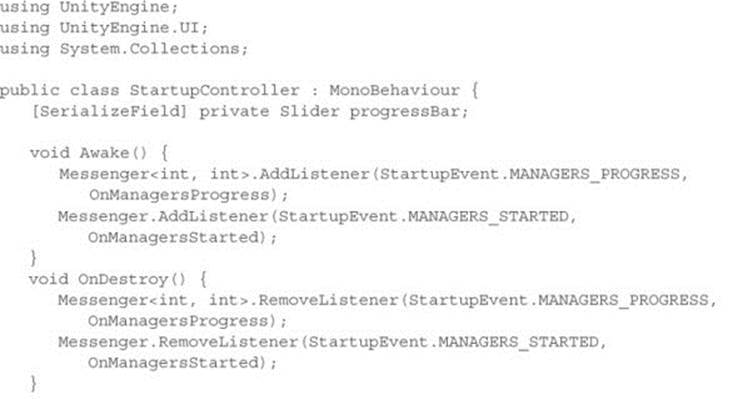
Next, link the Slider object to the slot in the Inspector. One last thing to do in preparation is add the two scenes to Build Settings. Building the app will be the topic of the next chapter, so for now choose File > Build Settings to see and adjust the list of scenes. Click the Add Current button to add a scene to the list (load both scenes and do this for each).
Note
You need to add the scenes to Build Settings so that they can be loaded. If you don’t, Unity won’t know what scenes are available. You didn’t need to do this in chapter 5 because you weren’t actually switching levels—you were reloading the current scene.
Now you can launch the game by hitting Play from the Startup scene. The Game Managers object will be shared in both scenes.
Warning
Because the managers are loaded in the Startup scene, you always need to launch the game from that scene. You could remember to always open that scene before hitting Play, but there’s a script on the Unify wiki that will automatically switch to a set scene when you click Play:http://wiki.unity3d.com/index.php/SceneAutoLoader.
This structural change handles the sharing of game managers between different scenes, but you still don’t have any success or failure conditions within the level.
11.2.2. Completing a level by reaching the exit
To handle level completion, you’ll put an object in the scene for the player to touch, and that object will inform MissionManager when the player reaches the objective. This will involve the UI responding to a message about level completion, so add another GameEvent (see the following listing).
Listing 11.19. Level Complete added to GameEvent.cs
public static class GameEvent {
public const string HEALTH_UPDATED = "HEALTH_UPDATED";
public const string LEVEL_COMPLETE = "LEVEL_COMPLETE";
}
Now add a new method to MissionManager in order to keep track of mission objectives and broadcast the new event message (see the next listing).
Listing 11.20. Objective method in MissionManager
...
public void ReachObjective() {
// could have logic to handle multiple objectives
Messenger.Broadcast(GameEvent.LEVEL_COMPLETE);
}
...
Adjust the UIController script to respond to that event (as shown in the next listing).
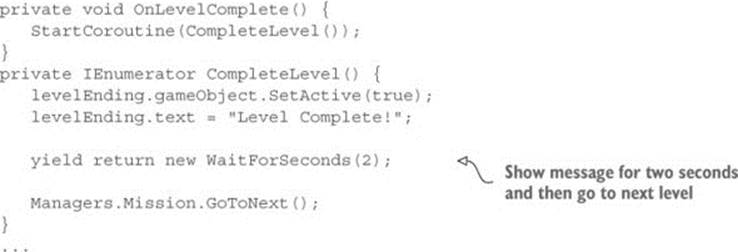
Listing 11.21. New event listener in UIController
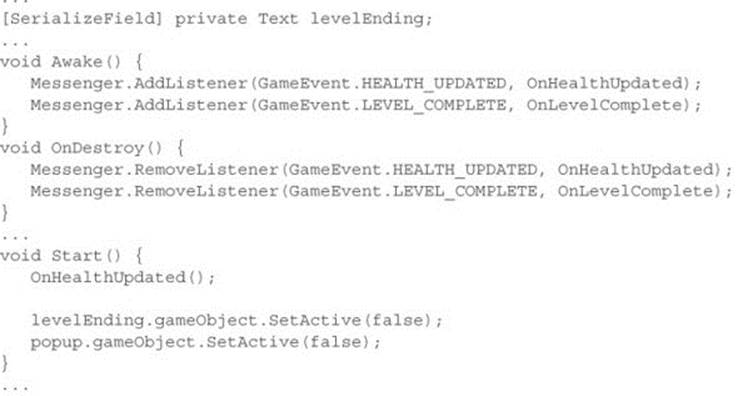
You’ll notice that this listing has a reference to a text label. Open the Level1 scene to edit it, and create a new UI text object. This label will be a level completion message that appears in the middle of the screen. Set this text to Width 240, Height 60, Center for both Align and Vertical-align, and Font Size 22. Type Level Complete! in the text area and then link this text object to the levelEnding reference of UIController.
Finally, we’ll create an object that the player touches to complete the level (figure 11.8 shows what the objective looks like). This will be similar to collectible items: it needs a material and a script, and you’ll make the entire thing a prefab.
Figure 11.8. Objective object that the player touches to complete the level
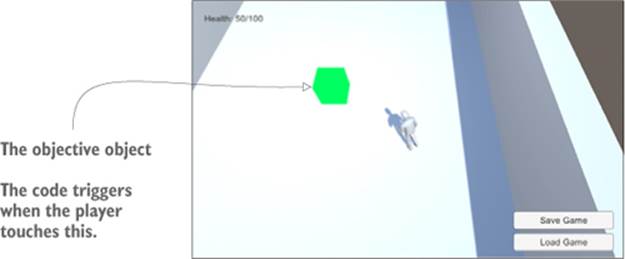
Create a cube object at Position 18, 1, 0. Select the Is Trigger option of the Box Collider, turn off Cast/Receive Shadows in Mesh Renderer, and set the object to the Ignore Raycast layer. Create a new material called objective; make it bright green and set the shader to Unlit > Color for a flat, bright look.
Next, create the script ObjectiveTrigger (shown in the next listing) and attach that script to the objective object.
Listing 11.22. Code for ObjectiveTrigger to put on objective objects

Drag this object from the Hierarchy into Project view to turn it into a prefab; in future levels, you could put the prefab in the scene. Now play the game and go reach the objective. The completion message shows when you beat the level.
Next let’s have a failure message show when you lose.
11.2.3. Losing the level when caught by enemies
The failure condition will be when the player runs out of health (because of the enemy attacking). First add another GameEvent:
public const string LEVEL_FAILED = "LEVEL_FAILED";
Now adjust PlayerManager to broadcast this message when health drops to 0 (as shown in the next listing).
Listing 11.23. Broadcast Level Failed from PlayerManager
Add a small method to MissionManager for restarting the level (see the next listing).
Listing 11.24. MissionManager, which can restart the current level
...
public void RestartCurrent() {
string name = "Level" + curLevel;
Debug.Log("Loading " + name);
Application.LoadLevel(name);
}
...
With that in place, add another event listener to UIController (shown in the following listing).
Listing 11.25. Responding to Level Failed in UIController
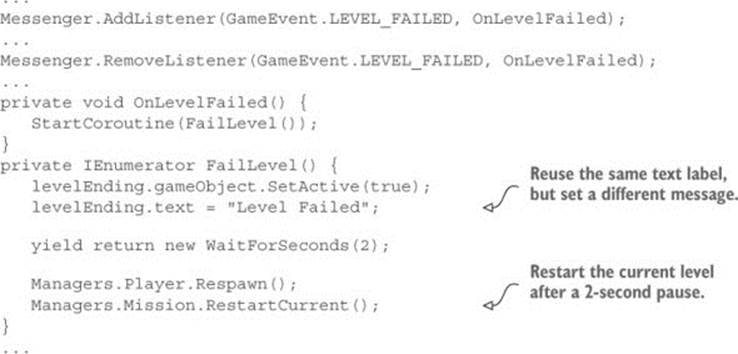
Play the game and let the enemy shoot you several times; the level failure message will appear. Great job—the player can now complete and fail levels! Building off that, the game must keep track of the player’s progress.
11.3. Handling the player’s progression through the game
Right now the individual level operates independently, without any relation to the overall game. You’ll add two things that will make progress through the game feel more complete: saving the player’s progress and detecting when the game (not just the level) is complete.
11.3.1. Saving and loading the player’s progress
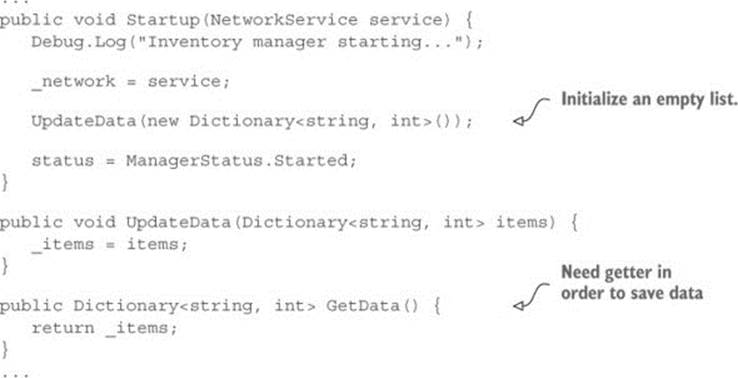
Saving and loading the game is an important part of most games. Unity and Mono provide I/O functionality that you can use for this purpose. Before you can start using that, though, you must add UpdateData() for both MissionManager and InventoryManager. That method will work just as it does in PlayerManager and will enable code outside the manager to update data within the manager. Listing 11.26 and listing 11.27 show the changed managers.
Listing 11.26. UpdateData() method in MissionManager
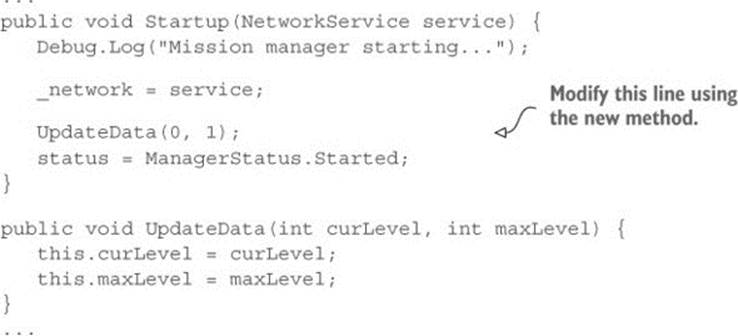
Listing 11.27. UpdateData() method in InventoryManager
Now that the various managers all have UpdateData() methods, the data can be saved from a new code module. Saving the data will involve a procedure referred to as serializing the data.
Definition
Serialize means to encode a batch of data into a form that can be stored.
You’ll save the game as binary data, but note that C# is also fully capable of saving text files. For example, the JSON strings you worked with in chapter 9 were data serialized as text. Previous chapters used PlayerPrefs but in this project you’re going to save a local file (PlayerPrefs are limited to one megabyte and are only intended to save a handful of values). Create the script DataManager (see the next listing).
Warning
You can’t access the filesystem in a web game. This is a security feature that means a web game can’t save a local file. To save data for web games, post the data to your server.
Listing 11.28. New script for DataManager
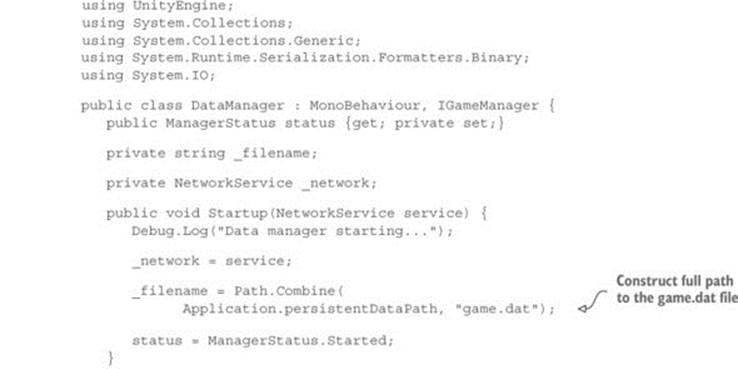

During Startup() the full file path is constructed using Application.persistentDataPath, a location Unity provides to store data in. The exact file path differs on different platforms, but Unity abstracts it behind this static variable (incidentally, this path includes both Company Name and Product Name from Player Settings, so adjust those if needed). The File.Create() method will create a binary file; call File.CreateText() if you want a text file.
Warning
When constructing file paths, the path separator is different on different computer platforms. C# has Path.DirectorySeparatorChar to account for this.
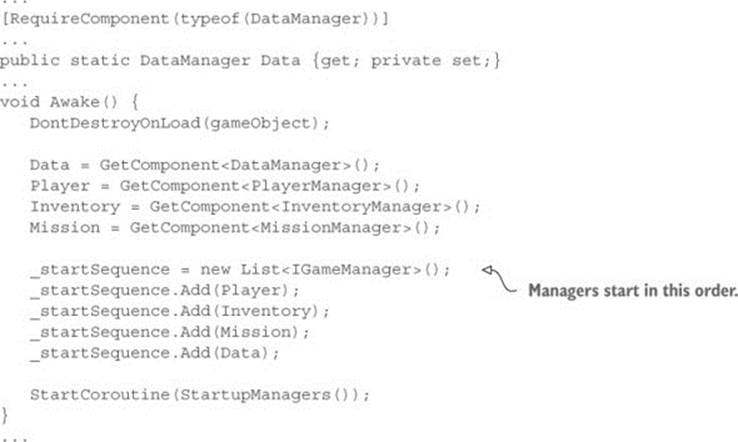
Open the Startup scene to find Game Managers. Add the DataManager script component to the Game Managers object, and then add the new manager to the Managers script (listing 11.29).
Listing 11.29. Adding DataManager to Managers.cs
Warning
Because DataManager uses other managers (in order to update them), you should make sure that the other managers appear earlier in the startup sequence.
Finally, add buttons to use functions in DataManager (figure 11.9 shows the buttons). Create two buttons parented to the HUD Canvas (not in the Inventory pop-up). Call them (set the attached text objects) Save Game and Load Game, set Anchor to bottom-right, and position them at -100,65 and -100,30.
Figure 11.9. Save and Load buttons on the bottom right of the screen
These buttons will link to functions in UIController, so write those methods (as shown in the following listing).
Listing 11.30. Save and Load methods in UIController
...
public void SaveGame() {
Managers.Data.SaveGameState();
}
public void LoadGame() {
Managers.Data.LoadGameState();
}
...
Link these functions to OnClick listeners in the buttons (add a listing in the OnClick setting, drag in the UIController object, and select functions from the menu). Now play the game, pick up a few items, use a health pack to increase your health, and then save the game. Restart the game and check your inventory to verify that it’s empty. Hit Load; you now have the health and items you had when you saved the game!
11.3.2. Beating the game by completing three levels
As implied by our saving of the player’s progress, this game can have multiple levels, not just the one level you’ve been testing. To properly handle multiple levels, the game must detect not only the completion of a single level, but also the completion of the entire game. First add yet anotherGameEvent:
public const string GAME_COMPLETE = "GAME_COMPLETE";
Now modify MissionManager to broadcast that message after the last level (see the next listing).
Listing 11.31. Broadcasting Game Complete from MissionManager
...
public void GoToNext() {
...
} else {
Debug.Log("Last level");
Messenger.Broadcast(GameEvent.GAME_COMPLETE);
}
}
Respond to that message in UIController (as shown in the following listing).
Listing 11.32. Adding an event listener to UIController
...
Messenger.AddListener(GameEvent.GAME_COMPLETE, OnGameComplete);
...
Messenger.RemoveListener(GameEvent.GAME_COMPLETE, OnGameComplete);
...
private void OnGameComplete() {
levelEnding.gameObject.SetActive(true);
levelEnding.text = "You Finished the Game!";
}
...
Try completing the level to watch what happens: move the player to the level objective to complete the level as before. You’ll first see the Level Complete message, but after a couple of seconds it’ll change to a message about completing the game.
Adding more levels
At this point you can add an arbitrary number of additional levels, and Mission-Manager will watch for the last level. The final thing you’ll do in this chapter is add a few more levels to the project in order to demonstrate the game progressing through multiple levels.
Duplicate the Level1 scene file twice (Unity should automatically increment the numbers to Level2 and Level3) and add the new levels to Build Settings (so that they can be loaded during gameplay). Modify each scene so that you can tell the difference between levels; feel free to rearrange most of the scene, but there are several essential game elements that you must keep: the player object that’s tagged Player, the floor object set to the Ground layer, and the objective object, Controller, HUD Canvas, and EventSystem.
Tip
By default, the lighting system regenerates the lightmaps when the level is loaded. But this only works while you are editing the level; lightmaps won’t be generated when loading levels while the game is running. As you did in chapter 9, you can turn off Continuous Baking in the lighting window (Window > Lighting) and then click Build to bake lightmaps (remember, don’t touch the Scene folder that’s created).
You also need to adjust MissionManager to load the new levels. Change maxLevel to 3 by changing the call UpdateData(0, 1); to UpdateData(0, 3);.
Now play the game and you’ll start on Level1 initially; reach the level objective and you’ll move on to the next level! Incidentally, you can also save on a later level to see that the game will restore that progress.
Exercise: Integrating audio into the full game
Chapter 10 was all about implementing audio in Unity. I didn’t explain how to integrate that into this chapter’s project, but at this point you should understand how. I encourage you to practice your skills by integrating the audio functionality from the previous chapter into this chapter’s project. Here’s a hint: change the key to toggle the audio settings pop-up so that it doesn’t interfere with the inventory pop-up.
You now know how to create a full game with multiple levels. The obvious next task is the final chapter: getting your game into the hands of players.
11.4. Summary
In this chapter you’ve learned that
· Unity makes it easy to repurpose assets and code from a project in a different game genre.
· Another great use for raycasting is to determine where in the scene the player is clicking.
· Unity has simple methods for both loading levels and persisting certain objects between levels.
· You progress through levels in response to various events within the game.
· You can use the I/O methods that come with C# to store data at Application .persistentDataPath.