Unity in Action: Multiplatform game development in C# with Unity 5 (2015)
Part 1. First steps
Chapter 3. Adding enemies and projectiles to the 3D game
This chapter covers
· Taking aim and firing, both for the player and for enemies
· Detecting and responding to hits
· Making enemies that wander around
· Spawning new objects in the scene
The movement demo from the previous chapter was pretty cool but still not really a game. Let’s turn that movement demo into a first-person shooter. If you think about what else we need now, it boils down to the ability to shoot, and things to shoot at. First we’re going to write scripts that enable the player to shoot objects in the scene. Then we’re going to build enemies to populate the scene, including code to both wander around aimlessly and react to being hit. Finally we’re going to enable the enemies to fight back, emitting fireballs at the player. None of the scripts fromchapter 2 need to change; instead, we’ll add scripts to the project—scripts that handle the additional features.
I’ve chosen a first-person shooter for this project for a couple of reasons. One is simply that FPS games are popular; people like shooting games, so let’s make a shooting game. A subtler reason has to do with the techniques you’ll learn; this project is a great way to learn about several fundamental concepts in 3D simulations. For example, shooting games are a great way to teach raycasting. In a bit we’ll get into the specifics of what raycasting is, but for now you just need to know that it’s a tool that’s useful for many different tasks in 3D simulations. Although raycasting is useful in a wide variety of situations, it happens that using raycasting makes the most intuitive sense for shooting.
Creating wandering targets to shoot at gives us a great excuse to explore code for computer-controlled characters, as well as use techniques for sending messages and spawning objects. In fact, this wandering behavior is another place that raycasting is valuable, so we’re already going to be looking at a different application of the technique after having first learned it with shooting. Similarly, the approach to sending messages that’s demonstrated in this project is also useful elsewhere. In future chapters you’ll see other applications for these techniques, and even within this one project we’ll go over alternative situations.
Ultimately we’ll approach this project one new feature at a time, with the game always playable at every step but also always feeling like there’s a missing part to work on next. This roadmap breaks down the steps into small, understandable changes, with only one new feature added in each step:
1. Write code enabling the player to shoot into the scene.
2. Create static targets that react to being hit.
3. Make the targets wander around.
4. Spawn the wandering targets automatically.
5. Enable the targets/enemies to shoot fireballs at the player.
Note
This chapter’s project assumes you already have a first-person movement demo to build on. We created a movement demo in chapter 2, but if you skipped to this chapter then you will need to download the sample files for chapter 2.
3.1. Shooting via raycasts
The first new feature to introduce into the 3D demo is shooting. Looking around and moving are certainly crucial features for a first-person shooter, but it’s not a game until players can affect the simulation and apply their skills. Shooting in 3D games can be implemented with a few different approaches, and one of the most important approaches is raycasting.
3.1.1. What is raycasting?
As the name indicates, raycasting is when you cast a ray into the scene. Clear, right? Well, okay, so what exactly is a ray?
Definition
A ray is an imaginary or invisible line in the scene that starts at some origin point and extends out in a specific direction.
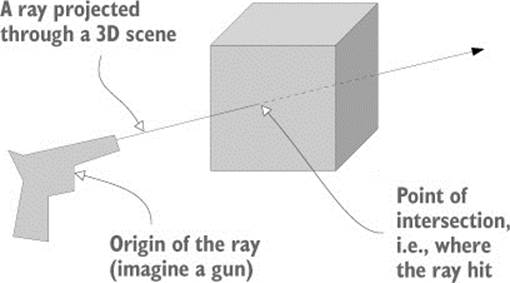
Raycasting is when you create a ray and then determine what intersects that ray; figure 3.1 illustrates the concept. Consider what happens when you fire a bullet from a gun: the bullet starts at the position of the gun and then flies forward in a straight line until it hits something. A ray is analogous to the path of the bullet, and raycasting is analogous to firing the bullet and seeing where it hits.
Figure 3.1. A ray is an imaginary line, and raycasting is finding where that line intersects.
As you can imagine, the math behind raycasting often gets complicated. Not only is it tricky to calculate the intersection of a line with a 3D plane, but you need to do that for all polygons of all mesh objects in the scene (remember, a mesh object is a 3D visual constructed from lots of connected lines and shapes). Fortunately, Unity handles the difficult math behind raycasting, but you still have to worry about higher-level concerns like where the ray is being cast from and why.
In this project the answer to the latter question (why) is to simulate a bullet being fired into the scene. For a first-person shooter, the ray generally starts at the camera position and then extends out through the center of the camera view. In other words, you’re checking for objects straight in front of the camera; Unity provides commands to make that task simple. Let’s take a look at these commands.
3.1.2. Using the command ScreenPointToRay for shooting
You’ll implement shooting by projecting a ray that starts at the camera and extends forward through the center of the view. Projecting a ray through the center of the camera view is a special case of an action referred to as mouse picking.
Definition
Mouse picking is the action of picking out the spot in the 3D scene directly under the mouse cursor.
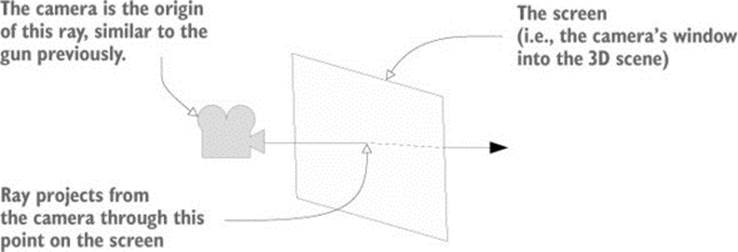
Unity provides the method ScreenPointToRay() to perform this action. Figure 3.2 illustrates what happens. The method creates a ray that starts at the camera and projects at an angle passing through the given screen coordinates. Usually the coordinates of the mouse position are used for mouse picking, but for first-person shooting the center of the screen is used. Once you have a ray, it can be passed to the method Physics.Raycast() to perform raycasting using that ray.
Figure 3.2. ScreenPointToRay() projects a ray from the camera through the given screen coordinates.
Let’s write some code that uses the methods we just discussed. In Unity create a new C# script, attach that script to the camera (not the player object), and then write the code from the next listing in it.
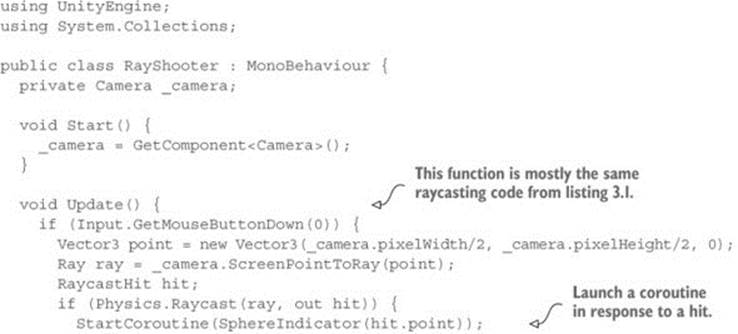
Listing 3.1. RayShooter script to attach to the camera
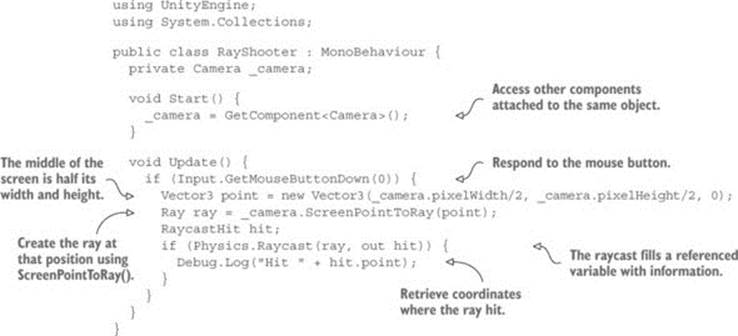
You should note a number of things in this code listing. First, the camera component is retrieved in Start(), just like the CharacterController in the previous chapter. Then the rest of the code is put in Update() because it needs to check the mouse over and over repeatedly, as opposed to just one time. The method Input.GetMouseButtonDown() returns true or false depending on whether the mouse has been clicked, so putting that command in a conditional means the enclosed code runs only when the mouse has been clicked. You want to shoot when the player clicks the mouse; hence the conditional check of the mouse button.
A vector is created to define the screen coordinates for the ray (remember that a vector is several related numbers stored together). The camera’s pixelWidth and pixelHeight values give you the size of the screen, so dividing those values in half gives you the center of the screen. Although screen coordinates are 2D, with only horizontal and vertical components and no depth, a Vector3 was created because ScreenPointToRay() requires that data type (presumably because calculating the ray involves arithmetic on 3D vectors). ScreenPointToRay() was called with this set of coordinates, resulting in a Ray object (code object, that is, not a game object; the two can be confusing sometimes).
The ray is then passed to the Raycast() method, but it’s not the only object passed in. There’s also a RaycastHit data structure; RaycastHit is a bundle of information about the intersection of the ray, including where the intersection happened and what object was intersected. The C# syntax out ensures that the data structure manipulated within the command is the same object that exists outside the command, as opposed to the objects being separate copies in the different function scopes.
Finally the code calls the Physics.Raycast() method. This method checks for intersections with the given ray, fills in data about the intersection, and returns true if the ray hit anything. Because a Boolean value is returned, this method can be put in a conditional check, just as you usedInput.GetMouseButtonDown() earlier.
For now the code emits a console message to indicate when an intersection occurred. This console message displays the 3D coordinates of the point where the ray hit (the XYZ values we discussed in chapter 2). But it can be hard to visualize where exactly the ray hit; similarly, it can be hard to tell where the center of the screen is (that is, where the ray shoots through). Let’s add visual indicators to address both problems.
3.1.3. Adding visual indicators for aiming and hits
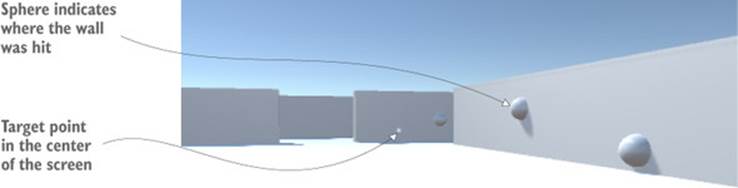
Our next step is to add two kinds of visual indicators: an aiming spot on the center of the screen, and a mark in the scene where the ray hit. For a first-person shooter the latter is usually bullet holes, but for now you’re going to put a blank sphere on the spot (and use a coroutine to remove the sphere after one second). Figure 3.3 shows what you’ll see.
Figure 3.3. Shooting repeatedly after adding visual indicators for aiming and hits
Definition
Coroutines are a Unity-specific way of handling tasks that execute incrementally over time, as opposed to how most functions make the program wait until they finish.
First let’s add indicators to mark where the ray hits. Listing 3.2 shows the script after making this addition. Run around the scene shooting; it’s pretty fun seeing the sphere indicators!
Listing 3.2. RayShooter script with sphere indicators added
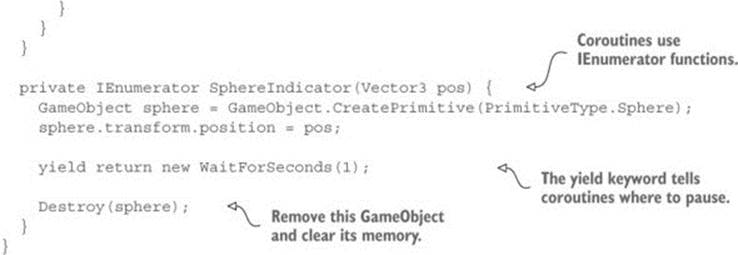
The new method is SphereIndicator(), plus a one-line modification in the existing Update() method. This method creates a sphere at a point in the scene and then removes that sphere a second later. Calling SphereIndicator() from the raycasting code ensures that there will be visual indicators showing exactly where the ray hit. This function is defined with IEnumerator, and that type is tied in with the concept of coroutines.
Technically, coroutines aren’t asynchronous (asynchronous operations don’t stop the rest of the code from running; think of downloading an image in the script of a website), but through clever use of enumerators, Unity makes coroutines behave similarly to asynchronous functions. The secret sauce in coroutines is the yield keyword; that keyword causes the coroutine to temporarily pause, handing back the program flow and picking up again from that point in the next frame. In this way, coroutines seemingly run in the background of a program, through a repeated cycle of running partway and then returning to the rest of the program.
As the name implies, StartCoroutine() sets a coroutine in motion. Once a coroutine is started, it keeps running until the function is finished; it just pauses along the way. Note the subtle but significant point that the method passed to StartCoroutine() has a set of parentheses following the name: this syntax means you’re calling that function, as opposed to passing its name. The called function runs until it hits a yield command, at which point the function pauses.
SphereIndicator() creates a sphere at a specific point, pauses for the yield statement, and then destroys the sphere after the coroutine resumes. The length of the pause is controlled by the value returned at yield. A few different types of return values work in coroutines, but the most straightforward is to return a specific length of time to wait. Returning WaitForSeconds(1) causes the coroutine to pause for one second. Create a sphere, pause for one second, and then destroy the sphere: that sequence sets up a temporary visual indicator.
Listing 3.2 gave you indicators to mark where the ray hits. But you also want an aiming spot in the center of the screen, so that’s done in the next listing.
Listing 3.3. Visual indicator for aiming
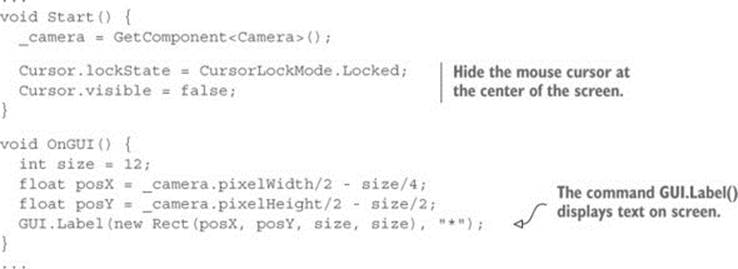
Another new method has been added to the RayShooter class, called OnGUI(). Unity comes with both a basic and more advanced user interface (UI) system; because the basic system has a lot of limitations, we’ll build a more flexible advanced UI in future chapters, but for now it’s much easier to display a point in the center of the screen using the basic UI. Much like Start() and Update(), every MonoBehaviour automatically responds to an OnGUI() method. That function runs every frame right after the 3D scene is rendered, resulting in everything drawn duringOnGUI() appearing on top of the 3D scene (imagine stickers applied to a painting of a landscape).
Definition
Render is the action of the computer drawing the pixels of the 3D scene. Although the scene is defined using XYZ coordinates, the actual display on your monitor is a 2D grid of colored pixels. Thus in order to display the 3D scene, the computer needs to calculate the color of all the pixels in the 2D grid; running that algorithm is referred to as rendering.
Inside OnGUI() the code defines 2D coordinates for the display (shifted slightly to account for the size of the label) and then calls GUI.Label(). That method displays a text label; because the string passed to the label is an asterisk (*), you end up with that character displayed in the center of the screen. Now it’s much easier to aim in our nascent FPS game!
Listing 3.3 also added some cursor settings to the Start() method. All that’s happening is that the values are being set for cursor visibility and locking. The script will work perfectly fine if you omit the cursor values, but these settings make first-person controls work a bit more smoothly. The mouse cursor will stay in the center of the screen, and to avoid cluttering the view it will turn invisible and will only reappear when you hit Esc.
Warning
Always remember that you can hit Esc to unlock the mouse cursor. While the mouse cursor is locked, it’s impossible to click the Play button and stop the game.
That wraps up the first-person shooting code...well, that wraps up the player’s end of the interaction, anyway, but we still need to take care of targets.
3.2. Scripting reactive targets
Being able to shoot is all well and good, but at the moment players don’t have anything to shoot at. We’re going to create a target object and give it a script that will respond to being hit. Or rather, we’ll slightly modify the shooting code to notify the target when hit, and then the script on the target will react when notified.
3.2.1. Determining what was hit
First you need to create a new object to shoot at. Create a new cube object (Game-Object > 3D Object > Cube) and then scale it up vertically by setting the Y scale to 2 and leaving X and Z at 1. Position the new object at 0, 1, 0 to put it on the floor in the middle of the room, and name the object Enemy. Create a new script called ReactiveTarget and attach that to the newly created box. Soon you’ll write code for this script, but leave it at the default for now; you’re only creating the script file because the next code listing requires it to exist in order to compile. Go back to RayShooter.cs and modify the raycasting code according to the following listing. Run the new code and shoot the new target; debug messages appear in the console instead of sphere indicators in the scene.
Listing 3.4. Detecting whether the target object was hit
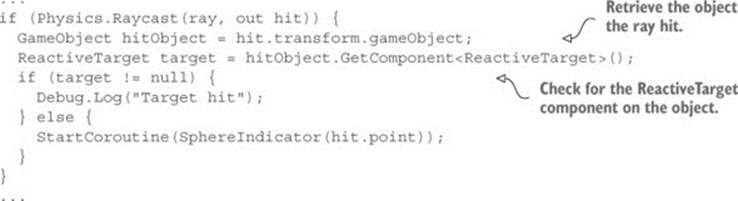
Notice that you retrieve the object from RaycastHit, just like the coordinates were retrieved for the sphere indicators. Technically, the hit information doesn’t return the game object hit; it indicates the Transform component hit. You can then access gameObject as a property oftransform.
Then, you use the method GetComponent() on the object to check whether it’s a reactive target (that is, if it has the ReactiveTarget script attached). As you saw previously, that method returns components of a specific type that are attached to the GameObject. If no component of that type is attached to the object, then Get-Component() won’t return anything. You check whether null was returned and run different code in each case.
If the hit object is a reactive target, the code emits a debug message instead of starting the coroutine for sphere indicators. Now let’s inform the target object about the hit so that it can react.
3.2.2. Alert the target that it was hit
All that’s needed in the code is a one-line change, as shown in the following listing.
Listing 3.5. Sending a message to the target object

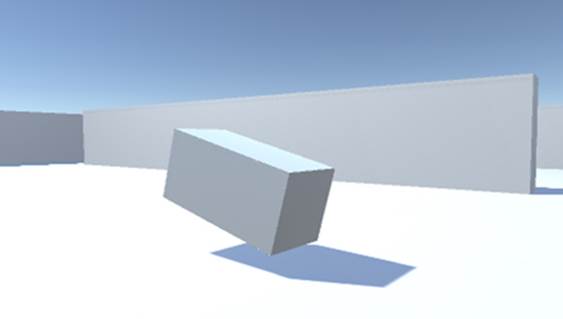
Now the shooting code calls a method of the target, so let’s write that target method. In the ReactiveTarget script, write in the code from the next listing. The target object will fall over and disappear when you shoot it; refer to figure 3.4.
Figure 3.4. The target object falling over when hit
Listing 3.6. ReactiveTarget script that dies when hit
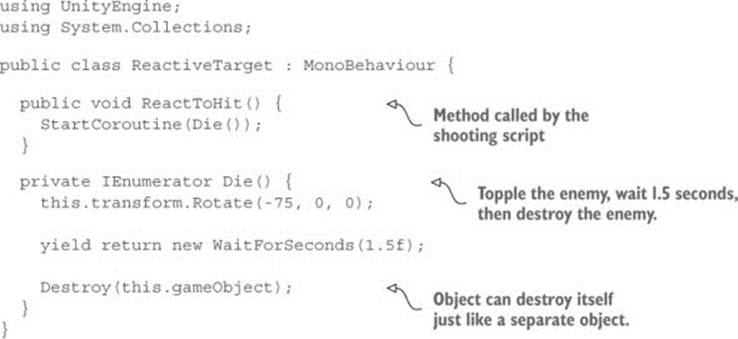
Most of this code should already be familiar to you from previous scripts, so we’ll only go over it briefly. First, you define the method ReactToHit(), because that’s the method name called in the shooting script. This method starts a coroutine that’s similar to the sphere indicator code from earlier; the main difference is that it operates on the object of this script rather than creating a separate object. Expressions like this.gameObject refer to the GameObject that this script is attached to (and the this keyword is optional, so code could refer to gameObject without anything in front of it).
The first line of the coroutine function makes the object tip over. As discussed in chapter 2, rotations can be defined as an angle around each of the three coordinate axes, X Y, and Z. Because we don’t want the object to rotate side to side at all, leave Y and Z as 0 and assign an angle to the X rotation.
Note
The transform is applied instantly, but you may prefer seeing the movement when objects topple over. Once you start looking beyond this book for more advanced topics, you might want to look up tweens, systems used to make objects move smoothly over time.
The second line of the method uses the yield keyword that’s so significant to coroutines, pausing the function there and returning the number of seconds to wait before resuming. Finally, the game object destroys itself in the last line of the function. Destroy(this.gameObject) is called after the wait time, just like the code called Destroy(sphere) before.
Warning
Be sure to call Destroy() on this.gameObject and not simply this! Don’t get confused between the two; this only refers to this script component, whereas this.gameObject refers to the object the script is attached to.
The target now reacts to being shot; great! But it doesn’t do anything else on its own, so let’s add more behavior to make this target a proper enemy character.
3.3. Basic wandering AI
A static target isn’t terribly interesting, so let’s write code that’ll make the enemy wander around. Code for wandering around is pretty much the simplest example of AI; artificial intelligence (AI) refers to computer-controlled entities. In this case the entity is an enemy in a game, but it could also be a robot in the real world, or a voice that plays chess, for example.
3.3.1. Diagramming how basic AI works
There are a number of different approaches to AI (seriously, artificial intelligence is a major area of research for computer scientists), but for our purposes we’ll stick with a simple approach. As you become more experienced and your games get more sophisticated, you’ll probably want to explore various approaches to AI.
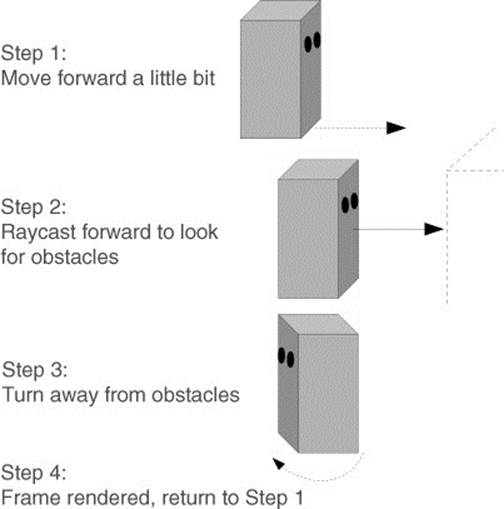
Figure 3.5 depicts the basic process. Every frame, the AI code will scan around its environment to determine whether it needs to react. If an obstacle appears in its way, the enemy turns to face a different direction. Regardless of whether the enemy needs to turn, it will always move forward steadily. Thus the enemy will ping-pong around the room, always moving forward and turning to avoid walls.
Figure 3.5. Basic AI: cyclical process of moving forward and avoiding obstacles
The actual code will look pretty familiar, because it moves enemies forward using the same commands as moving the player forward. The AI code will also use raycasting, similar to but in a different context from shooting.
3.3.2. “Seeing” obstacles with a raycast
As you saw in the introduction to this chapter, raycasting is a technique that’s useful for a number of tasks within 3D simulations. One easily grasped task was shooting, but another place raycasting can be useful is for scanning around the scene. Given that scanning around the scene is a step in AI code, that means raycasting is used in AI code.
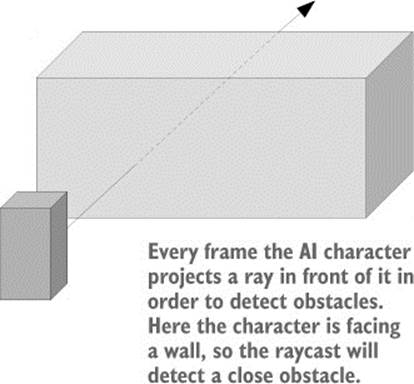
Earlier you created a ray that originated at the camera, because that’s where the player was looking from; this time you’ll create a ray that originates at the enemy. The first ray shot out through the center of the screen, but this time the ray will shoot forward in front of the character; figure 3.6illustrates this. Then just like the shooting code used RaycastHit information to determine whether anything was hit and where, the AI code will use RaycastHit information to determine whether anything is in front of the enemy and, if so, how far away.
Figure 3.6. Using raycasting to “see” obstacles
One difference between raycasting for shooting and raycasting for AI is the radius of the ray detected against. For shooting the ray was treated as infinitely thin, but for AI the ray will be treated as having a large cross-section; in terms of the code, this means using the method SphereCast()instead of Raycast(). The reason for this difference is that bullets are tiny, whereas to check for obstacles in front of the character we need to account for the width of the character.
Create a new script called WanderingAI, attach that to the target object (alongside the ReactiveTarget script), and write the code from the next listing. Play the scene now and you should see the enemy wandering around the room; you can still shoot the target and it reacts the same way as before.
Listing 3.7. Basic WanderingAI script
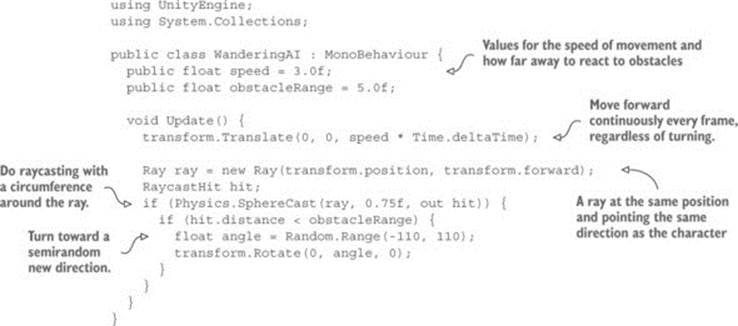
The listing added a couple of variables to represent the speed of movement and from how far away to react to obstacles. Then a Translate() method was added in the Update() method in order to move forward continuously (including the use of deltaTime for frame rate–independent movement). In Update() you’ll also see raycasting code that looks a lot like the shooting script from earlier; again, the same technique of raycasting is being used here to see instead of shoot. The ray is created using the enemy’s position and direction, instead of using the camera.
As explained earlier, the raycasting calculation was done using the method Physics.SphereCast(). This method takes a radius parameter to determine how far around the ray to detect intersections, but in every other respect it’s exactly the same as Physics.Raycast(). This similarity includes how the command fills in hit information, checks for intersections just like before, and uses the distance property to be sure to react only when the enemy gets near an obstacle (as opposed to a wall across the room).
When the enemy has a nearby obstacle right in front of it, the code rotates the character a semi-random amount toward a new direction. I say “semi-random” because the values are constrained to minimum and maximum values that make sense for this situation. Specifically, we use the method Random.Range() that Unity provides for obtaining a random value between constraints. In this case the constraints were just slightly beyond an exact left or right turn, allowing the character to turn sufficiently to avoid obstacles.
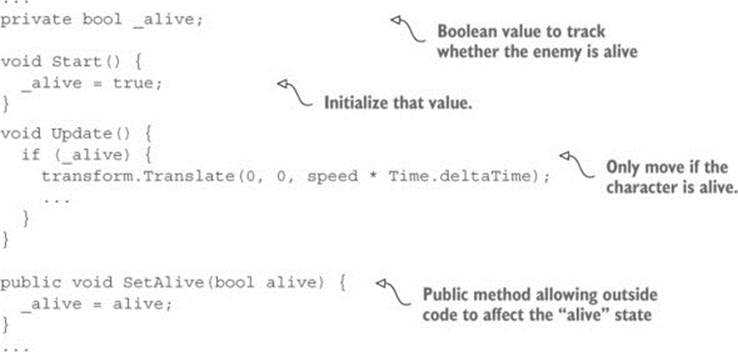
3.3.3. Tracking the character’s state
One oddity of the current behavior is that the enemy keeps moving forward after falling over from being hit. That’s because right now the Translate() method runs every frame no matter what. Let’s make small adjustments to the code in order to keep track of whether or not the character is alive—or to put it in another (more technical) way, we want to track the “alive” state of the character. Having the code keep track of and respond differently to the current state of the object is a common code pattern in many areas of programming, not just AI. More sophisticated implementations of this approach are referred to as state machines, or possibly even finite state machines.
Definition
Finite state machine (FSM) is a code structure in which the current state of the object is tracked, well-defined transitions exist between states, and the code behaves differently based on the state.
We’re not going to implement a full FSM, but it’s no coincidence that a common place to see the initials FSM is in discussions of AI. A full FSM would have many states for all the different behaviors of a sophisticated AI, but in this basic AI we just need to track whether or not the character is alive. The next listing adds a Boolean value, _alive, toward the top of the script, and the code needs occasional conditional checks of that value. With those checks in place, the movement code only runs while the enemy is alive.
Listing 3.8. WanderingAI script with “alive” state added
The ReactiveTarget script can now tell the WanderingAI script when the enemy is or isn’t alive (see the following listing).
Listing 3.9. ReactiveTarget tells WanderingAI when it dies

AI code structure
The AI code in this chapter is contained within a single class so that learning and understanding it is straightforward. This code structure is perfectly fine for simple AI needs, so don’t be afraid that you’ve done something “wrong” and that a more complex code structure is an absolute requirement. For more complex AI needs (such as a game with a wide variety of highly intelligent characters), a more robust code structure can help facilitate developing the AI.
As alluded to in chapter 1’s example for composition versus inheritance, sometimes you’ll want to split chunks of the AI into separate scripts. Doing so will enable you to mix and match components, generating unique behavior for each character. Think about the similarities and differences between your characters, and those differences will guide you as you design your code architecture. For example, if your game has some enemies that move by charging headlong at the player and some that slink around in the shadows, you may want to make Locomotion a separate component. Then you can create scripts for both LocomotionCharge and LocomotionSlink, and use different Locomotion components on different enemies.
The exact AI code structure you want depends on the design of your specific game; there’s no one “right” way to do it. Unity makes it easy to design flexible code architectures like this.
3.4. Spawning enemy prefabs
At the moment there’s just one enemy in the scene, and when it dies, the scene is empty. Let’s make the game spawn enemies so that whenever the enemy dies, a new one appears. This is easily done in Unity using a concept called prefabs.
3.4.1. What is a prefab?
Prefabs are a flexible approach to visually defining interactive objects. In a nutshell, a prefab is a fully fleshed-out game object (with components already attached and set up) that doesn’t exist in any specific scene but rather exists as an asset that can be copied into any scene. This copying can be done manually, to ensure that the enemy object (or other prefab) is the same in every scene. More important, though, prefabs can also be spawned from code; you can place copies of the object into the scene using commands in scripts and not only by doing it manually in the visual editor.
Definiton
An asset is any file that shows up in the Project view; these could be 2D images, 3D models, code files, scenes, and so on. I mentioned the term asset briefly in chapter 1, but I didn’t emphasize it until now.
The term for one of these copies of a prefab is an instance, analogous to how the word instance refers to a specific code object created from a class. Try to keep the terminology straight; prefab refers to the game object existing outside of any scene, whereas instance refers to a copy of the object that’s placed in a scene.
Definition
Also analogous to object-oriented terminology, instantiate is the action of creating an instance.
3.4.2. Creating the enemy prefab
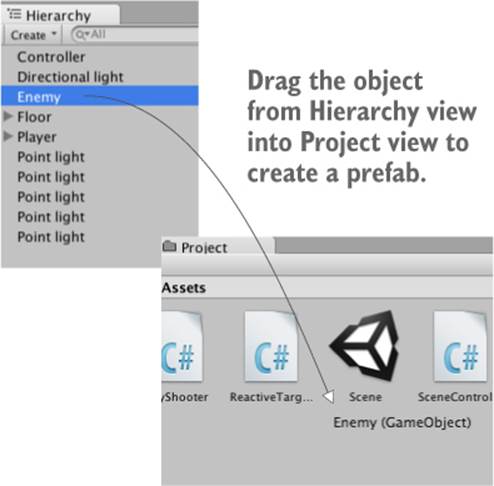
To create a prefab, first create an object in the scene that will become the prefab. Because our enemy object will become a prefab, we’ve already done this first step. Now all we do is drag the object down from the Hierarchy view and drop it in the Project view; this will automatically save the object as a prefab (see figure 3.7). Back in the Hierarchy view the original object’s name will turn blue to signify that it’s now linked to a prefab. If you wanted to edit the prefab further (such as by adding new components), you’d make those changes on the object in the scene and then select GameObject > Apply Changes To Prefab. But we don’t want the object in the scene anymore (we’re going to spawn the prefab, not use the instance already in the scene), so delete the enemy object now.
Figure 3.7. Drag objects from Hierarchy to Project in order to create prefabs.
Warning
The interface for working with prefabs is somewhat awkward, and the relationship between prefabs and their instances in scenes can be brittle. For example, you often have to drag a prefab into a scene to edit it, and then delete the object once you’re done editing. In the first chapter I mentioned this as a downside to Unity, and I hope the workflow with prefabs improves in future versions of Unity.
Now we have the actual prefab object to spawn in the scene, so let’s write code to create instances of the prefab.
3.4.3. Instantiating from an invisible SceneController
Although the prefab itself doesn’t exist in the scene, there has to be some object in the scene for the enemy spawning code to attach to. What we’ll do is create an empty game object; we can attach the script to that, but the object won’t be visible in the scene.
Tip
The use of empty GameObjects for attaching script components is a common pattern in Unity development. This trick is used for abstract tasks that don’t apply to any specific object in the scene. Unity scripts are intended to be attached to visible objects, but not every task makes sense that way.
Choose GameObject > Create Empty, rename the new object to Controller, and then set its position to 0, 0, 0 (technically the position doesn’t matter because the object isn’t visible, but putting it at the origin will make life simpler if you ever parent anything to it). Create a script called SceneController, as shown in the following listing.
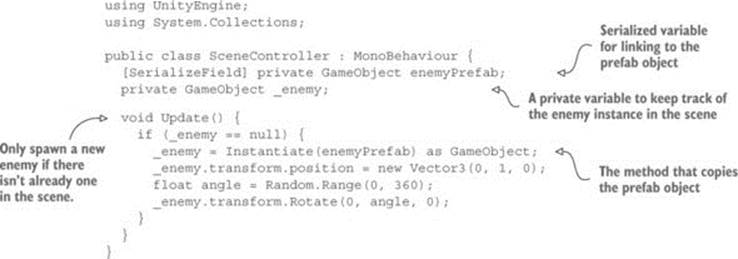
Listing 3.10. SceneController that spawns the enemy prefab
Attach this script to the controller object, and in the Inspector you’ll see a variable slot for the enemy prefab. This works similarly to public variables, but there’s an important difference (see the following warning).
Warning
I recommend private variables with SerializeField to reference objects in Unity’s editor because you want to expose that variable in the Inspector but don’t want the value to be changed by other scripts. As explained in chapter 2, public variables show up in the Inspector by default (in other words, they’re serialized by Unity), so most tutorials and sample code you’ll see use public variables for all serialized values. But these variables can also be modified by other scripts (these are public variables, after all); in many cases, you don’t want the value to be modified in code but only set in the Inspector.
Drag up the prefab asset from Project to the empty variable slot; when the mouse gets near, you should see the slot highlight to indicate that the object can be linked there (see figure 3.8). Once the enemy prefab is linked to the SceneController script, play the scene in order to see the code in action. An enemy will appear in the middle of the room just like before, but now if you shoot the enemy it will be replaced by a new enemy. Much better than just one enemy that’s gone forever!
Figure 3.8. Drag the enemy prefab from Project up to the Enemy Prefab slot in the Inspector.
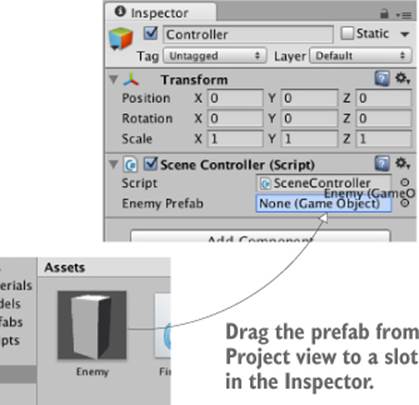
Tip
This approach of dragging objects onto the Inspector’s variable slots is a handy technique that comes up in a lot of different scripts. Here we linked a prefab to the script, but you can also link to objects in the scene, or even specific components (because the code needs to call public methods in that specific component). In future chapters we’ll use this technique again.
The core of this script is the Instantiate() method, so take note of that line. When we instantiate the prefab, that creates a copy in the scene. By default, Instantiate() returns the new object as a generic Object type, but Object is pretty useless directly and we need to handle it as aGameObject. In C#, use the as keyword for typecasting to convert from one type of code object into another type (written with the syntax original-object as new-type).
The instantiated object is stored in _enemy, a private variable of type GameObject (and again, keep straight the distinction between a prefab and an instance of the prefab; enemyPrefab stores the prefab whereas _enemy stores the instance). The if statement that checks the stored object ensures that Instantiate() is called only when _enemy is empty (or null, in coder-speak). The variable starts out empty, so the instantiating code runs once right from the beginning of the session. The object returned by Instantiate() is then stored in _enemy so that the instantiating code won’t run again.
Because the enemy destroys itself when shot, that empties the _enemy variable and causes Instantiate() to be run again. In this way, there’s always an enemy in the scene.
Destroying GameObjects and memory management
It’s somewhat unexpected that existing references become null when an object destroys itself. In a memory-managed programming language like C#, normally you aren’t able to directly destroy objects; you can only dereference them so that they can be destroyed automatically. This is still true within Unity, but the way GameObjects are handled behind the scenes makes it look like they were destroyed directly.
To display objects in the scene, Unity has to have a reference to all objects in its scene graph. Thus even if you removed all references to the GameObject in your code, there would still be this scene graph reference preventing the object from being destroyed automatically. Because of this, Unity provided the method Destroy() to tell the game engine “Remove this object from the scene graph.” As part of that behind-the-scenes functionality, Unity also overloaded the == operator to return true when checking for null. Technically that object still exists in memory, but it may as well not exist anymore, so Unity has it appearing to be null. You could confirm this by calling GetInstanceID() on the destroyed object.
Note, though, that the developers of Unity are considering changing this behavior to more standard memory management. If they do, then the spawning code will need to change as well, probably by swapping the (_enemy==null) check with a new parameter like(_enemy.isDestroyed). Refer to their blog/Facebook page:
https://www.facebook.com/unity3d/posts/10152271098591773
(If most of this discussion was Greek to you, then don’t worry about it; this was a tangential technical discussion for people interested in these obscure details.)
3.5. Shooting via instantiating objects
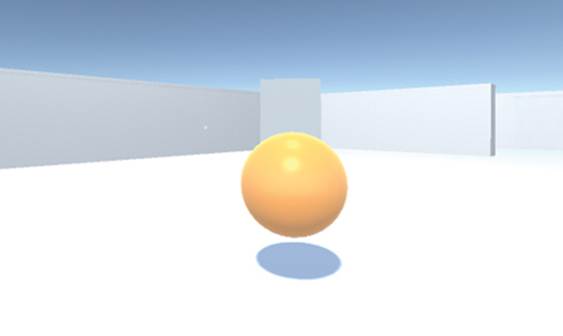
All right, let’s add another bit of functionality to the enemies. Much as we did with the player, first we made them move—now let’s make them shoot! As I mentioned back when introducing raycasting, that was just one of the approaches to implementing shooting. Another approach involves instantiating prefabs, so let’s take that approach to making the enemies shoot back. The goal of this section is to see figure 3.9 when playing.
Figure 3.9. Enemy shooting a “fireball” at the player
3.5.1. Creating the projectile prefab
Whereas the shooting before didn’t involve any actual projectile in the scene, this time shooting will involve a projectile in the scene. Shooting with raycasting was basically instantaneous, registering a hit the moment the mouse was clicked, but this time enemies are going to emit fireballs that fly through the air. Admittedly, they’ll be moving pretty fast, but it won’t be instantaneous, giving the player a chance to dodge out of the way. Instead of using raycasting to detect hits, we’ll use collision detection (the same collision system that keeps the moving player from passing through walls).
The code will spawn fireballs in the same way that enemies spawn: by instantiating a prefab. As explained in the previous section, the first step when creating a prefab is to create an object in the scene that will become the prefab, so let’s create a fireball. To start, choose GameObject > 3D Object > Sphere. Rename the new object Fireball. Now create a new script, also called Fireball, and attach that script to this object. Eventually we’ll write code in this script, but leave it at default for now while we work on a few other parts of the fireball object. So that it appears like a fireball and not just a gray sphere, we’re going to give the object a bright orange color. Surface properties such as color are controlled using materials.
Definition
A material is a packet of information that defines the surface properties of any 3D object that the material is attached to. These surface properties can include color, shininess, and even subtle roughness.
Choose Assets > Create > Material. Name the new material something like Flame. Select the material in the Project view in order to see the material’s properties in the Inspector. As figure 3.10 shows, click the color swatch labeled Albedo (that’s a technical term that refers to the main color of a surface). Clicking that will bring up a color picker in its own window; slide both the rainbow-colored bar on the right side and main picking area to set the color to orange.
Figure 3.10. Setting the color of a material
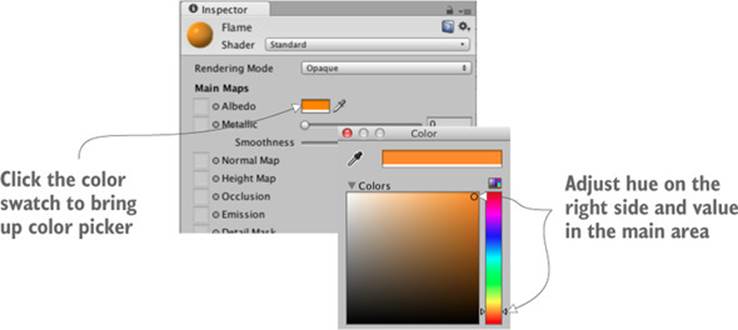
We’re also going to brighten up the material to make it look more like fire. Adjust the Emission value (one of the other attributes in the Inspector). It defaults to 0, so type in .3 to brighten up the material.
Now you can turn the fireball object into a prefab by dragging the object down from Hierarchy into Project, just as you did with the enemy prefab. Great, we have a new prefab to use as a projectile! Next up is writing code to shoot using that projectile.
3.5.2. Shooting the projectile and colliding with a target
Let’s make some adjustments to the enemy in order to emit fireballs. Because code to recognize the player will require a new script (just like ReactiveTarget was required by the code to recognize the target), first create a new script and name that script PlayerCharacter. Attach this script to the player object in the scene.
Now open up WanderingAI and add to the code from the following listing.
Listing 3.11. WanderingAI additions for emitting fireballs
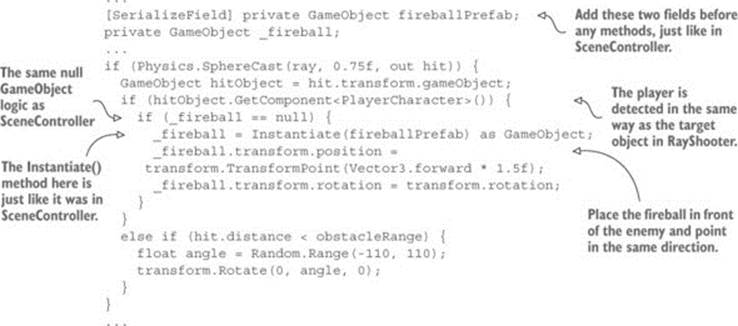
You’ll notice that all the annotations in this listing refer to similar (or the same) bits in previous scripts. Previous code listings already showed everything needed for emitting fireballs; now we’re mashing together and remixing bits of code to fit in the new context. Just like in SceneController, you need to add two GameObject fields toward the top of the script: a serialized variable for linking the prefab to, and a private variable for keeping track of the instance copied by the code. After doing a raycast, the code checks for the PlayerCharacter on the object hit; this works just like when the shooting code checked for ReactiveTarget on the object hit. The code that instantiates a fireball when there isn’t already one in the scene works like the code that instantiates an enemy. The positioning and rotation are different, though; this time, you place the instance just in front of the enemy and point it in the same direction.
Once all the new code is in place, a new Fireball Prefab slot will appear when you view the component in the Inspector, like the Enemy Prefab slot in the Scene-Controller component. Click the enemy prefab in the Project view and the Inspector will show that object’s components, as if you’d selected an object in the scene. Although the earlier warning about interface awkwardness often applies when editing prefabs, the interface makes it easy to adjust components on the object, and that’s all we’re doing. As shown in figure 3.11, drag up the fireball prefab from Project onto the Fireball Prefab slot in the Inspector (again, just as you did with SceneController).
Figure 3.11. Drag the fireball prefab from Project up to the Fireball Prefab slot in the Inspector.
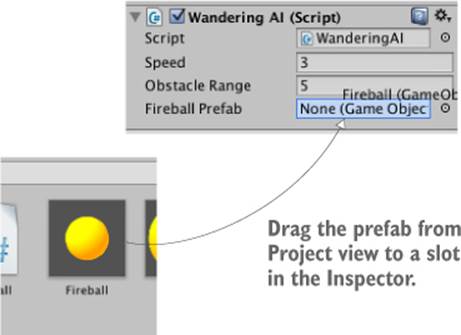
Now the enemy will fire at the player when the player is directly ahead of it...well, try to fire; the bright orange sphere appears in front of the enemy, but it just sits there because we haven’t written its script yet. Let’s do that now. The next listing shows the code for the Fireball script.
Listing 3.12. Fireball script that reacts to collisions
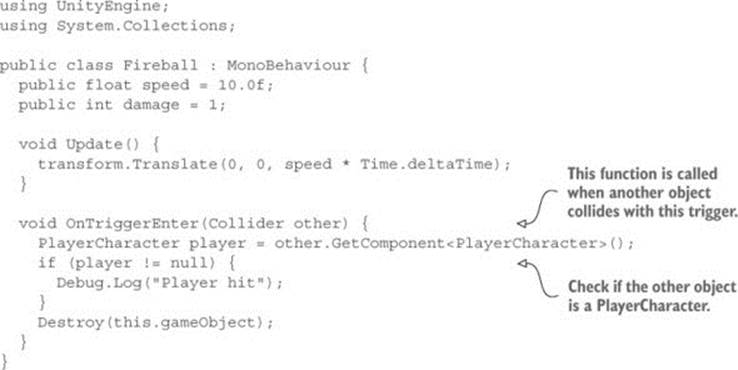
The crucial new bit to this code is the OnTriggerEnter() method. That method is called automatically when the object has a collision, such as colliding with the walls or with the player. At the moment this code won’t work entirely; if you run it, the fireball will fly forward thanks to theTranslate() line, but the trigger won’t run, queuing up a new fireball by destroying the current one. There need to be a couple of other adjustments made to components on the fireball object. The first change is making the collider a trigger. To adjust that, click the Is Trigger check box in the Sphere Collider component.
Tip
A Collider component set as a trigger will still react to touching/overlapping other objects, but it will no longer stop other objects from physically passing through.
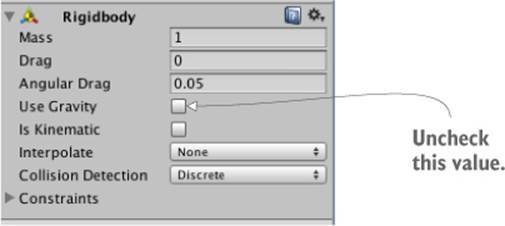
The fireball also needs a Rigidbody, a component used by the physics system in Unity. By giving the fireball a Rigidbody component, you ensure that the physics system is able to register collision triggers for that object. In the Inspector, click Add Component and choose Physics > Rigidbody. In the component that’s added, deselect Use Gravity (see figure 3.12) so that the fireball won’t be pulled down due to gravity.
Figure 3.12. Turn off gravity in the Rigidbody component.
Play now, and fireballs are destroyed when they hit something. Because the fireball-emitting code runs whenever there isn’t already a fireball in the scene, the enemy will shoot more fireballs at the player. Now there’s just one more bit remaining for shooting at the player: making the player react to being hit.
3.5.3. Damaging the player
Earlier you created a PlayerCharacter script but left it empty. Now you’ll write code to have it react to being hit, as the following listing shows.
Listing 3.13. Player that can take damage
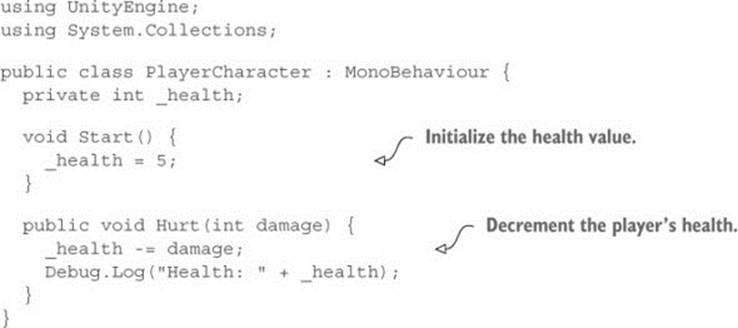
The listing defines a field for the player’s health and reduces the health on command. In later chapters we’ll go over text displays to show information on the screen, but for now we can just display information about the player’s health using debug messages.
Now we need to go back to the Fireball script to call the player’s Hurt() method. Replace the debug line in the Fireball script with player.Hurt(damage) to tell the player they’ve been hit. And that’s the final bit of code we needed!
Whew, that was a pretty intense chapter, with lots of code being introduced. Between the previous chapter and this one, you now have most of the functionality in place for a first-person shooter.
3.6. Summary
In this chapter you’ve learned that
· A ray is an imaginary line projected into the scene.
· For both shooting and sensing obstacles, do a raycast with that line.
· Making a character wander around involves basic AI.
· New objects are spawned by instantiating prefabs.
· Coroutines are used to spread out functions over time.