Unity in Action: Multiplatform game development in C# with Unity 5 (2015)
Part 3. Strong finish
You know a fair amount about Unity by now. You know how to program the player’s controls, how to create enemies that wander around, and how to add interactive devices to the game. You even know how to build a game using both 2D and 3D graphics! That’s almost everything you need to know in order to develop a complete game, but not quite. You still need to learn about a few final tasks like putting audio in the game, and you need to understand how to put together all the disparate pieces we’ve been working with.
This is the home stretch, with just four chapters left!
Chapter 9. Connecting your game to the internet
This chapter covers
· Generating visuals for the sky using a skybox
· Downloading data using WWW objects in coroutines
· Parsing common data formats like XML and JSON
· Displaying images downloaded from the internet
· Sending data to a web server
In this chapter you’ll learn how to send and receive data over a network. The projects built in previous chapters represented a variety of game genres, but all have been isolated to the player’s machine. As you know, connecting to the internet and exchanging data is increasingly important for games in all genres. Many games exist almost entirely over the internet, with constant connection to a community of other players; games of this sort are referred to as MMOs (massively multiplayer online) and are most widely known through MMORPGs (MMO role-playing games). Even when a game doesn’t require such constant connectivity, modern video games usually incorporate features like reporting scores to a global list of high scores. Unity provides support for such networking, so we’ll be going over those features.
Unity supports multiple approaches to network communication, since different approaches are better suited to different needs. However, this chapter will mostly cover the most general sort of internet communication: issuing HTTP requests.
What are HTTP requests?
I assume most readers know what HTTP requests are, but here’s a quick primer just in case: HTTP is a communication protocol for sending requests to and receiving responses from web servers. For example, when you click a link on a web page, your browser (the client) sends out a request to a specific address, and then that server responds with the new page. HTTP requests can be set to a variety of methods, in particular either GET or POST to retrieve or to send data.
HTTP requests are reliable, and that’s why the majority of the internet is built around them. The requests themselves, as well as the infrastructure for handling such requests, are designed to be robust and handle a wide range of failures in the network.
In an online game built around HTTP requests, the game developed in Unity is essentially a thick client that communicates with the server in an Ajax style. As a good comparison, imagine how a modern single-page web application works (as opposed to old-school web development based on web pages generated server-side). The familiarity of this approach can be misleading for experienced web developers. Video games often have much more stringent performance requirements than web applications, and these differences can affect design decisions.
Warning
Time scales can be vastly different between web apps and videogames. Half a second can seem like a short wait for updating a website, but pausing even just a fraction of that time can be excruciating in the middle of a high-intensity action game. The concept of “fast” is definitely relative to the situation.
Online games usually connect to a server specifically intended for that game; for learning purposes, however, we’ll connect to some freely available internet data sources, including both weather data and images we can download. The last section of this chapter does require you to set up a custom web server; that section is optional because of that requirement, although I’ll explain an easy way to do it with open-source software.
The plan for this chapter is to go over multiple uses of HTTP requests so that you can learn how they work within Unity:
1. Set up an outdoor scene (in particular, build a sky that can react to the weather data).
2. Write code to request weather data from the internet.
3. Parse the response and then modify the scene based on the data.
4. Download and display an image from the internet.
5. Post data to your own server (in this case, a log of what the weather was).
The actual game that you’ll use for this chapter’s project matters little. Everything in this chapter will add new scripts to an existing project and won’t modify any of the existing code. For the sample code, I used the movement demo from chapter 2, mostly so that we can see the sky in first-person view when it gets modified. The project for this chapter isn’t directly tied into the gameplay, but obviously for most games you create you would want the networking tied to the gameplay (for example, spawning enemies based on responses from the server).
On to the first step!
9.1. Creating an outdoor scene
Because we’re going to be downloading weather data, we’ll first set up an outdoor area where the weather will be visible. The trickiest part of that will be the sky, but first let’s take a moment to apply outdoors-looking textures on the level geometry.
Just as in chapter 4, I obtained a couple images from www.cgtextures.com to apply to the walls and floor of the level. Remember to change the size of the downloaded images to a power of 2, such as 256x256. Then import the images into the Unity project, create materials, and assign the images to the materials (that is, drag an image into the texture slot of the material). Drag the materials onto the walls or floor in the scene, and increase tiling in the material (try numbers like 8 or 9 in one or both directions) so that the image won’t be stretched in an ugly way.
Once the ground and walls are taken care of, it’s time to address the sky.
9.1.1. Generating sky visuals using a skybox
Start by importing the skybox images as you did in chapter 4: go to www.93i.de to download skybox images. This time get the images for the DarkStormy set in addition to TropicalSunnyDay (the sky will be more complex in this project). Import these textures into the Project view, and (as explained in chapter 4) set their Wrap Mode to Clamp.
Now create a new material to use for this skybox. At the top of the settings for this material, click the Shader menu in order to see the drop-down list with all the available shaders. Move down to the Skybox section and choose 6-Sided in that submenu. With this shader active, the material now has six texture slots (instead of only the small Albedo texture slot that the standard shader had).
Drag the SunnyDay skybox images to the texture slots of the new material. The names of the images correspond to the texture slot to assign them to (top, front, and so on) Once all six textures are linked up, you can use this new material as the skybox for the scene.
Assign this skybox material in the Lighting window (Window > Lighting). Assign the material for your skybox to the Skybox slot at the top of the window (either drag the material over or click the little circle button next to the slot). Hit Play and you should see something like figure 9.1.
Figure 9.1. Scene with background pictures of the sky
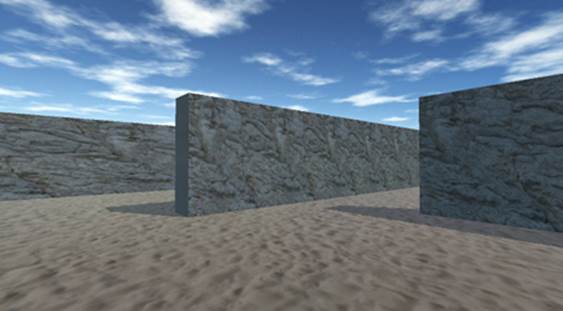
Great, now you have an outdoors scene! A skybox is an elegant way to create the illusion of a vast atmosphere surrounding the player. But the skybox shader built into Unity does have one significant limitation: the images can never change, resulting in a sky that appears completely static. We’ll address that limitation by creating a new custom shader.
9.1.2. Setting up an atmosphere that’s controlled by code
The images in the TropicalSunnyDay set look great for a sunny day, but what if we want to transition between sunny and overcast weather? This will require a second set of sky images (some pictures of a cloudy sky) so we need a new shader for the skybox.
As explained in chapter 4, a shader is a short program with instructions for how to render the image. That implies that you can program new shaders, and that is in fact the case. We’re going to create a new shader that takes two sets of skybox images and transitions between them. Fortunately a shader for this purpose already exists in the Unify Community wiki’s collection of scripts: http://wiki.unity3d.com/index.php?title=SkyboxBlended
In Unity create a new shader script: go to the Create menu just like when you create a new C# script, but select Shader instead. Name the asset SkyboxBlended and then double-click the shader to open the script. Copy the code from that wiki page and paste it into the shader script. The top line says Shader "Skybox/Blended", which tells Unity to add the new shader into the shader list under the Skybox category (the same category as the regular skybox).
Note
We’re not going to go over all the details of the shader program right now. Shader programming is a pretty advanced computer graphics topic and thus outside the scope of this book. You may want to look that up after you’ve finished this book; if so, start here:http://docs.unity3d.com/Manual/ShadersOverview.html
Now you can set your material to the Skybox Blended shader. There are 12 texture slots, in two sets of six images. Assign TropicalSunnyDay images to the first six textures just as before; for the remaining textures, use the DarkStormy set of skybox images.
This new shader also added a Blend slider near the top of the settings. The Blend value controls how much of each set of skybox images you want to display; when you adjust the slider from one side to the other, the skybox transitions from sunny to overcast. You can test by adjusting the slider and playing the game, but manually adjusting the sky isn’t terribly helpful while the game is running, so let’s write some code to transition the sky.
Create an empty object in the scene and name it Controller. Create a new script and name it WeatherController. Drag that script onto the empty object, and then write the following listing in that script.
Listing 9.1. WeatherController script that transitions from sunny to overcast
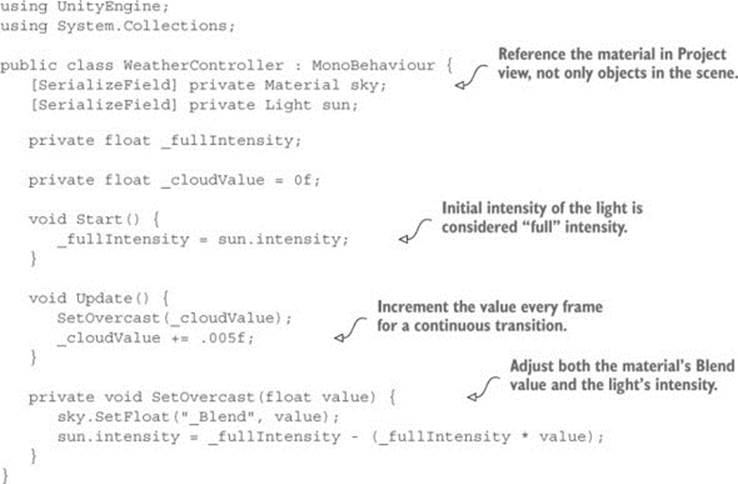
I’ll point out a number of things in this code, but the key new method is SetFloat(), which appears almost at the bottom. Everything up to that point should be fairly familiar, but that one is new. The method sets a number value on the material. Which value specifically is the first parameter to that method. In this case, the material has a property called Blend (note that material properties in code start with an underscore).
As for the rest of the code, a few variables are defined, including both the material and a light. For the material you want to reference the blended skybox material we just created, but what’s with the light? That’s so that the scene will also darken when transitioning from sunny to overcast; as the Blend value increases, we’ll turn down the light. The directional light in the scene acts as the main light and provides illumination everywhere; drag that light into the Inspector.
Note
The advanced lighting system (called Enlighten) in Unity takes the skybox into account in order to achieve realistic results. However, this lighting approach won’t work right with a changing skybox, so you may want to turn it off. In the Lighting window you can turn off Continuous Baking (this term was defined in chapter 7) at the bottom; now it will only update when you click the button. Set the Blend of the skybox to the middle for an average look, and then click Build at the bottom of the Lighting window to bake lightmaps (a folder called Scene is added to your project; don’t touch that folder).
When the script starts, it initializes the intensity of the light. The script will store the starting value and consider that to be “full” intensity. This full intensity will be used later in the script when dimming the light.
Then the code increments a value every frame and uses that value to adjust the sky. Specifically, it calls SetOvercast() every frame, and that function encapsulates the multiple adjustments made to the scene. I’ve already explained what SetFloat() is doing so we won’t go over that again, and the last line adjusts the intensity of the light.
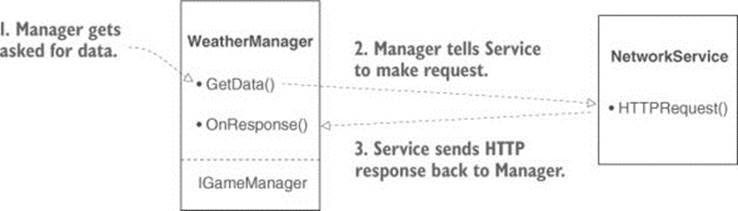
Now play the scene to watch the code running. You’ll see what figure 9.2 depicts: over a couple of seconds you’ll see the scene transition from a sunny day to dark and overcast.
Figure 9.2. Before and after: scene transition from sunny to overcast
Warning
One unexpected quirk about Unity is that the “Blend” change on the material is permanent. Unity resets objects in the scene when the game stops running, but assets that were linked directly from the Project view (such as the skybox material) are changed permanently. This only happens within Unity’s editor (changes don’t carry over between plays after the game is deployed outside the editor) and thus can result in frustrating bugs if you forget about it.
It’s pretty cool watching the scene transition from sunny to overcast. But this was all just a setup for the actual goal: having the weather in the game sync up to real-world weather conditions. For that, we need to start downloading weather data from the internet.
9.2. Downloading weather data from an internet service
Now that we have the outdoors scene set up, we can write code that will download weather data and modify the scene based on that data. This task will provide a good example of retrieving data using HTTP requests. A web service for free weather data is OpenWeatherMap; you’ll use their API (application programming interface, a way to access their service using code commands instead of a graphical interface) located at http://openweathermap.org/api
Definition
A web service or web API is a server connected to the internet that returns data upon request. There’s no technical difference between a web API and a website; a website is a web service that happens to return the data for a web page, and browsers interpret HTML data as a visible document.
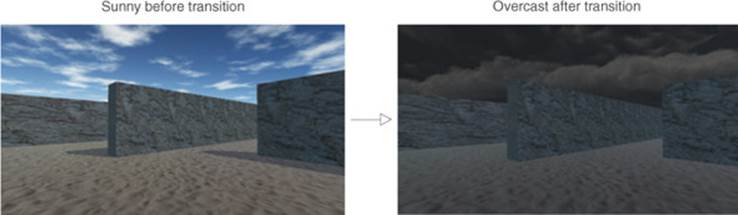
The code you’ll write will be structured around the same Managers architecture from chapter 8. This time you’ll have a WeatherManager class that gets initialized from the central manager-of-managers. WeatherManager will be in charge of retrieving and storing weather data, but to do so it’ll need the ability to communicate with the internet.
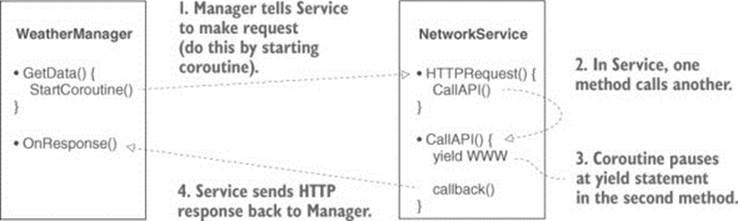
To accomplish that, you’ll create a utility class called NetworkService. NetworkService will handle the details of connecting to the internet and making HTTP requests. WeatherManager can then tell NetworkService to make those requests and pass back the response. Figure 9.3shows how this code structure will operate.
Figure 9.3. Diagram showing how the networking code will be structured
For this to work, obviously WeatherManager will need to have access to the NetworkService object. You’re going to address this by creating the object in Managers and then injecting the NetworkService object into the various managers when they’re initialized. In this way not only will WeatherManager have a reference to the NetworkService, but so will any other managers you create later.
To start bringing over the Managers code architecture from chapter 8, first copy over ManagerStatus and IGameManager (remember that IGameManager is the interface that all managers must implement, whereas ManagerStatus is an enum that IGameManager uses). You’ll need to modify IGameManager slightly to accommodate the new NetworkService class, so create a new script called NetworkService (leave it empty for now; you’ll fill it in later) and then adjust IGameManager as shown in listing 9.2.
Listing 9.2. Adjusting IGameManager to include NetworkService

Next let’s create WeatherManager to implement this slightly adjusted interface. Create a new C# script (see the following listing).
Listing 9.3. Initial script for WeatherManager
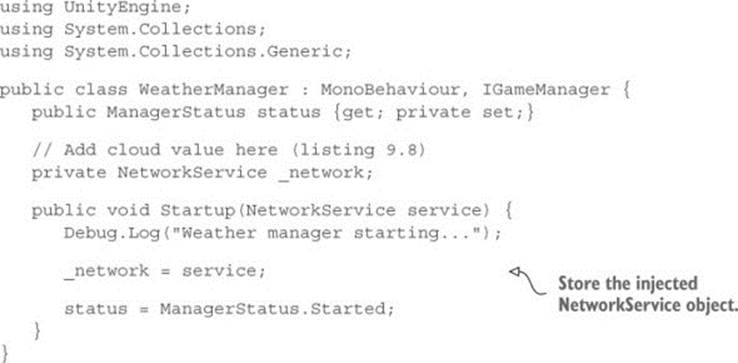
This initial pass at WeatherManager doesn’t really do anything. For now it’s just the minimum amount that IGameManager requires that the class implements: declare the status property from the interface, as well as implement the Startup() function. You’ll fill in this empty framework over the next few sections. Finally, copy over Managers from chapter 8 and adjust it to start up WeatherManager (see the next listing).
Listing 9.4. Managers.cs adjusted to initialize WeatherManager
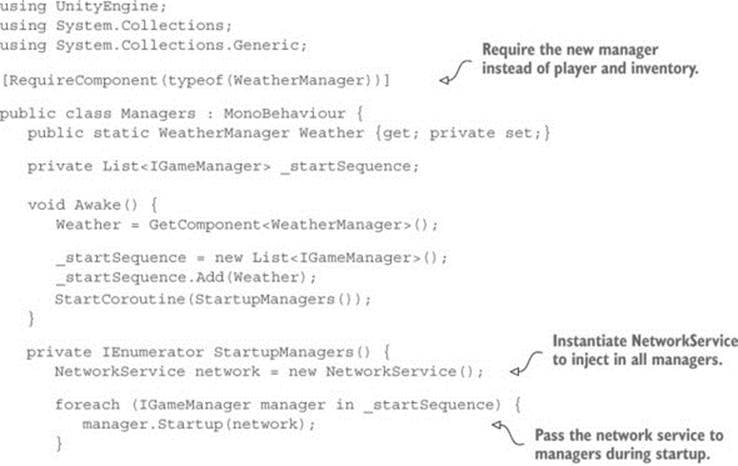
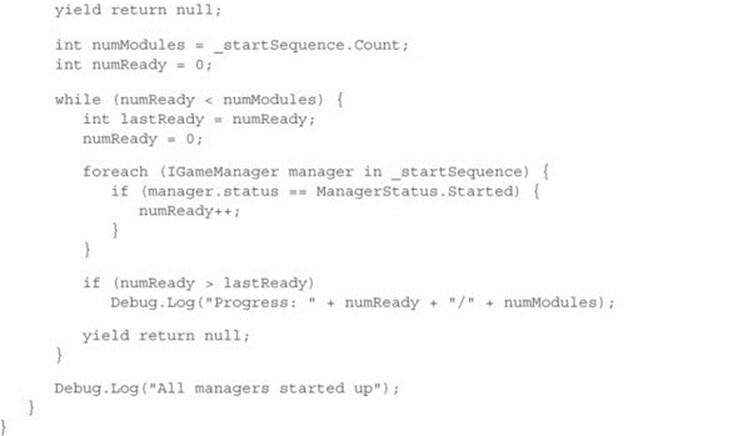
And that’s everything needed codewise for the Managers code architecture. As you have in previous chapters, create the game managers object in the scene and then attach both Managers and WeatherManager to the empty object. Even though the manager isn’t doing anything yet, you can see startup messages in the console when it’s set up correctly.
Whew, there were quite a few “boilerplate” things to get out of the way! Now we can get on with writing the networking code.
9.2.1. Requesting WWW data using coroutines
NetworkService is currently an empty script, so you can write code in it to make HTTP requests. The primary class you need to know about is WWW. Unity provides the WWW class to communicate with the internet. Instantiating a WWW object using a URL will send a request to that URL.
Coroutines can work with the WWW class to wait for the request to complete. Coroutines were first introduced back in chapter 3, where we used them to pause some code for a set period of time. Recall the explanation given there: coroutines are special functions that seemingly run in the background of a program, in a repeated cycle of running partway and then returning to the rest of the program. When used along with the StartCoroutine() method, the yield keyword causes the coroutine to temporarily pause, handing back the program flow and picking up again from that point next frame.
In chapter 3 the coroutines yielded at WaitForSeconds(), an object that caused the function to pause for a specific number of seconds. Yielding a coroutine with WWW will pause the function until that network request completes. The program flow here is similar to making asynchronous Ajax calls in a web application: first you send a request, then you continue with the rest of the program, and after some time you receive a response.
That was the theory; now let’s write the code
All right, let’s implement this stuff in our code. First open the NetworkService script and replace the default template with the contents of the following listing.
Listing 9.5. Making HTTP requests in NetworkService
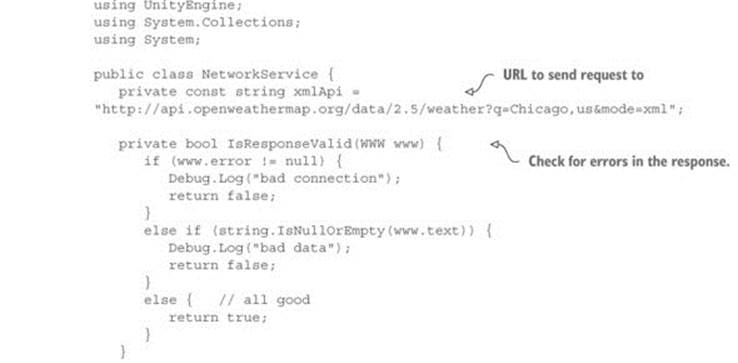
Remember the code design explained earlier: WeatherManager will tell Network-Service to go fetch data. Thus all this code doesn’t actually run yet; you’re setting up code that will be called by WeatherManager a bit later. To explore this code listing, let’s start at the bottom and work our way up.
Writing coroutine methods that cascade through each other
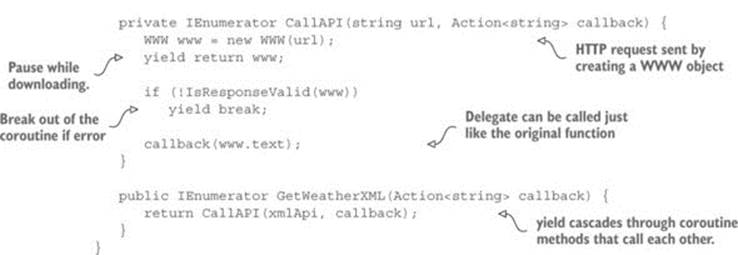
GetWeatherXML() is the coroutine method that outside code can use to tell NetworkService to make an HTTP request. Notice that this function has IEnumerator for its return type; methods used in coroutines must have IEnumerator declared as the return type.
It might look odd at first that GetWeatherXML() doesn’t have a yield statement. Coroutines are paused by the yield statement, which implies that every coroutine must yield somewhere. It turns out that the yielding can cascade through multiple methods. If the initial coroutine method itself calls another method, and that other method yields part of the way through, then the coroutine will pause inside that second method and resume there. Thus the yield statement in CallAPI() pauses the coroutine that was started in GetWeatherXML(); figure 9.4 shows this code flow.
Figure 9.4. Diagram showing how the network coroutine works
The next potential head-scratcher is the callback parameter of type Action.
Understanding how the callback works
When the coroutine is started, the method is called with a parameter called callback, and callback has the type Action. But what is an Action?
Definition
The type Action is a delegate (C# has a few approaches to delegates, but this one is the simplest). Delegates are references to some other method/function. They allow you to store the function (or rather a pointer to the function) in a variable and to pass that function as a parameter to another function.
If you’re unfamiliar with the concept of delegates, realize that they enable you to pass around functions just as you do numbers and strings. Without delegates, you can’t pass around functions to call later—you can only directly call the function then. With delegates you can tell code about other methods to call later. This is useful for many purposes, especially for implementing callback functions.
Definition
A callback is a function used to communicate back to the calling object. Object A could tell Object B about one of the methods in A. B could later call A’s method to communicate back to A.
For example, in this case the callback is used to communicate the response data back after waiting for the HTTP request to complete. In CallAPI() the code first makes an HTTP request, then yields until that request completes, and finally uses callback() to send back the response.
Note the <> syntax used with the Action keyword; the type written in the angle brackets declares the parameters required to fit this Action. In other words, the function this Action points to must take parameters matching the declared type. In this case the parameter is a single string, so the callback method must have a signature like this:
MethodName(string value)
The concept of a callback may make more sense after you’ve seen it in action, which you will in listing 9.6; this initial explanation is so that you’ll recognize what’s going on when you see that additional code.
The rest of listing 9.5 is pretty straightforward. IsResponseValid() checks for errors in the HTTP response. There are two kinds of errors: the request could’ve failed due to a bad internet connection, or the data returned could be malformed in some way. A const value is declared with the URL to make the request to. (Incidentally, you can change this URL to get weather for different locations.)
Making use of the Networking code
That wraps up the code in NetworkService. Now let’s use NetworkService in WeatherManager; the next listing shows the additions to that script.
Listing 9.6. Adjusting WeatherManager to use NetworkService
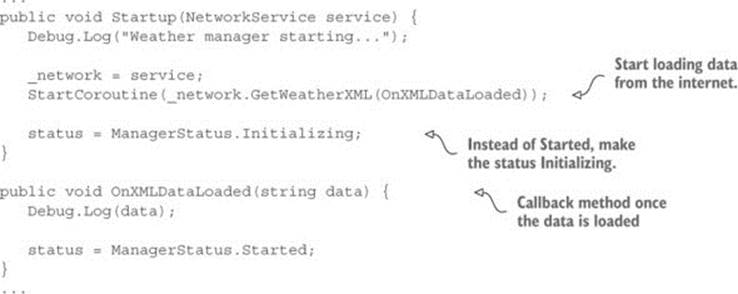
Three primary changes are made to the code in this manager: starting a coroutine to download data from the internet, setting a different startup status, and defining a callback method to receive the response.
Starting the coroutine is simple. Most of the complexity behind coroutines was already handled in NetworkService, so calling StartCoroutine() is all you need to do here. Then you set a different startup status, because the manager isn’t actually finished initializing; it needs to receive data from the internet before startup is complete.
Warning
Always start networking methods using StartCoroutine(); don’t just call the function normally. This can be easy to forget because creating WWW objects outside of a coroutine doesn’t generate any sort of compiler error.
When you call the StartCoroutine() method, you need to invoke the method. That is, actually type the parentheses—()—and don’t just provide the name of the function. In this case, the coroutine method needs a callback function as its one parameter, so let’s define that function. We’ll use OnXMLDataLoaded() for the callback; notice that this method has a string parameter, which fits the Action<string> declaration from NetworkService. The callback function doesn’t do a lot right now; the debug line simply prints the received data to the console to verify that the data was received correctly. Then the last line of the function changes the startup status of the manager to say that it’s completely started up.
Hit Play to run the code. Assuming you have a solid internet connection, you should see a bunch of data appear in the console. This data is simply a long string, but the string is formatted in a specific way that we can make use of.
9.2.2. Parsing XML
Data that exists as a long string usually has individual bits of information embedded within the string. You extract those bits of information by parsing the string.
Definition
Parsing means analyzing a chunk of data and dividing it up into separate pieces of information.
In order to parse the string, it needs to be formatted in a way that allows you (or rather, the parser code) to identify separate pieces. There are a couple of standard formats commonly used to transfer data over the internet; the most common standard format is XML.
Definition
XML stands for Extensible Markup Language. It’s a set of rules for encoding documents in a structured way, similar to HTML web pages.
Fortunately, Unity (or rather Mono, the code framework built into Unity) provides functionality for parsing XML. The weather data we requested is formatted in XML, so we’re going to add code to WeatherManager to parse the response and extract the cloudiness. Put the URL into a web browser in order to see the code; there’s a lot there, but we’re only interested in the node that contains something like <clouds value="40" name="scattered clouds"/>.
In addition to adding code to parse XML, we’re going to make use of the same messenger system we did in chapter 6. That’s because once the weather data is downloaded and parsed, we still need to inform the scene about that. Create a script called Messenger and paste in the code from this page on the Unify wiki: http://wiki.unity3d.com/index.php/CSharpMessenger_Extended
Then you need to create a script called GameEvent (see the next listing). As explained in chapter 6, this messenger system is great for providing a decoupled way of communicating events to the rest of the program.
Listing 9.7. GameEvent code
public static class GameEvent {
public const string WEATHER_UPDATED = "WEATHER_UPDATED";
}
Once the messenger system is in place, adjust WeatherManager as shown in the following listing.
Listing 9.8. Parsing XML in WeatherManager
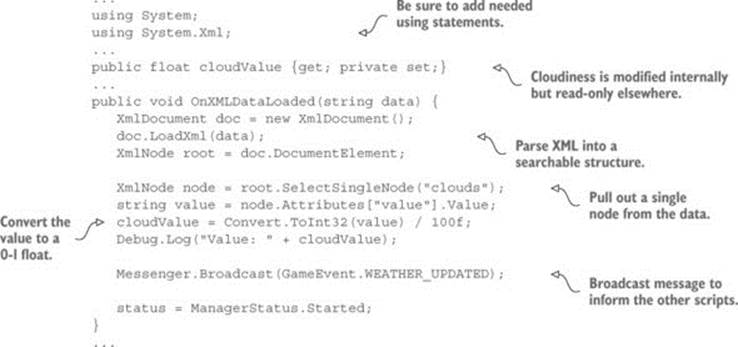
You can see that the most important changes were made inside OnXMLDataLoaded(). Previously this method simply logged the data to the console to verify that data was coming through correctly. This listing adds a lot of code to parse the XML.
First create a new empty XML document; this is an empty container that you can fill with a parsed XML structure. The next line parses the data string into a structure contained by the XML document. Then we start at the root of the XML tree so that everything can search up the tree in subsequent code.
At this point you can search for nodes within the XML structure in order to pull out individual bits of information. In this case, <clouds> is the only node we’re interested in. First find that node in the XML document, and then extract the value attribute from that node. This data defines the cloud value as a 0-100 integer, but we’re going to need it as a 0-1 float in order to adjust the scene later. Converting that is a simple bit of math added to the code.
Finally, after extracting out the cloudiness value from the full data, broadcast a message that the weather data has been updated. Currently nothing is listening for that message, but the broadcaster doesn’t need to know anything about listeners (indeed, that’s the entire point of a decoupled messenger system). Later we’ll add a listener to the scene.
Great—we’ve written code to parse XML data! But before we move on to applying this value to the visible scene, I want to go over another option for data transfer.
9.2.3. Parsing JSON
Before continuing to the next step in the project, let’s explore an alternative format for transferring data. XML is one common format for data transferred over the internet, but another common format is called JSON.
Definition
JSON stands for JavaScript Object Notation. Similar in purpose to XML, JSON was designed to be a lightweight alternative. Although the syntax for JSON was originally derived from JavaScript, the format is not language-specific and is readily used with a variety of programming languages.
Unlike XML, Mono doesn’t come with a parser for this format. There are a number of good JSON parsers available that you could download, such as MiniJSON (https://gist.github.com/darktable/1411710). Create a script called MiniJSON and paste in that code. Now you can use this library to parse JSON data. We’ve been getting XML from the OpenWeatherMap API, but as it happens they can also send the same data formatted as JSON. To do that, modify NetworkService according to the next listing.
Listing 9.9. Making NetworkService request JSON instead of XML

This is pretty much the same as the code to download XML data, except that the URL is slightly different. The data returned from this request has the same values, but it’s formatted differently. This time we’re looking for a chunk like "clouds":{"all":40}.
There wasn’t a ton of additional code required this time. That’s because we set up the code for requests into nicely parceled separate functions, so every subsequent HTTP request will be easy to add. Nice! Now let’s modify WeatherManager to request JSON data instead of XML (see the following listing).
Listing 9.10. Modifying WeatherManager to request JSON instead
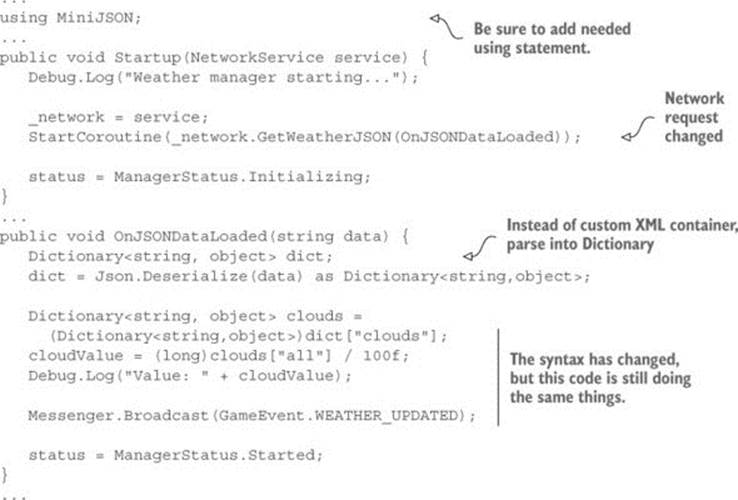
As you can see, the code for working with JSON looks similar to the code for XML. The only real difference is that this JSON parser works with a standard Dictionary instead of a custom document container like XML did. There’s a command to deserialize, and that may be an unfamiliar word.
Definition
Deserialize means pretty much the same thing as parse. This is the reverse of serialize, which means to encode a batch of data into a form that can be transferred and stored, such as a JSON string.
Aside from the different syntax, all the steps are exactly the same. Extract the value from the data chunk (for some reason the value is called all this time, but that’s just a quirk of the API) and do some simple math to convert the value to a 0-1 float.
With that done, it’s time to apply the value to the visible scene.
9.2.4. Affecting the scene based on Weather Data
Regardless of exactly how the data is formatted, once the cloudiness value is extracted from the response data, we can use that value in the SetOvercast() method of WeatherController. Whether XML or JSON, the data string ultimately gets parsed into a series of words and numbers. The SetOvercast() method takes a number as a parameter. In section 9.1.2 we used a number incremented every frame, but we could just as easily use the number returned by the weather API.
The next listing shows the full WeatherController script again after modifications.
Listing 9.11. WeatherController that reacts to downloaded weather data
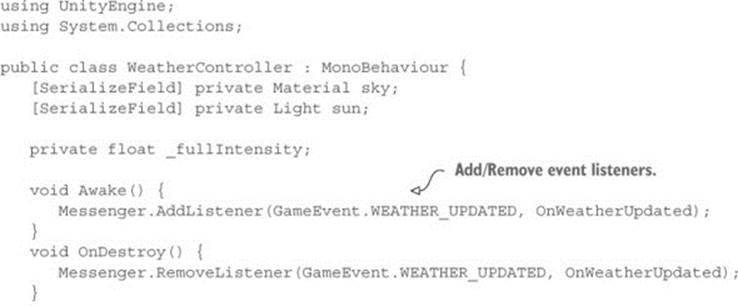
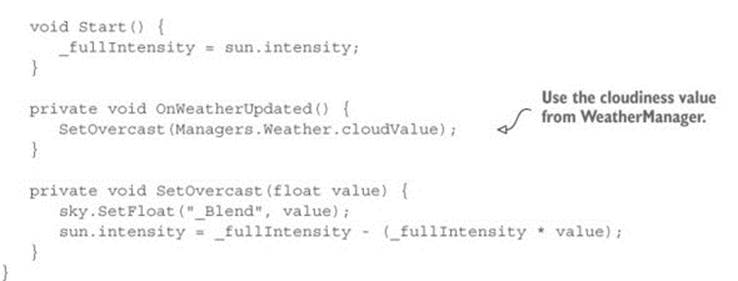
Notice that the changes aren’t only additions; several bits of test code got removed. Specifically, we removed the local cloudiness value that was incremented every frame; we don’t need that anymore, because we’ll use the value from WeatherManager.
A listener gets added and removed in Awake()/OnDestroy() (these are MonoBehaviour’s functions called when the object awakes or is removed). This listener is part of the broadcast messaging system, and it calls OnWeatherUpdated() when that message is received.OnWeatherUpdated() retrieves the cloudiness value from WeatherManager and calls SetOvercast() using that value. In this way, the appearance of the scene is controlled by downloaded weather data.
Run the scene now and you’ll see the sky update according to the cloudiness in the weather data. You may see it take time to request the weather; in a real game, you’d probably want to hide the scene behind a loading screen until the sky updates.
Game networking beyond HTTP
HTTP requests are robust and reliable, but the latency between making a request and receiving a response can be a little slow for many games. HTTP requests are therefore a good way of doing relatively slow-paced messages to a server (such as moves in a turn-based game, or submission of high scores for any game), but something like a multiplayer FPS would need a different approach to networking.
These different approaches involve various communication technologies, as well as techniques to compensate for lag. For example, Unity uses the RakNet networking library through a system called remote procedure calls (RPCs).
The cutting edge for networked action games is a complex topic that goes beyond the scope of this book. You can look up more information on your own, starting here: http://docs.unity3d.com/Manual/NetworkReferenceGuide.html.
Now that you know how to get numerical and string data from the internet, let’s do the same thing with an image.
9.3. Adding a networked billboard
Although the responses from a web API are almost always text strings formatted in XML or JSON, many other sorts of data are transferred over the internet. Besides text data, the most common kind of data requested is images. Unity’s WWW object can be used to download images, too.
You’re going to learn about this task by creating a billboard that displays an image downloaded from the internet. You need to code two steps: downloading an image to display, and applying that image to the billboard object. Then, as a third step, you’ll improve the code so that the image will be stored to use on multiple billboards.
9.3.1. Loading images from the internet
First let’s write the code to download an image. You’re going to download some public domain landscape photography (see figure 9.5) to test with. The downloaded image won’t be visible on the billboard yet; I’ll show you a script to display the image in the next section, but before that, let’s get code in place that will retrieve the image.
Figure 9.5. Image of Moraine Lake in Banff National Park, Canada

The code architecture for downloading an image looks much the same as the architecture for downloading data. A new manager module (called ImagesManager) will be in charge of downloaded images to be displayed. Once again, the details of connecting to the internet and sending HTTP requests will be handled in NetworkService, and ImagesManager will call upon NetworkService to download images for it.
The first addition to code is in NetworkService. The following listing adds image downloading to that script.
Listing 9.12. Downloading an image in NetworkService
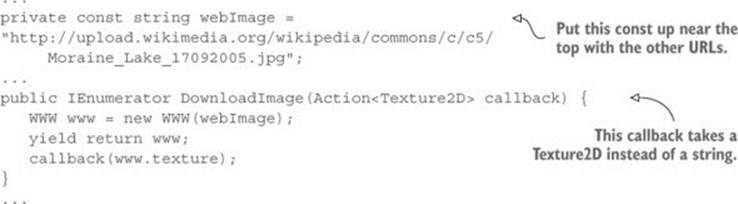
The code that downloads an image looks almost identical to the code for downloading data. The primary difference is the type of callback method; note that the callback takes a Texture2D this time instead of a string. That’s because you’re sending back the relevant response: you downloaded a string of data before—now you’re downloading an image. The next listing contains code for the new ImagesManager. Create a new script and enter that code.
Listing 9.13. Creating ImagesManager to retrieve and store images
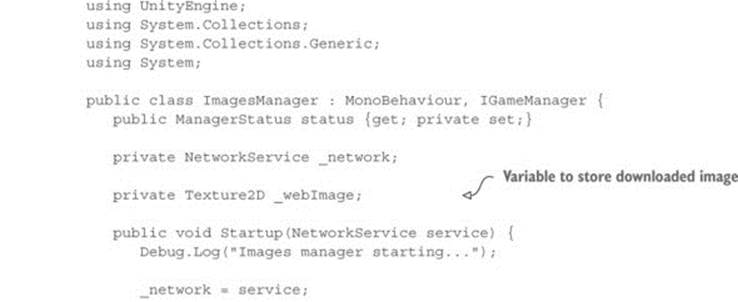
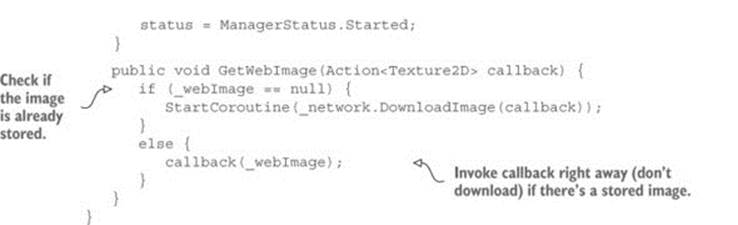
The most interesting part of this code is GetWebImage(); everything else in this script consists of standard properties and methods that implement the manager interface. When GetWebImage() is called, it’ll return (via a callback function) the web image. First it’ll check if _webImagealready has a stored image: if not, it’ll invoke the network call to download the image. If _webImage already has a stored image, GetWebImage() will send back the stored image (rather than downloading the image anew).
Note
Currently the downloaded image is never being stored, which means _webImage will always be empty. Code that specifies what to do when _webImage is not empty is already in place, so you’ll adjust the code to store that image in the following sections. This adjustment is in a separate section because it involves some tricky code wizardry.
Of course, just like all manager modules, ImagesManager needs to be added to Managers; the following listing details the additions to Managers.cs.
Listing 9.14. Adding the new manager to Managers.cs
...
[RequireComponent(typeof(ImagesManager))]
...
public static ImagesManager Images {get; private set;}
...
void Awake() {
Weather = GetComponent<WeatherManager>();
Images = GetComponent<ImagesManager>();
_startSequence = new List<IGameManager>();
_startSequence.Add(Weather);
_startSequence.Add(Images);
StartCoroutine(StartupManagers());
}
...
Unlike how we set up WeatherManager, GetWebImage() in ImagesManager isn’t called automatically on startup. Instead, the code waits until invoked; that’ll happen in the next section.
9.3.2. Displaying images on the billboard
The ImagesManager you just wrote doesn’t do anything until it’s called upon, so now we’ll create a billboard object that will call methods in ImagesManager. First create a new cube and then place it in the middle of the scene, at something like Position 0 1.5 -5 and Scale 5 3 .5 (see figure 9.6).
Figure 9.6. The billboard object, before and after displaying the downloaded image

You’re going to create a device that operates just like the color-changing monitor in chapter 8. Copy the DeviceOperator script and put it on the player. As you may recall, that script will operate nearby devices when the Fire3 button is pressed (which is defined in the project’s input settings as the left Command key). Also create a script for the billboard device called WebLoadingBillboard, put that script on the billboard object, and enter the code from the next listing.
Listing 9.15. WebLoadingBillboard device script
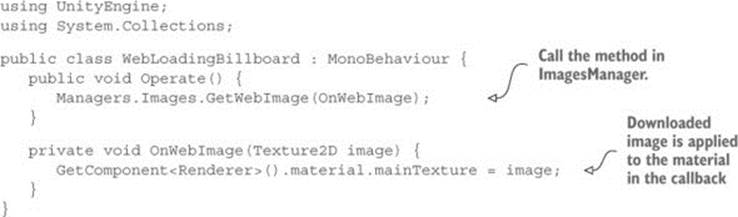
This code does two primary things: it calls ImagesManager.GetWebImage() when the device is operated, and it applies the image from the callback function. Textures are applied to materials so you can change the texture in the material that’s on the billboard. Figure 9.6 shows what the billboard will look like after you play the game.
AssetBundles: How to download other kinds of assets
Downloading an image is fairly straightforward using the WWW object, but what about other kinds of assets, like mesh objects and prefabs? WWW has properties for text and images, but other assets are a bit more complicated.
Unity can download any kind of asset through a mechanism called AssetBundles. Long story short, you first package up some assets into a bundle, and then Unity can extract the assets after downloading the bundle. The details of both creating and downloading AssetBundles are beyond the scope of this book; if you want to learn more, start by reading this section of Unity’s manual:
http://docs.unity3d.com/Manual/AssetBundlesIntro.html
Great, the downloaded image is displayed on the billboard! But this code could be optimized further to work with multiple billboards. Let’s tackle that optimization in the next section.
9.3.3. Caching the downloaded image for reuse
As noted in section 9.3.1, ImagesManager doesn’t yet store the downloaded image. That means the image will be downloaded over and over for multiple billboards. This is inefficient, because it’ll be the same image each time. To address this, we’re going to adjust ImagesManager to cache images that have been downloaded.
Definition
Cache means to keep stored locally. The most common (but not only!) context involves images downloaded from the internet.
The key is to provide a callback function in ImagesManager that first saves the image, and then calls the callback from WebLoadingBillboard. This is tricky to do (as opposed to the current code that uses the callback from WebLoadingBillboard) because the code doesn’t know ahead of time what the callback from WebLoadingBillboard will be. Put another way, there’s no way to write a method in Images-Manager that calls a specific method in WebLoadingBillboard because the code doesn’t know what that specific method will be. The way around this conundrum is to use lambda functions.
Definition
A lambda function (also called an anonymous function) is a function that doesn’t have a name. Such functions are usually created on the fly inside other functions.
Lambda functions are a tricky code feature supported in a number of programming languages, including C#. By using a lambda function for the callback in Images-Manager, the code can create the callback function on the fly using the method passed in from WebLoadingBillboard. Thus you don’t need to know the method to call ahead of time, because this lambda function doesn’t exist ahead of time! The following listing shows how to do this voodoo in ImagesManager.
Listing 9.16. Lambda function for callback in ImagesManager
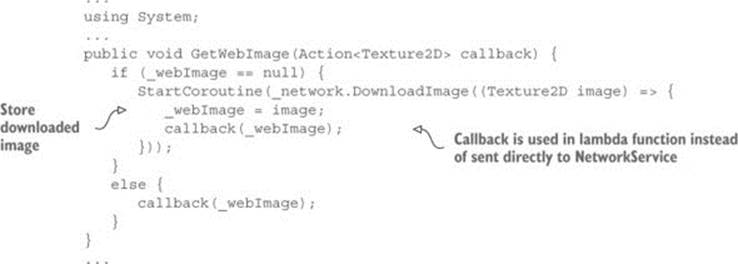
The main change was in the function passed to NetworkService.DownloadImage(). Previously the code was passing through the same callback method from WebLoadingBanner. After the change, though, the callback sent to NetworkService was a separate lambda function declared on the spot that called the method from WebLoading-Banner. Take note of the syntax to declare a lambda method: () => {}.
Making the callback a separate function made it possible to do more than call the method in WebLoadingBanner; specifically, the lambda function also stores a local copy of the downloaded image. Thus GetWebImage() only has to download the image the first time; all subsequent calls will use the locally stored image.
Because this optimization applies to subsequent calls, the effect will be noticeable only on multiple billboards. Let’s duplicate the billboard object so that there will be a second billboard in the scene. Select the billboard object, hit Duplicate (look under the Edit menu or right-click), and move the duplicate over (for example, change the X position to 18).
Now play the game and watch what happens. When you operate the first billboard, there will be a noticeable pause while the image downloads from the internet. But when you then walk over to the second billboard, the image will appear immediately because it has already been downloaded.
This is an important optimization for downloading images (there’s a reason web browsers cache images by default). There’s one more major networking task remaining to go over: sending data back to the server.
9.4. Posting data to a web server
We’ve gone over multiple examples of downloading data, but we still need to see an example of sending data. This last section does require you to have a server to send requests to, so this section is optional. But it’s easy to download open-source software to set up a server to test on.
I recommend XAMPP for a test server. Go to www.apachefriends.org to download XAMPP. Once that’s installed and the server is running, you can access XAMPP’s htdocs folder with the address http://localhost/just like you would a server on the internet. Once you have XAMPP up and running, create a folder called ch9 in htdocs; that’s where you’ll put the server-side script.
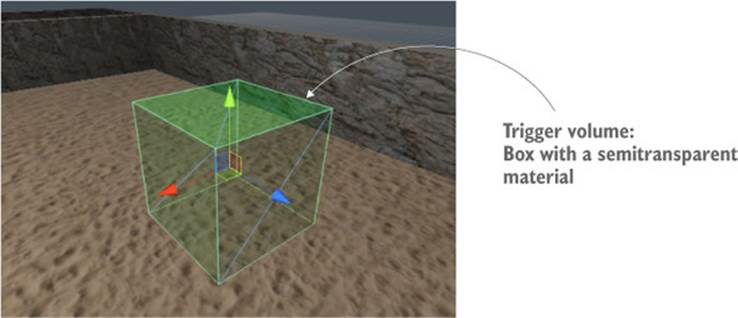
Whether you use XAMPP or your own existing web server, the actual task will be to post weather data to the server when the player reaches a checkpoint in the scene. This checkpoint will be a trigger volume, just like the door trigger in chapter 8. You need to create a new cube object, position the object off to one side of the scene, set the collider to Trigger, and apply a semitransparent material like you did in the previous chapter (remember, set the material’s Rendering Mode). Figure 9.7 shows the checkpoint object with a green semitransparent material applied.
Figure 9.7. The checkpoint object that triggers data sending
Now that the trigger object is in the scene, let’s write the code that it invokes.
9.4.1. Tracking current weather: sending post requests
The code that’s invoked by the checkpoint object will cascade through several scripts. As with the code for downloading data, the code for sending data will involve WeatherManager telling NetworkService to make the request, while NetworkService handles the details of HTTP communication. The next listing shows the adjustments you need to make to NetworkService.
Listing 9.17. Adjusting NetworkService to post data
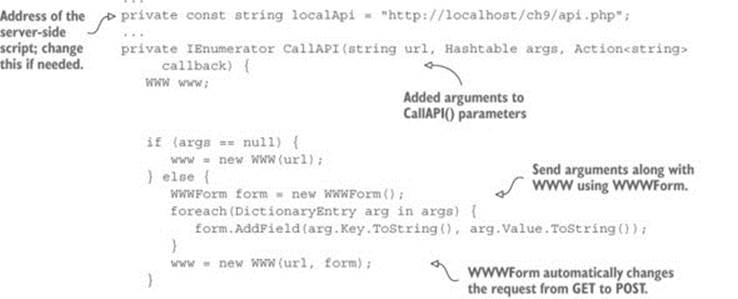
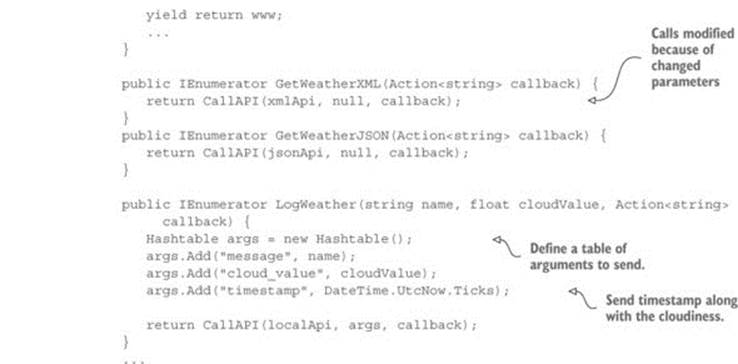
First, notice that CallAPI() has a new parameter. This is a table of arguments to send along with the HTTP request. Within CallAPI() a WWWForm object may be created according to that table of arguments. Normally WWW sends a GET request, but WWWForm will change it to a POST request to send data. All the other changes in the code react to that central change (for example, modifying GetWhatever() code because of the CallAPI() parameters).
The next listing shows what you need to add in WeatherManager.
Listing 9.18. Adding code to WeatherManager that sends data
...
public void LogWeather(string name) {
StartCoroutine(_network.LogWeather(name, cloudValue, OnLogged));
}
private void OnLogged(string response) {
Debug.Log(response);
}
...
Finally, make use of that code by adding a checkpoint script to the trigger volume in the scene. Create a script called CheckpointTrigger, put that script on the trigger volume, and enter the contents of the next listing.
Listing 9.19. CheckpointTrigger script for the trigger volume

An Identifier slot will appear in the Inspector; name it something like checkpoint1. Run the code and data will be sent when you enter the checkpoint. The response will indicate an error, though, because there’s no script on the server to receive the request. That’s the last step in this section.
9.4.2. Server-side code in PHP
The server needs to have a script to receive data sent from the game. Coding server scripts is beyond the scope of this book, so we won’t go into detail here. We’ll just whip up a PHP script because that’s the easiest approach. Create a text file in htdocs (or wherever your web server is located) and name the file api.php (see listing 9.20).
Listing 9.20. Server script written in PHP that receives our data
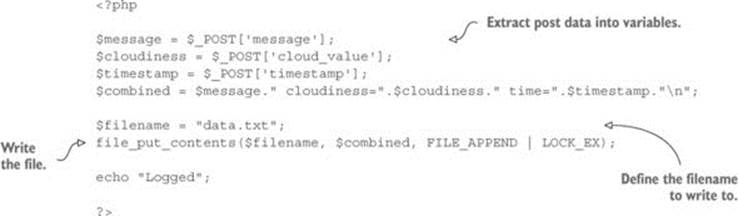
Note that this script writes received data into data.txt, so you also need to put a text file with that name on the server. Once api.php is in place, you’ll see weather logs appear in data.txt when triggering checkpoints in the game. Great!
9.5. Summary
In this chapter you’ve learned that
· Skybox is designed for sky visuals that render behind everything else.
· Unity provides WWW to download data.
· Common data formats like XML and JSON can be parsed easily.
· Materials can display images downloaded from the internet.
· WWW can also post data to a web server.