MCSD Certification Toolkit (Exam 70-483): Programming in C# (2013)
Chapter 2
Basic Program Structure
What You Will Learn in This Chapter
· Understanding C# simple statements
· Exploring C# complex statements
· Using boolean expressions
· Creating if-then-else statements
· Using switch statements
· Constructing for statements
· Using foreach statements
· Understanding while statements
· Using do-while statements
WROX.COM CODE DOWNLOADS FOR THIS CHAPTER
You can find the code downloads for this chapter at www.wrox.com/remtitle.cgi?isbn=1118612094 on the Download Code tab. The code is in the chapter 02 download and individually named according to the names throughout the chapter.
Computer programming has certain foundational aspects that any programming language must incorporate. C# is no exception. Programming has basic concepts such as repetition structures that help you repeat certain tasks and decision structures that allow your code to execute a different branch of statements based on the outcome of comparisons. This chapter introduces you to the basics of programming in C# and covers the topics necessary for you to understand core functionality in the C# programming language so that you can successfully take the exam. These key topics enable you to learn about statements in C#, both simple and complex, and how they are used in a C# application to perform the actions necessary to complete the tasks your code is intended to perform. You will learn what statements are and how to construct them your code.
The chapter then focuses on giving you an understanding of some core programming structures that you can use to form the logic of your program code. As you develop applications, you can focus on writing algorithms. These algorithms are formed through logical program flow based on decisions and repetition.
Table 2-1 introduces you to the exam objectives covered in this chapter.
Table 2-1: 70-483 Exam Objectives Covered in This Chapter
|
Objective |
Content Covered |
|
Implement Program Flow |
Iterate across collections. This includes using looping structures such as for, while, and do-while loops for the iterations. |
Writing Your First Program
Most programming books that focus on teaching computer programming start with a simple application called Hello World. This book assumes you know the basic programming concepts and instead will focus on getting your knowledge on C# to the right level so that you can be successful on the exam. That’s not to say this book provides you with explicit and focused information that guarantees a pass on the exam, but rather that it focuses on the knowledge while providing you with the opportunity to understand the concepts. Only through understanding can you be effective in applying the concepts learned. Microsoft will test you on the fundamentals of programming and the C# Language so you need to have a fresh understanding of the concepts.
You might be an experienced C# programmer looking to test on the latest certification exam, or you might be coming from another programming language and learning C#. In either case, a review of the fundamental language concepts is never a waste of time.
NOTE C# was designed and developed at Microsoft to be an object-oriented programming language for the .NET platform. The concepts that you learn in this chapter are not new and are part of most other programming languages. This chapter will help you understand the concepts from the C# perspective.
ADVICE FROM THE EXPERTS: Don’t Skip This Chapter
If you have been programming in C# for some time, you may consider skipping this chapter. The exams are written by programmers that have years of programming experience and, as such, they typically write questions that will test your understanding of these core concepts, not just knowing what they are. Ensure you understand these concepts as opposed to just memorizing syntax. Remember, IntelliSense isn’t available to you on the exam.
Exploring the Structure of the Program
Although the sections on C# statement types do not have a direct relationship to a section or objective on the exam, the concepts covered here are important in helping you understand the basic structure of a program in the C# language. As you start to learn the C# language and prepare for the exam, this foundational information can be helpful in understanding why the other aspects of the language, such as decision and repetition structures, work the way they do.
The remaining sections provide you with an understanding of the basic C# program structure that you can use in your applications. You can gain an understanding of controlling your program flow using repetition and decision structures. These are the core building blocks of an application written in C#, whether the application is a console-based app or one written with new Windows 8-style user interface (UI).
C# code is written using a series of statements. The language divides statements into two basic types: simple and complex. The following two sections provide you with an understanding of these statement types, enabling you to read C# code better and understand how to use the statement types in your own programs.
Understanding Simple Statements
In any programming language, statements are the code constructs that cause the application to perform an action. C# uses the concept of simple statements and complex statements. In C#, simple statements are those that end with a semicolon (;) and are typically used for program actions such as the following:
· Declaring variables (declaration statements)
· Assigning values to variables (assignment statements)
· Calling method in your code
· Branching statements that change program flow
NOTE Even a simple statement such as assigning a value to a variable can equate into many actual instructions to the CPU in the computer after the code is compiled.
As a result of the rule that all statements end in a semicolon, you might come to the conclusion that simple statements will exist only on a single line. Although most do take up only a single line in your development editor because of the short length, you may find it necessary to continue a long statement on multiple lines for readability or screen resolution limits. In this case, the statement is still considered a simple statement, but it merely stretches across multiple lines. Only one semicolon is used at the end of the statement.
An example of simple statements follows. Don’t worry about the data types such as int, float, and so on in these examples. Chapter 3, “Working with the Type System,” introduces these and focuses on types.
//variable declaration statements
int counter;
float distance;
string firstName;
// assignment statements
counter = 0;
distance = 4.5;
firstName = "Bill";
// jump statements
break;
return;
// the empty statement consists of a single semicolon on a line by itself
// the statement does nothing and is merely a placeholder where a code
// statement is required but you don't want an action to take place.
// A good example of this is in a looping statement used in a delayed
// processing scenario
void SomeFunction()
{
while (DoSomething())
;
}
Note that the last simple statement in the preceding code shows an empty statement. This is interesting in that it’s not something you will use on a regular basis, but it demonstrates that C# recognizes a statement that contains no keywords but because the semicolon is present, C# recognizes it as a statement.
The comment section (a code line that starts with the // characters and is a way of helping to document the code) in the preceding code indicates that it might be used in a delayed processing scenario, but realistically, with the performance of computers today, delayed processing in this manner isn’t that effective. Instead, you can use timer functions built into programming languages. This sample is just intended to show that you can use an empty statement to essentially take the place of one that might perform an action.
Understanding Complex Statements
C# also has complex statements. Complex statements are those that can or will enclose one or more simple statements into a code block surrounded by curly braces: {}. Typical complex statements are those that are covered in the section on loops and decision structures, such as foreach(), if(),switch, do(), and so on.
An example of using a complex statement might be iteration over an array of values and taking some action within the code using various statements. An example of such a use is shown here:
// check to see how many values in an array are even numbers
int[] numbers = {5, 24, 36, 19, 45, 60, 78};
int evenNums = 0;
foreach(int num in numbers)
{
Console.Writeline(num);
if(num % 2 == 0)
{
evenNums++;
}
}
In this code sample, the first line declares an array, or collection, of integers. (Arrays are covered in Chapter 9, “Working with Data.”) Arrays are merely a collection of similar types of data, in this case integers.
A variable called num is declared to be of type int so that you can use it in the foreach loop. (The foreach loop is covered in the “Using Loops” section later in this chapter, so don’t worry too much about syntax right now.) The array declaration in line 1 and the variable declaration in line 2 are considered simple statements. (A declaration is used to create a variable in code.) The complex statement is the entire foreach loop that starts with the keyword foreach and ends with the final curly brace: }. Note that you actually have another complex statement within this complex statement. Theif statement is another example of a complex statement.
The foreach loop looks at the array, and for every integer value it finds (for each), it writes the value to the console window. The if statement performs the mathematical modulus function on the value to see if it is an even number by checking for remainder after dividing by 2. If the result is 0, the number is even and the evenNums variable is incremented (increased by a certain value) by one.
Note that within each of these complex statements are simple statements. Console.Writeline(num); is a simple statement as is evenNums++;. So you might also say that complex statements are formed using multiple simple statements, but a structure is still required to contain the simple statements. With the exception of a few, complex statements do not end with a semicolon.
Controlling Program Flow
All applications require some program flow options. If you take a trip back in history and look at structured programming, you would notice that program flow was typically done in a top-down fashion with execution starting at the first line of code and continuing one line at a time until the end of the code sequence.
Often, this top-down approach didn’t work well in helping to solve real-world problems that weren’t computing-specific. In the real world, you iterate over a series of steps, but at some point, you might need to do something different depending on the outcome of some other action.
Consider a scenario in your code where a user is attempting to log in to a secure website. Your code will direct the user to the requested page in the site if they provide the correct username and password combination, or let the user know the login was not successful and offer them a chance to log in again.
This would equate to code branching. Codebranching can be thought of as program flow moving to a different location in the code listing and then coming back to where it left off, or repeating lines of code to complete a set of tasks over and over.
Early attempts at program flow control used statements such as goto where labels were used in code and program flow was directed to code in a labeled section. In the days of BASIC, subroutines were commonly used, and the keyword GOSUB was a part of BASIC to provide code flow as well.
These code branching statements created spaghetti code, making it hard to debug and maintain application code because it forced the programmer to jump from one code location to another and back again to try to make sense of the logic often getting lost in the process. Why spaghetti? Next time you have a plate of spaghetti in front of you, try to follow one single noodle from one end to the other without pulling it out from the rest. You’ll get the idea.
More detail on how these issues were overcome will be discussed in the book when functions are covered. The remainder of this chapter focuses on the various program components and aspects that enable you to make decisions in your program and control program flow based on those decisions. You might execute a piece of code, or do nothing. This chapter also takes a look at the components of C# that you use to repeat actions in code where necessary.
These sections can help you understand the exam objective “Implement Program Flow.” The objective covers topics such as iterating over collections and arrays, making program decisions with switch statements, and if/then constructs. You can also gain an understanding of the operators used in evaluating expressions.
EXAM TIPS AND TRICKS: Understanding the Difference Between Exam Design and Question Writing
Exam design and exam question writing are two separate processes. The design session sets up the topic coverage, which is where the objectives come from. The authors who write the exam questions are typically not involved in the design session. As a result, you must understand all the concepts covered in an exam objective because you have no idea what an author has chosen to write the question about.
Conditional Instructions
Conditional instructions in C# are those that evaluate a condition and then execute an action, take no action, or choose between available actions to execute. To evaluate conditions, C# provides the following:
· Relational operators
· Boolean expressions
· Logical operators
· A conditional operator (ternary operator)
Conditions in your C# program enable you to compare values, typically held in variables but also constants and literals. A variable is a named location in memory that enables you to store a value for later use. It is called a variable because you can change the content in it whenever you want. Aconstant is like a variable in that it is a named memory location used to store a value, but you cannot change the value at will. It accepts a value when you declare it and keeps that value throughout the life of your program’s execution time. Literals are values that, well, literally are what they are. Examples of literals are 1, 25, ‘c’, and “strings”. You can’t and don’t assign other items to literals; you can assign literals only to variables of constants.
Your program execution can be controlled based on these comparisons. To effectively use these concepts in your programs, you need to understand the available comparison logical operators (operators perform an operation on values). These operators are listed in the Tables 2-2 and 2-3. Examples are included following each table.
Table 2-2: Relational Operators
|
Operator |
Meaning |
Sample |
|
< |
Less than |
expr1 < expr2 |
|
> |
Greater than |
expr1 > expr2 |
|
<= |
Less than or equal |
expr1 <= expr2 |
|
>= |
Greater than or equal |
expr1 >= expr2 |
|
== |
Equality |
expr1 == expr2 |
|
!= |
Not equal |
expr1 != expr2 |
Now look at some examples to help clarify the meaning of these operators. The relational operators should be self-explanatory, but some simple examples help to solidify your understanding. An expression is an activity or code statement that returns a result.
The expression 2 < 3 checks to see if the value on the left is less than the value on the right. In this case, is 2 less than 3? If so, the evaluation returns true, which in this case it does.
The expression 2 > 3 checks to see if the left operand is greater than the right operand. In this case, 2 is not greater than 3, and the expression returns false.
The operators <= and >= check to see if the left operand is less than or equal to the right operand for the former and the opposite for the latter. For example, 2 < = 3 and 3 <= 3 both return true because 2 is less than 3, and in the second comparison, 3 is equal to 3. However 2 >= 3 would returnfalse because 2 is neither greater than nor equal to 3.
Anytime time you see the = operator in C#, be certain you remember that it is an assignment operator and not a comparison operator. C# uses two = signs together (==) to denote equality. Therefore 2 = 2 is not the same as 2 == 2. The former is actually not legal in C# because it attempts to assign a literal to a literal, which is not possible. A literal in C# is an actual value as opposed to a variable. However, 2 == 2 is valid in C# and is evaluating whether the literal 2 is equal to the literal 2. In this case it is, and the result is a value of true for the comparison.
The final relational operator is the != operator, which means not equal. The expression 2 != 3 would return true because the literal value 2 is not equal to the literal value 3.
Table 2-3: Boolean (Boolean and Bitwise) Operators
|
Operator |
Meaning |
Sample |
|
& |
Unary variant returns the address of its operand. Binary variant is the bitwise AND of two operands. |
& expr1 |
|
| |
The binary OR operator. True if one or both operand is true, false if both operands are false. |
expr1 | expr2 |
|
^ |
The bitwise exclusive OR. Returns true if, and only if, one of the operands is true. |
expr1 ^ expr2 |
|
! |
Unary logical negation operator. Returns false if operand is true or vice versa. |
! expr |
|
~ |
The bitwise complement operator. |
~expr |
|
&& |
Conditional AND that performs a logical AND operation on the bool operands. Capable of short circuit logic wherein the second operand is evaluated only if necessary. |
expr && expr2 |
|
|| |
Conditional OR that performs a logical OR on the bool operands. Evaluates Only second operand if necessary. |
expr1 || expr2 |
|
true |
Used as a bool operator to indicate truth in an expression. |
bool success = true; |
|
false |
Used as a bool operator to indicated untruth in an expression. |
bool success = false; |
For the boolean operators, you look only at samples of the most common operators that you can use in your decision making code. These are the and (&&), the or (||), and the bool values of true and false. (A boolean is a value that is represented as either true or false.)
The && operator is used to evaluate multiple conditions. The most common use is to check if one value is true AND another value is true. True is returned only if both conditions are true. For example, if you are 21 years of age or older and you have ID to prove it, you can purchase alcohol:
if(age >= 21 && hasID == true)
The && operator is also optimized for what is known as short-circuit evaluation. That is to say, because the expression returns only true if both conditions are true, you can also say that if the first condition is false, there is no need to evaluate the second condition. This is the short-circuit functionality, and although providing a small improvement in performance, it nevertheless eliminates some code work on the computer side.
To understand why requires that you know how the computer does comparisons. For each comparison that is made, the CPU must do the following:
1. Fetch the instruction and load it into memory.
2. Increment the instruction pointer.
3. Visit memory to get the first value and store that in a register.
4. Access memory for the second value and store that in a CPU register.
5. Perform the comparison and store the result in a CPU register.
6. Pop the stack for the instruction pointer to get back to where the code was executing before the comparison.
7. Return the value of the comparison to the code.
8. Continue execution at the next instruction.
For today’s computers with fast CPUs, fast memory, various caching techniques, and hardware optimization, these small things can seem inconsequential, but enough of them combined can help make your programs more efficient.
The next boolean operator is the or (||) operator. This enables you to state that you want to know if one or the other condition is true. If so, the expression returns true; otherwise it returns false.
if(temperature < 60 || reaction == shivering)
turn on heat
The values of true and false are considered to be of type bool in C#. To use these in code, you declare a variable of type bool and then assign the result of a comparison to that variable, for example:
// bool samples
bool result = true; // always a good practice to assign
// a value to variables prior to using them
result = 2 < 3; // result will contain the value true
result = 2 > 3; // result will contain the value false
You can also flip the bool value through the use of the unary logical negation operator !. This can actually create some confusing code, but is also a unique way of “flipping” a bool:
// logical negation sample
bool result = true; // result has the value true
result = !result; // result has the value false
The final operator that C# offers for conditional logic is the conditional operator, also known as the ternary operator. This operator returns one of the two values included in the operator based on the evaluation of the boolean expression:
// example of using conditional operator
Random rnd = new Random();
int num = 0;
num = rnd.Next(100); // generate a random number between 1 and 100
// and assign to num
// if the value in num mod 2 is equal to zero, the operator will return
// the string even indicating an even number, otherwise it will return
// the string false
string type = num % 2 == 0 ? "even" : "odd";
The preceding sample uses some of the C# built-in functionality for generating random numbers. Random is a class in .NET that is used here to generate a random number between 1 and 100. You assign that random number to the variable num.
The code then performs a little mathematical function known as modulus. Modulus returns the remainder of an integer division. For example, 5 divided by 2 is not an even number or an integer because it has a fractional part. The result is 2.5 in floating point math, but modulus works with integers (whole numbers with no decimals) so the value returned is actually 1 as far as modulus is concerned. Only even numbers divide by 2 will return a remainder of 0. As a result, the ternary operator checks for this by using the modulus operator in the condition portion. If 0 is returned, that means the number is an even number and the ternary operator returns a string indicating that, otherwise it returns the string value of odd.
The syntax of the ternary operator is:
condition ? value if true : value if false
Boolean Expressions
You have already seen an example of boolean operators in the previous section. This section describes what boolean expressions are and provides more detail on their use.
In the simplest of terms, a boolean expression in C# is an expression that results in a value of type bool being returned. In C#, the keyword bool is an alias for the System.Boolean type. System.Boolean has many methods but you are mostly concerned with the types that it uses. These are simply true and false. As a simple example, if you were asked whether or not 2 and 2 were the same number, you would likely reply yes, or you would say that is true. However, 2 and 3 are not the same number, and you would say that comparison is false.
In the past, programming languages that didn’t implement a bool type used numeric values to represent boolean results such as 1 for true and 0 for false. They also used any non-zero value as true. This had the side-effect of causing confusion if programmers used more than one programming language. One application might be written in BASIC and another application written in COBOL. Programmers could forget which language implemented boolean values in which way and introduce subtle bugs in their code without knowing. Thankfully, you can use actual words with clear meaning in C#.
In C#, you form boolean expressions by comparison. These comparisons are made using the relational and boolean operators listed in the previous tables. The following code lab shows some uses of comparisons in boolean expressions in C#.
Code Lab: Demonstrate the use of bool [Use of Bool Code Lab.txt]
// create a variable of type bool called result and assign it an initial
// value of false
bool result = false;
// check a simple comparison and assign the value to variable result
// in this case, we check if the literal 2 is equal to the literal 2
// the result of this comparison is true and the variable result will
// now contain the bool value true
result = 2 == 2;
Console.Writeline(result); // will output the value true
Code Lab Analysis
The line result= 2 == 2 might be a little foreign to you or perhaps hard to decipher at first glance. Although this book doesn’t go into much detail on order or precedence, a small introduction here can help.
C# has a specific order of precedence. This determines what portions of a statement get evaluated first, then second, and so on. If you consider precedence in math, you know that multiplication and division have higher precedence than addition or subtraction. If the addition and subtraction are in the same expression, the one on the left is evaluated first.
In this code sample, comparison has a higher precedence than assignment, so the expression 2 == 2 is evaluated first. This results in a boolean, which in this case is true. That boolean is then assigned to the variable result. As a side note, you can change the precedence in C# as you can in math, through the use of parentheses.
Making Decisions in Code
Life involves decisions on a daily basis. What time do you set the alarm for waking in the morning? Do you buy milk and bread tonight or wait until tomorrow? If the light turns yellow, will you stop or should you race through the intersection before the light changes to red?
Programming is no different in this respect. Your code can execute simple tasks without the need for decisions, but at some point, your code needs to evaluate a condition and take an appropriate action based on the result of that condition. It might be the result of input by the user. It might stem from the fact that a disc is not in the drive when reading or writing files. You might need to check the presence of a network connection before sending requests to a server. All these scenarios require decision making in your program code, and C# provides the keywords and foundation for working with decisions in your code.
ADVICE FROM THE EXPERTS: Implementing Decision Types
As you go through these different decision types that follow, ensure you not only understand the syntax and how to use them, but also ensure you have gained the understanding of why one would be used over another. The exam tests your knowledge of how to implement these, but understanding when to use a specific decision structure can serve you well in your career as a programmer.
if Statements
The C# language provides the programmer with the ability to program decisions through the use of various decision structures. The first of these that you will look at is the if statement:
// single if statement syntax
if(condition)
statement;
remaining code statements;
The if statement includes a conditional portion, in parentheses, and a statement or series of statements to execute. The if statement evaluates a boolean condition that is enclosed in the parentheses. If the boolean condition is true, the code immediately following the if statement is executed. If the return value is false, code execution skips the statement in the if clause and executes the remaining code statements following the if clause.
Note the indentation in the preceding code sample where statement is indented more than the rest of the code. Without this indentation it is difficult to know for certain which statements will execute as a part of the ifstatement. In the code sample, statement; executes only if the condition is true. The remaining code statements; executes regardless of the outcome of the if statement.
When coding ifstatements, it is recommended that you use curly braces to enclose the statements for each section of the if statement even when the structure includes only one statement. If you have multiple statements that need to be executed when the condition is true, you must use a statement block that is delineated with curly braces to include the set of statements that need to be executed. You cannot execute multiple statements for an if condition without using the statement block. The following sample uses the same statements as earlier with the exception of using curly braces to denote a statement block. Now it is clear which statements execute.
// single if statement syntax with a statement block
if(condition)
{
statement;
}
remaining code statements;
So far you have seen only a single if statement, but you can also use nested if statements to help you deal with more complex decisions. For example, what happens if you want a piece of code to execute but only if another condition is also true? There are a couple of ways to do this, and the following sample shows two possible ways to accomplish this:
// nested if statement
if(condition1)
{
if(condition2)
{
statement;
}
outer statement;
}
remaining code statements;
// if statement with logical operator
if(condition1 && condition2)
{
statement;
}
In the first example, condition1 is evaluated in the outer if statement. If the condition returns true, the inner if statement will execute and condition2 will be evaluated. If condition1 evaluates to false, condition2 is never reached. Regardless of the evaluations in either of the if statements, the line with remaining code statements; will execute.
The second example depicts the use of the binary AND operator, &&. It simply states that if condition1 is true AND condition2 is true, then execute the statement. If either condition1 or condition2 is false, statement; will not be executed.
There is a subtle difference between these two uses. In the first example, the nested if, you check condition1 and if true, you check condition2. Regardless of the outcome of condition2, outer statement; will execute. In other words, you can have multiple statements execute depending on a more complex set of evaluations in the nested if than you can with the second example where the conditions are evaluated in a single if statement. This is part of the reason why nested if statements can become confusing rather quickly.
You can nest if statements as deep as you want to, but it can quickly get unwieldy and become difficult to keep track of. Not to mention it is difficult to read when you nest deeper than even a low number of levels.
To help you gain a better understanding of each type presented so far, you create a small application that can help you understand the different if statements covered up to this point, as well as allowing you to see first-hand how the nested statements work.
Code Lab: Using if Statements [using_if_statements]
Open Visual Studio on your computer, and create a new project using the C# template for a Console application. Name your application using_if_statements, or a name of your own choosing.
After the IDE loads the project, copy and paste, or type, the following code into the editor window. Note that Visual Studio creates some code for you automatically, such as the using statements, namespace, class, and main components, so you can either replace the entire code in your project with this code, or you can choose to include only the code within the static void main(string[] args) function.
using System;
using System.Collections.Generic;
using System.Linq;
using System.Text;
using System.Threading.Tasks;
namespace using_if_statements
{
class Program
{
static void Main(string[] args)
{
// declare some variables for use in the code and assign initial values
int first = 2;
int second = 0;
// use a single if statement to evaluate a condition and output
// some text
// indicating the results
Console.WriteLine("Single if statement");
if (first == 2)
{
Console.WriteLine("The if statement evaluated to true");
}
Console.WriteLine("This line outputs regardless of the if condition");
Console.WriteLine();
// create an if statement that evaluates two conditions and executes
// statements only if both are true
Console.WriteLine("An if statement using && operator.");
if (first == 2 && second == 0)
{
Console.WriteLine("The if statement evaluated to true");
}
Console.WriteLine("This line outputs regardless of the if condition");
Console.WriteLine();
// create nested if statements
Console.WriteLine("Nested if statements.");
if (first == 2)
{
if (second == 0)
{
Console.WriteLine("Both outer and inner conditions are true.");
}
Console.WriteLine("Outer condition is true, inner may be true.");
}
Console.WriteLine("This line outputs regardless of the if condition");
Console.WriteLine();
}
}
}
Code Lab Analysis
After you have entered this code into your application, press Ctrl+F5, or choose Start Without Debugging from the Debug menu. This results in the code executing and generating output to the screen, as shown in Figure 2-1. Note that if you just press F5 and start the application without debugging, the output displays but the console window disappears as soon as the code finishes executing. By starting without debugging, the console windows remains open enabling you to view the output and then waiting for you press a key before stopping program execution.
Figure 2-1: Output of code lab
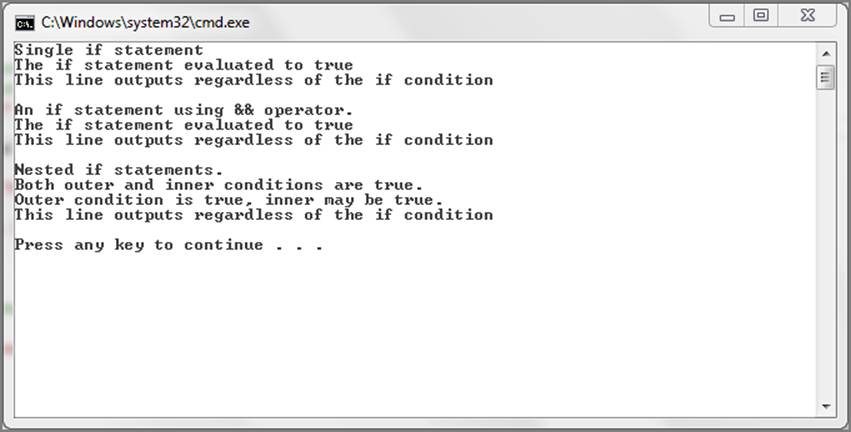
In this initial setup, you have ensured that all paths return true, and as a result, all lines are output to the console window. Start changing the values of the two variables, and experiment with the results to see which lines get output based on the condition evaluations when both true andfalse are returned. Evaluate all possible values for each condition to ensure you understand how these if statements function.
As mentioned earlier, when executing an if statement, you evaluate a condition and then take action if that condition is true. If false, the code continues after the if statement. But what happens if you want to execute one set of code statements when the condition is true or another set of code statements if the condition is false, and then continue executing remaining code statements regardless of the outcome? You can use the if-else statement:
// if-else statement syntax
if (condition)
{
statement1;
}
else
{
statement2;
}
remaining code statements;
In this example, statement1 is executed if the condition is true, otherwise the else clause will be entered and statement2 will be executed. Regardless of the condition, the remaining code statements will execute after either the if or the else clause is executed.
You also saw an example of nested if statements for executing code only if the current and previous conditions evaluate to true. You can also choose to execute a code path based on multiple conditions by using the if, else if statement:
// if-else if statement syntax
if (condition1)
{
statement1;
}
else if (condition2)
{
statement2;
}
else if (condition3)
{
statement3;
}
...
else
{
statement4;
}
remaining code statements;
The ellipsis (...) in the preceding sample, just above the else statement, indicates that you can have as many else if portions as you want. Note that the else clause is also optional, as it is in the single if statement. What this code demonstrates is that you check condition1 and if that is true you execute statement1. If condition1 is not true, you skip statement1 and check condition2. In this instance, statement2 is executed if condition2 is true; otherwise, you check condition3 and so on. It’s important to note that as soon as one condition evaluates to true, the statements for that condition are executed and the if statement then exits. None of the other conditions are evaluated, and the remaining code statements then get executed.
Beyond Basic if Statements
Now look at a simple application that demonstrates the use of these if statements. Copy and paste this code into Visual Studio in a C# console application. Change the values of the condition variables and execute the code to see how it affects the outcome. Again, run the code using different values for the boolean variables and watch how the output changes.
using System;
using System.Collections.Generic;
using System.Linq;
using System.Text;
using System.Threading.Tasks;
namespace beyond_basic_if_statements
{
class Program
{
static void Main(string[] args)
{
bool condition1;
bool condition2;
bool condition3;
// single if statement
condition1 = true;
if (condition1)
{
Console.WriteLine("This statement prints if condition is true");
}
Console.WriteLine("This statement executes regardless of condition.");
Console.WriteLine();
//nested if statement
condition1 = true;
condition2 = true;
if (condition1)
{
if (condition2)
{
Console.WriteLine("This only prints if both conditions
are true.");
}
}
Console.WriteLine();
// if statement with logical operator
condition1 = true;
condition2 = true;
if (condition1 && condition2)
{
Console.WriteLine("This only prints if both conditions are true.");
}
Console.WriteLine();
// if-else statement
condition1 = true;
if (condition1)
{
Console.WriteLine("This statement prints if condition is true.");
}
else
{
Console.WriteLine("This statement prints if condition is false.");
}
Console.WriteLine("This statement executes regardless of condition.");
Console.WriteLine();
// if-else if statement
condition1 = true;
condition2 = false;
condition3 = false;
if (condition1)
{
Console.WriteLine("This statement prints if condition1 is true.");
}
else if (condition2)
{
Console.WriteLine("This statement prints if condition2 is true.");
}
else if (condition3)
{
Console.WriteLine("This statement prints if condition3 is true.");
}
else
{
Console.WriteLine("This statement prints if previous conditions
are false.");
}
Console.WriteLine("This statement executes regardless of condition.");
Console.WriteLine();
}
}
}
switch statements
In the preceding section, you saw examples of nested if statements and if, else if statements. Both of those sets of statements are hard to read when the number of nesting or if-else statements exceeds a certain number. C#, like other C-based programming languages, provides the switchstatement to enable you to make multiple comparisons, executing code based on the condition, or conditions that return true. It is a much cleaner code construct than multiple if-else or nested if statements. Consider the following:
// switch statement syntax
switch (condition)
{
case 1:
statement1;
break;
case 2:
statement2;
break;
case 3:
statement3;
break;
default:
defaultStatement;
break;
}
The condition in a switch statement in previous languages, such as C, had to be of type int. C# allows you to compare any simple data type such as int, string, float, and even enumerations.
In the switch statement, the condition to evaluate is the value included in the opening switch phrase. The code then begins executing at the first case statement looking for a match. The code in the case statement that matches the condition is executed. Finally, the break statement causes the code to branch out of the switch statement and continue execution after the closing curly brace of the switch statement.
You can include as many case statements as you want, but keep in mind that no two case statements can include the same value. There is also an optional default: statement in the switch. If none of the case statements matches, the default statement is selected, if present. A sample follows:
// sample switch statement using a string comparison
string condition = "Hello";
switch (condition)
{
case "Good Morning":
Console.WriteLine("Good morning to you");
break;
case "Hello":
Console.WriteLine("Hello");
break;
case "Good Evening":
Console.WriteLine("Wonderful evening");
break;
default:
Console.WriteLine("So long");
break;
}
Another key feature of switch statements is that you can perform a single action in code, based on multiple conditions. To handle multiple conditions with a single action, you simply eliminate the break statements in each case section of the switch statement containing the conditions you want handled. A sample follows showing how you can do this:
// switch handling multiple conditions with a single action
int number;
switch (number)
{
case 0:
case 1:
case 2:
Console.Writeline ("Contained in the set of whole numbers.");
break;
case -1:
case -10:
Console.WriteLine ("Contained in the set of Integers.");
break;
}
In the preceding example, the code checks to see if the value of number is either 0, 1, or 2. If so, it writes to the console that these values are contained in the mathematical set known as whole numbers. The break statement only comes after case 2, which means that the code will execute sequentially comparing number to 0, 1, or 2 allowing either condition to be true. If the value of number is either one of these numerical values, the statement is printed and then the switch statement is exited.
If the value of number is not 0, 1, 2, the switch statement continues to evaluate number to see if it is either -1 or -10. If so, it prints out the fact that these numbers are included in the mathematical set known as integers.
COMMON MISTAKES: Math Versus Programming Integer Types
Don’t confuse the mathematical integer with the programming language integer data type. Programming language integer types have a specific range of values based on their size (16, 32, or 64 bit) whereas mathematical integers go from negative infinity to positive infinity, including zero.
Using Loops
Using looping structures in your code allows your applications to repeat a series of instructions to accomplish a task. (A loop is a repetition structure that repeats instructions.) You might need to calculate the average for a series of grades that are stored in a data structure such as an array, or you might need to iterate over a collection of items such as a dataset that stores records from a database.
C# provides four looping structures:
· for statements
· foreach statements
· while statements
· do-while statements
Deciding which one to use depends on your requirements, but ultimately, these structures all provide repetition functionality. The first looping structure you look at is the basic for structure.
for statements
The for statement looping structure in C# enables you to repeat a statement, or series of statements, until a specified condition is met. The for statement contains initializer, condition, and increment (iterator) components (an iterator is a portion of a loop that changes a value):
// for statement syntax
for(initializer; condition; iterator)
{
statement(s);
}
In the preceding example, the for statement includes the components in parentheses that control the statement itself. The initializer is used to declare and/or initialize (set a starting value) a variable (counter) that will be used in the loop. The condition is used to determine what will cause the loop to stop, and the iterator portion is used to modify the counter variable. Note that each component is separated by a semicolon. An example follows:
// Count up to 10 in increments of 2
for(int counter = 0; counter <= 10; counter += 2)
{
Console.WriteLine(counter);
}
In this example, the for statement initializes a loop counter variable conveniently named counter. You can use any variable name you choose for this portion of the for loop but keep the following in mind:
· You cannot use keywords for variable names.
· The variable declared here should not have the same name as a variable that you use for another purpose in the for loop.
· The variable used as the initializer can be used in the for loop. As you can see in the example, you output the value of counter.
· You cannot use this variable outside of the for loop due to variable scope.
The for statement then checks the condition to see if counter is less than or equal to 10. Because the loop hasn’t executed yet, and you initialized counter to 0, this condition returns true and the loop statement Console.Writeline(counter); is executed.
The increment routine hasn’t been forgotten. The increment portion will increment counter by 2 as a result of the += operator, but it executes only after the loop iterates over the statement block. You can use different aspects of counter modification in your for loops such as increment and decrement operators like ++, --, +=, *=,and so on. Following is an explanation of the for loop execution.
To give you a better idea on this, you can visualize what happens by using the debugger and breakpoints in Visual Studio. The following screenshots show how the for loop functions.
In Figure 2-2, the code has just started the execution of the for loop, and counter has been initialized to zero. The image shows the code window with the breakpoint set and also shows the watch window where you can see the value counter. Note it is set at 0 and the highlight is on theConsole.WriteLine(counter); line.
Figure 2-2: Counter Initialization
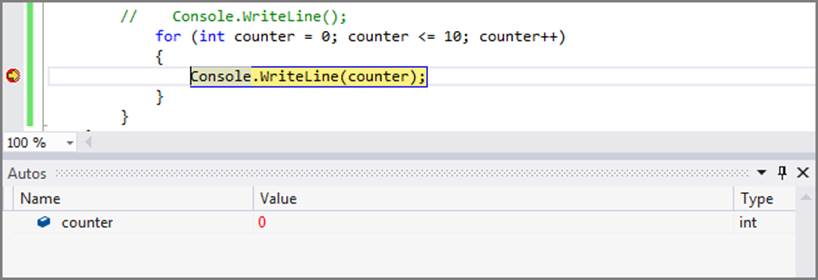
Figure 2-3 has stepped through the code to output the value to the console window, which is not shown here. Notice that the loop has executed the statement inside the curly braces, but now, Figure 2-3 shows the increment statement as highlighted. This is key to understanding how the for loop functions. The increment portion happens after the loop statements execute. However, because you haven’t stepped into the next line, the value of counter in the watch window is still 0 indicating that the increment hasn’t happened just yet.
Figure 2-3: Counter prior to increment portion of loop
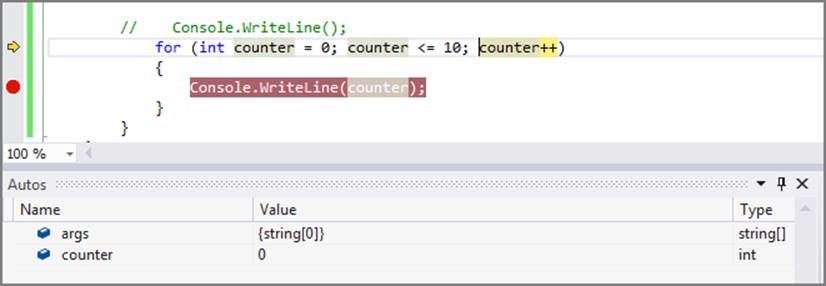
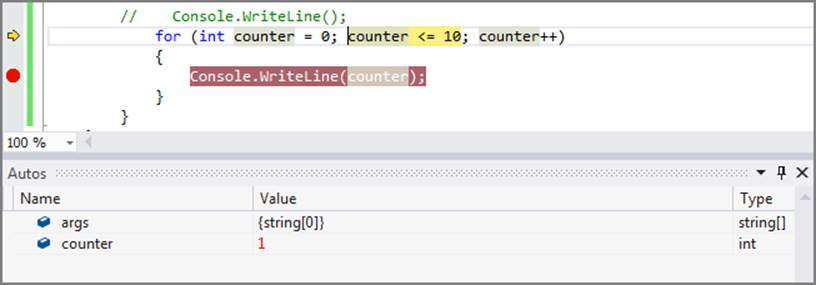
Figure 2-4 shows what happens when you step into the next line of code. The watch window shows that counter is now equal to 1, and the highlighted portion of the code shows the condition evaluation. In this way, you can see that the variable is incremented before the condition is next checked, but the initialization component is not performed again.
Figure 2-4: Counter has incremented.
The initialize portion happens only once; the first time the loop is executed. The condition portion is checked for each iteration of the loop including the first iteration. It happens prior to the increment and after the initialize. The loop statement block then executes, and finally the counter variable is acted on.
On each subsequent iteration of the loop, the condition is checked, and if it returns true, the loop executes the statement block and then increments the counter variable. After the condition returns false, the loop stops execution. The statements in the block are no longer executed, and the counter is not acted on any longer. Execution now continues at the next line after the for statement.
You should make use of the debugging features built into Visual Studio and use breakpoints throughout your code to see how these aspects of the C# language function. A picture truly is worth a thousand words here.
COMMON MISTAKES: Creating Infinite Loops
When writing your loop, ensure you have an exit condition for the loop. Failing to do so will result in an infinite loop. This is a loop that doesn’t exit. Not only is this embarrassing, but also it can quickly lock up a computer by consuming memory and CPU resources depending on what the statements in the loop are doing. Unless of course you intend to create an infinite loop on purpose.
C# enables you to create an infinite loop if you choose to do so by simply creating the for loop without any of the values in the parentheses. You might decide to use an infinite loop in real-time applications where you want a continuous polling of inputs, or perhaps you want to stress test an application or server. Just ensure that you is a means to exit the loop, which is sometimes simply closing the application. Here is an example where there is no initializer, no condition, and no increment:
// infinite for loop in C#
for(;;)
{
statement;
}
Another consideration when creating for loops is that your loop doesn’t have to do anything. An empty statement block means that no code executes during the loop. The loop simply iterates until the condition is true:
// empty for loop
for(int counter = 0; counter >= 10; counter++)
{
;
}
Thus far, you have seen only the for loop iterator as counting up. You can use any of the C# increment operators in this portion of the for loop, which means you can increment or decrement (to decrease by a certain value). The following operators are all legal for use in your for loop iterator section:
· ++ is the increment operator where values are incremented by one.
· -- is the decrement operator where values are decremented by one.
· += is the operator that can be used with literals to change the step such as += 2, which increments by a value of 2 each time.
· -= is the decrement of the above operator.
· *= is the increment by a multiplication factor.
· /= is the decrement by a division factor.
Nested for Loops
As one final discussion topic on for loops, it’s also important to note that you can nest for loops as well. This allows you to create more complex looping constructs that you might find useful in various applications. One that comes to mind immediately would be the lottery.
REAL-WORLD CASE SCENARIO: Nested Loops for a Lottery Program
Where I grew up, we had a lottery that was called 6/49. You could select six numbers from the range 1 to 49. My brother-in-law asked me to write a program for him to predict the winning numbers. Of course, I told him that wasn’t possible because if it were, programmers much smarter than myself would be billionaires today. However, to appease him, I did create a small application that allowed him to randomly pick his numbers. Try to create this same application on your own. Take note that this code sample doesn’t need to include logic to prevent duplicates.
Solution (lottery_program)
Here is the solution:
static void Main(string[] args)
{
// used to set up a range of values to choose from
int[] range = new int[49];
// used to simulate lottery numbers chosen
int[] picked = new int[6];
// set up a random number generator
Random rnd = new Random();
// populate the range with values from 1 to 49
for (int i = 0; i < 49; i++)
{
range[i] = i + 1;
}
// pick 6 random numbers
for (int limit = 0; limit < 49; limit++)
{
for (int select = 0; select < 6; select++)
{
picked[select] = range[rnd.Next(49)];
}
}
Console.WriteLine("Your lotto numbers are:");
for (int j = 0; j < 6; j++)
{
Console.Write(" " + picked[j] + " ");
}
Console.WriteLine();
}
In this code, two arrays are set up to contain the values for the range (49) that can be chosen from and the count of values for a ticket (6). The random number generator is used to start a random sequence for choosing a random number from the 1 to 49 range. The first loop populates the range[] array with values from 1 to 49. The i + 1 is used because as you recall, arrays in C# start at 0, but 0 is not a valid number in the ticket choices.
The nested loop sets up the outer portion to iterate over all 49 possible values and pick a random value in the inner loop six times. This is not the cleanest possible method of doing this, but it serves to show a nesting example.
foreach statements
The for loop can be considered a sentinel controlled loop, one in which you determine when the loop terminates through the use of a counter. Typically, it’s used when you know how you want to end the loop because you set up the condition in the loop. But what happens when you don’t know how many iterations you need to loop over? This situation can arise when working with collections of items in your code where the quantity is not known at run time, such as dynamic allocations based on user input.
C# provides the foreach statement for iterating over collections of items. Collections are typically arrays but also other .NET objects that have implemented the IEnumerable interfaces. (IEnumerable is a code component in C# that supports iteration.)
You may have an array or collection that contains a known or unknown number of values. Although you can use the standard for loop for these collection types with known number of values, it’s almost impossible to know how many values will be in a collection in all instances. For example, you might create a character array out of the individual characters of a text string entered by a user at run time. Other possibilities might be a dataset created after accessing a database. In both cases, you will not know the number of values at the time you write the code. Consider the following:
// foreach syntax
foreach(type in collection)
{
statement;
}
In the this syntax example, type is a data type that the collection will contain. A simple example can demonstrate this. Assume you have an array that stores integer values for grades that a teacher may want to average, as shown in the following Code Lab.
Code Lab: Using a foreach Loop [average_grades]
// foreach loop to average grades in an array
// set up an integer array and assign some values
int[] arrGrades = new int[] {78, 89, 90, 76, 98, 65};
// create three variables to hold the sum, number of grades, and the average
int total = 0;
int gradeCount = 0;
double average = 0.0;
// loop to iterate over each integer value in the array
// foreach doesn't need to know the size initially as it is determined
// at the time the array is accessed.
foreach(int grade in arrGrades)
{
total = total + grade; // add each grade value to total
gradeCount++; // increment counter for use in average
}
average = total / gradeCount; // calculate average of grades
Console.WriteLine(average);
Code Lab Analysis
In the preceding code sample, you know how many grades are in the array because you created the array at design time, but this is to simplify the example. You might have a scenario in which the user would enter grades, and you would dynamically create an array in your code.
You create three other variables:
· total is used to add the values of the grades
· gradeCount is used to keep track of how many grades were in the array, so you can calculate the average.
· average is declared as a double in the event you end up with a fractional value for the average.
The foreach loop declares an integer variable called grade. You have used an integer variable because the values in the array are integers. It’s important to ensure that your variable in the foreach loop matches the data types expected in the collection. The variable grade is then used to iterate over each value in the array. The statements in the foreach loop then add the value in each integer in the array to the total variable.
You increment the gradeCount variable by one each time so that you can use the value in the average calculation. After the loop is finished, the average calculation is completed and output to the console window.
The foreach loop makes it easy for programmers to set up a means to iterate over the items in a collection without having to worry about knowing the number of items in advance.
while statements
The while statement acts in a similar fashion to the for statement in that it enables you to perform a statement or set of statements repeatedly until a condition is met (returns false). The easiest way to think of the while statement is to state it as, “while the condition remains true, execute the loop.”
// while statement syntax
while(condition)
{
statement;
}
The while statement starts with the keyword while, enclosed in parentheses is the condition to test. If the condition returns true, the statement or statements enclosed in the curly braces executes. When the condition returns false, the execution will fall to the line of code following the closing curly brace of the while statement. An example helps to demonstrate this concept:
// while statement example
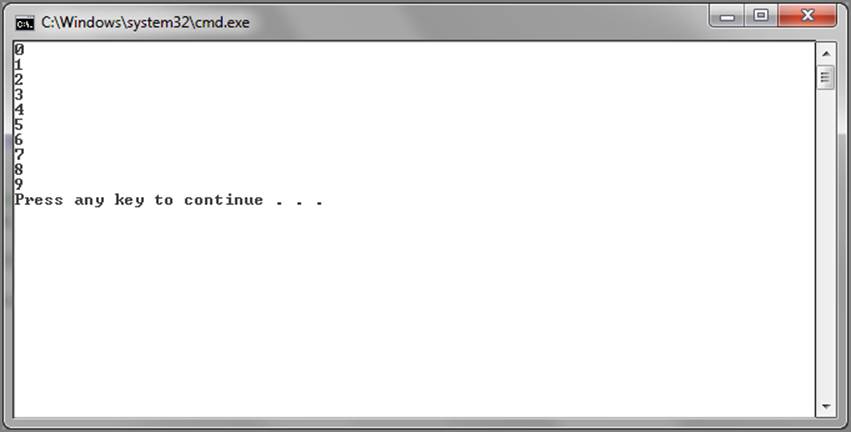
int someValue = 0;
while(someValue < 10)
{
Console.WriteLine(someValue);
someValue++;
}
The preceding code sample sets the variable someValue to 0. The while loop tests a condition to see if someValue is less than 10. In this case 0 is less than 10, so the while loop executes and outputs the value of someValue to the console window. It then increments someValue by 1. The loop condition is checked again, and the loop executes because someValue is now equal to 1, which is still less than 10. Figure 2-5 provides a sample output from this code.
After someValue is incremented to the value of 10, the loop condition fails, and execution continues after the closing brace of the while loop. The value 10 is not printed due to the condition returning false. Some programmers new to the concept might think that the values up to and including 10will be printed, but that is not the case.
Figure 2-5: Output of while loop
Note the differences between the while and for loops. The for loop sets up a variable, a condition, and an increment all within the for loop parentheses. The while loop relies on previously set variables and requires the increment to take place within the loop. Failure to increment in the loop could create an infinite loop here as well.
do-while statements
The last repetition structure to look at is the do-while loop. This looping structure operates in a similar fashion as the while loop with two distinct exceptions. First, the do-while loop executes the statement block at least once regardless of the condition. The reason for this comes from the second distinction, which is where the condition is evaluated in each structure. Second, the while loop checks the condition at the beginning, whereas the do-while loop checks the condition at the end.
// do-while loop syntax
do
{
statement;
} while (condition);
As you can see from the preceding syntax, statement; will get executed first; then the condition is checked at the end in the while portion. Also important to note is the use of a semicolon at the end of the while portion even though it follows the closing brace. Forgetting this semicolon is considered a syntax error and results in the compiler generating an error with the message ; expected.
EXAM TIPS AND TRICKS: Knowing the Difference Between Loops
Exam writers like to test your knowledge of the difference between loops. Ensure you watch for subtle things like the semicolon or where conditions are evaluated when reading the exam questions.
Take a moment to look at the previous while loop sample, converted to a do-while loop:
// do-while statement example
int someValue = 0;
do
{
Console.WriteLine(someValue);
someValue++;
} while (someValue < 10);
The preceding code sample produces the same output as the previous while statement (see Figure 2-6).
Figure 2-6: do-while execution
As a result, this sample doesn’t actually depict the fact that these two loops behave differently, so you’ll modify the code a bit to show how the do loop differs from the while loop:
// do-while statement example
int someValue = 10;
do
{
Console.WriteLine(someValue);
someValue++;
} while (someValue < 10);
What you have changed in this code sample is the initial value for the variable someValue. It is now set to 10. As a result, you might think that because the while condition tests for values less than 10, this loop will not execute the statements in the curly braces. However, the do-while loop will execute at least once, and as a result, Figure 2-7 shows the output from running this code sample.
Figure 2-7: do-while after setting variable to 10
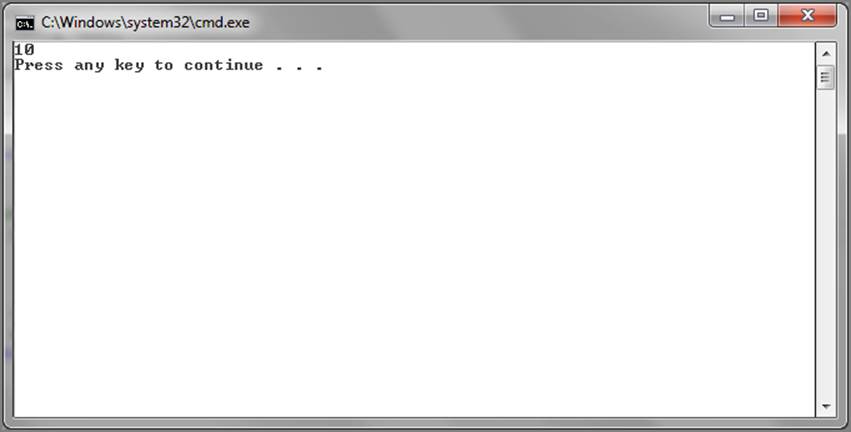
The output shows only a single value, 10. This was the initial value set in the variable, and it was output to the screen showing that the do-while executes the statement block at least once. When the condition is checked at the end of the loop, it returns false because someValue is not less than 10, and the loop no longer executes.
So why would you choose a do-while over a while? There could be many reasons for choosing one over the other, but a typical scenario is when you are expecting input from the user and need to ensure that input is taken in the loop as opposed to outside of the loop. An example helps to demonstrate:
// while statement example
char someValue;
do
{
someValue = (char) Console.Read();
Console.WriteLine(someValue);
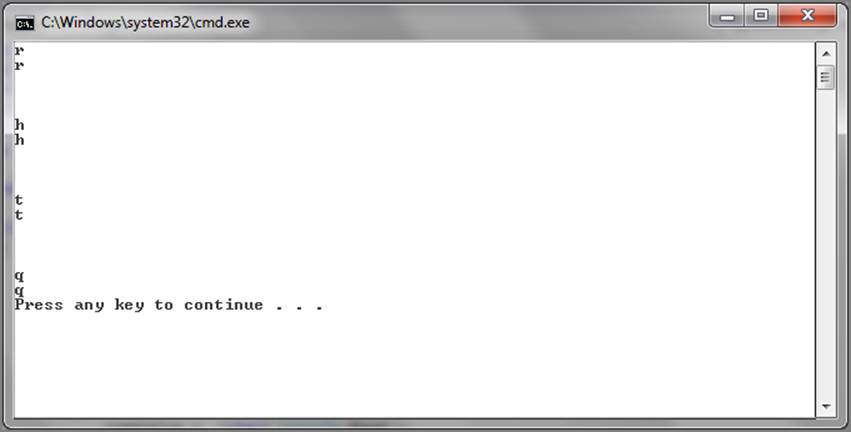
} while (someValue != 'q');
This sample introduces some code you may not be familiar with yet, so don’t fret too much over it. The variable declaration declares someValue to be of type char, which represents a single character. Inside the do loop, you set someValue equal to a character entered by the user when the program runs. The Console.Read() line is a method for the Console class that reads a single character from the console input. The (char) is merely an explicit cast that converts the input to a char value for use in the program.
The value input from the user is then echoed to the screen through the Console.WriteLine method. The while condition checks to see if the value entered by the user is the letter q. If so, the loop quits; otherwise, it continues until q is entered at the console. This type of loop control is known as asentinel. The sentinel value causes the loop to stop. An example of the output is shown in Figure 2-8.
At this point, you might be anxious to try out some of these looping structures in code, so you can set up a sample that walks you through these different looping structures.
Figure 2-8: Using a sentinel to end a loop
Code Lab: Working with Loops
Start a new C# console application in Visual Studio called Loops. After the code window opens for program.cs, paste or type this code into the main function:
// using a for loop to count up by one
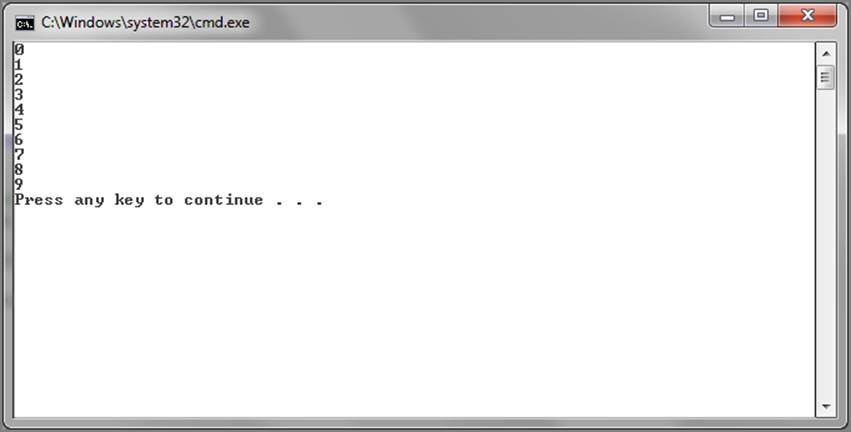
Console.WriteLine("Count up by one");
for (int i = 0; i < 10; i++)
{
Console.WriteLine(i);
}
Console.WriteLine();
// using a for loop to count down by one
Console.WriteLine("Count down by one");
for (int i = 10; i > 0; i--)
{
Console.WriteLine(i);
}
Console.WriteLine();
// using a for loop to count up by 2
Console.WriteLine("Count up by two");
for (int i = 0; i < 10; i += 2)
{
Console.WriteLine(i);
}
Console.WriteLine();
// using a for loop to increment by multiples of 5
Console.WriteLine("Count up by multiples of 5");
for (int i = 5; i < 1000; i *= 5)
{
Console.WriteLine(i);
}
Console.WriteLine();
// using a foreach loop with integers
Console.WriteLine("foeach over an array of integers");
int[] arrInts = new int[] { 1, 2, 3, 4, 5 };
foreach (int number in arrInts)
{
Console.WriteLine(number);
}
Console.WriteLine();
// using a foreach loop with strings
Console.WriteLine("foreach over an array of strings");
string[] arrStrings = new string[] { "First", "Second", "Third",
"Fourth", "Fifth" };
foreach (string text in arrStrings)
{
Console.WriteLine(text);
}
Console.WriteLine();
// using a while loop
int whileCounter = 0;
Console.WriteLine("Counting up by one using a while loop");
while (whileCounter < 10)
{
Console.WriteLine(whileCounter);
whileCounter++;
}
Console.WriteLine();
// using a do-while loop
int doCounter = 0;
Console.WriteLine("Counting up using a do-while loop");
do
{
Console.WriteLine(doCounter);
doCounter++;
} while (doCounter < 10);
Console.WriteLine();
Code Lab Analysis
This code sample can provide you with the opportunity to check out the different loop structures that were introduced in this chapter. You can use commenting to allow you to focus on individual sections and also make use of the debugging features in Visual Studio to place breakpoints in the code and step through the code to see how it operates.
Summary
In this chapter you have learned some of the core foundational aspects of the C# programming language. C# enables you to build applications from statements. The language supports simple and complex statements. Simple statements are those that provide basic code functionality such as variable declarations, whereas complex statements include more structure around the components of the statement. Examples of complex statements are the for loop and the switch statement. All simple statements end with a semicolon; although, this is not a requirement for complex statements.
This chapter also looked at controlling program flow and how that is accomplished in C#. Program flow refers to the control of executing code within the program and allows you, the programmer, to determine which code or segment of code gets executed at any point in your program.
C# provides various program flow statements such as decision and repetition structures that allow the programmer to make decisions based on conditions and to iterate or repeat over code to accomplish necessary tasks.
Decision structures such as the if statement and the switch statement permit the programmer to compare values and direct code execution based on the result. These comparisons are typically the result of a true or false value returned using conditional operators such as less than (<), greater than (>), equal to (==), and so on.
Repetition in code enables you to iterate over collections or arrays to act on the items contained in those structures. Repetition also enables you to perform the same code statement or set of statements to perform various other actions until a certain condition is met. The for, foreach, while, and doloops all provide the repetition necessary in a C# program.
These foundational concepts can help you understand how to structure your C# code to achieve the output or program goal that you want. They are core to C# programming and will be found throughout the .NET Framework.
Test Questions
Read each question carefully and select the answer or answers that represent the best solution to the problem. You can find the answers in Appendix A, “Answers to Sample Test Questions.”
1. You want to declare an integer variable called myVar and assign it the value 0. How can you accomplish this?
a. declare myVar as 0;
b. myVar = 0;
c. int myVar = 0
d. int myVar = 0;
2. You need to make a logical comparison where two values must return true in order for your code to execute the correct statement. Which logical operator enables you to achieve this?
a. AND
b. |
c. &
d. &&
3. What kind of result is returned in the condition portion of an if statement?
a. Boolean
b. Integer
c. Double
d. String
4. What are the keywords supported in an if statement?
a. if, else, else-if, return
b. if, else, else if
c. if, else, else if, break
d. if, else, default
5. In the following code sample, will the second if structure be evaluated?
bool condition = true;
if(condition)
if(5 < 10)
Console.WriteLine("5 is less than 10);
a. Yes
b. No
6. If you want to iterate over the values in an array of integers called arrNumbers to perform an action on them, which loop statement enables you to do this?
a. foreach (int number in arrNumbers){}
b. for each (int number in arrNumbers){}
c. for (int i; each i in arrNumbers; i++){}
d. foreach (number in arrNumbers){}
7. What is the purpose of break; in a switch statement?
a. It causes the program to exit.
b. It causes the code to exit the switch statement.
c. It causes the program to pause.
d. It causes the code to stop executing until the user presses a key on the keyboard.
8. What are the four basic repetition structures in C#?
a. for, foreach, loop, while
b. loop, while, do-for, for-each
c. for, foreach, while, do-while
d. do-each, while, for, do
9. How many times will this loop execute?
int value = 0;
do
{
Console.WriteLine (value);
} while value > 10;
a. 10 times
b. 1 time
c. 0 times
d. 9 times
Additional Reading and Resources
Following are some additional useful resources to help you understand the topics presented in this chapter:
C# keywords http://msdn.microsoft.com/en-us/library/x53a06bb.aspx
C# Programming Guide http://msdn.microsoft.com/en-us/library/kx37x362.aspx
Developer Code Samples http://code.msdn.microsoft.com/
C# Corner http://www.c-sharpcorner.com/
Cheat Sheet
This cheat sheet is designed as a way for you to quickly study the key points of this chapter.
Simple statements
· Will end with a semicolon.
· They typically exist on one line but may extend to more than one line.
· Commonly used for variable declarations.
· They are also used for assignment statements.
· Typical usage scenarios are to perform a simple task.
Complex statements
· May or may not end with a semicolon with the do-while loop being an example of ending with a semicolon.
· Typically contain simple statements within the curly braces.
· Complex statements use curly braces to enclose other statements.
· They have structures, such as parentheses, that support their function.
Boolean expressions
· These are used in comparisons.
· C# uses the bool values true and false rather than 1 and 0 as in some other languages.
· They can be considered logical operators.
· They can exist in both unary and binary forms.
· Unary operates on a single operand, such as logical negation !.
· Binary operates on two operands, such as && and ||.
if-then-else statements
· Used for decision making.
· Will execute a code path depending on condition.
· Returns either true or false from the condition check.
· Doesn’t require curly braces but use is recommended to help clarify what is included in the statement.
· Can be nested within other if-then-else statements.
· The else clause is used to choose alternative path for a false condition.
· The else if clause is used to choose alternative path for a true condition.
switch statements
· Can check various data types in the condition in contrast to if statements.
· Uses case statements for each value to test against the condition.
· Switch statements are a cleaner code choice than nested if statements for code readability.
· Can use a default case when none of the cases return true.
· The break statement is used to end switch evaluation in a true case.
· They handle multiple conditions with a single set of instructions by removing the break from each case statement that holds the conditions to match.
for statements
· Create a simple repetition structure.
· Uses an initialize component, a condition, and iterator in parentheses.
· Makes use of a statement block to contain one or more statements for execution enclosed in curly braces.
· Can be nested to create more complex looping structures.
· The initialization portion executes only at the start of the loop and not for each iteration.
· The condition portion is checked at each iteration.
· The increment portion happens only after the statements are executed in each iteration.
· This loop does not end with a semicolon.
foreach statements
· They can be used for iterating over collections of items.
· They are best used when the number of values in collection is not known at design time.
· They work with any collection that implements IEnumerable.
· The declaration statement must use data types that are in the collection.
while statements
· These execute similar to a for loop.
· The initialization is not part of the while loop; it takes place before the loop.
· The condition is evaluated at the start and on each iteration.
· The increment is accomplished within the loop.
· These are more intuitive than the for loop in terms of readability.
do-while statements
· Similar to the while loop, requires initialization outside of the loop structure.
· The condition is evaluated at the end of the loop.
· The increment is accomplished within the loop.
· The loop will execute at least once, regardless of condition.
· This loop style does end with a semicolon.
Review of Key Terms
assignment Providing a value for a variable.
Boolean A value that is represented as either true or false.
branching Refers to changing code execution to a different path.
condition An evaluation of operands using logical operators.
conditional instructions Instructions that evaluate Boolean expressions and take action based on the outcome of the evaluation.
comment A code line that starts with the // characters and is a way of helping to document the code so that programmers can understand what the different code segments are intended to do.
complex statement A statement that can enclose one or more simple statements into a code block surrounded by curly braces {}. Typical complex statements are those used for repetition and decision structures such as foreach(), if(), switch, do() and so on.
constant A named value that is assigned at time of declaration and cannot be changed in code later.
declaration Used to create a variable in code.
decrement To decrease by a certain value.
expression An activity or code statement that returns a result.
IEnumerable A code component in C# that supports iteration.
increment To increase by a certain value.
initialize To set a starting value.
iterator A portion of loop that changes a value.
literal A notation used to indicate fixed values in code. Not the same as a constant. You cannot assign a value to a literal.
loop A repetition structure that repeats instructions.
modulus Remainder of integer division
operator Performs an operation on values.
program flow The logical execution of code.
sentinel A value used to signal the end for execution on a loop
simple statement A statement that ends with a semicolon and is typically used for program actions such as declaring variables, assigning values to variables, method calls, and code branching.
spaghetti code A term used to describe code that is complicated to follow and understand due to branching.
statement The code construct of the C# programming language that causes the application to perform an action.
ternary operator An operator that takes three arguments, a condition, a value for true, and a value for false.
variables Named values that can be changed in code.
Exam Tips and Tricks
The Review of Key Terms and the Cheat Sheet for this chapter can be printed off to help you study. You can find these files in the ZIP file for this chapter at www.wrox.com/remtitle.cgi?isbn=1118612094 on the Download Code tab.
All materials on the site are licensed Creative Commons Attribution-Sharealike 3.0 Unported CC BY-SA 3.0 & GNU Free Documentation License (GFDL)
If you are the copyright holder of any material contained on our site and intend to remove it, please contact our site administrator for approval.
© 2016-2026 All site design rights belong to S.Y.A.