MCSD Certification Toolkit (Exam 70-483): Programming in C# (2013)
Chapter 3
Working with the Type System
What You Will Learn in This Chapter
· Using C# value types
· Understanding data structures
· Using enumerations
· Understanding C# reference types
· Working with reference types properties
· Understanding encapsulation
· Using generics
WROX.COM CODE DOWNLOADS FOR THIS CHAPTER
You can find the code downloads for this chapter at www.wrox.com/remtitle.cgi?isbn=1118612094 on the Download Code tab. The code is in the chapter03 download and individually named according to the names throughout the chapter.
This chapter introduces you to the type system in C#, which provides the infrastructure necessary to model objects and handle the different types of data and information within a program. As a result, the exam tests your abilities to create and consume types in the C# language.
To help you gain this understanding, you explore types in a sequenced and logical manner. Value types are the simplest types in C#, and the chapter starts there. Not only are they the basic core types you need to store values and data in your code, but they are also used to maintain properties, which are components of C# classes. Class properties define characteristics of the classes you create.
Next, you look at reference types, which Microsoft defines as types that “store references to the actual data.” Another term for reference types is classes.
The key to working with reference types such as a C# class is the concept of encapsulation. Encapsulation enables a developer to create functionality in a class that is hidden from other developers who might use that class.
Table 3-1 introduces you to the exam objectives covered in this chapter.
Table 3-1: 70-483 Exam Objectives Covered in This Chapter
|
Objective |
Content Covered |
|
Create types |
Create value types. This focuses on creating and using the standard C# value type variables in your code. |
|
Enforce encapsulation |
Properties. This focuses on enforcing encapsulation of your class files through the use of properties to hide the member variables and provide a means to validate the values supplied to modify the member variables. |
Creating Value Types
Exam 70-483 has an objective titled “Create types.” Creating and consuming value types in C# is a core and fundamental skillset. Value types are the basis of all data types that you use in your C# programs.
C# divides value types into two distinct categories known as structs and enumerations. Structs are further divided into subcategories called numeric types (integral types, floating-point types, and decimals), Boolean types (bool), and user-defined structs. Enumerations, or enums, are formed as a set of types declared using the keyword enum. (More on enums later in the section on “Working with Enumerations.”)
Understanding Predefined Value Types
Developer documentation from Microsoft refers to value types as intrinsic, simple, or built-in types. Value types identify specific values of data. This is a rather simple statement, but it is accurate. C# includes intrinsic data types that are present in many other programming languages and are used to store simple values. C# intrinsic data types have direct mappings to .NET Framework types that follow under the System namespace. The names listed in the type column in the following table are known as aliases for the .NET Types. All value types derive from System.ValueType.
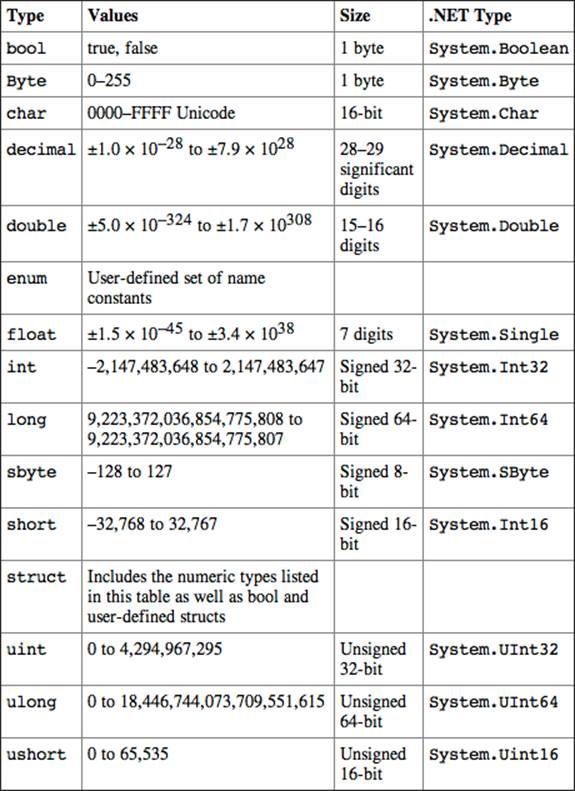
Table 3-2 lists the basic value types that C# supports including the range of the data values that they support.
Table 3-2: C# Data Types
To work with these data types, you declare a variable to be of the specific date type. After a variable is declared, you can store the value directly in that variable through an assignment statement. Assignment can be included as part of the declaration as well. For example, the following code demonstrates both options:
// declare an integer variable
int myInt;
// and assign a value to it
myInt = 3;
// use declaration and assignment in one statement
int mySecondInt = 50;
The keyword int is used to indicate that the variable will be of type int, the alias for the System.Int32 type. As a result, it can contain any value from negative 2,147,482,648 to positive 2,147,482,647.
ADVICE FROM THE EXPERTS: Don’t Confuse C# Data Types
Do not confuse C# data types with similar names found in mathematical concepts. For example, the data type int, which is short for integer, is not the same as the mathematical integer concept. Integers in math can contain values from minus infinity to positive infinity. However, data types on C# are dependent on the number of bits used to contain the data type. In this case, int is 32-bits signed; 2 raised to the power of 32 provides you with a maximum of 4,294,967,296. Take away 1 bit to use for the signed portion, and you find the values listed in the preceding table forint.
You should be aware of a couple of restrictions with value types. You cannot derive a new type from a value type, and value types cannot contain a null value. Now, here is where the use of the alias for a value type and the .NET System type differ. Trying to use an alias with an unassigned variable in code will result in Visual Studio generating an error about the use of an unassigned variable. As mentioned, each value type has a corresponding .NET type in the System namespace, and you can use an unassigned version of this type. This is possible because the System types are essentially classes (reference types), are created through use of the new operator, and contain a default value. The following Code Lab shows an example of this.
Code Lab: Comparison of value types and their alias [value_type_alias]
// create a variable to hold a value type using the alias form
// but don't assign a variable
int myInt;
int myNewInt = new int();
// create a variable to hold a .NET value type
// this type is the .NET version of the alias form int
// note the use of the keyword new, we are creating an object from
// the System.Int32 class
System.Int32 myInt32 = new System.Int32();
// you will need to comment out this first Console.WriteLine statement
// as Visual Studio will generate an error about using an unassigned
// variable. This is to prevent using a value that was stored in the
// memory location prior to the creation of this variable
Console.WriteLine(myInt);
// print out the default value assigned to an int variable
// that had no value assigned previously
Console.WriteLine(myNewInt);
// this statement will work fine and will print out the default value for
// this type, which in this case is 0
Console.WriteLine(myInt32);
Code Lab Analysis
In the previous code sample, the myInt32 variable is created as a new object based on the System.Int32 .NET type. A value isn’t provided in the statement System.Int32 myInt32 = new System.Int32();. As a result, Visual Studio calls the default constructor for this object and assigns the default value. (You learn more about constructors and their purposes later in this chapter under the section titled “Using Constructors” in “Creating Reference Types.”)
A variable was created called myNewInt by using the keyword new. The .NET Framework recognizes this form of variable declaration as being the same as using the System.Int32 style of variable. Although the declaration of int myInt; does not allow you to output the value of this variable if it has not been assigned, the declaration of int myNewInt = new int(); does allow you to output the unassigned variable. This second version is not often used when dealing with simple types, however, but nothing is stopping you from using it.
The .NET Framework provides default values for all System value types created in this way. The default values for all the numeric types are equivalent to the value zero (0). Any of the floating point types such as decimal, double, or float will be 0.0. The default value for bool is false, char is'\0', enums are (E)0, and structs are set to null.
Another important aspect to understand about value types is in the way the values are managed. The .NET Framework stores value types on the stack rather than on the heap, in computer memory. The result of these types storing the value directly and being stored on the stack is that if you assign one value type to another, it will copy the value from the first to the second. Reference types copy a reference (memory address) as opposed to the actual values, which are discussed later in the section “Creating Reference Types.” The following sample code shows the creation of two integer variables. A value is assigned to one of the variables and then one variable is assigned to another.
// assigning one value type to another
int myInt;
int secondInt;
// myInt will be assigned the value of 2
myInt = 2;
// secondInt will contain the value 2 after this statement executes
secondInt = myInt;
// output the value of the variables
Console.WriteLine(myInt);
Console.WriteLine(secondInt);
Console.WriteLine();
Although in the previous samples you have shown only the integer data type, you work with the other simple value types in a similar manner. Copy and paste, or type, this code into a new Console application in Visual Studio to see how to work with other value types.
Code Lab: Using value types [using_value_types]
// declare some numeric data types
int myInt;
double myDouble;
byte myByte;
char myChar;
decimal myDecimal;
float myFloat;
long myLong;
short myShort;
bool myBool;
// assign values to these types and then
// print them out to the console window
// also use the sizeOf operator to determine
// the number of bytes taken up be each type
myInt = 5000;
Console.WriteLine("Integer");
Console.WriteLine(myInt);
Console.WriteLine(myInt.GetType());
Console.WriteLine(sizeof (int));
Console.WriteLine();
myDouble = 5000.0;
Console.WriteLine("Double");
Console.WriteLine(myDouble);
Console.WriteLine(myDouble.GetType());
Console.WriteLine(sizeof(double));
Console.WriteLine();
myByte = 254;
Console.WriteLine("Byte");
Console.WriteLine(myByte);
Console.WriteLine(myByte.GetType());
Console.WriteLine(sizeof(byte));
Console.WriteLine();
myChar = 'r';
Console.WriteLine("Char");
Console.WriteLine(myChar);
Console.WriteLine(myChar.GetType());
Console.WriteLine(sizeof(byte));
Console.WriteLine();
myDecimal = 20987.89756M;
Console.WriteLine("Decimal");
Console.WriteLine(myDecimal);
Console.WriteLine(myDecimal.GetType());
Console.WriteLine(sizeof(byte));
Console.WriteLine();
myFloat = 254.09F;
Console.WriteLine("Float");
Console.WriteLine(myFloat);
Console.WriteLine(myFloat.GetType());
Console.WriteLine(sizeof(byte));
Console.WriteLine();
myLong = 2544567538754;
Console.WriteLine("Long");
Console.WriteLine(myLong);
Console.WriteLine(myLong.GetType());
Console.WriteLine(sizeof(byte));
Console.WriteLine();
myShort = 3276;
Console.WriteLine("Short");
Console.WriteLine(myShort);
Console.WriteLine(myShort.GetType());
Console.WriteLine(sizeof(byte));
Console.WriteLine();
myBool = true;
Console.WriteLine("Boolean");
Console.WriteLine(myBool);
Console.WriteLine(myBool.GetType());
Console.WriteLine(sizeof(byte));
Console.WriteLine();
Code Lab Analysis
This lab declares variables of various values types that are intrinsic to C#. Then each variable is used in a repeating set of code statements that:
· Assigns a value to the variable
· Outputs a line to the console indicating the value type
· Outputs the value that was assigned
· Outputs the System type associated with the value type
· Outputs the size of the value type in bytes
To gain a thorough understanding of these types, change the values in the assignment statements to different types or outside the range and see what the compiler returns for error messages.
An understanding of these simple types is necessary to represent the data that your applications will use to represent real-world problems. They also form the basis for the properties that you will create in your classes as you move into the next section on reference types.
BEST PRACTICES: Code Efficiency
Developers writing code today spend less and less time thinking about efficiency of code and the data types used, mostly due to the power and storage capacity of computers that are in use today. In the early days of the personal computer, thinking back to the Commodore VIC-20 era, memory was at a premium, and all code written was done in a way to conserve memory usage of the application.
Understanding the data sizes helps you to choose the proper data type for your storage needs. Too large a data type can waste resources, while too small a data type range can cause overflow issues and sometimes wrap-around issues where incrementing an int value that is signed might go from 32,767 to -32,767, causing bugs that are hard to locate.
Working with Data Structures
Data structures, or simply structs, are value types that you can use for storing related sets of variables. Structs share some similarities with classes, but they also have certain restrictions.
The C# language provides numerous mechanisms for storing related data such as structs, classes, arrays, collections, and so on. Each has a specific set of requirements and restrictions that dictate how or where you can use them. Arrays and collections are covered in Chapter 9, “Working With Data,” and classes will be covered later in this chapter in the section “Creating Reference Types.” For now, you’ll focus on an understanding of structs.
Consider some common uses of a struct to help better understand where you might use one, leading to the creation of structs and how to use them in code. If you consider an object in real-life that has a set of characteristics, you can understand how to model this object using a struct.
For a simple example, consider a student as a real-world object you want to model in your code. Yes, you could consider using a class for this, and realistically you would in all likelihood, but for this example, you will create a simple struct to model the student. To do so, think about the characteristics that you want to model. To put it into perspective, consider how you want to use the Student struct in your code. For this simple example, consider using the Student struct as a means to help a teacher calculate the student’s average grade across a number of tests. Here are the characteristics to consider:
· First Name
· Middle Initial
· Last Name
· Test1 Score
· Test2 Score
· Test3 Score
· Test4 Score
· Test5 Score
· Average
Use a relatively simple set of characteristics where you limit the number of tests to only 5, provide a field to store the average of all tests, and fields for the Student’s name. (A field is a variable that stores characteristic data for a class.) You could have used an array for the grades here as well but in the lab portion of this section, you get a chance to do so. For now, create this struct in code:
public struct Student
{
public string firstName;
public string lastname;
public char initial;
public double score1;
public double score2;
public double score3;
public double score4;
public double score5;
public double average;
}
The Student struct created includes a set of properties represented by variables of simple value types. As you can see, a struct is a value type, but it is a complex value type because it can hold multiple differing value types as properties.
To use this struct in your code, you need to create a new instance of it. You cannot simply use Student as a new type in your code. The following code shows how to create a new instance of the Student struct in your code:
// create a new instance of the Student struct in code
Student myStudent = new Student();
// create a new instance of the Student struct without the new keyword
Student myOtherStudent;
After you create a new instance of the struct, you can then begin to assign or read values from the properties declared in the struct. The following code demonstrates creating a new struct of type Student, assigning values to the properties, and reading the values from the properties. It also demonstrates a small piece of code that attempts to use Student directly in code.
// create a new instance of the Student struct
Student myStudent = new Student();
// assign some values to the properties of myStudent
myStudent.firstName = "Fred";
myStudent.lastName = "Jones";
myStudent.score1 = 89;
myStudent.score2 = 95;
Console.Write("Student " + myStudent.firstName + " " + myStudent.lastName);
Console.Write(" scored " + myStudent.score1 + " on his/her first test. ");
// illegal statement, cannot use the type directly
// Visual Studio will indicate that an object reference is required
Student.firstName = "Fail";
Structs can contain more than just properties. They can include functions, constructors, constants, indexers, operators, events, and nested types and can implement interfaces. You must understand the use of constructors in structs because they differ slightly from classes. The following points about constructors in structs are worth noting:
· Constructors are optional, but if included they must contain parameters. No default constructors are allowed.
· Fields cannot be initialized in a struct body.
· Fields can be initialized only by using the constructor or after the struct is declared.
· Private members can be initialized using only the constructor.
· Creating a new struct type without the new operator will not result in a call to a constructor if one is present.
· If your struct contains a reference type (class) as one of its members, you must call the reference type’s constructor explicitly.
The following code expands on the previous Student struct by adding a constructor that sets the Student's name when the object is created:
// create a Student struct that uses a constructor
public struct Student
{
public string firstName;
public string lastname;
private string courseName;
public Student(string first, string last,string course)
{
this.firstName = first;
this.lastName = last;
this.courseName = course;
}
}
In the preceding sample code, the struct is simplified just to show the use of the constructor. You have only two fields for first and last name, and use the constructor to supply those values to the fields when the object is created with the keyword new.
The next sample code snippet shows an illegal use of a constructor in a struct. The reason is that in a struct if you create a constructor, you must provide for each member field in the struct; otherwise, Visual Studio throws and error.
public struct Student
{
public string firstName;
public string lastName;
public char initial;
public double score1;
public double score2;
public double score3;
public double score4;
public double score5;
public double average;
public Student(string first, string last)
{
this.firstName = first;
this.lastName = last;
}
}
As stated before, a struct can contain functions as well. You would create functions or methods in your struct to allow it to perform some action on the data members it contains, or for other purposes you deem necessary. The following code snippet shows an example of the previous Studentstruct with a method added to calculate the Student average. The constructor code has been removed to keep the sample clean.
// Student struct that contains a method to calculate the Student average
public struct Student
{
public string firstName;
public string lastname;
public char initial;
public double score1;
public double score2;
public double score3;
public double score4;
public double score5;
public double average;
public void calcAverage()
{
double avg = ((score1 + score2 + score3 + score4 + score5) / 5);
this.average = avg;
}
}
Coming from the perspective of efficient code, a programmer should always consider how best to use the available data structures in a language. To that end, you should consider whether a struct or a class is required when deciding how to store your application objects.
In the preceding sample code, the Student struct is simple and should be created as a struct to avoid the overhead necessary with class files. However, evaluate the scenario where you want to store a number of student objects in a collection, such as an array. Knowing that value types are passed by value, your memory consumption can grow rather quickly if you start passing around an array of Student structs. Remember, these are passed on the stack. Instead, consider using a class for the student, in which case an array of student objects will be filled with pointers (references) to the student objects rather than the whole student data structure.
Now that you have covered the core concepts of structs, get some practice in creating them in code.
REAL-WORLD CASE SCENARIO: Creating structs
Open Visual Studio and create a C# console-based application, naming it bookStruct. The book struct will contain the following properties:
· Title
· Category
· Author
· Number of pages
· Current page
· ISBN
· Cover style
· Methods to turn pages, called nextPage and prevPage
Implement the code based on the knowledge you have gained so far about structs. Use a constructor to initialize the properties. Using the main method in your console application, create a new struct for a book you know about, such as this one, and assign the properties in the constructor. Using the Console.WriteLine method, output each property to the console window, and then call the next and previous page methods. These methods need to take into consideration only the current page, and then increment or decrement that based on the method called.
Solution
The complete code is provided here:
public struct Book
{
public string title;
public string category;
public string author;
public int numPages;
public int currentPage;
public double ISBN;
public string coverStyle;
public Book(string title, string category, string author, int numPages, int
currentPage, double isbn, string cover)
{
this.title = title;
this.category = category;
this.author = author;
this.numPages = numPages;
this.currentPage = currentPage;
this.ISBN = isbn;
this.coverStyle = cover;
}
public void nextPage()
{
if (currentPage != numPages)
{
currentPage++;
Console.WriteLine("Current page is now: " + this.currentPage);
}
else
{
Console.WriteLine("At end of book.");
}
}
public void prevPage()
{
if (currentPage != 1)
{
currentPage--;
Console.WriteLine("Current page is now: " + this.currentPage);
}
else
{
Console.WriteLine("At the beginning of the book.");
}
}
}
static void Main(string[] args)
{
Book myBook = new Book("MCSD Certification Toolkit (Exam 70-483)",
"Certification", "Covaci, Tiberiu", 648, 1, 81118612095, "Soft Cover");
Console.WriteLine(myBook.title);
Console.WriteLine(myBook.category);
Console.WriteLine(myBook.author);
Console.WriteLine(myBook.numPages);
Console.WriteLine(myBook.currentPage);
Console.WriteLine(myBook.ISBN);
Console.WriteLine(myBook.coverStyle);
myBook.nextPage();
myBook.prevPage();
}
This sample application enables you to see how structs can be used in an application by enabling you to create a struct using properties and methods. It shows you how to instantiate a struct in code and access its data members and methods.
You might notice that in the struct shown in the Real-World Case Scenario, the methods and properties were declared as public. Structs share a similar trait to classes for accessibility of the members of the struct. Public means that code has access to the members directly and can assign values and read values as well as call the methods. At times, you want to control access to your members. To do so, you can declare them as private instead of public. This allows you to create accessor methods for the properties.
Accessor methods are methods that are public and provide an interface to your struct. By using accessor methods, you can set your data member fields as private, which prevents writing or reading them directly. Instead, users of your struct must go through the accessor methods. In these methods, you can include code to check the validity of the data entered. For example, what happens if other developers use your struct in their code and attempt to input a string value for the ISBN number? This would result in a bug in the code. Instead, your code inside the struct could perform validation on the input value and return an error to the calling code if the value is not correct.
You can leave structs for now and move onto discussing enumerations; however, more on accessibility of data fields will be covered in the section on reference types. In that section, you learn to use accessor functions and can apply that knowledge to structs as well.
Working with Enumerations
Microsoft defines enumerations as “a distinct type that consists of a set of named constants called the enumerator list.” Now break this down so you can make sense of the definition. First, an enumeration is known as a type. A distinct type means that it will be declared as a type in your code, and no other type can have that same name and be declared as an enum. Each enum in your code needs to be distinct.
A set of named constants merely indicates that the enum is a set, which is to say a grouping of like values. The values contained in the enumeration are given names, so you can easily identify them, and they are constants, meaning you cannot change the names or the values after the enumeration is created.
Even though you assign names to the members of the enum list, the compiler actually assigns integer values to the members of the list starting with 0 and incrementing by one for each successive member in the enum. This is the default behavior. You can initialize members with your own value to override the default behavior. (To override is to extend or modify the abstract or virtual implementation of an inherited method, property, indexer, or event.) A common example used to demonstrate enumerations is to use the months of the year as named constants. The following sample code demonstrates using an enum called Months that contains the 12 months of the year. The first sample uses the default starting point of 0, whereas the second changes that to start at 1.
// enum called Months, using default initializer
enum Months {Jan, Feb, Mar, Apr, May, Jun, Jul, Aug, Sept, Oct, Nov, Dec};
// enum call Months, using an overidden initializer
enum Months {Jan = 1, Feb, Mar, Apr, May, Jun, Jul, Aug, Sept, Oct, Nov, Dec};
BEST PRACTICES: Enumerator Names
Much like variable names, the names of your enumerators cannot contain spaces. If you want to use names that might require a space, consider using CamelCase notation or an underscore.
In the previous examples, the first sample uses the default initializer of 0 and therefore the values in the enum contain the values 0 through 11; Jan = 0, Feb = 1, Mar = 2, and so on. For the most part, you know the months as Jan = 1, Feb = 2, Mar = 2, and so on. To better maintain that numeric representation, you can choose the second sample in the preceding code and start the enum at 1 with each subsequent month containing the correct numeric representation.
By default, and in the sample code shown, the enum uses an underlying data type of int to represent the list values. You can choose to change that default underlying type if you want by following the name of the enum with a colon and the data type as the below code demonstrates.
// using a non-default data type for an enum
enum Months : byte {Jan, Feb, Mar, Apr, May, Jun, Jul, Aug, Sept, Oct, Nov, Dec};
You can use only certain data types for the underlying types on enums. The allowable value types are
· byte
· sbyte
· short
· ushort
· int
· uint
· long
· ulong
All these types are numeric types. So why would you want to choose a different underlying type than the default? It depends on your requirements for you enumeration values. For example, if you are truly concerned about memory conservation in your application, you might elect to use the bytetype as previously shown for the Months enumeration to save on memory requirements. After all, an int is a 32-bit value, which means 4 bytes when compared with using the byte type for a single byte. It doesn’t amount to a large savings in this one instance, but little bits can add up.
You do not need to rely on the incremental assignment of values either. You can assign each enumerator its own nonsequential value. For example, aircraft pilots deal with different air speeds to help them know when they can safely lower the landing gear and the flaps, or when they are about to aerodynamically stall the airplane. You can represent specific air speeds by their letter designators and then assign the proper airspeeds to those designators by using an enumeration.
// enumeration to depict airspeeds for aircraft
enum AirSpeeds
{
Vx = 55,
Vy = 65,
Vs0 = 50,
Vs1 = 40,
Vne = 120
{
In this sample enumeration, you have established five enumerators to represent different airspeeds in an airplane. Vx is the best angle of climb speed; Vy is the best rate of climb; Vs0 is the stall speed in a clean configuration; Vs1 is the stall speed with flaps and gear extended; and Vne is the never exceed speed. As you can see, if you were to write code that used only the numeric values, the code would be hard to read because you couldn’t easily decipher the meaning of the values. However, with an enumeration, programmers writing an application to handle air speeds would understand the named constants when encountered in code—assuming they knew the different airspeed designators that is.
In addition to making your code easier to read when using these constants, enumerations have a couple other distinct advantages, such as enabling other developers using your enumeration to know clearly what the allowable values are for that enumeration, and feeding the IntelliSense engine of Visual Studio. When you declare an enumeration and then create a new type that uses your enumeration, IntelliSense displays the allowable values, as shown in Figure 3-1.
Earlier you learned that each value type had its own equivalent System type, such as System.Int32 or System.Byte. The enum type is no different because it is an instance of the System.Enum type. System.Enum contains a number of methods that you can use with your own enums. Refer to the MSDN documentation for a complete list of these methods, but following is some sample code that shows a couple of the methods available to you when working with your enumerations.
Figure 3-1: IntelliSense displaying enumeration list

Code Lab: Using an enum [using_enums]
class Program
{
enum Months { Jan = 1, Feb, Mar, Apr, May, Jun, Jul, Aug, Sept,
Oct, Nov, Dec };
static void Main(string[] args)
{
string name = Enum.GetName(typeof(Months), 8);
Console.WriteLine("The 8th month in the enum is " + name);
Console.WriteLine("The underlying values of the Months enum:");
foreach (int values in Enum.GetValues(typeof(Months)))
{
Console.WriteLine(values);
}
}
}
Code Lab Analysis
The preceding code sample created an enumeration called Months that starts the values at 1 and increments the default value of 1 for each subsequent month. In the method main, you create a string variable called name and then used the GetName() method of System.Enum to get the eighth value from the enumeration, assign it to the variable name, and then output it to the console window.
Next, the code uses the fact that enumerations implicitly implement IEnumerable, and as such, you can iterate over them using foreach. The foreach loop uses the GetValues() method of the System.Enum class to pull the underlying values for the enumeration and print them to the console window.
This section has discussed the various value types that you can use in your code when building C# applications. Value types form the basis for the data that you can store in your application and are the simple data types that all programs use at some point. Understanding them and how to use them in your code gives you a solid foundation for moving onto the next section on reference types.
Creating Reference Types
In the previous section, you were introduced to value types, which represent the most basic data types you use in your applications. Early applications were actually written using only these basic data types. Although you can write a complete application with only these basic data types, attempting to create sophisticated applications that help users solve their real-world problems is incredibly complex. Object-oriented programming (OOP) was conceived to help developers deal with this complexity.
OOP enables the developer to model real-world objects in their code through the use of classes. Consider creating an application that might be used in a banking ATM. Your application would need to deal with objects such as customers, accounts, deposits, withdrawals, balances, and so on. It’s much easier to write code to model these objects by creating a representation of such objects in your code and then assigning these code objects the same characteristics and functionality as the real-world objects. This is where class files come into play. A class file is a file that contains all the code necessary to model the real-world object. You create a class to act as a template for objects that will be created in code.
C# refers to classes as reference types. (Also included in the reference type category are interfaces and delegates. Interfaces are covered in Chapter 5, “Creating and Implementing Class Hierarchies” while delegates are found in Chapter 6, “Working with Delegates, Events, and Exceptions.”) The reason these types are referred to as reference types is that the variable declared for the type holds only a reference to the actual object. A brief explanation of how C# deals with data types helps to clarify what this means.
In .NET code, there are two distinct, logical sections of computer memory used. They are called the stack and the heap. The stack is an area of memory reserved by the operating system for the executing application. This stack is where .NET stores simple data types. It is a relatively small amount of memory used for code execution. Mostly the simple data types will typically be created and destroyed rather quickly as the application executes, and therefore the stack can be kept somewhat clean during execution of the code. It is also the reason why you will receive out-of-memory exceptions if you have an infinite loop executing that is storing values on the stack.
The heap is a much larger area of memory that the .NET Framework uses to store the objects you create in your code based on classes. An object created from a class can require large amounts of memory depending on the size of the class. Classes contain simple data types to hold the values pertaining to the characteristics of the objects you are modeling. They also contain methods that provide the functionality that an object exhibits. An example might be a method for a game character to stand up, run, or talk.
As a result of an object potentially taking up a large amount of memory, the .NET Framework uses the reference for the object, which is its memory address. In this way, if the code requires copying or assigning the object to another variable, for example, memory is conserved because the compiler copies only the memory address and not the object itself. Classes are created with a specific syntax as shown here:
class MyClass
{
// fields
// properties
// methods
// events
// delegates
// nested classes
}
The preceding example doesn’t dictate the order of the components of the class, but merely lists the items that a class can contain. Also, the listed items are not mandatory. The fields portion is where you would list the characteristics of the objects. If you were modeling a car, fields might consist of the model, make, color, year, number of doors, and so on. Fields are also commonly known as members, data members, and data fields.
Properties are directly related to the fields. Properties are used to allow controlled access to the fields in your class. Why this is important will be discussed more in the section on encapsulation, so you can leave the concept of properties for later.
Methods are used to provide the functionality for your objects. Real-world objects have functionality that needs to be modeled. Sticking with the car analogy, you know that a car can have the engine turned on or off and it can accelerate, slow down, stop, and so on. These are examples of methods that you might create within a car class.
Events are also functionality in your code, but in a different way. Think of events as things that happen as the result of some outside influence. For example, if a sensor in a car detects a problem, it raises an event and the computer in the car “hears” the event getting triggered. It can then take action or generate a warning about the issue. Essentially, events are a mechanism for objects to notify other objects when something happens. The object that raised the event is the event publisher, and the object that receives the event is the event subscriber.
Microsoft defines a delegate as “a type that references a method.” Think of a delegate in terms of a political scenario, and you can gain an understanding of how a delegate functions. For example, a political delegate is someone who has been chosen to represent one or more other people. In C#, a delegate can be associated with any method that has a similar signature (argument types).
Nested classes are exactly what they sound like—one class file nested inside another class file. This book doesn’t delve into nested classes too much because they are not necessary for passing the exam.
Understanding Modifiers
Before creating classes, you must understand the use of modifiers in C#. Modifiers are used in the declaration of types and the data members of your reference types. Table 3-3 lists the modifiers available in C# along with a description of what the modifiers do.
Table 3-3: C# Modifiers
|
Modifier |
Description |
|
public |
An access modifier that declares the accessibility of the type it is assigned to. This is the most permissive level. Access outside the class body or struct is permitted. Reference and value types can be declared public. Methods can also be declared public. |
|
private |
An access modifier that declares the accessibility of the type it is assigned to. The least permissive, it enables access only with the body of the class or struct. Reference and value types can be declared private. Methods can also be declared private. |
|
internal |
An access modifier that declares the accessibility of the type it is assigned to. Allows access only within files in the same .NET assembly. |
|
protected |
A member access modifier. Members declared protected are accessible only from within the class and in derived classes. |
|
abstract |
Used for classes to indicate that this class cannot be instantiated but that it serves as a base class for other classes in an inheritance hierarchy. |
|
async |
Sets up the method or lambda expression it is applied to as an asynchronous method. This allows the methods to call long-running processes without blocking the calling code. |
|
const |
Applying this to a field indicates that field cannot be modified. Constants must be initialized at the time they are created. |
|
event |
Used to declare events in your code. |
|
extern |
Used to indicate that the method has been declared and implemented externally. You might use this with imported DLLs or external assemblies. |
|
new |
When used with class members, this modifier hides inherited members from the base class members. You would do this if you have inherited a member from a base class but your derived class needs to use its own version of that member. |
|
override |
Used when inheriting functionality from a base class that you want to change. Overriding is covered later in the chapter in the section “Abstract and Overriden Methods.” |
|
partial |
Class files can exist across multiple files in the same assembly. This modifier tells the compiler that the class exists in another file or files in the assembly. |
|
readonly |
Read-only members can be assigned only during declaration or in a class constructor. No other means of changing or assigning a value to that member are permitted. |
|
sealed |
Applied to classes. Sealed classes cannot be inherited. |
|
static |
When applied to a class member, it means that the member belongs to the class only and not to specific objects created from the class. The .NET Framework has many examples of this such as the Math class or the String class. |
|
unsafe |
C# is managed code, which means that memory operations are handled in a protected manner. Using the unsafe keyword declares a context that is not safe in terms of memory management. C++ pointers are examples of unsafe memory operations. To use pointers in C#, you need to declare an unsafe context. |
|
virtual |
If you create a class and want to allow the method to be overridden in a derived class, you can use the virtual modifier. |
|
volatile |
When this modifier is applied to a field, the field can be modified by components other than your code. Examples might be the operating system. |
When you look at encapsulation later in the section titled “Understanding Encapsulation,” you start to apply some of the access modifiers to enforce encapsulation on your classes. You also explore some of the other modifiers as you look at creating and consuming classes.
Defining Fields
As discussed earlier in the section on reference types, you use fields to store the data that describes the characteristics of your classes. Fields are declared as variables within the class and can be any type including value and reference types.
Fields come in two basic types, instance and static, and a class can contain either or both. An instance field is one that you will use most often in your classes. Instance fields are those that are contained within each object you create from the class definition. Each instance field contains data specific to the object that it is assigned to. As an example, create a simple class file in code and then create two instances of the class file, setting different values for the fields in the class.
Code Lab: Student class depicting instance fields [student_class]
// create a class called Student
class Student
{
public static int StudentCount;
public string firstName;
public string lastName;
public string grade;
}
class Program
{
static void Main(string[] args)
{
Student firstStudent = new Student();
Student.StudentCount++;
Student secondStudent = new Student();
Student.StudentCount++;
firstStudent.firstName = "John";
firstStudent.lastName = "Smith";
firstStudent.grade = "six";
secondStudent.firstName = "Tom";
secondStudent.lastName = "Thumb";
secondStudent.grade = "two";
Console.WriteLine(firstStudent.firstName);
Console.WriteLine(secondStudent.firstName);
Console.WriteLine(Student.StudentCount);
}
}
Code Lab Analysis
This example is a simple example of creating and using a class, but it demonstrates some key points. The first portion of the code creates a simple class called Student. In this class, you create four variables. One is declared as a static variable of type int and is called StudentCount. You use this variable to keep track of how many Students you have created. Because it is static, it is a variable that is assigned to the class, not to an instance. (You see how this differs in the code later.)
Each of the remaining variables are instance variables and will be assigned values in each object (instance) of this class that you create. Again, these are just simple for the purpose of demonstration. You will get into more complex classes later when you start creating private fields, properties, and so on.
Inside your main method, you can create two instances of the Student class: one called firstStudent and one called secondStudent. You can do so by first indicating the type for the variable that you will use. In the same way that you created value types, use the type name followed by the variable name. In this case, the variable name is actually the name of an object of the class type that you create in code. The keyword new tells the compiler that you want to create a new instance of the class type Student. The new keyword is an instruction to the compiler to look at the classStudent, identify the members and their data types, and then reserve enough memory to store the object and all its data requirements.
After you create each object, use the static variable in the Student class and increment it by one. This variable is only available in the class and not in the instance objects, so you must use the name of the class, Student, to access this variable.
After you have your instances created, like the structs earlier in the chapter, you can now assign values to the members. You must use the name of each instance to assign a value to the members of that instance. This is where the differentiation comes in for static and instance variables. After the assignments are done, you output values to the console window. In this case, you output only the first names of each Student instance just to show that the values actually are unique for each instance. You also output the count of Student objects using the class name as opposed to an instance name, again because StudentCount is a static class variable and not an instance variable.
Using Constructors
The previous section showed an example of creating a simple class and instantiating some objects of that class. The class was simple because it included only four data fields. Each of the data fields was assigned values after the class was instantiated in code. There is another way, and preferred by some, to assign values to the members of an object. This is through the use of a constructor.
A constructor is a method called whenever an object is instantiated. You can use constructors in your class files to allow you, or other programmers, to set initial values for some or all the data members in the objects you create from the class definition. In the previous code example, you didn’t use a constructor because C# enables you to create your own constructor. If you don’t provide a constructor of your own, C# creates a default constructor. The default constructor sets the values of each member variable to its default value. The default values were discussed earlier in the chapter.
Constructors have a specific syntax, as shown here:
// constructor syntax
public ClassName()
{
optional initializing statements;
}
// constructor for the Student class
class Student
{
public static int StudentCount;
public string firstName;
public string lastName;
public string grade;
public Student(string first, string last, string grade)
{
this.firstName = first;
this.lastName = last;
this.grade = grade;
}
public Student()
{
}
}
There are two constructors listed in the previous sample code. The top of the code listing shows the syntax for a constructor. Constructors use the public modifier because they must be accessible outside of the class. This is necessary to allow the object to be initialized when it is created. The constructor takes the same name as the class. Within the enclosing braces, the initialization statements are optional. A constructor is a method but includes no return type, not even void. To include a return type in a constructor is improper syntax and will generate a compiler warning.
In the Student class code, there are two constructors provided. One is a nondefault constructor that accepts three string values and uses them to initialize the member variables. The second is a default constructor that includes no statements and takes no arguments. This is the type of constructor that the compiler generates if no other constructors are created by the developer. This constructor initializes the member variables with their default values.
The compiler deals with constructors when there are multiple constructors in a class. When you create a new object from a constructor, you have the option of using any of the available constructors declared in the class, or none at all. In the previous Student class example, you can call the nondefault constructor, passing in the values for first and last names as well as the grade. If you don’t provide any values, the default constructor will be called. Also, you cannot call the previous nondefault constructor with only some of the values. It’s all or nothing.
NOTE Default constructors are used only when no other constructor is called or none exist.
Defining Methods
Methods are the components in an application that enable you to break up the computing requirements of your application into smaller pieces of functionality. Good programming practice dictates that you create methods to perform discrete pieces of functionality in your code and that the method performs only that which is necessary to achieve the wanted outcome. Some argue that coding in this manner results in code that takes up more resources due to the need for the operating system to maintain instruction pointers and references for all the function calls, but it makes your code much easier to read and to maintain. If your program is generating errors, it’s much easier to track down the method providing the offending functionality and debug that small piece of code.
In essence, a method is a construct in code that contains a name, a signature, a statement block enclosing a statement or set of statements, and an optional return statement. The syntax for a method follows:
// method syntax
modifier return type name(optional arguments)
{
statements;
}
In the preceding syntax example, the modifier is one of the previously mentioned modifiers such as public, private, and so on. The return type can be any valid C# type (value or reference) but can also be the keyword void, which indicates the method does not return any value to the caller. The name is used to identify the method in code and is used when calling the method. The parentheses enclose optional arguments for the method. A method can have 0 or more arguments depending on the requirements of the method. Within the enclosing braces is where the functionality exists for the method in the form of statements. These statements can be any legal C# statement and can also include an optional return statement. The return statement is used only if the method declares a return type.
NOTE It is illegal to include a return statement in a method that declares the return type void. Also, a compiler warning will be generated if you omit a return statement or a method that indicates a return type other than void.
Now look at some examples of methods that you might write to perform simple functionality in code. Continue to use the Student class example and create two simple methods in the code. One method retrieves the Student first and last name, concatenates them, and returns the name to the calling method. The calling method does not return a value but prints out the name to the console window.
Code Lab: Methods in a class [student_class_with_methods]
class Student
{
public static int StudentCount;
public string firstName;
public string lastName;
public string grade;
public string concatenateName()
{
string fullName = this.firstName + " " + this.lastName;
return fullName;
}
public void displayName()
{
string name = concatenateName();
Console.WriteLine(name);
}
}
class Program
{
static void Main(string[] args)
{
Student firstStudent = new Student();
Student.StudentCount++;
Student secondStudent = new Student();
Student.StudentCount++;
firstStudent.firstName = "John";
firstStudent.lastName = "Smith";
firstStudent.grade = "six";
secondStudent.firstName = "Tom";
secondStudent.lastName = "Thumb";
secondStudent.grade = "two";
firstStudent.displayName();
}
}
Code Lab Analysis
This example demonstrates the use of methods both within the class and in the main method of the application. In the Student class, you added two methods. The first method is called concatenateName() and returns a string value. You have used the public modifier, listed the return type asstring, named the method, and included a return statement. The method takes no parameters but simply declares a variable called fullName of type string. It then uses the string concatenation functionality in C# and combines the firstName variable with a space and the lastName variable to create the full name for the Student. It assigns this to the fullName variable and then you send it back to the calling function with the return statement.
The calling function for concatenateName() is another simple method that you created, called displayName(). Note that displayName() uses the return type void, which means it does not return a value and does not have a return statement in the statement block. It declares a string variable called name and uses the return value from the called method concatenateName() to assign to the name variable. It then writes the value to the console window.
Here is how this code functions. In the main method of the application, you added a new statement to the end of the method, firstStudent.displayName();. This statement uses the firstStudent object that you created in code and calls its public method displayName(). Execution shifts to this method in the object’s code. The method creates a variable, and then in the assignment statement, it calls the concatenateName() method of the same object. Execution now passes to this method where the fullName variable is created and used in an assignment statement to be assigned the concatenated values of first and last name.
Because the statement string name = concatenateName(); was responsible for calling this method, the compiler has kept track of this on the memory stack and knows where the return value needs to go. The return statement of concatenateName() ends that method and returns the value to the calling method where the value of the concatenated name is assigned to the name variable. The displayName() method can now output the full name to the console window.
One further aspect of methods not covered yet is the capability of the method to accept incoming values. This is possible through the use of parameters and arguments. The method signature that accepts values looks like this:
// method syntax for accepting values
modifierreturntypename(parameters)
{
statements;
}
Unfortunately, the use of the terms parameters and arguments have been misused somewhat among programmers and even authors. When dealing with methods, the term parameter is used to identify the placeholders in the method signature, whereas the term arguments are the actual values that you pass in to the method. Now look at a method signature and a call to that method to put these terms in better focus:
// sample method signature to accept values
public int sum(int num1, int num2)
{
return num1 + num2;
}
int sumValue = sum(2, 3);
In the preceding example, the method sum is public and returns an integer value. But what you are interested in is how it accepts values. Within the parentheses you see int num1, int num2. These are correctly known as parameters to the method. You must indicate the type of data that will be expected in these parameters. This helps the compiler catch invalid assignments when the method is called. The names num1 and num2 are the actual parameters.
The last line in the sample code calls the sum method and passes in two values. These two values are correctly called the arguments of the method call. You can see now where confusion can come from and why these two terms are used interchangeably at times. To keep it straight, think of the parameters as the placeholders in the method signature, and the arguments as the values that are passed in to these placeholders.
The preceding example is also simple and passes in only value types. Methods support the ability to pass objects as well. An important distinction, however, is when passing value types, a copy of the value is passed to the method, but when passing reference types, a reference (memory address) to that type is passed and not the entire object. Remember, that could take up considerable memory if you passed an entire object to a method.
This brings up a unique characteristic of method calls and how they act on the arguments that are passed in. When using value types, the method acts only on a local copy of the variable and doesn’t change the original value. When acting on a reference type being passed in, it does affect the original value. Another code example can demonstrate this.
Code Lab: Passing value types to methods [value_type_passing]
class Student
{
public string firstName;
public string lastName;
public string grade;
}
class Program
{
static void Main(string[] args)
{
int num1 = 2;
int num2 = 3;
int result;
Student firstStudent = new Student();
firstStudent.firstName = "John";
firstStudent.lastName = "Smith";
firstStudent.grade = "six";
result = sum(num1, num2);
Console.Write("Sum is: ");
Console.WriteLine(result); // outputs 5
Console.WriteLine();
changeValues(num1, num2);
Console.WriteLine();
Console.WriteLine("Back from changeValues()");
Console.WriteLine(num1); // outputs 2
Console.WriteLine(num2); // outputs 3
Console.WriteLine();
Console.WriteLine("First name for firstStudent is " +
firstStudent.firstName);
changeName(firstStudent);
Console.WriteLine();
Console.WriteLine("First name for firstStudent is " +
firstStudent.firstName);
}
static int sum(int value1, int value2)
{
Console.WriteLine("In method sum()");
return value1 + value2;
}
static void changeValues(int value1, int value2)
{
Console.WriteLine("In changeValues()");
Console.WriteLine("value1 is " + value1); // outputs 2
Console.WriteLine("value2 is " + value2); // outputs 3
Console.WriteLine();
Console.WriteLine("Changing values");
value1--;
value2 += 5;
Console.WriteLine();
Console.WriteLine("value1 is now " + value1); // outputs 1
Console.WriteLine("value2 is now " + value2); // outputs 8
}
static void changeName(Student refValue)
{
Console.WriteLine();
Console.WriteLine("In changeName()");
refValue.firstName = "George";
}
}
Code Lab Analysis
There is a lot going on here. The Student class is simplified for this example, and you have only three member fields. In the main method of the program, you declare four variables, three of type int and one of type Student. You assign values to num1, num2, and the members of the Studentobject called firstStudent. The variable result will get assigned later in the code.
The first method you call is the sum method. You pass in num1 and num2 as arguments to the method. Inside sum(), write out a message to indicate that you are inside this method. This helps you keep track of where you are. Next, add the two values and return the result back to the caller where it is assigned to the variable result. Then output that to the window to show that the sum() method did indeed add the two values.
Next, show an example of how method calling with value types uses copies of the values. Call the changeValues() method passing in num1 and num2 again. Inside the method output the fact that you are inside changeValues() and you output the numeric values of the two parameters value1and value2. This is to show that you indeed did pass in the same values for num1 and num2. Then indicate that you will change these values and decrement value1 by 1 and increment value2 by 5. Before leaving changeValues(), output the new values for value1 and value2. The method then ends.
Back in main, output the values for num1 and num2 again to show that these variables have not been changed by the changeValues() method. Only the local copies were changed, not the original values. This is how value types work in method calls.
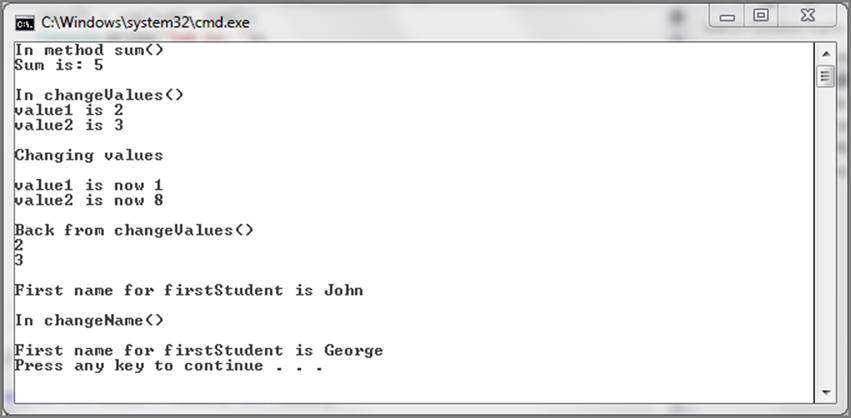
To show how reference types are affected in method calls, now output the first name of the firstStudent object you created to show that its value is Fred, the value assigned to it early in the code. Then call another method called changeName(), which takes a reference variable of typeStudent, and pass firstStudent as the reference type to this method. Inside this method, change the first name of firstStudent to George. After returning from the method, output the first name of firstStudent and notice that it has indeed changed. This clearly shows that passing a reference variable to a method results in changing the original value—quite different from passing value types. Figure 3-2 shows the output from the previous code.
Figure 3-2: Output of value_type_passing
Overloaded Methods
Methods are defined by the modifier, return type, name, and number and type of arguments. But a method also has a signature. The signature is what uniquely identifies the method from any other method with the same name. When you call a method in your code, the compiler looks for a method with the correct signature. The signature actually consists of the method name plus the data type and kind of the parameters in the method. You already know what the data types represent, but the kind or parameter in a method may be a value type, a reference type, or an output parameter. The return type is not a unique component of a method signature.
You might ask why you would want to create more than one method with the same name in your code. Wouldn’t that surely introduce complications and make your code hard to read? To answer that question, consider that you might need to have a method name the same based on the action you want to take, but which performs its internal functionality differently depending on the data sent to method. Think about some simple mathematics as an example. You can calculate the area of various geometric shapes with each having a specific formula. Following are two sample methods to calculate the area of a circle and a rectangle:
// calculate the area of a circle
public double calcArea(double radius)
{
double area = Math.Pi * (r*r);
return area;
}
// calculate the area of a rectangle
public double calcArea(double length, double width)
{
double area = length * width;
return area;
}
Here you have two methods with the same name calcArea. The name explains the purpose of the method, to calculate the area. The difference between the two methods is in the signature. In the first, you set up the method to accept a single double type to represent the radius of a circle. The method then performs the correct calculation to determine the area of the circle whose radius is passed in. The second method is also called calcArea() but accepts two arguments for the length and width of a rectangle and performs the appropriate calculation to determine the area of a rectangle.
This is an example of overloaded methods. Overloading essentially means that you create multiple methods with the same name but with each having a different signature, intended to perform some action specific to the functionality wanted.
Another common use of overloaded methods is in constructors for classes. The overloading provides you the opportunity to initialize member variables selectively. Remember, a constructor is just a method without a return type. As a way of reinforcing overloaded methods, create the Studentclass again, this time with multiple constructors designed to initialize different member variables.
REAL-WORLD CASE SCENARIO: Overloading constructors
Oftentimes when working with classes in a program, you will need to provide multiple ways to initialize the class. The rationale is that at creation time in a program, you want to provide some flexibility to the users of the program and only require known information. An example would be completing a form in an application to establish new students in a system. At the time, the instructor may not know the student’s class or the student will not necessarily have a grade. Overloading the constructor is the preferred mechanism to provide this functionality.
Start Visual Studio and create a C# console-based application. Create the Student class with the following member variables:
· firstName of type string
· lastName of type string
· Grade of type int
· schoolName of type string
In the Student class, create three constructors that will be overloaded. Create a default constructor that takes no arguments and doesn’t initialize any member variables. Create a second constructor that accepts values for the Students’ first and last names. Assign these to the member variables in the constructor. Use the last constructor to accept values for all the member variables and assign them in the constructor.
After you have the class created, using the main method in your console application, create three new Student objects. Call a different constructor on each Student object, watching the IntelliSense in Visual Studio to see how the different constructors are listed there. Provide the necessary values for each Student object to set the member values using the constructors.
Solution
Here is the solution:
class Student
{
public string firstName;
public string lastName;
public int grade;
public string schoolName;
public Student()
{
}
public Student(string first, string last)
{
this.firstName = first;
this.lastName = last;
}
public Student(string first, string last, int grade, string school)
{
this.firstName = first;
this.lastName = last;
this.grade = grade;
this.schoolName = school;
}
}
class Program
{
static void Main(string[] args)
{
Student Student1 = new Student();
Student Student2 = new Student("Tom", "Jones");
Student Student3 = new Student("Mike", "Myers", 5, "My School");
}
}
As you can see from the preceding code, method overloading enables you to achieve some specific functionality in the constructors of your class. The constructor has three different versions. Each version is differentiated by the number of parameters in the constructor. This provides a fair bit of flexibility in how you create out objects in code by allowing you to assign values at the time you create an object, or defer the assignments until later.
Abstract and Overridden Methods
So far, you have taken a look at simple methods and at overloaded methods discussing the rationale for each and how to use them. Another key aspect in OOP is the use of abstract and overridden methods. First, take a look at abstract methods; then review overriding methods. The two are almost related.
If you look up the definition of abstract, you can find something such as, “not relating to concrete objects but expressing something that [can] be appreciated [only] intellectually.” Bing.com’s online dictionary gives you one more definition that is closer to what you will see when dealing withabstract methods in programming: “nonrepresentational: aiming not to depict an object but composed with the focus on internal structure and form.”
In OOP concepts, an abstract method is one that declares a method signature but no implementation. It is also known as a virtual method, which means it isn’t considered a real method because it has no implementation. So, how does it become useful if there is no implementation? Quite simply, it means that derived classes must implement the functionality in their code. This is also where overridden methods come into the picture. A derived class must override abstract classes through the implementation.
// an abstract method inside a class
public abstract class Student
{
public abstract void outputDetails();
}
As you can see from this simple example, the method is declared with the abstract keyword and ends with a semicolon. It contains no implementation details. In other words, developers who derive a class from this Student base class must provide their own implementation of how to output the details for the Student objects they create.
WARNING You cannot include an abstract method declaration in a nonabstract class.
You won’t get to class inheritance until Chapter 5, but to understand abstract and overridden methods, you need to see an example here showing an abstract base class along with a derived class including the overridden method. The following code sample uses the same abstract Student class and method done previously, but shows the use of a derived class overriding the abstract method:
// an abstract method inside a class
public abstract class Student
{
public abstract void outputDetails();
}
public class CollegeStudent: Student
{
public string firstName;
public string lastName;
public string major;
public double GPA;
public override void outputDetails()
{
Console.WriteLine("Student " + firstName + " " + lastName +
" enrolled in " + major + " is has a GPA of " + GPA);
}
}
Again, keep in mind that these examples are kept simple to demonstrate the concepts without adding too much complexity around the actual implementations. In this example, the Student class becomes an abstract class that serves as the base class for other Student type classes. In this case, you create a new class to represent a college Student. The college Student class declaration names the class and follows it with : Student, which indicates that the CollegeStudent class inherits from the Student class. (Again, this is covered in Chapter 5 in more detail for inheritance.)
Inherited classes take on the characteristics of their base classes, but in this instance, you provided only an abstract method in the base class. This means that collegeStudent must implement that functionality by overriding this abstract method. The method simply concatenates the member variables into an output string to the console. Again, this isn’t complex, but it does serve to illustrate the point of abstract methods. By creating an abstract class with abstract methods, you can enforce a specific structure on classes that are derived from the abstract base class but leave the implementation details to each derived class. That means that each derived class is free to implement this outputDetails() method in the way that makes the most sense for that class.
WARNING You cannot create an instance of an abstract class. If you attempt to do so, Visual Studio generates an error and your code does not compile. Abstract classes are meant to be base classes only.
Extension Methods
Extension methods provide you the opportunity to extend an existing class or type by adding a new method or methods without modifying the original class or type and without recompiling that class or type. The reason you might want to do this is to add functionality to an existing type without extending the entire class or type. Prior to .NET 3.5 this was the only way to add functionality to existing types.
Extension methods can be applied to your own types or even existing types in .NET. An example might be adding some functionality to the Math class that .NET already includes. Yes, the existing Math class already provides quite a bit of functionality, but it doesn’t cover all the mathematical functions or procedures you might want in your application. There is no need to create a new Math class, nor is there a need to inherit from the existing Math class just to add the functionality you want. You can use extension methods. In this section, you won’t add extension methods to the Mathclass but rather extend the .NET int type to include a method for squaring numbers.
If your programmer wheels are churning around this, you might be thinking that you can just create your own lightweight class that has the methods you need and call those in your code. You might say that there is actually no need to create extension methods as a result because your own class can do what you need. And that would be correct as well, and you can certainly not even bother with extension methods if you don’t want. However, .NET uses extension methods for the LINQ standard query operators to add functionality to existing types such as IEnumerable. This doesn’t mean you need to use them, but understanding them can go a long way to helping you work with LINQ in your C# code as well—not to mention that the exam also covers them.
So, exactly how do you create extension methods? First, you need to include the extension method in a public static class, so first you must create that class. After the class is created, you define the method inside that class and make the method an extension method with the simple addition of the keyword this. Remember the keyword this refers to the specific instance of the class in which it appears. The following code example demonstrates how you might create an extension method to the .NET int type:
public static class MyExtendedMethods
{
public static int square(this int num)
{
int result = 0;
result = num * num;
return result;
}
}
The method must also be static. If you don’t declare it as static, it does not display in the code IntelliSense window and is not available for you to call. Figure 3-3 shows an example of not declaring the method static, whereas Figure 3-4 shows the correctly implemented method and the IntelliSense result.
Figure 3-3: Built-in methods
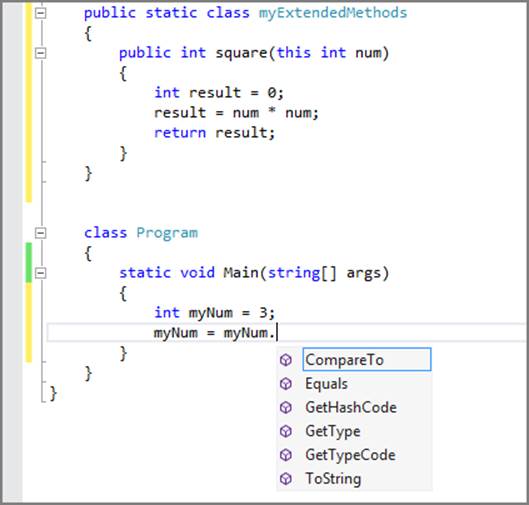
Figure 3-4: Extension method added
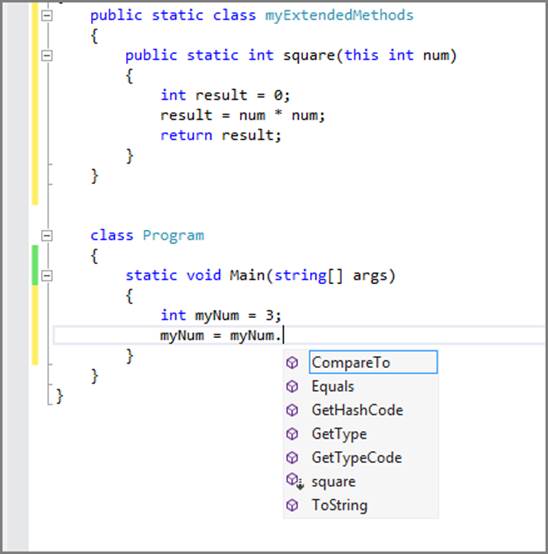
Note that absence of the static keyword and the square method in Figure 3-3. Figure 3-4 shows that the static keyword has been added to the method. And in the Main method call, you can now see the method square added to the IntelliSense window indicating that you have indeed extended the int type to include a method for squaring integers.
ADVICE FROM THE EXPERTS: Naming Extension Methods
If you create an extension method for a type, but that type already has a method with the same name as your extension method, the compiler will use only the type’s method and not your extension method. Name your extension methods carefully.
WARNING Creating extension methods on the type Object results in the extension method being available for every type in the framework. Your implementation must be carefully thought out and allow for correct operation on the different types it might be applied to.
Optional and Named Parameters
Typically, when calling a method that contains multiple parameters, you must pass in the arguments to the parameters in the order in which the parameters exist. The parameters are known as positional. IntelliSense aids greatly in this effort and enables you to see the method signature from the perspective of the parameters and the order. However, not all programmers use Visual Studio for their coding so IntelliSense may not be an option for them.
Named arguments enable you to explicitly indicate which parameter the argument is intended to be used for. Named arguments go hand-in-hand with named parameters. In other words, the parameter must be named first; then the argument you pass in can use that parameter name. But wait, your parameters are all named regardless, so one-half of the solution is already present.
As an example, consider calculating the area of a rectangle. The method includes parameters for the length and width of the rectangle. It performs the area calculation and returns the result. The call to the method uses named arguments.
class Program
{
static void Main(string[] args)
{
double area = rectArea(length: 35.0, width: 25.5);
Console.WriteLine(area);
}
public static double rectArea(double length, double width)
{
return length * width;
}
}
In the call to the rectArea() method, you can pass in the two arguments required, but use the named arguments length: and width:. Failure to add the colon at the end of the argument name results in a compiler warning. The warning is not intuitive, unfortunately, and merely indicates the requirement for a closing parenthesis. This is simply because the compiler isn’t quite sure what your intentions are for the label without the colon.
Another key advantage to using named arguments is in the readability of your code. Looking at the code sample, you can tell precisely which value is the length and which is the width of the rectangle you want to calculate the area of. This is also a quick-and-dirty form of debugging because it helps you to ensure you pass in the proper values. Bugs that result from these types of errors are known as logic errors and are often difficult to debug.
WARNING Named arguments can follow positional arguments, but positional arguments cannot follow named arguments.
Optional parameters are a feature of methods that enables you to require only some arguments be passed in to a method while making others optional. Calling a method with optional parameters means that the caller must provide required parameters but can omit the optional parameters. Required parameters are those that are not declared optional.
Optional parameters are permitted in methods, constructors, indexers, and delegates. Each optional parameter also includes a default value to be used in the event a value is not provided in a call to that method. Default values can be
· A constant expression
· Value types including creating new types with the new keyword
Optional parameters are placed at the end of the parameter list in the method signature. All required parameters must be listed first in the method signature. Also, if you provide a value for an optional parameter, any optional parameters that precede this optional parameter must also be provided with a value.
// sample method with optional parameters
public void displayName(string first, string initial = "", string last = "")
{
Console.WriteLine(first + " " + initial + " " + last);
}
In this simple example, you can create a method that outputs a name to the console window. It uses two optional parameters for the middle initial and last name. They are optional parameters because of the default values assigned to them. These default values are an empty string because you don’t want to output arbitrary characters or strings if the caller chooses not to supply values for these. In this example, the caller must provide a value for the first parameter but can exclude the initial and last. However, if the caller provides a value for last, it must also provide a value for theinitial. If a value for the initial is passed, a value for the last name is still optional, however.
WARNING Required parameters cannot exist after an optional parameter in a method signature.
Understanding Encapsulation
In OOP, the term encapsulation is used to describe the concept of packaging the properties, methods, and any other members into a package called the class. But it does more than just package these components. Encapsulation is also used to refer to the “hiding” of the implementation details of the class functionality and also the protection of the class characteristics.
To get a better understanding of this, consider your MP3 player. When you look at the device, you see certain external characteristics such as the color, shape, size and so on. But there are other characteristics internally such as the amount and type of storage used along with the functionality such as playlists, play, pause, stop, shuffle, and such. You have no idea how the device functions internally, and you don’t need to know that to use the MP3 player. You are provided a specific set of controls to operate the device. These controls are essentially the interface for interacting with the device.
Now take this to the class concept. If you create a class for a digital music player, you create certain characteristics for your software player in the form of member variables. You also provide some functionality in the class to open song files, display song information, shuffle the song lists, create playlists, play the song, pause, stop, add, delete, and more. This class defines your software version of a music player, and it might be a class that you want other developers to use in their code.
To ensure that the music player class can be used by other developers with minimal effort, and to ensure that the other developers do not get bogged down in the details of how your various methods work, you use encapsulation. The methods of your class merely expose the method signature for the class methods. As you know, the signature includes the method name, any return type, and required or optional parameters. Use of the class methods is limited to calling the method and accepting any return value back. The implementation details of how the play method works are not important to someone using the class. They need to provide only the arguments to the play method, which would likely be a song filename. Internally, the play method would have functionality to locate the song file provided, open a handle to that file, start playing the song, and perhaps call other methods to display the song details. The caller of this method could care less about how the method does these tasks; they simply want the song to play.
The “hiding” aspect of encapsulation comes into being when you explore the use of properties in a class. Your classes contain member variables to store the class characteristics. As mentioned earlier in the chapter, you can set access modifiers on these variables. So far, you have used the public access modifier to make all the member variables available outside the class. This was for ease of use. However, this style of class programming leads to a situation that can result in your application becoming unsafe or crashing more than you had hoped.
The reason for these mentioned issues is due to the way developers might use your classes. Allowing a member variable to be modified directly means that you have little to no control over validation of the value assigned to that member variable. This means that you might inadvertently assign a string value to a variable intended to hold only a numeric value. The compiler catches this at compile-time—maybe—and if not, it can result in your application crashing at run time, in a nongraceful manner. Another more serious consideration is in the form of hacking attempts such as SQL injection attacks where hackers take advantage of nonsecure code such as this to include characters in a SQL query string that you didn’t anticipate.
The way to avoid these issues is to make your member variables private and expose them only through properties. The next section introduces you to properties, what they are, and how to use them in your classes.
Properties
Properties are public methods that you use for access to the private member variables. Making the member variables private means they cannot be accessed directly from outside of the class. So how do you access the values or set the values of these variables if they are private? You can do so through the use of the properties. Remember that public access means that the methods can be accessed outside of the class. Also, because the properties are members of the class, they have access to the private members of the class.
Properties can be modified by using access modifiers as well. You can assign the public, private, protected, internal, or protected internal access modifiers to a property. Properties can also be declared with the static keyword, which means that they can be called on the class without having to instantiate a new object.
Just like methods in a base class, you can also choose to make a property virtual, which enables derived classes to override the behavior code in the property to better suit the needs of the derived class. You may also use the abstract keyword when declaring a property, and it acts just like an abstract method, which requires an implementation in the derived class.
Even though properties can be considered as components of a class that represent object characteristics, they are not the characteristics by themselves. Properties rely on two key methods to access and modify the member variables. The first method is known as the get method. get is used to access the member variable the property represents. The second method is called set. As you might expect, this method is used to modify (set) the data of a member variable it represents. The syntax of a property for a class follows:
// sample propety syntax
class Student
{
private firstName;
public string FirstName
{
get {return firstName;}
set { firstName = value;}
}
}
Note the specific characteristics of the property syntax. First, in the class you declare the firstName property as private. The property follows including a return type and uses a name identical to the member variable except that it starts with an uppercase letter. This is not a strict syntax requirement, but is more of a recommended form of coding. The name should be as close as possible to the name of the member variable that it is intended to modify for code readability. Some developers prefer to also include the word Property in the name but this also is not a requirement.
Inside the property you see two methods called get and set. As you might expect, the get method returns the value from the corresponding member variable, and set is responsible for modifying the associated member variable. The set method uses a parameter called value. This is a component of the property method set and contains the value passed in to the method call.
You can create read-only properties and write-only properties by simply omitting either the get or set, respectively, in your property code. A write-only property is rare; however, and the most common are either read/write or read-only.
The two property methods enable you to control the values assigned or returned from your class. In this way, you can validate the data passed in to a property before assignment, and you can transform values being read prior to passing them to the caller, if necessary. The following section discusses how to enforce encapsulation through the use of properties.
Enforced Encapsulation by Using Properties
As stated earlier, encapsulation in OOP involves hiding data and implementation. Now see an example of this as you modify your Student class to take advantage of encapsulation through properties.
You create a Student class that contains numerous member variables but declare them as private. You permit access to them only through properties. Start Visual Studio and create a new console-based application, or use an existing Student class example if you have created one from earlier in this chapter. Add the following code to your application to create the Student class.
Code Lab: Using properties [using_properties]
public class Student
{
private string firstName;
private char middleInitial;
private string lastName;
private int age;
private string program;
private double gpa;
public Student(string first, string last)
{
this.firstName = first;
this.lastName = last;
}
public string FirstName
{
get { return firstName; }
set { firstName = value; }
}
public string LastName
{
get { return lastName; }
set { lastName = value; }
}
public char MiddleInitial
{
get { return middleInitial; }
set { middleInitial = value; }
}
public int Age
{
get { return age; }
set
{
if (value > 6)
{
age = value;
}
else
{
Console.WriteLine("Student age must be greater than 6");
}
}
}
public string Program
{
get { return program; }
set { program = value; }
}
public double GPA
{
get { return gpa; }
set
{
if (value <= 4.0)
{
gpa = value;
}
else
{
Console.WriteLine("GPA cannot be greater than 4.0");
}
}
}
public void displayDetails()
{
Console.WriteLine(this.FirstName + " " + this.MiddleInitial + " " + this.LastName);
Console.WriteLine("Has a GPA of " + this.GPA);
}
}
Code Lab Analysis
In this class, you declared a number of private data members. These are no longer accessible outside of this class unless the caller goes through the properties or the constructor. That’s right; if you look at the code for the Student class, you can notice that the constructor can still directly access the private member variables. The constructor is part of the class, so it has access to the private members. Note that the constructor makes use of the keyword this to ensure that the values are applied to the instance variables of the instantiated class.
After the constructor, you start to create some properties for this class—one property for each private member variable. This is how your code can now access the member variables. Unlike standard methods, properties do not enclose parameters in parentheses. That is because you accept only one value for the property or return only one value. The parameter for a property is known as the value, as shown in the set portions of these properties.
You could have included substantially more code in each property for validation, such as including a check for length of values passed in to the name properties or ensuring the middle initial is only a single character. To keep the code simple while you gain an understanding of working with properties, you include only validation logic for the age and GPA values. But this is an example of how properties enable you to validate data prior to assigning it to a member variable.
The final piece of code in the Student class is a method called displayDetails(). In this method simply concatenate the name components and then include a text message about the Student’s GPA. When code calls this method, it has no idea how the details are assembled to be output to the console window. In this way, you can change the implementation of this method at any time you want, as long as you don’t change the signature, and callers of this method still function correctly and the details are still output.
Now, use the Student class in your program to see how the properties have now become the interface for the member variables. Before you enter the code to use the Student class, take note of the IntelliSense displayed in Figure 3-5, which shows the property names and not those of the member variables. This is due to the access modifiers used on the member variables making them private. The properties are public.
Figure 3-5: IntelliSense displaying the properties
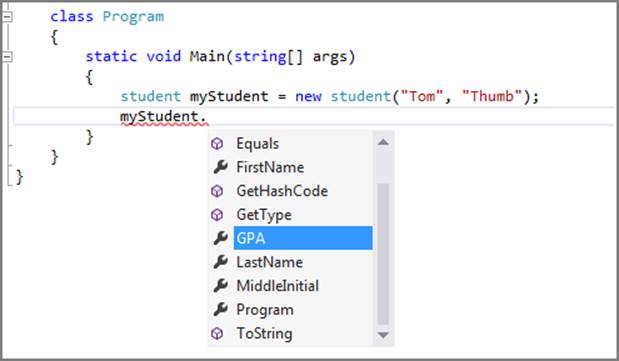
Enter the following code in your application to make use of the Student class you created and access the properties by assigning values to them. After you have the code entered and working, change the values of the age and GPA to values outside the range and see the behavior.
Code Lab: Accessing properties [accessing_properties]
class Program
{
static void Main(string[] args)
{
Student myStudent = new Student("Tom", "Thumb");
myStudent.MiddleInitial = 'R';
myStudent.Age = 15;
myStudent.GPA = 3.5;
myStudent.displayDetails();
}
}
Code Lab Analysis
In this sample code for using the Student class, you rely on the constructor to set the first and last names. Then you call on the properties to set the middle initial, age, and GPA values. Then you output the values to the console window to validate that they did indeed get set correctly.
Indexed Properties
Indexed properties, or indexers, behave a little differently from standard properties. The primary purpose of indexed properties is to allow “array-like access to groups of items,” according to MSDN documentation. In other words, if you have classes that make use of arrays or other collection types, you should consider using indexers for accessing the values of these internal collections. The standard properties discussed so far are used to access single values in classes, whereas an indexed property will be used to encapsulate a set of values.
To demonstrate indexed properties, you need a simple example that illustrates the use of these types of properties in a class. One example might be for an application that deals with network addresses in an IP subnetting scenario. If you aren’t familiar with TCP/IP v4 addressing, a brief explanation follows. For those who understand it, feel free to skip this portion.
IP addresses in version 4 of TCP/IP are 32-bit addresses. The bits can be set to either a 0 or a 1, giving you a total of 2 raised to the power of 32, which is the number of addresses available for use. You might want to create a class that contains an array of 32 values to store these addresses. Each array could represent a specific IP address by setting the array elements to either a 1 or a 0 and then used to represent an IP address. Now create an address class and create an indexed property inside the class to store the array of bits that will be used for the IP address.
public class IPAddress
{
private int[] ip;
public int this[int index]
{
get
{
return ip[index];
}
set
{
if (value == 0 || value == 1)
ip[index] = value;
else
throw new Exception("Invalid value");
}
}
}
class Program
{
static void Main(string[] args)
{
IPAddress myIP = new IPAddress();
// initialize the IP address to all zeros
for (int i = 0; i < 32; i++)
{
myIP[i] = 0;
}
}
}
Again, you created simple code samples to focus on the core principles. This class contains only one property, which is an indexed property to store the 32 bits of an IP address. The key differentiator that makes this an indexed property is the use of the keyword this in the property. Notice also that the property appears to accept a parameter, but in reality it is accepting an index for the value parameter.
Place this code into a C# console application and execute it as-is to populate the int array property in IPAddress with all zeros. To try out the code sample even further, add your own code to update the values of arbitrary index values and inspect the array through debugging to see how the values have been applied.
Here are some key points to keep in mind for indexed properties:
· They accept an index value in place of the standard property value parameter.
· They are identified through the use of the keyword this.
· Indexed properties can be created in classes or structs.
· Only one indexed property can exist in a single class or struct.
· They can contain get and set methods just like other properties.
Understanding Generic Types and Generic Methods
Generics didn’t always exist in C#; they were added only in version 2.0 of the C# language. The benefit of using generics is that you can now design your classes and the methods in those classes without specifying the types until declaration and instantiation. The advantage to doing so is a reduction in type casting or boxing and unboxing at run time. Generics work for both value types and reference types. Other advantages of generics can be found in code reuse, type safety, and efficiency.
Consider using different collection types in your code that act on objects. For example, consider the Queue class. You can store objects in the queue class using the Enqueue() method and remove them using the Dequeue() method. However, what happens if your queue is used to store items of different types such as int or char? Because the .NET Queue object is designed to hold reference types, you need to use boxing and unboxing for value types. If you are storing objects in the queue, you need to use explicit casts for those reference types when dequeuing. This can result in error-prone code.
Instead of dealing with the performance hit of converting types, you can use generic classes with a generic parameter that accepts a class type at run time. This also saves the need to create multiple classes that implement the same functionality for each type you need to support.
Defining Generic Types
Defining generic types is done through the use a generic type parameter enclosed in angle brackets, <T>. T is just the standard representation for generic types that is used in most documentation concerning generics. You can use the letter of your own choosing. An example of a generic Queue class follows:
// example of a generic style Queue
public class GenericQueue<T>
{
public void Enqueue(T obj);
public T DeQueue();
}
Although a class is demonstrated here called GenericQueue<T> to differentiate a queue from the .NET Queue class, you should look at the System.Collection.Generic namespace to determine if the .NET Framework already contains a generic class. Always reuse existing code where possible.
Your generic types act just like other reference types and can include constructors, member variables, and methods. The methods, including the constructor, can include type parameters as well.
Using Generic Types
Creating the GenericQueue class allows you to pass in the type of object that this class can store in the queue when you instantiate the object. An example of instantiating a GenericQueue object to store Student objects follows:
// generic queue that will be used to store Student objects
GenericQueue<Student> StudentQueue = new GenericQueue<Student>();
Student myStudent = new Student("Tom", "Thumb");
// store the myStudent object in the StudentQueue
StudentQueue.Enqueue(myStudent);
// retrieve the myStudent object from the StudentQueue
StudentQueue.Dequeue();
By using generics, this queue class can add and remove Student objects in the queue without the need for explicit casting because the reference type is specified during the instantiation.
Defining Generic Methods
Much as you might expect, generic methods will be declared with type parameters as well. This means that like the class signature, the method signature will use a placeholder for the type that will be passed in to the method. In the same way that generic classes are type-safe and don’t require boxing/unboxing or explicit casts, generic methods also share this same characteristic. One of the simplest examples that exists on MSDN and in various other documentation samples is using a swap method. Swapping is a commonly used function in simple sorting algorithms. An example of a generic swap method follows:
// example of generic method with type parameters
public void Swap<T>(ref T valueOne, ref T valueTwo)
{
T temp = valueOne;
valueOne = valueTwo;
valueTwo = temp;
}
Now take a moment to dissect this method to understand how it is designed. In the signature of the method, you still use access modifiers and return types. In this case, make this method public and set the return type as void. Then name the function as Swap, and similar to the generic class, use the angle brackets and a type placeholder <T>.
Here is where the generic method differs slightly from the nongeneric version. The parameters use the keyword ref and the type placeholder. The ref keyword means that the arguments passed in will be passed by reference. The method acts on the actual values passed in through the reference to the memory address for the arguments. The T placeholder means that the arguments will be of type T, based on the type used at the time the method is called. This can be value types or reference types.
Also notice that the local variable in the swap method called temp is also declared with type T. Thinking about this, it makes perfect sense because you need to use the same types during the swap process, and temp is just a local variable that can be used to temporarily store one value before assigning it to the second variable.
Using Generic Methods
When using generic methods, you simply pass the correct type into the method call, replacing the T parameter with the type you use for the swap. For this example, assume you have an array of values and want to call the swap method to help with sorting the array. The array can be of almost any type, but ideally if you are sorting, you would want it to be of types that can actually have a sorting value. The example here is designed to sort integer values:
class Program
{
static void Main(string[] args)
{
int[] arrInts = new int[] {2, 5, 4, 7, 6, 7, 1, 3, 9, 8};
char[] arrChar = new char[] { 'f', 'a', 'r', 'c', 'h' };
// Sorting: integer Sort
for (int i = 0; i < arrInts.Length; i++)
{
for (int j = i + 1; j < arrInts.Length; j++)
{
if (arrInts[i] > arrInts[j])
{
swap<int>(ref arrInts[i], ref arrInts[j]);
}
}
}
// Sorting: character Sort
for (int i = 0; i < arrChar.Length; i++)
{
for (int j = i + 1; j < arrChar.Length; j++)
{
if (arrChar[i] > arrChar[j])
{
swap<char>(ref arrChar[i], ref arrChar[j]);
}
}
}
}
static void swap<T>(ref T valueOne, ref T valueTwo)
{
T temp = valueOne;
valueOne = valueTwo;
valueTwo = temp;
}
}
You could certainly have written the swap functionality within the nested for loop because the swap is relatively simple. However, in this instance you want to demonstrate how you can use a type-safe, generic method that will accept any type of object where you can compare for greater or less than.
The first array consists of integers and the bubble sort works fine when you call the swap method and pass it in the int type. The second array consists of characters of the type char. When you call the swap method this time, pass in the char type as the type that will be acted on.
Okay, so you cheated a little bit because ultimately char values are compared using their numeric codes, which enable you to determine which character comes before another. But again, without complicating the concepts, it demonstrates how you can use generic methods with different types.
Summary
The type system in C# is the foundation for the data that your application will work with. At the basic level are the value types providing the data structures for supporting basic data types for numeric and character data. To model real-world objects, the .NET platform provides object-oriented programming support in the form of classes.
Value types are the simplest to work with and can be used to store simple data or complex data through the use of structs and enumerations. Structs are similar to lightweight class files, whereas enumerations make code more readable through the use of named constants for related data.
Through the OOP principle of encapsulation, you can create class files that hide the details of the implementation for the methods that make up the class. Encapsulation means that a class can act similar to a black box. In other words, a public accessible interface exposes only the signatures of the methods with required and optional parameters while not exposing the details of how the class or methods perform their functions. This makes class files easier to use because the coding of objects based on these classes do not get written around the class implementation details.
With the inclusion of generics in C#, the platform supports the creation of classes with operations not specific to any particular data type. Generics include more than just classes because they also extend to interfaces, methods, and delegates. Generics provide the developer with the convenience creating type-safe classes and methods resulting in less error-prone code, but also in better performing code by taking away the need to do conversion on data types through boxing and boxing of value types.
Chapter Test Questions
Read each question carefully and select the answer or answers that represent the best solution to the problem. You can find the answers in Appendix A, “Answers to Chapter Test Questions.”
1. What is the maximum value you can store in an int data type?
a. Positive infinity
b. 32,167
c. 65,536
d. 4,294,967,296
2. True or false: double and float data types can store values with decimals.
3. Which declaration can assign the default value to an int type?
a. new int();
b. int myInt = new int();
c. int myInt;
d. int myInt = new int(default);
4. True or false: structs can contain methods.
5. What is the correct way to access the firstName property of a struct named Student?
a. string name = Student.firstName;
b. string name = Student.firstName();
c. string name = Student(firstName);
d. string name = Student.(firstName);
6. In the following enumeration, what will be the underlying value of Wed?
enum Days {Mon = 1, Tue, Wed, Thur, Fri, Sat, Sun};
a. 2
b. 3
c. 4
d. It has no numeric value.
7. What are two methods with the same name but with different parameters?
a. Overloading
b. Overriding
c. Duplexing
d. Duplicate
8. What is the parameter in this method known as?
public void displayAbsoluteValue(int value = 1)
a. Modified
b. Optional
c. Named
d. Default
9. When you create an abstract method, how do you use that method in a derived class?
a. You must overload the method in your derived class.
b. You must override the method in your derived class.
c. Abstract methods cannot be used in derived classes.
d. You need to declare the method as virtual in your derived class.
10. How do you enforce encapsulation on the data members of your class?
a. Create private data members.
b. Create private methods.
c. Use public properties.
d. Use private properties.
e. Use the protected access modifier on methods, properties, and member variables.
11. Boxing refers to:
a. Encapsulation
b. Converting a value type to a reference type
c. Converting a reference type to a value type
d. Creating a class to wrap functionality in a single entity
12. What is one advantage of using named parameters?
a. You can pass the arguments in to the method in any order using the parameter names.
b. You can pass in optional arguments as long as you use the parameter names in your arguments.
c. Named parameters make compiling much faster.
d. Name parameters do not affect compile time.
13. What is an advantage of using generics in .NET?
a. Generics enable you to create classes that span types.
b. Generics enable you to create classes that accept the type at creation time.
c. Generics perform better than nongeneric classes.
d. Generics do not use optional parameters.
14. What does the <T> designator indicate in a generic class?
a. It is the parameter for all arguments passed in to the class constructor.
b. It is the parameter designator for the default method of the class.
c. It is a placeholder that will contain the object type used.
d. It is a placeholder that will serve as the class name.
15. How are the values passed in generic methods?
a. They are passed by value.
b. They are passed by reference.
c. They must be encapsulated in a property.
d. They are passed during class instantiation.
Additional Reading and Resources
Here are some additional useful resources to help you understand the topics presented in this chapter:
C# keywords http://msdn.microsoft.com/en-us/library/x53a06bb.aspx
The C# Programming Guide http://msdn.microsoft.com/en-us/library/kx37x362.aspx
MSDN Code Gallery http://code.msdn.microsoft.com
Cheat Sheet
This cheat sheet is designed as a way for you to quickly study the key points of this chapter.
Value types
· Store the values directly.
· Are an alias for System types such as int for System.Int32.
· Are passed as a copy to methods.
· Framework includes standard data types most commonly required.
· Legal values are based on number of bits used to store the type.
Data structures
· Data structures involved structs, enumerations, and classes.
· Structs are lightweight data structures.
· Structs can contain member variables and methods.
· Structs are passed by value unlike reference types, which are passed by reference.
Enumerations
· Enumerations contain a list of named constants.
· They make code more readable.
· They use an underlying value for the named constant.
· Underlying values of type int start at 0 and increment by one unless otherwise indicated in the declaration.
Reference types
· Reference types are also commonly referred to as classes.
· Classes contain member variables to store characteristics.
· Classes contain member functions to provide functionality.
· Class files encompass data and functionality in one package.
Modifiers
· Modifiers are used to determine access for classes and class members.
· See Table 3-3 for a complete list of modifiers.
· Modifiers are listed first in declarations.
Fields
· Fields contain the data for classes.
· Fields are also known as member variables.
· They describe characteristics of the class.
· They should be marked private to avoid unwanted modification.
Constructors
· Use to initialize classes.
· Do not include a return type.
· Use the same name as the class.
· May contain no parameters (default constructor).
· If no constructor is defined, compiler generates a default constructor.
Methods
· Provide functionality for a class
· Can be used with modifiers
· Can return values or not (return type void)
· Can accept arguments through parameters in the signature
· Can use optional and named parameters
Overloaded methods
· Same method name with multiple instances for different functionality
· Defined by the signature (name, types, and kinds of parameters)
Abstract methods
· Do not define an implementation
· Can be declared in abstract classes only
· End with a semicolon
Overridden methods
· Hide the implementation of a method of the same name in the base class
· Provide a means to change method behavior in derived class
· Used for virtual and abstract methods in base class
Extension methods
· Can be applied to your own types or even existing types in .NET
· Extend existing classes by adding methods without recompiling
Optional parameters
· Enable you to choose which parameters are required in a method.
· Defined as optional by including a default value.
· The default value is used if none is passed by caller.
· Must exist after required parameters.
· If multiple optional parameters exist and a value is specified for one, all preceding optional parameters must also be supplied values.
Named parameters
· Allow for giving parameters in a method a name
· Increase code readability
· Enable you to pass arguments to a method in an order other than in the method signature
Encapsulation
· Also known as data hiding.
· Involves making member variable private.
· Data exposed through properties.
· Functionality and data are all enclosed as part of the class.
· Creates a “black box” concept.
Properties
· Present the public interface to your class
· Enforce encapsulation
· May be read/write, read-only, or write-only
· Can be used to perform data validation on incoming and outgoing data values
Indexed properties
· Allow array-like access to groups of items
· Must be access using an index in the same manner as arrays
Generic types
· Design classes without specifying the types at definition stage
· Design methods without specifying the types for parameters at definition stage
· Use a placeholder at definition stage that will be replaced by type during instantiation
· Enable type-safe coding
· Increases performance due to reduction in conversions, boxing/unboxing
Review of Key Terms
abstract method Indicates that the thing modified has a missing or incomplete implementation. The abstract modifier can be used with classes, methods, properties, indexers, and events. Use the abstract modifier in a class declaration to indicate that a class is intended to be only a base class of other classes.
accessor methods Methods used to access hidden member variables.
class files File that contain a C# class. Classes encapsulate data and functionality into one unit of code.
classes Coding components that enable you to create custom types that group together characteristics, methods, and events.
constructors Class methods executed when an object of a given type is created.
data structures Components in code that are used to store data within the program.
encapsulation The hiding of details around the implementation of an object so there are no external dependencies on the particular implementation.
enumerations A distinct type consisting of a set of named constants.
event publisher The object in code that will raise the event for the listener or subscriber.
event subscriber The object that listens for an event to be raised
fields Variables that store characteristic data for a class.
heap An area of memory used by the .NET compiler to store reference type variables
instance fields The same as fields but are known as instance fields because they relate to an instance of an object. In other words, their values are not shared among objects of the same class.
memory address An addressable location in computer memory that is used to store and retrieve values stored there.
methods Provide the functionality for a class.
modifiers Modify declarations of types and type members.
overloaded methods Methods with identical names for procedures that operate on different data types.
override To extend or modify the abstract or virtual implementation of an inherited method, property, indexer, or event.
properties Members that provide a flexible mechanism to read, write, or compute the values of private fields.
reference types Class files or other objects represented as references to the actual data (memory addresses).
signature In this case, a method signature. It is the unique identifying components of the method such as return type, name, and parameters.
stack An area of memory used by the .NET compiler to store value types during program execution.
EXAM TIPS AND TRICKS
The Review of Key Terms and the Cheat Sheet for this chapter can be printed off to help you study. You can find these files in the ZIP file for this chapter at www.wrox.com/remtitle.cgi?isbn=1118612094 on the Download Code tab.