C# 6.0 and the .NET 4.6 Framework (2015)
PART V
Programming with .NET Assemblies
CHAPTER 14
Building and Configuring Class Libraries
During the first four parts of this book, you have created a number of “stand-alone” executable applications, in which all the programming logic was packaged within a single executable file (*.exe). These executable assemblies were using little more than the primary .NET class library,mscorlib.dll. While some simple .NET programs may be constructed using nothing more than the .NET base class libraries, chances are it will be commonplace for you (or your teammates) to isolate reusable programming logic into custom class libraries (*.dll files) that can be shared among applications.
In this chapter, you will learn about various ways to package your types into custom libraries of code. To begin, you’ll learn the details of partitioning types into .NET namespaces. After this, you will examine the class library project templates of Visual Studio and learn the distinction between private and shared assemblies.
Next, you’ll explore exactly how the .NET runtime resolves the location of an assembly, and you’ll come to understand the global assembly cache, XML application configuration files (*.config files), publisher policy assemblies, and the System.Configuration namespace.
Defining Custom Namespaces
Before diving into the aspects of library deployment and configuration, the first task is to learn the details of packaging your custom types into .NET namespaces. Up to this point in the text, you’ve been building small test programs that leverage existing namespaces in the .NET universe (System, in particular). However, when you build larger applications with many types, it can be helpful to group your related types into custom namespaces. In C#, this is accomplished using the namespace keyword. Explicitly defining custom namespaces is even more important when creating .NET *.dll assemblies, as other developers will need to reference the library and import your custom namespaces to use your types.
To investigate the issues firsthand, begin by creating a new Console Application project named CustomNamespaces. Now, assume you are developing a collection of geometric classes named Square, Circle, and Hexagon. Given their similarities, you would like to group them together into a unique namespace called MyShapes within the CustomNamespaces.exe assembly. You have two basic approaches. First, you can choose to define all classes in a single C# file (ShapesLib.cs) as follows:
// ShapesLib.cs
using System;
namespace MyShapes
{
// Circle class
public class Circle { /* Interesting members... */ }
// Hexagon class
public class Hexagon { /* More interesting members... */ }
// Square class
public class Square { /* Even more interesting members... */ }
}
While the C# compiler has no problems with a single C# code file containing multiple types, this could be cumbersome when you want to reuse class definitions in new projects. For example, say you are building a new project and only need to use the Circle class. If all types are defined in a single code file, you are more or less stuck with the entire set. Therefore, as an alternative, you can split a single namespace across multiple C# files. To ensure each type is packaged into the same logical group, simply wrap the given class definitions in the same namespace scope, like so:
// Circle.cs
using System;
namespace MyShapes
{
// Circle class
public class Circle { /* Interesting methods... */ }
}
// Hexagon.cs
using System;
namespace MyShapes
{
// Hexagon class
public class Hexagon { /* More interesting methods... */ }
}
// Square.cs
using System;
namespace MyShapes
{
// Square class
public class Square { /* Even more interesting methods... */ }
}
In both cases, notice how the MyShapes namespace acts as the conceptual “container” of these classes. When another namespace (such as CustomNamespaces) wants to use types in a separate namespace, you use the using keyword, just as you would when using namespaces of the .NET base class libraries, as follows:
// Bring in a namespace from the base class libraries.
using System;
// Make use of types defined the MyShapes namespace.
using MyShapes;
namespace CustomNamespaces
{
public class Program
{
static void Main(string[] args)
{
Hexagon h = new Hexagon();
Circle c = new Circle();
Square s = new Square();
}
}
}
For this particular example, the assumption is that the C# file (or files) that defines the MyShapes namespace is part of the same Console Application project that contains the file defining the CustomNamespaces namespace; in other words, all the files are used to compile a single .NET executable assembly. If you defined the MyShapes namespace within an external assembly, you would also need to add a reference to that library before you could compile successfully. You’ll learn all the details of building applications that use external libraries during the course of this chapter.
Resolving Name Clashes with Fully Qualified Names
Technically speaking, you are not required to use the C# using keyword when referring to types defined in external namespaces. You could use the fully qualified name of the type, which, as you may recall from Chapter 1, is the type’s name prefixed with the defining namespace. Here’s an example:
// Note we are not importing MyShapes anymore!
using System;
namespace CustomNamespaces
{
public class Program
{
static void Main(string[] args)
{
MyShapes.Hexagon h = new MyShapes.Hexagon();
MyShapes.Circle c = new MyShapes.Circle();
MyShapes.Square s = new MyShapes.Square();
}
}
}
Typically, there is no need to use a fully qualified name. Not only does it require a greater number of keystrokes, it also makes no difference whatsoever in terms of code size or execution speed. In fact, in CIL code, types are always defined with the fully qualified name. In this light, the C# using keyword is simply a typing time-saver.
However, fully qualified names can be helpful (and sometimes necessary) to avoid potential name clashes when using multiple namespaces that contain identically named types. Assume you have a new namespace termed My3DShapes, which defines the following three classes, capable of rendering a shape in stunning 3D:
// Another shape-centric namespace.
using System;
namespace My3DShapes
{
// 3D Circle class.
public class Circle { }
// 3D Hexagon class.
public class Hexagon { }
// 3D Square class.
public class Square { }
}
If you update the Program class as shown next, you are issued a number of compile-time errors, because both namespaces define identically named classes:
// Ambiguities abound!
using System;
using MyShapes;
using My3DShapes;
namespace CustomNamespaces
{
public class Program
{
static void Main(string[] args)
{
// Which namespace do I reference?
Hexagon h = new Hexagon(); // Compiler error!
Circle c = new Circle(); // Compiler error!
Square s = new Square(); // Compiler error!
}
}
}
The ambiguity can be resolved using the type’s fully qualified name, like so:
// We have now resolved the ambiguity.
static void Main(string[] args)
{
My3DShapes.Hexagon h = new My3DShapes.Hexagon();
My3DShapes.Circle c = new My3DShapes.Circle();
MyShapes.Square s = new MyShapes.Square();
}
Resolving Name Clashes with Aliases
The C# using keyword also lets you create an alias for a type’s fully qualified name. When you do so, you define a token that is substituted for the type’s full name at compile time. Defining aliases provides a second way to resolve name clashes. Here’s an example:
using System;
using MyShapes;
using My3DShapes;
// Resolve the ambiguity using a custom alias.
using The3DHexagon = My3DShapes.Hexagon;
namespace CustomNamespaces
{
class Program
{
static void Main(string[] args)
{
// This is really creating a My3DShapes.Hexagon class.
The3DHexagon h2 = new The3DHexagon();
...
}
}
}
This alternative using syntax also lets you create an alias for a lengthy namespace. One of the longer namespaces in the base class library is System.Runtime.Serialization.Formatters.Binary, which contains a member named BinaryFormatter. If you want, you can create an instance of the BinaryFormatter as follows:
using bfHome = System.Runtime.Serialization.Formatters.Binary;
namespace MyApp
{
class ShapeTester
{
static void Main(string[] args)
{
bfHome.BinaryFormatter b = new bfHome.BinaryFormatter();
...
}
}
}
as well as with a traditional using directive:
using System.Runtime.Serialization.Formatters.Binary;
namespace MyApp
{
class ShapeTester
{
static void Main(string[] args)
{
BinaryFormatter b = new BinaryFormatter();
...
}
}
}
At this point in the game, there is no need to concern yourself with what the BinaryFormatter class is used for (you’ll examine this class in Chapter 20). For now, simply remember that the C# using keyword can be used to define aliases for lengthy fully qualified names or, more commonly, to resolve name clashes that can arise when importing multiple namespaces that define identically named types.
![]() Note Be aware that overuse of C# aliases can result in a confusing code base. If other programmers on your team are unaware of your custom aliases, they could assume the aliases refer to types in the .NET base class libraries and become quite confused when they can’t find these tokens in the .NET Framework SDK documentation!
Note Be aware that overuse of C# aliases can result in a confusing code base. If other programmers on your team are unaware of your custom aliases, they could assume the aliases refer to types in the .NET base class libraries and become quite confused when they can’t find these tokens in the .NET Framework SDK documentation!
Creating Nested Namespaces
When organizing your types, you are free to define namespaces within other namespaces. The .NET base class libraries do so in numerous places to provide deeper levels of type organization. For example, the IO namespace is nested within System to yield System.IO. If you want to create a root namespace containing the existing My3DShapes namespace, you can update your code as follows:
// Nesting a namespace.
namespace Chapter14
{
namespace My3DShapes
{
// 3D Circle class.
public class Circle{ }
// 3D Hexagon class.
public class Hexagon{ }
// 3D Square class.
public class Square{ }
}
}
In many cases, the role of a root namespace is simply to provide a further level of scope; therefore, it may not define any types directly within its scope (as in the case of the Chapter14 namespace). If this is the case, a nested namespace can be defined using the following compact form:
// Nesting a namespace (take two).
namespace Chapter14.My3DShapes
{
// 3D Circle class.
public class Circle{ }
// 3D Hexagon class.
public class Hexagon{ }
// 3D Square class.
public class Square{ }
}
Given that you have now nested the My3DShapes namespace within the Chapter14 root namespace, you need to update any existing using directives and type aliases, like so:
using Chapter14.My3DShapes;
using The3DHexagon = Chapter14.My3DShapes.Hexagon;
The Default Namespace of Visual Studio
On a final namespace-related note, it is worth pointing out that, by default, when you create a new C# project using Visual Studio, the name of your application’s default namespace will be identical to the project name. From this point on, when you insert new code files using the Project ![]() Add New Item menu selection, types will automatically be wrapped within the default namespace. If you want to change the name of the default namespace, simply access the Default namespace option using the Application tab of the project’s Properties window (see Figure 14-1).
Add New Item menu selection, types will automatically be wrapped within the default namespace. If you want to change the name of the default namespace, simply access the Default namespace option using the Application tab of the project’s Properties window (see Figure 14-1).
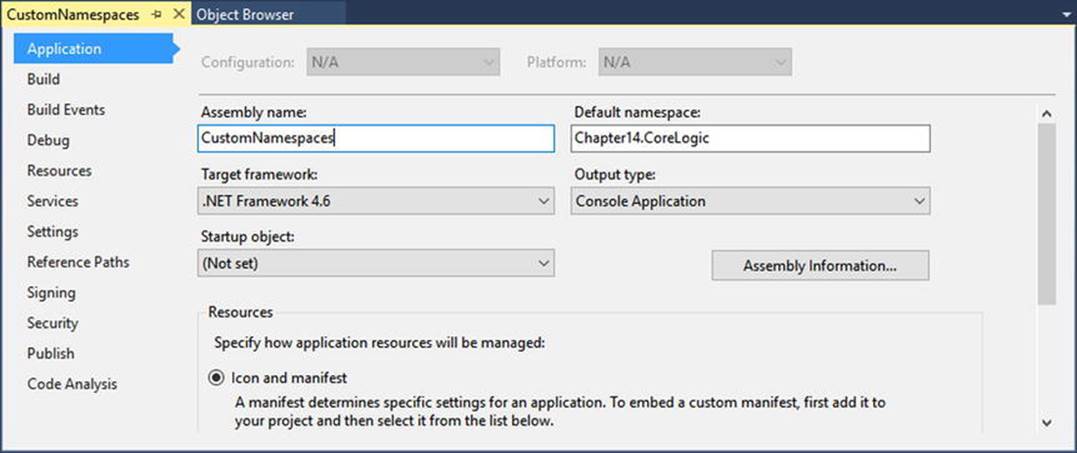
Figure 14-1. Configuring the default namespace
With this update, any new item inserted into the project will be wrapped within the Chapter14.CoreLogic namespace (and, obviously, if another namespace wants to use these types, the correct using directive must be applied).
So far, so good. Now that you have seen some details regarding how to package your custom types into well-organized namespaces, let’s quickly review the benefits and format of the .NET assembly. After this, you will delve into the details of creating, deploying, and configuring your custom class libraries.
![]() Source Code The CustomNamespaces project is located in the Chapter 14 subdirectory.
Source Code The CustomNamespaces project is located in the Chapter 14 subdirectory.
The Role of .NET Assemblies
.NET applications are constructed by piecing together any number of assemblies. Simply put, an assembly is a versioned, self-describing binary file hosted by the CLR. Now, despite that .NET assemblies have the same file extensions (*.exe or *.dll) as previous Windows binaries, they have little in common with those files under the hood. Thus, to set the stage for the information to come, let’s consider some of the benefits provided by the assembly format.
Assemblies Promote Code Reuse
As you have built your Console Application projects over the previous chapters, it might have seemed that all the applications’ functionality was contained within the executable assembly you were constructing. In reality, your applications were leveraging numerous types contained within the always-accessible .NET code library, mscorlib.dll (recall that the C# compiler references mscorlib.dll automatically), and in the case of some examples, System.Core.dll.
As you might know, a code library (also termed a class library) is a *.dll that contains types intended to be used by external applications. When you are creating executable assemblies, you will no doubt be leveraging numerous system-supplied and custom code libraries as you create your application. Do be aware, however, that a code library need not take a *.dll file extension. It is perfectly possible (although certainly not common) for an executable assembly to use types defined within an external executable file. In this light, a referenced *.exe can also be considered a code library.
Regardless of how a code library is packaged, the .NET platform allows you to reuse types in a language-independent manner. For example, you could create a code library in C# and reuse that library in any other .NET programming language. It is possible not only to allocate types across languages but also to derive from them. A base class defined in C# could be extended by a class authored in Visual Basic. Interfaces defined in F# can be implemented by structures defined in C#, and so forth. The point is that when you begin to break apart a single monolithic executable into numerous .NET assemblies, you achieve a language-neutral form of code reuse.
Assemblies Establish a Type Boundary
Recall that a type’s fully qualified name is composed by prefixing the type’s namespace (e.g., System) to its name (e.g., Console). Strictly speaking, however, the assembly in which a type resides further establishes a type’s identity. For example, if you have two uniquely named assemblies (say, MyCars.dll and YourCars.dll) that both define a namespace (CarLibrary) containing a class named SportsCar, they are considered unique types in the .NET universe.
Assemblies are Versionable Units
.NET assemblies are assigned a four-part numerical version number of the form <major>.<minor>.<build>.<revision>. (If you do not explicitly provide a version number, the assembly is automatically assigned a version of 1.0.0.0, given the default Visual Studio project settings.) This number, in conjunction with an optional public key value, allows multiple versions of the same assembly to coexist in harmony on a single machine. Formally speaking, assemblies that provide public key information are termed strongly named. As you will see in this chapter, by using a strong name, the CLR is able to ensure that the correct version of an assembly is loaded on behalf of the calling client.
Assemblies are Self-Describing
Assemblies are regarded as self-describing, in part because they record every external assembly they must have access to in order to function correctly. Thus, if your assembly requires System.Windows.Forms.dll and System.Core.dll, this will be documented in the assembly’smanifest. Recall from Chapter 1 that a manifest is a blob of metadata that describes the assembly itself (name, version, required external assemblies, etc.).
In addition to manifest data, an assembly contains metadata that describes the composition (member names, implemented interfaces, base classes, constructors, and so forth) of every contained type. Because an assembly is documented in such detail, the CLR does not consult the Windows system registry to resolve its location (quite the radical departure from Microsoft’s legacy COM programming model). As you will discover during this chapter, the CLR makes use of an entirely new scheme to resolve the location of external code libraries.
Assemblies are Configurable
Assemblies can be deployed as “private” or “shared.” Private assemblies reside in the same directory (or possibly a subdirectory) as the client application that uses them. Shared assemblies, on the other hand, are libraries intended to be consumed by numerous applications on a single machine and are deployed to a specific directory termed the global assembly cache, or GAC.
Regardless of how you deploy your assemblies, you are free to author XML-based configuration files. Using these configuration files, you can instruct the CLR to “probe” for assemblies at a specific location, load a specific version of a referenced assembly for a particular client, or consult an arbitrary directory on your local machine, your network location, or a web-based URL. You’ll learn a good deal more about XML configuration files throughout this chapter.
Understanding the Format of a .NET Assembly
Now that you’ve learned about several benefits provided by the .NET assembly, let’s shift gears and get a better idea of how an assembly is composed under the hood. Structurally speaking, a .NET assembly (*.dll or *.exe) consists of the following elements:
· A Windows file header
· A CLR file header
· CIL code
· Type metadata
· An assembly manifest
· Optional embedded resources
While the first two elements (the Windows and CLR headers) are blocks of data you can typically always ignore, they do deserve some brief consideration. Here’s an overview of each element.
The Windows File Header
The Windows file header establishes the fact that the assembly can be loaded and manipulated by the Windows family of operating systems. This header data also identifies the kind of application (console- based, GUI-based, or *.dll code library) to be hosted by Windows. If you open a .NET assembly using the dumpbin.exe utility (via a Windows Command Prompt) and specify the /headers flag as so:
dumpbin /headers CarLibrary.dll
you can view an assembly’s Windows header information. Here is the (partial) Windows header information for the CarLibrary.dll assembly you will build a bit later in this chapter (if you would like to run dumpbin.exe yourself right now, you can specify the name of any *.dll or*.exe you wrote during this book in place of CarLibrary.dll):
Dump of file CarLibrary.dll
PE signature found
File Type: DLL
FILE HEADER VALUES
14C machine (x86)
3 number of sections
4B37DCD8 time date stamp Sun Dec 27 16:16:56 2011
0 file pointer to symbol table
0 number of symbols
E0 size of optional header
2102 characteristics
Executable
32 bit word machine
DLL
OPTIONAL HEADER VALUES
10B magic # (PE32)
8.00 linker version
E00 size of code
600 size of initialized data
0 size of uninitialized data
2CDE entry point (00402CDE)
2000 base of code
4000 base of data
400000 image base (00400000 to 00407FFF)
2000 section alignment
200 file alignment
4.00 operating system version
0.00 image version
4.00 subsystem version
0 Win32 version
8000 size of image
200 size of headers
0 checksum
3 subsystem (Windows CUI)
...
Now, remember that the vast majority of .NET programmers will never need to concern themselves with the format of the header data embedded in a .NET assembly. Unless you happen to be building a new .NET language compiler (where you would care about such information), you are free to remain blissfully unaware of the grimy details of the header data. Do be aware, however, that this information is used under the covers when Windows loads the binary image into memory.
The CLR File Header
The CLR header is a block of data that all .NET assemblies must support (and do support, courtesy of the C# compiler) to be hosted by the CLR. In a nutshell, this header defines numerous flags that enable the runtime to understand the layout of the managed file. For example, flags exist that identify the location of the metadata and resources within the file, the version of the runtime the assembly was built against, the value of the (optional) public key, and so forth. If you supply the /clrheader flag to dumpbin.exe like so:
dumpbin /clrheader CarLibrary.dll
you are presented with the internal CLR header information for a given .NET assembly, as shown here:
Dump of file CarLibrary.dll
File Type: DLL
clr Header:
48 cb
2.05 runtime version
2164 [ A74] RVA [size] of MetaData Directory
1 flags
IL Only
0 entry point token
0 [ 0] RVA [size] of Resources Directory
0 [ 0] RVA [size] of StrongNameSignature Directory
0 [ 0] RVA [size] of CodeManagerTable Directory
0 [ 0] RVA [size] of VTableFixups Directory
0 [ 0] RVA [size] of ExportAddressTableJumps Directory
0 [ 0] RVA [size] of ManagedNativeHeader Directory
Summary
2000 .reloc
2000 .rsrc
2000 .text
Again, as a .NET developer, you will not need to concern yourself with the gory details of an assembly’s CLR header information. Just understand that every .NET assembly contains this data, which is used behind the scenes by the .NET runtime as the image data loads into memory. Now turn your attention to some information that is much more useful in your day-to-day programming tasks.
CIL Code, Type Metadata, and the Assembly Manifest
At its core, an assembly contains CIL code, which, as you recall, is a platform- and CPU-agnostic intermediate language. At runtime, the internal CIL is compiled on the fly using a just-in-time (JIT) compiler, according to platform- and CPU-specific instructions. Given this design, .NET assemblies can indeed execute on a variety of architectures, devices, and operating systems. (Although you can live a happy and productive life without understanding the details of the CIL programming language, Chapter 18 offers an introduction to the syntax and semantics of CIL.)
An assembly also contains metadata that completely describes the format of the contained types, as well as the format of external types referenced by this assembly. The .NET runtime uses this metadata to resolve the location of types (and their members) within the binary, lay out types in memory, and facilitate remote method invocations. You’ll check out the details of the .NET metadata format in Chapter 15 during your examination of reflection services.
An assembly must also contain an associated manifest (also referred to as assembly metadata). The manifest documents each module within the assembly, establishes the version of the assembly, and also documents any external assemblies referenced by the current assembly. As you will see over the course of this chapter, the CLR makes extensive use of an assembly’s manifest during the process of locating external assembly references.
Optional Assembly Resources
Finally, a .NET assembly may contain any number of embedded resources, such as application icons, image files, sound clips, or string tables. In fact, the .NET platform supports satellite assemblies that contain nothing but localized resources. This can be useful if you want to partition your resources based on a specific culture (English, German, etc.) for the purposes of building international software. The topic of building satellite assemblies is outside the scope of this text; consult the .NET 4.6 Framework documentation for information on satellite assemblies if you are interested.
Building and Consuming Custom Class Library
To begin exploring the world of .NET class libraries, you’ll first create a *.dll assembly (named CarLibrary) that contains a small set of public types. To build a code library using Visual Studio, select the Class Library project workspace via the File ![]() New Project menu option (seeFigure 14-2).
New Project menu option (seeFigure 14-2).
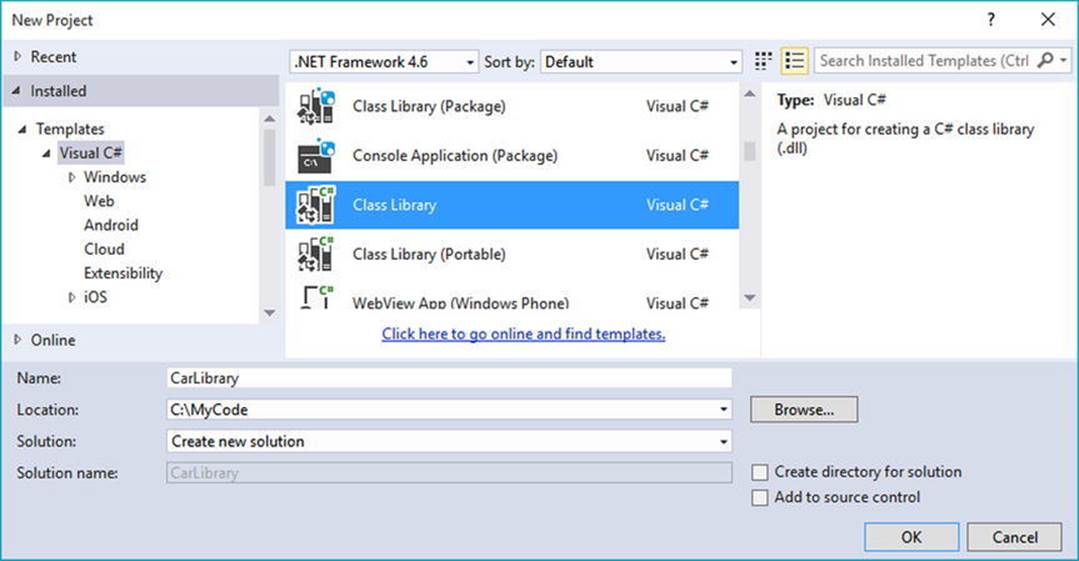
Figure 14-2. Creating a C# class library
The design of your automobile library begins with an abstract base class named Car that defines various state data via automatic property syntax. This class also has a single abstract method named TurboBoost(), which uses a custom enumeration (EngineState) representing the current condition of the car’s engine, as shown here:
using System;
using System.Collections.Generic;
using System.Linq;
using System.Text;
using System.Threading.Tasks;
namespace CarLibrary
{
// Represents the state of the engine.
public enum EngineState
{ engineAlive, engineDead }
// The abstract base class in the hierarchy.
public abstract class Car
{
public string PetName {get; set;}
public int CurrentSpeed {get; set;}
public int MaxSpeed {get; set;}
protected EngineState egnState = EngineState.engineAlive;
public EngineState EngineState
{
get { return egnState; }
}
public abstract void TurboBoost();
public Car(){}
public Car(string name, int maxSp, int currSp)
{
PetName = name; MaxSpeed = maxSp; CurrentSpeed = currSp;
}
}
}
Now assume you have two direct descendants of the Car type named MiniVan and SportsCar. Each overrides the abstract TurboBoost() method by displaying an appropriate message via a Windows Forms message box. Insert a new C# class file into your project, namedDerivedCars.cs, which contains the following code:
using System;
using System.Collections.Generic;
using System.Linq;
using System.Text;
using System.Threading.Tasks;
// Keep reading! This won’t compile until you reference a .NET library.
using System.Windows.Forms;
namespace CarLibrary
{
public class SportsCar : Car
{
public SportsCar(){ }
public SportsCar(string name, int maxSp, int currSp)
: base (name, maxSp, currSp){ }
public override void TurboBoost()
{
MessageBox.Show("Ramming speed!", "Faster is better...");
}
}
public class MiniVan : Car
{
public MiniVan(){ }
public MiniVan(string name, int maxSp, int currSp)
: base (name, maxSp, currSp){ }
public override void TurboBoost()
{
// Minivans have poor turbo capabilities!
egnState = EngineState.engineDead;
MessageBox.Show("Eek!", "Your engine block exploded!");
}
}
}
Notice how each subclass implements TurboBoost() using the Windows Form’s MessageBox class, which is defined in the System.Windows.Forms.dll assembly. For your assembly to use the types defined within this external assembly, the CarLibrary project must add a reference to this assembly via the Add Reference dialog box (see Figure 14-3), which you can access through the Visual Studio Project ![]() Add Reference menu selection.
Add Reference menu selection.
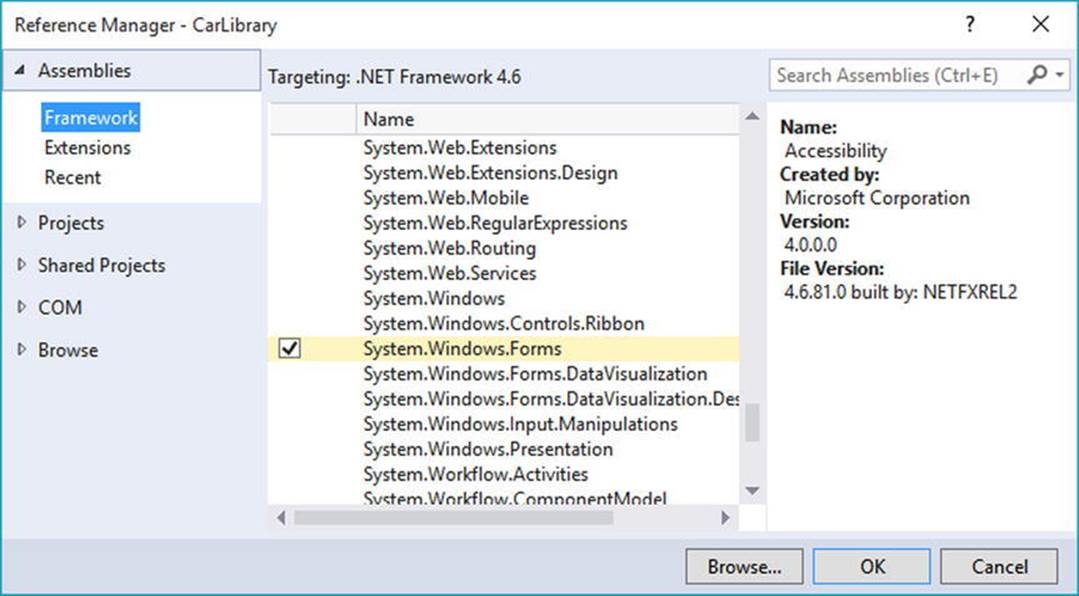
Figure 14-3. Referencing external .NET assemblies using the Add Reference dialog box
It is really important to understand that the assemblies displayed in the Framework area of the Add Reference dialog box do not represent every assembly on your machine. The Add Reference dialog box will not display your custom libraries, and it does not display all libraries located in the GAC (more details later in the chapter). Rather, this dialog box simply presents a list of common assemblies that Visual Studio is preprogrammed to display. When you are building applications that require the use of an assembly not listed within the Add Reference dialog box, you need to click the Browse node to manually navigate to the *.dll or *.exe in question.
![]() Note Be aware that the Recent section of the Add Reference dialog box keeps a running list of previously referenced assemblies. This can be handy, as many .NET projects tend to use the same core set of external libraries.
Note Be aware that the Recent section of the Add Reference dialog box keeps a running list of previously referenced assemblies. This can be handy, as many .NET projects tend to use the same core set of external libraries.
Exploring the Manifest
Before using CarLibrary.dll from a client application, let’s check out how the code library is composed under the hood. Assuming you have compiled this project, load CarLibrary.dll into ildasm.exe via the File ![]() Open menu, and navigate to the \bin\Debug subdirectory of your CarLibrary project. When you are done, you should see your library displayed in the IL disassembler tool (see Figure 14-4).
Open menu, and navigate to the \bin\Debug subdirectory of your CarLibrary project. When you are done, you should see your library displayed in the IL disassembler tool (see Figure 14-4).
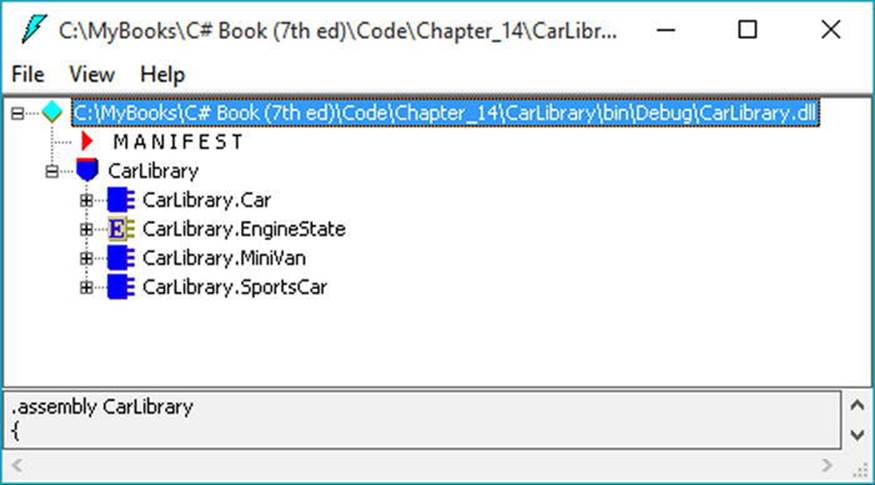
Figure 14-4. CarLibrary.dll loaded into ildasm.exe
Now, open the manifest of CarLibrary.dll by double-clicking the MANIFEST icon. The first code block in a manifest specifies all external assemblies required by the current assembly to function correctly. As you recall, CarLibrary.dll made use of types withinmscorlib.dll and System.Windows.Forms.dll, both of which are listed in the manifest using the .assembly extern token, as shown here:
.assembly extern mscorlib
{
.publickeytoken = (B7 7A 5C 56 19 34 E0 89 )
.ver 4:0:0:0
}
.assembly extern System.Windows.Forms
{
.publickeytoken = (B7 7A 5C 56 19 34 E0 89 )
.ver 4:0:0:0
}
Here, each .assembly extern block is qualified by the .publickeytoken and .ver directives. The .publickeytoken instruction is present only if the assembly has been configured with a strong name (more details on strong names in the section “Understanding Strong Names,” later in this chapter). The .ver token defines (of course) the numerical version identifier of the referenced assembly.
After the external references, you will find a number of .custom tokens that identify assembly-level attributes (copyright information, company name, assembly version, etc.). Here is a (very) partial listing of this particular chunk of manifest data:
.assembly CarLibrary
{
.custom instance void ...AssemblyDescriptionAttribute...
.custom instance void ...AssemblyConfigurationAttribute...
.custom instance void ...RuntimeCompatibilityAttribute...
.custom instance void ...TargetFrameworkAttribute...
.custom instance void ...AssemblyTitleAttribute...
.custom instance void ...AssemblyTrademarkAttribute...
.custom instance void ...AssemblyCompanyAttribute...
.custom instance void ...AssemblyProductAttribute...
.custom instance void ...AssemblyCopyrightAttribute...
...
.ver 1:0:0:0
}
.module CarLibrary.dll
Typically, these settings are established visually using the Properties editor of your current project. Now, switching back to Visual Studio, if you click the Properties icon within the Solution Explorer, you can click the Assembly Information button located on the (automatically selected) Application tab. This will bring up the GUI editor shown in Figure 14-5.
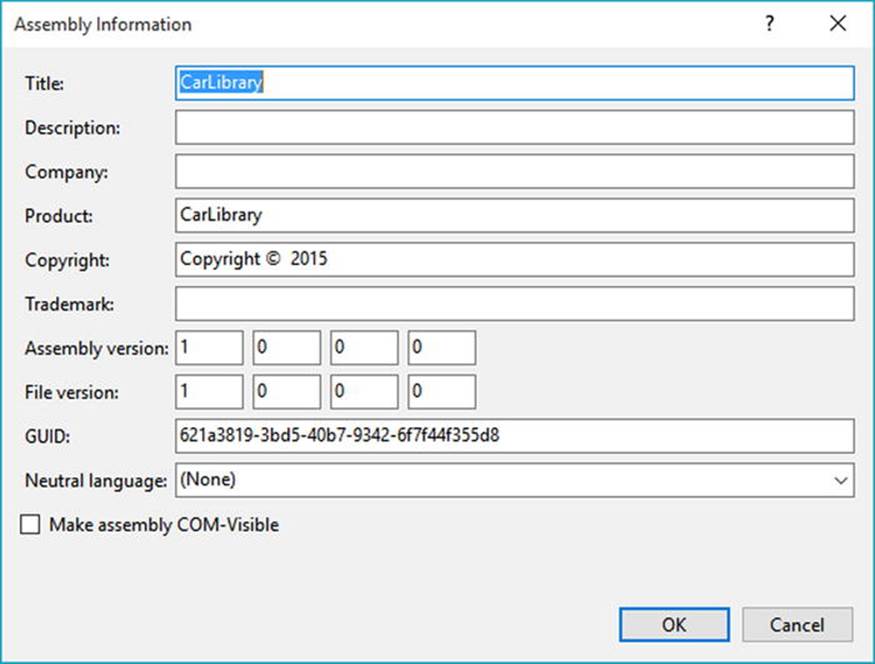
Figure 14-5. Editing assembly information using Visual Studio’s Properties editor
When you save your changes, the GUI editor updates your project’s AssemblyInfo.cs file, which is maintained by Visual Studio and can be viewed by expanding the Properties node of the Solution Explorer (see Figure 14-6).
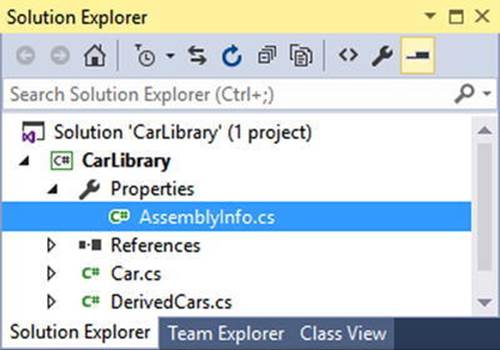
Figure 14-6. The AssemblyInfo.cs file is updated as you use the GUI Properties editor
If you view the contents of this C# file, you’ll see a number of .NET attributes sandwiched between square brackets. Here’s an example:
[assembly: AssemblyTitle("CarLibrary")]
[assembly: AssemblyDescription("")]
[assembly: AssemblyConfiguration("")]
[assembly: AssemblyCompany("")]
[assembly: AssemblyProduct("CarLibrary")]
[assembly: AssemblyCopyright("Copyright © 2015")]
[assembly: AssemblyTrademark("")]
[assembly: AssemblyCulture("")]
Chapter 15 examines the role of attributes in depth, so don’t sweat the details at this point. For now, just be aware that a majority of the attributes in AssemblyInfo.cs will be used to update the .custom token values within an assembly manifest.
Exploring the CIL
Recall that an assembly does not contain platform-specific instructions; rather, it contains platform- agnostic common intermediate language (CIL) instructions. When the .NET runtime loads an assembly into memory, the underlying CIL is compiled (using the JIT compiler) into instructions that can be understood by the target platform. For example, back in ildasm.exe, if you double-click the TurboBoost() method of the SportsCar class, ildasm.exe will open a new window showing the CIL tokens that implement this method.
.method public hidebysig virtual instance void
TurboBoost() cil managed
{
// Code size 18 (0x12)
.maxstack 8
IL_0000: nop
IL_0001: ldstr "Ramming speed!"
IL_0006: ldstr "Faster is better..."
IL_000b: call valuetype [System.Windows.Forms]System.Windows.Forms.DialogResult
[System.Windows.Forms]System.Windows.Forms.MessageBox::Show(string, string)
IL_0010: pop
IL_0011: ret
} // end of method SportsCar::TurboBoost
Again, while most .NET developers don’t need to be deeply concerned with the details of CIL on a daily basis, Chapter 18 provides more details on its syntax and semantics. Believe it or not, understanding the grammar of CIL can be helpful when you are building more complex applications that require advanced services, such as runtime construction of assemblies (again, see Chapter 18).
Exploring the Type Metadata
Before you build some applications that use your custom .NET library, if you press the Ctrl+M keystroke combination in ildasm.exe, you can see the metadata for each type within the CarLibrary.dll assembly (see Figure 14-7).
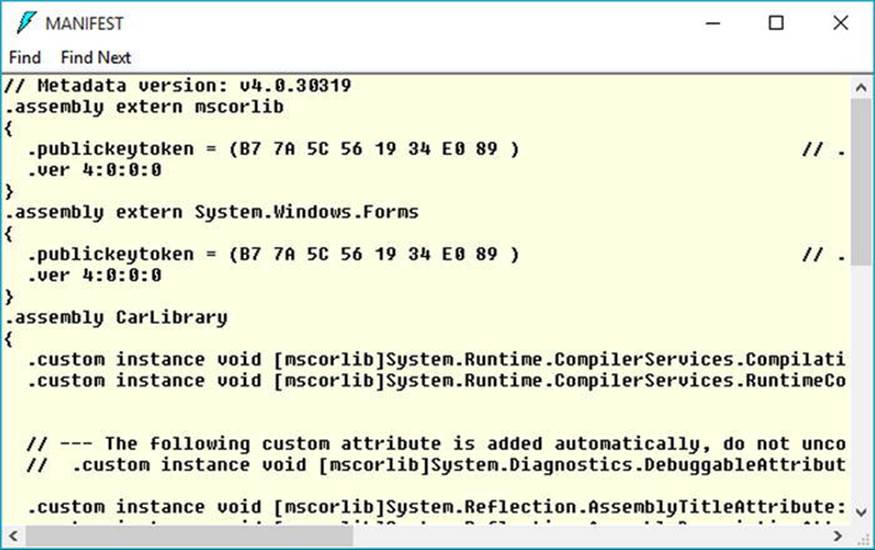
Figure 14-7. Type metadata for the types within CarLibrary.dll
As explained in the next chapter, an assembly’s metadata is an important element of the .NET platform and serves as the backbone for numerous technologies (object serialization, late binding, extendable applications, etc.). In any case, now that you have looked inside theCarLibrary.dll assembly, you can build some client applications that use your types.
![]() Source Code The CarLibrary project is located in the Chapter 14 subdirectory.
Source Code The CarLibrary project is located in the Chapter 14 subdirectory.
Building a C# Client Application
Because each of the CarLibrary types has been declared using the public keyword, other .NET applications are able to use them as well. Recall that you may also define types using the C# internal keyword (in fact, this is the default C# access mode). Internal types can be used only by the assembly in which they are defined. External clients can neither see nor create types marked with the internal keyword.
To use your library’s functionality, create a new C# Console Application project named CSharpCarClient. After you have done so, set a reference to CarLibrary.dll using the Browse node of the Add Reference dialog box (if you compiled CarLibrary.dll using Visual Studio, your assembly is located in the \bin\Debug subdirectory of the CarLibrary project folder). At this point, you can build your client application to use the external types. Update your initial C# file as follows:
using System;
using System.Collections.Generic;
using System.Linq;
using System.Text;
using System.Threading.Tasks;
// Don’t forget to import the CarLibrary namespace!
using CarLibrary;
namespace CSharpCarClient
{
public class Program
{
static void Main(string[] args)
{
Console.WriteLine("***** C# CarLibrary Client App *****");
// Make a sports car.
SportsCar viper = new SportsCar("Viper", 240, 40);
viper.TurboBoost();
// Make a minivan.
MiniVan mv = new MiniVan();
mv.TurboBoost();
Console.WriteLine("Done. Press any key to terminate");
Console.ReadLine();
}
}
}
This code looks just like the code of the other applications developed thus far in the book. The only point of interest is that the C# client application is now using types defined within a separate custom library. Go ahead and run your program and verify that you see the display of various message boxes.
You might be wondering exactly what happened when you referenced CarLibrary.dll using the Add Reference dialog box. If you click the Show All Files button of the Solution Explorer, you will notice that Visual Studio added a copy of the original CarLibrary.dll into the\bin\Debug folder of the CSharpCarClient project folder (see Figure 14-8).

Figure 14-8. Visual Studio copies private assemblies to the client’s directory
As explained shortly, CarLibrary.dll has been configured as a “private” assembly (which is the automatic behavior for all Visual Studio Class Library projects). When you reference private assemblies in new applications (such as CSharpCarClient.exe), the IDE responds by placing a copy of the library in the client application’s output directory.
![]() Source Code The CSharpCarClient project is located in the Chapter 14 subdirectory.
Source Code The CSharpCarClient project is located in the Chapter 14 subdirectory.
Building a Visual Basic Client Application
Recall that the .NET platform allows developers to share compiled code across programming languages. To illustrate the language-agnostic attitude of the .NET platform, let’s create another Console Application (VisualBasicCarClient), this time using Visual Basic (see Figure 14-9). Once you have created the project, set a reference to CarLibrary.dll using the Add Reference dialog box, which can be activated by the Project ![]() Add Reference menu option.
Add Reference menu option.

Figure 14-9. Creating a Visual Basic Console Application project
Like C#, Visual Basic allows you to list each namespace used within the current file. However, Visual Basic offers the Imports keyword rather than the C# using keyword, so add the following Imports statement within the Module1.vb code file:
Imports CarLibrary
Module Module1
Sub Main()
End Sub
End Module
Notice that the Main() method is defined within a Visual Basic module type. In a nutshell, modules are a Visual Basic notation for defining a class that can contain only static methods (much like a C# static class). In any case, to exercise the MiniVan and SportsCar types using the syntax of Visual Basic, update your Main() method as follows:
Sub Main()
Console.WriteLine("***** VB CarLibrary Client App *****")
’ Local variables are declared using the Dim keyword.
Dim myMiniVan As New MiniVan()
myMiniVan.TurboBoost()
Dim mySportsCar As New SportsCar()
mySportsCar.TurboBoost()
Console.ReadLine()
End Sub
When you compile and run your application, you will once again find a series of message boxes displayed. Furthermore, this new client application has its own local copy of CarLibrary.dll located under the bin\Debug folder.
Cross-Language Inheritance in Action
An enticing aspect of .NET development is the notion of cross-language inheritance. To illustrate, let’s create a new Visual Basic class that derives from SportsCar (which was authored using C#). First, add a new class file to your current Visual Basic application (by selecting the Project ![]() Add Class menu option) named PerformanceCar.vb. Update the initial class definition by deriving from the SportsCar type using the Inherits keyword. Then, override the abstract TurboBoost() method using the Overrides keyword, like so:
Add Class menu option) named PerformanceCar.vb. Update the initial class definition by deriving from the SportsCar type using the Inherits keyword. Then, override the abstract TurboBoost() method using the Overrides keyword, like so:
Imports CarLibrary
’ This VB class is deriving from the C# SportsCar.
Public Class PerformanceCar
Inherits SportsCar
Public Overrides Sub TurboBoost()
Console.WriteLine("Zero to 60 in a cool 4.8 seconds...")
End Sub
End Class
To test this new class type, update the module’s Main() method as follows:
Sub Main()
...
Dim dreamCar As New PerformanceCar()
’ Use Inherited property.
dreamCar.PetName = "Hank"
dreamCar.TurboBoost()
Console.ReadLine()
End Sub
Notice that the dreamCar object is able to invoke any public member (such as the PetName property) found up the chain of inheritance, regardless of the fact that the base class was defined in a completely different language and in a completely different assembly! The ability to extend classes across assembly boundaries in a language-independent manner is a natural aspect of the .NET development cycle. This makes it easy to use compiled code written by individuals who would rather not build their shared code with C#.
![]() Source Code The VisualBasicCarClient project is located in the Chapter 14 subdirectory.
Source Code The VisualBasicCarClient project is located in the Chapter 14 subdirectory.
Understanding Private Assemblies
Technically speaking, the class libraries you’ve created thus far in this chapter have been deployed as private assemblies. Private assemblies must be located within the same directory as the client application that’s using them (the application directory) or a subdirectory thereof. Recall that when you add a reference to CarLibrary.dll while building the CSharpCarClient.exe and VisualBasicCarClient.exe applications, Visual Studio responded by placing a copy of CarLibrary.dll within the client’s application directory (at least, after the first compilation).
When a client program uses the types defined within this external assembly, the CLR simply loads the local copy of CarLibrary.dll. Because the .NET runtime does not consult the system registry when searching for referenced assemblies, you can relocate theCSharpCarClient.exe (or VisualBasicCarClient.exe) and CarLibrary.dll assemblies to a new location on your machine and run the application (this is often termed Xcopy deployment).
Uninstalling (or replicating) an application that makes exclusive use of private assemblies is a no- brainer: simply delete (or copy) the application folder. More important, you do not need to worry that the removal of private assemblies will break any other applications on the machine.
The Identity of a Private Assembly
The full identity of a private assembly consists of the friendly name and numerical version, both of which are recorded in the assembly manifest. The friendly name is simply the name of the module that contains the assembly’s manifest minus the file extension. For example, if you examine the manifest of the CarLibrary.dll assembly, you find the following:
.assembly CarLibrary
{
...
.ver 1:0:0:0
}
Given the isolated nature of a private assembly, it should make sense that the CLR does not bother to use the version number when resolving its location. The assumption is that private assemblies do not need to have any elaborate version checking, as the client application is the only entity that “knows” of its existence. Because of this, it is possible for a single machine to have multiple copies of the same private assembly in various application directories.
Understanding the Probing Process
The .NET runtime resolves the location of a private assembly using a technique called probing, which is much less invasive than it sounds. Probing is the process of mapping an external assembly request to the location of the requested binary file. Strictly speaking, a request to load an assembly may be either implicit or explicit. An implicit load request occurs when the CLR consults the manifest to resolve the location of an assembly defined using the .assembly extern tokens. Here’s an example:
// An implicit load request.
.assembly extern CarLibrary
{ ... }
An explicit load request occurs programmatically using the Load() or LoadFrom() method of the System.Reflection.Assembly class type, typically for the purposes of late binding and dynamic invocation of type members. You’ll examine these topics further in Chapter 15, but for now you can see an example of an explicit load request in the following code:
// An explicit load request based on a friendly name.
Assembly asm = Assembly.Load("CarLibrary");
In either case, the CLR extracts the friendly name of the assembly and begins probing the client’s application directory for a file named CarLibrary.dll. If this file cannot be located, an attempt is made to locate an executable assembly based on the same friendly name (for example,CarLibrary.exe). If neither file can be located in the application directory, the runtime gives up and throws a FileNotFoundException exception at runtime.
![]() Note Technically speaking, if a copy of the requested assembly cannot be found within the client’s application directory, the CLR will also attempt to locate a client subdirectory with the same name as the assembly’s friendly name (e.g., C:\MyClient\CarLibrary). If the requested assembly resides within this subdirectory, the CLR will load the assembly into memory.
Note Technically speaking, if a copy of the requested assembly cannot be found within the client’s application directory, the CLR will also attempt to locate a client subdirectory with the same name as the assembly’s friendly name (e.g., C:\MyClient\CarLibrary). If the requested assembly resides within this subdirectory, the CLR will load the assembly into memory.
Configuring Private Assemblies
While it is possible to deploy a .NET application by simply copying all required assemblies to a single folder on the user’s hard drive, you will most likely want to define a number of subdirectories to group related content. For example, assume you have an application directory namedC:\MyApp that contains CSharpCarClient.exe. Under this folder might be a subfolder named MyLibraries that contains CarLibrary.dll.
Regardless of the intended relationship between these two directories, the CLR will not probe the MyLibraries subdirectory unless you supply a configuration file. Configuration files contain various XML elements that allow you to influence the probing process. Configuration filesmust have the same name as the launching application and take a *.config file extension, and they must be deployed in the client’s application directory. Thus, if you want to create a configuration file for CSharpCarClient.exe, it must be namedCSharpCarClient.exe.config and be located (for this example) in the C:\MyApp directory.
To illustrate the process, create a new directory on your C: drive named MyApp using Windows Explorer. Next, copy CSharpCarClient.exe and CarLibrary.dll to this new folder, and run the program by double-clicking the executable. Your program should run successfully at this point.
Now, create a new subdirectory in C:\MyApp named MyLibraries (see Figure 14-10) and move CarLibrary.dll to this location.
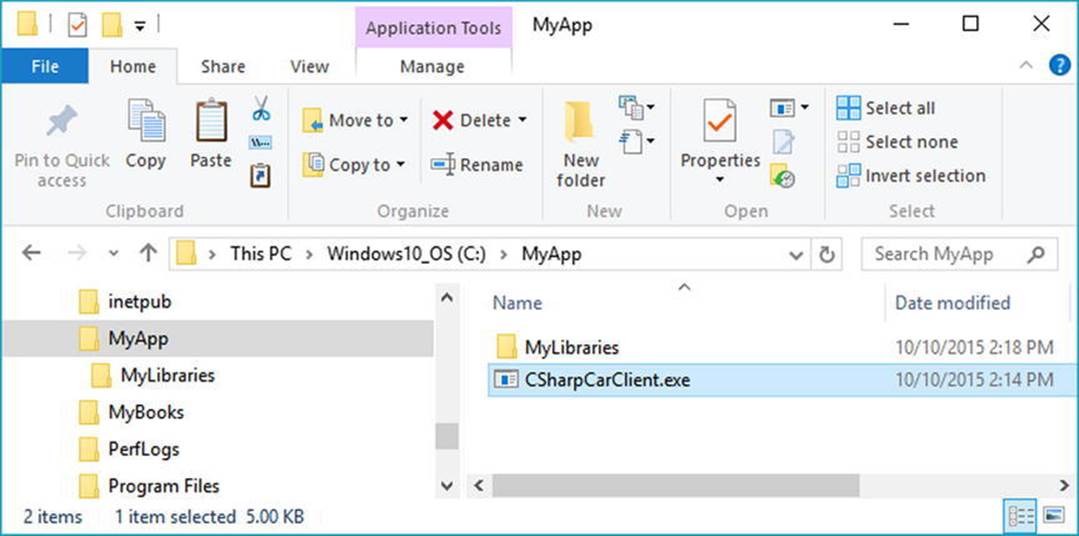
Figure 14-10. CarLibrary.dll now resides under the MyLibraries subdirectory
Try to run your client program again by double-clicking the executable. Because the CLR could not locate an assembly named CarLibrary directly within the application directory, you are presented with a rather nasty unhandled FileNotFoundException exception.
To instruct the CLR to probe under the MyLibraries subdirectory, create a new configuration file named CSharpCarClient.exe.config using any text editor, and save the file in the folder containing the CSharpCarClient.exe application, which in this example isC:\MyApp. Open this file and enter the following content exactly as shown (be aware that XML is case sensitive!):
<configuration>
<runtime>
<assemblyBinding xmlns="urn:schemas-microsoft-com:asm.v1">
<probing privatePath="MyLibraries"/>
</assemblyBinding>
</runtime>
</configuration>
.NET *.config files always open with a root element named <configuration>. The nested <runtime> element may specify an <assemblyBinding> element, which nests a further element named <probing>. The privatePath attribute is the key point in this example, as it is used to specify the subdirectories relative to the application directory where the CLR should probe.
Once you’ve finished creating CSharpCarClient.exe.config, run the client by double-clicking the executable in Windows Explorer. You should find that CSharpCarClient.exe executes without a hitch (if this is not the case, double-check your *.config file for typos).
Do note that the <probing> element does not specify which assembly is located under a given subdirectory. In other words, you cannot say, “CarLibrary is located under the MyLibraries subdirectory, but MathLibrary is located under the OtherStuff subdirectory.” The <probing>element simply instructs the CLR to investigate all specified subdirectories for the requested assembly until the first match is encountered.
![]() Note Be very aware that the privatePath attribute cannot be used to specify an absolute (C:\SomeFolder\SomeSubFolder) or relative (..\SomeFolder\AnotherFolder) path! If you need to specify a directory outside the client’s application directory, you will need to use a completely different XML element named <codeBase> (more details on this element later in the chapter).
Note Be very aware that the privatePath attribute cannot be used to specify an absolute (C:\SomeFolder\SomeSubFolder) or relative (..\SomeFolder\AnotherFolder) path! If you need to specify a directory outside the client’s application directory, you will need to use a completely different XML element named <codeBase> (more details on this element later in the chapter).
Multiple subdirectories can be assigned to the privatePath attribute using a semicolon-delimited list. You have no need to do so at this time, but here is an example that informs the CLR to consult the MyLibraries and MyLibraries\Tests client subdirectories:
<probing privatePath="MyLibraries;MyLibraries\Tests"/>
Next, for testing purposes, change the name of your configuration file (in one way or another) and attempt to run the program once again. The client application should now fail. Remember that *.config files must be prefixed with the same name as the related client application. By way of a final test, open your configuration file for editing and capitalize any of the XML elements. Once the file is saved, your client should fail to run once again (as XML is case sensitive).
![]() Note Understand that the CLR will load the first assembly it finds during the probing process. For example, if the C:\MyApp folder did contain a copy of CarLibrary.dll, it will be loaded into memory, while the copy in MyLibraries is effectively ignored.
Note Understand that the CLR will load the first assembly it finds during the probing process. For example, if the C:\MyApp folder did contain a copy of CarLibrary.dll, it will be loaded into memory, while the copy in MyLibraries is effectively ignored.
The Role of the App.Config File
While you are always able to create XML configuration files by hand using your text editor of choice, Visual Studio allows you to create a configuration file during the development of the client program. By default a new Visual Studio project will contain a configuration file for editing. If you ever need to add one manually, you may do so via the Project ![]() Add New Item menu option. Notice in Figure 14-11, you have left the name of this file as the suggested App.config.
Add New Item menu option. Notice in Figure 14-11, you have left the name of this file as the suggested App.config.
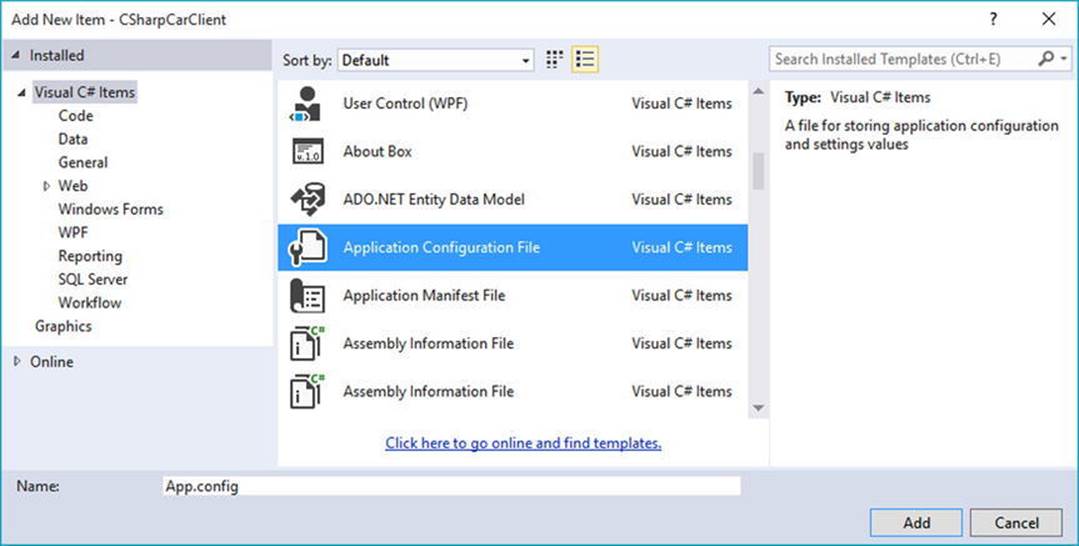
Figure 14-11. Inserting a new XML configuration file
If you open this file for viewing, you’ll see a minimal set of instructions, to which you will add additional elements.
<?xml version="1.0" encoding="utf-8" ?>
<configuration>
<startup>
<supportedRuntime version="v4.0" sku=".NETFramework,Version=v4.6" />
</startup>
</configuration>
Now, here is the cool thing. Each time you compile your project, Visual Studio will automatically copy the data in App.config to a new file in the \bin\Debug directory using the proper naming convention (such as CSharpCarClient.exe.config). However, this behavior will happen only if your configuration file is indeed named App.config; see Figure 14-12.
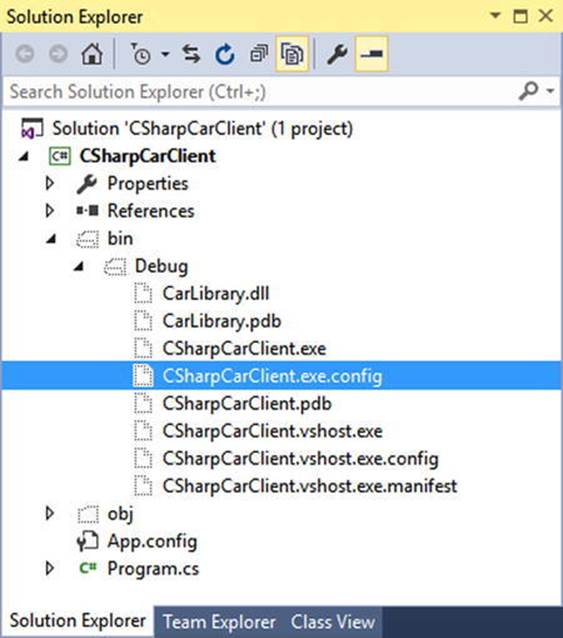
Figure 14-12. The contents of App.config will be copied to a correctly named *.config in your output directory
Using this approach, all you need to do is maintain App.config, and Visual Studio will ensure your application directory contains the latest and greatest configuration data (even if you happen to rename your project).
Understanding Shared Assemblies
Now that you understand how to deploy and configure a private assembly, you can begin to examine the role of a shared assembly. Like a private assembly, a shared assembly is a collection of types intended for reuse among projects. The most obvious difference between shared and private assemblies is that a single copy of a shared assembly can be used by several applications on the same machine.
Consider the fact that all the applications created in this text that required access to mscorlib.dll. If you were to look in the application directory of each of these clients, you would not find a private copy of this .NET assembly. The reason is that mscorlib.dll has been deployed as a shared assembly. Clearly, if you need to create a machine-wide class library, this is the way to go.
![]() Note Deciding whether a code library should be deployed as a private or shared library is yet another design issue to contend with, and this will be based on many project-specific details. As a rule of thumb, when you are building libraries that need to be used by a wide variety of applications, shared assemblies can be quite helpful in that they can be updated to new versions easily (as you will see).
Note Deciding whether a code library should be deployed as a private or shared library is yet another design issue to contend with, and this will be based on many project-specific details. As a rule of thumb, when you are building libraries that need to be used by a wide variety of applications, shared assemblies can be quite helpful in that they can be updated to new versions easily (as you will see).
The Global Assembly Cache
As suggested in the previous paragraph, a shared assembly is not deployed within the same directory as the application that uses it. Rather, shared assemblies are installed into the GAC. However, the exact location of the GAC will depend on which versions of the .NET platform you installed on the target computer.
Machines that have not installed .NET 4.0 or higher will find the GAC is located in a subdirectory of your Windows directory named Assembly (e.g., C:\Windows\assembly). These days, you might consider this the “historical GAC,” as it can only contain .NET libraries compiled on versions 1.0, 2.0, 3.0, or 3.5. See Figure 14-13.
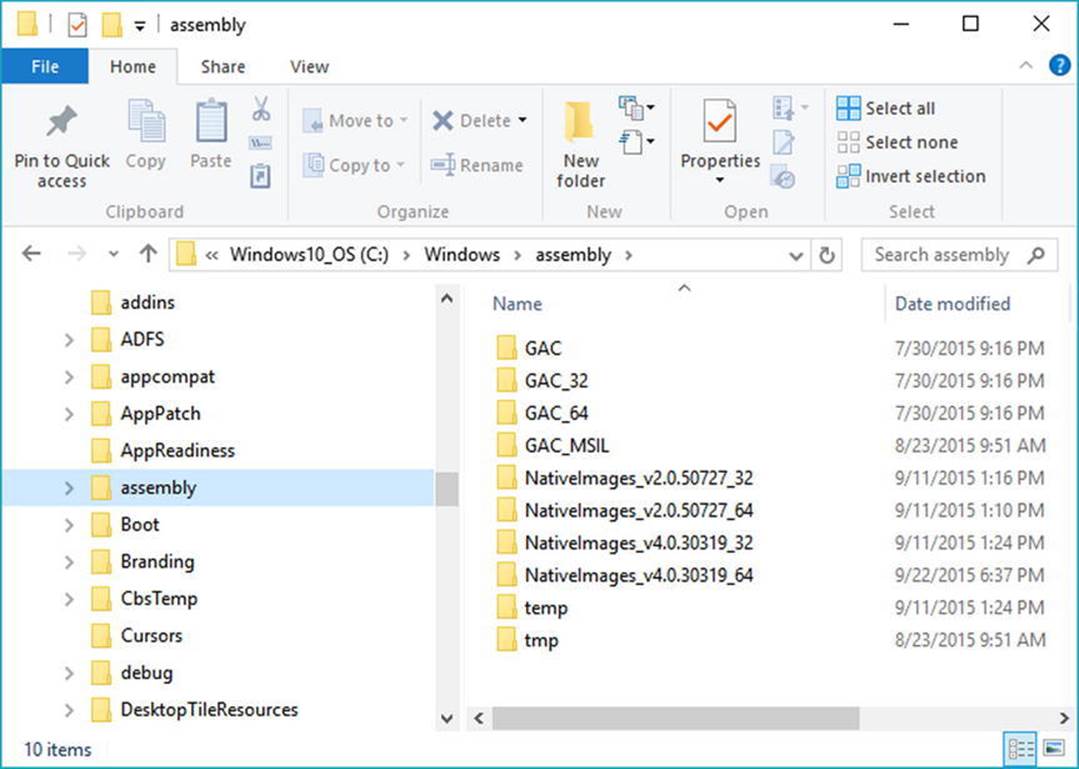
Figure 14-13. The “historical” global assembly cache
![]() Note You cannot install executable assemblies (*.exe) into the GAC. Only assemblies that take the *.dll file extension can be deployed as a shared assembly.
Note You cannot install executable assemblies (*.exe) into the GAC. Only assemblies that take the *.dll file extension can be deployed as a shared assembly.
With the release of .NET 4.0, Microsoft decided to isolate .NET 4.0 and higher libraries to a separate location, specifically C:\Windows\Microsoft.NET\assembly\GAC_MSIL (Figure 14-14).
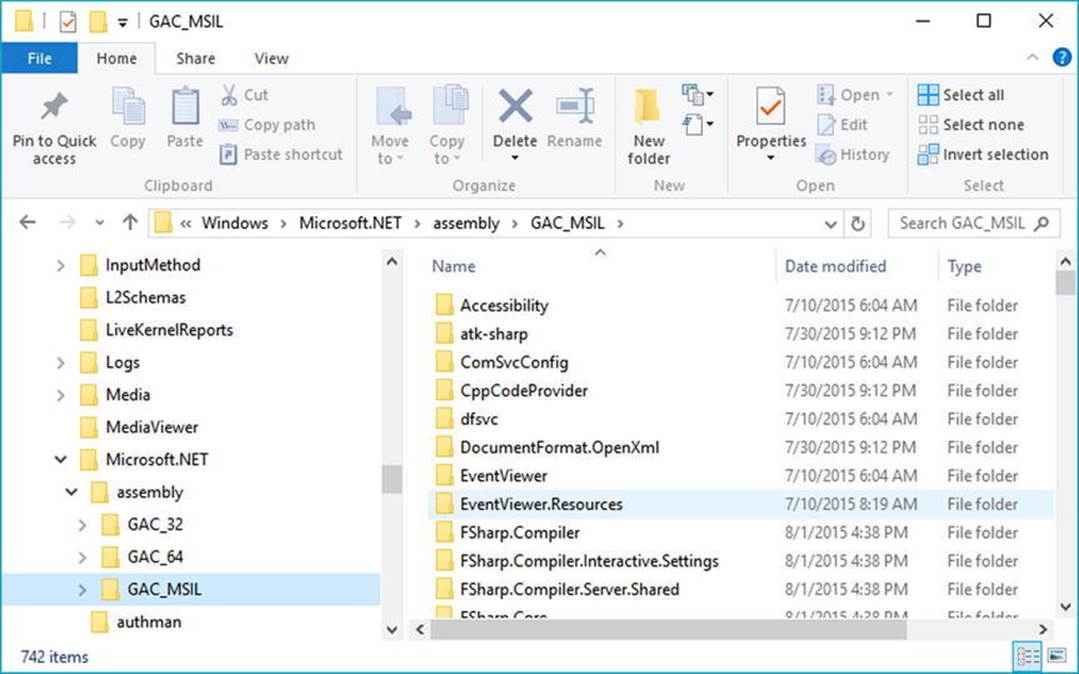
Figure 14-14. The .NET 4.0 and higher global assembly cache
Under this new folder, you will find a set of subdirectories, each of which is named identically to the friendly name of a particular code library (for example, \System.Windows.Forms, \System.Core, and so on). Beneath a given friendly name folder, you’ll find yet another subdirectory that always takes the following naming convention:
v4.0_major.minor.build.revision_publicKeyTokenValue
The “v4.0” prefix denotes that the library compiled under .NET version 4.0 or higher. That prefix is followed by a single underscore and then the version of the library in question (for example, 1.0.0.0). After a pair of underscores, you’ll see another number termed the publickeytoken value. As you will see in the next section, the public key value is part of the assembly’s “strong name.” Finally, under this folder, you will find a copy of the *.dll in question.
In this book, I am assuming you are building applications using .NET 4.6; therefore, if you install a library to the GAC, it will be installed under C:\Windows\Microsoft.NET\assembly\GAC_MSIL. However, be aware that if you were to configure a Class Library project to be compiled using version 3.5 or earlier, you would find shared libraries installed under C:\Windows\assembly.
Understanding Strong Names
Before you can deploy an assembly to the GAC, you must assign it a strong name, which is used to uniquely identify the publisher of a given .NET binary. Understand that a “publisher” can be an individual programmer (such as yourself), a department within a given company, or an entire company itself.
In some ways, a strong name is the modern-day .NET equivalent of the COM globally unique identifier (GUID) identification scheme. If you have a COM background, you might recall that AppIDs are GUIDs that identify a particular COM application. Unlike COM GUID values (which are nothing more than 128-bit numbers), strong names are based (in part) on two cryptographically related keys (public keys and private keys), which are much more unique and resistant to tampering than a simple GUID.
Formally, a strong name is composed of a set of related data, much of which is specified using the following assembly-level attributes:
· The friendly name of the assembly (which, you recall, is the name of the assembly minus the file extension)
· The version number of the assembly (assigned using the [AssemblyVersion] attribute)
· The public key value (assigned using the [AssemblyKeyFile] attribute)
· An optional culture identity value for localization purposes (assigned using the [AssemblyCulture] attribute)
· An embedded digital signature, created using a hash of the assembly’s contents and the private key value
To provide a strong name for an assembly, your first step is to generate public/private key data using the .NET Framework sn.exe utility (which you’ll do in a moment). The sn.exe utility generates a file (typically ending with the *.snk [Strong Name Key] file extension) that contains data for two distinct but mathematically related keys, the public key and the private key. Once the C# compiler is made aware of the location of your *.snk file, it will record the full public key value in the assembly manifest using the .publickey token at the time of compilation.
The C# compiler will also generate a hash code based on the contents of the entire assembly (CIL code, metadata, and so forth). As you recall from Chapter 6, a hash code is a numerical value that is statistically unique for a fixed input. Thus, if you modify any aspect of a .NET assembly (even a single character in a string literal), the compiler yields a different hash code. This hash code is combined with the private key data within the *.snk file to yield a digital signature embedded within the assembly’s CLR header data. Figure 14-15 illustrates the process of strongly naming an assembly.
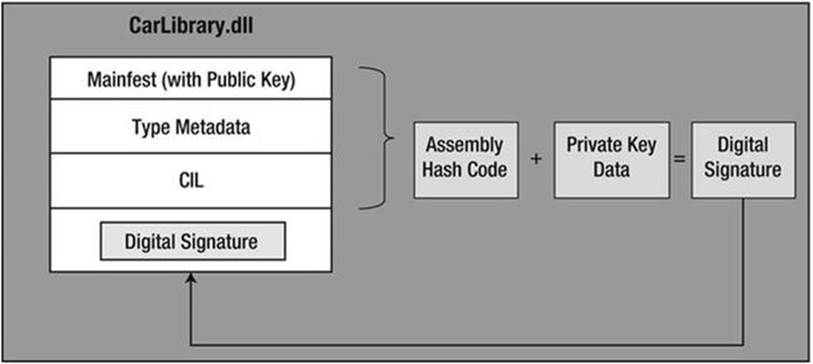
Figure 14-15. At compile time, a digital signature is generated and embedded into the assembly based, in part, on public and private key data
Understand that the actual private key data is not listed anywhere within the manifest but is used only to digitally sign the contents of the assembly (in conjunction with the generated hash code). Again, the whole idea of using public/private key data is to ensure that no two companies, departments, or individuals have the same identity in the .NET universe. In any case, once the process of assigning a strong name is complete, the assembly may be installed into the GAC.
![]() Note Strong names also provide a level of protection against potential evildoers tampering with your assembly’s contents. Given this point, it is considered a .NET best practice to strongly name every assembly (including *.exe assemblies), regardless of whether it is deployed to the GAC.
Note Strong names also provide a level of protection against potential evildoers tampering with your assembly’s contents. Given this point, it is considered a .NET best practice to strongly name every assembly (including *.exe assemblies), regardless of whether it is deployed to the GAC.
Generating Strong Names at the Command Line
Let’s walk through the process of assigning a strong name to the CarLibrary assembly created earlier in this chapter. These days, you will most likely generate the required *.snk file using Visual Studio. However, in the bad old days (circa 2003), the only option for strongly signing an assembly was to do so at the command line. Let’s see how to do this.
The first order of business is to generate the required key data using the sn.exe utility. Although this tool has numerous command-line options, all you need to concern yourself with for the moment is the -k flag, which instructs the tool to generate a new file containing the public/private key information.
Create a new folder on your C drive named MyTestKeyPair and change to that directory using the developer command prompt. Next, issue the following command to generate a file named MyTestKeyPair.snk:
sn –k MyTestKeyPair.snk
Now that you have your key data, you need to inform the C# compiler exactly where MyTestKeyPair.snk is located. Recall from earlier in this chapter, when you create any new C# project workspace using Visual Studio, one of the initial project files (located under the Properties node of the Solution Explorer) is named AssemblyInfo.cs. This file contains a number of attributes that describe the assembly itself. The [AssemblyKeyFile] assembly-level attribute can be added to your AssemblyInfo.cs file to inform the compiler of the location of a valid*.snk file. Simply specify the path as a string parameter. Here’s an example:
[assembly: AssemblyKeyFile(@"C:\MyTestKeyPair\MyTestKeyPair.snk")]
![]() Note When you manually specify the [AssemblyKeyFile] attribute, Visual Studio will generate a warning informing you to use the /keyfile option of csc.exe or to establish the key file via the Visual Studio Properties window. You’ll use the IDE to do so in just a moment (so feel free to ignore the generated warning).
Note When you manually specify the [AssemblyKeyFile] attribute, Visual Studio will generate a warning informing you to use the /keyfile option of csc.exe or to establish the key file via the Visual Studio Properties window. You’ll use the IDE to do so in just a moment (so feel free to ignore the generated warning).
Because the version of a shared assembly is one aspect of a strong name, selecting a version number for CarLibrary.dll is a necessary detail. In the AssemblyInfo.cs file, you will find another attribute named [AssemblyVersion]. Initially, the value is set to 1.0.0.0.
[assembly: AssemblyVersion("1.0.0.0")]
A .NET version number is composed of the four parts (<major>.<minor>.<build>.<revision>). While specifying a version number is entirely up to you, you can instruct Visual Studio to automatically increment the build and revision numbers as part of each compilation using the wildcard token, rather than with a specific build and revision value. You have no need to do so for this example; however, consider the following:
// Format: <Major number>.<Minor number>.<Build number>.<Revision number>
// Valid values for each part of the version number are between 0 and 65535.
[assembly: AssemblyVersion("1.0.*")]
At this point, the C# compiler has all the information needed to generate strong name data (as you are not specifying a unique culture value via the [AssemblyCulture] attribute, you “inherit” the culture of your current machine, which in my case would be U.S. English).
Compile your CarLibrary code library, open your assembly into ildasm.exe, and check the manifest. You will now see that a new .publickey tag is used to document the full public key information, while the .ver token records the version specified via the[AssemblyVersion] attribute (see Figure 14-16).
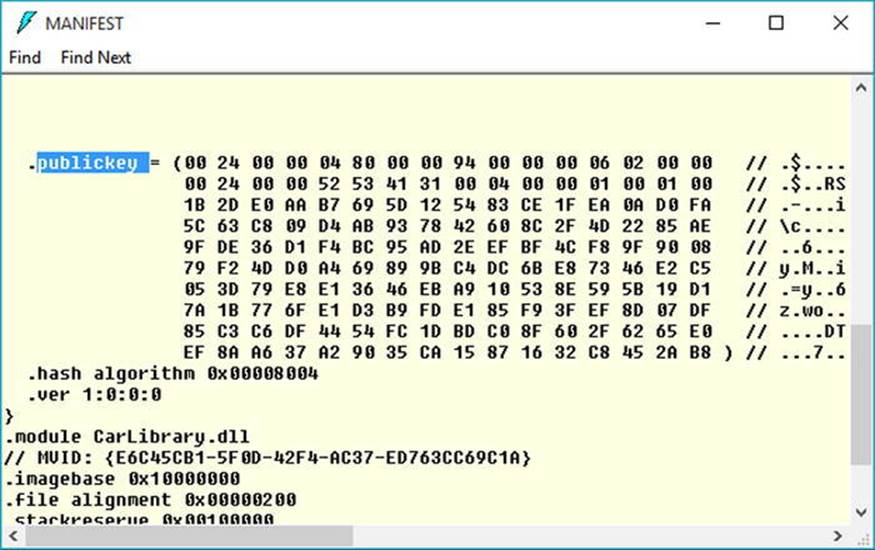
Figure 14-16. A strongly named assembly records the public key in the manifest
Great! At this point, you could deploy your shared CarLibrary.dll assembly to the GAC. However, remember that these days, .NET developers can use Visual Studio to create strongly named assemblies using a friendly user interface rather than the cryptic sn.exe command-line tool. Before seeing how to do so, be sure you delete (or comment out) the following line of code from your AssemblyInfo.cs file (assuming you manually added this line during this section of the text):
// [assembly: AssemblyKeyFile(@"C:\MyTestKeyPair\MyTestKeyPair.snk")]
Generating Strong Names Using Visual Studio
Visual Studio allows you to specify the location of an existing *.snk file using the project’s Properties page, as well as generate a new *.snk file. To make a new *.snk file for the CarLibrary project, first double-click the Properties icon of the Solution Explorer and select the Signing tab. Next, select the “Sign the assembly” check box, and choose the <New...> option from the drop-down list (see Figure 14-17).
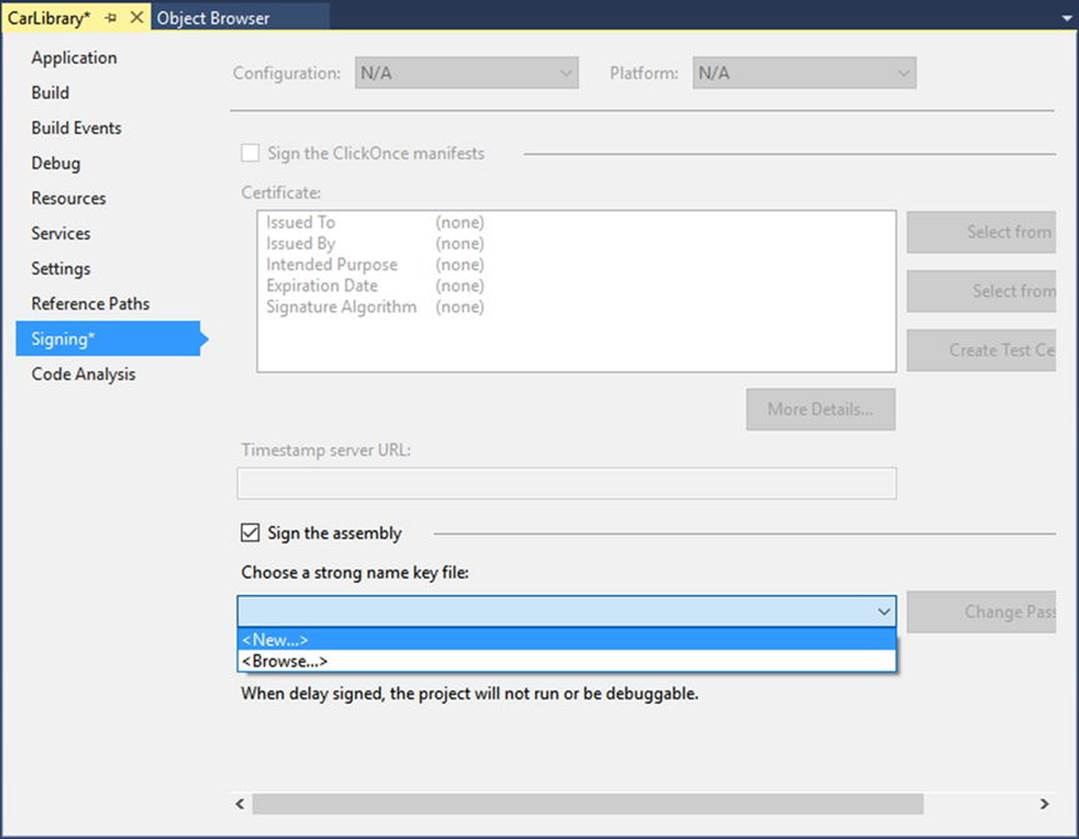
Figure 14-17. Creating a new *.snk file using Visual Studio
After you have done so, you will be asked to provide a name for your new *.snk file (such as myKeyPair.snk), and you’ll have the option to password-protect your file (which is not required for this example); see Figure 14-18.
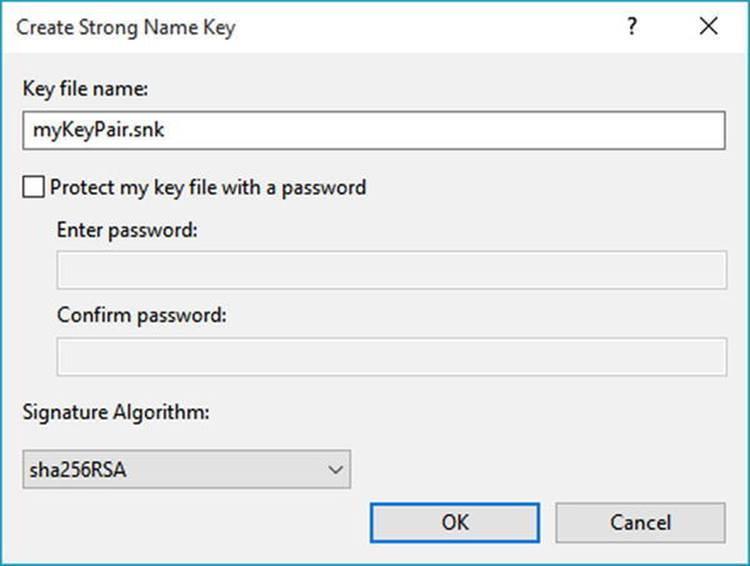
Figure 14-18. Naming the new *.snk file using Visual Studio
At this point, you will see your *.snk file within the Solution Explorer (Figure 14-19). Every time you build your application, this data will be used to assign a proper strong name to the assembly.
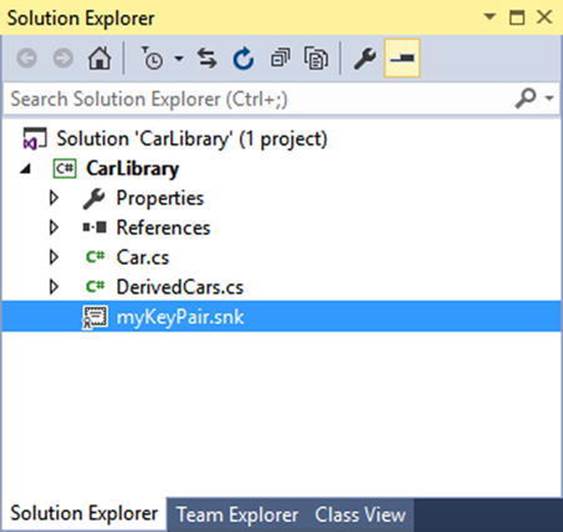
Figure 14-19. Visual Studio will now strongly sign your assembly with each compilation
![]() Note Recall that the Application tab of the Properties editor provides a button named Assembly Information. When clicked, the button displays a dialog box that allows you to establish numerous assembly-level attributes, including the version number, copyright information, and so forth.
Note Recall that the Application tab of the Properties editor provides a button named Assembly Information. When clicked, the button displays a dialog box that allows you to establish numerous assembly-level attributes, including the version number, copyright information, and so forth.
Installing Strongly Named Assemblies to the GAC
The final step is to install the (now strongly named) CarLibrary.dll into the GAC. While the preferred way to deploy assemblies to the GAC in a production setting is to create an installer package (using a commercial installer program such as InstallShield), the .NET Framework SDK ships with a command-line tool named gacutil.exe, which can be useful for quick tests.
![]() Note You must have administrator rights to interact with the GAC on your machine. Be sure to run your command window As Administrator.
Note You must have administrator rights to interact with the GAC on your machine. Be sure to run your command window As Administrator.
Table 14-1 documents some relevant options of gacutil.exe (specify the /? flag when you run the program to see each option).
Table 14-1. Various Options of gacutil.exe
|
Option |
Meaning in Life |
|
-i |
Installs a strongly named assembly into the GAC |
|
-u |
Uninstalls an assembly from the GAC |
|
-l |
Displays the assemblies (or a specific assembly) in the GAC |
To install a strongly named assembly using gacutil.exe, first open a command prompt, and then change to the directory containing CarLibrary.dll. Here’s an example (your path may differ):
cd C:\MyCode\CarLibrary\bin\Debug
Next, install the library using the -i command, like so:
gacutil /i CarLibrary.dll
After you have done so, you can verify that the library has been deployed by specifying the -l command as follows (note that you omit the file extension when using the -l command):
gacutil /l CarLibrary
If all is well, you should see the following output to the Console window (you will find a unique PublicKeyToken value, as expected):
The Global Assembly Cache contains the following assemblies:
CarLibrary, Version=1.0.0.0, Culture=neutral, PublicKeyToken=33a2bc294331e8b9, processorArchitecture=MSIL
Number of items = 1
Furthermore, if you were to navigate to C:\Windows\Microsoft.NET\assembly\GAC_MSIL, you would find a new CarLibrary folder with the correct subdirectory structure (see Figure 14-20).
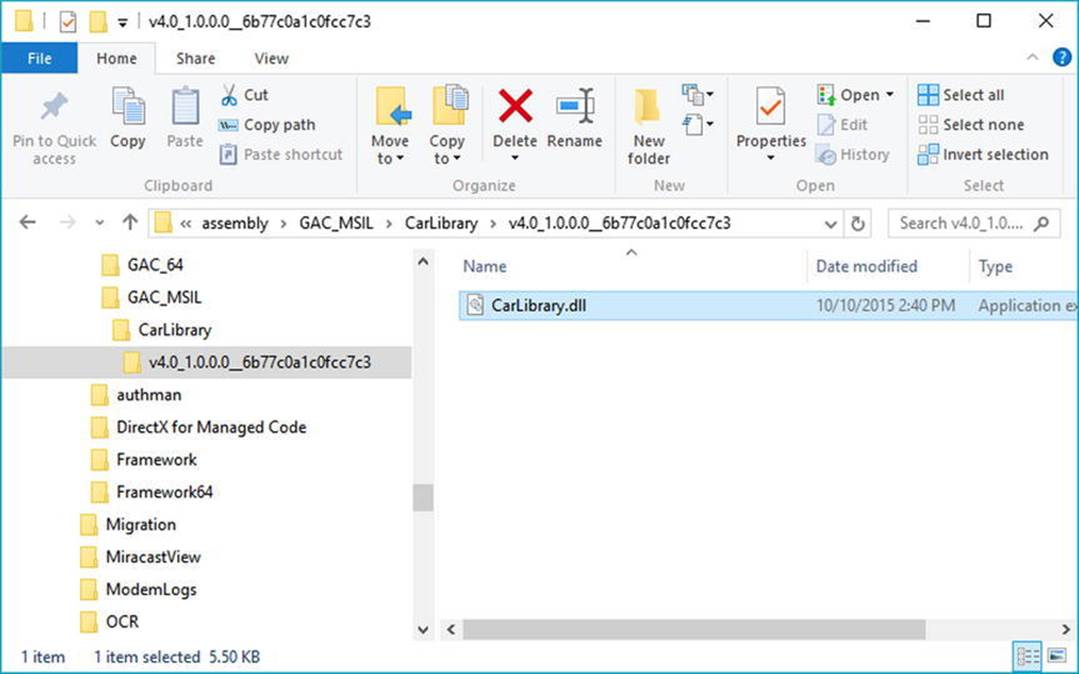
Figure 14-20. The shared CarLibrary assembly in the GAC
Consuming a Shared Assembly
When you are building applications that use a shared assembly, the only difference from consuming a private assembly is in how you reference the library using Visual Studio. In reality, there is no difference as far as the tool is concerned—you still use the Add Reference dialog box.
When you need to reference a private assembly, you could use the Browse button to navigate to the correct subdirectory of the GAC. However, you can also simply navigate to the location of the strongly named assembly (such as the /bin/debug folder of a class library project) and reference the copy. When Visual Studio finds a strongly named library, it will not copy the library to the output folder of the client application. In any case, Figure 14-21 shows the referenced library.
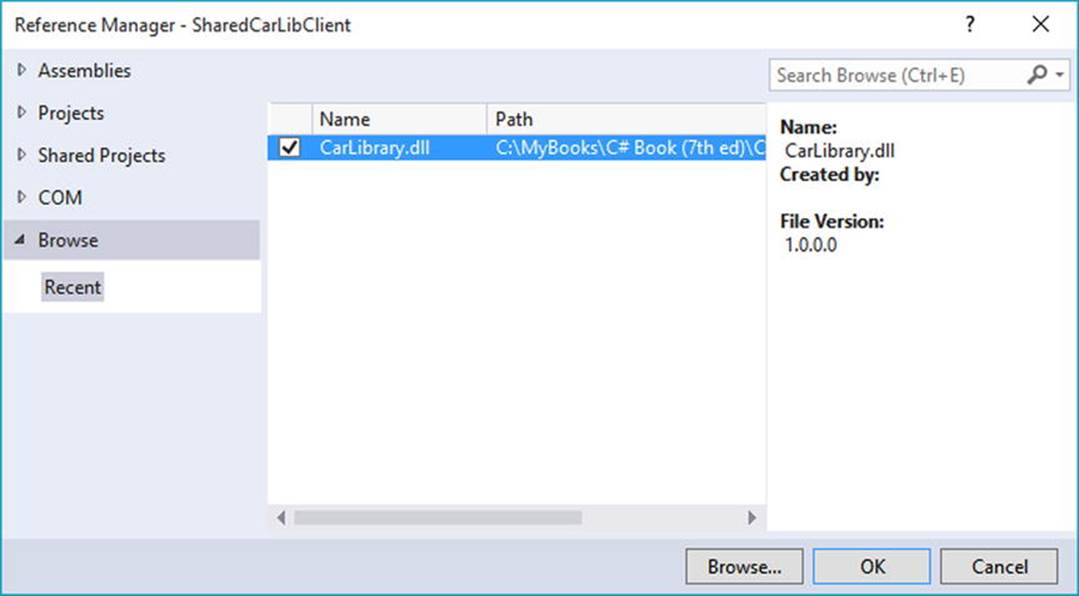
Figure 14-21. Referencing the strongly named, shared CarLibrary (version 1.0.0.0) using Visual Studio
To illustrate, create a new C# Console Application project named SharedCarLibClient and reference your CarLibrary.dll assembly as just described. As you would hope, you can now see an icon in your Solution Explorer’s Reference folder. If you select this icon and then view the Properties window (accessible from the Visual Studio View menu), you’ll notice that the Copy Local property of the selected CarLibrary is now set to False. In any case, author the following test code in your new client application:
using System;
using System.Collections.Generic;
using System.Linq;
using System.Text;
using System.Threading.Tasks;
using CarLibrary;
namespace SharedCarLibClient
{
class Program
{
static void Main(string[] args)
{
Console.WriteLine("***** Shared Assembly Client *****");
SportsCar c = new SportsCar();
c.TurboBoost();
Console.ReadLine();
}
}
}
After you have compiled your client application, navigate to the directory that contains SharedCarLibClient.exe using Windows Explorer and notice that Visual Studio has not copied CarLibrary.dll to the client’s application directory. When you reference an assembly whose manifest contains a .publickey value, Visual Studio assumes the strongly named assembly will be deployed to the GAC and, therefore, does not bother to copy the binary.
Exploring the Manifest of SharedCarLibClient
Recall that when you generate a strong name for an assembly, the entire public key is recorded in the assembly manifest. On a related note, when a client references a strongly named assembly, its manifest records a condensed hash value of the full public key, denoted by the.publickeytoken tag. If you open the manifest of SharedCarLibClient.exe using ildasm.exe, you would find the following (your public key token value will of course differ, as it is computed based on the public key value):
.assembly extern CarLibrary
{
.publickeytoken = (33 A2 BC 29 43 31 E8 B9 )
.ver 1:0:0:0
}
If you compare the value of the public key token recorded in the client manifest with the public key token value shown in the GAC, you will find a dead-on match. Recall that a public key represents one aspect of the strongly named assembly’s identity. Given this, the CLR will load only version 1.0.0.0 of an assembly named CarLibrary that has a public key that can be hashed down to the value 33A2BC294331E8B9. If the CLR does not find an assembly meeting this description in the GAC (and did not find a private assembly named CarLibrary in the client’s directory), a FileNotFoundException exception is thrown.
![]() Source Code You can find the SharedCarLibClient application in the Chapter 14 subdirectory.
Source Code You can find the SharedCarLibClient application in the Chapter 14 subdirectory.
Configuring Shared Assemblies
Like private assemblies, shared assemblies can be configured using a client *.config file. Of course, because shared assemblies are deployed to a well-known location (the GAC), you don’t use the <privatePath> element as you did for private assemblies (although if the client is using both shared and private assemblies, the <privatePath> element may still exist in the *.config file).
You can use application configuration files in conjunction with shared assemblies whenever you want to instruct the CLR to bind to a different version of a specific assembly, effectively bypassing the value recorded in the client’s manifest. This can be useful for a number of reasons. For example, imagine that you have shipped version 1.0.0.0 of an assembly and later discover a major bug. One corrective action would be to rebuild the client application to reference the correct version of the bug-free assembly (say, 1.1.0.0) and redistribute the updated client and new library to every target machine.
Another option is to ship the new code library and a *.config file that automatically instructs the runtime to bind to the new (bug-free) version. As long as the new version has been installed into the GAC, the original client runs without recompilation, redistribution, or fear of having to update your resume.
Here’s another example: you have shipped the first version of a bug-free assembly (1.0.0.0), and after a month or two, you add new functionality to the assembly to yield version 2.0.0.0. Obviously, existing client applications that were compiled against version 1.0.0.0 have no clue about these new types, given that their code base makes no reference to them.
New client applications, however, want to make reference to the new functionality in version 2.0.0.0. Under .NET, you are free to ship version 2.0.0.0 to the target machines and have version 2.0.0.0 run alongside the older version 1.0.0.0. If necessary, existing clients can be dynamically redirected to load version 2.0.0.0 (to gain access to the implementation refinements), using an application configuration file without needing to recompile and redeploy the client application.
Freezing the Current Shared Assembly
To illustrate how to dynamically bind to a specific version of a shared assembly, open Windows Explorer and copy the current version of the compiled CarLibrary.dll assembly (1.0.0.0) into a distinct subdirectory (I called mine CarLibrary Version 1.0.0.0) to symbolize the freezing of this version (see Figure 14-22).
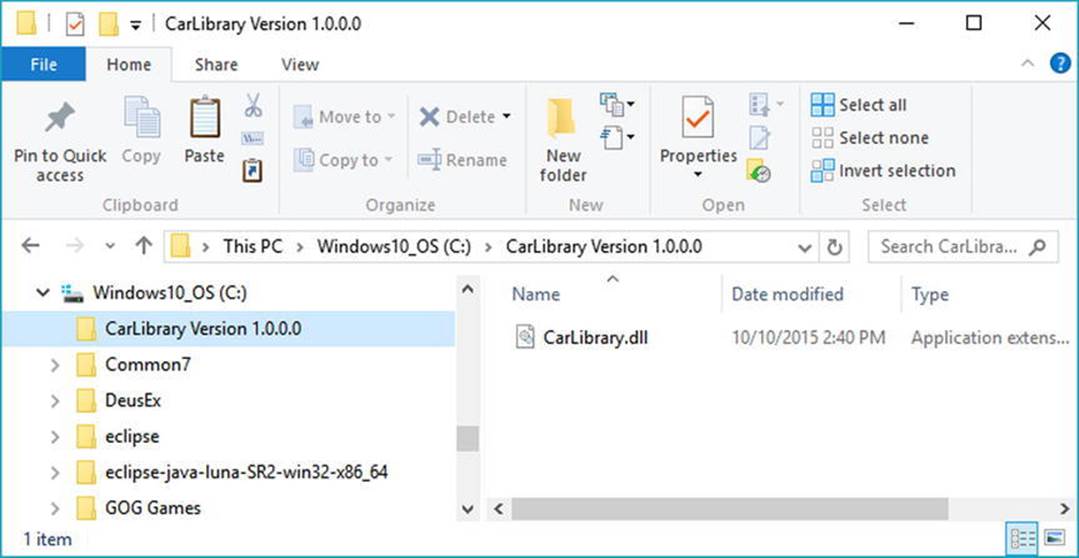
Figure 14-22. Freezing the current version of CarLibrary.dll
Building a Shared Assembly Version 2.0.0.0
Now, open your existing CarLibrary project and update your code base with a new enum type named MusicMedia that defines the following four possible musical devices.
// Which type of music player does this car have?
public enum MusicMedia
{
musicCd,
musicTape,
musicRadio,
musicMp3
}
As well, add a new public method to the Car type that allows the caller to turn on one of the given media players (be sure to import the System.Windows.Forms namespace if necessary), like so:
public abstract class Car
{
...
public void TurnOnRadio(bool musicOn, MusicMedia mm)
{
if(musicOn)
MessageBox.Show(string.Format("Jamming {0}", mm));
else
MessageBox.Show("Quiet time...");
}
}
Update the constructors of the Car class to display a MessageBox that verifies you are indeed using CarLibrary 2.0.0.0 as follows:
public abstract class Car
{
...
public Car()
{
MessageBox.Show("CarLibrary Version 2.0!");
}
public Car(string name, int maxSp, int currSp)
{
MessageBox.Show("CarLibrary Version 2.0!");
PetName = name; MaxSpeed = maxSp; CurrentSpeed = currSp;
}
...
}
Last but not least, before you recompile your new library, update the version to be 2.0.0.0. Recall you can do so in a visual manner by double-clicking the Properties icon of the Solution Explorer and clicking the Assembly Information button on the Application tab. After you do, simply update the Assembly Version number (see Figure 14-23).
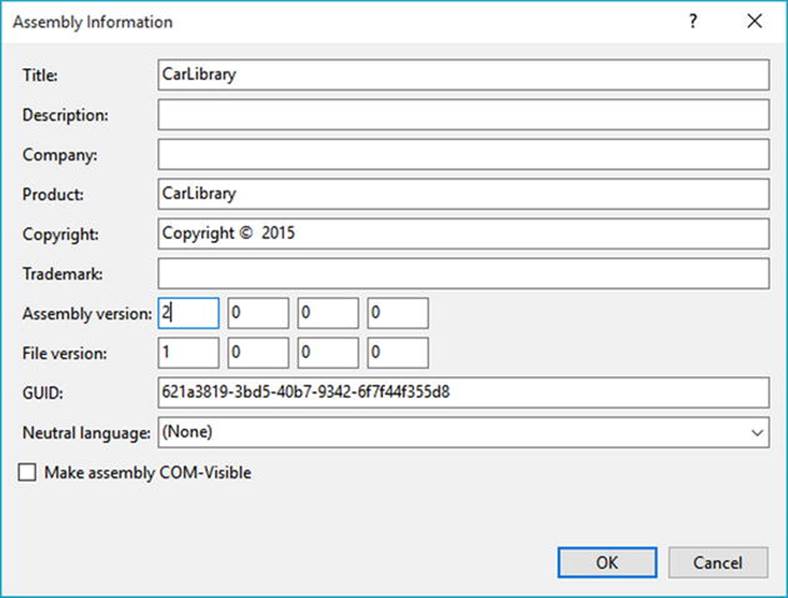
Figure 14-23. Setting the version number of CarLibrary.dll to 2.0.0.0
If you look in your project’s \bin\Debug folder, you’ll see that you have a new version of this assembly (2.0.0.0), while version 1.0.0.0 is safe in storage in the CarLibrary Version 1.0.0.0 directory. Install this new assembly into the 4.0 GAC using gacutil.exe, as described earlier in this chapter. Notice that you now have two versions of the same assembly (see Figure 14-24).
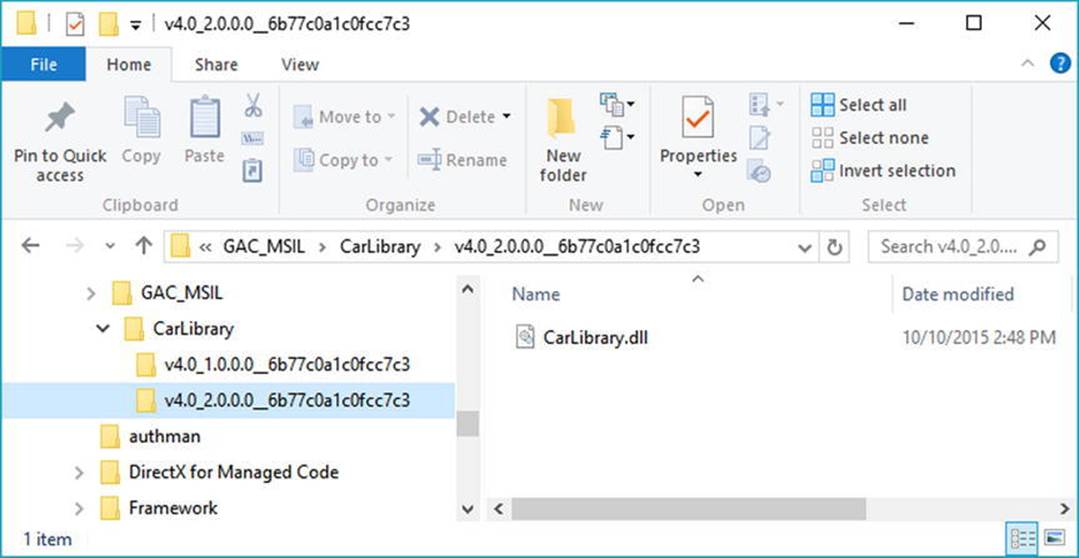
Figure 14-24. Side-by-side execution of a shared assembly
If you run the current SharedCarLibClient.exe program by double-clicking the icon in Windows Explorer, you should not see the “CarLibrary Version 2.0!” message box appear, as the manifest is specifically requesting version 1.0.0.0. How then can you instruct the CLR to bind to version 2.0.0.0? Glad you asked!
![]() Note Visual Studio will automatically reset references when you compile your applications! Therefore, if you run your SharedCarLibClient.exe application within Visual Studio, it will grab CarLibrary.dll version 2.0.0.0! If you accidentally ran your application in this way, simply delete the current CarLibrary.dll reference and select version 1.0.0.0 (which I suggested you place in a folder named CarLibrary Version 1.0.0.0).
Note Visual Studio will automatically reset references when you compile your applications! Therefore, if you run your SharedCarLibClient.exe application within Visual Studio, it will grab CarLibrary.dll version 2.0.0.0! If you accidentally ran your application in this way, simply delete the current CarLibrary.dll reference and select version 1.0.0.0 (which I suggested you place in a folder named CarLibrary Version 1.0.0.0).
Dynamically Redirecting to Specific Versions of a Shared Assembly
When you want to tell the CLR to load a version of a shared assembly other than the version listed in the manifest, you can build a *.config file that contains a <dependentAssembly> element. When doing so, you will need to create an <assemblyIdentity> subelement that specifies the friendly name of the assembly listed in the client manifest (CarLibrary, for this example) and an optional culture attribute (which can be assigned an empty string or omitted altogether if you want to use the default culture for the machine). Moreover, the<dependentAssembly> element will define a <bindingRedirect> subelement to define the version currently in the manifest (via the oldVersion attribute) and the version in the GAC to load instead (via the newVersion attribute).
Update the current configuration file in the application directory of SharedCarLibClient named SharedCarLibClient.exe.config that contains the following XML data.
![]() Note The value of your public key token will be different from what you see in the following markup. To find your public key token value, recall you can open the client into ildasm.exe, double-click the MANIFEST icon, and copy the value to your clipboard (just be sure to remove the blank spaces!).
Note The value of your public key token will be different from what you see in the following markup. To find your public key token value, recall you can open the client into ildasm.exe, double-click the MANIFEST icon, and copy the value to your clipboard (just be sure to remove the blank spaces!).
<?xml version="1.0" encoding="utf-8" ?>
<configuration>
<!--Runtime binding info -->
<runtime>
<assemblyBinding xmlns="urn:schemas-microsoft-com:asm.v1">
<dependentAssembly>
<assemblyIdentity name="CarLibrary"
publicKeyToken="64ee9364749d8328"
culture="neutral"/>
<bindingRedirect oldVersion= "1.0.0.0"
newVersion= "2.0.0.0"/>
</dependentAssembly>
</assemblyBinding>
</runtime>
</configuration>
Now run the SharedCarLibClient.exe program by double-clicking the executable from Windows Explorer. You should see the message that version 2.0.0.0 has loaded.
Multiple <dependentAssembly> elements can appear within a client’s configuration file. Although there’s no need for this example, assume that the manifest of SharedCarLibClient.exe also references version 2.5.0.0 of an assembly named MathLibrary. If you wanted to redirect to version 3.0.0.0 of MathLibrary (in addition to version 2.0.0.0 of CarLibrary), the SharedCarLibClient.exe.config file would look like the following:
<configuration>
<runtime>
<assemblyBinding xmlns="urn:schemas-microsoft-com:asm.v1">
<!-- Controls Binding to CarLibrary -->
<dependentAssembly>
<assemblyIdentity name="CarLibrary"
publicKeyToken="64ee9364749d8328"
culture=""/>
<bindingRedirect oldVersion= "1.0.0.0" newVersion= "2.0.0.0"/>
</dependentAssembly>
<!-- Controls Binding to MathLibrary -->
<dependentAssembly>
<assemblyIdentity name="MathLibrary"
publicKeyToken="64ee9364749d8328"
culture=""/>
<bindingRedirect oldVersion= "2.5.0.0" newVersion= "3.0.0.0"/>
</dependentAssembly>
</assemblyBinding>
</runtime>
</configuration>
![]() Note It is possible to specify a range of old version numbers via the oldVersion attribute; for example, <bindingRedirect oldVersion="1.0.0.0-1.2.0.0" newVersion="2.0.0.0"/> informs the CLR to use version 2.0.0.0 for any older version within the range of 1.0.0.0 to 1.2.0.0.
Note It is possible to specify a range of old version numbers via the oldVersion attribute; for example, <bindingRedirect oldVersion="1.0.0.0-1.2.0.0" newVersion="2.0.0.0"/> informs the CLR to use version 2.0.0.0 for any older version within the range of 1.0.0.0 to 1.2.0.0.
Understanding Publisher Policy Assemblies
The next configuration issue you’ll examine is the role of publisher policy assemblies. As you’ve just seen, *.config files can be constructed to bind to a specific version of a shared assembly, thereby bypassing the version recorded in the client manifest. While this is all well and good, imagine you’re an administrator who now needs to reconfigure all client applications on a given machine to rebind to version 2.0.0.0 of the CarLibrary.dll assembly. Given the strict naming convention of a configuration file, you would need to duplicate the same XML content in numerous locations (assuming you are, in fact, aware of the locations of the executables using CarLibrary!). Clearly this would be a maintenance nightmare.
Publisher policy allows the publisher of a given assembly (you, your department, your company, or what have you) to ship a binary version of a *.config file that is installed into the GAC along with the newest version of the associated assembly. The benefit of this approach is that client application directories do not need to contain specific *.config files. Rather, the CLR will read the current manifest and attempt to find the requested version in the GAC. However, if the CLR finds a publisher policy assembly, it will read the embedded XML data and perform the requested redirection at the level of the GAC.
Publisher policy assemblies are created at the command line using a .NET utility named al.exe (the assembly linker). Though this tool provides many options, building a publisher policy assembly requires passing in only the following input parameters:
· The location of the *.config or *.xml file containing the redirecting instructions
· The name of the resulting publisher policy assembly
· The location of the *.snk file used to sign the publisher policy assembly
· The version numbers to assign the publisher policy assembly being constructed
If you wanted to build a publisher policy assembly that controls CarLibrary.dll, the command set would be as follows (which must be entered on a single line within the command window):
al /link:CarLibraryPolicy.xml /out:policy.1.0.CarLibrary.dll
/keyf:C:\MyKey\myKey.snk /v:1.0.0.0
Here, the XML content is contained within a file named CarLibraryPolicy.xml. The name of the output file (which must be in the format policy.<major>.<minor>.assemblyToConfigure) is specified using the obvious /out flag. In addition, note that the name of the file containing the public/private key pair will also need to be supplied via the /keyf option. Remember, publisher policy files are shared and, therefore, must have strong names!
Once the al.exe tool has executed, the result is a new assembly that can be placed into the GAC to force all clients to bind to version 2.0.0.0 of CarLibrary.dll, without the use of a specific client application configuration file. Using this technique, you can design a machine-wide redirection for all applications using a specific version (or range of versions) of an existing assembly.
Disabling Publisher Policy
Now, assume you (as a system administrator) have deployed a publisher policy assembly (and the latest version of the related assembly) to the GAC of a client machine. As luck would have it, nine of the ten affected applications rebind to version 2.0.0.0 without error. However, the remaining client application (for whatever reason) blows up when accessing CarLibrary.dll 2.0.0.0. (As we all know, it is next to impossible to build backward-compatible software that works 100 percent of the time.)
In such a case, it is possible to build a configuration file for a specific troubled client that instructs the CLR to ignore the presence of any publisher policy files installed in the GAC. The remaining client applications that are happy to consume the newest .NET assembly will simply be redirected via the installed publisher policy assembly. To disable publisher policy on a client-by-client basis, author a (properly named) *.config file that uses the <publisherPolicy> element and set the apply attribute to no. When you do so, the CLR will load the version of the assembly originally listed in the client’s manifest.
<configuration>
<runtime>
<assemblyBinding xmlns="urn:schemas-microsoft-com:asm.v1">
<publisherPolicy apply="no" />
</assemblyBinding>
</runtime>
</configuration>
Understanding the <codeBase> Element
Application configuration files can also specify code bases. The <codeBase> element can be used to instruct the CLR to probe for dependent assemblies located at arbitrary locations (such as network end points or an arbitrary machine path outside a client’s application directory).
If the value assigned to a <codeBase> element is located on a remote machine, the assembly will be downloaded on demand to a specific directory in the GAC termed the download cache. Given what you have learned about deploying assemblies to the GAC, it should make sense that assemblies loaded from a <codeBase> element will need to be assigned a strong name (after all, how else could the CLR install remote assemblies to the GAC?). If you are interested, you can view the content of your machine’s download cache by supplying the /ldl option togacutil.exe, like so:
gacutil /ldl
![]() Note Technically speaking, the <codeBase> element can be used to probe for assemblies that do not have strong names. However, the assembly’s location must be relative to the client’s application directory (and, thus, is little more than an alternative to the <privatePath> element).
Note Technically speaking, the <codeBase> element can be used to probe for assemblies that do not have strong names. However, the assembly’s location must be relative to the client’s application directory (and, thus, is little more than an alternative to the <privatePath> element).
To see the <codeBase> element in action, create a Console Application project named CodeBaseClient, set a reference to CarLibrary.dll version 2.0.0.0, and update the initial file as follows:
using System;
using System.Collections.Generic;
using System.Linq;
using System.Text;
using System.Threading.Tasks;
using CarLibrary;
namespace CodeBaseClient
{
class Program
{
static void Main(string[] args)
{
Console.WriteLine("***** Fun with CodeBases *****");
SportsCar c = new SportsCar();
Console.WriteLine("Sports car has been allocated.");
Console.ReadLine();
}
}
}
Given that CarLibrary.dll has been deployed to the GAC, you are able to run the program as is. However, to illustrate the use of the <codeBase> element, create a new folder under your C: drive (perhaps C:\MyAsms) and place a copy of CarLibrary.dll version 2.0.0.0 into this directory.
Now, add an App.config file (or edit an existing App.config) to the CodeBaseClient project (as explained earlier in this chapter) and author the following XML content (remember that your .publickeytoken value will differ; consult your GAC as required):
<configuration>
...
<runtime>
<assemblyBinding xmlns="urn:schemas-microsoft-com:asm.v1">
<dependentAssembly>
<assemblyIdentity name="CarLibrary" publicKeyToken="33A2BC294331E8B9"
culture="neutral"/>
<codeBase version="2.0.0.0" href="file:///C:/MyAsms/CarLibrary.dll" />
</dependentAssembly>
</assemblyBinding>
</runtime>
</configuration>
As you can see, the <codeBase> element is nested within the <assemblyIdentity> element, which makes use of the name and publicKeyToken attributes to specify the friendly name and associated publicKeyToken values. The <codeBase> element itself specifies the version and location (via the href property) of the assembly to load. If you were to delete version 2.0.0.0 of CarLibrary.dll from the GAC, this client would still run successfully, as the CLR is able to locate the external assembly under C:\MyAsms.
![]() Note If you place assemblies at random locations on your development machine, you are in effect re-creating the system registry (and the related DLL hell), given that if you move or rename the folder containing your binaries, the current bind will fail. With that in mind, use<codeBase> with caution.
Note If you place assemblies at random locations on your development machine, you are in effect re-creating the system registry (and the related DLL hell), given that if you move or rename the folder containing your binaries, the current bind will fail. With that in mind, use<codeBase> with caution.
The <codeBase> element can also be helpful when referencing assemblies located on a remote networked machine. Assume you have permission to access a folder located at http://www.MySite.com. To download the remote *.dll to the GAC’s download cache on your local machine, you could update the <codeBase> element as follows:
<codeBase version="2.0.0.0"
href="http://www.MySite.com/Assemblies/CarLibrary.dll" />
![]() Source Code You can find the CodeBaseClient application in the Chapter 14 subdirectory.
Source Code You can find the CodeBaseClient application in the Chapter 14 subdirectory.
The System.Configuration Namespace
Currently, all of the *.config files shown in this chapter have made use of well-known XML elements that are read by the CLR to resolve the location of external assemblies. In addition to these recognized elements, it is perfectly permissible for a client configuration file to contain application-specific data that has nothing to do with binding heuristics. Given this, it should come as no surprise that the .NET Framework provides a namespace that allows you to programmatically read the data within a client configuration file.
The System.Configuration namespace provides a small set of types you can use to read custom data from a client’s *.config file. These custom settings must be contained within the scope of an <appSettings> element. The <appSettings> element contains any number of <add> elements that define key-value pairs to be obtained programmatically.
For example, assume you have an App.config file for a Console Application project named AppConfigReaderApp that defines two application specific values, listed like so:
<?xml version="1.0" encoding="utf-8" ?>
<configuration>
<startup>
<supportedRuntime version="v4.0" sku=".NETFramework,Version=v4.6" />
</startup>
<!-- Custom App settings -->
<appSettings>
<add key="TextColor" value="Green" />
<add key="RepeatCount" value="8" />
</appSettings>
</configuration>
Reading these values for use by the client application is as simple as calling the instance-level GetValue() method of the System.Configuration.AppSettingsReader type. As shown in the following code, the first parameter to GetValue() is the name of the key in the*.config file, whereas the second parameter is the underlying type of the key (obtained via the C# typeof operator):
using System;
using System.Collections.Generic;
using System.Linq;
using System.Text;
using System.Threading.Tasks;
using System.Configuration;
namespace AppConfigReaderApp
{
class Program
{
static void Main(string[] args)
{
Console.WriteLine("***** Reading <appSettings> Data *****\n");
// Get our custom data from the *.config file.
AppSettingsReader ar = new AppSettingsReader();
int numbOfTimes = (int)ar.GetValue("RepeatCount", typeof(int));
string textColor = (string)ar.GetValue("TextColor", typeof(string));
Console.ForegroundColor =
(ConsoleColor)Enum.Parse(typeof(ConsoleColor), textColor);
// Now print a message correctly.
for (int i = 0; i < numbOfTimes; i++)
Console.WriteLine("Howdy!");
Console.ReadLine();
}
}
}
![]() Source Code You can find the AppConfigReaderApp application in the Chapter 14 subdirectory.
Source Code You can find the AppConfigReaderApp application in the Chapter 14 subdirectory.
The Configuration File Schema Documentation
In this chapter, you were introduced to the role of XML configuration files. Here, you focused on a few settings you can add to the <runtime> element that control how the CLR will attempt to locate externally required libraries. As you work on upcoming chapters of this book (and as you move beyond this book and begin to build larger-scale software), you will quickly notice that use of XML configuration files is commonplace.
To be sure, the .NET platform uses *.config files in numerous APIs. For example, in Chapter 25, you will see that Windows Communication Foundation (WCF) uses configuration files to establish complex network settings. Later in this text when you examine web development via ASP.NET, you’ll quickly note that the web.config file contains the same type of instructions as a desktop App.config file.
Because a given .NET configuration file can contain a large number of instructions, you should be aware that the entire schema of this XML file is documented in the .NET help system. Specifically, if you do a search for the topic Configuration File Schema for the .NET Framework in the help system, you will be given a detailed explanation of each element (see Figure 14-25).
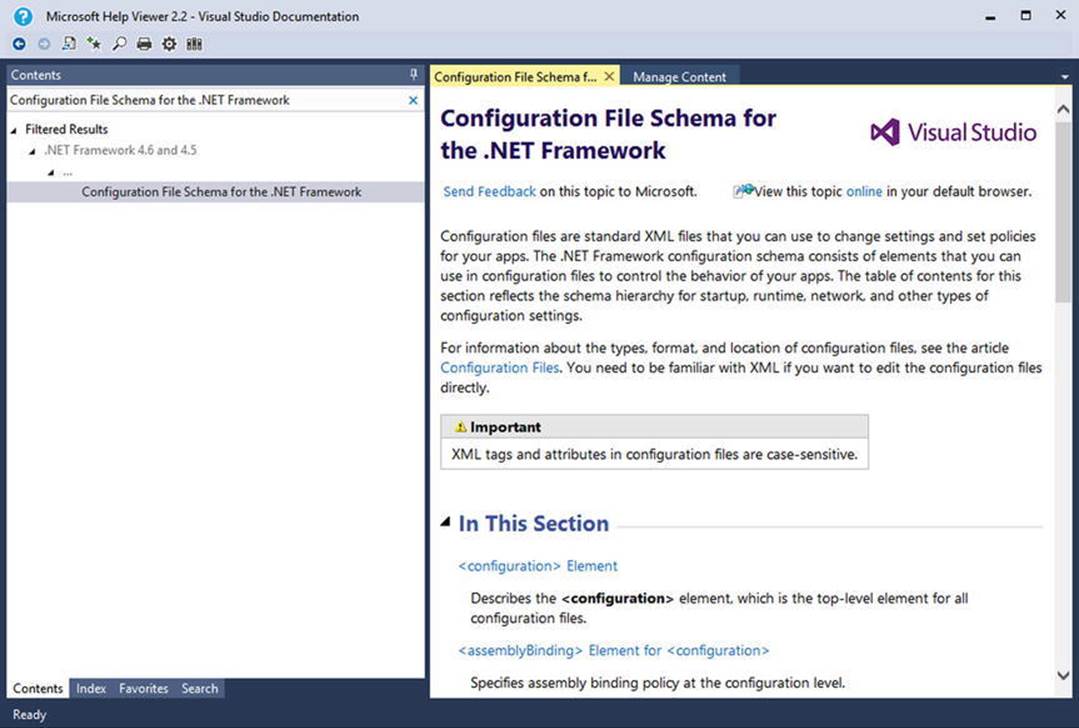
Figure 14-25. XML configuration files are fully documented in the .NET help system
Summary
This chapter examined the role of .NET class libraries (aka .NET *.dlls). As you have seen, class libraries are .NET binaries that contain logic intended to be reused across a variety of projects. Recall that libraries can be deployed in two primary ways, specifically privately or shared. Private assemblies are deployed to the client folder or a subdirectory thereof, provided you have a proper XML configuration file. Shared assemblies are libraries that can be used by any application on the machine and can also be influenced by the settings in a client-side configuration file.
You learned how shared assemblies are marked with a “strong name,” which essentially establishes a unique identify for a library in the eyes of the CLR. As well, you learned about various command-line tools (sn.exe and gacutil.exe) that are used during the development and deployment of shared libraries.
The chapter wrapped up by examining the role of publisher policies and the process of storing and retrieving custom settings using the System.Configuration namespace.
All materials on the site are licensed Creative Commons Attribution-Sharealike 3.0 Unported CC BY-SA 3.0 & GNU Free Documentation License (GFDL)
If you are the copyright holder of any material contained on our site and intend to remove it, please contact our site administrator for approval.
© 2016-2026 All site design rights belong to S.Y.A.