C# 6.0 and the .NET 4.6 Framework (2015)
PART V
Programming with .NET Assemblies
CHAPTER 15
Type Reflection, Late Binding, and Attribute-Based Programming
As shown in Chapter 14, assemblies are the basic unit of deployment in the .NET universe. Using the integrated object browsers of Visual Studio (and numerous other IDEs), you are able to examine the types within a project’s referenced set of assemblies. Furthermore, external tools such asildasm.exe allow you to peek into the underlying CIL code, type metadata, and assembly manifest for a given .NET binary. In addition to this design-time investigation of .NET assemblies, you are also able to programmatically obtain this same information using theSystem.Reflection namespace. To this end, the first task of this chapter is to define the role of reflection and the necessity of .NET metadata.
The remainder of the chapter examines a number of closely related topics, all of which hinge upon reflection services. For example, you’ll learn how a .NET client may employ dynamic loading and late binding to activate types it has no compile-time knowledge of. You’ll also learn how to insert custom metadata into your .NET assemblies through the use of system-supplied and custom attributes. To put all of these (seemingly esoteric) topics into perspective, the chapter closes by demonstrating how to build several “snap-in objects” that you can plug into an extendable desktop GUI application.
The Necessity of Type Metadata
The ability to fully describe types (classes, interfaces, structures, enumerations, and delegates) using metadata is a key element of the .NET platform. Numerous .NET technologies, such as Windows Communication Foundation (WCF), and object serialization require the ability to discover the format of types at runtime. Furthermore, cross-language interoperability, numerous compiler services, and an IDE’s IntelliSense capabilities all rely on a concrete description of type.
Recall that the ildasm.exe utility allows you to view an assembly’s type metadata using the Ctrl+M keyboard option (see Chapter 1). Thus, if you were to open any of the *.dll or *.exe assemblies created over the course of this book (such as the CarLibrary.dll created in theChapter 14) using ildasm.exe and press Ctrl+M, you would find the relevant type metadata (see Figure 15-1).

Figure 15-1. Viewing an assembly’s metadata using ildasm.exe
As you can see, ildasm.exe’s display of .NET type metadata is verbose (the actual binary format is much more compact). In fact, if I were to list the entire metadata description representing the CarLibrary.dll assembly, it would span several pages. Given that this act would be a woeful waste of paper, let’s just glimpse into some key metadata descriptions of the CarLibrary.dll assembly.
![]() Note Don’t be too concerned with the exact syntax of every piece of .NET metadata in the next few sections. The bigger point to absorb is that .NET metadata is very descriptive and lists each internally defined (and externally referenced) type found within a given code base.
Note Don’t be too concerned with the exact syntax of every piece of .NET metadata in the next few sections. The bigger point to absorb is that .NET metadata is very descriptive and lists each internally defined (and externally referenced) type found within a given code base.
Viewing (Partial) Metadata for the EngineState Enumeration
Each type defined within the current assembly is documented using a TypeDef #n token (where TypeDef is short for type definition). If the type being described uses a type defined within a separate .NET assembly, the referenced type is documented using a TypeRef #n token (whereTypeRef is short for type reference). A TypeRef token is a pointer (if you will) to the referenced type’s full metadata definition in an external assembly. In a nutshell, .NET metadata is a set of tables that clearly mark all type definitions (TypeDefs) and referenced types (TypeRefs), all of which can be viewed using ildasm.exe’s metadata window.
As far as CarLibrary.dll goes, one TypeDef is the metadata description of the CarLibrary.EngineState enumeration (your number may differ; TypeDef numbering is based on the order in which the C# compiler processes the file).
TypeDef #2 (02000003)
-------------------------------------------------------
TypDefName: CarLibrary.EngineState (02000003)
Flags : [Public] [AutoLayout] [Class] [Sealed] [AnsiClass] (00000101)
Extends : 01000001 [TypeRef] System.Enum
Field #1 (04000006)
-------------------------------------------------------
Field Name: value__ (04000006)
Flags : [Public] [SpecialName] [RTSpecialName] (00000606)
CallCnvntn: [FIELD]
Field type: I4
Field #2 (04000007)
-------------------------------------------------------
Field Name: engineAlive (04000007)
Flags : [Public] [Static] [Literal] [HasDefault] (00008056)
DefltValue: (I4) 0
CallCnvntn: [FIELD]
Field type: ValueClass CarLibrary.EngineState
...
Here, the TypDefName token is used to establish the name of the given type, which in this case is the custom CarLibrary.EngineState enum. The Extends metadata token is used to document the base type of a given .NET type (in this case, the referenced type,System.Enum). Each field of an enumeration is marked using the Field #n token. For brevity, I have simply listed the metadata for CarLibrary.EngineState.engineAlive.
Viewing (Partial) Metadata for the Car Type
Here is a partial dump of the Car class that illustrates the following:
· How fields are defined in terms of .NET metadata
· How methods are documented via .NET metadata
· How an automatic property is represented in .NET metadata
TypeDef #3 (02000004)
-------------------------------------------------------
TypDefName: CarLibrary.Car (02000004)
Flags : [Public] [AutoLayout] [Class] [Abstract]
[AnsiClass] [BeforeFieldInit] (00100081)
Extends : 01000002 [TypeRef] System.Object
...
Field #2 (0400000a)
-------------------------------------------------------
Field Name: <PetName>k__BackingField (0400000A)
Flags : [Private] (00000001)
CallCnvntn: [FIELD]
Field type: String
...
Method #1 (06000001)
-------------------------------------------------------
MethodName: get_PetName (06000001)
Flags : [Public] [HideBySig] [ReuseSlot] [SpecialName] (00000886)
RVA : 0x000020d0
ImplFlags : [IL] [Managed] (00000000)
CallCnvntn: [DEFAULT]
hasThis
ReturnType: String
No arguments.
...
Method #2 (06000002)
-------------------------------------------------------
MethodName: set_PetName (06000002)
Flags : [Public] [HideBySig] [ReuseSlot] [SpecialName] (00000886)
RVA : 0x000020e7
ImplFlags : [IL] [Managed] (00000000)
CallCnvntn: [DEFAULT]
hasThis
ReturnType: Void
1 Arguments
Argument #1: String
1 Parameters
(1) ParamToken : (08000001) Name : value flags: [none] (00000000)
...
Property #1 (17000001)
-------------------------------------------------------
Prop.Name : PetName (17000001)
Flags : [none] (00000000)
CallCnvntn: [PROPERTY]
hasThis
ReturnType: String
No arguments.
DefltValue:
Setter : (06000002) set_PetName
Getter : (06000001) get_PetName
0 Others
...
First, note that the Car class metadata marks the type’s base class (System.Object) and includes various flags that describe how this type was constructed (e.g., [Public], [Abstract], and whatnot). Methods (such as the Car’s constructor) are described in regard to their parameters, return value, and name.
Note how an automatic property results in a compiler-generated private backing field (which was named <PetName>k BackingField) and two compiler-generated methods (in the case of a read-write property) named, in this example, get_PetName() and set_PetName() . Finally, the actual property is mapped to the internal get/set methods using the .NET metadata Getter/Setter tokens.
Examining a TypeRef
Recall that an assembly’s metadata will describe not only the set of internal types (Car, EngineState, etc.) but also any external types the internal types reference. For example, given that CarLibrary.dll has defined two enumerations, you find a TypeRef block for theSystem.Enum type, as follows:
TypeRef #1 (01000001)
-------------------------------------------------------
Token: 0x01000001
ResolutionScope: 0x23000001
TypeRefName: System.Enum
Documenting the Defining Assembly
The ildasm.exe metadata window also allows you to view the .NET metadata that describes the assembly itself using the Assembly token. As you can see from the following (partial) listing, information documented within the Assembly table is (surprise, surprise!) the same information that can be viewable via the MANIFEST icon. The following is a partial dump of the manifest of CarLibrary.dll (version 2.0.0.0):
Assembly
-------------------------------------------------------
Token: 0x20000001
Name : CarLibrary
Public Key : 00 24 00 00 04 80 00 00 // Etc...
Hash Algorithm : 0x00008004
Major Version: 0x00000002
Minor Version: 0x00000000
Build Number: 0x00000000
Revision Number: 0x00000000
Locale: <null>
Flags : [PublicKey] ...
Documenting Referenced Assemblies
In addition to the Assembly token and the set of TypeDef and TypeRef blocks, .NET metadata also makes use of AssemblyRef #n tokens to document each external assembly. Given that the CarLibrary.dll makes use of the System.Windows.Forms.MessageBox class, you find an AssemblyRef for the System.Windows.Forms assembly, as shown in the following code:
AssemblyRef #2 (23000002)
-------------------------------------------------------
Token: 0x23000002
Public Key or Token: b7 7a 5c 56 19 34 e0 89
Name: System.Windows.Forms
Version: 4.0.0.0
Major Version: 0x00000004
Minor Version: 0x00000000
Build Number: 0x00000000
Revision Number: 0x00000000
Locale: <null>
HashValue Blob:
Flags: [none] (00000000)
Documenting String Literals
The final point of interest regarding .NET metadata is the fact that every string literal in your code base is documented under the User Strings token.
User Strings
-------------------------------------------------------
70000001 : (11) L"Jamming {0}"
70000019 : (13) L"Quiet time..."
70000035 : (23) L"CarLibrary Version 2.0!"
70000065 : (14) L"Ramming speed!"
70000083 : (19) L"Faster is better..."
700000ab : ( 4) L"Eek!"
700000cd : (27) L"Your engine block exploded!"
![]() Note As illustrated in this last metadata listing, always be aware that all strings are clearly documented in the assembly metadata. This could have huge security consequences if you were to use string literals to capture passwords, credit card numbers, or other sensitive information.
Note As illustrated in this last metadata listing, always be aware that all strings are clearly documented in the assembly metadata. This could have huge security consequences if you were to use string literals to capture passwords, credit card numbers, or other sensitive information.
The next question on your mind may be (in the best-case scenario) “How can I leverage this information in my applications?” or (in the worst-case scenario) “Why should I care about metadata?” To address both points of view, allow me to introduce .NET reflection services. Be aware that the usefulness of the topics presented over the pages that follow may be a bit of a head-scratcher until this chapter’s endgame. So hang tight.
![]() Note You will also find a number of CustomAttribute tokens displayed by the MetaInfo window, which documents the attributes applied within the code base. You’ll learn about the role of .NET attributes later in this chapter.
Note You will also find a number of CustomAttribute tokens displayed by the MetaInfo window, which documents the attributes applied within the code base. You’ll learn about the role of .NET attributes later in this chapter.
Understanding Reflection
In the .NET universe, reflection is the process of runtime type discovery. Using reflection services, you are able to programmatically obtain the same metadata information displayed by ildasm.exe using a friendly object model. For example, through reflection, you can obtain a list of all types contained within a given *.dll or *.exe assembly, including the methods, fields, properties, and events defined by a given type. You can also dynamically discover the set of interfaces supported by a given type, the parameters of a method, and other related details (base classes, namespace information, manifest data, and so forth).
Like any namespace, System.Reflection (which is defined in mscorlib.dll) contains a number of related types. Table 15-1 lists some of the core items you should be familiar with.
Table 15-1. A Sampling of Members of the System.Reflection Namespace
|
Type |
Meaning in Life |
|
Assembly |
This abstract class contains a number of members that allow you to load, investigate, and manipulate an assembly. |
|
AssemblyName |
This class allows you to discover numerous details behind an assembly’s identity (version information, culture information, and so forth). |
|
EventInfo |
This abstract class holds information for a given event. |
|
FieldInfo |
This abstract class holds information for a given field. |
|
MemberInfo |
This is the abstract base class that defines common behaviors for the EventInfo, FieldInfo, MethodInfo, and PropertyInfo types. |
|
MethodInfo |
This abstract class contains information for a given method. |
|
Module |
This abstract class allows you to access a given module within a multifile assembly. |
|
ParameterInfo |
This class holds information for a given parameter. |
|
PropertyInfo |
This abstract class holds information for a given property. |
To understand how to leverage the System.Reflection namespace to programmatically read .NET metadata, you need to first come to terms with the System.Type class.
The System.Type Class
The System.Type class defines a number of members that can be used to examine a type’s metadata, a great number of which return types from the System.Reflection namespace. For example, Type.GetMethods() returns an array of MethodInfo objects,Type.GetFields() returns an array of FieldInfo objects, and so on. The complete set of members exposed by System.Type is quite expansive; however, Table 15-2 offers a partial snapshot of the members supported by System.Type (see the .NET Framework 4.6 SDK documentation for full details).
Table 15-2. Select Members of System.Type
|
Member |
Meaning in Life |
|
IsAbstract IsArray IsClass IsCOMObject IsEnum IsGenericTypeDefinition IsGenericParameter IsInterface IsPrimitive IsNestedPrivate IsNestedPublic IsSealed IsValueType |
These properties (among others) allow you to discover a number of basic traits about the Type you are referring to (e.g., if it is an abstract entity, an array, a nested class, and so forth). |
|
GetConstructors() GetEvents() GetFields() GetInterfaces() GetMembers() GetMethods() GetNestedTypes() GetProperties() |
These methods (among others) allow you to obtain an array representing the items (interface, method, property, etc.) you are interested in. Each method returns a related array (e.g., GetFields() returns a FieldInfo array, GetMethods() returns a MethodInfo array, etc.). Be aware that each of these methods has a singular form (e.g., GetMethod(), GetProperty(), etc.) that allows you to retrieve a specific item by name, rather than an array of all related items. |
|
FindMembers() |
This method returns a MemberInfo array based on search criteria. |
|
GetType() |
This static method returns a Type instance given a string name. |
|
InvokeMember() |
This method allows “late binding” for a given item. You’ll learn about late binding later in this chapter. |
Obtaining a Type Reference Using System.Object.GetType()
You can obtain an instance of the Type class in a variety of ways. However, the one thing you cannot do is directly create a Type object using the new keyword, as Type is an abstract class. Regarding your first choice, recall that System.Object defines a method named GetType(), which returns an instance of the Type class that represents the metadata for the current object.
// Obtain type information using a SportsCar instance.
SportsCar sc = new SportsCar();
Type t = sc.GetType();
Obviously, this approach will work only if you have compile-time knowledge of the type you want to reflect over (SportsCar in this case) and currently have an instance of the type in memory. Given this restriction, it should make sense that tools such as ildasm.exe do not obtain type information by directly calling System.Object.GetType() for each type, given the ildasm.exe was not compiled against your custom assemblies.
Obtaining a Type Reference Using typeof()
The next way to obtain type information is using the C# typeof operator, like so:
// Get the type using typeof.
Type t = typeof(SportsCar);
Unlike System.Object.GetType(), the typeof operator is helpful in that you do not need to first create an object instance to extract type information. However, your code base must still have compile-time knowledge of the type you are interested in examining, as typeofexpects the strongly typed name of the type.
Obtaining a Type Reference Using System.Type.GetType()
To obtain type information in a more flexible manner, you may call the static GetType() member of the System.Type class and specify the fully qualified string name of the type you are interested in examining. Using this approach, you do not need to have compile-time knowledge of the type you are extracting metadata from, given that Type.GetType() takes an instance of the omnipresent System.String.
![]() Note When I say you do not need compile-time knowledge when calling Type.GetType(), I am referring to the fact that this method can take any string value whatsoever (rather than a strongly typed variable). Of course, you would still need to know the name of the type in a “stringified” format!
Note When I say you do not need compile-time knowledge when calling Type.GetType(), I am referring to the fact that this method can take any string value whatsoever (rather than a strongly typed variable). Of course, you would still need to know the name of the type in a “stringified” format!
The Type.GetType() method has been overloaded to allow you to specify two Boolean parameters, one of which controls whether an exception should be thrown if the type cannot be found, and the other of which establishes the case sensitivity of the string. To illustrate, ponder the following:
// Obtain type information using the static Type.GetType() method
// (don’t throw an exception if SportsCar cannot be found and ignore case).
Type t = Type.GetType("CarLibrary.SportsCar", false, true);
In the previous example, notice that the string you are passing into GetType() makes no mention of the assembly containing the type. In this case, the assumption is that the type is defined within the currently executing assembly. However, when you want to obtain metadata for a type within an external private assembly, the string parameter is formatted using the type’s fully qualified name, followed by a comma, followed by the friendly name of the assembly containing the type, like so:
// Obtain type information for a type within an external assembly.
Type t = Type.GetType("CarLibrary.SportsCar, CarLibrary");
As well, do know that the string passed into Type.GetType() may specify a plus token (+) to denote a nested type. Assume you want to obtain type information for an enumeration (SpyOptions) nested within a class named JamesBondCar. To do so, you would write the following:
// Obtain type information for a nested enumeration
// within the current assembly.
Type t = Type.GetType("CarLibrary.JamesBondCar+SpyOptions");
Building a Custom Metadata Viewer
To illustrate the basic process of reflection (and the usefulness of System.Type), let’s create a Console Application project named MyTypeViewer. This program will display details of the methods, properties, fields, and supported interfaces (in addition to some other points of interest) for any type within mscorlib.dll (recall all .NET applications have automatic access to this core framework class library) or a type within MyTypeViewer itself. Once the application has been created, be sure to import the System.Reflection namespace.
// Need to import this namespace to do any reflection!
using System.Reflection;
Reflecting on Methods
The Program class will be updated to define a number of static methods, each of which takes a single System.Type parameter and returns void. First you have ListMethods(), which (as you might guess) prints the name of each method defined by the incoming type. Notice howType.GetMethods() returns an array of System.Reflection.MethodInfo objects, which can be enumerated over using a standard foreach loop, as follows:
// Display method names of type.
static void ListMethods(Type t)
{
Console.WriteLine("***** Methods *****");
MethodInfo[] mi = t.GetMethods();
foreach(MethodInfo m in mi)
Console.WriteLine("->{0}", m.Name);
Console.WriteLine();
}
Here, you are simply printing the name of the method using the MethodInfo.Name property. As you might guess, MethodInfo has many additional members that allow you to determine whether the method is static, virtual, generic, or abstract. As well, the MethodInfo type allows you to obtain the method’s return value and parameter set. You’ll spruce up the implementation of ListMethods() in just a bit.
If you wanted, you could also build a fitting LINQ query to enumerate the names of each method. Recall from Chapter 12, LINQ to Objects allows you to build strongly typed queries that can be applied to in-memory object collections. As a good rule of thumb, whenever you find blocks of looping or decision programming logic, you could make use of a related LINQ query. For example, you could rewrite the previous method as so:
static void ListMethods(Type t)
{
Console.WriteLine("***** Methods *****");
var methodNames = from n in t.GetMethods() select n.Name;
foreach (var name in methodNames)
Console.WriteLine("->{0}", name);
Console.WriteLine();
}
Reflecting on Fields and Properties
The implementation of ListFields() is similar. The only notable difference is the call to Type.GetFields() and the resulting FieldInfo array. Again, to keep things simple, you are printing out only the name of each field using a LINQ query.
// Display field names of type.
static void ListFields(Type t)
{
Console.WriteLine("***** Fields *****");
var fieldNames = from f in t.GetFields() select f.Name;
foreach (var name in fieldNames)
Console.WriteLine("->{0}", name);
Console.WriteLine();
}
The logic to display a type’s properties is similar.
// Display property names of type.
static void ListProps(Type t)
{
Console.WriteLine("***** Properties *****");
var propNames = from p in t.GetProperties() select p.Name;
foreach (var name in propNames)
Console.WriteLine("->{0}", name);
Console.WriteLine();
}
Reflecting on Implemented Interfaces
Next, you will author a method named ListInterfaces() that will print the names of any interfaces supported on the incoming type. The only point of interest here is that the call to GetInterfaces() returns an array of System.Types! This should make sense given that interfaces are, indeed, types.
// Display implemented interfaces.
static void ListInterfaces(Type t)
{
Console.WriteLine("***** Interfaces *****");
var ifaces = from i in t.GetInterfaces() select i;
foreach(Type i in ifaces)
Console.WriteLine("->{0}", i.Name);
}
![]() Note Be aware that a majority of the “get” methods of System.Type (GetMethods(), GetInterfaces(), etc.) have been overloaded to allow you to specify values from the BindingFlags enumeration. This provides a greater level of control on exactly what should be searched for (e.g., only static members, only public members, include private members, etc.). Consult the .NET Framework 4.6 SDK documentation for details.
Note Be aware that a majority of the “get” methods of System.Type (GetMethods(), GetInterfaces(), etc.) have been overloaded to allow you to specify values from the BindingFlags enumeration. This provides a greater level of control on exactly what should be searched for (e.g., only static members, only public members, include private members, etc.). Consult the .NET Framework 4.6 SDK documentation for details.
Displaying Various Odds and Ends
Last but not least, you have one final helper method that will simply display various statistics (indicating whether the type is generic, what the base class is, whether the type is sealed, and so forth) regarding the incoming type.
// Just for good measure.
static void ListVariousStats(Type t)
{
Console.WriteLine("***** Various Statistics *****");
Console.WriteLine("Base class is: {0}", t.BaseType);
Console.WriteLine("Is type abstract? {0}", t.IsAbstract);
Console.WriteLine("Is type sealed? {0}", t.IsSealed);
Console.WriteLine("Is type generic? {0}", t.IsGenericTypeDefinition);
Console.WriteLine("Is type a class type? {0}", t.IsClass);
Console.WriteLine();
}
Implementing Main()
The Main() method of the Program class prompts the user for the fully qualified name of a type. Once you obtain this string data, you pass it into the Type.GetType() method and send the extracted System.Type into each of your helper methods. This process repeats until the user enters Q to terminate the application.
static void Main(string[] args)
{
Console.WriteLine("***** Welcome to MyTypeViewer *****");
string typeName = "";
do
{
Console.WriteLine("\nEnter a type name to evaluate");
Console.Write("or enter Q to quit: ");
// Get name of type.
typeName = Console.ReadLine();
// Does user want to quit?
if (typeName.ToUpper() == "Q")
{
break;
}
// Try to display type.
try
{
Type t = Type.GetType(typeName);
Console.WriteLine("");
ListVariousStats(t);
ListFields(t);
ListProps(t);
ListMethods(t);
ListInterfaces(t);
}
catch
{
Console.WriteLine("Sorry, can’t find type");
}
} while (true);
}
At this point, MyTypeViewer.exe is ready to take for a test-drive. For example, run your application and enter the following fully qualified names (be aware that the manner in which you invoked Type.GetType() requires case-sensitive string names):
· System.Int32
· System.Collections.ArrayList
· System.Threading.Thread
· System.Void
· System.IO.BinaryWriter
· System.Math
· System.Console
· MyTypeViewer.Program
For example, here is some partial output when specifying System.Math:
***** Welcome to MyTypeViewer *****
Enter a type name to evaluate
or enter Q to quit: System.Math
***** Various Statistics *****
Base class is: System.Object
Is type abstract? True
Is type sealed? True
Is type generic? False
Is type a class type? True
***** Fields *****
->PI
->E
***** Properties *****
***** Methods *****
->Acos
->Asin
->Atan
->Atan2
->Ceiling
->Ceiling
->Cos
...
Reflecting on Generic Types
When you call Type.GetType() to obtain metadata descriptions of generic types, you must make use of a special syntax involving a “back tick” character (`) followed by a numerical value that represents the number of type parameters the type supports. For example, if you want to print out the metadata description of System.Collections.Generic.List<T>, you would need to pass the following string into your application:
System.Collections.Generic.List`1
Here, you are using the numerical value of 1, given that List<T> has only one type parameter. However, if you want to reflect over Dictionary<TKey, TValue>, you would supply the value 2, like so:
System.Collections.Generic.Dictionary`2
Reflecting on Method Parameters and Return Values
So far, so good! Let’s make a minor enhancement to the current application. Specifically, you will update the ListMethods() helper function to list not only the name of a given method but also the return type and incoming parameter types. The MethodInfo type provides theReturnType property and GetParameters() method for these tasks. In the following modified code, notice that you are building a string that contains the type and name of each parameter using a nested foreach loop (without the use of LINQ):
static void ListMethods(Type t)
{
Console.WriteLine("***** Methods *****");
MethodInfo[] mi = t.GetMethods();
foreach (MethodInfo m in mi)
{
// Get return type.
string retVal = m.ReturnType.FullName;
string paramInfo = "( ";
// Get params.
foreach (ParameterInfo pi in m.GetParameters())
{
paramInfo += string.Format("{0} {1} ", pi.ParameterType, pi.Name);
}
paramInfo += " )";
// Now display the basic method sig.
Console.WriteLine("->{0} {1} {2}", retVal, m.Name, paramInfo);
}
Console.WriteLine();
}
If you now run this updated application, you will find that the methods of a given type are much more detailed. If you enter your good friend System.Object as input to the program, the following methods will display:
***** Methods *****
->System.String ToString ( )
->System.Boolean Equals ( System.Object obj )
->System.Boolean Equals ( System.Object objA System.Object objB )
->System.Boolean ReferenceEquals ( System.Object objA System.Object objB )
->System.Int32 GetHashCode ( )
->System.Type GetType ( )
The current implementation of ListMethods() is helpful, in that you can directly investigate each parameter and method return type using the System.Reflection object model. As an extreme shortcut, be aware that all of the XXXInfo types (MethodInfo, PropertyInfo,EventInfo, etc.) have overridden ToString() to display the signature of the item requested. Thus, you could also implement ListMethods() as follows (once again using LINQ, where you simply select all MethodInfo objects, rather than only the Name values):
static void ListMethods(Type t)
{
Console.WriteLine("***** Methods *****");
var methodNames = from n in t.GetMethods() select n;
foreach (var name in methodNames)
Console.WriteLine("->{0}", name);
Console.WriteLine();
}
Interesting stuff, huh? Clearly the System.Reflection namespace and System.Type class allow you to reflect over many other aspects of a type beyond what MyTypeViewer is currently displaying. As you would hope, you can obtain a type’s events, get the list of any generic parameters for a given member, and glean dozens of other details.
Nevertheless, at this point you have created a (somewhat capable) object browser. The major limitation, of course, is that you have no way to reflect beyond the current assembly (MyTypeViewer) or the always-accessible mscorlib.dll. This begs the question, “How can I build applications that can load (and reflect over) assemblies not referenced at compile time?” Glad you asked.
![]() Source Code You can find the MyTypeViewer project in the Chapter 15 subdirectory.
Source Code You can find the MyTypeViewer project in the Chapter 15 subdirectory.
Dynamically Loading Assemblies
In Chapter 14, you learned all about how the CLR consults the assembly manifest when probing for an externally referenced assembly. However, there will be many times when you need to load assemblies on the fly programmatically, even if there is no record of said assembly in the manifest. Formally speaking, the act of loading external assemblies on demand is known as a dynamic load.
System.Reflection defines a class named Assembly. Using this class, you are able to dynamically load an assembly, as well as discover properties about the assembly itself. Using the Assembly type, you are able to dynamically load private or shared assemblies, as well as load an assembly located at an arbitrary location. In essence, the Assembly class provides methods (Load() and LoadFrom(), in particular) that allow you to programmatically supply the same sort of information found in a client-side*.config file.
To illustrate dynamic loading, create a new Console Application project named ExternalAssemblyReflector. Your task is to construct a Main() method that prompts for the friendly name of an assembly to load dynamically. You will pass the Assembly reference into a helper method named DisplayTypes(), which will simply print the names of each class, interface, structure, enumeration, and delegate it contains. The code is refreshingly simple.
using System;
using System.Collections.Generic;
using System.Linq;
using System.Text;
using System.Reflection;
using System.IO; // For FileNotFoundException definition.
namespace ExternalAssemblyReflector
{
class Program
{
static void DisplayTypesInAsm(Assembly asm)
{
Console.WriteLine("\n***** Types in Assembly *****");
Console.WriteLine("->{0}", asm.FullName);
Type[] types = asm.GetTypes();
foreach (Type t in types)
Console.WriteLine("Type: {0}", t);
Console.WriteLine("");
}
static void Main(string[] args)
{
Console.WriteLine("***** External Assembly Viewer *****");
string asmName = "";
Assembly asm = null;
do
{
Console.WriteLine("\nEnter an assembly to evaluate");
Console.Write("or enter Q to quit: ");
// Get name of assembly.
asmName = Console.ReadLine();
// Does user want to quit?
if (asmName.ToUpper() == "Q")
{
break;
}
// Try to load assembly.
try
{
asm = Assembly.Load(asmName);
DisplayTypesInAsm(asm);
}
catch
{
Console.WriteLine("Sorry, can’t find assembly.");
}
} while (true);
}
}
}
Notice that the static Assembly.Load() method has been passed only the friendly name of the assembly you are interested in loading into memory. Thus, if you want to reflect over CarLibrary.dll, you will need to copy the CarLibrary.dll binary to the \bin\Debugdirectory of the ExternalAssemblyReflector application to run this program. Once you do, you will find output similar to the following:
***** External Assembly Viewer *****
Enter an assembly to evaluate
or enter Q to quit: CarLibrary
***** Types in Assembly *****
->CarLibrary, Version=2.0.0.0, Culture=neutral, PublicKeyToken=33a2bc294331e8b9
Type: CarLibrary.MusicMedia
Type: CarLibrary.EngineState
Type: CarLibrary.Car
Type: CarLibrary.SportsCar
Type: CarLibrary.MiniVan
If you want to make ExternalAssemblyReflector more flexible, you can update your code to load the external assembly using Assembly.LoadFrom() rather than Assembly.Load(), like so:
try
{
asm = Assembly.LoadFrom(asmName);
DisplayTypesInAsm(asm);
}
By doing so, you can enter an absolute path to the assembly you want to view (e.g., C:\MyApp\MyAsm.dll). Essentially, Assembly.LoadFrom() allows you to programmatically supply a <codeBase> value. With this adjustment, you can now pass in a full path to your Console Application project. Thus, if CarLibrary.dll was located under C:\MyCode, you could enter the following:
***** External Assembly Viewer *****
Enter an assembly to evaluate
or enter Q to quit: C:\MyCode\CarLibrary.dll
***** Types in Assembly *****
->CarLibrary, Version=2.0.0.0, Culture=neutral, PublicKeyToken=33a2bc294331e8b9
Type: CarLibrary.EngineState
Type: CarLibrary.Car
Type: CarLibrary.SportsCar
Type: CarLibrary.MiniVan
![]() Source Code The ExternalAssemblyReflector project is in the Chapter 15 subdirectory.
Source Code The ExternalAssemblyReflector project is in the Chapter 15 subdirectory.
Reflecting on Shared Assemblies
The Assembly.Load() method has been overloaded a number of times. One variation allows you to specify a culture value (for localized assemblies), as well as a version number and public key token value (for shared assemblies). Collectively speaking, the set of items identifying an assembly is termed the display name. The format of a display name is a comma-delimited string of name-value pairs that begins with the friendly name of the assembly, followed by optional qualifiers (that may appear in any order). Here is the template to follow (optional items appear in parentheses):
Name (,Version = major.minor.build.revision) (,Culture = culture token)
(,PublicKeyToken= public key token)
When you’re crafting a display name, the convention PublicKeyToken=null indicates that binding and matching against a nonstrongly named assembly is required. Additionally, Culture="" indicates matching against the default culture of the target machine, for example:
// Load version 1.0.0.0 of CarLibrary using the default culture.
Assembly a =
Assembly.Load(@"CarLibrary, Version=1.0.0.0, PublicKeyToken=null, Culture=""");
Also be aware that the System.Reflection namespace supplies the AssemblyName type, which allows you to represent the preceding string information in a handy object variable. Typically, this class is used in conjunction with System.Version, which is an OO wrapper around an assembly’s version number. Once you have established the display name, it can then be passed into the overloaded Assembly.Load() method, like so:
// Make use of AssemblyName to define the display name.
AssemblyName asmName;
asmName = new AssemblyName();
asmName.Name = "CarLibrary";
Version v = new Version("1.0.0.0");
asmName.Version = v;
Assembly a = Assembly.Load(asmName);
To load a shared assembly from the GAC, the Assembly.Load() parameter must specify a PublicKeyToken value. For example, assume you have a new Console Application project named SharedAsmReflector and want to load version 4.0.0.0 of theSystem.Windows.Forms.dll assembly provided by the .NET base class libraries. Given that the number of types in this assembly is quite large, the following application prints out only the names of public enums, using a simple LINQ query:
using System;
using System.Collections.Generic;
using System.Linq;
using System.Text;
using System.Reflection;
using System.IO;
namespace SharedAsmReflector
{
public class SharedAsmReflector
{
private static void DisplayInfo(Assembly a)
{
Console.WriteLine("***** Info about Assembly *****");
Console.WriteLine("Loaded from GAC? {0}", a.GlobalAssemblyCache);
Console.WriteLine("Asm Name: {0}", a.GetName().Name);
Console.WriteLine("Asm Version: {0}", a.GetName().Version);
Console.WriteLine("Asm Culture: {0}",
a.GetName().CultureInfo.DisplayName);
Console.WriteLine("\nHere are the public enums:");
// Use a LINQ query to find the public enums.
Type[] types = a.GetTypes();
var publicEnums = from pe in types where pe.IsEnum &&
pe.IsPublic select pe;
foreach (var pe in publicEnums)
{
Console.WriteLine(pe);
}
}
static void Main(string[] args)
{
Console.WriteLine("***** The Shared Asm Reflector App *****\n");
// Load System.Windows.Forms.dll from GAC.
string displayName = null;
displayName = "System.Windows.Forms," +
"Version=4.0.0.0," +
"PublicKeyToken=b77a5c561934e089," +
@"Culture=""";
Assembly asm = Assembly.Load(displayName);
DisplayInfo(asm);
Console.WriteLine("Done!");
Console.ReadLine();
}
}
}
![]() Source Code The SharedAsmReflector project is in the Chapter 15 subdirectory.
Source Code The SharedAsmReflector project is in the Chapter 15 subdirectory.
At this point, you should understand how to use some of the core members of the System.Reflection namespace to discover metadata at runtime. Of course, I realize despite the “cool factor,” you likely will not need to build custom object browsers at your place of employment too often. Do recall, however, that reflection services are the foundation for a number of common programming activities, including late binding.
Understanding Late Binding
Simply put, late binding is a technique in which you are able to create an instance of a given type and invoke its members at runtime without having hard-coded compile-time knowledge of its existence. When you are building an application that binds late to a type in an external assembly, you have no reason to set a reference to the assembly; therefore, the caller’s manifest has no direct listing of the assembly.
At first glance, it is not easy to see the value of late binding. It is true that if you can “bind early” to an object (e.g., add an assembly reference and allocate the type using the C# new keyword), you should opt to do so. For one reason, early binding allows you to determine errors at compile time, rather than at runtime. Nevertheless, late binding does have a critical role in any extendable application you may be building. You will have a chance to build such an “extendable” program at the end of this chapter, in the section “Building an Extendable Application.” Until then, let’s examine the role of the Activator class.
The System.Activator Class
The System.Activator class (defined in mscorlib.dll) is the key to the .NET late-binding process. For the current example, you are interested only in the Activator.CreateInstance() method, which is used to create an instance of a type à la late binding. This method has been overloaded numerous times to provide a good deal of flexibility. The simplest variation of the CreateInstance() member takes a valid Type object that describes the entity you want to allocate into memory on the fly.
Create a new Console Application project named LateBindingApp and import the System.IO and System.Reflection namespaces via the C# using keyword. Now, update the Program class as follows:
// This program will load an external library,
// and create an object using late binding.
public class Program
{
static void Main(string[] args)
{
Console.WriteLine("***** Fun with Late Binding *****");
// Try to load a local copy of CarLibrary.
Assembly a = null;
try
{
a = Assembly.Load("CarLibrary");
}
catch(FileNotFoundException ex)
{
Console.WriteLine(ex.Message);
return;
}
if(a != null)
CreateUsingLateBinding(a);
Console.ReadLine();
}
static void CreateUsingLateBinding(Assembly asm)
{
try
{
// Get metadata for the Minivan type.
Type miniVan = asm.GetType("CarLibrary.MiniVan");
// Create a Minivan instance on the fly.
object obj = Activator.CreateInstance(miniVan);
Console.WriteLine("Created a {0} using late binding!", obj);
}
catch(Exception ex)
{
Console.WriteLine(ex.Message);
}
}
}
Now, before you run this application, you will need to manually place a copy of CarLibrary.dll into the bin\Debug folder of this new application using Windows Explorer. The reason is that you are calling Assembly.Load() and, therefore, the CLR will probe only in the client folder (if you want, you could enter a path to the assembly using Assembly.LoadFrom(); however, there is no need to do so).
![]() Note Don’t add a reference to CarLibrary.dll using Visual Studio for this example! That will record this library in the client’s manifest. The whole point of late binding is that you are trying to create an object that is not known at compile time.
Note Don’t add a reference to CarLibrary.dll using Visual Studio for this example! That will record this library in the client’s manifest. The whole point of late binding is that you are trying to create an object that is not known at compile time.
Notice that the Activator.CreateInstance() method returns a System.Object rather than a strongly typed MiniVan. Therefore, if you apply the dot operator on the obj variable, you will fail to see any members of the MiniVan class. At first glance, you might assume you can remedy this problem with an explicit cast, like so:
// Cast to get access to the members of MiniVan?
// Nope! Compiler error!
object obj = (MiniVan)Activator.CreateInstance(minivan);
However, because your program has not added a reference to CarLibrary.dll, you cannot use the C# using keyword to import the CarLibrary namespace and, therefore, you can’t use a MiniVan during the casting operation! Remember that the whole point of late binding is to create instances of objects for which there is no compile-time knowledge. Given this, how can you invoke the underlying methods of the MiniVan object stored in the System.Object reference? The answer, of course, is by using reflection.
Invoking Methods with No Parameters
Assume you want to invoke the TurboBoost() method of the MiniVan. As you recall, this method will set the state of the engine to “dead” and display an informational message box. The first step is to obtain a MethodInfo object for the TurboBoost() method usingType.GetMethod(). From the resulting MethodInfo, you are then able to call MiniVan.TurboBoost using Invoke(). MethodInfo.Invoke() requires you to send in all parameters that are to be given to the method represented by MethodInfo. These parameters are represented by an array of System.Object types (as the parameters for a given method could be any number of various entities).
Given that TurboBoost() does not require any parameters, you can simply pass null (meaning “this method has no parameters”). Update your CreateUsingLateBinding() method as follows:
static void CreateUsingLateBinding(Assembly asm)
{
try
{
// Get metadata for the Minivan type.
Type miniVan = asm.GetType("CarLibrary.MiniVan");
// Create the Minivan on the fly.
object obj = Activator.CreateInstance(miniVan);
Console.WriteLine("Created a {0} using late binding!", obj);
// Get info for TurboBoost.
MethodInfo mi = miniVan.GetMethod("TurboBoost");
// Invoke method (’null’ for no parameters).
mi.Invoke(obj, null);
}
catch(Exception ex)
{
Console.WriteLine(ex.Message);
}
}
At this point, you will see the message box shown in Figure 15-2, once the TurboBoost() method is invoked.

Figure 15-2. Late-bound method invocation
Invoking Methods with Parameters
When you want to use late binding to invoke a method requiring parameters, you should package up the arguments as a loosely typed array of objects. Recall that version 2.0.0.0 of CarLibrary.dll defined the following method in the Car class:
public void TurnOnRadio(bool musicOn, MusicMedia mm)
{
if (musicOn)
MessageBox.Show(string.Format("Jamming {0}", mm));
else
MessageBox.Show("Quiet time...");
}
This method takes two parameters: a Boolean representing if the automobile’s music system should be turned on or off and an enum that represents the type of music player. Recall this enum was structured as so:
public enum MusicMedia
{
musicCd, // 0
musicTape, // 1
musicRadio, // 2
musicMp3 // 3
}
Here is a new method of the Program class, which invokes TurnOnRadio(). Notice that you are using the underlying numerical values of the MusicMedia enumeration to specify a “radio” media player.
static void InvokeMethodWithArgsUsingLateBinding(Assembly asm)
{
try
{
// First, get a metadata description of the sports car.
Type sport = asm.GetType("CarLibrary.SportsCar");
// Now, create the sports car.
object obj = Activator.CreateInstance(sport);
// Invoke TurnOnRadio() with arguments.
MethodInfo mi = sport.GetMethod("TurnOnRadio");
mi.Invoke(obj, new object[] { true, 2 });
}
catch (Exception ex)
{
Console.WriteLine(ex.Message);
}
}
Ideally, at this point, you can see the relationships among reflection, dynamic loading, and late binding. To be sure, the reflection API provides many additional features beyond what has been covered here, but you should be in good shape to dig into more details if you are interested.
Again, you still might wonder exactly when you should use these techniques in your own applications. The conclusion of this chapter should shed light on this issue; however, the next topic under investigation is the role of .NET attributes.
![]() Source Code The LateBindingApp project is in the Chapter 15 subdirectory.
Source Code The LateBindingApp project is in the Chapter 15 subdirectory.
Understanding the Role of .NET Attributes
As illustrated at beginning of this chapter, one role of a .NET compiler is to generate metadata descriptions for all defined and referenced types. In addition to this standard metadata contained within any assembly, the .NET platform provides a way for programmers to embed additional metadata into an assembly using attributes. In a nutshell, attributes are nothing more than code annotations that can be applied to a given type (class, interface, structure, etc.), member (property, method, etc.), assembly, or module.
.NET attributes are class types that extend the abstract System.Attribute base class. As you explore the .NET namespaces, you will find many predefined attributes that you are able to use in your applications. Furthermore, you are free to build custom attributes to further qualify the behavior of your types by creating a new type deriving from Attribute.
The .NET base class library provides a number of attributes in various namespaces. Table 15-3 gives a snapshot of some—but by absolutely no means all—predefined attributes.
Table 15-3. A Tiny Sampling of Predefined Attributes
|
Attribute |
Meaning in Life |
|
[CLSCompliant] |
Enforces the annotated item to conform to the rules of the Common Language Specification (CLS). Recall that CLS-compliant types are guaranteed to be used seamlessly across all .NET programming languages. |
|
[DllImport] |
Allows .NET code to make calls to any unmanaged C- or C++-based code library, including the API of the underlying operating system. Do note that [DllImport] is not used when communicating with COM-based software. |
|
[Obsolete] |
Marks a deprecated type or member. If other programmers attempt to use such an item, they will receive a compiler warning describing the error of their ways. |
|
[Serializable] |
Marks a class or structure as being “serializable,” meaning it is able to persist its current state into a stream. |
|
[NonSerialized] |
Specifies that a given field in a class or structure should not be persisted during the serialization process. |
|
[ServiceContract] |
Marks a method as a contract implemented by a WCF service. |
Understand that when you apply attributes in your code, the embedded metadata is essentially useless until another piece of software explicitly reflects over the information. If this is not the case, the blurb of metadata embedded within the assembly is ignored and completely harmless.
Attribute Consumers
As you would guess, the .NET 4.6 Framework SDK ships with numerous utilities that are indeed on the lookout for various attributes. The C# compiler (csc.exe) itself has been preprogrammed to discover the presence of various attributes during the compilation cycle. For example, if the C# compiler encounters the [CLSCompliant] attribute, it will automatically check the attributed item to ensure it is exposing only CLS-compliant constructs. By way of another example, if the C# compiler discovers an item attributed with the [Obsolete] attribute, it will display a compiler warning in the Visual Studio Error List window.
In addition to development tools, numerous methods in the .NET base class libraries are preprogrammed to reflect over specific attributes. For example, if you want to persist the state of an object to file, all you are required to do is annotate your class or structure with the[Serializable] attribute. If the Serialize() method of the BinaryFormatter class encounters this attribute, the object is automatically persisted to file in a compact binary format.
Finally, you are free to build applications that are programmed to reflect over your own custom attributes, as well as any attribute in the .NET base class libraries. By doing so, you are essentially able to create a set of “keywords” that are understood by a specific set of assemblies.
Applying Attributes in C#
To illustrate the process of applying attributes in C#, create a new Console Application project named ApplyingAttributes. Assume you want to build a class named Motorcycle that can be persisted in a binary format. To do so, simply apply the [Serializable] attribute to the class definition. If you have a field that should not be persisted, you may apply the [NonSerialized] attribute.
// This class can be saved to disk.
[Serializable]
public class Motorcycle
{
// However, this field will not be persisted.
[NonSerialized]
float weightOfCurrentPassengers;
// These fields are still serializable.
bool hasRadioSystem;
bool hasHeadSet;
bool hasSissyBar;
}
![]() Note An attribute applies to the “very next” item. For example, the only nonserialized field of the Motorcycle class is weightOfCurrentPassengers. The remaining fields are serializable given that the entire class has been annotated with [Serializable].
Note An attribute applies to the “very next” item. For example, the only nonserialized field of the Motorcycle class is weightOfCurrentPassengers. The remaining fields are serializable given that the entire class has been annotated with [Serializable].
At this point, don’t concern yourself with the actual process of object serialization (Chapter 20 examines the details). Just notice that when you want to apply an attribute, the name of the attribute is sandwiched between square brackets.
Once this class has been compiled, you can view the extra metadata using ildasm.exe. Notice that these attributes are recorded using the serializable token (see the red triangle immediately inside the Motorcycle class) and the notserialized token (on theweightOfCurrentPassengers field; see Figure 15-3).
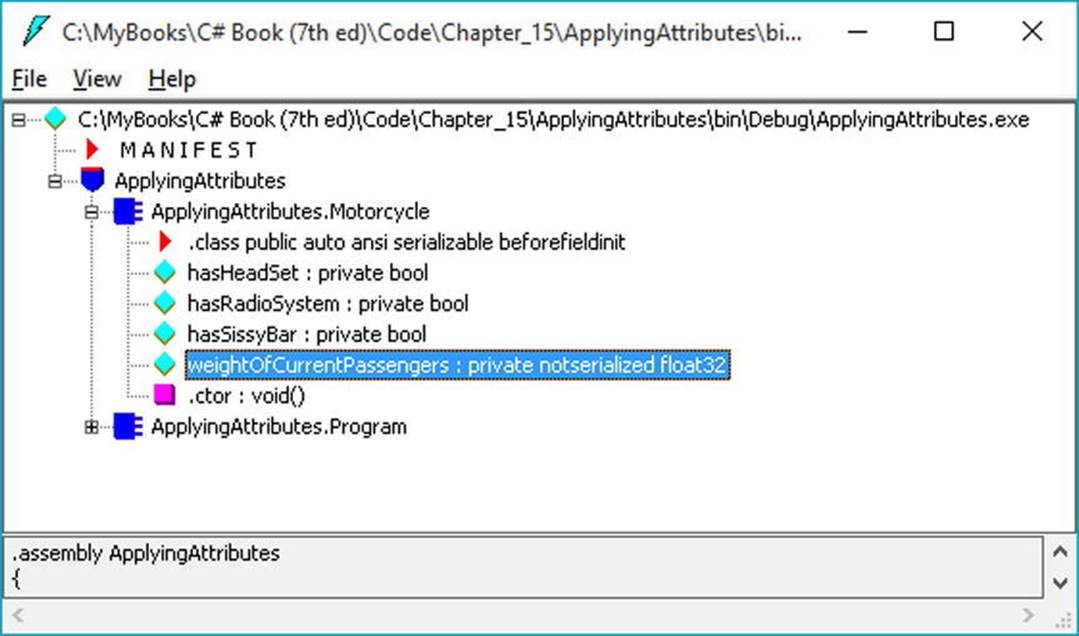
Figure 15-3. Attributes shown in ildasm.exe
As you might guess, a single item can be attributed with multiple attributes. Assume you have a legacy C# class type (HorseAndBuggy) that was marked as serializable but is now considered obsolete for current development. Rather than deleting the class definition from your code base (and risk breaking existing software), you can mark the class with the [Obsolete] attribute. To apply multiple attributes to a single item, simply use a comma-delimited list, like so:
[Serializable, Obsolete("Use another vehicle!")]
public class HorseAndBuggy
{
// ...
}
As an alternative, you can also apply multiple attributes on a single item by stacking each attribute as follows (the end result is identical):
[Serializable]
[Obsolete("Use another vehicle!")]
public class HorseAndBuggy
{
// ...
}
C# Attribute Shorthand Notation
If you were consulting the .NET Framework 4.6 SDK documentation, you might have noticed that the actual class name of the [Obsolete] attribute is ObsoleteAttribute, not Obsolete. As a naming convention, all .NET attributes (including custom attributes you may create yourself) are suffixed with the Attribute token. However, to simplify the process of applying attributes, the C# language does not require you to type in the Attribute suffix. Given this, the following iteration of the HorseAndBuggy type is identical to the previous (it just involves a few more keystrokes):
[SerializableAttribute]
[ObsoleteAttribute("Use another vehicle!")]
public class HorseAndBuggy
{
// ...
}
Be aware that this is a courtesy provided by C#. Not all .NET-enabled languages support this shorthand attribute syntax.
Specifying Constructor Parameters for Attributes
Notice that the [Obsolete] attribute is able to accept what appears to be a constructor parameter. If you view the formal definition of the [Obsolete] attribute by right-clicking the item in the code editor and selecting the Go To Definition menu option, you will find that this class indeed provides a constructor receiving a System.String.
public sealed class ObsoleteAttribute : Attribute
{
public ObsoleteAttribute(string message, bool error);
public ObsoleteAttribute(string message);
public ObsoleteAttribute();
public bool IsError { get; }
public string Message { get; }
}
Understand that when you supply constructor parameters to an attribute, the attribute is not allocated into memory until the parameters are reflected upon by another type or an external tool. The string data defined at the attribute level is simply stored within the assembly as a blurb of metadata.
The Obsolete Attribute in Action
Now that HorseAndBuggy has been marked as obsolete, if you were to allocate an instance of this type:
static void Main(string[] args)
{
HorseAndBuggy mule = new HorseAndBuggy();
}
you would find that the supplied string data is extracted and displayed within the Error List window of Visual Studio, as well as on the offending line of code when you hover your mouse cursor above the obsolete type (see Figure 15-4).
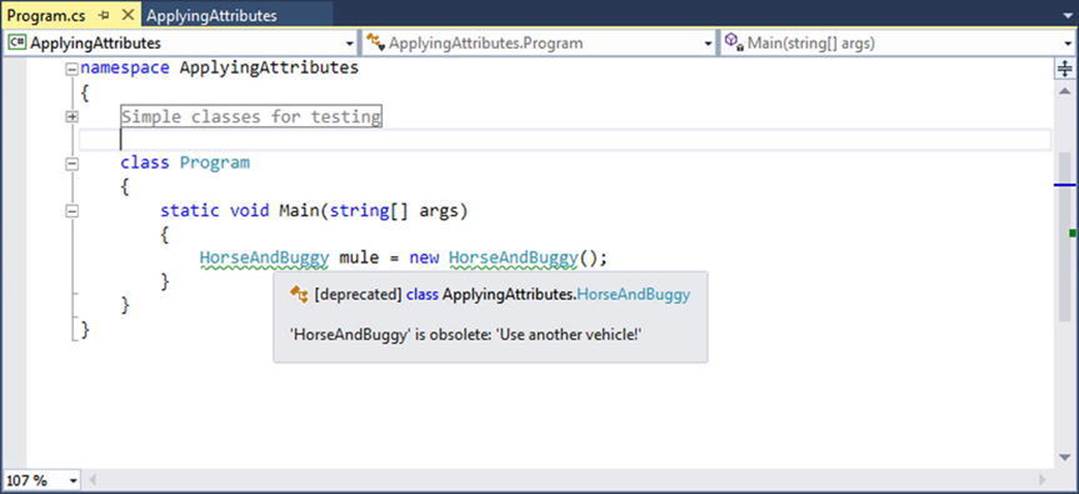
Figure 15-4. Attributes in action
In this case, the “other piece of software” that is reflecting on the [Obsolete] attribute is the C# compiler. Ideally, at this point, you should understand the following key points regarding .NET attributes:
· Attributes are classes that derive from System.Attribute.
· Attributes result in embedded metadata.
· Attributes are basically useless until another agent reflects upon them.
· Attributes are applied in C# using square brackets.
Next up, let’s examine how you can build your own custom attributes and a piece of custom software that reflects over the embedded metadata.
![]() Source Code The ApplyingAttributes project is in the Chapter 15 subdirectory.
Source Code The ApplyingAttributes project is in the Chapter 15 subdirectory.
Building Custom Attributes
The first step in building a custom attribute is to create a new class deriving from System.Attribute. Keeping in step with the automobile theme used throughout this book, assume you have created a new C# Class Library project named AttributedCarLibrary. This assembly will define a handful of vehicles, each of which is described using a custom attribute named VehicleDescriptionAttribute, as follows:
// A custom attribute.
public sealed class VehicleDescriptionAttribute : System.Attribute
{
public string Description { get; set; }
public VehicleDescriptionAttribute(string vehicalDescription)
{
Description = vehicalDescription;
}
public VehicleDescriptionAttribute(){ }
}
As you can see, VehicleDescriptionAttribute maintains a piece of string data manipulated using an automatic property (Description). Beyond the fact that this class derived from System.Attribute, there is nothing unique to this class definition.
![]() Note For security reasons, it is considered a .NET best practice to design all custom attributes as sealed. In fact, Visual Studio provides a code snippet named Attribute that will dump out a new System.Attribute-derived class into your code window. See Chapter 2 for full explication of using code snippets; however, recall you can expand any snippet by typing its name and pressing the Tab key twice.
Note For security reasons, it is considered a .NET best practice to design all custom attributes as sealed. In fact, Visual Studio provides a code snippet named Attribute that will dump out a new System.Attribute-derived class into your code window. See Chapter 2 for full explication of using code snippets; however, recall you can expand any snippet by typing its name and pressing the Tab key twice.
Applying Custom Attributes
Given that VehicleDescriptionAttribute is derived from System.Attribute, you are now able to annotate your vehicles as you see fit. For testing purposes, add the following class definitions to your new class library:
// Assign description using a "named property."
[Serializable]
[VehicleDescription(Description = "My rocking Harley")]
public class Motorcycle
{
}
[Serializable]
[Obsolete ("Use another vehicle!")]
[VehicleDescription("The old gray mare, she ain’t what she used to be...")]
public class HorseAndBuggy
{
}
[VehicleDescription("A very long, slow, but feature-rich auto")]
public class Winnebago
{
}
Named Property Syntax
Notice that the description of the Motorcycle is assigned a description using a new bit of attribute-centric syntax termed a named property. In the constructor of the first [VehicleDescription] attribute, you set the underlying string data by using the Description property. If this attribute is reflected upon by an external agent, the value is fed into the Description property (named property syntax is legal only if the attribute supplies a writable .NET property).
In contrast, the HorseAndBuggy and Winnebago types are not using named property syntax and are simply passing the string data via the custom constructor. In any case, once you compile the AttributedCarLibrary assembly, you can use ildasm.exe to view the injected metadata descriptions for your type. For example, Figure 15-5 shows an embedded description of the Winnebago class, specifically the data within the beforefieldinit item in ildasm.exe.
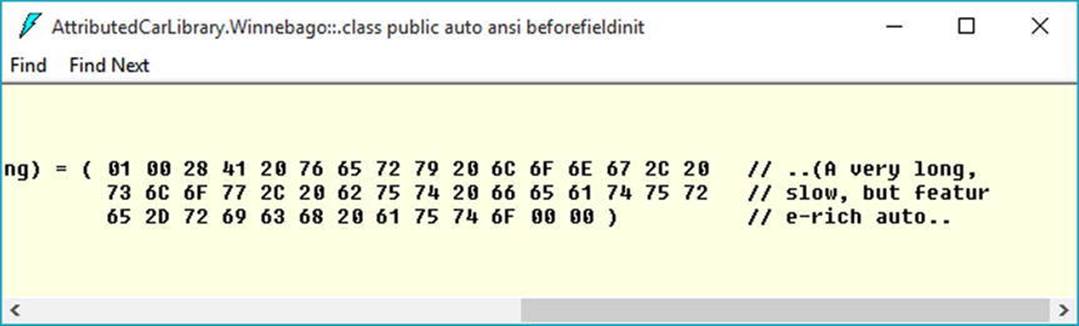
Figure 15-5. Embedded vehicle description data
Restricting Attribute Usage
By default, custom attributes can be applied to just about any aspect of your code (methods, classes, properties, and so on). Thus, if it made sense to do so, you could use VehicleDescription to qualify methods, properties, or fields (among other things).
[VehicleDescription("A very long, slow, but feature-rich auto")]
public class Winnebago
{
[VehicleDescription("My rocking CD player")]
public void PlayMusic(bool On)
{
...
}
}
In some cases, this is exactly the behavior you require. Other times, however, you may want to build a custom attribute that can be applied only to select code elements. If you want to constrain the scope of a custom attribute, you will need to apply the [AttributeUsage] attribute on the definition of your custom attribute. The [AttributeUsage] attribute allows you to supply any combination of values (via an OR operation) from the AttributeTargets enumeration, like so:
// This enumeration defines the possible targets of an attribute.
public enum AttributeTargets
{
All, Assembly, Class, Constructor,
Delegate, Enum, Event, Field, GenericParameter,
Interface, Method, Module, Parameter,
Property, ReturnValue, Struct
}
Furthermore, [AttributeUsage] also allows you to optionally set a named property (AllowMultiple) that specifies whether the attribute can be applied more than once on the same item (the default is false). As well, [AttributeUsage] allows you to establish whether the attribute should be inherited by derived classes using the Inherited named property (the default is true).
To establish that the [VehicleDescription] attribute can be applied only once on a class or structure, you can update the VehicleDescriptionAttribute definition as follows:
// This time, we are using the AttributeUsage attribute
// to annotate our custom attribute.
[AttributeUsage(AttributeTargets.Class | AttributeTargets.Struct,
Inherited = false)]
public sealed class VehicleDescriptionAttribute : System.Attribute
{
...
}
With this, if a developer attempted to apply the [VehicleDescription] attribute on anything other than a class or structure, he or she is issued a compile-time error.
Assembly-Level Attributes
It is also possible to apply attributes on all types within a given assembly using the [assembly:] tag. For example, assume you want to ensure that every public member of every public type defined within your assembly is CLS compliant.
![]() Note Chapter 1 mentioned the role of CLS-compliant assemblies. Recall that a CLS-compliant assembly can be used by all .NET programming languages out of the box. If you create public members of public types, which expose non-CLS-compliant programming constructs (such as unsigned data or pointer parameters), other .NET languages may not be able to use your functionality. Therefore, if you are building C# code libraries that need to be used by a wide variety of .NET languages, checking for CLS compliance is a must.
Note Chapter 1 mentioned the role of CLS-compliant assemblies. Recall that a CLS-compliant assembly can be used by all .NET programming languages out of the box. If you create public members of public types, which expose non-CLS-compliant programming constructs (such as unsigned data or pointer parameters), other .NET languages may not be able to use your functionality. Therefore, if you are building C# code libraries that need to be used by a wide variety of .NET languages, checking for CLS compliance is a must.
To do so, simply add the following assembly-level attribute at the top of any C# source code file. Be aware that all assembly- or module-level attributes must be listed outside the scope of any namespace scope! If you add assembly- or module-level attributes to your project, here is a recommended file layout to follow:
// List "using" statements first.
using System;
using System.Collections.Generic;
using System.Linq;
using System.Text;
// Now list any assembly- or module-level attributes.
// Enforce CLS compliance for all public types in this assembly.
[assembly: CLSCompliant(true)]
// Now, your namespace(s) and types.
namespace AttributedCarLibrary
{
// Types...
}
If you now add a bit of code that falls outside the CLS specification (such as an exposed point of unsigned data):
// Ulong types don’t jibe with the CLS.
public class Winnebago
{
public ulong notCompliant;
}
you are issued a compiler warning.
The Visual Studio AssemblyInfo.cs File
By default, Visual Studio projects receive a file named AssemblyInfo.cs, which can be viewed by expanding the Properties icon of the Solution Explorer (see Figure 15-6).
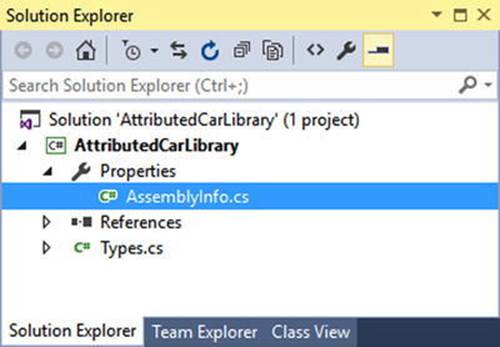
Figure 15-6. The AssemblyInfo.cs file
This file is a handy place to put attributes that are to be applied at the assembly level. You might recall from Chapter 14, during the examination of .NET assemblies, that the manifest contains assembly- level metadata, much of which comes from the assembly-level attributes shown inTable 15-4.
Table 15-4. Select Assembly-Level Attributes
|
Attribute |
Meaning in Life |
|
[AssemblyCompany] |
Holds basic company information |
|
[AssemblyCopyright] |
Holds any copyright information for the product or assembly |
|
[AssemblyCulture] |
Provides information on what cultures or languages the assembly supports |
|
[AssemblyDescription] |
Holds a friendly description of the product or modules that make up the assembly |
|
[AssemblyKeyFile] |
Specifies the name of the file containing the key pair used to sign the assembly (i.e., establish a strong name) |
|
[AssemblyProduct] |
Provides product information |
|
[AssemblyTrademark] |
Provides trademark information |
|
[AssemblyVersion] |
Specifies the assembly’s version information, in the format <major.minor.build.revision> |
![]() Source Code The AttributedCarLibrary project is included in the Chapter 15 subdirectory.
Source Code The AttributedCarLibrary project is included in the Chapter 15 subdirectory.
Reflecting on Attributes Using Early Binding
Remember that an attribute is quite useless until another piece of software reflects over its values. Once a given attribute has been discovered, that piece of software can take whatever course of action necessary. Now, like any application, this “other piece of software” could discover the presence of a custom attribute using either early binding or late binding. If you want to make use of early binding, you’ll require the client application to have a compile-time definition of the attribute in question (VehicleDescriptionAttribute, in this case). Given that theAttributedCarLibrary assembly has defined this custom attribute as a public class, early binding is the best option.
To illustrate the process of reflecting on custom attributes, create a new C# Console Application project named VehicleDescriptionAttributeReader. Next, add a reference to the AttributedCarLibrary assembly. Finally, update your initial *.cs file with the following code:
// Reflecting on attributes using early binding.
using System;
using System.Collections.Generic;
using System.Linq;
using System.Text;
using AttributedCarLibrary;
namespace VehicleDescriptionAttributeReader
{
class Program
{
static void Main(string[] args)
{
Console.WriteLine("***** Value of VehicleDescriptionAttribute *****\n");
ReflectOnAttributesUsingEarlyBinding();
Console.ReadLine();
}
private static void ReflectOnAttributesUsingEarlyBinding()
{
// Get a Type representing the Winnebago.
Type t = typeof(Winnebago);
// Get all attributes on the Winnebago.
object[] customAtts = t.GetCustomAttributes(false);
// Print the description.
foreach (VehicleDescriptionAttribute v in customAtts)
Console.WriteLine("-> {0}\n", v.Description);
}
}
}
The Type.GetCustomAttributes() method returns an object array that represents all the attributes applied to the member represented by the Type (the Boolean parameter controls whether the search should extend up the inheritance chain). Once you have obtained the list of attributes, iterate over each VehicleDescriptionAttribute class and print out the value obtained by the Description property.
![]() Source Code The VehicleDescriptionAttributeReader project is included in the Chapter 15 subdirectory.
Source Code The VehicleDescriptionAttributeReader project is included in the Chapter 15 subdirectory.
Reflecting on Attributes Using Late Binding
The previous example used early binding to print out the vehicle description data for the Winnebago type. This was possible because the VehicleDescriptionAttribute class type was defined as a public member in the AttributedCarLibrary assembly. It is also possible to make use of dynamic loading and late binding to reflect over attributes.
Create a new project called VehicleDescriptionAttributeReaderLateBinding and copy AttributedCarLibrary.dll to the project’s \bin\Debug directory. Now, update your Program class as follows:
using System;
using System.Collections.Generic;
using System.Linq;
using System.Text;
using System.Reflection;
namespace VehicleDescriptionAttributeReaderLateBinding
{
class Program
{
static void Main(string[] args)
{
Console.WriteLine("***** Value of VehicleDescriptionAttribute *****\n");
ReflectAttributesUsingLateBinding();
Console.ReadLine();
}
private static void ReflectAttributesUsingLateBinding()
{
try
{
// Load the local copy of AttributedCarLibrary.
Assembly asm = Assembly.Load("AttributedCarLibrary");
// Get type info of VehicleDescriptionAttribute.
Type vehicleDesc =
asm.GetType("AttributedCarLibrary.VehicleDescriptionAttribute");
// Get type info of the Description property.
PropertyInfo propDesc = vehicleDesc.GetProperty("Description");
// Get all types in the assembly.
Type[] types = asm.GetTypes();
// Iterate over each type and obtain any VehicleDescriptionAttributes.
foreach (Type t in types)
{
object[] objs = t.GetCustomAttributes(vehicleDesc, false);
// Iterate over each VehicleDescriptionAttribute and print
// the description using late binding.
foreach (object o in objs)
{
Console.WriteLine("-> {0}: {1}\n",
t.Name, propDesc.GetValue(o, null));
}
}
}
catch (Exception ex)
{
Console.WriteLine(ex.Message);
}
}
}
}
If you were able to follow along with the examples in this chapter, this code should be (more or less) self-explanatory. The only point of interest is the use of the PropertyInfo.GetValue() method, which is used to trigger the property’s accessor. Here is the output of the current example:
***** Value of VehicleDescriptionAttribute *****
-> Motorcycle: My rocking Harley
-> HorseAndBuggy: The old gray mare, she ain’t what she used to be...
-> Winnebago: A very long, slow, but feature-rich auto
![]() Source Code The VehicleDescriptionAttributeReaderLateBinding project is included in the Chapter 15 subdirectory.
Source Code The VehicleDescriptionAttributeReaderLateBinding project is included in the Chapter 15 subdirectory.
Putting Reflection, Late Binding, and Custom Attributes in Perspective
Even though you have seen numerous examples of these techniques in action, you may still be wondering when to make use of reflection, dynamic loading, late binding, and custom attributes in your programs. To be sure, these topics can seem a bit on the academic side of programming (which may or may not be a bad thing, depending on your point of view). To help map these topics to a real-world situation, you need a solid example. Assume for the moment that you are on a programming team that is building an application with the following requirement:
· The product must be extendable by the use of additional third-party tools.
What exactly is meant by extendable? Well, consider the Visual Studio IDE. When this application was developed, various “hooks” were inserted into the code base to allow other software vendors to “snap” (or plug in) custom modules into the IDE. Obviously, the Visual Studio development team had no way to set references to external .NET assemblies it had not developed yet (thus, no early binding), so how exactly would an application provide the required hooks? Here is one possible way to solve this problem:
1. First, an extendable application must provide some input mechanism to allow the user to specify the module to plug in (such as a dialog box or command-line flag). This requires dynamic loading.
2. Second, an extendable application must be able to determine whether the module supports the correct functionality (such as a set of required interfaces) to be plugged into the environment. This requires reflection.
3. Finally, an extendable application must obtain a reference to the required infrastructure (such as a set of interface types) and invoke the members to trigger the underlying functionality. This may require late binding.
Simply put, if the extendable application has been preprogrammed to query for specific interfaces, it is able to determine at runtime whether the type can be activated. Once this verification test has been passed, the type in question may support additional interfaces that provide a polymorphic fabric to their functionality. This is the exact approach taken by the Visual Studio team and, despite what you might be thinking, is not at all difficult!
Building an Extendable Application
In the sections that follow, I will take you through a complete example that illustrates the process of building an extendable Windows Forms application that can be augmented by the functionality of external assemblies. If you do not have some experience building GUIs with the Windows Forms API, you might want to load up the provided solution code and follow along.
![]() Note Windows Forms was the initial desktop API of the .NET platform. However, since the release of .NET 3.0, the Windows Presentation Foundation (WPF) API has become an often preferred GUI framework. While this is true, I will use Windows Forms for a number of client GUI examples in this text, as the related code is a bit more intuitive than the corresponding WPF code.
Note Windows Forms was the initial desktop API of the .NET platform. However, since the release of .NET 3.0, the Windows Presentation Foundation (WPF) API has become an often preferred GUI framework. While this is true, I will use Windows Forms for a number of client GUI examples in this text, as the related code is a bit more intuitive than the corresponding WPF code.
If you are not familiar with the process of building Windows Forms applications, feel free to simply open up the supplied sample code and follow along. To serve as a road map, the extendable application entails the following assemblies:
· CommonSnappableTypes.dll: This assembly contains type definitions that will be used by each snap-in object and will be directly referenced by the Windows Forms application.
· CSharpSnapIn.dll: A snap-in written in C#, which leverages the types of CommonSnappableTypes.dll.
· VbSnapIn.dll: A snap-in written in Visual Basic, which leverages the types of CommonSnappableTypes.dll.
· MyExtendableApp.exe: This Windows Forms application will be the executable application that may be extended by the functionality of each snap-in.
Again, this application will use dynamic loading, reflection, and late binding to dynamically gain the functionality of assemblies it has no prior knowledge of.
Building CommonSnappableTypes.dll
The first order of business is to create an assembly that contains the types that a given snap-in must leverage to be plugged into the expandable Windows Forms application. The CommonSnappableTypes Class Library project defines two types:
namespace CommonSnappableTypes
{
public interface IAppFunctionality
{
void DoIt();
}
[AttributeUsage(AttributeTargets.Class)]
public sealed class CompanyInfoAttribute : System.Attribute
{
public string CompanyName { get; set; }
public string CompanyUrl { get; set; }
}
}
The IAppFunctionality interface provides a polymorphic interface for all snap-ins that can be consumed by the extendable Windows Forms application. Given that this example is purely illustrative, you supply a single method named DoIt(). A more realistic interface (or a set of interfaces) might allow the object to generate scripting code, render an image onto the application’s toolbox, or integrate into the main menu of the hosting application.
The CompanyInfoAttribute type is a custom attribute that can be applied on any class type that wants to be snapped into the container. As you can tell by the definition of this class, [CompanyInfo] allows the developer of the snap-in to provide some basic details about the component’s point of origin.
Building the C# Snap-In
Next up, you need to create a type that implements the IAppFunctionality interface. Again, to focus on the overall design of an extendable application, a trivial type is in order. Assume a new C# Class Library project named CSharpSnapIn defines a class type named CSharpModule. Given that this class must make use of the types defined in CommonSnappableTypes, be sure to add a reference to the CommonSnappableTypes assembly (as well as System.Windows.Forms.dll to display a noteworthy message). This being said, here is the code:
using System;
using System.Collections.Generic;
using System.Linq;
using System.Text;
using CommonSnappableTypes;
using System.Windows.Forms;
namespace CSharpSnapIn
{
[CompanyInfo(CompanyName = "FooBar",
CompanyUrl = "www.FooBar.com")]
public class CSharpModule : IAppFunctionality
{
void IAppFunctionality.DoIt()
{
MessageBox.Show("You have just used the C# snap-in!");
}
}
}
Notice that I chose to make use of explicit interface implementation (see Chapter 9) when supporting the IAppFunctionality interface. This is not required; however, the idea is that the only part of the system that needs to directly interact with this interface type is the hosting Windows application. By explicitly implementing this interface, the DoIt() method is not directly exposed from the CSharpModule type.
Building the Visual Basic Snap-In
Now, to simulate the role of a third-party vendor who prefers Visual Basic over C#, create a new Visual Basic Class Library (VbSnapIn) that references the same external assemblies as the previous CSharpSnapIn project.
![]() Note By default, a Visual Basic project will not display the References folder within the Solution Explorer. To add references in a VB project, use the Project
Note By default, a Visual Basic project will not display the References folder within the Solution Explorer. To add references in a VB project, use the Project ![]() Add Reference menu option of Visual Studio.
Add Reference menu option of Visual Studio.
The code is (again) intentionally simple.
Imports System.Windows.Forms
Imports CommonSnappableTypes
<CompanyInfo(CompanyName:="Chucky’s Software", CompanyUrl:="www.ChuckySoft.com")>
Public Class VbSnapIn
Implements IAppFunctionality
Public Sub DoIt() Implements CommonSnappableTypes.IAppFunctionality.DoIt
MessageBox.Show("You have just used the VB snap in!")
End Sub
End Class
Notice that applying attributes in the syntax of Visual Basic requires angle brackets (< >) rather than square brackets ([ ]). Also notice that the Implements keyword is used to implement interface types on a given class or structure.
Building an Extendable Windows Forms Application
The final step is to create a new C# Windows Forms application (MyExtendableApp) that allows the user to select a snap-in using a standard Windows Open dialog box. If you have not created a Windows Forms application before, you might want to simply open the completed code sample supplied with the book’s source code. However, if you do want to build the GUI yourself, begin this final project of the chapter by selecting a Windows Forms Application project from the New Project dialog box of Visual Studio (see Figure 15-7).
![]() Note Appendix A provides an overview of the Windows Forms API.
Note Appendix A provides an overview of the Windows Forms API.

Figure 15-7. Creating a new Windows Forms project with Visual Studio
Now, add a reference to the CommonSnappableTypes.dll assembly but not the CSharpSnapIn.dll or VbSnapIn.dll code libraries. As well, import the System.Reflection and CommonSnappableTypes namespaces into your form’s primary code file (which you can open by right-clicking the form designer and selecting View Code). Remember that the whole goal of this application is to use late binding and reflection to determine the “snapability” of independent binaries created by third-party vendors.
Again, I won’t bother to examine all the details of Windows Forms development at this time. However, the GUI consists of a MenuStrip component placed onto the form designer; the component defines a single topmost menu item named File that provides a single submenu named Snap In Module. As well, the main window will contain a ListBox type (which I renamed as lstLoadedSnapIns) that will be used to display the names of each snap-in loaded by the user. Figure 15-8 shows the final GUI.
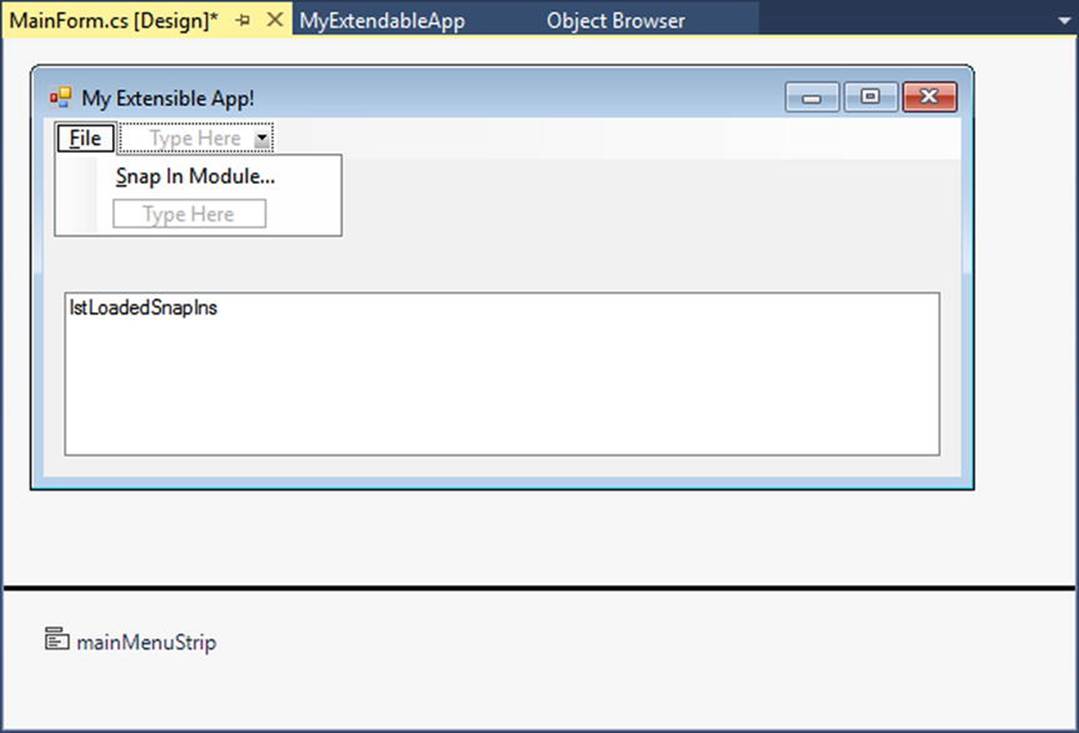
Figure 15-8. GUI for MyExtendableApp
The code that handles the Click event for the File Snap In Module menu item (which may be created simply by double-clicking the menu item from the design-time editor) displays a File Open dialog box and extracts the path to the selected file. Assuming the user did not select theCommonSnappableTypes.dll assembly (as this is purely infrastructure), the path is then sent into a helper function named LoadExternalModule() for processing (implemented next). This method will return false if it is unable to find a class implementingIAppFunctionality.
private void snapInModuleToolStripMenuItem_Click(object sender,
EventArgs e)
{
// Allow user to select an assembly to load.
OpenFileDialog dlg = new OpenFileDialog();
if (dlg.ShowDialog() == DialogResult.OK)
{
if(dlg.FileName.Contains("CommonSnappableTypes"))
MessageBox.Show("CommonSnappableTypes has no snap-ins!");
else if(!LoadExternalModule(dlg.FileName))
MessageBox.Show("Nothing implements IAppFunctionality!");
}
}
The LoadExternalModule() method performs the following tasks:
· Dynamically loads the selected assembly into memory
· Determines whether the assembly contains any types implementing IAppFunctionality
· Creates the type using late binding
If a type implementing IAppFunctionality is found, the DoIt() method is called, and the fully qualified name of the type is added to the ListBox (note that the foreach loop will iterate over all types in the assembly to account for the possibility that a single assembly has multiple snap-ins).
private bool LoadExternalModule(string path)
{
bool foundSnapIn = false;
Assembly theSnapInAsm = null;
try
{
// Dynamically load the selected assembly.
theSnapInAsm = Assembly.LoadFrom(path);
}
catch(Exception ex)
{
MessageBox.Show(ex.Message);
return foundSnapIn;
}
// Get all IAppFunctionality-compatible classes in assembly.
var theClassTypes = from t in theSnapInAsm.GetTypes()
where t.IsClass &&
(t.GetInterface("IAppFunctionality") != null)
select t;
// Now, create the object and call DoIt() method.
foreach (Type t in theClassTypes)
{
foundSnapIn = true;
// Use late binding to create the type.
IAppFunctionality itfApp =
(IAppFunctionality)theSnapInAsm.CreateInstance(t.FullName, true);
itfApp.DoIt();
lstLoadedSnapIns.Items.Add(t.FullName);
}
return foundSnapIn;
}
At this point, you can run your application. When you select the CSharpSnapIn.dll or VbSnapIn.dll assemblies, you should see the correct message displayed. The final task is to display the metadata provided by the [CompanyInfo] attribute. To do so, updateLoadExternalModule() to call a new helper function named DisplayCompanyData() before exiting the foreach scope. Notice this method takes a single System.Type parameter.
private bool LoadExternalModule(string path)
{
...
foreach (Type t in theClassTypes)
{
...
// Show company info.
DisplayCompanyData(t);
}
return foundSnapIn;
}
Using the incoming type, simply reflect over the [CompanyInfo] attribute, like so:
private void DisplayCompanyData(Type t)
{
// Get [CompanyInfo] data.
var compInfo = from ci in t.GetCustomAttributes(false) where
(ci.GetType() == typeof(CompanyInfoAttribute))
select ci;
// Show data.
foreach (CompanyInfoAttribute c in compInfo)
{
MessageBox.Show(c.CompanyUrl,
string.Format("More info about {0} can be found at", c.CompanyName));
}
}
Figure 15-9 shows one possible run.
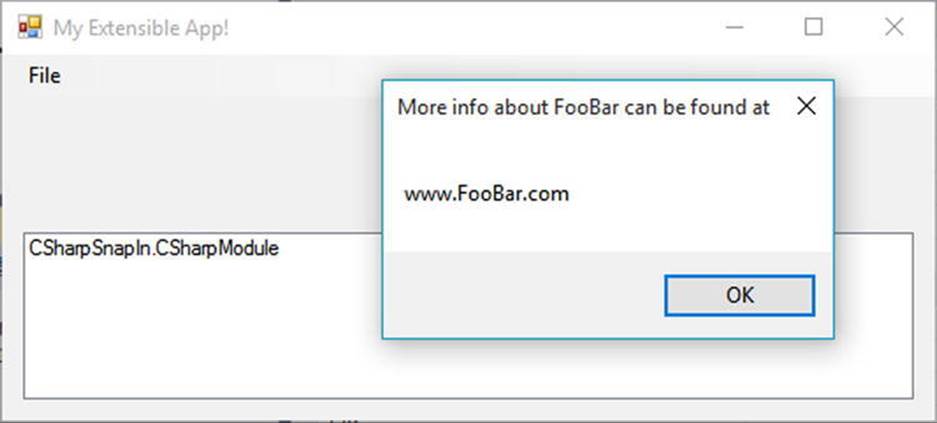
Figure 15-9. Snapping in external assemblies
Excellent! That wraps up the example application. I hope you can see that the topics presented in this chapter can be quite helpful in the real world and are not limited to the tool builders of the world.
![]() Source Code The ExtendableApp folder in the Chapter 15 subdirectory contains the CommonSnappableTypes, CSharpSnapIn, VbSnapIn, and MyExtendableApp projects.
Source Code The ExtendableApp folder in the Chapter 15 subdirectory contains the CommonSnappableTypes, CSharpSnapIn, VbSnapIn, and MyExtendableApp projects.
Summary
Reflection is an interesting aspect of a robust OO environment. In the world of .NET, the keys to reflection services revolve around the System.Type class and the System.Reflection namespace. As you have seen, reflection is the process of placing a type under the magnifying glass at runtime to understand the who, what, where, when, why, and how of a given item.
Late binding is the process of creating an instance of a type and invoking its members without prior knowledge of the specific names of said members. Late binding is often a direct result of dynamic loading, which allows you to load a .NET assembly into memory programmatically. As shown during this chapter’s extendable application example, this is a powerful technique used by tool builders as well as tool consumers.
This chapter also examined the role of attribute-based programming. When you adorn your types with attributes, the result is the augmentation of the underlying assembly metadata.
All materials on the site are licensed Creative Commons Attribution-Sharealike 3.0 Unported CC BY-SA 3.0 & GNU Free Documentation License (GFDL)
If you are the copyright holder of any material contained on our site and intend to remove it, please contact our site administrator for approval.
© 2016-2026 All site design rights belong to S.Y.A.