C# 6.0 and the .NET 4.6 Framework (2015)
PART V
Programming with .NET Assemblies
CHAPTER 17
Processes, AppDomains, and Object Contexts
In Chapters 14 and 15, you examined the steps taken by the CLR to resolve the location of a referenced external assembly, as well as the role of .NET metadata. In this chapter, you’ll drill deeper into the details of how an assembly is hosted by the CLR and come to understand the relationship between processes, application domains, and object contexts.
In a nutshell, application domains (or simply AppDomains) are logical subdivisions within a given process that host a set of related .NET assemblies. As you will see, an AppDomain is further subdivided into contextual boundaries, which are used to group like-minded .NET objects. Using the notion of context, the CLR is able to ensure that objects with special runtime requirements are handled appropriately.
While it is true that many of your day-to-day programming tasks might not involve directly working with processes, AppDomains, or object contexts, understanding these topics is important when working with numerous .NET APIs, including Windows Communication Foundation (WCF), multithreading and parallel processing, and object serialization.
The Role of a Windows Process
The concept of a “process” existed within Windows-based operating systems well before the release of the .NET platform. In simple terms, a process is a running program. However, formally speaking, a process is an operating system–level concept used to describe a set of resources (such as external code libraries and the primary thread) and the necessary memory allocations used by a running application. For each *.exe loaded into memory, the OS creates a separate and isolated process for use during its lifetime.
Using this approach to application isolation, the result is a much more robust and stable runtime environment, given that the failure of one process does not affect the functioning of another. Furthermore, data in one process cannot be directly accessed by another process, unless you make use of a distributed computing programming API such as Windows Communication Foundation. Given these points, you can regard the process as a fixed, safe boundary for a running application.
Now, every Windows process is assigned a unique process identifier (PID) and may be independently loaded and unloaded by the OS as necessary (as well as programmatically). As you might be aware, the Processes tab of the Windows Task Manager utility (activated via the Ctrl+Shift+Esc keystroke combination) allows you to view various statistics regarding the processes running on a given machine. The Details tab allows you to view the assigned PID and image name (see Figure 17-1).
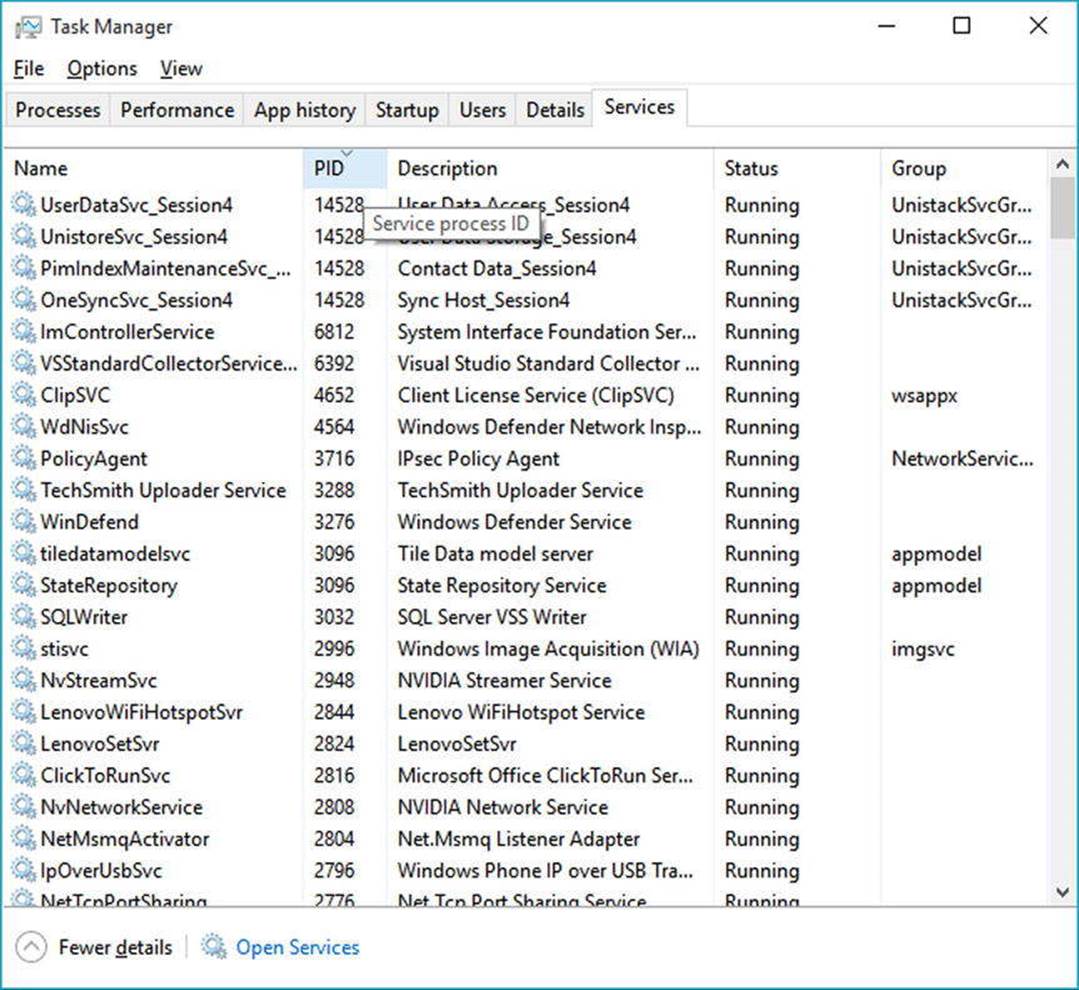
Figure 17-1. The Windows Task Manager
![]() Note In Windows 10, you can view the PID of a process on the Services tab.
Note In Windows 10, you can view the PID of a process on the Services tab.
The Role of Threads
Every Windows process contains an initial “thread” that functions as the entry point for the application. Chapter 19 examines the details of building multithreaded applications under the .NET platform; however, to facilitate the topics presented here, you need a few working definitions. First, a thread is a path of execution within a process. Formally speaking, the first thread created by a process’s entry point is termed the primary thread. Any .NET executable program (Console Application, Windows service, WPF application, etc.) marks its entry point with the Main() method. When this method is invoked, the primary thread is created automatically.
Processes that contain a single primary thread of execution are intrinsically thread safe, given the fact that there is only one thread that can access the data in the application at a given time. However, a single-threaded process (especially one that is GUI-based) will often appear a bit unresponsive to the user if this single thread is performing a complex operation (such as printing out a lengthy text file, performing a mathematically intensive calculation, or attempting to connect to a remote server located thousands of miles away).
Given this potential drawback of single-threaded applications, the Windows API (as well as the .NET platform) makes it possible for the primary thread to spawn additional secondary threads (also termed worker threads) using a handful of Windows API functions such asCreateThread(). Each thread (primary or secondary) becomes a unique path of execution in the process and has concurrent access to all shared points of data within the process.
As you might have guessed, developers typically create additional threads to help improve the program’s overall responsiveness. Multithreaded processes provide the illusion that numerous activities are happening at more or less the same time. For example, an application may spawn a worker thread to perform a labor-intensive unit of work (again, such as printing a large text file). As this secondary thread is churning away, the main thread is still responsive to user input, which gives the entire process the potential of delivering greater performance. However, this may not actually be the case: using too many threads in a single process can actually degrade performance, as the CPU must switch between the active threads in the process (which takes time).
On some machines, multithreading is most commonly an illusion provided by the OS. Machines that host a single (non-hyperthreaded) CPU do not have the ability to literally handle multiple threads at the same time. Rather, a single CPU will execute one thread for a unit of time (called atime slice) based in part on the thread’s priority level. When a thread’s time slice is up, the existing thread is suspended to allow another thread to perform its business. For a thread to remember what was happening before it was kicked out of the way, each thread is given the ability to write to Thread Local Storage (TLS) and is provided with a separate call stack, as illustrated in Figure 17-2.
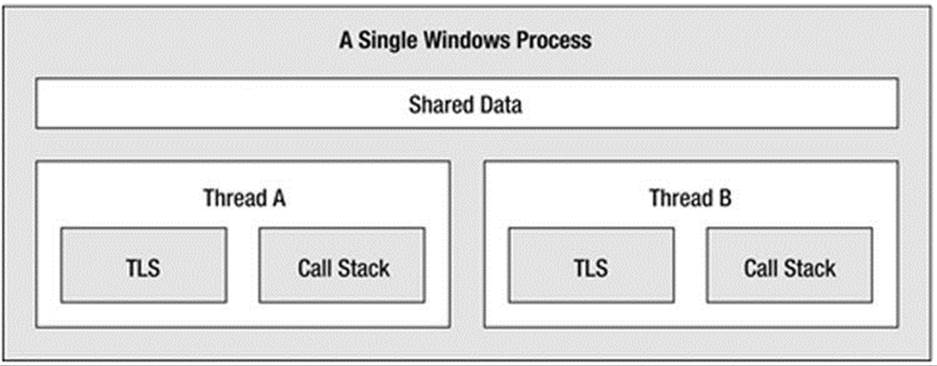
Figure 17-2. The Windows process/thread relationship
If the subject of threads is new to you, don’t sweat the details. At this point, just remember that a thread is a unique path of execution within a Windows process. Every process has a primary thread (created via the executable’s entry point) and may contain additional threads that have been programmatically created.
Interacting with Processes Under the .NET Platform
Although processes and threads are nothing new, the manner in which you interact with these primitives under the .NET platform has changed quite a bit (for the better). To pave the way to understanding the world of building multithreaded assemblies (see Chapter 19), let’s begin by checking out how to interact with processes using the .NET base class libraries.
The System.Diagnostics namespace defines a number of types that allow you to programmatically interact with processes and various diagnostic-related types such as the system event log and performance counters. In this chapter, you are concerned with only the process-centric types defined in Table 17-1.
Table 17-1. Select Members of the System.Diagnostics Namespace
|
Process-Centric Types of the System.Diagnostics Namespace |
Meaning in Life |
|
Process |
The Process class provides access to local and remote processes and also allows you to programmatically start and stop processes. |
|
ProcessModule |
This type represents a module (*.dll or *.exe) that is loaded into a particular process. Understand that the ProcessModule type can represent any module—COM-based, .NET-based, or traditional C-based binaries. |
|
ProcessModuleCollection |
This provides a strongly typed collection of ProcessModule objects. |
|
ProcessStartInfo |
This specifies a set of values used when starting a process via the Process.Start() method. |
|
ProcessThread |
This type represents a thread within a given process. Be aware that ProcessThread is a type used to diagnose a process’s thread set and is not used to spawn new threads of execution within a process. |
|
ProcessThreadCollection |
This provides a strongly typed collection of ProcessThread objects. |
The System.Diagnostics.Process class allows you to analyze the processes running on a given machine (local or remote). The Process class also provides members that allow you to programmatically start and terminate processes, view (or modify) a process’s priority level, and obtain a list of active threads and/or loaded modules within a given process. Table 17-2 lists some of the key properties of System.Diagnostics.Process.
Table 17-2. Select Properties of the Process Type
|
Property |
Meaning in Life |
|
ExitTime |
This property gets the timestamp associated with the process that has terminated (represented with a DateTime type). |
|
Handle |
This property returns the handle (represented by an IntPtr) associated to the process by the OS. This can be useful when building .NET applications that need to communicate with unmanaged code. |
|
Id |
This property gets the PID for the associated process. |
|
MachineName |
This property gets the name of the computer the associated process is running on. |
|
MainWindowTitle |
MainWindowTitle gets the caption of the main window of the process (if the process does not have a main window, you receive an empty string). |
|
Modules |
This property provides access to the strongly typed ProcessModuleCollection type, which represents the set of modules (*.dll or *.exe) loaded within the current process. |
|
ProcessName |
This property gets the name of the process (which, as you would assume, is the name of the application itself). |
|
Responding |
This property gets a value indicating whether the user interface of the process is responding to user input (or is currently “hung”). |
|
StartTime |
This property gets the time that the associated process was started (via a DateTime type). |
|
Threads |
This property gets the set of threads that are running in the associated process (represented via a collection of ProcessThread objects). |
In addition to the properties just examined, System.Diagnostics.Process also defines a few useful methods (see Table 17-3).
Table 17-3. Select Methods of the Process Type
|
Method |
Meaning in Life |
|
CloseMainWindow() |
This method closes a process that has a user interface by sending a close message to its main window. |
|
GetCurrentProcess() |
This static method returns a new Process object that represents the currently active process. |
|
GetProcesses() |
This static method returns an array of new Process objects running on a given machine. |
|
Kill() |
This method immediately stops the associated process. |
|
Start() |
This method starts a process. |
Enumerating Running Processes
To illustrate the process of manipulating Process objects (pardon the redundancy), create a C# Console Application project named ProcessManipulator that defines the following static helper method within the Program class (be sure you import the System.Diagnostics namespace in your code file):
static void ListAllRunningProcesses()
{
// Get all the processes on the local machine, ordered by
// PID.
var runningProcs =
from proc in Process.GetProcesses(".") orderby proc.Id select proc;
// Print out PID and name of each process.
foreach(var p in runningProcs)
{
string info = string.Format("-> PID: {0}\tName: {1}",
p.Id, p.ProcessName);
Console.WriteLine(info);
}
Console.WriteLine("************************************\n");
}
The static Process.GetProcesses() method returns an array of Process objects that represent the running processes on the target machine (the dot notation shown here represents the local computer). After you have obtained the array of Process objects, you are able to invoke any of the members listed in Tables 17-2 and 17-3. Here, you are simply displaying the PID and the name of each process, ordered by PID. Assuming the Main() method has been updated to call ListAllRunningProcesses() as follows:
static void Main(string[] args)
{
Console.WriteLine("***** Fun with Processes *****\n");
ListAllRunningProcesses();
Console.ReadLine();
}
you will see the names and PIDs for all processes on your local computer. Here is some partial output from my current machine (your output will most likely be different):
***** Fun with Processes *****
-> PID: 0 Name: Idle
-> PID: 4 Name: System
-> PID: 108 Name: iexplore
-> PID: 268 Name: smss
-> PID: 432 Name: csrss
-> PID: 448 Name: svchost
-> PID: 472 Name: wininit
-> PID: 504 Name: csrss
-> PID: 536 Name: winlogon
-> PID: 560 Name: services
-> PID: 584 Name: lsass
-> PID: 592 Name: lsm
-> PID: 660 Name: devenv
-> PID: 684 Name: svchost
-> PID: 760 Name: svchost
-> PID: 832 Name: svchost
-> PID: 844 Name: svchost
-> PID: 856 Name: svchost
-> PID: 900 Name: svchost
-> PID: 924 Name: svchost
-> PID: 956 Name: VMwareService
-> PID: 1116 Name: spoolsv
-> PID: 1136 Name: ProcessManipulator.vshost
************************************
Investigating a Specific Process
In addition to obtaining a complete list of all running processes on a given machine, the static Process.GetProcessById() method allows you to obtain a single Process object via the associated PID. If you request access to a nonexistent PID, an ArgumentException exception is thrown. For example, if you were interested in obtaining a Process object representing a process with the PID of 987, you could write the following code:
// If there is no process with the PID of 987, a
// runtime exception will be thrown.
static void GetSpecificProcess()
{
Process theProc = null;
try
{
theProc = Process.GetProcessById(987);
}
catch(ArgumentException ex)
{
Console.WriteLine(ex.Message);
}
}
At this point, you have learned how to get a list of all processes, as well as a specific process on a machine via a PID lookup. While it is somewhat useful to discover PIDs and process names, the Process class also allows you to discover the set of current threads and libraries used within a given process. Let’s see how to do so.
Investigating a Process’s Thread Set
The set of threads is represented by the strongly typed ProcessThreadCollection collection, which contains some number of individual ProcessThread objects. To illustrate, assume the following additional static helper function has been added to your current application:
static void EnumThreadsForPid(int pID)
{
Process theProc = null;
try
{
theProc = Process.GetProcessById(pID);
}
catch(ArgumentException ex)
{
Console.WriteLine(ex.Message);
return;
}
// List out stats for each thread in the specified process.
Console.WriteLine("Here are the threads used by: {0}",
theProc.ProcessName);
ProcessThreadCollection theThreads = theProc.Threads;
foreach(ProcessThread pt in theThreads)
{
string info =
string.Format("-> Thread ID: {0}\tStart Time: {1}\tPriority: {2}",
pt.Id , pt.StartTime.ToShortTimeString(), pt.PriorityLevel);
Console.WriteLine(info);
}
Console.WriteLine("************************************\n");
}
As you can see, the Threads property of the System.Diagnostics.Process type provides access to the ProcessThreadCollection class. Here, you are printing the assigned thread ID, start time, and priority level of each thread in the process specified by the client. Now, update your program’s Main() method to prompt the user for a PID to investigate, as follows:
static void Main(string[] args)
{
...
// Prompt user for a PID and print out the set of active threads.
Console.WriteLine("***** Enter PID of process to investigate *****");
Console.Write("PID: ");
string pID = Console.ReadLine();
int theProcID = int.Parse(pID);
EnumThreadsForPid(theProcID);
Console.ReadLine();
}
When you run your program, you can now enter the PID of any process on your machine and see the threads used in the process. The following output shows the threads used by PID 108 on my machine, which happens to be hosting Microsoft Internet Explorer:
***** Enter PID of process to investigate *****
PID: 108
Here are the threads used by: iexplore
-> Thread ID: 680 Start Time: 9:05 AM Priority: Normal
-> Thread ID: 2040 Start Time: 9:05 AM Priority: Normal
-> Thread ID: 880 Start Time: 9:05 AM Priority: Normal
-> Thread ID: 3380 Start Time: 9:05 AM Priority: Normal
-> Thread ID: 3376 Start Time: 9:05 AM Priority: Normal
-> Thread ID: 3448 Start Time: 9:05 AM Priority: Normal
-> Thread ID: 3476 Start Time: 9:05 AM Priority: Normal
-> Thread ID: 2264 Start Time: 9:05 AM Priority: Normal
-> Thread ID: 2380 Start Time: 9:05 AM Priority: Normal
-> Thread ID: 2384 Start Time: 9:05 AM Priority: Normal
-> Thread ID: 2308 Start Time: 9:05 AM Priority: Normal
-> Thread ID: 3096 Start Time: 9:07 AM Priority: Highest
-> Thread ID: 3600 Start Time: 9:45 AM Priority: Normal
-> Thread ID: 1412 Start Time: 10:02 AM Priority: Normal
The ProcessThread type has additional members of interest beyond Id, StartTime, and PriorityLevel. Table 17-4 documents some members of interest.
Table 17-4. Select Members of the ProcessThread Type
|
Member |
Meaning in Life |
|
CurrentPriority |
Gets the current priority of the thread |
|
Id |
Gets the unique identifier of the thread |
|
IdealProcessor |
Sets the preferred processor for this thread to run on |
|
PriorityLevel |
Gets or sets the priority level of the thread |
|
ProcessorAffinity |
Sets the processors on which the associated thread can run |
|
StartAddress |
Gets the memory address of the function that the operating system called that started this thread |
|
StartTime |
Gets the time that the operating system started the thread |
|
ThreadState |
Gets the current state of this thread |
|
TotalProcessorTime |
Gets the total amount of time that this thread has spent using the processor |
|
WaitReason |
Gets the reason that the thread is waiting |
Before you read any further, be aware that the ProcessThread type is not the entity used to create, suspend, or kill threads under the .NET platform. Rather, ProcessThread is a vehicle used to obtain diagnostic information for the active Windows threads within a running process. Again, you will investigate how to build multithreaded applications using the System.Threading namespace in Chapter 19.
Investigating a Process’s Module Set
Next up, let’s check out how to iterate over the number of loaded modules that are hosted within a given process. When talking about processes, a module is a general term used to describe a given *.dll (or the *.exe itself) that is hosted by a specific process. When you access theProcessModuleCollection via the Process.Modules property, you are able to enumerate over all modules hosted within a process: .NET- based, COM-based, or traditional C-based libraries. Ponder the following additional helper function that will enumerate the modules in a specific process based on the PID:
static void EnumModsForPid(int pID)
{
Process theProc = null;
try
{
theProc = Process.GetProcessById(pID);
}
catch(ArgumentException ex)
{
Console.WriteLine(ex.Message);
return;
}
Console.WriteLine("Here are the loaded modules for: {0}",
theProc.ProcessName);
ProcessModuleCollection theMods = theProc.Modules;
foreach(ProcessModule pm in theMods)
{
string info = string.Format("-> Mod Name: {0}", pm.ModuleName);
Console.WriteLine(info);
}
Console.WriteLine("************************************\n");
}
To see some possible output, let’s check out the loaded modules for the process hosting the current example program (ProcessManipulator). To do so, run the application, identify the PID assigned to ProcessManipulator.exe (via the Task Manager), and pass this value to theEnumModsForPid() method (be sure to update your Main() method accordingly). Once you do, you might be surprised to see the list of *.dlls used for a simple Console Application project (GDI32.dll, USER32.dll, ole32.dll, and so forth). Consider the following output:
Here are the loaded modules for: ProcessManipulator
-> Mod Name: ProcessManipulator.exe
-> Mod Name: ntdll.dll
-> Mod Name: MSCOREE.DLL
-> Mod Name: KERNEL32.dll
-> Mod Name: KERNELBASE.dll
-> Mod Name: ADVAPI32.dll
-> Mod Name: msvcrt.dll
-> Mod Name: sechost.dll
-> Mod Name: RPCRT4.dll
-> Mod Name: SspiCli.dll
-> Mod Name: CRYPTBASE.dll
-> Mod Name: mscoreei.dll
-> Mod Name: SHLWAPI.dll
-> Mod Name: GDI32.dll
-> Mod Name: USER32.dll
-> Mod Name: LPK.dll
-> Mod Name: USP10.dll
-> Mod Name: IMM32.DLL
-> Mod Name: MSCTF.dll
-> Mod Name: clr.dll
-> Mod Name: MSVCR100_CLR0400.dll
-> Mod Name: mscorlib.ni.dll
-> Mod Name: nlssorting.dll
-> Mod Name: ole32.dll
-> Mod Name: clrjit.dll
-> Mod Name: System.ni.dll
-> Mod Name: System.Core.ni.dll
-> Mod Name: psapi.dll
-> Mod Name: shfolder.dll
-> Mod Name: SHELL32.dll
************************************
Starting and Stopping Processes Programmatically
The final aspects of the System.Diagnostics.Process class examined here are the Start() and Kill() methods. As you can gather by their names, these members provide a way to programmatically launch and terminate a process, respectively. For example, consider the following static StartAndKillProcess() helper method:
![]() Note You must be running Visual Studio with Administrator rights to start new processes. If this is not the case, you will receive a runtime error.
Note You must be running Visual Studio with Administrator rights to start new processes. If this is not the case, you will receive a runtime error.
static void StartAndKillProcess()
{
Process ieProc = null;
// Launch Internet Explorer, and go to facebook!
try
{
ieProc = Process.Start("IExplore.exe", "www.facebook.com");
}
catch (InvalidOperationException ex)
{
Console.WriteLine(ex.Message);
}
Console.Write("--> Hit enter to kill {0}...", ieProc.ProcessName);
Console.ReadLine();
// Kill the iexplore.exe process.
try
{
ieProc.Kill();
}
catch (InvalidOperationException ex)
{
Console.WriteLine(ex.Message);
}
}
The static Process.Start() method has been overloaded a few times. At a minimum, you will need to specify the friendly name of the process you want to launch (such as Microsoft Internet Explorer, iexplore.exe). This example uses a variation of the Start() method that allows you to specify any additional arguments to pass into the program’s entry point (i.e., the Main() method).
After you call the Start() method, you are returned a reference to the newly activated process. When you want to terminate the process, simply call the instance-level Kill() method. Here, you are wrapping the calls to Start() and Kill() within a try/catch block and handling any InvalidOperationException errors. This is especially important when calling the Kill() method, as this error will be raised if the process has already been terminated prior to calling Kill().
Controlling Process Startup Using the ProcessStartInfo Class
The Start() method also allows you to pass in a System.Diagnostics.ProcessStartInfo type to specify additional bits of information regarding how a given process should come to life. Here is a partial definition of ProcessStartInfo (see the .NET Framework 4.5 SDK documentation for full details):
public sealed class ProcessStartInfo : object
{
public ProcessStartInfo();
public ProcessStartInfo(string fileName);
public ProcessStartInfo(string fileName, string arguments);
public string Arguments { get; set; }
public bool CreateNoWindow { get; set; }
public StringDictionary EnvironmentVariables { get; }
public bool ErrorDialog { get; set; }
public IntPtr ErrorDialogParentHandle { get; set; }
public string FileName { get; set; }
public bool LoadUserProfile { get; set; }
public SecureString Password { get; set; }
public bool RedirectStandardError { get; set; }
public bool RedirectStandardInput { get; set; }
public bool RedirectStandardOutput { get; set; }
public Encoding StandardErrorEncoding { get; set; }
public Encoding StandardOutputEncoding { get; set; }
public bool UseShellExecute { get; set; }
public string Verb { get; set; }
public string[] Verbs { get; }
public ProcessWindowStyle WindowStyle { get; set; }
public string WorkingDirectory { get; set; }
}
To illustrate how to fine-tune your process startup, here is a modified version of StartAndKillProcess(), which will load Microsoft Internet Explorer, navigate to www.facebook.com, and show the window in a maximized state:
static void StartAndKillProcess()
{
Process ieProc = null;
// Launch Internet Explorer, and go to facebook,
// with maximized window.
try
{
ProcessStartInfo startInfo = new
ProcessStartInfo("IExplore.exe", "www.facebook.com");
startInfo.WindowStyle = ProcessWindowStyle.Maximized;
ieProc = Process.Start(startInfo);
}
catch (InvalidOperationException ex)
{
Console.WriteLine(ex.Message);
}
...
}
Great! Now that you understand the role of Windows processes and how to interact with them from C# code, you are ready to investigate the concept of a .NET application domain.
![]() Source Code The ProcessManipulator project is included in the Chapter 17 subdirectory.
Source Code The ProcessManipulator project is included in the Chapter 17 subdirectory.
Understanding .NET Application Domains
Under the .NET platform, executables are not hosted directly within a Windows process, as is the case in traditional unmanaged applications. Rather, a .NET executable is hosted by a logical partition within a process termed an application domain. As you will see, a single process may contain multiple application domains, each of which is hosting a .NET executable. This additional subdivision of a traditional Windows process offers several benefits, some of which are as follows:
· AppDomains are a key aspect of the OS-neutral nature of the .NET platform, given that this logical division abstracts away the differences in how an underlying OS represents a loaded executable.
· AppDomains are far less expensive in terms of processing power and memory than a full-blown process. Thus, the CLR is able to load and unload application domains much quicker than a formal process and can drastically improve scalability of server applications.
· AppDomains provide a deeper level of isolation for hosting a loaded application. If one AppDomain within a process fails, the remaining AppDomains remain functional.
As mentioned, a single process can host any number of AppDomains, each of which is fully and completely isolated from other AppDomains within this process (or any other process). Given this fact, be aware that an application running in one AppDomain is unable to obtain data of any kind (global variables or static fields) within another AppDomain, unless they use a distributed programming protocol (such as Windows Communication Foundation).
While a single process may host multiple AppDomains, this is not typically the case. At the least, an OS process will host what is termed the default application domain. This specific application domain is automatically created by the CLR at the time the process launches. After this point, the CLR creates additional application domains on an as-needed basis.
The System.AppDomain Class
The .NET platform allows you to programmatically monitor AppDomains, create new AppDomains (or unload them) at runtime, load assemblies into AppDomains, and perform a whole slew of additional tasks, using the AppDomain class in the System namespace of mscorlib.dll.Table 17-5 documents some useful methods of the AppDomain class (consult the .NET Framework 4.6 SDK documentation for full details).
Table 17-5. Select Methods of AppDomain
|
Method |
Meaning in Life |
|
CreateDomain() |
This static method allows you to create a new AppDomain in the current process. |
|
CreateInstance() |
This creates an instance of a type in an external assembly, after loading said assembly into the calling application domain. |
|
ExecuteAssembly() |
This method executes an *.exe assembly within an application domain, given its file name. |
|
GetAssemblies() |
This method gets the set of .NET assemblies that have been loaded into this application domain (COM-based or C-based binaries are ignored). |
|
GetCurrentThreadId() |
This static method returns the ID of the active thread in the current application domain. |
|
Load() |
This method is used to dynamically load an assembly into the current application domain. |
|
Unload() |
This is another static method that allows you to unload a specified AppDomain within a given process. |
![]() Note The .NET platform does not allow you to unload a specific assembly from memory. The only way to programmatically unload libraries is to tear down the hosting application domain via the Unload() method.
Note The .NET platform does not allow you to unload a specific assembly from memory. The only way to programmatically unload libraries is to tear down the hosting application domain via the Unload() method.
In addition, the AppDomain class defines a set of properties that can be useful when you want to monitor activity of a given application domain. Table 17-6 documents some core properties of interest.
Table 17-6. Select Properties of AppDomain
|
Property |
Meaning in Life |
|
BaseDirectory |
This gets the directory path that the assembly resolver uses to probe for assemblies. |
|
CurrentDomain |
This static property gets the application domain for the currently executing thread. |
|
FriendlyName |
This gets the friendly name of the current application domain. |
|
MonitoringIsEnabled |
This gets or sets a value that indicates whether CPU and memory monitoring of application domains is enabled for the current process. Once monitoring is enabled for a process, it cannot be disabled. |
|
SetupInformation |
This gets the configuration details for a given application domain, represented by an AppDomainSetup object. |
Last but not least, the AppDomain class supports a set of events that correspond to various aspects of an application domain’s life cycle. Table 17-7 shows some of the more useful events you can hook into.
Table 17-7. Select Events of the AppDomain Type
|
Event |
Meaning in Life |
|
AssemblyLoad |
This occurs when an assembly is loaded into memory. |
|
AssemblyResolve |
This event will fire when the assembly resolver cannot find the location of a required assembly. |
|
DomainUnload |
This occurs when an AppDomain is about to be unloaded from the hosting process. |
|
FirstChanceException |
This event allows you to be notified that an exception has been thrown from the application domain, before the CLR will begin looking for a fitting catch statement. |
|
ProcessExit |
This occurs on the default application domain when the default application domain’s parent process exits. |
|
UnhandledException |
This occurs when an exception is not caught by an exception handler. |
Interacting with the Default Application Domain
Recall that when a .NET executable starts, the CLR will automatically place it into the default AppDomain of the hosting process. This is done automatically and transparently, and you never have to author any specific code to do so. However, it is possible for your application to gain access to this default application domain using the static AppDomain.CurrentDomain property. After you have this access point, you are able to hook into any events of interest or use the methods and properties of AppDomain to perform some runtime diagnostics.
To learn how to interact with the default application domain, begin by creating a new Console Application project named DefaultAppDomainApp. Now, update your program with the following logic, which will simply display some details about the default application domain, using a number of members of the AppDomain class:
class Program
{
static void Main(string[] args)
{
Console.WriteLine("***** Fun with the default AppDomain *****\n");
DisplayDADStats();
Console.ReadLine();
}
private static void DisplayDADStats()
{
// Get access to the AppDomain for the current thread.
AppDomain defaultAD = AppDomain.CurrentDomain;
// Print out various stats about this domain.
Console.WriteLine("Name of this domain: {0}", defaultAD.FriendlyName);
Console.WriteLine("ID of domain in this process: {0}", defaultAD.Id);
Console.WriteLine("Is this the default domain?: {0}",
defaultAD.IsDefaultAppDomain());
Console.WriteLine("Base directory of this domain: {0}", defaultAD.BaseDirectory);
}
}
The output of this example is shown here:
***** Fun with the default AppDomain *****
Name of this domain: DefaultAppDomainApp.exe
ID of domain in this process: 1
Is this the default domain?: True
Base directory of this domain: E:\MyCode\DefaultAppDomainApp\bin\Debug\
Notice that the name of the default application domain will be identical to the name of the executable that is contained within it (DefaultAppDomainApp.exe, in this example). Also notice that the base directory value, which will be used to probe for externally required private assemblies, maps to the current location of the deployed executable.
Enumerating Loaded Assemblies
It is also possible to discover all the loaded .NET assemblies within a given application domain using the instance-level GetAssemblies() method. This method will return to you an array of Assembly objects, which, as you recall from the Chapter 15, is a member of theSystem.Reflection namespace (so don’t forget to import this namespace into your C# code file).
To illustrate, define a new method named ListAllAssembliesInAppDomain() within the Program class. This helper method will obtain all loaded assemblies and print the friendly name and version of each.
static void ListAllAssembliesInAppDomain()
{
// Get access to the AppDomain for the current thread.
AppDomain defaultAD = AppDomain.CurrentDomain;
// Now get all loaded assemblies in the default AppDomain.
Assembly[] loadedAssemblies = defaultAD.GetAssemblies();
Console.WriteLine("***** Here are the assemblies loaded in {0} *****\n",
defaultAD.FriendlyName);
foreach(Assembly a in loadedAssemblies)
{
Console.WriteLine("-> Name: {0}", a.GetName().Name);
Console.WriteLine("-> Version: {0}\n", a.GetName().Version);
}
}
Assuming you have updated your Main() method to call this new member, you will see that the application domain hosting your executable is currently making use of the following .NET libraries:
***** Here are the assemblies loaded in DefaultAppDomainApp.exe *****
-> Name: mscorlib
-> Version: 4.0.0.0
-> Name: DefaultAppDomainApp
-> Version: 1.0.0.0
Now understand that the list of loaded assemblies can change at any time as you author new C# code. For example, assume you have updated your ListAllAssembliesInAppDomain() method to make use of a LINQ query, which will order the loaded assemblies by name, as follows:
static void ListAllAssembliesInAppDomain()
{
// Get access to the AppDomain for the current thread.
AppDomain defaultAD = AppDomain.CurrentDomain;
// Now get all loaded assemblies in the default AppDomain.
var loadedAssemblies = from a in defaultAD.GetAssemblies()
orderby a.GetName().Name select a;
Console.WriteLine("***** Here are the assemblies loaded in {0} *****\n",
defaultAD.FriendlyName);
foreach (var a in loadedAssemblies)
{
Console.WriteLine("-> Name: {0}", a.GetName().Name);
Console.WriteLine("-> Version: {0}\n", a.GetName().Version);
}
}
If you were to run the program once again, you would see that System.Core.dll and System.dll have also been loaded into memory, as they are required for the LINQ to Objects API.
***** Here are the assemblies loaded in DefaultAppDomainApp.exe *****
-> Name: DefaultAppDomainApp
-> Version: 1.0.0.0
-> Name: mscorlib
-> Version: 4.0.0.0
-> Name: System
-> Version: 4.0.0.0
-> Name: System.Core
-> Version: 4.0.0.0
Receiving Assembly Load Notifications
If you want to be informed by the CLR when a new assembly has been loaded into a given application domain, you may handle the AssemblyLoad event. This event is typed against the AssemblyLoadEventHandler delegate, which can point to any method taking aSystem.Object as the first parameter and an AssemblyLoadEventArgs as the second.
Let’s add one final method to the current Program class called InitDAD(). As the name suggests, this method will initialize the default application domain, specifically by handling the AssemblyLoad event via a fitting lambda expression.
private static void InitDAD()
{
// This logic will print out the name of any assembly
// loaded into the applicaion domain, after it has been
// created.
AppDomain defaultAD = AppDomain.CurrentDomain;
defaultAD.AssemblyLoad += (o, s) =>
{
Console.WriteLine("{0} has been loaded!", s.LoadedAssembly.GetName().Name);
};
}
As you would expect, when you run the modified application, you will be notified when a new assembly has been loaded. Here, you are simply printing the friendly name of the assembly, using the LoadedAssembly property of the incoming AssemblyLoadedEventArgsparameter.
![]() Source Code The DefaultAppDomainApp project is included in the Chapter 17 subdirectory.
Source Code The DefaultAppDomainApp project is included in the Chapter 17 subdirectory.
Creating New Application Domains
Recall that a single process is capable of hosting multiple application domains via the static AppDomain.CreateDomain() method. While creating new AppDomains on the fly is a rather infrequent task for most .NET applications, it is important to understand the basics of doing so. For example, as you will see later in this text, when you build dynamic assemblies (see Chapter 18), you will need to install them into a custom AppDomain. As well, several .NET security APIs require you to understand how to construct new AppDomains to isolate assemblies based on supplied security credentials.
To investigate how to create new application domains on the fly (and how to load new assemblies into these custom homes), create a new Console Application project named CustomAppDomains. The AppDomain.CreateDomain() method has been overloaded a number of times. At minimum, you will specify the friendly name of the new application domain to be constructed. Update your Program class with the following code. Here, you are leveraging the ListAllAssembliesInAppDomain() method from the previous example; however, this time you are passing in the AppDomain object to analyze as an incoming argument.
class Program
{
static void Main(string[] args)
{
Console.WriteLine("***** Fun with Custom AppDomains *****\n");
// Show all loaded assemblies in default AppDomain.
AppDomain defaultAD = AppDomain.CurrentDomain;
ListAllAssembliesInAppDomain(defaultAD);
// Make a new AppDomain.
MakeNewAppDomain();
Console.ReadLine();
}
private static void MakeNewAppDomain()
{
// Make a new AppDomain in the current process and
// list loaded assemblies.
AppDomain newAD = AppDomain.CreateDomain("SecondAppDomain");
ListAllAssembliesInAppDomain(newAD);
}
static void ListAllAssembliesInAppDomain(AppDomain ad)
{
// Now get all loaded assemblies in the default AppDomain.
var loadedAssemblies = from a in ad.GetAssemblies()
orderby a.GetName().Name select a;
Console.WriteLine("***** Here are the assemblies loaded in {0} *****\n",
ad.FriendlyName);
foreach (var a in loadedAssemblies)
{
Console.WriteLine("-> Name: {0}", a.GetName().Name);
Console.WriteLine("-> Version: {0}\n", a.GetName().Version);
}
}
}
If you run the current example, you will see that the default application domain (CustomAppDomains.exe) has loaded mscorlib.dll, System.dll, System.Core.dll, and CustomAppDomains.exe, given the C# code base of the current project. However, the new application domain contains only mscorlib.dll, which, as you recall, is the one .NET assembly that is always loaded by the CLR for every application domain.
***** Fun with Custom AppDomains *****
***** Here are the assemblies loaded in CustomAppDomains.exe *****
-> Name: CustomAppDomains
-> Version: 1.0.0.0
-> Name: mscorlib
-> Version: 4.0.0.0
-> Name: System
-> Version: 4.0.0.0
-> Name: System.Core
-> Version: 4.0.0.0
***** Here are the assemblies loaded in SecondAppDomain *****
-> Name: mscorlib
-> Version: 4.0.0.0
![]() Note If you debug this project (via F5), you will find many additional assemblies are loaded into each AppDomain, which are used by the Visual Studio debugging process. Running this project (via Ctrl+F5) will display only the assemblies directly within each AppDomain.
Note If you debug this project (via F5), you will find many additional assemblies are loaded into each AppDomain, which are used by the Visual Studio debugging process. Running this project (via Ctrl+F5) will display only the assemblies directly within each AppDomain.
This might seem counterintuitive if you have a background in traditional Windows. (As you might suspect, both application domains have access to the same assembly set.) Recall, however, that an assembly loads into an application domain, not directly into the process itself.
Loading Assemblies into Custom Application Domains
The CLR will always load assemblies into the default application domain when required. However, if you do ever manually create new AppDomains, you can load assemblies into said AppDomain using the AppDomain.Load() method. Also, be aware that theAppDomain.ExecuteAssembly() method can be called to load an *.exe assembly and execute the Main() method.
Assume that you want to load CarLibrary.dll into your new secondary AppDomain. Provided you have copied this library to the \bin\Debug folder of the current application, you could update the MakeNewAppDomain() method as so (be sure to import the System.IOnamespace, to gain access to the FileNotFoundException class):
private static void MakeNewAppDomain()
{
// Make a new AppDomain in the current process.
AppDomain newAD = AppDomain.CreateDomain("SecondAppDomain");
try
{
// Now load CarLibrary.dll into this new domain.
newAD.Load("CarLibrary");
}
catch (FileNotFoundException ex)
{
Console.WriteLine(ex.Message);
}
// List all assemblies.
ListAllAssembliesInAppDomain(newAD);
}
This time, the output of the program would appear as so (note the presence of CarLibrary.dll):
***** Fun with Custom AppDomains *****
***** Here are the assemblies loaded in CustomAppDomains.exe *****
-> Name: CustomAppDomains
-> Version: 1.0.0.0
-> Name: mscorlib
-> Version: 4.0.0.0
-> Name: System
-> Version: 4.0.0.0
-> Name: System.Core
-> Version: 4.0.0.0
***** Here are the assemblies loaded in SecondAppDomain *****
-> Name: CarLibrary
-> Version: 2.0.0.0
-> Name: mscorlib
-> Version: 4.0.0.0
![]() Note Remember, if you debug this application, you will see many additional libraries loaded into each application domain.
Note Remember, if you debug this application, you will see many additional libraries loaded into each application domain.
Programmatically Unloading AppDomains
It is important to point out that the CLR does not permit unloading individual .NET assemblies. However, using the AppDomain.Unload() method, you are able to selectively unload a given application domain from its hosting process. When you do so, the application domain will unload each assembly in turn.
Recall that the AppDomain type defines the DomainUnload event, which is fired when a custom application domain is unloaded from the containing process. Another event of interest is the ProcessExit event, which is fired when the default application domain is unloaded from the process (which obviously entails the termination of the process itself).
If you want to programmatically unload newAD from the hosting process and be notified when the associated application domain is torn down, you could update MakeNewAppDomain() with the following additional logic:
private static void MakeNewAppDomain()
{
// Make a new AppDomain in the current process.
AppDomain newAD = AppDomain.CreateDomain("SecondAppDomain");
newAD.DomainUnload += (o, s) =>
{
Console.WriteLine("The second AppDomain has been unloaded!");
};
try
{
// Now load CarLibrary.dll into this new domain.
newAD.Load("CarLibrary");
}
catch (FileNotFoundException ex)
{
Console.WriteLine(ex.Message);
}
// List all assemblies.
ListAllAssembliesInAppDomain(newAD);
// Now tear down this AppDomain.
AppDomain.Unload(newAD);
}
If you want to be notified when the default application domain is unloaded, modify your Main() method to handle the ProcessEvent event of the default application domain, like so:
static void Main(string[] args)
{
Console.WriteLine("***** Fun with Custom AppDomains *****\n");
// Show all loaded assemblies in default AppDomain.
AppDomain defaultAD = AppDomain.CurrentDomain;
defaultAD.ProcessExit += (o, s) =>
{
Console.WriteLine("Default AD unloaded!");
};
ListAllAssembliesInAppDomain(defaultAD);
MakeNewAppDomain();
Console.ReadLine();
}
That wraps up your look at the .NET application domain. To conclude this chapter, let’s look at one further level of partitioning, which is used to group objects into contextual boundaries.
![]() Source Code The CustomAppDomains project is included in the Chapter 17 subdirectory.
Source Code The CustomAppDomains project is included in the Chapter 17 subdirectory.
Understanding Object Context Boundaries
As you have just seen, AppDomains are logical partitions within a process used to host .NET assemblies. On a related note, a given application domain may be further subdivided into numerous context boundaries. In a nutshell, a .NET context provides a way for a single AppDomain to establish a “specific home” for a given object.
![]() Note Friendly FYI: While understanding processes and application domains is quite important, most .NET applications will never demand that you work with object contexts. I’ve included this overview material just to paint a more complete picture.
Note Friendly FYI: While understanding processes and application domains is quite important, most .NET applications will never demand that you work with object contexts. I’ve included this overview material just to paint a more complete picture.
Using context, the CLR is able to ensure that objects that have special runtime requirements are handled in an appropriate and consistent manner by intercepting method invocations into and out of a given context. This layer of interception allows the CLR to adjust the current method invocation to conform to the contextual settings of a given object. For example, if you define a C# class type that requires automatic thread safety (using the [Synchronization] attribute), the CLR will create a “synchronized context” during allocation.
Just as a process defines a default AppDomain, every application domain has a default context. This default context (sometimes referred to as context 0, given that it is always the first context created within an application domain) is used to group together .NET objects that have no specific or unique contextual needs. As you might expect, a vast majority of .NET objects are loaded into context 0. If the CLR determines a newly created object has special needs, a new context boundary is created within the hosting application domain. Figure 17-3 illustrates the process/AppDomain/context relationship.
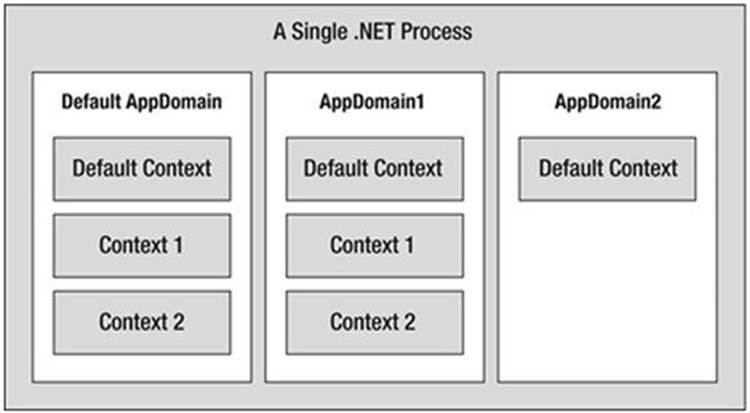
Figure 17-3. Processes, application domains, and context boundaries
Context-Agile and Context-Bound Types
.NET objects that do not demand any special contextual treatment are termed context-agile objects. These objects can be accessed from anywhere within the hosting AppDomain without interfering with the object’s runtime requirements. Building context-agile objects is easy, given that you simply do nothing (specifically, you do not adorn the type with any contextual attributes and do not derive from the System.ContextBoundObject base class). Here’s an example:
// A context-agile object is loaded into context zero.
class SportsCar{}
On the other hand, objects that do demand contextual allocation are termed context-bound objects, and they must derive from the System.ContextBoundObject base class. This base class solidifies the fact that the object in question can function appropriately only within the context in which it was created. Given the role of .NET context, it should stand to reason that if a context-bound object were to somehow end up in an incompatible context, bad things would be guaranteed to occur at the most inopportune times.
In addition to deriving from System.ContextBoundObject, a context-sensitive type will also be adorned by a special category of .NET attributes termed (not surprisingly) context attributes. All context attributes derive from the ContextAttribute base class. Let’s see an example.
Defining a Context-Bound Object
Assume that you want to define a class (SportsCarTS) that is automatically thread safe in nature, even though you have not hard-coded thread synchronization logic within the member implementations. To do so, derive from ContextBoundObject and apply the[Synchronization] attribute as follows:
using System.Runtime.Remoting.Contexts;
// This context-bound type will only be loaded into a
// synchronized (hence thread-safe) context.
[Synchronization]
class SportsCarTS : ContextBoundObject
{}
Types that are attributed with the [Synchronization] attribute are loaded into a thread-safe context. Given the special contextual needs of the SportsCarTS class type, imagine the problems that would occur if an allocated object were moved from a synchronized context into a nonsynchronized context. The object is suddenly no longer thread safe and, thus, becomes a candidate for massive data corruption, as numerous threads are attempting to interact with the (now thread-volatile) reference object. To ensure the CLR does not move SportsCarTS objects outside a synchronized context, simply derive from ContextBoundObject.
Inspecting an Object’s Context
Although few of the applications you will write will need to programmatically interact with context, here is an illustrative example. Create a new Console Application project named ObjectContextApp. This application defines one context-agile class (SportsCar) and a single context-bound type (SportsCarTS) as follows:
using System;
using System.Runtime.Remoting.Contexts; // For Context type.
using System.Threading; // For Thread type.
// SportsCar has no special contextual
// needs and will be loaded into the
// default context of the AppDomain.
class SportsCar
{
public SportsCar()
{
// Get context information and print out context ID.
Context ctx = Thread.CurrentContext;
Console.WriteLine("{0} object in context {1}",
this.ToString(), ctx.ContextID);
foreach(IContextProperty itfCtxProp in ctx.ContextProperties)
Console.WriteLine("-> Ctx Prop: {0}", itfCtxProp.Name);
}
}
// SportsCarTS demands to be loaded in
// a synchronization context.
[Synchronization]
class SportsCarTS : ContextBoundObject
{
public SportsCarTS()
{
// Get context information and print out context ID.
Context ctx = Thread.CurrentContext;
Console.WriteLine("{0} object in context {1}",
this.ToString(), ctx.ContextID);
foreach(IContextProperty itfCtxProp in ctx.ContextProperties)
Console.WriteLine("-> Ctx Prop: {0}", itfCtxProp.Name);
}
}
Notice that each constructor obtains a Context object from the current thread of execution, via the static Thread.CurrentContext property. Using the Context object, you are able to print statistics about the contextual boundary, such as its assigned ID, as well as a set of descriptors obtained via Context.ContextProperties. This property returns an array of objects implementing the IContextProperty interface, which exposes each descriptor through the Name property. Now, update Main() to allocate an instance of each class type, like so:
static void Main(string[] args)
{
Console.WriteLine("***** Fun with Object Context *****\n");
// Objects will display contextual info upon creation.
SportsCar sport = new SportsCar();
Console.WriteLine();
SportsCar sport2 = new SportsCar();
Console.WriteLine();
SportsCarTS synchroSport = new SportsCarTS();
Console.ReadLine();
}
As the objects come to life, the class constructors will dump out various bits of context-centric information (the “lease life time service property” printout is a low-level aspect of the .NET remoting layer and can be ignored).
***** Fun with Object Context *****
ObjectContextApp.SportsCar object in context 0
-> Ctx Prop: LeaseLifeTimeServiceProperty
ObjectContextApp.SportsCar object in context 0
-> Ctx Prop: LeaseLifeTimeServiceProperty
ObjectContextApp.SportsCarTS object in context 1
-> Ctx Prop: LeaseLifeTimeServiceProperty
-> Ctx Prop: Synchronization
Given that the SportsCar class has not been qualified with a context attribute, the CLR has allocated sport and sport2 into context 0 (i.e., the default context). However, the SportsCarTS object is loaded into a unique contextual boundary (which has been assigned a context ID of 1), given that this context-bound type was adorned with the [Synchronization] attribute.
![]() Source Code The ObjectContextApp project is included in the Chapter 17 subdirectory.
Source Code The ObjectContextApp project is included in the Chapter 17 subdirectory.
Summarizing Processes, AppDomains, and Context
At this point, you should have a much better idea about how a .NET assembly is hosted by the CLR. These are the key points:
· A .NET process hosts one to many application domains. Each AppDomain is able to host any number of related .NET assemblies. AppDomains may be independently loaded and unloaded by the CLR (or programmatically via the System.AppDomain type).
· A given AppDomain consists of one to many contexts. Using a context, the CLR is able to place a “special needs” object into a logical container to ensure that its runtime requirements are honored.
If the previous pages have seemed to be a bit too low level for your liking, fear not. For the most part, the CLR automatically deals with the details of processes, application domains, and contexts on your behalf. The good news, however, is that this information provides a solid foundation for understanding multithreaded programming under the .NET platform.
Summary
The point of this chapter was to examine exactly how a .NET-executable image is hosted by the .NET platform. As you have seen, the long-standing notion of a Windows process has been altered under the hood to accommodate the needs of the CLR. A single process (which can be programmatically manipulated via the System.Diagnostics.Process type) is now composed of one or more application domains, which represent isolated and independent boundaries within a process.
As you have seen, a single process can host multiple application domains, each of which is capable of hosting and executing any number of related assemblies. Furthermore, a single application domain can contain any number of contextual boundaries. Using this additional level of type isolation, the CLR can ensure that special-need objects are handled correctly.
All materials on the site are licensed Creative Commons Attribution-Sharealike 3.0 Unported CC BY-SA 3.0 & GNU Free Documentation License (GFDL)
If you are the copyright holder of any material contained on our site and intend to remove it, please contact our site administrator for approval.
© 2016-2026 All site design rights belong to S.Y.A.