C# 6.0 and the .NET 4.6 Framework (2015)
PART V
Programming with .NET Assemblies
CHAPTER 18
Understanding CIL and the Role of Dynamic Assemblies
When you are building a full-scale .NET application, you will most certainly use C# (or a similar managed language such as Visual Basic), given its inherent productivity and ease of use. However, as you learned in the first chapter, the role of a managed compiler is to translate *.cs code files into terms of CIL code, type metadata, and an assembly manifest. As it turns out, CIL is a full-fledged .NET programming language, with its own syntax, semantics, and compiler (ilasm.exe).
In this chapter, you will be given a tour of .NET’s mother tongue. Here you will understand the distinction between a CIL directive, CIL attribute, and CIL opcode. You will then learn about the role of round-trip engineering of a .NET assembly and various CIL programming tools. The remainder of the chapter will then walk you through the basics of defining namespaces, types, and members using the grammar of CIL. The chapter will wrap up with an examination of the role of the System.Reflection.Emit namespace and examine how it is possible to construct an assembly (with CIL instructions) dynamically at runtime.
Of course, few programmers will ever need to work with raw CIL code on a day-to-day basis. Therefore, I will start up this chapter by examining a few reasons why getting to know the syntax and semantics of this low-level .NET language might be worth your while.
Motivations for Learning the Grammar of CIL
CIL is the true mother tongue of the .NET platform. When you build a .NET assembly using your managed language of choice (C#, VB, F#, etc.), the associated compiler translates your source code into terms of CIL. Like any programming language, CIL provides numerous structural and implementation-centric tokens. Given that CIL is just another .NET programming language, it should come as no surprise that it is possible to build your .NET assemblies directly using CIL and the CIL compiler (ilasm.exe) that ships with the .NET Framework SDK.
Now while it is true that few (if any!) programmers would choose to build an entire .NET application directly with CIL, CIL is still an extremely interesting intellectual pursuit. Simply put, the more you understand the grammar of CIL, the better able you are to move into the realm of advanced .NET development. By way of some concrete examples, individuals who possess an understanding of CIL are capable of the following:
· Disassembling an existing .NET assembly, editing the CIL code, and recompiling the updated code base into a modified .NET binary. For example, there are some scenarios where you might need to modify CIL to interoperate with some advanced COM features.
· Building dynamic assemblies using the System.Reflection.Emit namespace. This API allows you to generate an in-memory .NET assembly, which can optionally be persisted to disk. This is a useful technique for the tool builders of the world who need to generate assemblies on the fly.
· Understanding aspects of the CTS that are not supported by higher-level managed languages but do exist at the level of CIL. To be sure, CIL is the only .NET language that allows you to access every aspect of the CTS. For example, using raw CIL, you are able to define global-level members and fields (which are not permissible in C#).
Again, to be perfectly clear, if you choose not to concern yourself with the details of CIL code, you are still absolutely able to gain mastery of C# and the .NET base class libraries. In many ways, knowledge of CIL is analogous to a C(++) programmer’s understanding of assembly language. Those who know the ins and outs of the low-level “goo” are able to create rather advanced solutions for the task at hand and gain a deeper understanding of the underlying programming (and runtime) environment. So, if you are up for the challenge, let’s begin to examine the details of CIL.
![]() Note Understand that this chapter is not intended to be a comprehensive treatment of the syntax and semantics of CIL. If you require a full examination of the topic, I recommend downloading the official ECMA specification (ecma-335.pdf) from the ECMA International web site (www.ecma-international.org).
Note Understand that this chapter is not intended to be a comprehensive treatment of the syntax and semantics of CIL. If you require a full examination of the topic, I recommend downloading the official ECMA specification (ecma-335.pdf) from the ECMA International web site (www.ecma-international.org).
Examining CIL Directives, Attributes, and Opcodes
When you begin to investigate low-level languages such as CIL, you are guaranteed to find new (and often intimidating-sounding) names for familiar concepts. For example, at this point in the text, if you were shown the following set of items
{new, public, this, base, get, set, explicit, unsafe, enum, operator, partial}
you would most certainly understand them to be keywords of the C# language (which is correct). However, if you look more closely at the members of this set, you might be able to see that while each item is indeed a C# keyword, it has radically different semantics. For example, the enumkeyword defines a System.Enum-derived type, while the this and base keywords allow you to reference the current object or the object’s parent class, respectively. The unsafe keyword is used to establish a block of code that cannot be directly monitored by the CLR, while theoperator keyword allows you to build a hidden (specially named) method that will be called when you apply a specific C# operator (such as the plus sign).
In stark contrast to a higher-level language such as C#, CIL does not just simply define a general set of keywords per se. Rather, the token set understood by the CIL compiler is subdivided into the following three broad categories based on semantics:
· CIL directives
· CIL attributes
· CIL operation codes (opcodes)
Each category of CIL token is expressed using a particular syntax, and the tokens are combined to build a valid .NET assembly.
The Role of CIL Directives
First up, there is a set of well-known CIL tokens that are used to describe the overall structure of a .NET assembly. These tokens are called directives. CIL directives are used to inform the CIL compiler how to define the namespaces(s), type(s), and member(s) that will populate an assembly.
Directives are represented syntactically using a single dot (.) prefix (e.g., .namespace, .class, .publickeytoken, .method, .assembly, etc.). Thus, if your *.il file (the conventional extension for a file containing CIL code) has a single .namespace directive and three.class directives, the CIL compiler will generate an assembly that defines a single .NET namespace containing three .NET class types.
The Role of CIL Attributes
In many cases, CIL directives in and of themselves are not descriptive enough to fully express the definition of a given .NET type or type member. Given this fact, many CIL directives can be further specified with various CIL attributes to qualify how a directive should be processed. For example, the .class directive can be adorned with the public attribute (to establish the type visibility), the extends attribute (to explicitly specify the type’s base class), and the implements attribute (to list the set of interfaces supported by the type).
![]() Note Don’t confuse a .NET attribute (see Chapter 15) with that of a CIL attribute, which are two very different concepts.
Note Don’t confuse a .NET attribute (see Chapter 15) with that of a CIL attribute, which are two very different concepts.
The Role of CIL Opcodes
Once a .NET assembly, namespace, and type set have been defined in terms of CIL using various directives and related attributes, the final remaining task is to provide the type’s implementation logic. This is a job for operation codes, or simply opcodes. In the tradition of other low-level languages, many CIL opcodes tend to be cryptic and completely unpronounceable by us mere humans. For example, if you need to load a string variable into memory, you don’t use a friendly opcode named LoadString but rather ldstr.
Now, to be fair, some CIL opcodes do map quite naturally to their C# counterparts (e.g., box, unbox, throw, and sizeof). As you will see, the opcodes of CIL are always used within the scope of a member’s implementation, and unlike CIL directives, they are never written with a dot prefix.
The CIL Opcode/CIL Mnemonic Distinction
As just explained, opcodes such as ldstr are used to implement the members of a given type. In reality, however, tokens such as ldstr are CIL mnemonics for the actual binary CIL opcodes. To clarify the distinction, assume you have authored the following method in C#:
static int Add(int x, int y)
{
return x + y;
}
The act of adding two numbers is expressed in terms of the CIL opcode 0X58. In a similar vein, subtracting two numbers is expressed using the opcode 0X59, and the act of allocating a new object on the managed heap is achieved using the 0X73 opcode. Given this reality, understand that the “CIL code” processed by a JIT compiler is actually nothing more than blobs of binary data.
Thankfully, for each binary opcode of CIL, there is a corresponding mnemonic. For example, the add mnemonic can be used rather than 0X58, sub rather than 0X59, and newobj rather than 0X73. Given this opcode/mnemonic distinction, realize that CIL decompilers such asildasm.exe translate an assembly’s binary opcodes into their corresponding CIL mnemonics. For example, here would be the CIL presented by ildasm.exe for the previous C# Add() method (your exact output may differ based on your version of .NET):
.method private hidebysig static int32 Add(int32 x,
int32 y) cil managed
{
// Code size 9 (0x9)
.maxstack 2
.locals init ([0] int32 CS$1$0000)
IL_0000: nop
IL_0001: ldarg.0
IL_0002: ldarg.1
IL_0003: add
IL_0004: stloc.0
IL_0005: br.s IL_0007
IL_0007: ldloc.0
IL_0008: ret
}
Unless you’re building some extremely low-level .NET software (such as a custom managed compiler), you’ll never need to concern yourself with the literal numeric binary opcodes of CIL. For all practical purposes, when .NET programmers speak about “CIL opcodes,” they’re referring to the set of friendly string token mnemonics (as I’ve done within this text and will do for the remainder of this chapter) rather than the underlying numerical values.
Pushing and Popping: The Stack-Based Nature of CIL
Higher-level .NET languages (such as C#) attempt to hide low-level CIL grunge from view as much as possible. One aspect of .NET development that is particularly well hidden is that CIL is a stack- based programming language. Recall from the examination of the collection namespaces (see Chapter 9) that the Stack<T> class can be used to push a value onto a stack as well as pop the topmost value off of the stack for use. Of course, CIL developers do not use an object of type Stack<T> to load and unload the values to be evaluated; however, the same pushing and popping mind-set still applies.
Formally speaking, the entity used to hold a set of values to be evaluated is termed the virtual execution stack. As you will see, CIL provides a number of opcodes that are used to push a value onto the stack; this process is termed loading. As well, CIL defines a number of additional opcodes that transfer the topmost value on the stack into memory (such as a local variable) using a process termed storing.
In the world of CIL, it is impossible to access a point of data directly, including locally defined variables, incoming method arguments, or field data of a type. Rather, you are required to explicitly load the item onto the stack, only to then pop it off for later use (keep this point in mind, as it will help explain why a given block of CIL code can look a bit redundant).
![]() Note Recall that CIL is not directly executed but compiled on demand. During the compilation of CIL code, many of these implementation redundancies are optimized away. Furthermore, if you enable the code optimization option for your current project (using the Build tab of the Visual Studio Project Properties window), the compiler will also remove various CIL redundancies.
Note Recall that CIL is not directly executed but compiled on demand. During the compilation of CIL code, many of these implementation redundancies are optimized away. Furthermore, if you enable the code optimization option for your current project (using the Build tab of the Visual Studio Project Properties window), the compiler will also remove various CIL redundancies.
To understand how CIL leverages a stack-based processing model, consider a simple C# method, PrintMessage(), which takes no arguments and returns void. Within the implementation of this method, you will simply print the value of a local string variable to the standard output stream, like so:
public void PrintMessage()
{
string myMessage = "Hello.";
Console.WriteLine(myMessage);
}
If you were to examine how the C# compiler translates this method in terms of CIL, you would first find that the PrintMessage() method defines a storage slot for a local variable using the .locals directive. The local string is then loaded and stored in this local variable using theldstr (load string) and stloc.0 opcodes (which can be read as “store the current value in a local variable at storage slot zero”).
The value (again, at index 0) is then loaded into memory using the ldloc.0 (“load the local argument at index 0”) opcode for use by the System.Console.WriteLine() method invocation (specified using the call opcode). Finally, the function returns via the ret opcode. Here is the (annotated) CIL code for the PrintMessage() method (note that I’ve removed the nop opcodes from this listing, for brevity):
.method public hidebysig instance void PrintMessage() cil managed
{
.maxstack 1
// Define a local string variable (at index 0).
.locals init ([0] string myMessage)
// Load a string onto the stack with the value "Hello."
ldstr " Hello."
// Store string value on the stack in the local variable.
stloc.0
// Load the value at index 0.
ldloc.0
// Call method with current value.
call void [mscorlib]System.Console::WriteLine(string)
ret
}
![]() Note As you can see, CIL supports code comments using the double-slash syntax (as well as the /*...*/ syntax, for that matter). As in C#, code comments are completely ignored by the CIL compiler.
Note As you can see, CIL supports code comments using the double-slash syntax (as well as the /*...*/ syntax, for that matter). As in C#, code comments are completely ignored by the CIL compiler.
Now that you have the basics of CIL directives, attributes, and opcodes, let’s see a practical use of CIL programming, beginning with the topic of round-trip engineering.
Understanding Round-Trip Engineering
You are aware of how to use ildasm.exe to view the CIL code generated by the C# compiler (see Chapter 1). What you might not know, however, is that ildasm.exe allows you to dump the CIL contained within an assembly loaded into ildasm.exe to an external file. Once you have the CIL code at your disposal, you are free to edit and recompile the code base using the CIL compiler, ilasm.exe.
Formally speaking, this technique is termed round-trip engineering, and it can be useful under select circumstances, such as the following:
· You need to modify an assembly for which you no longer have the source code.
· You are working with a less-than-perfect .NET language compiler that has emitted ineffective (or flat-out incorrect) CIL code, and you want to modify the code base.
· You are constructing a COM interoperability library and want to account for some COM IDL attributes that have been lost during the conversion process (such as the COM [helpstring] attribute).
To illustrate the process of round-tripping, begin by creating a new C# code file (HelloProgram.cs) using a simple text editor such as Notepad, and define the following class type (you are free to create a new Console Application project using Visual Studio if you want. However, be sure to delete the AssemblyInfo.cs file to decrease the amount of generated CIL code).
// A simple C# console app.
using System;
// Note that we are not wrapping our class in a namespace,
// to help simplify the generated CIL code.
class Program
{
static void Main(string[] args)
{
Console.WriteLine("Hello CIL code!");
Console.ReadLine();
}
}
Save your file to a convenient location (for example, C:\RoundTrip) and compile your program using csc.exe, like so:
csc HelloProgram.cs
Now, open HelloProgram.exe with ildasm.exe and, using the File ![]() Dump menu option, save the raw CIL code to a new *.il file (HelloProgram.il) in the same folder containing your compiled assembly (all the default values of the resulting dialog box are fine as is).
Dump menu option, save the raw CIL code to a new *.il file (HelloProgram.il) in the same folder containing your compiled assembly (all the default values of the resulting dialog box are fine as is).
![]() Note ildasm.exe will also generate a *.res file when dumping the contents of an assembly to file. These resource files can be ignored (and deleted) throughout this chapter, as you will not be using them. This file contains some low-level CLR security information (among other things).
Note ildasm.exe will also generate a *.res file when dumping the contents of an assembly to file. These resource files can be ignored (and deleted) throughout this chapter, as you will not be using them. This file contains some low-level CLR security information (among other things).
Now you are able to view HelloProgram.il using your text editor of choice. Here is the (slightly reformatted and annotated) result:
// Referenced assemblies.
.assembly extern mscorlib
{
.publickeytoken = (B7 7A 5C 56 19 34 E0 89 )
.ver 4:0:0:0
}
// Our assembly.
.assembly HelloProgram
{
/**** TargetFrameworkAttribute data removed for clarity! ****/
.hash algorithm 0x00008004
.ver 0:0:0:0
}
.module HelloProgram.exe
.imagebase 0x00400000
.file alignment 0x00000200
.stackreserve 0x00100000
.subsystem 0x0003
.corflags 0x00000003
// Definition of Program class.
.class private auto ansi beforefieldinit Program
extends [mscorlib]System.Object
{
.method private hidebysig static void Main(string[] args) cil managed
{
// Marks this method as the entry point of the
// executable.
.entrypoint
.maxstack 8
IL_0000: nop
IL_0001: ldstr "Hello CIL code!"
IL_0006: call void [mscorlib]System.Console::WriteLine(string)
IL_000b: nop
IL_000c: call string [mscorlib]System.Console::ReadLine()
IL_0011: pop
IL_0012: ret
}
// The default constructor.
.method public hidebysig specialname rtspecialname
instance void .ctor() cil managed
{
.maxstack 8
IL_0000: ldarg.0
IL_0001: call instance void [mscorlib]System.Object::.ctor()
IL_0006: ret
}
}
First, notice that the *.il file opens by declaring each externally referenced assembly the current assembly is compiled against. Here, you can see a single .assembly extern token set for the always present mscorlib.dll. Of course, if your class library used types within other referenced assemblies, you would find additional .assembly extern directives.
Next, you find the formal definition of your HelloProgram.exe assembly, which has been assigned a default version of 0.0.0.0 (given that you did not specify a value using the [AssemblyVersion] attribute). The assembly is further described using various CIL directives (such as .module, .imagebase, and so forth).
After documenting the externally referenced assemblies and defining the current assembly, you find a definition of the Program type. Note that the .class directive has various attributes (many of which are actually optional) such as extends, shown here, which marks the base class of the type:
.class private auto ansi beforefieldinit Program
extends [mscorlib]System.Object
{ ... }
The bulk of the CIL code represents the implementation of the class’s default constructor and the Main() method, both of which are defined (in part) with the .method directive. Once the members have been defined using the correct directives and attributes, they are implemented using various opcodes.
It is critical to understand that when interacting with .NET types (such as System.Console) in CIL, you will always need to use the type’s fully qualified name. Furthermore, the type’s fully qualified name must always be prefixed with the friendly name of the defining assembly (in square brackets). Consider the following CIL implementation of Main():
.method private hidebysig static void Main(string[] args) cil managed
{
.entrypoint
.maxstack 8
IL_0000: nop
IL_0001: ldstr "Hello CIL code!"
IL_0006: call void [mscorlib]System.Console::WriteLine(string)
IL_000b: nop
IL_000c: call string [mscorlib]System.Console::ReadLine()
IL_0011: pop
IL_0012: ret
}
The implementation of the default constructor in terms of CIL code makes use of yet another “load-centric” instruction (ldarg.0). In this case, the value loaded onto the stack is not a custom variable specified by you but the current object reference (more details on this later). Also note that the default constructor explicitly makes a call to the base class constructor, as follows (which, in this case, is your good friend System.Object):
.method public hidebysig specialname rtspecialname
instance void .ctor() cil managed
{
.maxstack 8
IL_0000: ldarg.0
IL_0001: call instance void [mscorlib]System.Object::.ctor()
IL_0006: ret
}
The Role of CIL Code Labels
One thing you certainly have noticed is that each line of implementation code is prefixed with a token of the form IL_XXX: (e.g., IL_0000:, IL_0001:, and so on). These tokens are called code labels and may be named in any manner you choose (provided they are not duplicated within the same member scope). When you dump an assembly to file using ildasm.exe, it will automatically generate code labels that follow an IL_XXX: naming convention. However, you may change them to reflect a more descriptive marker. Here’s an example:
.method private hidebysig static void Main(string[] args) cil managed
{
.entrypoint
.maxstack 8
Nothing_1: nop
Load_String: ldstr "Hello CIL code!"
PrintToConsole: call void [mscorlib]System.Console::WriteLine(string)
Nothing_2: nop
WaitFor_KeyPress: call string [mscorlib]System.Console::ReadLine()
RemoveValueFromStack: pop
Leave_Function: ret
}
The truth of the matter is that most code labels are completely optional. The only time code labels are truly mandatory is when you are authoring CIL code that makes use of various branching or looping constructs, as you can specify where to direct the flow of logic via these code labels. For the current example, you can remove these autogenerated labels altogether with no ill effect, like so:
.method private hidebysig static void Main(string[] args) cil managed
{
.entrypoint
.maxstack 8
nop
ldstr "Hello CIL code!"
call void [mscorlib]System.Console::WriteLine(string)
nop
call string [mscorlib]System.Console::ReadLine()
pop
ret
}
Interacting with CIL: Modifying an *.il File
Now that you have a better understanding of how a basic CIL file is composed, let’s complete the round- tripping experiment. The goal here is to update the CIL within the existing *.il file as follows:
1. Add a reference to the System.Windows.Forms.dll assembly.
2. Load a local string within Main().
3. Call the System.Windows.Forms.MessageBox.Show() method using the local string variable as an argument.
The first step is to add a new .assembly directive (qualified with the extern attribute) that specifies your assembly requires the System.Windows.Forms.dll assembly. To do so, update the *.il file with the following logic after the external reference to mscorlib:
.assembly extern System.Windows.Forms
{
.publickeytoken = (B7 7A 5C 56 19 34 E0 89)
.ver 4:0:0:0
}
Be aware that the value assigned to the .ver directive may differ depending on which version of the .NET platform you have installed on your development machine. Here, you see that System.Windows.Forms.dll version 4.0.0.0 is used and has the public key token of B77A5C561934E089. If you open the GAC (see Chapter 14) and locate your version of the System.Windows.Forms.dll assembly, you can simply copy the correct version and public key token value.
Next, you need to alter the current implementation of the Main() method. Locate this method within the *.il file and remove the current implementation code (the .maxstack and .entrypoint directives should remain intact), like so:
.method private hidebysig static void Main(string[] args) cil managed
{
.entrypoint
.maxstack 8
// ToDo: Write new CIL code!
}
Again, the goal here is to push a new string onto the stack and call the MessageBox.Show() method (rather than the Console.WriteLine() method). Recall that when you specify the name of an external type, you must use the type’s fully qualified name (in conjunction with the friendly name of the assembly). Also notice that in terms of CIL, every method call documents the fully qualified return type. Keeping these things in mind, update the Main() method as follows:
.method private hidebysig static void Main(string[] args) cil managed
{
.entrypoint
.maxstack 8
ldstr "CIL is way cool"
call valuetype [System.Windows.Forms]
System.Windows.Forms.DialogResult
[System.Windows.Forms]
System.Windows.Forms.MessageBox::Show(string)
pop
ret
}
In effect, you have just updated the CIL code to correspond to the following C# class definition:
class Program
{
static void Main(string[] args)
{
System.Windows.Forms.MessageBox.Show("CIL is way cool");
}
}
Compiling CIL Code Using ilasm.exe
Assuming you have saved this modified *.il file, you can compile a new .NET assembly using the ilasm.exe (CIL compiler) utility. While the CIL compiler has numerous command-line options (all of which can be seen by specifying the -? option), Table 18-1 shows the core flags of interest.
Table 18-1. Common ilasm.exe Command-Line Flags
|
Flag |
Meaning in Life |
|
/debug |
Includes debug information (such as local variable and argument names, as well as line numbers). |
|
/dll |
Produces a *.dll file as output. |
|
/exe |
Produces an *.exe file as output. This is the default setting and may be omitted. |
|
/key |
Compiles the assembly with a strong name using a given *.snk file. |
|
/output |
Specifies the output file name and extension. If you do not use the /output flag, the resulting file name (minus the file extension) is the same as the name of the first source file. |
To compile your updated HelloProgram.il file into a new .NET *.exe, you can issue the following command within a Developer Command prompt:
ilasm /exe HelloProgram.il /output=NewAssembly.exe
Assuming things have worked successfully, you will see the report shown here:
Microsoft (R) .NET Framework IL Assembler. Version 4.0.30319.33440
Copyright (c) Microsoft Corporation. All rights reserved.
Assembling ’HelloProgram.il’ to EXE --> ’NewAssembly.exe’
Source file is UTF-8
Assembled method Program::Main
Assembled method Program::.ctor
Creating PE file
Emitting classes:
Class 1: Program
Emitting fields and methods:
Global
Class 1 Methods: 2;
Emitting events and properties:
Global
Class 1
Writing PE file
Operation completed successfully
At this point, you can run your new application. Sure enough, rather than showing a message within the console window, you will now see a message box displaying your message. While the output of this simple example is not all that spectacular, it does illustrate one practical use of programming in CIL round-tripping.
The Role of peverify.exe
When you are building or modifying assemblies using CIL code, it is always advisable to verify that the compiled binary image is a well-formed .NET image using the peverify.exe command-line tool, like so:
peverify NewAssembly.exe
This tool will examine all opcodes within the specified assembly for valid CIL code. For example, in terms of CIL code, the evaluation stack must always be empty before exiting a function. If you forget to pop off any remaining values, the ilasm.exe compiler will still generate a compiled assembly (given that compilers are concerned only with syntax). peverify.exe, on the other hand, is concerned with semantics. If you did forget to clear the stack before exiting a given function, peverify.exe will let you know before you try running your code base.
![]() Source Code The RoundTrip example is included in the Chapter 18 subdirectory.
Source Code The RoundTrip example is included in the Chapter 18 subdirectory.
Understanding CIL Directives and Attributes
Now that you have seen how ildasm.exe and ilasm.exe can be used to perform a round-trip, you can get down to the business of checking out the syntax and semantics of CIL itself. The next sections will walk you through the process of authoring a custom namespace containing a set of types. However, to keep things simple, these types will not contain any implementation logic for their members (yet). After you understand how to create empty types, you can then turn your attention to the process of defining “real” members using CIL opcodes.
Specifying Externally Referenced Assemblies in CIL
Create a new file named CILTypes.il using your editor of choice. The first task a CIL project will require is to list the set of external assemblies used by the current assembly. For this example, you will only use types found within mscorlib.dll. To do so, the .assembly directive will be qualified using the external attribute. When you are referencing a strongly named assembly, such as mscorlib.dll, you’ll want to specify the .publickeytoken and .ver directives as well, like so:
.assembly extern mscorlib
{
.publickeytoken = (B7 7A 5C 56 19 34 E0 89 )
.ver 4:0:0:0
}
![]() Note Strictly speaking, you are not required to explicitly reference mscorlib.dll as an external reference, as ilasm.exe will do so automatically. However, for each external .NET library your CIL project requires, you will need to author a similar .assembly extern directive.
Note Strictly speaking, you are not required to explicitly reference mscorlib.dll as an external reference, as ilasm.exe will do so automatically. However, for each external .NET library your CIL project requires, you will need to author a similar .assembly extern directive.
Defining the Current Assembly in CIL
The next order of business is to define the assembly you are interested in building using the .assembly directive. At the simplest level, an assembly can be defined by specifying the friendly name of the binary, like so:
// Our assembly.
.assembly CILTypes { }
While this indeed defines a new .NET assembly, you will typically place additional directives within the scope of the assembly declaration. For this example, update your assembly definition to include a version number of 1.0.0.0 using the .ver directive (note that each numerical identifier is separated by colons, not the C#-centric dot notation), as follows:
// Our assembly.
.assembly CILTypes
{
.ver 1:0:0:0
}
Given that the CILTypes assembly is a single-file assembly (see Chapter 14), you will finish up the assembly definition using the following single .module directive, which marks the official name of your .NET binary, CILTypes.dll:
.assembly CILTypes
{
.ver 1:0:0:0
}
// The module of our single-file assembly.
.module CILTypes.dll
In addition to .assembly and .module are CIL directives that further qualify the overall structure of the .NET binary you are composing. Table 18-2 lists a few of the more common assembly-level directives.
Table 18-2. Additional Assembly-Centric Directives
|
Directive |
Meaning in Life |
|
.mresources |
If your assembly uses internal resources (such as bitmaps or string tables), this directive is used to identify the name of the file that contains the resources to be embedded. |
|
.subsystem |
This CIL directive is used to establish the preferred UI that the assembly want to execute within. For example, a value of 2 signifies that the assembly should run within a GUI application, whereas a value of 3 denotes a console executable. |
Defining Namespaces in CIL
Now that you have defined the look and feel of your assembly (and the required external references), you can create a .NET namespace (MyNamespace) using the .namespace directive, like so:
// Our assembly has a single namespace.
.namespace MyNamespace {}
Like C#, CIL namespace definitions can be nested within further namespaces. There is no need to define a root namespace here; however, for the sake of argument, assume you want to create the following root namespace named MyCompany:
.namespace MyCompany
{
.namespace MyNamespace {}
}
Like C#, CIL allows you to define a nested namespace as follows:
// Defining a nested namespace.
.namespace MyCompany.MyNamespace {}
Defining Class Types in CIL
Empty namespaces are not very interesting, so let’s now check out the process of defining a class type using CIL. Not surprisingly, the .class directive is used to define a new class. However, this simple directive can be adorned with numerous additional attributes, to further qualify the nature of the type. To illustrate, add a public class to your namespace named MyBaseClass. As in C#, if you do not specify an explicit base class, your type will automatically be derived from System.Object.
.namespace MyNamespace
{
// System.Object base class assumed.
.class public MyBaseClass {}
}
When you are building a class type that derives from any class other than System.Object, you use the extends attribute. Whenever you need to reference a type defined within the same assembly, CIL demands that you also use the fully qualified name (however, if the base type is within the same assembly, you can omit the assembly’s friendly name prefix). Therefore, the following attempt to extend MyBaseClass results in a compiler error:
// This will not compile!
.namespace MyNamespace
{
.class public MyBaseClass {}
.class public MyDerivedClass
extends MyBaseClass {}
}
To correctly define the parent class of MyDerivedClass, you must specify the full name of MyBaseClass as follows:
// Better!
.namespace MyNamespace
{
.class public MyBaseClass {}
.class public MyDerivedClass
extends MyNamespace.MyBaseClass {}
}
In addition to the public and extends attributes, a CIL class definition may take numerous additional qualifiers that control the type’s visibility, field layout, and so on. Table 18-3 illustrates some (but not all) of the attributes that may be used in conjunction with the .class directive.
Table 18-3. Various Attributes Used in Conjunction with the .class Directive
|
Attributes |
Meaning in Life |
|
public, private, nested assembly, nested famandassem, nested family, nested famorassem, nested public,nested private |
CIL defines various attributes that are used to specify the visibility of a given type. As you can see, raw CIL offers numerous possibilities other than those offered by C#. Refer to ECMA 335 for details if you are interested. |
|
abstract, sealed |
These two attributes may be tacked onto a .class directive to define an abstract class or sealed class, respectively. |
|
auto, sequential, explicit |
These attributes are used to instruct the CLR how to lay out field data in memory. For class types, the default layout flag (auto) is appropriate. Changing this default can be helpful if you need to use P/Invoke to call into unmanaged C code. |
|
extends, implements |
These attributes allow you to define the base class of a type (via extends) or implement an interface on a type (via implements). |
Defining and Implementing Interfaces in CIL
As odd as it might seem, interface types are defined in CIL using the .class directive. However, when the .class directive is adorned with the interface attribute, the type is realized as a CTS interface type. Once an interface has been defined, it may be bound to a class or structure type using the CIL implements attribute, like so:
.namespace MyNamespace
{
// An interface definition.
.class public interface IMyInterface {}
// A simple base class.
.class public MyBaseClass {}
// MyDerivedClass now implements IMyInterface,
// and extends MyBaseClass.
.class public MyDerivedClass
extends MyNamespace.MyBaseClass
implements MyNamespace.IMyInterface {}
}
![]() Note The extends clause must precede the implements clause. As well, the implements clause can incorporate a comma-separated list of interfaces.
Note The extends clause must precede the implements clause. As well, the implements clause can incorporate a comma-separated list of interfaces.
As you recall from Chapter 9, interfaces can function as the base interface to other interface types in order to build interface hierarchies. However, contrary to what you might be thinking, the extends attribute cannot be used to derive interface A from interface B. The extendsattribute is used only to qualify a type’s base class. When you want to extend an interface, you will use the implements attribute yet again. Here’s an example:
// Extending interfaces in terms of CIL.
.class public interface IMyInterface {}
.class public interface IMyOtherInterface
implements MyNamespace.IMyInterface {}
Defining Structures in CIL
The .class directive can be used to define a CTS structure if the type extends System.ValueType. As well, the .class directive must be qualified with the sealed attribute (given that structures can never be a base structure to other value types). If you attempt to do otherwise,ilasm.exe will issue a compiler error.
// A structure definition is always sealed.
.class public sealed MyStruct
extends [mscorlib]System.ValueType{}
Do be aware that CIL provides a shorthand notation to define a structure type. If you use the value attribute, the new type will derive the type from [mscorlib]System.ValueType automatically. Therefore, you could define MyStruct as follows:
// Shorthand notation for declaring a structure.
.class public sealed value MyStruct{}
Defining Enums in CIL
.NET enumerations (as you recall) derive from System.Enum, which is a System.ValueType (and therefore must also be sealed). When you want to define an enum in terms of CIL, simply extend [mscorlib]System.Enum, like so:
// An enum.
.class public sealed MyEnum
extends [mscorlib]System.Enum{}
Like a structure definition, enumerations can be defined with a shorthand notation using the enum attribute. Here’s an example:
// Enum shorthand.
.class public sealed enum MyEnum{}
You’ll see how to specify the name-value pairs of an enumeration in just a moment.
![]() Note The other fundamental .NET type, the delegate, also has a specific CIL representation. See Chapter 10 for details.
Note The other fundamental .NET type, the delegate, also has a specific CIL representation. See Chapter 10 for details.
Defining Generics in CIL
Generic types also have a specific representation in the syntax of CIL. Recall from Chapter 9 that a given generic type or generic member may have one or more type parameters. For example, the List<T> type has a single type parameter, while Dictionary<TKey, TValue> has two. In terms of CIL, the number of type parameters is specified using a backward-leaning single tick (`), followed by a numerical value representing the number of type parameters. Like C#, the actual value of the type parameters is encased within angled brackets.
![]() Note On most keyboards, you can find the ` character on the key above the Tab key (and to the left of the 1 key).
Note On most keyboards, you can find the ` character on the key above the Tab key (and to the left of the 1 key).
For example, assume you want to create a List<T> variable, where T is of type System.Int32. In C#, you would type the following:
void SomeMethod()
{
List<int> myInts = new List<int>();
}
In CIL, you would author the following (which could appear in any CIL method scope):
// In C#: List<int> myInts = new List<int>();
newobj instance void class [mscorlib]
System.Collections.Generic.List`1<int32>::.ctor()
Notice that this generic class is defined as List`1<int32>, as List<T> has a single type parameter. However, if you needed to define a Dictionary<string, int>type, you would do so as follows:
// In C#: Dictionary<string, int> d = new Dictionary<string, int>();
newobj instance void class [mscorlib]
System.Collections.Generic.Dictionary`2<string,int32>::.ctor()
As another example, if you have a generic type that uses another generic type as a type parameter, you would author CIL code such as the following:
// In C#: List<List<int>> myInts = new List<List<int>>();
newobj instance void class [mscorlib]
System.Collections.Generic.List`1<class
[mscorlib]System.Collections.Generic.List`1<int32>>::.ctor()
Compiling the CILTypes.il file
Even though you have not yet added any members or implementation code to the types you have defined, you are able to compile this *.il file into a .NET DLL assembly (which you must do, as you have not specified a Main() method). Open a command prompt and enter the following command to ilasm.exe:
ilasm /dll CilTypes.il
After you have done so, can now open your compiled assembly into ildasm.exe to verify the creation of each type. After you have confirmed the contents of your assembly, run peverify.exe against it, like so:
peverify CilTypes.dll
Notice that you are issued errors, given that all your types are completely empty. Here is some partial output:
Microsoft (R) .NET Framework PE Verifier. Version 4.0.30319.33440
Copyright (c) Microsoft Corporation. All rights reserved.
[MD]: Error: Value class has neither fields nor size parameter. [token:0x02000005]
[MD]: Error: Enum has no instance field. [token:0x02000006]
...
To understand how to populate a type with content, you first need to examine the fundamental data types of CIL.
.NET Base Class Library, C#, and CIL Data Type Mappings
Table 18-4 illustrates how a .NET base class type maps to the corresponding C# keyword and how each C# keyword maps into raw CIL. As well, Table 18-4 documents the shorthand constant notations used for each CIL type. As you will see in just a moment, these constants are often referenced by numerous CIL opcodes.
Table 18-4. Mapping .NET Base Class Types to C# Keywords, and C# Keywords to CIL
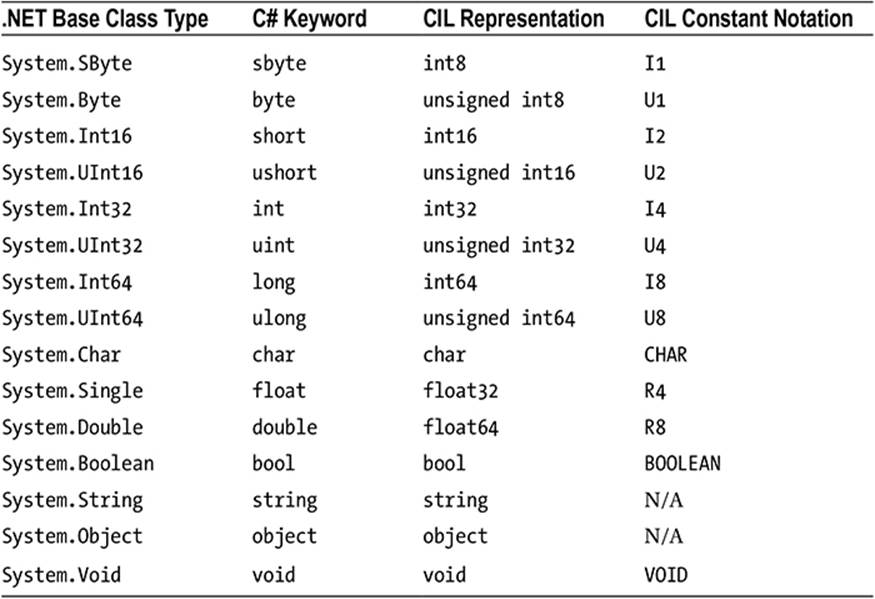
![]() Note The System.IntPtr and System.UIntPtr types map to native int and native unsigned int (this is good to know, as many of COM interoperability and P/Invoke scenarios use these extensively).
Note The System.IntPtr and System.UIntPtr types map to native int and native unsigned int (this is good to know, as many of COM interoperability and P/Invoke scenarios use these extensively).
Defining Type Members in CIL
As you are already aware, .NET types may support various members. Enumerations have some set of name-value pairs. Structures and classes may have constructors, fields, methods, properties, static members, and so on. Over the course of this book’s first 17 chapters, you have already seen partial CIL definitions for the items previously mentioned, but nevertheless, here is a quick recap of how various members map to CIL primitives.
Defining Field Data in CIL
Enumerations, structures, and classes can all support field data. In each case, the .field directive will be used. For example, let’s breathe some life into the skeleton MyEnum enumeration and define the following three name-value pairs (note the values are specified within parentheses):
.class public sealed enum MyEnum
{
.field public static literal valuetype
MyNamespace.MyEnum A = int32(0)
.field public static literal valuetype
MyNamespace.MyEnum B = int32(1)
.field public static literal valuetype
MyNamespace.MyEnum C = int32(2)
}
Fields that reside within the scope of a .NET System.Enum-derived type are qualified using the static and literal attributes. As you would guess, these attributes set up the field data to be a fixed value accessible from the type itself (e.g., MyEnum.A).
![]() Note The values assigned to an enum value may also be in hexadecimal with a 0x prefix.
Note The values assigned to an enum value may also be in hexadecimal with a 0x prefix.
Of course, when you want to define a point of field data within a class or structure, you are not limited to a point of public static literal data. For example, you could update MyBaseClass to support two points of private, instance-level field data, set to default values:
.class public MyBaseClass
{
.field private string stringField = "hello!"
.field private int32 intField = int32(42)
}
As in C#, class field data will automatically be initialized to an appropriate default value. If you want to allow the object user to supply custom values at the time of creation for each of these points of private field data, you (of course) need to create custom constructors.
Defining Type Constructors in CIL
The CTS supports both instance-level and class-level (static) constructors. In terms of CIL, instance-level constructors are represented using the .ctor token, while a static-level constructor is expressed via .cctor (class constructor). Both of these CIL tokens must be qualified using thertspecialname (return type special name) and specialname attributes. Simply put, these attributes are used to identify a specific CIL token that can be treated in unique ways by a given .NET language. For example, in C#, constructors do not define a return type; however, in terms of CIL, the return value of a constructor is indeed void.
.class public MyBaseClass
{
.field private string stringField
.field private int32 intField
.method public hidebysig specialname rtspecialname
instance void .ctor(string s, int32 i) cil managed
{
// TODO: Add implementation code...
}
}
Note that the .ctor directive has been qualified with the instance attribute (as it is not a static constructor). The cil managed attributes denote that the scope of this method contains CIL code, rather than unmanaged code, which may be used during platform invocation requests.
Defining Properties in CIL
Properties and methods also have specific CIL representations. By way of an example, if MyBaseClass were updated to support a public property named TheString, you would author the following CIL (note again the use of the specialname attribute):
.class public MyBaseClass
{
...
.method public hidebysig specialname
instance string get_TheString() cil managed
{
// TODO: Add implementation code...
}
.method public hidebysig specialname
instance void set_TheString(string ’value’) cil managed
{
// TODO: Add implementation code...
}
.property instance string TheString()
{
.get instance string
MyNamespace.MyBaseClass::get_TheString()
.set instance void
MyNamespace.MyBaseClass::set_TheString(string)
}
}
In terms of CIL, a property maps to a pair of methods that take get_ and set_ prefixes. The .property directive makes use of the related .get and .set directives to map property syntax to the correct “specially named” methods.
![]() Note Notice that the incoming parameter to the set method of a property is placed in single quotation marks, which represents the name of the token to use on the right side of the assignment operator within the method scope.
Note Notice that the incoming parameter to the set method of a property is placed in single quotation marks, which represents the name of the token to use on the right side of the assignment operator within the method scope.
Defining Member Parameters
In a nutshell, specifying arguments in CIL is (more or less) identical to doing so in C#. For example, each argument is defined by specifying its data type, followed by the parameter name. Furthermore, like C#, CIL provides a way to define input, output, and pass-by-reference parameters. As well, CIL allows you to define a parameter array argument (aka the C# params keyword), as well as optional parameters.
To illustrate the process of defining parameters in raw CIL, assume you want to build a method that takes an int32 (by value), an int32 (by reference), a [mscorlib]System.Collection.ArrayList, and a single output parameter (of type int32). In terms of C#, this method would look something like the following:
public static void MyMethod(int inputInt,
ref int refInt, ArrayList ar, out int outputInt)
{
outputInt = 0; // Just to satisfy the C# compiler...
}
If you were to map this method into CIL terms, you would find that C# reference parameters are marked with an ampersand (&) suffixed to the parameter’s underlying data type (int32&).
Output parameters also use the & suffix, but they are further qualified using the CIL [out] token. Also notice that if the parameter is a reference type (in this case, the [mscorlib]System.Collections.ArrayList type), the class token is prefixed to the data type (not to be confused with the .class directive!).
.method public hidebysig static void MyMethod(int32 inputInt,
int32& refInt,
class [mscorlib]System.Collections.ArrayList ar,
[out] int32& outputInt) cil managed
{
...
}
Examining CIL Opcodes
The final aspect of CIL code you’ll examine in this chapter has to do with the role of various operational codes (opcodes). Recall that an opcode is simply a CIL token used to build the implementation logic for a given member. The complete set of CIL opcodes (which is fairly large) can be grouped into the following broad categories:
· Opcodes that control program flow
· Opcodes that evaluate expressions
· Opcodes that access values in memory (via parameters, local variables, etc.)
To provide some insight to the world of member implementation via CIL, Table 18-5 defines some of the more useful opcodes that are directly related to member implementation logic, grouped by related functionality.
Table 18-5. Various Implementation-Specific CIL Opcodes
|
Opcodes |
Meaning in Life |
|
add, sub, mul, div, rem |
These CIL opcodes allow you to add, subtract, multiply, and divide two values (rem returns the remainder of a division operation). |
|
and, or, not, xor |
These CIL opcodes allow you to perform bit-wise operations on two values. |
|
ceq, cgt, clt |
These CIL opcodes allow you to compare two values on the stack in various manners. Here’s an example: |
|
ceq: Compare for equality |
|
|
cgt: Compare for greater than |
|
|
clt: Compare for less than |
|
|
box, unbox |
These CIL opcodes are used to convert between reference types and value types. |
|
ret |
This CIL opcode is used to exit a method and return a value to the caller (if necessary). |
|
beq, bgt, ble, blt, switch |
These CIL opcodes (in addition to many other related opcodes) are used to control branching logic within a method. Here’s an example: |
|
beq: Break to code label if equal |
|
|
bgt: Break to code label if greater than |
|
|
ble: Break to code label if less than or equal to |
|
|
blt: Break to code label if less than |
|
|
All the branch-centric opcodes require that you specify a CIL code label to jump to if the result of the test is true. |
|
|
call |
This CIL opcode is used to call a member on a given type. |
|
newarr, newobj |
These CIL opcodes allow you to allocate a new array or new object type into memory (respectively). |
The next broad category of CIL opcodes (a subset of which is shown in Table 18-6) is used to load (push) arguments onto the virtual execution stack. Note how these load-specific opcodes take an ld (load) prefix.
Table 18-6. The Primary Stack-Centric Opcodes of CIL
|
Opcode |
Meaning in Life |
|
ldarg (with numerous variations) |
Loads a method’s argument onto the stack. In addition to the general ldarg (which works in conjunction with a given index that identifies the argument), there are numerous other variations. |
|
For example, ldarg opcodes that have a numerical suffix (ldarg_0) hard-code which argument to load. As well, variations of the ldarg opcode allow you to hard-code the data type using the CIL constant notation shown in Table 18-4 (ldarg_I4, for an int32), as well as the data type and value (ldarg_I4_5, to load anint32 with the value of 5). |
|
|
ldc (with numerous variations) |
Loads a constant value onto the stack. |
|
ldfld (with numerous variations) |
Loads the value of an instance-level field onto the stack. |
|
ldloc (with numerous variations) |
Loads the value of a local variable onto the stack. |
|
ldobj |
Obtains all the values gathered by a heap-based object and places them on the stack. |
|
ldstr |
Loads a string value onto the stack. |
In addition to the set of load-specific opcodes, CIL provides numerous opcodes that explicitly pop the topmost value off the stack. As shown over the first few examples in this chapter, popping a value off the stack typically involves storing the value into temporary local storage for further use (such as a parameter for an upcoming method invocation). Given this, note how many opcodes that pop the current value off the virtual execution stack take an st (store) prefix. Table 18-7 hits the highlights.
Table 18-7. Various Pop-Centric Opcodes
|
Opcode |
Meaning in Life |
|
pop |
Removes the value currently on top of the evaluation stack but does not bother to store the value |
|
starg |
Stores the value on top of the stack into the method argument at a specified index |
|
stloc (with numerous variations) |
Pops the current value from the top of the evaluation stack and stores it in a local variable list at a specified index |
|
stobj |
Copies a value of a specified type from the evaluation stack into a supplied memory address |
|
stsfld |
Replaces the value of a static field with a value from the evaluation stack |
Do be aware that various CIL opcodes will implicitly pop values off the stack to perform the task at hand. For example, if you are attempting to subtract two numbers using the sub opcode, it should be clear that sub will have to pop off the next two available values before it can perform the calculation. Once the calculation is complete, the result of the value (surprise, surprise) is pushed onto the stack once again.
The .maxstack Directive
When you write method implementations using raw CIL, you need to be mindful of a special directive named .maxstack. As its name suggests, .maxstack establishes the maximum number of variables that may be pushed onto the stack at any given time during the execution of the method. The good news is that the .maxstack directive has a default value (8), which should be safe for a vast majority of methods you might be authoring. However, if you want to be explicit, you are able to manually calculate the number of local variables on the stack and define this value explicitly, like so:
.method public hidebysig instance void
Speak() cil managed
{
// During the scope of this method, exactly
// 1 value (the string literal) is on the stack.
.maxstack 1
ldstr "Hello there..."
call void [mscorlib]System.Console::WriteLine(string)
ret
}
Declaring Local Variables in CIL
Let’s first check out how to declare a local variable. Assume you want to build a method in CIL named MyLocalVariables() that takes no arguments and returns void. Within the method, you want to define three local variables of type System.String, System.Int32, andSystem.Object. In C#, this member would appear as follows (recall that locally scoped variables do not receive a default value and should be set to an initial state before further use):
public static void MyLocalVariables()
{
string myStr = "CIL code is fun!";
int myInt = 33;
object myObj = new object();
}
If you were to construct MyLocalVariables() directly in CIL, you could author the following:
.method public hidebysig static void
MyLocalVariables() cil managed
{
.maxstack 8
// Define three local variables.
.locals init ([0] string myStr, [1] int32 myInt, [2] object myObj)
// Load a string onto the virtual execution stack.
ldstr "CIL code is fun!"
// Pop off current value and store in local variable [0].
stloc.0
// Load a constant of type "i4"
// (shorthand for int32) set to the value 33.
ldc.i4 33
// Pop off current value and store in local variable [1].
stloc.1
// Create a new object and place on stack.
newobj instance void [mscorlib]System.Object::.ctor()
// Pop off current value and store in local variable [2].
stloc.2
ret
}
As you can see, the first step taken to allocate local variables in raw CIL is to use the .locals directive, which is paired with the init attribute. Within the scope of the related parentheses, your goal is to associate a given numerical index to each variable (seen here as [0], [1], and[2]). As you can see, each index is identified by its data type and an optional variable name. After the local variables have been defined, you load a value onto the stack (using the various load-centric opcodes) and store the value within the local variable (using the various storage-centric opcodes).
Mapping Parameters to Local Variables in CIL
You have already seen how to declare local variables in raw CIL using the .locals init directive; however, you have yet to see exactly how to map incoming parameters to local methods. Consider the following static C# method:
public static int Add(int a, int b)
{
return a + b;
}
This innocent-looking method has a lot to say in terms of CIL. First, the incoming arguments (a and b) must be pushed onto the virtual execution stack using the ldarg (load argument) opcode. Next, the add opcode will be used to pop the next two values off the stack and find the summation and store the value on the stack yet again. Finally, this sum is popped off the stack and returned to the caller via the ret opcode. If you were to disassemble this C# method using ildasm.exe, you would find numerous additional tokens injected by csc.exe, but the crux of the CIL code is quite simple.
.method public hidebysig static int32 Add(int32 a,
int32 b) cil managed
{
.maxstack 2
ldarg.0 // Load "a" onto the stack.
ldarg.1 // Load "b" onto the stack.
add // Add both values.
ret
}
The Hidden this Reference
Notice that the two incoming arguments (a and b) are referenced within the CIL code using their indexed position (index 0 and index 1), given that the virtual execution stack begins indexing at position 0.
One thing to be mindful of when you are examining or authoring CIL code is that every nonstatic method that takes incoming arguments automatically receives an implicit additional parameter, which is a reference to the current object (think the C# this keyword). Given this, if theAdd() method were defined as nonstatic, like so:
// No longer static!
public int Add(int a, int b)
{
return a + b;
}
the incoming a and b arguments are loaded using ldarg.1 and ldarg.2 (rather than the expected ldarg.0 and ldarg.1 opcodes). Again, the reason is that slot 0 actually contains the implicit this reference. Consider the following pseudocode:
// This is JUST pseudo-code!
.method public hidebysig static int32 AddTwoIntParams(
MyClass_HiddenThisPointer this, int32 a, int32 b) cil managed
{
ldarg.0 // Load MyClass_HiddenThisPointer onto the stack.
ldarg.1 // Load "a" onto the stack.
ldarg.2 // Load "b" onto the stack.
...
}
Representing Iteration Constructs in CIL
Iteration constructs in the C# programming language are represented using the for, foreach, while, and do keywords, each of which has a specific representation in CIL. Consider the following classic for loop:
public static void CountToTen()
{
for(int i = 0; i < 10; i++)
;
}
Now, as you may recall, the br opcodes (br, blt, and so on) are used to control a break in flow when some condition has been met. In this example, you have set up a condition in which the for loop should break out of its cycle when the local variable i is equal to or greater than the value of 10. With each pass, the value of 1 is added to i, at which point the test condition is yet again evaluated.
Also recall that when you use any of the CIL branching opcodes, you will need to define a specific code label (or two) that marks the location to jump to when the condition is indeed true. Given these points, ponder the following (augmented) CIL code generated via ildasm.exe(including the autogenerated code labels):
.method public hidebysig static void CountToTen() cil managed
{
.maxstack 2
.locals init ([0] int32 i) // Init the local integer "i".
IL_0000: ldc.i4.0 // Load this value onto the stack.
IL_0001: stloc.0 // Store this value at index "0".
IL_0002: br.s IL_0008 // Jump to IL_0008.
IL_0004: ldloc.0 // Load value of variable at index 0.
IL_0005: ldc.i4.1 // Load the value "1" on the stack.
IL_0006: add // Add current value on the stack at index 0.
IL_0007: stloc.0
IL_0008: ldloc.0 // Load value at index "0".
IL_0009: ldc.i4.s 10 // Load value of "10" onto the stack.
IL_000b: blt.s IL_0004 // Less than? If so, jump back to IL_0004
IL_000d: ret
}
In a nutshell, this CIL code begins by defining the local int32 and loading it onto the stack. At this point, you jump back and forth between code label IL_0008 and IL_0004, each time bumping the value of i by 1 and testing to see whether i is still less than the value 10. If so, you exit the method.
![]() Source Code The CilTypes example is included in the Chapter 18 subdirectory.
Source Code The CilTypes example is included in the Chapter 18 subdirectory.
Building a .NET Assembly with CIL
Now that you’ve taken a tour of the syntax and semantics of raw CIL, it’s time to solidify your current understanding by building a .NET application using nothing but ilasm.exe and your text editor of choice. Specifically, your application will consist of a privately deployed, single-file*.dll that contains two class type definitions, and a console-based *.exe that interacts with these types.
Building CILCars.dll
The first order of business is to build the *.dll to be consumed by the client. Open a text editor and create a new *.il file named CILCars.il. This single-file assembly will use two external .NET assemblies. Begin by updating your code file as follows:
// Reference mscorlib.dll and
// System.Windows.Forms.dll.
.assembly extern mscorlib
{
.publickeytoken = (B7 7A 5C 56 19 34 E0 89 )
.ver 4:0:0:0
}
.assembly extern System.Windows.Forms
{
.publickeytoken = (B7 7A 5C 56 19 34 E0 89 )
.ver 4:0:0:0
}
// Define the single-file assembly.
.assembly CILCars
{
.hash algorithm 0x00008004
.ver 1:0:0:0
}
.module CILCars.dll
This assembly will contain two class types. The first type, CILCar, defines two points of field data (public for simplicity in this example) and a custom constructor. The second type, CILCarInfo, defines a single static method named Display(), which takes CILCar as a parameter and returns void. Both types are in the CILCars namespace. In terms of CIL, CILCar can be implemented as follows:
// Implementation of CILCars.CILCar type.
.namespace CILCars
{
.class public auto ansi beforefieldinit CILCar
extends [mscorlib]System.Object
{
// The field data of the CILCar.
.field public string petName
.field public int32 currSpeed
// The custom constructor simply allows the caller
// to assign the field data.
.method public hidebysig specialname rtspecialname
instance void .ctor(int32 c, string p) cil managed
{
.maxstack 8
// Load first arg onto the stack and call base class ctor.
ldarg.0 // "this" object, not the int32!
call instance void [mscorlib]System.Object::.ctor()
// Now load first and second args onto the stack.
ldarg.0 // "this" object
ldarg.1 // int32 arg
// Store topmost stack (int 32) member in currSpeed field.
stfld int32 CILCars.CILCar::currSpeed
// Load string arg and store in petName field.
ldarg.0 // "this" object
ldarg.2 // string arg
stfld string CILCars.CILCar::petName
ret
}
}
}
Keeping in mind that the real first argument for any nonstatic member is the current object reference, the first block of CIL simply loads the object reference and calls the base class constructor. Next, you push the incoming constructor arguments onto the stack and store them into the type’s field data using the stfld (store in field) opcode.
Now let’s implement the second type in this namespace: CILCarInfo. The meat of the type is found within the static Display() method. In a nutshell, the role of this method is to take the incoming CILCar parameter, extract the values of its field data, and display it in a Windows Forms message box. Here is the complete implementation of CILCarInfo (which should be defined within the CILCars namespace) with analysis to follow:
.class public auto ansi beforefieldinit CILCarInfo
extends [mscorlib]System.Object
{
.method public hidebysig static void
Display(class CILCars.CILCar c) cil managed
{
.maxstack 8
// We need a local string variable.
.locals init ([0] string caption)
// Load string and the incoming CILCar onto the stack.
ldstr "{0}’s speed is:"
ldarg.0
// Now place the value of the CILCar’s petName on the
// stack and call the static String.Format() method.
ldfld string CILCars.CILCar::petName
call string [mscorlib]System.String::Format(string, object)
stloc.0
// Now load the value of the currSpeed field and get its string
// representation (note call to ToString()).
ldarg.0
ldflda int32 CILCars.CILCar::currSpeed
call instance string [mscorlib]System.Int32::ToString()
ldloc.0
// Now call the MessageBox.Show() method with loaded values.
call valuetype [System.Windows.Forms]
System.Windows.Forms.DialogResult
[System.Windows.Forms]
System.Windows.Forms.MessageBox::Show(string, string)
pop
ret
}
}
Although the amount of CIL code is a bit more than you see in the implementation of CILCar, things are still rather straightforward. First, given that you are defining a static method, you don’t have to be concerned with the hidden object reference (thus, the ldarg.0 opcode really does load the incoming CILCar argument).
The method begins by loading a string ("{0}’s speed is") onto the stack, followed by the CILCar argument. After these two values are in place, you load the value of the petName field and call the static System.String.Format() method to substitute the curly bracket placeholder with the CILCar’s pet name.
The same general procedure takes place when processing the currSpeed field, but note that you use the ldflda opcode, which loads the argument address onto the stack. At this point, you call System.Int32.ToString() to transform the value at said address into a string type. Finally, after both strings have been formatted as necessary, you call the MessageBox.Show() method.
At this point, you are able to compile your new *.dll using ilasm.exe with the following command:
ilasm /dll CILCars.il
and verify the contained CIL using peverify.exe, as follows:
peverify CILCars.dll
Building CILCarClient.exe
Now you can build a simple *.exe assembly with a Main() method that will do the following:
· Make a CILCar object
· Pass the object into the static CILCarInfo.Display() method
Create a new file named CarClient.il and define external references to mscorlib.dll and CILCars.dll (don’t forget to place a copy of this .NET assembly in the client’s application directory!). Next, define a single type (Program) that manipulates the CILCars.dllassembly. Here’s the complete code:
// External assembly refs.
.assembly extern mscorlib
{
.publickeytoken = (B7 7A 5C 56 19 34 E0 89)
.ver 4:0:0:0
}
.assembly extern CILCars
{
.ver 1:0:0:0
}
// Our executable assembly.
.assembly CarClient
{
.hash algorithm 0x00008004
.ver 1:0:0:0
}
.module CarClient.exe
// Implementation of Program type.
.namespace CarClient
{
.class private auto ansi beforefieldinit Program
extends [mscorlib]System.Object
{
.method private hidebysig static void
Main(string[] args) cil managed
{
// Marks the entry point of the *.exe.
.entrypoint
.maxstack 8
// Declare a local CILCar variable and push
// values onto the stack for ctor call.
.locals init ([0] class
[CILCars]CILCars.CILCar myCilCar)
ldc.i4 55
ldstr "Junior"
// Make new CilCar; store and load reference.
newobj instance void
[CILCars]CILCars.CILCar::.ctor(int32, string)
stloc.0
ldloc.0
// Call Display() and pass in topmost value on stack.
call void [CILCars]
CILCars.CILCarInfo::Display(
class [CILCars]CILCars.CILCar)
ret
}
}
}
The one opcode that is important to point out is .entrypoint. Recall from the discussion earlier in this chapter that this opcode is used to mark which method of an *.exe functions as the entry point of the module. In fact, given that .entrypoint is how the CLR identifies the initial method to execute, this method can be called anything, although here you are using the standard method name of Main(). The remainder of the CIL code found in the Main() method is your basic pushing and popping of stack-based values.
Do note, however, that the creation of a CILCar object involves the use of the newobj opcode. On a related note, recall that when you want to invoke a member of a type using raw CIL, you use the double-colon syntax and, as always, use the fully qualified name of the type. With this, you can compile your new file with ilasm.exe, verify your assembly with peverify.exe, and execute your program. Issue the following commands within your command prompt:
ilasm CarClient.il
peverify CarClient.exe
CarClient.exe
![]() Source Code The CilCars example is included in the Chapter 18 subdirectory.
Source Code The CilCars example is included in the Chapter 18 subdirectory.
Understanding Dynamic Assemblies
To be sure, the process of building a complex .NET application in CIL would be quite the labor of love. On the one hand, CIL is an extremely expressive programming language that allows you to interact with all the programming constructs allowed by the CTS. On the other hand, authoring raw CIL is tedious, error-prone, and painful. While it is true that knowledge is power, you might indeed wonder just how important it is to commit the laws of CIL syntax to memory. The answer is, “It depends.” To be sure, most of your .NET programming endeavors will not require you to view, edit, or author CIL code. However, with the CIL primer behind you, you are now ready to investigate the world of dynamic assemblies (as opposed to static assemblies) and the role of the System.Reflection.Emit namespace.
The first question you may have is, “What exactly is the difference between static and dynamic assemblies?” By definition, static assemblies are .NET binaries loaded directly from disk storage, meaning they are located somewhere on your hard drive in a physical file (or possibly a set of files in the case of a multifile assembly) at the time the CLR requests them. As you might guess, every time you compile your C# source code, you end up with a static assembly.
A dynamic assembly, on the other hand, is created in memory, on the fly, using the types provided by the System.Reflection.Emit namespace. The System.Reflection.Emit namespace makes it possible to create an assembly and its modules, type definitions, and CIL implementation logic at runtime. After you have done so, you are then free to save your in-memory binary to disk. This, of course, results in a new static assembly. To be sure, the process of building a dynamic assembly using the System.Reflection.Emit namespace does require some level of understanding regarding the nature of CIL opcodes.
Although creating dynamic assemblies is a fairly advanced (and uncommon) programming task, they can be useful under various circumstances. Here’s an example:
· You are building a .NET programming tool that needs to generate assemblies on demand based on user input.
· You are building a program that needs to generate proxies to remote types on the fly, based on the obtained metadata.
· You want to load a static assembly and dynamically insert new types into the binary image.
This being said, let’s check out the types within System.Reflection.Emit.
Exploring the System.Reflection.Emit Namespace
Creating a dynamic assembly requires you to have some familiarity with CIL opcodes, but the types of the System.Reflection.Emit namespace hide the complexity of CIL as much as possible. For example, rather than directly specifying the necessary CIL directives and attributes to define a class type, you can simply use the TypeBuilder class. Likewise, if you want to define a new instance-level constructor, you have no need to emit the specialname, rtspecialname, or .ctor token; rather, you can use the ConstructorBuilder. Table 18-8 documents the key members of the System.Reflection.Emit namespace.
Table 18-8. Select Members of the System.Reflection.Emit Namespace
|
Members |
Meaning in Life |
|
AssemblyBuilder |
Used to create an assembly (*.dll or *.exe) at runtime. *.exes must call the ModuleBuilder.SetEntryPoint() method to set the method that is the entry point to the module. If no entry point is specified, a *.dll will be generated. |
|
ModuleBuilder |
Used to define the set of modules within the current assembly. |
|
EnumBuilder |
Used to create a .NET enumeration type. |
|
TypeBuilder |
May be used to create classes, interfaces, structures, and delegates within a module at runtime. |
|
MethodBuilder LocalBuilder PropertyBuilder FieldBuilder ConstructorBuilder CustomAttributeBuilder ParameterBuilder EventBuilder |
Used to create type members (such as methods, local variables, properties, constructors, and attributes) at runtime. |
|
ILGenerator |
Emits CIL opcodes into a given type member. |
|
OpCodes |
Provides numerous fields that map to CIL opcodes. This type is used in conjunction with the various members of System.Reflection.Emit.ILGenerator. |
In general, the types of the System.Reflection.Emit namespace allow you to represent raw CIL tokens programmatically during the construction of your dynamic assembly. You will see many of these members in the example that follows; however, the ILGenerator type is worth checking out straightaway.
The Role of the System.Reflection.Emit.ILGenerator
As its name implies, the ILGenerator type’s role is to inject CIL opcodes into a given type member. However, you cannot directly create ILGenerator objects, as this type has no public constructors; rather, you receive an ILGenerator type by calling specific methods of the builder-centric types (such as the MethodBuilder and ConstructorBuilder types). Here’s an example:
// Obtain an ILGenerator from a ConstructorBuilder
// object named "myCtorBuilder".
ConstructorBuilder myCtorBuilder =
new ConstructorBuilder(/* ...various args... */);
ILGenerator myCILGen = myCtorBuilder.GetILGenerator();
Once you have an ILGenerator in your hands, you are then able to emit the raw CIL opcodes using any number of methods. Table 18-9 documents some (but not all) methods of ILGenerator.
Table 18-9. Various Methods of ILGenerator
|
Method |
Meaning in Life |
|
BeginCatchBlock() |
Begins a catch block |
|
BeginExceptionBlock() |
Begins an exception scope for an exception |
|
BeginFinallyBlock() |
Begins a finally block |
|
BeginScope() |
Begins a lexical scope |
|
DeclareLocal() |
Declares a local variable |
|
DefineLabel() |
Declares a new label |
|
Emit() |
Is overloaded numerous times to allow you to emit CIL opcodes |
|
EmitCall() |
Pushes a call or callvirt opcode into the CIL stream |
|
EmitWriteLine() |
Emits a call to Console.WriteLine() with different types of values |
|
EndExceptionBlock() |
Ends an exception block |
|
EndScope() |
Ends a lexical scope |
|
ThrowException() |
Emits an instruction to throw an exception |
|
UsingNamespace() |
Specifies the namespace to be used in evaluating locals and watches for the current active lexical scope |
The key method of ILGenerator is Emit(), which works in conjunction with the System.Reflection.Emit.OpCodes class type. As mentioned earlier in this chapter, this type exposes a good number of read-only fields that map to raw CIL opcodes. The full set of these members are all documented within online help, and you will see various examples in the pages that follow.
Emitting a Dynamic Assembly
To illustrate the process of defining a .NET assembly at runtime, let’s walk through the process of creating a single-file dynamic assembly named MyAssembly.dll. Within this module is a class named HelloWorld. The HelloWorld class supports a default constructor and a custom constructor that is used to assign the value of a private member variable (theMessage) of type string. In addition, HelloWorld supports a public instance method named SayHello(), which prints a greeting to the standard I/O stream, and another instance method namedGetMsg(), which returns the internal private string. In effect, you are going to programmatically generate the following class type:
// This class will be created at runtime
// using System.Reflection.Emit.
public class HelloWorld
{
private string theMessage;
HelloWorld() {}
HelloWorld(string s) {theMessage = s;}
public string GetMsg() {return theMessage;}
public void SayHello()
{
System.Console.WriteLine("Hello from the HelloWorld class!");
}
}
Assume you have created a new Visual Studio Console Application project named DynamicAsmBuilder and you import the System.Reflection, System.Reflection.Emit, and System.Threading namespaces. Define a static method named CreateMyAsm() in theProgram class. This single method is in charge of the following:
· Defining the characteristics of the dynamic assembly (name, version, etc.)
· Implementing the HelloClass type
· Saving the in-memory assembly to a physical file
Also note that the CreateMyAsm() method takes as a single parameter a System.AppDomain type, which will be used to obtain access to the AssemblyBuilder type associated with the current application domain (see Chapter 17 for a discussion of .NET application domains). Here is the complete code, with analysis to follow:
// The caller sends in an AppDomain type.
public static void CreateMyAsm(AppDomain curAppDomain)
{
// Establish general assembly characteristics.
AssemblyName assemblyName = new AssemblyName();
assemblyName.Name = "MyAssembly";
assemblyName.Version = new Version("1.0.0.0");
// Create new assembly within the current AppDomain.
AssemblyBuilder assembly =
curAppDomain.DefineDynamicAssembly(assemblyName,
AssemblyBuilderAccess.Save);
// Given that we are building a single-file
// assembly, the name of the module is the same as the assembly.
ModuleBuilder module =
assembly.DefineDynamicModule("MyAssembly", "MyAssembly.dll");
// Define a public class named "HelloWorld".
TypeBuilder helloWorldClass = module.DefineType("MyAssembly.HelloWorld",
TypeAttributes.Public);
// Define a private String member variable named "theMessage".
FieldBuilder msgField =
helloWorldClass.DefineField("theMessage", Type.GetType("System.String"),
FieldAttributes.Private);
// Create the custom ctor.
Type[] constructorArgs = new Type[1];
constructorArgs[0] = typeof(string);
ConstructorBuilder constructor =
helloWorldClass.DefineConstructor(MethodAttributes.Public,
CallingConventions.Standard,
constructorArgs);
ILGenerator constructorIL = constructor.GetILGenerator();
constructorIL.Emit(OpCodes.Ldarg_0);
Type objectClass = typeof(object);
ConstructorInfo superConstructor =
objectClass.GetConstructor(new Type[0]);
constructorIL.Emit(OpCodes.Call, superConstructor);
constructorIL.Emit(OpCodes.Ldarg_0);
constructorIL.Emit(OpCodes.Ldarg_1);
constructorIL.Emit(OpCodes.Stfld, msgField);
constructorIL.Emit(OpCodes.Ret);
// Create the default ctor.
helloWorldClass.DefineDefaultConstructor(MethodAttributes.Public);
// Now create the GetMsg() method.
MethodBuilder getMsgMethod =
helloWorldClass.DefineMethod("GetMsg", MethodAttributes.Public,
typeof(string), null);
ILGenerator methodIL = getMsgMethod.GetILGenerator();
methodIL.Emit(OpCodes.Ldarg_0);
methodIL.Emit(OpCodes.Ldfld, msgField);
methodIL.Emit(OpCodes.Ret);
// Create the SayHello method.
MethodBuilder sayHiMethod =
helloWorldClass.DefineMethod("SayHello",
MethodAttributes.Public, null, null);
methodIL = sayHiMethod.GetILGenerator();
methodIL.EmitWriteLine("Hello from the HelloWorld class!");
methodIL.Emit(OpCodes.Ret);
// "Bake" the class HelloWorld.
// (Baking is the formal term for emitting the type.)
helloWorldClass.CreateType();
// (Optionally) save the assembly to file.
assembly.Save("MyAssembly.dll");
}
Emitting the Assembly and Module Set
The method body begins by establishing the minimal set of characteristics about your assembly, using the AssemblyName and Version types (defined in the System.Reflection namespace). Next, you obtain an AssemblyBuilder type via the instance-levelAppDomain.DefineDynamicAssembly() method (recall the caller will pass an AppDomain reference into the CreateMyAsm() method), like so:
// Establish general assembly characteristics
// and gain access to the AssemblyBuilder type.
public static void CreateMyAsm(AppDomain curAppDomain)
{
AssemblyName assemblyName = new AssemblyName();
assemblyName.Name = "MyAssembly";
assemblyName.Version = new Version("1.0.0.0");
// Create new assembly within the current AppDomain.
AssemblyBuilder assembly =
curAppDomain.DefineDynamicAssembly(assemblyName,
AssemblyBuilderAccess.Save);
...
}
As you can see, when calling AppDomain.DefineDynamicAssembly(), you must specify the access mode of the assembly you want to define, the most common values of which are shown in Table 18-10.
Table 18-10. Common Values of the AssemblyBuilderAccess Enumeration
|
Value |
Meaning in Life |
|
ReflectionOnly |
Represents that a dynamic assembly can only be reflected over |
|
Run |
Represents that a dynamic assembly can be executed in memory but not saved to disk |
|
RunAndSave |
Represents that a dynamic assembly can be executed in memory and saved to disk |
|
Save |
Represents that a dynamic assembly can be saved to disk but not executed in memory |
The next task is to define the module set for your new assembly. Given that the assembly is a single- file unit, you need to define only a single module. If you were to build a multifile assembly using the DefineDynamicModule() method, you would specify an optional second parameter that represents the name of a given module (e.g., myMod.dotnetmodule). However, when creating a single-file assembly, the name of the module will be identical to the name of the assembly itself. In any case, once the DefineDynamicModule() method has returned, you are provided with a reference to a valid ModuleBuilder type.
// The single-file assembly.
ModuleBuilder module =
assembly.DefineDynamicModule("MyAssembly", "MyAssembly.dll");
The Role of the ModuleBuilder Type
ModuleBuilder is the key type used during the development of dynamic assemblies. As you would expect, ModuleBuilder supports a number of members that allow you to define the set of types contained within a given module (classes, interfaces, structures, etc.) as well as the set of embedded resources (string tables, images, etc.) contained within. Table 18-11 describes a few of the creation-centric methods. (Do note that each method will return to you a related type that represents the type you want to construct.)
Table 18-11. Select Members of the ModuleBuilder Type
|
Method |
Meaning in Life |
|
DefineEnum() |
Used to emit a .NET enum definition |
|
DefineResource() |
Defines a managed embedded resource to be stored in this module |
|
DefineType() |
Constructs a TypeBuilder, which allows you to define value types, interfaces, and class types (including delegates) |
The key member of the ModuleBuilder class to be aware of is DefineType(). In addition to specifying the name of the type (via a simple string), you will also use the System.Reflection.TypeAttributes enum to describe the format of the type itself. Table 18-12 lists some (but not all) of the key members of the TypeAttributes enumeration.
Table 18-12. Select Members of the TypeAttributes Enumeration
|
Member |
Meaning in Life |
|
Abstract |
Specifies that the type is abstract |
|
Class |
Specifies that the type is a class |
|
Interface |
Specifies that the type is an interface |
|
NestedAssembly |
Specifies that the class is nested with assembly visibility and is thus accessible only by methods within its assembly |
|
NestedFamANDAssem |
Specifies that the class is nested with assembly and family visibility and is thus accessible only by methods lying in the intersection of its family and assembly |
|
NestedFamily |
Specifies that the class is nested with family visibility and is thus accessible only by methods within its own type and any subtypes |
|
NestedFamORAssem |
Specifies that the class is nested with family or assembly visibility and is thus accessible only by methods lying in the union of its family and assembly |
|
NestedPrivate |
Specifies that the class is nested with private visibility |
|
NestedPublic |
Specifies that the class is nested with public visibility |
|
NotPublic |
Specifies that the class is not public |
|
Public |
Specifies that the class is public |
|
Sealed |
Specifies that the class is concrete and cannot be extended |
|
Serializable |
Specifies that the class can be serialized |
Emitting the HelloClass Type and the String Member Variable
Now that you have a better understanding of the role of the ModuleBuilder.CreateType() method, let’s examine how you can emit the public HelloWorld class type and the private string variable.
// Define a public class named "MyAssembly.HelloWorld".
TypeBuilder helloWorldClass = module.DefineType("MyAssembly.HelloWorld",
TypeAttributes.Public);
// Define a private String member variable named "theMessage".
FieldBuilder msgField =
helloWorldClass.DefineField("theMessage",
Type.GetType("System.String"),
FieldAttributes.Private);
Notice how the TypeBuilder.DefineField() method provides access to a FieldBuilder type. The TypeBuilder class also defines other methods that provide access to other “builder” types. For example, DefineConstructor() returns a ConstructorBuilder,DefineProperty() returns a PropertyBuilder, and so forth.
Emitting the Constructors
As mentioned earlier, the TypeBuilder.DefineConstructor() method can be used to define a constructor for the current type. However, when it comes to implementing the constructor of HelloClass, you need to inject raw CIL code into the constructor body, which is responsible for assigning the incoming parameter to the internal private string. To obtain an ILGenerator type, you call the GetILGenerator() method from the respective “builder” type you have reference to (in this case, the ConstructorBuilder type).
The Emit() method of the ILGenerator class is the entity in charge of placing CIL into a member implementation. Emit() itself makes frequent use of the OpCodes class type, which exposes the opcode set of CIL using read-only fields. For example, OpCodes.Ret signals the return of a method call, OpCodes.Stfld makes an assignment to a member variable, and OpCodes.Call is used to call a given method (in this case, the base class constructor). That said, ponder the following constructor logic:
// Create the custom constructor taking
// a single System.String argument.
Type[] constructorArgs = new Type[1];
constructorArgs[0] = typeof(string);
ConstructorBuilder constructor =
helloWorldClass.DefineConstructor(MethodAttributes.Public,
CallingConventions.Standard, constructorArgs);
// Now emit the necessary CIL into the ctor.
ILGenerator constructorIL = constructor.GetILGenerator();
constructorIL.Emit(OpCodes.Ldarg_0);
Type objectClass = typeof(object);
ConstructorInfo superConstructor = objectClass.GetConstructor(new Type[0]);
constructorIL.Emit(OpCodes.Call, superConstructor); // Call base class ctor.
// Load the object’s "this" pointer on the stack.
constructorIL.Emit(OpCodes.Ldarg_0);
// Load incoming argument on virtual stack and store in msgField.
constructorIL.Emit(OpCodes.Ldarg_1);
constructorIL.Emit(OpCodes.Stfld, msgField); // Assign msgField.
constructorIL.Emit(OpCodes.Ret); // Return.
Now, as you are well aware, as soon as you define a custom constructor for a type, the default constructor is silently removed. To redefine the no-argument constructor, simply call the DefineDefaultConstructor() method of the TypeBuilder type as follows:
// Reinsert the default ctor.
helloWorldClass.DefineDefaultConstructor(MethodAttributes.Public);
This single call emits the standard CIL code used to define a default constructor.
.method public hidebysig specialname rtspecialname
instance void .ctor() cil managed
{
.maxstack 1
ldarg.0
call instance void [mscorlib]System.Object::.ctor()
ret
}
Emitting the SayHello() Method
Last but not least, let’s examine the process of emitting the SayHello() method. The first task is to obtain a MethodBuilder type from the helloWorldClass variable. After you do this, you define the method and obtain the underlying ILGenerator to inject the CIL instructions, like so:
// Create the SayHello method.
MethodBuilder sayHiMethod =
helloWorldClass.DefineMethod("SayHello",
MethodAttributes.Public, null, null);
methodIL = sayHiMethod.GetILGenerator();
// Write a line to the Console.
methodIL.EmitWriteLine("Hello from the HelloWorld class!");
methodIL.Emit(OpCodes.Ret);
Here you have established a public method (MethodAttributes.Public) that takes no parameters and returns nothing (marked by the null entries contained in the DefineMethod() call). Also note the EmitWriteLine() call. This helper member of the ILGenerator class automatically writes a line to the standard output with minimal fuss and bother.
Using the Dynamically Generated Assembly
Now that you have the logic in place to create and save your assembly, all that’s needed is a class to trigger the logic. To come full circle, assume your current project defines a second class named AsmReader. The logic in Main() obtains the current AppDomain via theThread.GetDomain() method that will be used to host the assembly you will dynamically create. Once you have a reference, you are able to call the CreateMyAsm() method.
To make things a bit more interesting, after the call to CreateMyAsm() returns, you will exercise some late binding (see Chapter 15) to load your newly created assembly into memory and interact with the members of the HelloWorld class. Update your Main() method as follows:
static void Main(string[] args)
{
Console.WriteLine("***** The Amazing Dynamic Assembly Builder App *****");
// Get the application domain for the current thread.
AppDomain curAppDomain = Thread.GetDomain();
// Create the dynamic assembly using our helper f(x).
CreateMyAsm(curAppDomain);
Console.WriteLine("-> Finished creating MyAssembly.dll.");
// Now load the new assembly from file.
Console.WriteLine("-> Loading MyAssembly.dll from file.");
Assembly a = Assembly.Load("MyAssembly");
// Get the HelloWorld type.
Type hello = a.GetType("MyAssembly.HelloWorld");
// Create HelloWorld object and call the correct ctor.
Console.Write("-> Enter message to pass HelloWorld class: ");
string msg = Console.ReadLine();
object[] ctorArgs = new object[1];
ctorArgs[0] = msg;
object obj = Activator.CreateInstance(hello, ctorArgs);
// Call SayHello and show returned string.
Console.WriteLine("-> Calling SayHello() via late binding.");
MethodInfo mi = hello.GetMethod("SayHello");
mi.Invoke(obj, null);
// Invoke method.
mi = hello.GetMethod("GetMsg");
Console.WriteLine(mi.Invoke(obj, null));
}
In effect, you have just created a .NET assembly that is able to create and execute .NET assemblies at runtime! That wraps up the examination of CIL and the role of dynamic assemblies. I hope this chapter has deepened your understanding of the .NET type system, the syntax and semantics of CIL, and how the C# compiler processes your code at compile time.
![]() Source Code The DynamicAsmBuilder project is included in the Chapter 18 subdirectory.
Source Code The DynamicAsmBuilder project is included in the Chapter 18 subdirectory.
Summary
This chapter provided an overview of the syntax and semantics of CIL. Unlike higher-level managed languages such as C#, CIL does not simply define a set of keywords but provides directives (used to define the structure of an assembly and its types), attributes (which further qualify a given directive), and opcodes (which are used to implement type members).
You were introduced to a few CIL-centric programming tools and learned how to alter the contents of a .NET assembly with new CIL instructions using round-trip engineering. After this point, you spent time learning how to establish the current (and referenced) assembly, namespaces, types, and members. I wrapped up with a simple example of building a .NET code library and executable using little more than CIL, command-line tools, and a bit of elbow grease.
Finally, you took an introductory look at the process of creating a dynamic assembly. Using the System.Reflection.Emit namespace, it is possible to define a .NET assembly in memory at runtime. As you have seen firsthand, using this particular API requires you to know the semantics of CIL code in some detail. While the need to build dynamic assemblies is certainly not a common task for most .NET applications, it can be useful for those of you who need to build support tools and other programming utilities.
All materials on the site are licensed Creative Commons Attribution-Sharealike 3.0 Unported CC BY-SA 3.0 & GNU Free Documentation License (GFDL)
If you are the copyright holder of any material contained on our site and intend to remove it, please contact our site administrator for approval.
© 2016-2026 All site design rights belong to S.Y.A.