C# 6.0 and the .NET 4.6 Framework (2015)
PART I
![]()
Introducing C# and the .NET Platform
CHAPTER 2
Building C# Applications
As a C# programmer, you can choose from among numerous tools to build .NET applications. The tool (or tools) you select will be based primarily on three factors: any associated costs, the OS you are using to develop the software, and the computing platforms you are targeting. The point of this chapter is to provide a survey of the most common integrated development environments (IDEs) that support the C# language. Do understand that this chapter will not go over every single detail of each IDE; it will give you enough information to select your programming environment as you work through this text and give you a foundation to build on.
The first part of this chapter will examine a set of IDEs from Microsoft that enable development of .NET applications on a Windows operating system (7, 8.x, and 10). As you will see, some of these IDEs can be used to build Windows-centric applications only, while others support the construction of C# apps for alternative operating systems and devices (such as Mac OS X, Linux, or Android). The latter part of this chapter will then examine some IDEs that can run on a non-Windows OS. This enables developers to build C# programs using Apple computers as well as Linux distributions.
![]() Note This chapter will overview a good number of IDEs. However, this book will assume you are using the (completely free) Visual Studio Community Edition IDE. If you want to build your applications on a different OS (Mac OS X or Linux), this chapter will guide you in the right direction; however, your IDE will differ from the various screenshots in this text.
Note This chapter will overview a good number of IDEs. However, this book will assume you are using the (completely free) Visual Studio Community Edition IDE. If you want to build your applications on a different OS (Mac OS X or Linux), this chapter will guide you in the right direction; however, your IDE will differ from the various screenshots in this text.
Building C# Applications on the Windows OS
As you will see over the course of this chapter, you can choose from a variety of IDEs to build C# applications; some come from Microsoft, and others come from third-party (many of which are open source) vendors. Now, despite what you might be thinking, many Microsoft IDEs are completely free. Thus, if your primary interest is to build .NET software on the Windows operating system (7, 8.x, or 10), you will find the following major options:
· Visual Studio Express
· Visual Studio Community
· Visual Studio Professional (or higher)
While these IDEs provide similar functionally, they differ primarily by the number of enterprise-level features and the number of supported project types. For example, the Express editions of Visual Studio lack some sophisticated database integration tools and specialized project templates for alternative .NET languages (such as F# and Python) that are included with Visual Studio 2015 Professional. The Visual Studio Community Edition supports the same project types as Visual Studio 2015 Professional, but it still lacks some features that would be most useful in a corporate development environment (such as full integration with Team Foundation Server). Thankfully, each IDE ships with sophisticated code editors, key database designers, integrated visual debuggers, GUI designers for desktop and web applications, and so forth. To begin, let’s start by examining the role of the Express family of IDEs.
The Visual Studio Express Family of IDEs
The Visual Studio Express family of IDEs is completely free. In earlier versions of the .NET platform, the Express editions were partitioned by their supported .NET language; for example, previously Microsoft offered tools named C# Express, VB Express, Web Developer Express, and C++ Express. Recently, however, the Express family has been repartitioned based exclusively on the type of application you are interested in creating (web app, desktop app, etc.). Specifically, the Visual Studio Express family includes the following members:
· Express for Windows Desktop: Supports development of console-based and desktop GUI applications (Windows Forms and Windows Presentation Foundation) for the Windows OS. C#, VB, and C++ are supported.
· Express for Windows 10: Supports development for core software targeted for the Windows 10 “universal” application type that can run on multiple Microsoft devices (Windows OS, Xbox, Windows Mobile devices, HoloLens, and so on). C#, VB, and C++ are supported.
· Express for Web: Supports development for ASP.NET web applications, Azure cloud-based applications, and Microsoft Silverlight applications. C#, VB, and C++ are supported.
· Team Foundation Server 2015 Express: This version of the Express family is focused on providing a GUI interface to version code, create and process stories and tasks, and enable collaboration of software teams. Limited development tools are provided with this edition, and thus I won’t comment on it further.
![]() Note You can download the Express products from https://www.visualstudio.com/products/visual-studio-express-vs (or simply search for Visual Studio Express online).
Note You can download the Express products from https://www.visualstudio.com/products/visual-studio-express-vs (or simply search for Visual Studio Express online).
The Express tools are useful to those of you who are new to .NET development in that they provide all the important features you would hope to find (visual GUI designers, debuggers, feature-rich code editors, etc.) but do not overwhelm you with dozens of auxiliary or advanced features that would only get in the way. To be sure, the Express tools can be a perfect fit for programming hobbyists or anybody wanting to use a “minimal but complete” IDE.
If you want, you could download the Express for Windows Desktop and Express for Web IDEs and work through this text successfully. Roughly speaking, Chapters 2–30 can be completed using Express for Windows Desktop, as I will be focusing on console apps, WPF apps, and an occasional Windows Forms app. The reminder of the book, which covers web application development (Chapters 31 onward), could use the Express for Web IDE, or Visual Studio Community Edition (examined later in this chapter).
Keep in mind that the Express IDEs, Visual Studio 2015 Community, and Visual Studio 2015 Professional all share a common core set of features. So, the good news is that it is easy to move between them and feel quite comfortable with their basic operation. Given this, let’s dig a bit deeper into some of the Express IDEs (which, again, are all completely free).
A Brief Overview of Express for Windows Desktop
This version of the Express family allows you to build desktop applications that run directly on a Windows OS (version 7, 8.x, or Windows 10). To get your feet wet, let’s take some time to build a simple C# application using Express for Windows Desktop and keep in mind that the topics illustrated here will be useful for all Microsoft IDEs.
The New Project Dialog Box and C# Code Editor
Assuming you have downloaded and installed this IDE, activate the File ![]() New Project menu option. As you can see in Figure 2-1, this IDE has support for console apps, WPF/Windows Forms apps, and some lower-level C++ project types. To start, create a new C# Console Application project named SimpleCSharpConsoleApp.
New Project menu option. As you can see in Figure 2-1, this IDE has support for console apps, WPF/Windows Forms apps, and some lower-level C++ project types. To start, create a new C# Console Application project named SimpleCSharpConsoleApp.
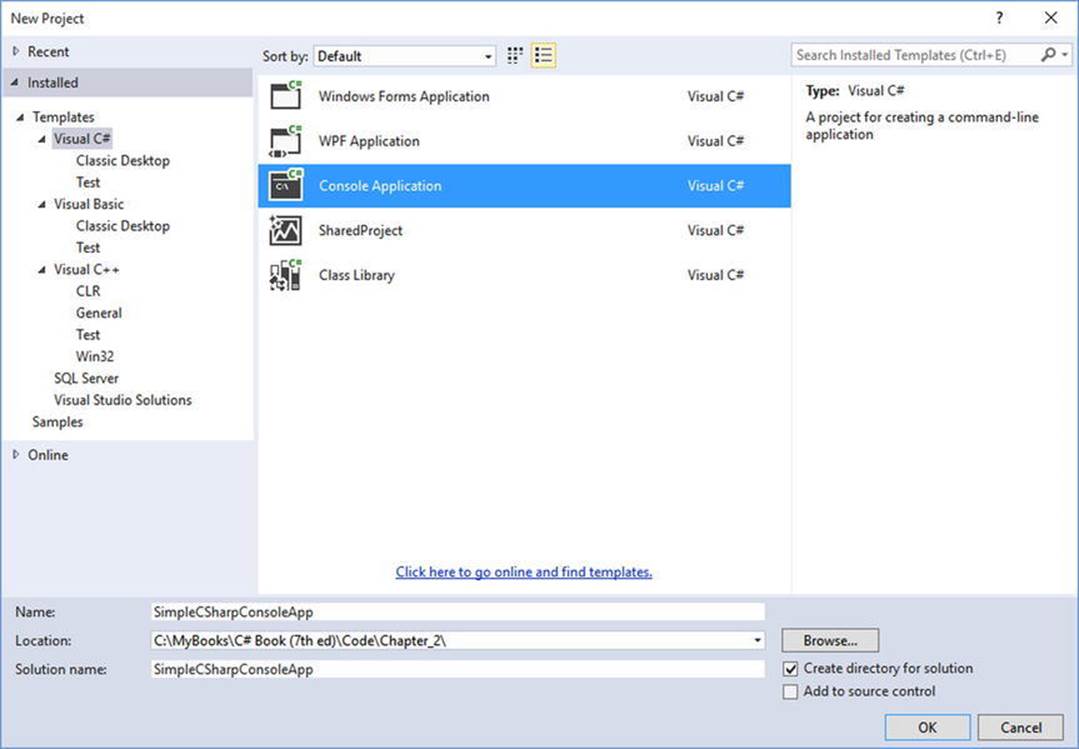
Figure 2-1. The New Project dialog box
Once the project has been created, you will see the initial C# code file (named Program.cs) has been opened in the code editor. Add the following C# code to your Main() method. You’ll notice as you type that IntelliSense will kick in as you apply the dot operator.
static void Main(string[] args)
{
// Set up Console UI (CUI)
Console.Title = "My Rocking App";
Console.ForegroundColor = ConsoleColor.Yellow;
Console.BackgroundColor = ConsoleColor.Blue;
Console.WriteLine("*************************************");
Console.WriteLine("***** Welcome to My Rocking App *****");
Console.WriteLine("*************************************");
Console.BackgroundColor = ConsoleColor.Black;
// Wait for Enter key to be pressed.
Console.ReadLine();
}
Here, you are using the Console class defined in the System namespace. Because the System namespace has been automatically included at the top of your file via a using statement, you have no need to qualify the namespace before the class name (e.g.,System.Console.WriteLine()). This program does not do anything too interesting; however, note the final call to Console.ReadLine(). This is in place simply to ensure the user must press a key to terminate the application. If you did not do this, the program would disappear almost instantly when debugging the program!
Running and Debugging your Project
Now, to run your program and see the output, you can simply press the Ctrl+F5 keyboard command (which is also accessed from the Debug menu). Once you do, you will see a Windows console window pop on the screen with your custom (and colorful) message. Be aware that when you “run” your program, you bypass the integrated debugger.
If you need to debug your code (which will certainly be important when building larger programs), your first step is to set breakpoints at the code statement you want to examine. Although there isn’t much code in this example, set a breakpoint by clicking the leftmost gray bar of the code editor (note that breakpoints are marked with a red dot icon; see Figure 2-2).
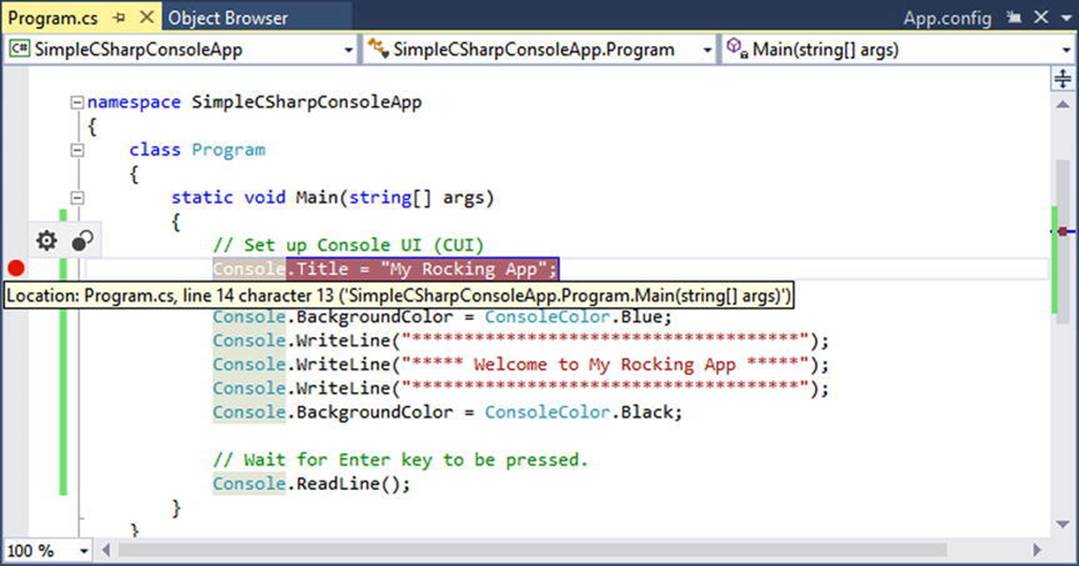
Figure 2-2. Setting breakpoints
If you now press the F5 key (or use the Debug menu), your program will halt at each breakpoint. As you would expect, you can interact with the debugger using the various toolbar buttons and menu options of the IDE. Once you have evaluated all breakpoints, the application will eventually terminate once Main() has completed.
![]() Note Microsoft IDEs have sophisticated debuggers, and you will learn about various techniques over the chapters to come. For now, be aware that when you are in a debugging session, a large number of useful options will appear under the Debug menu. Take a moment to verify this for yourself.
Note Microsoft IDEs have sophisticated debuggers, and you will learn about various techniques over the chapters to come. For now, be aware that when you are in a debugging session, a large number of useful options will appear under the Debug menu. Take a moment to verify this for yourself.
The Solution Explorer
If you look at the right of the IDE, you will see a window named Solution Explorer, which shows you a few important things. First, notice that the IDE has created a solution with a single project (see Figure 2-3). This can be confusing at first, as they both have been given the same name (SimpleCSharpConsoleApp). The idea here is that a “solution” can contain multiple projects that all work together. For example, your solution might include three class libraries, one WPF application, and one WCF web service. The earlier chapters of this book will always have a single project; however, when you build some more complex examples, you’ll see how to add new projects to your initial solution space.
![]() Note Be aware that when you select the topmost solution in the Solution Explorer window, the IDE’s menu system will show you a different set of choices than when you select a project. If you ever find yourself wondering where a certain menu item has disappeared to, double-check you did not accidentally select the wrong node.
Note Be aware that when you select the topmost solution in the Solution Explorer window, the IDE’s menu system will show you a different set of choices than when you select a project. If you ever find yourself wondering where a certain menu item has disappeared to, double-check you did not accidentally select the wrong node.

Figure 2-3. The Solution Explorer
You will also notice a References icon. You can use this node when your application needs to reference additional .NET libraries beyond what are included for a project type by default. Because you have created a C# Console Application project, you will notice a number of libraries have been automatically added such as System.dll, System.Core.dll, System.Data.dll, and so forth (note the items listed under the References node don’t show the .dll file extension). You will see how to add libraries to a project shortly.
![]() Note Recall from Chapter 1 that all .NET projects have access to a foundational library named mscorlib.dll. This library is so necessary that it is not even listed explicitly in the Solution Explorer.
Note Recall from Chapter 1 that all .NET projects have access to a foundational library named mscorlib.dll. This library is so necessary that it is not even listed explicitly in the Solution Explorer.
The Object Browser
If you were to double-click any library under the References node, you will open the integrated Object Browser (you can also open this using the View menu). Using this tool, you can see the various namespaces in an assembly, the types in a namespace, and the members of each type. Figure 2-4 shows some namespaces of the always-present mscorlib.dll assembly.
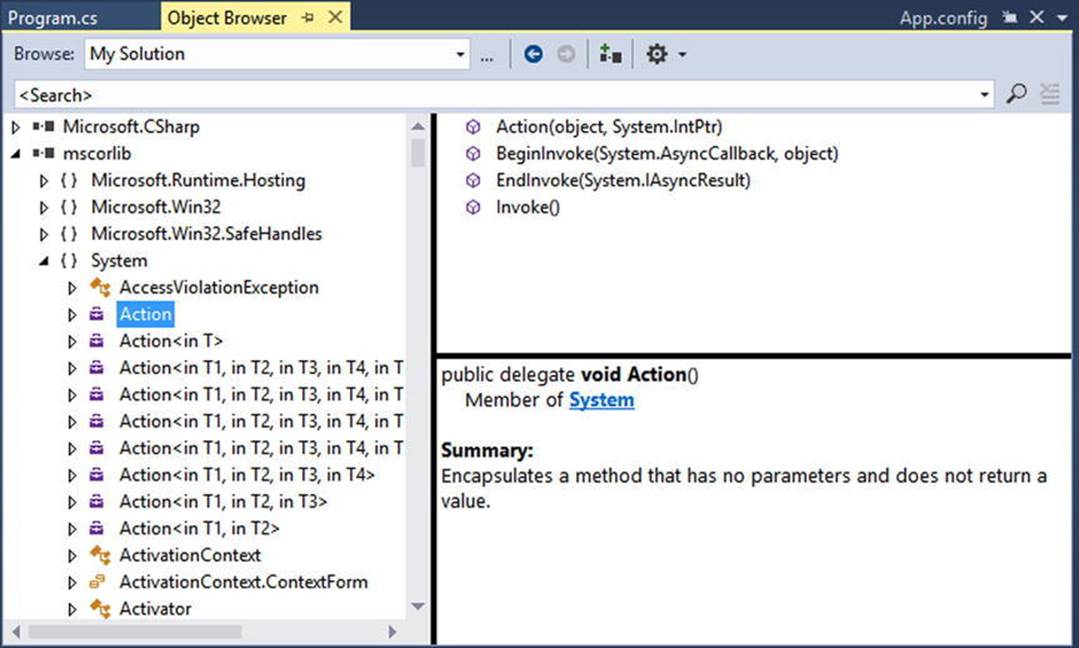
Figure 2-4. The Object Browser
This tool can be useful when you want to see the internal organization of a .NET library as well as when you want to get a brief description of a given item. Also notice the <Search> bar at the top of the window. This can be helpful when you know the name of a type you want to use but have no idea where it might be located. On a related note, keep in mind that the search feature will search only the libraries used in your current solution by default (you can search the entire .NET Framework by changing the selection in the Browse drop-down box).
Referencing Additional Assemblies
To continue your test, let’s add an assembly (aka, code library) not automatically included in a Console Application project. To do so, right-click the References tab of the Solution Explorer and select Add Reference (or select the Project ![]() Add Reference menu option). From the resulting dialog box, find a library named System.Windows.Forms.dll (again, you won’t see the file extension here) and check it off (Figure 2-5).
Add Reference menu option). From the resulting dialog box, find a library named System.Windows.Forms.dll (again, you won’t see the file extension here) and check it off (Figure 2-5).

Figure 2-5. The Add Reference dialog
Once you click the OK button, this new library is added to your reference set (you’ll see it listed under the References node). As explained in Chapter 1, however, referencing a library is only the first step. To use the types in a given C# code file, you need to define a using statement. Add the following line to the using directives in your code file:
using System.Windows.Forms;
And then add the following line of code directly after the call to Console.ReadLine() in your Main() method:
MessageBox.Show("All done!");
When you run or debug your program once again, you will find a simple message box appears before the program terminates.
Viewing Project Properties
Next, notice an icon named Properties within the Solution Explorer. When you double-click this item, you are presented with a sophisticated project configuration editor. For example, in Figure 2-6, notice how you can change the version of the .NET Framework you are targeting for the solution.

Figure 2-6. The Project Properties window
You will see various aspects of the Project Properties window as you progress through this book. However, if you take some time to poke around, you will see that you can establish various security settings, strongly name your assembly (see Chapter 14), deploy your application, insert application resources, and configure pre- and post-build events.
That wraps up the brief overview of Express for Windows Desktop. To be sure, this tool has many more features available than I have shown at this point. Recall that Visual Studio Community edition has the same core GUI as found in Express for Windows Desktop. You’ll be introduced to other features that apply to either IDE as you progress through the book, but do take the time to tinker with menu options, dialog boxes, and property settings.
![]() Source Code You can find the SimpleCSharpConsoleApp project in the Chapter 2 subdirectory.
Source Code You can find the SimpleCSharpConsoleApp project in the Chapter 2 subdirectory.
A Brief Overview of Express for Web
If you want to build web applications with the .NET platform with the Express toolset, you can download and install the free Express for Web IDE. The final chapters of this text (Chapters 31–34) will dive into a number of important details regarding the construction of web apps under the .NET platform, so for now, simply check out Figure 2-7, which shows the types of projects you can create with this IDE via the New ![]() Project menu option.
Project menu option.
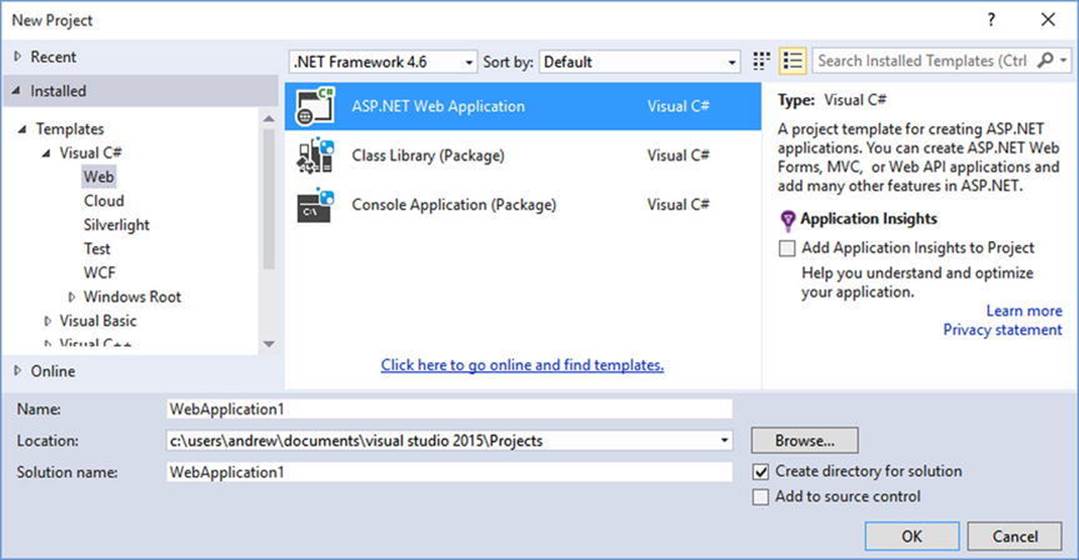
Figure 2-7. The Project Properties window of Express for Web
As you can see, Express for Web allows you to build ASP.NET web applications and Silverlight web GUIs and has support for Microsoft Azure Cloud services. Additionally, this IDE provides a WCF template to allow you to build service-oriented distributed solutions. Again, you will examine ASP.NET in the final chapters of this book.
That wraps up your quick overview of some of the members of the Express family. As mentioned, you will find that these tools provide “just enough” functionality for your coding efforts. Next up, let’s examine the role of Visual Studio Community.
The Visual Studio Community Edition IDE
Each of the Express tools is limited in that it allows you to build .NET software that will run only on the Windows OS (7, 8.x, or 10). However, as mentioned in Chapter 1, the .NET platform runs on a wide variety of operating systems and hardware devices. Thus, if you need to build a .NET program that can run on (for example) Android or an Apple product, the Express products won’t offer much help. As luck would have it, Microsoft offers another completely free IDE that allows you to build a much wider variety of project types using a larger number of .NET languages: the Visual Studio Community IDE.
![]() Note You can download Visual Studio Community from https://www.visualstudio.com/products/visual-studio-community-vs.
Note You can download Visual Studio Community from https://www.visualstudio.com/products/visual-studio-community-vs.
The first thing to be aware of is that Visual Studio Community provides a single environment for building desktop and web apps (as well as “universal” .NET applications). Thus, unlike the Express family, there is no need to download multiple products.
As well, this IDE provides support for a number of additional programming languages (F#, Python, and JavaScript) and project types. Not only will you find more specialized Windows OS project types, but you will also find project types that target non-Microsoft platforms. Here are a few notable examples:
· Projects that target Windows Phone and Windows 8.x applications
· Projects that target Android devices
· Projects that target the iOS family (iPad, iPhone, and Apple Watch)
· Projects that target lower-level C++ APIs such as MFC and ATL
· Several project types that target the construction of video games on various devices
· Projects that allow you to extend Visual Studio Community (as well as Visual Studio Professional) with new functionality via extensibility plugins
· Projects to build custom PowerShell scripts
To get a better taste of all the language and project types provided by Visual Studio Community, take a look at Figure 2-8, which shows the New Project dialog of this IDE.
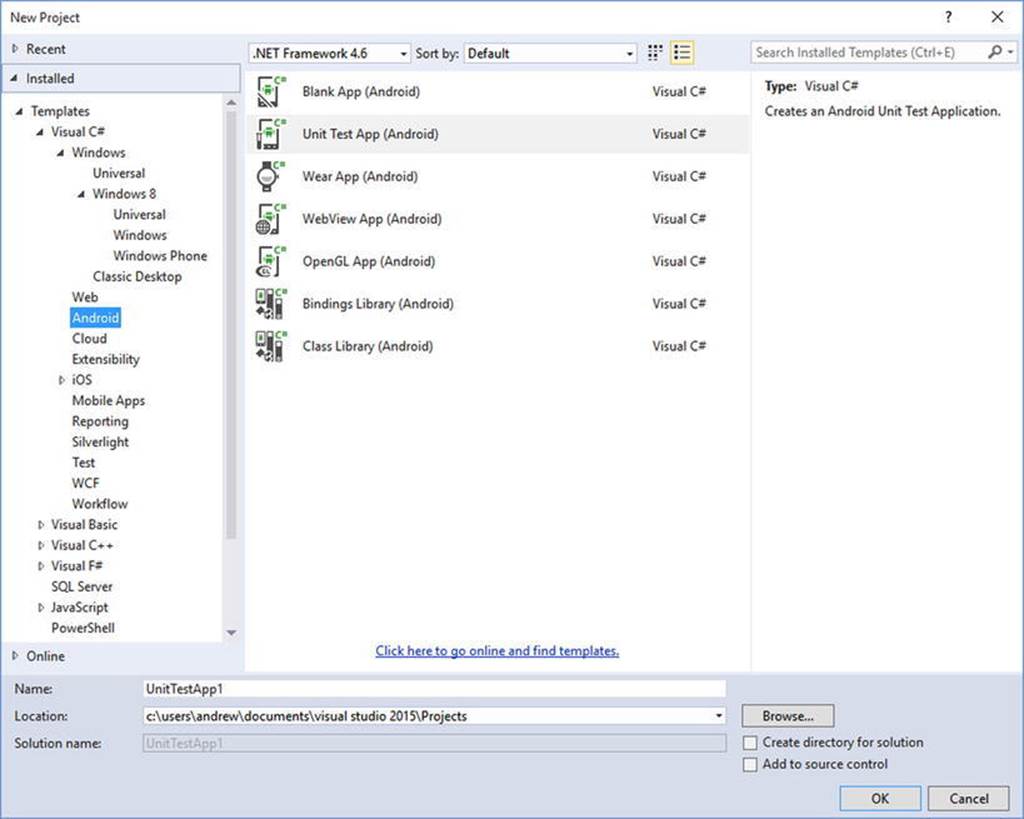
Figure 2-8. The New Project dialog of Visual Studio Community
The Visual Class Designer
Visual Studio Community also gives you the ability to design classes and other types (such as interfaces or delegates) in a visual manner (this functionality is not included in the Express IDEs). The Class Designer utility allows you to view and modify the relationships of the types (classes, interfaces, structures, enumerations, and delegates) in your project. Using this tool, you are able to visually add (or remove) members to (or from) a type and have your modifications reflected in the corresponding C# file. Also, as you modify a given C# file, changes are reflected in the class diagram.
Assuming you have installed Visual Studio Community, create a new C# Console Application project named VisualTypeDesignerApp. To access the visual type designer tools, the first step is to insert a new class diagram file. To do so, activate the Project ![]() Add New Item menu option and locate the Class Diagram type (Figure 2-9).
Add New Item menu option and locate the Class Diagram type (Figure 2-9).
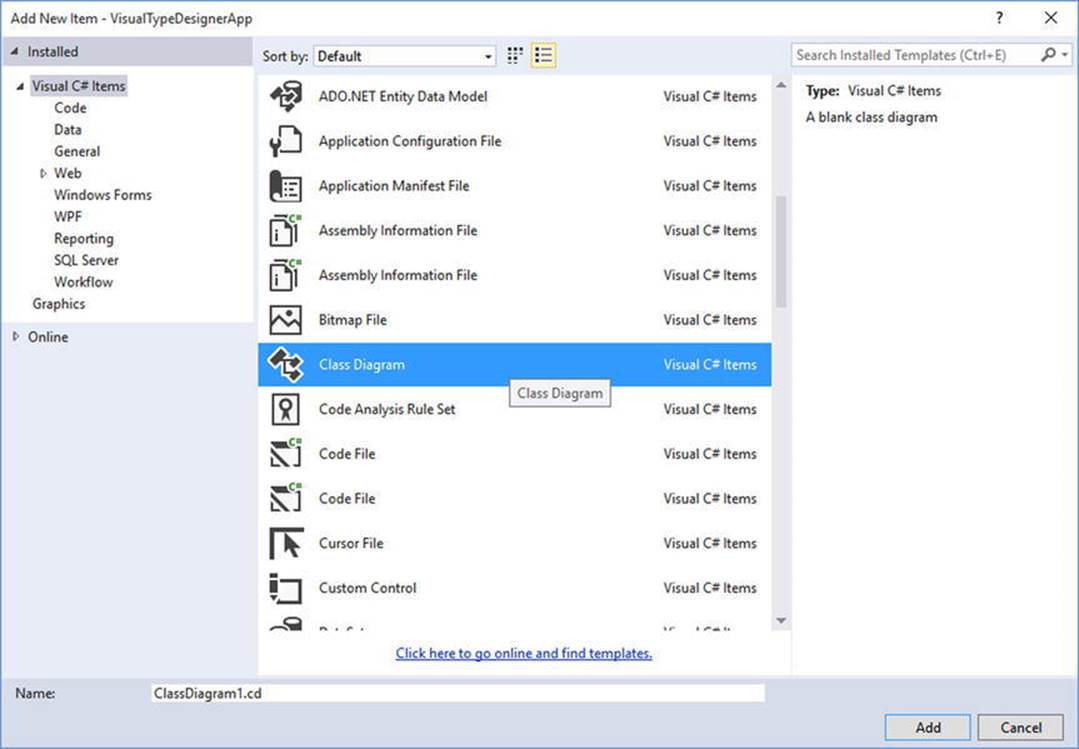
Figure 2-9. Inserting a class diagram file into the current project
Initially, the designer will be empty; however, you can drag and drop files from your Solution Explorer window on the surface. For example, once you drag Program.cs onto the designer, you will find a visual representation of the Program class. If you click the arrow icon for a given type, you can show or hide the type’s members (see Figure 2-10).
![]() Note Using the Class Designer toolbar, you can fine-tune the display options of the designer surface.
Note Using the Class Designer toolbar, you can fine-tune the display options of the designer surface.
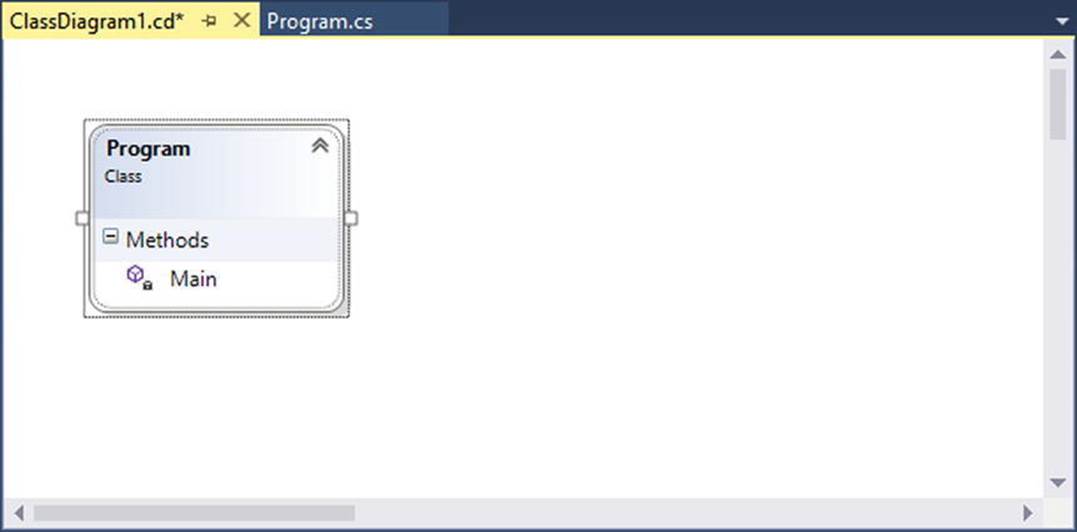
Figure 2-10. The Class Diagram viewer
The Class Designer utility works in conjunction with two other aspects of Visual Studio: the Class Details window (activated using the View ![]() Other Windows menu) and the Class Designer Toolbox (activated using the View
Other Windows menu) and the Class Designer Toolbox (activated using the View ![]() Toolbox menu item). The Class Details window not only shows you the details of the currently selected item in the diagram but also allows you to modify existing members and insert new members on the fly (see Figure 2-11).
Toolbox menu item). The Class Details window not only shows you the details of the currently selected item in the diagram but also allows you to modify existing members and insert new members on the fly (see Figure 2-11).
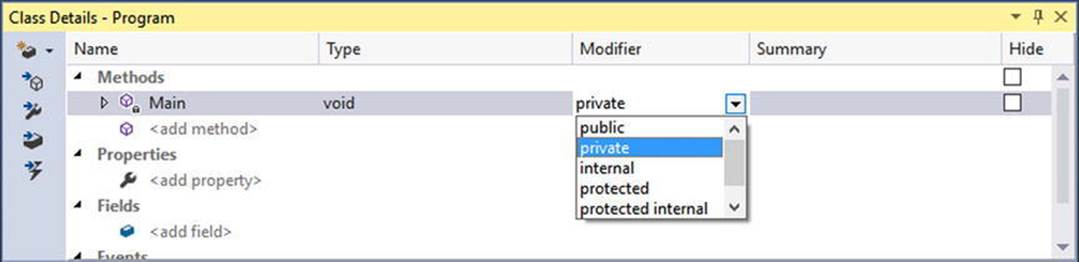
Figure 2-11. The Class Details window
The Class Designer Toolbox, which can also be activated using the View menu, allows you to insert new types (and create relationships between these types) into your project visually (see Figure 2-12). (Be aware you must have a class diagram as the active window to view this toolbox.) As you do so, the IDE automatically creates new C# type definitions in the background.
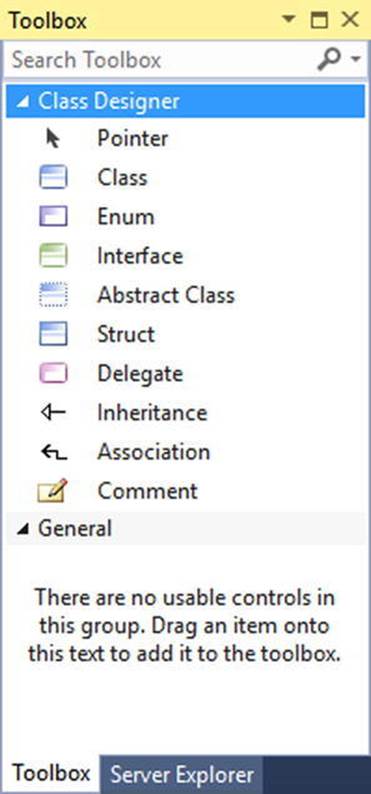
Figure 2-12. The Class Designer Toolbox
By way of example, drag a new class from the Class Designer Toolbox onto your Class Designer. Name this class Car in the resulting dialog box. This will result in the creation of a new C# file named Car.cs that is automatically added to your project. Now, using the Class Details window, add a public string field named petName (see Figure 2-13).
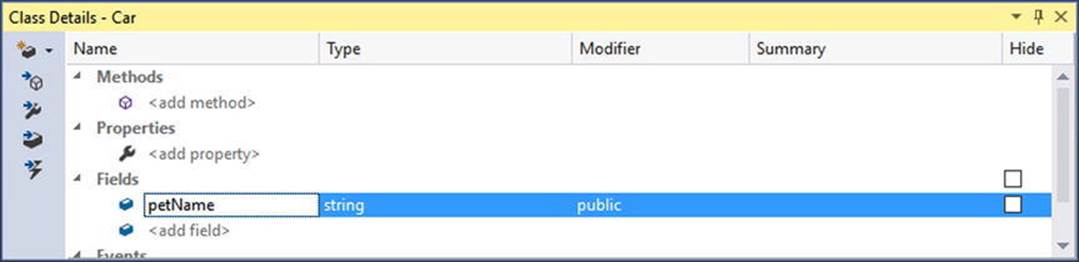
Figure 2-13. Adding a field with the Class Details window
If you now look at the C# definition of the Car class, you will see it has been updated accordingly (minus the additional code comments shown here).
public class Car
{
// Public data is typically a bad idea; however,
// it keeps this example simple.
public string petName;
}
Now, activate the designer file once again and drag another new class onto the designer and name it SportsCar. Select the Inheritance icon from the Class Designer Toolbox and click the top of the SportsCar icon. Next, click the mouse on top of the Car class icon. If you performed these steps correctly, you have just derived the SportsCar class from Car (see Figure 2-14).
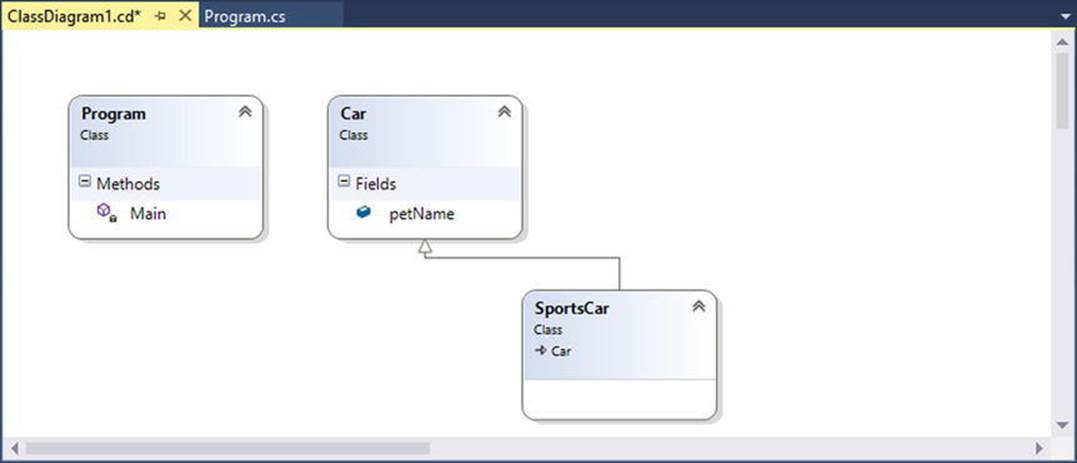
Figure 2-14. Visually deriving from an existing class
![]() Note The concept of inheritance will be fully examined in Chapter 6.
Note The concept of inheritance will be fully examined in Chapter 6.
To complete this example, update the generated SportsCar class with a public method named GetPetName(), authored as follows:
public class SportsCar : Car
{
public string GetPetName()
{
petName = "Fred";
return petName;
}
}
As you would expect, the visual type designer is one of the many features of Visual Studio Community. As mentioned earlier, this edition of the book will assume you are using Visual Studio Community as your IDE of choice. Over the chapters to come, you will learn many more features of this tool.
![]() Source Code You can find the VisualTypeDesignerApp project in the Chapter 2 subdirectory.
Source Code You can find the VisualTypeDesignerApp project in the Chapter 2 subdirectory.
The Visual Studio 2015 Professional IDE
To wrap up your examination of IDEs that run exclusively on the Windows OS, let’s take a quick look at Visual Studio 2015 Professional. If you are currently employed as a software engineer, the chances are good your company has purchased a copy of this IDE for you as your tool of choice. Visual Studio 2015 Professional has all the same features found in Visual Studio Community (the same project types, same language choices, and same visual designers). In addition, this IDE has a number of features geared toward corporate-level collaborative development. By way of a few examples, with Visual Studio Professional you have the following:
· Integration with Team Foundation Server (TFS) to manage Agile and Kanban boards
· Tools to create and manage stories, tasks, and epics
· SharePoint integration and developer chat rooms
· Tools to manage sprint planning
To be sure, diving into the details of the software development life cycle is beyond the scope of this book. Given this, I won’t be saying much more about Visual Studio 2015 Professional. If you choose to use this IDE, that is perfectly fine. Remember, the functionality of Community and Professional is identical beyond these team-centric development tools.
![]() Note You can find a side-by-side comparison of Community vs. Professional online at https://www.visualstudio.com/products/compare-visual-studio-2015-products-vs.
Note You can find a side-by-side comparison of Community vs. Professional online at https://www.visualstudio.com/products/compare-visual-studio-2015-products-vs.
The .NET Framework Documentation System
The final aspect of Visual Studio you must be comfortable with from the outset is the fully integrated help system. The .NET Framework documentation is extremely good, very readable, and full of useful information. Given the huge number of predefined .NET types (which number well into the thousands), you must be willing to roll up your sleeves and dig into the provided documentation. If you resist, you are doomed to a long, frustrating, and painful existence as a .NET developer.
If you have an Internet connection, you can view the .NET Framework SDK documentation online at the following web address:
http://msdn.microsoft.com/library
Once you are on this main page, locate the Development Tools and Languages section of the page and click ”.NET Framework class library.” From here, click the ”.NET Framework class library” link for the version of the framework you are interested in (which I will assume is 4.6). At this point, you can use the tree navigation window to view each namespace, type, and member of the platform. See Figure 2-15 for an example of viewing the types of the System namespace.
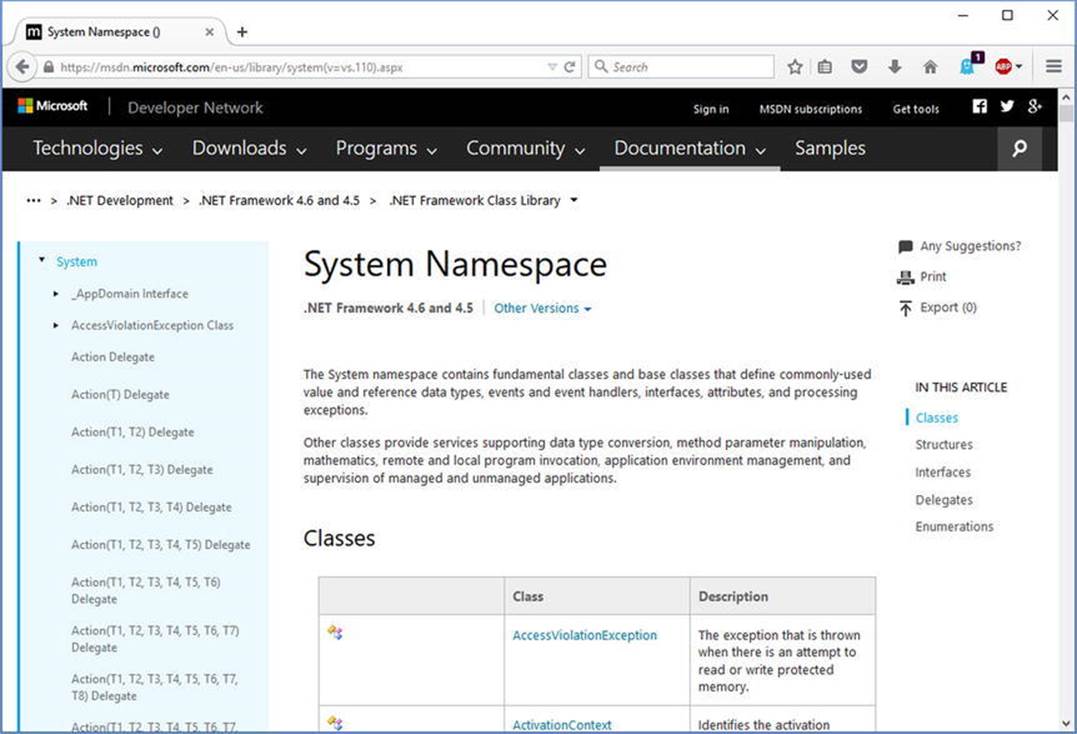
Figure 2-15. Viewing the .NET Framework documentation online
![]() Note It would not be surprising if Microsoft someday changes the location of the online .NET Framework Class Library documentation. If this is the case, a web search for the same topic (.NET Framework Class Library documentation) should quickly help you find the current location.
Note It would not be surprising if Microsoft someday changes the location of the online .NET Framework Class Library documentation. If this is the case, a web search for the same topic (.NET Framework Class Library documentation) should quickly help you find the current location.
In addition to the online documentation, Visual Studio provides the option to install the same help system locally to your computer (which can be helpful when you don’t have an active Internet connection). If you want to perform a local installation of the help system after installing Visual Studio Community, access the Help ![]() Add and Remove Help Content menu option. From here, you can select each of the help systems you want to install locally (if hard drive space allows, I recommend adding all possible documentation). See Figure 2-16.
Add and Remove Help Content menu option. From here, you can select each of the help systems you want to install locally (if hard drive space allows, I recommend adding all possible documentation). See Figure 2-16.
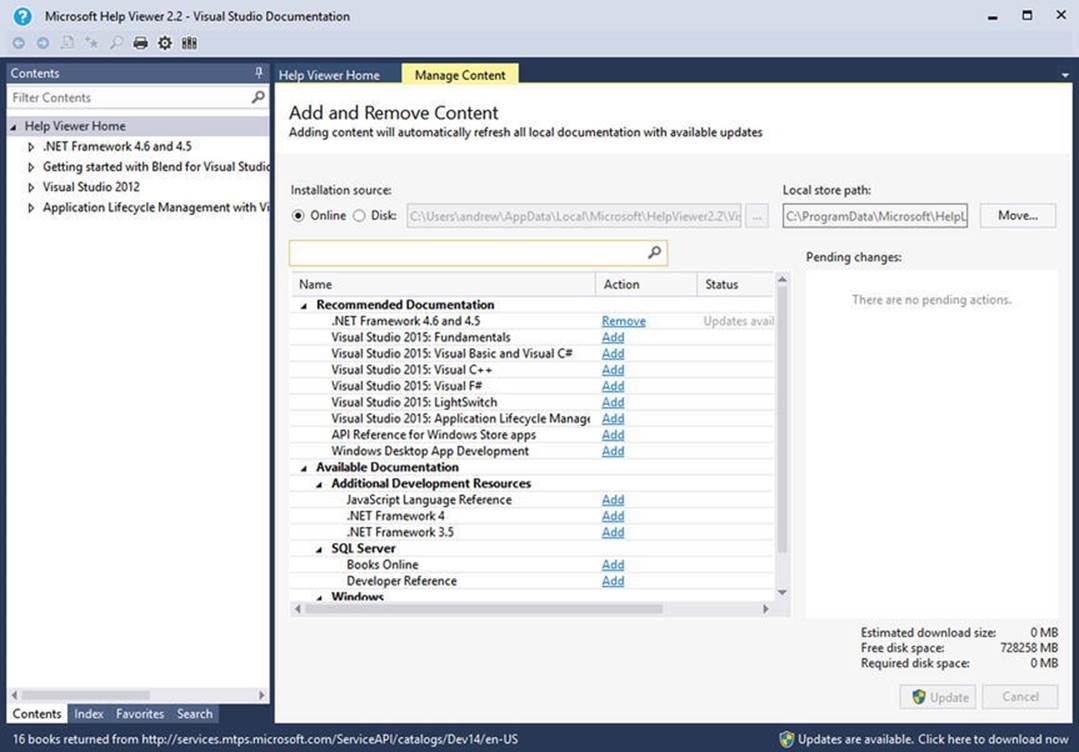
Figure 2-16. Installing a local help system
Once you have installed all the documentation, you can launch the help viewer application (as well as set up how you want Visual Studio to display help [locally or online]) using the Help menu. As well, an even easier way to interact with the documentation is to highlight a C# keyword, type the name or member name within the Visual Studio code window, and press the F1 key. This will automatically open a documentation window for the selected item. For example, select the string keyword within your Car class definition. After you press F1, you will see the help page for the string type appear.
Another useful aspect of the documentation is the Search tab of the display. Here you can enter in the name of any namespace, type, or member and navigate to the correct location. If you were to try to search for the System.Reflection namespace, you would be able to learn about the details of this namespace, examine the contained types, view code examples, and so forth.
![]() Note At the risk of sounding like a broken record, I really can’t emphasize enough how important it is that you learn to use the .NET Framework SDK documentation. No book, no matter how lengthy, can cover every aspect of the .NET platform. Make sure you take some time to get comfortable using the help system—you’ll thank yourself later.
Note At the risk of sounding like a broken record, I really can’t emphasize enough how important it is that you learn to use the .NET Framework SDK documentation. No book, no matter how lengthy, can cover every aspect of the .NET platform. Make sure you take some time to get comfortable using the help system—you’ll thank yourself later.
Building .NET Applications Beyond the Windows OS
The members of the Microsoft Visual Studio family are powerful and quite sophisticated. Indeed, if your primary (if not your only) interest is to build .NET programs on a Windows machine and run them on a Windows machine, then Visual Studio will most likely be the only IDE you will need. Recall from Chapter 1, however, the .NET platform can run on a variety of operating systems. Given this, allow me to point out a key cross-platform IDE.
The Role of Xamarin Studio
Chapter 1 mentioned the role of the Mono platform. Recall that this cross-platform implementation of .NET ships with numerous command-line tools to build your software. While you could build a full-scale .NET program using a simple text editor and the command-line C# compiler, this would quickly become quite cumbersome!
Xamarin Studio is a free .NET IDE that runs on Windows, Mac OS X, and Linux. It is similar to Visual Studio Community in that it supports a variety of programming languages (including C#) and provides feature-rich code editors and visual debuggers and GUI designers. If you intend to build your .NET software on a non-Microsoft operating system, this IDE is sure to be your tool of choice. You can download (and read up on) this tool from the following URL:
http://xamarin.com/
![]() Note It is perfectly fine to install Xamarin Studio on a machine that also has installed Visual Studio Community. However, be sure to shut down the Visual Studio IDE before installing Xamarin Studio to ensure a smooth installation.
Note It is perfectly fine to install Xamarin Studio on a machine that also has installed Visual Studio Community. However, be sure to shut down the Visual Studio IDE before installing Xamarin Studio to ensure a smooth installation.
Once you have installed this IDE, you can create a new project via the File ![]() New
New ![]() Solution menu option. Here, you can select from a variety of templates and select your programming language of choice. In Figure 2-17, you can see the now-familiar C# Console Application type.
Solution menu option. Here, you can select from a variety of templates and select your programming language of choice. In Figure 2-17, you can see the now-familiar C# Console Application type.
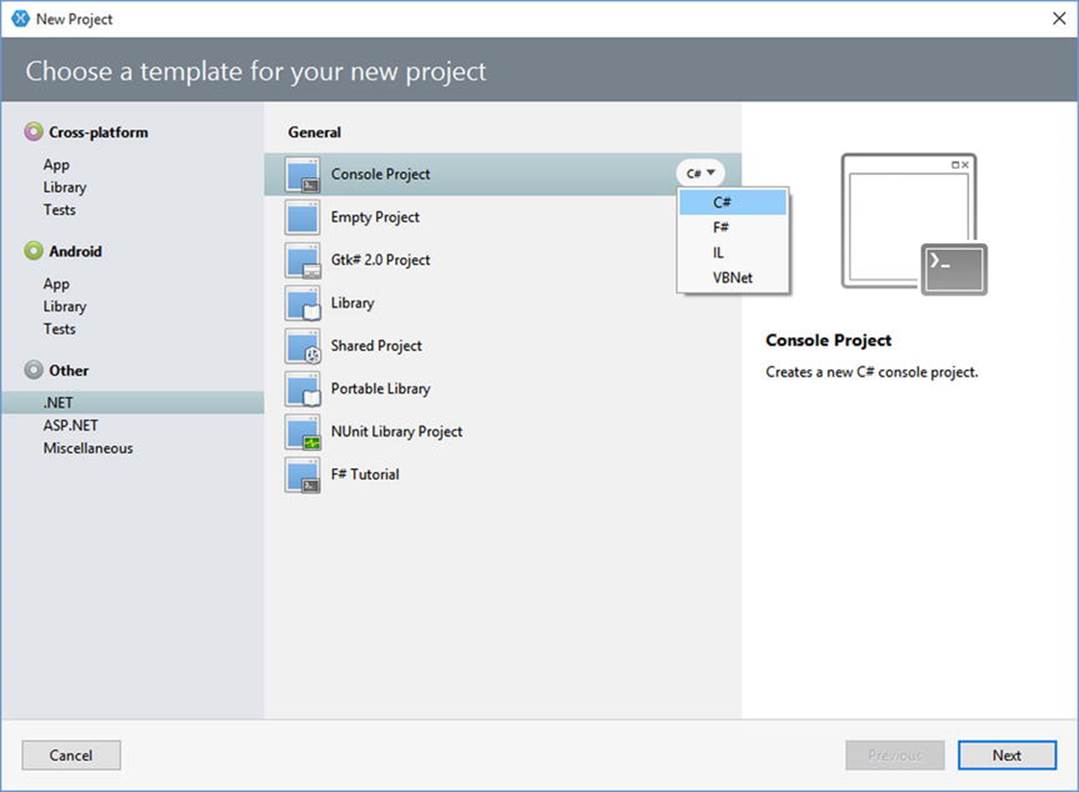
Figure 2-17. Creating a new solution in Xamarin Studio
Once you create a new project, you should find the basics of this IDE fairly familiar given your exploration of the Visual Studio IDEs examined thus far. In Figure 2-18, you can see IntelliSense and project navigation are alive and well.
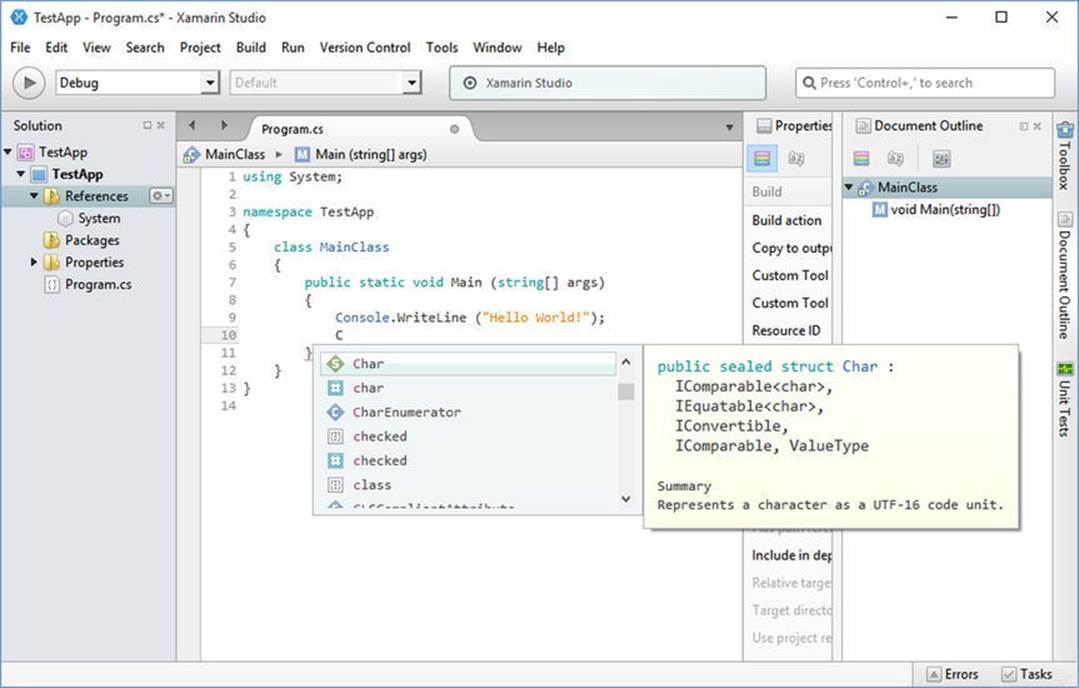
Figure 2-18. The Xamarin Studio code editor
Because Xamarin Studio is able to run on non-Microsoft operating systems, it should not be too surprising that if this IDE is used on Mac OS X or Linux, it will be using the Mono runtime and Mono toolset. However, Xamarin Studio can also run just fine on the Windows OS. Given this, you are able to compile your C# code against either the Microsoft .NET platform or the Mono platform (provided you have indeed installed Mono). To select your platform target, use the Tools ![]() Options menu option and then select .NET Runtimes (see Figure 2-19).
Options menu option and then select .NET Runtimes (see Figure 2-19).
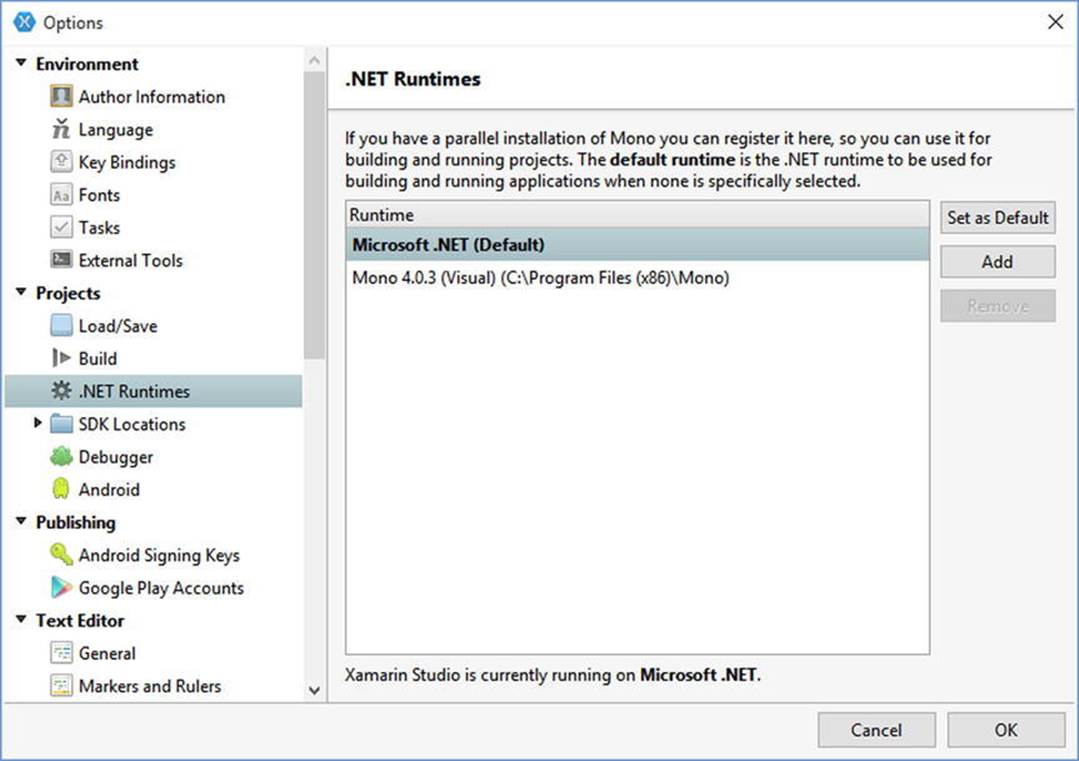
Figure 2-19. Selecting a .NET runtime in Xamarin Studio
Although I will not be using Xamarin Studio in this book, you will be happy to know that a majority of the coding projects created over the text will work perfectly on non-Microsoft systems. Thus, if you want to work through the material using Mac OS X or Linux, you will be able to do so fairly cleanly. Do be aware, however, that the Mono platform does not support the Windows Presentation Foundation (WPF) APIs, so you would be unable to build WPF apps on a non-Microsoft OS. However, Mono does offer support for a majority of the APIs used in this book (you’ll have no problem going through Chapters 3–24 and most of the web development content).
![]() Note See the Mono documentation (www.mono-project.com/docs/) for full details regarding which aspects of Microsoft .NET are fully supported.
Note See the Mono documentation (www.mono-project.com/docs/) for full details regarding which aspects of Microsoft .NET are fully supported.
Summary
As you can see, you have many new toys at your disposal! The point of this chapter was to provide you with a tour of the major programming tools a C# programmer may leverage during the development process. As mentioned, if you are interested only in building .NET applications on a Windows development machine, your best bet is to download Visual Studio Community Edition. As also mentioned, this edition of the book will use this particular IDE going forward. Thus, the forthcoming screenshots, menu options, and visual designers will all assume you are using Visual Studio Community.
If you want to build .NET applications using the Mono platform or want to build your software on a non-Windows OS, Xamarin Studio will be your best choice. While this IDE is not identical to Visual Studio Community, you should have little problem using this tool during a majority of the book. With this, Chapter 3 will begin your examination of the C# programming language.
All materials on the site are licensed Creative Commons Attribution-Sharealike 3.0 Unported CC BY-SA 3.0 & GNU Free Documentation License (GFDL)
If you are the copyright holder of any material contained on our site and intend to remove it, please contact our site administrator for approval.
© 2016-2026 All site design rights belong to S.Y.A.