C# 6.0 and the .NET 4.6 Framework (2015)
PART II
Core C# Programming
CHAPTER 3
Core C# Programming Constructs, Part I
This chapter begins your formal investigation of the C# programming language by presenting a number of bite-sized, stand-alone topics you must be comfortable with as you explore the .NET Framework. The first order of business is to understand how to build your program’s application object and to examine the composition of an executable program’s entry point: the Main() method. Next, you will investigate the fundamental C# data types (and their equivalent types in the System namespace) including an examination of the System.String andSystem.Text.StringBuilder classes.
After you know the details of the fundamental .NET data types, you will then examine a number of data type conversion techniques, including narrowing operations, widening operations, and the use of the checked and unchecked keywords.
This chapter will also examine the role of the C# var keyword, which allows you to implicitly define a local variable. As you will see later in this book, implicit typing is extremely helpful, if not occasionally mandatory, when working with the LINQ technology set. You will wrap up this chapter by quickly examining the C# keywords and operators that allow you to control the flow of an application using various looping and decision constructs.
The Anatomy of a Simple C# Program
C# demands that all program logic be contained within a type definition (recall from Chapter 1 that type is a general term referring to a member of the set {class, interface, structure, enumeration, delegate}). Unlike many other languages, in C# it is not possible to create global functions or global points of data. Rather, all data members and all methods must be contained within a type definition. To get the ball rolling, create a new Console Application project named SimpleCSharpApp. You might agree that the code within the initial Program.cs file is rather uneventful.
using System;
using System.Collections.Generic;
using System.Linq;
using System.Text;
using System.Threading.Tasks;
namespace SimpleCSharpApp
{
class Program
{
static void Main(string[] args)
{
}
}
}
Given this, update the Main() method of your Program class with the following code statements:
class Program
{
static void Main(string[] args)
{
// Display a simple message to the user.
Console.WriteLine("***** My First C# App *****");
Console.WriteLine("Hello World!");
Console.WriteLine();
// Wait for Enter key to be pressed before shutting down.
Console.ReadLine();
}
}
![]() Note C# is a case-sensitive programming language. Therefore, Main is not the same as main, and Readline is not the same as ReadLine. Be aware that all C# keywords are lowercase (e.g., public, lock, class, dynamic), while namespaces, types, and member names begin (by convention) with an initial capital letter and have capitalized the first letter of any embedded words (e.g., Console.WriteLine,System.Windows.MessageBox, System.Data.SqlClient). As a rule of thumb, whenever you receive a compiler error regarding “undefined symbols,” be sure to check your spelling and casing first!
Note C# is a case-sensitive programming language. Therefore, Main is not the same as main, and Readline is not the same as ReadLine. Be aware that all C# keywords are lowercase (e.g., public, lock, class, dynamic), while namespaces, types, and member names begin (by convention) with an initial capital letter and have capitalized the first letter of any embedded words (e.g., Console.WriteLine,System.Windows.MessageBox, System.Data.SqlClient). As a rule of thumb, whenever you receive a compiler error regarding “undefined symbols,” be sure to check your spelling and casing first!
The previous code contains a definition for a class type that supports a single method named Main(). By default, Visual Studio names the class defining Main() Program; however, you are free to change this if you so choose. Every executable C# application (console program, Windows desktop program, or Windows service) must contain a class defining a Main() method, which is used to signify the entry point of the application.
Formally speaking, the class that defines the Main() method is termed the application object. While it is possible for a single executable application to have more than one application object (which can be useful when performing unit tests), you must inform the compiler which Main()method should be used as the entry point via the /main option of the command-line compiler or via the Startup Object drop- down list box, located on the Application tab of the Visual Studio project properties editor (see Chapter 2).
Note that the signature of Main() is adorned with the static keyword, which will be examined in detail in Chapter 5. For the time being, simply understand that static members are scoped to the class level (rather than the object level) and can thus be invoked without the need to first create a new class instance.
In addition to the static keyword, this Main() method has a single parameter, which happens to be an array of strings (string[] args). Although you are not currently bothering to process this array, this parameter may contain any number of incoming command-line arguments (you’ll see how to access them momentarily). Finally, this Main() method has been set up with a void return value, meaning you do not explicitly define a return value using the return keyword before exiting the method scope.
The logic of Program is within Main(). Here, you make use of the Console class, which is defined within the System namespace. Among its set of members is the static WriteLine(), which, as you might assume, sends a text string and carriage return to the standard output. You also make a call to Console.ReadLine() to ensure the command prompt launched by the Visual Studio IDE remains visible during a debugging session until you press the Enter key. (If you did not add this line, your application would terminate immediately during a debugging session and you could not read the output!) You will learn more about the System.Console class shortly.
Variations on the Main( ) Method
By default, Visual Studio will generate a Main() method that has a void return value and an array of string types as the single input parameter. This is not the only possible form of Main(), however. It is permissible to construct your application’s entry point using any of the following signatures (assuming it is contained within a C# class or structure definition):
// int return type, array of strings as the parameter.
static int Main(string[] args)
{
// Must return a value before exiting!
return 0;
}
// No return type, no parameters.
static void Main()
{
}
// int return type, no parameters.
static int Main()
{
// Must return a value before exiting!
return 0;
}
![]() Note The Main() method may also be defined as public as opposed to private, which is assumed if you do not supply a specific access modifier. Visual Studio automatically defines a program’s Main() method as implicitly private.
Note The Main() method may also be defined as public as opposed to private, which is assumed if you do not supply a specific access modifier. Visual Studio automatically defines a program’s Main() method as implicitly private.
Obviously, your choice of how to construct Main() will be based on two questions. First, do you want to return a value to the system when Main() has completed and your program terminates? If so, you need to return an int data type rather than void. Second, do you need to process any user-supplied, command-line parameters? If so, they will be stored in the array of strings. Let’s examine all of the options in more detail.
Specifying an Application Error Code
While a vast majority of your Main() methods will return void as the return value, the ability to return an int from Main() keeps C# consistent with other C-based languages. By convention, returning the value 0 indicates the program has terminated successfully, while another value (such as -1) represents an error condition (be aware that the value 0 is automatically returned, even if you construct a Main() method prototyped to return void).
On the Windows operating system, an application’s return value is stored within a system environment variable named %ERRORLEVEL%. If you were to create an application that programmatically launches another executable (a topic examined in Chapter 18), you can obtain the value of%ERRORLEVEL% using the static System.Diagnostics.Process.ExitCode property.
Given that an application’s return value is passed to the system at the time the application terminates, it is obviously not possible for an application to obtain and display its final error code while running. However, to illustrate how to view this error level upon program termination, begin by updating the Main() method, as follows:
// Note we are now returning an int, rather than void.
static int Main(string[] args)
{
// Display a message and wait for Enter key to be pressed.
Console.WriteLine("***** My First C# App *****");
Console.WriteLine("Hello World!");
Console.WriteLine();
Console.ReadLine();
// Return an arbitrary error code.
return -1;
}
Now let’s capture the return value of Main() with the help of a batch file. Using Windows Explorer, navigate to the folder containing your compiled application (for example, C:\SimpleCSharpApp\bin\Debug). Add a new text file (named SimpleCSharpApp.bat) to theDebug folder that contains the following instructions (if you have not authored *.bat files before, don’t concern yourself with the details; this is a test . . . this is only a test):
@echo off
rem A batch file for SimpleCSharpApp.exe
rem which captures the app’s return value.
SimpleCSharpApp
@if "%ERRORLEVEL%" == "0" goto success
:fail
echo This application has failed!
echo return value = %ERRORLEVEL%
goto end
:success
echo This application has succeeded!
echo return value = %ERRORLEVEL%
goto end
:end
echo All Done.
At this point, open a command prompt and navigate to the folder containing your executable and new *.bat file. Execute the batch logic by typing its name and pressing the Enter key. You should find the output shown next, given that your Main() method is returning -1. Had theMain() method returned 0, you would see the message “This application has succeeded!” print to the console.
***** My First C# App *****
Hello World!
This application has failed!
return value = -1
All Done.
Again, a vast majority (if not all) of your C# applications will use void as the return value from Main(), which, as you recall, implicitly returns the error code of zero. To this end, the Main() methods used in this text (beyond the current example) will indeed return void (and the remaining projects will certainly not need to make use of batch files to capture return codes).
Processing Command-Line Arguments
Now that you better understand the return value of the Main() method, let’s examine the incoming array of string data. Assume that you now want to update your application to process any possible command-line parameters. One way to do so is using a C# for loop. (Note that C#’s iteration constructs will be examined in some detail near the end of this chapter.)
static int Main(string[] args)
{
...
// Process any incoming args.
for(int i = 0; i < args.Length; i++)
Console.WriteLine("Arg: {0}", args[i]);
Console.ReadLine();
return -1;
}
Here, you are checking to see whether the array of strings contains some number of items using the Length property of System.Array. As you’ll see in Chapter 4, all C# arrays actually alias the System.Array class and, therefore, share a common set of members. As you loop over each item in the array, its value is printed to the console window. Supplying the arguments at the command line is equally simple, as shown here:
C:\SimpleCSharpApp\bin\Debug>SimpleCSharpApp.exe /arg1 -arg2
***** My First C# App *****
Hello World!
Arg: /arg1
Arg: -arg2
As an alternative to the standard for loop, you may iterate over an incoming string array using the C# foreach keyword. Here is some sample usage (but again, you will see specifics of looping constructs later in this chapter):
// Notice you have no need to check the size of the array when using "foreach".
static int Main(string[] args)
{
...
// Process any incoming args using foreach.
foreach(string arg in args)
Console.WriteLine("Arg: {0}", arg);
Console.ReadLine();
return -1;
}
Finally, you are also able to access command-line arguments using the static GetCommandLineArgs() method of the System.Environment type. The return value of this method is an array of strings. The first index identifies the name of the application itself, while the remaining elements in the array contain the individual command-line arguments. Note that when using this approach, it is no longer necessary to define Main() as taking a string array as the input parameter, although there is no harm in doing so.
static int Main(string[] args)
{
...
// Get arguments using System.Environment.
string[] theArgs = Environment.GetCommandLineArgs();
foreach(string arg in theArgs)
Console.WriteLine("Arg: {0}", arg);
Console.ReadLine();
return -1;
}
Of course, it is up to you to determine which command-line arguments your program will respond to (if any) and how they must be formatted (such as with a - or / prefix). Here, I simply passed in a series of options that were printed directly to the command prompt. Assume, however, you were creating a new video game and programmed your application to process an option named -godmode. If the user starts your application with the flag, you know he is, in fact, a cheater, and you can take an appropriate course of action.
Specifying Command-Line Arguments with Visual Studio
In the real world, an end user has the option of supplying command-line arguments when starting a program. However, during the development cycle, you might want to specify possible command-line flags for testing purposes. To do so with Visual Studio, double-click the Properties icon in Solution Explorer and select the Debug tab on the left side. From there, specify values using the command-line arguments text box (see Figure 3-1) and save your changes.
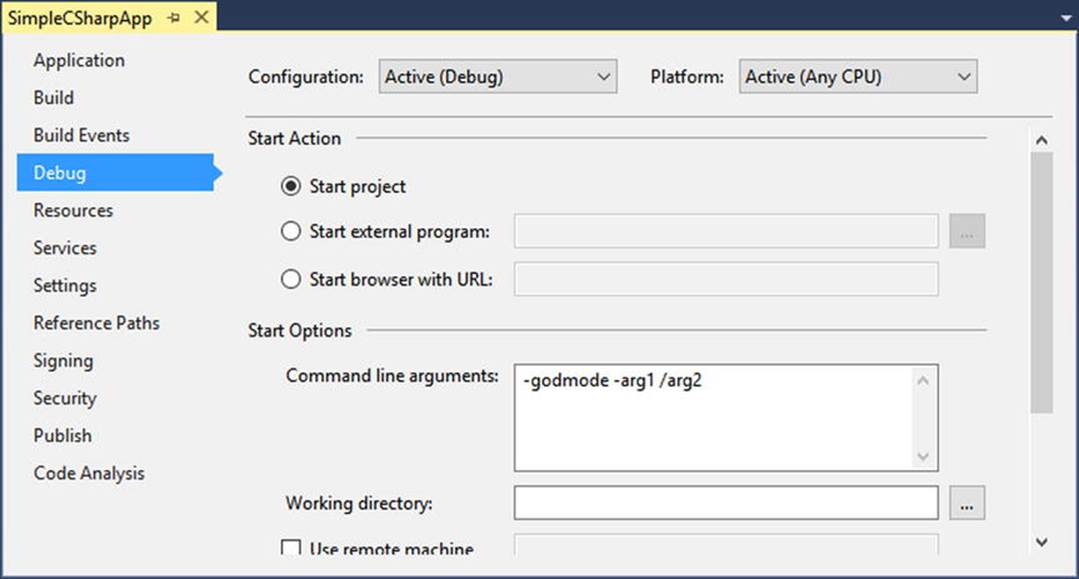
Figure 3-1. Setting command arguments via Visual Studio
After you have established such command-line arguments, they will automatically be passed to the Main() method when debugging or running your application within the Visual Studio IDE.
An Interesting Aside: Some Additional Members of the System.Environment Class
The Environment class exposes a number of extremely helpful methods beyond GetCommandLineArgs(). Specifically, this class allows you to obtain a number of details regarding the operating system currently hosting your .NET application using various static members. To illustrate the usefulness of System.Environment, update your Main() method to call a helper method named ShowEnvironmentDetails() .
static int Main(string[] args)
{
...
// Helper method within the Program class.
ShowEnvironmentDetails();
Console.ReadLine();
return -1;
}
Implement this method within your Program class to call various members of the Environment type.
static void ShowEnvironmentDetails()
{
// Print out the drives on this machine,
// and other interesting details.
foreach (string drive in Environment.GetLogicalDrives())
Console.WriteLine("Drive: {0}", drive);
Console.WriteLine("OS: {0}", Environment.OSVersion);
Console.WriteLine("Number of processors: {0}",
Environment.ProcessorCount);
Console.WriteLine(".NET Version: {0}",
Environment.Version);
}
The following output shows a possible test run of invoking this method. Of course, if you did not specify command-line arguments via the Visual Studio Debug tab, you will not find them printed to the console.
***** My First C# App *****
Hello World!
Arg: -godmode
Arg: -arg1
Arg: /arg2
Drive: C:\
Drive: D:\
OS: Microsoft Windows NT 6.2.9200.0
Number of processors: 8
.NET Version: 4.0.30319.42000
The Environment type defines members other than those shown in the previous example. Table 3-1 documents some additional properties of interest; however, be sure to check out the .NET Framework 4.6 SDK documentation for full details.
Table 3-1. Select Properties of System.Environment
|
Property |
Meaning in Life |
|
ExitCode |
Gets or sets the exit code for the application |
|
Is64BitOperatingSystem |
Returns a bool to represent whether the host machine is running a 64-bit OS |
|
MachineName |
Gets the name of the current machine |
|
NewLine |
Gets the newline symbol for the current environment |
|
SystemDirectory |
Returns the full path to the system directory |
|
UserName |
Returns the name of the user that started this application |
|
Version |
Returns a Version object that represents the version of the .NET platform |
![]() Source Code The SimpleCSharpApp project is located in the Chapter 3 subdirectory.
Source Code The SimpleCSharpApp project is located in the Chapter 3 subdirectory.
The System.Console Class
Almost all the example applications created over the course of the initial chapters of this book make extensive use of the System.Console class. While it is true that a console user interface (CUI) may not be as enticing as a graphical user interface (GUI) or web application, restricting the early examples to console programs will allow you to keep focused on the syntax of C# and the core aspects of the .NET platform, rather than dealing with the complexities of building desktop GUIs or web sites.
As its name implies, the Console class encapsulates input, output, and error-stream manipulations for console-based applications. Table 3-2 lists some (but definitely not all) members of interest. As you can see, the Console class does provide some members that can spice up a simple command-line application, such as the ability to change background and foreground colors and issue beep noises (in a variety of frequencies!).
Table 3-2. Select Members of System.Console
|
Member |
Meaning in Life |
|
Beep() |
This method forces the console to emit a beep of a specified frequency and duration. |
|
BackgroundColor |
These properties set the background/foreground colors for the current output. |
|
ForegroundColor |
They may be assigned any member of the ConsoleColor enumeration. |
|
BufferHeight |
These properties control the height/width of the console’s buffer area. |
|
BufferWidth |
|
|
Title |
This property gets or sets the title of the current console. |
|
WindowHeight |
These properties control the dimensions of the console in relation to the established buffer. |
|
WindowWidth |
|
|
WindowTop |
|
|
WindowLeft |
|
|
Clear() |
This method clears the established buffer and console display area. |
Basic Input and Output with the Console Class
In addition to the members in Table 3-2, the Console type defines a set of methods to capture input and output, all of which are static and are, therefore, called by prefixing the name of the class (Console) to the method name. As you have seen, WriteLine() pumps a text string (including a carriage return) to the output stream. The Write() method pumps text to the output stream without a carriage return. ReadLine() allows you to receive information from the input stream up until the Enter key is pressed, while Read() is used to capture a single character from the input stream.
To illustrate basic I/O using the Console class, create a new Console Application project named BasicConsoleIO and update your Main() method to call a helper method named GetUserData().
class Program
{
static void Main(string[] args)
{
Console.WriteLine("***** Basic Console I/O *****");
GetUserData();
Console.ReadLine();
}
private static void GetUserData()
{
}
}
![]() Note Visual Studio supports a number of “code snippets” that will insert code once activated. The cw code snippet is quite useful during the early chapters of this text, in that it will automatically expand to Console.WriteLine()! To test this for yourself, type in cw somewhere within your Main() method and hit the Tab key twice (sadly, there is no code snippet for Console.ReadLine()). To see all code snippets, right-click in a C# code file and choose the Insert Snippet menu option.
Note Visual Studio supports a number of “code snippets” that will insert code once activated. The cw code snippet is quite useful during the early chapters of this text, in that it will automatically expand to Console.WriteLine()! To test this for yourself, type in cw somewhere within your Main() method and hit the Tab key twice (sadly, there is no code snippet for Console.ReadLine()). To see all code snippets, right-click in a C# code file and choose the Insert Snippet menu option.
Implement this method within the Program class with logic that prompts the user for some bits of information and echoes each item to the standard output stream. For example, you could ask the user for a name and age (which will be treated as a text value for simplicity, rather than the expected numerical value), as follows:
static void GetUserData()
{
// Get name and age.
Console.Write("Please enter your name: ");
string userName = Console.ReadLine();
Console.Write("Please enter your age: ");
string userAge = Console.ReadLine();
// Change echo color, just for fun.
ConsoleColor prevColor = Console.ForegroundColor;
Console.ForegroundColor = ConsoleColor.Yellow;
// Echo to the console.
Console.WriteLine("Hello {0}! You are {1} years old.",
userName, userAge);
// Restore previous color.
Console.ForegroundColor = prevColor;
}
Not surprisingly, when you run this application, the input data is printed to the console (using a custom color to boot!).
Formatting Console Output
During these first few chapters, you might have noticed numerous occurrences of tokens such as {0} and {1} embedded within various string literals. The .NET platform supports a style of string formatting slightly akin to the printf() statement of C. Simply put, when you are defining a string literal that contains segments of data whose value is not known until runtime, you are able to specify a placeholder within the literal using this curly-bracket syntax. At runtime, the values passed into Console.WriteLine() are substituted for each placeholder.
The first parameter to WriteLine() represents a string literal that contains optional placeholders designated by {0}, {1}, {2}, and so forth. Be aware that the first ordinal number of a curly-bracket placeholder always begins with 0. The remaining parameters to WriteLine() are simply the values to be inserted into the respective placeholders.
![]() Note If you have more uniquely numbered curly-bracket placeholders than fill arguments, you will receive a format exception at runtime. However, if you have more fill arguments than placeholders, the unused fill arguments are ignored.
Note If you have more uniquely numbered curly-bracket placeholders than fill arguments, you will receive a format exception at runtime. However, if you have more fill arguments than placeholders, the unused fill arguments are ignored.
It is permissible for a given placeholder to repeat within a given string. For example, if you are a Beatles fan and want to build the string "9, Number 9, Number 9", you would write this:
// John says...
Console.WriteLine("{0}, Number {0}, Number {0}", 9);
Also, know that it is possible to position each placeholder in any location within a string literal, and it need not follow an increasing sequence. For example, consider the following code snippet:
// Prints: 20, 10, 30
Console.WriteLine("{1}, {0}, {2}", 10, 20, 30);
Formatting Numerical Data
If you require more elaborate formatting for numerical data, each placeholder can optionally contain various format characters. Table 3-3 shows the most common formatting options.
Table 3-3. .NET Numerical Format Characters
|
String Format Character |
Meaning in Life |
|
C or c |
Used to format currency. By default, the flag will prefix the local cultural symbol (a dollar sign [$] for U.S. English). |
|
D or d |
Used to format decimal numbers. This flag may also specify the minimum number of digits used to pad the value. |
|
E or e |
Used for exponential notation. Casing controls whether the exponential constant is uppercase (E) or lowercase (e). |
|
F or f |
Used for fixed-point formatting. This flag may also specify the minimum number of digits used to pad the value. |
|
G or g |
Stands for general. This character can be used to format a number to fixed or exponential format. |
|
N or n |
Used for basic numerical formatting (with commas). |
|
X or x |
Used for hexadecimal formatting. If you use an uppercase X, your hex format will also contain uppercase characters. |
These format characters are suffixed to a given placeholder value using the colon token (e.g., {0:C}, {1:d}, {2:X}). To illustrate, update the Main() method to call a new helper function named FormatNumericalData(). Implement this method in your Program class to format a fixed numerical value in a variety of ways.
// Now make use of some format tags.
static void FormatNumericalData()
{
Console.WriteLine("The value 99999 in various formats:");
Console.WriteLine("c format: {0:c}", 99999);
Console.WriteLine("d9 format: {0:d9}", 99999);
Console.WriteLine("f3 format: {0:f3}", 99999);
Console.WriteLine("n format: {0:n}", 99999);
// Notice that upper- or lowercasing for hex
// determines if letters are upper- or lowercase.
Console.WriteLine("E format: {0:E}", 99999);
Console.WriteLine("e format: {0:e}", 99999);
Console.WriteLine("X format: {0:X}", 99999);
Console.WriteLine("x format: {0:x}", 99999);
}
The following output shows the result of calling the FormatNumericalData() method:
The value 99999 in various formats:
c format: $99,999.00
d9 format: 000099999
f3 format: 99999.000
n format: 99,999.00
E format: 9.999900E+004
e format: 9.999900e+004
X format: 1869F
x format: 1869f
You’ll see additional formatting examples where required throughout this text; however, if you are interested in digging into .NET string formatting further, look up the topic “Formatting Types” within the .NET Framework 4.6 SDK documentation.
![]() Source Code The BasicConsoleIO project is located in the Chapter 3 subdirectory.
Source Code The BasicConsoleIO project is located in the Chapter 3 subdirectory.
Formatting Numerical Data Beyond Console Applications
On a final note, be aware that the use of the .NET string formatting characters is not limited to console programs. This same formatting syntax can be used when calling the static string.Format() method. This can be helpful when you need to compose textual data at runtime for use in any application type (e.g., desktop GUI app, ASP.NET web app, and so forth).
The string.Format() method returns a new string object, which is formatted according to the provided flags. After this point, you are free to use the textual data as you see fit. For example, assume you are building a graphical WPF desktop application and need to format a string for display in a message box. The following code illustrates how to do so, but be aware that this code will not compile until you reference the PresentationFramework.dll assembly for use by your project (see Chapter 2 for information on referencing libraries using Visual Studio).
static void DisplayMessage()
{
// Using string.Format() to format a string literal.
string userMessage = string.Format("100000 in hex is {0:x}", 100000);
// You need to reference PresentationFramework.dll
// in order to compile this line of code!
System.Windows.MessageBox.Show(userMessage);
}
![]() Note .NET 4.6 has introduced an alternative syntax to the curly-bracket placeholders termed string interpolation syntax. You will examine this approach later in the chapter.
Note .NET 4.6 has introduced an alternative syntax to the curly-bracket placeholders termed string interpolation syntax. You will examine this approach later in the chapter.
System Data Types and Corresponding C# Keywords
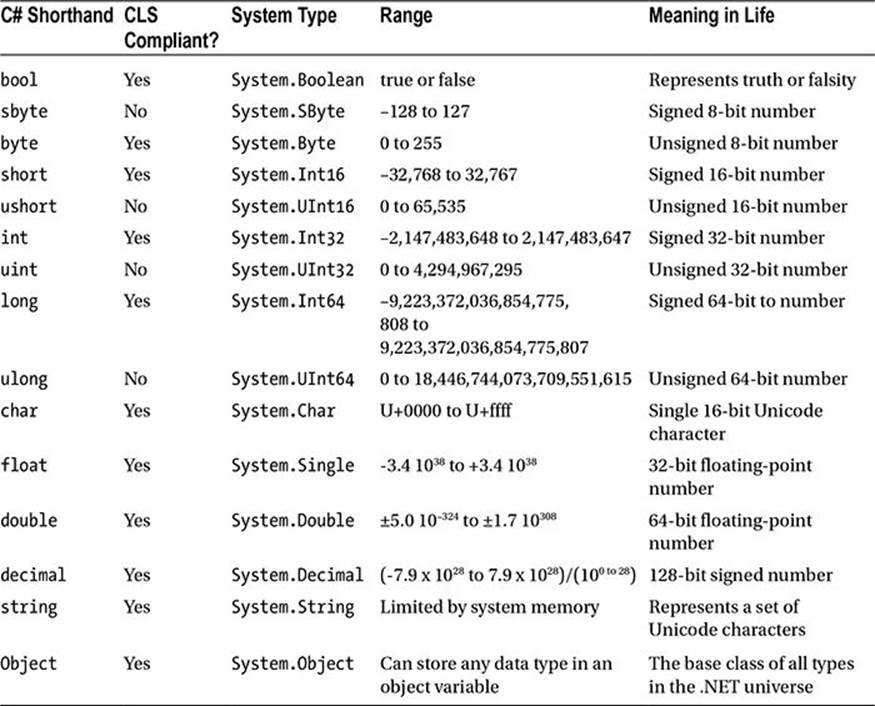
Like any programming language, C# defines keywords for fundamental data types, which are used to represent local variables, class data member variables, method return values, and parameters. Unlike other programming languages, however, these keywords are much more than simple compiler- recognized tokens. Rather, the C# data type keywords are actually shorthand notations for full-blown types in the System namespace. Table 3-4 lists each system data type, its range, the corresponding C# keyword, and the type’s compliance with the common language specification (CLS).
Table 3-4. The Intrinsic Data Types of C#
![]() Note Recall from Chapter 1 that CLS-compliant .NET code can be used by any managed programming language. If you expose non–CLS-compliant data from your programs, other .NET languages might not be able to make use of it.
Note Recall from Chapter 1 that CLS-compliant .NET code can be used by any managed programming language. If you expose non–CLS-compliant data from your programs, other .NET languages might not be able to make use of it.
By default, a floating-point number is treated as a double. To declare a float variable, use the suffix f or F to the raw numerical value (5.3F), and use the suffix m or M to a floating-point number to declare a decimal (300.5M). Finally, raw whole numbers default to an int data type. To set the underlying data type to a long, suffix l or L (4L).
Variable Declaration and Initialization
When you are declaring a local variable (e.g., a variable within a member scope), you do so by specifying the data type followed by the variable’s name. To begin, create a new Console Application project named BasicDataTypes. Update the Program class with the following helper method that is called from within Main():
static void LocalVarDeclarations()
{
Console.WriteLine("=> Data Declarations:");
// Local variables are declared as so:
// dataType varName;
int myInt;
string myString;
Console.WriteLine();
}
Be aware that it is a compiler error to make use of a local variable before assigning an initial value. Given this, it is good practice to assign an initial value to your local data points at the time of declaration. You may do so on a single line or by separating the declaration and assignment into two code statements.
static void LocalVarDeclarations()
{
Console.WriteLine("=> Data Declarations:");
// Local variables are declared and initialized as follows:
// dataType varName = initialValue;
int myInt = 0;
// You can also declare and assign on two lines.
string myString;
myString = "This is my character data";
Console.WriteLine();
}
It is also permissible to declare multiple variables of the same underlying type on a single line of code, as in the following three bool variables:
static void LocalVarDeclarations()
{
Console.WriteLine("=> Data Declarations:");
int myInt = 0;
string myString;
myString = "This is my character data";
// Declare 3 bools on a single line.
bool b1 = true, b2 = false, b3 = b1;
Console.WriteLine();
}
Since the C# bool keyword is simply a shorthand notation for the System.Boolean structure, it is also possible to allocate any data type using its full name (of course, the same point holds true for any C# data type keyword). Here is the final implementation ofLocalVarDeclarations(), which illustrates various ways to declare a local variable:
static void LocalVarDeclarations()
{
Console.WriteLine("=> Data Declarations:");
// Local variables are declared and initialized as follows:
// dataType varName = initialValue;
int myInt = 0;
string myString;
myString = "This is my character data";
// Declare 3 bools on a single line.
bool b1 = true, b2 = false, b3 = b1;
// Use System.Boolean data type to declare a bool.
System.Boolean b4 = false;
Console.WriteLine("Your data: {0}, {1}, {2}, {3}, {4}, {5}",
myInt, myString, b1, b2, b3, b4);
Console.WriteLine();
}
Intrinsic Data Types and the new Operator
All intrinsic data types support what is known as a default constructor (see Chapter 5). This feature allows you to create a variable using the new keyword, which automatically sets the variable to its default value.
· bool variables are set to false.
· Numeric data is set to 0 (or 0.0 in the case of floating-point data types).
· char variables are set to a single empty character.
· BigInteger variables are set to 0.
· DateTime variables are set to 1/1/0001 12:00:00 AM.
· Object references (including strings) are set to null.
![]() Note The BigInteger data type mentioned in the previous list will be explained in just a bit.
Note The BigInteger data type mentioned in the previous list will be explained in just a bit.
Although it is more cumbersome to use the new keyword when creating a basic data type variable, the following is syntactically well-formed C# code:
static void NewingDataTypes()
{
Console.WriteLine("=> Using new to create variables:");
bool b = new bool(); // Set to false.
int i = new int(); // Set to 0.
double d = new double(); // Set to 0.
DateTime dt = new DateTime(); // Set to 1/1/0001 12:00:00 AM
Console.WriteLine("{0}, {1}, {2}, {3}", b, i, d, dt);
Console.WriteLine();
}
The Data Type Class Hierarchy
It is interesting to note that even the primitive .NET data types are arranged in a class hierarchy. If you are new to the world of inheritance, you will discover the full details in Chapter 6. Until then, just understand that types at the top of a class hierarchy provide some default behaviors that are granted to the derived types. The relationship between these core system types can be understood as shown in Figure 3-2.
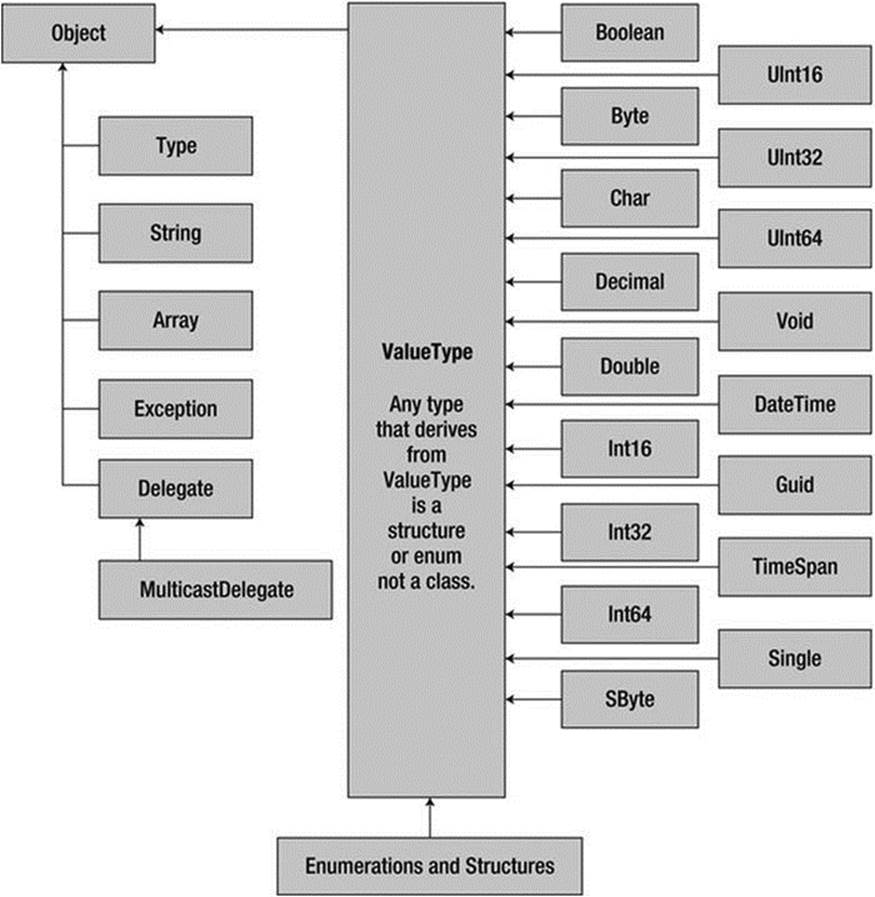
Figure 3-2. The class hierarchy of system types
Notice that each type ultimately derives from System.Object, which defines a set of methods (e.g., ToString(), Equals(), GetHashCode()) common to all types in the .NET base class libraries (these methods are fully detailed in Chapter 6).
Also note that many numerical data types derive from a class named System.ValueType. Descendants of ValueType are automatically allocated on the stack and, therefore, have a predictable lifetime and are quite efficient. On the other hand, types that do not haveSystem.ValueType in their inheritance chain (such as System.Type, System.String, System.Array, System.Exception, and System.Delegate) are not allocated on the stack but on the garbage-collected heap. (You can find more information on this distinction inChapter 4.)
Without getting too hung up on the details of System.Object and System.ValueType, just understand that because a C# keyword (such as int) is simply shorthand notation for the corresponding system type (in this case, System.Int32), the following is perfectly legal syntax, given that System.Int32 (the C# int) eventually derives from System.Object and, therefore, can invoke any of its public members, as illustrated by this additional helper function:
static void ObjectFunctionality()
{
Console.WriteLine("=> System.Object Functionality:");
// A C# int is really a shorthand for System.Int32,
// which inherits the following members from System.Object.
Console.WriteLine("12.GetHashCode() = {0}", 12.GetHashCode());
Console.WriteLine("12.Equals(23) = {0}", 12.Equals(23));
Console.WriteLine("12.ToString() = {0}", 12.ToString());
Console.WriteLine("12.GetType() = {0}", 12.GetType());
Console.WriteLine();
}
If you were to call this method from within Main(), you would find the output shown here:
=> System.Object Functionality:
12.GetHashCode() = 12
12.Equals(23) = False
12.ToString() = 12
12.GetType() = System.Int32
Members of Numerical Data Types
To continue experimenting with the intrinsic C# data types, understand that the numerical types of .NET support MaxValue and MinValue properties that provide information regarding the range a given type can store. In addition to the MinValue/MaxValue properties, a given numerical system type may define further useful members. For example, the System.Double type allows you to obtain the values for epsilon and infinity (which might be of interest to those of you with a mathematical flare). To illustrate, consider the following helper function:
static void DataTypeFunctionality()
{
Console.WriteLine("=> Data type Functionality:");
Console.WriteLine("Max of int: {0}", int.MaxValue);
Console.WriteLine("Min of int: {0}", int.MinValue);
Console.WriteLine("Max of double: {0}", double.MaxValue);
Console.WriteLine("Min of double: {0}", double.MinValue);
Console.WriteLine("double.Epsilon: {0}", double.Epsilon);
Console.WriteLine("double.PositiveInfinity: {0}",
double.PositiveInfinity);
Console.WriteLine("double.NegativeInfinity: {0}",
double.NegativeInfinity);
Console.WriteLine();
}
Members of System.Boolean
Next, consider the System.Boolean data type. The only valid assignment a C# bool can take is from the set {true | false}. Given this point, it should be clear that System.Boolean does not support a MinValue/MaxValue property set but ratherTrueString/FalseString (which yields the string "True" or "False", respectively). Here’s an example:
Console.WriteLine("bool.FalseString: {0}", bool.FalseString);
Console.WriteLine("bool.TrueString: {0}", bool.TrueString);
Members of System.Char
C# textual data is represented by the string and char keywords, which are simple shorthand notations for System.String and System.Char, both of which are Unicode under the hood. As you might already know, a string represents a contiguous set of characters (e.g.,"Hello"), while the char can represent a single slot in a string (e.g., ’H’).
The System.Char type provides you with a great deal of functionality beyond the ability to hold a single point of character data. Using the static methods of System.Char, you are able to determine whether a given character is numerical, alphabetical, a point of punctuation, or whatnot. Consider the following method:
static void CharFunctionality()
{
Console.WriteLine("=> char type Functionality:");
char myChar = ’a’;
Console.WriteLine("char.IsDigit(’a’): {0}", char.IsDigit(myChar));
Console.WriteLine("char.IsLetter(’a’): {0}", char.IsLetter(myChar));
Console.WriteLine("char.IsWhiteSpace(’Hello There’, 5): {0}",
char.IsWhiteSpace("Hello There", 5));
Console.WriteLine("char.IsWhiteSpace(’Hello There’, 6): {0}",
char.IsWhiteSpace("Hello There", 6));
Console.WriteLine("char.IsPunctuation(’?’): {0}",
char.IsPunctuation(’?’));
Console.WriteLine();
}
As illustrated in the previous method, many members of System.Char have two calling conventions: a single character or a string with a numerical index that specifies the position of the character to test.
Parsing Values from String Data
The .NET data types provide the ability to generate a variable of their underlying type given a textual equivalent (e.g., parsing). This technique can be extremely helpful when you want to convert some user input data (such as a selection from a GUI-based, drop-down list box) into a numerical value. Consider the following parsing logic within a method named ParseFromStrings().
static void ParseFromStrings()
{
Console.WriteLine("=> Data type parsing:");
bool b = bool.Parse("True");
Console.WriteLine("Value of b: {0}", b);
double d = double.Parse("99.884");
Console.WriteLine("Value of d: {0}", d);
int i = int.Parse("8");
Console.WriteLine("Value of i: {0}", i);
char c = Char.Parse("w");
Console.WriteLine("Value of c: {0}", c);
Console.WriteLine();
}
System.DateTime and System.TimeSpan
The System namespace defines a few useful data types for which there are no C# keywords, such as the DateTime and TimeSpan structures. (I’ll leave the investigation of System.Guid and System.Void, as shown in Figure 3-2, to interested readers, but do be aware that these two data types in the System namespace are seldom useful in most applications.)
The DateTime type contains data that represents a specific date (month, day, year) and time value, both of which may be formatted in a variety of ways using the supplied members. The TimeSpan structure allows you to easily define and transform units of time using various members.
static void UseDatesAndTimes()
{
Console.WriteLine("=> Dates and Times:");
// This constructor takes (year, month, day).
DateTime dt = new DateTime(2015, 10, 17);
// What day of the month is this?
Console.WriteLine("The day of {0} is {1}", dt.Date, dt.DayOfWeek);
// Month is now December.
dt = dt.AddMonths(2);
Console.WriteLine("Daylight savings: {0}", dt.IsDaylightSavingTime());
// This constructor takes (hours, minutes, seconds).
TimeSpan ts = new TimeSpan(4, 30, 0);
Console.WriteLine(ts);
// Subtract 15 minutes from the current TimeSpan and
// print the result.
Console.WriteLine(ts.Subtract(new TimeSpan(0, 15, 0)));
}
The System.Numerics.dll Assembly
The System.Numerics namespace defines a structure named BigInteger. As its name implies, the BigInteger data type can be used when you need to represent humongous numerical values, which are not constrained by a fixed upper or lower limit.
![]() Note The System.Numerics namespace defines a second structure named Complex, which allows you to model mathematically complex numerical data (e.g., imaginary units, real data, hyperbolic tangents). Consult the .NET Framework 4.6 SDK documentation if you are interested.
Note The System.Numerics namespace defines a second structure named Complex, which allows you to model mathematically complex numerical data (e.g., imaginary units, real data, hyperbolic tangents). Consult the .NET Framework 4.6 SDK documentation if you are interested.
While many of your .NET applications might never need to make use of the BigInteger structure, if you do find the need to define a massive numerical value, your first step is to reference the System.Numerics.dll assembly into your project. If you want to follow along with the current example, perform the following tasks:
1. Select the Project ![]() Add Reference menu option of Visual Studio.
Add Reference menu option of Visual Studio.
2. Locate and select the System.Numerics.dll assembly within the list of presented libraries found in the Framework tab on the left side.
3. Click the OK button.
After you have done so, add the following using directive to the file, which will be using the BigInteger data type:
// BigInteger lives here!
using System.Numerics;
At this point, you can create a BigInteger variable using the new operator. Within the constructor, you can specify a numerical value, including floating-point data. However, recall that when you define a literal whole number (such as 500), the runtime will default the data type to anint. Likewise, literal floating-point data (such as 55.333) will default to a double. How, then, can you set BigInteger to a massive value while not overflowing the default data types used for raw numerical values?
The simplest approach is to establish the massive numerical value as a text literal, which can be converted into a BigInteger variable via the static Parse() method. If required, you can also pass in a byte array directly to the constructor of the BigInteger class.
![]() Note After you assign a value to a BigInteger variable, you cannot change it, as the data is immutable. However, the BigInteger class defines a number of members that will return new BigInteger objects based on your data modifications (such as the static Multiply()method used in the proceeding code sample).
Note After you assign a value to a BigInteger variable, you cannot change it, as the data is immutable. However, the BigInteger class defines a number of members that will return new BigInteger objects based on your data modifications (such as the static Multiply()method used in the proceeding code sample).
In any case, after you have defined a BigInteger variable, you will find this class defines similar members as other intrinsic C# data types (e.g., float, int). In addition, the BigInteger class defines several static members that allow you to apply basic mathematical expressions (such as adding and multiplying) to BigInteger variables. Here is an example of working with the BigInteger class:
static void UseBigInteger()
{
Console.WriteLine("=> Use BigInteger:");
BigInteger biggy =
BigInteger.Parse("9999999999999999999999999999999999999999999999");
Console.WriteLine("Value of biggy is {0}", biggy);
Console.WriteLine("Is biggy an even value?: {0}", biggy.IsEven);
Console.WriteLine("Is biggy a power of two?: {0}", biggy.IsPowerOfTwo);
BigInteger reallyBig = BigInteger.Multiply(biggy,
BigInteger.Parse("8888888888888888888888888888888888888888888"));
Console.WriteLine("Value of reallyBig is {0}", reallyBig);
}
It is also important to note that the BigInteger data type responds to C#’s intrinsic mathematical operators, such as +, -, and *. Therefore, rather than calling BigInteger.Multiply() to multiply two huge numbers, you could author the following code:
BigInteger reallyBig2 = biggy * reallyBig;
At this point, I hope you understand that the C# keywords representing basic data types have a corresponding type in the .NET base class libraries, each of which exposes a fixed functionality. While I have not detailed each member of these data types, you are in a great position to dig into the details as you see fit. Be sure to consult the .NET Framework 4.6 SDK documentation for full details regarding the various .NET data types—you will likely be surprised at the amount of built-in functionality.
![]() Source Code The BasicDataTypes project is located in the Chapter 3 subdirectory.
Source Code The BasicDataTypes project is located in the Chapter 3 subdirectory.
Working with String Data
System.String provides a number of methods you would expect from such a utility class, including methods that return the length of the character data, find substrings within the current string, and convert to and from uppercase/lowercase. Table 3-5 lists some (but by no means all) of the interesting members.
Table 3-5. Select Members of System.String
|
String Member |
Meaning in Life |
|
Length |
This property returns the length of the current string. |
|
Compare() |
This static method compares two strings. |
|
Contains() |
This method determines whether a string contains a specific substring. |
|
Equals() |
This method tests whether two string objects contain identical character data. |
|
Format() |
This static method formats a string using other primitives (e.g., numerical data, other strings) and the {0} notation examined earlier in this chapter. |
|
Insert() |
This method inserts a string within a given string. |
|
PadLeft() |
These methods are used to pad a string with some characters. |
|
PadRight() |
|
|
Remove() |
These methods are used to receive a copy of a string with modifications (characters removed or replaced). |
|
Replace() |
|
|
Split() |
This method returns a String array containing the substrings in this instance that are delimited by elements of a specified char array or string array. |
|
Trim() |
This method removes all occurrences of a set of specified characters from the beginning and end of the current string. |
|
ToUpper() |
These methods create a copy of the current string in uppercase or lowercase format, respectively. |
|
ToLower() |
Basic String Manipulation
Working with the members of System.String is as you would expect. Simply declare a string variable and make use of the provided functionality via the dot operator. Be aware that a few of the members of System.String are static members and are, therefore, called at the class (rather than the object) level. Assume you have created a new Console Application project named FunWithStrings. Author the following method, which should be called from within Main():
static void BasicStringFunctionality()
{
Console.WriteLine("=> Basic String functionality:");
string firstName = "Freddy";
Console.WriteLine("Value of firstName: {0}", firstName);
Console.WriteLine("firstName has {0} characters.", firstName.Length);
Console.WriteLine("firstName in uppercase: {0}", firstName.ToUpper());
Console.WriteLine("firstName in lowercase: {0}", firstName.ToLower());
Console.WriteLine("firstName contains the letter y?: {0}",
firstName.Contains("y"));
Console.WriteLine("firstName after replace: {0}", firstName.Replace("dy", ""));
Console.WriteLine();
}
There’s not too much to say here, as this method simply invokes various members, such as ToUpper() and Contains(), on a local string variable to yield various formats and transformations. Here is the initial output:
***** Fun with Strings *****
=> Basic String functionality:
Value of firstName: Freddy
firstName has 6 characters.
firstName in uppercase: FREDDY
firstName in lowercase: freddy
firstName contains the letter y?: True
firstName after replace: Fred
While this output might not seem too surprising, the output seen via calling the Replace() method is a bit misleading. In reality, the firstName variable has not changed at all; rather, you receive a new string in a modified format. You will revisit the immutable nature of strings in just a few moments.
String Concatenation
string variables can be connected together to build larger strings via the C# + (as well as +=) operator. As you might know, this technique is formally termed string concatenation. Consider the following new helper function:
static void StringConcatenation()
{
Console.WriteLine("=> String concatenation:");
string s1 = "Programming the ";
string s2 = "PsychoDrill (PTP)";
string s3 = s1 + s2;
Console.WriteLine(s3);
Console.WriteLine();
}
You might be interested to know that the C# + symbol is processed by the compiler to emit a call to the static String.Concat() method. Given this, it is possible to perform string concatenation by calling String.Concat() directly (although you really have not gained anything by doing so—in fact, you have incurred additional keystrokes!).
static void StringConcatenation()
{
Console.WriteLine("=> String concatenation:");
string s1 = "Programming the ";
string s2 = "PsychoDrill (PTP)";
string s3 = String.Concat(s1, s2);
Console.WriteLine(s3);
Console.WriteLine();
}
Escape Characters
As in other C-based languages, C# string literals may contain various escape characters, which qualify how the character data should be printed to the output stream. Each escape character begins with a backslash, followed by a specific token. In case you are a bit rusty on the meanings behind these escape characters, Table 3-6 lists the more common options.
Table 3-6. String Literal Escape Characters
|
Character |
Meaning in Life |
|
\’ |
Inserts a single quote into a string literal. |
|
\" |
Inserts a double quote into a string literal. |
|
\\ |
Inserts a backslash into a string literal. This can be quite helpful when defining file or network paths. |
|
\a |
Triggers a system alert (beep). For console programs, this can be an audio clue to the user. |
|
\n |
Inserts a new line (on Windows platforms). |
|
\r |
Inserts a carriage return. |
|
\t |
Inserts a horizontal tab into the string literal. |
For example, to print a string that contains a tab between each word, you can make use of the \t escape character. Or assume you want to create a string literal that contains quotation marks, another that defines a directory path, and a final string literal that inserts three blank lines after printing the character data. To do so without compiler errors, you would need to make use of the \", \\, and \n escape characters. Also, to annoy any person within a 10-foot radius from you, notice that I have embedded an alarm within each string literal (to trigger a beep). Consider the following:
static void EscapeChars()
{
Console.WriteLine("=> Escape characters:\a");
string strWithTabs = "Model\tColor\tSpeed\tPet Name\a ";
Console.WriteLine(strWithTabs);
Console.WriteLine("Everyone loves \"Hello World\"\a ");
Console.WriteLine("C:\\MyApp\\bin\\Debug\a ");
// Adds a total of 4 blank lines (then beep again!).
Console.WriteLine("All finished.\n\n\n\a ");
Console.WriteLine();
}
Defining Verbatim Strings
When you prefix a string literal with the @ symbol, you have created what is termed a verbatim string . Using verbatim strings, you disable the processing of a literal’s escape characters and print out a string as is. This can be most useful when working with strings representing directory and network paths. Therefore, rather than making use of \\ escape characters, you can simply write the following:
// The following string is printed verbatim,
// thus all escape characters are displayed.
Console.WriteLine(@"C:\MyApp\bin\Debug");
Also note that verbatim strings can be used to preserve white space for strings that flow over multiple lines.
// White space is preserved with verbatim strings.
string myLongString = @"This is a very
very
very
long string";
Console.WriteLine(myLongString);
Using verbatim strings, you can also directly insert a double quote into a literal string by doubling the " token.
Console.WriteLine(@"Cerebus said ""Darrr! Pret-ty sun-sets""");
Strings and Equality
As fully explained in Chapter 4, a reference type is an object allocated on the garbage-collected managed heap. By default, when you perform a test for equality on reference types (via the C# == and != operators), you will be returned true if the references are pointing to the same object in memory. However, even though the string data type is indeed a reference type, the equality operators have been redefined to compare the values of string objects, not the object in memory to which they refer.
static void StringEquality()
{
Console.WriteLine("=> String equality:");
string s1 = "Hello!";
string s2 = "Yo!";
Console.WriteLine("s1 = {0}", s1);
Console.WriteLine("s2 = {0}", s2);
Console.WriteLine();
// Test these strings for equality.
Console.WriteLine("s1 == s2: {0}", s1 == s2);
Console.WriteLine("s1 == Hello!: {0}", s1 == "Hello!");
Console.WriteLine("s1 == HELLO!: {0}", s1 == "HELLO!");
Console.WriteLine("s1 == hello!: {0}", s1 == "hello!");
Console.WriteLine("s1.Equals(s2): {0}", s1.Equals(s2));
Console.WriteLine("Yo.Equals(s2): {0}", "Yo!".Equals(s2));
Console.WriteLine();
}
The C# equality operators perform a case-sensitive, character-by-character equality test on string objects. Therefore, "Hello!" is not equal to "HELLO!", which is also different from "hello!". Also, keeping the connection between string and System.String in mind, notice that you are able to test for equality using the Equals() method of String as well as the baked-in equality operators. Finally, given that every string literal (such as "Yo") is a valid System.String instance, you are able to access string-centric functionality from a fixed sequence of characters.
Strings Are Immutable
One of the interesting aspects of System.String is that after you assign a string object with its initial value, the character data cannot be changed. At first glance, this might seem like a flat-out lie, given that you are always reassigning strings to new values and because theSystem.String type defines a number of methods that appear to modify the character data in one way or another (such as uppercasing and lowercasing). However, if you look more closely at what is happening behind the scenes, you will notice the methods of the string type are, in fact, returning you a new string object in a modified format.
static void StringsAreImmutable()
{
// Set initial string value.
string s1 = "This is my string.";
Console.WriteLine("s1 = {0}", s1);
// Uppercase s1?
string upperString = s1.ToUpper();
Console.WriteLine("upperString = {0}", upperString);
// Nope! s1 is in the same format!
Console.WriteLine("s1 = {0}", s1);
}
If you examine the relevant output that follows, you can verify that the original string object (s1) is not uppercased when calling ToUpper(). Rather, you are returned a copy of the string in a modified format.
s1 = This is my string.
upperString = THIS IS MY STRING.
s1 = This is my string.
The same law of immutability holds true when you use the C# assignment operator. To illustrate, implement the following StringsAreImmutable2() method:
static void StringsAreImmutable2()
{
string s2 = "My other string";
s2 = "New string value";
}
Now, compile your application and load the assembly into ildasm.exe (see Chapter 1). The following output shows what you would find if you were to generate CIL code for the StringsAreImmutable2() method:
.method private hidebysig static void StringsAreImmutable2() cil managed
{
// Code size 14 (0xe)
.maxstack 1
.locals init ([0] string s2)
IL_0000: nop
IL_0001: ldstr "My other string"
IL_0006: stloc.0
IL_0007: ldstr "New string value"
IL_000c: stloc.0
IL_000d: ret
} // end of method Program::StringAreImmutable2
Although you have yet to examine the low-level details of the CIL, note the numerous calls to the ldstr (load string) opcode. Simply put, the ldstr opcode of the CIL loads a new string object on the managed heap. The previous string object that contained the value "My other string" will eventually be garbage collected.
So, what exactly are you to gather from this insight? In a nutshell, the string class can be inefficient and result in bloated code if misused, especially when performing string concatenation or working with huge amounts of text data. If you need to represent basic character data such as a U.S. Social Security number, first or last names, or simple bits of text used within your application, the string class is the perfect choice.
However, if you are building an application that makes heavy use of frequently changing textual data (such as a word processing program), it would be a bad idea to represent the word processing data using string objects, as you will most certainly (and often indirectly) end up making unnecessary copies of string data. So, what is a programmer to do? Glad you asked.
The System.Text.StringBuilder Type
Given that the string type can be inefficient when used with reckless abandon, the .NET base class libraries provide the System.Text namespace. Within this (relatively small) namespace lives a class named StringBuilder. Like the System.String class, the StringBuilderdefines methods that allow you to replace or format segments, for example. When you want to use this type in your C# code files, your first step is to make sure the following namespace is imported into your code file (this should already be the case for a new Visual Studio project):
// StringBuilder lives here!
using System.Text;
What is unique about the StringBuilder is that when you call members of this type, you are directly modifying the object’s internal character data (making it more efficient), not obtaining a copy of the data in a modified format. When you create an instance of the StringBuilder, you can supply the object’s initial startup values via one of many constructors. If you are new to the topic of constructors, simply understand that constructors allow you to create an object with an initial state when you apply the new keyword. Consider the following usage ofStringBuilder:
static void FunWithStringBuilder()
{
Console.WriteLine("=> Using the StringBuilder:");
StringBuilder sb = new StringBuilder("**** Fantastic Games ****");
sb.Append("\n");
sb.AppendLine("Half Life");
sb.AppendLine("Morrowind");
sb.AppendLine("Deus Ex" + "2");
sb.AppendLine("System Shock");
Console.WriteLine(sb.ToString());
sb.Replace("2", " Invisible War");
Console.WriteLine(sb.ToString());
Console.WriteLine("sb has {0} chars.", sb.Length);
Console.WriteLine();
}
Here, I have constructed a StringBuilder set to the initial value "**** Fantastic Games ****". As you can see, I am appending to the internal buffer and am able to replace or remove characters at will. By default, a StringBuilder is only able to initially hold a string of 16 characters or fewer (but will expand automatically if necessary); however, this default starting value can be changed via an additional constructor argument.
// Make a StringBuilder with an initial size of 256.
StringBuilder sb = new StringBuilder("**** Fantastic Games ****", 256);
If you append more characters than the specified limit, the StringBuilder object will copy its data into a new instance and grow the buffer by the specified limit.
String Interpolation
The curly bracket syntax illustrated within this chapter ({0}, {1}, and so on) has existed within the .NET platform since version 1.0. Starting with the current release, C# programmers can use an alternative syntax to build string literals that contain placeholders for variables. Formally, this is called string interpolation. While the output of the operation is identical to traditional string formatting syntax, this new approach allows you to directly embed the variables themselves, rather than tacking them on as a comma-delimited list.
Consider the following additional method of your Program class (StringInterpolation()), which builds a string variable using each approach:
static void StringInterpolation()
{
// Some local variables we will plug into our larger string
int age = 4;
string name = "Soren";
// Using curly bracket syntax.
string greeting = string.Format("Hello {0} you are {1} years old.", name, age);
// Using string interpolation
string greeting2 = $"Hello {name} you are {age} years old.";
}
In the greeting2 variable, notice how the string you are construction begins with a dollar sign prefix ($). Next, notice that the curly brackets still are used to mark a variable placeholder; however, rather than using a numerical tag, you are able to place the variable directly into the scope. The assumed advantage is that this new formatting syntax is a bit easier to read in a linear (left-to-right) fashion, given that you are not required to “jump to the end” to see the list of values to plug in at runtime.
There is another interesting aspect of this new syntax: the curly brackets used in string interpolation are a valid scope. Therefore, you can use the dot operation on the variables to change their state. Consider updates to each assembled string variable.
string greeting = string.Format("Hello {0} you are {1} years old.", name.ToUpper(), age);
string greeting2 = $"Hello {name.ToUpper()} you are {age} years old.";
Here, I have uppercased the name via a call to ToUpper(). Do note that in the string interpolation approach, you do not add a semicolon terminator when calling this method. Given this, you cannot use the curly-bracket scope as a fully blown method scope that contains numerous lines of executable code. Rather, you can invoke a single member on the object using the dot operator as well as define a simple general expression such as {age += 1}.
It is also worth noting that you can still use escape characters in the string literal within this new syntax. Thus, if you wanted to insert a tab, you can prefix a \t token as so:
string greeting = string.Format("\tHello {0} you are {1} years old.", name.ToUpper(), age);
string greeting2 = $"\tHello {name.ToUpper()} you are {age} years old.";
As you might expect, you are free to use either approach when building your string variables on the fly. Do keep in mind, however, that if you are using an earlier version of the .NET platform, string interpolation syntax will result in a compiler error. Thus, if you need to ensure your C# code will compile under multiple versions of the compiler, it is safer to stick to the traditional numerical placeholder approach.
![]() Source Code The FunWithStrings project is located in the Chapter 3 subdirectory.
Source Code The FunWithStrings project is located in the Chapter 3 subdirectory.
Narrowing and Widening Data Type Conversions
Now that you understand how to work with intrinsic C# data types, let’s examine the related topic of data type conversion. Assume you have a new Console Application project named TypeConversions that defines the following class:
class Program
{
static void Main(string[] args)
{
Console.WriteLine("***** Fun with type conversions *****");
// Add two shorts and print the result.
short numb1 = 9, numb2 = 10;
Console.WriteLine("{0} + {1} = {2}",
numb1, numb2, Add(numb1, numb2));
Console.ReadLine();
}
static int Add(int x, int y)
{
return x + y;
}
}
Notice that the Add() method expects to be sent two int parameters. However, the Main() method is, in fact, sending in two short variables. While this might seem like a complete and total mismatch of data types, the program compiles and executes without error, returning the expected result of 19.
The reason the compiler treats this code as syntactically sound is because there is no possibility for loss of data. Given that the maximum value of a short (32,767) is well within the maximum range of an int (2,147,483,647), the compiler implicitly widens each short to an int. Formally speaking, widening is the term used to define an implicit upward cast that does not result in a loss of data.
![]() Note Look up “Type Conversion Tables” in the .NET Framework 4.6 SDK documentation if you want to see permissible widening (and narrowing, discussed next) conversions for each C# data type.
Note Look up “Type Conversion Tables” in the .NET Framework 4.6 SDK documentation if you want to see permissible widening (and narrowing, discussed next) conversions for each C# data type.
Although this implicit widening worked in your favor for the previous example, other times this “feature” can be the source of compile-time errors. For example, assume that you have set values to numb1 and numb2 that (when added together) overflow the maximum value of a short. Also, assume you are storing the return value of the Add() method within a new local short variable, rather than directly printing the result to the console.
static void Main(string[] args)
{
Console.WriteLine("***** Fun with type conversions *****");
// Compiler error below!
short numb1 = 30000, numb2 = 30000;
short answer = Add(numb1, numb2);
Console.WriteLine("{0} + {1} = {2}",
numb1, numb2, answer);
Console.ReadLine();
}
In this case, the compiler reports the following error:
Cannot implicitly convert type ’int’ to ’short’. An explicit conversion exists (are you missing a cast?)
The problem is that although the Add() method is capable of returning an int with the value 60,000 (as this fits within the range of a System.Int32), the value cannot be stored in a short, as it overflows the bounds of this data type. Formally speaking, the CLR was unable to apply a narrowing operation. As you can guess, narrowing is the logical opposite of widening, in that a larger value is stored within a smaller data type variable.
It is important to point out that all narrowing conversions result in a compiler error, even when you can reason that the narrowing conversion should indeed succeed. For example, the following code also results in a compiler error:
// Another compiler error!
static void NarrowingAttempt()
{
byte myByte = 0;
int myInt = 200;
myByte = myInt;
Console.WriteLine("Value of myByte: {0}", myByte);
}
Here, the value contained within the int variable (myInt) is safely within the range of a byte; therefore, you would expect the narrowing operation to not result in a runtime error. However, given that C# is a language built with type safety in mind, you do indeed receive a compiler error.
When you want to inform the compiler that you are willing to deal with a possible loss of data because of a narrowing operation, you must apply an explicit cast using the C# casting operator, (). Consider the following update to the Program type:
class Program
{
static void Main(string[] args)
{
Console.WriteLine("***** Fun with type conversions *****");
short numb1 = 30000, numb2 = 30000;
// Explicitly cast the int into a short (and allow loss of data).
short answer = (short)Add(numb1, numb2);
Console.WriteLine("{0} + {1} = {2}",
numb1, numb2, answer);
NarrowingAttempt();
Console.ReadLine();
}
static int Add(int x, int y)
{
return x + y;
}
static void NarrowingAttempt()
{
byte myByte = 0;
int myInt = 200;
// Explicitly cast the int into a byte (no loss of data).
myByte = (byte)myInt;
Console.WriteLine("Value of myByte: {0}", myByte);
}
}
At this point, the code compiles; however, the result of the addition is completely incorrect.
***** Fun with type conversions *****
30000 + 30000 = -5536
Value of myByte: 200
As you have just witnessed, an explicit cast allows you to force the compiler to apply a narrowing conversion, even when doing so may result in a loss of data. In the case of the NarrowingAttempt() method, this was not a problem because the value 200 can fit snuggly within the range of a byte. However, in the case of adding the two shorts within Main(), the end result is completely unacceptable (30,000 + 30,000 = –5536?).
If you are building an application where loss of data is always unacceptable, C# provides the checked and unchecked keywords to ensure data loss does not escape undetected.
The checked Keyword
Let’s begin by learning the role of the checked keyword. Assume you have a new method within Program that attempts to add two bytes, each of which has been assigned a value that is safely below the maximum (255). If you were to add the values of these types (casting the returnedint to a byte), you would assume that the result would be the exact sum of each member.
static void ProcessBytes()
{
byte b1 = 100;
byte b2 = 250;
byte sum = (byte)Add(b1, b2);
// sum should hold the value 350. However, we find the value 94!
Console.WriteLine("sum = {0}", sum);
}
If you were to view the output of this application, you might be surprised to find that sum contains the value 94 (rather than the expected 350). The reason is simple. Given that a System.Byte can hold a value only between 0 and 255 (inclusive, for a grand total of 256 slots), sum now contains the overflow value (350 – 256 = 94). By default, if you take no corrective course of action, overflow/underflow conditions occur without error.
To handle overflow or underflow conditions in your application, you have two options. Your first choice is to leverage your wits and programming skills to handle all overflow/underflow conditions manually. Of course, the problem with this technique is the simple fact that you are human, and even your best attempts might result in errors that have escaped your eyes.
Thankfully, C# provides the checked keyword. When you wrap a statement (or a block of statements) within the scope of the checked keyword, the C# compiler emits additional CIL instructions that test for overflow conditions that may result when adding, multiplying, subtracting, or dividing two numerical data types.
If an overflow has occurred, you will receive a runtime exception: System.OverflowException. Chapter 7 will examine all the details of structured exception handling and the use of the try and catch keywords. Without getting too hung up on the specifics at this point, observe the following update:
static void ProcessBytes()
{
byte b1 = 100;
byte b2 = 250;
// This time, tell the compiler to add CIL code
// to throw an exception if overflow/underflow
// takes place.
try
{
byte sum = checked((byte)Add(b1, b2));
Console.WriteLine("sum = {0}", sum);
}
catch (OverflowException ex)
{
Console.WriteLine(ex.Message);
}
}
Notice that the return value of Add() has been wrapped within the scope of the checked keyword. Because the sum is greater than a byte, this triggers a runtime exception. Notice the error message printed out via the Message property.
Arithmetic operation resulted in an overflow.
If you want to force overflow checking to occur over a block of code statements, you can do so by defining a “checked scope” as follows:
try
{
checked
{
byte sum = (byte)Add(b1, b2);
Console.WriteLine("sum = {0}", sum);
}
}
catch (OverflowException ex)
{
Console.WriteLine(ex.Message);
}
In either case, the code in question will be evaluated for possible overflow conditions automatically, which will trigger an overflow exception if encountered.
Setting Project-wide Overflow Checking
If you are creating an application that should never allow silent overflow to occur, you might find yourself in the annoying position of wrapping numerous lines of code within the scope of the checked keyword. As an alternative, the C# compiler supports the /checked flag. When enabled, all your arithmetic will be evaluated for overflow without the need to make use of the C# checked keyword. If overflow has been discovered, you will still receive a runtime exception.
To enable this flag using Visual Studio, open your project’s property page and click the Advanced button on the Build tab. From the resulting dialog box, select the “Check for arithmetic overflow/underflow” check box (see Figure 3-3).

Figure 3-3. Enabling project-wide overflow/underflow data checking
Enabling this setting can be helpful when you’re creating a debug build. After all the overflow exceptions have been squashed out of the code base, you’re free to disable the /checked flag for subsequent builds (which can increase the runtime performance of your application).
The unchecked Keyword
Now, assuming you have enabled this project-wide setting, what are you to do if you have a block of code where data loss is acceptable? Given that the /checked flag will evaluate all arithmetic logic, C# provides the unchecked keyword to disable the throwing of an overflow exception on a case-by-case basis. This keyword’s use is identical to that of the checked keyword in that you can specify a single statement or a block of statements.
// Assuming /checked is enabled,
// this block will not trigger
// a runtime exception.
unchecked
{
byte sum = (byte)(b1 + b2);
Console.WriteLine("sum = {0} ", sum);
}
So, to summarize the C# checked and unchecked keywords, remember that the default behavior of the .NET runtime is to ignore arithmetic overflow/underflow. When you want to selectively handle discrete statements, make use of the checked keyword. If you want to trap overflow errors throughout your application, enable the /checked flag. Finally, the unchecked keyword can be used if you have a block of code where overflow is acceptable (and thus should not trigger a runtime exception).
![]() Source Code The TypeConversions project is located in the Chapter 3 subdirectory.
Source Code The TypeConversions project is located in the Chapter 3 subdirectory.
Understanding Implicitly Typed Local Variables
Up until this point in the chapter, when you have been defining local variables, you’ve explicitly specified the underlying data type of each variable being declared.
static void DeclareExplicitVars()
{
// Explicitly typed local variables
// are declared as follows:
// dataType variableName = initialValue;
int myInt = 0;
bool myBool = true;
string myString = "Time, marches on...";
}
While many (including yours truly) would argue that is it is always good practice to explicitly specify the data type of each variable, the C# language does provide for implicitly typing of local variables using the var keyword. The var keyword can be used in place of specifying a specific data type (such as int, bool, or string). When you do so, the compiler will automatically infer the underlying data type based on the initial value used to initialize the local data point.
To illustrate the role of implicit typing, create a new Console Application project named ImplicitlyTypedLocalVars. Notice how the local variables within the previous method can now be declared as follows:
static void DeclareImplicitVars()
{
// Implicitly typed local variables
// are declared as follows:
// var variableName = initialValue;
var myInt = 0;
var myBool = true;
var myString = "Time, marches on...";
}
![]() Note Strictly speaking, var is not a C# keyword. It is permissible to declare variables, parameters, and fields named var without compile-time errors. However, when the var token is used as a data type, it is contextually treated as a keyword by the compiler.
Note Strictly speaking, var is not a C# keyword. It is permissible to declare variables, parameters, and fields named var without compile-time errors. However, when the var token is used as a data type, it is contextually treated as a keyword by the compiler.
In this case, the compiler is able to infer, given the initially assigned value, that myInt is, in fact, a System.Int32, myBool is a System.Boolean, and myString is indeed of type System.String. You can verify this by printing the type name via reflection. As you will see in much more detail in Chapter 15, reflection is the act of determining the composition of a type at runtime. For example, using reflection, you can determine the data type of an implicitly typed local variable. Update your method with the following code statements:
static void DeclareImplicitVars()
{
// Implicitly typed local variables.
var myInt = 0;
var myBool = true;
var myString = "Time, marches on...";
// Print out the underlying type.
Console.WriteLine("myInt is a: {0}", myInt.GetType().Name);
Console.WriteLine("myBool is a: {0}", myBool.GetType().Name);
Console.WriteLine("myString is a: {0}", myString.GetType().Name);
}
![]() Note Be aware that you can use this implicit typing for any type including arrays, generic types (see Chapter 9), and your own custom types. You’ll see other examples of implicit typing over the course of this book.
Note Be aware that you can use this implicit typing for any type including arrays, generic types (see Chapter 9), and your own custom types. You’ll see other examples of implicit typing over the course of this book.
If you were to call the DeclareImplicitVars() method from within Main(), you’d find the output shown here:
***** Fun with Implicit Typing *****
myInt is a: Int32
myBool is a: Boolean
myString is a: String
Restrictions on Implicitly Typed Variables
There are various restrictions regarding the use of the var keyword. First, implicit typing applies only to local variables in a method or property scope. It is illegal to use the var keyword to define return values, parameters, or field data of a custom type. For example, the following class definition will result in various compile-time errors:
class ThisWillNeverCompile
{
// Error! var cannot be used as field data!
private var myInt = 10;
// Error! var cannot be used as a return value
// or parameter type!
public var MyMethod(var x, var y){}
}
Also, local variables declared with the var keyword must be assigned an initial value at the exact time of declaration and cannot be assigned the initial value of null. This last restriction should make sense, given that the compiler cannot infer what sort of type in memory the variable would be pointing to based only on null.
// Error! Must assign a value!
var myData;
// Error! Must assign value at exact time of declaration!
var myInt;
myInt = 0;
// Error! Can’t assign null as initial value!
var myObj = null;
It is permissible, however, to assign an inferred local variable to null after its initial assignment (provided it is a reference type).
// OK, if SportsCar is a reference type!
var myCar = new SportsCar();
myCar = null;
Furthermore, it is permissible to assign the value of an implicitly typed local variable to the value of other variables, implicitly typed or not.
// Also OK!
var myInt = 0;
var anotherInt = myInt;
string myString = "Wake up!";
var myData = myString;
Also, it is permissible to return an implicitly typed local variable to the caller, provided the method return type is the same underlying type as the var-defined data point.
static int GetAnInt()
{
var retVal = 9;
return retVal;
}
Implicit Typed Data Is Strongly Typed Data
Be aware that implicit typing of local variables results in strongly typed data. Therefore, use of the var keyword is not the same technique used with scripting languages (such as JavaScript or Perl) or the COM Variant data type, where a variable can hold values of different types over its lifetime in a program (often termed dynamic typing).
![]() Note C# does allow for dynamic typing in C# using a keyword called—surprise, surprise—dynamic. You will learn about this aspect of the language in Chapter 16.
Note C# does allow for dynamic typing in C# using a keyword called—surprise, surprise—dynamic. You will learn about this aspect of the language in Chapter 16.
Rather, type inference keeps the strongly typed aspect of the C# language and affects only the declaration of variables at compile time. After that, the data point is treated as if it were declared with that type; assigning a value of a different type into that variable will result in a compile-time error.
static void ImplicitTypingIsStrongTyping()
{
// The compiler knows "s" is a System.String.
var s = "This variable can only hold string data!";
s = "This is fine...";
// Can invoke any member of the underlying type.
string upper = s.ToUpper();
// Error! Can’t assign numerical data to a string!
s = 44;
}
Usefulness of Implicitly Typed Local Variables
Now that you have seen the syntax used to declare implicitly typed local variables, I am sure you are wondering when to make use of this construct. First, using var to declare local variables simply for the sake of doing so brings little to the table. Doing so can be confusing to others reading your code because it becomes harder to quickly determine the underlying data type and, therefore, more difficult to understand the overall functionality of the variable. So, if you know you need an int, declare an int!
However, as you will see beginning in Chapter 12, the LINQ technology set makes use of query expressions that can yield dynamically created result sets based on the format of the query itself. In these cases, implicit typing is extremely helpful because you do not need to explicitly define the type that a query may return, which in some cases would be literally impossible to do. Without getting hung up on the following LINQ example code, see whether you can figure out the underlying data type of subset:
static void LinqQueryOverInts()
{
int[] numbers = { 10, 20, 30, 40, 1, 2, 3, 8 };
// LINQ query!
var subset = from i in numbers where i < 10 select i;
Console.Write("Values in subset: ");
foreach (var i in subset)
{
Console.Write("{0} ", i);
}
Console.WriteLine();
// Hmm...what type is subset?
Console.WriteLine("subset is a: {0}", subset.GetType().Name);
Console.WriteLine("subset is defined in: {0}", subset.GetType().Namespace);
}
You might be assuming that the subset data type is an array of integers. That seems to be the case, but, in fact, it is a low level LINQ data type that you would never know about unless you have been doing LINQ for a long time or you open the compiled image in ildasm.exe. The good news is that when you are using LINQ, you seldom (if ever) care about the underlying type of the query’s return value; you will simply assign the value to an implicitly typed local variable.
In fact, it could be argued that the only time you would make use of the var keyword is when defining data returned from a LINQ query. Remember, if you know you need an int, just declare an int! Overuse of implicit typing (via the var keyword) is considered by most developers to be poor style in production code.
![]() Source Code The ImplicitlyTypedLocalVars project can be found in the Chapter 3 subdirectory.
Source Code The ImplicitlyTypedLocalVars project can be found in the Chapter 3 subdirectory.
C# Iteration Constructs
All programming languages provide ways to repeat blocks of code until a terminating condition has been met. Regardless of which language you have used in the past, I would guess the C# iteration statements should not raise too many eyebrows and should require little explanation. C# provides the following four iteration constructs:
· for loop
· foreach/in loop
· while loop
· do/while loop
Let’s quickly examine each looping construct in turn, using a new Console Application project named IterationsAndDecisions.
![]() Note I will keep this final section of the chapter short and to the point, as I am assuming you have experience using similar keywords (if, for, switch, etc.) in your current programming language. If you require more information, look up the topics “Iteration Statements (C# Reference),” “Jump Statements (C# Reference),” and “Selection Statements (C# Reference)” within the .NET Framework 4.6 SDK documentation.
Note I will keep this final section of the chapter short and to the point, as I am assuming you have experience using similar keywords (if, for, switch, etc.) in your current programming language. If you require more information, look up the topics “Iteration Statements (C# Reference),” “Jump Statements (C# Reference),” and “Selection Statements (C# Reference)” within the .NET Framework 4.6 SDK documentation.
The for Loop
When you need to iterate over a block of code a fixed number of times, the for statement provides a good deal of flexibility. In essence, you are able to specify how many times a block of code repeats itself, as well as the terminating condition. Without belaboring the point, here is a sample of the syntax:
// A basic for loop.
static void ForLoopExample()
{
// Note! "i" is only visible within the scope of the for loop.
for(int i = 0; i < 4; i++)
{
Console.WriteLine("Number is: {0} ", i);
}
// "i" is not visible here.
}
All your old C, C++, and Java tricks still hold when building a C# for statement. You can create complex terminating conditions, build endless loops, loop in reverse (via the -- operator), and use the goto, continue, and break jump keywords.
The foreach Loop
The C# foreach keyword allows you to iterate over all items in a container without the need to test for an upper limit. Unlike a for loop, however, the foreach loop will walk the container only in a linear (n+1) fashion (thus, you cannot go backward through the container, skip every third element, or whatnot).
However, when you simply need to walk a collection item by item, the foreach loop is the perfect choice. Here are two examples using foreach—one to traverse an array of strings and the other to traverse an array of integers. Notice that the data type before the in keyword represents the type of data in the container.
// Iterate array items using foreach.
static void ForEachLoopExample()
{
string[] carTypes = {"Ford", "BMW", "Yugo", "Honda" };
foreach (string c in carTypes)
Console.WriteLine(c);
int[] myInts = { 10, 20, 30, 40 };
foreach (int i in myInts)
Console.WriteLine(i);
}
The item after the in keyword can be a simple array (seen here) or, more specifically, any class implementing the IEnumerable interface. As you will see in Chapter 9, the .NET base class libraries ship with a number of collections that contain implementations of common abstract data types (ADTs). Any of these items (such as the generic List<T>) can be used within a foreach loop.
Use of Implicit Typing Within foreach Constructs
It is also possible to use implicit typing within a foreach looping construct. As you would expect, the compiler will correctly infer the correct “type of type.” Recall the LINQ example method shown earlier in this chapter. Given that you don’t know the exact underlying data type of thesubset variable, you can iterate over the result set using implicit typing.
static void LinqQueryOverInts()
{
int[] numbers = { 10, 20, 30, 40, 1, 2, 3, 8 };
// LINQ query!
var subset = from i in numbers where i < 10 select i;
Console.Write("Values in subset: ");
foreach (var i in subset)
{
Console.Write("{0} ", i);
}
}
The while and do/while Looping Constructs
The while looping construct is useful should you want to execute a block of statements until some terminating condition has been reached. Within the scope of a while loop, you will need to ensure this terminating event is indeed established; otherwise, you will be stuck in an endless loop. In the following example, the message "In while loop" will be continuously printed until the user terminates the loop by entering yes at the command prompt:
static void WhileLoopExample()
{
string userIsDone = "";
// Test on a lower-class copy of the string.
while(userIsDone.ToLower() != "yes")
{
Console.WriteLine("In while loop");
Console.Write("Are you done? [yes] [no]: ");
userIsDone = Console.ReadLine();
}
}
Closely related to the while loop is the do/while statement. Like a simple while loop, do/while is used when you need to perform some action an undetermined number of times. The difference is that do/while loops are guaranteed to execute the corresponding block of code at least once. In contrast, it is possible that a simple while loop may never execute if the terminating condition is false from the onset.
static void DoWhileLoopExample()
{
string userIsDone = "";
do
{
Console.WriteLine("In do/while loop");
Console.Write("Are you done? [yes] [no]: ");
userIsDone = Console.ReadLine();
}while(userIsDone.ToLower() != "yes"); // Note the semicolon!
}
Decision Constructs and the Relational/Equality Operators
Now that you can iterate over a block of statements, the next related concept is how to control the flow of program execution. C# defines two simple constructs to alter the flow of your program, based on various contingencies.
· The if/else statement
· The switch statement
The if/else Statement
First up is the if/else statement. Unlike in C and C++, the if/else statement in C# operates only on Boolean expressions, not ad hoc values such as –1 or 0.
Equality and Relational Operators
C# if/else statements typically involve the use of the C# operators shown in Table 3-7 to obtain a literal Boolean value.
Table 3-7. C# Relational and Equality Operators
|
C# Equality/Relational Operator |
Example Usage |
Meaning in Life |
|
== |
if(age == 30) |
Returns true only if each expression is the same |
|
!= |
if("Foo" != myStr) |
Returns true only if each expression is different |
|
< |
if(bonus < 2000) |
Returns true if expression A (bonus) is less than, greater than, less than or equal to, or greater than or equal to expression B (2000) |
|
> |
if(bonus > 2000) |
|
|
<= |
if(bonus <= 2000) |
|
|
>= |
if(bonus >= 2000) |
Again, C and C++ programmers need to be aware that the old tricks of testing a condition for a value not equal to zero will not work in C#. Let’s say you want to see whether the string you are working with is longer than zero characters. You might be tempted to write this:
static void IfElseExample()
{
// This is illegal, given that Length returns an int, not a bool.
string stringData = "My textual data";
if(stringData.Length)
{
Console.WriteLine("string is greater than 0 characters");
}
}
If you want to use the String.Length property to determine truth or falsity, you need to modify your conditional expression to resolve to a Boolean.
// Legal, as this resolves to either true or false.
if(stringData.Length > 0)
{
Console.WriteLine("string is greater than 0 characters");
}
Conditional Operators
An if statement may be composed of complex expressions as well and can contain else statements to perform more complex testing. The syntax is identical to C(++) and Java. To build complex expressions, C# offers an expected set of conditional logical operators, as shown in Table 3-8.
Table 3-8. C# Conditional Operators
|
Operator |
Example |
Meaning in Life |
|
&& |
if(age == 30 && name == "Fred") |
AND operator. Returns true if all expressions are true. |
|
|| |
if(age == 30 || name == "Fred") |
OR operator. Returns true if at least one expression is true. |
|
! |
if(!myBool) |
NOT operator. Returns true if false, or false if true. |
![]() Note The && and || operators both “short circuit” when necessary. This means that after a complex expression has been determined to be false, the remaining subexpressions will not be checked. If you require all expressions to be tested regardless, you can use the related & and |operators.
Note The && and || operators both “short circuit” when necessary. This means that after a complex expression has been determined to be false, the remaining subexpressions will not be checked. If you require all expressions to be tested regardless, you can use the related & and |operators.
The switch Statement
The other simple selection construct offered by C# is the switch statement. As in other C-based languages, the switch statement allows you to handle program flow based on a predefined set of choices. For example, the following Main() logic prints a specific string message based on one of two possible selections (the default case handles an invalid selection).
// Switch on a numerical value.
static void SwitchExample()
{
Console.WriteLine("1 [C#], 2 [VB]");
Console.Write("Please pick your language preference: ");
string langChoice = Console.ReadLine();
int n = int.Parse(langChoice);
switch (n)
{
case 1:
Console.WriteLine("Good choice, C# is a fine language.");
break;
case 2:
Console.WriteLine("VB: OOP, multithreading, and more!");
break;
default:
Console.WriteLine("Well...good luck with that!");
break;
}
}
![]() Note C# demands that each case (including default) that contains executable statements have a terminating break or goto to avoid fall-through.
Note C# demands that each case (including default) that contains executable statements have a terminating break or goto to avoid fall-through.
One nice feature of the C# switch statement is that you can evaluate string data in addition to numeric data. Here is an updated switch statement that does this very thing (notice there is no need to parse the user data into a numeric value with this approach):
static void SwitchOnStringExample()
{
Console.WriteLine("C# or VB");
Console.Write("Please pick your language preference: ");
string langChoice = Console.ReadLine();
switch (langChoice)
{
case "C#":
Console.WriteLine("Good choice, C# is a fine language.");
break;
case "VB":
Console.WriteLine("VB: OOP, multithreading and more!");
break;
default:
Console.WriteLine("Well...good luck with that!");
break;
}
}
It is also possible to switch on an enumeration data type. As you will see in Chapter 4, the C# enum keyword allows you to define a custom set of name-value pairs. To whet your appetite, consider the following final helper function, which performs a switch test on theSystem.DayOfWeek enum. You’ll notice some syntax I have not yet examined, but focus on the issue of switching over the enum itself; the missing pieces will be filled in over the chapters to come.
static void SwitchOnEnumExample()
{
Console.Write("Enter your favorite day of the week: ");
DayOfWeek favDay;
try
{
favDay = (DayOfWeek)Enum.Parse(typeof(DayOfWeek), Console.ReadLine());
}
catch (Exception)
{
Console.WriteLine("Bad input!");
return;
}
switch (favDay)
{
case DayOfWeek.Friday:
Console.WriteLine("Yes, Friday rules!");
break;
case DayOfWeek.Monday:
Console.WriteLine("Another day, another dollar");
break;
case DayOfWeek.Saturday:
Console.WriteLine("Great day indeed.");
break;
case DayOfWeek.Sunday:
Console.WriteLine("Football!!");
break;
case DayOfWeek.Thursday:
Console.WriteLine("Almost Friday...");
break;
case DayOfWeek.Tuesday:
Console.WriteLine("At least it is not Monday");
break;
case DayOfWeek.Wednesday:
Console.WriteLine("A fine day.");
break;
}
}
![]() Source Code The IterationsAndDecisions project is located in the Chapter 3 subdirectory.
Source Code The IterationsAndDecisions project is located in the Chapter 3 subdirectory.
Summary
The goal of this chapter was to expose you to numerous core aspects of the C# programming language. You examined the commonplace constructs in any application you may be interested in building. After examining the role of an application object, you learned that every C# executable program must have a type defining a Main() method, which serves as the program’s entry point. Within the scope of Main(), you typically create any number of objects that work together to breathe life into your application.
Next, you dove into the details of the built-in data types of C# and came to understand that each data type keyword (e.g., int) is really a shorthand notation for a full-blown type in the System namespace (System.Int32, in this case). Given this, each C# data type has a number of built-in members. Along the same vein, you also learned about the role of widening and narrowing, as well as the role of the checked and unchecked keywords.
The chapter wrapped up by covering the role of implicit typing using the var keyword. As discussed, the most useful place for implicit typing is when working with the LINQ programming model. Finally, you quickly examined the various iteration and decision constructs supported by C#.
Now that you have an understanding of some of the basic nuts and bolts, the next chapter (Chapter 4) will complete your examination of core language features. After that, you will be well prepared to examine the object-oriented features of C# beginning in Chapter 5.
All materials on the site are licensed Creative Commons Attribution-Sharealike 3.0 Unported CC BY-SA 3.0 & GNU Free Documentation License (GFDL)
If you are the copyright holder of any material contained on our site and intend to remove it, please contact our site administrator for approval.
© 2016-2026 All site design rights belong to S.Y.A.