C# 6.0 and the .NET 4.6 Framework (2015)
PART VIII
ASP.NET
CHAPTER 34
ASP.NET MVC and Web API
The last three chapters covered ASP.NET Web Forms as well as web-related concepts such as HTTP and HTML. This chapter introduces two newcomers to the ASP.NET ecosystem: ASP.NET MVC and Web API. MVC grew out of the user community (specifically the ALT.NET movement) asking for a framework that more closely adhered to the tenants of HTTP, was more testable, and adhered to separation of concerns. While Web Forms still controls the market share of the .NET web development ecosystem, MVC is rapidly growing its adoption rate.
This chapter begins with a brief explanation of the MVC pattern and then dives right into creating an MVC project. There is a lot of scaffolding that comes with the default project template, and the next sections cover the parts that are created for you. After getting a solid understanding of MVC, you will build the inventory pages for CarLotMVC, an MVC-based subset of the web site you built in the last three chapters.
The next section introduces you to Web API, a service framework built largely on the chassis of MVC, and shares many of the concepts, including routing, controllers, and actions. ASP.NET Web API allows you to leverage your MVC knowledge to build RESTful services without the configuration and plumbing that WCF (Chapter 25) requires. You will create a RESTful service called CarLotWebAPI that exposes all of the create, read, update, delete (CRUD) functionality on the inventory records. Finally, you finish the chapter by updating CarLotMVC to use CarLotWebAPI as the data source, instead of using Entity Framework and AutoLotDAL.
Introducing the MVC Pattern
The Model-View-Controller (MVC) pattern has been around since the 1970s (created as a pattern used in Smalltalk) but has exploded in popularity fairly recently. Many languages have MVC frameworks, including Java (most notably in the Spring Framework), Ruby (Ruby on Rails), .NET (with the introduction of ASP.NET MVC in 2007), and many JavaScript client frameworks such as Angular and EmberJS.
If the description of the pattern that follows reminds you of the Model-View-ViewModel pattern (covered in Chapter 30), you are correct. MVVM leverages many components of MVC (along with the Presentation Model pattern). Enough history. Let’s get into the pattern!
The Model
Just like in MVVM, the model is the data of your application. The data is typically represented by plain old CLR objects (POCOs), as you built in the AutoLotDAL library (Chapter 23) and used in the MVVM examples (Chapter 30). The model classes can (and often do) have validation built in and, depending on the client-side JavaScript framework used (such as knockout.js), can be configured as observables.
The View
The view is the UI of the application and renders the output to the user. The view should be as lightweight as is practical.
The Controller
The controller is the brains of the operation. Controllers have two responsibilities; the first is taking commands/requests from the user (referred to as actions) and correctly marshaling them appropriately (such as to a repository), and the second is to send any changes to the view. Controllers (as well as models and views) should be lightweight and leverage other components to maintain separation of concerns. This all sounds simple, doesn’t it? Before you dive into building an MVC application, there is that age-old question…
Why MVC?
By the time ASP.NET MVC was released in 2007, ASP.NET Web Forms had been in production for six years. Thousands of sites built on Web Forms were in production, with more and more coming online every day. So, why would Microsoft make a new framework from scratch? Before we answer that, a short look backward in time is appropriate.
When Microsoft first released ASP.NET Web Forms, web development wasn’t as prolific as it is today. The stateless paradigm was a difficult one to grasp, especially for smart client developers (such as those making desktop apps with Visual Basic 6, MFC, and PowerBuilder). To bridge the knowledge gap and make it easier for developers to build web sites, Web Forms enabled many of the desktop concepts, such as state (through viewstate) and prebuilt controls.
The plan worked. Web Forms was generally well received, and many developers made the jump to web developers. The number of web sites based on Web Forms continued to grow, and the story of .NET evolved. A thriving third-party ecosystem suppling Web Forms controls (and many other .NET controls) grew up in lockstep with Web Forms and .NET. Everything was coming up roses!
At the same time, developers were learning more about (and becoming comfortable with) the statelessness of programming for the Web, the HTTP protocol, HMTL, and JavaScript. These developers needed the bridging technologies less and less and wanted more and more control of the rendered views.
With each new version of Web Forms, additional features and capabilities were added into the framework, each adding to the weight of the applications. The increasing complexity of web sites being developed meant items such as viewstate were growing seemingly out of control. Even worse, some early decisions made in the creation of Web Forms (such as where viewstate was placed in the rendered page) were causing issues such as performance degradation to rear their ugly heads. This was causing some high-profile “defections” from .NET to other languages, like Ruby (using Ruby on Rails).
But Microsoft couldn’t (and wisely wouldn’t) remove those bridging technologies and other code from the ASP.NET core without risking millions of lines of code. Something had to be done, and retooling Web Forms wasn’t an option (although as you learned in the previous chapters, significant work was put into ASP.NET Web Forms 4.5 to resolve a whole host of issues). Microsoft had some hard decisions to make: how to keep the existing web developers (and the control ecosystem that grew up with Web Forms) happy and productive, while providing a platform for those developers who wanted to be closer to the metal of the Web.
Enter ASP.NET MVC
Thus, for all of those reasons, a new framework was born. ASP.NET MVC was created to be an alternative to ASP.NET Web Forms. There are some noticeable differences between ASP.NET Web Forms and ASP.NET MVC, including the following:
· Removing:
· Code-behind files for views
· Server-side control support
· Viewstate
· Adding:
· Model binding
· Routing
· The Razor View Engine (starting with MVC 3)
The result is a lightweight framework built on the speed of rendering and designed for testability and separation of concerns, but also requiring a deeper knowledge of HTML and JavaScript and the way HTTP actually works. Since the versions up to and including MVC5 are still built on the same core .NET libraries as Web Forms and Web API, combining Web Forms, MVC, and/or Web API becomes a viable deployment pattern. Each has strengths and weaknesses, and you should pick the right tool for the right job.
Convention over Configuration
One of the tenants of ASP.NET MVC is convention over configuration. This means that there are specific conventions (such as naming conventions and directory structure) for MVC projects that enable a lot of “magic” to be done for you by Visual Studio and .NET. This reduces the amount of manual or templated configuration necessary, but it also means you need to know the conventions. As you progress through this chapter, you will see several of the conventions in action.
Building Your First ASP.NET MVC Application
Enough theory. It’s time for code. Visual Studio ships with a rather complete project template for building ASP.NET MVC apps, and you will take full advantage of that when you build CarLotMVC.
The New Project Wizard
Start by launching Visual Studio, selecting File ![]() New
New ![]() Project. In the left sidebar, select Web under Visual C#, select ASP.NET Web Application, and change Name to CarLotMVC, as shown in Figure 34-1.
Project. In the left sidebar, select Web under Visual C#, select ASP.NET Web Application, and change Name to CarLotMVC, as shown in Figure 34-1.
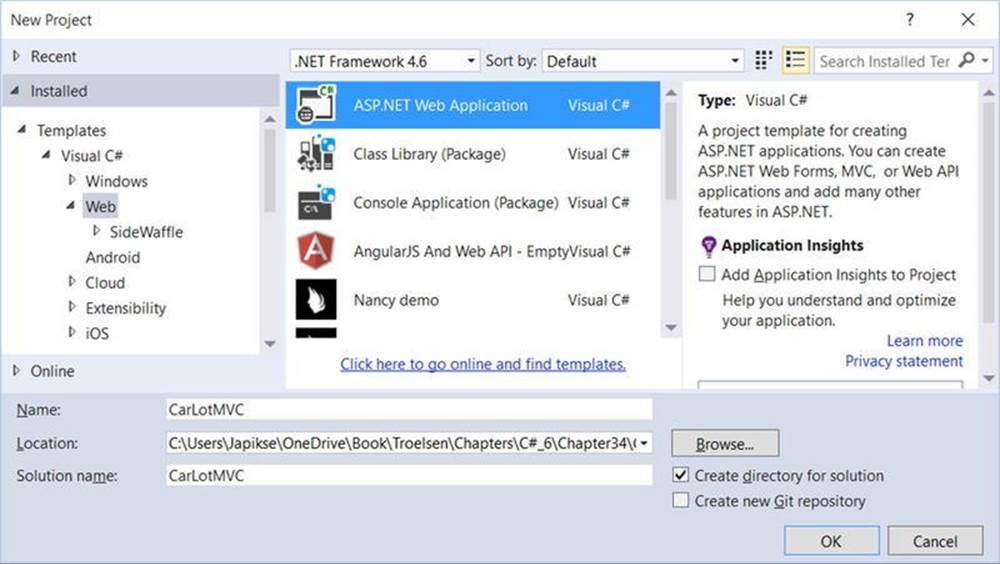
Figure 34-1. Creating a new ASP.NET web application
If you’ve been following along with the previous chapters on ASP.NET, you will notice that this is the same way you started building an ASP.NET Web Forms application. All ASP.NET application types (Web Forms, MVC, Web API) start with a single selection in the New Project Wizard, instead of having to choose a specific framework. Known as One ASP.NET, this change was introduced in .NET 4.5.
On the next screen, select MVC under ASP.NET 4.6 Templates. Notice that the MVC check box is selected under “Add folders and core references for:” and the others are not. If you wanted to create a hybrid application that supported MVC and Web Forms, you could select the Web Forms check box as well. For this example, just select MVC app, as shown in Figure 34-2. Also notice the “Add unit tests” check box. If you select this option, another project will be created for you that provides a basic framework for unit testing your ASP.NET application. Don’t click OK yet, as you’ll examine the authentication mechanisms for your project.
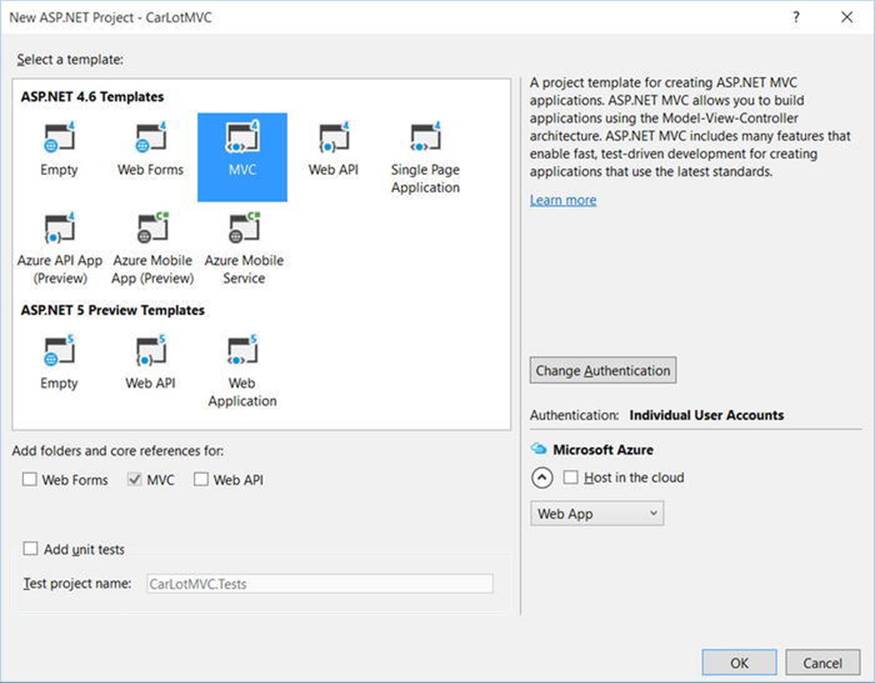
Figure 34-2. Selecting MVC
Click the Change Authentication button, and you will see the dialog shown in Figure 34-3. Leave the default set to Individual User Accounts (the default), click OK, and click OK in the Select a Template dialog.
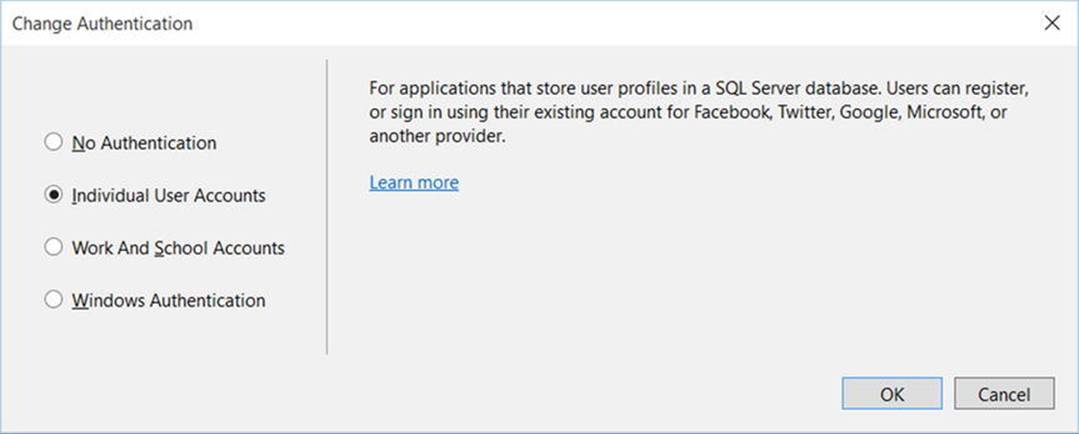
Figure 34-3. Authentication options for the project
Table 34-1 discusses the four authentication options available to MVC applications.
Table 34-1. Authentication Choices
|
Option |
Meaning in Life |
|
No Authentication |
No mechanism for logging in, entity classes for membership, or a membership database. |
|
Individual User Accounts |
Uses ASP.NET Identity (formerly known as ASP.NET Membership) for user authentication. |
|
Work and School Accounts |
For applications that authenticate with Active Directory, Azure Active Directory, or Office 365. |
|
Windows Authentication |
Uses Windows Authentication. Intended for intranet web sites. |
![]() Note I don’t cover authentication in this book because of space limitations. For more information on authentication in MVC, please see Adam Freeman’s book Pro ASP.NET MVC5.
Note I don’t cover authentication in this book because of space limitations. For more information on authentication in MVC, please see Adam Freeman’s book Pro ASP.NET MVC5.
Once that’s completed, you will see a lot of generated files and folders, as in Figure 34-4. You’ll be examining these in the next section.
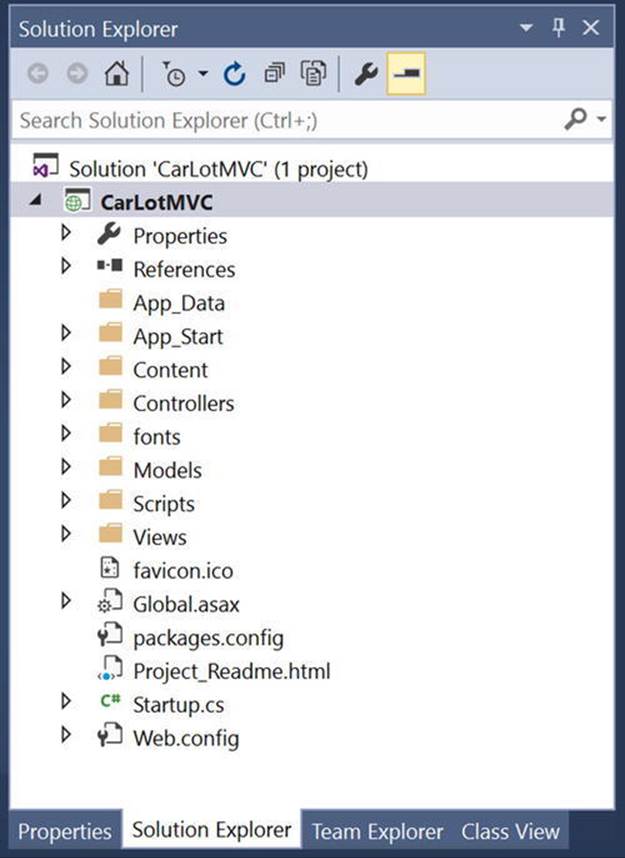
Figure 34-4. The generated files and folders for an MVC app
The Components of a Base MVC Project
Some of the folders and files should look familiar to you because they are named the same as the files and folders available to ASP.NET Web Forms projects.
Project Root Files
Most of the files in MVC projects have specific locations where they should be placed. However, there are a few files that are in the root of the project, and not all of them get deployed with the web site. Table 34-2 lists the files in the root of the MVC site and whether or not they are deployed.
Table 34-2. Files in the Project Root
|
File |
Meaning in Life |
Deployed? |
|
favicon.ico |
The icon that is displayed by browsers in the address bar next to the page name. Not having this can cause performance issues, as browser will continually look for this. |
Yes |
|
Global.asax/ Global.asax.cs |
The entry point into the application (like ASP.NET Web Forms). |
Yes |
|
packages.config |
Configuration information for NuGet packages used in the project. |
Yes |
|
Project_Readme.html |
Visual Studio–specific file that provides useful links and other information about ASP.MVC. |
No |
|
Startup.cs |
Startup class for OWIN (ASP.NET Identity). |
Yes (Compiled) |
|
Web.config |
Project configuration file. |
Yes |
Global.asax.cs
The Global.asax.cs file is where you hook into the ASP.NET pipeline. The events are the same events available to ASP.NET Web Forms. The default project template uses only the Application_Start event handler, but there are many more events that can be hooked into if you need them. Table 34-3 lists the most commonly used events.
Table 34-3. Commonly Used Global.asax.cs Events
|
Event |
Meaning in Life |
|
Application_Start |
Raised on first request for the application |
|
Application_End |
Raised when the application ends |
|
Application_Error |
Raised when an unhandled error occurs |
|
Session_Start |
Raised when a first request for a new session |
|
Session_End |
Raised when a session ends (or times out) |
|
Application_BeginRequest |
Raised when a request is made to the server |
|
Application_EndRequest |
Raised as the last event in the HTTP pipeline chain of execution when ASP.NET responds to a request |
The Models Folder
This is exactly what it sounds like; it’s the place to put model classes. In larger applications, you should use a data access library to hold your data access models. The Models folder is most commonly used for view-specific models, such as the model classes generated by Visual Studio for ASP.NET Identity.
The Controllers Folder
Again, just as the name implies, the Controllers folder is where the controllers in your application live. I will cover controllers in great detail later in this chapter.
The Views Folder
The Views folder is where the MVC views are stored (as the name suggests), but unlike the Models and Controllers folders, there is a convention for the directory structure contained in the Views folder.
In the root of the Views folder there is a Web.config file and a file named _ViewStart.cshtml. The Web.config file is specific for the views in this folder hierarchy, defines the base page type (e.g., System.Web.Mvc.WebViewPage), and, in Razor-based projects, adds all the references and using statements for Razor. The _ViewStart.cshtml file specifies the default layout view to use if one is not specifically assigned for a view. This will be discussed in greater detail with layouts. The layout view is analogous to the master page in Web Forms and will be covered in more detail later in this chapter.
![]() Note Why the leading underscore for _ViewStart.html (and _Layout.cshtml)? The Razor View Engine was originally created for WebMatrix, which would allow any file that did not start with an underscore to be rendered, so core files (such as layout and configuration) all have names that began with an underscore. You will also see this naming convention used for partial views. However, this is not a convention that MVC cares about since MVC doesn’t have the same issue as WebMatrix, but the underscore legacy lives on anyway.
Note Why the leading underscore for _ViewStart.html (and _Layout.cshtml)? The Razor View Engine was originally created for WebMatrix, which would allow any file that did not start with an underscore to be rendered, so core files (such as layout and configuration) all have names that began with an underscore. You will also see this naming convention used for partial views. However, this is not a convention that MVC cares about since MVC doesn’t have the same issue as WebMatrix, but the underscore legacy lives on anyway.
Each controller gets its own folder under the Views folder. This folder structure is part of the MVC convention; controllers look for their views in a folder of the same name as the controller (minus the word Controller). For example, the Views/Home folder holds all the views for theHomeController controller class.
The Shared Folder
A special folder under Views is named Shared. This folder is accessible to all views.
The ASP.NET Folders
There are also folders reserved for ASP.NET. An example of this is the App_Data ASP.NET folder that is included in the default MVC template. This folder is a special folder designed to store any file-based data needed by the site. There are also folders for storing code, resources, and themes. The ASP.NET folders can be added by right-clicking the project, selecting Add ![]() Add New ASP.NET Web Folder, and selecting one from the dialog shown in Figure 34-5. The ASP.NET folders are not viewable from the web site, even if folder navigation is enabled.
Add New ASP.NET Web Folder, and selecting one from the dialog shown in Figure 34-5. The ASP.NET folders are not viewable from the web site, even if folder navigation is enabled.
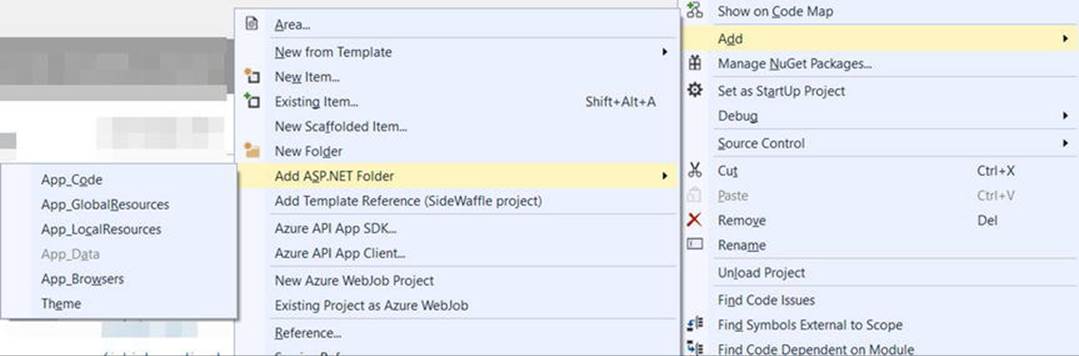
Figure 34-5. Adding new ASP.NET folders
Table 34-4 lists the available ASP.NET web folders.
Table 34-4. ASP.NET Web Folders
|
Folder |
Meaning in Life |
|
App_Code |
Code files contained in this folder are dynamically compiled. |
|
App_GlobalResources |
Holds resource files available to the entire application. Typically used for localization. |
|
App_LocalResources |
Contains resources available to a specific page. Typically used for localization. |
|
App_Data |
Contains file-based data used by the application. |
|
App_Browsers |
Place to hold browser capability files. |
|
App_Themes |
Holds themes for the site. |
The App_Start Folder
Early versions of MVC contained all the site configuration code (such as routing and security) in the Global.asax.cs class. As the amount of configuration grew, the developers on the MVC team wisely split the code into separate classes to better follow single responsibility. Out of this refactoring, the App_Start folder and its contained classes were born (details in Table 34-5). Any code in the App_Start folder gets automatically compiled into the site.
Table 34-5. Files in App_Start
|
File |
Meaning in Life |
|
BundleConfig.cs |
Creates the files bundles for JavaScript and CSS files. Additional bundles can (and should) be created in this class. |
|
FilterConfig.cs |
Registers action filters (such as authentication or authorization) at a global scope. |
|
IdentityConfig.cs |
Contains support classes for ASP.NET Identity. |
|
RouteConfig.cs |
Class where the routing table is configured. |
|
Startup.Auth.cs |
Entry point for configuration of ASP.NET Identity. |
BundleConfig
This class sets up the bundles for CSS and JavaScript files. By default, when using ScriptBundle, all included files are bundled and minified (see the next section for an explanation of bundling and minification) for production and not bundled or minified for debug mode. This can be controlled through Web.config or in the class itself. To turn off bundling and minification, enter the following into the system.web section of your top-level Web.config (if it doesn’t already exist):
<system.web>
<compilation debug="true" targetFramework="4.6" />
</system.web>
Or add BundleTable.EnableOptimizations = false in the RegisterBundles method in BundleConfig.cs, as follows:
public static void RegisterBundles(BundleCollection bundles)
{
bundles.Add(new ScriptBundle("~/bundles/jquery").Include("~/Scripts/jquery-{version}.js"));
// Code removed for clarity.
BundleTable.EnableOptimizations = false;
}
Bundling
Bundling is the process of combining multiple files into one. This is done for a couple of reasons; the main reason is to speed up your site. Browsers have a limit of how many files they will download concurrently from a single server. If your site contains a lot of small files (which is usually a good idea in support of separation of concerns and single responsibility), this can slow down your users’ experience. Bundling and using content delivery networks (CDNs) can help resolve this. Of course, you need to temper your actions with wisdom since having one gigantic file probably isn’t going to be any better than a million little ones.
Minification
Like bundling, minification is designed to speed up load time for web pages. For CSS and JavaScript files to be readable, they are typically written with meaningful variable and function names, comments, and other formatting (at least they should be). The problem is that every bit getting sent over the wire counts, especially when dealing with mobile clients.
Minification is a process of replacing long names with short (sometimes just one-character) names, removing extra spaces, as well as other formatting. Most modern frameworks ship with two versions of their CSS and JavaScript files. Bootstrap is no different, shipping withbootstrap.css for use while developing your application and bootstrap.min.css for production.
FilterConfig
Filters are custom classes that provide a mechanism to intercept actions and requests. They can be applied at the action, controller, or global level. There are four types of filters in MVC, as listed in Table 34-6.
Table 34-6. Filters in ASP.NET MVC
|
Filter Type |
Meaning in Life |
|
Authorization |
These implement IAuthorizationFilter and run before any other filter. Two examples are Authorize and AllowAnonymous. For example, the AccountController class is annotated with the [Authorize] attribute to require an authenticated user through Identity, and the Login action is marked with the [AllowAnonymous]attribute to allow any user. |
|
Action |
Implement IActionFilter and allow for interception of action execution with OnActionExecuting and OnActionExecuted. |
|
Result |
Implement IResultFilter and intercept the result of an action with OnResultExecuting and OnResultExecuted. |
|
Exception |
Implement IExceptionFilter and execute if an unhandled exception is thrown during the execution of the ASP.NET pipeline. By default, the HandleError filter is configured at the global level. This filter displays the error view page Error.cshtml located in the Shared\Error folder. |
Identity
Identity.config.cs and Startup.Auth.cs are both used to support ASP.NET Identity. Identity is too big of a topic to be covered as part of this chapter. In fact, one could write a book on all the details around security and identity. As mentioned early, ASP.NET Identity is based on OWIN, separating Identity from its dependency on IIS. While this separation doesn’t come into play for MVC using the .NET 4.6 framework, it can be significant in ASP.NET Web API if you are self-hosting your service.
RouteConfig
Early versions of ASP.NET Web Forms defined the URLs of the site based on the physical folder structure of the project. This could be changed with HttpModules and HttpHandlers, but that was far from ideal. MVC from the start included routing, which enables you to shape the URLs to better suit your users. This will be covered in greater detail later in this chapter.
The Content Folder
The Content folder is designed to hold your site’s CSS files. This is also commonly used to hold images and other non-programmatic content. Unlike many of the folders listed here, there isn’t a dependency on this folder name; it’s just a convention of convenience.
ASP.NET MVC ships with Bootstrap, one of the most popular HTML, CSS, and JavaScript frameworks in use today. Two of the default CSS files (bootstrap.css and bootstrap.min.css) are part of Bootstrap, and site.css is where you would put your site-specific CSS.
Bootstrap
Bootstrap is an open source HTML, CSS, and JavaScript framework for developing responsive, Mobile First web sites. Microsoft started including Bootstrap with MVC4 and continues to ship it with MVC5, and the default project template for MVC5 uses Bootstrap to style the scaffolded pages. While there isn’t space to cover Bootstrap in depth in this book, you will use some of the features in Bootstrap in this chapter to add additional styling to your site.
The Fonts Folder
Bootstrap ships with GlyphIcons-Halflings font sets, which you will use later in this chapter to enhance your application UI. The version of Bootstrap that ships with the MVC project template requires that the fonts are located in the Fonts folder.
The Scripts Folder
The Scripts folder is where JavaScript files are placed. Table 34-7 lists the files that ship with the default template and their use.
Table 34-7. JavaScript Files in the ASP.NET MVC Project Template
|
JavaScript File |
Meaning in Life |
|
_references.js |
The _references.js file is for Visual Studio IntelliSense. You can add additional references into this file pointing to your custom JavaScript files. |
|
bootstrap.js bootstrap.min.js |
These are the JavaScript files for Bootstrap. The .min file is the pre-minified version. |
|
jquery-1.x.intellisense.js jquery-1.x.js jquery-1.x.min.js jquery-1.x.min.map |
jQuery is the dominant JavaScript framework for web developers. In addition to DOM manipulation capabilities, there are a host of frameworks that depend on jQuery, including the validation plug-in used in the MVC project template. The MVC project template ships with older versions of jQuery. In the next section, you will update them to the current version. |
|
jquery.validate-vsdoc.js jquery.validate.js jquery.validate.min.js |
The jQuery Validate plug-in makes client-side validation much simpler. The vsdoc file is for Visual Studio IntelliSense, and the .min file is the pre-minified version. |
|
jquery.validate.unobtrusive.js jquery.validate.unobtrusive.min.js |
The Unobtrusive jQuery Validation plug-in works with jQuery Validation, leveraging HTML5 attributes for client-side validation. |
|
modernizr-2.x.js |
Modernizr contains a series of fast tests (“detects” in Modernizr parlance) to determine browser capabilities. This works directly against the browser instead of relying on browser caps files that may or may not be out of date. |
|
respond.js respond.min.js |
Respond.js is an experimental jQuery plug-in for building web sites with responsive content. |
Updating NuGet Packages to Current Versions
As you can see, there are a lot of files and packages that comprise the core MVC project template, and many of them are open source frameworks. Open source projects get updated at a much more rapid pace than Microsoft can (or should) release updates to Visual Studio. It’s almost a guarantee that as soon as you create a new project, the packages are already out-of-date.
Fortunately, updating them is as simple as running the NuGet GUI. Right-click your project and select Manage NuGet Packages from the context menu. Once the NuGet Package Manage loads, change Filter to Installed, which will then show only the packages that are installed. Packages with a blue arrow pointing up have an upgrade available, as shown in Figure 34-6. Go ahead and update all your packages.
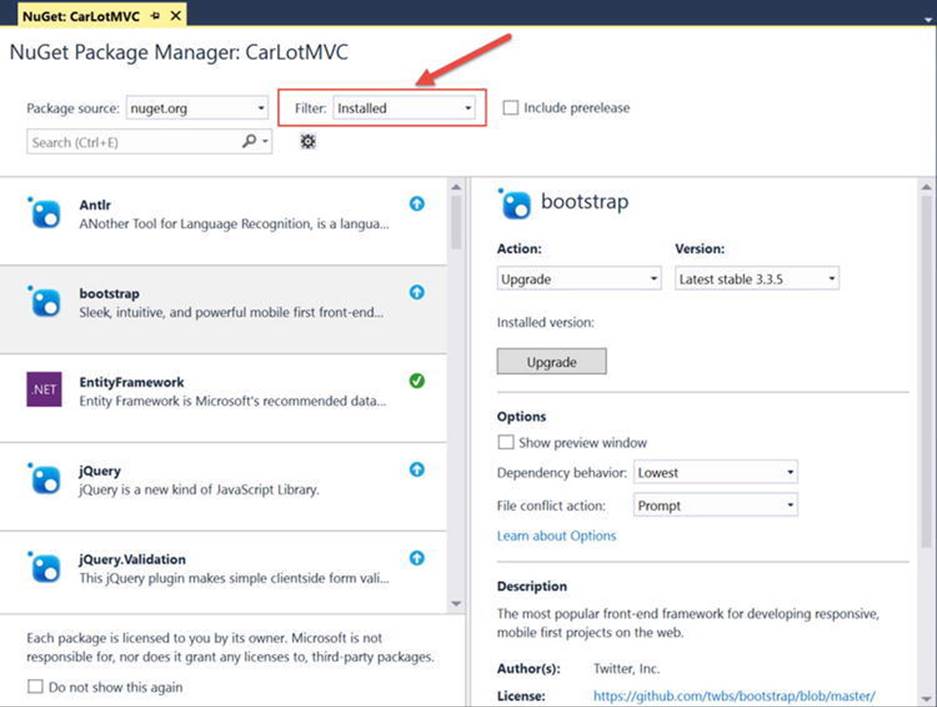
Figure 34-6. Updating NuGet packages
Test-Drive Your Site
Before you go any further into the chapter, run the project and click around to see what is included with the default project template. You will find that there is quite a lot already built for you. The template has a menu, several screens, and login capabilities (complete with a registration screen). Figure 34-7 shows the home page.
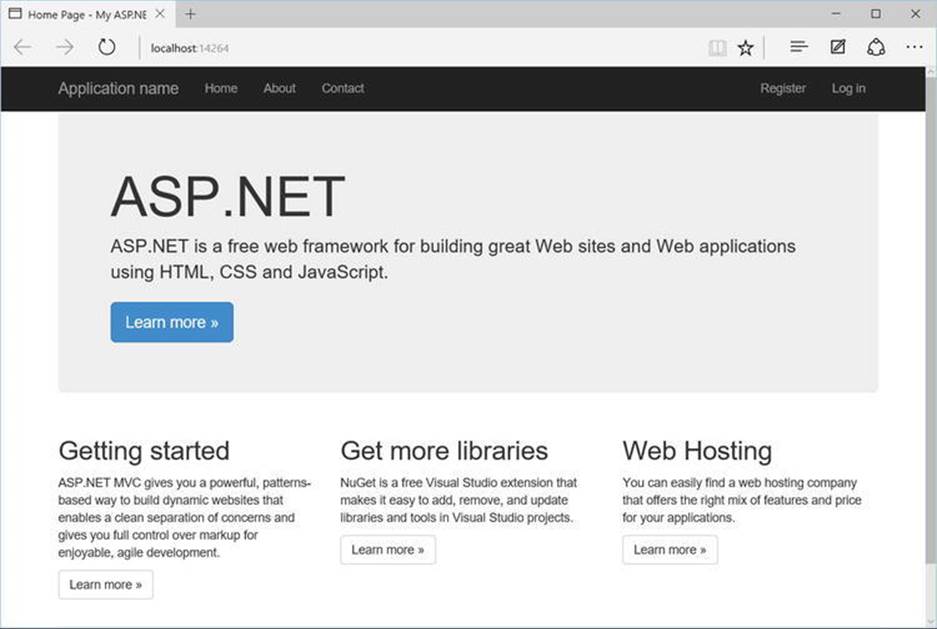
Figure 34-7. Default home page
As mentioned, Bootstrap is a responsive framework, which means it is capable of adapting the UI based on the viewport. Shrink the size of your browser, and you will see the home page alter to be more mobile friendly, as shown in Figure 34-8. The menu becomes the standard “cheeseburger” glyph, and the horizontal layout of the three “Learn more” sections change to vertical.
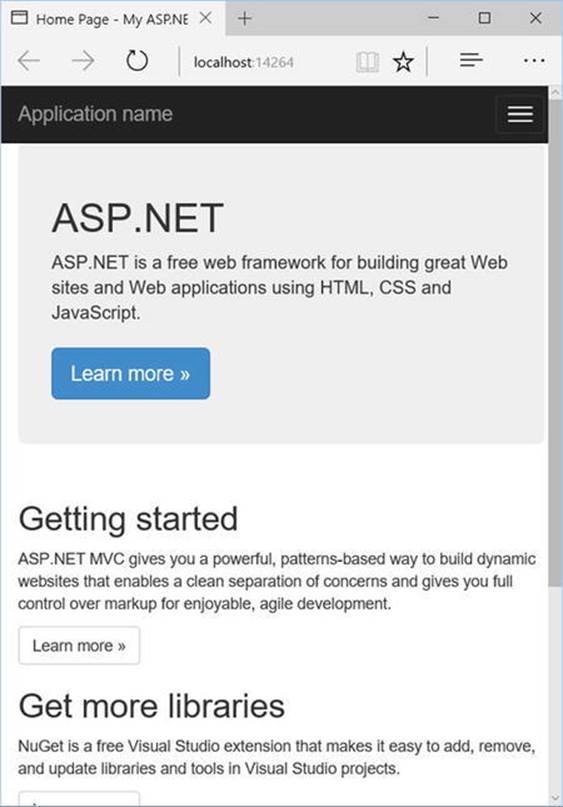
Figure 34-8. The responsive view of the home page
Routing
Routing is the way MVC matches URL requests to controllers and actions in your application, instead of the old Web Forms process of matching URLS to file structure. Run the CarLotMVC project again, and notice the URL is essentially blank. On my machine, the URL ishttp://localhost:14264 (on your machine, the port number will most likely be different). Now click the Contact link, and the URL changes to http://localhost:14264/Home/Contact. Examining your solution, there isn’t a folder path of Home/Contact. This is because the Route table mapped the URL request of Home/Contact to execute the Contact() action method on the HomeController.cs class. (You’ll learn more about controllers and actions later in this chapter.)
URL Patterns
Routing entries are composed of URL patterns comprised of variable placeholders and literals placed into a collection known as the route table, with each entry defining a different URL pattern to match. Variable placeholders can be custom variables or from a list of predefined variables. For example, {controller} and {action} direct to a controller and action. The placeholder {id} is custom and is translated into a parameter for the action. When a URL is checked against the route table, the process is serial and ordered. It checks the URL against the entries in the collection in the order that they were added. The process stops when the first match is found; it doesn’t matter if a better match occurs later in the route table. This is an important consideration to keep in mind when adding route table entries.
Open RouteConfig.cs (located in the App_Start folder) and examine the contents, as shown here:
public class RouteConfig
{
public static void RegisterRoutes(RouteCollection routes)
{
routes.IgnoreRoute("{resource}.axd/{*pathInfo}");
routes.MapRoute(
name: "Default",
url: "{controller}/{action}/{id}",
defaults: new { controller = "Home", action = "Index", id = UrlParameter.Optional }
);
}
}
The first line directs the routing engine to ignore requests that have an .axd extension, which denotes an HttpHandler. The IgnoreRoute() method passes the request back to the web server, in this case IIS. The {*pathinfo} pattern handles a variable number of parameters, extending the matches to any URL that includes an HttpHandler.
The MapRoute() method adds a new entry into the route table. The call specifies a name, URL pattern, and default values for the variables in the URL pattern. The URL pattern in the preceding example is the same as discussed earlier, calling the specified action on the specified controller and passing the {id} entry into the action method as a parameter. An example URL that would be serviced by this route is Inventory/Add/5. This invokes the Add() action method on the InventoryController, passing 5 to the id parameter.
The defaults specify how to fill in the blanks for partial URLs. In the previous code, if nothing was specified in the URL (such as http://localhost:14264), then the routing engine would call the Index() action method of the HomeController class, without any idparameter. The defaults are progressive, meaning that they can be excluded from right to left. Entering a URL like http://localhost14264/Add/5 will fail the {controller}/{action}/{id} pattern.
Creating Routes for the Contact and About Pages
Of course, when your site is deployed, the URL won’t be localhost:14264 but something meaningful like http://skimedic.com. One of the advantages of routing is the ability to shape URLs to the benefit of your users. This means creating URLs that are easy to remember and find on search engines. For example, instead of http://skimedic.com/Home/Contact and http://skimedic.com/Home/About, it would be better to also be able to reach them with http://skimedic.com/Contact and http://skimedic.com/About (of course without losing the longer mapping). With routing, this is easy to accomplish.
Open RouteConfig.cs, and add the following line of code after the IgnoreRoutes call and before the default route:
routes.MapRoute("Contact", "Contact", new { controller = "Home", action = "Contact" });
This line adds a new entry named Contact into the route table that contains only one literal value, Contact. It maps to Home/Contact, not as defaults, but as hard-coded values. To test this, run the app, and click the Contact link. The URL changes tohttp://localhost:14264/Contact, which is exactly what you wanted—an easy-to-remember URL for your customers.
Now update the URL to http://localhost:14264/Home/Contact/Foo. It still works! This is because the URL failed to match the first entry in the route table and fell through to the second route entry, which it matched. Now update the URL in the browser tohttp://localhost:14264/Home/Contact/Foo/Bar. This time it fails, since it doesn’t match any of the routes. Fix this by adding {*pathinfo} to the pattern. This allows any number of additional URL parameters. Update the Contact route entry to the following:
routes.MapRoute("Contact", "Contact/{*pathinfo}", new { controller = "Home", action = "Contact" });
Now when you enter the URL http://localhost:14264/Home/Contact/Foo/Bar, it still shows the Contact page. Mission accomplished. This is an easy-to-remember URL for your users, and even if they mess it up by adding a bunch of additional garbage on the end, they can still find your page.
To complete the exercise, add the following line immediately after the Contact entry to create a route for the About page:
routes.MapRoute("About", "About/{*pathinfo}", new { controller = "Home", action = "About" });
Redirecting Users Using Routing
Another advantage of routing is that you no longer have to hard-code URLs for other pages in your site. The routing entries are used bi-directionally, not only to match incoming requests but also to build URLs for your site. For example, open the _Layout.cshtml file in theViews/Shared folder. Notice this line (don’t worry about the syntax for now; you’ll learn about it shortly):
@Html.ActionLink("Contact", "Contact", "Home")
The ActionLink() HTML helper creates a hyperlink with the display text Contact for the Contact action in the Home controller. Just like incoming requests, the routing engine starts at the top and works down until it finds a match. This line matches the Contact route you added earlier in the chapter and is used to create the following link:
<a href="/Contact">Contact</a>
If you hadn’t added the Contact route, the routing engine would have been created this:
<a href="/Home/Contact">Contact</a>
![]() Note This section introduced several new items that I haven’t covered yet, such as the @ syntax, the Html object, and the _Layout.cshtml file. These are all covered soon enough. The main takeaway is that the routing table is used not only to parse incoming requests and send them to the appropriate resource for handling but also to create URLs based on the resources specified.
Note This section introduced several new items that I haven’t covered yet, such as the @ syntax, the Html object, and the _Layout.cshtml file. These are all covered soon enough. The main takeaway is that the routing table is used not only to parse incoming requests and send them to the appropriate resource for handling but also to create URLs based on the resources specified.
Adding AutoLotDAL
Applications need data, and CarLotMVC is no different. Start by copying the AutoLotDAL project from Chapter 31 and all of its files into the CarLotMVC folder (at the same level as the CarLotMVC solution file). You can also copy the project from the Chapter 34 subfolder of the source download. You will be updating the data access library from what you built in Chapter 31, so you can’t just reference the DLL.
Add the project into your solution by right-clicking the CarLotMVC solution, selecting Add ![]() Existing Project, navigating to the AutoLotDAL folder, and selecting AutoLotDAL.csproj. Add a reference to AutoLotDAL by right-clicking the CarLotMVC project and selecting Add
Existing Project, navigating to the AutoLotDAL folder, and selecting AutoLotDAL.csproj. Add a reference to AutoLotDAL by right-clicking the CarLotMVC project and selecting Add ![]() Reference from the context menu. In the Reference Manager dialog, select Projects
Reference from the context menu. In the Reference Manager dialog, select Projects ![]() Solution in the left sidebar, check the box next to AutoLotDAL (as shown in Figure 34-9), and click OK.
Solution in the left sidebar, check the box next to AutoLotDAL (as shown in Figure 34-9), and click OK.
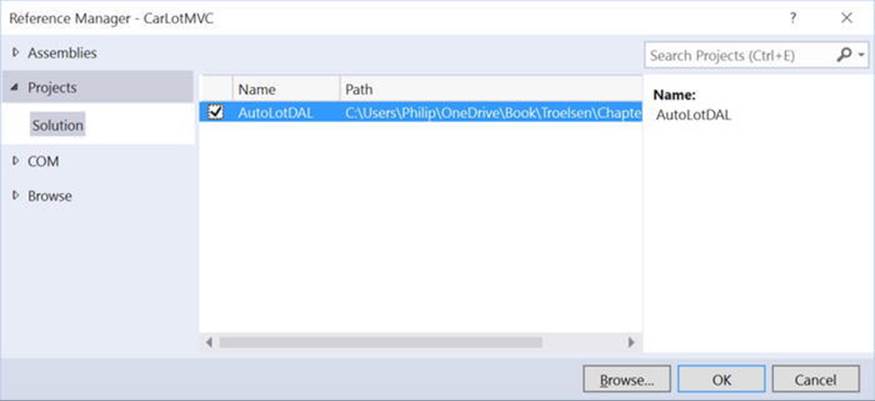
Figure 34-9. Adding the project reference for AutoLotDAL
The next step is to add the connection string to the AutoLot database into the CarLotMVC Web.config file. Since ASP.NET Identity uses Entity Framework (EF), you don’t need to install the EF package like you did when building the Web Forms sites. You just need to add another connection string. Open the Web.config file and locate the <connectionStrings> element. Either copy the AutoLotConnection value from the App.config file in the AutoLotDAL project or manually add the AutoLotConnection value as shown here (your value might be slightly different than shown here based on how you installed SQL Server Express):
<connectionStrings>
<!-- default connection omitted for brevity -->
<add name="AutoLotConnection" connectionString="data source=localhost\SQLEXPRESS2014;initial catalog=AutoLot;integrated security=True;MultipleActiveResultSets=True;App=EntityFramework" providerName="System.Data.SqlClient" />
</connectionStrings>
![]() Note You probably noticed that ASP.NET Identity uses LocalDb (a lightweight version of SQL Server that doesn’t require administration) for the data source, and you can certainly use LocalDb with ASP.NET MVC projects (many developers do). Since this book uses the same database since Chapter 21 for all the data-driven examples, I decided to create a SQL Express database instead of using LocalDb. Does it make a difference in how you would build this site? No, it does not. The end result is the same, and I wanted to focus on C# and keep the SQL Server aspect simple and unobtrusive.
Note You probably noticed that ASP.NET Identity uses LocalDb (a lightweight version of SQL Server that doesn’t require administration) for the data source, and you can certainly use LocalDb with ASP.NET MVC projects (many developers do). Since this book uses the same database since Chapter 21 for all the data-driven examples, I decided to create a SQL Express database instead of using LocalDb. Does it make a difference in how you would build this site? No, it does not. The end result is the same, and I wanted to focus on C# and keep the SQL Server aspect simple and unobtrusive.
Controllers and Actions
As discussed earlier, when a request comes in from the browser, it (typically) gets mapped to an action method for a specific controller class. While that sounds fancy, it’s pretty straightforward. A controller is a class that inherits from one of two abstract classes, Controller orAsyncController. Note that you can also create a controller from scratch by implementing IController, but that is beyond the scope of this book. An action method is a method of the controller class.
Adding the Inventory Controller
The best way to understand this is to add a new controller with actions using the built-in helpers in Visual Studio. Right-click the Controllers folder in your project, and select Add ![]() Controller, as shown in Figure 34-10.
Controller, as shown in Figure 34-10.
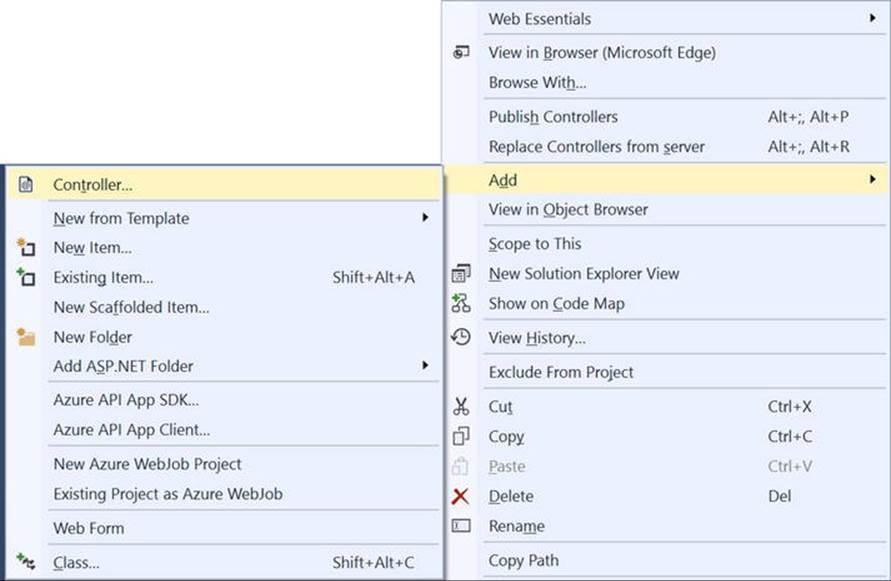
Figure 34-10. Launching the Add Scaffold dialog for a new controller
This brings up the Add Scaffold dialog, as shown in Figure 34-11. There are several options available, and you want to choose the “MVC5 Controller with views, using Entity Framework.”
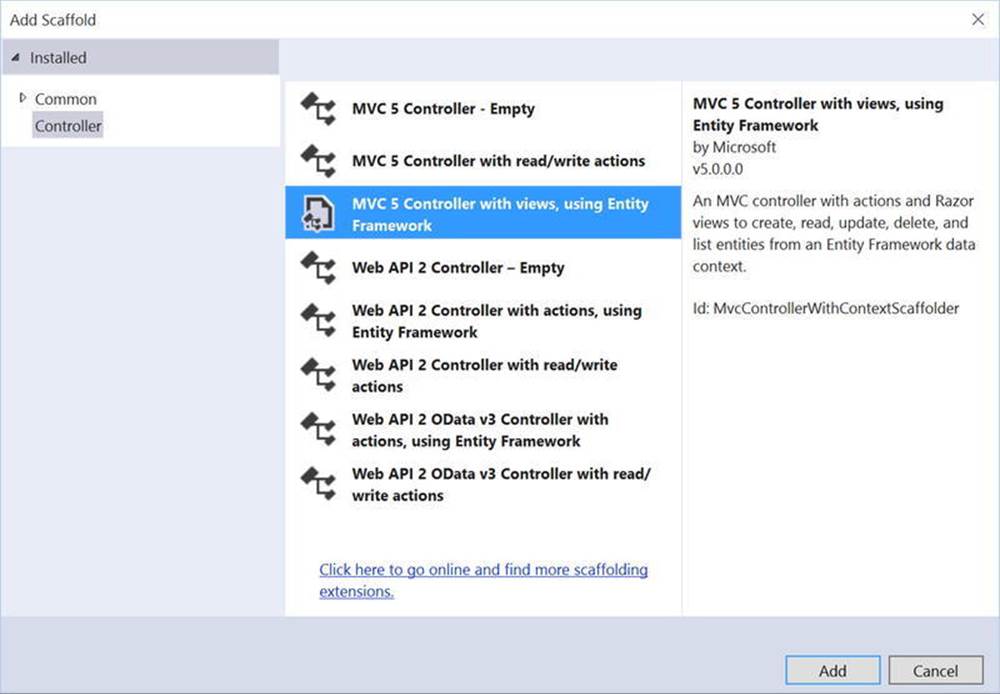
Figure 34-11. The Add Scaffold dialog
This will bring up an additional dialog (shown in Figure 34-12) that allows you to specify the types for your controller and action methods. The first question is to specify the model class, which determines the type for the controllers and action methods. Select the Inventory class from the drop-down. The next question asks you to specify the context class. If you don’t select one, the wizard will create one for you. For the data context, select AutoLotEntities. The next option is to use async action methods. Select the option that best meets your project needs. For this example, select the “Use async controller actions” check box. The Generate Views option (on by default) instructs the wizard to create a related view for each of the action methods. The “Reference script libraries” option instructs include the render for jQuery validation. The “Use a layout page” option will be discussed later in this chapter. Leave those three (Generate Views, Reference script libraries, and Use a layout page) checked, and change the name to InventoryController (from InventoriesController).
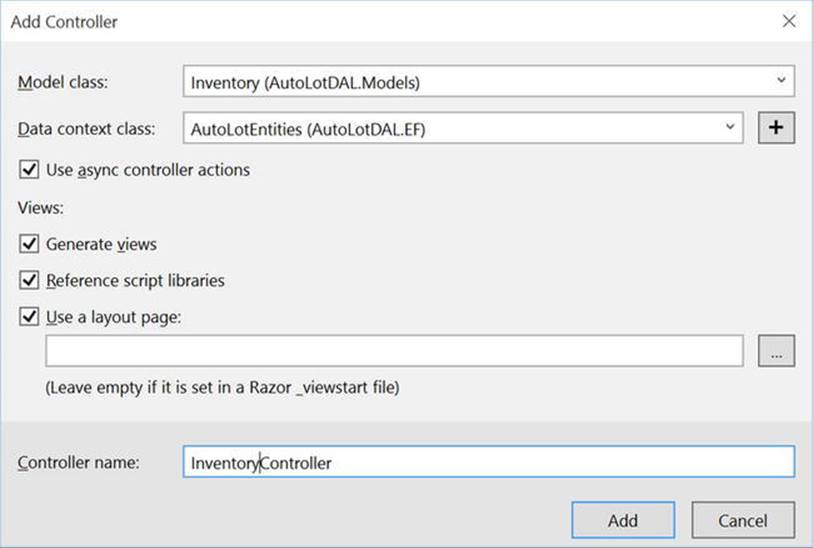
Figure 34-12. Selecting the model, context, and other options
![]() Note There are a lot of MVC tooling aides in Visual Studio. You just saw how you can invoke the New Controller Wizard, which uses scaffolding to create a controller and a series of views (based on your answers in the wizard). If you right-click the Views folder, there is a menu item to add a new view, and the New View Wizard invokes the view scaffolding. If you right-click an action, you can add a new view (which will be placed in the Views/Controller folder with the same name as the action), or you can navigate to the proper view. All of these features depend on the conventions discussed earlier, so if you follow the rules, life will be good!
Note There are a lot of MVC tooling aides in Visual Studio. You just saw how you can invoke the New Controller Wizard, which uses scaffolding to create a controller and a series of views (based on your answers in the wizard). If you right-click the Views folder, there is a menu item to add a new view, and the New View Wizard invokes the view scaffolding. If you right-click an action, you can add a new view (which will be placed in the Views/Controller folder with the same name as the action), or you can navigate to the proper view. All of these features depend on the conventions discussed earlier, so if you follow the rules, life will be good!
This does several things for you. First, it created an InventoryController class in the Controllers folder. It also created an Inventory folder in the Views folder and added five views under that folder. We will examine each of these in detail now.
Examine the Scaffolded Views
To access the new views without hacking the URL, you need to create a menu item for them. Open _Layout.cshtml (under Views/Shared), and locate the line containing @Html.ActionLink(" Home", "Index","Home"). Make a copy of that line and paste it in just below. Update the line to the following:
<li>@Html.ActionLink("Inventory", "Index", "Inventory")</li>
Before you run the program, you need to change the startup settings for the project. Select the CarLotMVC project in Solution Explorer, right-click, and select Properties. Navigate to Web in the left sidebar, and select “Specific page” (leaving the value blank) under Start Action, as inFigure 34-13. This will cause Visual Studio to launch your site at the root (e.g., http://localhost:14264).
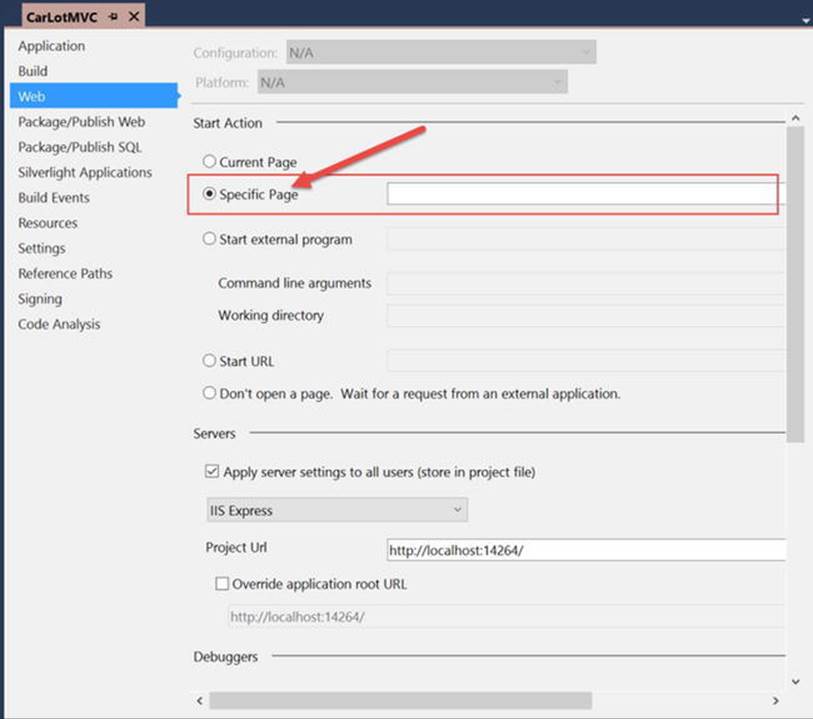
Figure 34-13. Updating the Web start action
Now run the program, click the Inventory link, and play around with viewing, editing, creating, and deleting cars. The views aren’t going to win any design awards, but they are functional. You will upgrade the UI in the next section, but for now, let’s examine the controller and actions in more detail.
MVC Controllers
Open the InventoryController.cs class. Notice that it follows the convention of ending in the word Controller. It also derives from the abstract class Controller. There are a series of methods (actions) such as Index() , Edit() , and so on. You will examine each of these in turn, as well as the attributes decorating them. Finally, there is a Dispose() override that you can use to forcefully garbage collect any expensive resources used by the controller.
Action Results
Actions typically return an ActionResult (or Task<ActionResult> for async operations). There are several types that derive from ActionResult, and some of the more common ones are listed in Table 34-8.
Table 34-8. Typical ActionResult-Derived Classes
|
Action Result |
Meaning in Life |
|
ViewResult PartialViewResult |
Returns a view (or a partial view) as a web page |
|
RedirectResult RedirectToRouteResult |
Redirects to another action |
|
JsonResult |
Returns a serialized JSON result to the client |
|
FileResult |
Returns binary file content to the client |
|
ContentResult |
Returns a user-defined content type to the client |
|
HttpStatusCodeResult |
Returns a specific HTTP status code |
Using the Inventory Repository
The first line in the InventoryController class creates a new instance of AutoLotEntities, which is exactly what you told the wizard to use. You need to change this to use the InventoryRepo class. Add an InventoryRepo instance variable at the top of the class like this:
private readonly InventoryRepo _repo = new InventoryRepo();
Next, dispose the instance in the Dispose override:
protected override void Dispose(bool disposing)
{
if (disposing)
{
db.Dispose();
_repo.Dispose();
}
base.Dispose(disposing);
}
The Index Action
The Index action gets all the Inventory records and returns the data to the view (more on views in the next section). Update the call to use the InventoryRepo class instead of calling into the AutoLotEntities class directly.
public async Task<ActionResult> Index()
{
return View(await _repo.GetAllAsync());
}
The View() call in the previous code snippet is an overloaded method in the Controller base class and returns a new ViewResult. When a view name is not passed in (as in the version you just saw), convention dictates that the view will be named after the action method and located in the folder named after the controller, in this case, Views/Inventory/Index.cshtml. You can also change the name of the view and pass the new name into the View() method. For example, if you named your view Foo.cshtml, you would call the View() method as follows:
return View("Foo",await _repo.GetAllAsync());
The Details Action
The Details() action method returns all the details for one Inventory record. A URL in the format http://mysite.com/Inventory/Details/5 will get mapped to the InventoryController, Details() action method, with a parameter named id and a value of 5. Update this method to call _repo.GetOneAsync(id) instead of the call to AutoLotEntities directly, like this:
// GET: Inventory/Details/5
public async Task<ActionResult> Details(int? id)
{
if (id == null)
{
return new HttpStatusCodeResult(HttpStatusCode.BadRequest);
}
var inventory = await _repo.GetOneAsync(id);
if (inventory == null)
{
return HttpNotFound();
}
return View(inventory);
}
There are a couple of interesting items in this simple-looking method. Remember from the route discussion that the id parameter is optional, so the URL /Inventory/Details will correctly map to this method. However, you can’t get an Inventory record if there isn’t an idvalue passed in to the method, so the method returns an HttpStatusCode 400 (Bad Request). Try this by running the app and entering Inventory/Details (leaving off the id part of the URL), and you should see an error screen similar to Figure 34-14.
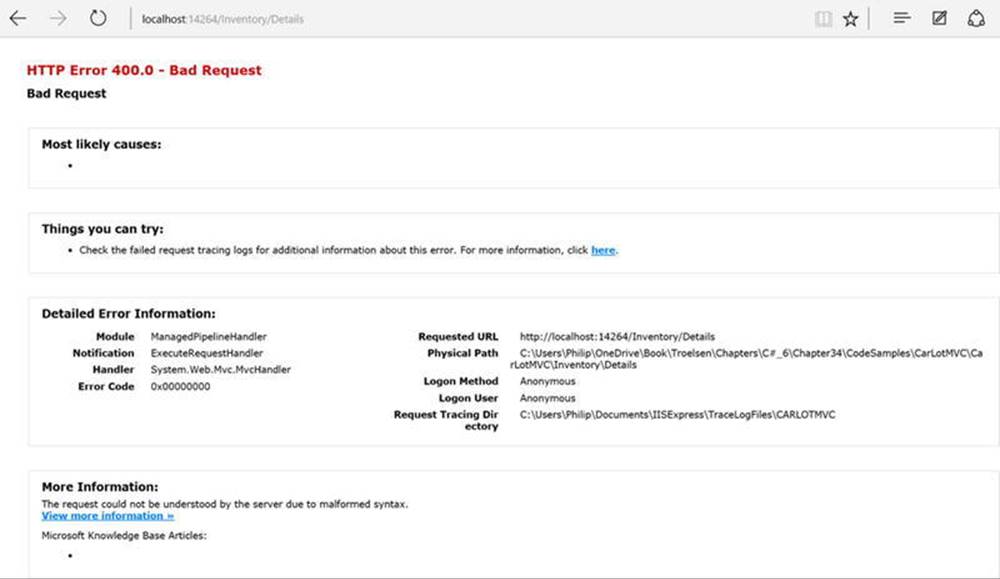
Figure 34-14. Returning the HttpStatusCode (Bad Request)
Likewise, if an inventory record cannot be found, the action method returns the HttpNotFound (404) status code.
Finally, if everything is good with the format of the URL and an Inventory record is found, then the Views/Inventory/Details.cshtml page is returned to the client.
The Create Action
Next, examine the Create() action method , and you will see two Create() methods; one takes no parameters, and the second takes an Inventory object as a parameter.
HttpGet
The Create() method without any parameters handles an HttpGet request, does not call into the database (which makes sense since the user is not creating a new record but retrieving one), and returns the ~/Views/Inventory/Create.cshtml view.
// GET: Inventory/Create
public ActionResult Create()
{
return View();
}
Don’t worry about the view details yet; I will cover this soon.
HttpPost
The Create() overload that takes an Inventory object as its parameter (instantiated using implicit model binding) has two method-level attributes, [HttpPost] and [ValidateAntiForgeryToken], and one parameter-level attribute, [Bind]. This version is executed when a user has clicked the submit button of the Create form (presuming all client-side validations pass).
Model Binding
As a refresher from Chapter 32, model binding takes all the form, query string, and so on, name-value pairs and attempts to reconstitute a specified type using reflection. There is explicit model binding and implicit model binding. In each case, the model binding engine attempts to assign the values (from the name-value pairs in the submitted form values) to the matching properties on the desired type. If it can’t assign one or more values (e.g., because of data type conversion issues or validation errors), it will set ModelState.IsValid = false. If all matched properties are successfully assigned, it sets ModelState.IsValid = true. In addition to the IsValid property, the ModelState is a ModelStateDictionary and contains error information for every property that failed, as well as model-level error information. If you want to add a specific error for a property, you would write code like this:
ModelState.AddModelError("Name","Name is required");
If you want to add an error for the entire model, use string.Empty for the property name, like this:
ModelState.AddModelError(string.Empty, $"Unable to create record: {ex.Message}");
For explicit model binding, you call TryUpdateModel(), passing in an instance of the type. If the model binding fails, the TryUpdateModel() call returns false. For example, you could write the Create() method this way:
public async Task<ActionResult> Create()
{
var inv = new Inventory();
if (TryUpdateModel(inv))
{
//Save the data
}
}
For implicit model binding, you use the desired type as the parameter for the method. The model binding engine does the same operation with the parameter as it did with TryUpdateModel() in the previous example.
public async Task<ActionResult> Create(Inventory inventory)
{
if (ModelState.IsValid)
{
//Save the data;
}
}
HttpPost vs. HttpGet
While ASP.NET Web Forms largely ignored the difference between HttpGet and HttpPost, MVC uses the HTTP verbs appropriately. The Hypertext Transfer Protocol (HTTP) defines an HttpGet call as requesting data from the server and an HttpPost call as one that submits data to be processed to a specific resource.
In MVC, any action without an HTTP attribute (such as HttpPost) will be executed as an HttpGet operation. To specify an HttpPost (an action where data will be submitted and potentially updated), you must decorate your action with the [HttpPost] attribute.
AntiForgery Tokens
One of a number of weapons to fight hacking, AntiForgeryToken is a form value that is added into your views. When an HttpPost request comes in, the token is validated as long as the [ValidateAntiForgeryToken] attribute is present. While not a one-stop shop for security (web security is beyond the scope of this book), every form should add an AntiForgeryToken, and every HttpPost action should validate it.
The Bind Attribute
The Bind attribute in the Create() and Edit() action methods allows you to white list or black list or add a prefix for properties (not covered in this chapter). When fields are white listed, they are the only fields that will be assigned through model binding, helping to protect your data from a user over-posting data. Black listing excludes properties from model binding. In the Create() method, all the fields are white listed, but you want only Make, Color, and PetName to be submitted. Remove the CarId and Timestamp fields from the Include portion, as follows:
public async Task<ActionResult> Create([Bind(Include = "Make,Color,PetName”)] Inventory inventory)
And Now the Code…
If the model state isn’t valid, the method sends the Create view back to the user with the current data, giving them an opportunity to correct any erroneous data. If the model state is indeed valid and the values are successfully saved by the repository, the action method returns aRedirectToAction, which redirects the user to the Index action method of the inventory controller. The redirection to the Index view after a successful save prevents the user from clicking the Create button again, which would cause a double post. If there is an error thrown during the save process, a new ModelError is added to the ModelState, and the user is sent back to the Create page to try again. Note: I like to flip the initial if statement around to make the method more readable. The final change is to use the AddAsync() method of the repo. The updated code should look like this:
[HttpPost][ValidateAntiForgeryToken]
public async Task<ActionResult> Create([Bind(Include = " Make,Color,PetName")] Inventory inventory)
{
if (!ModelState.IsValid) { return View(inventory); }
try
{
await _repo.AddAsync(inventory);
return RedirectToAction("Index");
}
catch (Exception ex)
{
ModelState.AddModelError(string.Empty, $"Unable to create record: {ex.Message}");
return View(inventory);
}
}
The Edit Action
Just like the Create() action method, the Edit() action method has two methods: one that handles an HttpGet request and one that handles an HttpPost request.
HttpGet
The first Edit() method takes an id and is identical to the Details() HttpGet method. Make sure to change the method to use the Inventory repository instead of AutoLotEntities.
public async Task<ActionResult> Edit(int? id)
{
if (id == null)
{
return new HttpStatusCodeResult(HttpStatusCode.BadRequest);
}
Inventory inventory = await _repo.GetOneAsync(id);
if (inventory == null)
{
return HttpNotFound();
}
return View(inventory);
}
HttpPost
Just like the Create() action method, this version is executed when a user has clicked the submit button of the Edit form (presuming all client-side validations pass). If the model state isn’t valid, the method once again returns the Edit view, sending the current values for the Inventoryobject. If the model state is valid, the Inventory object is sent to the repository for an attempted save. In addition to the general error handling (like you used in the Create() method), you also need to add a check for DbUpdateConcurrencyException, which will occur if another user has updated the record since the user originally loaded it into the web page. If all is successful, the action method returns a RedirectToAction result, sending the user to the Index() action method of the InventoryController.
The Bind attribute can stay the same since all the values need to come from the form, but change the method to use the AddAsync() method of the repo, as follows:
[HttpPost][ValidateAntiForgeryToken]
public async Task<ActionResult> Edit(
[Bind(Include = "CarId,Make,Color,PetName,Timestamp")] Inventory inventory)
{
if (!ModelState.IsValid) { return View(inventory); }
try
{
await _repo.SaveAsync(inventory);
return RedirectToAction("Index");
}
catch (DbUpdateConcurrencyException)
{
ModelState.AddModelError(string.Empty, "Unable to save record. Another user updated the record.");
}
catch (Exception ex)
{
ModelState.AddModelError(string.Empty, $"Unable to save record: {ex.Message}");
}
return View(inventory);
}
![]() Note As you saw in Chapter 23, DbUpdateConcurrencyException provides a lot of information to you, the developer. Because of space constraints, leveraging that capability in this chapter won’t be demonstrated.
Note As you saw in Chapter 23, DbUpdateConcurrencyException provides a lot of information to you, the developer. Because of space constraints, leveraging that capability in this chapter won’t be demonstrated.
The Delete Action
The Delete() action method also has two methods: one that handles an HttpGet request and one that handles an HttpPost request.
HttpGet
The first Delete() method takes an id and is identical to the Details() and Edit() HttpGet methods. Make sure to change the HttpGet version to use the Inventory repository instead of AutoLotEntities.
public async Task<ActionResult> Delete(int? id)
{
if (id == null)
{
return new HttpStatusCodeResult(HttpStatusCode.BadRequest);
}
Inventory inventory = await _repo.GetOneAsync(id);
if (inventory == null)
{
return HttpNotFound();
}
return View(inventory);
}
HttpPost
This version is executed when a user has clicked the submit button of the Delete form. The autogenerated version of this method takes only the id as a parameter, meaning it has the same signature as the HttpGet version of the method. Since you can’t have two methods of the same name with the same signature, the wizard named this method DeleteConfirmed() and added the [ActionName("Delete")] attribute. AutoLotDAL checks for concurrency conflicts and requires the Timestamp property in addition to the CarId in order to delete a record. You also want an Inventory instance to show any model errors. To accommodate these needs, simply change the int id parameter to Inventory inventory. This change will use implicit model binding to get the Inventory record values from the request.
To delete a record, you only need the CarId and Timestamp properties. Add a [Bind] attribute with the Include value of “CarId,Timestamp” to pull those values into the Inventory instance and ignore the rest of the values. Now that the method signature has changed from the HttpGet version, you can rename the method Delete() and remove the ActionName attribute. Finally, update the method to use the DeleteAsync() method of the Inventory repository and add the error handling (the same as you did for the HttpPost version of the Edit()method). The final version of the code is as follows:
[HttpPost]
[ValidateAntiForgeryToken]
public async Task<ActionResult> Delete([Bind(Include="CarId,Timestamp")]Inventory inventory)
{
try
{
await _repo.DeleteAsync(inventory);
return RedirectToAction("Index");
}
catch (DbUpdateConcurrencyException)
{
ModelState.AddModelError(string.Empty, "Unable to delete record. Another user updated the record.");
}
catch (Exception ex)
{
ModelState.AddModelError(string.Empty, $"Unable to create record: {ex.Message}");
}
return View(inventory);
}
If you ran your project now and tried to delete an Inventory record, it wouldn’t work, because the view is not sending the Timestamp property, just the CarId. You will fix that shortly.
The Dispose Method
Finally, in the Dispose() method, delete the disposal of the AutoLotEntities variable (db) and then delete the class-level variable for AutoLotEntities. Your cleaned up Dispose() method should look like this:
protected override void Dispose(bool disposing)
{
if (disposing)
{
_repo.Dispose();
}
base.Dispose(disposing);
}
The Final Word on Controllers
This was a lot of information to cover, and (like with routing) we’ve only scratched the surface of everything that you can do in MVC controllers and action methods. However, to distill it all down, controllers are merely C# classes. They should follow the <Name>Controller.cs naming convention (the Controller part of the name gets stripped away by the framework). Actions are methods in a controller class that return an ActionResult. Action methods can be decorated with an attribute that indicates if it’s an HttpPost or an HttpGet (the default), and allHttpPost methods should validate the AntiForgery token. Now, let’s move onto views.
MVC Views
Views in MVC represent the UI in MVC sites. Initially, MVC views were built using the Web Forms View Engine. Now, you have the choice of using the Razor View Engine or the Web Forms View Engine, although the majority of MVC sites are built using Razor. MVC views are meant to be very lightweight, passing server-side processing to the controllers and client-side processing to JavaScript.
The Razor View Engine
The Razor View Engine was designed as an improvement over the Web Forms View Engine and uses Razor as the core language. Razor is template markup syntax that is interpreted to C# (or VB.NET code) on the server side. Using Razor in your views with HTML and CSS results in cleaner and easier-to-read markup. While there are many improvements with using Razor in your views, views based on Razor still support everything you would expect from a web form.
Razor Syntax
The first difference between the Web Forms View Engine and the Razor View Engine is that you add code with the @ symbol. There is also intelligence built into Razor that removes the need add closing @ symbols, unlike Web Forms, which required opening and closing “nuggets” (<% %>).
Statement blocks open with an @ and are enclosed in braces, like this (notice how there isn’t an @ used as a statement terminator):
@foreach (var item in Model)
{
}
Code blocks can intermix markup and code. Lines that begin with a markup tag are interpreted as HTML, while lines that begin with code are interpreted as code, like this:
@foreach (var item in Model)
{
int x = 0;
<tr></tr>
}
Lines can also intermix markup and code, like this:
<h1>Hello, @username</h1>
The <text> tag denotes text that should be rendered as part of the markup, like this:
@item<text>-<text>
The @ sign in front of a variable is equivalent to Response.Write(), and by default HTML encodes all values. If you want to output unencoded data (i.e., potentially unsafe data), you have to use the @Html.Raw(username) syntax.
Helpers, Functions, and Delegates
Razor enables encapsulation of code to enhance your productivity and reduce the amount of repetitive code. You can place these inline, in the App_Code folder, or as statics.
HTML Helpers
Razor HTML helpers render markup. There are many built-in helpers that you will use extensively, such as @Html.ActionLink() that you used earlier for the inventory screens. You can also build your own HTML helpers to reduce (or eliminate repetitive code). For example, you can write a helper that outputs the details for an Inventory record. To do this, put the following HTML helper code at the top of the Index.cshtml view file (after the @model line), like this:
@using AutoLotDAL.Models
@helper ShowInventory(Inventory item)
{
@item.Make<text>-</text>@item.Color<text>(</text>@item.PetName<text>)</text>
}
After the @foreach, add a call to ShowInventory(), like this:
@foreach (var item in Model)
{
@ShowInventory(item)
<!-- rest removed for brevity -->
}
Run the app, navigate to the Inventory index page, and you will see the details for each record as one lone string. In a real HTML helper, you would add formatting and markup to be consistent with the look and feel of your site. Since this is just an example of how to create an HTML helper and not something you want to use in your site, comment out the line using Razor comments, which are @* … *@, like this:
@*@ShowInventory(item)*@
Razor Functions
Razor functions do not return markup but instead are used to encapsulate code for reuse. To see this in action, add the following SortCars() function after the HTML helper in the Index.cshtml view page. The function takes a list of Inventory items and sorts them by PetName:
@functions
{
public IList<Inventory> SortCars(IList<Inventory> cars)
{
var list = from s in cars orderby s.PetName select s;
return list.ToList();
}
}
Update the @foreach to call the function. The Model variable represents an IEnumerable<Inventory>, so you must add the ToList() method in that call, as follows:
@foreach (var item in SortCars(Model.ToList()))
{
<!-- rest removed for brevity -->
}
Razor Delegates
The final example shows Razor delegates, which work just like C# delegates. For example, add the following delegate code immediately after the SortCars() function in the Index.cshtml view file. This delegate makes the marked characters bold.
@{
Func<dynamic, object> b = @<strong>@item</strong>;
}
To see this in action, add the following line of code immediately after the code block that defines the delegate:
This will be bold: @b("Foo")
Of course, this example is trivial, but more involved code that is repeated can benefit by being wrapped in a delegate. Essentially, all the same procs and cons for C# delegates apply. After running the app and navigating to the Inventory index page, you will see the word Foo in bold. Go ahead and comment out the call to the delegate since you don’t need it for the rest or the samples.
The Final Word on Razor
Once again, you have to move on to a new subject because there just isn’t enough space in this book to detail everything that you can do with Razor. You will see more examples of Razor as you work through the rest of this chapter. This section gave you the foundation you need to expand your knowledge.
Layouts
Similar to Web Forms master pages, MVC supports layouts. MVC views can be based on a master layout to give the site a universal look and feel. Recall from Figure 34-12, there is a check box that says “Use a layout page.” Leave the text box empty if it’s specified in the_ViewStart.cshtml file. Also recall, from the information in the Views folder, there is a file named _ViewStart.cshtml. Open this file now to examine the contents, shown here:
@{
Layout = "~/Views/Shared/_Layout.cshtml";
}
This file just has one Razor code block that sets the layout to a specific file. This is the fallback value; if a layout is not specified in a view, this is the file that will be used by default for the view.
Navigate to the Views/Shared folder and open the _Layout.cshtml file. It is a full-fledged HTML file, complete with <head> and <body> tags and a mix of HTML markup and Razor HTML helpers. Just like Web Forms master pages, the _Layout.cshtml page is the core of what will be presented to the user when views (that use the _Layout.cshtml page) are rendered.
There are two key items to keep in mind when working with layouts: body and sections. The body is where the view code will be inserted when the view and layout are combined. Where the view page content is placed in the layout is controlled by the following line of Razor code:
@RenderBody()
Sections are areas of the layout page that layouts can fill in at runtime. They can be required or optional and are introduced into the layout page with RenderSection(). The first parameter names the section, and the second parameter indicates whether the section is required to be implemented by the view. In _Layout.cshtml, the following line of code creates a section named scripts, which is optional for the view:
@RenderSection("scripts", required: false)
Sections can also be marked as required by passing in true as the second parameter. For example, if you wanted to create a new section named Header that is required, you would code it like this:
@RenderSection("Header",required: true)
To render a section in from your view, you use the @section Razor block. For example, in the Edit.cshtml page under Views/Inventory, the following lines add the jQuery validation bundle to the rendered page:
@section Scripts {
@Scripts.Render("~/bundles/jqueryval")
}
Using a Specific Layout Page
In addition to relying on the default layout page, you can specify your views to use a specific page. To show this, copy _Layout.cshtml into a new file called _LayoutNew.cshtml. Open this new file, and just after the <body> tag, add the following line:
<div class="jumbotron">
<h1>My MVC Application</h1>
</div>
Now, open Index.cshml under Views/Inventory, and add Layout="~/Views/Shared/_LayoutNew.cshtml", just after the ViewBag line. The updated code block should look like this:
@{
ViewBag.Title = "Index";
Layout = "~/Views/Shared/_LayoutNew.cshtml";
}
This line directs the view to use the new file as the layout file. Run the app and click the Inventory menu, and you will see the screen shown in Figure 34-15.
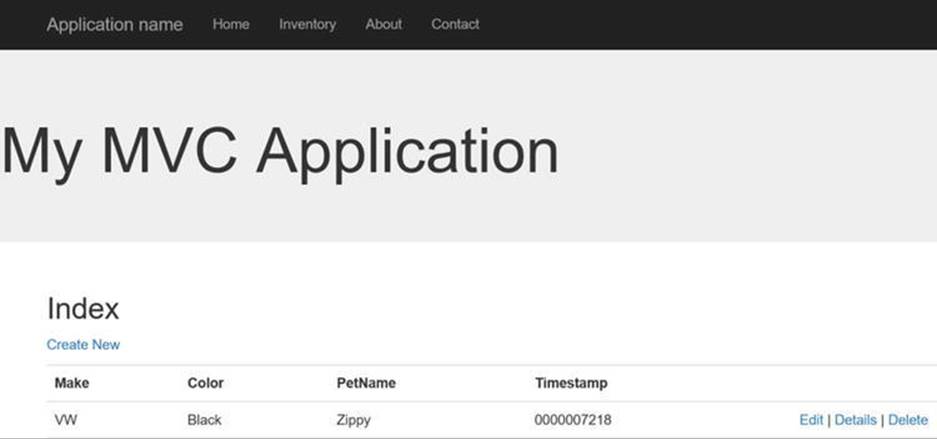
Figure 34-15. The Index view with the new layout
Partial Views
Partial views are useful for encapsulating UI, which reduces (or eliminates) repeating code. Since Razor views do not inherit System.Web.Page (and there’s no Page directive), the only technical difference between a partial view and a regular view is how it’s rendered from the action method. A full view (returned from a controller with the View() method) will use a layout page if one is specified, either as the default through _ViewStart.cshtml or through the Layout Razor statement. A view when rendered with the PartialView() method (or the Partial() HTML helper) does not use the default layout, but will still use a layout if specified with a Layout Razor statement.
To demonstrate this, open the InventoryController.cs class and change the Index() action method to return a partial view instead of a view, as follows:
public async Task<ActionResult> Index()
{
return PartialView(await _repo.GetAllAsync());
}
Now open the Index.cshtml page and either remove the Layout= line that you added above or comment it out, like this:
@{
ViewBag.Title = "Index";
//Layout = "~/Views/Shared/_LayoutNew.cshtml";
}
Run the app and click the Inventory menu link. You will then see the same data as you did before, minus any layout, as in Figure 34-16.
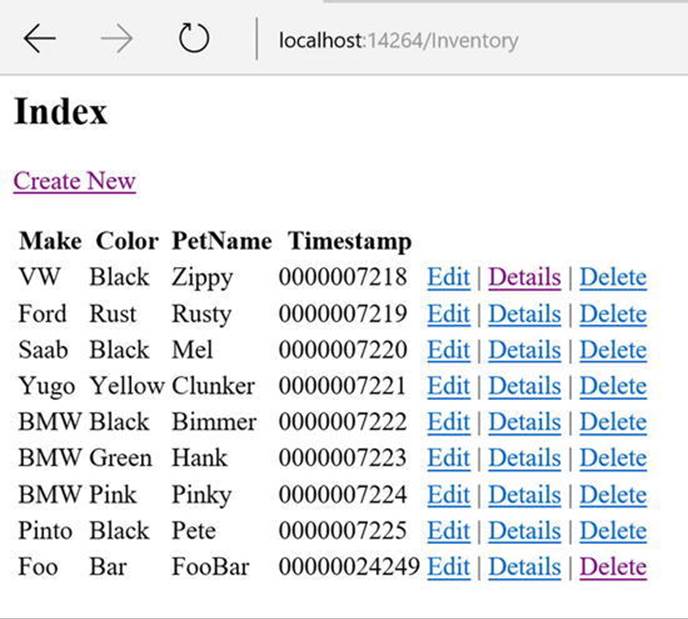
Figure 34-16. The inventory Index page rendered as a partial view
Make sure to change the Index action method back to calling View() instead of PartialView(). You can leave the //Layout = "~/Views/Shared/_LayoutNew.cshtml" line commented out so the Index view returns to using the default layout.
In addition to rendering a view from an action method with the PartialView() method, you can pull in a partial view into another view using an HTML Helper, similar to loading a user control in Web Forms. In the _Layout.cshtml page, the following Razor block creates the login UI shown in every page.
@Html.Partial("_LoginPartial")
Sending Data to the View
As discussed earlier in the chapter, the MVC pattern relies on a certain level of separation of concerns. The controller sends data to the view, the view requests actions, and the models get passed around as the data for the application. I’ve already covered how views request actions, but I haven’t yet discussed how to get data (the models) into the views.
ViewBag, ViewData, and TempData
The ViewBag, ViewData, and TempData objects are mechanisms for sending small amounts of data into a view. An example of this is in the top of each of the Inventory views with a line setting the ViewBag.Title property, like the following in the Index.cshtml view:
@{
ViewBag.Title = "Index";
}
The ViewBag.Title is used to send the title of a view to the layout to be used in the following line in _Layout.cshtml:
<title>@ViewBag.Title - My ASP.NET Application</title>
Table 34-9 lists the three mechanisms to pass data from a controller to a view (besides the Model property, described in the next section) or from a view to a view.
Table 34-9. Ways to Send Data to a View
|
Data Transport Object |
Meaning in Life |
|
TempData |
This is a short-lived object that works during the current request and next request only. |
|
ViewData |
A dictionary that allows storing values in name-value pairs. Here’s an example: ViewData["Title"] = "Foo". |
|
ViewBag |
Dynamic wrapper for the ViewData dictionary. Here’s an example: ViewBag.Title = "Foo". |
Strongly Type Views and View Models
For larger amounts of data (such as all Inventory records used by the Index.cshtml view), you use the Model property. Examine the first line of the Index.cshtml file, and you will see this line, which indicates the view is strongly typed, with the type set toIEnumerable<Inventory>:
@model IEnumerable<AutoLotDAL.Models.Inventory>
The @model attribute represents the view’s type. To access this in the rest of the view, you use the Model property. Note the uppercase M in the Model property and the lowercase m in the initial attribute. When referring to the data contained in the view, you use Model (capital M), as in the following line, which iterates through each of the Inventory records:
@foreach (var item in Model)
{
//Do something interesting here
}
The Index View
Now it’s time to start digging into the actual views. Open Index.cshtml, and examine the following code:
@Html.DisplayNameFor(model => model.Make)
This uses the DisplayNameFor() HTML helper to show the display name (as plain text) for the model field referenced in the lambda. In this example, the code gets the display name for the Make property of the Inventory object.
This works fine for Make and Color, but PetName is displayed as “PetName.” You would rather have it display as “Pet Name.” You could change the code and hard-code the words Pet Name, but this fixes the problem only for this particular view. Any other view that needs to display the PetName field would also have to have this label hard-coded. A better method is to use data annotations on the model to set the display name. You will do this shortly.
Since the users don’t want to see the timestamp values, delete the header for the timestamp, including the markup and the Razor code. Also delete the timestamp code in the for-loop.
Inside the for-loop, the values for each item are displayed using another HTML helper, DisplayFor(). This HTML helper looks at the data type and presents the value based on the default template for that datatype. In this example, the data fields are strings, so the HTML helper just displays the values.
MVC Display Data Annotations
In addition to the data annotations used to define the model so Entity Framework can create the database (as used in Chapter 23), there are additional data annotations that you can use to define display properties. While you can add these to the model classes themselves, if you used EF to create your model classes from an existing database, any changes you make would be overwritten if you needed to regenerate your models. To prevent this, you can put your data annotations into another file.
Start by navigating to the Models folder in the AutoLotDAL project and add a new folder named MetaData. In this folder, add a new class named InventoryMetaData.cs. Make the class public, and add a property of type string named PetName. To this property, add the[Display(Name="Pet Name")] attribute. Your class should look like this:
public class InventoryMetaData
{
[Display(Name="Pet Name")]
public string PetName;
}
This is not a full class definition file; it will be used only to load attributes that you have assigned. Therefore, you do not need to add the get/set syntax to this property, and in fact, you shouldn’t. You might be asking how the framework knows that this class is supplying attributes to the Inventory class. Currently, it doesn’t. You need to add a class-level attribute to the Inventory.cs class so the framework knows this class holds additional attributes for it. You’ll make that change next.
Open the InventoryPartial.cs class in the Models/Partials folder, and add the [MetadataType] attribute to the class, as follows:
[MetadataType(typeof(InventoryMetaData))]
public partial class Inventory
{
public override string ToString() =>
$"{this.PetName ?? "**No Name**"} is a {this.Color} {this.Make} with ID {this.CarId}.";
}
Run the app now, click the Inventory link, and you will see that the PetName label is displayed as “Pet Name,” without changing any code in the view.
Updating the View with Bootstrap
The next step is to jazz up the Index.cshtml view a bit using Bootstrap.
Update the Header
The first thing to do is update the page header. The generated view has the header of “Index,” which isn’t very meaningful. Delete the <h2>Index</h2> line, and replace it with the following, which creates a small shaded area housing the page header. The markup looks like this:
<div class="well well-sm"><h1>Available Inventory</h1></div>
Figure 34-17 shows the result.
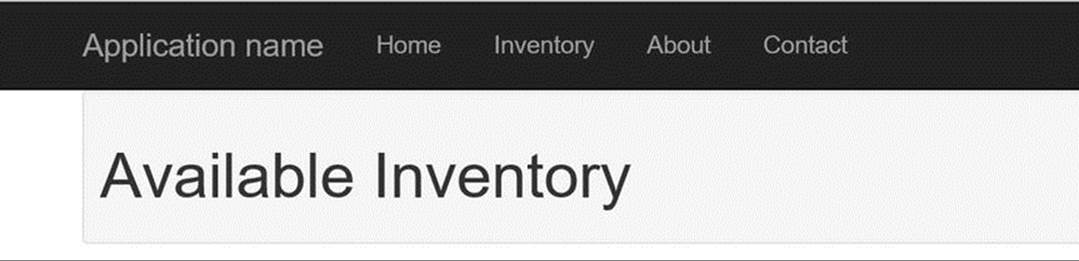
Figure 34-17. Placing a header into a well
Update the Table
Next, you will update the table. The default table class in Bootstrap adds some rudimentary design elements, including separator lines. There are additional built-in styles that you can add, as shown in Table 34-10.
Table 34-10. Table-Style Options
|
Style |
Meaning in Life |
|
.table |
This is the base table style. It adds divider lines and light padding. |
|
.table-striped |
This adds striping to the table (think a green bar). Not available in Internet Explorer 8. |
|
.table-bordered |
This adds borders around every cell in the table. |
|
.table-hover |
This adds hover highlighting to the table. |
|
.table-condensed |
This cuts cell padding in half. |
|
.table-responsive |
Makes the table more responsive on mobile devices. |
Add all of them to the <table> class attribute except for table-condensed, and on the next line add a <caption> tag with the text “Vehicle List” as follows:
<table class="table table-striped table-responsive table-hover table-bordered">
<caption>Vehicle List</caption>
Figure 34-18 shows the resulting UI.
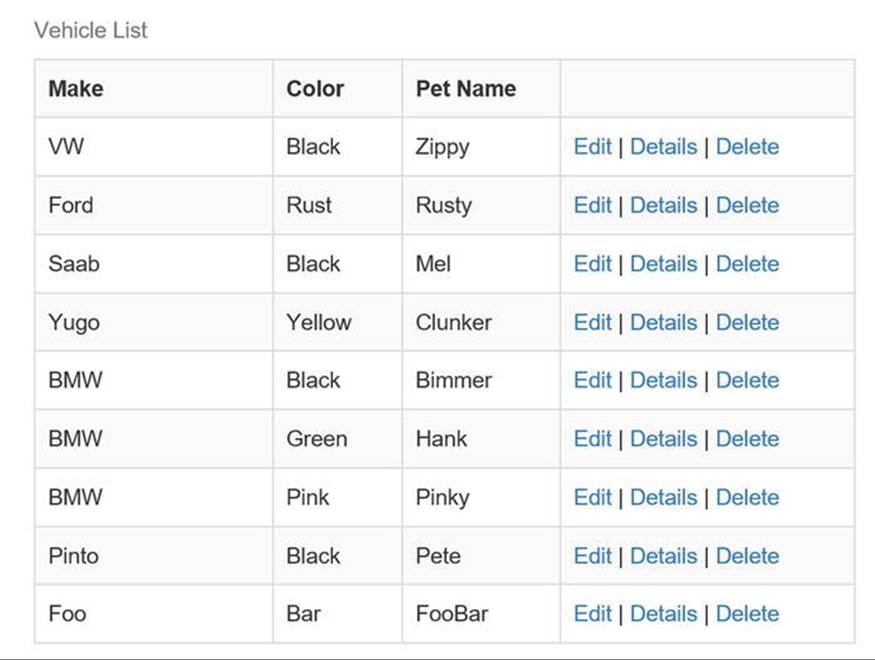
Figure 34-18. The updated table UI
Using GlyphIcons
The GlyphIcons are a set of icons that ship with Bootstrap and are useful to add visuals to links and buttons. You are going to add icons to all the links on the Index view, but first it helps to explore another HTML helper: @Url.Action(). The @Url.Action() helper returns just the URL portion, whereas Html.ActionLink() creates the entire markup for an anchor tag.
Update the @Html.ActionLink("Create") line to this:
<a href="@Url.Action("Create")">Create a new Car</a>
This creates the same URL as the ActionLink, but now you have complete control of the markup. Next, add the “plus” GlyphIcon to the content of the anchor tag, like this:
<a href="@Url.Action("Create")">
<span class="glyphicon glyphicon-plus"></span> Create
a new Car
</a>
Figure 34-19 shows the updated link.
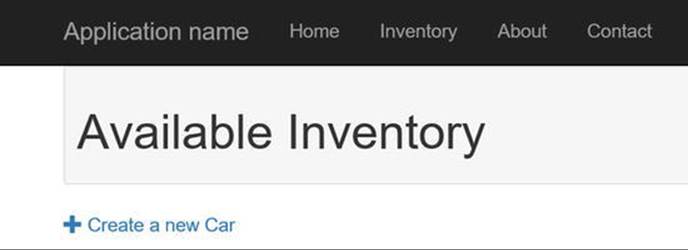
Figure 34-19. The Create a new Car link with the plus GlyphIcon
Next, update the Edit, Details, and Delete links in the table to use the Edit, List-Alt, and Trash GlyphIcons, respectively. This is shown in the following code listing:
<a href="@Url.Action("Edit", new {id = item.CarId})">
<span class="glyphicon glyphicon-edit"></span> Edit
</a>
|
<a href="@Url.Action("Details", new {id = item.CarId})">
<span class="glyphicon glyphicon-list-alt"></span> Details
</a>
|
<a href="@Url.Action("Delete", new {id = item.CarId})">
<span class="glyphicon glyphicon-trash"></span> Delete
</a>
Figure 34-20 shows the final page.
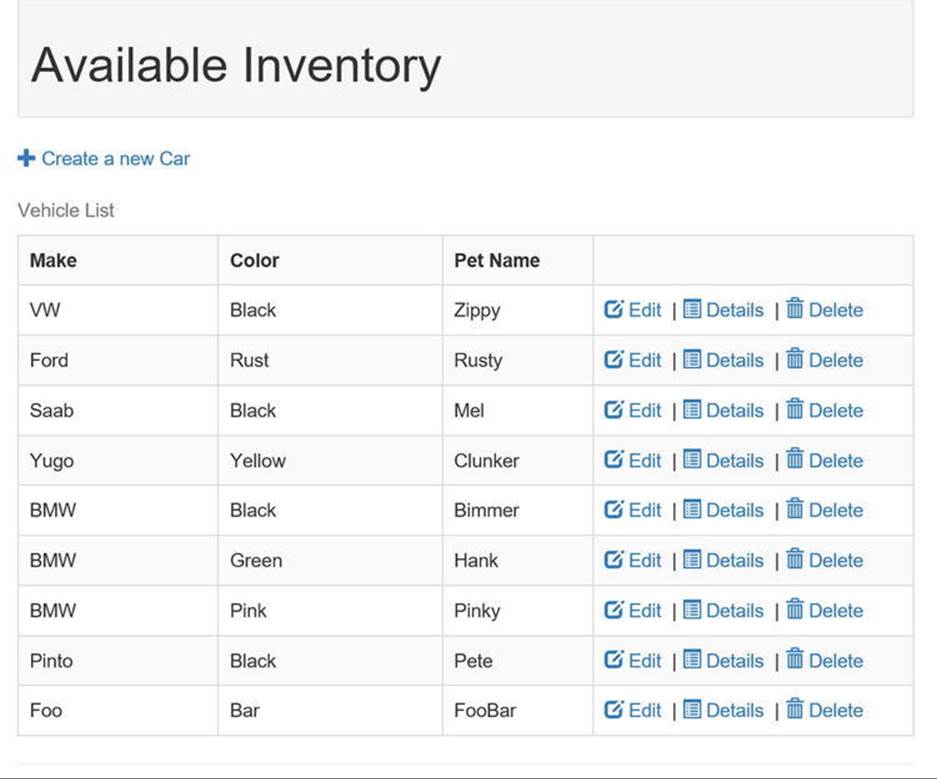
Figure 34-20. The final Index view
The Details View
There aren’t a lot of changes to be made to the Details.cshtml view. Just like the Index.cshtml view, the Details.cshtml view uses the DisplayNameFor() and DisplayFor() HTML helpers. Since you updated the AutoLotDAL, the “Pet Name” change carried through to this view as well. So, the only thing you need to do on this page is delete the TimeStamp rows.
Updating the View with Bootstrap
Start by deleting the <h2>Details</h2> and <h4>Inventory</h4> lines and replace them at the top with the following:
<div class="well well-sm"><h1>Inventory Details</h1></div>
Next, update the Edit and Back To List links to use the GlyphIcons and add a Delete link. The updated markup is listed here, and the updated page is shown in Figure 34-21:
<a href="@Url.Action("Edit", new {id = Model.CarId})">
<span class="glyphicon glyphicon-edit"></span> Edit
</a>
|
<a href="@Url.Action("Delete", new {id = Model.CarId})">
<span class="glyphicon glyphicon-trash"></span> Delete
</a>
|
<a href="@Url.Action("Index", new {id = Model.CarId})">
<span class="glyphicon glyphicon-list"></span> Back to List
</a>
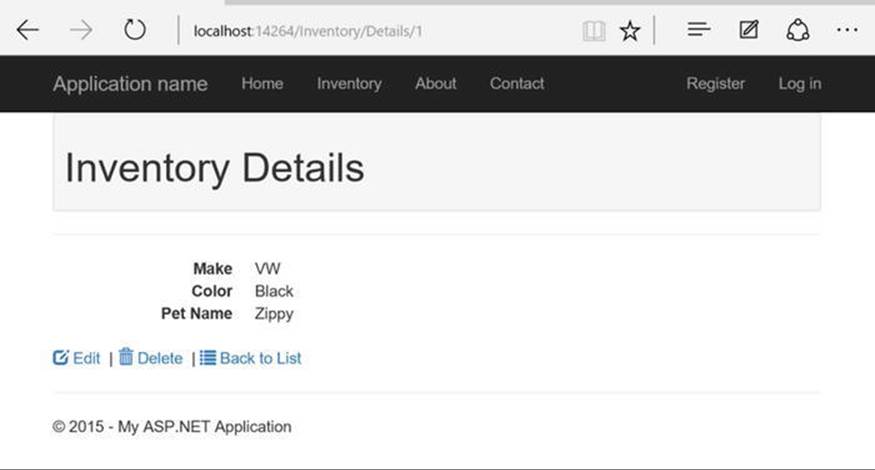
Figure 34-21. The updated details view
The Create View
Examining the code in this view, you see two more HTML helpers in use: Html.LabelFor() and Html.EditorFor(). The EditorFor() HTML helper creates an input field based on the data type of the property referenced in the lambda. For example, the following line:
@Html.EditorFor(model => model.Make, new { htmlAttributes = new { @class = "form-control" } })
creates this:
<input name="Make" class="form-control text-box single-line" id="Make" type="text" value="" data-val-length-max="50" data-val-length="The field Make must be a string with a maximum length of 50." data-val="true">
Let’s examine this before moving on. The name and the id of the HTML element comes from the name of the property, the type comes from the data type of the property, and the class assignment comes from a combination of the HTML helper and the additional HTML attributes added through the helper. The value of the control is set to the property’s value. In this case, the value is set to the empty string since it’s a new instance of Inventory.
The LabelFor helper creates a Label control. For example, examine the following line:
@Html.LabelFor(model => model.Make, htmlAttributes: new { @class = "control-label col-md-2" })
This creates the following markup, including the for attribute that is automatically added (using the name of the property):
<label class="control-label col-md-2" for="Make">Make</label>
The BeginForm( ) HTML Helper
The BeginForm() HTML helper creates a <form> tag in the HTML output. By default, the form’s action property is the current URL, and the form’s method property is post (each is customizable through different overloads of the BeginForm() method). The using block in Razor will encapsulate everything between the opening and closing braces in between the opening and closing HTML tags. For example, if you entered this Razor block into a view:
@using (Html.BeginForm())
{
<input name="foo" id="foo" type="text"/>
}
It would create a form tag in HTML with the action set to the same URL as the URL that brought your user to this view. For example, if the URL for the HttpGet request was Inventory/Create, the Html.BeginForm() helper would create the following markup:
<form action="/Inventory/Create" method="post">
<input name="foo" id="foo" type="text"/>
</form>
The AntiForgery Token
If you recall, the [ValidateAntiForgeryToken] attribute is added to all of the HttpPost versions of the action methods. This attribute checks for an antiforgery token submitted as part of the form values, so you need to add an antiforgery token into the BeginForm() Razor code block. The HTML helper to do this is aptly named AntiForgeryToken(), and it’s already added into the scaffolded forms that require it. If you need to add it yourself to a form block, the syntax is simple.
@Html.AntiForgeryToken()
Updating the View with Bootstrap
Finalize your changes to Create.cshtml by deleting the <h2>Create</h2> and <h4>Inventory</h4> lines, and replace them at the top with the following:
<div class="well well-sm"><h1>Add Inventory</h1></div>
Next, update Create button to include the plus icon, like this:
<button type="submit" class="btn btn-default">
<span class="glyphicon glyphicon-plus"></span> Create
</button>
The final change is to move the Back To List link next to the Create button (instead of in a lower <div> as created by the scaffolding) and to use the list GlyphIcon. The updated markup is shown here:
|
<a href="@Url.Action("Index")">
<span class="glyphicon glyphicon-list"></span> Back to list
</a>
The complete markup for the <div> section looks like this:
<div class="form-group">
<div class="col-md-offset-2 col-md-10">
<button type="submit" class="btn btn-default">
<span class="glyphicon glyphicon-plus"></span> Create
</button>
|
<a href="@Url.Action("Index")"><span class="glyphicon glyphicon-list"></span> Back to list</a>
</div>
</div>
Figure 34-22 shows the final look for the view.
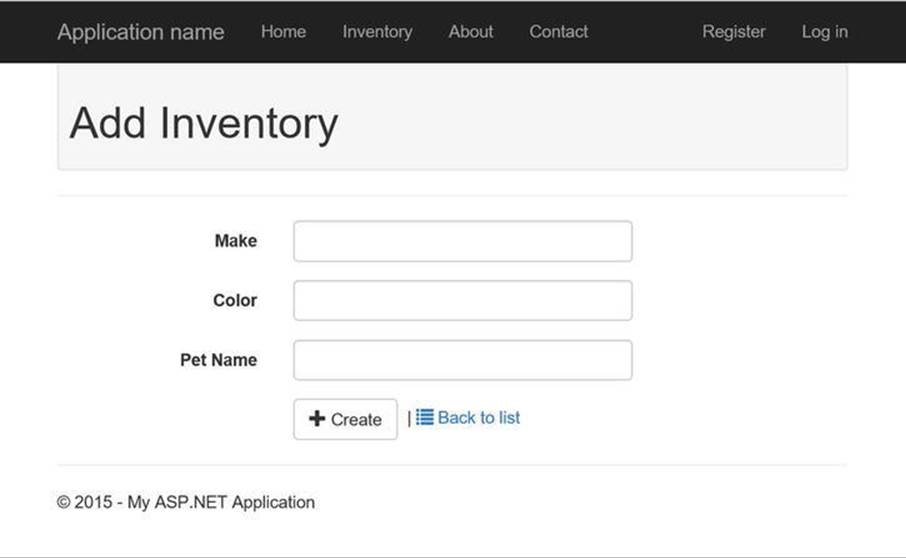
Figure 34-22. The Add Inventory view
The Delete View
The scaffolded Delete view displays the Timestamp field, which is meaningless (and potentially confusing) to the user. Delete the <dt> and <dd> tags for the Timestamp field (you will add the Timestamp field back in as a hidden value next).
Hidden Values
In addition to the CarId value, the Delete()/DeleteAsync() methods on the InventoryRepo object require the Timestamp value to be sent with the CarId, or an Inventory object with the CarId and TimeStamp fields populated. The URL is set up to send the CarId(e.g., /Inventory/Delete/46), but the best way to send these values is through form values in the HTTP request body and not as query string values in the URL.
To do this, you will use another HTML helper inside the BeginForm() Razor block: the HiddenFor() helper. This creates a hidden form value for the property referred to in the lambda. Add in the hidden form values (within the BeginForm() Razor block), like this:
@Html.HiddenFor(x => x.CarId)
@Html.HiddenFor(x => x.Timestamp)
This creates the following HTML:
<input name="CarId" id="CarId" type="hidden" value="46" data-val-required="The CarId field is required." data-val-number="The field CarId must be a number." data-val="true">
<input name="Timestamp" id="Timestamp" type="hidden" value="AAAAAAABAdE=">
Validation Summary
Even though I haven’t covered validation yet, add another HTML helper, ValidationSummary(), inside the BeginForm() Razor block.
@Html.ValidationSummary(true, "", new { @class = "text-danger" })
Updating the View with Bootstrap
Start by deleting the <h2>Delete</h2> and <h4>Inventory</h4> lines and replacing them at the top with the following:
<div class="well well-sm"><h1>Delete</h1></div>
Next, update the Delete button to include the Trash icon, like this:
<button type="submit" class="btn btn-default">
<span class="glyphicon glyphicon-trash"></span> Delete
</button>
The final change is to update the Back To List link to use the list GlyphIcon. The updated markup is shown here:
|
<a href="@Url.Action("Index")">
<span class="glyphicon glyphicon-list"></span> Back to list
</a>
The complete markup for the <div> section looks like this:
<div class="form-actions no-color">
<button type="submit" class="btn btn-default">
<span class="glyphicon glyphicon-trash"></span> Delete
</button>
|
<a href="@Url.Action("Index")"><span class="glyphicon glyphicon-list"></span> Back to list</a>
</div>
Figure 34-23 shows the updated view.
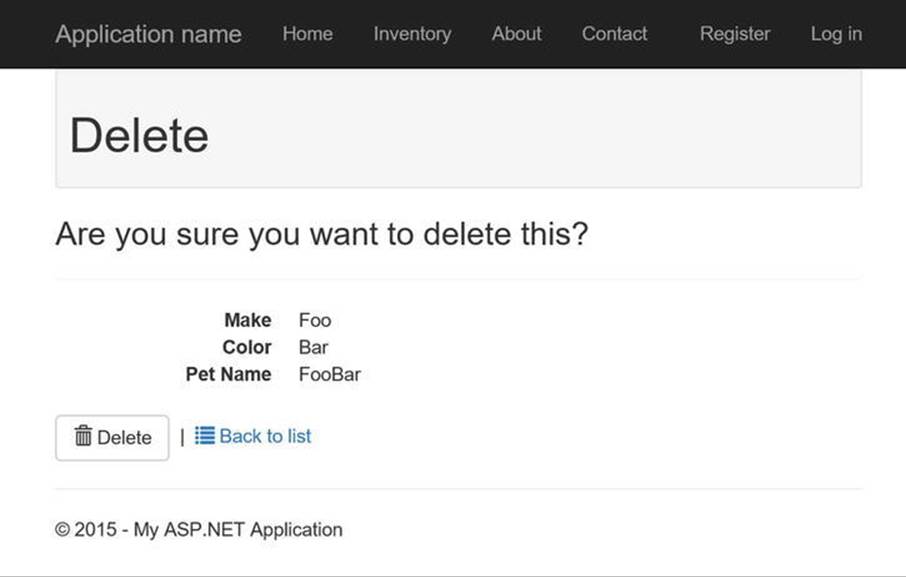
Figure 34-23. The updated Delete view
The Edit View
The scaffolded Edit.schtml view displays the Timestamp field, which is meaningless (and potentially confusing) to the user. Delete the <div class="form-group"> for the Timestamp field, and add a HiddenFor() immediately after theHiddenFor(model=>model.CarId) line like this:
@Html.HiddenFor(model => model.Timestamp)
Updating the View with Bootstrap
Start by deleting the <h2>Edit</h2> and <h4>Inventory</h4> lines and replace them at the top with the following:
<div class="well well-sm"><h1>Edit</h1></div>
Next, update the Save button to include the Save icon, like this:
<button type="submit" class="btn btn-default">
<span class="glyphicon glyphicon-save"></span> Save
</button>
The final change is to update the Back To List link to use the list GlyphIcon, and move it next to the Save button. The updated markup is shown here:
|
<a href="@Url.Action("Index")">
<span class="glyphicon glyphicon-list"></span> Back to list
</a>
The complete markup for the <div> section looks like this:
<div class="form-group">
<div class="col-md-offset-2 col-md-10">
<button type="submit" class="btn btn-default">
<span class="glyphicon glyphicon-save"></span> Save
</button>
|
<a href="@Url.Action("Index")"><span class="glyphicon glyphicon-list"></span> Back to list</a>
</div>
</div>
Figure 34-24 shows the final UI.
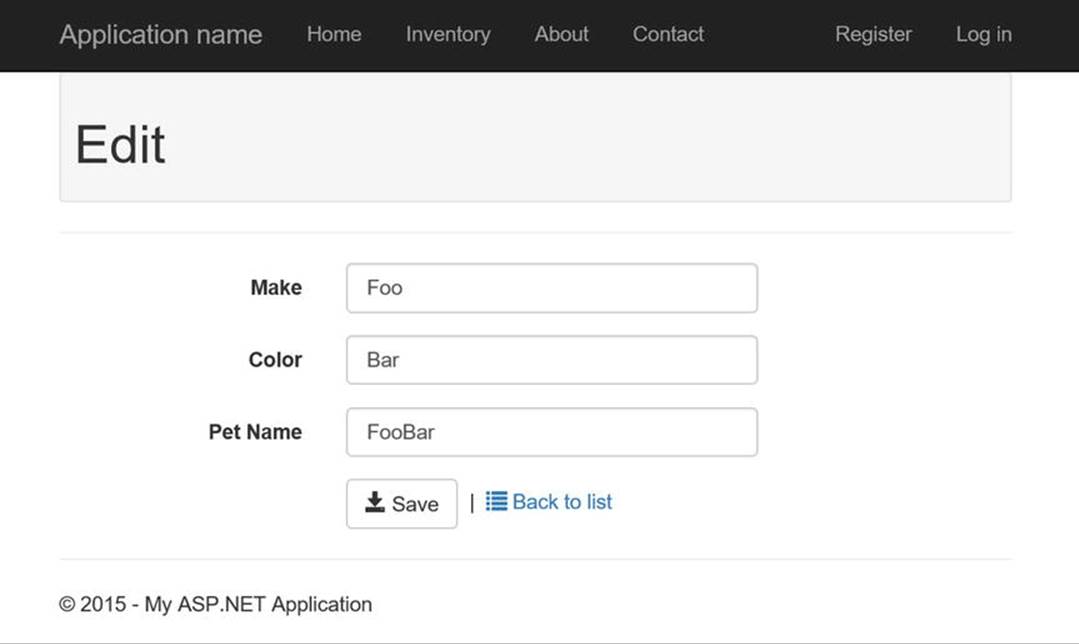
Figure 34-24. The Edit view
Validation
MVC applications have two layers of validation: server side and client side. You saw server-side validation earlier in the chapter, when you added errors to the ModelState, in addition to the errors that came from model binding failures (because of datatype conversion, data annotation failures, or some other reason). Client-side checking happens with JavaScript, and you’ll look at that soon enough.
Displaying Errors
The ModelState errors get displayed in the UI by the HTML helpers ValidationMessageFor() and ValidationSummary(). The ValidationSummary() will show ModelState errors that are not attached to a property as well as property errors (as long as theExcludePropertyErrors is set to false). Typically, you will display property errors alongside the properties and show only non-property-specific errors in the ValidationSummary(). For example, the following line (in the Create, Update, and Delete views) will show all the model errors and none of the property errors in a red font:
@Html.ValidationSummary(true, "", new { @class = "text-danger" })
To show individual property errors, use the ValidationMessageFor() helper adjacent to a particular property in the view page, like this:
@Html.ValidationMessageFor(model => model.Make, "", new { @class = "text-danger" })
This produces the following markup:
<span class="field-validation-valid text-danger" data-valmsg-replace="true" data-valmsg-for="Make"></span>
To see this in action, you first have to disable client-side validation, which was added to the page as part of the default scaffolding. To do this, open Create.cshtml and comment out the rendering of the jQuery validation bundle at the end of the code.
@section Scripts {
@*@Scripts.Render("~/bundles/jqueryval")*@
}
Next, open InventoryController.cs and update the first part of the Create HttpPost action method to the following:
if (!ModelState.IsValid)
{
ModelState.AddModelError(string.Empty,
"An error occurred in the data. Please check all values and try again.");
return View(inventory);
}
Now run the project, navigate to the Inventory ![]() Create page, and type something into the Make field that is longer than 50 characters. When you click Save, the form values are posted back to the Create method. The model is validated during model binding and fails since the Make property has the [StringLength(50)] attribute. The result should look something like Figure 34-25.
Create page, and type something into the Make field that is longer than 50 characters. When you click Save, the form values are posted back to the Create method. The model is validated during model binding and fails since the Make property has the [StringLength(50)] attribute. The result should look something like Figure 34-25.
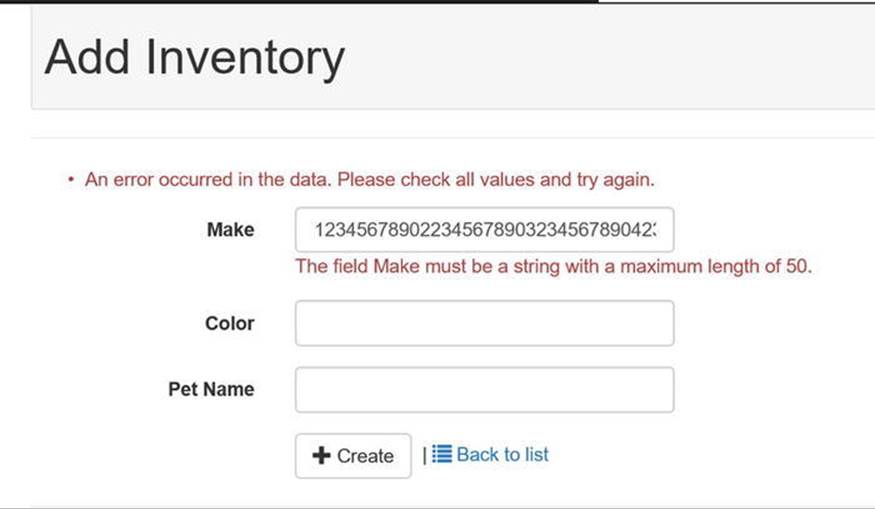
Figure 34-25. Displaying server-side validation
Client-Side Validation
Client-side validation is handled through the jQuery (jquery-2.1.4.min.js), jQuery validation (jquery.validate.min.js), and jQuery validation unobtrusive (jquery.validate.unobtrusive.min.js) libraries. The jQuery validation libraries add HTML5 data attributes used for the validation of user input. The MVC framework works with jQuery by examining the attributes on the model to determine which validations to add. The results are then generated by the EditorFor HTML helper into the following markup for the Make property:
<input name="Make" class="form-control text-box single-line input-validation-error" id="Make" aria-invalid="true" aria-describedby="Make-error" type="text" value="" data-val-length-max="50" data-val-length="The field Make must be a string with a maximum length of 50." data-val="true">
The data attributes also support custom error messages. Open the Inventory.cs class in the AutoLotDAL project, and update the StringLength attribute on the Make property to include an ErrorMessage assignment, like this:
[StringLength(50,ErrorMessage="Please enter a value less than 50 characters long.")]
public string Make { get; set; }
Now run the app, repeat the test, and the error message displays like Figure 34-26.
Figure 34-26. Updated error message from the data annotations
Finishing the UI
You’re going to finish off the MVC section of this chapter by cleaning up the remaining items on the UI.
Updating the Layout View
Start by opening _Layout.cshtml under Views/Shared. At the top of the page, add a Razor code block to declare a string variable and assign the value of Car Lot MVC. This is to replace all the hard-coded instances of the application name. The code is listed here:
@{
var appName = "Car Lot MVC";
}
Next, replace the hard-coded strings "My ASP.NET Application" and "Application Name" with @appName. You will find three places to make the change in the <title> HTML tag, in the nav-bar ActionLink() helper, and in the footer. The updated code is shown here:
<!-- In the <head> section -->
<title>@ViewBag.Title - @appName</title>
<head>
<title>@ViewBag.Title - @appName</title>
<!-- rest ommitted for brevity -->
</head>
<!-- In the nav-bar header <div> -->
<div class="navbar navbar-inverse navbar-fixed-top">
<div class="container">
<div class="navbar-header">
<button type="button" class="navbar-toggle" data-toggle="collapse" data-target=".navbar-collapse">
<!-- ommitted for brevity -->
</button>
@Html.ActionLink(@appName, "Index", "Home", new { area = "" }, new { @class = "navbar-brand" })
</div>
<!-- ommitted for brevity -->
</div>
</div>
<!-- In the <footer> section -->
<footer>
<p>© @DateTime.Now.Year - @appName</p>
</footer>
For the final change, place the image of the slug bug in the menu bar. This probably isn’t where you want to place an advertisement in a real web site; however, this example shows that you can place anything in the menu bar, and when the viewport size changes, the responsive features of Bootstrap hide those items. Create a folder named Images under the Content folder in CarLotMVC. Next, add an image to the folder; you can find the example image in the Chapter 34 downloads. Now add the image to the navigation bar, just before the call to load the _LoginPartial partial view.
<img src="~/Content/Images/CAR.gif" />
@Html.Partial("_LoginPartial")
When you run the app, you’ll see the image in the menu bar, as in Figure 34-27. When you shrink the viewport of your browser, you’ll see that the image disappears along with the menus.

Figure 34-27. Adding an image to the menu bar
Update the Home Page
The final change is to update the home page, which is (as you already know) the Index view of the Home controller. Start by updating the JumboTron to the following:
<div class="jumbotron">
<h1>Car Lot MVC</h1>
<p class="lead">A site for viewing and updating vehicles in the dealership.</p>
</div>
Next, delete all the content after the JumboTron block, and add the following:
<h2>View the Inventory</h2>
<p>
Autolot has the car you are looking for! Check out our expansive inventory on the @Html.ActionLink("Inventory", "Index", "Inventory") page.
</p>
Figure 34-28 shows the final result.
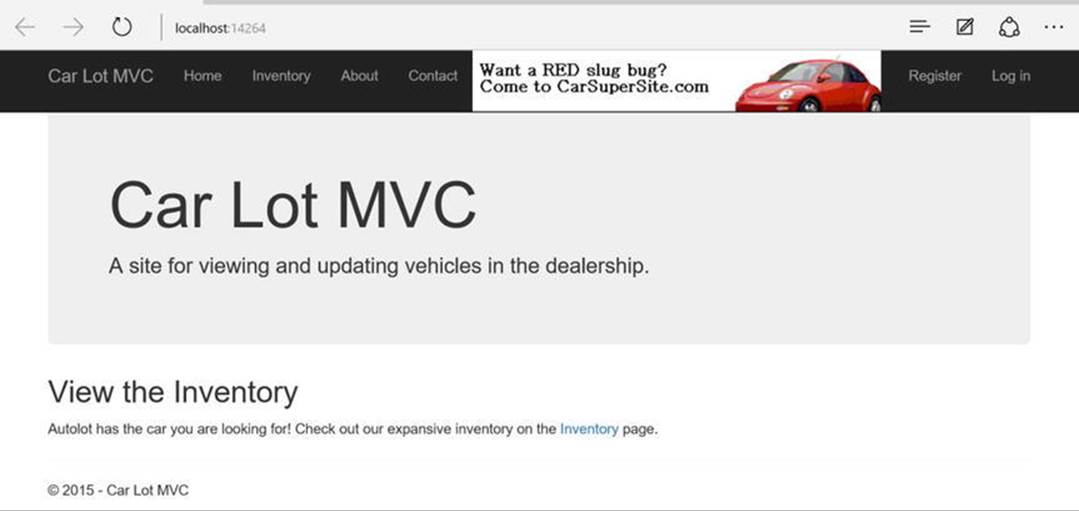
Figure 34-28. Final version of the home page
The Final Word on ASP.NET MVC
The question I am often asked is this: “Web Forms or MVC?” The answer not that simple. If your dev team is more comfortable with the drag-and-drop nature of UI creation or they struggle with the stateless nature of HTTP, Web Forms is probably the better choice. If your team is more comfortable with having complete control of the UI (which also means less “magic” being done for you) and developing stateless applications that leverage the HTTP verbs (such as HttpGet and HttpPost), then MVC is probably a better choice. Of course, there are a lot more factors to consider in your decision. These are just a few of them.
The good news is that you don’t have to choose between MVC and Web Forms. As mentioned at the beginning of this chapter, both are based on System.Web (up to and including MVC5), and they have always been able to be used together. When Microsoft introduced One ASP.NET in Visual Studio 2013, blending the two frameworks into a single project became much easier.
Admittedly, this chapter only scratches the surface of ASP.NET MVC. There is just too much to cover in one chapter. For a deeper look into all that MVC has to offer, Pro ASP.NET MVC 5 by Adam Freemen (available on Apress at www.apress.com/9781430265290?gtmf=s) is an excellent book on the subject.
![]() Source Code The CarLotMVC solution can be found in the Chapter 34 subfolder.
Source Code The CarLotMVC solution can be found in the Chapter 34 subfolder.
Introducing ASP.NET Web API
As you learned in Chapter 25, Windows Communication Foundation (WCF) is a full-fledged framework for creating .NET-based services that can communicate with a wide range of clients. While WCF is extremely powerful, if all you need are simple HTTP-based services, creating WCF-based services may be more involved than you want or need. Enter ASP.NET Web API, another framework for building web APIs in .NET that can be accessed from any HTTP-aware client. As an MVC developer, Web API is a logical addition to your .NET toolbox. Web API is built on MVC and leverages many of the same concepts such as models, controllers, and routing. Web API was first released with Visual Studio 2012 as part of MVC 4 and updated to version 2.2 with Visual Studio 2013 Update 1.
Adding the Web API Project
Start by adding a Web API project to your solution. Right-click your solution, select Add ![]() New Project, and select ASP.NET Web Application (shown in Figure 34-29). Name the project CarLotWebAPI.
New Project, and select ASP.NET Web Application (shown in Figure 34-29). Name the project CarLotWebAPI.

Figure 34-29. Adding a new ASP.NET web application
By now you should be familiar with the next screen. This time, select the Empty template and check the “Add folders and core references for:” Web API (as shown in Figure 34-30). If you select the Web API template, a lot of boilerplate and sample code (including MVC controllers and views) is added to the project, and all you need is the base Web API plumbing. The next screen presents the same choices you saw when creating a Web Forms or MVC app, and the options are collectively referred to as One ASP.NET.
Figure 34-30. Adding the Empty project template with Web API support
Click OK, and the project is added to the solution. As with the Web Forms and MVC projects, many of the included NuGet packages are out-of-date when you create a new project. Right-click the project in Solution Explorer, select Manage NuGet Packages, and change the filter to Upgrade Available. Upgrade all the packages that can be upgraded. Change the filter back to All and install Entity Framework (as you have done previously). You need to install one additional package: AutoMapper (which you will use later in the chapter). To find this package, enterAutoMapper in the search box (as in Figure 34-31).

Figure 34-31. Installing AutoMapper from NuGet
Finally, add a reference to the AutoLotDAL project (by right-clicking the References node in Solution Explorer for CarLotWebAPI and selecting AutoLotDAL from Projects/Solution). Add the connection string to the Web.config file (your connection string may differ based on your installation path).
<connectionStrings>
<add name="AutoLotConnection" connectionString="data source=localhost\SQLEXPRESS2014;initial catalog=AutoLot;integrated security=True;MultipleActiveResultSets=True;App=EntityFramework" providerName="System.Data.SqlClient" />
</connectionStrings>
Examining the Web API Project
This project is a lot more barren than the MVC project you created at the beginning of this chapter. Let’s examine the files that were created. Start by opening the WebApiConfig.cs file in the App_Start folder. The code (listed next) should look familiar to you. The first line enables attribute routing (not covered in this book). The second line defines the default route with the default values. The default route is a little different from what you saw in MVC. The first major difference is the lack of an action in the route. This is because (as you will see later in this chapter) routing beyond the controller is based on the HTTP verb used in the request. Finally, the id is set to RouteParameter.Optional, just like MVC.
public static void Register(HttpConfiguration config)
{
// Web API configuration and services
// Web API routes
config.MapHttpAttributeRoutes();
config.Routes.MapHttpRoute(
name: "DefaultApi",
routeTemplate: "api/{controller}/{id}",
defaults: new { id = RouteParameter.Optional }
);
}
Next, open the Global.asax.cs file (listed next). This is a stripped-down version of what you saw in MVC. There is only one line in the file, and it adds the routing for the web route(s).
protected void Application_Start()
{
GlobalConfiguration.Configure(WebApiConfig.Register);
}
Configuring the Project
Since the CarLotWebAPI project is a headless service (i.e., without any UI), it needs to be configured to run on start and wait for a call to one of the configured routes. To do this, open the project properties by right-clicking the project name in Solution Explorer and selecting Properties. Click the Web item in the left sidebar and then select “Don’t open a page. Wait for a request from an external application.” Also, make note of the project URL (in my example, it’s http://localhost:46024/). This is shown in Figure 34-32.
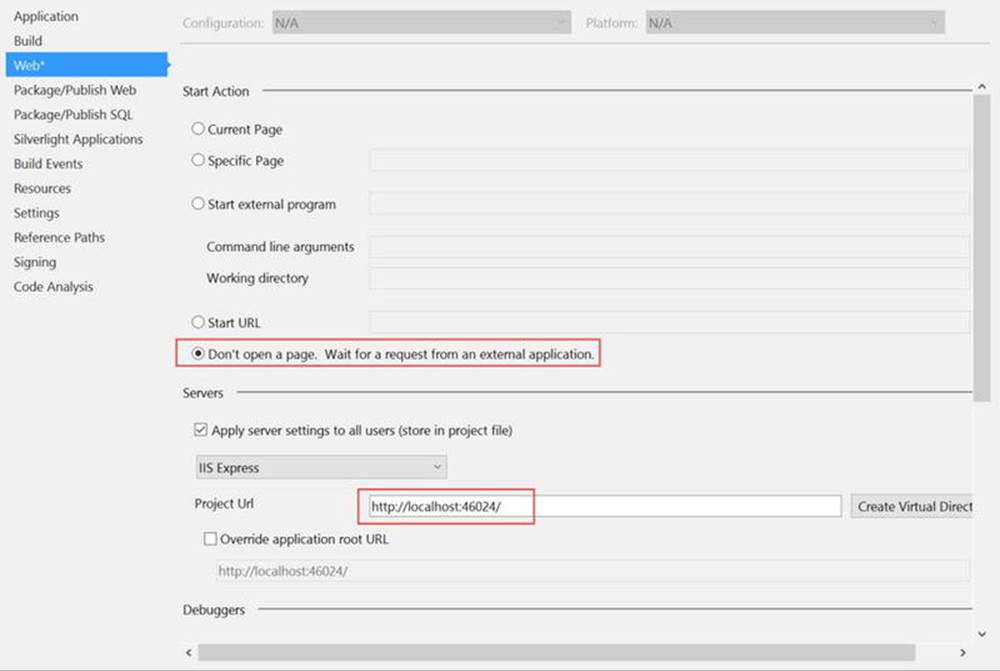
Figure 34-32. Configuring the project startup for CarLotWebAPI
Finally, set CarLotWebAPI as the startup project in your solution by right-clicking the project name in Solution Explorer and clicking Set as StartUp Project.
A Note About JSON
JavaScript Object Notation (JSON) is one way to transport data between services. It is a simple key-value text representation of objects and classes. For example, consider the following JSON representation of an Inventory item:
{"CarId":1,"Make":"VW","Color":"Black","PetName":"Zippy","Timestamp":"AAAAAAAAB9o=","Orders":[]}
Each JSON object starts and ends with braces, and property name and string values are quoted. JSON objects can also be nested. If the Make property wasn’t a string but an object (with the properties Builder and Year), the JSON could resemble something like this:
{"CarId":1,"Make":{"Builder":"VW","Year":2015},"Color":"Black","PetName":"Zippy","Timestamp":"AAAAAAAAB9o=","Orders":[]}
As you can see from the Orders property, lists are indicated by brackets ([). If the service was sending a list of Inventory objects, the JSON might resemble this:
[{"CarId":1,"Make":"VW","Color":"Black","PetName":"Zippy","Timestamp":"AAAAAAAAB9o=","Orders":[]},{"CarId":2,"Make":"Ford","Color":"Rust","PetName":"Rusty","Timestamp":"AAAAAAAAB9s=","Orders":[]}]
![]() Note The Web API project template includes a free open source utility called JSON.NET. It is a robust utility for creating JSON from objects, as well as creating objects from JSON. You will use JSON.NET later in this chapter, and you can find more information (including documentation and examples) at www.newtonsoft.com/json.
Note The Web API project template includes a free open source utility called JSON.NET. It is a robust utility for creating JSON from objects, as well as creating objects from JSON. You will use JSON.NET later in this chapter, and you can find more information (including documentation and examples) at www.newtonsoft.com/json.
Adding a Controller
Just like MVC, Web API code is centered on controllers and actions. Right-click the Controllers folder and select Add ![]() Controller. Next, select Web API 2 Controller with actions, using Entity Framework (shown in Figure 34-33), and click Add.
Controller. Next, select Web API 2 Controller with actions, using Entity Framework (shown in Figure 34-33), and click Add.
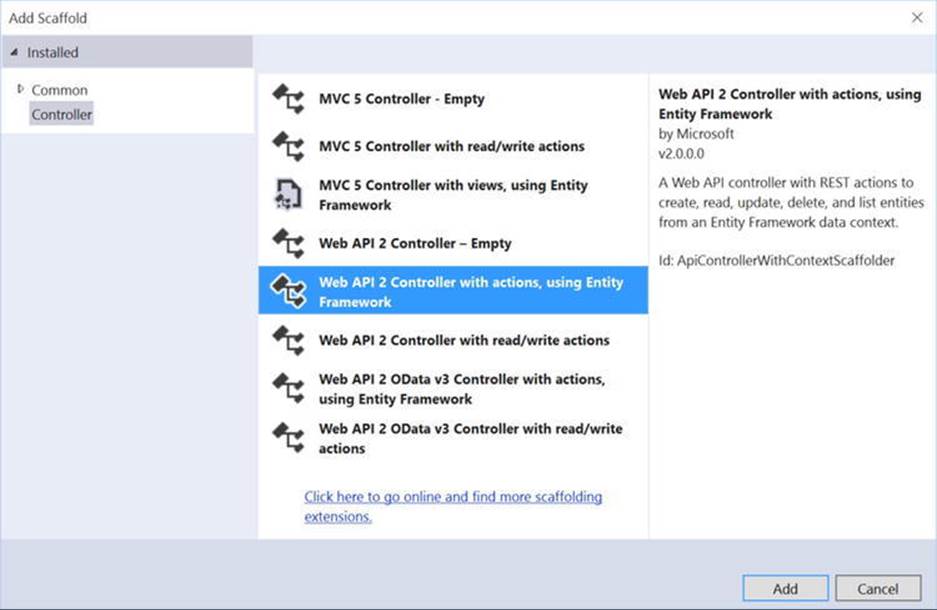
Figure 34-33. Adding a new Web API 2 Controller
On the Add Controller screen, select the Inventory class for the model and select AutoLotEntities for the data context. Check the box that asks to use async controller actions, change the name to InventoryController (shown in Figure 34-34), and click Add.
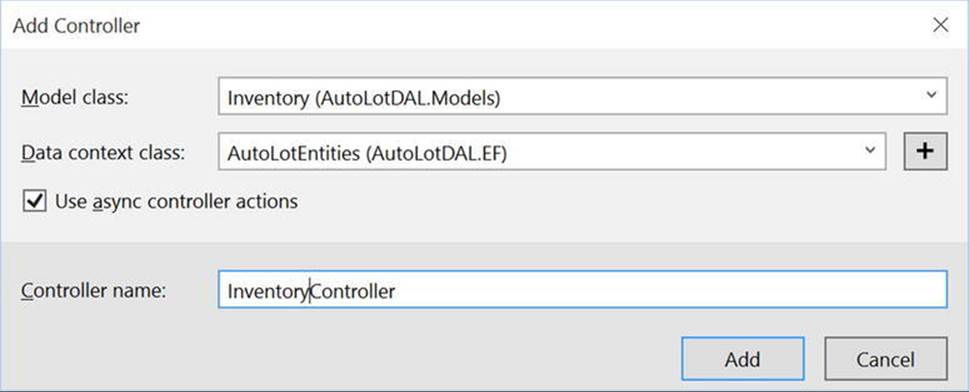
Figure 34-34. Adding the Model and Context classes for the controller
Examining the Controller Methods
Open the newly created InventoryController.cs class, add a class-level variable for the InventoryRepo class, and instantiate it. Also, dispose of the repo in the controller Dispose() method. Both code snippets are listed here:
private readonly InventoryRepo _repo = new InventoryRepo();
protected override void Dispose(bool disposing)
{
if (disposing)
{
db.Dispose();
_repo.Dispose();
}
base.Dispose(disposing);
}
Next, look at the action method signatures. While they resemble the actions from the MVC InventoryController.cs class, there are some glaring differences. Instead of routing the request based on the content of the URL, many of the actions take the same URL! Recall that in MVC, there are two methods each for Add(), Update() , and Delete() actions, and MVC decides which one to use based on the HTTP verb in the request (either HttpGet or Httpost). Web API follows the same pattern but uses additional HTTP verbs to distinguish between calls. In addition to the HttpGet and HttpPost verbs used in MVC, Web API also uses HttpPut and HttpDelete. Another glaring difference is the lack of HTTP verb attributes decorating the actions! This is more convention over configuration. Web API looks for the case-insensitive match of the start of the action name with the HTTP verb. For example, an action named DeleteInventory() would handle the HttpDelete request. You can certainly call the method anything you want, but then you would have to remember to decorate the method with the correct attribute. In the next sections, you will examine the actions in more detail as you update them to use the InventoryRepo from the AutoLotDAL library.
Getting All Inventory Records
There are two HttpGet methods, GetInventory( ) and GetInventory(int id) . The first gets all the inventory records (recall that the id parameter is optional in the route). It’s a pretty standard method just like what you saw in your MVC controller, except that this action method doesn’t return an ActionResult; it appears to just return data. In actuality, in addition to the data, the Web API framework wraps the data in an HttpOk (200) HttpResponseMessage, adding the data as the message body. The only change to this method is to update theInventoryRepo.GetAll() method and change the return type to IEnumerable<Inventory>, as follows:
// GET: api/Inventory
public IEnumerable<Inventory> GetInventory()
{
return _repo.GetAll();
}
Now it’s time to test the app. When you run the solution, it appears that nothing happened except the Run icon in Visual Studio changed to the traditional Pause/Stop icon. This is because you set the project to run headless and just wait for an external call. When everything is loaded (and the debug icons have changed), open a new web browser. Enter the URL for the service (you saw this when you changed the project web properties), plus the route, which is api/Inventory. On my machine, this equates to this (your port number will most likely be different):
http://localhost:46024/api/Inventory
When you enter this into the browser, you will get the following error as plain text (actually the error is much longer, but it’s shortened here to show the key part of the message). There isn’t any “yellow screen of death” like you are used to seeing in Web Forms and MVC!
"Message":"An error has occurred.","ExceptionMessage":"Self referencing loop detected for property ’Car’ with type ’System.Data.Entity.DynamicProxies.Inventory_4F2216023579E149E169D586253289F35987B42694292AD3BF08836508A419F5’. Path ’[0].Orders[0]’"
The lack of the traditional error page that you get in MVC (or Web Forms) is because Web API returns everything as JSON, unless specified otherwise. Therefore, the calling application (in this case the browser) doesn’t know an error occurred; it just displays the returned text. Note that Web API can also return any of the standard HTTP error codes (as you will see later). When Web API returns an error, the calling application is responsible for interpreting it and handling it accordingly. To see this, open the developer tools for your browser (F12 for most browsers), navigate to the Network tab, and then refresh your browser. The developer tools will show you great details about the call, the returned HttpMessage, and any errors (shown in Figure 34-35).
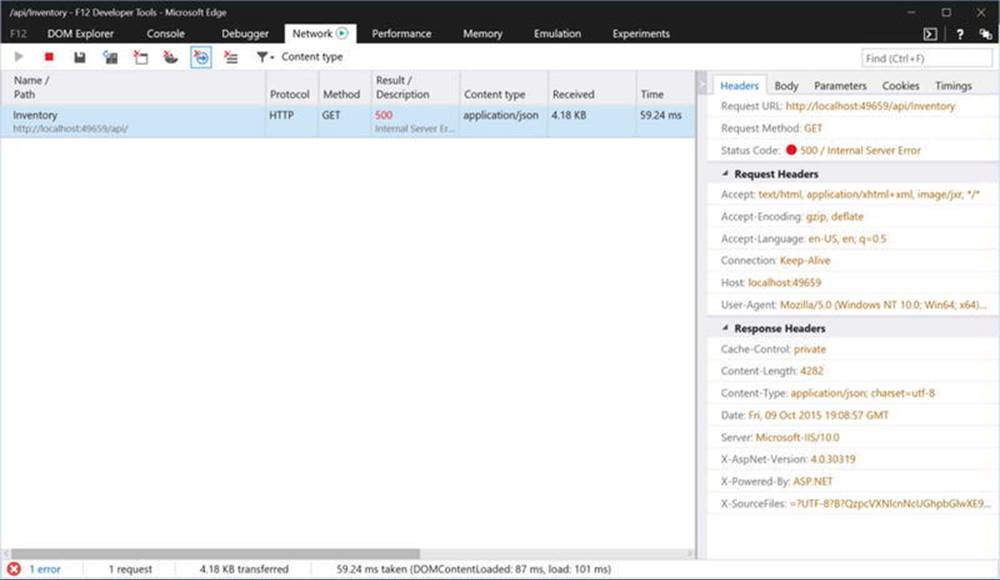
Figure 34-35. Showing HTTP errors in Microsoft Edge browser
The error itself is because EF (by default) lazy loads entities. If you recall from Chapter 23, lazy loading means that EF will call for the data from the database when properties are requested. Serialization of .NET objects traverses every property, so in this case, it walks down the list ofOrders, and the Order class has a reference back to its Inventory class. This circular reference causes the serialization to fail. To resolve this, you either need to turn lazy loading off or copy all the relevant properties into a new class, ignoring the ones that cause problems for serialization. You will do that next with AutoMapper.
Creating View Models with AutoMapper
AutoMapper (which you installed earlier in this section) is a free, open source utility for creating a new instance of a type from an instance of another type. It can also be used to create a new instance of the same type, which you will do here. Add a new constructor intoInventoryController.cs, and in that constructor add the following code:
public InventoryController()
{
Mapper.Initialize(
cfg =>
{
cfg.CreateMap<Inventory, Inventory>()
.ForMember(x => x.Orders, opt => opt.Ignore());
});
}
This code creates a mapping between the Inventory type and itself, ignoring the Orders property. AutoMapper uses reflection to determine what properties match between the two types and will copy all the values from the original instance into a new instance of the target type, with the exception of any ignored properties (in this example, the Orders navigation property). It also works on collections, as you will see next.
Next, update the Inventory() method to convert the list of Inventory records into a new list of Inventory records that don’t contain any Orders, like this:
// GET: api/Inventory
public IEnumerable<Inventory> GetInventory()
{
var inventories = _repo.GetAll();
return Mapper.Map<List<Inventory>, List<Inventory>>(inventories);
}
![]() Note There isn’t enough space in this chapter to go any deeper with AutoMapper, but it is an active and widely used utility for .NET developers. You should consider adding it to your standard toolbox. You can find more information, including documentation and examples, at the project home page at http://automapper.org.
Note There isn’t enough space in this chapter to go any deeper with AutoMapper, but it is an active and widely used utility for .NET developers. You should consider adding it to your standard toolbox. You can find more information, including documentation and examples, at the project home page at http://automapper.org.
Run the app again and, using Internet Explorer or Microsoft Edge (both Chrome and Firefox return XML by default), enter the Inventory URI (http://localhost:46024/api/Inventory). You will see the following JSON output (your actual data might vary):
[{"CarId":1,"Make":"VW","Color":"Black","PetName":"Zippy","Timestamp":"AAAAAAAAB9o=","Orders":[]},{"CarId":2,"Make":"Ford","Color":"Rust","PetName":"Rusty","Timestamp":"AAAAAAAAB9s=","Orders":[]},{"CarId":3,"Make":"Saab","Color":"Black","PetName":"Mel","Timestamp":"AAAAAAAAB9w=","Orders":[]},{"CarId":4,"Make":"Yugo","Color":"Yellow","PetName":"Clunker","Timestamp":"AAAAAAAAB90=","Orders":[]},{"CarId":5,"Make":"BMW","Color":"Black","PetName":"Bimmer","Timestamp":"AAAAAAAAB94=","Orders":[]},{"CarId":6,"Make":"BMW","Color":"Green","PetName":"Hank","Timestamp":"AAAAAAAAB98=","Orders":[]},{"CarId":7,"Make":"BMW","Color":"Pink","PetName":"Pinky","Timestamp":"AAAAAAAAB+A=","Orders":[]},{"CarId":13,"Make":"Pinto","Color":"Black","PetName":"Pete","Timestamp":"AAAAAAAAB+E=","Orders":[]},{"CarId":54,"Make":"Yugo","Color":"Brown","PetName":"Brownie","Timestamp":"AAAAAAABX5E=","Orders":[]},{"CarId":55,"Make":"Yugo","Color":"Brown","PetName":"Brownie","Timestamp":"AAAAAAABbzE=","Orders":[]},{"CarId":56,"Make":"Yugo","Color":"Brown","PetName":"Brownie","Timestamp":"AAAAAAABftE=","Orders":[]},{"CarId":57,"Make":"Yugo","Color":"Brown","PetName":"Brownie","Timestamp":"AAAAAAABjnE=","Orders":[]},{"CarId":58,"Make":"Yugo","Color":"Brown","PetName":"Brownie","Timestamp":"AAAAAAABnhE=","Orders":[]},{"CarId":59,"Make":"Yugo","Color":"Brown","PetName":"Brownie","Timestamp":"AAAAAAABrbE=","Orders":[]},{"CarId":60,"Make":"Yugo","Color":"Brown","PetName":"Brownie","Timestamp":"AAAAAAABvVE=","Orders":[]},{"CarId":61,"Make":"Yugo","Color":"Brown","PetName":"Brownie","Timestamp":"AAAAAAABzPE=","Orders":[]},{"CarId":62,"Make":"Yugo","Color":"Brown","PetName":"Brownie","Timestamp":"AAAAAAAB3JE=","Orders":[]},{"CarId":63,"Make":"Yugo","Color":"Brown","PetName":"Brownie","Timestamp":"AAAAAAAB7DE=","Orders":[]},{"CarId":64,"Make":"Yugo","Color":"Brown","PetName":"Brownie","Timestamp":"AAAAAAAB+9E=","Orders":[]}]
You see the Orders property is still there, but all the records are empty, avoiding the circular reference issue. Problem solved!
Getting One Inventory Record
The second HttpGet method, GetInventory(int id), returns a single inventory record based on the ID passed in. Update the method to call the GetOneAsync() method from the repo, and use AutoMapper to create a new instance of an Inventory class, as follows:
// GET: api/Inventory/5
[ResponseType(typeof(Inventory))]
public async Task<IHttpActionResult> GetInventory(int id)
{
Inventory inventory = await _repo.GetOneAsync(id);
if (inventory == null)
{
return NotFound();
}
return Ok(Mapper.Map<Inventory,Inventory>(inventory));
}
There are four new items/methods in this action method: the ResponseType attribute, IHttpActionResult, and the NotFound() and Ok() methods. The ResponseType attribute is used to specify the entity type returned in the body of theHttpResponseMessage. In this, it’s priming the pump to serialize an Inventory record for the HttpActionResult (which is the Web API version of MVC’s ActionResult). NotFound() returns a NotFoundResult, which translates to a 404 error message. Ok() returns an HttpOk (200) and adds the object(s) passed into the method (as JSON or XML, depending on your browser) into the message body.
To test this, entry the following into Internet Explorer/Edge (your port and CarId might be different):
http://localhost:46024/api/Inventory/5
Updating an Inventory Record
Updating a record in HTTP language is achieved with an HttpPut call and passing in the id of the record to be updated and an instance of the object being updated. This method uses model binding (just like Web Forms and MVC) to create an instance of the Inventory class with the values sent from the client in the body of the message. Update the PutInventory() method to use the InventoryRepo. The code is shown here and will be discussed after the listing:
// PUT: api/Inventory/5
[ResponseType(typeof(void))]
public async Task<IHttpActionResult> PutInventory(int id, Inventory inventory)
{
if (!ModelState.IsValid)
{
return BadRequest(ModelState);
}
if (id != inventory.CarId)
{
return BadRequest();
}
try
{
await _repo.SaveAsync(inventory);
}
catch (Exception ex)
{
//Production app should do more here
throw;
}
return StatusCode(HttpStatusCode.NoContent);
}
In the body of the action method (as with model binding in MVC and Web Forms), the first check is to make sure the ModelState is valid. If not, then it returns an HttpBadRequest (400). If it is valid, the method then checks that the id passed in through the URL matches the CarIdof the Inventory record (from the message body). This helps cut down (but doesn’t eliminate) URL hacking by an unscrupulous user. The code then attempts to save the record and, if successful, returns an HTTP 204 (No content). If there is an exception, this example merely throws it out to the client. In a production app, you would want to handle any and all exceptions accordingly.
Adding Inventory Records
Adding a record in HTTP language is achieved with an HttpPost call and passing the object being updated in the message body. In MVC, you used only Httpost for anything other than HttpGet requests, but Web API is better at using the HTTP verbs correctly. ThePostInventory() method also uses model binding to create an instance of the Inventory class with the values sent from the client in the body of the message. Update the method to use the InventoryRepo. The code is shown here and will be discussed after the listing:
// POST: api/Inventory
[ResponseType(typeof(Inventory))]
public async Task<IHttpActionResult> PostInventory(Inventory inventory)
{
if (!ModelState.IsValid)
{
return BadRequest(ModelState);
}
try
{
await _repo.AddAsync(inventory);
}
catch (Exception ex)
{
//Production app should do more here
throw;
}
return CreatedAtRoute("DefaultApi", new { id = inventory.CarId }, inventory);
}
The PostInventory() action returns the added Inventory record, complete with the server-generated values, so the ResponseType is of type Inventory. This action method also uses model binding to get the values from the message body, checks ModelState, and returns an HttpBadRequest (400) if there are issues in the model binding. If model binding is successful, the method then attempts to add the new record. If the add is successful, then the action returns an HttpCreated (201) with the new Inventory record in the body of the message.
Deleting Inventory Records
The final action method to update is DeleteInventory. The controller template creates a method that takes an id, pulls up the record, and, if found, deletes them. The problem with this (as you discovered with the MVC Delete action) is that the AutoLotDAL library uses concurrency checking to make sure no one else changed the record before this current user sent the delete request. So, you need to update the signature to accept an id and an Inventory object, which will get populated from the message body. Update the method to the following:
// DELETE: api/Inventory/5
[ResponseType(typeof(void))]
public async Task<IHttpActionResult> DeleteInventory(int id, Inventory inventory)
{
if (id != inventory.CarId)
{
return BadRequest();
}
try
{
await _repo.DeleteAsync(inventory);
}
catch (Exception ex)
{
//Production app should do more here
throw;
}
return Ok();
}
The first change is to update the ResponeType to void. Next, update the signature to accept an Inventory type in addition to the id parameter. In the method body, you also check to make sure the id parameter matches the CarId of the Inventory record from the message body. If it matches, attempt to delete the Inventory record. If the deletion succeeds, return an HttpOk (200).
Remove the AutoLotEntities Variable
The final cleanup for the InventoryController is to remove the AutoLotEntities variable from the top of the class and dispose of the repo in the controller’s Dispose method. The updated Dispose method is shown here:
protected override void Dispose(bool disposing)
{
if (disposing)
{
_repo.Dispose();
}
base.Dispose(disposing);
}
Updating CarLotMVC to Use CarLotWebAPI
Currently, CarLotMVC uses the AutoLotDAL library for all of its CRUD operations. In this section, you will use the CarLotWebAPI for all the data access operations.
Updating the Index Action
Next, open the InventoryController.cs file in CarLotMVC and navigate to the Index() action method. Instead of using the InventoryRepo from the AutoLotDAL library, you are going to use the services in CarLotWebAPI. To do this, create a new HttpClient and callGetAsync(), passing in the URL of the GetInventory() action method. This Web API method returns an IHTTPActionResult. This result has two properties that you care about for this method: IsSuccessStatusCode and Content. The IsSuccessStatusCode returnstrue if the call worked. This prevents you from having to check every possible code that could get returned, since there are many that are considered successful. The Content property provides access to the message body. In the case of the Index() action method, if the Inventoryrecords were returned, the Web API returns an HttpOk (200).
If everything works, all the Inventory records are contained in the Content property as JSON. This is where JSON.NET comes into play (as mentioned earlier in the chapter). The JsonConvert.DeserializeObject<T>() method is called using either a single type (Inventory) or IEnumerable of a type (List<Inventory>) as the generic parameter. You then pass in the JSON string, and it attempts to convert the JSON string into the type specified. If the method successfully converts the text into objects, then it returns the Index view. Note that your port for the Web API call will probably be different.
// GET: Inventory
public async Task<ActionResult> Index()
{
var client = new HttpClient();
var response = await client.GetAsync("http://localhost:46024/api/Inventory");
if (response.IsSuccessStatusCode)
{
var items = JsonConvert.DeserializeObject<List<Inventory>>(
await response.Content.ReadAsStringAsync());
return View(items);
}
return HttpNotFound();
}
![]() Note None of these examples has the level of error handling needed for a production application. That decision was made to make sure the examples are clear and concise. You would want to take what you learned earlier in Chapter 7 to handle any and all exceptions gracefully.
Note None of these examples has the level of error handling needed for a production application. That decision was made to make sure the examples are clear and concise. You would want to take what you learned earlier in Chapter 7 to handle any and all exceptions gracefully.
Make sure the CarLotMVC app is set as the startup project by right-clicking the CarLotMVC project name in Solution Explorer. Run the app and click Set as StartUp Project. Run the app and click the Inventory link in the menu, and you will see the same page as when the Index()method was calling directly into the AutoLotDAL library. It is literally that simple!
![]() Note You might be wondering if you still need the reference to AutoLotDAL in CarLotMVC. The answer is Yes, at least for how this solution is structured. AutoLotDAL contains the model definitions, and CarLotMVC needs access to the model classes. A common pattern (not shown here for simplicity) is to place the model definitions into a separate assembly and reference that library from any project that need the type definitions for the models.
Note You might be wondering if you still need the reference to AutoLotDAL in CarLotMVC. The answer is Yes, at least for how this solution is structured. AutoLotDAL contains the model definitions, and CarLotMVC needs access to the model classes. A common pattern (not shown here for simplicity) is to place the model definitions into a separate assembly and reference that library from any project that need the type definitions for the models.
Updating the Details Action
The next step is to update the Details() action method . Update the code to the following (changing your port as necessary):
// GET: Inventory/Details/5
public async Task<ActionResult> Details(int? id)
{
if (id == null)
{
return new HttpStatusCodeResult(HttpStatusCode.BadRequest);
}
var client = new HttpClient();
var response = await client.GetAsync($"http://localhost:46024/api/Inventory/{id.Value}");
if (response.IsSuccessStatusCode)
{
var inventory = JsonConvert.DeserializeObject<Inventory>(
await response.Content.ReadAsStringAsync());
return View(inventory);
}
return HttpNotFound();
}
The main change here (just like in the Index action) is to change the call to get the record to CarLotMVC using a new HttpClient. Check whether the response was a successful call, and if so, use JSON.NET to deserialize the content of the message to an Inventory object. Finally, return the view.
Updating the Add Action
There are two Create() action methods, but the HttpGet version doesn’t need to be updated since it loads a view without any database interaction. The HttpPost version does need to be updated. Fortunately, the HttpClient takes care of a lot of the work for you (just like in theIndex() action method). However, before you update the method, you need to add a using statement for System.Net.Http and a reference to System.Net.Http.Formatting. The System.Net.Http.Formatting class has extension methods that you will use throughout this project, such as PostAsJsonAsync(), shown in the following code. The entire action method is listed here, and the changes will be discussed after the listing:
[HttpPost]
[ValidateAntiForgeryToken]
public async Task<ActionResult> Create([Bind(Include = "Make,Color,PetName"] Inventory inventory)
{
if (!ModelState.IsValid)
{
ModelState.AddModelError(string.Empty,
"An error occurred in the data. Please check all values and try again.");
return View(inventory);
}
try
{
var client = new HttpClient();
var response = await client.PostAsJsonAsync("http://localhost:46024/api/Inventory", inventory);
if (response.IsSuccessStatusCode)
{
return RedirectToAction("Index");
}
}
catch (Exception ex)
{
ModelState.AddModelError(string.Empty, $"Unable to create record: {ex.Message}");
}
return View(inventory);
}
The main change is that after creating an HttpClient instance, you call the PostAsJsonAsync() extension method. This method takes two parameters: the service URI (for example, http:/localhost/46024/api/Inventory) and the data to post (inventory). The method takes care of creating the JSON for you, creating an HttpPost method, and inserting your data into the message body. If the request was successful, the IsSuccessStatusCode will be set to true.
Updating the Edit Action
Both of the Edit() action methods need to be updated. The HttpGet version must call CarLotWebAPI to get the record to display, and the changes are the same that you made to the Details() action method to get the data from the web service.
// GET: Inventory/Edit/5
public async Task<ActionResult> Edit(int? id)
{
if (id == null)
{
return new HttpStatusCodeResult(HttpStatusCode.BadRequest);
}
var client = new HttpClient();
var response = await client.GetAsync($"http://localhost:46024/api/Inventory/{id.Value}");
if (response.IsSuccessStatusCode)
{
var inventory = JsonConvert.DeserializeObject<Inventory>(
await response.Content.ReadAsStringAsync());
return View(inventory);
}
return new HttpNotFoundResult();
}
The HttpPost version uses a similar extension method as the Add() action method. PutAsJsonAsync() creates an HttpPut message at the specified URL and adds the objects into the body of the message as JSON. The updated code is listed here:
// POST: Inventory/Edit/5
[HttpPost]
[ValidateAntiForgeryToken]
public async Task<ActionResult> Edit(
[Bind(Include = "CarId,Make,Color,PetName,Timestamp")] Inventory inventory)
{
if (!ModelState.IsValid) { return View(inventory); }
var client = new HttpClient();
var response = await client.PutAsJsonAsync($"http://localhost:46024/api/Inventory/{inventory.CarId}", inventory);
if (response.IsSuccessStatusCode)
{
return RedirectToAction("Index");
}
return View(inventory);
}
![]() Note You might be wondering why the action method in the MVC controller is marked with the HttpPost attribute but the call to the web service is an HttpPut. The important takeaway is that the HTTP verb used to call MVC actions does not have to match the HTTP verb used to call Web API action methods. They are separate operations.
Note You might be wondering why the action method in the MVC controller is marked with the HttpPost attribute but the call to the web service is an HttpPut. The important takeaway is that the HTTP verb used to call MVC actions does not have to match the HTTP verb used to call Web API action methods. They are separate operations.
Updating the Delete Action
There are two Delete() action methods, and like the Edit() HttpGet version, the only change is to call the web service to get the data. The change is done the same way as you did for the Delete() and Details() action methods.
// GET: Inventory/Delete/5
public async Task<ActionResult> Delete(int? id)
{
if (id == null)
{
return new HttpStatusCodeResult(HttpStatusCode.BadRequest);
}
var client = new HttpClient();
var response = await client.GetAsync($"http://localhost:46024/api/Inventory/{id.Value}");
if (response.IsSuccessStatusCode)
{
var inventory = JsonConvert.DeserializeObject<Inventory>(
await response.Content.ReadAsStringAsync());
return View(inventory);
}
return new HttpNotFoundResult();
}
The HttpGet Delete() action method requires more work. As you might suspect, there is indeed a DeleteAsync() extension method on the HttpClient, but it doesn’t accept any parameters for content in the message body. Using this method will cause the delete to fail since the timestamp value must be passed in as part of the concurrency check. Instead, you have to create the HttpRequestMessage by hand. The constructor for the HttpRequestMessage takes the HttpMethod as the first parameter and the URL as the second. Create a new instance passing in HttpDelete as the verb, and the URL of the Delete() action method, as follows:
HttpRequestMessage request = new HttpRequestMessage(
HttpMethod.Delete,
$"http://localhost:46024/api/Inventory/{inventory.CarId}");
Next, use JSON.NET to serialize the inventory object and then add it to the content. The serialization call is straightforward:
JsonConvert.SerializeObject(inventory)
When assigning content to the HttpRequestMessage, you have to set the encoding and the type, which is application.json, like this:
Content = new StringContent(JsonConvert.SerializeObject(inventory), Encoding.UTF8, "application/json")
Putting it all together using object initialization, you should have this:
HttpRequestMessage request = new HttpRequestMessage(
HttpMethod.Delete,
$"http://localhost:46024/api/Inventory/{inventory.CarId}")
{
Content =
new StringContent(JsonConvert.SerializeObject(inventory), Encoding.UTF8, "application/json")
};
Finally, send the message by calling SendAsync() on an instance of HttpClient, thus sending the request you just created. The full Delete() method is shown here:
// POST: Inventory/Delete/5
[HttpPost]
[ValidateAntiForgeryToken]
public async Task<ActionResult> Delete([Bind(Include = "CarId,Timestamp")]Inventory inventory)
{
try
{
var client = new HttpClient();
HttpRequestMessage request = new HttpRequestMessage(
HttpMethod.Delete,
$"http://localhost:46024/api/Inventory/{inventory.CarId}")
{
Content =
new StringContent(JsonConvert.SerializeObject(inventory), Encoding.UTF8, "application/json")
};
var response = await client.SendAsync(request);
return RedirectToAction("Index");
}
catch (DbUpdateConcurrencyException)
{
ModelState.AddModelError(string.Empty, "Unable to delete record. Another user updated the record.");
}
catch (Exception ex)
{
ModelState.AddModelError(string.Empty, $"Unable to create record: {ex.Message}");
}
return View(inventory);
}
Testing the Applications
To run the application, you need to set both CarLotMVC and CarLotWebAPI to start when you begin debugging. Do this by right-clicking the solution in Solution Explorer and selecting Set StartUp Projects. In the dialog that opens, select “Multiple startup projects” and set both CarLotMVC and CarLotWebAPI to Start (shown in Figure 34-36).
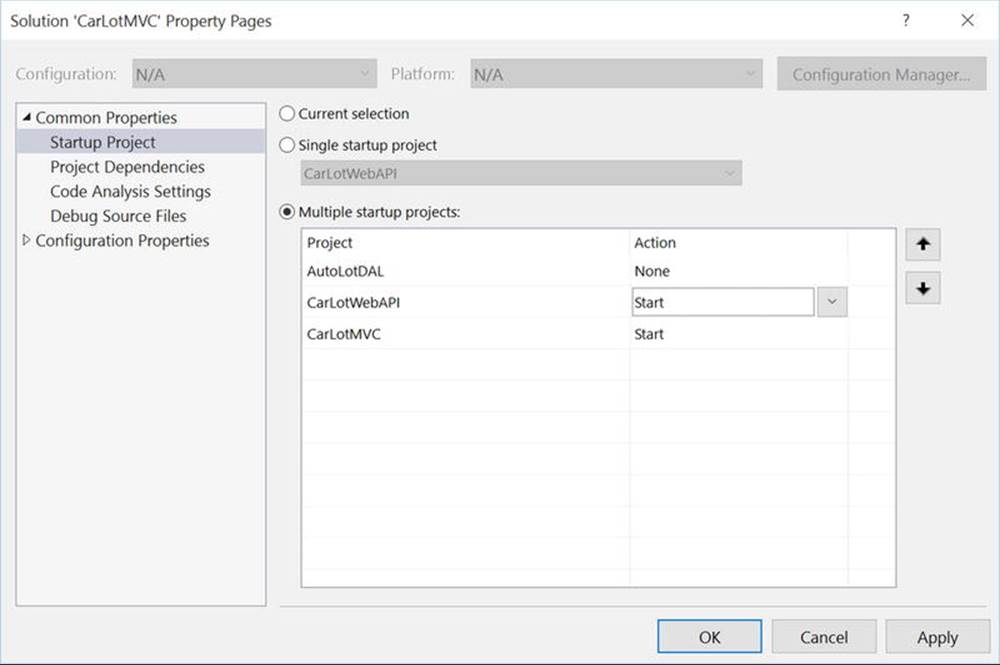
Figure 34-36. Setting multiple startup projects
Now, when you press F5 to run the solution, the CarLotMVC project will load a browser to the home page, and CarLotWebAPI will be running as a headless application, waiting for a call. Run the application, click the Inventory menu, and click around the pages. The app works the same as it did from a user perspective.
![]() Source Code The CarLotMVC_Web API solution can be found in the Chapter 34 subfolder.
Source Code The CarLotMVC_Web API solution can be found in the Chapter 34 subfolder.
Summary
This chapter examined many aspects of ASP.NET MVC and Web API. You began by examining the Model-View-Controller pattern and then building your first MVC site. You learned about the convention over configuration for the MVC framework and about all the files scaffolded for you as part of the new project template, as well as the folders that were created and their purpose. You examined each of the classes created in the App_Start folder and how they help you create MVC applications. You also learned about bundling and minification and how to turn it off if needed.
The next section went into routing and how requests are directed to your controllers and actions. You created new routes for the About and Contact pages and learned about redirecting users to other resources in your site using routing instead of hard-coded URLs.
Next, you created a controller for the Inventory pages and learned how the scaffolding built into Visual Studio creates base action methods and views. You learned about HttpGet and HttpPost requests and how they work with routing for even finer control of what action method gets called. You then updated the action methods to use AutoLotDAL, as well as updating the signatures and code to fit your business requirements.
Then you learned about the Razor View Engine, the syntax, and Razor helpers, functions, and delegates. You also learned more about strongly typed views, partial views, and layouts. You also learned to send data to the view using ViewBag, ViewData, and TempData.
After that, you modified each scaffolded view, updated the InventoryController actions, added validation, and used Bootstrap to dress up the UI.
In the major next section, you learned about Web API. You created a new Web API project and examined the scaffolded files and folders and their purpose. You then used the Visual Studio scaffolding to add a controller and its action methods. You learned about additional HTTP verbs and how they are applied in Web API routing. You updated each of the action methods to use AutoLotDAL and Entity Framework and used AutoMapper to avoid the circular reference issue with EF lazy loading and serialization.
After updating all the InventoryController actions in CarLotWebAPI, you updated CarLotMVC to call into the CarLotWebAPI service’s URLs, using JSON.NET to deserialize and deserialize records. You also learned how to make calls using the additional HTTP verbs used by the Web API.
All materials on the site are licensed Creative Commons Attribution-Sharealike 3.0 Unported CC BY-SA 3.0 & GNU Free Documentation License (GFDL)
If you are the copyright holder of any material contained on our site and intend to remove it, please contact our site administrator for approval.
© 2016-2026 All site design rights belong to S.Y.A.