C# 6.0 and the .NET 4.6 Framework (2015)
PART VIII
ASP.NET
CHAPTER 33
ASP.NET State Management Techniques
The previous two chapters concentrated on the composition and behavior of ASP.NET pages and the web controls they contain. This chapter builds on that information by examining the role of the Global.asax file and the underlying HttpApplication type. As you will see, the functionality of HttpApplication allows you to intercept numerous events that enable you to treat your web application as a cohesive unit, rather than a set of stand-alone *.aspx files driven by a master page.
In addition to investigating the HttpApplication type, this chapter also addresses the all-important topic of state management. Here you will learn the role of the view state, session, and application variables (including the application cache), cookie data, and the ASP.NET Profile API.
The Issue of State
At the beginning of Chapter 31, I pointed out that HTTP on the Web results in a stateless wire protocol. This very fact makes web development extremely different from the process of building an executable assembly. For example, when you are building a Windows desktop UI application, you can rest assured that any member variables defined in the Form-derived class will typically exist in memory until the user explicitly shuts down the executable.
public partial class MainWindow : Window
{
// State data!
private string userFavoriteCar = "Yugo";
}
In the World Wide Web environment, however, you are not afforded the same luxurious assumption. To prove the point, create a new Empty Web Site project named SimpleStateExample and insert a new Web Form. In the code-behind file of your *.aspx file, define a page-level string variable named userFavoriteCar, as follows:
public partial class _Default : System.Web.UI.Page
{
// State data?
private string userFavoriteCar = "Yugo";
protected void Page_Load(object sender, EventArgs e)
{
}
}
Next, construct a very simple web UI, as shown in Figure 33-1.
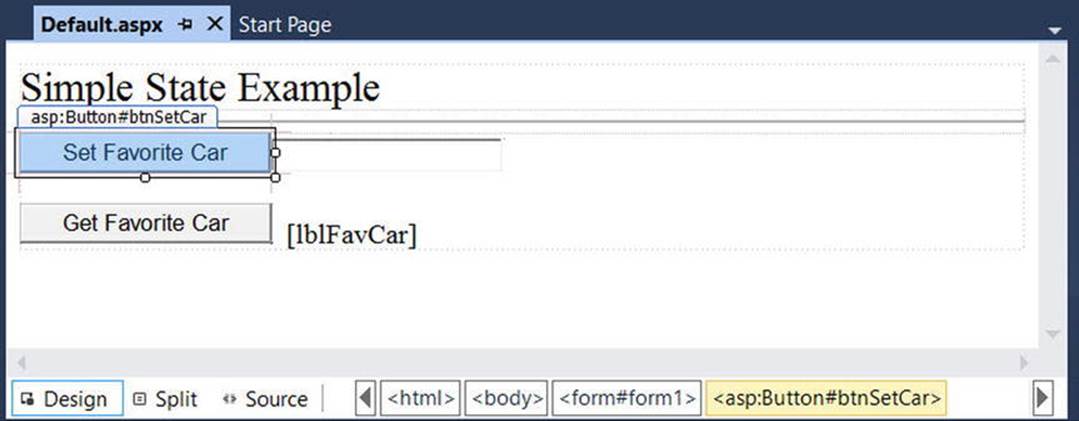
Figure 33-1. The UI for the simple state page
The server-side Click event handler for the Set button (named btnSetCar) allows the user to assign the string member variable to the value within the TextBox (named txtFavCar), like so:
protected void btnSetCar_Click(object sender, EventArgs e)
{
// Store favorite car in member variable.
userFavoriteCar = txtFavCar.Text;
}
The Click event handler for the Get button (btnGetCar) displays the current value of the member variable within the page’s Label widget (lblFavCar), as follows:
protected void btnGetCar_Click(object sender, EventArgs e)
{
// Show value of member variable.
lblFavCar.Text = userFavoriteCar;
}
If you were building a Windows GUI application, you would be right to assume that once the user sets the initial value, it will be remembered throughout the life of the desktop application. Sadly, when you run this web application, you will find that each time you post back to the web server (by clicking either button), the value of the userFavoriteCar string variable is set back to the initial value of “Yugo.” Therefore, the Label’s text is continuously fixed.
Again, given that HTTP has no clue how to automatically remember data once the HTTP response has been sent, it stands to reason that the Page object is destroyed almost instantly. As a result, when the client posts back to the *.aspx file, a new Page object is constructed that will reset any page-level member variables. This is clearly a major issue. Imagine how useless online shopping would be if every time you posted back to the web server, any and all information you previously entered (such as the items you wished to purchase) were discarded. When you want to remember information regarding the users who are logged on to your site, you need to make use of various state management techniques.
![]() Note This issue is in no way limited to ASP.NET. Java web applications, CGI applications, classic ASP applications, and PHP applications all must contend with the thorny issue of state management.
Note This issue is in no way limited to ASP.NET. Java web applications, CGI applications, classic ASP applications, and PHP applications all must contend with the thorny issue of state management.
To remember the value of the userFavoriteCar string type between postbacks, one approach is to store the value of this string type in a session variable. You will examine the details of session state in the pages that follow. For the sake of completion, however, here are the necessary updates for the current page (note that you are no longer using the private string member variable, so feel free to comment out or remove the definition altogether):
public partial class _Default : System.Web.UI.Page
{
// State data?
// private string userFavoriteCar = "Yugo";
protected void Page_Load(object sender, EventArgs e)
{
}
protected void btnSetCar_Click(object sender, EventArgs e)
{
// Store value to be remembered in session variable.
Session["UserFavCar"] = txtFavCar.Text;
}
protected void btnGetCar_Click(object sender, EventArgs e)
{
// Get session variable value.
lblFavCar.Text = (string)Session["UserFavCar"];
}
}
If you now run the application, the value of your favorite automobile will be preserved across postbacks, thanks to the HttpSessionState object manipulated indirectly by the inherited Session property. Session data (which will be examined in greater detail later in this chapter) is just one way to “remember” information in your web sites. Over the next several pages, you will examine each of the major options supported by ASP.NET.
![]() Source Code The SimpleStateExample web site is included in the Chapter 33 subdirectory.
Source Code The SimpleStateExample web site is included in the Chapter 33 subdirectory.
ASP.NET State Management Techniques
ASP.NET provides several mechanisms you can use to maintain stateful information in your web applications. Here are some common options:
· Use ASP.NET view state.
· Use ASP.NET control state.
· Define application-level data.
· Use the cache object.
· Define session-level data.
· Define cookie data.
In addition to these techniques, if you want to persist user data in a permanent manner, ASP.NET provides an out-of-the-box Profile API. You’ll examine the details of each approach in turn, beginning with the topic of ASP.NET view state.
Understanding the Role of ASP.NET View State
The term view state has been thrown out a few times here and in the previous chapters without a formal definition, so let’s demystify this term. Without framework support, web developers are required to manually repopulate the values of the incoming form widgets during the process of constructing the outgoing HTTP response.
Using ASP.NET, we no longer have to manually scrape out and repopulate the values in the HTML widgets because the ASP.NET runtime automatically embeds a hidden form field (named __VIEWSTATE), which will flow between the browser and a specific page. The data assigned to this field is a Base64-encoded string that contains a set of name/value pairs representing the values of each GUI widget on the page at hand.
The System.Web.UI.Page base class’s Init event handler is the entity in charge of reading the incoming values in the __VIEWSTATE field to populate the appropriate member variables in the derived class. (This is why it is risky at best to access the state of a web widget within the scope of a page’s Init event handler.)
Also, just before the outgoing response is emitted back to the requesting browser, the __VIEWSTATE data is used to repopulate the form’s widgets. Clearly, the best thing about this aspect of ASP.NET is that it just happens without any work on your part. Of course, you are always able to interact with, alter, or disable this default functionality if you so choose. To understand how to do this, let’s see a concrete view state example.
Demonstrating View State
First, create a new Empty Web Site called ViewStateApp and insert a new Web Form named Default.aspx. Right-click the project name, and select Manage NuGet Packages. Add the Microsoft.CodeDom.Providers.DotNetCompilerPlatform NuGet package, which provides C# 6 features for your web site. On your *.aspx page, add a single ASP.NET ListBox web control named myListBox and a single Button control named btnPostback.
![]() Note For all of the examples in this chapter, you will need to add the Microsoft.CodeDom.Providers.DotNetCompilerPlatform NuGet package to support the C# 6 features.
Note For all of the examples in this chapter, you will need to add the Microsoft.CodeDom.Providers.DotNetCompilerPlatform NuGet package to support the C# 6 features.
Now, using the Visual Studio Properties window, access the Items property and add four ListItems to the ListBox using the associated dialog box. The resulting markup should look something like this:
<asp:ListBox ID="myListBox" runat="server">
<asp:ListItem>Item One</asp:ListItem>
<asp:ListItem>Item Two</asp:ListItem>
<asp:ListItem>Item Three</asp:ListItem>
<asp:ListItem>Item Four</asp:ListItem>
</asp:ListBox>
Note that you are hard-coding the items in the ListBox directly within the *.aspx file. As you already know, all <asp:> definitions in an ASP.NET Web Form will automatically render back their HTML representation before the final HTTP response (provided they have therunat="server" attribute).
The <%@Page%> directive has an optional attribute called EnableViewState that by default is set to true. To disable this behavior, simply update the <%@Page%> directive as follows:
<%@ Page Language="C#" AutoEventWireup="true"
CodeFile="Default.aspx.cs" Inherits="_Default"
EnableViewState ="false" %>
So, what exactly does it mean to disable view state? The answer is, it depends. Given the previous definition of the term, you would think that if you disable view state for an *.aspx file, the values in your ListBox would not be remembered between postbacks to the web server. However, if you were to run this application as is, you might be surprised to find that the information in the ListBox is retained regardless of how many times you post back to the page.
In fact, if you examine the source HTML returned to the browser (by right-clicking the page within the browser and selecting View Source), you might be further surprised to see that the hidden __VIEWSTATE field is still present.
<input type="hidden" name="__VIEWSTATE" id="__VIEWSTATE"
value="/wEPDwUKLTM4MTM2MDM4NGRkqGC6gjEV25JnddkJiRmoIc10SIA=" />
However, assume that your ListBox is dynamically populated within the code-behind file rather than within the HTML <form> definition. First, remove the <asp:ListItem> declarations from the current *.aspx file.
<asp:ListBox ID="myListBox" runat="server">
</asp:ListBox>
Next, fill the list items within the Load event handler in your code-behind file, like so:
protected void Page_Load(object sender, EventArgs e)
{
if (!IsPostBack)
{
// Fill ListBox dynamically!
myListBox.Items.Add("Item One");
myListBox.Items.Add("Item Two");
myListBox.Items.Add("Item Three");
myListBox.Items.Add("Item Four");
}
}
If you post to this updated page, you’ll find that the first time the browser requests the page, the values in the ListBox are present and accounted for. However, on postback, the ListBox is suddenly empty. The first rule of the ASP.NET view state is that its effect is only realized when you have widgets whose values are dynamically generated through code. If you hard-code values within the *.aspx file’s <form> tags, the state of these items is always remembered across postbacks (even when you set EnableViewState to false for a given page).
If the idea of disabling view state for the entire *.aspx file seems a bit too aggressive, know that every descendant of the System.Web.UI.Control base class inherits the EnableViewState property, which makes it very simple to disable view state on a control-by-control basis.
<asp:GridView id="myHugeDynamicallyFilledGridOfData" runat="server"
EnableViewState="false">
</asp:GridView>
![]() Note Beginning with .NET 4.0, large view state data values are automatically compressed to help reduce the size of this hidden form field.
Note Beginning with .NET 4.0, large view state data values are automatically compressed to help reduce the size of this hidden form field.
Adding Custom View State Data
In addition to the EnableViewState property, the System.Web.UI.Control base class provides a protected property named ViewState. Under the hood, this property provides access to a System.Web.UI.StateBag type, which represents all the data contained within the__VIEWSTATE field. Using the indexer of the StateBag type, you can embed custom information within the hidden VIEWSTATE form field using a set of name/value pairs. Here’s a simple example:
protected void btnAddToVS_Click(object sender, EventArgs e)
{
ViewState["CustomViewStateItem"] = "Some user data";
lblVSValue.Text = (string)ViewState["CustomViewStateItem"];
}
Because the System.Web.UI.StateBag type has been designed to operate on System.Object types, when you want to access the value of a given key, you should explicitly cast it into the correct underlying data type (in this case, a System.String). Be aware, however, that values placed within the __VIEWSTATE field cannot be just any object. Specifically, the only valid types are Strings, Integers, Booleans, ArrayLists, Hashtables, or an array of these types.
So, given that *.aspx pages can insert custom bits of information into the __VIEWSTATE string, the next logical step is to figure out when you would want to do so. Most of the time, custom view-state data is best suited for user-specific preferences. For example, you could establish view-state data that specifies how a user wants to view the UI of a GridView (such as a sort order). However, view-state data is not well-suited for full-blown user data, such as items in a shopping cart or cached DataSets. When you need to store this sort of complex information, you must work with session or application data. Before you get to that point, though, you need to understand the role of the Global.asax file.
![]() Source Code The ViewStateApp web site is included in the Chapter 33 subdirectory.
Source Code The ViewStateApp web site is included in the Chapter 33 subdirectory.
The Role of the Global.asax File
At this point, an ASP.NET application might seem little more than a set of .aspx files and their respective web controls. While you could build a web application by simply linking a set of related web pages, you will most likely need a way to interact with the web application as a whole. To this end, an ASP.NET application may choose to include an optional Global.asax file via the WebSite ![]() Add New Item menu option, shown in Figure 33-2. (Notice you are selecting the Global Application Class icon.)
Add New Item menu option, shown in Figure 33-2. (Notice you are selecting the Global Application Class icon.)
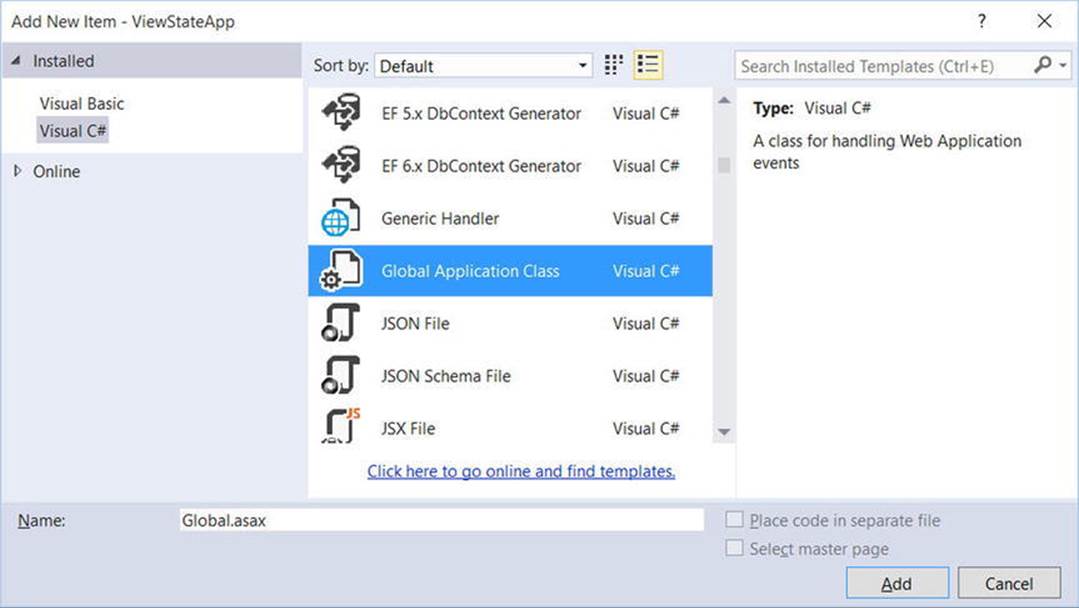
Figure 33-2. The Global.asax file
Simply put, Global.asax is just about as close to a traditional double-clickable *.exe as you can get in the world of ASP.NET, meaning this type represents the runtime behavior of the web site itself. When you insert a Global.asax file into a web project, you’ll see that it’s little more than a <script> block containing a set of event handlers, like this:
<%@ Application Language="C#" %>
<script runat="server">
void Application_Start(object sender, EventArgs e)
{
// Code that runs on application startup.
}
void Application_End(object sender, EventArgs e)
{
// Code that runs on application shutdown.
}
void Application_Error(object sender, EventArgs e)
{
// Code that runs when an unhandled error occurs.
}
void Session_Start(object sender, EventArgs e)
{
// Code that runs when a new session is started.
}
void Session_End(object sender, EventArgs e)
{
// Code that runs when a session ends.
// Note: The Session_End event is raised only when the sessionstate mode
// is set to InProc in the web.config file. If session mode is set to
// StateServer or SQLServer, the event is not raised.
}
</script>
Looks can be deceiving, however. At runtime, the code within this <script> block is assembled into a class type deriving from System.Web.HttpApplication. Therefore, within any of the provided event handlers, you can access parent class members via the this or basekeywords.
As mentioned, the members defined inside Global.asax are event handlers that allow you to interact with application-level (and session-level) events. Table 33-1 documents the role of each member.
Table 33-1. Core Types of the System.Web Namespace
|
Event Handler |
Meaning in Life |
|
Application_Start() |
This event handler is called the very first time the web application is launched. Thus, this event will fire exactly once over the lifetime of a web application. It is an ideal place to define the application-level data used throughout your web application. |
|
Application_End() |
This event handler is called when the application is shutting down. This will occur when the last user times out or if you manually shut down the application via IIS. |
|
Session_Start() |
This event handler is fired when a new user reaches your application. Here you can establish any user-specific data points you want to preserve across postbacks. |
|
Session_End() |
This event handler is fired when a user’s session has terminated (typically through a predefined timeout). |
|
Application_Error() |
This is a global error handler that will be called when an unhandled exception is thrown by the web application. |
The Global Last-Chance Exception Event Handler
First, let’s talk about the role of the Application_Error() event handler. Recall that a specific page may handle the Error event to process any unhandled exception that occurred within the scope of the page itself. In a similar light, the Application_Error() event handler is the final place to handle an exception that was not handled by a given page. As with the page-level Error event, you are able to access the specific System.Exception using the inherited Server property, like so:
void Application_Error(object sender, EventArgs e)
{
// Obtain the unhandled error.
Exception ex = Server.GetLastError();
// Process error here...
// Clear error when finished.
Server.ClearError();
}
Given that the Application_Error() event handler is the last-chance exception handler for your web application, it is quite common to implement this method in such a way that the user is transferred to a predefined error page on the server. Other common duties could include sending an e-mail to the web administrator or writing to an external error log.
The HttpApplication Base Class
As mentioned, the Global.asax script is dynamically generated as a class deriving from the System.Web.HttpApplication base class, which supplies some of the same sort of functionality as the System.Web.UI.Page type (without a visible user interface). Table 33-2documents the key members of interest.
Table 33-2. Key Members Defined by the System.Web.HttpApplication Type
|
Property |
Meaning in Life |
|
Application |
This property allows you to interact with application-level data, using the exposed HttpApplicationState type. |
|
Request |
This property allows you to interact with the incoming HTTP request, using the underlying HttpRequest object. |
|
Response |
This property allows you to interact with the incoming HTTP response, using the underlying HttpResponse object. |
|
Server |
This property gets the intrinsic server object for the current request, using the underlying HttpServerUtility object. |
|
Session |
This property allows you to interact with session-level data, using the underlying HttpSessionState object. |
Again, given that the Global.asax file does not explicitly document that HttpApplication is the underlying base class, it is important to remember that all of the rules of the “is-a” relationship do indeed apply.
Understanding the Application/Session Distinction
Under ASP.NET, application state is maintained by an instance of the HttpApplicationState type. This class enables you to share global information across all users (and all pages) using your ASP.NET application. Not only can application data be shared by all users on your site, but also if the value of an application-level data point changes, the new value is seen by all users on their next postback.
On the other hand, session state is used to remember information for a specific user (again, such as items in a shopping cart). Physically, a user’s session state is represented by the HttpSessionState class type. When a new user reaches an ASP.NET web application, the runtime will automatically assign that user a new session ID, which by default will expire after 20 minutes of inactivity. Thus, if 20,000 users are logged on to your site, you have 20,000 distinct HttpSessionState objects, each of which is automatically assigned a unique session ID. The relationship between a web application and web sessions is shown in Figure 33-3.
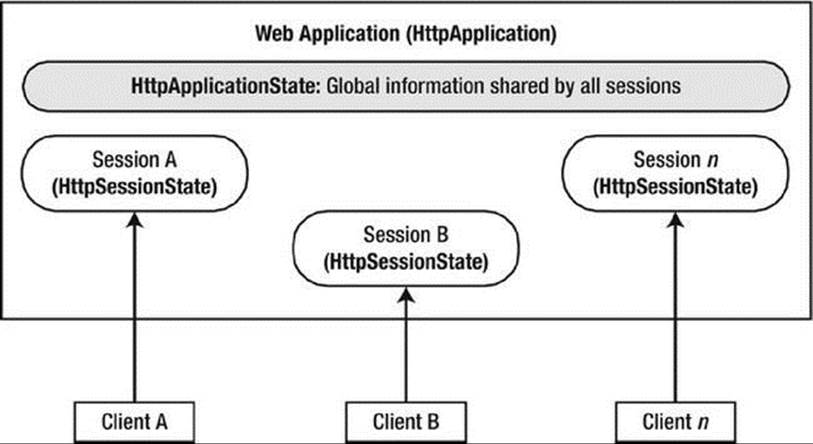
Figure 33-3. The application/session state distinction
Maintaining Application-Level State Data
The HttpApplicationState type enables developers to share global information across multiple users in an ASP.NET application. Table 33-3 describes some core members of this type.
Table 33-3. Members of the HttpApplicationState Type
|
Members |
Meaning in Life |
|
Add() |
This method allows you to add a new name/value pair to the HttpApplicationState object. Note that this method is typically not used in favor of the indexer of the HttpApplicationState class. |
|
AllKeys |
This property returns an array of string objects that represent all the names in the HttpApplicationState type. |
|
Clear() |
This method deletes all items in the HttpApplicationState object. This is functionally equivalent to the RemoveAll() method. |
|
Count |
This property gets the number of item objects in the HttpApplicationState type. |
|
Lock(), UnLock() |
These two methods are used when you want to alter a set of application variables in a thread-safe manner. |
|
RemoveAll(), Remove(), RemoveAt() |
These methods remove a specific item (by string name) within the HttpApplicationState object. RemoveAt() removes the item via a numerical indexer. |
To illustrate working with application state, create a new Empty Web Site project named AppState (and insert a new Web Form). Next, insert a new Global.asax file. When you create data members that can be shared among all users, you need to establish a set of name/value pairs. In most cases, the most natural place to do so is within the Application_Start() event handler in Global.asax.cs, like so:
void Application_Start(Object sender, EventArgs e)
{
// Set up some application variables.
Application["SalesPersonOfTheMonth"] = "Chucky";
Application["CurrentCarOnSale"] = "Colt";
Application["MostPopularColorOnLot"] = "Black";
}
During the lifetime of your web application (which is to say, until the web application is manually shut down or until the final user times out), any user on any page may access these values as necessary. Assume you have a page that will display the current discount car within a Label via a button Click event handler, like so:
protected void btnShowCarOnSale_Click(object sender, EventArgs arg)
{
lblCurrCarOnSale.Text = string.Format("Sale on {0}’s today!",
(string)Application["CurrentCarOnSale"]);
}
As with the ViewState property, notice how you should cast the value returned from the HttpApplicationState object into the correct underlying type because the Application property operates on general System.Object types.
Now, given that the Application property can hold any type, it should stand to reason that you can place custom types (or any .NET object) within your site’s application state. Assume you’d rather maintain the three current application variables within a strongly typed class namedCarLotInfo, as follows:
public class CarLotInfo
{
public CarLotInfo(string salesPerson, string currentCar, string mostPopular)
{
SalesPersonOfTheMonth = salesPerson;
CurrentCarOnSale = currentCar;
MostPopularColorOnLot = mostPopular;
}
public string SalesPersonOfTheMonth { get; set; }
public string CurrentCarOnSale { get; set; }
public string MostPopularColorOnLot { get; set; }
}
With this helper class in place, you could modify the Application_Start() event handler as follows:
void Application_Start(Object sender, EventArgs e)
{
// Place a custom object in the application data sector.
Application["CarSiteInfo"] =
new CarLotInfo("Chucky", "Colt", "Black");
}
You could then access the information using the public field data within a server-side Click event handler for a Button control named btnShowAppVariables, as follows:
protected void btnShowAppVariables_Click(object sender, EventArgs e)
{
CarLotInfo appVars =
((CarLotInfo)Application["CarSiteInfo"]);
string appState = $"<li>Car on sale: { appVars.CurrentCarOnSale }</li>"
appState += $"<li>Most popular color: { appVars.MostPopularColorOnLot }</li>";
appState += $"<li>Big shot SalesPerson: { appVars.SalesPersonOfTheMonth }</li>"
lblAppVariables.Text = appState;
}
Given that the current car-on-sale data is now exposed from a custom class type, your btnShowCarOnSale Click event handler would also need to be updated, like so:
protected void btnShowCarOnSale_Click(object sender, EventArgs e)
{
lblCurrCarOnSale.Text =
$"Sale on {((CarLotInfo)Application["CarSiteInfo"]).CurrentCarOnSale }’s today!";
}
Modifying Application Data
You may programmatically update or delete any or all application-wide data items using members of the HttpApplicationState type during the execution of your web application. For example, to delete a specific item, simply call the Remove() method. If you want to destroy all application-level data, call RemoveAll().
private void CleanAppData()
{
// Remove a single item via string name.
Application.Remove("SomeItemIDontNeed");
// Destroy all application data!
Application.RemoveAll();
}
If you want to change the value of an existing application-level data item, you need only make a new assignment to the data item in question. Assume your page now has a Button that allows your user to change the current hotshot salesperson by reading in a value from a TextBoxnamed txtNewSP. The Click event handler here is as you’d expect:
protected void btnSetNewSP_Click(object sender, EventArgs e)
{
// Set the new Salesperson.
((CarLotInfo)Application["CarSiteInfo"]).SalesPersonOfTheMonth
= txtNewSP.Text;
}
If you run the web application, you’ll find that the application-level data item has been updated. Furthermore, given that application variables are accessible by any user on any page in the web application, if you launched three or four instances of your web browser, you’d find that if one instance changes the current salesperson, each of the other browsers displays the new value on postback. Figure 33-4 shows some possible output.
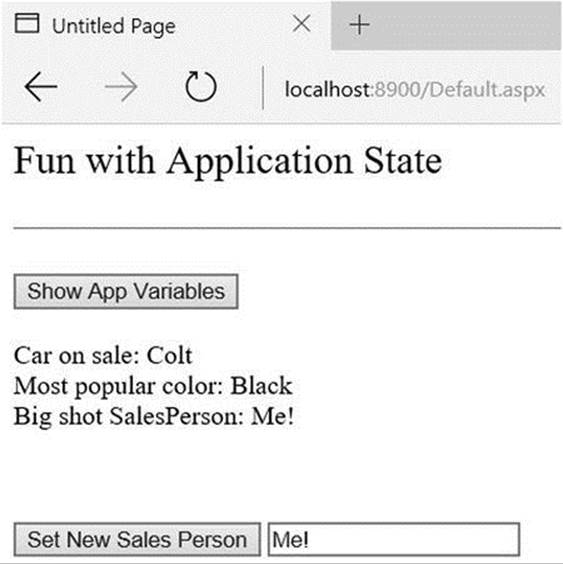
Figure 33-4. Displaying application data
Understand that if you have a situation where a set of application-level variables must be updated as a unit, you risk the possibility of data corruption since it is technically possible that an application-level data point may be changed while another user is attempting to access it! You could take the long road and manually lock down the logic using threading primitives of the System.Threading namespace, but the HttpApplicationState type has two methods, Lock() and Unlock(), that automatically ensure thread safety:
// Safely access related application data.
Application.Lock();
Application["SalesPersonOfTheMonth"] = "Maxine";
Application["CurrentBonusedEmployee"] = Application["SalesPersonOfTheMonth"];
Application.UnLock();
Handling Web Application Shutdown
The HttpApplicationState type is designed to maintain the values of the items it contains until one of two situations occurs: the last user on your site times out (or manually logs out) or someone manually shuts down the web site via IIS. In either case, the Application_End()method of the HttpApplication- derived type will automatically be called. Within this event handler, you are able to perform whatever sort of cleanup is necessary.
void Application_End(Object sender, EventArgs e)
{
// Write current application variables
// to a database or whatever else you need to do.
}
![]() Source Code The AppState web site is included in the Chapter 33 subdirectory.
Source Code The AppState web site is included in the Chapter 33 subdirectory.
Working with the Application Cache
ASP.NET provides a second and more flexible way to handle application-wide data. As you recall, the values within the HttpApplicationState object remain in memory as long as your web application is alive and kicking. Sometimes, however, you might want to maintain a piece of application data only for a specific period of time. For example, you might want to obtain an ADO.NET DataSet that is valid for only five minutes. After that time, you might want to obtain a fresh DataSet to account for possible database updates. While it’s technically possible to build this infrastructure using HttpApplicationState and some sort of handcrafted monitor, the ASP.NET application cache greatly simplifies your task.
As its name suggests, the ASP.NET System.Web.Caching.Cache object (which is accessible via the Context.Cache property) allows you to define objects that are accessible by all users from all pages for a fixed amount of time. In its simplest form, interacting with the cache looks identical to interacting with the HttpApplicationState type.
// Add an item to the cache.
// This item will *not* expire.
Context.Cache["SomeStringItem"] = "This is the string item";
// Get item from the cache.
string s = (string)Context.Cache["SomeStringItem"];
![]() Note If you want to access the cache from within Global.asax, you need to use the Context property. However, if you are within the scope of a System.Web.UI.Page-derived type, you can access the Cache object directly via the page’s Cache property.
Note If you want to access the cache from within Global.asax, you need to use the Context property. However, if you are within the scope of a System.Web.UI.Page-derived type, you can access the Cache object directly via the page’s Cache property.
The System.Web.Caching.Cache class defines only a small number of members beyond the type’s indexer. You can use the Add() method to insert a new item into the cache that is not currently defined (if the specified item is already present, Add() effectively does nothing). The Insert() method will also place a member into the cache. If the item is currently defined, however, Insert() will replace the current item with the new object. Since this is generally the behavior you’ll desire, I’ll focus on the Insert() method exclusively.
Fun with Data Caching
Let’s see an example. To begin, create a new Empty Web Site named CacheState and insert a Web Form and a Global.asax file. Like any application-level data item maintained by the HttpApplicationState type, the cache may hold any System.Object-derived type and is often populated within the Application_Start() event handler. For this example, the goal is to automatically update the contents of a DataSet every 15 seconds. The DataSet in question will contain the current set of records from the Inventory table of the AutoLot database created during our discussion of ADO.NET.
Given these design notes, set a reference to AutoLotDAL.dll (see Chapter 31; it’s also included in the code download for this chapter), add Entity Framework (EF) to your site (using the Manage NuGet Packages context menu on the project name), and add the correctConnectionString to your web.config like this (your connection string might differ based on your installation of SQL Server Express):
<connectionStrings>
<add name="AutoLotConnection" connectionString="data source=(local)\SQLEXPRESS2014;initial catalog=AutoLot;integrated security=True;MultipleActiveResultSets=True;App=EntityFramework" providerName="System.Data.SqlClient" />
</connectionStrings>
Once you have configured your site for EF and added the reference to AutoLotDAL.dll, update your Global.asax like so (code analysis to follow):
<%@ Application Language="C#" %>
<%@ Import Namespace = "AutoLotDAL.Repos" %>
<script runat="server">
// Define a static-level Cache member variable.
static Cache _theCache;
void Application_Start(Object sender, EventArgs e)
{
// First assign the static "theCache" variable.
_theCache = Context.Cache;
// When the application starts up,
// read the current records in the
// Inventory table of the AutoLot DB.
var theCars = new InventoryRepo().GetAll();
// Now store DataTable in the cache.
_theCache.Insert("CarList",
theCars,
null,
DateTime.Now.AddSeconds(15),
Cache.NoSlidingExpiration,
CacheItemPriority.Default,
UpdateCarInventory);
}
// The target for the CacheItemRemovedCallback delegate.
static void UpdateCarInventory(string key, object item,
CacheItemRemovedReason reason)
{
var theCars = new InventoryRepo().GetAll();
// Now store in the cache.
_theCache.Insert("CarList",
theCars,
null,
DateTime.Now.AddSeconds(15),
Cache.NoSlidingExpiration,
CacheItemPriority.Default,
UpdateCarInventory);
}
</script>
First, notice you’ve defined a static Cache member variable. The reason is that you’ve defined two static members that need to access the Cache object. Recall that static methods do not have access to inherited members, so you can’t use the Context property!
Inside the Application_Start() event handler, you get the list of Inventory items and insert it into the application cache. As you would guess, the Context.Cache.Insert() method has been overloaded a number of times. Here, you supply a value for each possible parameter. Consider the following commented call to Insert():
_theCache.Insert("CarList", // Name used to identify item in the cache.
theCars, // Object to put in the cache.
null, // Any dependencies for this object?
DateTime.Now.AddSeconds(15), // Absolute timeout value.
Cache.NoSlidingExpiration, // Don’t use sliding expiration (see below).
CacheItemPriority.Default, // Priority level of cache item.
// Delegate for CacheItemRemove event.
UpdateCarInventory);
The first two parameters simply make up the name/value pair of the item. The third parameter allows you to define a CacheDependency object (which is null in this case because the IList<Inventory> does not depend on anything).
The DateTime.Now.AddSeconds(15) parameter specifies an absolute expiration time. It means the cache item will definitely be evicted from the cache after 15 seconds. Absolute expiration is useful for data items that need to be constantly refreshed (such as a stock ticker).
The Cache.NoSlidingExpiration parameter specifies that the cache item doesn’t use sliding expiration. Sliding expiration is a way of keeping an item in the cache for at least a certain amount of time. For example, if you set a sliding expiration of 60 seconds for a cache item, it will live in the cache for at least 60 seconds. If any web page accesses the cache item within that time, the clock is reset and the cache item has a fresh 60 seconds to live. If no web page accesses the cache item in 60 seconds, the item is removed from the cache. Sliding expiration is useful for data that might be expensive (time-wise) to generate, but which might not be used very frequently by web pages.
Note that you can’t specify both an absolute expiration and a sliding expiration for a given cache item. You set either an absolute expiration (and use Cache.NoSlidingExpiration) or a sliding expiration (and use Cache.NoAbsoluteExpiration).
Finally, as you can see from the signature of the UpdateCarInventory() method, the CacheItemRemovedCallback delegate can only call methods that match the following signature:
void UpdateCarInventory(string key, object item, CacheItemRemovedReason reason)
{
}
So, when the application starts up, the DataTable is populated and cached. Every 15 seconds, the DataTable is purged, updated, and reinserted into the cache. To see the effects of doing this, you need to create a page that allows for some degree of user interaction.
Modifying the *.aspx File
Figure 33-5 shows a UI that allows the user to enter the necessary data to insert a new record into the database (via three different TextBox controls). The Click event for the single Button control will be coded (in just a bit) to handle the database manipulation. Finally, minus a number of descriptive Label controls, the GridView on the bottom of the page will be used to display the set of current records in the Inventory table.
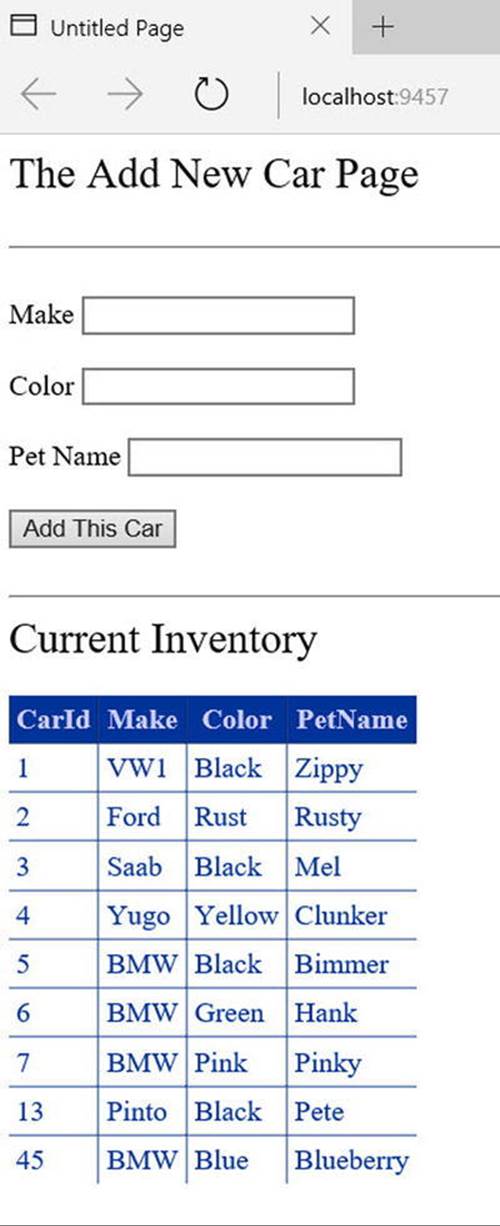
Figure 33-5. The cache application GUI
In the page’s Load event handler, configure your GridView to display the current contents of the cached data the first time the user posts to the page (be sure to import the AutoLotDAL.Models and AutoLotDAL.Repos namespaces within your code file).
protected void Page_Load(object sender, EventArgs e)
{
if (!IsPostBack)
{
carsGridView.DataSource = (IList<Inventory>)Cache["AppDataTable"];
carsGridView.DataBind();
}
}
In the Click event handler of the Add This Car button, insert the new record into the AutoLot database using the InventoryRepo type. After the record has been inserted, call a helper function named RefreshGrid(), which will update the UI.
protected void btnAddCar_Click(object sender, EventArgs e)
{
// Update the Inventory table
// and call RefreshGrid().
new InventoryRepo().Add(new Inventory()
{
Color = txtCarColor.Text,
Make = txtCarMake.Text,
PetName = txtCarPetName.Text
});
RefreshGrid();
}
private void RefreshGrid()
{
carsGridView.DataSource = new InventoryRepo().GetAll();
carsGridView.DataBind();
}
Now, to test the use of the cache, begin by running the current program (Ctrl+F5) and copy the URL appearing in the browser to your clipboard. Next, launch a second instance of your browser (using the Start button) and paste the URL into this instance. At this point, you should have two instances of your web browser, both viewing Default.aspx and showing identical data.
In one instance of the browser, add a new automobile entry. Obviously, this results in an updated GridView viewable from the browser that initiated the postback.
In the second browser instance, click the Refresh button (F5). You should not see the new item, since the Page_Load event handler is reading directly from the cache. (If you did see the value, the 15 seconds had already expired. Either type faster or increase the amount of time the data will remain in the cache.) Wait a few seconds and click the Refresh button from the second browser instance one more time. Now you should see the new item, given that the data in the cache has expired and the CacheItemRemovedCallback delegate target method has automatically updated the cached data.
As you can see, the major benefit of the Cache type is that you can ensure that when an item is removed, you have a chance to respond. In this example, you certainly could avoid using the Cache and simply have the Page_Load() event handler always read directly from theAutoLot database (but this would potentially be much slower than the caching approach). Nevertheless, the point should be clear: the cache allows you to automatically refresh data using the cache mechanism.
![]() Source Code The CacheState web site is included in the Chapter 33 subdirectory.
Source Code The CacheState web site is included in the Chapter 33 subdirectory.
Maintaining Session Data
So much for our examination of application-level and cached data. Next, let’s check out the role of per-user data. As mentioned, a session is little more than a given user’s ongoing interaction with a web application, which is represented via a unique HttpSessionState object. To maintain stateful information for a particular user, you can use the Session property in your web page class or in Global.asax. The classic example of the need to maintain per-user data is an online shopping cart. Again, if 10 people all log on to an online store, each individual will have a unique set of items that she (might) intend to purchase, and that data needs to be maintained.
When a new user joins to your web application, the .NET runtime automatically assigns the user a unique session ID, which is used to identify that user. Each session ID identifies a custom instance of the HttpSessionState type to hold user-specific data. Inserting or retrieving session data is syntactically identical to manipulating application data. For example,
// Add/retrieve session data for current user.
Session["DesiredCarColor"] = "Green";
string color = (string) Session["DesiredCarColor"];
In Global.asax, you can intercept the beginning and end of a session via the Session_Start() and Session_End() event handlers. Within Session_Start(), you can freely create any per-user data items, while Session_End() allows you to perform any work you might need to do when the user’s session has terminated.
<%@ Application Language="C#" %>
...
void Session_Start(Object sender, EventArgs e)
{
// New session! Prep if required.
}
void Session_End(Object sender, EventArgs e)
{
// User logged off/timed out. Tear down if needed.
}
Like application state, session state may hold any System.Object-derived type, including your custom classes. For example, assume you have a new Empty Web Site project (named SessionState) that defines a class named UserShoppingCart, as follows:
public class UserShoppingCart
{
public string DesiredCar {get; set;}
public string DesiredCarColor {get; set;}
public float DownPayment {get; set;}
public bool IsLeasing {get; set;}
public DateTime DateOfPickUp {get; set;}
public override string ToString() =>
$"Car: {DesiredCar}<br>Color: {DesiredCarColor}<br>$ Down: {DownPayment}" +
$"<br>Lease: {IsLeasing}<br>Pick-up Date: {DateOfPickUp.ToShortDateString()}";
}
Now, insert a Global.asax file. Within the Session_Start() event handler, you can now assign each user a new instance of the UserShoppingCart class, like so:
void Session_Start(Object sender, EventArgs e)
{
Session["UserShoppingCartInfo"] = new UserShoppingCart();
}
As the user traverses your web pages, you are able to pluck out the UserShoppingCart instance and fill the fields with user-specific data. For example, assume you have a simple *.aspx page that defines a set of input controls that correspond to each field of theUserShoppingCart type, a Button for setting the values, and two Labels that will be used to display the user’s session ID and session information (see Figure 33-6).

Figure 33-6. The session application GUI
The server-side Click event handler for the Button control is straightforward (scrape out values from TextBoxes and display the shopping cart data on a Label control).
protected void btnSubmit_Click(object sender, EventArgs e)
{
// Set current user prefs.
var cart = (UserShoppingCart)Session["UserShoppingCartInfo"];
cart.DateOfPickUp = myCalendar.SelectedDate;
cart.DesiredCar = txtCarMake.Text;
cart.DesiredCarColor = txtCarColor.Text;
cart.DownPayment = float.Parse(txtDownPayment.Text);
cart.IsLeasing = chkIsLeasing.Checked;
lblUserInfo.Text = cart.ToString();
Session["UserShoppingCartInfo"] = cart;
}
Within Session_End(), you might elect to persist the fields of the UserShoppingCart to a database or whatnot (however, as you will see at the conclusion of this chapter, the ASP.NET Profile API will do so automatically). As well, you might want to implementSession_Error() to trap any faulty input (or perhaps make use of various validation controls on the Default.aspx page to account for such user errors).
In any case, if you were to launch two or three instances of your browser of choice all posting to the same URL (via a copy/paste operation as you did for the data cache example), you would find that each user is able to build a custom shopping cart that maps to his unique instance ofHttpSessionState.
Additional Members of HttpSessionState
The HttpSessionState class defines a number of other members of interest beyond the type indexer. First, the SessionID property will return the current user’s unique ID. If you would like to view the automatically assigned session ID for this example, handle the Load event of your page as follows:
protected void Page_Load(object sender, EventArgs e)
{
lblUserID.Text = $"Here is your ID: { Session.SessionID }";
}
The Remove() and RemoveAll() methods may be used to clear items out of the user’s instance of HttpSessionState, like so:
Session.Remove("SomeItemWeDontNeedAnymore");
The HttpSessionState type also defines a set of members that control the expiration policy of the current session. Again, by default each user has 20 minutes of inactivity before the HttpSessionState object is destroyed. Thus, if a user enters your web application (and therefore obtains a unique session ID), but then does not return to the site within 20 minutes, the runtime assumes the user is no longer interested and destroys all session data for that user. You are free to change this default 20-minute expiration value on a user-by-user basis using theTimeout property. The most common place to do so is within the scope of your Session_Start() method, like so:
void Session_Start(Object sender, EventArgs e)
{
// Each user has 5 minutes of inactivity.
Session.Timeout = 5;
Session["UserShoppingCartInfo"]
= new UserShoppingCart();
}
![]() Note If you do not need to tweak each user’s Timeout value, you can alter the 20-minute default for all users via the timeout attribute of the <sessionState> element within the web.config file (examined at the end of this chapter).
Note If you do not need to tweak each user’s Timeout value, you can alter the 20-minute default for all users via the timeout attribute of the <sessionState> element within the web.config file (examined at the end of this chapter).
The benefit of the Timeout property is that you have the ability to assign specific timeout values separately for each user. For example, imagine you have created a web application that allows users to pay cash for a given membership level. You could specify that Gold members should time out within one hour, while Wood members should get only 30 seconds. This possibility begs the question, how can you remember user-specific information (such as the current membership level) if users close the browser and come back at a later time? One possible answer is through the use of the HttpCookie type. (And speaking of cookies . . .)
![]() Source Code The SessionState web site is included in the Chapter 32 subdirectory.
Source Code The SessionState web site is included in the Chapter 32 subdirectory.
Understanding Cookies
The next state management technique you’ll examine is the persisting of data within a cookie, which is often realized as a text file (or set of files) on the user’s machine. When a user joins a given site, the browser checks to see whether the user’s machine has a cookie file for the URL in question and, if so, appends this data to the HTTP request.
The receiving server-side web page can then read the cookie data to create a GUI based on the current user preferences. I’m sure you’ve noticed that when you visit certain of your favorite web sites, they somehow “just know” the sort of content you would like to see. The reason (in part) may have to do with a cookie stored on your computer that contains information relevant to a given web site.
![]() Note The exact location of your cookie files depends on which browser and operating system you happen to be using.
Note The exact location of your cookie files depends on which browser and operating system you happen to be using.
The contents of a given cookie file will obviously vary among web sites, but keep in mind that they are ultimately text files. Thus, cookies are a horrible choice for maintaining sensitive information about the current user (such as a credit card number, password, and the like). Even if you take the time to encrypt the data, a crafty hacker could decrypt the value and use it for evil purposes. In any case, cookies do play a role in the development of web applications, so let’s check out how ASP.NET handles this particular state management technique.
Creating Cookies
First of all, understand that ASP.NET cookies can be configured to be either persistent or temporary. A persistent cookie is typically regarded as the classic definition of cookie data, in that the set of name/value pairs is physically saved to the user’s hard drive. A temporary cookie (also termed a session cookie) contains the same data as a persistent cookie, but the name/value pairs are never saved to the user’s hard drive; rather, they exist only while the browser is open. When the user shuts down the browser, all data contained in the session cookie is destroyed.
The System.Web.HttpCookie type is the class that represents the server side of the cookie data (persistent or temporary). When you want to create a new cookie in your web page code, you access the Response.Cookies property. Once the new HttpCookie is inserted into the internal collection, the name/value pairs flow back to the browser within the HTTP header.
To check out cookie behavior firsthand, create a new Empty Web Site (named CookieStateApp) and create the UI of the first Web Form (which you will need to insert) displayed in Figure 33-7.
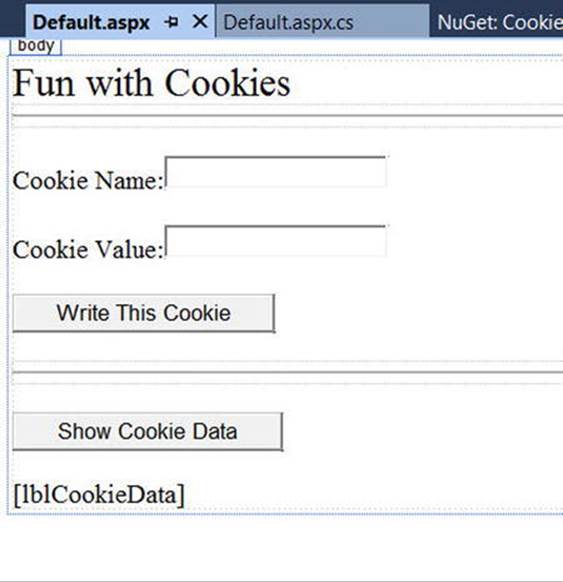
Figure 33-7. The UI of CookieStateApp
Within the first button’s Click event handler, build a new HttpCookie and insert it into the Cookie collection exposed from the HttpRequest.Cookies property. Be very aware that the data will not persist itself to the user’s hard drive unless you explicitly set an expiration date using the HttpCookie.Expires property. Thus, the following implementation will create a temporary cookie that is destroyed when the user shuts down the browser:
protected void btnCookie_Click(object sender, EventArgs e)
{
// Make a temp cookie.
HttpCookie theCookie = new HttpCookie(txtCookieName.Text,txtCookieValue.Text);
Response.Cookies.Add(theCookie);
}
However, the following generates a persistent cookie that will expire three months from today:
protected void btnCookie_Click(object sender, EventArgs e)
{
HttpCookie theCookie = new HttpCookie(txtCookieName.Text,txtCookieValue.Text);
theCookie.Expires = DateTime.Now.AddMonths(3);
Response.Cookies.Add(theCookie);
}
Reading Incoming Cookie Data
Recall that the browser is the entity in charge of accessing persisted cookies when navigating to a previously visited page. If a browser decides to send a cookie to the server, you can access the incoming data in your *.aspx page via the HttpRequest.Cookies property. To illustrate, implement the Click event handler for the second button like so:
protected void btnShowCookie_Click(object sender, EventArgs e)
{
string cookieData = "";
foreach (string s in Request.Cookies)
{
cookieData +=
$"<li><b>Name</b>: {s}, <b>Value</b>: { Request.Cookies[s]?.Value }</li>";
}
lblCookieData.Text = cookieData;
}
If you now run the application and click your new button, you will find that the cookie data has indeed been sent by your browser and accessed successfully in your *.aspx code at the server, as shown in Figure 33-8.
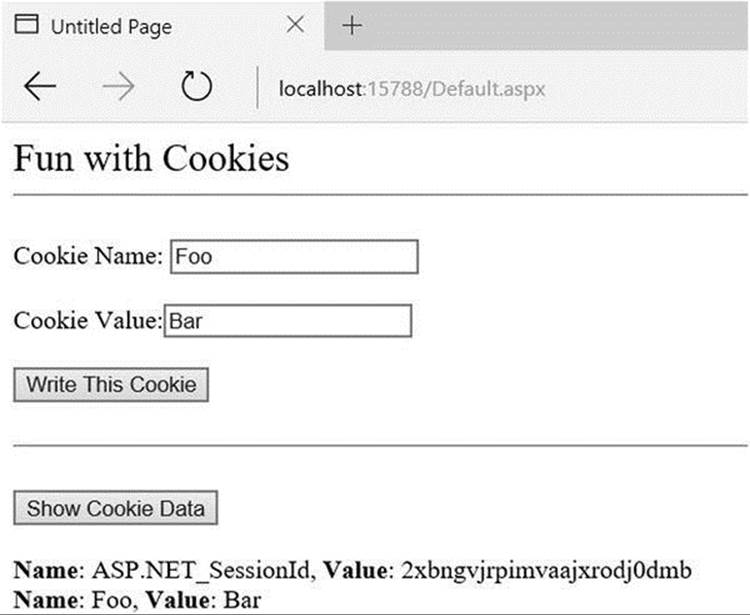
Figure 33-8. Running the CookieStateApp
![]() Source Code The CookieStateApp web site is included in the Chapter 33 subdirectory.
Source Code The CookieStateApp web site is included in the Chapter 33 subdirectory.
The Role of the <sessionState> Element
At this point, you have examined numerous ways to remember information about your users. As you have seen, view state and application, cache, session, and cookie data are manipulated programmatically in more or less the same way (via a class indexer). As you have also seen,Global.asax has methods that allow you to intercept and respond to events that occur during your web application’s lifetime.
By default, ASP.NET will store session state in-process. The plus side is that access to the information is as fast as possible. However, the downside is that if this AppDomain crashes (for whatever reason), all of the user’s state data is destroyed. Furthermore, when you store state data as an in-process *.dll, you cannot interact with a networked web farm. This default mode of storage works just fine if your web application is hosted by a single web server. As you might guess, however, this model is not ideal for a farm of web servers, given that session state is “trapped” within a given AppDomain.
Storing Session Data in the ASP.NET Session State Server
Under ASP.NET, you can instruct the runtime to host the session state *.dll in a surrogate process named the ASP.NET session state server (aspnet_state.exe). When you do so, you are able to offload the *.dll from aspnet_wp.exe into a unique *.exe, which can be located on any machine within the web farm. Even if you intend to run the aspnet_state.exe process on the same machine as the web server, you gain the benefit of partitioning the state data in a unique process (as it is more durable).
To make use of the session state server, the first step is to start the aspnet_state.exe Windows service on the target machine by typing the following in a Developer Command Prompt window (note that you will need admin privileges to do so):
net start aspnet_state
Alternatively, you can start aspnet_state.exe using the Services applet accessed from the Administrative Tools folder of the Control Panel, as shown in Figure 33-9.
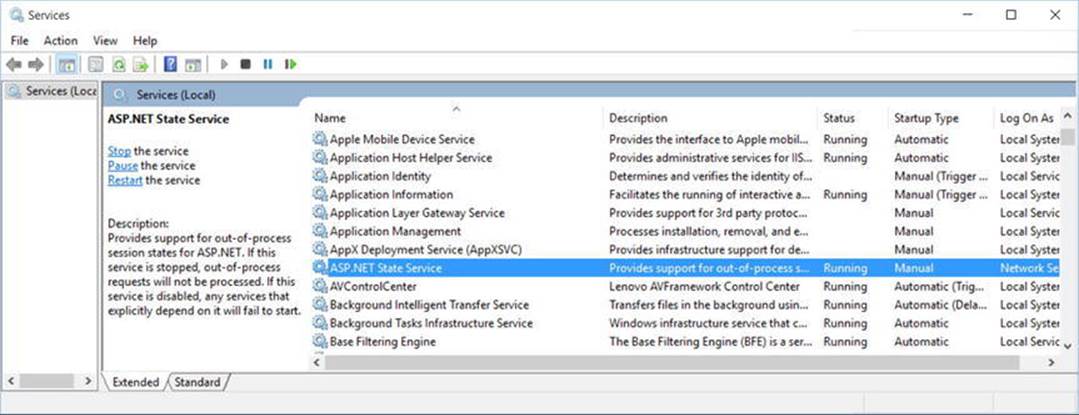
Figure 33-9. Starting aspnet_state.exe using the Services applet
The key benefit of this approach is that you can use the Properties window to configure aspnet_state.exe to start automatically when the machine boots up. In any case, once the session state server is running, add the following <sessionState> element of your web.configfile:
<system.web>
<sessionState
mode="StateServer"
stateConnectionString="tcpip=127.0.0.1:42626"
sqlConnectionString="data source=127.0.0.1;Trusted_Connection=yes"
cookieless="false"
timeout="20"
/>
...
</system.web>
That’s it! At this point, the CLR will host session-centric data within aspnet_state.exe. In this way, if the AppDomain hosting the web application crashes, the session data is preserved. Moreover, note that the <sessionState> element can also support astateConnectionString attribute. The default TCP/IP address value (127.0.0.1) points to the local machine. If you would rather have the .NET runtime use the aspnet_state.exe service located on another networked machine (again, think web farms), you are free to update this value.
Storing Session Data in a Dedicated Database
Finally, if you require the highest degree of isolation and durability for your web application, you may choose to have the runtime store all your session state data within Microsoft SQL Server. The following appropriate update to the web.config file is simple:
<sessionState
mode="SQLServer"
stateConnectionString="tcpip=127.0.0.1:42626"
sqlConnectionString="data source=127.0.0.1;Trusted_Connection=yes"
cookieless="false"
timeout="20"
/>
However, before you attempt to run the associated web application, you need to ensure that the target machine (specified by the sqlConnectionString attribute) has been properly configured. When you install the .NET Framework 4.6 SDK (or Visual Studio proper), you will be provided with two files named InstallSqlState.sql and UninstallSqlState.sql, located by default under C:\Windows\Microsoft.NET\Framework\<version>. On the target machine, you must run the InstallSqlState.sql file using a tool such as the Microsoft SQL Server Management Studio (which ships with Microsoft SQL Server).
After you have run InstallSqlState.sql, you will find a new SQL Server database has been created (ASPState), which contains a number of stored procedures called by the ASP.NET runtime, as well as a set of tables used to store the session data itself. (Also, the tempdb database has been updated with a set of tables for swapping purposes.) As you’d guess, configuring your web application to store session data within SQL Server is the slowest of all possible options. The benefit is that user data is as durable as possible (even if the web server is rebooted).
![]() Note If you use the ASP.NET session state server or SQL Server to store your session data, you must make sure that any custom types placed in the HttpSessionState object have been marked with the [Serializable] attribute.
Note If you use the ASP.NET session state server or SQL Server to store your session data, you must make sure that any custom types placed in the HttpSessionState object have been marked with the [Serializable] attribute.
Introducing the ASP.NET Profile API
So far you have examined numerous techniques that allow you to remember user-level and application-level bits of data. However, many web sites require the ability to persist user information across sessions. For example, perhaps you need to give users the ability to build an account on your site. Maybe you need to persist instances of a ShoppingCart class across sessions (for an online shopping site). Or perhaps you need to persist basic user preferences (themes, etc.).
While you could build a custom database (with several stored procedures) to hold such information, you would then need to build a custom code library to interact with these database objects. This is not necessarily a complex task, but the bottom line is that you are the individual in charge of building this sort of infrastructure.
To help simplify matters, ASP.NET ships with an out-of-the-box user profile management API and database system for this very purpose. In addition to providing the necessary infrastructure, the Profile API allows you to define the data to be persisted directly within your web.configfile (for purposes of simplification); however, you are also able to persist any [Serializable] type. Before we get too far ahead of ourselves, let’s check out where the Profile API will be storing the specified data.
The ASPNETDB.mdf Database
Every ASP.NET web site built with Visual Studio can support an App_Data subdirectory. By default, the Profile API (as well as other services, such as the ASP.NET role membership API, which is not examined in this text) is configured to make use of a local SQL Server database namedASPNETDB.mdf, located within the App_Data folder. This default behavior is due to settings within the machine.config file for the current .NET installation on your machine. In fact, when your code base makes use of any ASP.NET service requiring the App_Data folder, theASPNETDB.mdf data file will be automatically created on the fly if a copy does not currently exist.
If you’d rather have the ASP.NET runtime communicate with an ASPNETDB.mdf file located on another networked machine, or you’d prefer to install this database on an instance of SQL Server 7.0 (or higher), you will need to manually build ASPNETDB.mdf using theaspnet_regsql.exe command-line utility. Like any good command-line tool, aspnet_regsql.exe provides numerous options; however, if you run the tool with no arguments (from a Developer Command Prompt window), like
aspnet_regsql
you will launch a GUI-based wizard that will walk you through the process of creating and installing ASPNETDB.mdf on your machine (and version of SQL Server) of choice.
Now, assuming your site is not using a local copy of the database under the App_Data folder, the final step is to update your web.config file to point to the unique location of your ASPNETDB.mdf. Assume you have installed ASPNETDB.mdf on a machine named ProductionServer. The following (partial) machine.config file would instruct the Profile API where to find the necessary database items in their default location (you could add a custom web.config to change these defaults):
<configuration>
<connectionStrings>
<add name="LocalSqlServer"
connectionString ="Data Source=ProductionServer;Integrated
Security=SSPI;Initial Catalog=aspnetdb;"
providerName="System.Data.SqlClient"/>
</connectionStrings>
<system.web>
<profile>
<providers>
<clear/>
<add name="AspNetSqlProfileProvider"
connectionStringName="LocalSqlServer"
applicationName="/"
type="System.Web.Profile.SqlProfileProvider, System.Web,
Version=4.0.0.0,
Culture=neutral, PublicKeyToken=b03f5f7f11d50a3a" />
</providers>
</profile>
</system.web>
</configuration>
Like most *.config files, this looks much worse than it is. Basically you are defining a <connectionString> element with the necessary data, followed by a named instance of the SqlProfileProvider (this is the default provider used regardless of physical location of theASPNETDB.mdf).
![]() Note For simplicity, I will assume that you’ll use the autogenerated ASPNETDB.mdf database located in your web application’s App_Data subdirectory.
Note For simplicity, I will assume that you’ll use the autogenerated ASPNETDB.mdf database located in your web application’s App_Data subdirectory.
Defining a User Profile Within web.config
As mentioned, a user profile is defined within a web.config file. The really nifty aspect of this approach is that you can interact with this profile in a strongly typed manner using the inherited Profile property in your code files. To illustrate this, create a new Empty Web Site named FunWithProfiles, add a new *.aspx file, and open your web.config file for editing.
The goal is to make a profile that models the home address of the users who are in session, as well as the total number of times they have posted to this site. Not surprisingly, profile data is defined within a <profile> element using a set of name/data type pairs. Consider the following profile, which is created within the scope of the <system.web> element:
<profile>
<properties>
<add name="StreetAddress" type="System.String" />
<add name="City" type="System.String" />
<add name="State" type="System.String" />
<add name="TotalPost" type="System.Int32" />
</properties>
</profile>
Here, you have specified a name and CLR data type for each item in the profile (of course, you could add additional items for ZIP code, name, and so forth, but I am sure you get the idea). Strictly speaking, the type attribute is optional; however, the default is a System.String. There are many other attributes that can be specified in a profile entry to further qualify how this information should be persisted in ASPNETDB.mdf. Table 33-4 illustrates some of the core attributes.
Table 33-4. Select Attributes of Profile Data
|
Attribute |
Example Values |
Meaning in Life |
|
allowAnonymous |
True | False |
Restricts or allows anonymous access to this value. If it is set to false, anonymous users won’t have access to this profile value. |
|
defaultValue |
String |
The value to return if the property has not been explicitly set. |
|
Name |
String |
A unique identifier for this property. |
|
Provider |
String |
The provider used to manage this value. It overrides the defaultProvider setting in web.config or machine.config. |
|
readOnly |
True | False |
Restricts or allows write access. The default is false (i.e., it’s not read-only). |
|
serializeAs |
String | XML | Binary |
The format of a value when persisting in the data store. |
|
type |
Primitive | User- defined type |
A .NET primitive type or class. Class names must be fully qualified (e.g., MyApp.UserData.ColorPrefs). |
You will see some of these attributes in action as you modify the current profile. For now, let’s see how to access this data programmatically from within our pages.
Accessing Profile Data Programmatically
Recall that the whole purpose of the ASP.NET Profile API is to automate the process of writing data to (and reading data from) a dedicated database. To test this out for yourself, update the UI of your Default.aspx file with a set of TextBoxes (and descriptive Labels) to gather the street address, city, and state of the user. As well, add a Button (named btnSubmit) and a final Label (named lblUserData) to display the persisted data, as shown in Figure 33-10.
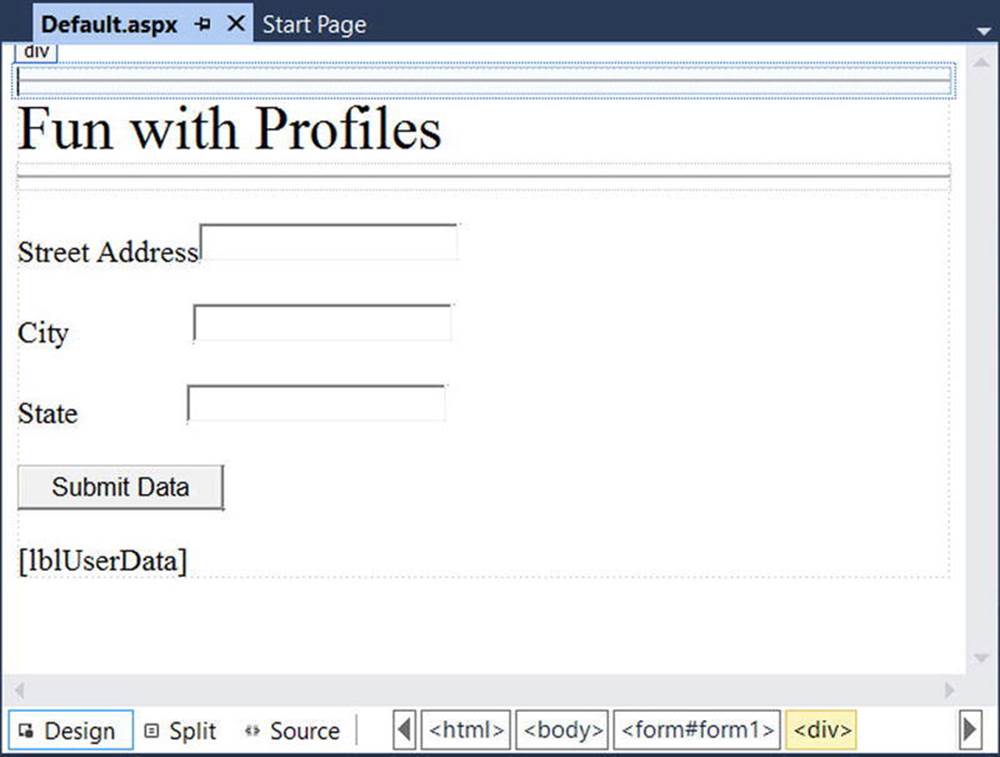
Figure 33-10. The UI of the FunWithProfiles Default.aspx page
Now, within the Click event handler of the button, use the inherited Profile property to persist each point of profile data based on what the user has entered in the related TextBox. After you have persisted each piece of data within ASPNETDB.mdf, read each piece of data out of the database and format it into a string that is displayed on the lblUserData Label type. Finally, handle the page’s Load event, and display the same information on the Label type. In this way, when users come to the page, they can see their current settings. Here is the complete code file:
public partial class _Default : System.Web.UI.Page
{
protected void Page_Load(object sender, EventArgs e)
{
GetUserAddress();
}
protected void btnSubmit_Click(object sender, EventArgs e)
{
// Database writes happening here!
Profile.StreetAddress = txtStreetAddress.Text;
Profile.City = txtCity.Text;
Profile.State = txtState.Text;
// Get settings from database.
GetUserAddress();
}
private void GetUserAddress()
{
// Database reads happening here!
lblUserData.Text =
$"You live here: {Profile. StreetAddress }, {Profile.City}, {Profile.State}";
}
}
Now if you run this page, you will notice a lengthy delay the first time Default.aspx is requested. The reason is that the ASPNETDB.mdf file is being created on the fly and placed within your App_Data folder (you can verify this for yourself by refreshing the Solution Explorer window and looking in the App_Data folder).
You will also find that the first time you come to this page, the lblUserData Label does not display any profile data because you have not yet entered your data into the correct table of ASPNETDB.mdf. After you enter values in the TextBox controls and post back to the server, this Label will be formatted with the persisted data.
Now for the really interesting aspect of this technology: if you shut down your browser and rerun your web site, you will find that your previously entered profile data has indeed been persisted because the Label displays the correct information. This begs the obvious question, how were you remembered?
For this example, the Profile API used your Windows network identity, which was obtained via your current machine credentials. However, when you are building public web sites (where the users are not part of a given domain), rest assured that the Profile API integrates with the Forms-based authentication model of ASP.NET and also supports the notion of “anonymous profiles,” which allow you to persist profile data for users who do not currently have an active identity on your site.
![]() Note This edition of the text does not address ASP.NET security topics (such as Forms-based authentication or anonymous profiles). Consult the .NET Framework 4.6 SDK documentation for details.
Note This edition of the text does not address ASP.NET security topics (such as Forms-based authentication or anonymous profiles). Consult the .NET Framework 4.6 SDK documentation for details.
Grouping Profile Data and Persisting Custom Objects
Finally, let’s look at how profile data may be defined within a web.config file. The current profile simply defined four pieces of data that were exposed directly from the profile type. When you build more complex profiles, it can be helpful to group related pieces of data under a unique name. Consider the following update:
<profile>
<properties>
<group name ="Address">
<add name="StreetAddress" type="String" />
<add name="City" type="String" />
<add name="State" type="String" />
</group>
<add name="TotalPost" type="Integer" />
</properties>
</profile>
This time, you have defined a custom group named Address to expose the street address, city, and state of your user. To access this data in your pages would now require you to update your code base by specifying Profile.Address to get each subitem. For example, here is the updated GetUserAddress() method (the Click event handler for the Button would need to be updated in a similar manner):
private void GetUserAddress()
{
// Database reads happening here!
lblUserData.Text =
$"You live here: {Profile.Address.StreetAddress}, {Profile.Address.City}, " +
$"{Profile.Address.State}";
}
Before you run this example, you need to delete ASPNETDB.mdf from your App_Data folder to ensure the database schema is refreshed. After you have done so, you should be able to run your web site example without error.
![]() Note A profile can contain as many groups as you feel are necessary. Simply define multiple <group> elements within your <properties> scope.
Note A profile can contain as many groups as you feel are necessary. Simply define multiple <group> elements within your <properties> scope.
Finally, it is worth pointing out that a profile may also persist (and obtain) custom objects to and from ASPNETDB.mdf. To illustrate, assume you want to build a custom class (or structure) that will represent the user’s address data. The only requirement expected by the Profile API is that the type be marked with the [Serializable] attribute, like so:
[Serializable]
public class UserAddress
{
public string Street = string.Empty;
public string City = string.Empty;
public string State = string.Empty;
}
With this class in place, your profile definition can now be updated as follows (notice I removed the custom group, although this is not mandatory):
<profile>
<properties>
<add name="AddressInfo" type="UserAddress" serializeAs ="Binary"/>
<add name="TotalPost" type="Integer" />
</properties>
</profile>
Note that when you are adding [Serializable] types to a profile, the type attribute is the fully qualified name of the type being persisted. As you will see from the Visual Studio IntelliSense, your core choices are binary, XML, or string data. Now that you are capturing street address information as a custom class type, you (once again) need to update your code base as follows:
private void GetUserAddress()
{
// Database reads happening here!
lblUserData.Text =
$"You live here: {Profile.AddressInfo.Street}, {Profile.AddressInfo.City}, " +
$"{Profile.AddressInfo.State}";
}
To be sure, there is much more to the Profile API than I’ve had space to cover here. For example, the Profile property actually encapsulates a type named ProfileCommon. Using this type, you can programmatically obtain all information for a given user, delete (or add) profiles toASPNETDB.mdf, update aspects of a profile, and so forth.
Moreover, the Profile API has numerous points of extensibility that can allow you to optimize how the profile manager accesses the tables of the ASPNETDB.mdf database. As you would expect, there are many ways to decrease the number of “hits” this database takes. Interested readers are encouraged to consult the .NET Framework 4.6 SDK documentation for further details.
![]() Source Code The FunWithProfiles web site is included in the Chapter 33 subdirectory.
Source Code The FunWithProfiles web site is included in the Chapter 33 subdirectory.
Summary
In this chapter, you rounded out your knowledge of ASP.NET by examining how to leverage the HttpApplication type. As you have seen, this type provides a number of default event handlers that allow you to intercept various application- and session-level events. The bulk of this chapter was spent exploring a number of state management techniques. Recall that view state is used to automatically repopulate the values of HTML widgets between postbacks to a specific page. Next, you checked out the distinction of application- and session-level data, cookie management, and the ASP.NET application cache.
Finally, this chapter exposed you to the ASP.NET Profile API. As you have seen, this technology provides an out-of-the-box solution for the issue of persisting user data across sessions. Using your web site’s web.config file, you can define any number of profile items (including groups of items and [Serializable] types) that will automatically be persisted into ASPNETDB.mdf.
All materials on the site are licensed Creative Commons Attribution-Sharealike 3.0 Unported CC BY-SA 3.0 & GNU Free Documentation License (GFDL)
If you are the copyright holder of any material contained on our site and intend to remove it, please contact our site administrator for approval.
© 2016-2026 All site design rights belong to S.Y.A.