C# 5.0 in a Nutshell (2012)
Chapter 15. Streams and I/O
This chapter describes the fundamental types for input and output in .NET, with emphasis on the following topics:
§ The .NET stream architecture and how it provides a consistent programming interface for reading and writing across a variety of I/O types
§ Classes for manipulating files and directories on disk
§ Specialized streams for compression, named pipes and memory-mapped files.
This chapter concentrates on the types in the System.IO namespace, the home of lower-level I/O functionality. The .NET Framework also provides higher-level I/O functionality in the form of SQL connections and commands, LINQ to SQL and LINQ to XML, Windows Communication Foundation, Web Services, and Remoting.
Stream Architecture
The .NET stream architecture centers on three concepts: backing stores, decorators, and adapters, as shown in Figure 15-1.

Figure 15-1. Stream architecture
A backing store is the endpoint that makes input and output useful, such as a file or network connection. Precisely, it is either or both of the following:
§ A source from which bytes can be sequentially read
§ A destination to which bytes can be sequentially written
A backing store is of no use, though, unless exposed to the programmer. A Stream is the standard .NET class for this purpose; it exposes a standard set of methods for reading, writing, and positioning. Unlike an array, where all the backing data exists in memory at once, a stream deals with data serially—either one byte at a time or in blocks of a manageable size. Hence, a stream can use little memory regardless of the size of its backing store.
Streams fall into two categories:
Backing store streams
These are hard-wired to a particular type of backing store, such as FileStream or NetworkStream
Decorator streams
These feed off another stream, transforming the data in some way, such as DeflateStream or CryptoStream
Decorator streams have the following architectural benefits:
§ They liberate backing store streams from needing to implement such features as compression and encryption themselves.
§ Streams don’t suffer a change of interface when decorated.
§ You connect decorators at runtime.
§ You can chain decorators together (e.g., a compressor followed by an encryptor).
Both backing store and decorator streams deal exclusively in bytes. Although this is flexible and efficient, applications often work at higher levels such as text or XML. Adapters bridge this gap by wrapping a stream in a class with specialized methods typed to a particular format. For example, a text reader exposes a ReadLine method; an XML writer exposes a WriteAttributes method.
NOTE
An adapter wraps a stream, just like a decorator. Unlike a decorator, however, an adapter is not itself a stream; it typically hides the byte-oriented methods completely.
To summarize, backing store streams provide the raw data; decorator streams provide transparent binary transformations such as encryption; adapters offer typed methods for dealing in higher-level types such as strings and XML. Figure 15-1 illustrates their associations. To compose a chain, you simply pass one object into another’s constructor.
Using Streams
The abstract Stream class is the base for all streams. It defines methods and properties for three fundamental operations: reading, writing, and seeking, as well as for administrative tasks such as closing, flushing, and configuring timeouts (see Table 15-1).
Table 15-1. Stream class members
|
Category |
Members |
|
Reading |
public abstract bool CanRead { get; } |
|
public abstract int Read (byte[] buffer, int offset, int count) |
|
|
public virtual int ReadByte(); |
|
|
Writing |
public abstract bool CanWrite { get; } |
|
public abstract void Write (byte[] buffer, int offset, int count); |
|
|
public virtual void WriteByte (byte value); |
|
|
Seeking |
public abstract bool CanSeek { get; } |
|
public abstract long Position { get; set; } |
|
|
public abstract void SetLength (long value); |
|
|
public abstract long Length { get; } |
|
|
public abstract long Seek (long offset, SeekOrigin origin); |
|
|
Closing/flushing |
public virtual void Close(); |
|
public void Dispose(); |
|
|
public abstract void Flush(); |
|
|
Timeouts |
public virtual bool CanTimeout { get; } |
|
public virtual int ReadTimeout { get; set; } |
|
|
public virtual int WriteTimeout { get; set; } |
|
|
Other |
public static readonly Stream Null; // "Null" stream |
|
public static Stream Synchronized (Stream stream); |
From Framework 4.5, there are also asynchronous versions of the Read and Write methods, both of which return Tasks and optionally accept a cancellation token.
In the following example, we use a file stream to read, write, and seek:
using System;
using System.IO;
class Program
{
static void Main()
{
// Create a file called test.txt in the current directory:
using (Stream s = new FileStream ("test.txt", FileMode.Create))
{
Console.WriteLine (s.CanRead); // True
Console.WriteLine (s.CanWrite); // True
Console.WriteLine (s.CanSeek); // True
s.WriteByte (101);
s.WriteByte (102);
byte[] block = { 1, 2, 3, 4, 5 };
s.Write (block, 0, block.Length); // Write block of 5 bytes
Console.WriteLine (s.Length); // 7
Console.WriteLine (s.Position); // 7
s.Position = 0; // Move back to the start
Console.WriteLine (s.ReadByte()); // 101
Console.WriteLine (s.ReadByte()); // 102
// Read from the stream back into the block array:
Console.WriteLine (s.Read (block, 0, block.Length)); // 5
// Assuming the last Read returned 5, we'll be at
// the end of the file, so Read will now return 0:
Console.WriteLine (s.Read (block, 0, block.Length)); // 0
}
}
}
Reading or writing asynchronously is simply a question of calling ReadAsync/WriteAsync instead of Read/Write, and awaiting the expression. (We must also add the async keyword to the calling method, as we described in Chapter 14.)
async static void AsyncDemo()
{
using (Stream s = new FileStream ("test.txt", FileMode.Create))
{
byte[] block = { 1, 2, 3, 4, 5 };
await s.WriteAsync (block, 0, block.Length); // Write asychronously
s.Position = 0; // Move back to the start
// Read from the stream back into the block array:
Console.WriteLine (await s.ReadAsync (block, 0, block.Length)); // 5
}
}
The asynchronous methods make it easy to write responsive and scalable applications that work with potentially slow streams (particularly network streams), without tying up a thread.
NOTE
For the sake of brevity, we’ll continue to use synchronous methods for most of the examples in this chapter; however we recommend the asynchronous Read/Write operations as preferable in most scenarios involving network I/O.
Reading and Writing
A stream may support reading, writing, or both. If CanWrite returns false, the stream is read-only; if CanRead returns false, the stream is write-only.
Read receives a block of data from the stream into an array. It returns the number of bytes received, which is always either less than or equal to the count argument. If it’s less than count, it means either that the end of the stream has been reached or the stream is giving you the data in smaller chunks (as is often the case with network streams). In either case, the balance of bytes in the array will remain unwritten, their previous values preserved.
WARNING
With Read, you can be certain you’ve reached the end of the stream only when the method returns 0. So, if you have a 1,000-byte stream, the following code may fail to read it all into memory:
// Assuming s is a stream:
byte[] data = new byte [1000];
s.Read (data, 0, data.Length);
The Read method could read anywhere from 1 to 1,000 bytes, leaving the balance of the stream unread.
Here’s the correct way to read a 1,000-byte stream:
byte[] data = new byte [1000];
// bytesRead will always end up at 1000, unless the stream is
// itself smaller in length:
int bytesRead = 0;
int chunkSize = 1;
while (bytesRead < data.Length && chunkSize > 0)
bytesRead +=
chunkSize = s.Read (data, bytesRead, data.Length - bytesRead);
NOTE
Fortunately, the BinaryReader type provides a simpler way to achieve the same result:
byte[] data = new BinaryReader (s).ReadBytes (1000);
If the stream is less than 1,000 bytes long, the byte array returned reflects the actual stream size. If the stream is seekable, you can read its entire contents by replacing 1000 with (int)s.Length.
We describe the BinaryReader type further in the section Stream Adapters, later in this chapter.
The ReadByte method is simpler: it reads just a single byte, returning −1 to indicate the end of the stream. ReadByte actually returns an int rather than a byte, as the latter cannot return −1.
The Write and WriteByte methods send data to the stream. If they are unable to send the specified bytes, an exception is thrown.
WARNING
In the Read and Write methods, the offset argument refers to the index in the buffer array at which reading or writing begins, not the position within the stream.
Seeking
A stream is seekable if CanSeek returns true. With a seekable stream (such as a file stream), you can query or modify its Length (by calling SetLength), and at any time change the Position at which you’re reading or writing. The Position property is relative to the beginning of the stream; the Seek method, however, allows you to move relative to the current position or the end of the stream.
NOTE
Changing the Position on a FileStream typically takes a few microseconds. If you’re doing this millions of times in a loop, the MemoryMappedFile class may be a better choice than a FileStream (see Memory-Mapped Files, later in this chapter).
With a nonseekable stream (such as an encryption stream), the only way to determine its length is to read it right through. Furthermore, if you need to reread a previous section, you must close the stream and start afresh with a new one.
Closing and Flushing
Streams must be disposed after use to release underlying resources such as file and socket handles. A simple way to guarantee this is by instantiating streams within using blocks.
In general, streams follow standard disposal semantics:
§ Dispose and Close are identical in function.
§ Disposing or closing a stream repeatedly causes no error.
Closing a decorator stream closes both the decorator and its backing store stream. With a chain of decorators, closing the outermost decorator (at the head of the chain) closes the whole lot.
Some streams internally buffer data to and from the backing store to lessen round-tripping and so improve performance (file streams are a good example of this). This means data you write to a stream may not hit the backing store immediately; it can be delayed as the buffer fills up. TheFlush method forces any internally buffered data to be written immediately. Flush is called automatically when a stream is closed, so you never need to do the following:
s.Flush(); s.Close();
Timeouts
A stream supports read and write timeouts if CanTimeout returns true. Network streams support timeouts; file and memory streams do not. For streams that support timeouts, the ReadTimeout and WriteTimeout properties determine the desired timeout in milliseconds, where 0 means no timeout. The Read and Write methods indicate that a timeout has occurred by throwing an exception.
Thread Safety
As a rule, streams are not thread-safe, meaning that two threads cannot concurrently read or write to the same stream without possible error. The Stream class offers a simple workaround via the static Synchronized method. This method accepts a stream of any type and returns a thread-safe wrapper. The wrapper works by obtaining an exclusive lock around each read, write, or seek, ensuring that only one thread can perform such an operation at a time. In practice, this allows multiple threads to simultaneously append data to the same stream—other kinds of activities (such as concurrent reading) require additional locking to ensure that each thread accesses the desired portion of the stream. We discuss thread safety fully in Chapter 22.
Backing Store Streams
Figure 15-2 shows the key backing store streams provided by the .NET Framework. A “null stream” is also available, via the Stream’s static Null field.
In the following sections, we describe FileStream and MemoryStream; in the final section in this chapter, we describe IsolatedStorageStream. In Chapter 16, we cover NetworkStream.
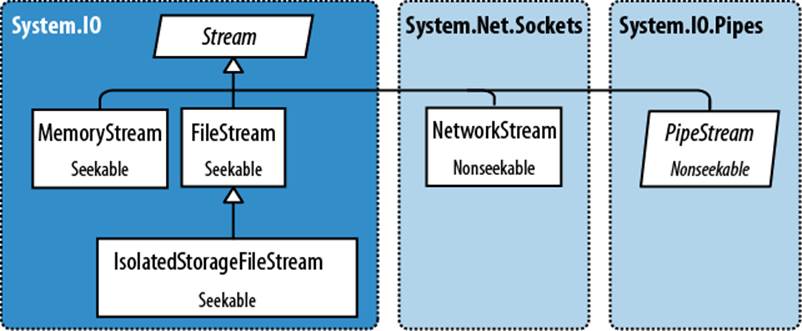
Figure 15-2. Backing store streams
FileStream
Earlier in this section, we demonstrated the basic use of a FileStream to read and write bytes of data. We’ll now examine the special features of this class.
NOTE
FileStream is unavailable to Metro applications. Instead, use the Windows Runtime types in Windows.Storage (see File I/O in Windows Runtime).
Constructing a FileStream
The simplest way to instantiate a FileStream is to use one of the following static façade methods on the File class:
FileStream fs1 = File.OpenRead ("readme.bin"); // Read-only
FileStream fs2 = File.OpenWrite (@"c:\temp\writeme.tmp"); // Write-only
FileStream fs3 = File.Create (@"c:\temp\writeme.tmp"); // Read/write
OpenWrite and Create differ in behavior if the file already exists. Create truncates any existing content; OpenWrite leaves existing content intact with the stream positioned at zero. If you write fewer bytes than were previously in the file, OpenWrite leaves you with a mixture of old and new content.
You can also instantiate a FileStream directly. Its constructors provide access to every feature, allowing you to specify a filename or low-level file handle, file creation and access modes, and options for sharing, buffering, and security. The following opens an existing file for read/write access without overwriting it:
var fs = new FileStream ("readwrite.tmp", FileMode.Open); // Read/write
More on FileMode shortly.
SHORTCUT METHODS ON THE FILE CLASS
The following static methods read an entire file into memory in one step:
§ File.ReadAllText (returns a string)
§ File.ReadAllLines (returns an array of strings)
§ File.ReadAllBytes (returns a byte array)
The following static methods write an entire file in one step:
§ File.WriteAllText
§ File.WriteAllLines
§ File.WriteAllBytes
§ File.AppendAllText (great for appending to a log file)
There’s also a static method called File.ReadLines: this is like ReadAllLines except that it returns a lazily-evaluated IEnumerable<string>. This is more efficient because it doesn’t load the entire file into memory at once. LINQ is ideal for consuming the results: the following calculates the number of lines greater than 80 characters in length:
int longLines = File.ReadLines ("filePath")
.Count (l => l.Length > 80);
Specifying a filename
A filename can be either absolute (e.g., c:\temp\test.txt) or relative to the current directory (e.g., test.txt or temp\test.txt). You can access or change the current directory via the static Environment.CurrentDirectory property.
WARNING
When a program starts, the current directory may or may not coincide with that of the program’s executable. For this reason, you should never rely on the current directory for locating additional runtime files packaged along with your executable.
AppDomain.CurrentDomain.BaseDirectory returns the application base directory, which in normal cases is the folder containing the program’s executable. To specify a filename relative to this directory, you can call Path.Combine:
string baseFolder = AppDomain.CurrentDomain.BaseDirectory;
string logoPath = Path.Combine (baseFolder, "logo.jpg");
Console.WriteLine (File.Exists (logoPath));
You can read and write across a network via a UNC path, such as \\JoesPC\PicShare\pic.jpg or \\10.1.1.2\PicShare\pic.jpg.
Specifying a FileMode
All of FileStream’s constructors that accept a filename also require a FileMode enum argument. Figure 15-3 shows how to choose a FileMode, and the choices yield results akin to calling a static method on the File class.
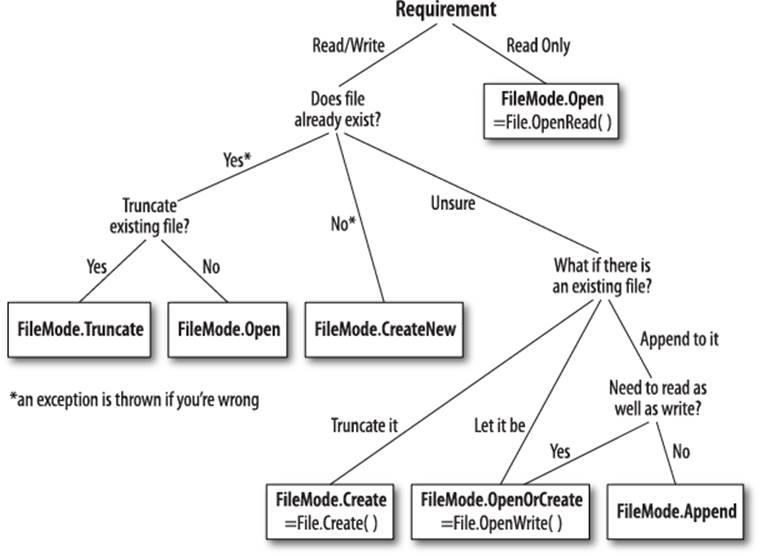
Figure 15-3. Choosing a FileMode
WARNING
File.Create and FileMode.Create will throw an exception if used on hidden files. To overwrite a hidden file, you must delete and re-create it:
if (File.Exists ("hidden.txt")) File.Delete ("hidden.txt");
Constructing a FileStream with just a filename and FileMode gives you (with just one exception) a readable/writable stream. You can request a downgrade if you also supply a FileAccess argument:
[Flags]
public enum FileAccess { Read = 1, Write = 2, ReadWrite = 3 }
The following returns a read-only stream, equivalent to calling File.OpenRead:
using (var fs = new FileStream ("x.bin", FileMode.Open, FileAccess.Read))
...
FileMode.Append is the odd one out: with this mode, you get a write-only stream. To append with read-write support, you must instead use FileMode.Open or FileMode.OpenOrCreate, and then seek the end of the stream:
using (var fs = new FileStream ("myFile.bin", FileMode.Open))
{
fs.Seek (0, SeekOrigin.End);
...
Advanced FileStream features
Here are other optional arguments you can include when constructing a FileStream:
§ A FileShare enum describing how much access to grant other processes wanting to dip into the same file before you’ve finished (None, Read [default], ReadWrite, or Write).
§ The size, in bytes, of the internal buffer (default is currently 4 KB).
§ A flag indicating whether to defer to the operating system for asynchronous I/O.
§ A FileSecurity object describing what user and role permissions to assign a new file.
§ A FileOptions flags enum for requesting operating system encryption (Encrypted), automatic deletion upon closure for temporary files (DeleteOnClose), and optimization hints (RandomAccess and SequentialScan). There is also a WriteThrough flag that requests that the operating system disable write-behind caching; this is for transactional files or logs.
Opening a file with FileShare.ReadWrite allows other processes or users to simultaneously read and write to the same file. To avoid chaos, you can all agree to lock specified portions of the file before reading or writing, using these methods:
// Defined on the FileStream class:
public virtual void Lock (long position, long length);
public virtual void Unlock (long position, long length);
Lock throws an exception if part or all of the requested file section has already been locked. This is the system used in file-based databases such as Access and FoxPro.
MemoryStream
MemoryStream uses an array as a backing store. This partly defeats the purpose of having a stream, because the entire backing store must reside in memory at once. MemoryStream still has uses, however; an example is when you need random access to a nonseekable stream. If you know the source stream will be of a manageable size, you can copy it into a MemoryStream as follows:
static MemoryStream ToMemoryStream (this Stream input, bool closeInput)
{
try
{ // Read and write in
byte[] block = new byte [0×1000]; // blocks of 4K.
MemoryStream ms = new MemoryStream();
while (true)
{
int bytesRead = input.Read (block, 0, block.Length);
if (bytesRead == 0) return ms;
ms.Write (block, 0, bytesRead);
}
}
finally { if (closeInput) input.Close (); }
}
The reason for the closeInput argument is to avoid a situation where the method author and consumer each think the other will close the stream.
You can convert a MemoryStream to a byte array by calling ToArray. The GetBuffer method does the same job more efficiently by returning a direct reference to the underlying storage array; unfortunately, this array is usually longer than the stream’s real length.
NOTE
Closing and flushing a MemoryStream is optional. If you close a MemoryStream, you can no longer read or write to it, but you are still permitted to call ToArray to obtain the underlying data. Flush does absolutely nothing on a memory stream.
You can find further MemoryStream examples in the section Compression Streams later in this chapter, and in the section Cryptography Overview in Chapter 21.
PipeStream
PipeStream was introduced in Framework 3.5. It provides a simple means by which one process can communicate with another through the Windows pipes protocol. There are two kinds of pipe:
Anonymous pipe
Allows one-way communication between a parent and child process on the same computer.
Named pipe
Allows two-way communication between arbitrary processes on the same computer—or different computers across a Windows network.
A pipe is good for interprocess communication (IPC) on a single computer: it doesn’t rely on a network transport, which equates to good performance and no issues with firewalls. Pipes are not supported in Metro applications.
NOTE
Pipes are stream-based, so one process waits to receive a series of bytes while another process sends them. An alternative is for processes to communicate via a block of shared memory—we describe how to do this later, in the section Memory-Mapped Files.
PipeStream is an abstract class with four concrete subtypes. Two are used for anonymous pipes and the other two for named pipes:
Anonymous pipes
AnonymousPipeServerStream and AnonymousPipeClientStream
Named pipes
NamedPipeServerStream and NamedPipeClientStream
Named pipes are simpler to use, so we’ll describe them first.
NOTE
A pipe is a low-level construct that allows just the sending and receiving of bytes (or messages, which are groups of bytes). The WCF and Remoting APIs offer higher-level messaging frameworks with the option of using an IPC channel for communication.
Named pipes
With named pipes, the parties communicate through a pipe of the same name. The protocol defines two distinct roles: the client and server. Communication happens between the client and server as follows:
§ The server instantiates a NamedPipeServerStream and then calls WaitForConnection.
§ The client instantiates a NamedPipeClientStream and then calls Connect (with an optional timeout).
The two parties then read and write the streams to communicate.
The following example demonstrates a server that sends a single byte (100), and then waits to receive a single byte:
using (var s = new NamedPipeServerStream ("pipedream"))
{
s.WaitForConnection();
s.WriteByte (100);
Console.WriteLine (s.ReadByte());
}
Here’s the corresponding client code:
using (var s = new NamedPipeClientStream ("pipedream"))
{
s.Connect();
Console.WriteLine (s.ReadByte());
s.WriteByte (200); // Send the value 200 back.
}
Named pipe streams are bidirectional by default, so either party can read or write their stream. This means the client and server must agree on some protocol to coordinate their actions, so both parties don’t end up sending or receiving at once.
There also needs to be agreement on the length of each transmission. Our example was trivial in this regard, because we bounced just a single byte in each direction. To help with messages longer than one byte, pipes provide a message transmission mode. If this is enabled, a party callingRead can know when a message is complete by checking the IsMessageComplete property.
To demonstrate, we’ll start by writing a helper method that reads a whole message from a message-enabled PipeStream—in other words, reads until IsMessageComplete is true:
static byte[] ReadMessage (PipeStream s)
{
MemoryStream ms = new MemoryStream();
byte[] buffer = new byte [0x1000]; // Read in 4 KB blocks
do { ms.Write (buffer, 0, s.Read (buffer, 0, buffer.Length)); }
while (!s.IsMessageComplete);
return ms.ToArray();
}
(To make this asynchronous, replace “s.Read” with “await s.ReadAsync”.)
WARNING
You cannot determine whether a PipeStream has finished reading a message simply by waiting for Read to return 0. This is because, unlike most other stream types, pipe streams and network streams have no definite end. Instead, they temporarily “dry up” between message transmissions.
Now we can activate message transmission mode. On the server, this is done by specifying PipeTransmissionMode.Message when constructing the stream:
using (var s = new NamedPipeServerStream ("pipedream", PipeDirection.InOut,
1, PipeTransmissionMode.Message))
{
s.WaitForConnection();
byte[] msg = Encoding.UTF8.GetBytes ("Hello");
s.Write (msg, 0, msg.Length);
Console.WriteLine (Encoding.UTF8.GetString (ReadMessage (s)));
}
On the client, we activate message transmission mode by setting ReadMode after calling Connect:
using (var s = new NamedPipeClientStream ("pipedream"))
{
s.Connect();
s.ReadMode = PipeTransmissionMode.Message;
Console.WriteLine (Encoding.UTF8.GetString (ReadMessage (s)));
byte[] msg = Encoding.UTF8.GetBytes ("Hello right back!");
s.Write (msg, 0, msg.Length);
}
Anonymous pipes
An anonymous pipe provides a one-way communication stream between a parent and child process. Instead of using a system-wide name, anonymous pipes tune in through a private handle.
As with named pipes, there are distinct client and server roles. The system of communication is a little different, however, and proceeds as follows:
1. The server instantiates an AnonymousPipeServerStream, committing to a PipeDirection of In or Out.
2. The server calls GetClientHandleAsString to obtain an identifier for the pipe, which it then passes to the client (typically as an argument when starting the child process).
3. The child process instantiates an AnonymousPipeClientStream, specifying the opposite PipeDirection.
4. The server releases the local handle that was generated in Step 2, by calling DisposeLocalCopyOfClientHandle.
5. The parent and child processes communicate by reading/writing the stream.
Because anonymous pipes are unidirectional, a server must create two pipes for bidirectional communication. The following demonstrates a server that sends a single byte to the child process, and then receives a single byte back from that process:
string clientExe = @"d:\PipeDemo\ClientDemo.exe";
HandleInheritability inherit = HandleInheritability.Inheritable;
using (var tx = new AnonymousPipeServerStream (PipeDirection.Out, inherit))
using (var rx = new AnonymousPipeServerStream (PipeDirection.In, inherit))
{
string txID = tx.GetClientHandleAsString();
string rxID = rx.GetClientHandleAsString();
var startInfo = new ProcessStartInfo (clientExe, txID + " " + rxID);
startInfo.UseShellExecute = false; // Required for child process
Process p = Process.Start (startInfo);
tx.DisposeLocalCopyOfClientHandle(); // Release unmanaged
rx.DisposeLocalCopyOfClientHandle(); // handle resources.
tx.WriteByte (100);
Console.WriteLine ("Server received: " + rx.ReadByte());
p.WaitForExit();
}
Here’s the corresponding client code that would be compiled to d:\PipeDemo\ClientDemo.exe:
string rxID = args[0]; // Note we're reversing the
string txID = args[1]; // receive and transmit roles.
using (var rx = new AnonymousPipeClientStream (PipeDirection.In, rxID))
using (var tx = new AnonymousPipeClientStream (PipeDirection.Out, txID))
{
Console.WriteLine ("Client received: " + rx.ReadByte());
tx.WriteByte (200);
}
As with named pipes, the client and server must coordinate their sending and receiving and agree on the length of each transmission. Anonymous pipes don’t, unfortunately, support message mode, so you must implement your own protocol for message length agreement. One solution is to send, in the first 4 bytes of each transmission, an integer value defining the length of the message to follow. The BitConverter class provides methods for converting between an integer and an array of 4 bytes.
BufferedStream
BufferedStream decorates, or wraps, another stream with buffering capability, and it is one of a number of decorator stream types in the core .NET Framework, all of which are illustrated in Figure 15-4.
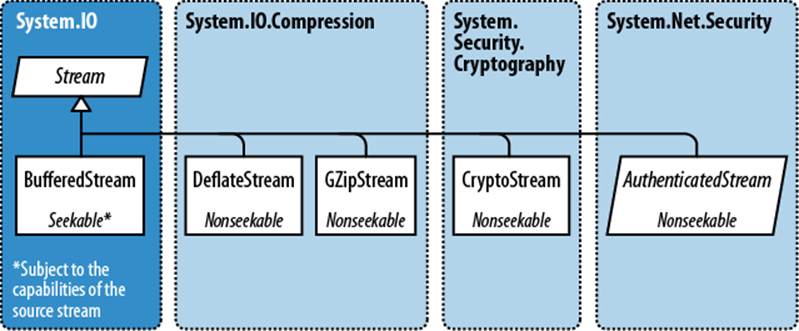
Figure 15-4. Decorator streams
Buffering improves performance by reducing round trips to the backing store. Here’s how we wrap a FileStream in a 20 KB BufferedStream:
// Write 100K to a file:
File.WriteAllBytes ("myFile.bin", new byte [100000]);
using (FileStream fs = File.OpenRead ("myFile.bin"))
using (BufferedStream bs = new BufferedStream (fs, 20000)) //20K buffer
{
bs.ReadByte();
Console.WriteLine (fs.Position); // 20000
}
In this example, the underlying stream advances 20,000 bytes after reading just 1 byte, thanks to the read-ahead buffering. We could call ReadByte another 19,999 times before the FileStream would be hit again.
Coupling a BufferedStream to a FileStream, as in this example, is of limited value because FileStream already has built-in buffering. Its only use might be in enlarging the buffer on an already constructed FileStream.
Closing a BufferedStream automatically closes the underlying backing store stream.
Stream Adapters
A Stream deals only in bytes; to read or write data types such as strings, integers, or XML elements, you must plug in an adapter. Here’s what the Framework provides:
Text adapters (for string and character data)
TextReader, TextWriter
StreamReader, StreamWriter
StringReader, StringWriter
Binary adapters (for primitive types such as int, bool, string, and float)
BinaryReader, BinaryWriter
XML adapters (covered in Chapter 11)
XmlReader, XmlWriter
The relationships between these types are illustrated in Figure 15-5.
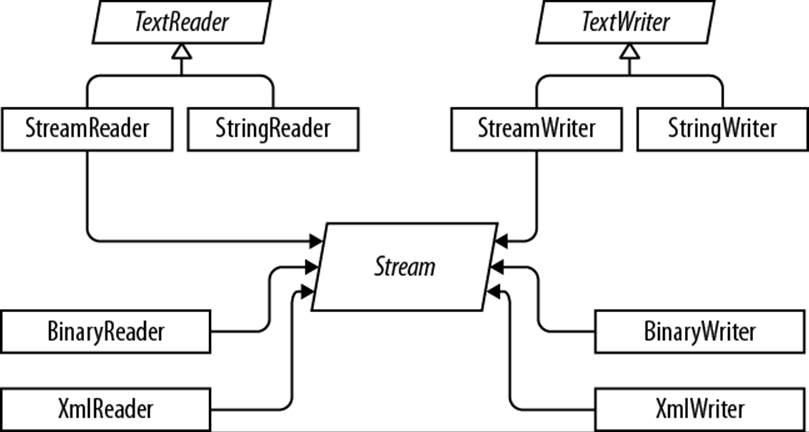
Figure 15-5. Readers and writers
Text Adapters
TextReader and TextWriter are the abstract base classes for adapters that deal exclusively with characters and strings. Each has two general-purpose implementations in the framework:
StreamReader/StreamWriter
Uses a Stream for its raw data store, translating the stream’s bytes into characters or strings
StringReader/StringWriter
Implements TextReader/TextWriter using in-memory strings
Table 15-2 lists TextReader’s members by category. Peek returns the next character in the stream without advancing the position. Both Peek and the zero-argument version of Read return −1 if at the end of the stream; otherwise, they return an integer that can be cast directly to a char. The overload of Read that accepts a char[] buffer is identical in functionality to the ReadBlock method. ReadLine reads until reaching either a CR (character 13) or LF (character 10), or a CR+LF pair in sequence. It then returns a string, discarding the CR/LF characters.
Table 15-2. TextReader members
|
Category |
Members |
|
Reading one char |
public virtual int Peek(); // Cast the result to a char |
|
public virtual int Read(); // Cast the result to a char |
|
|
Reading many chars |
public virtual int Read (char[] buffer, int index, int count); |
|
public virtual int ReadBlock (char[] buffer, int index, int count); |
|
|
public virtual string ReadLine(); |
|
|
public virtual string ReadToEnd(); |
|
|
Closing |
public virtual void Close(); |
|
public void Dispose(); // Same as Close |
|
|
Other |
public static readonly TextReader Null; |
|
public static TextReader Synchronized (TextReader reader); |
NOTE
The new line sequence in Windows is loosely modeled on a mechanical typewriter: a carriage return (character 13) followed by a line feed (character 10). The C# string is "\r\n" (think “ReturN”). Reverse the order and you’ll get either two new lines or none!
TextWriter has analogous methods for writing, as shown in Table 15-3. The Write and WriteLine methods are additionally overloaded to accept every primitive type, plus the object type. These methods simply call the ToString method on whatever is passed in (optionally through an IFormatProvider specified either when calling the method or when constructing the TextWriter).
Table 15-3. TextWriter members
|
Category |
Members |
|
Writing one char |
public virtual void Write (char value); |
|
Writing many chars |
public virtual void Write (string value); |
|
public virtual void Write (char[] buffer, int index, int count); |
|
|
public virtual void Write (string format, params object[] arg); |
|
|
public virtual void WriteLine (string value); |
|
|
Closing and flushing |
public virtual void Close(); |
|
public void Dispose(); // Same as Close |
|
|
public virtual void Flush(); |
|
|
Formatting and encoding |
public virtual IFormatProvider FormatProvider { get; } |
|
public virtual string NewLine { get; set; } |
|
|
public abstract Encoding Encoding { get; } |
|
|
Other |
public static readonly TextWriter Null; |
|
public static TextWriter Synchronized (TextWriter writer); |
WriteLine simply appends the given text with CR+LF. You can change this via the NewLine property (this can be useful for interoperability with Unix file formats).
NOTE
As with Stream, TextReader and TextWriter offer task-based asynchronous versions of their read/write methods.
StreamReader and StreamWriter
In the following example, a StreamWriter writes two lines of text to a file, and then a StreamReader reads the file back:
using (FileStream fs = File.Create ("test.txt"))
using (TextWriter writer = new StreamWriter (fs))
{
writer.WriteLine ("Line1");
writer.WriteLine ("Line2");
}
using (FileStream fs = File.OpenRead ("test.txt"))
using (TextReader reader = new StreamReader (fs))
{
Console.WriteLine (reader.ReadLine()); // Line1
Console.WriteLine (reader.ReadLine()); // Line2
}
Because text adapters are so often coupled with files, the File class provides the static methods CreateText, AppendText, and OpenText to shortcut the process:
using (TextWriter writer = File.CreateText ("test.txt"))
{
writer.WriteLine ("Line1");
writer.WriteLine ("Line2");
}
using (TextWriter writer = File.AppendText ("test.txt"))
writer.WriteLine ("Line3");
using (TextReader reader = File.OpenText ("test.txt"))
while (reader.Peek() > −1)
Console.WriteLine (reader.ReadLine()); // Line1
// Line2
// Line3
This also illustrates how to test for the end of a file (viz. reader.Peek()). Another option is to read until reader.ReadLine returns null.
You can also read and write other types such as integers, but because TextWriter invokes ToString on your type, you must parse a string when reading it back:
using (TextWriter w = File.CreateText ("data.txt"))
{
w.WriteLine (123); // Writes "123"
w.WriteLine (true); // Writes the word "true"
}
using (TextReader r = File.OpenText ("data.txt"))
{
int myInt = int.Parse (r.ReadLine()); // myInt == 123
bool yes = bool.Parse (r.ReadLine()); // yes == true
}
Character encodings
TextReader and TextWriter are by themselves just abstract classes with no connection to a stream or backing store. The StreamReader and StreamWriter types, however, are connected to an underlying byte-oriented stream, so they must convert between characters and bytes. They do so through an Encoding class from the System.Text namespace, which you choose when constructing the StreamReader or StreamWriter. If you choose none, the default UTF-8 encoding is used.
WARNING
If you explicitly specify an encoding, StreamWriter will, by default, write a prefix to the start of the stream to identity the encoding. This is usually undesirable and you can prevent it by constructing the encoding as follows:
var encoding = new UTF8Encoding (
encoderShouldEmitUTF8Identifier:false,
throwOnInvalidBytes:true);
The second argument tells the StreamWriter (or StreamReader) to throw an exception if it encounters bytes that do not have a valid string translation for their encoding, which matches its default behavior if you do not specify an encoding.
The simplest of the encodings is ASCII, because each character is represented by one byte. The ASCII encoding maps the first 127 characters of the Unicode set into its single byte, covering what you see on a U.S.-style keyboard. Most other characters, including specialized symbols and non-English characters, cannot be represented and are converted to the □ character. The default UTF-8 encoding can map all allocated Unicode characters, but it is more complex. The first 127 characters encode to a single byte, for ASCII compatibility; the remaining characters encode to a variable number of bytes (most commonly two or three). Consider this:
using (TextWriter w = File.CreateText ("but.txt")) // Use default UTF-8
w.WriteLine ("but-"); // encoding.
using (Stream s = File.OpenRead ("but.txt"))
for (int b; (b = s.ReadByte()) > −1;)
Console.WriteLine (b);
The word “but” is followed not by a stock-standard hyphen, but by the longer em dash (—) character, U+2014. This is the one that won’t get you into trouble with your book editor! Let’s examine the output:
98 // b
117 // u
116 // t
226 // em dash byte 1 Note that the byte values
128 // em dash byte 2 are >= 128 for each part
148 // em dash byte 3 of the multibyte sequence.
13 // <CR>
10 // <LF>
Because the em dash is outside the first 127 characters of the Unicode set, it requires more than a single byte to encode in UTF-8 (in this case, three). UTF-8 is efficient with the Western alphabet as most popular characters consume just one byte. It also downgrades easily to ASCII simply by ignoring all bytes above 127. Its disadvantage is that seeking within a stream is troublesome, since a character’s position does not correspond to its byte position in the stream. An alternative is UTF-16 (labeled just “Unicode” in the Encoding class). Here’s how we write the same string with UTF-16:
using (Stream s = File.Create ("but.txt"))
using (TextWriter w = new StreamWriter (s, Encoding.Unicode))
w.WriteLine ("but-");
foreach (byte b in File.ReadAllBytes ("but.txt"))
Console.WriteLine (b);
The output is then:
255 // Byte-order mark 1
254 // Byte-order mark 2
98 // 'b' byte 1
0 // 'b' byte 2
117 // 'u' byte 1
0 // 'u' byte 2
116 // 't' byte 1
0 // 't' byte 2
20 // '--' byte 1
32 // '--' byte 2
13 // <CR> byte 1
0 // <CR> byte 2
10 // <LF> byte 1
0 // <LF> byte 2
Technically, UTF-16 uses either 2 or 4 bytes per character (there are close to a million Unicode characters allocated or reserved, so 2 bytes is not always enough). However, because the C# char type is itself only 16 bits wide, a UTF-16 encoding will always use exactly 2 bytes per .NETchar. This makes it easy to jump to a particular character index within a stream.
UTF-16 uses a 2-byte prefix to identify whether the byte pairs are written in a “little-endian” or “big-endian” order (the least significant byte first or the most significant byte first). The default little-endian order is standard for Windows-based systems.
StringReader and StringWriter
The StringReader and StringWriter adapters don’t wrap a stream at all; instead, they use a string or StringBuilder as the underlying data source. This means no byte translation is required—in fact, the classes do nothing you couldn’t easily achieve with a string or StringBuildercoupled with an index variable. Their advantage, though, is that they share a base class with StreamReader/StreamWriter. For instance, suppose we have a string containing XML and want to parse it with an XmlReader. The XmlReader.Create method accepts one of the following:
§ A URI
§ A Stream
§ A TextReader
So, how do we XML-parse our string? Because StringReader is a subclass of TextReader, we’re in luck. We can instantiate and pass in a StringReader as follows:
XmlReader r = XmlReader.Create (new StringReader (myString));
Binary Adapters
BinaryReader and BinaryWriter read and write native data types: bool, byte, char, decimal, float, double, short, int, long, sbyte, ushort, uint, and ulong, as well as strings and arrays of the primitive data types.
Unlike StreamReader and StreamWriter, binary adapters store primitive data types efficiently, as they are represented in memory. So, an int uses 4 bytes; a double 8 bytes. Strings are written through a text encoding (as with StreamReader and StreamWriter) but are length-prefixed, in order to make it possible to read back a series of strings without needing special delimiters.
Imagine we have a simple type, defined as follows:
public class Person
{
public string Name;
public int Age;
public double Height;
}
We can add the following methods to Person to save/load its data to/from a stream using binary adapters:
public void SaveData (Stream s)
{
var w = new BinaryWriter (s);
w.Write (Name);
w.Write (Age);
w.Write (Height);
w.Flush(); // Ensure the BinaryWriter buffer is cleared.
// We won't dispose/close it, so more data
} // can be written to the stream.
public void LoadData (Stream s)
{
var r = new BinaryReader (s);
Name = r.ReadString();
Age = r.ReadInt32();
Height = r.ReadDouble();
}
BinaryReader can also read into byte arrays. The following reads the entire contents of a seekable stream:
byte[] data = new BinaryReader (s).ReadBytes ((int) s.Length);
This is more convenient than reading directly from a stream, because it doesn’t require a loop to ensure that all data has been read.
Closing and Disposing Stream Adapters
You have four choices in tearing down stream adapters:
1. Close the adapter only.
2. Close the adapter, and then close the stream.
3. (For writers) Flush the adapter, and then close the stream.
4. (For readers) Close just the stream.
NOTE
Close and Dispose are synonymous with adapters, just as they are with streams.
Options 1 and 2 are semantically identical, because closing an adapter automatically closes the underlying stream. Whenever you nest using statements, you’re implicitly taking option 2:
using (FileStream fs = File.Create ("test.txt"))
using (TextWriter writer = new StreamWriter (fs))
writer.WriteLine ("Line");
Because the nest disposes from the inside out, the adapter is first closed, and then the stream. Furthermore, if an exception is thrown within the adapter’s constructor, the stream still closes. It’s hard to go wrong with nested using statements!
WARNING
Never close a stream before closing or flushing its writer—you’ll amputate any data that’s buffered in the adapter.
Options 3 and 4 work because adapters are in the unusual category of optionally disposable objects. An example of when you might choose not to dispose an adapter is when you’ve finished with the adapter, but you want to leave the underlying stream open for subsequent use:
using (FileStream fs = new FileStream ("test.txt", FileMode.Create))
{
StreamWriter writer = new StreamWriter (fs);
writer.WriteLine ("Hello");
writer.Flush();
fs.Position = 0;
Console.WriteLine (fs.ReadByte());
}
Here we write to a file, reposition the stream, and then read the first byte before closing the stream. If we disposed the StreamWriter, it would also close the underlying FileStream, causing the subsequent read to fail. The proviso is that we call Flush to ensure that the StreamWriter’s buffer is written to the underlying stream.
NOTE
Stream adapters—with their optional disposal semantics—do not implement the extended disposal pattern where the finalizer calls Dispose. This allows an abandoned adapter to evade automatic disposal when the garbage collector catches up with it.
From Framework 4.5, there’s a new constructor on StreamReader/StreamWriter that instructs it to keep the stream open after disposal. Hence we can rewrite the preceding example as follows:
using (var fs = new FileStream ("test.txt", FileMode.Create))
{
using (var writer = new StreamWriter (fs, new UTF8Encoding (false, true),
0x400, true))
writer.WriteLine ("Hello");
fs.Position = 0;
Console.WriteLine (fs.ReadByte());
Console.WriteLine (fs.Length);
}
Compression Streams
Two general-purpose compression streams are provided in the System.IO.Compression namespace: DeflateStream and GZipStream. Both use a popular compression algorithm similar to that of the ZIP format. They differ in that GZipStream writes an additional protocol at the start and end—including a CRC to detect for errors. GZipStream also conforms to a standard recognized by other software.
Both streams allow reading and writing, with the following provisos:
§ You always write to the stream when compressing.
§ You always read from the stream when decompressing.
DeflateStream and GZipStream are decorators; they compress or decompress data from another stream that you supply in construction. In the following example, we compress and decompress a series of bytes, using a FileStream as the backing store:
using (Stream s = File.Create ("compressed.bin"))
using (Stream ds = new DeflateStream (s, CompressionMode.Compress))
for (byte i = 0; i < 100; i++)
ds.WriteByte (i);
using (Stream s = File.OpenRead ("compressed.bin"))
using (Stream ds = new DeflateStream (s, CompressionMode.Decompress))
for (byte i = 0; i < 100; i++)
Console.WriteLine (ds.ReadByte()); // Writes 0 to 99
Even with the smaller of the two algorithms, the compressed file is 241 bytes long: more than double the original! Compression works poorly with “dense,” nonrepetitive binary filesdata (and worst of all with encrypted data, which lacks regularity by design). It works well with most text files; in the next example, we compress and decompress a text stream composed of 1,000 words chosen randomly from a small sentence. This also demonstrates chaining a backing store stream, a decorator stream, and an adapter (as depicted at the start of the chapter in Figure 15-1), and the use asynchronous methods:
string[] words = "The quick brown fox jumps over the lazy dog".Split();
Random rand = new Random();
using (Stream s = File.Create ("compressed.bin"))
using (Stream ds = new DeflateStream (s, CompressionMode.Compress))
using (TextWriter w = new StreamWriter (ds))
for (int i = 0; i < 1000; i++)
await w.WriteAsync (words [rand.Next (words.Length)] + " ");
Console.WriteLine (new FileInfo ("compressed.bin").Length); // 1073
using (Stream s = File.OpenRead ("compressed.bin"))
using (Stream ds = new DeflateStream (s, CompressionMode.Decompress))
using (TextReader r = new StreamReader (ds))
Console.Write (await r.ReadToEndAsync()); // Output below:
lazy lazy the fox the quick The brown fox jumps over fox over fox The
brown brown brown over brown quick fox brown dog dog lazy fox dog brown
over fox jumps lazy lazy quick The jumps fox jumps The over jumps dog...
In this case, DeflateStream compresses efficiently to 1,073 bytes—slightly more than 1 byte per word.
Compressing in Memory
Sometimes you need to compress entirely in memory. Here’s how to use a MemoryStream for this purpose:
byte[] data = new byte[1000]; // We can expect a good compression
// ratio from an empty array!
var ms = new MemoryStream();
using (Stream ds = new DeflateStream (ms, CompressionMode.Compress))
ds.Write (data, 0, data.Length);
byte[] compressed = ms.ToArray();
Console.WriteLine (compressed.Length); // 113
// Decompress back to the data array:
ms = new MemoryStream (compressed);
using (Stream ds = new DeflateStream (ms, CompressionMode.Decompress))
for (int i = 0; i < 1000; i += ds.Read (data, i, 1000 - i));
The using statement around the DeflateStream closes it in a textbook fashion, flushing any unwritten buffers in the process. This also closes the MemoryStream it wraps—meaning we must then call ToArray to extract its data.
Here’s an alternative that avoids closing the MemoryStream, and uses the asynchronous read and write methods:
byte[] data = new byte[1000];
MemoryStream ms = new MemoryStream();
using (Stream ds = new DeflateStream (ms, CompressionMode.Compress, true))
await ds.WriteAsync (data, 0, data.Length);
Console.WriteLine (ms.Length); // 113
ms.Position = 0;
using (Stream ds = new DeflateStream (ms, CompressionMode.Decompress))
for (int i = 0; i < 1000; i += await ds.ReadAsync (data, i, 1000 - i));
The additional flag sent to DeflateStream’s constructor tells it not to follow the usual protocol of taking the underlying stream with it in disposal. In other words, the MemoryStream is left open, allowing us to position it back to zero and reread it.
Working with Zip Files
A welcome new feature in Framework 4.5 is support for the popular zip-file compression format, via the new ZipArchive and ZipFile classes in System.IO.Compression (in an assembly called System.IO.Compression.dll). The advantage of this format over DeflateStream andGZipStream is that it acts as a container for multiple files, and is compatible with zip files created with Windows Explorer or other compression utilities.
ZipArchive works with streams, whereas ZipFile addresses the more common scenario of working with files. (ZipFile is a static helper class for ZipArchive).
ZipFile’s CreateFromDirectory method adds all the files in a specified directory into a zip file:
ZipFile.CreateFromDirectory (@"d:\MyFolder", @"d:\compressed.zip");
whereas ExtractToDirectory does the opposite and extracts a zip file to a directory:
ZipFile.ExtractToDirectory (@"d:\compressed.zip", @"d:\MyFolder");
When compressing, you can specify whether to optimize for file size or speed, and whether to include the name of the source directory in the archive. Enabling the latter option in our example would create a subdirectory in the archive called MyFolder into which the compressed files would go.
ZipFile has an Open method for reading/writing individual entries. This returns a ZipArchive object (which you can also obtain by instantiating ZipArchive with a Stream object). When calling Open, you must specify a filename and indicate whether you want to Read, Create, orUpdate the archive. You can then enumerate existing entries via the Entries property, or find a particular file with GetEntry:
using (ZipArchive zip = ZipFile.Open (@"d:\zz.zip", ZipArchiveMode.Read))
foreach (ZipArchiveEntry entry in zip.Entries)
Console.WriteLine (entry.FullName + " " + entry.Length);
ZipArchiveEntry also has a Delete method, an ExtractToFile method (this is actually an extension method in the ZipFileExtensions class), and an Open method which returns a readable/writable Stream. You can create new entries by calling CreateEntry (or theCreateEntryFromFile extension method) on the ZipArchive. The following creates the archive d:\zz.zip, to which it adds foo.dll, under a directory structure within the archive called bin\X86:
byte[] data = File.ReadAllBytes (@"d:\foo.dll");
using (ZipArchive zip = ZipFile.Open (@"d:\zz.zip", ZipArchiveMode.Update))
zip.CreateEntry (@"bin\X64\foo.dll").Open().Write (data, 0, data.Length);
You could do the same thing entirely in memory by constructing ZipArchive with a MemoryStream.
File and Directory Operations
The System.IO namespace provides a set of types for performing “utility” file and directory operations, such as copying and moving, creating directories, and setting file attributes and permissions. For most features, you can choose between either of two classes, one offering static methods and the other instance methods:
Static classes
File and Directory
Instance method classes (constructed with a file or directory name)
FileInfo and DirectoryInfo
Additionally, there’s a static class called Path. This does nothing to files or directories; instead, it provides string manipulation methods for filenames and directory paths. Path also assists with temporary files.
All three classes are unavailable to Metro applications (see File I/O in Windows Runtime).
The File Class
File is a static class whose methods all accept a filename. The filename can be either relative to the current directory or fully qualified with a directory. Here are its methods (all public and static):
bool Exists (string path); // Returns true if the file is present
void Delete (string path);
void Copy (string sourceFileName, string destFileName);
void Move (string sourceFileName, string destFileName);
void Replace (string sourceFileName, string destinationFileName,
string destinationBackupFileName);
FileAttributes GetAttributes (string path);
void SetAttributes (string path, FileAttributes fileAttributes);
void Decrypt (string path);
void Encrypt (string path);
DateTime GetCreationTime (string path); // UTC versions are
DateTime GetLastAccessTime (string path); // also provided.
DateTime GetLastWriteTime (string path);
void SetCreationTime (string path, DateTime creationTime);
void SetLastAccessTime (string path, DateTime lastAccessTime);
void SetLastWriteTime (string path, DateTime lastWriteTime);
FileSecurity GetAccessControl (string path);
FileSecurity GetAccessControl (string path,
AccessControlSections includeSections);
void SetAccessControl (string path, FileSecurity fileSecurity);
Move throws an exception if the destination file already exists; Replace does not. Both methods allow the file to be renamed as well as moved to another directory.
Delete throws an UnauthorizedAccessException if the file is marked read-only; you can tell this in advance by calling GetAttributes. Here are all the members of the FileAttribute enum that GetAttributes returns:
Archive, Compressed, Device, Directory, Encrypted,
Hidden, Normal, NotContentIndexed, Offline, ReadOnly,
ReparsePoint, SparseFile, System, Temporary
Members in this enum are combinable. Here’s how to toggle a single file attribute without upsetting the rest:
string filePath = @"c:\temp\test.txt";
FileAttributes fa = File.GetAttributes (filePath);
if ((fa & FileAttributes.ReadOnly) > 0)
{
fa ^= FileAttributes.ReadOnly;
File.SetAttributes (filePath, fa);
}
// Now we can delete the file, for instance:
File.Delete (filePath);
NOTE
FileInfo offers an easier way to change a file’s read-only flag:
new FileInfo (@"c:\temp\test.txt").IsReadOnly = false;
Compression and encryption attributes
The Compressed and Encrypted file attributes correspond to the compression and encryption checkboxes on a file or directory’s properties dialog box in Windows Explorer. This type of compression and encryption is transparent in that the operating system does all the work behind the scenes, allowing you to read and write plain data.
You cannot use SetAttributes to change a file’s Compressed or Encrypted attributes—it fails silently if you try! The workaround is simple in the latter case: you instead call the Encrypt() and Decrypt() methods in the File class. With compression, it’s more complicated; one solution is to use the Windows Management Instrumentation (WMI) API in System.Management. The following method compresses a directory, returning 0 if successful (or a WMI error code if not):
static uint CompressFolder (string folder, bool recursive)
{
string path = "Win32_Directory.Name='" + folder + "'";
using (ManagementObject dir = new ManagementObject (path))
using (ManagementBaseObject p = dir.GetMethodParameters ("CompressEx"))
{
p ["Recursive"] = recursive;
using (ManagementBaseObject result = dir.InvokeMethod ("CompressEx",
p, null))
return (uint) result.Properties ["ReturnValue"].Value;
}
}
To uncompress, replace CompressEx with UncompressEx.
Transparent encryption relies on a key seeded from the logged-in user’s password. The system is robust to password changes performed by the authenticated user, but if a password is reset via an administrator, data in encrypted files is unrecoverable.
NOTE
Transparent encryption and compression require special filesystem support. NTFS (used most commonly on hard drives) supports these features; CDFS (on CD-ROMs) and FAT (on removable media cards) do not.
You can determine whether a volume supports compression and encryption with Win32 interop:
using System;
using System.IO;
using System.Text;
using System.Runtime.InteropServices;
class SupportsCompressionEncryption
{
const int SupportsCompression = 0×10;
const int SupportsEncryption = 0×20000;
[DllImport ("Kernel32.dll", SetLastError = true)]
extern static bool GetVolumeInformation (string vol, StringBuilder name,
int nameSize, out uint serialNum, out uint maxNameLen, out uint flags,
StringBuilder fileSysName, int fileSysNameSize);
static void Main()
{
uint serialNum, maxNameLen, flags;
bool ok = GetVolumeInformation (@"C:\", null, 0, out serialNum,
out maxNameLen, out flags, null, 0);
if (!ok)
throw new Win32Exception();
bool canCompress = (flags & SupportsCompression) > 0;
bool canEncrypt = (flags & SupportsEncryption) > 0;
}
}
File security
The GetAccessControl and SetAccessControl methods allow you to query and change the operating system permissions assigned to users and roles via a FileSecurity object (namespace System.Security.AccessControl). You can also pass a FileSecurity object to aFileStream’s constructor to specify permissions when creating a new file.
In this example, we list a file’s existing permissions, and then assign execution permission to the “Users” group:
using System;
using System.IO;
using System.Security.AccessControl;
using System.Security.Principal;
...
FileSecurity sec = File.GetAccessControl (@"d:\test.txt");
AuthorizationRuleCollection rules = sec.GetAccessRules (true, true,
typeof (NTAccount));
foreach (FileSystemAccessRule rule in rules)
{
Console.WriteLine (rule.AccessControlType); // Allow or Deny
Console.WriteLine (rule.FileSystemRights); // e.g., FullControl
Console.WriteLine (rule.IdentityReference.Value); // e.g., MyDomain/Joe
}
var sid = new SecurityIdentifier (WellKnownSidType.BuiltinUsersSid, null);
string usersAccount = sid.Translate (typeof (NTAccount)).ToString();
FileSystemAccessRule newRule = new FileSystemAccessRule
(usersAccount, FileSystemRights.ExecuteFile, AccessControlType.Allow);
sec.AddAccessRule (newRule);
File.SetAccessControl (@"d:\test.txt", sec);
We give another example, later, in “Special Folders.”
The Directory Class
The static Directory class provides a set of methods analogous to those in the File class—for checking whether a directory exists (Exists), moving a directory (Move), deleting a directory (Delete), getting/setting times of creation or last access, and getting/setting security permissions. Furthermore, Directory exposes the following static methods:
string GetCurrentDirectory ();
void SetCurrentDirectory (string path);
DirectoryInfo CreateDirectory (string path);
DirectoryInfo GetParent (string path);
string GetDirectoryRoot (string path);
string[] GetLogicalDrives();
// The following methods all return full paths:
string[] GetFiles (string path);
string[] GetDirectories (string path);
string[] GetFileSystemEntries (string path);
IEnumerable<string> EnumerateFiles (string path);
IEnumerable<string> EnumerateDirectories (string path);
IEnumerable<string> EnumerateFileSystemEntries (string path);
NOTE
The last three methods were added in Framework 4.0. They’re potentially more efficient than the Get* variants, because they’re lazily evaluated—fetching data from the file system as you enumerate the sequence. They’re particularly well-suited to LINQ queries.
The Enumerate* and Get* methods are overloaded to also accept searchPattern (string) and searchOption (enum) parameters. If you specify SearchOption.SearchAllSubDirectories, a recursive subdirectory search is performed. The *FileSystemEntries methods combine the results of *Files with *Directories.
Here’s how to create a directory if it doesn’t already exist:
if (!Directory.Exists (@"d:\test"))
Directory.CreateDirectory (@"d:\test");
FileInfo and DirectoryInfo
The static methods on File and Directory are convenient for executing a single file or directory operation. If you need to call a series of methods in a row, the FileInfo and DirectoryInfo classes provide an object model that makes the job easier.
FileInfo offers most of the File’s static methods in instance form—with some additional properties such as Extension, Length, IsReadOnly, and Directory—for returning a DirectoryInfo object. For example:
FileInfo fi = new FileInfo (@"c:\temp\FileInfo.txt");
Console.WriteLine (fi.Exists); // false
using (TextWriter w = fi.CreateText())
w.Write ("Some text");
Console.WriteLine (fi.Exists); // false (still)
fi.Refresh();
Console.WriteLine (fi.Exists); // true
Console.WriteLine (fi.Name); // FileInfo.txt
Console.WriteLine (fi.FullName); // c:\temp\FileInfo.txt
Console.WriteLine (fi.DirectoryName); // c:\temp
Console.WriteLine (fi.Directory.Name); // temp
Console.WriteLine (fi.Extension); // .txt
Console.WriteLine (fi.Length); // 9
fi.Encrypt();
fi.Attributes ^= FileAttributes.Hidden; // (Toggle hidden flag)
fi.IsReadOnly = true;
Console.WriteLine (fi.Attributes); // ReadOnly,Archive,Hidden,Encrypted
Console.WriteLine (fi.CreationTime);
fi.MoveTo (@"c:\temp\FileInfoX.txt");
DirectoryInfo di = fi.Directory;
Console.WriteLine (di.Name); // temp
Console.WriteLine (di.FullName); // c:\temp
Console.WriteLine (di.Parent.FullName); // c:\
di.CreateSubdirectory ("SubFolder");
Here’s how to use DirectoryInfo to enumerate files and subdirectories:
DirectoryInfo di = new DirectoryInfo (@"e:\photos");
foreach (FileInfo fi in di.GetFiles ("*.jpg"))
Console.WriteLine (fi.Name);
foreach (DirectoryInfo subDir in di.GetDirectories())
Console.WriteLine (subDir.FullName);
Path
The static Path class defines methods and fields for working with paths and filenames.
Assuming this setup code:
string dir = @"c:\mydir";
string file = "myfile.txt";
string path = @"c:\mydir\myfile.txt";
Directory.SetCurrentDirectory (@"k:\demo");
we can demonstrate Path’s methods and fields with the following expressions:
|
Expression |
Result |
|
Directory.GetCurrentDirectory() |
k:\demo\ |
|
Path.IsPathRooted (file) |
False |
|
Path.IsPathRooted (path) |
True |
|
Path.GetPathRoot (path) |
c:\ |
|
Path.GetDirectoryName (path) |
c:\mydir |
|
Path.GetFileName (path) |
myfile.txt |
|
Path.GetFullPath (file) |
k:\demo\myfile.txt |
|
Path.Combine (dir, file) |
c:\mydir\myfile.txt |
|
File extensions: |
|
|
Path.HasExtension (file) |
True |
|
Path.GetExtension (file) |
.txt |
|
Path.GetFileNameWithoutExtension (file) |
myfile |
|
Path.ChangeExtension (file, ".log") |
myfile.log |
|
Separators and characters: |
|
|
Path.AltDirectorySeparatorChar |
/ |
|
Path.PathSeparator |
; |
|
Path.VolumeSeparatorChar |
: |
|
Path.GetInvalidPathChars() |
chars 0 to 31 and "<>| |
|
Path.GetInvalidFileNameChars() |
chars 0 to 31 and "<>|:*?\/ |
|
Temporary files: |
|
|
Path.GetTempPath() |
<local user folder>\Temp |
|
Path.GetRandomFileName() |
d2dwuzjf.dnp |
|
Path.GetTempFileName() |
<local user folder>\Temp\tmp14B.tmp |
Combine is particularly useful: it allows you to combine a directory and filename—or two directories—without first having to check whether a trailing backslash is present.
GetFullPath converts a path relative to the current directory to an absolute path. It accepts values such as ..\..\file.txt.
GetRandomFileName returns a genuinely unique 8.3 character filename, without actually creating any file. GetTempFileName generates a temporary filename using an auto-incrementing counter that repeats every 65,000 files. It then creates a zero-byte file of this name in the local temporary directory.
WARNING
You must delete the file generated by GetTempFileName when you’re done; otherwise, it will eventually throw an exception (after your 65,000th call to GetTempFileName). If this is a problem, you can instead Combine GetTempPath with GetRandomFileName. Just be careful not to fill up the user’s hard drive!
Special Folders
One thing missing from Path and Directory is a means to locate folders such as My Documents, Program Files, Application Data, and so on. This is provided instead by the GetFolderPath method in the System.Environment class:
string myDocPath = Environment.GetFolderPath
(Environment.SpecialFolder.MyDocuments);
Environment.SpecialFolder is an enum whose values encompass all special directories in Windows:
|
AdminTools |
CommonVideos |
Personal |
|
ApplicationData |
Cookies |
PrinterShortcuts |
|
CDBurning |
Desktop |
ProgramFiles |
|
CommonAdminTools |
DesktopDirectory |
ProgramFilesX86 |
|
CommonApplicationData |
Favorites |
Programs |
|
CommonDesktopDirectory |
Fonts |
Recent |
|
CommonDocuments |
History |
Resources |
|
CommonMusic |
InternetCache |
SendTo |
|
CommonOemLinks |
LocalApplicationData |
StartMenu |
|
CommonPictures |
LocalizedResources |
Startup |
|
CommonProgramFiles |
MyComputer |
System |
|
CommonProgramFilesX86 |
MyDocuments |
SystemX86 |
|
CommonPrograms |
MyMusic |
Templates |
|
CommonStartMenu |
MyPictures |
UserProfile |
|
CommonStartup |
MyVideos |
Windows |
|
CommonTemplates |
NetworkShortcuts |
NOTE
Everything is covered here, except the .NET Framework directory which you can obtain as follows:
System.Runtime.InteropServices.
RuntimeEnvironment.GetRuntimeDirectory()
Of particular value is ApplicationData: this is where you can store settings that travel with a user across a network (if roaming profiles are enabled on the network domain) and LocalApplicationData, which is for non-roaming data (specific to the logged-in user) andCommonApplicationData, which is shared by every user of the computer. Writing application data to these folders is considered preferable to using the Windows Registry. The standard protocol for storing data in these folders is to create a subdirectory with the name of your application:
string localAppDataPath = Path.Combine (
Environment.GetFolderPath (Environment.SpecialFolder.ApplicationData),
"MyCoolApplication");
if (!Directory.Exists (localAppDataPath))
Directory.CreateDirectory (localAppDataPath);
NOTE
Programs that run in the most restrictive sandboxes, such as Silverlight applications, cannot access these folders. Instead, use Isolated Storage (see the final section in this chapter) or for Metro apps, use the WinRT libraries (see File I/O in Windows Runtime).
There’s a horrible trap when using CommonApplicationData: if a user starts your program with administrative elevation and your program then creates folders and files in CommonApplicationData, that user might lack permissions to replace those files later, when run under a restricted Windows login. (A similar problem exists when switching between restricted-permission accounts.) You can work around it by creating the desired folder (with permissions assigned to everyone) as part of your setup. Alternatively, if you run the following code immediately after creating a folder under CommonApplicationData (before writing any files) it will ensure that everyone in the “users” group is given unrestricted access:
public void AssignUsersFullControlToFolder (string path)
{
try
{
var sec = Directory.GetAccessControl (path);
if (UsersHaveFullControl (sec)) return;
var rule = new FileSystemAccessRule (
GetUsersAccount().ToString(),
FileSystemRights.FullControl,
InheritanceFlags.ContainerInherit | InheritanceFlags.ObjectInherit,
PropagationFlags.None,
AccessControlType.Allow);
sec.AddAccessRule (rule);
Directory.SetAccessControl (path, sec);
}
catch (UnauthorizedAccessException)
{
// Folder was already created by another user
}
}
bool UsersHaveFullControl (FileSystemSecurity sec)
{
var usersAccount = GetUsersAccount();
var rules = sec.GetAccessRules (true, true, typeof (NTAccount))
.OfType<FileSystemAccessRule>();
return rules.Any (r =>
r.FileSystemRights == FileSystemRights.FullControl &&
r.AccessControlType == AccessControlType.Allow &&
r.InheritanceFlags == (InheritanceFlags.ContainerInherit |
InheritanceFlags.ObjectInherit) &&
r.IdentityReference == usersAccount);
}
NTAccount GetUsersAccount()
{
var sid = new SecurityIdentifier (WellKnownSidType.BuiltinUsersSid, null);
return (NTAccount)sid.Translate (typeof (NTAccount));
}
Another place to write configuration and log files is to the application’s base directory, which you can obtain with AppDomain.CurrentDomain.BaseDirectory. This is not recommended, however, because the operating system is likely to deny your application permissions to write to this folder after initial installation (without administrative elevation).
Querying Volume Information
You can query the drives on a computer with the DriveInfo class:
DriveInfo c = new DriveInfo ("C"); // Query the C: drive.
long totalSize = c.TotalSize; // Size in bytes.
long freeBytes = c.TotalFreeSpace; // Ignores disk quotas.
long freeToMe = c.AvailableFreeSpace; // Takes quotas into account.
foreach (DriveInfo d in DriveInfo.GetDrives()) // All defined drives.
{
Console.WriteLine (d.Name); // C:\
Console.WriteLine (d.DriveType); // Fixed
Console.WriteLine (d.RootDirectory); // C:\
if (d.IsReady) // If the drive is not ready, the following two
// properties will throw exceptions:
{
Console.WriteLine (d.VolumeLabel); // The Sea Drive
Console.WriteLine (d.DriveFormat); // NTFS
}
}
The static GetDrives method returns all mapped drives, including CD-ROMs, media cards, and network connections. DriveType is an enum with the following values:
Unknown, NoRootDirectory, Removable, Fixed, Network, CDRom, Ram
Catching Filesystem Events
The FileSystemWatcher class lets you monitor a directory (and optionally, subdirectories) for activity. FileSystemWatcher has events that fire when files or subdirectories are created, modified, renamed, and deleted, as well as when their attributes change. These events fire regardless of the user or process performing the change. Here’s an example:
static void Main() { Watch (@"c:\temp", "*.txt", true); }
static void Watch (string path, string filter, bool includeSubDirs)
{
using (var watcher = new FileSystemWatcher (path, filter))
{
watcher.Created += FileCreatedChangedDeleted;
watcher.Changed += FileCreatedChangedDeleted;
watcher.Deleted += FileCreatedChangedDeleted;
watcher.Renamed += FileRenamed;
watcher.Error += FileError;
watcher.IncludeSubdirectories = includeSubDirs;
watcher.EnableRaisingEvents = true;
Console.WriteLine ("Listening for events - press <enter> to end");
Console.ReadLine();
}
// Disposing the FileSystemWatcher stops further events from firing.
}
static void FileCreatedChangedDeleted (object o, FileSystemEventArgs e)
{
Console.WriteLine ("File {0} has been {1}", e.FullPath, e.ChangeType);
}
static void FileRenamed (object o, RenamedEventArgs e)
{
Console.WriteLine ("Renamed: {0}->{1}", e.OldFullPath, e.FullPath);
}
static void FileError (object o, ErrorEventArgs e)
{
Console.WriteLine ("Error: " + e.GetException().Message);
}
WARNING
Because FileSystemWatcher raises events on a separate thread, you must exception-handle the event handling code to prevent an error from taking down the application. See “Exception Handling” in Chapter 14 for more information.
The Error event does not inform you of filesystem errors; instead, it indicates that the FileSystemWatcher’s event buffer overflowed because it was overwhelmed by Changed, Created, Deleted, or Renamed events. You can change the buffer size via the InternalBufferSizeproperty.
IncludeSubdirectories applies recursively. So, if you create a FileSystemWatcher on C:\ with IncludeSubdirectories true, its events will fire when a file or directory changes anywhere on the hard drive.
WARNING
A trap in using FileSystemWatcher is to open and read newly created or updated files before the file has been fully populated or updated. If you’re working in conjunction with some other software that’s creating files, you might need to consider some strategy to mitigate this, such as creating files with an unwatched extension and then renaming them once fully written.
File I/O in Windows Runtime
The FileStream and Directory/File classes are unavailable to Metro applications. Instead, there are WinRT types in the Windows.Storage namespace for this purpose, the two primary classes being StorageFolder and StorageFile.
Working with Directories
The StorageFolder class represents a directory. You can obtain a StorageFolder via its static method GetFolderFromPathAsync, giving it a full path to the folder. However, given that WinRT lets you access files only in certain locations, an easier approach is to obtain aStorageFolder via the KnownFolders class, which exposes a static property for each of the (potentially) permitted locations:
public static StorageFolder DocumentsLibrary { get; }
public static StorageFolder PicturesLibrary { get; }
public static StorageFolder MusicLibrary { get; }
public static StorageFolder VideosLibrary { get; }
NOTE
File access is further restricted by what’s declared in the package manifest. In particular, Metro applications can access only those files whose extensions match their declared file type associations.
In addition, Package.Current.InstalledLocation returns the StorageFolder of your current application (to which you have read-only access).
KnownFolders also has properties for accessing removable devices and home group folders.
StorageFolder has the properties you’d expect (Name, Path, DateCreated, DateModified, Attributes and so on), methods to delete/rename the folder (DeleteAsync/RenameAsync), and methods to list files and subfolders (GetFilesAsync and GetFoldersAsync).
As is evident from their names, the methods are asynchronous, returning an object that you can convert into a task with the AsTask extension method, or directly await. The following obtains a directory listing of all files in the documents folder:
StorageFolder docsFolder = KnownFolders.DocumentsLibrary;
IReadOnlyList<StorageFile> files = await docsFolder.GetFilesAsync();
foreach (IStorageFile file in files)
Debug.WriteLine (file.Name);
The CreateFileQueryWithOptions method lets you filter to a specific extension:
StorageFolder docsFolder = KnownFolders.DocumentsLibrary;
var queryOptions = new QueryOptions (CommonFileQuery.DefaultQuery,
new[] { ".txt" });
var txtFiles = await docsFolder.CreateFileQueryWithOptions (queryOptions)
.GetFilesAsync();
foreach (StorageFile file in txtFiles)
Debug.WriteLine (file.Name);
The QueryOptions class exposes properties to further control the search. For example, the FolderDepth property requests a recursive directory listing:
queryOptions.FolderDepth = FolderDepth.Deep;
Working with Files
StorageFile is the primary class for working with files. You can obtain an instance from a full path (to which you have permission) with the static StorageFile.GetFileFromPathAsync method, or from a relative path by calling GetFileAsync method on a StorageFolder (orIStorageFolder) object:
StorageFolder docsFolder = KnownFolders.DocumentsLibrary;
StorageFile file = await docsFolder.GetFileAsync ("foo.txt");
If the file does not exist, a FileNotFoundException is thrown at that point.
StorageFile has properties such as Name, Path, etc., and methods for working with files, such as Move, Rename, Copy and Delete (all Async). The CopyAsync method returns a StorageFile corresponding to the new file. There’s also a CopyAndReplaceAsync which accepts a target StorageFile object rather than a target name and folder.
StorageFile also exposes methods to open the file for reading/writing via .NET streams (OpenStreamForReadAsync and OpenStreamForWriteAsync). For example, the following creates and writes to a file called test.txt in the documents folder:
StorageFolder docsFolder = KnownFolders.DocumentsLibrary;
StorageFile file = await docsFolder.CreateFileAsync
("test.txt", CreationCollisionOption.ReplaceExisting);
using (Stream stream = await file.OpenStreamForWriteAsync())
using (StreamWriter writer = new StreamWriter (stream))
await writer.WriteLineAsync ("This is a test");
WARNING
If you don’t specify CreationCollisionOption.ReplaceExisting and the file already exists, it will automatically append a number to the filename to make it unique.
The following reads the file back:
StorageFolder docsFolder = KnownFolders.DocumentsLibrary;
StorageFile file = await docsFolder.GetFileAsync ("test.txt");
using (var stream = await file.OpenStreamForReadAsync ())
using (StreamReader reader = new StreamReader (stream))
Debug.WriteLine (await reader.ReadToEndAsync());
Isolated Storage in Metro Apps
Metro apps also have access to private folders that are isolated from other applications and can be used to store application-specific data:
Windows.Storage.ApplicationData.Current.LocalFolder
Windows.Storage.ApplicationData.Current.RoamingFolder
Windows.Storage.ApplicationData.Current.TemporaryFolder
Each of these static properties returns a StorageFolder object which can be used to read/write and list files as we described previously.
Memory-Mapped Files
Memory-mapped files provide two key features:
§ Efficient random access to file data
§ The ability to share memory between different processes on the same computer
The types for memory-mapped files reside in the System.IO.MemoryMappedFiles namespace and were introduced in Framework 4.0. Internally, they work by wrapping the Win32 API for memory-mapped files, and are unavailable in the Metro profile.
Memory-Mapped Files and Random File I/O
Although an ordinary FileStream allows random file I/O (by setting the stream’s Position property), it’s optimized for sequential I/O. As a rough rule of thumb:
§ FileStreams are 10 times faster than memory-mapped files for sequential I/O.
§ Memory-mapped files are 10 times faster than FileStreams for random I/O.
Changing a FileStream’s Position can cost several microseconds—which adds up if done within a loop. A FileStream is also unsuitable for multithreaded access—because its position changes as it is read or written.
To create a memory-mapped file:
1. Obtain a FileStream as you would ordinarily.
2. Instantiate a MemoryMappedFile, passing in the file stream.
3. Call CreateViewAccessor on the memory-mapped file object.
The last step gives you a MemoryMappedViewAccessor object which provides methods for randomly reading and writing simple types, structures, and arrays (more on this in Working with View Accessors).
The following creates a one million-byte file and then uses the memory-mapped file API to read and then write a byte at position 500,000:
File.WriteAllBytes ("long.bin", new byte [1000000]);
using (MemoryMappedFile mmf = MemoryMappedFile.CreateFromFile ("long.bin"))
using (MemoryMappedViewAccessor accessor = mmf.CreateViewAccessor())
{
accessor.Write (500000, (byte) 77);
Console.WriteLine (accessor.ReadByte (500000)); // 77
}
You can also specify a map name and capacity when calling CreateFromFile. Specifying a non-null map name allows the memory block to be shared with other processes (see the following section); specifying a capacity automatically enlarges the file to that value. The following creates a 1,000-byte file:
using (var mmf = MemoryMappedFile.CreateFromFile
("long.bin", FileMode.Create, null, 1000))
...
Memory-Mapped Files and Shared Memory
You can also use memory-mapped files as a means of sharing memory between processes on the same computer. One process creates a shared memory block by calling MemoryMappedFile.CreateNew, while other processes subscribe to that same memory block by callingMemoryMappedFile.OpenExisting with the same name. Although it’s still referred to as a memory-mapped “file,” it lives entirely in memory and has no disk presence.
The following creates a 500-byte shared memory-mapped file, and writes the integer 12345 at position 0:
using (MemoryMappedFile mmFile = MemoryMappedFile.CreateNew ("Demo", 500))
using (MemoryMappedViewAccessor accessor = mmFile.CreateViewAccessor())
{
accessor.Write (0, 12345);
Console.ReadLine(); // Keep shared memory alive until user hits Enter.
}
while the following opens that same memory-mapped file and reads that integer:
// This can run in a separate EXE:
using (MemoryMappedFile mmFile = MemoryMappedFile.OpenExisting ("Demo"))
using (MemoryMappedViewAccessor accessor = mmFile.CreateViewAccessor())
Console.WriteLine (accessor.ReadInt32 (0)); // 12345
Working with View Accessors
Calling CreateViewAccessor on a MemoryMappedFile gives you a view accessor that lets you read/write values at random positions.
The Read*/Write* methods accept numeric types, bool, and char, as well as arrays and structs that contain value-type elements or fields. Reference types—and arrays or structs that contain reference types—are prohibited because they cannot map into unmanaged memory. So if you want to write a string, you must encode it into an array of bytes:
byte[] data = Encoding.UTF8.GetBytes ("This is a test");
accessor.Write (0, data.Length);
accessor.WriteArray (4, data, 0, data.Length);
Notice that we wrote the length first. This means we know how many bytes to read back later:
byte[] data = new byte [accessor.ReadInt32 (0)];
accessor.ReadArray (4, data, 0, data.Length);
Console.WriteLine (Encoding.UTF8.GetString (data)); // This is a test
Here’s an example of reading/writing a struct:
struct Data { public int X, Y; }
...
var data = new Data { X = 123, Y = 456 };
accessor.Write (0, ref data);
accessor.Read (0, out data);
Console.WriteLine (data.X + " " + data.Y); // 123 456
You can also directly access the underlying unmanaged memory via a pointer. Following on from the previous example:
unsafe
{
byte* pointer = null;
accessor.SafeMemoryMappedViewHandle.AcquirePointer (ref pointer);
int* intPointer = (int*) pointer;
Console.WriteLine (*intPointer); // 123
}
Pointers can be advantageous when working with large structures: they let you work directly with the raw data rather than using Read/Write to copy data between managed and unmanaged memory. We explore this further in Chapter 25.
Isolated Storage
Each .NET program has access to a local storage area unique to that program, called isolated storage. Isolated storage is useful when your program can’t access the standard file system, and so cannot write to ApplicationData, LocalApplicationData, CommonApplicationData,MyDocuments, and so on (see Special Folders). This is the case with Silverlight applications and ClickOnce applications deployed with restricted “Internet” permissions.
Isolated storage has the following disadvantages:
§ The API is awkward to use.
§ You can read/write only via an IsolatedStorageStream—you cannot obtain a file or directory path and then use ordinary file I/O.
§ The machines stores (equivalent to CommonApplicationData) won’t let users with restricted OS permissions delete or overwrite files if they were created by another user (although they can modify them). This is effectively a bug.
In terms of security, isolated storage is a fence designed more to keep you in than to keep other applications out. Data in isolated storage is strongly protected against intrusion from other .NET applications running under the most restricted permission set (i.e., the “Internet” zone). In other cases, there’s no hard security preventing another application from accessing your isolated storage if it really wants to. The benefit of isolated storage is that applications must go out of their way to interfere with each other—it cannot happen through carelessness or by accident.
Applications running in a sandbox typically have their quota of isolated storage limited via permissions. The default is 1MB for Internet and Silverlight applications.
NOTE
A hosted UI-based application (e.g., Silverlight) can ask the user for permission to increase the isolated storage quota by calling the IncreaseQuotaTo method on an IsolatedStorageFile object. This must be called from a user-initiated event, such as a button click. If the user agrees, the method returns true.
You can query the current allowance via the Quota property.
Isolation Types
Isolated storage can separate by both program and user. This results in three basic types of compartments:
Local user compartments
One per user, per program, per computer
Roaming user compartments
One per user, per program
Machine compartments
One per program, per computer (shared by all users of a program)
The data in a roaming user compartment follows the user across a network—with appropriate operating system and domain support. If this support is unavailable, it behaves like a local user compartment.
So far, we’ve talked about how isolated storage separates by “program.” Isolated storage considers a program to be one of two things, depending on which mode you choose:
§ An assembly
§ An assembly running within the context of a particular application
The latter is called domain isolation and is more commonly used than assembly isolation. Domain isolation segregates according to two things: the currently executing assembly and the executable or web application that originally started it. Assembly isolation segregates only according to the currently executing assembly—so different applications calling the same assembly will share the same store.
WARNING
Assemblies and applications are identified by their strong name. If no strong name is present, the assembly’s full file path or URI is used instead. This means that if you move or rename a weakly named assembly, its isolated storage is reset.
In total, then, there are six kinds of isolated storage compartments. Table 15-4 compares the isolation provided by each.
Table 15-4. Isolated storage containers
|
Type |
Computer? |
Application? |
Assembly? |
User? |
Method to obtain store |
|
Domain User (default) |
✓ |
✓ |
✓ |
✓ |
GetUserStoreForDomain |
|
Domain Roaming |
✓ |
✓ |
✓ |
||
|
Domain Machine |
✓ |
✓ |
✓ |
GetMachineStoreForDomain |
|
|
Assembly User |
✓ |
✓ |
✓ |
GetUserStoreForAssembly |
|
|
Assembly Roaming |
✓ |
✓ |
|||
|
Assembly Machine |
✓ |
✓ |
GetMachineStoreForAssembly |
There is no such thing as domain-only isolation. If you want to share an isolated store across all assemblies within an application, there’s a simple workaround, however. Just expose a public method in one of the assemblies that instantiates and returns an IsolatedStorageFileStreamobject. Any assembly can access any isolated store if given an IsolatedStorageFile object—isolation restrictions are imposed upon construction, not subsequent use.
Similarly, there’s no such thing as machine-only isolation. If you want to share an isolated store across a variety of applications, the workaround is to write a common assembly that all applications reference, and then expose a method on the common assembly that creates and returns an assembly-isolated IsolatedStorageFileStream. The common assembly must be strongly named for this to work.
Reading and Writing Isolated Storage
Isolated storage uses streams that work much like ordinary file streams. To obtain an isolated storage stream, you first specify the kind of isolation you want by calling one of the static methods on IsolatedStorageFile—as shown previously in Table 15-4. You then use it to construct anIsolatedStorageFileStream, along with a filename and FileMode:
// IsolatedStorage classes live in System.IO.IsolatedStorage
using (IsolatedStorageFile f =
IsolatedStorageFile.GetMachineStoreForDomain())
using (var s = new IsolatedStorageFileStream ("hi.txt",FileMode.Create,f))
using (var writer = new StreamWriter (s))
writer.WriteLine ("Hello, World");
// Read it back:
using (IsolatedStorageFile f =
IsolatedStorageFile.GetMachineStoreForDomain())
using (var s = new IsolatedStorageFileStream ("hi.txt", FileMode.Open, f))
using (var reader = new StreamReader (s))
Console.WriteLine (reader.ReadToEnd()); // Hello, world
NOTE
IsolatedStorageFile is poorly named in that it doesn’t represent a file, but rather a container for files (basically, a directory).
A better (though more verbose) way to obtain an IsolatedStorageFile is to call IsolatedStorageFile.GetStore, passing in the right combination of IsolatedStorageScope flags (as shown in Figure 15-6):
var flags = IsolatedStorageScope.Machine
| IsolatedStorageScope.Application
| IsolatedStorageScope.Assembly;
using (IsolatedStorageFile f = IsolatedStorageFile.GetStore (flags,
typeof (StrongName), typeof (StrongName)))
{
...
The advantage of doing it this way is that we can tell GetStore what kind of evidence to consider when identifying our program, rather than letting it choose automatically. Most commonly, you’ll want to use the strong names of your program’s assemblies (as we have done in this example) because a strong name is unique and easy to keep consistent across versions.
WARNING
The danger of letting the CLR choose evidence automatically is that also considers Authenticode signatures (Chapter 18). This is usually undesirable because it means that an Authenticode-related change will trigger a change of identity. In particular, if you start out without Authenticode and then later decide to add it, the CLR will see your application as different from the perspective of isolated storage, and this can mean users losing data between versions.
IsolatedStorageScope is a flags enum whose members you must combine in exactly the right way to get a valid store. Figure 15-6 lists all the valid combinations. Note that they let you access the roaming stores (these are like local stores but with the capability to “roam” via Windows Roaming Profiles).
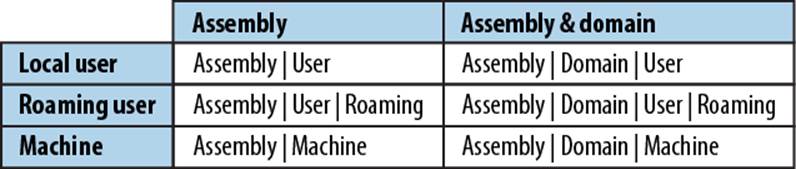
Figure 15-6. Valid IsolatedStorageScope combinations
Here’s how to write to a store isolated by assembly and roaming user:
var flags = IsolatedStorageScope.Assembly
| IsolatedStorageScope.User
| IsolatedStorageScope.Roaming;
using (IsolatedStorageFile f = IsolatedStorageFile.GetStore (flags,
null, null))
using (var s = new IsolatedStorageFileStream ("a.txt", FileMode.Create, f))
using (var writer = new StreamWriter (s))
writer.WriteLine ("Hello, World");
Store Location
Here’s where .NET writes isolated storage files:
|
Scope |
Location |
|
Local user |
[LocalApplicationData]\IsolatedStorage |
|
Roaming user |
[ApplicationData]\IsolatedStorage |
|
Machine |
[CommonApplicationData]\IsolatedStorage |
You can obtain the locations of each of the folders in square brackets by calling the Environment.GetFolderPath method. Here are the defaults for Windows Vista and above:
|
Scope |
Location |
|
Local user |
\Users\<user>\AppData\Local\IsolatedStorage |
|
Roaming user |
\Users\<user>\AppData\Roaming\IsolatedStorage |
|
Machine |
\ProgramData\IsolatedStorage |
For Windows XP:
|
Scope |
Location |
|
Local user |
\Documents and Settings\<user>\Local Settings\Application Data\IsolatedStorage |
|
Roaming user |
\Documents and Settings\<user>\Application Data\IsolatedStorage |
|
Machine |
\Documents and Settings\All Users\Application Data\IsolatedStorage |
These are merely the base folders; the data files themselves are buried deep in a labyrinth of subdirectories whose names derive from hashed assembly names. This is both a reason to use—and not to use—isolated storage. On the one hand, it makes isolation possible: a permission-restricted application wanting to interfere with another can be stumped by being denied a directory listing—despite having the same filesystem rights as its peers. On the other hand, it makes administration impractical from outside the application. Sometimes it’s handy—or essential—to edit an XML configuration file in Notepad so that an application can start up properly. Isolated storage makes this impractical.
Enumerating Isolated Storage
An IsolatedStorageFile object also provides methods for listing files in the store:
using (IsolatedStorageFile f = IsolatedStorageFile.GetUserStoreForDomain())
{
using (var s = new IsolatedStorageFileStream ("f1.x",FileMode.Create,f))
s.WriteByte (123);
using (var s = new IsolatedStorageFileStream ("f2.x",FileMode.Create,f))
s.WriteByte (123);
foreach (string s in f.GetFileNames ("*.*"))
Console.Write (s + " "); // f1.x f2.x
}
You can also create and remove subdirectories, as well as files:
using (IsolatedStorageFile f = IsolatedStorageFile.GetUserStoreForDomain())
{
f.CreateDirectory ("subfolder");
foreach (string s in f.GetDirectoryNames ("*.*"))
Console.WriteLine (s); // subfolder
using (var s = new IsolatedStorageFileStream (@"subfolder\sub1.txt",
FileMode.Create, f))
s.WriteByte (100);
f.DeleteFile (@"subfolder\sub1.txt");
f.DeleteDirectory ("subfolder");
}
With sufficient permissions, you can also enumerate over all isolated stores created by the current user, as well as all machine stores. This function can violate program privacy, but not user privacy. Here’s an example:
System.Collections.IEnumerator rator =
IsolatedStorageFile.GetEnumerator (IsolatedStorageScope.User);
while (rator.MoveNext())
{
var isf = (IsolatedStorageFile) rator.Current;
Console.WriteLine (isf.AssemblyIdentity); // Strong name or URI
Console.WriteLine (isf.CurrentSize);
Console.WriteLine (isf.Scope); // User + ...
}
The GetEnumerator method is unusual in accepting an argument (this makes its containing class foreach-unfriendly). GetEnumerator accepts one of three values:
IsolatedStorageScope.User
Enumerates all local stores belonging to the current user
IsolatedStorageScope.User | IsolatedStorageScope.Roaming
Enumerates all roaming stores belonging to the current user
IsolatedStorageScope.Machine
Enumerates all machine stores on the computer
Once you have the IsolatedStorageFile object, you can list its content by calling GetFiles and GetDirectories.
All materials on the site are licensed Creative Commons Attribution-Sharealike 3.0 Unported CC BY-SA 3.0 & GNU Free Documentation License (GFDL)
If you are the copyright holder of any material contained on our site and intend to remove it, please contact our site administrator for approval.
© 2016-2025 All site design rights belong to S.Y.A.