C# 5.0 in a Nutshell (2012)
Chapter 21. Security
In this chapter, we discuss the two main components of .NET security:
§ Permissions
§ Cryptography
Permissions, in .NET, provide a layer of security independent of that imposed by the operating system. Their job is twofold:
Sandboxing
Limiting the kinds of operations that partially trusted .NET assemblies can perform
Authorization
Limiting who can do what
The cryptography support in .NET allows you to store or exchange high-value secrets, prevent eavesdropping, detect message tampering, generate one-way hashes for storing passwords, and create digital signatures.
The types covered in this chapter are defined in the following namespaces:
System.Security;
System.Security.Permissions;
System.Security.Principal;
System.Security.Cryptography;
In Chapter 15, we covered isolated storage, which serves another useful role in a secure environment.
Permissions
The Framework uses permissions for both sandboxing and authorization. A permission acts as a gate that conditionally prevents code from executing. Sandboxing uses code access permissions; authorization uses identity and role permissions.
Although both follow a similar model, they feel quite different to use. Part of the reason for this is that they typically put you on a different side of the fence: with code access security, you’re usually the untrusted party; with identity and role security, you’re usually the untrusting party. Code access security is most often forced upon you by the CLR or a hosting environment such as ASP.NET or Internet Explorer, whereas authorization is usually something you implement to prevent unprivileged callers from accessing your program.
As an application developer, you’ll need to understand code access security (CAS) in order to write assemblies that will run in a limited permissions environment. If you’re writing and selling a component library, it’s easy to overlook the possibility that your customers will call your library from a sandboxed environment such as a SQL Server CLR host.
Another reason to understand CAS is if you want to create your own hosting environment that sandboxes other assemblies. For example, you might write an application that allows third parties to write plug-in components. Running those plug-ins in an application domain with limited permissions reduces the chance of a plug-in destabilizing your application or compromising its security.
The main scenario for identity and role security is when writing middle tier or web application servers. You typically decide on a set of roles, and then for each method that you expose, you demand that callers are members of a particular role.
CodeAccessPermission and PrincipalPermission
There are essentially two kinds of permissions:
CodeAccessPermission
The abstract base class for all code access security (CAS) permissions, such as FileIOPermission, ReflectionPermission, or PrintingPermission
PrincipalPermission
Describes an identity and/or role (e.g., “Mary” or “Human Resources”)
The term permission is somewhat misleading in the case of CodeAccessPermission, because it suggests something has been granted. This is not necessarily the case. A CodeAccessPermission object describes a privileged operation.
For instance, a FileIOPermission object describes the privilege of being able to Read, Write, or Append to a particular set of files or directories. Such an object can be used in a variety of ways:
§ To verify that you and all your callers have the rights to perform these actions (Demand)
§ To verify that your immediate caller has the rights to perform these actions (LinkDemand)
§ To temporarily escape a sandbox and Assert your assembly-given rights to perform these actions, regardless of callers’ privileges
NOTE
You’ll also see the following security actions in the CLR: Deny, RequestMinimum, RequestOptional, RequestRefuse, and PermitOnly. However, these (along with link demands) have been deprecated or discouraged since Framework 4.0, in favor of the new transparency model.
PrincipalPermission is much simpler. Its only security method is Demand, which checks that the specified user or role is valid given the current execution thread.
IPermission
Both CodeAccessPermission and PrincipalPermission implement the IPermission interface:
public interface IPermission
{
void Demand();
IPermission Intersect (IPermission target);
IPermission Union (IPermission target);
bool IsSubsetOf (IPermission target);
IPermission Copy();
}
The crucial method here is Demand. It performs a spot-check to see whether the permission or privileged operation is currently permitted, and it throws a SecurityException if not. If you’re the untrusting party, you will be Demanding. If you’re the untrusted party, code that you call will be Demanding.
For example, to ensure that only Mary can run management reports, you could write this:
new PrincipalPermission ("Mary", null).Demand();
// ... run management reports
In contrast, suppose your assembly was sandboxed such that file I/O was prohibited, so the following line threw a SecurityException:
using (FileStream fs = new FileStream ("test.txt", FileMode.Create))
...
The Demand, in this case, is made by code that you call—in other words, FileStream’s constructor:
...
new FileIOPermission (...).Demand();
NOTE
A code access security Demand checks right up the call stack, in order to ensure that the requested operation is allowed for every party in the calling chain (within the current application domain). Effectively, it’s asking, “Is this application domain entitled to this permission?”
With code access security, an interesting case arises with assemblies that run in the GAC, which are considered fully trusted. If such an assembly runs in a sandbox, any Demands that it makes are still subject to the sandbox’s permission set. Fully trusted assemblies can, however, temporarily escape the sandbox by calling Assert on a CodeAccessPermission object. After doing so,Demands for the permissions that were asserted always succeed. An Assert ends either when the current method finishes or when you call CodeAccessPermission.RevertAssert.
The Intersect and Union methods combine two same-typed permission objects into one. The purpose of Intersect is to create a “smaller” permission object, whereas the purpose of Union is to create a “larger” permission object.
With code access permissions, a “larger” permission object is more restrictive when Demanded, because a greater number of permissions must be met.
With principle permissions, a “larger” permission object is less restrictive when Demanded, because only one of the principles or identities is enough to satisfy the demand.
IsSubsetOf returns true if the given target contains at least its permissions:
PrincipalPermission jay = new PrincipalPermission ("Jay", null);
PrincipalPermission sue = new PrincipalPermission ("Sue", null);
PrincipalPermission jayOrSue = (PrincipalPermission) jay.Union (sue);
Console.WriteLine (jay.IsSubsetOf (jayOrSue)); // True
In this example, calling Intersect on jay and sue would generate an empty permission, because they don’t overlap.
PermissionSet
A PermissionSet represents a collection of differently typed IPermission objects. The following creates a permission set with three code access permissions, and then Demands all of them in one hit:
PermissionSet ps = new PermissionSet (PermissionState.None);
ps.AddPermission (new UIPermission (PermissionState.Unrestricted));
ps.AddPermission (new SecurityPermission (
SecurityPermissionFlag.UnmanagedCode));
ps.AddPermission (new FileIOPermission (
FileIOPermissionAccess.Read, @"c:\docs"));
ps.Demand();
PermissionSet’s constructor accepts a PermissionState enum, which indicates whether the set should be considered “unrestricted.” An unrestricted permission set is treated as though it contained every possible permission (even though its collection is empty). Assemblies that execute with unrestricted code access security are said to be fully trusted.
AddPermission applies Union-like semantics in that it creates a “larger” set. Calling AddPermission on an unrestricted permission set has no effect (as it already has, logically, all possible permissions).
You can Union and Intersect permission sets just as you can with IPermission objects.
Declarative Versus Imperative Security
So far, we manually instantiated permission objects and called Demand on them. This is imperative security. You can achieve the same result by adding attributes to a method, constructor, class, struct, or assembly—this is declarative security. Although imperative security is more flexible, declarative security has three advantages:
§ It can mean less coding.
§ It allows the CLR to determine in advance what permissions your assembly requires.
§ It can improve performance.
For example:
[PrincipalPermission (SecurityAction.Demand, Name="Mary")]
public ReportData GetReports()
{
...
}
[UIPermission(SecurityAction.Demand, Window=UIPermissionWindow.AllWindows)]
public Form FindForm()
{
...
}
This works because every permission type has a sister attribute type in the .NET Framework. PrincipalPermission has a PrincipalPermissionAttribute sister. The first argument of the attribute’s constructor is always a SecurityAction, which indicates what security method to call once the permission object is constructed (usually Demand). The remaining named parameters mirror the properties on the corresponding permission object.
Code Access Security (CAS)
The CodeAccessPermission types that are enforced throughout the .NET Framework are listed by category in Table 21-1 through Table 21-6. Collectively, these are intended to cover all the means by which a program can do mischief!
Table 21-1. Core permissions
|
Type |
Enables |
|
SecurityPermission |
Advanced operations, such as calling unmanaged code |
|
ReflectionPermission |
Use of reflection |
|
EnvironmentPermission |
Reading/writing command-line environment settings |
|
RegistryPermission |
Reading or writing to the Windows Registry |
SecurityPermission accepts a SecurityPermissionFlag argument. This is an enum that allows any combination of the following:
AllFlags ControlThread
Assertion Execution
BindingRedirects Infrastructure
ControlAppDomain NoFlags
ControlDomainPolicy RemotingConfiguration
ControlEvidence SerializationFormatter
ControlPolicy SkipVerification
ControlPrincipal UnmanagedCode
The most significant member of this enum is Execution, without which code will not run. The other members should be granted only in full-trust scenarios, because they enable a grantee to compromise or escape a sandbox. ControlAppDomain allows the creation of new application domains (see Chapter 24); UnmanagedCode allows you to call native methods (see Chapter 25).
ReflectionPermission accepts a ReflectionPermissionFlag enum, which includes the members MemberAccess and RestrictedMemberAccess. If you’re sandboxing assemblies, the latter is safer to grant while permitting reflection scenarios required by APIs such as LINQ to SQL.
Table 21-2. I/O and data permissions
|
Type |
Enables |
|
FileIOPermission |
Reading/writing files and directories |
|
FileDialogPermission |
Reading/writing to a file chosen through an Open or Save dialog box |
|
IsolatedStorageFilePermission |
Reading/writing to own isolated storage |
|
ConfigurationPermission |
Reading of application configuration files |
|
SqlClientPermission, OleDbPermission, OdbcPermission |
Communicating with a database server using the SqlClient, OleDb, or Odbc class |
|
DistributedTransactionPermission |
Participation in distributed transactions |
FileDialogPermission controls access to the OpenFileDialog and SaveFileDialog classes. These classes are defined in Microsoft.Win32 (for use in WPF applications) and in System.Windows.Forms (for use in Windows Forms applications). For this to work,UIPermission is also required. FileIOPermission is not also required, however, if you access the chosen file by calling OpenFile on the OpenFileDialog or SaveFileDialog object.
Table 21-3. Networking permissions
|
Type |
Enables |
|
DnsPermission |
DNS lookup |
|
WebPermission |
WebRequest-based network access |
|
SocketPermission |
Socket-based network access |
|
SmtpPermission |
Sending mail through the SMTP libraries |
|
NetworkInformationPermission |
Use of classes such as Ping and NetworkInterface |
Table 21-4. Encryption permissions
|
Type |
Enables |
|
DataProtectionPermission |
Use of the Windows data protection methods |
|
KeyContainerPermission |
Public key encryption and signing |
|
StorePermission |
Access to X.509 certificate stores |
Table 21-5. UI permissions
|
Type |
Enables |
|
UIPermission |
Creating windows and interacting with the clipboard |
|
WebBrowserPermission |
Use of the WebBrowser control |
|
MediaPermission |
Image, audio, and video support in WPF |
|
PrintingPermission |
Accessing a printer |
Table 21-6. Diagnostics permissions
|
Type |
Enables |
|
EventLogPermission |
Reading or writing to the Windows event log |
|
PerformanceCounterPermission |
Use of Windows performance counters |
Demands for these permission types are enforced within the .NET Framework. There are also some permission classes for which the intention is that Demands are enforced in your own code. The most important of these are concerned with establishing identity of the calling assembly, and are listed in Table 21-7. The caveat is that (as with all CAS permissions) a Demand always succeeds if the application domain is running in full trust (see the following section).
Table 21-7. Identity permissions
|
Type |
Enforces |
|
GacIdentityPermission |
The assembly is loaded into the GAC |
|
StrongNameIdentityPermission |
The calling assembly has a particular strong name |
|
PublisherIdentityPermission |
The calling assembly is Authenticode-signed with a particular certificate |
How Code Access Security Is Applied
When you run a .NET executable from the Windows shell or command prompt, it runs with unrestricted permissions. This is called full trust.
If you execute an assembly via another hosting environment—such as a SQL Server CLR integration host, ASP.NET, ClickOnce, or a custom host—the host decides what permissions to give your assembly. If it restricts permissions in any way, this is called partial trust or sandboxing.
More accurately, a host does not restrict permissions to your assembly. Rather, it creates an application domain with restricted permissions, and then loads your assembly into that sandboxed domain. This means that any other assemblies that load into that domain (such as assemblies that you reference) run in that same sandbox with the same permission set. There are two exceptions, however:
§ Assemblies registered in the GAC (including the .NET Framework)
§ Assemblies that a host has nominated to fully trust
Assemblies in those two categories are considered fully trusted and can escape the sandbox by Asserting any permission they want. They can also call methods marked as [SecurityCritical] in other fully trusted assemblies, run unverifiable (unsafe) code, and call methods that enforce link demands, and those link demands will always succeed.
So when we say that a partially trusted assembly calls a fully trusted assembly, we mean that an assembly running in a sandboxed application domain calls a GAC assembly—or an assembly nominated by the host for full trust.
Testing for Full Trust
You can test whether you have unrestricted permissions as follows:
new PermissionSet (PermissionState.Unrestricted).Demand();
This throws an exception if your application domain is sandboxed. However, it might be that your assembly is, in fact, fully trusted and so can Assert its way out of the sandbox. You can test for this by querying the IsFullyTrusted property on the Assembly in question.
Allowing Partially Trusted Callers
Allowing an assembly to accept partially trusted callers creates the possibility of an elevation of privilege attack, and is therefore disallowed by the CLR unless you request otherwise. To see why this is so, let’s look first at an elevation of privilege attack.
Elevation of Privilege
Let’s suppose the CLR didn’t enforce the rule just described, and you wrote a library intended to be used in full-trust scenarios. One of your properties was as follows:
public string ConnectionString
{
get { return File.ReadAllText (_basePath + "cxString.txt"); }
}
Now, assume that the user who deploys your library decides (rightly or wrongly) to load your assembly into the GAC. That user then runs a totally unrelated application hosted in ClickOnce or ASP.NET, inside a restrictive sandbox. The sandboxed application now loads your fully trusted assembly—and tries to call the ConnectionString property. Fortunately, it throws a SecurityException because File.ReadAllText will demand a FileIOPermission, which the caller won’t have (remember that a Demand checks right up the calling stack). But now consider the following method:
public unsafe void Poke (int offset, int data)
{
int* target = (int*) _origin + offset;
*target = data;
...
}
Without an implicit Demand, the sandboxed assembly can call this method—and use it to inflict damage. This is an elevation of privilege attack.
The problem in this case is that you never intended for your library to be called by partially trusted assemblies. Fortunately, the CLR helps you by preventing this situation by default.
APTCA and [SecurityTransparent]
To help avoid elevation of privilege attacks, the CLR does not allow partially trusted assemblies to call fully trusted assemblies by default.[13]
To allow such calls, you must do one of two things to the fully trusted assembly:
§ Apply the [AllowPartiallyTrustedCallers] attribute (called APTCA for short).
§ Apply the [SecurityTransparent] attribute.
Applying these attributes means that you must think about the possibility of being the untrusting party (rather than the untrusted party).
Prior to CLR 4.0, only the APTCA attribute was supported. And all that it did was to enable partially trusted callers. From CLR 4.0, the APTCA also has the effect of implicitly marking all the methods (and functions) in your assembly as security transparent. We’ll explain this in detail in the next section; for now, we can summarize it by saying that security transparent methods can’t do any of the following (whether running in full or partial trust):
§ Run unverifiable (unsafe) code.
§ Run native code via P/Invoke or COM.
§ Assert permissions to elevate their security level.
§ Satisfy a link demand.
§ Call methods in the .NET Framework marked as [SecurityCritical]. Essentially, these comprise methods that do one of the preceding four things without appropriate safeguards or security checks.
NOTE
The rationale is that an assembly that doesn’t do any of these things cannot, in general, be susceptible to an elevation of privilege attack.
The [SecurityTransparent] attribute applies a stronger version of the same rules. The difference is that with APTCA, you can nominate selected methods in your assembly as nontransparent, whereas with [SecurityTransparent], all methods must be transparent.
NOTE
If your assembly can work with [SecurityTransparent], your job is done as a library author. You can ignore the nuances of the transparency model and skip ahead to “Operating System Security”!
Before we look at how to nominate selected methods as nontransparent, let’s first look at when you’d apply these attributes.
The first (and more obvious) scenario is if you plan to write a fully trusted assembly that will run in a partially trusted domain. We walk through an example in Sandboxing Another Assembly.
The second (and less obvious) scenario is writing a library without knowledge of how it will be deployed. For instance, suppose you write an object relational mapper and sell it over the Internet. Customers have three options in how they call your library:
1. From a fully trusted environment
2. From a sandboxed domain
3. From a sandboxed domain, but with your assembly fully trusted (e.g., by loading it into the GAC)
It’s easy to overlook the third option—and this is where the transparency model helps.
The Transparency Model
NOTE
To follow this, you’ll need to have read the previous section and understand the scenarios for applying APTCA and [SecurityTransparent].
The security transparency model makes it easier to secure assemblies that might be fully trusted and then called from partially trusted code.
By way of analogy, let’s imagine that being a partially trusted assembly is like being convicted of a crime and being sent to prison. In prison, you discover that there are a set of privileges (permissions) that you can earn for good behavior. These permissions entitle you to perform activities such as watching TV or playing basketball. There are some activities, however, that you can never perform—such as getting the keys to the TV room (or the prison gates)—because such activities (methods) would undermine the whole security system. These methods are called security-critical.
If writing a fully trusted library, you would want to protect those security-critical methods. One way to do so is to Demand that callers be fully trusted. This was the approach prior to CLR 4.0:
[PermissionSet (SecurityAction.Demand, Unrestricted = true)]
public Key GetTVRoomKey() { ... }
This creates two problems. First, Demands are slow because they must check right up the call stack; this matters because security-critical methods are sometimes performance-critical. A Demand can become particularly wasteful if a security-critical method is called in a loop—perhaps from another fully trusted assembly in the Framework. The CLR 2.0 workaround with such methods was to instead enforce link demands, which check only the immediate caller. But this also comes at a price. To maintain security, methods that call link-demanded methods must themselves perform demands or link demands—or be audited to ensure that they don’t allow anything potentially harmful if called from a less trusted party. Such an audit becomes burdensome when call graphs are complicated.
The second problem is that it’s easy to forget to perform a demand or link demand on security-critical methods (again, complex call graphs exacerbate this). It would be nice if the CLR could somehow help out and enforce that security-critical functions are not unintentionally exposed to inmates.
The transparency model does exactly that.
NOTE
The introduction of the transparency model is totally unrelated to the removal of CAS policy (see sidebar, Security Policy in CLR 2.0).
How the Transparency Model Works
In the transparency model, security-critical methods are marked with the [SecurityCritical] attribute:
[SecurityCritical]
public Key GetTVRoomKey() { ... }
All “dangerous” methods (containing code that the CLR considers could breach security and allow an inmate to escape) must be marked with [SecurityCritical] or [SecuritySafeCritical]. This comprises:
§ Unverifiable (unsafe) methods
§ Methods that call unmanaged code via P/Invoke or COM interop
§ Methods that Assert permissions or call link-demanding methods
§ Methods that call [SecurityCritical] methods
§ Methods that override virtual [SecurityCritical] methods
[SecurityCritical] means “this method could allow a partially trusted caller to escape a sandbox”.
[SecuritySafeCritical] means “this method does security-critical things—but with appropriate safeguards and so is safe for partially trusted callers”.
Methods in partially trusted assemblies can never call security critical methods in fully trusted assemblies. [SecurityCritical] methods can be called only by:
§ Other [SecurityCritical] methods
§ Methods marked as [SecuritySafeCritical]
Security-safe critical methods act as gatekeepers for security-critical methods (see Figure 21-1), and can be called by any method in any assembly (fully or partially trusted, subject to permission-based CAS demands). To illustrate, suppose that as an inmate you want to watch television. TheWatchTV method that you’ll call will need to call GetTVRoomKey, which means that WatchTV must be security-safe-critical:
[SecuritySafeCritical]
public void WatchTV()
{
new TVPermission().Demand();
using (Key key = GetTVRoomKey())
PrisonGuard.OpenDoor (key);
}
Notice that we Demand a TVPermission to ensure that the caller actually has TV-watching rights, and carefully dispose of the key we create. We are wrapping a security-critical method, making it safe to be called by anyone.
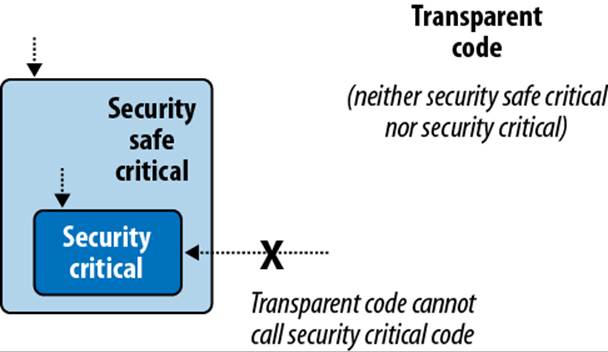
Figure 21-1. Transparency model; only the area in gray needs security auditing
NOTE
Some methods partake in the activities considered “dangerous” by the CLR, but are not actually dangerous. You can mark these methods directly with [SecuritySafeCritical] instead of [SecurityCritical]. An example is the Array.Copy method: it has an unmanaged implementation for efficiency, and yet cannot be abused by partially trusted callers.
THE UNSAFEXXX PATTERN
There’s a potential inefficiency in our TV-watching example in that if a prison guard wants to watch TV via the WatchTV method, he must (unnecessarily) satisfy a TVPermission demand. As a remedy, the CLR team recommends a pattern whereby you define two versions of the method. The first is security-critical and is prefixed by the word Unsafe:
[SecurityCritical]
public void UnsafeWatchTV()
{
using (Key key = GetTVRoomKey())
PrisonGuard.OpenDoor(key);
}
The second is security-safe-critical, and calls the first after satisfying a full stack-walking demand:
[SecuritySafeCritical]
public void WatchTV()
{
new TVPermission().Demand();
UnsafeWatchTV();
}
Transparent code
Under the transparency model, all methods fall into one of three categories:
§ Security-critical
§ Security-safe-critical
§ Neither (in which case, they’re called transparent)
Transparent methods are so called because you can ignore them when it comes to auditing code for elevation of privilege attacks. All you need to focus on are the [SecuritySafeCritical] methods (the gatekeepers) which typically comprise just a small fraction of an assembly’s methods. If an assembly comprises entirely transparent methods, the entire assembly can be marked with the [SecurityTransparent] attribute:
[assembly: SecurityTransparent]
We then say that the assembly itself is transparent. Transparent assemblies don’t need auditing for elevation of privilege attacks and implicitly allow partially trusted callers—you don’t need to apply APTCA.
Settings the transparency default for an assembly
To summarize what we said previously, there are two ways to specify transparency at the assembly level:
§ Apply the APTCA. All methods are then implicitly transparent except those you mark otherwise.
§ Apply the [SecurityTransparent] assembly attribute. All methods are then implicitly transparent, without exception.
The third option is to do nothing. This still opts you into the transparency rules, but with every method implicitly [SecurityCritical] (apart from any virtual [SecuritySafeCritical] methods that you override, which will remain safe-critical). The effect is that you can call any method you like (assuming you’re fully trusted), but transparent methods in other assemblies won’t be able to call you.
How to Write APTCA Libraries with Transparency
To follow the transparency model, first identify the potentially “dangerous” methods in your assembly (as described in the previous section). Unit tests will pick these up, because the CLR will refuse to run such methods—even in a fully trusted environment. (The .NET Framework also ships with a tool called SecAnnotate.exe to help with this.) Then mark each such method with:
§ [SecurityCritical], if the method might be harmful if called from a less trusted assembly
§ [SecuritySafeCritical], if the method performs appropriate checks/safeguards and can be safely called from a less trusted assembly
To illustrate, consider the following method, which calls a security-critical method in the .NET Framework:
public static void LoadLibraries()
{
GC.AddMemoryPressure (1000000); // Security critical
...
}
This method could be abused by being called repeatedly from less trusted callers. We could apply the [SecurityCritical] attribute, but then the method would be callable only from other trusted parties via critical or safe-critical methods. A better solution is to fix the method so that it’s secure and then apply the [SecuritySafeCritical] attribute:
static bool _loaded;
[SecuritySafeCritical]
public static void LoadLibraries()
{
if (_loaded) return;
_loaded = true;
GC.AddMemoryPressure (1000000);
...
}
(This has the benefit of making it safer for trusted callers, too.)
Securing unsafe methods
Next, suppose we have an unsafe method that is potentially harmful if called by a less trusted assembly. We simply decorate it with [SecurityCritical]:
[SecurityCritical]
public unsafe void Poke (int offset, int data)
{
int* target = (int*) _origin + offset;
*target = data;
...
}
NOTE
If you write unsafe code in a transparent method, the CLR will throw a VerificationException (“Operation could destabilize the runtime”) before executing the method.
We then secure the upstream methods, marking them with [SecurityCritical] or [SecuritySafeCritical] as appropriate.
Next, consider the following unsafe method, which filters a bitmap. This is intrinsically harmless, so we can mark it SecuritySafeCritical:
[SecuritySafeCritical]
unsafe void BlueFilter (int[,] bitmap)
{
int length = bitmap.Length;
fixed (int* b = bitmap)
{
int* p = b;
for (int i = 0; i < length; i++)
*p++ &= 0xFF;
}
}
Conversely, you might write a function that doesn’t perform anything “dangerous” as far as the CLR is concerned, but poses a security risk nonetheless. You can decorate these, too, with [SecurityCritical]:
public string Password
{
[SecurityCritical] get { return _password; }
}
P/Invokes and [SuppressUnmanagedSecurity]
Finally, consider the following unmanaged method, which returns a window handle from a Point (System.Drawing):
[DllImport ("user32.dll")]
public static extern IntPtr WindowFromPoint (Point point);
Remember that you can call unmanaged code only from [SecurityCritical] and [SecuritySafeCritical] methods.
NOTE
You could say that all extern methods are implicitly [SecurityCritical], although there is a subtle difference: applying [SecurityCritical] explicitly to an extern method has the subtle effect of advancing the security check from runtime to JIT time. To illustrate, consider the following method:
static void Foo (bool exec)
{
if (exec) WindowFromPoint (...)
}
If called with false, this will be subject to a security check only if WindowFromPoint is marked explicitly with [SecurityCritical].
Because we’ve made the method public, other fully trusted assemblies can call WindowFromPoint directly from [SecurityCritical] methods. For partially trusted callers, we expose the following secure version, which eliminates the danger, by Demanding UI permission and returning a managed class instead of an IntPtr:
[UIPermission (SecurityAction.Demand, Unrestricted = true)]
[SecuritySafeCritical]
public static System.Windows.Forms.Control ControlFromPoint (Point point)
{
IntPtr winPtr = WindowFromPoint (point);
if (winPtr == IntPtr.Zero) return null;
return System.Windows.Forms.Form.FromChildHandle (winPtr);
}
Just one problem remains: the CLR performs an implicit Demand for unmanaged permission whenever you P/Invoke. And because a Demand checks right up the call stack, the WindowFromPoint method will fail if the caller’s caller is partially trusted. There are two ways around this. The first is to assert permission for unmanaged code in the first line of the ControlFromPoint method:
new SecurityPermission (SecurityPermissionFlag.UnmanagedCode).Assert();
Asserting our assembly-given unmanaged right here will ensure that the subsequent implicit Demand in WindowFromPoint will succeed. Of course, this assertion would fail if the assembly itself wasn’t fully trusted (by virtue of being loaded into the GAC or being nominated as fully trusted by the host). We’ll cover assertions in more detail in Sandboxing Another Assembly.
The second (and more performant) solution is to apply the [SuppressUnmanagedCodeSecurity] attribute to the unmanaged method:
[DllImport ("user32.dll"), SuppressUnmanagedCodeSecurity]
public static extern IntPtr WindowFromPoint (Point point);
This tells the CLR to skip the expensive stack-walking unmanaged Demand (an optimization that could be particularly valuable if WindowFromPoint was called from other trusted classes or assemblies). We can then dump the unmanaged permission assertion in ControlFromPoint.
NOTE
Because you’re following the transparency model, applying this attribute to an extern method doesn’t create the same security risk as in CLR 2.0. This is because you’re still protected by the fact that P/Invokes are implicitly security-critical, and so can be called only by other critical or safe-critical methods.
Transparency in Full-Trust Scenarios
In a fully trusted environment, you might want to write critical code and yet avoid the burden of security attributes and method auditing. The easiest way to achieve this is not to attach any assembly security attributes—in which case all your methods are implicitly [SecurityCritical].
This works well as long as all partaking assemblies do the same thing—or if the transparency-enabled assemblies are at the bottom of the call graph. In other words, you can still call transparent methods in third-party libraries (and in the .NET Framework).
To go in the reverse direction is troublesome; however, this trouble typically guides you to a better solution. Suppose you’re writing assembly T, which is partly or wholly transparent, and you want to call assembly X, which is unattributed (and therefore fully critical).
You have three options:
§ Go fully critical yourself. If your domain will always be fully trusted, you don’t need to support partially trusted callers. Making that lack of support explicit makes sense.
§ Write [SecuritySafeCritical] wrappers around methods in X. This then highlights the security vulnerability points (although this can be burdensome).
§ Ask the author of X to consider transparency. If X does nothing critical, this will be as simple as applying [SecurityTransparent] to X. If X does perform critical functions, the process of following the transparency model will force the author of X to at least identify (if not address) X’s vulnerability points.
SECURITY POLICY IN CLR 2.0
Prior to CLR 4.0, the CLR granted a default set of permissions to .NET assemblies based on a complex set of rules and mappings. This was called CAS policy and was defined in the computer’s .NET Framework configuration. Three standard grant sets resulted from policy evaluation, customizable at the enterprise, machine, user, and application domain levels:
§ “Full trust,” which was granted to assemblies that ran on the local hard drive
§ “LocalIntranet,” granted to assemblies that ran over a network share
§ “Internet,” granted to assemblies that ran within Internet Explorer
Only “Full trust” was fully trusted by default. This meant that if you ran a .NET executable over a network share, it would run with a limited permission set and usually fail. This was supposed to offer some protection, but in reality it offered none—because a malicious party could simply replace the .NET executable with an unmanaged executable and be subject to no permission restrictions. All that this restriction achieved was to frustrate people who wanted to run .NET assemblies in full trust over a network share.
Therefore, the designers of CLR 4.0 decided to abolish these security policies. All assemblies now run in a permission set defined entirely by the hosting environment. Executables that you double-click or run from the command prompt will always run in full trust—whether on a network share or on a local hard drive.
In other words, it’s now entirely up to the host as to how permissions should be restricted—a machine’s CAS policy is irrelevant.
If you still need to work with CLR 2.0’s security policy (which will be the case if your entry executable targets Framework Version 3.5 or earlier) you can view and adjust security policy with either the mscorcfg.msc MMC plug-in (Control Panel→Administrative Tools→Microsoft .NET Framework Configuration) or the caspol.exe command-line tool. The MMC plug-in no longer ships as standard with the .NET Framework: you must install the .NET Framework 3.5 SDK.
The security configuration is ultimately stored in an XML file called security.config, in the Framework’s configuration folder. You can obtain this as follows:
string dir = Path.Combine
(System.Runtime.InteropServices.RuntimeEnvironment
.GetRuntimeDirectory(), "config");
string configFile = Path.Combine (dir, "security.config");
Sandboxing Another Assembly
Suppose you write an application that allows consumers to install third-party plug-ins. Most likely you’d want to prevent plug-ins from leveraging your privileges as a trusted application, so as not to destabilize your application—or the end user’s computer. The best way to achieve this is to run each plug-in in its own sandboxed application domain.
For this example, we’ll assume a plug-in is packaged as a .NET assembly called plugin.exe and that activating it is simply a matter of starting the executable. (In Chapter 24, we describe how to load a library into an application domain and interact with it in a more sophisticated way.)
Here’s the complete code, for the host program:
using System;
using System.IO;
using System.Net;
using System.Reflection;
using System.Security;
using System.Security.Policy;
using System.Security.Permissions;
class Program
{
static void Main()
{
string pluginFolder = Path.Combine (
AppDomain.CurrentDomain.BaseDirectory, "plugins");
string plugInPath = Path.Combine (pluginFolder, "plugin.exe");
PermissionSet ps = new PermissionSet (PermissionState.None);
ps.AddPermission
(new SecurityPermission (SecurityPermissionFlag.Execution));
ps.AddPermission
(new FileIOPermission (FileIOPermissionAccess.PathDiscovery |
FileIOPermissionAccess.Read, plugInPath));
ps.AddPermission (new UIPermission (PermissionState.Unrestricted));
AppDomainSetup setup = AppDomain.CurrentDomain.SetupInformation;
AppDomain sandbox = AppDomain.CreateDomain ("sbox", null, setup, ps);
sandbox.ExecuteAssembly (plugInPath);
AppDomain.Unload (sandbox);
}
}
NOTE
You can optionally pass an array of StrongName objects into the CreateDomain method, indicating assemblies to fully trust. We’ll give an example in the following section.
First, we create a limited permission set to describe the privileges we want to give to the sandbox. This must include at least execution rights and permission for the plug-in to read its own assembly; otherwise, it won’t start. In this case, we also give unrestricted UI permissions. Then we construct a new application domain, specifying our custom permission set, which will be awarded to all assemblies loaded into that domain. We then execute the plug-in assembly in the new domain, and unload the domain when the plug-in finishes executing.
WARNING
In this example, we load the plug-in assemblies from a subdirectory called plugins. Putting plug-ins in the same directory as the fully trusted host creates the potential for an elevation of privilege attack, whereby the fully trusted domain implicitly loads and runs code in a plug-in assembly in order to resolve a type. An example of how this could happen is if the plug-in throws a custom exception whose type is defined in its own assembly. When the exception bubbles up to the host, the host will implicitly load the plug-in assembly if it can find it— in an attempt to deserialize the exception. Putting the plug-ins in a separate folder prevents such a load from succeeding.
Asserting Permissions
Permission assertions are useful when writing methods that can be called from a partially trusted assembly. They allow fully trusted assemblies to temporarily escape the sandbox in order to perform actions that would otherwise be prohibited by downstream Demands.
NOTE
Assertions in the world of CAS have nothing to do with diagnostic or contract-based assertions. Calling Debug.Assert, in fact, is more akin to Demanding a permission than Asserting a permission. In particular, asserting a permission has side-effects if the assertion succeeds, whereas Debug.Assert does not.
Recall that we previously wrote an application that ran third-party plug-ins in a restricted permission set. Suppose we want to extend this by providing a library of safe methods for plug-ins to call. For instance, we might prohibit plug-ins from accessing a database directly, and yet still allow them to perform certain queries through methods in a library that we provide. Or we might want to expose a method for writing to a log file—without giving them any file-based permission.
The first step in doing this is to create a separate assembly for this (e.g., utilities) and add the AllowPartiallyTrustedCallers attribute. Then we can expose a method as follows:
public static void WriteLog (string msg)
{
// Write to log
...
}
The difficulty here is that writing to a file requires FileIOPermission. Even though our utilities assembly will be fully trusted, the caller won’t be, and so any file-based Demands will fail. The solution is to first Assert the permission:
public class Utils
{
string _logsFolder = ...;
[SecuritySafeCritical]
public static void WriteLog (string msg)
{
FileIOPermission f = new FileIOPermission (PermissionState.None);
f.AddPathList (FileIOPermissionAccess.AllAccess, _logsFolder);
f.Assert();
// Write to log
...
}
}
NOTE
Because we’re asserting a permission, we must mark the method as [SecurityCritical] or [SecuritySafeCritical] (unless we’re targeting an earlier version of the Framework). In this case, the method is safe for partially trusted callers, so we choose SecuritySafeCritical. This, of course, means that we can’t mark the assembly as a whole with[SecurityTransparent]; we must use APTCA instead.
Remember that Demand performs a spot-check and throws an exception if the permission is not satisfied. It then walks the stack, checking that all callers also have that permission (within the current AppDomain). An assertion checks only that the current assembly has the necessary permissions, and if successful, makes a mark on the stack, indicating that from now on, the caller’s rights should be ignored and only the current assembly’s rights should be considered with respect to those permissions. An Assert ends when the method finishes or when you callCodeAccessPermission.RevertAssert.
To complete our example, the remaining step is to create a sandboxed application domain that fully trusts the utilities assembly. Then we can instantiate a StrongName object that describes the assembly, and pass it into AppDomain’s CreateDomain method:
static void Main()
{
string pluginFolder = Path.Combine (
AppDomain.CurrentDomain.BaseDirectory, "plugins");
string plugInPath = Path.Combine (pluginFolder, "plugin.exe");
PermissionSet ps = new PermissionSet (PermissionState.None);
// Add desired permissions to ps as we did before
// ...
Assembly utilAssembly = typeof (Utils).Assembly;
StrongName utils = utilAssembly.Evidence.GetHostEvidence<StrongName>();
AppDomainSetup setup = AppDomain.CurrentDomain.SetupInformation;
AppDomain sandbox = AppDomain.CreateDomain ("sbox", null, setup, ps,
utils);
sandbox.ExecuteAssembly (plugInPath);
AppDomain.Unload (sandbox);
}
For this to work, the utilities assembly must be strong-name signed.
NOTE
Prior to Framework 4.0, you couldn’t obtain a StrongName by calling GetHostEvidence as we did. The solution was to instead do this:
AssemblyName name = utilAssembly.GetName();
StrongName utils = new StrongName (
new StrongNamePublicKeyBlob (name.GetPublicKey()),
name.Name,
name.Version);
The old-fashioned approach is still useful when you don’t want to load the assembly into the host’s domain. This is because you can obtain an AssemblyName without needing an Assembly or Type object:
AssemblyName name = AssemblyName.GetAssemblyName
(@"d:\utils.dll");
Operating System Security
The operating system can further restrict what an application can do, based on the user’s login privileges. In Windows, there are two types of accounts:
§ An administrative account that imposes no restrictions in accessing the local computer
§ A limited permissions account that restricts administrative functions and visibility of other users’ data
A feature called User Access Control (UAC) introduced in Windows Vista means that administrators receive two tokens or “hats” when logging in: an administrative hat and an ordinary user hat. By default, programs run wearing the ordinary user hat—with restricted permissions—unless the program requests administrative elevation. The user must then approve the request in the dialog box that’s presented.
For application developers, UAC means that by default, your application will run with restricted user privileges. This means you must either:
§ Write your application such that it can run without administrative privileges.
§ Demand administrative elevation in the application manifest.
The first option is safer and more convenient to the user. Designing your program to run without administrative privileges is easy in most cases: the restrictions are much less draconian than those of a typical code access security sandbox.
NOTE
You can find out whether you’re running under an administrative account with the following method:
[DllImport ("shell32.dll", EntryPoint = "#680")]
static extern bool IsUserAnAdmin();
With UAC enabled, this returns true only if the current process has administrative elevation.
Running in a Standard User Account
Here are the key things that you cannot do in a standard Windows user account:
§ Write to the following directories:
§ The operating system folder (typically \Windows) and subdirectories
§ The program files folder (\Program Files) and subdirectories
§ The root of the operating system drive (e.g., C:\)
§ Write to the HKEY_LOCAL_MACHINE branch of the Registry
§ Read performance monitoring (WMI) data
Additionally, as an ordinary user (or even as an administrator), you may be refused access to files or resources that belong to other users. Windows uses a system of Access Control Lists (ACLs) to protect such resources—you can query and assert your own rights in the ACLs via types inSystem.Security.AccessControl. ACLs can also be applied to cross-process wait handles, described in Chapter 22.
If you’re refused access to anything as a result of operating system security, an UnauthorizedAccessException is thrown. This is different from the SecurityException thrown when a .NET permission demand fails.
NOTE
The .NET code access permission classes are mostly independent of ACLs. This means you can successfully Demand a FileIOPermission—but still get an UnauthorizedAccessException due to ACL restrictions when trying to access the file.
In most cases, you can deal with standard user restrictions as follows:
§ Write files to their recommended locations.
§ Avoid using the Registry for information that can be stored in files (aside of the HKEY_CURRENT_USER hive, which you will have read/write access to).
§ Register ActiveX or COM components during setup.
The recommended location for user documents is SpecialFolder.MyDocuments:
string docsFolder = Environment.GetFolderPath
(Environment.SpecialFolder.MyDocuments);
string path = Path.Combine (docsFolder, "test.txt");
The recommended location for configuration files that a user might need to modify outside of your application is SpecialFolder.ApplicationData (current user only) or SpecialFolder.CommonApplicationData (all users). You typically create subdirectories within these folders, based on your organization and product name.
A good place to put data that need only be accessed within your application is isolated storage.
Perhaps the most inconvenient aspect of running in a standard user account is that a program doesn’t have write access to its files, making it difficult to implement an automatic update system. One option is to deploy with ClickOnce: this allows updates to be applied without administrative elevation, but places significant restrictions on the setup procedure (e.g., you cannot register ActiveX controls). Applications deployed with ClickOnce may also be sandboxed with code access security, depending on their mode of delivery. We described another, more sophisticated solution in Chapter 18, in the section Packing a Single-File Executable.
Administrative Elevation and Virtualization
In Chapter 18, we described how to deploy an application manifest. With an application manifest, you can request that Windows prompt the user for administrative elevation whenever running your program:
<?xml version="1.0" encoding="utf-8"?>
<assembly manifestVersion="1.0" xmlns="urn:schemas-microsoft-com:asm.v1">
<trustInfo xmlns="urn:schemas-microsoft-com:asm.v2">
<security>
<requestedPrivileges>
<requestedExecutionLevel level="requireAdministrator" />
</requestedPrivileges>
</security>
</trustInfo>
</assembly>
If you replace requireAdministrator with asInvoker, it instructs Windows that administrative elevation is not required. The effect is almost the same as not having an application manifest at all—except that virtualization is disabled. Virtualization is a temporary measure introduced with Windows Vista to help old applications run correctly without administrative privileges. The absence of an application manifest with a requestedExecutionLevel element activates this backward-compatibility feature.
Virtualization comes into play when an application writes to the Program Files or Windows directory, or the HKEY_LOCAL_MACHINE area of the Registry. Instead of throwing an exception, changes are redirected to a separate location on the hard disk where they can’t impact the original data. This prevents the application from interfering with the operating system—or other well-behaved applications.
Identity and Role Security
Identity and role-based security is useful when writing a middle tier server or an ASP.NET application, where you’re potentially dealing with many users. It allows you to restrict functionality according to the authenticated user’s name or role. An identity describes a username; a roledescribes a group. A principal is an object that describes an identity and/or a role. Hence, a PrincipalPermission class enforces identity and/or role security.
In a typical application server, you demand a PrincipalPermission on all methods exposed to the client for which you want to enforce security. For example, the following requires that the caller be a member of the “finance” role:
[PrincipalPermission (SecurityAction.Demand, Role = "finance")]
public decimal GetGrossTurnover (int year)
{
...
}
To enforce that only a particular user can call a method, you can specify a Name instead:
[PrincipalPermission (SecurityAction.Demand, Name = "sally")]
(Of course, the necessity to hardcode names makes this hard to manage.) To allow a combination of identities or roles, you have to use imperative security instead. This means instantiating PrincipalPermission objects, calling Union to combine them, and then calling Demand on the end result.
Assigning Users and Roles
Before a PrincipalPermission demand can succeed, you must attach an IPrincipal object to the current thread.
You can instruct that the current Windows user be used as an identity in either of two ways, depending on whether you want to impact the whole application domain or just the current thread:
AppDomain.CurrentDomain.SetPrincipalPolicy (PrincipalPolicy.
WindowsPrincipal);
// or:
Thread.CurrentPrincipal = new WindowsPrincipal (WindowsIdentity.
GetCurrent());
If you’re using WCF or ASP.NET, their infrastructures can help with impersonating the client’s identity. You can also do this yourself with the GenericPrincipal and GenericIdentity classes. The following creates a user called “Jack” and assigns him three roles:
GenericIdentity id = new GenericIdentity ("Jack");
GenericPrincipal p = new GenericPrincipal
(id, new string[] { "accounts", "finance", "management" } );
For this to take effect, you’d assign it to the current thread as follows:
Thread.CurrentPrincipal = p;
A principal is thread-based because an application server typically processes many client requests concurrently—each on its own thread. As each request may come from a different client, it needs a different principal.
You can subclass GenericIdentity and GenericPrincipal—or implement the IIdentity and IPrincipal interfaces directly in your own types. Here’s how the interfaces are defined:
public interface IIdentity
{
string Name { get; }
string AuthenticationType { get; }
bool IsAuthenticated { get; }
}
public interface IPrincipal
{
IIdentity Identity { get; }
bool IsInRole (string role);
}
The key method is IsInRole. Notice that there’s no method returning a list of roles, so you’re obliged only to rule on whether a particular role is valid for that principal. This can be the basis for more elaborate authorization systems.
Cryptography Overview
Table 21-8 summarizes the cryptography options in .NET. In the remaining sections, we explore each of these.
Table 21-8. Encryption and hashing options in .NET
|
Option |
Keys to manage |
Speed |
Strength |
Notes |
|
File.Encrypt |
0 |
Fast |
Depends on user’s password |
Protects files transparently with filesystem support. A key is derived implicitly from the logged-in user’s credentials. |
|
Windows Data Protection |
0 |
Fast |
Depends on user’s password |
Encrypts and decrypts byte arrays using an implicitly derived key. |
|
Hashing |
0 |
Fast |
High |
One-way (irreversible) transformation. Used for storing passwords, comparing files, and checking for data corruption. |
|
Symmetric Encryption |
1 |
Fast |
High |
For general-purpose encryption/decryption. The same key encrypts and decrypts. Can be used to secure messages in transit. |
|
Public Key Encryption |
2 |
Slow |
High |
Encryption and decryption use different keys. Used for exchanging a symmetric key in message transmission and for digitally signing files. |
The Framework also provides more specialized support for creating and validating XML-based signatures in System.Security.Cryptography.Xml and types for working with digital certificates in System.Security.Cryptography.X509Certificates.
Windows Data Protection
In the section File and Directory Operations in Chapter 15, we described how you could use File.Encrypt to request that the operating system transparently encrypt a file:
File.WriteAllText ("myfile.txt", "");
File.Encrypt ("myfile.txt");
File.AppendAllText ("myfile.txt", "sensitive data");
The encryption in this case uses a key derived from the logged-in user’s password. You can use this same implicitly derived key to encrypt a byte array with the Windows Data Protection API. The Data Protection API is exposed through the ProtectedData class—a simple type with two static methods:
public static byte[] Protect (byte[] userData, byte[] optionalEntropy,
DataProtectionScope scope);
public static byte[] Unprotect (byte[] encryptedData, byte[] optionalEntropy,
DataProtectionScope scope);
NOTE
Most types in System.Security.Cryptography live in mscorlib.dll and System.dll. ProtectedData is an exception: it lives in System.Security.dll.
Whatever you include in optionalEntropy is added to the key, thereby increasing its security. The DataProtectionScope enum argument allows two options: CurrentUser or LocalMachine. With CurrentUser, a key is derived from the logged-in user’s credentials; withLocalMachine, a machine-wide key is used, common to all users. A LocalMachine key provides less protection, but works under a Windows Service or a program needing to operate under a variety of accounts.
Here’s a simple encryption and decryption demo:
byte[] original = {1, 2, 3, 4, 5};
DataProtectionScope scope = DataProtectionScope.CurrentUser;
byte[] encrypted = ProtectedData.Protect (original, null, scope);
byte[] decrypted = ProtectedData.Unprotect (encrypted, null, scope);
// decrypted is now {1, 2, 3, 4, 5}
Windows Data Protection provides moderate security against an attacker with full access to the computer, depending on the strength of the user’s password. With LocalMachine scope, it’s effective only against those with restricted physical and electronic access.
Hashing
Hashing provides one-way encryption. This is ideal for storing passwords in a database, as you might never need (or want) to see a decrypted version. To authenticate, simply hash what the user types in and compare it to what’s stored in the database.
A hash code is always a small fixed size regardless of the source data length. This makes it good for comparing files or detecting errors in a data stream (rather like a checksum). A single-bit change anywhere in the source data results in a significantly different hash code.
To hash, you call ComputeHash on one of the HashAlgorithm subclasses such as SHA256 or MD5:
byte[] hash;
using (Stream fs = File.OpenRead ("checkme.doc"))
hash = MD5.Create().ComputeHash (fs); // hash is 16 bytes long
The ComputeHash method also accepts a byte array, which is convenient for hashing passwords:
byte[] data = System.Text.Encoding.UTF8.GetBytes ("stRhong%pword");
byte[] hash = SHA256.Create().ComputeHash (data);
NOTE
The GetBytes method on an Encoding object converts a string to a byte array; the GetString method converts it back. An Encoding object cannot, however, convert an encrypted or hashed byte array to a string, because scrambled data usually violates text encoding rules. Instead, use Convert.ToBase64String and Convert.FromBase64String: these convert between any byte array and a legal (and XML-friendly) string.
MD5 and SHA256 are two of the HashAlgorithm subtypes provided by the .NET Framework. Here are all the major algorithms, in ascending order of security (and hash length, in bytes):
MD5(16) → SHA1(20) → SHA256(32) → SHA384(48) → SHA512(64)
The shorter the algorithm, the faster it executes. MD5 is more than 20 times faster than SHA512 and is well suited to calculating file checksums. You can hash hundreds of megabytes per second with MD5, and then store its result in a Guid. (A Guid happens to be exactly 16 bytes long, and as a value type it is more tractable than a byte array; you can meaningfully compare Guids with the simple equality operator, for instance.) However, shorter hashes increase the possibility of collision (two distinct files yielding the same hash).
WARNING
Use at least SHA256 when hashing passwords or other security-sensitive data. MD5 and SHA1 are considered insecure for this purpose, and are suitable to protect only against accidental corruption, not deliberate tampering.
NOTE
SHA384 is no faster than SHA512, so if you want more security than SHA256, you may as well use SHA512.
The longer SHA algorithms are suitable for password hashing, but they require that you enforce a strong password policy to mitigate a dictionary attack—a strategy whereby an attacker builds a password lookup table by hashing every word in a dictionary. You can provide additional protection against this by “stretching” your password hashes—repeatedly rehashing to obtain more computationally intensive byte sequences. If you rehash 100 times, a dictionary attack that might otherwise take 1 month would take 8 years. The Rfc2898DeriveBytes andPasswordDeriveBytes classes perform exactly this kind of stretching.
Another technique to avoid dictionary attacks is to incorporate “salt”—a long series of bytes that you initially obtain via a random number generator, and then combine with each password before hashing. This frustrates hackers in two ways: hashes take longer to compute, and they may not have access to the salt bytes.
The Framework also provides a 160-bit RIPEMD hashing algorithm, slightly above SHA1 in security. It suffers an inefficient .NET implementation, though, making it slower to execute than even SHA512.
Symmetric Encryption
Symmetric encryption uses the same key for encryption as for decryption. The Framework provides four symmetric algorithms, of which Rijndael is the premium (pronounced “Rhine Dahl” or “Rain Doll”). Rijndael is both fast and secure and has two implementations:
§ The Rijndael class, which was available since Framework 1.0
§ The Aes class, which was introduced in Framework 3.5
The two are almost identical, except that Aes does not let you weaken the cipher by changing the block size. Aes is recommended by the CLR’s security team.
Rijndael and Aes allow symmetric keys of length 16, 24, or 32 bytes: all are currently considered secure. Here’s how to encrypt a series of bytes as they’re written to a file, using a 16-byte key:
byte[] key = {145,12,32,245,98,132,98,214,6,77,131,44,221,3,9,50};
byte[] iv = {15,122,132,5,93,198,44,31,9,39,241,49,250,188,80,7};
byte[] data = { 1, 2, 3, 4, 5 }; // This is what we're encrypting.
using (SymmetricAlgorithm algorithm = Aes.Create())
using (ICryptoTransform encryptor = algorithm.CreateEncryptor (key, iv))
using (Stream f = File.Create ("encrypted.bin"))
using (Stream c = new CryptoStream (f, encryptor, CryptoStreamMode.Write))
c.Write (data, 0, data.Length);
The following code decrypts the file:
byte[] key = {145,12,32,245,98,132,98,214,6,77,131,44,221,3,9,50};
byte[] iv = {15,122,132,5,93,198,44,31,9,39,241,49,250,188,80,7};
byte[] decrypted = new byte[5];
using (SymmetricAlgorithm algorithm = Aes.Create())
using (ICryptoTransform decryptor = algorithm.CreateDecryptor (key, iv))
using (Stream f = File.OpenRead ("encrypted.bin"))
using (Stream c = new CryptoStream (f, decryptor, CryptoStreamMode.Read))
for (int b; (b = c.ReadByte()) > −1;)
Console.Write (b + " "); // 1 2 3 4 5
In this example, we made up a key of 16 randomly chosen bytes. If the wrong key was used in decryption, CryptoStream would throw a CryptographicException. Catching this exception is the only way to test whether a key is correct.
As well as a key, we made up an IV, or Initialization Vector. This 16-byte sequence forms part of the cipher—much like the key—but is not considered secret. If transmitting an encrypted message, you would send the IV in plain text (perhaps in a message header) and then change it with every message. This would render each encrypted message unrecognizable from any previous one—even if their unencrypted versions were similar or identical.
NOTE
If you don’t need—or want—the protection of an IV, you can defeat it by using the same 16-byte value for both the key and the IV. Sending multiple messages with the same IV, though, weakens the cipher and might even make it possible to crack.
The cryptography work is divided among the classes. Aes is the mathematician; it applies the cipher algorithm, along with its encryptor and decryptor transforms. CryptoStream is the plumber; it takes care of stream plumbing. You can replace Aes with a different symmetric algorithm, yet still use CryptoStream.
CryptoStream is bidirectional, meaning you can read or write to the stream depending on whether you choose CryptoStreamMode.Read or CryptoStreamMode.Write. Both encryptors and decryptors are read- and write-savvy, yielding four combinations—the choice can have you staring at a blank screen for a while! It can be helpful to model reading as “pulling” and writing as “pushing.” If in doubt, start with Write for encryption and Read for decryption; this is often the most natural.
To generate a random key or IV, use RandomNumberGenerator in System.Cryptography. The numbers it produces are genuinely unpredictable, or cryptographically strong (the System.Random class does not offer the same guarantee). Here’s an example:
byte[] key = new byte [16];
byte[] iv = new byte [16];
RandomNumberGenerator rand = RandomNumberGenerator.Create();
rand.GetBytes (key);
rand.GetBytes (iv);
If you don’t specify a key and IV, cryptographically strong random values are generated automatically. You can query these through the Aes object’s Key and IV properties.
Encrypting in Memory
With a MemoryStream, you can encrypt and decrypt entirely in memory. Here are helper methods that do just this, with byte arrays:
public static byte[] Encrypt (byte[] data, byte[] key, byte[] iv)
{
using (Aes algorithm = Aes.Create())
using (ICryptoTransform encryptor = algorithm.CreateEncryptor (key, iv))
return Crypt (data, encryptor);
}
public static byte[] Decrypt (byte[] data, byte[] key, byte[] iv)
{
using (Aes algorithm = Aes.Create())
using (ICryptoTransform decryptor = algorithm.CreateDecryptor (key, iv))
return Crypt (data, decryptor);
}
static byte[] Crypt (byte[] data, ICryptoTransform cryptor)
{
MemoryStream m = new MemoryStream();
using (Stream c = new CryptoStream (m, cryptor, CryptoStreamMode.Write))
c.Write (data, 0, data.Length);
return m.ToArray();
}
Here, CryptoStreamMode.Write works best for both encryption and decryption, since in both cases we’re “pushing” into a fresh memory stream.
Here are overloads that accept and return strings:
public static string Encrypt (string data, byte[] key, byte[] iv)
{
return Convert.ToBase64String (
Encrypt (Encoding.UTF8.GetBytes (data), key, iv));
}
public static string Decrypt (string data, byte[] key, byte[] iv)
{
return Encoding.UTF8.GetString (
Decrypt (Convert.FromBase64String (data), key, iv));
}
The following demonstrates their use:
byte[] kiv = new byte[16];
RandomNumberGenerator.Create().GetBytes (kiv);
string encrypted = Encrypt ("Yeah!", kiv, kiv);
Console.WriteLine (encrypted); // R1/5gYvcxyR2vzPjnT7yaQ==
string decrypted = Decrypt (encrypted, kiv, kiv);
Console.WriteLine (decrypted); // Yeah!
Chaining Encryption Streams
CryptoStream is a decorator, meaning it can be chained with other streams. In the following example, we write compressed encrypted text to a file, and then read it back:
// Use default key/iv for demo.
using (Aes algorithm = Aes.Create())
{
using (ICryptoTransform encryptor = algorithm.CreateEncryptor())
using (Stream f = File.Create ("serious.bin"))
using (Stream c = new CryptoStream (f,encryptor,CryptoStreamMode.Write))
using (Stream d = new DeflateStream (c, CompressionMode.Compress))
using (StreamWriter w = new StreamWriter (d))
await w.WriteLineAsync ("Small and secure!");
using (ICryptoTransform decryptor = algorithm.CreateDecryptor())
using (Stream f = File.OpenRead ("serious.bin"))
using (Stream c = new CryptoStream (f, decryptor, CryptoStreamMode.Read))
using (Stream d = new DeflateStream (c, CompressionMode.Decompress))
using (StreamReader r = new StreamReader (d))
Console.WriteLine (await r.ReadLineAsync()); // Small and secure!
}
(As a final touch, we make our program asynchronous by calling WriteLineAsync and ReadLineAsync, and awaiting the result.)
In this example, all one-letter variables form part of a chain. The mathematicians—algorithm, encryptor, and decryptor—are there to assist CryptoStream in the cipher work. The diagram in Figure 21-2 shows this.
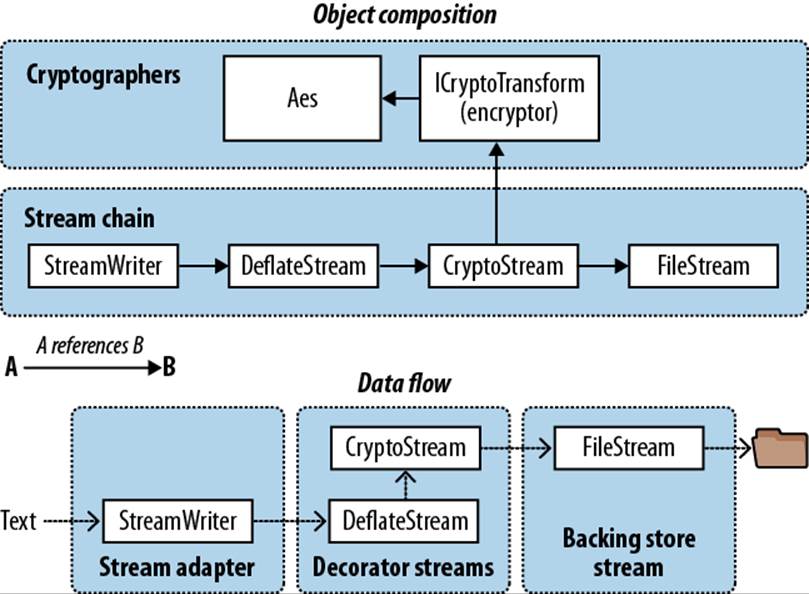
Figure 21-2. Chaining encryption and compression streams
Chaining streams in this manner demands little memory, regardless of the ultimate stream sizes.
NOTE
As an alternative to nesting multiple using statements, you can construct a chain as follows:
using (ICryptoTransform encryptor = algorithm.CreateEncryptor())
using
(StreamWriter w = new StreamWriter (
new DeflateStream (
new CryptoStream (
File.Create ("serious.bin"),
encryptor,
CryptoStreamMode.Write
),
CompressionMode.Compress)
)
)
This is less robust than the previous approach, however, because should an exception be thrown in an object’s constructor (e.g., DeflateStream), any objects already instantiated (e.g., FileStream) would not be disposed.
Disposing Encryption Objects
Disposing a CryptoStream ensures that its internal cache of data is flushed to the underlying stream. Internal caching is necessary for encryption algorithms because they process data in blocks, rather than one byte at a time.
CryptoStream is unusual in that its Flush method does nothing. To flush a stream (without disposing it) you must call FlushFinalBlock. In contrast to Flush, FlushFinalBlock can be called only once, and then no further data can be written.
In our examples, we also disposed the mathematicians—the Aes algorithm and ICryptoTransform objects (encryptor and decryptor). Disposal is actually optional with the Rijndael transforms, because their implementations are purely managed. Disposal still serves a useful role, however: it wipes the symmetric key and related data from memory, preventing subsequent discovery by other software running on the computer (we’re talking malware). You can’t rely on the garbage collector for this job because it merely flags sections of memory as available; it doesn’t write zeros over every byte.
The easiest way to dispose an Aes object outside of a using statement is to call Clear. Its Dispose method is hidden via explicit implementation (to signal its unusual disposal semantics).
Key Management
It is inadvisable to hardcode encryption keys because popular tools exist to decompile assemblies with little expertise. A better option is to manufacture a random key for each installation, storing it securely with Windows Data Protection (or encrypt the entire message with Windows Data Protection). If you’re encrypting a message stream, public key encryption provides the best option still.
Public Key Encryption and Signing
Public key cryptography is asymmetric, meaning that encryption and decryption use different keys.
Unlike symmetric encryption, where any arbitrary series of bytes of appropriate length can serve as a key, asymmetric cryptography requires specially crafted key pairs. A key pair contains a public key and private key component that work together as follows:
§ The public key encrypts messages.
§ The private key decrypts messages.
The party “crafting” a key pair keeps the private key secret while distributing the public key freely. A special feature of this type of cryptography is that you cannot calculate a private key from a public key. So, if the private key is lost, encrypted data cannot be recovered; conversely, if a private key is leaked, the encryption system becomes useless.
A public key handshake allows two computers to communicate securely over a public network, with no prior contact and no existing shared secret. To see how this works, suppose computer Origin wants to send a confidential message to computer Target:
1. Target generates a public/private key pair, and then sends its public key to Origin.
2. Origin encrypts the confidential message using Target’s public key, then sends it to Target.
3. Target decrypts the confidential message using its private key.
An eavesdropper will see the following:
§ Target’s public key
§ The secret message, encrypted with Target’s public key
But without Target’s private key, the message cannot be decrypted.
NOTE
This doesn’t prevent against a man-in-the-middle attack: in other words, Origin cannot know that Target isn’t some malicious party. In order to authenticate the recipient, the originator needs to already know the recipient’s public key, or be able to validate its key through a digital site certificate.
The secret message sent from Origin to Target typically contains a fresh key for subsequent symmetric encryption. This allows public key encryption to be abandoned for the remainder of the session, in favor of a symmetric algorithm capable of handling larger messages. This protocol is particularly secure if a fresh public/private key pair is generated for each session, as no keys then need to be stored on either computer.
WARNING
The public key encryption algorithms rely on the message being smaller than the key. This makes them suitable for encrypting only small amounts of data, such as a key for subsequent symmetric encryption. If you try to encrypt a message much larger than half the key size, the provider will throw an exception.
The RSA Class
The .NET Framework provides a number of asymmetric algorithms, of which RSA is the most popular. Here’s how to encrypt and decrypt with RSA:
byte[] data = { 1, 2, 3, 4, 5 }; // This is what we're encrypting.
using (var rsa = new RSACryptoServiceProvider())
{
byte[] encrypted = rsa.Encrypt (data, true);
byte[] decrypted = rsa.Decrypt (encrypted, true);
}
Because we didn’t specify a public or private key, the cryptographic provider automatically generated a key pair, using the default length of 1,024 bits; you can request longer keys in increments of eight bytes, through the constructor. For security-critical applications, it’s prudent to request 2048 bits:
var rsa = new RSACryptoServiceProvider (2048);
Generating a key pair is computationally intensive—taking perhaps 100ms. For this reason, the RSA implementation delays this until a key is actually needed, such as when calling Encrypt. This gives you the chance to load in an existing key—or key pair, should it exist.
The methods ImportCspBlob and ExportCspBlob load and save keys in byte array format. FromXmlString and ToXmlString do the same job in a string format, the string containing an XML fragment. A bool flag lets you indicate whether to include the private key when saving. Here’s how to manufacture a key pair and save it to disk:
using (var rsa = new RSACryptoServiceProvider())
{
File.WriteAllText ("PublicKeyOnly.xml", rsa.ToXmlString (false));
File.WriteAllText ("PublicPrivate.xml", rsa.ToXmlString (true));
}
Since we didn’t provide existing keys, ToXmlString forced the manufacture of a fresh key pair (on the first call). In the next example, we read back these keys and use them to encrypt and decrypt a message:
byte[] data = Encoding.UTF8.GetBytes ("Message to encrypt");
string publicKeyOnly = File.ReadAllText ("PublicKeyOnly.xml");
string publicPrivate = File.ReadAllText ("PublicPrivate.xml");
byte[] encrypted, decrypted;
using (var rsaPublicOnly = new RSACryptoServiceProvider())
{
rsaPublicOnly.FromXmlString (publicKeyOnly);
encrypted = rsaPublicOnly.Encrypt (data, true);
// The next line would throw an exception because you need the private
// key in order to decrypt:
// decrypted = rsaPublicOnly.Decrypt (encrypted, true);
}
using (var rsaPublicPrivate = new RSACryptoServiceProvider())
{
// With the private key we can successfully decrypt:
rsaPublicPrivate.FromXmlString (publicPrivate);
decrypted = rsaPublicPrivate.Decrypt (encrypted, true);
}
Digital Signing
Public key algorithms can also be used to digitally sign messages or documents. A signature is like a hash, except that its production requires a private key and so cannot be forged. The public key is used to verify the signature. Here’s an example:
byte[] data = Encoding.UTF8.GetBytes ("Message to sign");
byte[] publicKey;
byte[] signature;
object hasher = SHA1.Create(); // Our chosen hashing algorithm.
// Generate a new key pair, then sign the data with it:
using (var publicPrivate = new RSACryptoServiceProvider())
{
signature = publicPrivate.SignData (data, hasher);
publicKey = publicPrivate.ExportCspBlob (false); // get public key
}
// Create a fresh RSA using just the public key, then test the signature.
using (var publicOnly = new RSACryptoServiceProvider())
{
publicOnly.ImportCspBlob (publicKey);
Console.Write (publicOnly.VerifyData (data, hasher, signature)); // True
// Let's now tamper with the data, and recheck the signature:
data[0] = 0;
Console.Write (publicOnly.VerifyData (data, hasher, signature)); // False
// The following throws an exception as we're lacking a private key:
signature = publicOnly.SignData (data, hasher);
}
Signing works by first hashing the data, and then applying the asymmetric algorithm to the resultant hash. Because hashes are of a small fixed size, large documents can be signed relatively quickly (public key encryption is much more CPU-intensive than hashing). If you want, you can do the hashing yourself, and then call SignHash instead of SignData:
using (var rsa = new RSACryptoServiceProvider())
{
byte[] hash = SHA1.Create().ComputeHash (data);
signature = rsa.SignHash (hash, CryptoConfig.MapNameToOID ("SHA1"));
...
}
SignHash still needs to know what hash algorithm you used; CryptoConfig.MapNameToOID provides this information in the correct format from a friendly name such as “SHA1”.
RSACryptoServiceProvider produces signatures whose size matches that of the key. Currently, no mainstream algorithm produces secure signatures significantly smaller than 128 bytes (suitable for product activation codes, for instance).
NOTE
For signing to be effective, the recipient must know, and trust, the sender’s public key. This can happen via prior communication, preconfiguration, or a site certificate. A site certificate is an electronic record of the originator’s public key and name—itself signed by an independent trusted authority. The namespace System.Security.Cryptography.X509Certificates defines the types for working with certificates.
[13] Before CLR 4.0, partially trusted assemblies could not even call other partially trusted assemblies if the target was strongly named (unless you applied the APTCA). This restriction didn’t really aid security, and so was dropped in CLR 4.0.
All materials on the site are licensed Creative Commons Attribution-Sharealike 3.0 Unported CC BY-SA 3.0 & GNU Free Documentation License (GFDL)
If you are the copyright holder of any material contained on our site and intend to remove it, please contact our site administrator for approval.
© 2016-2025 All site design rights belong to S.Y.A.