Beginning Object-Oriented Programming with C# (2012)
Part V
Advanced Topics
Chapter 17
Printing and Threading
What you will learn in this chapter:
· How to initialize a printer object
· How to alter things such as fonts, page size, and margins
· How to create a printer class that can be used in other programs
· What threading is and how to use it with your printer class
· What reflection is
wrox.com code downloads for this chapter
You can find the wrox.com code downloads for this chapter at www.wrox.com/remtitle.cgi?isbn=9781118336922 on the Download Code tab. The code in the Chapter17 folder is individually named according to the names throughout the chapter.
In this chapter you learn about using your printer and the resources associated with it. Some of the topics learned here can be retrofitted to previous programs. For example, threading might be useful in the database programs where there is a noticeable pause while network information is updated.
Using a Printer
Often a program generates data that you don't necessarily want to persist on disk, but that you might like to review at a later time without rerunning the program. Obviously, printed output of the data is one way to go. In this chapter, you examine some of the printer objects that should prove useful in your programs.
In the following Try It Out you write a program that can read and print a simple text file. Although a text file is used for the output to print, the methods used apply to almost any type of data.
Try It Out: Printing (Chapter17ProgramBasicPrint.zip)
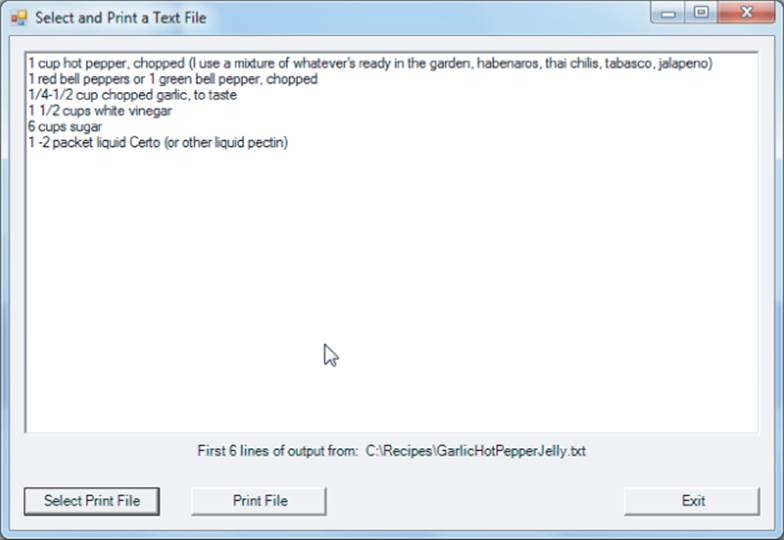
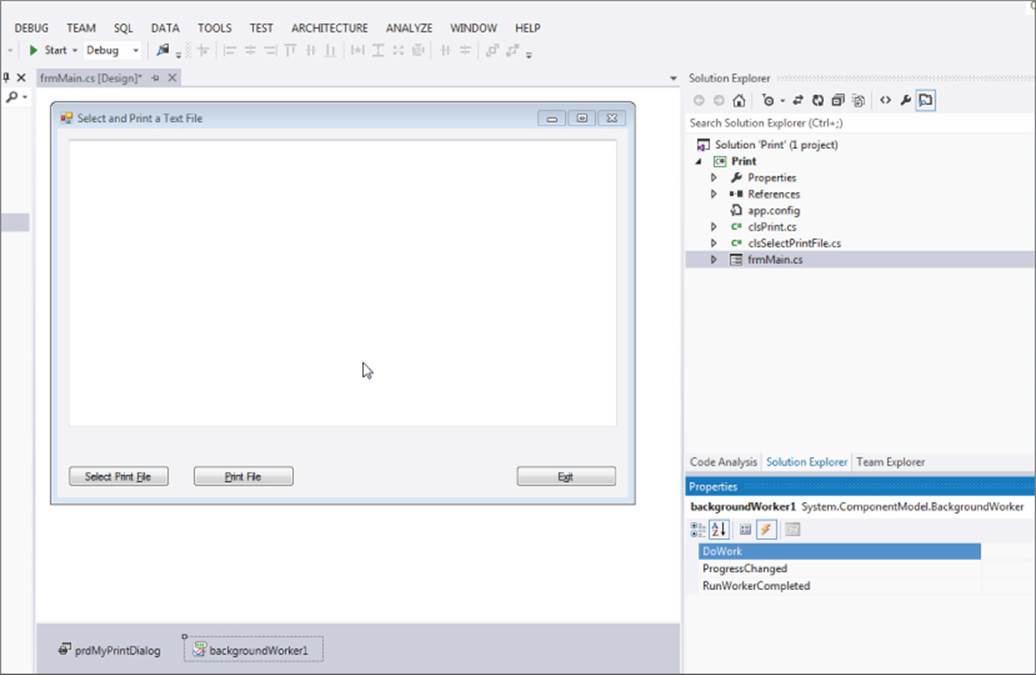
In this Try It Out, you write a program that simply opens a text file for printing. Rather than simply opening a file and dumping its contents to the printer, you can allow users to “preview” the content of the file before they print it. Often it's difficult to remember which files contain what. The content preview provides one way to do this. The user interface for your program is shown in Figure 17.1. The program uses a listbox, a label, and three button objects. Not visible is a PrintDialog object.
Figure 17.1 User interface for print program
Because this program is a little long, the easiest way to set things up is to create a new project and download the code found on this book's web page on Wrox.com, in Chapter17ProgamBasicPrint.zip. The steps for writing the program follow:
1. Create a new project in the usual manner.
2. Add the listbox, label, and button objects using Figure 17.1 as a model. Note that the label has its Visibility property set to False at program start.
3. Download the code for the project Chapter17ProgamBasicPrint.zip.
How It Works
Listing 17-1 shows the code associated with the frmMain code.
Listing 17-1: Code to Print a Text File (frmMain.cs)
using System;
using System.Windows.Forms;
public class frmMain : Form
{
private System.Windows.Forms.Button btnSelectPrintFile;
private System.Windows.Forms.Button btnExit;
private System.Windows.Forms.Button btnPrint;
private System.Windows.Forms.TextBox txtSampleOutput;
private PrintDialog prdMyPrintDialog;
private Label lblSample;
const int LINESTOPRINT = 6; // Let them peek at this many lines
string inFile = null;
#region Windows Form Designer generated code
public frmMain()
{
InitializeComponent();
}
[STAThread]
public static void Main()
{
frmMain main = new frmMain();
Application.Run(main);
}
private void btnSelectPrintFile_Click(object sender, EventArgs e)
{
clsSelectPrintFile myFile = new clsSelectPrintFile();
myFile.SelectPrintFile();
inFile = myFile.FileName;
myFile.ReadSampleFromFile(inFile, LINESTOPRINT);
txtSampleOutput.Text = myFile.GetBuffer;
lblSample.Text = "First " + LINESTOPRINT.ToString() +
" lines of output from: " + inFile;
lblSample.Visible = true;
}
private void btnExit_Click(object sender, EventArgs e)
{
Close();
}
private void btnPrint_Click(object sender, EventArgs e)
{
try
{
if (inFile == null)
{
MessageBox.Show("Select a file to print first",
"Input File Name Error");
return;
}
DialogResult result = prdMyPrintDialog.ShowDialog();
clsPrint doPrint = new clsPrint(inFile);
// If the result is OK then print the document.
if (result == DialogResult.OK)
{
doPrint.Print();
}
}
catch (Exception ex)
{
MessageBox.Show("Error: " + ex.Message);
return;
}
}
}
After the form displays, the user must click the btnSelectPrintFile button to select the file to print. The first thing that happens in the click event is to instantiate a clsSelectPrintFile object named myFile. The code for the clsSelectPrintFile is shown in Listing 17-2.
Listing 17-2: Source Code for clsSelectedPrintFile (clsSelectedPrintFile.cs)
using System;
using System.Windows.Forms;
using System.IO;
class clsSelectPrintFile
{
const int SAMPLELINES = 6;
private string fileName;
private string buffer;
//================================= Construcctor =================
public clsSelectPrintFile()
{
buffer = null;
fileName = null;
}
private StreamReader myReader;
//================================= Property Methods ==============
public string FileName
{
get
{ return fileName;
}
}
public string GetBuffer
{
get
{ return buffer;
}
}
//================================ General Methods ===============
public string SelectPrintFile()
{
try
{
OpenFileDialog myFile = new OpenFileDialog();
myFile.Title = "Select File to Print";
myFile.InitialDirectory = @"C:\ ";
myFile.FilterIndex = 2;
myFile.Filter = "Text files (*.txt | .txt | All files (*.*) | *.*";
if (myFile.ShowDialog() == DialogResult.OK)
{
fileName = myFile.FileName;
return myFile.FileName;
}
fileName = null;
return null;
}
catch (Exception ex)
{
MessageBox.Show("File read error: " + ex.Message);
return null;
}
}
public void ReadSampleFromFile(string infile, int LINESTOPRINT)
{
int lineCount = 0;
string temp;
try
{
myReader = new StreamReader(infile);
while (true)
{
temp = myReader.ReadLine();
if (temp == null)
break;
buffer += temp + Environment.NewLine;
lineCount++;
if (lineCount >= LINESTOPRINT)
break;
}
myReader.Close();
}
catch
{
buffer = null;
}
}
}
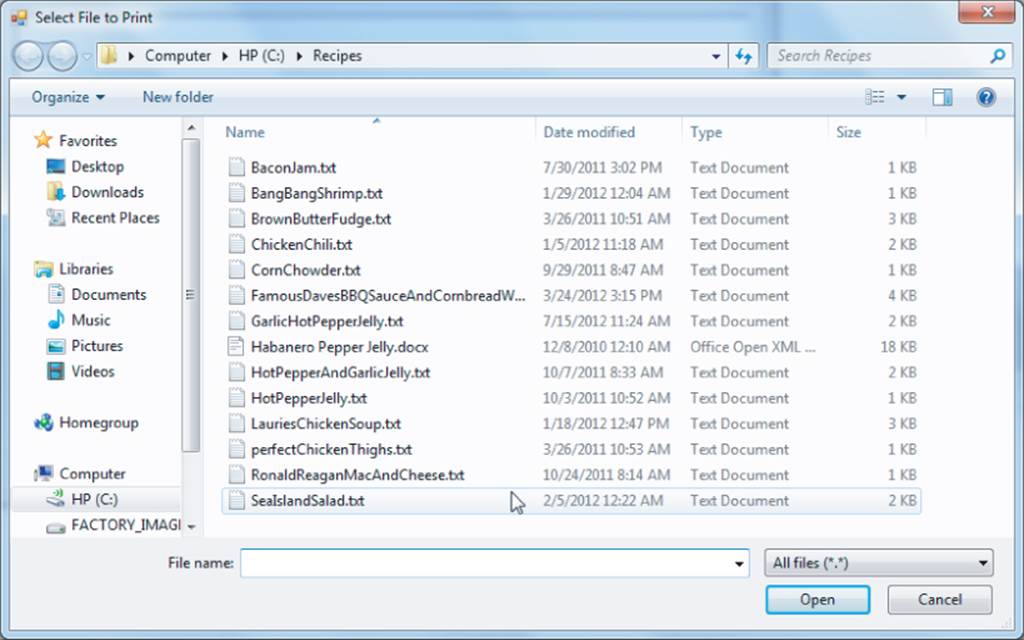
The method named SelectPrintFile() uses the OpenFileDialog object discussed in Chapter 13. (See Figure 17.2.)
Figure 17.2 Selecting the file to print
Assuming all goes well (note the try-catch if things don't go well), the name of the file the user wants to use is passed back to frmMain and assigned into inFile. The statement:
myFile.ReadSampleFromFile(inFile, LINESTOPRINT);
calls the ReadSampleFromFile()method of the clsSelectPrintFile class, passing in the filename and the number of lines you want to display. The lines display in the listbox, as shown in Figure 17.1. By displaying a few lines in the listbox, users can confirm that the selected file contains the information they want to print.
If users are happy with the content of the file selected, they can click the Print File button to actually print the file. The code for clsPrint is shown in Listing 17-3.
Listing 17-3: The clsPrint Print Code, (clsPrint.cs)
using System;
using System.Drawing.Printing;
using System.Drawing;
using System.IO;
class clsPrint
{
private string inFile;
private Font myFont;
private StreamReader myReader;
public clsPrint(string file)
{
inFile = file;
}
public int Print()
{
try {
myReader = new StreamReader (inFile); // File to print
myFont = new Font ("Arial", 10); // Use this font and size
PrintDocument myDocToPrint = new PrintDocument();
// PrintPage event handler
myDocToPrint.PrintPage += new
PrintPageEventHandler(this.PrintTextFileHandler);
myDocToPrint.Print();
if (myReader != null) // If reader not closed already…
myReader.Close();
return 1;
} catch {
return −1;
}
}
private void PrintTextFileHandler (object sender, PrintPageEventArgs printArgs)
{
int lineCount = 0;
int index;
float linesAllowed = 0.0f;
const int CHARSPERLINE = 100;
float yCoord = 0.0f;
// The .5f below is kinda arbitrary, but it works
float leftMargin = printArgs.MarginBounds.Left * .5f;
float topMargin = printArgs.MarginBounds.Top;
string buffer = null;
string temp;
Graphics g = printArgs.Graphics;
// How many lines per page?
linesAllowed = printArgs.MarginBounds.Height /
myFont.GetHeight (g);
// Read the file
while (lineCount < linesAllowed && ((buffer =
myReader.ReadLine()) != null))
{
// Get the starting position
yCoord = topMargin + (lineCount * myFont.GetHeight(g));
// Wrap line if necessary
if (buffer.Length > CHARSPERLINE)
{
index = buffer.LastIndexOf(" ", (CHARSPERLINE - 10));
temp = buffer.Substring(0, index) +
Environment.NewLine;
g.DrawString(temp, myFont, Brushes.Black, leftMargin,
yCoord, new StringFormat());
lineCount++; // Add for the extra line
// Set y coord for next line
yCoord = topMargin + (lineCount *
myFont.GetHeight(g));
// The rest of the line, with double-margin spacing added
g.DrawString(buffer.Substring(index + 1), myFont,
Brushes.Black, leftMargin + leftMargin, yCoord,
new StringFormat());
lineCount++;
}
else
{
g.DrawString(buffer, myFont, Brushes.Black,
leftMargin, yCoord, new StringFormat());
lineCount++;
}
}
if (buffer == null) // Are we done?
{
printArgs.HasMorePages = false; // yep
}
else
{
printArgs.HasMorePages = true; // nope
}
myReader = null; // We're done with it
}
}
The Print() method in clsPrint class opens the selected file and sets the font and margins for the document. The rest of the code simply figures out how many lines have been printed (lineCount) and uses that information to set the print head for the document. The Environment.NewLine is appended to each line, so the next line begins on a new line. The actual printing is done using the graphics object, g, using its DrawString() method. The process continues as long as the StreamReader object (myReader) doesn't return null. When myReader reads null, all the characters in the file have been read.
Threading
So far, so good. However, a problem often associated with printing a document is that it can take a long time. Depending on your printer and the size of the document, it could take several minutes for the document to print. While you are sitting there waiting for it to finish, perhaps you could use the program to look for the next file to print. Alas, that has to wait for the current file to finish printing. Not good.
You can solve this problem by making the program take advantage of a concept called threading. To keep things simple, when you design a program, perhaps using the Five Program Steps you learned about in Chapter 2, you can set the architecture for that application. Thus far, every program you have written has a single process that begins with the Main() method as typically found in the frmMain class. That single process is bound by whatever set of instructions your program feeds to it. Life is good…and simple.
When an application starts executing, the operating system dedicates a set of code instructions, memory, and other resources to that application. If there is but a single process running (for example, Main()), you can think of the application and its process as one and the same. Obviously, you can have multiple applications running under Windows.
As I write this, I am running a word processing application, an Internet browser, and the Task Manager application. Basically, I have three applications running. However, look at Figure 17.3, which shows that there are actually 28 processes running on my system. Further, if you look at the Internet browser application, you see that the browser is responsible for 12 of those 28 processes. If you look further, you can see that one of those 12 processes is running 27 threads.
Figure 17.3 Using the Task Manager to show the Processes that are running
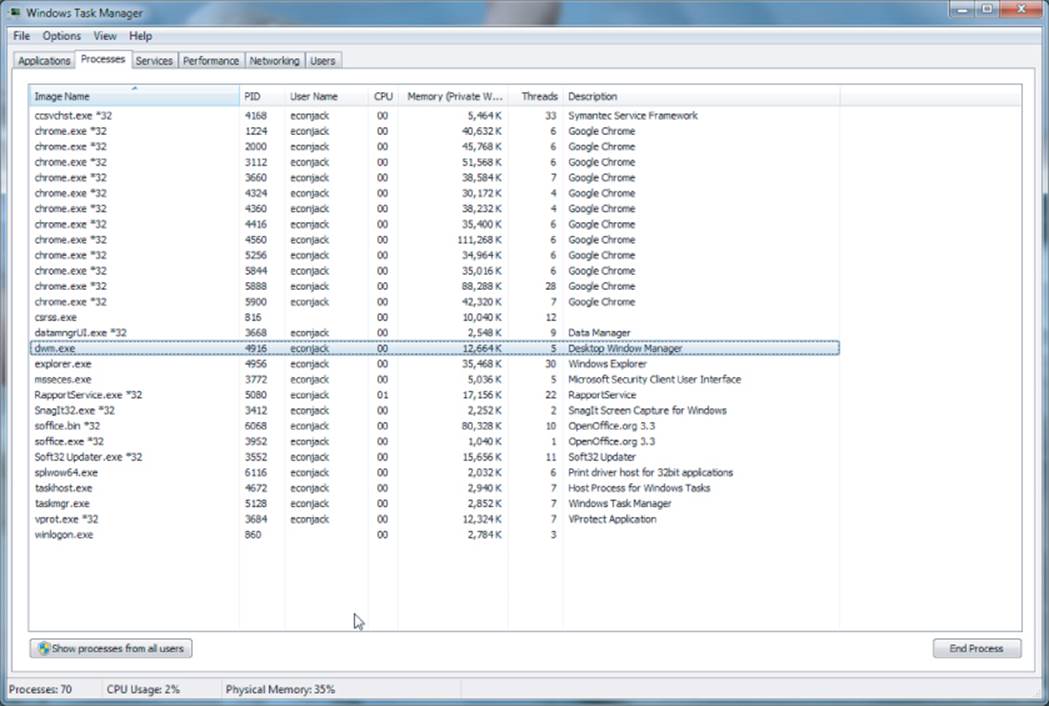
You can think of a thread as a separate set of instructions running within a process. Although each thread has its own stack (for temporary data), each thread shares its program memory and heap space with the process to which it belongs. Each application must have at least one process, and each process must have at least one thread. As Figure 17.3 shows, however, an application can have multiple processes, and those processes can have multiple threads. although it may appear that Windows is loafing along running three applications, which is true, all the processes and their threads keep Windows fairly busy.
A Threading Program
Although the print program functions as it should, it still leaves a little bit to be desired. The major shortcoming is that users have to sit there and wait for the print job to finish before they can do something else. Perhaps they have a second file to print. Users can't even look for the second file until after the first file is completely printed. Not good.
You can remove this limitation by implementing threading in your printer program. Although there are all kinds of problems that threading can conjure up (for example, deadlocks, race conditions, and so on), especially when accessing a database, your printing task is fairly simple, yet still gives you a chance to get your feet wet with threading.
In the following Try It Out you write a program that combines the printing and threading concepts into a single application.
Try It Out: Printing with Threading (Chapter17ProgramThreadingPrint.zip)
In this Try It Out, you want to modify the print program you wrote earlier to accommodate threading.
1. Create a new project in the usual manner, calling it Print.
2. Download the code from the book's website, Chapter17ProgramThreadingPrint.zip. (The code is almost identical to the previous print program, so you could also just move a copy of that program into this project's directory.)
3. Add a label object, lblJobDone, and place it somewhere between the Print File and Exit buttons. Set its Text property to Print job finished. Set its Visibility property to false. You don't want this button visible when the program starts executing.
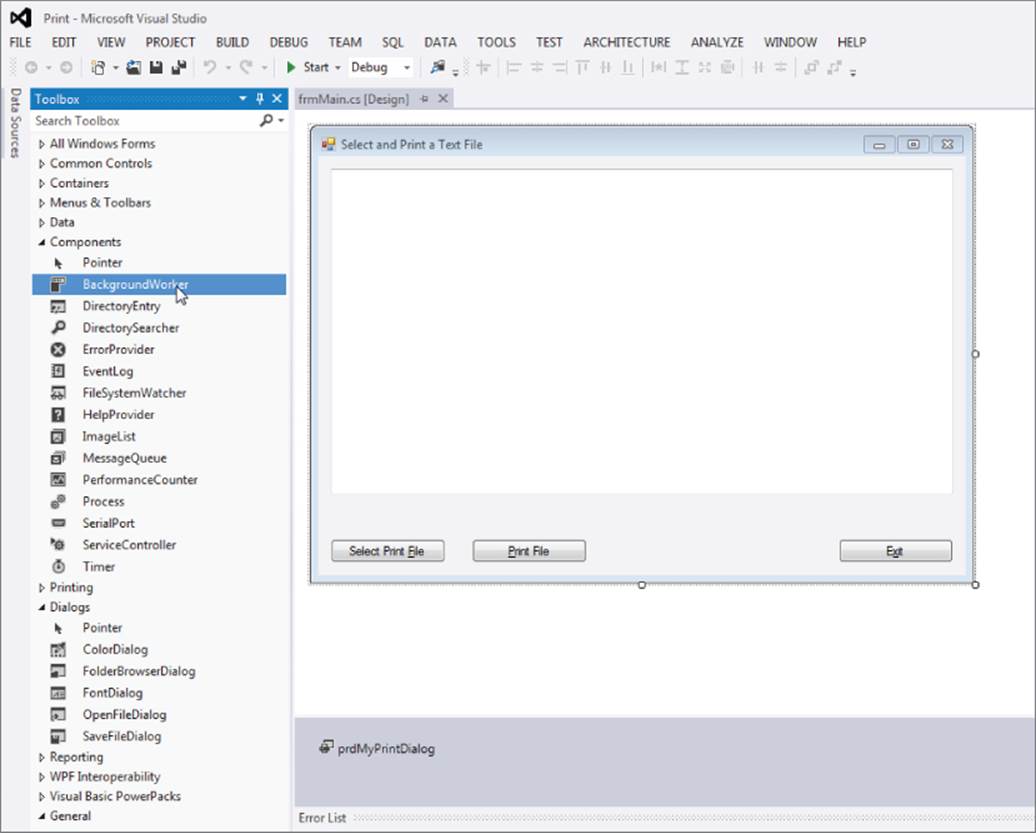
4. Add a BackgroundWorker object from the Toolbox → Components menu option. You can see this in Figure 17.4.
Figure 17.4 Adding a backgroundworker object to project.
5. Change the name of the BackgroundWorker object to myBackgroundWorker.
6. With the myBackgroundWorker object showing in the Properties Window, click the lightning bolt to switch to the object's events. The Properties Window now looks something like Figure 17.5.
Figure 17.5 Adding event handlers to project
7. Double-click the DoWork and then the RunWorkerCompleted events. This causes Visual Studio to add the stub code for these events.
That's all you need to do in the design stage, but you do need to add some new code to the program.
The code for your threading program is presented in Listing 17-4.
Listing 17-4: Print with Threading (frmMain.cs)
using System;
using System.Windows.Forms;
using System.Threading;
using System.ComponentModel;
public class frmMain : Form
{
private System.Windows.Forms.Button btnSelectPrintFile;
private System.Windows.Forms.Button btnExit;
private System.Windows.Forms.Button btnPrint;
private System.Windows.Forms.TextBox txtSampleOutput;
private PrintDialog prdMyPrintDialog;
private Label lblSample;
const int LINESTOPRINT = 6; // Let'em see this many lines
private System.ComponentModel.BackgroundWorker
myBackgroundWorker;
private Label lblJobDone;
string inFile = null;
public frmMain()
{
InitializeComponent();
}
[STAThread]
public static void Main()
{
frmMain main = new frmMain();
Application.Run(main);
}
private void btnSelectPrintFile_Click(object sender,
EventArgs e)
{
clsSelectPrintFile myFile = new clsSelectPrintFile();
myFile.SelectPrintFile();
inFile = myFile.FileName;
myFile.ReadSampleFromFile(inFile, LINESTOPRINT);
txtSampleOutput.Text = myFile.GetBuffer;
lblSample.Text = "First " + LINESTOPRINT.ToString() +
" lines of output from: " + inFile;
lblSample.Visible = true;
}
private void btnExit_Click(object sender, EventArgs e)
{
Close();
}
private void btnPrint_Click(object sender, EventArgs e)
{
try
{ // Make sure "job done" message is hidden
lblJobDone.Visible = false;
if (inFile == null)
{
MessageBox.Show("Select a file to print first",
"Input File Name Error");
return;
}
clsPrint doPrint = new clsPrint(inFile);
DialogResult result = prdMyPrintDialog.ShowDialog();
// If the result is OK then print the document.
if (result == DialogResult.OK)
{
myBackgroundWorker.RunWorkerAsync(doPrint);
}
}
catch (Exception ex)
{
MessageBox.Show("Error: " + ex.Message);
return;
}
}
private void myBackgroundWorker_DoWork(object sender,
System.ComponentModel.DoWorkEventArgs e)
{
try
{
clsPrint myPrinterJob = e.Argument as clsPrint;
// If you want to test this without wasting paper, uncomment the
// next line and comment out the call to myPrinterJob.Print();
// Thread.Sleep(10000);
// Comment out to avoid printing
myPrinterJob.Print();
e.Result = myPrinterJob;
} catch (Exception ex) {
MessageBox.Show("Error in DoWork: " + ex.Message);
}
}
private void myBackgroundWorker_RunWorkerCompleted(object
sender, RunWorkerCompletedEventArgs e)
{
// Let them know the job's done…
lblJobDone.Visible = true;
}
}
How It Works
Notice in the code that two new namespaces, Threading and ComponentModel, are added because the code references objects in those namespaces. Also near the top of the listing the statement
private System.ComponentModel.BackgroundWorker myBackgroundWorker;
is defined because of the BackgroundWorker object you need to use.
If you look closely at the code, virtually everything is the same, except in the btnPrint click event Instead of calling
doPrint.Print();
the code calls
myBackgroundWorker.RunWorkerAsync(doPrint);
The RunWorkerAsync() method causes the DoWork() threading event to be invoked. Note that the doPrint object is passed to the event handler so that the handler has access to any clsPrint data it may need. (Obviously, the event handler is going to need to know which file to print.)
Inside the event handler is the statement
clsPrint myPrinterJob = e.Argument as clsPrint;
In essence, the right side of the expression takes whatever was passed to the event handler as argument e and casts it as a clsPrint object using the as keyword. You've seen casts before, where you simply placed parentheses around the data type you want, as in
float val = (float) 12;
Knowing that, why not simply use the cast operator here? Well, the problem is that the cast operator works only with value types, not objects. The as keyword enables you to cast one object (for example, e.Argument) into another type of object (for example, clsPrint). In the code, this changes the event argument that was passed into the event handler (doPrint) into a clsPrint object. You do this so you can use your Print() method that's within clsPrint.
How does the thread know which file to print? This is not a problem because you already set the inFile property in clsPrint before you clicked the Print button. (If you didn't set it, inFile would be null and an error message would be issued.) When the print job finishes, the myPrinterJobobject is set to e.Result and the event handler relinquishes control. This causes the last event handler, myBackgroundWorker_RunWorkerCompleted(), to fire. All this event does is change the Visibility property of lblJobDone to true, which causes the Print Job Finished message to display.
What Have You Gained with Threading?
The main benefit of adding threading to your program is that users don't need to sit in front of their monitor waiting for a print job to finish. If they have a second file to print, users can start looking for it by clicking the Select Print File button before the current file finishes printing.
If you want to test this “no-waiting” feature without wasting a lot of paper in the process, uncomment the line:
// Thread.Sleep(10000);
in the DoWork() event handler and comment out
myPrinterJob.Print();
These changes cause the program to pause for 10 seconds instead of printing the file, which is long enough for you to click the Select Print File button and verify that it works even as the printer is doing its thing.
Another benefit of adding threading to the basic print program is that you can see how simple it is to make your programs take advantage of threading if the need arises.
Refactoring
Simply stated, refactoring is making changes to an existing program to either make it perform better or simplify the code. Figure 17.6 shows the different refactoring options as seen in the code editor's context menu.
Figure 17.6 Refactoring options
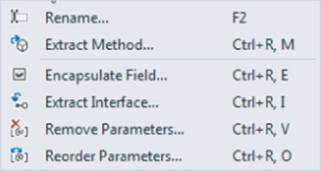
Rename
Simply stated, the Rename refactoring option enables you to rename a variable, method, class, or other program element. To use this option, simply move the cursor onto the element you want to change, double-click to highlight it, and then press F2. (You can also right-click the element to bring up the Refactor menu.) After you fill in the new name, Visual Studio makes the appropriate changes.
You may be thinking, “Why not just use the editor's search-and-replace functionality?” The reason is because Refactoring knows about the concept of scope and the editor doesn't. That is, if you have a variable named flag defined in one statement block and another variable with the same name in a different statement block, Refactoring changes only the occurrences of flag that have the same scope level. Using the editor for such changes makes the name change with no regard to scope…probably not what you have in mind.
Extract Method
The Extract Method refactoring option enables you to take duplicated code and easily integrate it into a method. For example, consider the RDC shown in Listing 17-5. Each textbox object has code tied to the object's Leave event (that is, the event that is fired when you press the Tab key to advance the cursor to the next field).
In the following Try It Out you use the code listing to see what the Extract Method refactoring brings to the party.
Try It Out: Extract Method
To see how the Extract Method works, follow these steps:
1. Create a new project using the project name ExtractMethod.
2. Type in the code in Listing 17-5. (Or download it; it's in the Chapter17ProgramRefactor.zip file.)
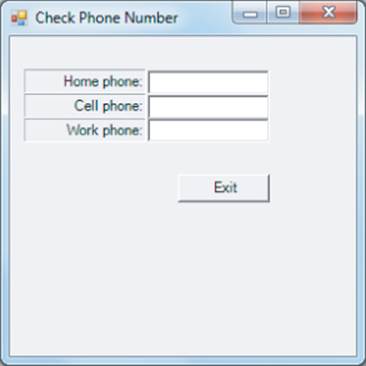
3. Add three label and corresponding textbox objects plus an Exit button.
Your user interface might look similar to Figure 17.7.
Listing 17-5: Program Without Refactoring
using System;
using System.Text.RegularExpressions;
using System.Windows.Forms;
public class frmMain : Form
{
private Label label1;
private Label label2;
private Label label3;
private TextBox txtHomePhone;
private TextBox txtCellPhone;
private TextBox txtWorkPhone;
private Button btnCheck;
private Button btnExit;
// Regex myRegex = new Regex();
#region Windows Code
public frmMain()
{
InitializeComponent();
}
[STAThread]
public static void Main()
{
frmMain main = new frmMain();
Application.Run(main);
}
private void txtHomePhone_Leave(object sender,
EventArgs e)
{
Regex regexObj = new Regex("\\d{3}-\\d{4}");
if (regexObj.IsMatch(txtHomePhone.Text) == false)
{
// Wrong format
MessageBox.Show("Phone number must be in
XXX-NNNN format.", "Format Error");
txtHomePhone.Focus();
return;
}
}
private void txtWorkPhone_Leave(object sender,
EventArgs e)
{
Regex regexObj = new Regex("\\d{3}-\\d{4}");
if (regexObj.IsMatch(txtWorkPhone.Text) == false)
{
// Wrong format
MessageBox.Show("Phone number must be in
XXX-NNNN format.", "Format Error");
txtWorkPhone.Focus();
return;
}
}
private void txtCellPhone_Leave(object sender,
EventArgs e)
{
Regex regexObj = new Regex("\\d{3}-\\d{4}");
if (regexObj.IsMatch(txtCellPhone.Text) == false)
{
// Wrong format
MessageBox.Show("Phone number must be in
XXX-NNNN format.", "Format Error");
txtCellPhone.Focus();
return;
}
}
private void btnExit_Click(object sender, EventArgs e)
{
Close();
}
}
Figure 17.7 Extract Method user interface
How It Works
Looking closely at the code, you see that the code fragment
Regex regexObj = new Regex("\\d{3}-\\d{4}");
if (regexObj.IsMatch(txtWorkPhone.Text) == false)
{
// Wrong format
MessageBox.Show("Phone number must be in
XXX-NNNN format.", "Format Error");
txtWorkPhone.Focus();
return;
}
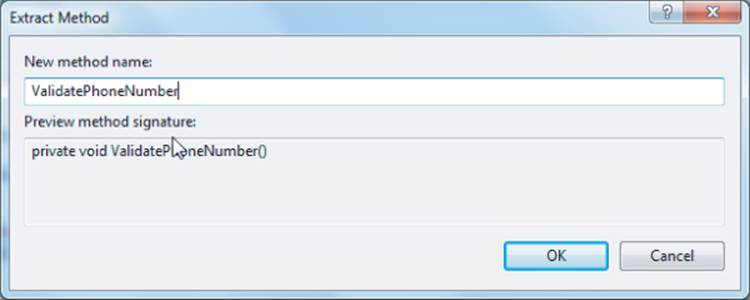
is repeated for each textbox object. If you highlight the code shown in the preceding fragment and then select the Extract Method refactor option (Ctrl+R, M), Visual studio creates a new method with the name you supply to the rename dialog (see Figure 17.8).
Figure 17.8 Extract method dialog
Clicking the OK button causes Visual Studio to create the following code:
private void ValidatePhoneNumber()
{
Regex regexObj = new Regex("\\d{3}-\\d{4}");
if (regexObj.IsMatch(txtHomePhone.Text) == false)
{
// Wrong format
MessageBox.Show("Phone number must be in
XXX-NNNN format.", "Format Error");
txtHomePhone.Focus();
return;
}
}
To make this new method work for all textboxes, you still need to modify the code a little:
private void ValidatePhoneNumber(TextBox myTextbox)
{
Regex regexObj = new Regex("\\d{3}-\\d{4}");
if (regexObj.IsMatch(myTextbox.Text) == false)
{
// Wrong format
MessageBox.Show("Phone number must be in
XXX-NNNN format.", "Format Error");
myTextbox.Focus();
return;
}
}
What you've done is add an argument to the method that allows you to pass in the textbox object to the method. Therefore, when you call the method
ValidatePhoneNumber(txtCellPhone);
the method knows to which object to send control that is the input is in error.
Although the code change in this example is fairly trivial, refactoring methods can save a huge amount of time when complex code is involved. The simplicity is enhanced when no arguments are passed to the refactored method. Still, it makes large scale changes simple.
The remaining refactoring options are what you'd expect. Encapsulating a field lets you change the access specifier for a specific field in a class, whereas Extract Interface enables you to convert one or more properties in a class to an interface if you want. The Remove Parameters and Reorder Parameters options simply go through the program code and delete or add a parameter to a method.
Summary
This chapter ties together some of the less used features of C# and Visual Studio. Although threading is a technique common to many other languages, refactoring may be less pervasive. Still, these are more tools to hang on your belt.
Exercises
You can find the answers to the following exercises in Appendix A.
1. What would you guess is the most common mistake beginning programmers make when it comes to printing?
2. What is threading?
3. What does threading bring to the party?
4. What is a BackgroundWorker?
5. Are there any dangers to threading?
6. What is refactoring?
What You Have Learned in This Chapter
|
Topic |
Key Points |
|
Printer object |
What a printer object is and how it can be used in your programs. |
|
Printer properties and how they can be changed |
How to change things such as fonts, margins, page margins, and related printer properties. |
|
Print class |
How to write a printer class that wraps a lot of the printer details into a single class. |
|
Threading |
A process in which a single program can have multiple processes. |
|
Reflection |
The ability to make small improvements to your code with minimal effort. |
All materials on the site are licensed Creative Commons Attribution-Sharealike 3.0 Unported CC BY-SA 3.0 & GNU Free Documentation License (GFDL)
If you are the copyright holder of any material contained on our site and intend to remove it, please contact our site administrator for approval.
© 2016-2026 All site design rights belong to S.Y.A.