Beginning Object-Oriented Programming with C# (2012)
Part II
Understanding C# Syntax
Chapter 5
Understanding Reference Data Types
What you will learn in this chapter:
· Reference data types
· How reference data types differ from value data types
· How the Bucket Analogy can be applied to reference data types
· String variables
· Verbatim string literals
· DateTime variables
· Constructor methods
· Overloaded methods
· Method signatures
wrox.com code downloads for this chapter
You can find the wrox.com code downloads for this chapter at www.wrox.com/remtitle.cgi?isbn=9781118336922 on the Download Code tab. The code in the Chapter05 folder is individually named as shown in this chapter.
In Chapter 3, you learned about the different value data types that C# makes available for use in your programs. This chapter concentrates on the other major type of data in C#: reference data types. Object-oriented programming owes much of its popularity to the power that reference data types bring to the programming table. Reference types are fundamental to object-oriented programming, and you will use them a lot.
String Variables
You already know that data used in a computer program falls into two broad categories: numeric data and textual data. Chapter 3 presented the value types that are used to store numeric data in a program. String variables are used to store textual data.
Data entered by a user into a program's textbox object is textual data. However, if you want to manipulate the user's input, you must first convert the textual data to numeric data by using the data type's TryParse() method. For example, if you want to convert the content of the txtOperand1textbox object into an int data type, use the following statement:
flag = int.TryParse(txtOperand1.Text, out val);
This statement converts the textual data typed into the txtOperand1 textbox object into an int data type, storing the integer result in variable val. What you may not realize is that the Text property of the textbox object is actually a string variable. The purpose of the TryParse() method is to convert the string data into a numeric data type.
In this chapter, you learn that string variables are simply places in memory to store textual data. Textual data, as a general rule, are not meant to be manipulated mathematically. Instead, you want to keep the data in a text format by storing it in a string variable. It's common to use textual data for storing names, addresses, phone numbers, ZIP codes, customer IDs, and so on. Some textual data actually is pure numbers, such as a ZIP code. How do you decide when to store something as a string or as a numeric data type? The rule is simple: If you are not going to manipulate the data in some mathematical way, store the data as a string.
Defining a String Reference Variable
Suppose you want to store the name "Hailey" in a program. Placing the double quotation marks around a sequence of text marks everything between the quotes as a string literal. Stated differently, you “literally” want to assign the word "Hailey" into the name variable. The double quotation marks that surround the string literal are not part of the literal. The quotation marks simply serve to tell Visual Studio the starting and ending points for the textual data.
You can assign the string literal "Hailey" into name with the following two lines of code:
string name;
name = "Hailey";
IntelliSense parses each of these two lines and finds the syntax to be correct. There is no dreaded squiggly line. So far, so good. Now consider the details of what Visual Studio is doing with the first statement line. Because there are no syntax errors in the first line, Visual Studio inspects the symbol table in the manner discussed in Chapter 4. Table 5.1 shows a simplified symbol table similar to what you saw in Chapter 4.
Table 5.1 Simplified Symbol Table
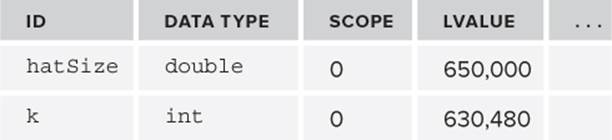
Because the variable name is not in the symbol table, Visual Studio sends a message to Windows requesting enough memory for a reference variable. All reference variables use the same amount of storage: 4 bytes. Provided the Windows Memory Manager can find 4 bytes of free memory, Windows returns the memory address for the reference variable name. You can assume that the memory address for name is 670,000. Visual Studio makes an entry into the symbol table, as shown in Table 5.2.
Table 5.2 The Reference Variable Added Symbol Table

Using the diagrams you studied in Chapter 4, you can show the lvalue and rvalue values for name as shown in Figure 5.1.
Figure 5.1 New lvalue and rvalue
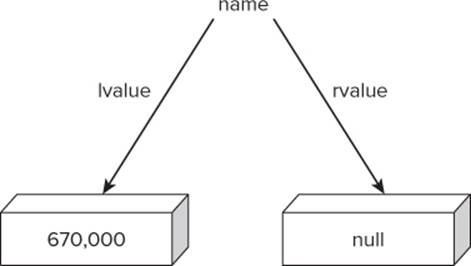
The interpretation of the lvalue of name in Figure 5.1 is exactly as in Chapter 4. That is, the lvalue is the memory address where the string reference variable name is stored in memory.
The Meaning of null
After Visual Studio has received the reference variable's lvalue from the Windows Memory Manager, it immediately assigns null into the rvalue of name. Recall that null is a keyword in C# that signifies that no useable data is currently associated with the variable. Anytime a variable has an rvalue equal to null, Visual Studio knows there is nothing useful associated with that variable. Figure 5.2 shows a memory map for the current state of the name reference variable.
Figure 5.2 Memory map for string variable
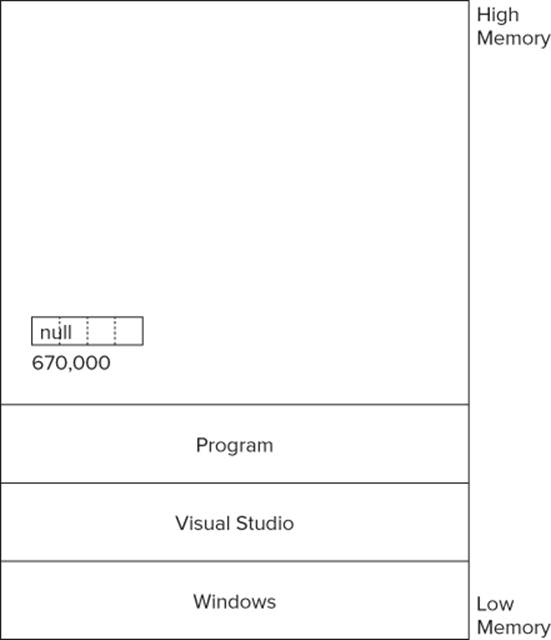
Using the Bucket Analogy from Chapter 4, you can verbalize the information in Figure 5.2 like this: The bucket for the name reference variable is stored at memory location 670,000 (its lvalue) and the content (rvalue) of its 4-byte bucket is null.
Now consider what happens when the second line is executed:
name = "Hailey";
Each textual letter in the name Hailey takes 2 bytes of storage. (See the sidebar “Unicode Versus ASCII.”) This means that the string literal Hailey actually requires 12 bytes of storage. However, you just read that the Windows Memory Manager returned only 4 bytes of storage for the rvalue ofname. You are probably saying to yourself, “Wait a minute! How do you hold 12 bytes of data in a 4-byte bucket?” Answer: You don't!
Unicode Versus ASCII
The need for a standard way to code computer information was recognized as early as the 1960s. The result was the American Standard Code for Information Interchange, or ASCII character set. The codes spanned 128 characters and included alpha and digit characters and punctuation, plus some nonprinting codes. Because there were only 128 characters, the entire ASCII set could be represented in one byte (that is, 256 = 28) with room to spare.
Problems began to arise as computing took on a more international flavor. Many languages and systems, such as the Kanji system for writing Japanese, have thousands of characters. The World Wide Web also pushed the need for a universal character set to the forefront. The result is the Unicode character set. The Unicode character set uses two bytes per character and permits more than 65,000 individual characters to be represented. C# uses the Unicode character set by default. This means that the actual storage requirement for a string variable is about twice as large as the number of characters in the string. (Many languages use a structure called a string descriptor block that is tied to the actual storage requirements. For your purposes, however, just think of each character as requiring 2 bytes of storage.)
Why Reference Types Are Different from Value Types
This is the cool part about reference variables: Reference variables can be associated with as much or as little data as necessary. The value data types you studied in Chapter 3 all have fixed storage requirements. For example, a byte data type requires 1 byte of storage but a long data type requires 8 bytes of storage. However, if you simply wanted to store the value 1 in a long, you still need to use 8 bytes of storage even though a single byte could store that value. For value data types, the number of bytes required to hold the rvalue is etched in stone for each one. Although using a fixed number of bytes for value types works fine, it won't work for things like string data. After all, the string might be used to hold a name like Hailey, but some other string variable in the program might be used to store the Declaration of Independence. Clearly, reference data types have to work differently to accommodate the varying lengths of data that can be associated with them. The way C# (and other programming languages) manages this is elegantly simple.
With a reference variable, the second line of code
name = "Hailey";
causes Visual Studio to send a second message to Windows. In essence, the message is, “Hey, Windows! It's me, Visual Studio…again. I need 12 bytes of free memory to store some data. Can you help me out?” Notice that Visual Studio doesn't say anything about the nature of the data other than how many bytes it needs for storage. When the value types are discussed in Chapter 3, you assume that Windows knows how many bytes are associated with the various value types. With reference types, Visual Studio can't assume Windows knows anything about the number of bytes needed because the storage requirements can be fairly short ("Hailey") or long (the Declaration of Independence).
Assuming there's some free memory available in the system, the Windows Memory Manager sends a message back saying: “Hey, Visual Studio! I found the storage you need starting at memory location 725,000. Now leave me alone for a while…I'm busy.” Memory Managers get cranky from time to time because they have other programs making similar requests, too. After all, there could be other programs running at the same time that you're running Visual Studio. Because you just asked it for a place to store name, it's not happy to hear from you again so soon for this 12-byte storage request. (Not to worry…the Memory Manager will get over it.)
When Windows returns the memory address 725,000 to Visual Studio, Visual Studio immediately takes the name "Hailey" and moves it into memory starting at address 725,000. The state of the memory map for name now appears as shown in Figure 5.3.
Figure 5.3 Memory map after a string assignment

Reference Variable Rules
Compare Figures 5.2 and 5.3. First, note how the rvalue of name has changed from its previous value of null to the memory address where the data is stored. Second, you can see that the 12 bytes starting at memory location 725,000 now hold the string literal "Hailey". These observations illustrate the following rules for reference variables:
· The rvalue of a reference variable can have only one of two values: null or a memory address.
· If the rvalue of a reference variable is null, the reference variable contains no useful data.
· If the rvalue of a reference variable is not null, it contains the memory address where the data associated with the reference variable is stored.
The first rule confirms several things about reference variables. First, unlike a value type, which has an rvalue that holds the data you're interested in, a reference variable does not hold the actual data you want to use in a program. Second, because the rvalue of a reference can hold only null or a memory address, the size of a reference variable is always 4 bytes on 32 bit systems. This means that the size of a reference variable's bucket is always the same regardless of the actual data that might be associated with it—4 bytes. When this topic comes up at your next party, you can look smart by saying, “The state of a reference variable is either null or a valid memory address.”
The second rule affects the way IntelliSense enforces the syntax of C# statements that use reference variables. If you try to perform some type of string operation on a reference variable whose rvalue is null, IntelliSense complains and issues an error message. For example, if you try to pass nameto a method when it contains a null rvalue, IntelliSense will say something like this:
Use of unassigned local variable 'name'.
IntelliSense does this because it knows the null rvalue means the program has no useful data associated with the variable.
The third rule is the most important. If a reference variable contains a non-null value, that value is the memory address where the actual data is stored. Indeed, this is why they are called reference variables. The non-null rvalue of a reference variable refers you to the memory location at which the data is stored.
Reference Type Variables Versus Value Type Variables
Consider the interpretation of the Bucket Analogy as it relates to the two types of variables. With value type variables, you look in the bucket, and you immediately find the data you are interested in stored in the variable's rvalue. Also, with value types, the size of the bucket varies according to the type of data stored in the bucket. That is, the bucket size for an int data type is 4 bytes, whereas the bucket size for a decimal data type is 16 bytes. Therefore, you are interested in the size of a value type's bucket because it gives you a clue as to the type of data stored there.
With a reference type variable, you look into the bucket and find either null or a memory address. If you find a null in the bucket, the variable has nothing interesting associated with it. On the other hand, if you look into the bucket and see something other than null, you must jump to that memory address to inspect the data.
The conclusion is simple: Value types have an rvalue that is the data. Reference types have an rvalue that either refers you to the data (a memory address) or does not reference any data (null).
Why Do Reference Variables Work the Way They Do?
Why did the people who designed C# make reference variables work the way they do? Consider the way value types work. Suppose you write a method that squares the number entered into the program by the user. After you convert the user's input into a value type, like an int, you now want to pass that value to a method you plan to write named SquareIt(). The purpose of the SquareIt() method is to take that value, square it, and return that squared value to the caller. To do this, Visual Studio makes a temporary copy of the value of the number, calls your SquareIt() method, and tells it where that temporary copy of the number is located. Because an int uses only 4 bytes of storage, the process to make a copy of the int is fast and doesn't use up much additional memory for the temporary copy.
Now suppose you have a program with a string variable that refers to the text of three chapters of a book. (Perhaps you read the data from a disk file into the program.) This means that the string variable might point to a block of memory with hundreds of thousands of bytes in it. Now suppose that you write a method whose purpose is to search those hundreds of thousands of bytes looking for a specific word. If the method call works as it does for value types, Visual Studio must copy those hundreds of thousands of bytes into a temporary memory location. Copying hundreds of thousands of bytes has two disadvantages. First, it's fairly slow relative to copying just a few bytes as with a value type. Second, the temporary copy of the chapters would take up another huge chunk of memory, possibly causing the program to run out of memory.
C# solves these performance and memory-limitation problems by simply passing the address of the memory location where the data is stored. Because the rvalue of a reference variable tells Visual Studio where to find the data, the 4-byte rvalue of a reference variable is all the method needs to find the data. Visual Studio doesn't need to copy the data. The method can find the data by just jumping to the memory location it receives from the reference variable's rvalue. This approach saves both time and memory.
That's the good news.
Pass by Value Versus Pass by Reference
The bad news is that the method that uses a reference variable has direct access to the data. Recall that a method that uses a value type receives a copy of the variable's value, not the lvalue of the variable itself. This means that the method cannot permanently change the user's value. With value types there are two buckets in memory: the original bucket and the bucket containing the copy. The method can alter the copy's rvalue but has no clue where the original bucket is stored. Therefore, this pass by value way to send data to a method protects the original data because only a copy of the data is seen by the method.
With a reference variable, you send the actual memory location of where the data is stored. Passing the actual memory location is called pass by reference. This means that the method has direct access to the original data, not to a copy of it. It also means that, if the method wants to, it can permanently affect the data associated with the reference variable.
The old saying, “There's no such thing as a free lunch,” applies to programming, too. You can use reference variables when writing a method to improve its performance and conserve memory. However, the price you pay is that you expose the data to the possibility of contamination because the method has direct access to it. This is sort of like a medieval king who takes the time to hide his daughter away in the castle tower, but then turns around and hands out her room key to every knight in the kingdom…probably not a good idea. Similarly, making the effort to hide data isn't terribly worthwhile if you tell everyone where it's hidden. Chapter 10 revisits these (encapsulation) issues and offers ways to cope with them.
A Little Efficiency Gain
As discussed earlier, the following statements caused Visual Studio to send two memory requests to the Windows Memory Manager:
string name;
name = "Hailey";
The first was to find storage for name and the second was to find storage for "Hailey". Anything you can do to lessen the number of messages sent between Windows and Visual Studio is probably a good thing. This is because exchanging messages between Visual Studio and Windows takes time. You can accomplish the same thing and save some time by collapsing the two statements into one:
string name = "Hailey";
In this case, only one message needs to be sent to the Windows Memory Manager. That message might be stated as, “Windows…wake up! I need a reference variable capable of storing 12 bytes of data.” Windows knows a reference variable requires 4 bytes of storage. Assuming it responds with the information shown in Figure 5.3, the message sent back might be, “Hey, Visual Studio! I've stored your reference variable at memory address 670,000 and set its rvalue to 725,000. You're welcome.” Visual Studio then proceeds to store "Hailey" starting at memory address 725,000 (refer to Figure 5.3).
The end result is exactly the same regardless of whether you use the one- or two-line version for assigning the string literal. The one-line version, however, accomplishes the same task with one less message sent to Windows. True, doing away with one Windows message isn't going to make much of a performance difference. However, if your program repeats a message thousands of times, the user might notice the difference. Obviously, either way works just fine. However, you are likely to see experienced programmers use the second form more often. If you do see the shorter version, it could well be that program speed has nothing to do with it. The programmer may have chosen it simply because it requires less typing!
Using String Variables
String variables are reference variables that enable you to store and manipulate textual data. Although most people associate computers with number crunching, a large part of the work done by computers involves manipulating textual data, not numbers. Indeed, database programs are often pushing around huge amounts of textual data, often even more than numeric data.
String Concatenation
You used string concatenation in an earlier program, but nothing much was said about it. Simply stated, string concatenation is the process of taking one string and adding it to another to form a new string, for example:
string name = "Hailey" ;
name = name + " Mohr";
In the preceding statements, name is assigned "Hailey", as explained earlier. The second line concatenates the string literal " Mohr" (there is a space before Mohr") to form the new string "Hailey Mohr". This new string is then assigned into name. As you can see, string concatenation is little more than adding one string onto another string. In this example, the string concatenation takes the first and last names and concatenates them into a full name.
Shorthand Assignment Operators
Taking one value and adding a second value to it is such a common task in programming that C# provides a number of shorthand assignment operators for the basic math and string concatenation operators. For example, suppose the variable name currently holds the string "Hailey" as you saw just now. You can take the original line shown earlier:
name = name + " Mohr";
and rewrite it, using a shorthand concatenation operator, as
name += " Mohr";
The result is exactly as before: "Hailey Mohr". In the statements
int i = 10;
i += 5;
the value of i is now 15. Therefore, the "+=" assignment operator serves a dual purpose: It performs string concatenation when string variables are used, or it can be used for addition when value type variables are used. Table 5.3 presents a list of the shorthand assignment operators.
Table 5.3 Shorthand Operators
|
OPERATOR |
EXAMPLE |
INTERPRETATION |
|
+= |
val += days; |
val = val + days; |
|
-= |
val -= days; |
val = val - days; |
|
*= |
val *= days; |
val = val *days; |
|
/= |
val /= days; |
val = val / days; |
|
%= |
val %= days; |
val = val % days; |
Of the operators shown in Table 5.3, only the concatenation operator (+) makes sense when you work with string data. All the operators in the table, however, may be used with value types. Obviously, the shorthand operators don't give you anything you didn't already have. However, programmers usually don't like to type more than they have to, so experienced C# programmers use the shorthand operators often.
String Manipulation
You already know that a string is a reference data type. You also know that reference types and value types are different. The rvalue of a value type variable is the data value of the variable. For reference type variables, however, the rvalue is either null or the memory addresses where the data reside. All reference types in C# behave as objects of a class. As such, reference types can have properties and methods just as textboxes, labels, buttons, and other objects do. This section introduces you to some of the more common properties and methods in the string class.
String Length
One common task when working with string data is to verify that the string contains the proper data. For example, if you ask a user to enter a ZIP code, you may want to verify that the user typed exactly five characters into the textbox object used to collect the ZIP code string. (Yeah, I know there can be 9-digit zip codes, but ignore that for the moment.) For example, suppose you've written a program that uses txtZipCode to collect the ZIP code from the user. Your next task might be to determine if the user typed five characters into the textbox. One of the properties provided by the string class is the Length property:
int length;
string zip = "45245";
length = zip.Length;
In the code fragment above, zip is assigned the literal value "45245". The integer variable length is then assigned the value of the Length property of the zip string object. In the example, the zip .Length property has a value of 5. Therefore, the length variable has an rvalue of 5 after the assignment statement in the last line of the preceding code is executed.
Letting IntelliSense Show You Properties and Methods
You might ask, “Are there other properties or methods in the string class?” Yes, there are a bunch of them. Any time you want to find the properties or method of an object (string or otherwise), let IntelliSense give you the list. For example, Figure 5.4 defines a string variable named temp. A few lines later you want to find out what property you might use to determine the length of the string. To do this, type in the name of the string variable followed by the dot operator. IntelliSense immediately presents you with a listbox containing all the properties and methods for the current object, a string named temp in this case. (Refer to Figure 5.4.)
Figure 5.4 Using IntelliSense to find a string property
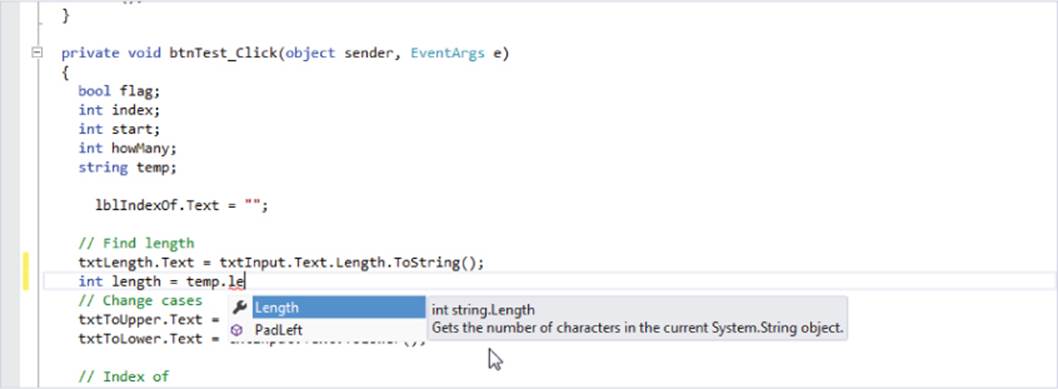
If you look closely at Figure 5.4 (or better yet, write some test code of your own), you can see the Length property in the listbox object. If your eyes are good, you can see that the icon to the left of the word Length in the listbox object is a hand pointing to a page of code. The hand icon denotes an object property. If you look to the right of the listbox object, you can see that IntelliSense also gives you a brief description:
int string.Length
Gets the current number of characters in the current System.String object.
The first word (int) of the first line tells you that string.Length is an int data type. (This is why you make length an int data type in the preceding code fragment). The second line simply provides a brief description about the property (or method).
Finally, if you look at the last item in the listbox object shown in Figure 5.4, you can see a 3-D purple box next to the word Remove. Because Remove has a 3-D box icon next to it, it is a method. If you had selected Remove from the list, the screen would show something like Figure 5.5.
Figure 5.5 Using IntelliSense to find a string method
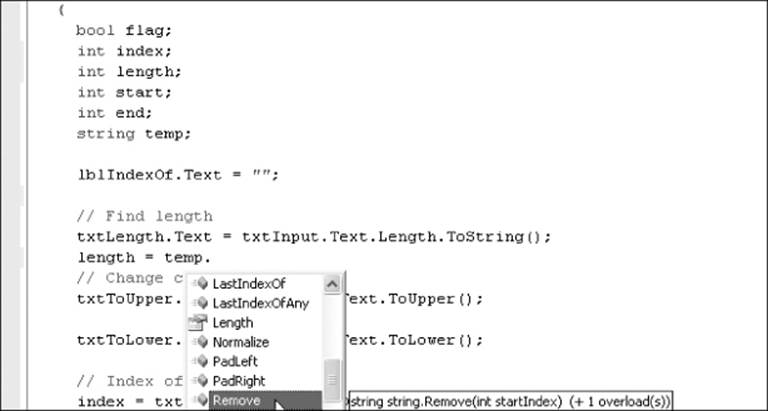
Note that the nature of the message from IntelliSense has changed. It now says this:
string string.Remove(int startIndex) (+ 1 overload(s))
The first word (string) says that the method returns a string data type. The phrase string .Remove(int startIndex) says that the Remove() method is part of the string class and that it expects an integer value to be supplied with it. (A complete example of how to use Remove() is given later in the Try It Out section, “Using String Class Properties and Methods.”) Finally, (+1 overload(s)) indicates that there are multiple “flavors” of this method. You're not ready to discuss what that means…yet, but you will be a little later in the section titled “Overloaded Methods.”
Using an IntelliSense Option
IntelliSense wouldn't present you with all the options in a listbox if you couldn't use the listbox. For example, Figure 5.4 shows the Length property highlighted. If you now press the Tab key, IntelliSense automatically fills in the word Length in your source code. You can use the same technique for object methods, too. The bad news is that if you select a method rather than a property, IntelliSense does not automatically supply the parentheses for the method. You must type the parentheses in.
An Important Distinction Between Properties and Methods
Properties are variables associated with an object. As such, they do not require parentheses to follow their names. On the other hand, all methods must have parentheses following the method name. Violating these rules evokes a squiggly line nastygram from IntelliSense.
Thinking About Object Properties and Methods
You have just seen that the string data type offers you a host of properties and methods from which to choose. You must think about string data as an object. Drawing on the discussion from Chapter 2, a string variable is actually an object with a box that you can open up using the dot operator. The dot operator then makes that object's properties and methods available to you. This can greatly simplify using reference type data because Visual Studio has already written the code for many properties and methods for you.
When you see IntelliSense open up a listbox with that object's properties and methods listed, take a moment to scroll through the list, highlighting each property and method. As you highlight each option in the listbox, IntelliSense gives you a brief description of the purpose of that property or method. In the process of doing this, you may discover that the task you need to accomplish has already been done for you.
In the following Try It Out section you will use a number of the String class method and properties. While not all of the String class methods and properties are used, the program does exercise those methods and properties you are most likely to use in your own programs.
Try It Out: Using String Class Methods and Properties (Chapter05StringMethods.zip)
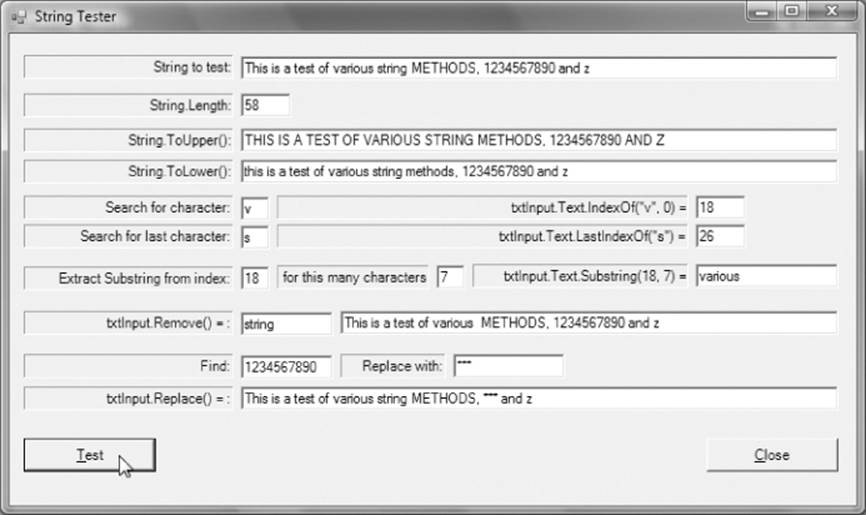
Figure 5.4 shows that numerous properties and methods are associated with strings. In this section, you write a program that exercises some of those properties and methods. Figure 5.6 shows the user interface for the program.
Figure 5.6 User interface for a string program
To create the program, use the following steps:
1. Create a new project using the sequence of steps you have used before when creating a new project, including inserting the C# template code presented in Listing 2-1 (in Chapter 2).
2. Add the label and textbox objects using the variable names shown in Table 5.4. (The table is organized such that the names of the textboxes shown in Figure 5.6 are presented from top to bottom and left to right.)
3. Also add two button objects for the Test and Close buttons.
4. Download the code found in the Chapter05StringMethods folder and copy it to the current project.
Table 5.4 Program Objects and their Description
|
TEXTBOX NAME |
DESCRIPTION |
|
txtInput |
The textual data to be used. |
|
txtLength |
The length of the input data. |
|
txtToUpper |
The result of converting the data to uppercase. |
|
txtToLower |
The result of converting the data to lowercase. |
|
txtSearchChar |
A character in the data to search for. |
|
txtSearchIndex |
The position where the character was found. |
|
txtLastChar |
Find the last occurrence of this letter. |
|
txtLastIndexOf |
The position where the last occurrence was found. |
|
txtStartIndex |
Start from this position within the string. |
|
txtEndIndex |
Copy this many characters from the string. |
|
txtSubstringResult |
The substring that is copied. |
|
txtRemove |
The text to remove from the string. |
|
txtRemoveResult |
The string after the text has been removed. |
|
txtReplaceChars |
Find this sequence of characters within the string. |
|
txtReplaceWith |
Replace the preceding sequence with this sequence of characters. |
|
txtReplaceResult |
The resultant string after the replacement. |
You can arrange the textboxes in a different order if you want. Because there are so many string methods used in this program, the How It Works section that follows is longer than most. However, understanding how the string data type works is extremely important.
How It Works
You can see in Figure 5.6 that the program asks the user to enter a line of text into the top textbox (txtInput). After the text is entered, the user clicks the Test button to exercise some of the many string methods provided by Visual Studio. The code for the Test button click event is shown inListing 5-1. Each of the features shown in Figure 5.6 is explained in the following sections.
Listing 5-1: btnTest Click Event Code (frmMain.cs)
private void btnTest_Click(object sender, EventArgs e)
{
bool flag;
int index;
int start;
int howMany;
string temp;
lblIndexOf.Text = "";
// Find length
txtLength.Text = txtInput.Text.Length.ToString();
// Change cases
txtToUpper.Text = txtInput.Text.ToUpper();
txtToLower.Text = txtInput.Text.ToLower();
// Index of
index = txtInput.Text.IndexOf(txtSearchChar.Text, 0);
lblIndexOf.Text = "txtInput.Text.IndexOf(\"" + txtSearchChar.Text +
"\",0) = ";
txtSearchIndex.Text = index.ToString();
//LastIndexOf
index = txtInput.Text.LastIndexOf(txtLastChar.Text);
lblLastIndexOf.Text = "txtInput.Text.LastIndexOf(\"" + txtLastChar.Text + "\")
= ";
txtLastIndexOf.Text = index.ToString();
// Substring
flag = int.TryParse(txtStartIndex.Text, out start);
if (flag == false)
{
MessageBox.Show("Improper numeric input. Re-enter.");
txtStartIndex.Focus();
return;
}
flag = int.TryParse(txtEndIndex.Text, out howMany);
if (flag == false)
{
MessageBox.Show("Improper numeric input. Re-enter.");
txtEndIndex.Focus();
return;
}
lblSubstring.Text = "txtInput.Text.Substring(" + start.ToString() + ", " +
howMany.ToString()+ ") = ";
txtSubstringResult.Text = txtInput.Text.Substring(start, howMany);
// Remove
temp = txtInput.Text;
index = temp.IndexOf(txtRemove.Text);
if (index > 0)
{
txtRemoveResult.Text = temp.Remove(index, txtRemove.Text.Length);
}
// Replace
temp = txtInput.Text;
txtReplaceResult.Text = temp.Replace(txtReplaceChars.Text, txtReplaceWith.Text);
}
For the sample test run shown in Figure 5.6, you can type in the following string:
This is a test of various string METHODS, 1234567890 and z
For the sections that follow, repeat specific lines of code relative to the method or property under discussion.
The Length of a String: Length
The Length property stores the number of characters of a string. This count includes everything in the string, including blank spaces, punctuation, and digit characters. The code shown in Listing 5-1 for the Length property is:
// Find length
txtLength.Text = txtInput.Text.Length.ToString();
You're probably saying, “Hold on a minute! Why so many dot operators in the statement?” Good question. Now break apart the right side of the expression first. Suppose you type in the following in the Source window of Visual Studio:
txtLength.Text = txtInput.
In Chapter 2 you learned that the dot operator is used to separate an object (the txtInput textbox object in this example) from the properties and methods available to that object. In other words, the dot operator “opens the box” of the object to give you access to the properties and methods of that object. (Refer to Figure 2.7 in Chapter 2.) The instant you type in the period after the name of the txtInput textbox object, Visual Studio displays the listbox, as shown in Figure 5.7.
Figure 5.7 A textbox list of properties and methods
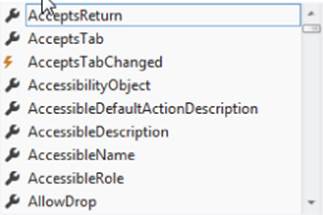
The listbox shown in Figure 5.7 actually contains more than 200 properties and methods associated with a textbox object. In this particular case, you are interested in the Text property of the txtInput textbox object. So you type in Te and the listbox automatically scrolls down to the Textproperty of the txtInput textbox object. Press the Tab key and Visual Studio fills in the rest of the word Text for you. So far, so good.
Now ask yourself this question: What kind of data type is the Text property? Well, if the Text property is storing textual data, the data must be stored in a string data type. Because the Text property of a textbox object is a string variable, it also means the Text property is a string object. Therefore, you should type in another dot operator to see what's available in that string object. So you type in the dot operator:
txtLength.Text = txtInput.Text.
After you do that, Visual Studio presents you with a listbox containing the properties and methods associated with a string object. This new list is shown in Figure 5.8.
Figure 5.8 The properties and methods for a Text object
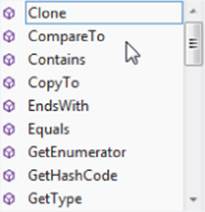
If you scroll through this list, you find there are a lot of methods for string objects, but only one property: Length. You can either scroll down to the Length property or type in the first few letters and let Visual Studio scroll you to the Length property. If you press the Tab key, Visual Studio fills in the property name for you. Your statement now looks like this:
txtLength.Text = txtInput.Text.Length
Now you have a problem. The length of a string is stored as an int data type. The problem is that you want to assign a numeric integer value (txtInput.Text.Length) into a textual property that is a string data type (txtLength.Text). The bad news is that you have an apple on one side of the assignment operator and an orange on the other side. The good news is that C# can treat value types as objects when it needs to…like right now. (See the “Data Wrappers” sidebar.) Therefore, because Length is an int value type that can be treated as an object when necessary, you add another dot operator to the expression:
txtLength.Text = txtInput.Text.Length.
Visual Studio immediately senses that you want to treat Length as an object, so it presents you with a list of properties and methods associated with value data types. The list of methods for value data types is shown in Figure 5.9.
Figure 5.9 List of methods for value types
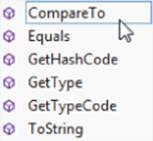
As illustrated in Figure 5.9, Visual Studio provides only six methods for value types. However, one of those six is the ToString() method, which is exactly what you need. You now complete the statement:
txtLength.Text = txtInput.Text.Length.ToString();
Now your problem has disappeared. You have a string data type property (Text) on the left side of the assignment operator and a string data type on the right side because you use the ToString() method to convert the integer value of Length into a string. Ta-da! You can now see the input string's length properly displayed in the txtLength textbox object. (Refer to Figure 5.6.)
This rather lengthy explanation may seem like using an H-bomb to kill an ant, but you must understand that one object (such as a textbox) can have another object (such as a string) stored as a property inside it. Further, that string object (Text) can also have a property (such as Length) that may be treated as an object, too. All value types have the six methods shown in Figure 5.9 available should you need them. In this example, you needed to use the ToString() method of the Length property so that you could convert the integer value of Length into a string for display in thetxtLength textbox.
Data Wrappers
In non-OOP languages, value types and reference types suffer the old oil-and-water problem…they don't mix well. C#, on the other hand, was designed to be an object-oriented programming language from the start. The designers knew, therefore, that there would be times when the programmer would like to treat the value type data as though it were an object. For that reason, C# has a wrapper class that envelops the value type. (You already read some information about wrapper classes in Chapter 3.) Although it's a bit of a simplification, you can think of a value type wrapper class as having one property (its value) and six methods (see Figure 5.9). Of the six methods, the ToString() method is used most often and enables you to convert the value of the data type to a string.
Changing the Case of a String: ToUpper( ) and ToLower( )
Sometimes certain tasks can be simplified if the textual data is all in the same case. For example, one person may write her last name as “Van d'Camp” whereas another person writes it as “van d'Camp.” If you were searching a list of strings that contain people's names, you might miss the person you were looking for because you didn't enter the name using exactly the same case the user did. To avoid problems like this, you can change the string to a single case and use that case during the search process. The following statements change the input string shown in Figure 5.6to all uppercase letters using the ToUpper() method:
txtToUpper.Text = txtInput.Text.ToUpper();
txtToLower.Text = txtInput.Text.ToLower();
The resulting changes are shown in their respective textbox objects. The second statement changes the string to all lowercase letters. The right side of the preceding assignment statements may be verbalized as, “Find the txtInput textbox object, locate its Text property, and because it's a string variable, use its ToUpper() or ToLower() methods to change the Text property to upper- or lowercase, respectively.” You can find both of these methods by scrolling the listbox shown in Figure 5.8.
Finding a Specific Character: IndexOf( )
Suppose you want to find a specific character in a string. In Figure 5.6, you typed in the character v and used the IndexOf() method to find the first occurrence of that character. The next textbox (txtSearchIndex) on the same line has the number 18 displayed in it. This means that theIndexOf() method found the letter v at index number 18 in the string. If you count the number of letters and spaces up to the letter v, you discover that the v is the 19th character.
What?
The reason the value is 19 is that programming languages start counting characters in a string referencing the first position as position zero, not position one. If you count the number of characters and spaces beginning with zero, you can find that the v is, indeed, at position 18. Programmers use the word index to refer to the zero-based position of a character in a string.
The code that accomplished the search is found in the following statements:
// Index of
index = txtInput.Text.IndexOf(txtSearchChar.Text, 0);
lblIndexOf.Text = "txtInput.Text.IndexOf(\"" + txtSearchChar.Text
+ "\",0) = ";
txtSearchIndex.Text = index.ToString();
Now examine the first statement. The right side of the assignment operator says, “Get the Text property of the txtInput textbox object and use the Text's method named IndexOf().” Unfortunately, IndexOf() can't do its job without two additional pieces of information. First, IndexOf()needs to know what character you want to find. The character to find is the letter the user typed into the txtSearchChar textbox object. (It's the textbox with the v in it in Figure 5.6.) You retrieve that character using the txtSearchChar.Text property. Second, IndexOf() wants to know the index where you want to begin the search. In your case, you want the search to start at the beginning of the string, so you use the index value 0. (The first character in a string is at position zero, remember?) These two pieces of information are called the arguments of the IndexOf() method. Simply stated, method arguments are information that you pass to a method so the method can perform its task. Method arguments can be in the form of variables, like txtSearchChar.Text, or literal values, like the second argument, 0. (Actually, there are two “flavors” of the IndexOf()method. If you only pass in a single argument, the IndexOf() method assumes the search starts with position 0 in the string. The “Overloaded Methods” section later in this chapter explains how this works.) After you enter the proper method arguments for IndexOf(), the program transfers program control to the program code for the IndexOf() method. Simply stated, the IndexOf() code starts examining itself (after all, IndexOf() is part of the Text property, so it knows what the string is) starting at the index you passed to it. Because you passed a zero to the IndexOf() method, it begins its search with the first character in the string, which is at position 0. The code examines the first character and compares it to the character you passed to it, the v. Because there is no match, it looks at the second position. It continues this process until it finds a match, which it finds at position 18. Okay…now what?
The IndexOf() method was successful in finding a match at index 18, but it needs a way to convey that information back to the point in the program where we invoked the IndexOf() method. Although the technical details of how the value 18 is passed back to the point in the program that needs it is covered in Chapter 10, for now, simply think of the right side of the assignment expression,
index = txtInput.Text.IndexOf(txtSearchChar.Text, 0);
as being replaced with this:
index = 18;
The reason to use the txtInput object was to get to the Text property so you could use its IndexOf() method to locate a specific character. Because the object (txtInput) and its property (Text) and method (IndexOf()) have all done their jobs, the code could determine the exact location of the v character in the string. In formal language you would say, “The IndexOf() method returned the integer value of 18.” When the statement is complete, the variable index now has an rvalue of 18 assigned into it.
“Calling” a Method
You read about calling a method in Chapter 3, but it's worth repeating here but with a slight twist. It's common to refer to the variable on the left side of an assignment statement as the caller when a method is used to resolve an expression. That is, index is invoking, or “calling,” theIndexOf() method so that it can have a proper position value assigned into itself. Likewise, you often hear something like, “IndexOf() returns the value 18 to the caller.” The interpretation is that the value determined by the IndexOf() method is assigned into the caller—index in this example.
What happens if the string doesn't contain the character you're looking for? In that case, IndexOf() returns the value -1 to the caller. If IndexOf() returns a negative value, you know the search failed. One more thing: Although the example presented here illustrates IndexOf() as searching for a single character, the first argument to IndexOf() can also be a string with more than a single character. In that case, IndexOf() returns the index of the first character in the string where the match occurred. If IndexOf() cannot find an exact match for the character sequence of the string passed to it, it returns a -1.
Searching for the Last Occurrence of a Character: LastIndexOf( )
The IndexOf() method enables you to search for the first occurrence of a particular character in a string. Now suppose that there are one-half-dozen occurrences of that character, but you're interested in the position of the last one. You could call IndexOf() five times, having the method return an index for each (unwanted) position. That is, you could then call IndexOf() again, using the index plus one as the second argument in the method call. (Think about what that means.) However, it's more efficient to use the LastIndexOf() string method instead.
The code for the LastIndexOf() method is this:
index = txtInput.Text.LastIndexOf(txtLastChar.Text);
lblLastIndexOf.Text = "txtInput.Text.LastIndexOf(\"" +
txtLastChar.Text + "\")
= ";
txtLastIndexOf.Text = index.ToString();
There is only one argument to LastIndexOf() and it is the character for which you are searching. It doesn't need a second argument for the starting position for the search because LastIndexOf() automatically starts the search at the end of the string, searching backward toward the start. The method returns the (zero-based) index of the character if the search is successful and -1 if no match is found. The remaining two lines of code have virtually the same interpretation as the IndexOf() code fragment. (Refer to Figure 5.6 to see what the contents of the label look like.)
Searching for a Substring
If you have ever used a word processor and searched a document for a specific word, chances are the word processor was using a method similar to the Substring() method to copy the substring that appears at the specified point in the string. The code that uses the Substring() method is shown here:
lblSubstring.Text = "txtInput.Text.Substring(" +
start.ToString() + ", " +
howMany.ToString()+ ") = ";
txtSubstringResult.Text = txtInput.Text.Substring(start, howMany);
You already know how to use the TryParse() method calls. Suffice it to say that the two TryParse() method calls in Listing 5-1 simply convert the digit characters entered by the user in the two textbox objects into integer variables named start and howMany.
In Figure 5.6, the start position is set to position 18 (start = 18). Again, because string positions are always referenced from position 0, you are actually going to start the substring with the 19th character in the string. If you count 19 characters (including spaces and punctuation) in the string, you find that the 19th character is the v in the word various.
The howMany variable might have a different meaning than you think. The value of howMany tells the Substring() method how many characters to copy, beginning with position start. The variable howMany does not set the ending index value for Substring(). In Figure 5.6 you can see that the value for howMany is set to 7. Therefore, the statement
txtSubstringResult.Text = txtInput.Text.Substring(start,
howMany);
becomes
txtSubstringResult.Text = txtInput.Text.Substring(18, 7);
that functionally results in
txtSubstringResult.Text = "various";
This means that the substring you want to copy from the string is the word various. You can see the result in Figure 5.6. You should experiment with the program and try different start and end values to see the impact it has on the substring.
Removing a Substring
Suppose you have a string that is actually a memo to a colleague who has botched a job you asked him to do. You find that your memo uses the word “idiot” several times, and your assistant suggests that it might not be politically correct to call him an “idiot” because he's your boss's son. You decide to remove the word “idiot” from the memo. The editor you use to remove the word “idiot” probably works like the Remove() string method.
The statements to use Remove() from Listing 5-1 are as follows:
// Remove
temp = txtInput.Text;
index = temp.IndexOf(txtRemove.Text);
if (index > 0)
{
txtRemoveResult.Text = temp.Remove(index,
txtRemove.Text.Length);
}
First, the code copies the original string entered by the user, so it doesn't permanently change the string as it appears in the first textbox. Next, the code uses the IndexOf() method to find the position where the “target string” is located. In the preceding discussion, the target string would be the word “idiot.” In Figure 5.6, the target string is the word “string.” In the code, the target string is whatever the user types into the txtRemove textbox object as stored in the Text property. The code then calls IndexOf() to locate the target string. Note that IndexOf() is capable of searching for a string with a single character, as you saw in the IndexOf() discussion section earlier, or it can locate a string with multiple characters in it.
If the search is successful, variable index is assigned the starting position of the string. If the search fails to find a match, index is assigned −1 (as explained earlier). The if statement prevents an unsuccessful search from calling the Remove() method.
Figure 5.6 shows that you searched for the word string when exercising the Remove() method. The target string starts at an index position of 26. This value becomes the first argument in the call to the Remove() method. The second argument is the number of characters you want to remove. You know that string has six characters in it, so you could “hard-code” the literal value 6 into the second argument. However, that's not flexible. Anytime you want to find a different string, you likely need to adjust the second Remove() method argument. Because the txtRemove textbox object holds the string you want to remove, you can always use the Length property to adjust the second argument to the proper value. Therefore, the statement
txtRemoveResult.Text = temp.Remove(index,
txtRemove.Text.Length);
becomes
txtRemoveResult.Text = temp.Remove(26, 6);
which resolves to
txtRemoveResult.Text = "This is a test of various METHODS,
1234567890 and z";
The new string then displays in the txtRemoveResult textbox object by assigning the new string to its Text property. (Note: There is a little hiccup in this code. Because the code removed only the word string from the original string, there are now two blank spaces between the wordsvarious and METHODS where there should only be one space. How would you fix this problem?)
Replacing a Substring
Sometimes you need to change one word in a larger string with a replacement word. For example, suppose your boss tells you to send the program specifications to Gene, which you obediently do, only to find out that Gene is actually Jean. In this case, you need to replace the word Gene with Jean. This task is exactly what the Replace() string method is designed to do.
Figure 5.6 suggests that you want to replace the substring 1234567890 with ***. The statements that accomplish this task are the following:
// Replace
temp = txtInput.Text;
txtReplaceResult.Text = temp.Replace(txtReplaceChars.Text,
txtReplaceWith.Text);
The first line simply copies the input string so you don't permanently change the Text property of the txtInput textbox object. The Replace() method requires two arguments. The first argument is the string you want to replace. The second argument is the string you want to substitute for the first argument. In the example shown in Figure 5.6, the method calls resolves to
txtReplaceResult.Text = temp.Replace("1234567890", "***");
that means you want to replace the digit characters with three asterisks. After the replacement takes place, the statement appears as this:
txtReplaceResult.Text = "This is a test of various string METHODS,
*** and z";
The new string is assigned into the Text property of the txtReplaceResult textbox object. If the target string does not exist in the original string, the original string is left unchanged.
The listbox in Figure 5.4 shows a partial listing of literally hundreds of string methods available to you. Obviously, it's not practical to show all the string methods here. However, you may want to spend a few moments scrolling through the list of possible string methods from which you can choose. Chances are good that anything you ever want to do to manipulate string data is already in the list.
Strings and Escape Sequences
You've already seen how a string variable can be assigned a literal value, as in
string name = "Katie";
However, sometimes certain string literals can pose problems. For example, suppose you want to display the following message:
John said: "Reach for the sky!"
If you try to write this as a normal string literal:
string message = "John said: "Reach for the sky!"";
Visual Studio gets confused because the double quotation marks are used to delimit the start and end of a string literal, not as part of the string itself.
To solve this problem, C# uses a special escape character within the string to signify that what follows is to be treated differently. The special escape character is the backslash character (\). In essence, the escape character says to treat whatever follows it as though it were part of the string literal. For example, suppose you rewrite the string literal like this:
string message = "John said: \"Reach for the sky!\"";
The double quotation mark before the word Reach and the double quotation mark at the end of the sentence are now treated as part of an escape sequence and, therefore, are printed out as part of the string literal. The end result is that the statement displays this:
John said: "Reach for the sky!"
Table 5.5 presents a list of the special escape sequences.
Table 5.5 Escape Sequences
|
ESCAPE SEQUENCE |
INTERPRETATION |
|
\” |
Display a double quotation mark. |
|
\' |
Display a single quotation mark. |
|
\\ |
Display a backslash. |
|
\0 |
Null (nonprinting). |
|
\a |
Alarm (beep terminal alarm). |
|
\b |
Backspace. (Back up one character position.) |
|
\f |
Form feed. (Advance to next page.) |
|
\n |
Newline. (Advance to next line.) |
|
\r |
Carriage return. (Move to left margin.) |
|
\t |
Tab. (Advance one tab space, often eight characters.) |
|
\v |
Vertical tab. |
There are other instances in which escape sequences come in handy. For example, suppose you want to set the directory path to the C# folder on the C drive. You would need to use the following command:
string path = "C:\\C#";
With longer path names, the path string starts to look rather messy. C#, however, it has a way to make it less so.
Verbatim String Literals
Suppose you want to issue a message stating the following:
Go to the C:\Programs\Source directory and send a \n character.
You would have to write the message as:
string message = "Go to the C:\\Programs\\Source directory and send a \\n
character.";
This looks ugly; C# provides a way to make such literals prettier. You can use the verbatim string literal character (@) to tell Visual Studio to build the string exactly as it appears within the double quotation marks. Therefore,
string message = @"Go to the C:\Programs\Source directory and send a \n
character.";
displays the message exactly as you have written it without you worrying about using escape sequences in the proper places. The verbatim string literal character is not needed often, but it comes in handy when you need to pass directory information around in a program.
Datetime Reference Objects
Many business applications need to manipulate dates and times. Banks need to calculate interest payments on loans based on dates. Producing certain products, like bread, requires that specific ingredients be added after so many minutes or hours have passed. Visual Studio provides a DateTime data type to enable you to work with dates and time easily.
The way Visual Studio tracks time is interesting. The Windows operating system maintains a system clock as part of its duties. Most of you can observe the current local time in the lower right corner of your display. Visual Studio uses the system clock to track the number of ticks on the system clock. A tick is a unit of time measured in 100-nanosecond blocks. A nanosecond is one-billionth of a second. That's a fairly small time slice. In fact, light travels approximately only 18 inches in a nanosecond.
The DateTime object maintains a count of the number of ticks since midnight, January 1, 0001 A.D. using the Gregorian calendar. That's a whole bunch of ticks to the present! However, by manipulating the tick count, the DataTime object can determine all kinds of things relative to times and dates.
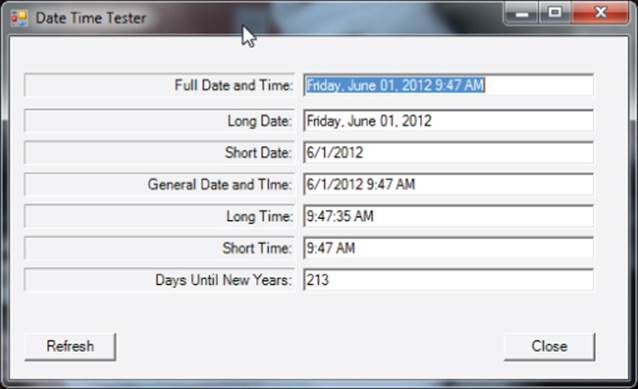
Figure 5.10 shows a sample run of a program that uses some of the DateTime methods and properties.
Figure 5.10 Date and time formats
DateTime and ToString( ) Conversions
As mentioned earlier, all C# data types provide a ToString() wrapper conversion method that enables you to express the data as a string. However, some data types enable you to pass an argument to the ToString() method, so the data can be formatted a specific way. Table 5.6 presents the most common formatting characters for use with a DateTime data type. In each case, the letter shown in column one of Table 5.6 becomes the argument to ToString(). For example, myDate. ToString("F") displays the full date and time for the myDate variable. The table example assumes the date is Oct. 25, 2007.
Table 5.6 Commonly Used Date and Time Conversion Characters
|
CONVERSION CHARACTER |
DESCRIPTION |
SAMPLE OUTPUT |
|
"F" |
Full date and time, including seconds |
Thursday, October 25, 2007 12:00:59 PM |
|
"f" |
Full date and time, without seconds |
Thursday, October 25, 2007 12:02 PM |
|
"D" |
Full date |
Thursday, October 25, 2007 |
|
"d" |
Short date |
10/25/2007 |
|
"G" |
General date, including seconds* |
10/25/2007 12:04:54 PM |
|
"g" |
General date, without seconds |
10/25/2007 12:05 PM |
|
"T" |
Full time, including seconds |
12:05:48 PM |
|
"t" |
Full time, without seconds |
12:05 PM |
* The “G” conversion character is the default format if no conversion character is used with ToString().
The first column in Table 5.6 shows the conversion character you may use as an argument to the ToString() method when using a DateTime variable. The third column of the table presents an example of what the resulting output looks like. As a general rule, an uppercase conversion character presents more detailed information than does its lowercase counterpart. Note that many of the date conversions are locale-aware. That is, the data are formatted in a stlye common to the locality where the program is run. In Europe, for example, May 19, 2013 would be written as: 19\05\2013 with the day coming before the month.
The following Try It Out shows you the impact of some of the commonly used string formatting options.
Try It Out: String Formatting (Chapter0501StringMethods.zip)
The program code that produced the output shown in Figure 5.10 is shown in Listing 5-2.
1. Create a new project in the normal manner.
2. Download the Chapter05DateTimeMethods.zip file and copy it into the current project.
Unlike in previous programs, here is all the program code less the code automatically generated by Windows.
Listing 5-2: The frmMain class definition. (frmMain.cs)
using System;
using System.Windows.Forms;
public class frmMain : Form
{
private Label label1;
private TextBox txtLongDate;
private Label label2;
private TextBox txtShortDate;
private Label label3;
private TextBox txtGeneralDateAndTime;
private Label label4;
private TextBox txtLongTime;
private Label label5;
private TextBox txtShortTime;
private Label label6;
private TextBox txtDaysToNewYears;
private Label label7;
private Button btnClose;
private Button btnRefresh;
private TextBox txtCompleteDateAndTime;
#region Windows code
#endregion
public frmMain()
{
InitializeComponent();
UpdateTimeInfo(); // Update textboxes
}
public static void Main()
{
frmMain main = new frmMain();
Application.Run(main);
}
private void UpdateTimeInfo()
{
int days;
DateTime myTime = new DateTime();
myTime = DateTime.Now;
DateTime newYears = new DateTime(myTime.Year, 12, 31);
txtCompleteDateAndTime.Text = myTime.ToString("f");
txtLongDate.Text = myTime.ToString("D");
txtShortDate.Text = myTime.ToString("d");
txtGeneralDateAndTime.Text = myTime.ToString("g");
txtLongTime.Text = myTime.ToString("T");
txtShortTime.Text = myTime.ToString("t");
days = newYears.DayOfYear myTime.DayOfYear;
txtDaysToNewYears.Text = days.ToString();
}
private void btnRefresh_Click(object sender, EventArgs e)
{
UpdateTimeInfo();
}
private void btnClose_Click(object sender, EventArgs e)
{
Close();
}
}
How It Works
Listing 5-2 presents the body of code that illustrates a number of different date and time format options. The program begins by informing Visual Studio of the references it plans to use via the using keywords. Then the code begins the definition for the class you are writing, named frmMain. The : Form at the end of the statement simply tells Visual Studio that you are going to use the Windows Form class as a starting point but add your own objects to that class and reference them with the name frmMain. Next, the program defines the control objects (such as labels, textboxes, and buttons) that you are adding to a generic Windows form (Form) to make the new class (frmMain) suit your needs. Now things start to get interesting.
As part of this sample program, a number of topics common to all C# programs as well as the program itself are discussed.
#region and #endregion
Toward the top of Listing 5-2 are the following lines:
#region Windows code
#endregion
#region and #endregion are C# program directives that tell Visual Studio to either hide or show a block of code. Assuming you use the C# template presented in Chapter 2 as the starting point for all programs, and then add the control objects to the form, Visual Studio generates a ton of code for you automatically. When you look at your program, the #region directive line has a small plus sign (+) in the left margin of the Source window. If you click that plus sign, Visual Studio expands the program listing to reveal the code it generated behind your back while you weren't looking! The code looks similar to that shown in Figure 5.11.
Figure 5.11 Using #region and #endregion
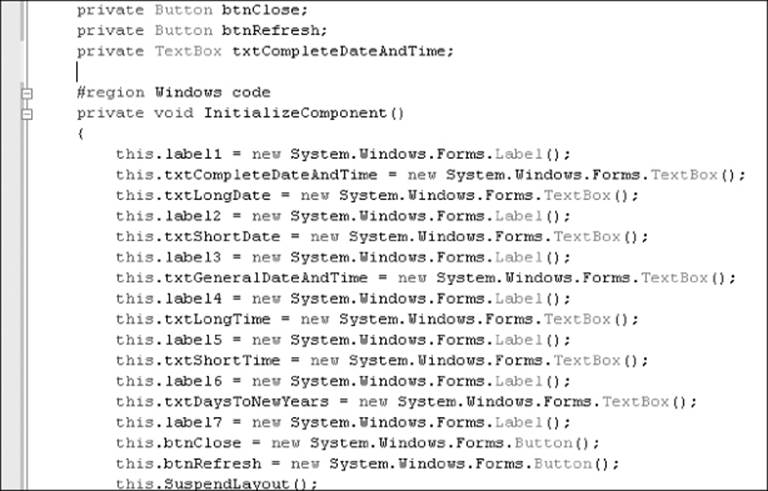
Note how the first several lines after the #region Windows code appear similar to this:
private void InitializeComponent()
{
this.label1 = new System.Windows.Forms.Label();
this.txtCompleteDateAndTime = new
System.Windows.Forms.TextBox();
this.txtLongDate = new System.Windows.Forms.TextBox();
this.label2 = new System.Windows.Forms.Label();
this.txtShortDate = new System.Windows.Forms.TextBox();
this.label3 = new System.Windows.Forms.Label();
This is the code that Visual Studio sneaked into the program for you. Now look at the first line inside the InitializeComponent() method:
this.label1 = new System.Windows.Forms.Label();
This statement tells Visual Studio to grab a label cookie cutter and carve out a piece of memory and reference that chunk of memory as label1. The keyword this is a kind of shorthand Visual Studio uses to refer to the current object used. Because you dragged a label object onto the form named frmMain, the keyword this is actually referring to the current instance of the object frmMain. The end result is that Visual Studio creates a new Label object named label1 and places it inside frmMain.
Sliding Down the Object Chain
You should also decipher the meaning of the right side of the statement:
this.label1 = new System.Windows.Forms.Label();
As you learned in Chapter 2, the new keyword means you want to create a new object of some kind. So you go to the System object and use the dot operator to look inside it. Inside the System object you see a bunch of stuff, including a Windows object. Because that looks promising, you use another dot operator to look inside the Windows object. Inside the Windows object you see some more properties and methods, including one that is a Forms object. Now you're getting close, so you use another dot operator to gain access to the Forms object. Inside the Forms object you find theLabel() method that you can call to instantiate a new label object. Perfect! Because that's precisely what you want to do. You call the Label() method to instantiate a new label object named label1.
Don't let multiple dot operators scare you. Just keep in mind that the dot operator always separates an object (to the left of the dot operator) from a property or method inside that object (to the right of the dot operator). However, because one object can contain another object, you might need to use another dot operator to peek inside that object. In the preceding statement the System object evidently has a Windows object inside it. So you use another dot operator to go inside the Windows object, and you find a Forms object is defined inside the Windows object. Undaunted, you go inside the Forms object and find there is a Label object. Finally you call the Label() method to instantiate a label object for you in memory. Visual Studio then enters the information about that label object into the symbol table using the ID label1. No matter how complex the statement, if you bump over enough dot operators, you'll eventually end up looking at the property or method you're interested in. Even though you had to plow through three objects to get there, eventually you found the method that constructs a new label object for you named label. Piece of cake!
Always remember: Each time you do use a dot operator, Visual Studio displays a listbox of the properties and methods available in the object. You saw this in Figure 5.4. (Some of the properties actually represent classes that can be used to instantiate a new object, but you can still think of them as properties.)
Visual Studio wrote the next line in the InitializeComponent() method for you:
this.txtCompleteDateAndTime = new System.Windows.Forms.TextBox();
This creates a new textbox object, gives it the name txtCompleteDateAndTime, and adds it to frmMain. This process repeats itself until all the form objects (labels, textboxes, and buttons) have been added. If you look further down the code listing in the InitializeComponent() method, you can see the property values you set when you created your user interface. That is, you can see the text you placed in the labels, the locations of each label, textbox, and button after you dragged them onto the form, and any associated properties you may have changed (such as border style, size, AutoSize, and so on).
How a Program Begins Execution
You learned in Chapter 1 that every C# program begins its execution with a special method named Main(). Consider the following statements from Listing 5-2:
public static void Main()
{
frmMain main = new frmMain();
Application.Run(main);
}
These statements define the Main() method and marks the spot where the program starts executing. The first line says you want to create a new object of the frmMain class and give it the name main. (Remember that C# is case-sensitive, so Main is not the same as main.) If you look at the top of Listing 5-2, you can see that the name of the class you define is frmMain. Therefore, this statement tells Visual Studio you want to create an object of type frmMain.
Class Constructors
Because the right side of the assignment operator is processed first, the first thing that happens is that the new keyword sends a message to Windows asking for enough memory to hold a frmMain object. Assuming Windows can find enough memory, the program then calls the frmMain() method. The method called shares the same name as the object you try to instantiate. A method that has the same name as its class is called a class constructor. The purpose of a constructor is to perform any initialization tasks that need to be done before you use the object of the class. From Listing 5-2, you can see that the constructor looks like this:
public frmMain()
{
InitializeComponent();
UpdateTimeInfo(); // Update textboxes
}
There are several things you need to remember about constructors:
· Constructors always have the same names as the classes in which they appear.
· Constructors always use the public keyword before their names if you want to instantiate objects of that class.
· Constructors can never return a value to their callers.
Inside the constructor for the frmMain class, the first thing that happens is that the code calls the InitializeComponent() method. However, as you saw in Figure 5.11, all InitializeComponent() does is place all the label, textbox, and button objects in the correct positions on the form and set their properties to whatever values you specified by dragging and dropping the objects on the form when you were creating the user interface.
When the frmMain() constructor finishes, your frmMain object sits in memory exactly the way you wanted it to look while you designed it. Now what?
Well, the next thing that happens is that the program calls the UpdateTimeInfo() method that you wrote (we will discuss this in a few moments). In essence, all the UpdateTimeInfo() method does is fill in the textboxes with date and time information using a variety of format options.
Invoking the Application
Having initialized the object, the program hits the closing curly brace for the frmMain() constructor method and knows it's time to return to the caller. Returning to the caller means that program control reverts back to the statement
frmMain main = new frmMain();
Your code has now created an image of your frmMain object in memory and associated it with an object named main. The next line says, “Okay, everything's set up and ready to go. Begin executing the program by calling the Run() method using the object named main”:
Application.Run(main);
At this point…shazam! Your frmMain object named main appears on the display screen, and the user actually sees what all your work has accomplished. The output should look similar to what is shown in Figure 5.10.
You should prove these actions to yourself. To do that, place the cursor on the following line and press F9:
frmMain main = new frmMain();
This sets a breakpoint at that point in the program. (The program line now has a red background.) Now run the program.
Shortly, Visual Studio halts the program on the line where the breakpoint is set, setting the background color to yellow. Think of yellow as a caution, informing you that Visual Studio is ready to execute that line. Now press F11. You see the yellow line jump to the frmMain() constructor. You can continue to press the F11 key to advance to the InitializeComponent() method. If you continue pressing the F11 key, Visual Studio continues to single-step through each line in the program. If you get bored, press Shift+F11, and Visual Studio sends you back to the caller, the frmMain() method. Using the debugger to march through the program code is a great way to see what's going on. It's even more informative if, when the first breakpoint is reached, you invoke the Debug Windows Locals menu sequence. This opens up a debugging window that enables you to observe program variables as you single-step through the code. Good stuff.
The UpdateTimeInfo( ) Method
The code for the UpdateTimeInfo() method is reproduced here for convenience:
private void UpdateTimeInfo()
{
int days;
DateTime myTime = new DateTime();
myTime = DateTime.Now;
DateTime newYears = new DateTime(myTime.Year, 12, 31);
txtCompleteDateAndTime.Text = myTime.ToString("f");
txtLongDate.Text = myTime.ToString("D");
txtShortDate.Text = myTime.ToString("d");
txtGeneralDateAndTime.Text = myTime.ToString("g");
txtLongTime.Text = myTime.ToString("T");
txtShortTime.Text = myTime.ToString("t");
days = newYears.DayOfYear myTime.DayOfYear;
txtDaysToNewYears.Text = days.ToString();
}
The method begins by defining an integer variable named days followed by a DateTime object named myTime. The right side of the statement calls a method named DateTime():
DateTime myTime = new DateTime();
However, because that method shares the same name as the class, you know that the DateTime() method is the constructor for the DateTime class. Therefore, after the statement executes, an object named myTime of type DateTime exists in memory and is ready to be used in the program.
The next statement creates another DateTime object named newYears by calling the DateTime() constructor:
DateTime newYears = new DateTime(myTime.Year, 12, 31);
Wait a minute! This time it appears that the DateTime() constructor has arguments supplied to it, but there were no arguments when you called the constructor for myTime. What's going on here?
Overloaded Methods
Earlier in this chapter you read that a constructor is used to perform any initialization tasks that need to be performed before you use the object. Usually, “performing initialization tasks” means setting the state of the object's properties to some nondefault value. When you created the myTime object, you didn't use any arguments to the constructor. That's because you were satisfied with the default values for the DateTime properties (that is, 0 or null). Figure 5.12 uses the same old dot operator technique to get a list of the properties and methods available for a DateTime object.
Figure 5.12 DateTime Object properties and methods
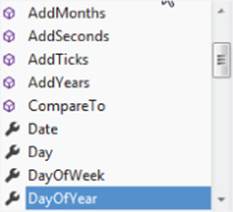
As you can see in the listbox, one of the properties is named Day. Evidently you were happy assigning the value of 0 to Day when myTime was instantiated. If you scroll the listbox shown in Figure 5.12, you find properties for Month and Year, too. These properties are also initialized to their default values of 0 for the myTime object. If you don't initialize any of the properties for a DateTime object, it displays the date and time of Monday, January 01, 0001, 12:00 AM, which is the starting date when the number of ticks is zero!
Suppose you backtrack and type in the statement
DateTime newYears = new DateTime(
to observe what you see on the screen. You should see something similar to Figure 5.13.
Figure 5.13 DateTime methods
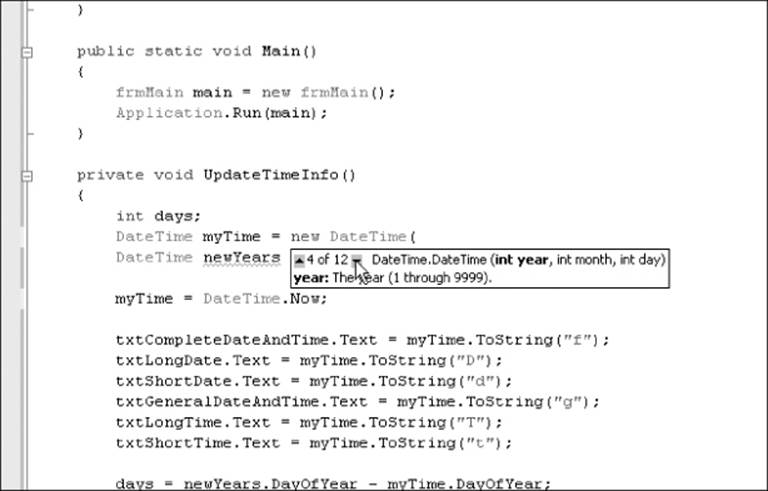
Your screen actually shows a small box stating 1 of 12 DateTime.DateTime() with up and down arrows surrounding the 1 of 12 part of the message. What IntelliSense is telling you is that there are 12 “flavors” of the DateTime() constructor method available to you. Figu re 5-13 shows that you want to use the fourth flavor that passes the year, month, and day to the constructor. It also tells you that each of these arguments should be an integer value. In your code you used the constructor with three integer arguments:
DateTime newYears = new DateTime(myTime.Year, 12, 31);
You are telling Visual Studio you're not happy initializing the newYears DateTime object with its default values. Instead, you want to initialize the state of the newYears DateTime object with the values that correspond to December 31, 2012. (This book is written in 2012.) This works properly because the statement before the instantiation of the newYears DateTime object is
myTime = DateTime.Now;
That sets the Year property of the myTime object to 2012. (Now is a property of the DateTime class that holds the current tick value as measured by the Windows system clock. The current tick value also determines the values for the Month and Day properties.)
The end result is that the program now has two DateTime objects it can use. The first object, myTime, holds the current date and time because you used the Now property to assign its state. You initialized the second object, newYears, to December 31, 2012, by using the fourth DateTime constructor and supplying the proper arguments to that constructor.
Given how the two DateTime objects have been initialized, the following two statements use the DayOfYear property to calculate the number of days until New Year's:
days = newYears.DayOfYear - myTime.DayOfYear;
txtDaysToNewYears.Text = days.ToString();
The rest of the code in the UpdateTimeInfo() method simply illustrates several of the different formatting options available through the ToString() characters presented in Table 5.6.
Method Signatures
When an overloaded method is called, which flavor of the method ends up being called? After all, if a method is overloaded, it means that multiple methods use the same method name. How does Visual Studio know which one to call? Visual Studio makes the decision based upon the signature of the method.
A method signature is everything from the method name through the closing parenthesis of the method. For example, you already know that the DateTime() constructor method has 12 different forms. You have seen 2 of these. The 2 forms you have used are these:
public DateTime()
public DateTime(int year, int month, int day)
The signature for the first constructor is DateTime(). The signature for the second is DateTime(int year, int month, int day). The signatures are different because the parameter lists for the two methods are different. That is, the first version of the constructor does not have any arguments passed to it. The second signature, however, expects three integer arguments to be passed to it. Therefore, the three statements from Listing 5-2 are as follows:
DateTime myTime = new DateTime();
myTime = DateTime.Now;
DateTime newYears = new DateTime(myTime.Year, 12, 31);
The first statement causes Visual Studio to call the constructor that has no arguments being passed to it. The third statement causes Visual Studio to call the constructor that expects three integer variables to be passed to it. This leads to an important rule about overloaded methods: Methods may be overloaded provided no two overloaded methods have the same signature. What this means is that only one overloaded method can have zero arguments passed to it. Likewise, only one overloaded method can have three integers passed to it. An overloaded method can have three other variables passed to it, but they cannot all be integers. For example, you could have an overloaded method named countThis() with the following signatures:
public int countThis(int val);
public int countThis(long val);
These are perfectly acceptable because their signatures are different. True, both flavors accept one argument, but the data type for that argument is different; therefore, the signatures are different. If you scroll through the 12 constructors for the DateTime data type, you discover that all 12 have different arguments passed to them.
Overloaded methods are great when you need to write methods that behave differently when different information is passed to them. You see other examples of overloaded methods in later chapters.
The Refresh Button
In the last Try It Out section, the purpose of the refresh button is to update the time aspects of any strings using the time component. The code is simple:
private void btnRefresh_Click(object sender, EventArgs e)
{
UpdateTimeInfo();
}
When the user clicks the refresh button (btnRefresh), the code calls the UpdateTimeInfo() method to update the information in the textboxes. Note that you call the UpdateTimeInfo() method in two different places in the program: once in the frmMain() constructor and again in thebtnRefresh_Click() method.
Because you can call a method illustrates another important feature of methods: They enable you to avoid writing duplicate code. You could, after all, take the following code and shove it into both the frmMain() constructor and the btnRefresh_Click() methods:
int days;
DateTime myTime = new DateTime();
myTime = DateTime.Now;
DateTime newYears = new DateTime(myTime.Year, 12, 31);
txtCompleteDateAndTime.Text = myTime.ToString("f");
txtLongDate.Text = myTime.ToString("D");
txtShortDate.Text = myTime.ToString("d");
txtGeneralDateAndTime.Text = myTime.ToString("g");
txtLongTime.Text = myTime.ToString("T");
txtShortTime.Text = myTime.ToString("t");
days = newYears.DayOfYear myTime.DayOfYear;
txtDaysToNewYears.Text = days.ToString();
But if you did that you'd have twice as much code to write and maintain. By placing the code in a method, you write, test, and debug the code only once, but you can call it from anywhere in the program as many times as you want. Methods make programming much easier! Chapters 9 and 10 get into writing your own methods in greater detail.
Summary
You've covered a lot of ground in this chapter. The information is important because so much of program writing deals with manipulating string data in one form or another. You must understand the difference between reference types and value types before you move to the next chapter. A little time spent now to understand the concepts presented in this chapter can yield huge benefits later.
Exercises
You can find the answers to the following exercises in Appendix A.
1. Explain the difference between a reference variable and a value type variable.
2. Suppose you have a long message that you wrote and stored in a string named message. You have this nagging feeling that you misspelled Friday as Frday somewhere in the string. Write the statement(s) that would find and correct the misspelling.
3. There is an error in the program that uses the Remove() method. The problem is that after the word is removed there are two spaces between the remaining words. How would you fix this bug?
4. What is a constructor and when should it be used?
5. Suppose the user typed her birthday into a textbox named txtBirthday in the form MM/DD/YY and you want to show how old she is in a textbox named txtAge. What would the code look like?
6. Suppose you are writing a program that inputs names and addresses of people who belong to a club in your city. Could you use a constructor to make the data entry person's life easier? (Hint: 99% of the members live in your city and your state.)
What You Learned in This Chapter
|
TOPIC |
KEY POINTS |
|
Reference data type |
Different than value types because rvalue is a memory address, not data. |
|
Reference versus value types |
rvalue for value type is the data. |
|
Bucket analogy |
Used to explain rvalue and lvalues. |
|
String variables |
Used to represent textual data. |
|
Verbatim string literals |
How to use the @ operator in strings. |
|
DateTime variables |
How to use the methods and properties of this data type. |
|
Constructors |
How to instantiate an object. |
|
Overloaded methods |
When and why to use them. |
|
Method signatures |
Rules when overloading a method. |