C# Design Pattern Essentials (2012)
Part III. Structural Patterns
This part describes the seven structural patterns, that is, those that help manage how classes are organised and interrelate.
· Adapter: Convert the interface of a class into the interface clients expect, letting classes work together that couldn’t otherwise because of incompatible types;
· Bridge: Decouple an abstraction from its implementation so that each may vary independently;
· Composite: Compose objects into tree structures to represent part-whole hierarchies, letting client objects treat individual objects and compositions uniformly;
· Decorator: Attach additional responsibilities to an object dynamically;
· Façade: Provide a uniform interface to a set of interfaces in a subsystem, by defining a higher-level interface that makes the subsystem easier to use;
· Flyweight: Use sharing to support large numbers of fine-grained objects efficiently;
· Proxy: Provide a surrogate or place-holder for another object to control access to it.
7. Adapter
Type: Structural
Purpose: Convert the interface of a class into another interface clients expect. Adapter lets classes work together that couldn't otherwise because of incompatible interfaces.
You will recall from the introduction that the Foobar Motor Company makes the engines for their vehicles. Here is a reminder of the IEngine hierarchy:

Figure 7.1 : IEngine class hierarchy
And here is a reminder of the code of the abstract AbstractEngine class:
public abstract class AbstractEngine : IEngine
{
private int size;
private bool turbo;
public AbstractEngine(int size, bool turbo)
{
this.size = size;
this.turbo = turbo;
}
public virtual int Size
{
get
{
return size;
}
}
public virtual bool Turbo
{
get
{
return turbo;
}
}
public override string ToString()
{
return this.GetType().Name + " (" + size + ")";
}
}
Let's say our client program takes engines stored in a collection and loops through them one at a time displaying the engine size and type:
IList<IEngine> engines = new List<IEngine>();
engines.Add(new StandardEngine(1300));
engines.Add(new StandardEngine(1600));
engines.Add(new TurboEngine(2000));
foreach (IEngine engine in engines) {
Console.WriteLine(engine);
}
Running the above code would result in the following display:
StandardEngine (1300)
StandardEngine (1600)
TurboEngine (2000)
For this chapter we will assume that in addition to the two concrete subclasses (StandardEngine and TurboEngine) Foobar have decided to use a further engine class named SuperGreenEngine which is made by a different manufacturer. Because the SuperGreenEngine class is provided by a third-party it does not implement our IEngine interface. Furthermore, Foobar do not have access to the C# source code and can therefore not modify it, but the following class details are known from the documentation:
· The class extends object;
· The constructor takes one argument for the engine size;
· There is an EngineSize property getter that returns the engine size as an int;
· These types of engines are never turbocharged;
· The ToString() method returns a string in the format: SUPER ENGINE nnnn (where nnnn is the engine size).
We can therefore see that SuperGreenEngine uses a different method name to access the engine size and there is no method related to whether it is turbocharged, and that it is not within the IEngine hierarchy. As it stands it would not be possible to add instances of SuperGreenEngine to the reporting collection and even if you could the method names are different.
The Adapter pattern provides an approach to resolve this through the definition of a new class that 'adapts' the class we want to use into the format existing classes require. For our purposes, therefore, we shall create a SuperGreenEngineAdapter class:
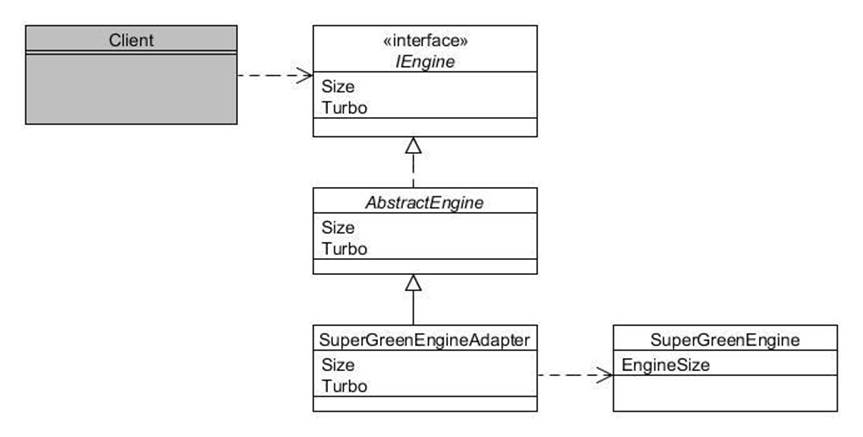
Figure 7.2 : Adapter class hierarchy
The code for the adapter is as follows:
public class SuperGreenEngineAdapter : AbstractEngine
{
public SuperGreenEngineAdapter(SuperGreenEngine greenEngine)
: base(greenEngine.EngineSize, false)
{
}
}
Note the following from the above code:
· We extend the class we are adapting to;
· We accept a reference in the constructor to the class we are adapting from;
· The constructor obtains the necessary state from the referenced object and passes it to the superclass constructor.
Now we are in a position to include SuperGreenEngine objects in our reporting collection (additional code indicated in bold):
IList<Engine> engines = new List<Engine>();
engines.Add(new StandardEngine(1300));
engines.Add(new StandardEngine(1600));
engines.Add(new TurboEngine(2000));
// "Adapt" the new engine type...SuperGreenEngine greenEngine = new SuperGreenEngine(1200);engines.Add(new SuperGreenEngineAdapter(greenEngine));
// Unchanged from before...
foreach (IEngine engine : engines) {
Console.WriteLine(engine);
}
The output should now be:
StandardEngine (1300)
StandardEngine (1600)
TurboEngine (2000)
SuperGreenEngineAdapter (1200)
Note how the output made use of the ToString() method as inherited from AbstractEngine rather than that of SuperGreenEngine.
Variations for implementing adapters
We were somewhat fortunate in that the design of the AbstractEngine and SuperGreenEngine classes made it easy for the adapter class to do the work inside its constructor. Often however, we need to take a few additional steps inside the code of the adapter class, so here is a general formula to apply:
1. Extend the class you are adapting to (or implement it, if it's an interface);
2. Specify the class you are adapting from in the constructor and store a reference to it in an instance variable;
3. For each method in the class you are extending (or interface you are implementing), override it to delegate to the corresponding method of the class you are adapting from.
Here is a generic example adapter class:
public class ObjectAdapter : ClassAdaptingTo
{
private ClassAdaptingFrom fromObject;
public ObjectAdapter(ClassAdaptingFrom fromObject)
{
this.fromObject = fromObject;
}
// Overridden method
public override void MethodInToClass()
{
fromObject.MethodInFromClass();
}
}
8. Bridge
Type: Structural
Purpose: Decouple an abstraction from its implementation so that each may vary independently.
The Foobar Motor Company manufactures engines for its vehicles. Here is a reminder of the IEngine class hierarchy:
Figure 8.1 : IEngine class hierarchy
The implementation of the AbstractEngine class as detailed in the introduction, merely stores the engine size (e.g. 1600cc) and whether it is turbocharged. For the purposes of this chapter this class will be enhanced to enable the engine to be started and stopped and for the power to the engine to be increased or decreased.
The modified version of the IEngine interface and AbstractEngine class is listed below with the changes marked in bold:
public interface IEngine
{
int Size { get; }
bool Turbo { get; }
void Start(); void Stop(); void IncreasePower(); void DecreasePower();
}
public abstract class AbstractEngine : IEngine
{
private int size;
private bool turbo;
private bool running; private int power;
public AbstractEngine(int size, bool turbo)
{
this.size = size;
this.turbo = turbo;
running = false; power = 0;
}
public virtual int Size
{
get
{
return size;
}
}
public virtual bool Turbo
{
get
{
return turbo;
}
}
public virtual void Start() { running = true; }
public virtual void Stop() { running = false; power = 0; }
public virtual void IncreasePower() { if ((running) && (power < 10)) { power++; } }
public virtual void DecreasePower() { if ((running) && (power > 0)) { power--; } }
public override string ToString()
{
return this.GetType().Name + " (" + size + ")";
}
}
Within a vehicle, the driver controls the functions of the engine indirectly by means of various hand and foot controls, such as the ignition switch, accelerator pedal and brake pedal. To retain flexibility, it is important to design the connection between the engine and the controls so that each can vary independently of the other. In other words:
· A new engine can be designed and plugged into a vehicle without needing any driver controls to be changed; and
· New driver controls (for example, to assist disabled drivers) can be designed and plugged into a vehicle without needing the engines to change.
The Bridge pattern addresses this requirement by separating the 'abstraction' from the 'implementation' into two separate but connected hierarchies such that each can vary independently of the other. In our example, the 'abstraction' is the driver controls and the 'implementation' is the engine.
The following diagram shows this relationship:
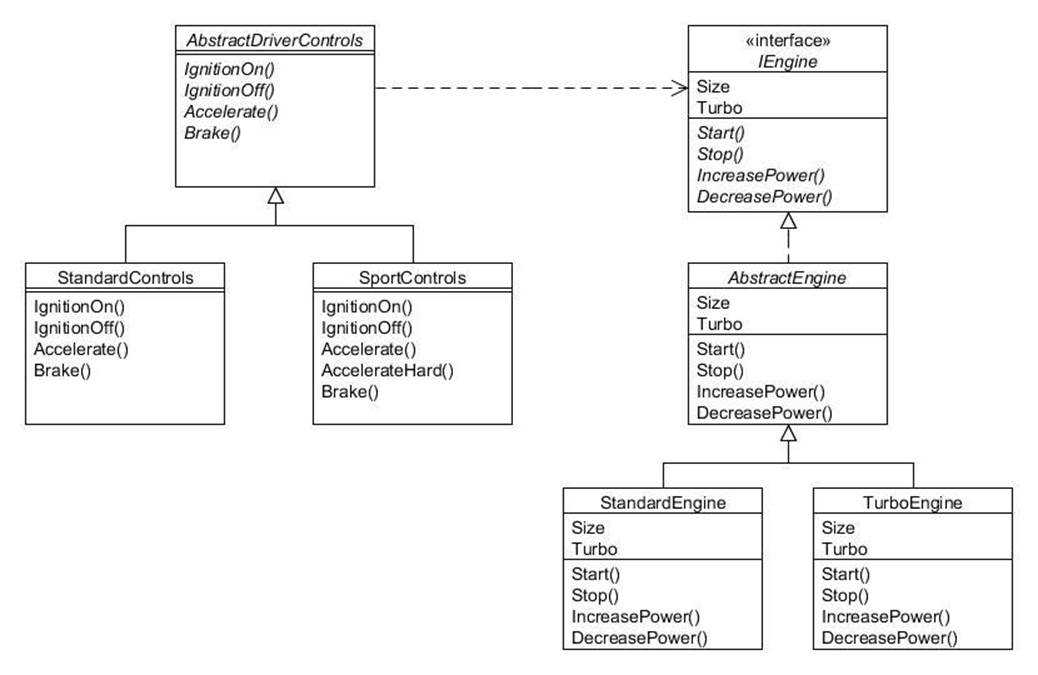
Figure 8.2 : Bridge pattern
As the above figure shows, there is an abstract AbstractDriverControls class with two concrete subclasses; StandardControls and SportControls:
The AbstractDriverControls class requires an Engine object passed to its constructor and then delegates to the engine for each of its methods:
public class AbstractDriverControls
{
private IEngine engine;
public AbstractDriverControls(IEngine engine)
{
this.engine = engine;
}
public virtual void IgnitionOn()
{
engine.Start();
}
public virtual void IgnitionOff()
{
engine.Stop();
}
public virtual void Accelerate()
{
engine.IncreasePower();
}
public virtual void Brake()
{
engine.DecreasePower();
}
}
Subclasses of AbstractDriverControls can either use the superclass methods as-is or define additional functionality. The StandardControls class uses AbstractDriverControls as-is:
public class StandardControls : AbstractDriverControls
{
public StandardControls(IEngine engine) : base(engine) {
}
// No extra functions
}
Whereas the SportControls class defines an additional method:
public class SportControls : AbstractDriverControls
{
public SportControls(IEngine engine) : base(engine) {
}
public virtual void AccelerateHard()
{
Accelerate();
Accelerate();
}
}
The important point to note from the above is that the additional method is coded in terms of the superclass 'abstraction' and not the 'implementation' (engine). So in the above example the AccelerateHard() method invokes the Accelerate() method as defined in AbstractDriverControls. It is this approach that allows the abstraction and the implementation to vary independently if needed.
Thus we could incorporate a brand-new type of engine without modifying the driver controls classes, provided the engine adheres to the IEngine contract. Conversely we could develop a new set of driver controls (such as enabling voice activation) without having to modify anything in theIEngine hierarchy.
Client programs can use the bridge as follows:
IEngine engine = new StandardEngine(1300);
StandardControls controls = new StandardControls(engine);
controls1.IgnitionOn();
controls1.Accelerate();
controls1.Brake();
controls1.IgnitionOff();
// Now use sport controls
SportControls controls2 = new SportControls(engine);
controls2.IgnitionOn();
controls2.Accelerate();
controls2.AccelerateHard();
controls2.Brake();
controls2.IgnitionOff();
9. Composite
Type: Structural
Purpose : Compose objects into tree structures to represent part-whole hierarchies. Composite lets clients treat individual objects and compositions of objects uniformly.
In the Foobar Motor Company workshop they build various items from component parts such as nuts, bolts, panels, etc. Each individual component item has an associated description and unit cost, and when items are assembled into larger items the cost is therefore the sum of its component parts.
The Composite pattern enables us to treat both individual parts and assemblies of parts as if they are the same, thus enabling them to be processed in a consistent manner, simplifying code. The class hierarchy looks like this:

Figure 9.1 : Composite pattern
The abstract Item class defines all possible methods for both parts and assemblies of parts:
public abstract class Item
{
private string description;
private int cost;
public Item(string description, int cost)
{
this.description = description;
this.cost = cost;
}
public virtual string Description
{
get
{
return description;
}
}
public virtual int Cost
{
get
{
return cost;
}
}
public abstract void AddItem(Item item);
public abstract void RemoveItem(Item item);
public abstract Item[] Items { get; }
public override string ToString()
{
return description + " (cost " + Cost + ")";
}
}
The above class provides default implementations for Description and Cost getters, and defines the abstract methods AddItem(), RemoveItem() and an Items property getter.
Individual parts are modelled using the Part subclass:
public class Part : Item
{
public Part(string description, int cost)
: base(description, cost)
{
}
// Empty implementations for unit parts...
public override void AddItem(Item item)
{
}
public override void RemoveItem(Item item)
{
}
public override Item[] Items
{
get
{
return new Item[0];
}
}
}
As you can see, the methods related to managing assemblies of items have empty implementations since a 'part' is the smallest unit possible, and therefore unable to have sub-parts, unlike 'assemblies'.
Assemblies of parts are modelled using the Assembly subclass:
public class Assembly : Item
{
private IList<Item> items;
public Assembly(string description)
: base(description, 0)
{
items = new List<Item>();
}
public override void AddItem(Item item)
{
items.Add(item);
}
public override void RemoveItem(Item item)
{
items.Remove(item);
}
public override Item[] Items
{
get
{
return items.ToArray();
}
}
// Also have to override getCost() to accumulate cost of all items in list
public override int Cost
{
get
{
int total = 0;
foreach (Item item in items)
{
total += item.Cost;
}
return total;
}
}
}
For assemblies, we have implemented the abstract methods to add other Item objects into an internal List collection. We have also overridden the Cost getter to loop through the collection to sum the cost of all contained items within this assembly.
All types of Item objects can now be used in a uniform manner:
Item nut = new Part("Nut", 5);
Item bolt = new Part("Bolt", 9);
Item panel = new Part("Panel", 35);
Item gizmo = new Assembly("Gizmo");
gizmo.AddItem(panel);
gizmo.AddItem(nut);
gizmo.AddItem(bolt);
Item widget = new Assembly("Widget");
widget.AddItem(gizmo);
widget.AddItem(nut);
In the above extract, nuts, bolts and panels are defined as individual parts, a "Gizmo" is assembled from one nut, one bolt and one panel, and a "Widget" is assembled from one "Gizmo" and another nut. Displaying the objects would result in this output:
Nut (cost 5)
Bolt (cost 9)
Panel (cost 35)
Gizmo (cost 49)
Widget (cost 54)
The assemblies have computed the total cost without the client program needing to know how.
10. Decorator
Type: Structural
Purpose: Attach additional responsibilities to an object dynamically. Decorators provide a flexible alternative to subclassing for extending functionality.
You will recall the Foobar Motor Company IVehicle class hierarchy:
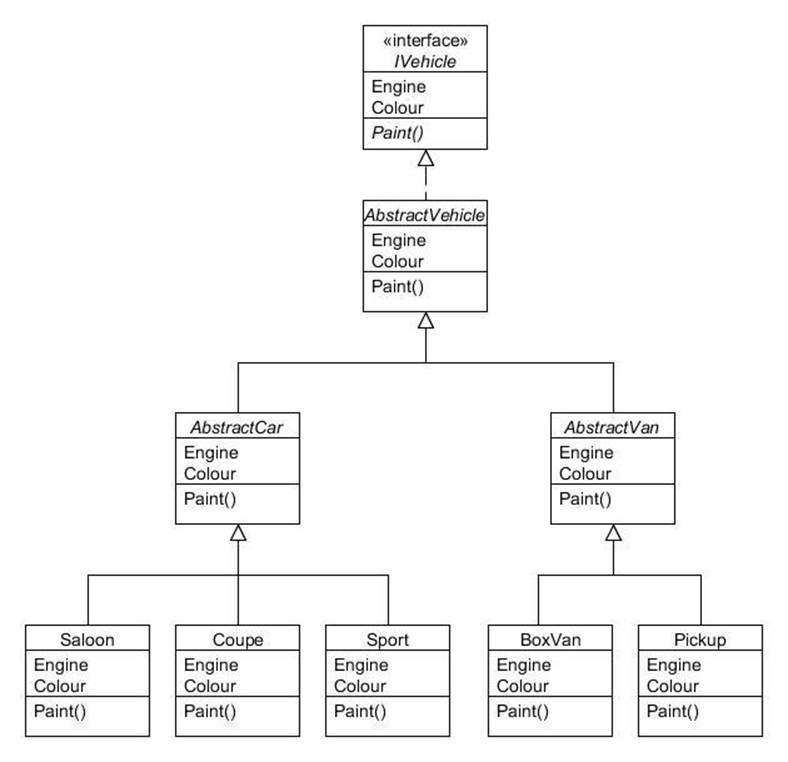
Figure 10.1 : IVehicle class hierarchy
For the purposes of this chapter, we shall add one additional property called Price to the IVehicle interface with a getter. We will also modify the ToString() method in AbstractVehicle to include the price. The modified interface and class is shown below with the changes marked in bold:
public interface IVehicle
{
IEngine Engine { get; }
VehicleColour Colour { get; }
void Paint(VehicleColour colour);
int Price { get; }
}
public abstract class AbstractVehicle : IVehicle
{
private IEngine engine;
private VehicleColour colour;
public AbstractVehicle(IEngine engine)
: this(engine, VehicleColour.Unpainted)
{
}
public AbstractVehicle(IEngine engine, VehicleColour colour)
{
this.engine = engine;
this.colour = colour;
}
public virtual IEngine Engine
{
get
{
return engine;
}
}
public virtual VehicleColour Colour
{
get
{
return colour;
}
}
public virtual void Paint(VehicleColour colour)
{
this.colour = colour;
}
public abstract int Price { get; }
public override string ToString() { return this.GetType().Name + " (" + engine + ", " + colour + ", price " + Price + ")"; }
}
Each of the concrete subclasses implement the Price getter as appropriate. For example, the Saloon class now looks like this (changes in bold):
public class Saloon : AbstractCar
{
public Saloon(IEngine engine)
: this(engine, VehicleColour.Unpainted)
{
}
public Saloon(IEngine engine, VehicleColour colour)
: base(engine, colour)
{
}
public override int Price { get { return 6000; } }
}
The other subclasses are similarly defined, and the Price getter returns:
· 6,000 for Saloon objects;
· 7,000 for Coupe objects;
· 8,000 for Sport objects;
· 9,000 for Pickup objects;
· 10,000 for BoxVan objects.
When a customer buys a vehicle they have the choice of adding any number of optional extras. They can choose from an air-conditioning system, alloy wheels, leather seats, metallic paint, or a satellite-navigation unit. They can choose none at all, or any combination up to all five.
The Decorator pattern is designed to facilitate the addition of state and/or behaviour without having to modify the inheritance hierarchy of the classes being added to. This is accomplished by defining a new hierarchy which itself extends the root of the main tree.
This is shown diagrammatically below:
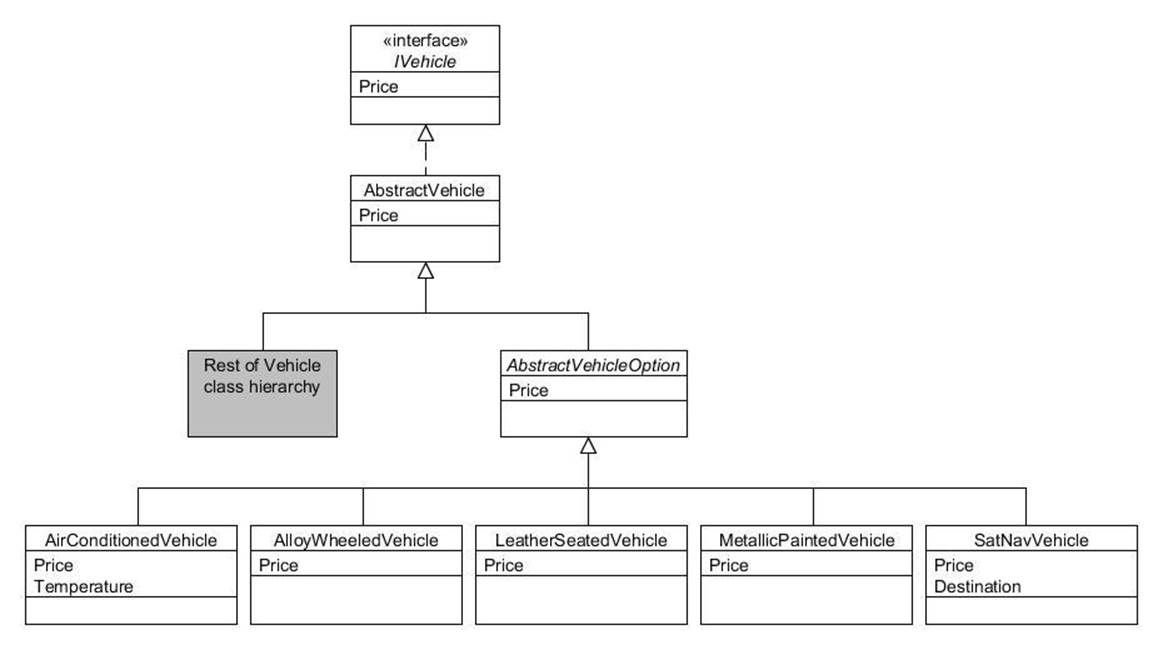
Figure 10.2 : Decorator pattern hierarchy
From the diagram you can see that a new abstract class has been defined called AbstractVehicleOption that inherits from AbstractVehicle. AbstractVehicleOption has five concrete subclasses; one for each option that can be selected.
The AbstractVehicleOption class looks like this:
public abstract class AbstractVehicleOption : AbstractVehicle
{
protected internal IVehicle decoratedVehicle;
public AbstractVehicleOption(IVehicle vehicle)
: base(vehicle.Engine)
{
decoratedVehicle = vehicle;
}
}
AbstractVehicleOption is the abstract "decorator" class and it requires a reference to the IVehicle class which is to be decorated.
Each of the option subclasses is straightforward. They all override the Price getter to add the price of the option to the price of the object that is being decorated. In the case of the AirConditionedVehicle and SatNavVehicle classes, we have also defined an extra method:
public class AirConditionedVehicle : AbstractVehicleOption
{
public AirConditionedVehicle(IVehicle vehicle)
: base(vehicle)
{
}
public override int Price
{
get
{
return decoratedVehicle.Price + 600;
}
}
public virtual int Temperature
{
set
{
// code to set the temperature...
}
}
}
public class AlloyWheeledVehicle : AbstractVehicleOption
{
public AlloyWheeledVehicle(IVehicle vehicle)
: base(vehicle)
{
}
public override int Price
{
get
{
return decoratedVehicle.Price + 250;
}
}
}
public class LeatherSeatedVehicle : AbstractVehicleOption
{
public LeatherSeatedVehicle(IVehicle vehicle)
: base(vehicle)
{
}
public override int Price
{
get
{
return decoratedVehicle.Price + 1200;
}
}
}
public class MetallicPaintedVehicle : AbstractVehicleOption
{
public MetallicPaintedVehicle(IVehicle vehicle)
: base(vehicle)
{
}
public override int Price
{
get
{
return decoratedVehicle.Price + 750;
}
}
}
public class SatNavVehicle : AbstractVehicleOption
{
public SatNavVehicle(IVehicle vehicle)
: base(vehicle)
{
}
public override int Price
{
get
{
return decoratedVehicle.Price + 1500;
}
}
public virtual string Destination
{
set
{
// code to set the destination...
}
}
}
To use the 'decorators' we initially instantiate the car or van we require and then "wrap" them inside the required decorator or decorators. Here is an example:
// Create a blue saloon car...
IVehicle myCar = new Saloon(new StandardEngine(1300));
myCar.Paint(Vehicle.Colour.Blue);
// Add air-conditioning to the car...
myCar = new AirConditionedVehicle(myCar);
// Now add alloy wheels...
myCar = new AlloyWheeledVehicle(myCar);
// Now add leather seats...
myCar = new LeatherSeatedVehicle(myCar);
// Now add metallic paint...
myCar = new MetallicPaintedVehicle(myCar);
// Now add satellite-navigation...
myCar = new SatNavVehicle(myCar);
If you invoke Console.WriteLine() on the myCar object at each stage you should see this output:
Saloon (StandardEngine (1300), Blue, price 6000)
AirConditionedVehicle (StandardEngine (1300), Blue, price 6600)
AlloyWheeledVehicle (StandardEngine (1300), Blue, price 6850)
LeatherSeatedVehicle (StandardEngine (1300), Blue, price 8050)
MetallicPaintedVehicle (StandardEngine (1300), Blue, price 8800)
SatNavVehicle (StandardEngine (1300), Blue, price 10300)
The price shown at each stage is the total of the vehicle plus the selected options as each is "added".
The Decorator pattern is a good example of preferring object composition over inheritance. Had we attempted to use inheritance for the various vehicle options we would have needed to create many different combinations of subclasses to model each combination of selectable options.
Decorator classes are sometimes called "wrapper" classes, since they serve to "wrap" an object inside another object, usually to add or modify its functionality.
11. Facade
Type: Structural
Purpose: Provide a unified interface to a set of interfaces in a subsystem. Facade defines a higher-level interface that makes the subsystem easier to use.
Sometimes you need to perform a series of steps to undertake a particular task, often involving multiple objects. The Facade pattern involves the creation of a separate object that simplifies the execution of such steps.
As an example, when the Foobar Motor Company are preparing their vehicles for sale there are a number of steps they have to undertake that utilise various objects. In this chapter we shall assume that the IVehicle interface defines the following additional methods beyond those defined in the introduction.
// Extra methods defined in IVehicle...
void CleanInterior();
void CleanExteriorBody();
void PolishWindows();
void TakeForTestDrive();
The above methods are implemented in AbstractVehicle as follows:
public virtual void CleanInterior()
{
Console.WriteLine("Cleaning interior...");
}
public virtual void CleanExteriorBody()
{
Console.WriteLine("Cleaning exterior body...");
}
public virtual void PolishWindows()
{
Console.WriteLine("Polishing windows...");
}
public virtual void TakeForTestDrive()
{
Console.WriteLine("Taking for test drive...");
}
We shall introduce two further simple classes called Registration and Documentation:
public class Registration
{
private IVehicle vehicle;
public Registration(IVehicle vehicle)
{
this.vehicle = vehicle;
}
public virtual void AllocateLicensePlate()
{
Console.WriteLine("Allocating license plate...");
}
public virtual void AllocateVehicleNumber()
{
Console.WriteLine("Allocating vehicle number...");
}
}
public class Documentation
{
public static void PrintBrochure(IVehicle vehicle)
{
Console.WriteLine("Printing brochure...");
}
}
To implement the pattern we will create a VehicleFacade class that defines a method to prepare the specified vehicle by using the above classes on our behalf:
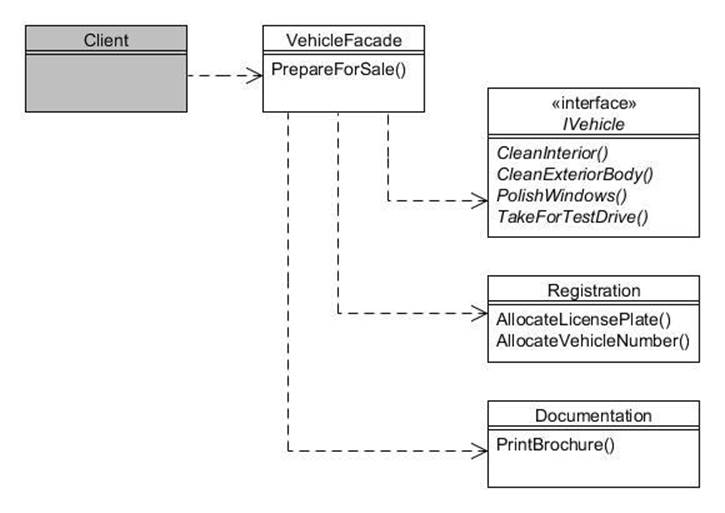
Figure 11.1 : Facade pattern
public class VehicleFacade
{
public virtual void PrepareForSale(IVehicle vehicle)
{
Registration reg = new Registration(vehicle);
reg.AllocateVehicleNumber();
reg.AllocateLicensePlate();
Documentation.PrintBrochure(vehicle);
vehicle.CleanInterior();
vehicle.CleanExteriorBody();
vehicle.PolishWindows();
vehicle.TakeForTestDrive();
}
}
Client programs then only need invoke the PrepareForSale() method on a VehicleFacade instance, and therefore need no knowledge of what needs to be done and what other objects are needed. And if something different is needed in a special circumstance, then the individual methods are still available for calling as required.
12. Flyweight
Type: Structural
Purpose: Use sharing to support large numbers of fine-grained objects efficiently.
Some programs need to create a large number of objects of one particular type, and if those objects happen to have a large amount of state then instantiating lots of them can quickly use up memory. When considering object state, we often note that at least some of it could potentially be shared among a group of objects.
For the Foobar Motor Company, the IEngine hierarchy is a case in point:
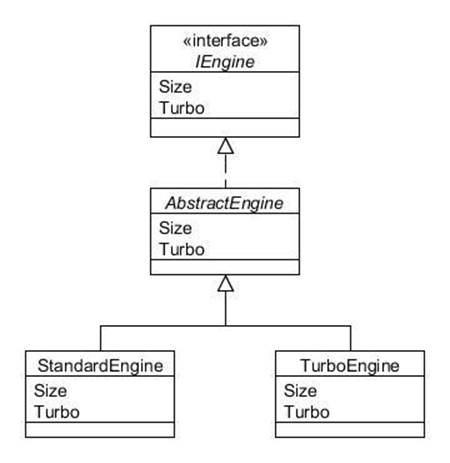
Figure 12.1 : IEngine class hierarchy
Our simple implementation of IEngine only defines two property getters; Size and Turbo. Let's suppose we instantiate two engines as follows:
Engine engine1 = new StandardEngine(1300);
Engine engine2 = new StandardEngine(1300);
The above would create two separate objects in memory, even though their state is identical. This can be thought of as its intrinsic state; i.e. all 1300cc standard engines will be storing 1300 for the engine size and false for whether it is turbocharged. Creating hundreds or thousands of these would be wasteful of memory, especially since a more realistic Engine class would require many more variables whose values would also be shared.
For the purposes of this chapter another method will be added to the IEngine interface, called Diagnose(). This new method will take a DiagnosticTool object as its argument, and this argument can be thought of as its extrinsic state, since its value is not actually stored in the Engine object; it is used purely so that the engine can use it to run a diagnostic check.
The DiagnosticTool interface looks like this:
public interface IDiagnosticTool
{
void RunDiagnosis(object obj);
}
The EngineDiagnosticTool implements the above for running diagnostics on an engine:
public class EngineDiagnosticTool : IDiagnosticTool
{
public virtual void RunDiagnosis(object obj)
{
Console.WriteLine("Starting engine diagnostic tool for " + obj);
Thread.Sleep(5000);
Console.WriteLine("Engine diagnosis complete");
}
}
To simulate a long-running process the method pauses for five seconds. With the above in place we can now add a suitable method to the IEngine interface:
public interface IEngine
{
// Properties having intrinsic (i.e. shared) state
int Size { get; }
bool Turbo { get; }
// Methods having extrinsic (i.e. unshared) state void Diagnose(IDiagnosticTool tool);
}
The implementation of this new method in AbstractEngine simply issues a call-back to the IDiagnosticTool:
public virtual void Diagnose(IDiagnosticTool tool) {
tool.RunDiagnosis(this);
}
The Flyweight pattern allows you to reference a multitude of objects of the same type and having the same state, but only by instantiating the minimum number of actual objects needed. This is typically done by allocating a 'pool' of objects which can be shared, and this is determined by a 'flyweight factory' class. Client programs get access to engines only through the factory:
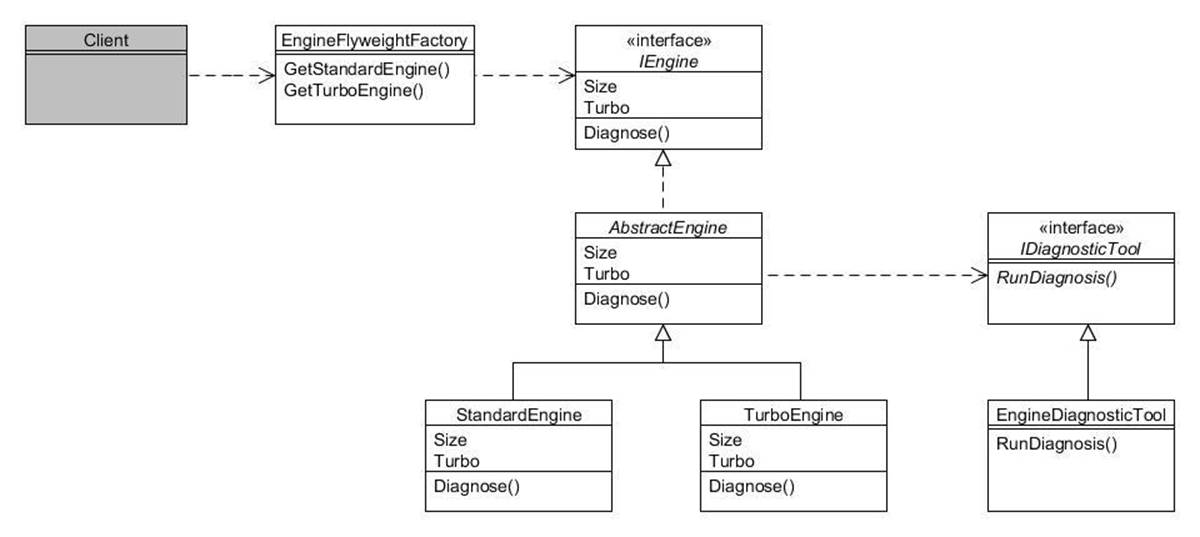
Figure 12.2 : Flyweight pattern
The EngineFlyweightFactory class looks like this:
public class EngineFlyweightFactory
{
private IDictionary<int?, IEngine> standardEnginePool;
private IDictionary<int?, IEngine> turboEnginePool;
public EngineFlyweightFactory()
{
standardEnginePool = new Dictionary<int?, IEngine>();
turboEnginePool = new Dictionary<int?, IEngine>();
}
public virtual IEngine GetStandardEngine(int size)
{
IEngine e = null;
bool found = standardEnginePool.TryGetValue(size, out e);
if (! found)
{
e = new StandardEngine(size);
standardEnginePool[size] = e;
}
return e;
}
public virtual IEngine GetTurboEngine(int size)
{
IEngine e = null;
bool found = turboEnginePool.TryGetValue(size, out e);
if (!found)
{
e = new TurboEngine(size);
turboEnginePool[size] = e;
}
return e;
}
}
This class utilises two dictionaries (one for standard engines and the other for turbo engines). Each time an engine of a particular type and size is requested, if a similar one has already been created it is returned rather than instantiating a new one. Client programs use the factory like this:
// Create the flyweight factory...
EngineFlyweightFactory factory = new EngineFlyweightFactory();
// Create the diagnostic tool
IDiagnosticTool tool = new EngineDiagnosticTool();
// Get the flyweights and run diagnostics on them
IEngine standard1 = factory.GetStandardEngine(1300);
standard1.Diagnose(tool);
IEngine standard2 = factory.GetStandardEngine(1300);
standard2.Diagnose(tool);
IEngine standard3 = factory.GetStandardEngine(1300);
standard3.Diagnose(tool);
IEngine standard4 = factory.GetStandardEngine(1600);
standard4.Diagnose(tool);
IEngine standard5 = factory.GetStandardEngine(1600);
standard5.Diagnose(tool);
// Show that objects are shared
Console.WriteLine(standard1.getHashCode());
Console.WriteLine(standard2.GetHashCode());
Console.WriteLine(standard3.GetHashCode());
Console.WriteLine(standard4.GetHashCode());
Console.WriteLine(standard5.GetHashCode());
In the above, the variables standard1, standard2 and standard3 all reference the same IEngine object (since they all 1300cc standard engines). Likewise, standard4 references the same object as standard5. Of course, whether it is worth running the diagnostics multiple times on the same objects is arguable depending upon the circumstances!
If the arguments passed to the extrinsic method (IDiagnosticTool in our example) need to be stored, this should be done in the client program.
13. Proxy
Type: Structural
Purpose: Provide a surrogate or place-holder for another object to control access to it.
Some methods can be time-consuming, such as those that load complex graphical components or need network connections. In these instances, the Proxy pattern provides a 'stand-in' object until such time that the time-consuming resource is complete, allowing the rest of your application to load.
In the chapter discussing the Flyweight pattern, the IEngine hierarchy was enhanced to define the additional method Diagnose(). As you saw, the implementation of RunDiagnosis() in EngineDiagnosticTool is slow (we made it sleep for five seconds to simulate this), so we might consider making this run is a separate thread.
Here is a reminder of the IEngine hierarchy with the additional method:
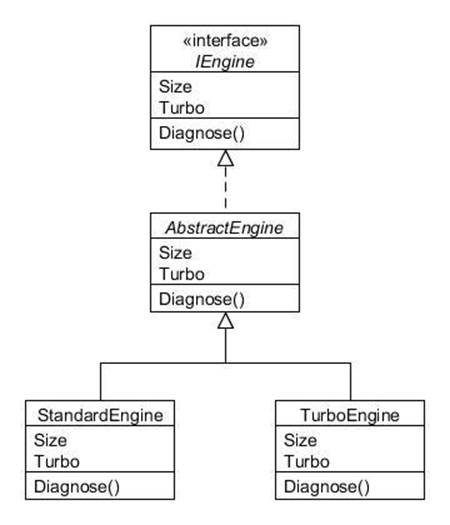
Figure 13.1 : IEngine class hierarchy
The Proxy pattern involves creating a class that implements the same interface that we are standing-in for, in our case IEngine. The proxy then forwards requests to the "real" object which it stores internally. Clients just access the proxy:
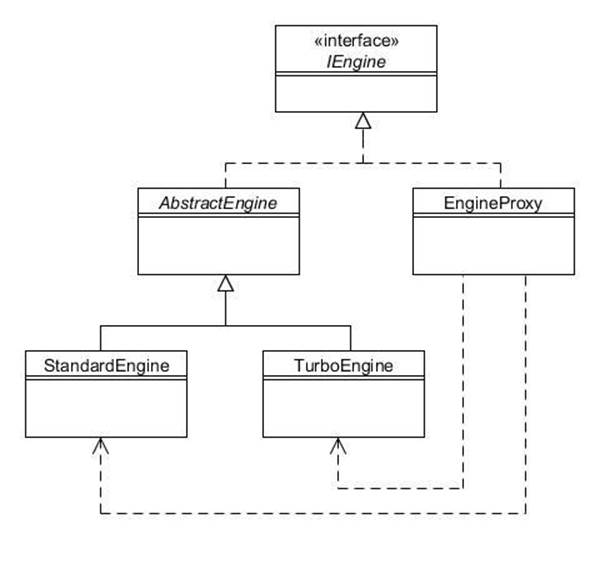
Figure 13.2 : Proxy pattern
Here is the code for the EngineProxy class:
public class EngineProxy : IEngine
{
private IEngine engine;
public EngineProxy(int size, bool turbo)
{
if (turbo)
{
engine = new TurboEngine(size);
}
else
{
engine = new StandardEngine(size);
}
}
public virtual int Size
{
get
{
return engine.Size;
}
}
public virtual bool Turbo
{
get
{
return engine.Turbo;
}
}
// This method is time-consuming...
public virtual void Diagnose(IDiagnosticTool tool)
{
Console.WriteLine("(Running tool as thread)");
Thread t = new Thread(() => RunDiagnosticTool(tool));
t.Start();
Console.WriteLine("EngineProxy diagnose() method finished");
}
public virtual void RunDiagnosticTool(IDiagnosticTool tool)
{
tool.RunDiagnosis(this);
}
}
The constructor creates either a StandardEngine or TurboEngine object and stores a reference to it as an instance variable. Calls to Size and Turbo getters simply forward to the referenced engine object. Calls to Diagnose() will invoke a separate thread to run the actual diagnosis. This can be useful if you cannot modify the original source for some reason.
All materials on the site are licensed Creative Commons Attribution-Sharealike 3.0 Unported CC BY-SA 3.0 & GNU Free Documentation License (GFDL)
If you are the copyright holder of any material contained on our site and intend to remove it, please contact our site administrator for approval.
© 2016-2026 All site design rights belong to S.Y.A.