C# Design Pattern Essentials (2012)
Part IV. Behavioural Patterns
This part describes the eleven behavioural patterns, that is, those that help manage what the classes actually do.
· Chain of Responsibility: Avoid coupling the sender of a request to its receiver by giving more than one object the chance to handle the request;
· Command: Encapsulate a request as an object, thereby letting you parameterise clients with different requests;
· Interpreter: Define the representation of a language’s grammar;
· Iterator: Provide a way to access the elements of an aggregate object sequentially without exposing its underlying representation;
· Mediator: Define an object that encapsulates how a set of objects interact;
· Memento: Capture and externalise an object’s state so that it can be restored to that state later;
· Observer: Define a one-to-many dependency between objects so that when one object changes its state, all of its dependents are notified and updated automatically;
· State: Allow an object to alter its behaviour when its internal state changes, as if it were a different class;
· Strategy: Allow clients to change the algorithm that an object uses to perform a function;
· Template Method: Define the skeleton of an algorithm in a method, deferring some steps to subclasses;
· Visitor: Simulate the addition of a method to a class without needing to actually change the class.
14. Chain of Responsibility
Type: Behavioural
Purpose: Avoid coupling the sender of a request to its receiver by giving more than one object a chance to handle the request. Chain the receiving objects and pass the request along the chain until an object handles it.
The Foobar Motor Company receives many emails each day, including servicing requests, sales enquiries, complaints, and of course the inevitable spam. Rather than employ someone specifically to sort through each email to determine which department it should be forwarded to, our task is to try and automate this by analysing the text in each email and making a "best guess".
In our simplified example, we will search the text of the email for a number of keywords and depending upon what we find will process accordingly. Here are the words we will search for and how they should be handled:
· If the email contains "viagra", "pills" or "medicines" then it should be forwarded to a spam handler;
· If the email contains "buy", or "purchase" then it should be forwarded to the sales department;
· If the email contains "service", or "repair" then it should be forwarded to the servicing department;
· If the email contains "complain", or "bad" then it should be forwarded to the manager;
· If the email contains none of the above words then it should be forwarded to the general enquiries department.
Note that only one object needs to handle the request, so if a particular email contains both "purchase" and "repair" it will be forwarded to the sales department only. The sequence in which to check the keywords is whatever seems most sensible for the application; so here we are trying to filter out spam before it reaches any other department.
Now it would be possible, of course, to just have a series of if...else... statements when checking for the keywords, but that would not be very object-oriented. The Chain of Responsibility pattern instead allows us to define separate 'handler' objects that all conform to an EmailHandler interface. This enables us to keep each handler independent and loosely-coupled.
The following diagram shows the pattern:
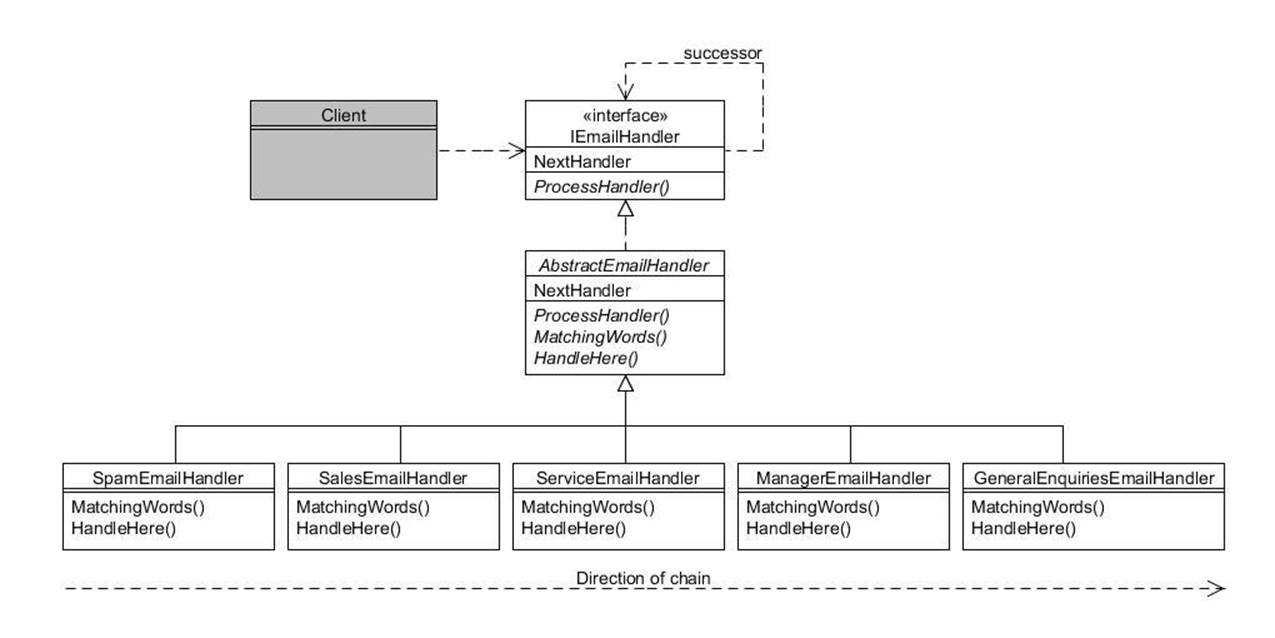
Figure 14.1 : Chain of Responsibility pattern
IEmailHandler is the interface at the top of the hierarchy:
public interface IEmailHandler
{
IEmailHandler NextHandler { set; }
void ProcessHandler(string email);
}
The NextHandler setter takes another IEmailHandler object as its argument which represents the handler to call if the current object is unable to handle the email.
The ProcessHandler() method takes the email text as its argument and determines if it is able to handle it (i.e. if it contains one of the keywords we are interested in). If the active object can handle the email it does so, otherwise it just forwards to the next in the chain.
The AbstractEmailHandler class implements the IEmailHandler interface to provide useful default functionality:
public abstract class AbstractEmailHandler : IEmailHandler
{
private IEmailHandler nextHandler;
public virtual IEmailHandler NextHandler
{
set
{
nextHandler = value;
}
}
public virtual void ProcessHandler(string email)
{
bool wordFound = false;
// If no words to match against then this object can handle
if (MatchingWords().Length == 0)
{
wordFound = true;
}
else
{
// Look for any of the matching words
foreach (string word in MatchingWords())
{
if (email.IndexOf(word) >= 0)
{
wordFound = true;
break;
}
}
}
// Can we handle email in this object?
if (wordFound)
{
HandleHere(email);
}
else
{
// Unable to handle here so forward to next in chain
nextHandler.ProcessHandler(email);
}
}
protected internal abstract string[] MatchingWords();
protected internal abstract void HandleHere(string email);
}
The method NextHandler simply stores the argument in an instance variable; the decision making process is made in ProcessHandler(). This has been written to utilise two protected helper methods that must be implemented by concrete subclasses:
· MatchingWords() will return an array of string objects that this handler is interested in;
· HandleHere() is only called if this object can actually handle the email and contains whatever code is required.
The concrete subclasses are straightforward:
public class SpamEmailHandler : AbstractEmailHandler
{
protected internal override string[] MatchingWords()
{
return new string[] { "viagra", "pills", "medicines" };
}
protected internal override void HandleHere(string email)
{
Console.WriteLine("This is a spam email.");
}
}
public class SalesEmailHandler : AbstractEmailHandler
{
protected internal override string[] MatchingWords()
{
return new string[] { "buy", "purchase" };
}
protected internal override void HandleHere(string email)
{
Console.WriteLine("Email handled by sales department.");
}
}
public class ServiceEmailHandler : AbstractEmailHandler
{
protected internal override string[] MatchingWords()
{
return new string[] { "service", "repair" };
}
protected internal override void HandleHere(string email)
{
Console.WriteLine("Email handled by service department.");
}
}
public class ManagerEmailHandler : AbstractEmailHandler
{
protected internal override string[] MatchingWords()
{
return new string[] { "complain", "bad" };
}
protected internal override void HandleHere(string email)
{
Console.WriteLine("Email handled by manager.");
}
}
public class GeneralEnquiriesEmailHandler : AbstractEmailHandler
{
protected internal override string[] MatchingWords()
{
return new string[0]; // match anything
}
protected internal override void HandleHere(string email)
{
Console.WriteLine("Email handled by general enquires.");
}
}
We now need to define the sequence in which the handlers are called. For this example, the following static method has been added to AbstractEmailHandler:
public static void Handle(string email)
{
// Create the handler objects...
IEmailHandler spam = new SpamEmailHandler();
IEmailHandler sales = new SalesEmailHandler();
IEmailHandler service = new ServiceEmailHandler();
IEmailHandler manager = new ManagerEmailHandler();
IEmailHandler general = new GeneralEnquiriesEmailHandler();
// Chain them together...
spam.NextHandler = sales;
sales.NextHandler = service;
service.NextHandler = manager;
manager.NextHandler = general;
// Start the ball rolling...
spam.ProcessHandler(email);
}
}
Putting a message through the handlers is now as simple as this:
String email = "I need my car repaired.";
AbstractEmailHandler.handle(email);
This should produce the following output:
Email handled by service department.
15. Command
Type: Behavioural
Purpose: Encapsulate a request as an object, thereby letting you parameterise clients with different requests, queue or log requests, and support undoable operations.
The vehicles made by the Foobar Motor Company each have an installed radio; this is modelled by the following Radio class:
public class Radio
{
public const int MinVolume = 0;
public const int MaxVolume = 10;
public const int DefaultVolume = 5;
private bool switchedOn;
private int volume;
public Radio()
{
switchedOn = false;
volume = DefaultVolume;
}
public virtual bool On
{
get
{
return switchedOn;
}
}
public virtual int Volume
{
get
{
return volume;
}
}
public virtual void SwitchOn()
{
switchedOn = true;
Console.WriteLine("Radio now on, volume level " + Volume);
}
public virtual void SwitchOff()
{
switchedOn = false;
Console.WriteLine("Radio now off");
}
public virtual void VolumeUp()
{
if (On)
{
if (Volume < MaxVolume)
{
volume++;
Console.WriteLine("Volume turned up to level " + Volume);
}
}
}
public virtual void VolumeDown()
{
if (On)
{
if (Volume > MinVolume)
{
volume--;
Console.WriteLine("Volume turned down to level " + Volume);
}
}
}
}
As you can see, the class enables the radio to be switched on and off, and provided it is switched on will enable the volume to be increased or decreased one level at a time, within the range 1 to 10.
Some of the vehicles also have electrically operated windows with simple up & down buttons, as modelled by the following ElectricWindow class.
public class ElectricWindow
{
private bool open;
public ElectricWindow()
{
open = false;
Console.WriteLine("Window is closed");
}
public virtual bool Open
{
get
{
return open;
}
}
public virtual bool Closed
{
get
{
return (!open);
}
}
public virtual void OpenWindow()
{
if (Closed)
{
open = true;
Console.WriteLine("Window is now open");
}
}
public virtual void CloseWindow()
{
if (Open)
{
open = false;
Console.WriteLine("Window is now closed");
}
}
}
Each of the devices (the radio and the electric window) has separate controls, typically buttons, to manage their state. But suppose the Foobar Motor Company now wishes to introduce speech recognition to their top-of-the-range vehicles and have them perform as follows:
· If the speech-recognition system is in "radio" mode, then if it hears the word "up" or "down" it adjusts the radio volume; or
· If the speech-recognition system is in "window" mode, then if it hears the word "up" or "down" it closes or opens the driver's door window.
We therefore need the speech-recognition system to be able to handle either Radio objects or ElectricWindow objects, which are of course in completely separate hierarchies. We might also want it to handle other devices in the future, such as the vehicle's speed or the gearbox (e.g. upon hearing "up" it would increase the speed by 1mph or it would change to the next higher gear). For good object-oriented design we need to isolate the speech-recognition from the devices it controls, so it can cope with any device without directly knowing what they are.
The Command patterns allows us to uncouple an object making a request from the object that receives the request and performs the action, by means of a "middle-man" object known as a "command object".
In its simplest form, this requires us to create an interface (which we shall call IVoiceCommand) with one method:
public interface IVoiceCommand {
void Execute();
}
We now need to create implementing classes for each action that we wish to take. For example, to turn up the volume of the radio we can create a VolumeUpCommand class:
public class VolumeUpCommand : IVoiceCommand
{
private Radio radio;
public VolumeUpCommand(Radio radio)
{
this.radio = radio;
}
public virtual void Execute()
{
radio.VolumeUp();
}
}
The class simply takes a reference to a Radio object in its constructor and invokes its VolumeUp() method whenever Execute() is called.
We likewise need to create a VolumeDownCommand class for when the volume is to be reduced:
public class VolumeDownCommand : IVoiceCommand
{
private Radio radio;
public VolumeDownCommand(Radio radio)
{
this.radio = radio;
}
public virtual void Execute()
{
window. VolumeDown();
}
}
Controlling an electric window's up and down movement is just as easy: this time we create classes implementing IVoiceCommand passing in a reference to an ElectricWindow object:
public class WindowUpCommand : IVoiceCommand
{
private ElectricWindow window;
public WindowUpCommand(ElectricWindow window)
{
this.window = window;
}
public virtual void Execute()
{
window.CloseWindow();
}
}
public class WindowDownCommand : IVoiceCommand
{
private ElectricWindow window;
public WindowDownCommand(ElectricWindow window)
{
this.window = window;
}
public virtual void Execute()
{
window.OpenWindow();
}
}
We will now define a SpeechRecogniser class that only knows about IVoiceCommand objects; it knows nothing about radios or electric windows.
public class SpeechRecogniser
{
private ICommand upCommand, downCommand;
public virtual void SetCommands(ICommand upCommand, ICommand downCommand)
{
this.upCommand = upCommand;
this.downCommand = downCommand;
}
public virtual void HearUpSpoken()
{
upCommand.Execute();
}
public virtual void HearDownSpoken()
{
downCommand.Execute();
}
}
We can view what we have created diagrammatically as follows:
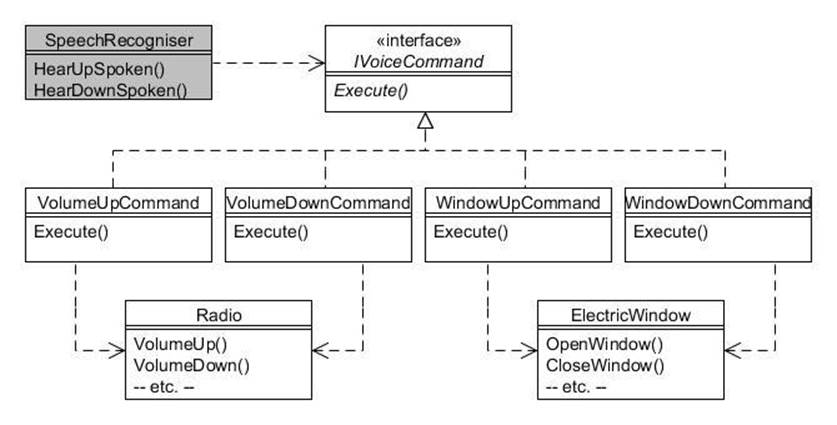
Figure 15.1 : Command pattern
Client programs can now create Radio and ElectricWindow instances, along with their respective IVoiceCommand instances. The command instances are then passed to the SpeechRecogniser object so it knows what to do.
We will first create a Radio and an ElectricWindow and their respective commands:
// Create a radio and its up/down command objects
Radio radio = new Radio();
radio.SwitchOn();
IVoiceCommand volumeUpCommand = new VolumeUpCommand(radio);
IVoiceCommand volumeDownCommand = new VolumeDownCommand(radio);
// Create an electric window and its up/down command objects
ElectricWindow window = new ElectricWindow();
IVoiceCommand windowUpCommand = new WindowUpCommand(window);
IVoiceCommand windowDownCommand = new WindowDownCommand(window);
Now create a single SpeechRecogniser object and set it to control the radio:
// Create a speech recognition object
SpeechRecogniser speechRecogniser = new SpeechRecogniser();
// Control the radio
speechRecogniser.SetCommands(volumeUpCommand, volumeDownCommand);
Console.WriteLine("Speech recognition controlling the radio");
speechRecogniser.HearUpSpoken();
speechRecogniser.HearUpSpoken();
speechRecogniser.HearUpSpoken();
speechRecogniser.HearDownSpoken();
Now set the same SpeechRecogniser object to control the window instead:
// Control the electric window
speechRecogniser.SetCommands(windowUpCommand, windowDownCommand);
Console.WriteLine("Speech recognition will now control the window");
speechRecogniser.HearDownSpoken();
speechRecogniser.HearUpSpoken();
If you run all the above statements you should see output similar to this:
Radio now on, volume level 5
Window is closed
Speech recognition controlling the radio
Volume turned up to level 6
Volume turned up to level 7
Volume turned up to level 8
Volume turned down to level 7
Speech recognition will now control the window
Window is now open
Window is now closed
Typical uses of the Command Pattern
One of the most frequent uses of the Command pattern is in UI toolkits. These provide pre-built components like graphical buttons and menu items that cannot possibly know what needs to be done when clicked, because that is always specific to your application.
Another common aspect of graphical applications is the provision of an "undo" mechanism. The Command pattern is used to accomplish this too; using the example in this chapter, we would add a method to the IVoiceCommand interface like this:
public interface IVoiceCommand
{
void Execute();
void undo();
}
Implementing classes then provide the code for the additional method to reverse the last action, as in this example for the VolumeUpCommand class:
public class VolumeUpCommand : IVoiceCommand {
private Radio radio;
public VolumeUpCommand(Radio r) {
radio = r;
}
public virtual void execute() {
radio.VolumeUp();
}
public virtual void undo() { radio.VolumeDown(); }
}
Most applications would be slightly more involved than the above example, in that you would need to store the state of the object prior to performing the code in the Execute() method, enabling you to restore that state when Undo() is called.
16. Interpreter
Type: Behavioural
Purpose: Given a language, define a representation for its grammar along with an interpreter that uses the representation to interpret sentences in the language.
The satellite-navigation systems fitted to some of the Foobar Motor Company's vehicles have a special feature that enables the user to enter a number of cities and let it calculate the most northerly, southerly, westerly or easterly, depending on which command string is entered. A sample command might look like this:
london edinburgh manchester southerly
The above would result in "London" being returned, being the most southerly of the three entered cities. You can even enter the command string like this:
london edinburgh manchester southerly aberdeen westerly
This would first determine that London was the most southerly and then use that result (London) and compare it to Aberdeen to tell you which of those two is the most westerly. Any number of cities can be entered before each of the directional commands of "northerly", "southerly", "westerly" and "easterly".
You can think of the above command string consisting of the city names and directional keywords as forming a simple "language" that needs to be interpreted by the satellite-navigation software. The Interpreter pattern is an approach that helps to decipher these kinds of relatively simple languages.
Before looking at the pattern itself, we shall create a class named City which models the essential points of interest for our example, which is just the name of the city and its latitude and longitude:
public class City
{
private string name;
private double latitude, longitude;
public City(string name, double latitude, double longitude)
{
this.name = name;
this.latitude = latitude;
this.longitude = longitude;
}
public virtual string Name
{
get
{
return name;
}
}
public virtual double Latitude
{
get
{
return latitude;
}
}
public virtual double Longitude
{
get
{
return longitude;
}
}
public override bool Equals(object otherObject)
{
if (this == otherObject)
{
return true;
}
if (!(otherObject is City))
{
return false;
}
City otherCity = (City)otherObject;
return Name.Equals(otherCity.Name);
}
public override int GetHashCode()
{
return Name.GetHashCode();
}
public override string ToString()
{
return Name;
}
}
You will notice that for simplicity the latitude and longitude are stored as doubles. Also note that for the latitude positive values represent North and negative values represent South. Similarly, a positive longitude represents East and negative values West. The example in this chapter only includes a small number of UK cities which are all Northern latitude and Western longitude, although any city should work should you wish to use your own.
The classes to interpret the language are structured as follows:
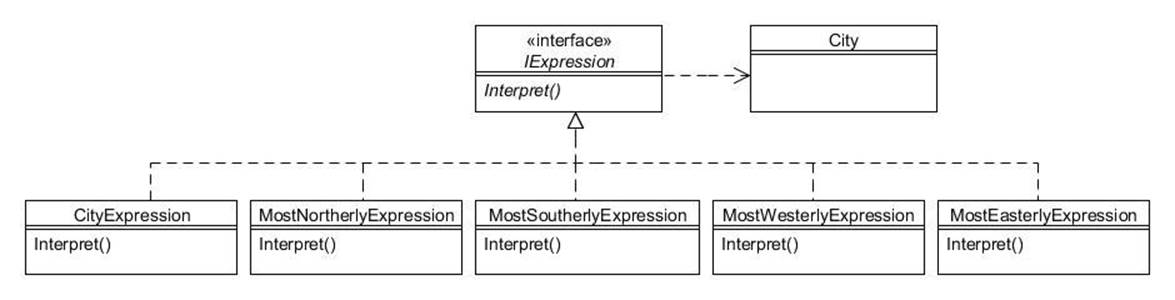
Figure 16.1 : Interpreter pattern
The Interpreter pattern resembles the Composite pattern in that it comprises an interface (or abstract class) with two types of concrete subclass; one type that represents the individual elements and the other type that represents repeating elements. We create one subclass to handle each type of element in the language.
The IExpression interface is very simple, merely declaring an Interpret() method that returns a City object:
public interface IExpression
{
City Interpret();
}
The first concrete subclass we will look at is CityExpression, an instance of which will be created for each city name it recognises in the command string. All this class needs to do is store a reference to a City object and return it when Interpret() is invoked:
public class CityExpression : IExpression
{
private City city;
public CityExpression(City city)
{
this.city = city;
}
public virtual City Interpret()
{
return city;
}
}
The classes to handle each of the commands (e.g. "northerly") are slightly more involved:
public class MostNortherlyExpression : IExpression
{
private IList<IExpression> expressions;
public MostNortherlyExpression(IList<IExpression> expressions)
{
this.expressions = expressions;
}
public virtual City Interpret()
{
City resultingCity = new City("Nowhere", -999.9, -999.9);
foreach (IExpression currentExpression in expressions)
{
City currentCity = currentExpression.Interpret();
if (currentCity.Latitude > resultingCity.Latitude)
{
resultingCity = currentCity;
}
}
return resultingCity;
}
}
The list of IExpression objects passed to the constructor will be of the CityExpression type. The Interpret() method loops through each of these to determine the most northerly, by comparing their latitude values.
The MostSoutherlyExpression class is very similar, merely changing the comparison:
public class MostSoutherlyExpression : IExpression
{
private IList<IExpression> expressions;
public MostSoutherlyExpression(IList<IExpression> expressions)
{
this.expressions = expressions;
}
public virtual City Interpret()
{
City resultingCity = new City("Nowhere", 999.9, 999.9);
foreach (IExpression currentExpression in expressions)
{
City currentCity = currentExpression.Interpret();
if (currentCity.Latitude < resultingCity.Latitude)
{
resultingCity = currentCity;
}
}
return resultingCity;
}
}
Likewise the MostWesterlyExpression and MostEasterlyExpression classes compute and return the appropriate City:
public class MostWesterlyExpression : IExpression
{
private IList<IExpression> expressions;
public MostWesterlyExpression(IList<IExpression> expressions)
{
this.expressions = expressions;
}
public virtual City Interpret()
{
City resultingCity = new City("Nowhere", 999.9, 999.9);
foreach (IExpression currentExpression in expressions)
{
City currentCity = currentExpression.Interpret();
if (currentCity.Longitude < resultingCity.Longitude)
{
resultingCity = currentCity;
}
}
return resultingCity;
}
}
public class MostEasterlyExpression : IExpression
{
private IList<IExpression> expressions;
public MostEasterlyExpression(IList<IExpression> expressions)
{
this.expressions = expressions;
}
public virtual City Interpret()
{
City resultingCity = new City("Nowhere", -999.9, -999.9);
foreach (IExpression currentExpression in expressions)
{
City currentCity = currentExpression.Interpret();
if (currentCity.Longitude > resultingCity.Longitude)
{
resultingCity = currentCity;
}
}
return resultingCity;
}
}
While the Interpreter pattern does not in itself cover the parsing of an expression, in practice we need to define a class to go through the command string (such as "london edinburgh manchester southerly") and create the appropriate IExpression classes as we go along. These IExpression classes are placed into a "syntax tree" which is normally implemented using a LIFO stack. We shall therefore define a DirectionalEvaluator class to do this parsing, and set-up a small sample of UK cities:
public class DirectionalEvaluator
{
private IDictionary<string, City> cities;
public DirectionalEvaluator()
{
cities = new Dictionary<string, City>();
cities["aberdeen"] = new City("Aberdeen", 57.15, -2.15);
cities["belfast"] = new City("Belfast", 54.62, -5.93);
cities["birmingham"] = new City("Birmingham", 52.42, -1.92);
cities["dublin"] = new City("Dublin", 53.33, -6.25);
cities["edinburgh"] = new City("Edinburgh", 55.92, -3.02);
cities["glasgow"] = new City("Glasgow", 55.83, -4.25);
cities["london"] = new City("London", 51.53, -0.08);
cities["liverpool"] = new City("Liverpool", 53.42, -3.0);
cities["manchester"] = new City("Manchester", 53.5, -2.25);
cities["southampton"] = new City("Southampton", 50.9, -1.38);
}
public virtual City Evaluate(string route)
{
// Define the syntax tree
Stack<IExpression> expressionStack = new Stack<IExpression>();
// Get each separate token
IList<string> tokens = new List<string>();
int fromIndex = 0;
bool finished = false;
while (!finished)
{
int spaceLocation = route.IndexOf(" ", fromIndex);
if (spaceLocation >= 0)
{
tokens.Add(route.Substring(fromIndex, spaceLocation - fromIndex));
fromIndex = spaceLocation + 1;
}
else
{
tokens.Add(route.Substring(fromIndex));
finished = true;
}
}
// Parse each token in route string
foreach (string token in SplitTokens(route))
{
// Is token a recognised city?
if (cities.ContainsKey(token))
{
City city = cities[token];
expressionStack.Push(new CityExpression(city));
// Is token to find most northerly?
}
else if (token.Equals("northerly"))
{
expressionStack.Push(new MostNortherlyExpression(LoadExpressions(expressionStack)));
// Is token to find most southerly?
}
else if (token.Equals("southerly"))
{
expressionStack.Push(new MostSoutherlyExpression(LoadExpressions(expressionStack)));
// Is token to find most westerly?
}
else if (token.Equals("westerly"))
{
expressionStack.Push(new MostWesterlyExpression(LoadExpressions(expressionStack)));
// Is token to find most easterly?
}
else if (token.Equals("easterly"))
{
expressionStack.Push(new MostEasterlyExpression(LoadExpressions(expressionStack)));
}
}
// Resulting value
return expressionStack.Pop().Interpret();
}
// Get each separate token from a string
private IList<string> SplitTokens(string str)
{
IList<string> tokens = new List<string>();
int fromIndex = 0;
bool finished = false;
while (!finished)
{
int spaceLocation = str.IndexOf(" ", fromIndex);
if (spaceLocation >= 0)
{
tokens.Add(str.Substring(fromIndex, spaceLocation - fromIndex));
fromIndex = spaceLocation + 1;
}
else
{
tokens.Add(str.Substring(fromIndex));
finished = true;
}
}
return tokens;
}
private IList<IExpression> LoadExpressions(Stack<IExpression> expressionStack)
{
IList<IExpression> expressions = new List<IExpression>();
while (expressionStack.Count > 0)
{
expressions.Add(expressionStack.Pop());
}
return expressions;
}
}
Within the Evaluate() method, when the parser detects a directional command (such as "northerly") it removes the cities on the stack and passes them along with the command back to the stack.
Note that the use above of if...else... statements has been used simply so that the chapter concentrates on the Interpreter pattern. A better approach would be to use a separate pattern to handle each token such as that defined in Chain of Responsibility.
Now all that remains is for our client programs to utilise the DirectionalEvaluator passing the command to interpret:
// Create the evaluator
DirectionalEvaluator evaluator = new DirectionalEvaluator();
// This should output "London"...
Console.WriteLine(evaluator.evaluate("london edinburgh manchester southerly"));
// This should output "Aberdeen"...
Console.WriteLine(evaluator.evaluate("london edinburgh manchester southerly aberdeen westerly"));
Console.Read();
17. Iterator
Type: Behavioural
Purpose: Provide a way to access the elements of an aggregate object sequentially without exposing its underlying representation.
The Foobar Motor Company wanted to produce a brochure listing their range of vehicles for sale and allocated the task to two separate programmers, one to provide the range of cars and the other to provide the range of vans.
The programmer that coded the CarRange class decided to internally store the range using an IList object:
public class CarRange
{
private IList<IVehicle> cars;
public CarRange()
{
cars = new List<IVehicle>();
// Define the range of car models available
cars.Add(new Saloon(new StandardEngine(1300)));
cars.Add(new Saloon(new StandardEngine(1600)));
cars.Add(new Coupe(new StandardEngine(2000)));
cars.Add(new Sport(new TurboEngine(2500)));
}
public virtual IList<IVehicle> Range
{
get
{
return cars;
}
}
}
You can see from the above that the programmer provided a Range getter that returns the IList collection object.
The other programmer decided to store the vans in an array when writing the VanRange class, and therefore his version of the Range getter returns an array of vehicles:
public class VanRange
{
private IVehicle[] vans;
public VanRange()
{
vans = new IVehicle[3];
// Define the range of van models available
vans[0] = new BoxVan(new StandardEngine(1600));
vans[1] = new BoxVan(new StandardEngine(2000));
vans[2] = new Pickup(new TurboEngine(2200));
}
public virtual IVehicle[] Range
{
get
{
return vans;
}
}
}
The problem with this is that the internal representation in both of these classes has been exposed to outside objects. A better approach would be for each of the CarRange and VanRange classes to provide an GetEnumerator() method that returns an IEnumerator object, so that as well as being consistent, the internal representation would not need to be exposed.
For CarRange the additional method will be as follows:
public virtual IEnumerator<IVehicle> GetEnumerator()
{
return cars.GetEnumerator();
}
For VanRange the additional method will need to convert from the array:
public virtual IEnumerator<IVehicle> GetEnumerator()
{
return ((IEnumerable<IVehicle>) vans).GetEnumerator();
}
Now we can process both cars and vans in a consistent manner:
Console.WriteLine("=== Our Cars ===");
CarRange carRange = new CarRange();
PrintIterator(carRange.GetEnumerator());
Console.WriteLine("=== Our Vans ===");
VanRange vanRange = new VanRange();
PrintIterator(vanRange.GetEnumerator());
private static void PrintIterator(IEnumerator iter)
{
while (iter.MoveNext()) {
Console.WriteLine(iter.Current);
}
}
The 'foreach' loop
Several of the other chapters in this book have made use of the foreach statement, providing a clean alternative to the above, as follows:
Console.WriteLine("=== Our Cars ===");
CarRange carRange = new CarRange();
foreach (IVehicle currentVehicle in carRange.Range) {
Console.WriteLine(currentVehicle);
}
Console.WriteLine("=== Our Vans ===");
VanRange vanRange = new VanRange();
foreach (IVehicle currentVehicle in vanRange.Range) {
Console.WriteLine(currentVehicle);
}
18. Mediator
Type: Behavioural
Purpose: Define an object that encapsulates how a set of objects interact. Mediator promotes loose coupling by keeping objects from referring to each other explicitly, and it lets you vary their interaction independently.
The Foobar Motor Company is looking to the future when vehicles can drive themselves. This, of course, would entail the various components (ignition, gearbox, accelerator and brakes, etc.) being controlled together and interacting in various ways. For example:
· Until the ignition is switched on, the gearbox, accelerator and brakes do not operate (we will assume the parking brake is in effect);
· When accelerating, the brakes should be disabled;
· When braking the accelerator should be disabled;
· The appropriate gear should be engaged dependent upon the speed of the vehicle.
And all this should happen automatically so the driver can just enjoy the view! (we will assume the vehicle can sense it's position so as to avoid crashes, etc.).
We will naturally create classes to model the individual components, so there will be an Ignition class, a Gearbox class, an Accelerator class and a Brake class. But we can also see that there are some complex interactions between them, and yet one of our core object-oriented design principles is to keep classes loosely-coupled.
The Mediator pattern helps to solve this through the definition of a separate class (the mediator) that knows about the individual component classes and takes responsibility for managing their interaction. The component classes also each know about the mediator class, but this is the only coupling they have. For our example, we will call the mediator class EngineManagementSystem.
We can see the connections diagrammatically below:
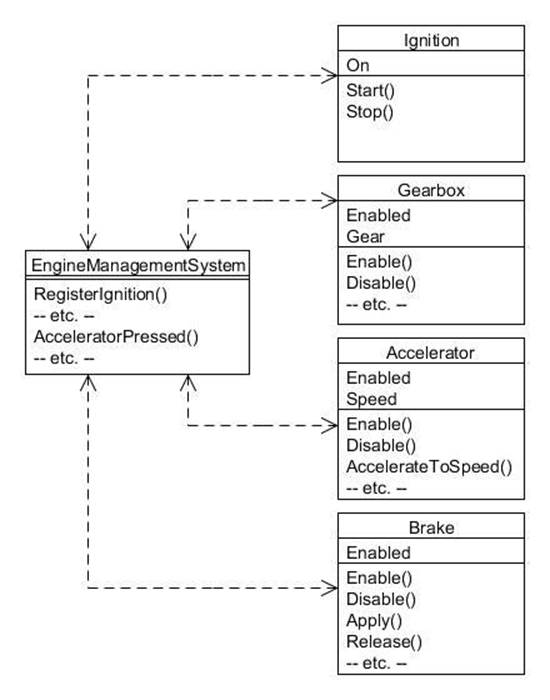
Figure 18.1 : Mediator pattern
The two-way communication is achieved via each of the component classes' constructors, in that they each accept a reference to the mediator object (so they can send messages to it) and register themselves with the mediator (so they can receive messages from it). But each component class has no knowledge of any other component class; they only know about the mediator.
We can see this by looking at the Ignition class:
public class Ignition
{
private EngineManagementSystem mediator;
private bool on;
// Constructor accepts mediator as an argument
public Ignition(EngineManagementSystem mediator)
{
this.mediator = mediator;
on = false;
// Register back with the mediator;
mediator.RegisterIgnition(this);
}
public virtual void Start()
{
on = true;
mediator.IgnitionTurnedOn();
Console.WriteLine("Ignition turned on");
}
public virtual void Stop()
{
on = false;
mediator.IgnitionTurnedOff();
Console.WriteLine("Ignition turned off");
}
public virtual bool On
{
get
{
return on;
}
}
}
Note how the constructor establishes the two-way communication, and then how methods that perform events notify the mediator of those events.
The Gearbox class applies the same principles:
public class Gearbox
{
private EngineManagementSystem mediator;
private bool enabled;
private Gear currentGear;
// Constructor accepts mediator as an argument
public Gearbox(EngineManagementSystem mediator)
{
this.mediator = mediator;
enabled = false;
currentGear = Gear.Neutral;
mediator.RegisterGearbox(this);
}
public virtual void Enable()
{
enabled = true;
mediator.GearboxEnabled();
Console.WriteLine("Gearbox enabled");
}
public virtual void Disable()
{
enabled = false;
mediator.GearboxDisabled();
Console.WriteLine("Gearbox disabled");
}
public virtual bool Enabled
{
get
{
return enabled;
}
}
public virtual Gear Gear
{
set
{
if ((Enabled) && (Gear != value))
{
currentGear = value;
mediator.GearChanged();
Console.WriteLine("Now in " + Gear + " gear");
}
}
get
{
return currentGear;
}
}
}
The Gear enum used by Gearbox is as follows:
public enum Gear
{
Neutral,
First,
Second,
Third,
Fourth,
Fifth,
Reverse
}
The Accelerator and Brake classes follow a similar process:
public class Accelerator
{
private EngineManagementSystem mediator;
private bool enabled;
private int speed;
// Constructor accepts mediator as an argument
public Accelerator(EngineManagementSystem mediator)
{
this.mediator = mediator;
enabled = false;
speed = 0;
mediator.RegisterAccelerator(this);
}
public virtual void Enable()
{
enabled = true;
mediator.AcceleratorEnabled();
Console.WriteLine("Accelerator enabled");
}
public virtual void Disable()
{
enabled = false;
mediator.AcceleratorDisabled();
Console.WriteLine("Accelerator disabled");
}
public virtual bool Enabled
{
get
{
return enabled;
}
}
public virtual void AccelerateToSpeed(int speed)
{
if (Enabled)
{
this.speed = speed;
Console.WriteLine("Speed now " + Speed);
}
}
public virtual int Speed
{
get
{
return speed;
}
}
}
public class Brake
{
private EngineManagementSystem mediator;
private bool enabled;
private bool applied;
// Constructor accepts mediator as an argument
public Brake(EngineManagementSystem mediator)
{
this.mediator = mediator;
enabled = false;
applied = false;
mediator.RegisterBrake(this);
}
public virtual void Enable()
{
enabled = true;
mediator.BrakeEnabled();
Console.WriteLine("Brakes enabled");
}
public virtual void Disable()
{
enabled = false;
mediator.BrakeDisabled();
Console.WriteLine("Brakes disabled");
}
public virtual bool Enabled
{
get
{
return enabled;
}
}
public virtual void Apply()
{
if (Enabled)
{
applied = true;
mediator.BrakePressed();
Console.WriteLine("Now braking");
}
}
private void Release()
{
if (Enabled)
{
applied = false;
}
}
}
So we now need the EngineManagementSystem class to serve as the mediator. This will hold a reference to each of the component classes with methods enabling their registration with the mediator. It also has methods to handle the interaction between the various components when particular events occur:
public class EngineManagementSystem
{
private Ignition ignition;
private Gearbox gearbox;
private Accelerator accelerator;
private Brake brake;
private int currentSpeed;
public EngineManagementSystem()
{
currentSpeed = 0;
}
// Methods that enable registration with this mediator...
public virtual void RegisterIgnition(Ignition ignition)
{
this.ignition = ignition;
}
public virtual void RegisterGearbox(Gearbox gearbox)
{
this.gearbox = gearbox;
}
public virtual void RegisterAccelerator(Accelerator accelerator)
{
this.accelerator = accelerator;
}
public virtual void RegisterBrake(Brake brake)
{
this.brake = brake;
}
// Methods that handle object interactions...
public virtual void IgnitionTurnedOn()
{
gearbox.Enable();
accelerator.Enable();
brake.Enable();
}
public virtual void IgnitionTurnedOff()
{
gearbox.Disable();
accelerator.Disable();
brake.Disable();
}
public virtual void GearboxEnabled()
{
Console.WriteLine("EMS now controlling the gearbox");
}
public virtual void GearboxDisabled()
{
Console.WriteLine("EMS no longer controlling the gearbox");
}
public virtual void GearChanged()
{
Console.WriteLine("EMS disengaging revs while gear changing");
}
public virtual void AcceleratorEnabled()
{
Console.WriteLine("EMS now controlling the accelerator");
}
public virtual void AcceleratorDisabled()
{
Console.WriteLine("EMS no longer controlling the accelerator");
}
public virtual void AcceleratorPressed()
{
brake.Disable();
while (currentSpeed < accelerator.Speed)
{
currentSpeed++;
Console.WriteLine("Speed currentlt " + currentSpeed);
// Set gear according to speed
if (currentSpeed <= 10)
{
gearbox.Gear = Gear.First;
}
else if (currentSpeed <= 20)
{
gearbox.Gear = Gear.Second;
}
else if (currentSpeed <= 30)
{
gearbox.Gear = Gear.Third;
}
else if (currentSpeed <= 50)
{
gearbox.Gear = Gear.Fourth;
}
else
{
gearbox.Gear = Gear.Fifth;
}
}
brake.Enable();
}
public virtual void BrakeEnabled()
{
Console.WriteLine("EMS now controlling the brake");
}
public virtual void BrakeDisabled()
{
Console.WriteLine("EMS no longer controlling the brake");
}
public virtual void BrakePressed()
{
accelerator.Disable();
currentSpeed = 0;
}
public virtual void BrakeReleased()
{
gearbox.Gear = Gear.First;
accelerator.Enable();
}
}
Common uses
A common use of the Mediator pattern is to manage the interaction of graphical components on a dialog. This frequently involves controlling when buttons, text fields, etc. should be enabled or disabled, or for passing data between components.
Note that it may be possible to reduce the coupling further by using the Observer pattern in place of Mediator. This would mean that the component classes (i.e. Ignition, etc.) would not need to hold a reference to a mediator but would instead fire events. The EngineManagementSystem class would then be an observer of the component classes and would still be able to invoke messages on them.
19. Memento
Type: Behavioural
Purpose: Without violating encapsulation, capture and externalise an object's internal state so that it can be restored to this state later.
The Foobar Motor Company's vehicles naturally have a speedometer mounted on the dashboard, which not only records the current speed but also the previous speed. There is now a requirement for the state to be stored externally at periodic intervals (so that it could, for example, be integrated into a tachograph for goods vehicles).
However, one of the instance variables in the Speedometer class does not have a getter method, but to adhere to encapsulation and data-hiding principles it is correctly declared to be private. We also want to adhere to the principle that a class should not have multiple responsibilities, so don't want to also have to build in a state save & restore mechanism into the class. So how can we capture the state of the object?
This chapter will present two different approaches, each having its advantages and disadvantages. In both cases, we make use of a separate class that performs the state saving and restoration, which we shall call SpeedometerMemento. This class takes a reference to the Speedometer object that needs to be externalised:
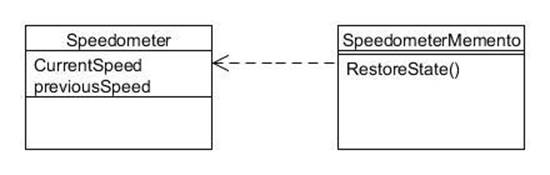
Figure 19.1 : Memento pattern
Approach 1: using internal visibility
When the access modifier internal is specified this means it is only accessible to other classes in the same assembly. Therefore we can place the Speedometer class and its associated memento class into into their own assembly, and we will call the latter class SpeedometerMemento.
Here is the very simple Speedometer class:
namespace AssembyNamespace
{
public class Speedometer
{
// Normal private visibility but has accessor method...
private int currentSpeed;
// internal visibility and no accessor method...
internal int previousSpeed;
public Speedometer()
{
currentSpeed = 0;
previousSpeed = 0;
}
public virtual int CurrentSpeed
{
set
{
previousSpeed = currentSpeed;
currentSpeed = value;
}
get
{
return currentSpeed;
}
}
}
}
The SpeedometerMemento class exists in the same assembly. It saves the state of the passed in Speedometer object in the constructor and defines a method to restore that state:
namespace AssembyNamespace
{
public class SpeedometerMemento
{
private Speedometer speedometer;
private int copyOfCurrentSpeed;
private int copyOfPreviousSpeed;
public SpeedometerMemento(Speedometer speedometer)
{
this.speedometer = speedometer;
copyOfCurrentSpeed = speedometer.CurrentSpeed;
copyOfPreviousSpeed = speedometer.previousSpeed;
}
public virtual void RestoreState()
{
speedometer.CurrentSpeed = copyOfCurrentSpeed;
speedometer.previousSpeed = copyOfPreviousSpeed;
}
}
}
Note that the CurrentSpeed property getter was used for the currentSpeed instance variable but the previousSpeed variable had to be accessed directly, which is possible because the memento exists in the same assembly.
We can test the memento with this code:
Speedometer speedo = new Speedometer();
speedo.CurrentSpeed = 50;
speedo.CurrentSpeed = 100;
Console.WriteLine("Current speed: " + speedo.CurrentSpeed);
Console.WriteLine("Previous speed: " + speedo.previousSpeed);
// Save the state of 'speedo'...
SpeedometerMemento memento = new SpeedometerMemento(speedo);
// Change the state of 'speedo'...
speedo.CurrentSpeed = 80;
Console.WriteLine("After setting to 80...");
Console.WriteLine("Current speed: " + speedo.CurrentSpeed);
Console.WriteLine("Previous speed: " + speedo.previousSpeed);
// Restore the state of 'speedo'...
Console.WriteLine("Now restoring state...");
memento.RestoreState();
Console.WriteLine("Current speed: " + speedo.CurrentSpeed);
Console.WriteLine("Previous speed: " + speedo.previousSpeed);
Console.Read();
Running the above results in the following output:
Current speed: 100
Previous speed: 50
After setting to 80...
Current speed: 80
Previous speed: 100
Now restoring state...
Current speed: 100
Previous speed: 50
The main disadvantage of this approach is that you either have to put the pair of classes in their own special assembly or accept that other classes in the assembly they are in will have direct access to the instance variables.
Approach 2: object serialization
This approach allows you to make all the instance variables private, thus regaining full encapsulation. The Speedometer class has been modified for this and now includes a PreviousSpeed getter, though this is purely to help us test the memento; it's not required by this approach. The class has also been changed to be Serializable (changes marked in bold):
[Serializable]
public class Speedometer
{
private int currentSpeed;
private int previousSpeed;
public Speedometer() {
currentSpeed = 0;
previousSpeed = 0;
}
public virtual int CurrentSpeed {
set {
previousSpeed = currentSpeed;
currentSpeed = value;
}
get
{
return currentSpeed;
}
}
// Only defined to help testing... public virtual int PreviousSpeed { get
{ return previousSpeed; } }
}
The SpeedometerMemento class now uses object serialisation for the state saving and restoration:
public class SpeedometerMemento
{
public SpeedometerMemento(Speedometer speedometer)
{
// Serialize...
Stream stream = File.Open("speedometer.ser", FileMode.Create);
BinaryFormatter formatter = new BinaryFormatter();
formatter.Serialize(stream, speedometer);
stream.Close();
}
public virtual Speedometer RestoreState()
{
// Deserialize...
Speedometer speedo;
Stream stream = File.Open("speedometer.ser", FileMode.Open);
BinaryFormatter formatter = new BinaryFormatter();
speedo = (Speedometer)formatter.Deserialize(stream);
stream.Close();
return speedo;
}
}
We can check that this achieves the same as the first approach, the only difference being that the RestoreState() method now returns the restored object reference:
Speedometer speedo = new Speedometer();
speedo.CurrentSpeed = 50;
speedo.CurrentSpeed = 100;
Console.WriteLine("Current speed: " + speedo.CurrentSpeed);
Console.WriteLine("Previous speed: " + speedo.previousSpeed);
// Save the state of 'speedo'...
SpeedometerMemento memento = new SpeedometerMemento(speedo);
// Change the state of 'speedo'...
speedo.CurrentSpeed = 80;
Console.WriteLine("After setting to 80...");
Console.WriteLine("Current speed: " + speedo.CurrentSpeed);
Console.WriteLine("Previous speed: " + speedo.previousSpeed);
// Restore the state of 'speedo'...
Console.WriteLine("Now restoring state...");
speedo = memento.RestoreState();
Console.WriteLine("Current speed: " + speedo.CurrentSpeed);
Console.WriteLine("Previous speed: " + speedo.previousSpeed);
Running the above should result in the same output as shown for the first approach. The main disadvantage of this approach is that writing to and reading from a disk file is much slower. Note also that while we have been able to make all fields private again, it might still be possible for someone who gained access to the serialized file to use a hex editor to read or change the data.
20. Observer
Type: Behavioural
Purpose: Define a one-to-many dependency between objects so that when one object changes its state, all its dependants are notified and updated automatically.
The Foobar Motor Company has decided that an alert should sound to the driver whenever a certain speed is exceeded. They also envisage that other things may need to happen depending upon the current speed (such as an automatic gearbox selecting the appropriate gear to match the speed). But they realise the need to keep objects loosely-coupled, so naturally don't wish the Speedometer class to have any direct knowledge of speed monitors or automatic gearboxes (or any other future class that might be interested in the speed a vehicle is travelling).
The Observer pattern enables a loose-coupling to be established between a 'subject' (the object that is of interest; Speedometer in our example) and its 'observers' (any other class that needs to be kept informed when interesting stuff happens).
Because this is a very common need in object-oriented systems, the C# libraries already contains mechanisms that enable the pattern to be implemented. One of these is by utilising the EventHandler event class:
The 'subject' (Speedometer) can have multiple observers, each of which will be notified whenever. an event occurs on the Speedometer object. The Speedometer class looks like this:
public class Speedometer
{
public event EventHandler ValueChanged;
private int currentSpeed;
public Speedometer()
{
speed = 0;
}
public virtual int CurrentSpeed
{
set
{
currentSpeed = value;
// Tell all observers so they know value has changed...
OnValueChanged();
}
get
{
return currentSpeed;
}
}
protected void OnValueChanged()
{
if (ValueChanged != null)
{
ValueChanged(this, EventArgs.Empty);
}
}
}
The SpeedMonitor class utilises ValueChanged:
public class SpeedMonitor
{
public const int SpeedToAlert = 70;
public SpeedMonitor(Speedometer speedo)
{
speedo.ValueChanged += ValueHasChanged;
}
private void ValueHasChanged(object sender, EventArgs e )
{
Speedometer speedo = (Speedometer)sender;
if (speedo.CurrentSpeed > SpeedToAlert)
{
Console.WriteLine("** ALERT ** Driving too fast! (" + speedo.CurrentSpeed + ")");
}
else
{
Console.WriteLine("... nice and steady ... (" + speedo.CurrentSpeed + ")");
}
}
}
Client programs simply pass a SpeedMonitor reference to an instance of Speedometer:
// Create a speedometer...
Speedometer speedo = new Speedometer();
// Create a monitor...
SpeedMonitor monitor = new SpeedMonitor(speedo);
// Drive at different speeds...
speedo.CurrentSpeed = 50;
speedo.CurrentSpeed = 70;
speedo.CurrentSpeed = 40;
speedo.CurrentSpeed = 100;
speedo.CurrentSpeed = 69;
Running the above will result in the following output:
... nice and steady ... (50)
... nice and steady ... (70)
... nice and steady ... (40)
** ALERT ** Driving too fast! (100)
... nice and steady ... (69)
The real power behind the Observer pattern is that any type of class can now become a monitor provided they implement the Observer interface, and without requiring any changes to be made to Speedometer. Let's create a simulation of an automatic gearbox:
public class AutomaticGearbox
{
public AutomaticGearbox(Speedometer speedo)
{
speedo.ValueChanged += ValueHasChanged;
}
private void ValueHasChanged(object sender, EventArgs e )
{
Speedometer speedo = (Speedometer)sender;
if (speedo.CurrentSpeed <= 10)
{
Console.WriteLine("Now in first gear");
}
else if (speedo.CurrentSpeed <= 20)
{
Console.WriteLine("Now in second gear");
}
else if (speedo.CurrentSpeed <= 30)
{
Console.WriteLine("Now in third gear");
}
else
{
Console.WriteLine("Now in fourth gear");
}
}
}
Our client program can now just add this as an additional observer and get notifications of speed changes as well:
AutomaticGearbox auto = new AutomaticGearbox(speedo);
21. State
Type: Behavioural
Purpose: Allow an object to alter its behaviour when its internal state changes. The object will appear to change its class.
The Foobar Motor Company's vehicles each have a digital clock fitted that displays the current date and time. These values will need to be reset from time to time (such as after a change of battery) and this is accomplished by means of a particular knob on the dashboard. When the knob is initially pressed, the 'year' value can be set. Turning the knob to the left (i.e. anti-clockwise) causes the previous year to be show, whereas turning it to the right goes forward one year. When the knob is pressed again the year value becomes 'set' and the set-up process then automatically allows the month value to be set, also by making appropriate left or right movements with the knob.
This process continues for the day of the month, the hour and the minute. The following summarises the flow of events:
· When the knob is first pushed the clock goes into "setup" mode for setting the year;
· If the knob is rotated left then 1 is deducted from the year value;
· If the knob is rotated right then 1 is added to the year value;
· When the knob is pushed the year becomes set and the clock goes into "setup" mode for setting the month;
· If the knob is rotated left then 1 is deducted from the month value;
· If the knob is rotated right then 1 is added to the month value;
· When the knob is pushed the month becomes set and the clock goes into "setup" mode for setting the day;
· If the knob is rotated left then 1 is deducted from the day value;
· If the knob is rotated right then 1 is added to the day value;
· When the knob is pushed the day becomes set and the clock goes into "setup" mode for setting the hour;
· If the knob is rotated left then 1 is deducted from the hour value;
· If the knob is rotated right then 1 is added to the hour value;
· When the knob is pushed the hour becomes set and the clock goes into "setup" mode for setting the minute;
· If the knob is rotated left then 1 is deducted from the minute value;
· If the knob is rotated right then 1 is added to the minute value;
· When the knob is pushed the minute becomes set and the clock goes into the "finished setup" mode;
· If the knob is pushed again the full selected date and time are displayed.
From the above steps it is clear that different parts of the date & time get set when the knob is turned or pressed, and that there are transitions between those parts. A naive approach when coding a class to accomplish this would be to have a 'mode' variable and then a series of if...else...statements in each method, which might look like this:
// *** DON'T DO THIS! ***
public void RotateKnobLeft()
{
if (mode == YearMode)
{
year--;
}
else if (mode == MonthMode)
{
month--;
}
else if (mode == DayMode)
{
day--;
}
else if (mode == HourMode)
{
hour--;
}
else if (mode == MinuteMode)
{
minute--;
}
}
The problem with code such as the above is that the if...else... conditions would have to be repeated in each action method (i.e. RotateKnobRight(), PushKnob(), etc.). Apart from making the code look unwieldy it also becomes hard to maintain, as if for example we now need to record seconds we would need to change multiple parts of the class.
The State pattern enables a hierarchy to be established that allows for state transitions such as necessitated by our clock setting example. We will create a ClockSetup class that initiates the states through the interface IClockSetupState, which has an implementing class for each individual state:
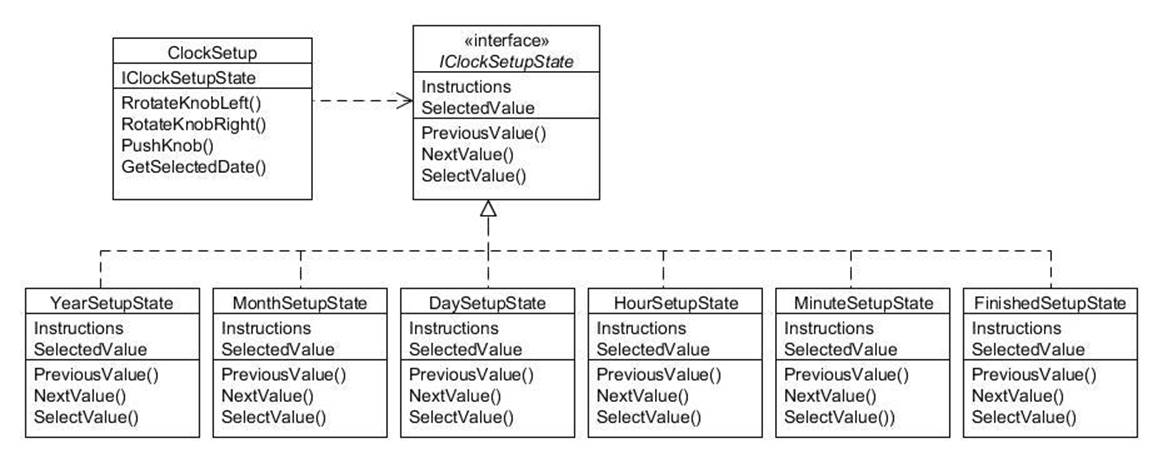
Figure 21.1 : State pattern
The IClockSetupState interface defines methods for handling changes to the state, plus methods that can provide user instructions and return the actual selected value:
public interface IClockSetupState
{
void PreviousValue();
void NextValue();
void SelectValue();
string Instructions { get; }
int SelectedValue { get; }
}
Looking first at YearSetupState, you will notice that it takes a reference to a ClockSetup object in the constructor (which is known in the language of design patterns as its 'context') and manages the setting of the year. Note in particular in the SelectValue() method how it transitions internally to a different state:
public class YearSetupState : ClockSetupState
{
private ClockSetup clockSetup;
private int year;
public YearSetupState(ClockSetup clockSetup)
{
this.clockSetup = clockSetup;
year = DateTime.Now.Year;
}
public virtual void PreviousValue()
{
year--;
}
public virtual void NextValue()
{
year++;
}
public virtual void SelectValue()
{
Console.WriteLine("Year set to " + year);
clockSetup.State = clockSetup.MonthSetupState;
}
public virtual string Instructions
{
get
{
return "Please set the year...";
}
}
public virtual int SelectedValue
{
get
{
return year;
}
}
}
The other date & time state classes follow a similar process, each transitioning to the next appropriate state when required:
public class MonthSetupState : ClockSetupState
{
private ClockSetup clockSetup;
private int month;
public MonthSetupState(ClockSetup clockSetup)
{
this.clockSetup = clockSetup;
month = DateTime.Now.Month;
}
public virtual void PreviousValue()
{
if (month > 1)
{
month--;
}
}
public virtual void NextValue()
{
if (month < 12)
{
month++;
}
}
public virtual void SelectValue()
{
Console.WriteLine("Month set to " + month);
clockSetup.State = clockSetup.DaySetupState;
}
public virtual string Instructions
{
get
{
return "Please set the month...";
}
}
public virtual int SelectedValue
{
get
{
return month;
}
}
}
public class DaySetupState : ClockSetupState
{
private ClockSetup clockSetup;
private int day;
public DaySetupState(ClockSetup clockSetup)
{
this.clockSetup = clockSetup;
day = DateTime.Now.Day;
}
public virtual void PreviousValue()
{
if (day > 1)
{
day--;
}
}
public virtual void NextValue()
{
if (day < System.DateTime.DaysInMonth(new DateTime().Year, new DateTime().Month))
{
day++;
}
}
public virtual void SelectValue()
{
Console.WriteLine("Day set to " + day);
clockSetup.State = clockSetup.HourSetupState;
}
public virtual string Instructions
{
get
{
return "Please set the day...";
}
}
public virtual int SelectedValue
{
get
{
return day;
}
}
}
public class HourSetupState : ClockSetupState
{
private ClockSetup clockSetup;
private int hour;
public HourSetupState(ClockSetup clockSetup)
{
this.clockSetup = clockSetup;
hour = DateTime.Now.Hour;
}
public virtual void PreviousValue()
{
if (hour > 0)
{
hour--;
}
}
public virtual void NextValue()
{
if (hour < 23)
{
hour++;
}
}
public virtual void SelectValue()
{
Console.WriteLine("Hour set to " + hour);
clockSetup.State = clockSetup.MinuteSetupState;
}
public virtual string Instructions
{
get
{
return "Please set the hour...";
}
}
public virtual int SelectedValue
{
get
{
return hour;
}
}
}
public class MinuteSetupState : ClockSetupState
{
private ClockSetup clockSetup;
private int minute;
public MinuteSetupState(ClockSetup clockSetup)
{
this.clockSetup = clockSetup;
minute = DateTime.Now.Minute;
}
public virtual void PreviousValue()
{
if (minute > 0)
{
minute--;
}
}
public virtual void NextValue()
{
if (minute < 59)
{
minute++;
}
}
public virtual void SelectValue()
{
Console.WriteLine("Minute set to " + minute);
clockSetup.State = clockSetup.FinishedSetupState;
}
public virtual string Instructions
{
get
{
return "Please set the minute...";
}
}
public virtual int SelectedValue
{
get
{
return minute;
}
}
}
This just leaves the FinishedSetupState class which doesn't need to transition to a different state:
public class FinishedSetupState : ClockSetupState
{
private ClockSetup clockSetup;
public FinishedSetupState(ClockSetup clockSetup)
{
this.clockSetup = clockSetup;
}
public virtual void PreviousValue()
{
Console.WriteLine("Ignored...");
}
public virtual void NextValue()
{
Console.WriteLine("Ignored...");
}
public virtual void SelectValue()
{
DateTime selectedDate = clockSetup.SelectedDate;
Console.WriteLine("Date set to: " + selectedDate);
}
public virtual string Instructions
{
get
{
return "Press knob to view selected date...";
}
}
public virtual int SelectedValue
{
get
{
throw new System.NotSupportedException("Clock setup finished");
}
}
}
As mentioned, the 'context' class is ClockSetup, which holds references to each state and forwards to whichever is the current state:
public class ClockSetup
{
// The various states the setup can be in...
private IClockSetupState yearState;
private IClockSetupState monthState;
private IClockSetupState dayState;
private IClockSetupState hourState;
private IClockSetupState minuteState;
private IClockSetupState finishedState;
// The current state we are in...
private IClockSetupState currentState;
public ClockSetup()
{
yearState = new YearSetupState(this);
monthState = new MonthSetupState(this);
dayState = new DaySetupState(this);
hourState = new HourSetupState(this);
minuteState = new MinuteSetupState(this);
finishedState = new FinishedSetupState(this);
// Initial state is set to the year
State = yearState;
}
public virtual IClockSetupState State
{
set
{
currentState = value;
Console.WriteLine(currentState.Instructions);
}
}
public virtual void RotateKnobLeft()
{
currentState.PreviousValue();
}
public virtual void RotateKnobRight()
{
currentState.NextValue();
}
public virtual void PushKnob()
{
currentState.SelectValue();
}
public virtual IClockSetupState YearSetupState
{
get
{
return yearState;
}
}
public virtual IClockSetupState MonthSetupState
{
get
{
return monthState;
}
}
public virtual IClockSetupState DaySetupState
{
get
{
return dayState;
}
}
public virtual IClockSetupState HourSetupState
{
get
{
return hourState;
}
}
public virtual IClockSetupState MinuteSetupState
{
get
{
return minuteState;
}
}
public virtual IClockSetupState FinishedSetupState
{
get
{
return finishedState;
}
}
public virtual DateTime SelectedDate
{
get
{
return new DateTime(yearState.SelectedValue, monthState.SelectedValue, dayState.SelectedValue, hourState.SelectedValue, minuteState.SelectedValue, 0);
}
}
}
We can simulate a user's example actions like this:
ClockSetup clockSetup = new ClockSetup();
// Setup starts in 'year' state
clockSetup.RotateKnobRight();
clockSetup.PushKnob(); // 1 year on
// Setup should now be in 'month' state
clockSetup.RotateKnobRight();
clockSetup.RotateKnobRight();
clockSetup.PushKnob(); // 2 months on
// Setup should now be in 'day' state
clockSetup.RotateKnobRight();
clockSetup.RotateKnobRight();
clockSetup.RotateKnobRight();
clockSetup.PushKnob(); // 3 days on
// Setup should now be in 'hour' state
clockSetup.RotateKnobLeft();
clockSetup.RotateKnobLeft();
clockSetup.PushKnob(); // 2 hours back
// Setup should now be in 'minute' state
clockSetup.RotateKnobRight();
clockSetup.PushKnob(); // 1 minute on
// Setup should now be in 'finished' state
clockSetup.PushKnob(); // to display selected date
Running the above should result in the following output relative to your current system date and time, with the above adjustments made.
Please set the year...
Year set to 2013
Please set the month...
Month set to 11
Please set the day...
Day set to 25
Please set the hour...
Hour set to 9
Please set the minute...
Minute set to 17
Press knob to view selected date...
Date set to: 25/11/2013 09:17:00
22. Strategy
Type: Behavioural
Purpose: Define a family of algorithms, encapsulate each one, and make them interchangeable. Strategy lets the algorithm vary independently from clients that use it.
The Foobar Motor Company wishes to implement a new type of automatic gearbox for their cars that will be able to be switched between its standard mode and a special 'sport' mode. The different modes will base the decision of which gear should be selected depending upon the speed of travel, size of the engine and whether it is turbocharged. And it's quite possible they will want other modes in the future, such as for off-road driving.
Just as with the discussion in the chapter for the State pattern, it would be inflexible to use a series of if...else... statements to control the different gearbox modes directly inside our vehicle classes. Instead, we shall encapsulate the concept that varies and define a separate hierarchy so that each different gearbox mode is a separate class, each in effect being a different 'strategy' that gets applied. This approach allows the actual strategy being used to be isolated from the vehicle. In our example, we shall only apply this to the cars:
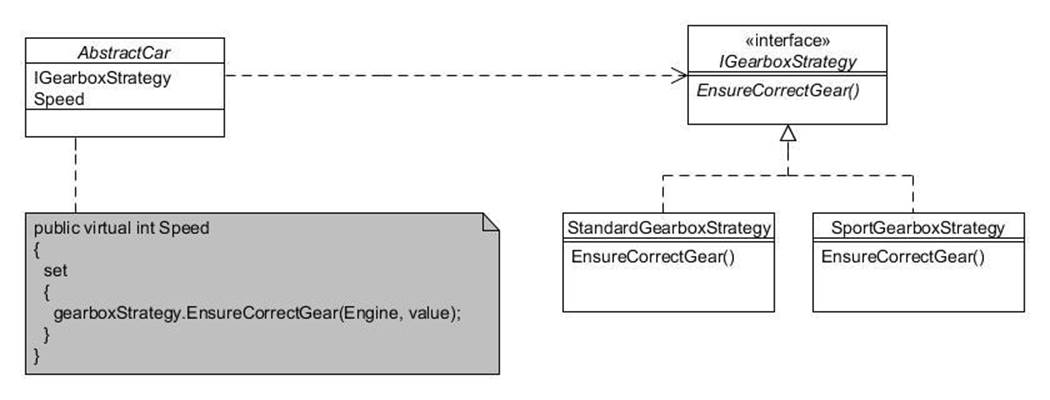
Figure 22.1 : Strategy pattern
The IGearboxStrategy interface defines the method to control the gear:
public interface IGearboxStrategy
{
void EnsureCorrectGear(IEngine engine, int speed);
}
There are two implementing classes; StandardGearboxStrategy and SportGearboxStrategy:
public class StandardGearboxStrategy : IGearboxStrategy
{
public virtual void EnsureCorrectGear(IEngine engine, int speed)
{
int engineSize = engine.Size;
bool turbo = engine.Turbo;
// Some complicated code to determine correct gear
// setting based on engineSize, turbo & speed, etc.
// ... omitted ...
Console.WriteLine("Working out correct gear at " + speed + "mph for a STANDARD gearbox");
}
}
public class SportGearboxStrategy : IGearboxStrategy
{
public virtual void EnsureCorrectGear(IEngine engine, int speed)
{
int engineSize = engine.Size;
bool turbo = engine.Turbo;
// Some complicated code to determine correct gear
// setting based on engineSize, turbo & speed, etc.
// ... omitted ...
Console.WriteLine("Working out correct gear at " + speed + "mph for a SPORT gearbox");
}
}
Our AbstractCar class is defined to hold a reference to the interface type (i.e. IGearboxStrategy) and provide accessor methods so different strategies can be switched. There is also a Speed property setter that delegates to whatever strategy is in effect. The pertinent code is marked in bold:
public abstract class AbstractCar : AbstractVehicle
{
private IGearboxStrategy gearboxStrategy;
public AbstractCar(IEngine engine)
: this(engine, VehicleColour.Unpainted)
{
}
public AbstractCar(IEngine engine, VehicleColour colour)
: base(engine, colour)
{
// Starts in standard gearbox mode (more economical) gearboxStrategy = new StandardGearboxStrategy();
}
// Allow the gearbox strategy to be changed... public virtual IGearboxStrategy IGearboxStrategy { set { gearboxStrategy = value; } get { return gearboxStrategy; } }
public virtual int Speed { set { // Delegate to strategy in effect... gearboxStrategy.EnsureCorrectGear(Engine, value); } }
}
Client programs just set the required strategy:
AbstractCar myCar = new Sport(new StandardEngine(2000));
myCar.Speed = 20;
myCar.Speed = 40;
Console.WriteLine("Switching on sports mode gearbox...");
myCar.IGearboxStrategy = new SportGearboxStrategy();myCar.Speed = 20;
myCar.Speed = 40;
This should result in the following output:
Working out correct gear at 20mph for a STANDARD gearbox
Working out correct gear at 40mph for a STANDARD gearbox
Switching on sports mode gearbox...
Working out correct gear at 20mph for a SPORT gearbox
Working out correct gear at 40mph for a SPORT gearbox
23. Template Method
Type: Behavioural
Purpose: Define the skeleton of an algorithm in a method, deferring some steps to subclasses. Template Method lets subclasses redefine certain steps of an algorithm without changing the algorithm's structure.
Each vehicle made by the Foobar Motor Company needs a small number of printed booklets to be produced and provided to the buyer, such as an Owner's Manual and a Service History booklet. The way booklets are produced always follows the same set of steps, but each different type of booklet might need to do each of the individual steps in a slightly different way.
The Template Method pattern enables the definition of one or more abstract methods that are called through a 'template method'. The simple hierarchy is as follows:
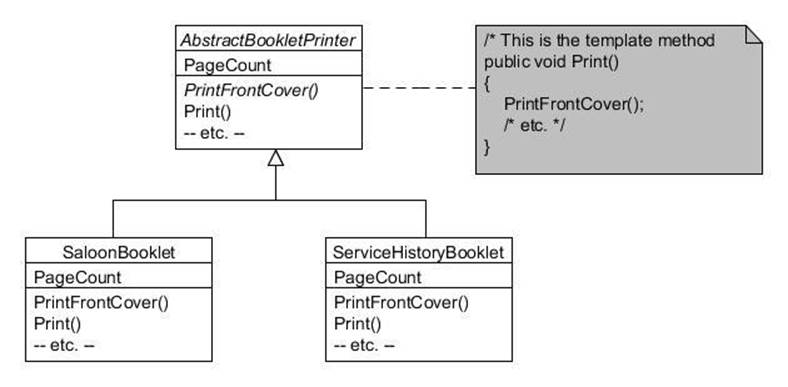
Figure 23.1 : Template Method pattern
The AbstractBookletPrinter class defines several protected abstract methods and one public 'template method' that makes use of the abstract methods:
public abstract class AbstractBookletPrinter
{
protected internal abstract int PageCount { get; }
protected internal abstract void PrintFrontCover();
protected internal abstract void PrintTableOfContents();
protected internal abstract void PrintPage(int pageNumber);
protected internal abstract void PrintIndex();
protected internal abstract void PrintBackCover();
// This is the 'template method'
public void Print()
{
PrintFrontCover();
PrintTableOfContents();
for (int i = 1; i <= PageCount; i++)
{
PrintPage(i);
}
PrintIndex();
PrintBackCover();
}
}
Each concrete subclass now only needs to provide the implementing code for each abstract method, for example the SaloonBooklet class below:
public class SaloonBooklet : AbstractBookletPrinter
{
protected internal override int PageCount
{
get
{
return 100;
}
}
protected internal override void PrintFrontCover()
{
Console.WriteLine("Printing front cover for Saloon car booklet");
}
protected internal override void PrintTableOfContents()
{
Console.WriteLine("Printing table of contents for Saloon car booklet");
}
protected internal override void PrintPage(int pageNumber)
{
Console.WriteLine("Printing page " + pageNumber + " for Saloon car booklet");
}
protected internal override void PrintIndex()
{
Console.WriteLine("Printing index for Saloon car booklet");
}
protected internal override void PrintBackCover()
{
Console.WriteLine("Printing back cover for Saloon car booklet");
}
}
The ServiceHistoryBooklet is very similar:
public class ServiceHistoryBooklet : AbstractBookletPrinter
{
protected internal override int PageCount
{
get
{
return 12;
}
}
protected internal override void PrintFrontCover()
{
Console.WriteLine("Printing front cover for service history booklet");
}
protected internal override void PrintTableOfContents()
{
Console.WriteLine("Printing table of contents for service history booklet");
}
protected internal override void PrintPage(int pageNumber)
{
Console.WriteLine("Printing page " + pageNumber + " for service history booklet");
}
protected internal override void PrintIndex()
{
Console.WriteLine("Printing index for service history booklet");
}
protected internal override void PrintBackCover()
{
Console.WriteLine("Printing back cover for service history booklet");
}
}
While it is not essential from the point of view of the pattern for the abstract methods to be protected, it is often the case that this is the most appropriate access level to assign since they are only intended for over-riding and not for direct invocation by client objects.
Also note that it's perfectly acceptable for some of the methods called from the 'template method' to not be abstract but have a default implementation provided. But when at least one abstract method is being called, it qualifies as the Template Method pattern.
Client programs merely need to instantiate the required concrete class and invoke the Print() method:
Console.WriteLine("About to print a booklet for Saloon cars");
AbstractBookletPrinter saloonBooklet = new SaloonBooklet();
saloonBooklet.Print();
Console.WriteLine("About to print a service history booklet");
AbstractBookletPrinter serviceBooklet = new ServiceHistoryBooklet();
serviceBooklet.Print();
Console.Read();
24. Visitor
Type: Behavioural
Purpose: Represent a method to be performed on the elements of an object structure. Visitor lets you define a new method without changing the classes of the elements on which it operates.
Sometimes a class hierarchy and its code become substantive, and yet it is known that future requirements will be inevitable. An example for the Foobar Motor Company is the IEngine hierarchy which looks like this:
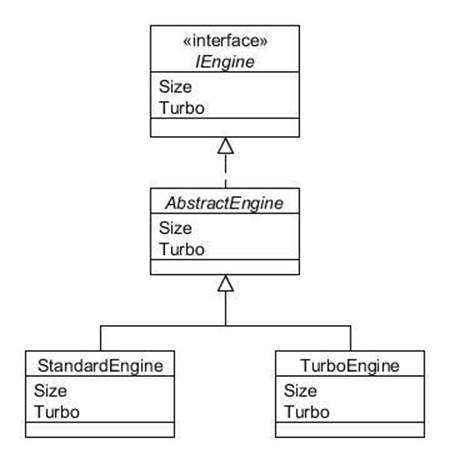
Figure 24.1 : IEngine class hierarchy
In reality, the code within the AbstractEngine class is likely to be composed of a multitude of individual components, such as a camshaft, piston, some spark plugs, etc. If we need to add some functionality that traverses these components then the natural way is to just add a method toAbstractEngine. But maybe we know there are potentially many such new requirements and we would rather not have to keep adding methods directly into the hierarchy?
The Visitor pattern enables us to define just one additional method to add into the class hierarchy in such a way that lots of different types of new functionality can be added without any further changes. This is accomplished by means of a technique known as "double-despatch", whereby the invoked method issues a call-back to the invoking object.
The technique requires first the definition of an interface we shall call IEngineVisitor:
public interface IEngineVisitor
{
void Visit(Camshaft camshaft);
void Visit(IEngine engine);
void Visit(Piston piston);
void Visit(SparkPlug sparkPlug);
}
We will also define an interface called IVisitable with an AcceptEngineVisitor() method:
public interface IVisitable
{
void AcceptEngineVisitor(IEngineVisitor visitor);
}
The IEngine interface you have met in previous chapters (although we will modify it slightly for this chapter). The Camshaft, Piston and SparkPlug classes are each very simple, as follows:
public class Camshaft : IVisitable
{
public void AcceptEngineVisitor(IEngineVisitor visitor)
{
visitor.Visit(this);
}
}
public class Piston : IVisitable
{
public void AcceptEngineVisitor(IEngineVisitor visitor)
{
visitor.Visit(this);
}
}
public class SparkPlug : IVisitable
{
public void AcceptEngineVisitor(IEngineVisitor visitor)
{
visitor.Visit(this);
}
}
As you can see, each of these classes defines a method called AcceptEngineVisitor() that takes a reference to an IEngineVisitor object as its argument. All the method does is invoke the Visit() method of the passed-in IEngineVisitor, passing back the object instance.
Our modified IEngine interface also now extends IVisitable:
public interface IEngine : IVisitable
{
int Size { get; }
int Turbo { get; }
}
The AbstractEngine class therefore needs to implement this new method, which in this case traverses the individual components (camshaft, piston, spark plugs) invoking AcceptEngineVisitor() on each:
public abstract class AbstractEngine : IEngine
{
private int size;
private bool turbo;
private Camshaft camshaft; private Piston piston; private SparkPlug[] sparkPlugs;
public AbstractEngine(int size, bool turbo)
{
this.size = size;
this.turbo = turbo;
// Create a camshaft, piston and 4 spark plugs... camshaft = new Camshaft(); piston = new Piston(); sparkPlugs = new SparkPlug[]{new SparkPlug(), new SparkPlug(), new SparkPlug(), new SparkPlug()};
}
public virtual int Size
{
get
{
return size;
}
}
public virtual bool Turbo
{
get
{
return turbo;
}
}
public virtual void AcceptEngineVisitor(IEngineVisitor visitor) { // Visit each component first... camshaft.AcceptEngineVisitor(visitor); piston.AcceptEngineVisitor(visitor); foreach (SparkPlug eachSparkPlug in sparkPlugs) { eachSparkPlug.AcceptEngineVisitor(visitor); }
// Now visit the receiver... visitor.Visit(this); }
public override string ToString()
{
return this.GetType().Name + " (" + size + ")";
}
}
Now we shall create an actual implementation of IEngineVisitor so you can see how we can easily add additional functionality to engines without any further changes to any engine hierarchy class. The first thing we shall do is to define some clever electronic gizmo that can be attached to an engine that will automatically check each component and diagnose any faults. We therefore define the EngineDiagnostics class:
public class EngineDiagnostics : IEngineVisitor
{
public virtual void Visit(Camshaft camshaft)
{
Console.WriteLine("Diagnosing the camshaft");
}
public virtual void Visit(IEngine engine)
{
Console.WriteLine("Diagnosing the engine");
}
public virtual void Visit(Piston piston)
{
Console.WriteLine("Diagnosing the piston");
}
public virtual void Visit(SparkPlug sparkPlug)
{
Console.WriteLine("Diagnosing a single spark plug");
}
}
We also want to print an inventory of how many of each type of component there is within an engine, so we also have an EngineInventory class:
public class EngineInventory : IEngineVisitor
{
private int camshaftCount;
private int pistonCount;
private int sparkPlugCount;
public EngineInventory()
{
camshaftCount = 0;
pistonCount = 0;
sparkPlugCount = 0;
}
public virtual void Visit(Camshaft camshaft)
{
camshaftCount++;
}
public virtual void Visit(IEngine engine)
{
Console.WriteLine("The engine has: " + camshaftCount +" camshaft(s), " + pistonCount + " piston(s), and " + sparkPlugCount + " spark plug(s)");
}
public virtual void Visit(Piston piston)
{
pistonCount++;
}
public virtual void Visit(SparkPlug sparkPlug)
{
sparkPlugCount++;
}
}
The following diagram summarises how all of these classes interact:
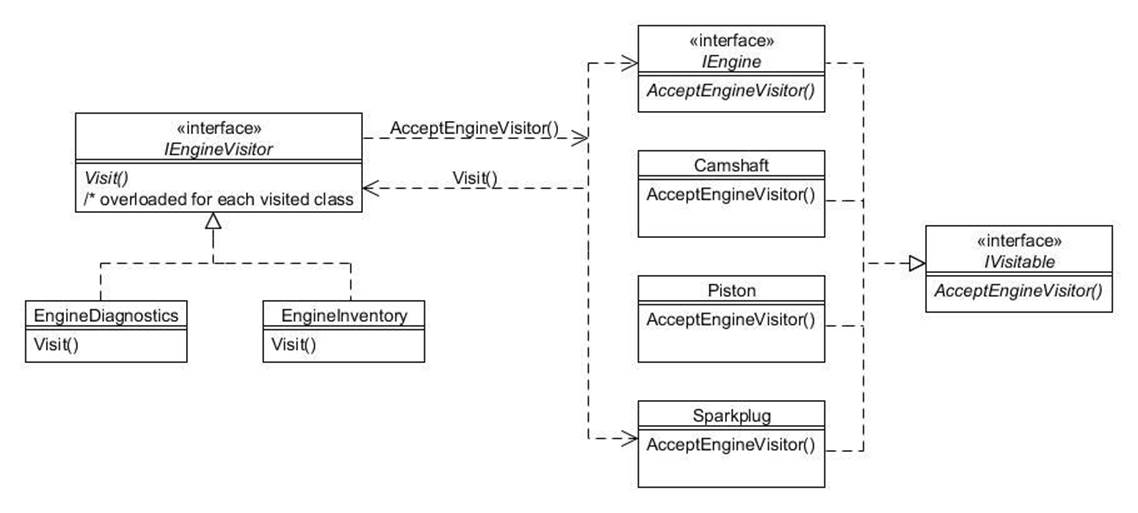
Figure 24.2 : Visitor pattern
Client programs now only need to invoke the AcceptEngineVisitor() method on an instance of IEngine, passing in the appropriate IEngineVisitor object:
// Create an engine...
IEngine engine = new StandardEngine(1300);
// Run diagnostics on the engine...
engine.AcceptEngineVisitor(new EngineDiagnostics());
The above will result in the following output:
Diagnosing the camshaft
Diagnosing the piston
Diagnosing a single spark plug
Diagnosing a single spark plug
Diagnosing a single spark plug
Diagnosing a single spark plug
Diagnosing the unit engine
And to obtain the inventory (using the same IEngine instance):
// Run inventory on the engine...
engine.AcceptEngineVisitor(new EngineInventory());
The output should show:
The engine has: 1 camshaft(s), 1 piston(s), and 4 spark plug(s)
All materials on the site are licensed Creative Commons Attribution-Sharealike 3.0 Unported CC BY-SA 3.0 & GNU Free Documentation License (GFDL)
If you are the copyright holder of any material contained on our site and intend to remove it, please contact our site administrator for approval.
© 2016-2026 All site design rights belong to S.Y.A.