C# Design Pattern Essentials (2012)
Part V. Other Useful Patterns
This part describes four additional patterns you should find useful in practical applications.
Null Object: Define a class that enables the processing of null values;
Simple Factory: Delegate the instantiation of objects;
Model View Controller: Separate a user interface component’s screen representation from its underlying data and functionality;
Layers: Partition an application into separate modular levels that communicate hierarchically.
25. Null Object
As any C# programmer soon discovers, software testing often throws up NullReferenceException messages. Sometimes, the only way around this is to specifically test for null before performing an operation, which puts an extra onus on the programmer.
Suppose a vehicle's instrument panel contains three slots for warning lights (such as for low oil level or low brake fluid level). A particular vehicle might only use these two lights, with the third slot empty, represented by null within C#. Looping through the slots would require a specific test to prevent a NullReferenceException being thrown:
// OilLevelLight & BrakeFluidLight are each types of IWarningLight
IWarningLight[] lights = new IWarningLight[3];
lights[0] = new OilLevelLight();
lights[1] = new BrakeFluidLight();
lights[2] = null; // empty slot
foreach (IWarningLight currentLight in lights)
{
if (currentLight != null)
{
currentLight.TurnOn();
currentLight.TurnOff();
Console.WriteLine(currentLight.On);
}
}
An approach that can help prevent the need to test for null is to create a 'null object' class as part of the class hierarchy. This class will implement the same interface but perform no actual function, as illustrated in the following figure:
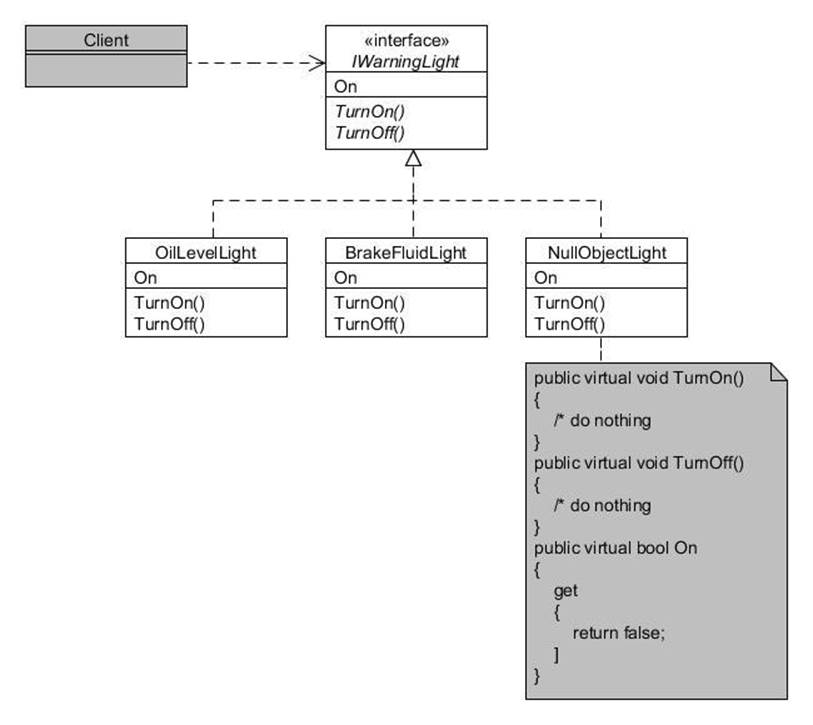
Figure 25.1 : Null Object pattern
The IWarningLight interface defines the methods TurnOn(), TurnOff() and a property getter for On:
public interface IWarningLight
{
void TurnOn();
void TurnOff();
bool On { get; }
}
The OilLightLevel and BrakeFluidLevel classes each implement the IWarningLight interface and provide the appropriate code to switch the light on or off:
public class OilLevelLight : IWarningLight
{
private bool on;
public virtual void TurnOn()
{
on = true;
Console.WriteLine("Oil level light ON");
}
public virtual void TurnOff()
{
on = false;
Console.WriteLine("Oil level light OFF");
}
public virtual bool On
{
get
{
return on;
}
}
}
public class BrakeFluidLight : IWarningLight
{
private bool on;
public virtual void TurnOn()
{
on = true;
Console.WriteLine("Brake fluid light ON");
}
public virtual void TurnOff()
{
on = false;
Console.WriteLine("Brake fluid light OFF");
}
public virtual bool On
{
get
{
return on;
}
}
For the Null Object pattern we also create a NullObjectLight class that implements the IWarningLight interface but performs no actual processing:
public class NullObjectLight : IWarningLight
{
public virtual void TurnOn()
{
// Do nothing...
}
public virtual void TurnOff()
{
// Do nothing...
}
public virtual bool On
{
get
{
return false;
}
}
}
Now our client code can be simplified since we no longer need to test if a slot is null, provided we make use of the null object:
IWarningLight[] lights = new IWarningLight[3];
lights[0] = new OilLevelLight();
lights[1] = new BrakeFluidLight();
lights[2] = new NullObjectLight(); // empty slot
// No need to test for null...
foreach (IWarningLight currentLight in lights)
{
currentLight.TurnOn();
currentLight.TurnOff();
Console.WriteLine(currentLight.On);
}
Note that for Null Object getter methods you will need to return whatever seems sensible as a default; hence above the On property getter returns false since it represents a non-extentent light.
26. Simple Factory
In the main section of this book we looked at both the Factory Method pattern and the Abstract Factory pattern. The Simple Factory pattern is a commonly used simplified means of delegating the instantiation of objects to a specific class (the 'factory').
We shall assume here that the Foobar Motor Company manufactures two types of gearbox; an automatic gearbox and a manual gearbox. Client programs might need to create one or the other based upon a condition, as illustrated by the following code fragment (assuming the classes are defined within a class hierarchy):
Gearbox selectedGearbox = null;
if (typeWanted.Equals("automatic"))
{
selectedGearbox = new AutomaticGearbox();
}
else if (typeWanted.Equals("manual"))
{
selectedGearbox = new ManualGearbox();
}
// Do something with selectedGearbox...
While the above code will of course work, what happens if more than one client program needs to perform a similar selection? We would have to repeat the if...else... statements in each client program, and if a new type of gearbox is subsequently manufactured we would have to track down every place the if...else... block is used.
Remembering the principle of encapsulating the concept that varies, we can instead delegate the selection and instantiation process to a specific class, known as the 'factory', just for that purpose. Client programs then only make use of the Create() method of the factory, as illustrated in the diagram below:
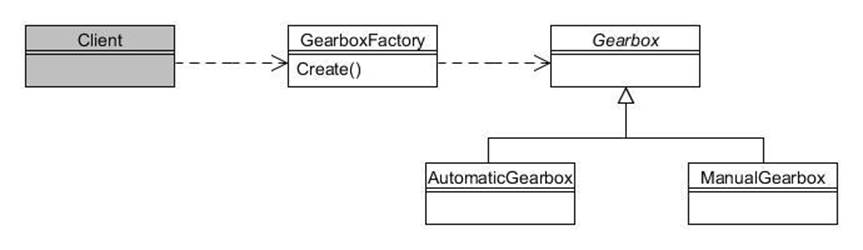
Figure 26.1 : Simple Factory pattern
The abstract Gearbox class in our simple example merely defines a no-argument constructor:
public abstract class Gearbox
{
public Gearbox()
{
}
}
The AutomaticGearbox and ManualGearbox classes each extend Gearbox for their respective types:
public class AutomaticGearbox : Gearbox
{
public AutomaticGearbox()
{
Console.WriteLine("New automaticGearbox gearbox created");
}
}
public class ManualGearbox : Gearbox
{
public ManualGearbox()
{
Console.WriteLine("New manual gearbox created");
}
}
We now need to create our GearboxFactory class that is capable of instantiating the appropriate Gearbox:
public class GearboxFactory
{
public enum Type
{
Automatic, Manual
}
public static Gearbox Create(Type type)
{
if (type == Type.Automatic)
{
return new AutomaticGearbox();
}
else
{
return new ManualGearbox();
}
}
}
The Create() method takes care of the selection and instantiation, and thus isolates each client program from repeating code. We have made the method static purely for convenience; it is not a requirement of the pattern.
Client programs now obtain the type of gearbox by means of the factory:
// Create an automatic gearbox
Gearbox auto = GearboxFactory.Create(GearboxFactory.Type.Automatic);
// Create a manual gearbox
Gearbox manual = GearboxFactory.Create(GearboxFactory.Type.Manual);
27. Model View Controller
The Foobar Motor Company's satellite-navigation system includes a visual display of the current location, the direction of travel and an indication of the current speed. There is also an input device; controls where you set the destination, etc. A fully fledged simulation is far beyond the scope of this book, so instead we will use a very simplified interface that merely lets you set the direction of travel (North, South, West and East) and the current speed, without regard to any roads, etc..
The user interface will look like this:

Figure 27.1 : Satellite navigation user interface
As you can see from the above, there are buttons to change direction and a spinner to adjust the speed. The 'Feedback' section at the bottom of the screen automatically adjusts itself to your selections. Note that each time you click one of the direction buttons that button is disabled, and the previously selected button is re-enabled. The program initially starts by pointing North but with a speed of zero.
This is a straightforward program that would be entirely possible to code within a single class. But as graphical applications become more complex, it greatly simplifies development and maintenance if you separate the major parts of the program.
The Model View Controller pattern (often abbreviated to MVC) is a way of achieving a looser coupling between the constituent parts, and is a tried-and-tested approach to graphical applications. There are typically three parts at play in GUI applications:
1. The "Model". This is the 'data' (i.e. state) and associated application or 'business' logic. In our example, this comprises the values of the current direction of travel and the current speed together with methods to update and return them.
2. The "View". This is the graphical display, as shown in Figure 27.1, automatically updating itself as necessary whenever the Model changes its state in some way.
3. The "Controller". This is the part that responds to all user input (button clicks, controlling the spinner, etc.) and liaises with both the Model and the View.
Each of the above three parts will be in a separate class, which can be visualised as follows:
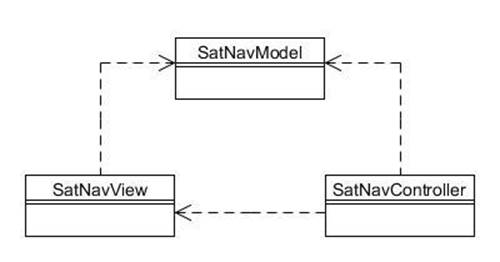
Figure 27.2 : Model View Controller pattern
These classes interrelate in the following way:
· SatNavModel contains methods to set and get both the direction and speed. It is 'observable' (see Chapter 20) and will notify interested observers whenever either the direction or the speed has changed, but has no direct knowledge of any other class;
· SatNavView defines the graphical form and user-interface display. It holds a reference to SatNavModel so it can listen to state changes in the Model and query its state as needed to keep the display up-to-date automatically;
· SatNavController holds a reference to both SatNavModel and SatNavView. It handles button clicks and movement of the speed spinner, updating the Model and liaising with the View as needed.
Just as with the other patterns described in this book, there are variations in how MVC can be structured, and the above might be described as the 'classical' approach. C# typically uses a modified version of MVC in which the View and Controller are combined into a single class, but for the purposes of this book we will use the full three-class separation to present the pattern.
We shall start with the Model, which in our case is the class SatNavModel. This has been coded to have no direct knowledge of either the View or the Controller, and could therefore be plugged into all sorts of other applications without any changes being required.
public class SatNavModel
{
// The directions we can travel
public enum TravelDirection
{
Still, North, South, East, West
}
// Change handler
public event EventHandler ModelChanged;
// The current direction and speed
private TravelDirection CurrentDirection;
private int CurrentSpeed;
public SatNavModel()
{
CurrentDirection = TravelDirection.North;
CurrentSpeed = 0;
}
public virtual TravelDirection Direction
{
set
{
if (value != CurrentDirection)
{
CurrentDirection = value;
if (ModelChanged != null)
{
ModelChanged(this, EventArgs.Empty);
}
}
}
get
{
return CurrentDirection;
}
}
public virtual int Speed
{
set
{
if (value != CurrentSpeed)
{
CurrentSpeed = value;
if (ModelChanged != null)
{
ModelChanged(this, EventArgs.Empty);
}
}
}
get
{
return CurrentSpeed;
}
}
}
As you can see, the only link with other classes is through its observers (we are using the EventHandler event object to facilitate this). Each time the direction or speed is modified its observers (also known as listeners) are notified.
The graphical display is performed by the SatNavView class using standard components. It takes a reference to the SatNavModel in its constructor, to register itself as an observer of the model. Whenever it detects a model change the HandleModelChanged() method is called, enabling the View to update its display accordingly. There are also methods to allow the UI controls to be observed (by, for example, the Controller).
public partial class SatNavView : Form
{
private SatNavModel model;
public event EventHandler ViewControlActivated;
public SatNavView(SatNavModel model)
{
InitializeComponent();
this.model = model;
this.model.ModelChanged += HandleModelChanged;
}
private void SatNavView_Load(object sender, EventArgs e)
{
northButton.Enabled = false;
feedbackLabel.Text = "You are pointing " + model.Direction + " but not yet moving. Use buttons and speed control";
}
public void HandleModelChanged(Object sender, EventArgs args)
{
feedbackLabel.Text = "Direction: " + model.Direction + ", speed: " + model.Speed;
}
private void eastButton_Click(object sender, EventArgs e)
{
if (ViewControlActivated != null)
{
ControlEventArgs args = new ControlEventArgs();
args.direction = SatNavModel.TravelDirection.East;
ViewControlActivated(this, args);
}
}
private void northButton_Click(object sender, EventArgs e)
{
if (ViewControlActivated != null)
{
ControlEventArgs args = new ControlEventArgs();
args.direction = SatNavModel.TravelDirection.North;
ViewControlActivated(this, args);
}
}
private void southButton_Click(object sender, EventArgs e)
{
if (ViewControlActivated != null)
{
ControlEventArgs args = new ControlEventArgs();
args.direction = SatNavModel.TravelDirection.South;
ViewControlActivated(this, args);
}
}
private void westButton_Click(object sender, EventArgs e)
{
if (ViewControlActivated != null)
{
ControlEventArgs args = new ControlEventArgs();
args.direction = SatNavModel.TravelDirection.West;
ViewControlActivated(this, args);
}
}
private void speedControl_ValueChanged(object sender, EventArgs e)
{
if (ViewControlActivated != null)
{
ControlEventArgs args = new ControlEventArgs();
args.speed = (int)speedControl.Value;
ViewControlActivated(this, args);
}
}
internal void enableAllowedButtons()
{
// Enable all direction buttons
eastButton.Enabled = true;
northButton.Enabled = true;
southButton.Enabled = true;
westButton.Enabled = true;
// Disable current direction button
if (model.Direction == SatNavModel.TravelDirection.East)
{
eastButton.Enabled = false;
}
else if (model.Direction == SatNavModel.TravelDirection.North)
{
northButton.Enabled = false;
}
else if (model.Direction == SatNavModel.TravelDirection.South)
{
southButton.Enabled = false;
}
else if (model.Direction == SatNavModel.TravelDirection.West)
{
westButton.Enabled = false;
}
}
// Nested class for change of direction or speed
public class ControlEventArgs : EventArgs
{
public SatNavModel.TravelDirection direction;
public int speed;
}
}
The SatNavController class is responsible for handling the user input, which in this case can be either clicking one of the direction buttons or moving the speed spinner. In response to the user input the Model state needs to be updated, and there is therefore a reference to both SatNavView andSatNavModel in the constructor. The class sets itself up to listen out for user input and reacts accordingly:
public class SatNavController
{
// Need a reference to both the model and the view
private SatNavModel model;
private SatNavView view;
public SatNavController(SatNavModel model, SatNavView view)
{
this.model = model;
this.view = view;
this.view.ViewControlActivated += HandleViewControlActivated;
}
public void HandleViewControlActivated(Object sender, EventArgs args)
{
SatNavView.ControlEventArgs satnavArgs = (SatNavView.ControlEventArgs)args;
if (satnavArgs.direction != SatNavModel.TravelDirection.Still)
{
model.Direction = satnavArgs.direction;
view.enableAllowedButtons();
}
else
{
model.Speed = satnavArgs.speed;
}
}
}
Running the application is now as simple as instantiating the above classes from Program.cs:
// Create the MVC classes
SatNavModel model = new SatNavModel();
SatNavView view = new SatNavView(model);
SatNavController controller = new SatNavController(model, view);
Application.Run(view)
28. Layers
As applications grow larger they can become unwieldy to manage, with lots of interconnections leading to increased coupling. The Layers pattern addresses this by partitioning an application into two or more layers in a hierarchy, where each layer communicates only with the layer immediately below it. This approach helps to modularise applications and can help lower the coupling between classes.
Client-server (2-tier) architecture
A simple example of the Layers pattern would be the client-server model, where a "client" (such as a web browser) communicates with a "server" (such as a web server) in order to view a web page:
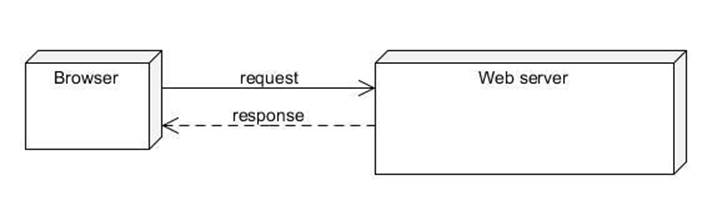
Figure 28.1 : Client-server architecture
In Figure 28.1 you can see a browser sending a request to a web server which returns a response (such as a web page). If you imagine the client and server each being in their own namepace, then another way of viewing the above would be as follows:
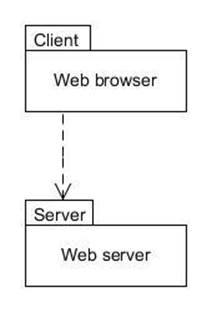
Figure 28.2 : Client-server namepace link
From Figure 28.2 you can infer that an object in the Client namepace holds a reference to an object in the Server namepace, such that the client can invoke a method on the server which may return a value in response.
Note that the client-server architecture is also known as a 2-tier architecture. The terms layer and tier are often used interchangeably, but "layer" more accurately refers to a logical partitioning and "tier" to a physical partitioning when each tier is potentially located on a different piece of hardware.
3-tier architecture
A common extension of the client-server architecture is where access to a data store is required, and therefore a third layer (or tier) is added to make a 3-tier architecture:

Figure 28.3 : 3-tier archiecture
Figure 28.3 shows the browser sending a request to a server, and the server in turn sending a request to a database to obtain the requested information. This is then returned to the server which in turn returns it to the browser. Viewing the above as namepaces gives the following structure:
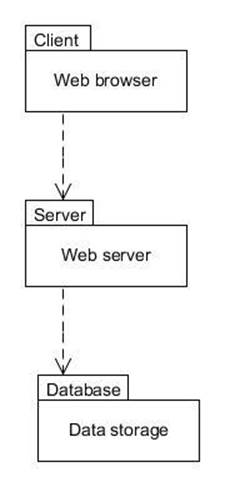
Figure 28.4 : 3-tier namepace links
From figure 28.4 you can infer that an object in the Client namepace holds a reference to an object in the Server namepace, just as in the 2-tier model. In addition, an object in the Server namepace holds a reference to an object in the Database namepace. However, the client has no direct access to the database; it has to communicate via the server layer in the middle.
You are not limited to 3 tiers, of course. As applications grow in complexity additional layers may help to partition systems even further. This leads to the term n-tier, where n is the number of tiers.
Although the examples above have shown the common usages that typically utilise separate hardware, there is no reason why you cannot apply the structure of the Layers pattern in your own self-contained applications. Another pattern you have already seen which can usefully be used in conjunction with Layers is the Facade pattern, where each layer defines a facade object that the layer above communicates with. This approach can help hide the complexity of each layer behind the facade.
The next chapter provides a worked example that makes use of the Layers and Facade patterns, along with several other patterns that are commonly found in applications.
All materials on the site are licensed Creative Commons Attribution-Sharealike 3.0 Unported CC BY-SA 3.0 & GNU Free Documentation License (GFDL)
If you are the copyright holder of any material contained on our site and intend to remove it, please contact our site administrator for approval.
© 2016-2026 All site design rights belong to S.Y.A.